

CE-RP5
User Manual
6 LED5 LED+
4 GND
3 MOTION OUT
2 GND
1 ALARM IN
H.264 FULL HD-SDI RECORDER with converter
REC EXIT PLAY MENU/ENTER
REC
PWR
Clinton reserves the right, without notification, to make changes in product design & specification.
Device Overview
1
3
2
4
01
6 LED5 LED+
4 GND
3 MOTION OUT
2 GND
6
1 ALARM IN
REC EXIT PLAY MENU/ENTER
5
10
7
8
H.264 FULL HD-SDI RECORDER with converter
9
REC
11
12
PWR
13
14
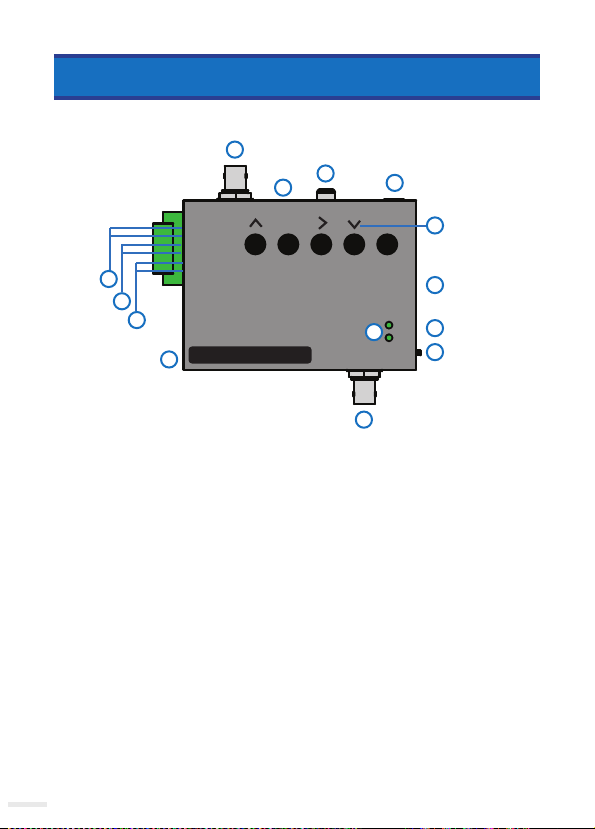
DEVIC E OVERVIEW:
1. HD-SDI Output
2. HDMI monitor o utput
3. Analog Output
4. DC12 Volt Pow er Input
5. OSD Menu Navigat ion Buttons (Up , Right, Down)
6. LED Output- Connect a sing le LED diod e to LED + / LED- , which will i lluminate i n conjunc tion with the ma in
recordi ng LED on the front of t he device.
7. Event Alarm Output- Connect #4 GND / M otion Out : This is a n ormally close d alarm output wh ich will become
open whe n triggered by a moti on or by an alarm event i nput.
8. Alarm Input - Conn ect wires to # 1 GND / Alarm I n: This alarm i nput can be c onfigure d to Normally O pen /
Normall y Closed in the OSD M enu under Powe r On Setup.
9. USB Service Por t - To be used by servic e personnel on ly
10. SD-Card Input
11. Record / P ower LED Indicat or lights
12. IR rem oter control sen sor (side)
13. Power sw itch
14. HD-SD I Input
Clinton Electronics | CE-RP5 User Manual
NAVIGATION ARROWS
Remote Control
MENU/ENTER
PLAY/PAUSE
EXIT
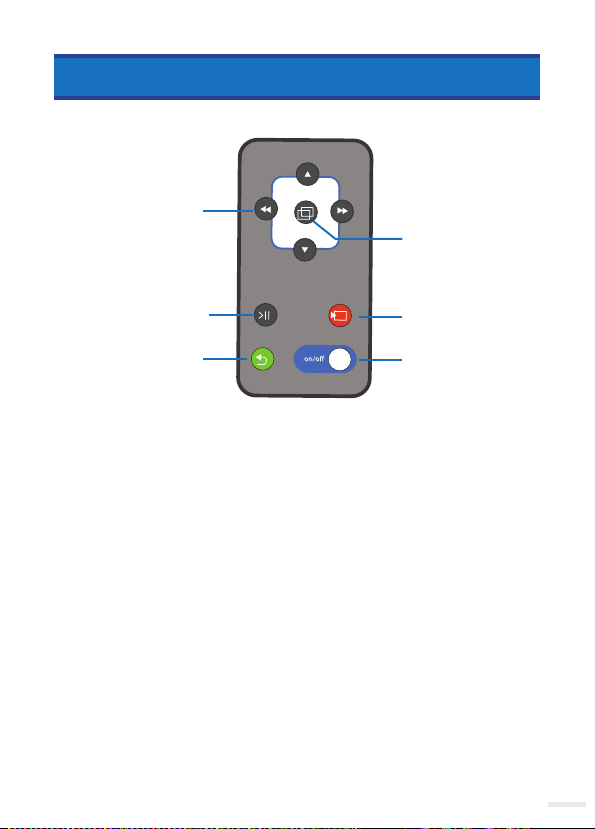
REMOTE OV ERVIEW:
1. Nav igation Arrows- Us e to move Up, Down, Lef t, Right within the O SD menu
2. Menu /Enter- Pres s to enter OSD menu, a nd for OSD selec tion
3. Play / Pause - Press o nce to enter playba ck mode. Press a gain when in playba ck mode to pause
4. Record- Pr ess to start man ual recording
5. Exit- Press to stop ma nual recording , or to exit a current me nu selection
6. OSD ON/ OFF- Press t o hide or show the men u information (date, t ime, resolutio n, etc.)
OSD
RECORD
OSD ON / OFF
Clinton Electronics | CE-RP5 User Manual
02
Included Items:
• 1-Channel DVR
• Phillips Head Screws x 4
• Cables (HDMI, HD-SDI, Power)
• SD-Card
• Remote
• Instructions
Required Items:
• #1 Phillips Head Screwdriver
REC EXIT PLAY MENU/ENTER
6 LED5 LED+
4 GND
3 MOTION OUT
2 GND
1 ALARM IN
REC
PWR
H.264 FULL HD-SDI RECORDER with converter
Basic Setup
4
VIDEO OUTPUT
HD-SDI IN
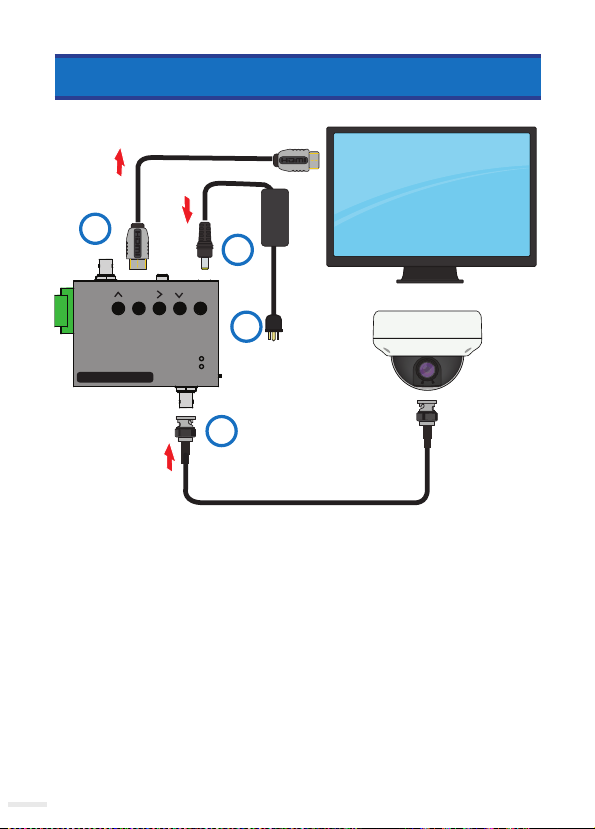
BASIC S ETUP:
1. Co nnect barrel p lug from DC12 Volt 1 A mp Power supply to dev ice. *Power supply sold separately.
2. Plug outlet from D C12 Volt Power Supp ly into wall outlet /power source.
3. Connect HD-S DI from camera to H D-SDI Input .
4. Connec t Video Outpu t (HD-SDI, H DMI, or Anal og) to correspo nding output , and connec t other end to Mon itor.
DC12V IN
1*
2
3
03
Clinton Electronics | CE-RP5 User Manual

1. ATTACH CABLES
CE-RP5
Install Guide
• Cables (HDMI, HD-SDI, Power)
• SD-Card
• Remote
• Instructions
3. INSERT SD-CARD
Insert the included SD-Card into the slot on the side of the CE-RP5. SD-Card
label should face toward the front of the CE-RP5.
4. POWER ON DEVICE
Turn the CE-RP5 power switch to the ON position. The Record, and Power
lights on the front of the CE-RP5 will illuminate to indicate proper function.
REC EXIT PLAY MENU/ENTER
6 LED-
5 LED+
4 GND
3 MOTION OUT
2 GND
1 ALARM IN
REC
PWR
H.264 FULL HD-SDI RECORDER with converter
RE
C
E
XIT
PL
AY
M
ENU/E
X
I
T
RE
C
P
W
R
H
.2
6
4
F
ULL
H
D-SD
I
R
E
C
O
R
D
E
R
w
i
th
c
onv
e
r
t
e
r
6
.
L
E
D-
5
.
LE
D
+
4.
G
N
D
3
.
M
O
T
ION
O
UT
2
.
G
N
D
1
.
AL
A
RM
I
N
OFF
ON
DC12V IN
HD-SDI IN
VIDEO OUTPUT
BASIC S ETUP:
5. Inser t SD-Card wi th contacts fac ing down, as shown b elow.
6. Turn the Powe r switch on the side of th e device to ON. Power, an d record LEDs sho uld illuminate gre en.
Basic Setup
64
REC
with converter
NOTICE
PWR
NOTICE
Maximu m SD Card
size is 128G B
This devi ce is factory se t to record on motio n events only. To record o n alarm, calen dar,
or schedule, make changes in the Schedule Record menu.
6
.
L
E
D-
5
.
LE
D
+
4.
G
N
D
3
.
M
O
T
ION
O
UT
2
.
G
N
D
1
.
AL
A
RM
I
N
RE
C
E
XIT
PL
AY
M
ENU/E
X
I
T
H
.2
6
4
F
ULL
H
D-SD
RE
C
I
R
E
C
O
R
D
E
R
P
w
W
i
th
R
c
onv
OFF
e
r
t
e
r
ON
Clinton Electronics | CE-RP5 User Manual
04

Menu Icons Explained - Live View
Live View
05 / 30 / 2018 1 0:53:44 1080P3 0
1
(C) RECORDING
3
2
Camera Image
1. Current Date & Time Information
2. Reco rd Mode & St atus
(C) - C ontinu ous (sche dule) Recording
(H) - Manual Record ing
(A) - A larm Event Recording
(M) - Motion Event Recording
3. Vide o Input Resolution - Reso lution a nd fram e rate of connected HD-SDI camera.
Changing the recording resolution/fr ame rate will not ee ct this input res olution/
frame r ate, nor will it eec t the device’s output resolution/f rame rate.
DVR Men u Navigatio n:
• Press M ENU/EN TER to ope n the OSD menu
• Press U P or DOWN on the remote control
to navigate
• To confirm or make a selection, press th e
MENU/ENTER button
• Press the LEFT o r RIGHT b uttons to change
the valu e
• Press the EXIT button to go b ack to the
previous menu screen an d to exit the OSD
Menu.
05
Clinton Electronics | CE-RP5 User Manual

Menu Icons Explained - Playback View
05 / 30 / 201 8 10:53:44
1
05 / 30 / 2018 1 0:53:44
7
Playback View
3
2
2x
Camera Image
4
5
6
1920
1080
1. Current Date & Time Information
2. Playback Mode
- Play
- Pause
- Fast Forwa rd / Rewind
- Slow Playba ck
3. Playback S peed
4. Record Mode
Alarm input
Motion
Calendar
Manual
Pre-Record
Clinton Electronics | CE-RP5 User Manual
5. Recorded Video Resolution
- 1920x1080
- 1280x72 0
6. Recorded Video Quality
- B asic Quality
- Normal Quality
- High Quality
7. Timestamp / Watermark
06

DVR - Date & Time Setup / Motion Detect
Normal Playback: While in Live View p ress the Play/Paus e button on the rem ote control to play vide o.
Normal Playback Speed
Fast Forw ard / Fast Rewind
During n ormal playback , press Fast Forw ard or Fast Rewind but ton in the same dir ection
again to in crease the searc h speed (Speed: x 2/ x4/ x8/ x16/ x32). P ress Play/Pause b utton to
playback a t normal speed
Pause
Slow Playb ack (frame by fra me)
After PAUSE, press Fast Forward/Rewind buttons to search frame by frame
Event Lis t Playback: Fro m the DVR Menu, ch oose Search & Play to c hoose which vide o to playback. Se lect the
desired d ate, and then sel ect from one of the av ailable files fo r playback.
Playbac k on PC:
• Eject the DVR S D Card.
• Insert SD C ard into computer.
• On your compu ter, select the SD C ard folder. Search t hrough the segm ented files to find you r desired clip.
• Open the clip i n Windows Media Pl ayer to view. Clips are in AVI fo rmat.
The last fi le on the SD Ca rd may be cor rupted du e to pullin g it from the u nit. Thi s 3MB file wil l not aect t he
desir ed recordi ng as it is only t he last few sec onds before t he SD Card was p ulled.
AVI video file s are not viewa ble on Apple /MAC compute rs.
07
Clinton Electronics | CE-RP5 User Manual

DVR - Date & Time Setup / Motion Detect
DATE & TIME
SET DATE / TIME
DATE FORMAT : M / D / Y
SET YEAR : 18
SET MONTH : 5
SET DAY : 30
SET TIME : 12 : 00 : 00
DST : ON
Date Form at: Adjust th e display of date - Mont h/Day/Year, Year/Month/ Day, Day/Month/Year
Set Year / Mon th / Date / Time: A djust the time an d date information .
DST: Day Light Saving s Time - On/O
MOTION DETECT
REC
Set MD Are a: Areas in hig hlighted in RED wil l detect motion. U se the arrow butto ns to select desi red cell(s).
Pressin g the MENU butto n will turn On/O th e selected motio n detection cell . To change th e Mode of select ion
press th e REC button.
• Cell Edit: Turn On/O c ells individua lly
• DEL Block: Tur n O large blocks o f cells
• DEL All: Turn all ce lls O
• Add Block: Turn O n large blocks of ce lls
• Add All: Turn all cel ls On
Set MD Sensitivity:
• MD Energy: D isplays current r ecognized motion . Motion is display ed as RED blocks .
• MD Thresho ld: Press Left or R ight on the remote cont rol to adjust the sen sitivity of motion de tection. The lowe r
the value , the more motion wil l be detected.
Clinton Electronics | CE-RP5 User Manual
08

DVR - Manual Record / Schedule Record
MANUAL RECORD
The DVR has m ultiple recor ding modes; M anual, Sche dule, Event & Conti nuous. Each r ecording mod e has
individual options for recording quality.
Manua l Recording occu rs when the REC bu tton on the remo te is pressed. To sto p Manual recor ding press the
EXIT but ton.
MANUAL RECORD
VIDEO SIZE : 1920x1080
FRAME RATE : 25 FPS
QUALITY : HIGH
SCHEDULE RECORD
Adjust t he dierent se ttings of Sche dule, Event/Mo tion & Continuo us Recording m odes.
SCHEDULE RECORD
1920x1080 25 FPS
1920x1080 25 FPS
1920x1080 25 FPS
SCHEDULE SETUP >
EVENT RECORD >
CONTINUE RECORD >
Schedule Setup:
• Schedule: Turn Schedule Re cording On/O. The S chedule map is l aid out in hours of th e day. Each hour can h ave
a dieren t type of reco rding mod e set to it. Navi gate betwee n the hours u sing the UP o r DOWN butto n on the
remote. Pr ess the LEF T or RIGH T button to ch ange the rec ording typ e; Alarm , Motion, Co ntinuou s (Calendar),
All Modes, or No modes.
Recording Modes
ALARM
MOTION
CONTINUOUS - CALENDAR
ALL
NONE
09
Clinton Electronics | CE-RP5 User Manual

DVR - Schedule Record / SD Card Options
SCHEDULE RECORD continued...
EVENT RECORD
VIDEO SIZE : 1920x1080
FRAME RATE : 25 FPS
QUALITY : HIGH
DURATION : 10 SEC
PRE-RECORD : 05 SEC
Event (Al arm & Motion) R ecord: Adjus t the video qualit y for motion and al arm input record ing.
Contin uous (Calen dar) Record : Adjust the vide o quality for cont inuous recordi ng. Hours for con tinuous recordi ng
can be set u p in the Schedule R ecord/Schedu le Setup sectio n.
SD CAR D OPTIONS
Disk Total : Displays the tot al capacity of th e installed SD C ard.
Disk Rem ain: Displa ys the total availab le remaining spa ce on the SD Card.
Max File S ize: Set the file s ize limit for recorde d video files. O nce the limit is reac hed a new file will sta rt to record.
Card Ful l: Choose bet ween LOOP or STOP.
• LOOP: Olde st files will be over written when the c ard is full.
• STOP: When th e card is full, rec ording will stop.
Format : Formats the S D Card to FAT32. All inform ation saved on the S D Card will be delet ed!
CONTINUE RECORD
VIDEO SIZE : 1920x1080
FRAME RATE : 25 FPS
QUALITY : HIGH
Clinton Electronics | CE-RP5 User Manual
10

DVR - System Status / Power On Setup / Factory Default
SYSTEM STATUS
Quickly view firmware information and recording settings.
SYSTEM STATUS
VERSION : V2.0101
SD FULL : LOOP
1920x1080 25FPS
1920x1080 25FPS
1920x1080 25FPS
1920x1080 25FPS
POWER O N SETUP
Change t he language , video format a nd alarm input t ype as needed . NOTE: If conne cting to a DVR, it may b e
necess ary to change th e “TV Output ” to 1080p30.
POWER ON SETUP
LANGUAGE : ENGLISH
TV OUTPUT : 1080I60
PASSWORD : 0 0 0 0
ALARM INPUT : N.C.
FACTO RY DEFAULT
Reset all DV R settings to fa ctory defaul t. Date & time info rmation will no t be reset.
11
Clinton Electronics | CE-RP5 User Manual

CE-RP5
User Manual
Clinton Electronics
6701 Clinton Road
Loves Park, IL 61111
Technical Support:
1-800-549-6393
Monday~Friday 8am~5pm (Central Standard Time)
www.clintonelectronics.com
Actual product may vary slightly from the images shown in this manual.
Clinton reserves the right, without notification, to make changes in product design & specification.
Clinton Electronics | CE-RP5 User Manual
ver: 06.06.18
 Loading...