

Clinton Electronics CE-PTZ10XHD, CE-PTZ10XHD-RM, CE-PTZ20XHDR, CE-PTZ30XHD-IN, CE-PTZ30XHDRS User Manual
...
PTZ User Manual
CE-PTZ10XHD
CE-PTZ10XHD-RM
CE-PTZ20XHDR
CE-PTZ30XHD-IN
CE-PTZ30XHDR
CE-PTZ30XHDRS
Actual product may vary slightly from the images shown in this manual.
Clinton reserves the right, without notification, to make changes in product design & specification.

ToC
TABLE OF CONTENTS
Important Safeguards
Initialization
Main Menu Navigation
Motion Menu
Preset
Tour
Group
Scan
Pattern
Area
Alarm
Privacy
Home Position
Dome Menu
Title
Speed by Zoom
OSD On/O
Park Mode
Temperature
Special
HDSDI Format
Tilt Limit
Power Up
Flip Type/Auto Flip
Scroll Type
Response
P-Freeze
Zero Position
Dome Reset
External IR Set
Wiper Setting
Camera Menu
Zoom
Focus
White Balance
Auto Exposure
WDR
Special
Special Sub
Aperture Gain
Back Light
DNR Level
Defog
Flickerless
Sharpness
Preset Freeze
Privacy Color
Stabilizer
Camera Reset
Clear
Factory Set
PTZ Reset
Keyboard Shortcuts
1
2
2
3~4
5~7
8~9
10~13
14~15
16~17
18~19
20~21
22
23
23
24
25
25
26
26
26
26
26
26
26
27
27
28
29
30
31
31
32
33
34
34
34
34
34
34
34
34
34
35
35
36
36
36
37
1
1. Read Instructions
All the safety and operating instructions should be read before
the appliance is operated.
2. Retain Instructions
The safety and operating instructions should be retained for
future reference.
3. Cleaning
Unplug this equipment from the power source before cleaning
it. Do not use liquid aerosol cleaners. Use a damp soft cloth for
cleaning.
4. Attachments
Never add any attachments and/or equipment without the
approval of the manufacturer as such additions may result in the
risk of fire, electric shock or other personal injury.
5. Water and/or Moisture
Do not use this equipment near water or in contact with water.
6. Accessories
Do not place this equipment on an unstable cart, stand or
table. The equipment may fall, causing serious injury to a child
or adult, and serious damage to the equipment. Mounting
should follow the manufacturer’s instructions, and should use a
mounting kit approved by the manufacturer.
7. Power Sources
This equipment should be operated only from the type of power
source indicated on the label. If you are not sure of the type of
power, please consult your equipment dealer or local power
company.
8. Power Cords
Operator or installer must remove power and communications
connections before handling the equipment.
9. Lightning
For added protection for this equipment during a lightning
storm, or when it is left unattended and unused for long periods
of time, unplug it from the power source and disconnect the
cables. This will prevent damage to the equipment due to
lightning and power-line surges.
10. Overloading
Do not overload wall outlets and extension cords as this can
result in the risk of fire or electric shock.
11. Objects and Liquids
Never push objects of any kind through openings of this
equipment as they may touch dangerous voltage points or short
out parts that could result in a fire or electric shock. Never spill
liquid of any kind on the equipment.
12. Servicing
Do not attempt to service this equipment yourself. Refer all
servicing to qualified service personnel.
13. Damage Requiring Service
Unplug this equipment from the wall outlet and refer servicing
to qualified service personnel under the following conditions:
A. When the power-supply cord or the plug has been damaged.
B. If liquid is spilled, or objects have fallen into the equipment.
C. If the circuitry has been exposed to rain or water.
D. If the equipment does not operate normally by following
the operating instructions, adjust only those controls that
are covered by the operating instructions as an improper
adjustment of other controls may result in damage and will
often require extensive work by a qualified technician to restore
the equipment to its normal operation.
E. If the equipment has been dropped.
F. When the equipment exhibits a distinct change in
performance —this indicates a need for service.
14. Replacement Parts
When replacement parts are required, be sure the service
technician has used replacement parts specified by the
manufacturer or that have the same characteristics as the
original part. Unauthorized substitutions may result in fire,
electric shock or other hazards.
15. Safety Check
Upon completion of any service or repairs to this equipment, ask
the service technician to perform safety checks to determine
that the equipment is in proper operating condition.
16. Field Installation
This installation should be made by a qualified service person
and should conform to all local codes.
17. Tmra
A manufacturer’s maximum recommended ambient temperature
(Tmra) for the equipment must be specified so that the
customer and installer may determine a suitable maximum
operating environment for the equipment.
19. Reduced Air Flow
Installation of the equipment should be such that the amount
of airflow required for safe operation of the equipment is not
compromised.
21. Circuit Overloading
Consideration should be given to connection of the equipment
to supply circuit and the eect that overloading of circuits might
have on over current protection and supply wiring. Appropriate
consideration of equipment nameplate ratings should be used
when addressing this concern.
22. Reliable Earthing (Grounding)
Reliable grounding of rack mounted equipment should be
maintained. Particular attention should be given to supply
connections other than direct connections to the branch circuit
(e.g., use of power strips).
IMPORTANT SAFEGUARDS
2
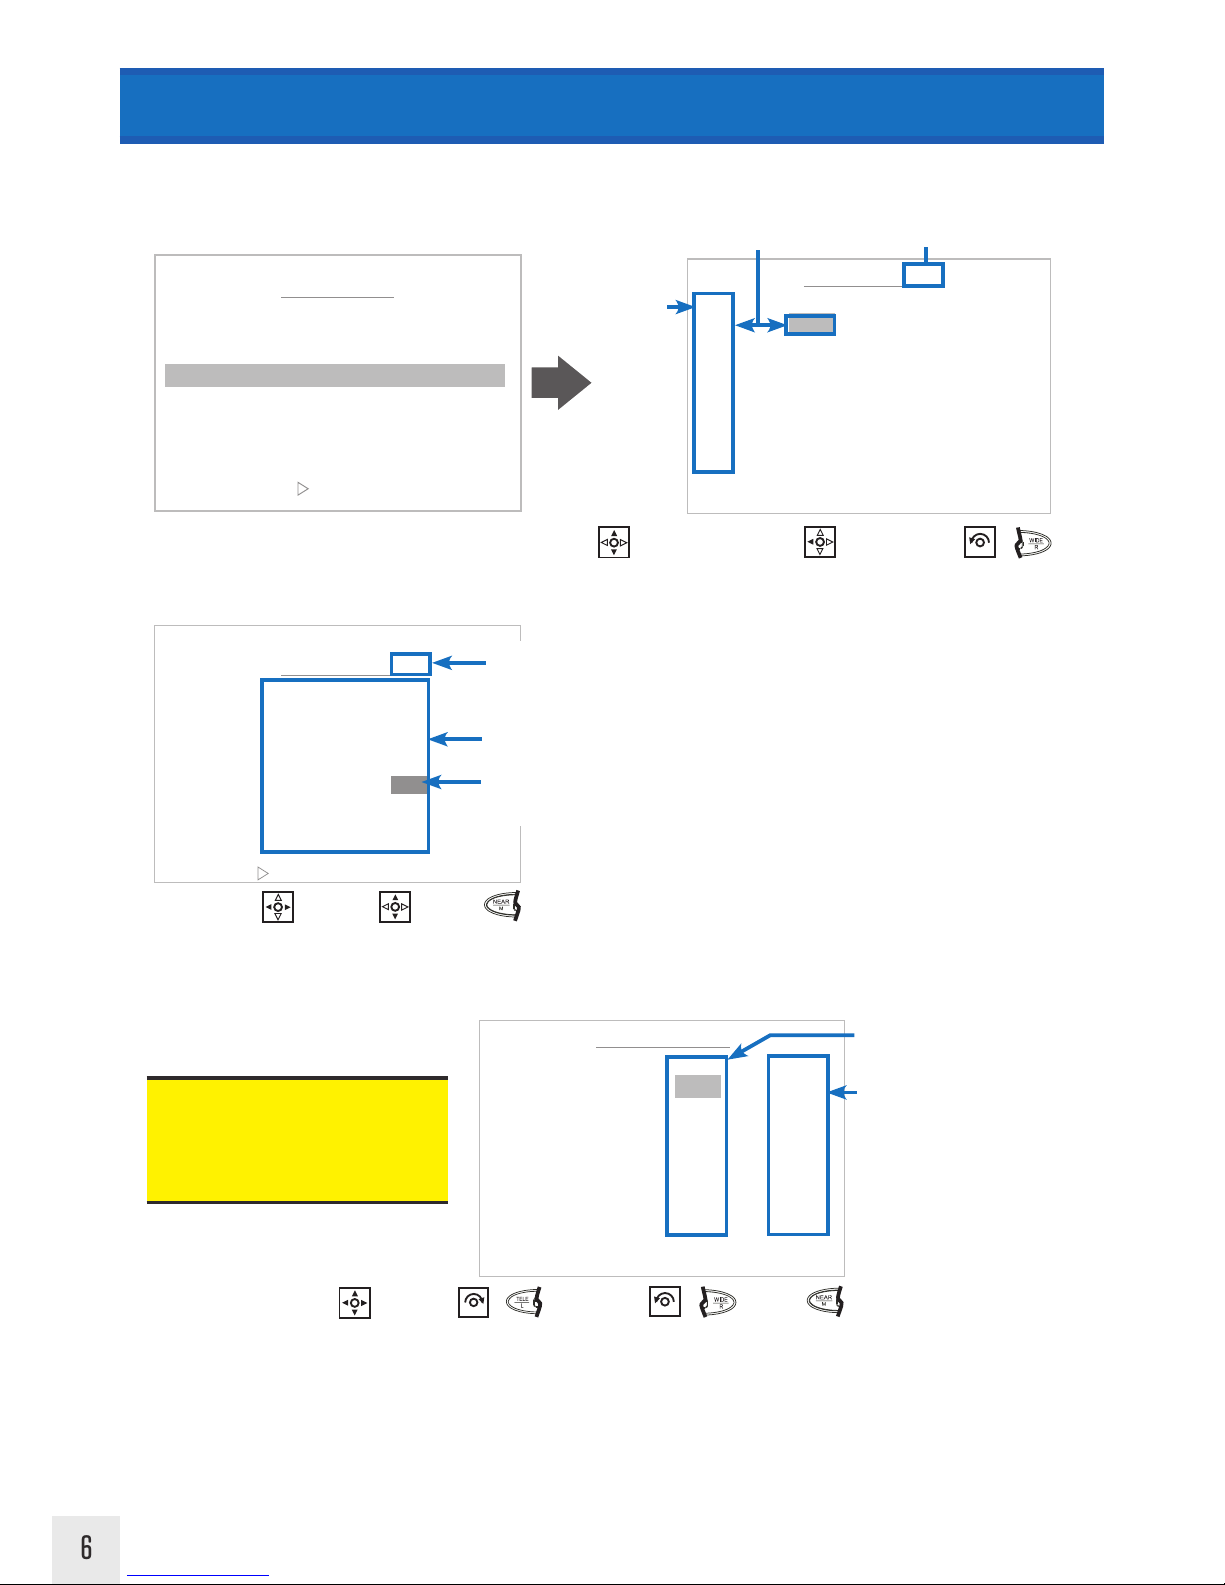
EXAMPLE:
Input options for this menu are NEAR or RIGHT
NEAR indicates pressing on the keyboard button
RIGHT indicates moving the joystick to the right
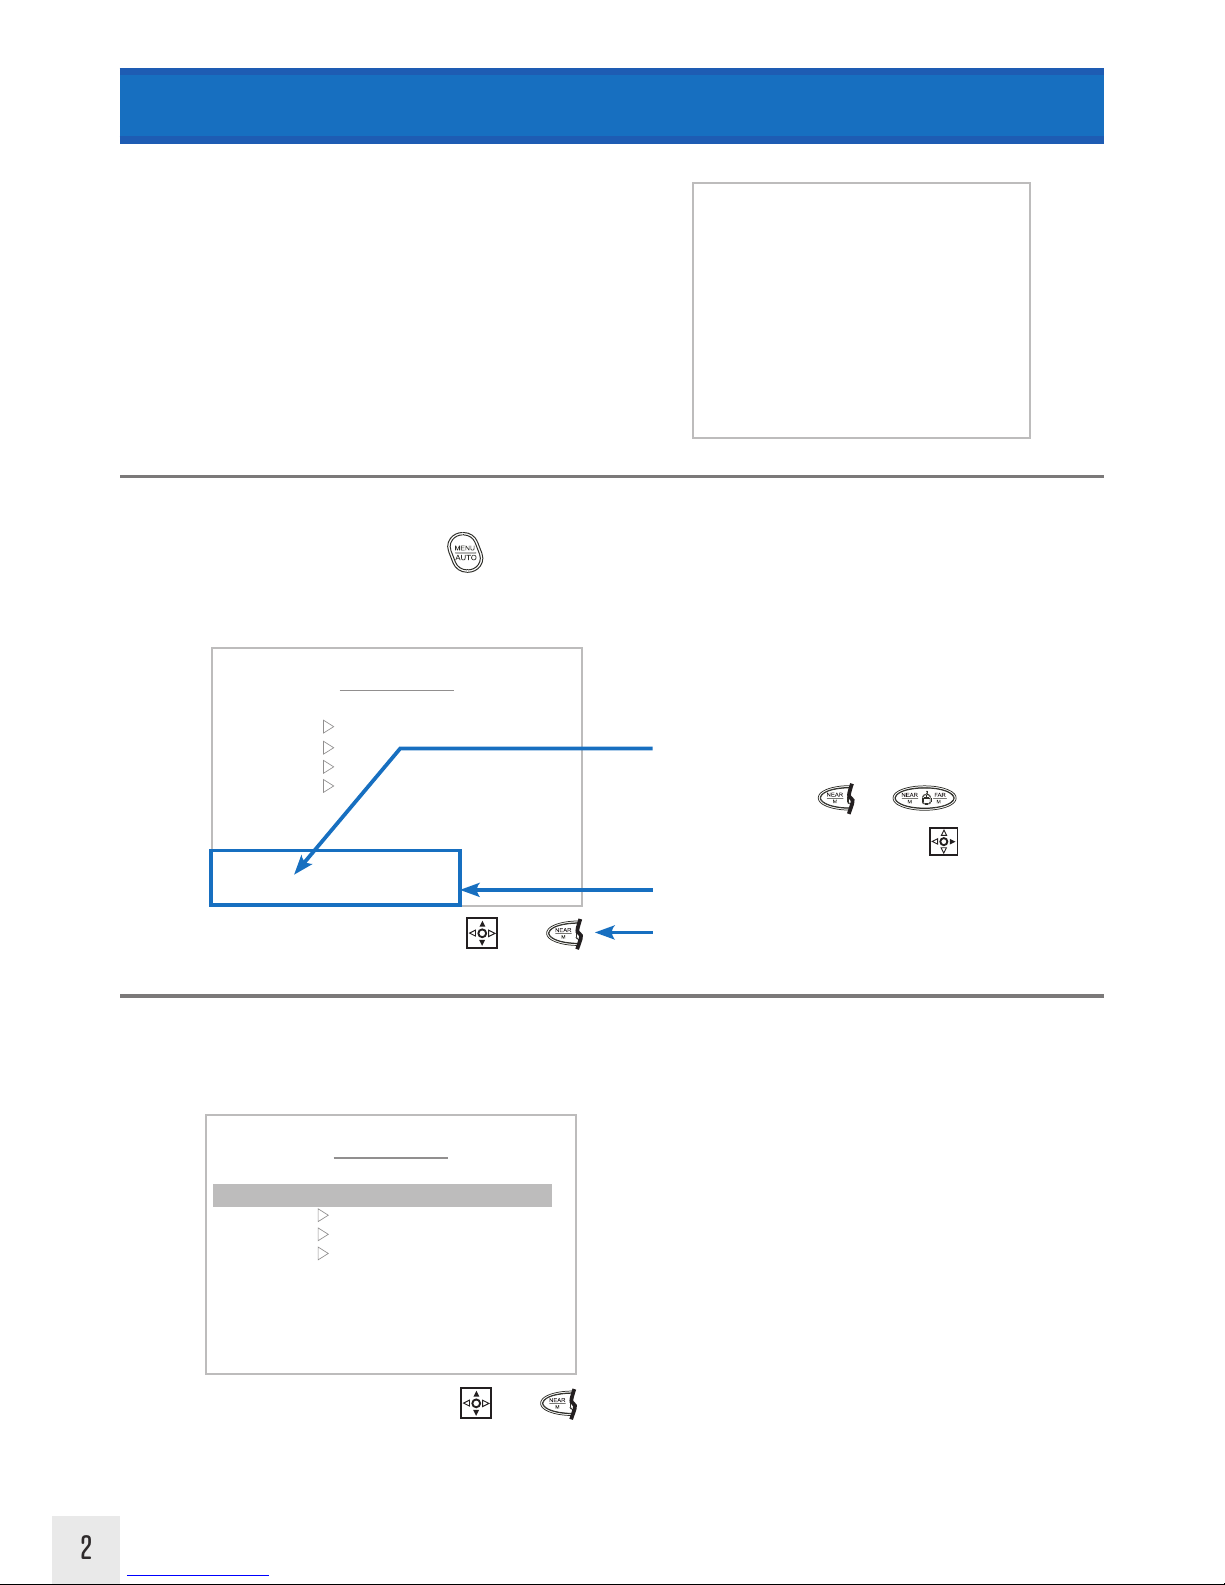
When these input options are performed, the OSD will enter the “MOTION” menu.
Available menu navigation options will be shown below the OSD image in this manual.
To enter the main menu, press and hold button on the keyboard for 3 seconds.
STARTUP MAIN MENU MOTION MENU
Motion
MAIN MENU
< NEAR / RIGHT ▷ MOTION >
MOTION
▶
DOME
CAMERA
CLEAR
PTZ RESET
FACTORY SET
EXIT
INITIALIZE
: 001
: X. XX
: 1080p30/NTSC
: PELCO-D
: 2400.N.1
: XX XXX..OK
VER: XX, XX
OK
OK
PTZ ID
VERSION
D-OUTPUT
PROTOCOL
BAUDRATE
CAMERA
▷ PAN INIT . . . .
▷ TILT INIT . . . .
▷NORMAL SETTING WAIT . .
In the Motion menu, you can set various movement settings such as preset points, tours, alarm areas, etc.
Initialize
Upon power-up you will first see the initialize screen which displays:
• PTZ ID number
• Firmware Version
• Video Output Resolution
• Protocol
• Baudrate
• Camera Type & Version
• Pan/Tilt Initialization Status
Main Menu
MAIN MENU
< NEAR / RIGHT ▷ MOTION >
MOTION
DOME
CAMERA
CLEAR
PTZ RESET
FACTORY SET
EXIT
Use the keyboard’s joystick to move the cursor up & down within the menu. Keyboard/Joystick input options will be
shown at the bottom of each menu screen.
Enter=
Move Cursor=
Enter=
Move Cursor=
3
Enter/Back=
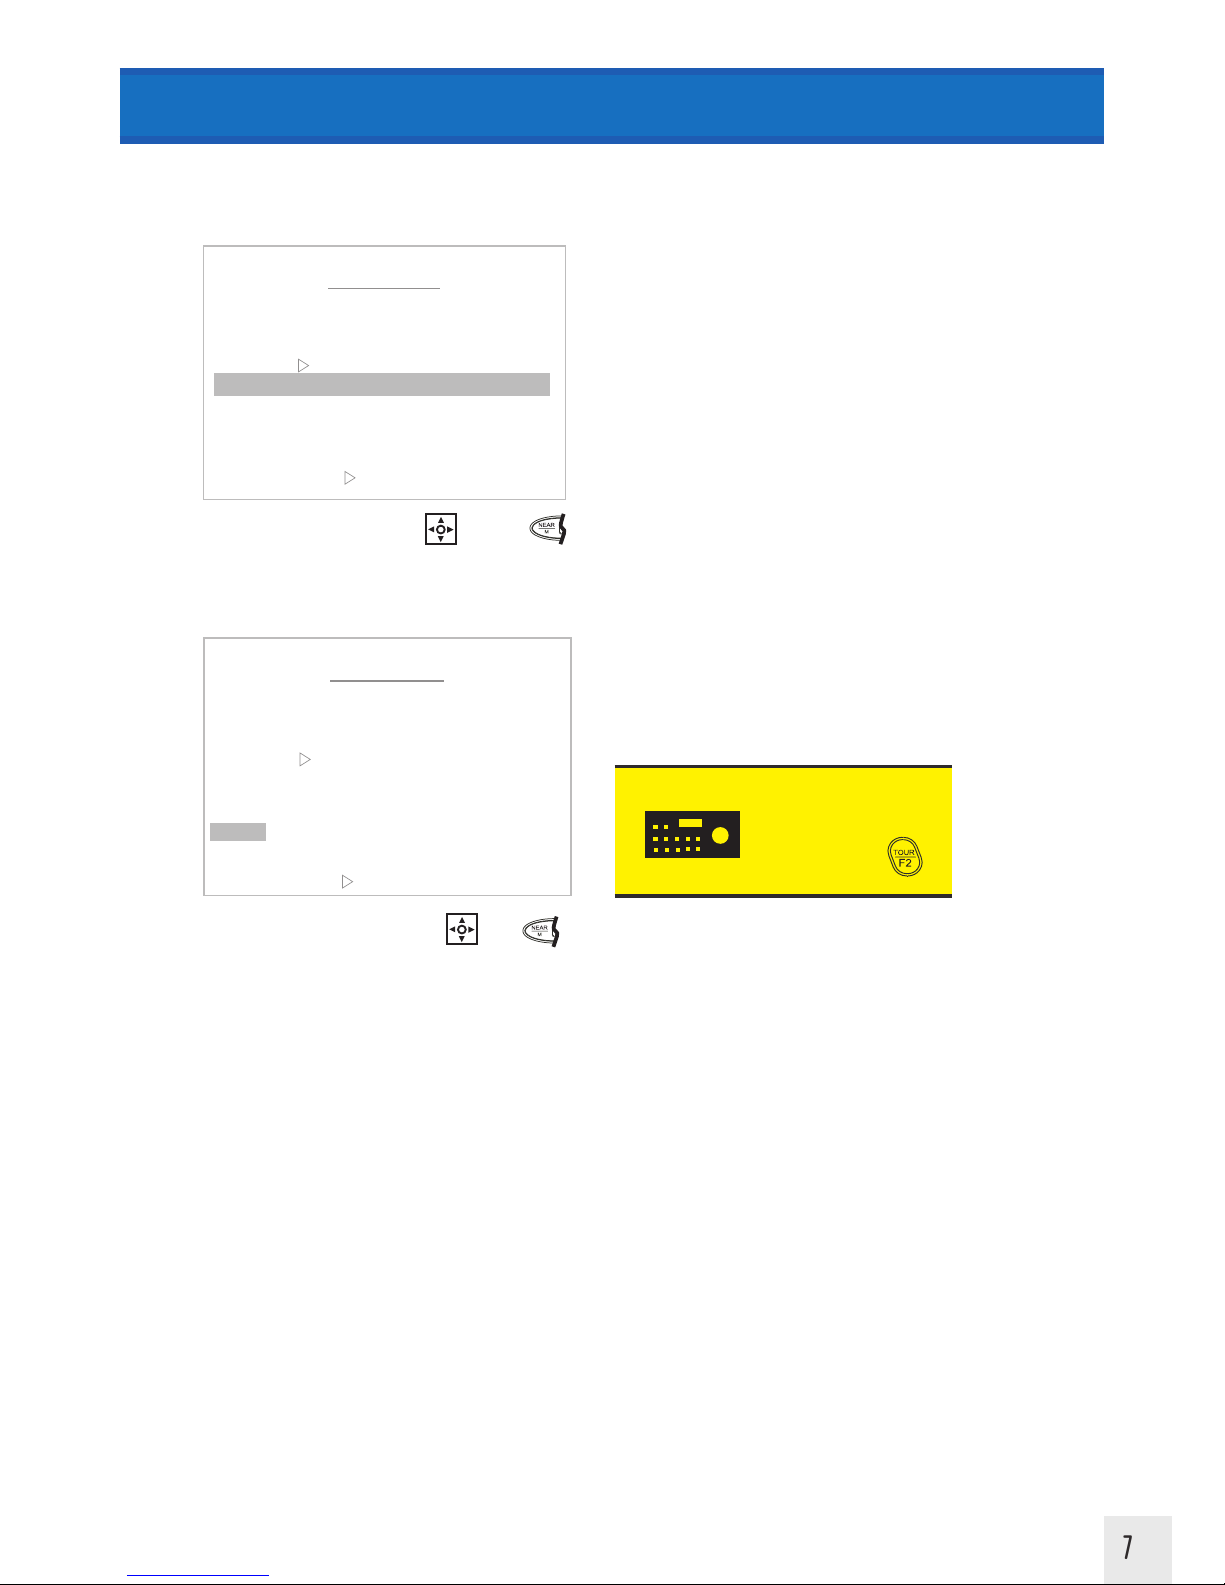
MOTION MENU
Preset
PRESET MENU
< NEAR / RIGHT PRESETNUM >
NUMBER : 001
TITLE :
: AUTOFOCUS
POSITION SET ▶
SAVE CLR BACK EXIT
: OFF EXIT TIME
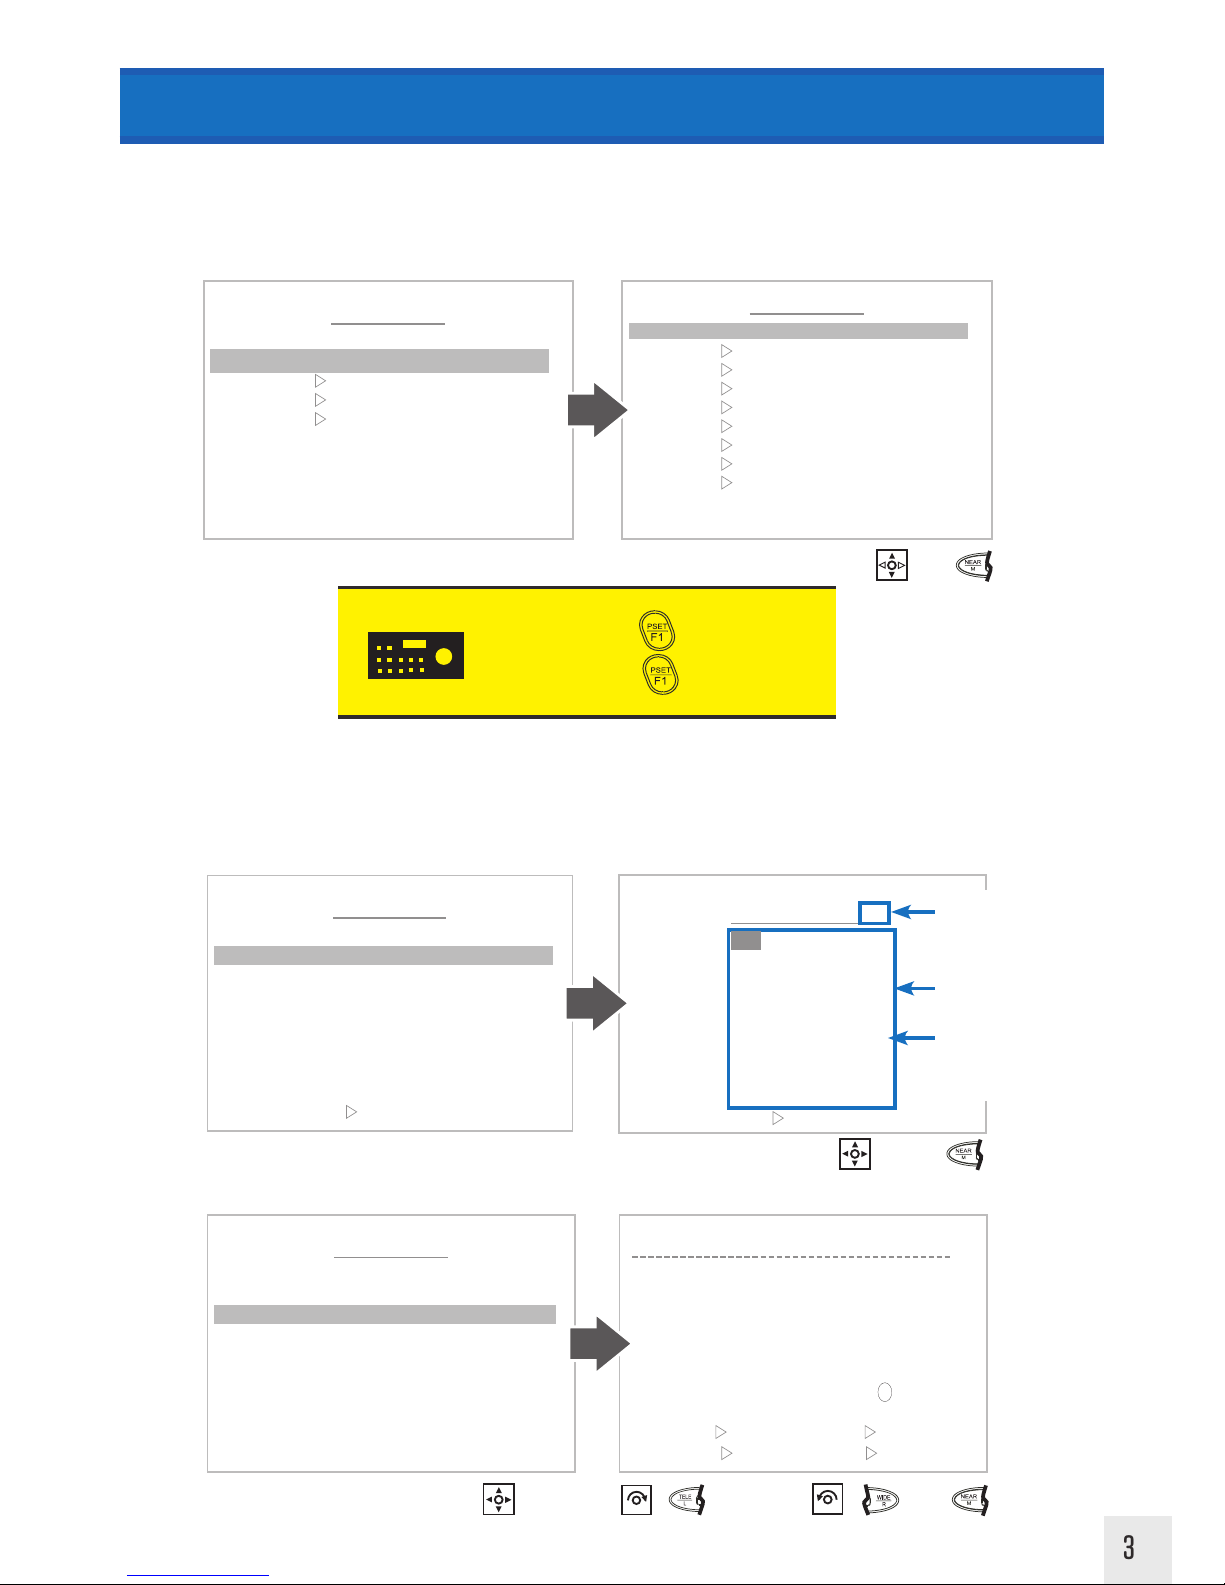
1. Choose a Preset Number 1~254.
2. Choose a name for the Preset.
Add a preset to allow the camera to recall a defined position, and quickly access these positions by entering a preset
number. A maximum of 220 preset positions can be defined. NOTE: Some preset numbers are allocated to other
functions, or are preset as factory set shortcuts.
Preset
KEYBOARD
SHORTCUT
Set Preset: 1~254 + (HOLD 3 SEC.)
Go to Preset: 1~254 +
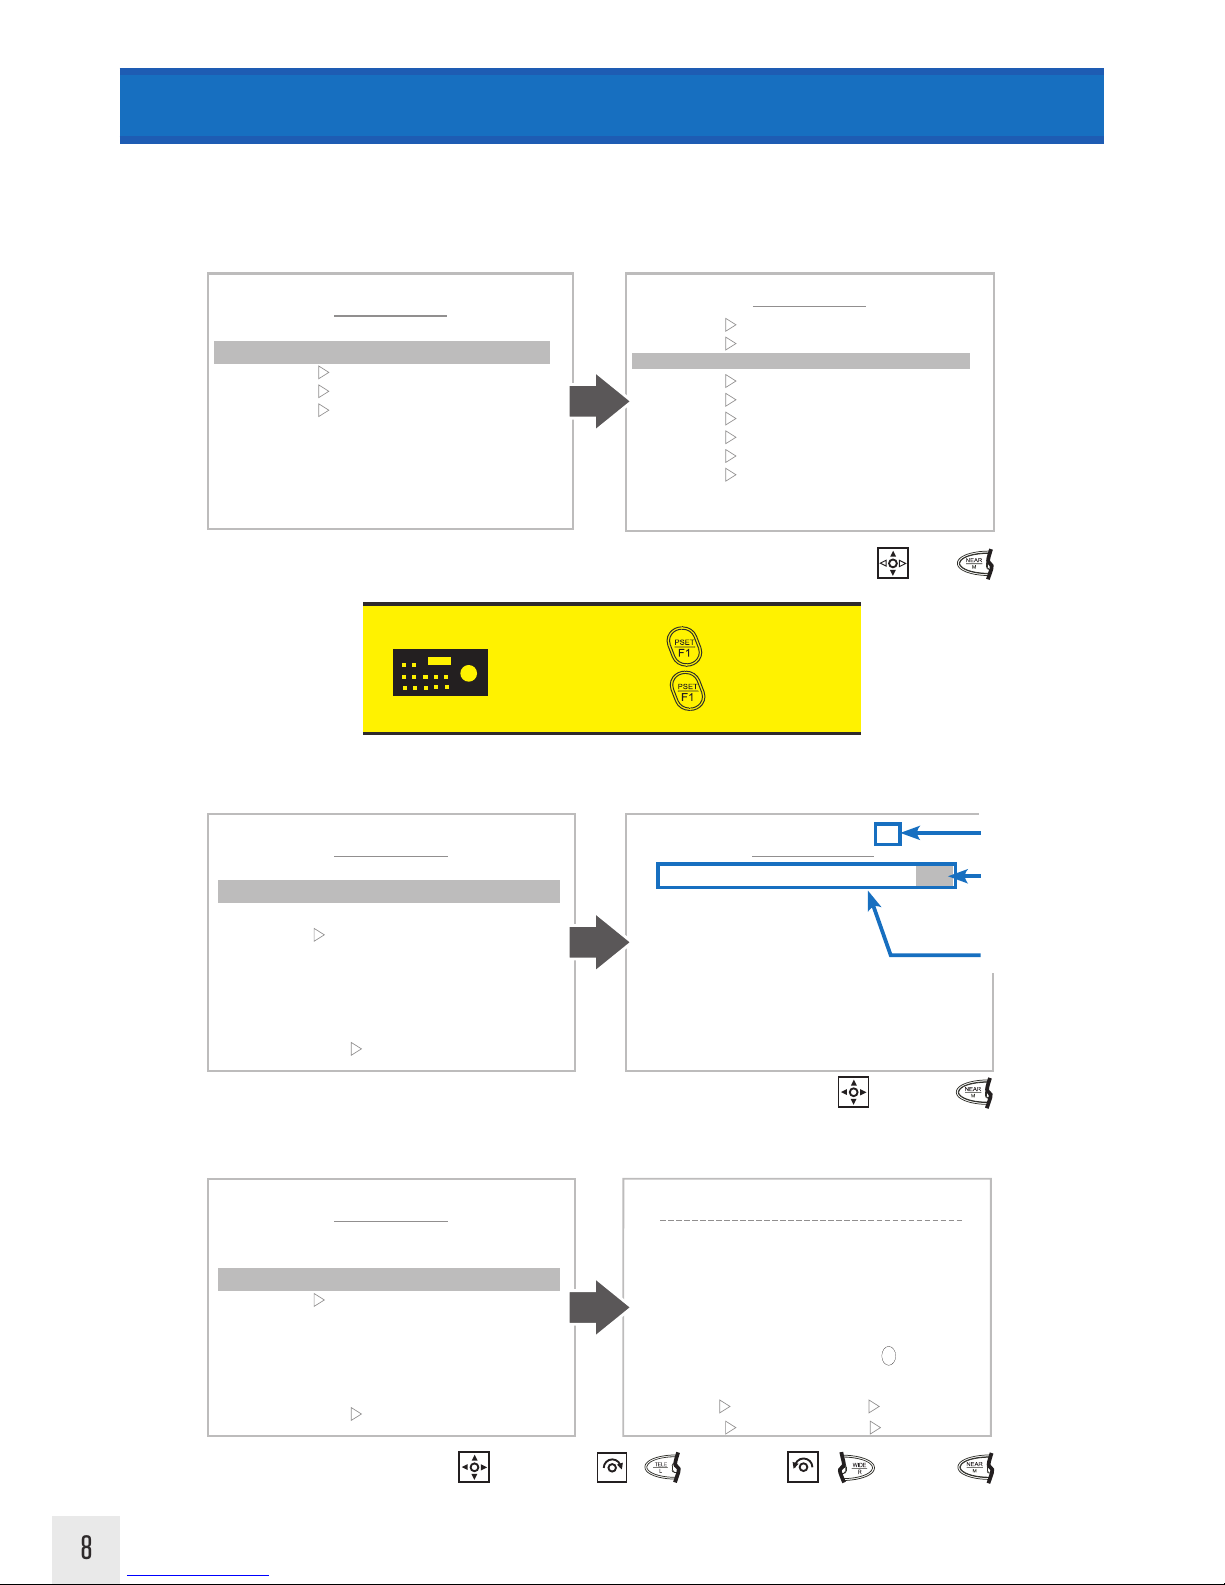
The menu will show all available preset numbers. To view higher numbers, change the first (hundreds position),
and second (tens position) number to a larger number.
PRESET MENU
PRESET SELECT : 001
001 002 003 004 005
006 007 008 009 010
011 012 013 014 015
016 017 018 019 020
021 022 023 024 025
026 027 028 029 P030
031 032 033 034 035
036 037 038 039 040
041 042 043 044 045
<EXIT
FOCUS NEAR>
Move Cursor=
“P” before number
indicates preset number
has been programmed.
Currently selected digit
Up/Down= change digit
Left/Right= change digit position
List of preset numbers
PRESET MENU
< NEAR / RIGHT ▷ PRESET TITLE >
NUMBER : 001
TITLE :
: AUTOFOCUS
POSITION SET ▶
SAVE CLR BACK EXIT
: OFF EXIT TIME
PRESET TITLE EDIT ( 01 )
< DELETE
WIDE
< STORE
TELE
BACK
NEAR >
MOVE
JOYSTICK >
TITLE :
0 1 2 3 4 5 6 7 8 9 (
) A B C D E F G H I J K
L M N O P Q R S T U V W
X Y Z . / , + - = < >
Select Character=
or
Delete Character=
or
Move Cursor= Back=
MOTION MENU
< NEAR / RIGHT ▷ PRESET >
PRESET ▶
TOUR
GROUP
SCAN
PATTERN
ALARM
AREA
PRIVACY
HOME POS
BACK EXIT
MAIN MENU
< NEAR / RIGHT ▷ MOTION >
MOTION
▶
DOME
CAMERA
CLEAR
PTZ RESET
FACTORY SET
EXIT
Enter=
Move Cursor=
The Preset number range (1~254) is a general range of presets. Some features have factory preset numbers that are not available to set as a preset. Numbers not available to
set as a preset are: 71~78, 81~88, 91~94, 101~106, 240~245, 248, 252, 255.
4
MOTION MENU
PRESET
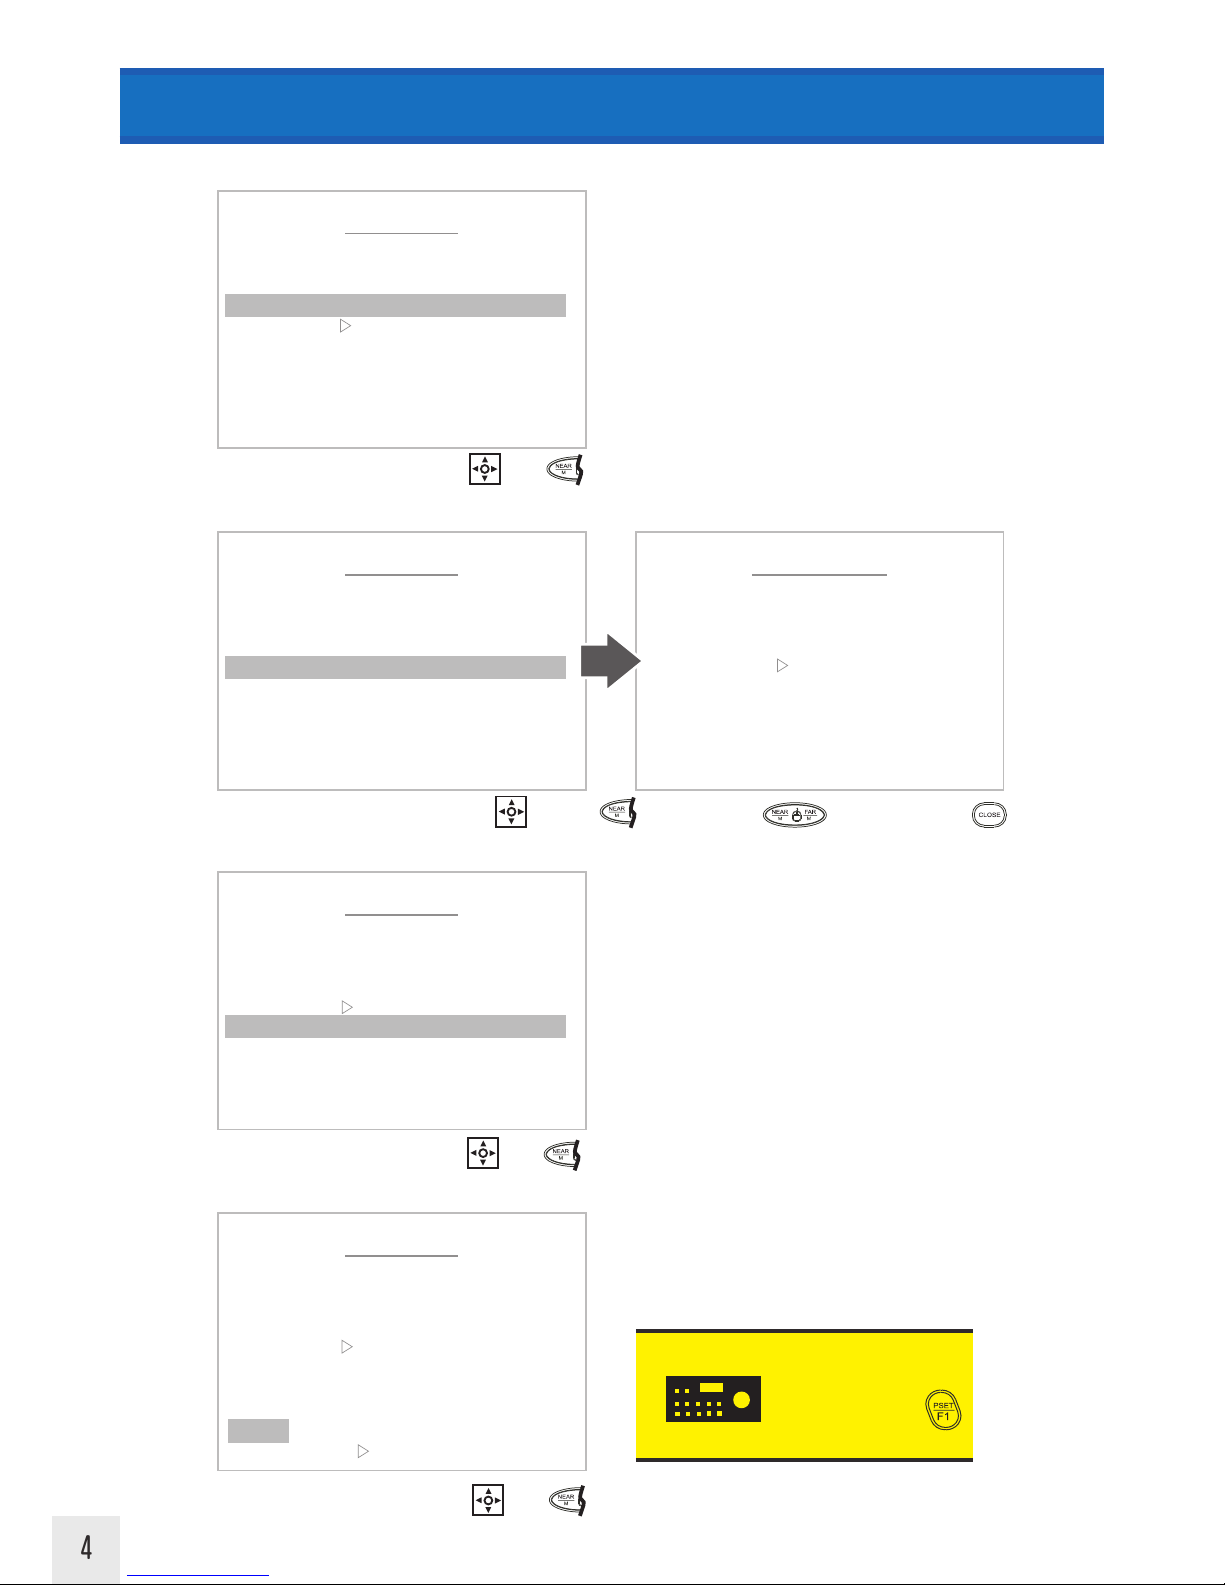
3. Select the focus mode for the preset. Choose from Auto, Manual, or One Shot.
Move Cursor=
Back=
4. Use the Joystick to set the position coordinates, and the preset zoom level. Also set focus level when in manual mode.
Auto- Camera focuses initially upon reaching the preset
point, as well as whenever when the camera detects a
scene change such as change in color, movement, etc.
Manual- Set the focus point manually within the
“Position Set” menu.
One Shot- Focus camera only once upon initially
reaching the preset point.
5. Set the time interval before the preset name, zoom level, and coordinates disappear from the screen.
6. Save or Clear the preset settings and exit.
SAVE- Saves the preset settings
CLR- Clear the settings for the current preset
BACK- Go back to the previous menu
EXIT- Exit the menu
Move Cursor=
Enter=
KEYBOARD
SHORTCUT
Go to Preset: 1~255 +
To test the Programming:
Enter=
Move Cursor=
PRESET MENU
< NEAR / RIGHT ▷ PRESET FOCUS >
NUMBER : 001
TITLE :
: AUTOFOCUS
POSITION SET
SAVE CLR BACK EXIT
: OFF EXIT TIME
Enter/Back=
Move Cursor & Camera=
PRESET MENU
< NEAR / RIGHT ▷ PRESET POSITION >
NUMBER : 001
TITLE :
: AUTOFOCUS
POSITION SET
SAVE CLR BACK EXIT
: OFF EXIT TIME
PRESET POSITION
<EXIT FOCUS NEAR >
POSITION : 000. 0 000. 0
Focus (Manual Mode)=
Enter/Back (Manual Mode)=
▶
PRESET MENU
< NEAR / RIGHT ▷ EXIT TIME >
NUMBER : 001
: OFF
TITLE
EXIT TIME
:
: AUTOFOCUS
POSITION SET
SAVE CLR BACK EXIT
PRESET MENU
< NEAR / RIGHT
DATA SAVE >
NUMBER : 001
TITLE :
: AUTOFOCUS
POSITION SET
SAVE CLR BACK EXIT
: OFF EXIT TIME

5
TOUR SELECT : 01
< SEL ▷ NEAR / MOVE JOYSTICK >
01 02 03 04 05 T06
07 08
MOTION MENU
TOUR
Enter/Back=
1. Choose a Tour Number 1~8 to setup.
A tour is a set of preset points which is toured through at a defined movement speed between points, and dwell time at
each preset. One tour can consist of 16 separate preset points. A maximum of 8 tours can be configured. A tour will play
continuously until interrupted by a keyboard button press or joystick movement.
Tour
MAIN MENU
< NEAR / RIGHT ▷ MOTION >
MOTION
▶
DOME
CAMERA
CLEAR
PTZ RESET
FACTORY SET
EXIT
Move Cursor=
MOTION MENU
< NEAR / RIGHT ▷ TOUR >
PRESET
TOUR ▶
GROUP
SCAN
PATTERN
ALARM
AREA
PRIVACY
HOME POS
BACK EXIT
TOUR MENU
< NEAR / RIGHT
TOUR NUM >
NUMBER : 01
TITLE :
TOUR SET
SAVE CLR BACK EXIT
TIME DISPLAY : OFF
“T” before number
indicates tour number
has been programmed.
Currently selected digit
Up/Down= change digit
List of tour numbers
2. Set the name for the Tour.
KEYBOARD
SHORTCUT
There are two ways to call Tour functions:
Se t To ur: 71~78 + (HOLD 3 SEC.)
Go to Tour: 7 1 ~78 +
Se t To ur: 1~8 + (HOLD 3 SEC.)
Go to Tour: 1~8 +
Enter=
Move Cursor=
TOUR MENU
< NEAR / RIGHT
TOUR TITLE >
NUMBER : 01
TITLE :
TOUR SET
SAVE CLR BACK EXIT
TIME DISPLAY : OFF
Select Character=
or
Delete Character=
or
Move Cursor=
Enter/Back=
TOUR TITLE EDIT
< DELETE WIDE
< STORE TELE
BACK NEAR >
MOVE JOYSTICK >
TITLE :
0 1 2 3 4 5 6 7 8 9 (
) A B C D E F G H I J K
L M N O P Q R S T U V W
X Y Z . / , + - = < >
6
TOUR MENU
PRESET SELECT: 030
P001 002 003 004 005
006 007 008 009 010
011 012 013 014 015
016 017 018 019 020
021 022 023 024 025
026 027 028 029
P030
031 032 033 034 035
036 037 038 039 040
041 042 043 044 045
<SEL NEAR /MOVE & JOYSTICK>
MOTION MENU
TOUR
Enter/Back=
“P” before number indicates preset number has been programmed & is available to select.
You must select a preset number which has been programmed already.
Currently selected Preset digit
Up/Down= change digit
Left/Right= change digit position
List of preset numbers
4. Edit the dwell time and speed for each tour number.
3. Select the preset points to include in the Tour. One tour can store 16 preset points.
Change Digit=
Move Cursor Digit=
TOUR EDIT <01>
NO PRESET SPEED DWELL
01 < 30 > 63 01
02
XXX XX XX
03
XXX XX XX
04
XXX XX XX
05
XXX XX XX
06
XXX XX XX
07
XXX XX XX
08
X
< SEL & NEAR PRESET & LEFT >
< SEL & NEAR DELETE WIDE >
TOUR MENU
< NEAR / RIGHT
TOUR SET >
NUMBER : 01
TITLE :
TOUR SET
SAVE CLR BACK EXIT
TIME DISPLAY : OFF
Tour Point Select=
Edit Preset No.
(When positioned over preset)=
Delete Tour Point Info =
Tour Point Number (1~16)
Currently Selected Tour NumberTour Point Number Corresponds to Preset Number
or
▶
XXX XX X
TOUR EDIT <01>
NO PRESET SPEED DWELL
01 30
< 63 > 01
02 XXX XX XX
03 XXX XX XX
04 XXX XX XX
05 XXX XX XX
06 XXX XX XX
07 XXX XX XX
08 X
< SEL & NEAR PRESET & LEFT >
< SEL & NEAR CHANGE &T/W >
Next Number=
or
Previous Number=
or
Enter/Back=
Move Cursor=
Default speed and dwell settings are
automatically entered after selecting a
Tour number.
Default Speed: 63
Default Dwell Time: 1 Sec.
Dwell Time= Number of seconds camera will
pause on selected preset (1~99 seconds).
Speed= Movement speed between tour
points (1~63)
XXX XX X
7
MOTION MENU
TOUR
TOUR MENU
< NEAR / RIGHT
TIME DISPLAY >
NUMBER : 01
TITLE :
TOUR SET
TIME DISPLAY : OFF
SAVE CLR BACK EXIT
5. Select Time Display option. Turning Time Display ON will show a countdown time until the the tour moves to the next
preset point.
Enter/Back=
6. Save or Clear the tour settings and exit.
SAVE- Saves the tour settings
CLR- Clear the settings for the current tour
BACK- Go back to the previous menu
EXIT- Exit the menu
TOUR MENU
< NEAR / RIGHT
DATA SAVE >
NUMBER : 01
TITLE :
TOUR SET
SAVE CLR BACK EXIT
TIME DISPLAY : OFF
Move Cursor=
Enter=
KEYBOARD
SHORTCUT
Go to Tour: 1~8 +
To test the Programming:
Move Cursor=
8
GROUP SELECT: 06
< EXIT ▷ FOCUS NEAR >
01 02 03 04 05 G06
MOTION MENU
GROUP
A group is a set of tours which is cycled through. One group can consist of 6 separate tours. A maximum of 6 groups can
be configured. A group will play continuously until interrupted by a keyboard button press or joystick movement.
Group
KEYBOARD
SHORTCUT
Set Group: 101~106 + (HOLD 3 SEC.)
Go to Group: 101~106 +
Enter/Back=
1. Choose a Group Number 1~6 to setup.
Move Cursor=
2. Choose a name for the Group.
“G” before number
indicates group number
has been programmed.
Currently selected digit
Up/Down= change digit
GROUP MENU
< NEAR / RIGHT
GROUP NUM >
NUMBER : 0
TITLE :
GROUP SET
SAVE CLR BACK EXIT
6
GROUP TITLE EDIT
< DELETE
WIDE
< STORE
TELE
BACK
NEAR >
MOVE
JOYSTICK >
TITLE :
0 1 2 3 4 5 6 7 8 9 (
) A B C D E F G H I J K
L M N O P Q R S T U V W
X Y Z . / , + - = < >
Select Character=
or
Delete Character=
or
Move Cursor=
Enter/Back=
GROUP MENU
< NEAR / RIGHT
GROUP TITLE >
NUMBER : 06
TITLE :
GROUP SET
SAVE CLR BACK EXIT
List of all group numbers
MAIN MENU
< NEAR / RIGHT
▷ MOTION >
MOTION
▶
DOME
CAMERA
CLEAR
PTZ RESET
FACTORY SET
EXIT
MOTION MENU
< NEAR / RIGHT ▷ GROUP >
PRESET
TOUR
GROUP ▶
SCAN
PATTERN
ALARM
AREA
PRIVACY
HOME POS
BACK EXIT
Enter=
Move Cursor=

9
TOUR SELECT: 06
< EXIT
▷ FOCUS NEAR >
01 02 03 04 05 T06
GROUP EDIT <06>
NO TOUR
01 <001>
02 002
03 XXX
04 XXX
05 XXX
06 XXX
< SEL & NEAR PRESET & LEFT >
< SEL & NEAR DELETE WIDE >
MOTION MENU
GROUP
Tour Placeholder Select=
Edit Tour No.=
3. Select the tours to include in the group. One group can store 6 tours.
Tour Placeholder
Number (1~6)
Currently Selected Group NumberTour Placeholder Number Corresponds to Tour Number
Enter/ Back=
Move Cursor=
“T” before number indicates tour number has
been programmed & is available to select.
Currently selected digit
Up/Down= change digit
List of all tour numbers. You must select a tour number which has been programmed already
4. Save or Clear the group settings and exit.
SAVE- Saves the group settings
CLR- Clear the settings for the current group
BACK- Go back to the previous menu
EXIT- Exit the menu
TOUR MENU
< NEAR / RIGHT
DATA SAVE >
NUMBER : 01
TITLE :
TOUR SET
SAVE CLR BACK EXIT
TIME DISPLAY : OFF
Move Cursor=
Enter=
KEYBOARD
SHORTCUT
Go to Group: 101~106 +
To test the Programming:
Delete Group Info =
or
Enter/ Back=
GROUP MENU
< NEAR / RIGHT
GROUP SET >
NUMBER : 01
TITLE :
GROUP SET
SAVE CLR BACK EXIT
▶
10
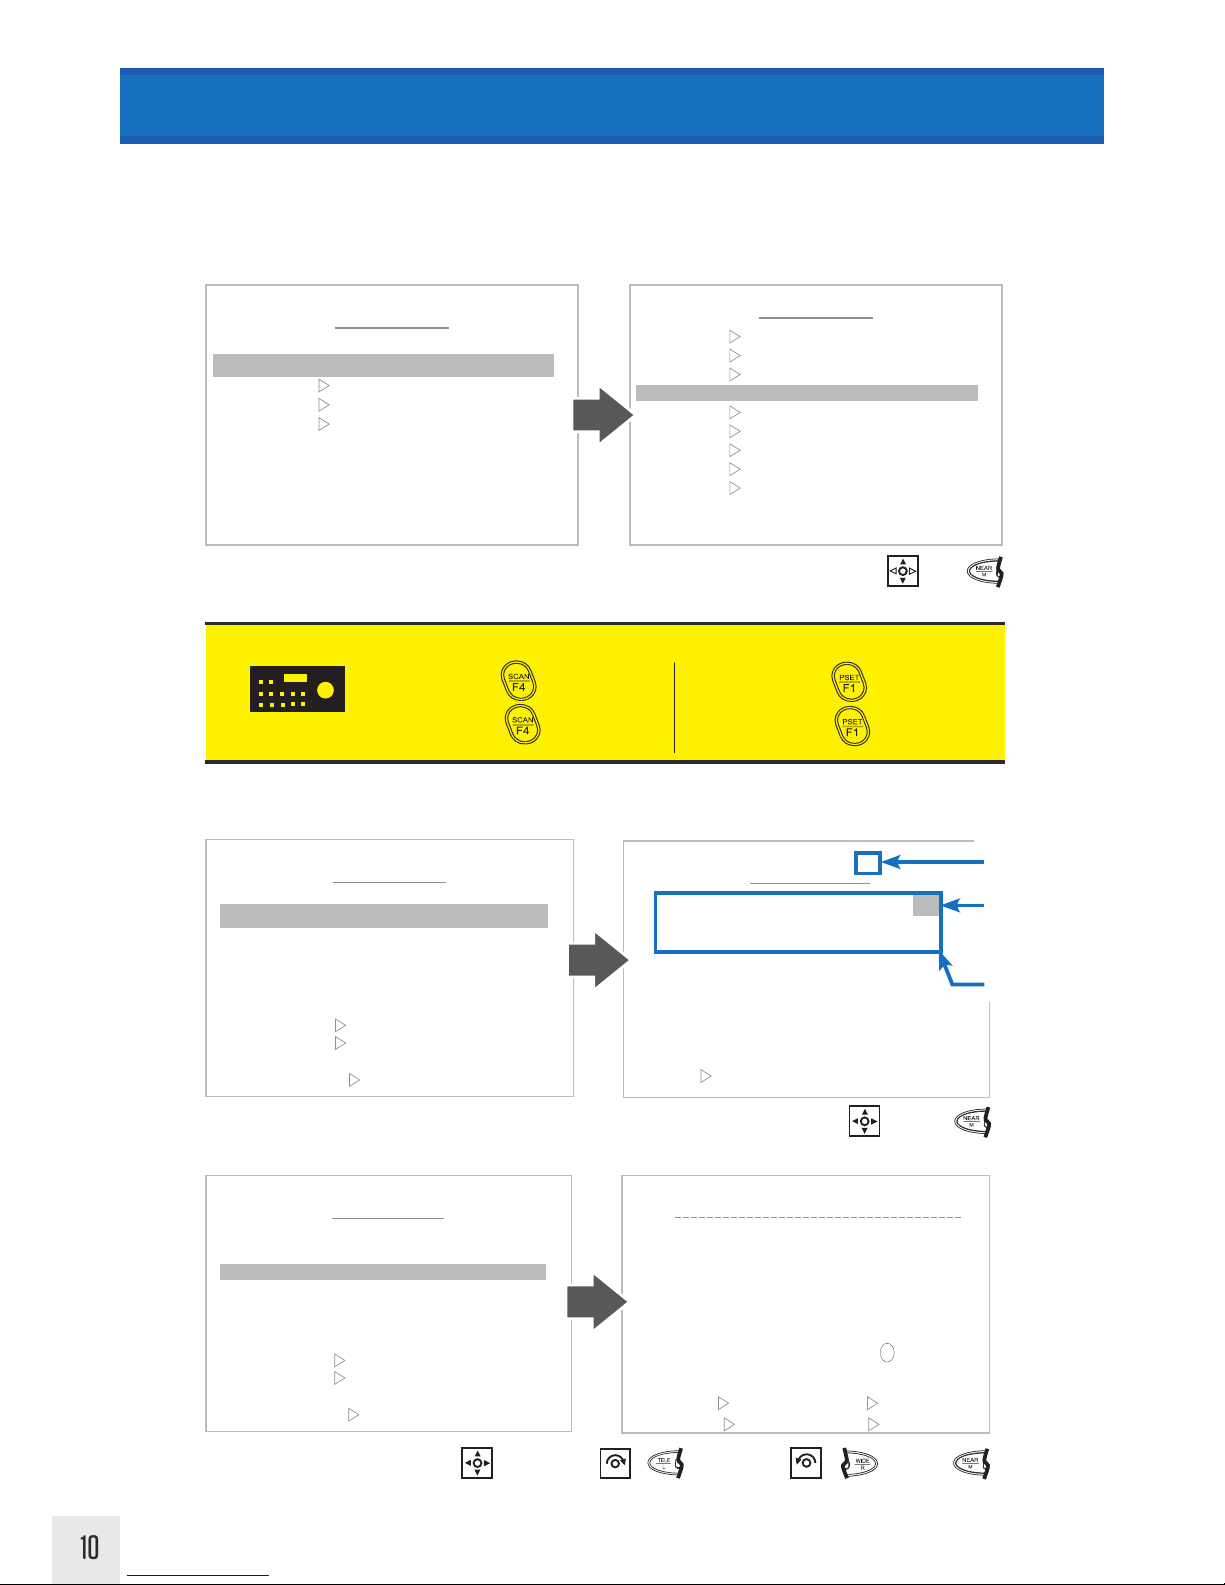
MOTION MENU
SCAN
A scan is a repeating horizontal (pan) or vertical (tilt) movement between two set points at a defined movement speed
between points, and dwell time at each point. A maximum of 8 scans can be configured. A scan will play continuously
until interrupted by a keyboard button press or joystick movement.
Scan
1. Choose a Scan Number 1~8 to setup.
2. Choose a name for the Scan.
KEYBOARD
SHORTCUT
There are two ways to call Scan functions:
Set Scan: 81~88 + (HOLD 3 SEC.)
Go to Scan: 81~88 +
Set Scan: 1~8 + (HOLD 3 SEC.)
Go to Scan: 1~8 +
SCAN SELECT: 06
< EXIT
FOCUS NEAR>
01 02 03 04 05 S06
07 08
Enter/Back=
Move Cursor=
“S” before number
indicates scan number
has been programmed.
Currently selected digit
Up/Down= change digit
List of all scan numbers
SCAN MENU
< NEAR / RIGHT
SCAN NUM >
NUMBER : 06
TITLE :
START POS
END POS
MOTION TYPE : NONE
DIRECTION : NONE
SPEED : NONE
DWELL : NONE
SAVE CLR BACK EXIT
Select Character=
or
Delete Character=
or
Move Cursor=
Enter/Back=
SCAN TITLE EDIT
< DELETE WIDE
< STORE
TELE
BACK
NEAR >
MOVE
JOYSTICK >
TITLE :
0 1 2 3 4 5 6 7 8 9 (
) A B C D E F G H I J K
L M N O P Q R S T U V W
X Y Z . / , + - = < >
SCAN MENU
< NEAR / RIGHT
SCAN TITLE>
NUMBER : 0
TITLE :
START POS
END POS
MOTION TYPE : NONE
DIRECTION : NONE
SPEED : NONE
DWELL : NONE
SAVE CLR BACK EXIT
6
MAIN MENU
< NEAR / RIGHT ▷ MOTION >
MOTION
▶
DOME
CAMERA
CLEAR
PTZ RESET
FACTORY SET
EXIT
MOTION MENU
< NEAR / RIGHT ▷ SCAN >
PRESET
TOUR
GROUP
SCAN ▶
PATTERN
ALARM
AREA
PRIVACY
HOME POS
BACK EXIT
Enter=
Move Cursor=

11
MOTION MENU
SCAN
3. Edit the speed and dwell time for the scan. Speed is the movement speed between tour points. Dwell Time is the
number of seconds the camera will pause on a selected preset point.
Default speed and dwell
settings are automatically
entered after selecting a
Scan number.
Default Speed: 35
Default Dwell Time: 5 Sec.
4. Choose a motion type for the scan. A scan will only perform a single movement type (Pan or Tilt). If you wish to
use both pan and tilt movements simultaneously, use the Preset and Tour functions detailed on previous pages.
TILT
PAN
SCAN MENU
< NEAR / RIGHT
MOVE SPEED>
NUMBER : 0
TITLE :
START POS
END POS
MOTION TYPE : NONE
DIRECTION : NONE
SPEED : NONE
DWELL : NONE
SAVE CLR BACK EXIT
6
SCAN MENU
< NEAR / RIGHT
DWELL>
NUMBER : 0
TITLE :
START POS
END POS
MOTION TYPE : NONE
DIRECTION : NONE
SPEED : NONE
DWELL : NONE
SAVE CLR BACK EXIT
6
SCAN MENU
< NEAR / RIGHT
MOTION TYPE>
NUMBER : 06
TITLE :
START POS
END POS
MOTION TYPE : NONE
DIRECTION : NONE
SPEED : NONE
DWELL : NONE
SAVE CLR BACK EXIT
Enter/Back=
Move Cursor=
Next Number=
or
or
Previous Number=
or
or
Enter/Back=
Move Cursor=
Next Number=
or
or
Previous Number=
or
or
90°
0°

12
MOTION MENU
SCAN
6. Choose a Start and End Position for the scan.
5. Choose a movement direction for the scan. Clockwise and Counter-Clockwise Pan movements are oriented as if you
are looking from the top of the PTZ. Set the appropriate direction to have the camera scan the desired horizontal portion
of the surveillance area.
NOTE: Direction movement will be set
to “UPDOWN” when Motion type is set
to Tilt. This cannot be changed.
Start Position
End Position
TILT
PAN
Clockwise (From top of PTZ)
Counter-Clockwise
(From top of PTZ)
Start Position
End Position
Start Position
End Position
SCAN MENU
< NEAR / RIGHT
DIRECTION>
NUMBER : 06
TITLE :
START POS
END POS
MOTION TYPE : NONE
DIRECTION : NONE
SPEED : NONE
DWELL : NONE
SAVE CLR BACK EXIT
Move Cursor=
Enter=
Change Selection=
START POSITION
< EXIT FOCUS NEAR >
POSITION : 000. 0 000. 0
SCAN MENU
< NEAR / RIGHT
JOYSTICK>
NUMBER : 06
TITLE :
START POS
END POS
MOTION TYPE : NONE
DIRECTION : NONE
SPEED : NONE
DWELL : NONE
SAVE CLR BACK EXIT
Move Camera=
Enter/Back=
▶

13
7. Save or Clear the scan settings and exit.
SAVE- Saves the scan settings
CLR- Clear the settings for the current scan
BACK- Go back to the previous menu
EXIT- Exit the menu
Move Cursor=
Enter=
KEYBOARD
SHORTCUT
Go to Scan: 1~8 +
or
Go to Scan: 81~88 +
To test the Programming:
MOTION MENU
SCAN
SCAN MENU
< NEAR / RIGHT DATA SAVE >
NUMBER : 0
TITLE :
TOUR SET
SAVE CLR BACK EXIT
TIME DISPLAY : OFF
6
Choose a Start and End Position...continued.
TILT
PAN
90°
0°
0° (360°)
270°
180°
90°
(View from top of PTZ)
NOTE: When defining a start position for Pan
mode, both Pan and Tilt movements will be
available. When defining the end position, only
Pan movement will be available.
Position Coordinates
END POSITION
< EXIT FOCUS NEAR >
POSITION : 000. 0 000. 0
SCAN MENU
< NEAR / RIGHT
JOYSTICK>
NUMBER : 06
TITLE :
START POS
END POS
MOTION TYPE : NONE
DIRECTION : NONE
SPEED : NONE
DWELL : NONE
SAVE CLR BACK EXIT
Move Camera=
Enter/Back=
▶

14
2. Choose a name for the Pattern.
Select Character=
or
Delete Character=
or
Move Cursor=
PATTERN TITLE EDIT: <04>
< DELETE
WIDE
< STORE
TELE
BACK
NEAR >
MOVE
JOYSTICK >
TITLE :
0 1 2 3 4 5 6 7 8 9 (
) A B C D E F G H I J K
L M N O P Q R S T U V W
X Y Z . / , + - = < >
PATTERN MENU
< NEAR / RIGHT
PATTERN TITLE >
NUMBER : 04
TITLE :
RECORD
PLAY
SAVE CLR BACK EXIT
PATTERN SELECT: 04
< EXIT FOCUS NEAR>
01 02 03 P04
MAIN MENU
< NEAR / RIGHT
▷ MOTION >
MOTION
▶
DOME
CAMERA
CLEAR
PTZ RESET
FACTORY SET
EXIT
MOTION MENU
< NEAR / RIGHT
▷ PATTERN >
PRESET
TOUR
GROUP
SCAN
PATTERN
▶
ALARM
AREA
PRIVACY
HOME POS
BACK EXIT
A pattern is a memorized path of movement with defined zoom controls. A maximum of 4 patterns can be configured,
with a maximum of 65 seconds of recording time for each pattern. A pattern will play continuously until interrupted by a
keyboard button press or joystick movement.
Pattern
KEYBOARD
SHORTCUT
Set Pattern: 1~8 + (HOLD 3 SEC.)
Go to Pattern: 1~8 +
There are two ways to call Pattern functions:
1. Choose a Pattern Number 1~4 to setup.
Enter/Back=
Move Cursor=
“P” before number
indicates pattern number
has been programmed.
Currently selected digit
Up/Down= change digit
List of all pattern numbers
PATTERN MENU
< NEAR / RIGHT
PATTERN NUM >
NUMBER : 04
TITLE :
RECORD
PLAY
SAVE CLR BACK EXIT
Set Pattern: 91~94 + (HOLD 3 SEC.)
Go to Pattern: 91~94 +
MOTION MENU
PATTERN
Enter/Back=
Enter=
Move Cursor=

15
MOTION MENU
PATTERN
3. Record a movement pattern. Press “Far” button to start recording. Use the joystick to define zoom and movement
path. Press “Near” to set the pattern and return to the previous menu.
PATTERN MENU
< NEAR / RIGHT
PLAY >
NUMBER : 04
TITLE :
RECORD
PLAY
SAVE CLR BACK EXIT
5. Save or Clear the pattern settings and exit.
SAVE- Saves the pattern settings
CLR- Clear the settings for the current pattern
BACK- Go back to the previous menu
EXIT- Exit the menu
Enter=
KEYBOARD
SHORTCUT
Go to Pattern: 1~8 +
or
Go to Pattern: 91~94 +
To test the Programming:
Move Cursor=
4. Selecting Play from the Patten menu will allow you to preview the pattern by playing it one time. Calling a pattern
normally using the keyboard will play the pattern continuously until interrupted by a button press or joystick movement.
When playing a pattern, you will see a count timer in the lower center of the screen which will count upwards until the
first progress number reaches the second recording limit number.
POSITION: 000.0, 000.0
<FAR
ON >
<NEAR EXIT>
PATTERN RECORD
Set / Back=
Start Record=
PATTERN MENU
< NEAR / RIGHT
RECORD >
NUMBER : 04
TITLE :
RECORD
PLAY
SAVE CLR BACK EXIT
Move Camera=
Zoom=
▶
123.4 012.3WEST LOT
BLDG. 1 PTZ
PAT1
[02/65]
PATTERN MENU
< NEAR / RIGHT
PLAY >
NUMBER : 04
TITLE :
RECORD
PLAY
SAVE CLR BACK EXIT
Enter=
Move Cursor=
Pattern Count Timer
▶

16
MOTION MENU
AREA
Setting an Area will display a defined name between two programmed pan positions in order to better identify an area
of surveillance. A maximum of 16 areas can be configured.
Area
1. Choose a Area Number 1~16 to setup.
2. Choose a name for the Area.
Select Character=
or
Delete Character=
or
Move Cursor=
Enter/Back=
AREA MENU
< NEAR / RIGHT
AREA TITLE >
NUMBER : 06
TITLE :
DIRECTION : NONE
S PAN POS.
E PAN POS.
SAVE CLR BACK EXIT
AREA TITLE EDIT: <06>
< DELETE
WIDE
< STORE
TELE
BACK
NEAR >
MOVE
JOYSTICK >
TITLE :
0 1 2 3 4 5 6 7 8 9 (
) A B C D E F G H I J K
L M N O P Q R S T U V W
X Y Z . / , + - = < >
MAIN MENU
< NEAR / RIGHT
▷ MOTION >
MOTION
▶
DOME
CAMERA
CLEAR
PTZ RESET
FACTORY SET
EXIT
MOTION MENU
< NEAR / RIGHT
▷
AREA >
PRESET
TOUR
GROUP
SCAN
PATTERN
ALARM
AREA
▶
PRIVACY
HOME POS
BACK EXIT
Enter=
Move Cursor=
<EXIT FOCUS NEAR>
AREA SELECT: 06
01 02 03 04 05
A06
07 08 09 10 11 12
13 14 15 16
Enter/Back=
Move Cursor=
“A” before number
indicates area number
has been programmed.
Currently selected digit
Up/Down= change digit
List of all area numbers
AREA MENU
< NEAR / RIGHT
AREA NO >
NUMBER : 06
TITLE :
DIRECTION : NONE
S PAN POS.
E PAN POS.
SAVE CLR BACK EXIT

17
5. Select a Start (S Pan Pos.), and End (E Pan Pos.) pan position to set the display direction for the area. Clockwise
and Counter-Clockwise area segments are oriented as if you are looking from the top of the PTZ. Set the appropriate
direction to have the area label appear in the desired horizontal portion of the surveillance area.
MOTION MENU
AREA
Clockwise (From top of PTZ)
A
R
E
A
L
A
B
E
L
S
H
O
W
N
H
E
R
E
Start Pan Position
End Pan Position
Counter-Clockwise
(From top of PTZ)
A
R
E
A
L
A
B
E
L
S
H
O
W
N
H
E
R
E
Start Pan Position
End Pan Position
AREA END PAN POSITION
< EXIT
FOCUS NEAR >
POSITION : 000. 0 000. 0
Move Camera=
4. Save or Clear the Area settings and exit.
SAVE- Saves the area settings
CLR- Clear the settings for the current area
BACK- Go back to the previous menu
EXIT- Exit the menu
Enter=
Enter/Back=
Move Cursor=
AREA MENU
< MOVE & NEAR / JOYSTICK >
SAVE CLR BACK EXIT
NUMBER : 06
TITLE :
DIRECTION : NONE
S PAN POS.
E PAN POS.
AREA START PAN POSITION
< EXIT
FOCUS NEAR >
POSITION : 000. 0 000. 0
Move Camera=
Enter/Back=
▶
AREA MENU
< MOVE & NEAR / JOYSTICK >
SAVE CLR BACK EXIT
NUMBER : 06
TITLE :
DIRECTION : NONE
S PAN POS.
E PAN POS.
▶
AREA MENU
< MOVE & NEAR
AREA>
VE CLR BACK EXIT
NUMBER : 06
TITLE :
DIRECTION : NONE
S PAN POS.
E PAN POS.
SAVE

18
ALARM SELECT: 02
< EXIT ▷ FOCUS NEAR >
01
A02
MOTION MENU
ALARM
Programming an alarm will move the camera to a preset position when an external alarm is triggered. Refer to the PTZ
installation instructions for more information on wiring an alarm. Number of alarms will vary based on PTZ model.
Alarm
1. Choose a Alarm Number to setup.
Enter/Back=
Move Cursor=
2. Choose a name for the Alarm.
Select Character=
or
Delete Character=
or
Move Cursor=
Enter/Back=
“A” before number
indicates alarm number
has been programmed.
Currently selected digit
Up/Down= change digit
List of all alarm numbers
ALARM MENU
< NEAR / RIGHT
ALARM NO >
NUMBER : 02
TITLE :
PRESET NUM : NONE
SAVE CLR BACK EXIT
ALARM MENU
< NEAR / RIGHT
ALARM TITLE >
NUMBER : 02
TITLE :
PRESET NUM : NONE
SAVE CLR BACK EXIT
ALARM TITLE EDIT: <002>
< DELETE WIDE
< STORE
TELE
BACK NEAR >
MOVE JOYSTICK >
TITLE :
0 1 2 3 4 5 6 7 8 9 (
) A B C D E F G H I J K
L M N O P Q R S T U V W
X Y Z . / , + - = < >
MAIN MENU
< NEAR / RIGHT
▷ MOTION >
MOTION
▶
DOME
CAMERA
CLEAR
PTZ RESET
FACTORY SET
EXIT
MOTION MENU
< NEAR / RIGHT
▷
ALARM >
PRESET
TOUR
GROUP
SCAN
PATTERN
ALARM ▶
AREA
PRIVACY
HOME POS
BACK EXIT
Enter=
Move Cursor=

19
MOTION MENU
ALARM
3. Choose preset position for the camera to go to when alarm is triggered.
4. Save or Clear the Alarm settings and exit.
SAVE- Saves the alarm settings
CLR- Clear the settings for the current alarm
BACK- Go back to the previous menu
EXIT- Exit the menu
Enter=
ALARM MENU
< NEAR / RIGHT & ALARM >
SAVE CLR BACK EXIT
NUMBER : 02
TITLE : WEST LOT
PRESET NUM : 006
PRESET SELECT: 006
001 002 003 004 005 P006
007 008 009 010 011 012
013 014 015 016 017 018
019 020 021 022 023 024
025 026 027 028 029 P030
031 032 033 034 035 036
037 038 039 040 041 042
043 044 045 046 047 048
049 050 051 052 053 054
<EXIT
FOCUS NEAR>
ALARM MENU
< NEAR / RIGHT
SELECT PRESET >
NUMBER : 02
TITLE :
PRESET NUM : NONE
SAVE CLR BACK EXIT
Select/Back=
Move Cursor=
“P” before number indicates
preset number has been programmed & is available to select.
You must select a preset number
which has been programmed
already.
Currently selected Preset digit
Up/Down= change digit
Left/Right= change digit position
List of preset numbers
Move Cursor=

20
MOTION MENU
PRIVACY
A privacy mask is a block of color that appears over a defined area to prevent the camera from viewing. A maximum of 8
privacy masks can be configured.
Privacy
1. Choose a Privacy Mask number to setup.
2. Set the Privacy Mask position. The Privacy Mask will appear at the center of the screen. Move the camera with the
joystick until the mask is positioned over the area to conceal. To adjust the mask size to cover a smaller area, press the
“close” button. To make the mask larger, press the “open” button.
PRIVACY SELECT: 05
< EXIT ▷ FOCUS NEAR>
01 02 03 04 R05
06 07 08
Enter/Back=
Move Cursor=
“R” before number
indicates privacy mask
number has been
programmed.
Currently selected digit
Up/Down= change digit
List of privacy mask
numbers
PRIVACY MENU
< NEAR / RIGHT PRIVACY NUM >
NUMBER : 05
MASK SET ▷
SAVE CLR BACK EXIT
MAIN MENU
< NEAR / RIGHT ▷ MOTION >
MOTION
▶
DOME
CAMERA
CLEAR
PTZ RESET
FACTORY SET
EXIT
MOTION MENU
< NEAR / RIGHT ▷ PRIVACY >
PRESET
TOUR
GROUP
SCAN
PATTERN
ALARM
AREA
PRIVACY ▶
HOME POS
BACK EXIT
Enter=
Move Cursor=
Zoom=
or
Move Camera=
Enter/Back=
PRIVACY MENU
< NEAR / RIGHT MASK SET >
NUMBER : 05
MASK SET ▷
SAVE CLR BACK EXIT
PRIVACY MASK SET
< EXIT FOCUS NEAR >
MASK SIZE : <OPEN / CLOSE>
POSITION : 000. 0 000. 0
Shrink Mask=
Enlarge Mask=

21
3. Save or Clear the Privacy settings and exit.
SAVE- Saves the privacy settings
CLR- Clear the settings for the current privacy mask
BACK- Go back to the previous menu
EXIT- Exit the menu
Enter=
MOTION MENU
PRIVACY
PRIVACY MENU
< NEAR / RIGHT
PRIVACY >
SAVE CLR BACK EXIT
NUMBER : 05
MASK SET ▷
Move Cursor=

22
MOTION MENU
HOME POSITION
If a camera loses power, or reboots, the camera will return to the home position. If a home position is not defined, the
camera will return to the last position that the in which it was pointed.
Home Position
1. Turn Home Position On/O.
2. Set the Home Position location.
Back=
Move Cursor=
HOME POS MENU
< NEAR / RIGHT & ON/OFF >
ON/OFF : OFF
POSITION SET ▷
SAVE CLR BACK EXIT
3. Save or Clear the Home Position settings and exit.
SAVE- Saves the home position settings
CLR- Clear the settings for the current home position
BACK- Go back to the previous menu
EXIT- Exit the menu
Enter=
Move Cursor=
HOME POS MENU
< NEAR / RIGHT POSITION SET >
ON/OFF : OFF
POSITION SET ▷
SAVE CLR BACK EXIT
MAIN MENU
< NEAR / RIGHT ▷ MOTION >
MOTION
▶
DOME
CAMERA
CLEAR
PTZ RESET
FACTORY SET
EXIT
MOTION MENU
< NEAR / RIGHT ▷ HOME POS >
PRESET
TOUR
GROUP
SCAN
PATTERN
ALARM
AREA
PRIVACY
HOME POS ▶
BACK EXIT
Enter=
Move Cursor=
KEYBOARD
SHORTCUT
Go to Home Position: 255 +
To test the Programming:
HOME POSITION
< EXIT FOCUS NEAR >
POSITION : 000. 0 000. 0
Zoom=
or
Move Camera=
Back=
HOME POS MENU
< NEAR / RIGHT POSITION SET >
ON/OFF : OFF
POSITION SET
SAVE CLR BACK EXIT
▶

23
DOME MENU
TITLE , SPEED by ZOOM
Set the display name for the PTZ camera. This name will appear in the lower left corner of the On-Screen Display.
Title
Dome Menu
In the Dome menu, you can adjust the mechanical features and OSD settings.
With this setting turned ON, the pan and tilt movement speeds will adjust according to the zoom level for a more natural
and accurate operation. Turning this setting OFF will enable pan and tilt movements at full speed, regardless of zoom
level.
Speed by Zoom
DOME MENU
TITLE :
SPECIAL
TEMPERATURE
PARK MODE
OSD ON/OFF
SPEED BY ZOOM : ON
ZERO POS
DOME RESET
SAVE BACK EXIT
< NEAR / RIGHT FUCTION >
Enter=
Move Cursor=
DOME MENU
TITLE
:
SPECIAL
TEMPERATURE
PARK MODE
OSD ON/OFF
SPEED BY ZOOM : ON
ZERO POS
DOME RESET
SAVE BACK EXIT
< NEAR / RIGHT TITLE SET >
TITLE :
0 1 2 3 4 5 6 7 8 9 (
) A B C D E F G H I J K
L M N O P Q R S T U V W
X Y Z . / , + - = < >
Select Character=
or
Delete Character=
or
Move Cursor=
Enter/Back=
MAIN MENU
< NEAR / RIGHT ▷ DOME >
MOTION
DOME
CAMERA
CLEAR
PTZ RESET
FACTORY SET
EXIT
Enter=
Move Cursor=
▶

24
ALARM SCAN ACTION ZOOM
DOME MENU
OSD ON/OFF
Customize the type of labels that are shown on the On Screen Display. O indicates OSD selection is ON, X indicates
selection is OFF.
OSD ON / OFF
TITLE: Turn camera name ON/OFF.
ZOOM: Turn zoom level indicator ON/OFF.
PRESET: Turn preset name ON/OFF.
TOUR: Turn tour name ON/OFF.
GROUP: Turn group name ON/OFF.
SCAN: Turn scan name ON/OFF.
PATTERN: Turn pattern name ON/OFF.
PRIVACY: Turn privacy mask ON/OFF.
AREA: Turn area name ON/OFF.
ALARM: Turn alarm name ON/OFF.
POSITION: Turn position name ON/OFF.
ACTION: Turn action indicator such as heater/fan
label ON/OFF.
DOME MENU
TITLE :
SPECIAL
TEMPERATURE
PARK MODE
OSD ON/OFF
SPEED BY ZOOM : ON
ZERO POS
DOME RESET
SAVE BACK EXIT
< NEAR / RIGHT FUCTION >
< ON TELE BACK NEAR>
< OFF
WIDE EXIT FAR >
CLEAR MENU
TITLE <X>
ZOOM X
PRESET X
TOUR X
GROUP X
PATTERN X
SCAN X
PRIVACY X
AREA X
ALARM X
POSITION X
ACTION X
Select Function= or Deselect Function= or
Move Cursor=
Back= Exit=
x001
123.4 012.3WEST LOTBLDG. 1 PTZ
TR1
PRESET 001
SCN1GRP1
ALM1
PAT1
H/F ON
On-Screen Label Overview
TOUR PATTERN
GROUP
PRESET
PRIVACY
TITLE AREA POSITION

25
DOME MENU
PARK, TEMPERATURE
Park Mode is a programmed action that will take place if the camera remains idle for a defined time period. This action
can be moving to a preset, or calling a tour, group, scan or pattern.
Park Mode
ON/OFF: Turn Park Mode ON/OFF.
TIME: Duration before Park Mode will start. 10 Sec, 30 Sec, 1 Min, 5 Min, 10 Min, 20 Min, 30 Min, 40 Min, 50 Min, 1 Hour.
MOTION: Action to occur after time duration. Select from Preset, Tour, Group, Scan, or Pattern.
NUMBER: Select the programmed number for the selected motion type.
Check the current internal temperature (in Celsius) of the camera. Define the temperature at which the internal heater
and fan will turn on, and duration the heater will remain on. This function is available on outdoor PTZ models only.
Temperature
HEATE R ON: Temperature at which the internal heater will turn on. 0~70°C.
ON TIME: Duration heater will remain on before cycling o. 10~60 Min. If internal temperature doesn’t reach the set
Heater O temperature within the set On Time, the heater will restart the On Time until temp is reached.
HEATE R OFF: Temperature at which the internal heater will turn o. 0~70°C.
FAN ON: Temperature at which the internal fan will turn on. 0~70°C.
FAN OFF: Temperature at which the internal heater will turn o. 0~70°C.
Enter=
Move Cursor=
< NEAR / RIGHT ON TEMP >
BACK
TEMP. MENU
HEATER ON
ON TIME
HEATER OFF
FAN ON
FAN OFF
: 5 C
: 30 MIN
: 15C
: 50 C
: 40 C
CURRENT
TEMPER: 039.9
DOME MENU
TITLE :
SPECIAL
TEMPERATURE
PARK MODE
OSD ON/OFF
SPEED BY ZOOM : ON
ZERO POS
DOME RESET
SAVE BACK EXIT
< NEAR / RIGHT SUB MENU >
▶
Enter=
Move Cursor=
PARK MENU
ON/OFF : ON
NUMBER : -----
MOTION : ------
TIME : -----
BACK
< NEAR / RIGHT & ONOFF>
DOME MENU
TITLE :
SPECIAL
TEMPERATURE
PARK MODE
OSD ON/OFF
SPEED BY ZOOM : ON
ZERO POS
DOME RESET
SAVE BACK EXIT
< NEAR / RIGHT SUB MENU >
▶

26
Change video output, user interface, and dome operation options within the Special menu.
Special
Enter=
Move Cursor=
HDSDI FORMAT: Select HD Resolution. 1080p30, 1080p60, 720p30, 720p60. NOTE: Switching to 1080p60 will result in
video loss if the attached device (DVR/monitor) does not support 60FPS.
TILT LIMIT: Select the angle at which PTZ tilt will stop. NOT AVAILABLE ON ALL PTZ models.
POWER UP: With this function on, the camera will remember the last program action (such as tour, scan, etc.) and if a
power loss occurs the camera will continue the last action upon power up.
FLIP TYPE/AUTO FLIP: With flip set to on, the camera will automatically pan the camera 180° when tilt has reached
its maximum limit of 90°. This provides for a more natural operation. Some models have a “D FLIP” option, where the
camera image will flip digitally rather than mechanically.
SCROLL TYPE: This function relates to how the joystick operates within the menus. With this function set to Step, each
joystick movement will advance the cursor one time. Setting this to Auto will allow the user to hold down the joystick to
advance the cursor to the next selection.
RESPONSE: Set to on for the Tx communication line to transfer unique protocol response values. This function sets
whether or not to output Response Packet for Action Packet when using Clinton, Pelco-D V5, or EZP protocols.
P-FREEZE: Preset Freeze relates to movement between preset points (either calling individual presets, or running a
tour). When set to on, the screen image will cycle through preset points, without showing camera movement between
these points. Screen image will be temporarily frozen while the camera moves to the next preset point.
DOME MENU
TITLE :
SPECIAL
▶
TEMPERATURE
PARK MODE
OSD ON/OFF
SPEED BY ZOOM : ON
ZERO POS
DOME RESET
SAVE BACK EXIT
< NEAR / RIGHT SUB MENU >
DOME MENU
SPECIAL
SPECIAL MENU
HDSDI FORMAT
TILT LIMIT
POWER UP
AUTO FLIP
SCROLL TYPE
RESPONSE
P-FREEZE
: 1080p30
: OFF
: OFF
: OFF
: STEP
: OFF
: OFF
BACK
< NEAR / RIGHT FORMAT CHG >

27
DOME MENU
ZERO POS, DOME RESET
With this function you can set the horizontal (pan) zero position to one of your choice. Vertical (Tilt) zero position will not
be eected.
Zero Pos
Enter=
Move Cursor=
DOME MENU
TITLE :
SPECIAL
TEMPERATURE
PARK MODE
OSD ON/OFF
SPEED BY ZOOM : ON
ZERO POS
DOME RESET
SAVE BACK EXIT
< NEAR / RIGHT ZERO POS >
ZERO POS MENU
ON/OFF
POSITION SET
: OFF
▷
SAVE BACK EXIT
< NEAR / RIGHT ZERO POS >
In Position Set: Move Camera=
Select Yes under this function to reset all settings in the “Dome Menu” only to factory defaults.
Dome Reset
Enter=
Move Cursor=
DOME MENU
TITLE :
SPECIAL
TEMPERATURE
PARK MODE
OSD ON/OFF
SPEED BY ZOOM : ON
ZERO POS
DOME RESET
SAVE BACK EXIT
< NEAR / RIGHT DOME INIT >
▶

28
DOME MENU
EXTERNAL IR SET
IR SYNC MODE: Select the IR LED activation mode.
ALS SYNC- Auto Light Source Sync will allow the camera to automatically detect the amount of incoming light and
activate the IR LEDs accordingly.
ICR SYNC- Infrared Cutfilter Removal Sync turns IR LEDs on/o according to the illuminance input to the camera lens
without changing the illuminance measurement by the CDS sensor.
ALL OFF- With this mode, IR LEDs are always o.
ALL ON- With this mode, IR LEDs are always on.
IR ILLUMINATE: Select the illumination level for the IR LEDs. Select from Highest, High, Low, Lowest.
ICR CHG LUX: Set the incoming light lux level at which the camera will change from day to night mode. Adjustable from
0.5~10 Lux. For Night-to-Day switching +5 lux will be added.
IR CONT. TYPE: Function to allow IR LEDs to be adjusted in conjunction with the zoom level of the camera. Auto is the
default setting and will adjust the LEDs automatically when the camera zooms. Setting to USER mode in conjunction with
setting the Focus mode within the Camera Menu to MANUAL will allow the IR adjustment to be controlled when manually
using tele / wide controls.
IR OFFSET: IR sensitivity adjustable from -4~+4.
External IR Set
Modify the settings of Infrared (IR) Lights. NOTE: With some PTZ models it may be necessary to select the next page of
the Dome Menu settings to see this option.
Enter=
Move Cursor=
EXT IR SETTING
IR SYNC MODE: ALS SYNC
IR ILLUMINATE: HIGHEST
ICR CHG LUX: 2 LUX
IR CONT. TYPE: AUTO
IR OFFSET: 0
BACK
< NEAR / RIGHT SYNC SET >
DOME MENU
WIPER SETTING
EXTERNAL IR SET ▶
BACK
< NEAR / RIGHT DOME INIT >
DOME MENU
TITLE :
SPECIAL
TEMPERATURE
PARK MODE
OSD ON/OFF
SPEED BY ZOOM : ON
ZERO POS
DOME RESET
NEXT SAVE BACK EXIT
< NEAR / RIGHT DOME INIT >
This function only applies to PTZ models equipped with IR LEDs
NOTE:

29
DOME MENU
WIPER
Set the operation of the lens wiper. NOTE: With some PTZ models it may be necessary to select the next page of the
Dome Menu settings to see this option.
Wiper Setting
WIPER MODE: Select the lens wiper operation mode.
ON MODE- Wiper will activate continuously every 5 seconds until turned o.
OFF MODE- Wiper is always o.
TIME SET- Use in combination with “Wiper Time” menu option to set the frequency at which the wiper will activate.
WIPER POS.: Set the resting position for the wiper (Bottom, or Right side of the lens). Not available on all PTZ models.
WIPER TIME: When Wiper Mode is set to “Time Set”, choose the frequency at which the wiper will activate. Selectable
from 1 Min~1 Hour.
WIPER SETTING
WIPER MODE
WIPER POS.
WIPER TIME
: ON MODE
: BOTTOM
: XXXXX
BACK
< NEAR / RIGHT TILT LIMIT >
Enter=
Move Cursor=
DOME MENU
WIPER SETTING
▶
EXTERNAL IR SET
BACK
< NEAR / RIGHT DOME INIT >
DOME MENU
TITLE :
SPECIAL
TEMPERATURE
PARK MODE
OSD ON/OFF
SPEED BY ZOOM : ON
ZERO POS
DOME RESET
NEXT SAVE BACK EXIT
< NEAR / RIGHT DOME INIT >
KEYBOARD
SHORTCUT
Turn Wiper on / o: 244 + (HOLD 3 SEC.)
Using the “Turn Wiper on/o” (244) keyboard shortcut
will override TIME SET wiper mode if it has been setup.
NOTICE
Turn Wiper Time Set mode (10 min.) on / o: 243 + (HOLD 3 SEC.)
This function only applies to PTZ models equipped with a wiper
NOTE:

30
CAMERA MENU
ZOOM
Zoom Mode
Set zoom speed and options for the PTZ.
ZOOM SPD: Select the speed at which the camera can zoom in/out. Select speed from 0~7, or User mode, which allows
the joystick to recognize various levels of user input and will zoom the camera accordingly.
D-ZOOM: Turn on/o the digital zoom function. Digital zoom level is dependent on PTZ camera model.
Camera Menu
In the Camera menu, you can define camera operation settings.
ZOOM MENU
ZOOM SPD : USER
D-ZOOM : OFF
BACK
NEAR / RIGHT D-ZOOM
Enter=
Move Cursor=
CAMERA MENU
ZOOM MODE
FOCUS MODE
WHITE BAL.
AUTO EXP.
WDR MODE
SPECIAL
STABILIZER
CAMERA RESET
SAVE BACK EXIT
NEAR / RIGHT ZOOM MODE
MAIN MENU
< NEAR / RIGHT ▷ DOME >
MOTION
DOME
CAMERA
CLEAR
PTZ RESET
FACTORY SET
EXIT
▶

31
Focus Mode
Set focus speed and options for the PTZ.
FOCUS SPD: Select the speed at which the camera can focus. Select speed from 0~7, or User mode, allows the joystick
to recognize various levels of user input and will focus the camera accordingly.
FOCUS MODE: Select from various ways in which the camera will focus on a scene.
AUTO- The camera adjusts the focus automatically while monitoring the screen continuously.
MANUAL- Manually set the focus with the keyboard controls.
ONEPUSH- Camera will focus only one time after the camera’s zoom, pan, or tilt is adjusted.
INFINITY- Allows you to focus on a subject at a long distance within the camera’s allowable range.
NE AR LIMIT: Set the closest point at which the camera should try to focus.
AF MODE: Set the function of the auto focus. Focus Mode must be set to AUTO in order to access these options.
NORMAL- Auto focus reacts as a scene change is detected.
INTERVAL- Auto focus is performed once every 255 seconds.
White Balance Mode
Set white balance mode and levels.
WB MODE: Set the white balance mode. Select from Auto, Indoor, Outdoor, OnePushAWB, or Manual.
RED GAIN: Set the red levels in the screen image. Only selectable when WB Mode is set to Manual. Select from 0~20.
BLUE GAIN: Set the blue levels in the screen image. Only selectable when WB Mode is set to Manual. Select from 0~20.
CAMERA MENU
FOCUS, WHITE BALANCE
Enter=
Move Cursor=
CAMERA MENU
ZOOM MODE
FOCUS MODE
WHITE BAL.
AUTO EXP.
WDR MODE
SPECIAL
STABILIZER
CAMERA RESET
SAVE BACK EXIT
NEAR / RIGHT FOCUS MODE
FOCUS MENU
FOCUS SPD : USER
FOCUS MODE : AUTO
NEAR LIMIT : 1M
AF MODE : NORMAL
BACK
NEAR / RIGHT FOCUS SPD
Enter=
Move Cursor=
CAMERA MENU
ZOOM MODE
FOCUS MODE
WHITE BAL.
AUTO EXP.
WDR MODE
SPECIAL
STABILIZER
CAMERA RESET
SAVE BACK EXIT
NEAR / RIGHT
WHITE BAL.
WHITE BALANCE MODE
WB MODE : AUTO
RED GAIN : XXX
BLUE GAIN : XXX
BACK
NEAR / RIGHT WB MODE SEL

32
Auto Exposure
Auto Exposure settings allow you to configure the concentration of light used to produce an image. You can configure a
custom exposure or let the camera determine the exposure automatically.
Enter=
Move Cursor=
AE MODE: Select the desired Auto Exposure mode.
AUTO- Exposure settings are determined automatically.
MANUAL- Requires you to manually configure the settings for gain, iris, and shutter to achieve proper exposure.
SHUTTER- Configure shutter settings only. All other settings are determined automatically.
IRIS- Configure iris settings only. All other settings are determined automatically.
BRIGHT- Configure Brightness settings only. All other settings are determined automatically.
EXPOSURE: Configure the concentration of light used to produce an image exposure. Select from 0~20. The AE MODE
must be set to SHUTTER, AUTO or IRIS to configure the iris setting.
AGC LEVEL: Setting the Auto Gain Control Level allows you to artificially create a brighter (high gain) or darker (low
gain) image. AE Mode must be set to Manual to select a numerical value. All other AE Modes will only allow on/o
selection. Select from ON/OFF, or from 1~10.
SHUTTER: Setting the shutter speed determines how long the camera shutter remains open when capturing an image.
AE Mode must be set to Manual or Shutter to change this setting. Select from 1/8 ~ 1/30,000.
IRIS LEVEL: Setting the iris manually determines how much light comes through the lens. The AE MODE must be set to
MANUAL or IRIS to configure the iris setting.
BRIGHT LEVEL: Setting the brightness manually determines how much light comes through the lens. The AE MODE
must be set to BRIGHT to configure the iris setting.
DSS LEVEL: Setting the Digital Slow Shutter manually allows to adjust the amount of light being allowed to hit the
sensor - for example, setting DSS to 2x is equivalent to two times the amount of “normal” light. Select from 2x~8x, or
OFF. The AE MODE must be set to AUTO or IRIS to configure this setting.
CAMERA MENU
AUTO EXPOSURE
NOTE:
When AE MODE is set to AUTO or IRIS, analog video output is disabled.
CAMERA MENU
ZOOM MODE
FOCUS MODE
WHITE BAL.
AUTO EXP.
WDR MODE
SPECIAL
STABILIZER
CAMERA RESET
SAVE BACK EXIT
NEAR / RIGHT
AUTO EXP.
AUTO EXPO. MENU
AE MODE : AUTO
EXPOSURE : AUTO
AGC LEVEL : OFF
SHUTTER : AUTO
IRIS LEVEL : AUTO
BRIGHT LEVEL : ON
SLOW SHUTTER : 1.5dB
DSS LEVEL : XX
BACK
NEAR / RIGHT AE MODE SEL

33
WDR MODE MENU
WDR MODE : AUTO
WDR GAIN : 07
ACE MODE : OFF
BACK
NEAR / RIGHT WDR MODE
CAMERA MENU
ZOOM MODE
FOCUS MODE
WHITE BAL.
AUTO EXP.
WDR MODE
SPECIAL
STABILIZER
CAMERA RESET
SAVE BACK EXIT
NEAR / RIGHT
WDR MODE
WDR Mode
Wide Dynamic Range Mode is used to correct the harsh contrast between bright and dark areas of the camera image.
Enter=
Move Cursor=
WDR MODE: Turn Wide Dynamic Range On/OFF or Auto.
WDR LEVEL: Configure the concentration of light used to produce an image exposure. Select from 0~4. The WDR MODE
must be set to ON to configure this setting.
ACE MODE: Adaptive Contrast Enhancer is capable of improving contrast, while preserving fine details and avoiding
common artifacts, gradient reversals or loss of local contrast. The WDR MODE must be set to ON to configure this
setting. Note, The DEFOG setting withing the SPECIAL menu will be disabled when ACE MODE is on.
CAMERA MENU
WDR
NOTE:
When WDR MODE is set to ON, analog video output is disabled.

34
SPECIAL MENU
SPECIAL SUB
APERTUREGAIN : 05
BACK LIGHT : OFF
DNR LEVEL : AUTO
DEFOG : OFF
FLICKERLESS : OFF
PRESET FREEZE : OFF
BACK
NEAR / RIGHT SUB MENU
Special
Configure other special settings.
SPECIAL SUB: Select the desired Auto Exposure mode.
ICR MODE- Infrared Cutfilter Removal mode applies beneficial settings to the selected mode. With DAY selected,
the IR cut filter is on when the camera is operating as a color camera in order to filter out IR light from the sun
which results in more precise color reproduction. With NIGHT selected, the filter is removed which allows for more
IR light from the IR LEDs to enter the lens for much greater light sensitivity in monochrome mode. Auto will apply
best settings when switching from day to night modes.
ICR LEVEL- Requires you to manually configure the settings for gain, iris, and shutter to achieve proper exposure.
BLC X POS- Set the X (horizontal) starting point to apply Backlight control. NOTE: BLC must be set to ON in
the SPECIAL MENU to modify this setting.
BLC Y POS- Set the Y (vertical) starting point to apply Backlight control. NOTE: BLC must be set to ON in the
SPECIAL MENU to modify this setting.
BLC X SIZE- Set the X (horizontal) size of the Backlight control area. NOTE: BLC must be set to ON in the SPECIAL
MENU to modify this setting.
BLC Y SIZE- Set the Y (vertical) size of the Backlight control area. NOTE: BLC must be set to ON in the SPECIAL
MENU to modify this setting.
APERTUREGAIN: Emphasize the boundary of the subject to make it appear more sharp. Level is adjustable from 0~10.
BACK LIGHT: In images where a bright light source is located behind the subject, the subject would normally appear
in silhouette. BLC allows the camera to adjust the exposure of the entire image to properly expose the subject in the
foreground. In the Camera Menu, the WDR MODE must be set to OFF in order to select BackLight.
DNR LEVEL: Select the level of Digital Noise Reduction to use in low light. Higher levels indicate a higher reduction of
noise.
DEFOG: Clear up a foggy image digitally by turning this function on. NOTE: ACE MODE within the CAMERA MENU’s
WDR MODE menu must be turned O in order to enable this setting.
FLICKERLESS: Compensate for a flickering image. Not available on all PTZ models.
SHARPNESS: Set the sharpness of the image. Not available on all PTZ models.
PRESET FREEZE: Preset Freeze relates to movement between preset points (either calling individual presets,
or running a tour). When set to on, the screen image will cycle through preset points, without showing camera
movement between these points. Screen image will be temporarily frozen while the camera moves to the next preset
point. Setting may be located in DOME / SPECIAL MENU on some PTZ models.
PRIVACY COLOR: Change the privacy mask color. Select from White, Red, Green, Blue, Cyan, Yellow, Magenta, Black,
or Gray. Not available on all PTZ models.
CAMERA MENU
ZOOM MODE
FOCUS MODE
WHITE BAL.
AUTO EXP.
WDR MODE
SPECIAL
STABILIZER
CAMERA RESET
SAVE BACK EXIT
NEAR / RIGHT SPECIAL
Enter=
Move Cursor=
CAMERA MENU
SPECIAL

35
Stabilizer
This function electronically compensates for an unstable camera image due to areas that are exposed to wind or
vibration.
MODE: Turn Stabilizer Mode On/OFF.
RANGE: Range is eectively a level of image stabilization. The percent range refers to the amount of viewable area
that will be consumed from the perimeter to enable image stabilization. The larger the percentage, the greater eect
image stabilizer will have.
FI LT E R : Select the filter strength level of Digital Image Stabilization. For example: if a large moving object is on the
screen, it may be recognized as a shaking screen, and an error may occur with the image stabilization. The lower the
filter strength, the better the stabilization, but also will result in higher probability of error occurring.
AUTO C: Function which determines whether or not to move the digital zoom area to the center of the full screen
which is actually being shown. Selecting OFF will keep the position even if Digital Zoom is pointing in one direction.
Full moves the screen image to the center of the screen. Half moves the screen image toward the center only to a
certain degree of margin.
STABILIZER MENU
MODE : OFF
RANGE : - - - FILTER : - - - AUTO C : - - - -
BACK
NEAR / RIGHT STABILIZER
CAMERA MENU
ZOOM MODE
FOCUS MODE
WHITE BAL.
AUTO EXP.
WDR MODE
SPECIAL
STABILIZER
CAMERA RESET
SAVE BACK EXIT
NEAR / RIGHT STABILIZER
Enter=
Move Cursor=
CAMERA MENU
STABILIZER, CAMERA RESET
NOTE:
When Stabilizer is set to ON, some eective pixels on the edge of the CCD are
used by the stabilization function. This will result in a reduction in resolution and
a narrower angle of view.
Image stabilization may not function where there is excessive camera movement or
when the scene has low light or low contrast objects.
CAMERA MENU
ZOOM MODE
FOCUS MODE
WHITE BAL.
AUTO EXP.
WDR MODE
SPECIAL
STABILIZER
CAMERA RESET
SAVE BACK EXIT
NEAR / RIGHT CAM RESET
Camera Reset
Restore factory settings to the camera menu.
Enter=
Move Cursor=

36
Clear
Choose to clear data for specific functions. Press the Tele button to clear the data of the highlighted function. The icon
will change from X to O when selected.
PTZ Reset
Reboots the PTZ.
Move Cursor=
Back=
Factory Set
Restore factory settings to the PTZ.
Move Cursor=
Back=
MAIN MENU
< NEAR / RIGHT ▷ CLEAR>
MOTION
DOME
CAMERA
CLEAR
PTZ RESET
FACTORY SET YES <NO>
EXIT
MAIN MENU
< NEAR / RIGHT ▷ CLEAR>
MOTION
DOME
CAMERA
CLEAR
PTZ RESET YES <NO>
FACTORY SET
EXIT
MAIN MENU
CLEAR, FACTORY SET, PTZ RESET
Select Function=
or
Deselect Function=
or
Move Cursor=
Back=
Exit=
MAIN MENU
< NEAR / RIGHT ▷ CLEAR>
MOTION
DOME
CAMERA
CLEAR
PTZ RESET
FACTORY SET
EXIT
▶
< ON TELE BACK NEAR>
< OFF
WIDE EXIT FAR >
CLEAR MENU
PRESET <X>
TOUR X
GROUP
SCAN X
PATTERN X
ALARM X
AREA
PRIVACY X
HOME POS. X
ZERO POS. X
MOTION ALL X
X

37
KEYBOARD
KEYBOARD SHORTCUTS
Keyboard Shortcut Guide
The Preset number range (1~254) is a general range of presets. Some features have factory preset numbers that are not available to set as a preset. Numbers not available
to set as a preset are: 71~78, 81~88, 91~94, 101~106, 240~245, 248, 252, 255.
FUNCTION BUTTON PRESS
ICR AUTO (ON) 240 +
ICR DAY (ON) 241 +
ICR NIGHT (ON) 242 +
WIPER- 10 MIN. TIME SET MODE (ON/OFF TOGGLE) 243 +
WIPER (ON/OFF) 244 +
HEATER (ON/OFF) 245 +
IR ZOOM (AUTO/MANUAL TOGGLE) 248 +
IR LEDs (ON/OFF) 252 +
DISPLAY INFO 255 +
SET PRESET* 1~254 +
GO TO PRESET* 1~254 +
GO TO HOME POSITION 255 +
SET TOUR
1~8 +
71~78 +
GO TO TOUR
1~8 +
71~78 +
SET GROUP 101~106 +
GO TO GROUP 101~106 +
SET SCAN
1~8 +
81~88 +
GO TO SCAN
1~8 +
81~88 +
SET PATTERN
1~4 +
91~94 +
GO TO PATTERN
1~4 +
91~94 +
(HOLD 3 SEC.)
(HOLD 3 SEC.)
(HOLD 3 SEC.)
(HOLD 3 SEC.)
(HOLD 3 SEC.)
(HOLD 3 SEC.)
(HOLD 3 SEC.)
(HOLD 3 SEC.)

Actual product may vary slightly from the images shown in this manual.
Clinton reserves the right, without notification, to make changes in product design & specification.
ver: 05.17.17
Clinton Electronics
6701 Clinton Road
Loves Park, IL 61111
Technical Support:
1-800-549-6393
Monday~Friday 8am~5pm (Central Standard Time)
www.clintonelectronics.com
PTZ User Manual
CE-PTZ10XHD
CE-PTZ10XHD-RM
CE-PTZ20XHDR
CE-PTZ30XHD-IN
CE-PTZ30XHDR
CE-PTZ30XHDRS
 Loading...