

Page 1
Quick Reference Guide for CE-20DVRPVM-HD & CE-8DVRPVM-HD
DVR CONTROLS
Reference the “Mini DVR Module” User Manual for full list of controls
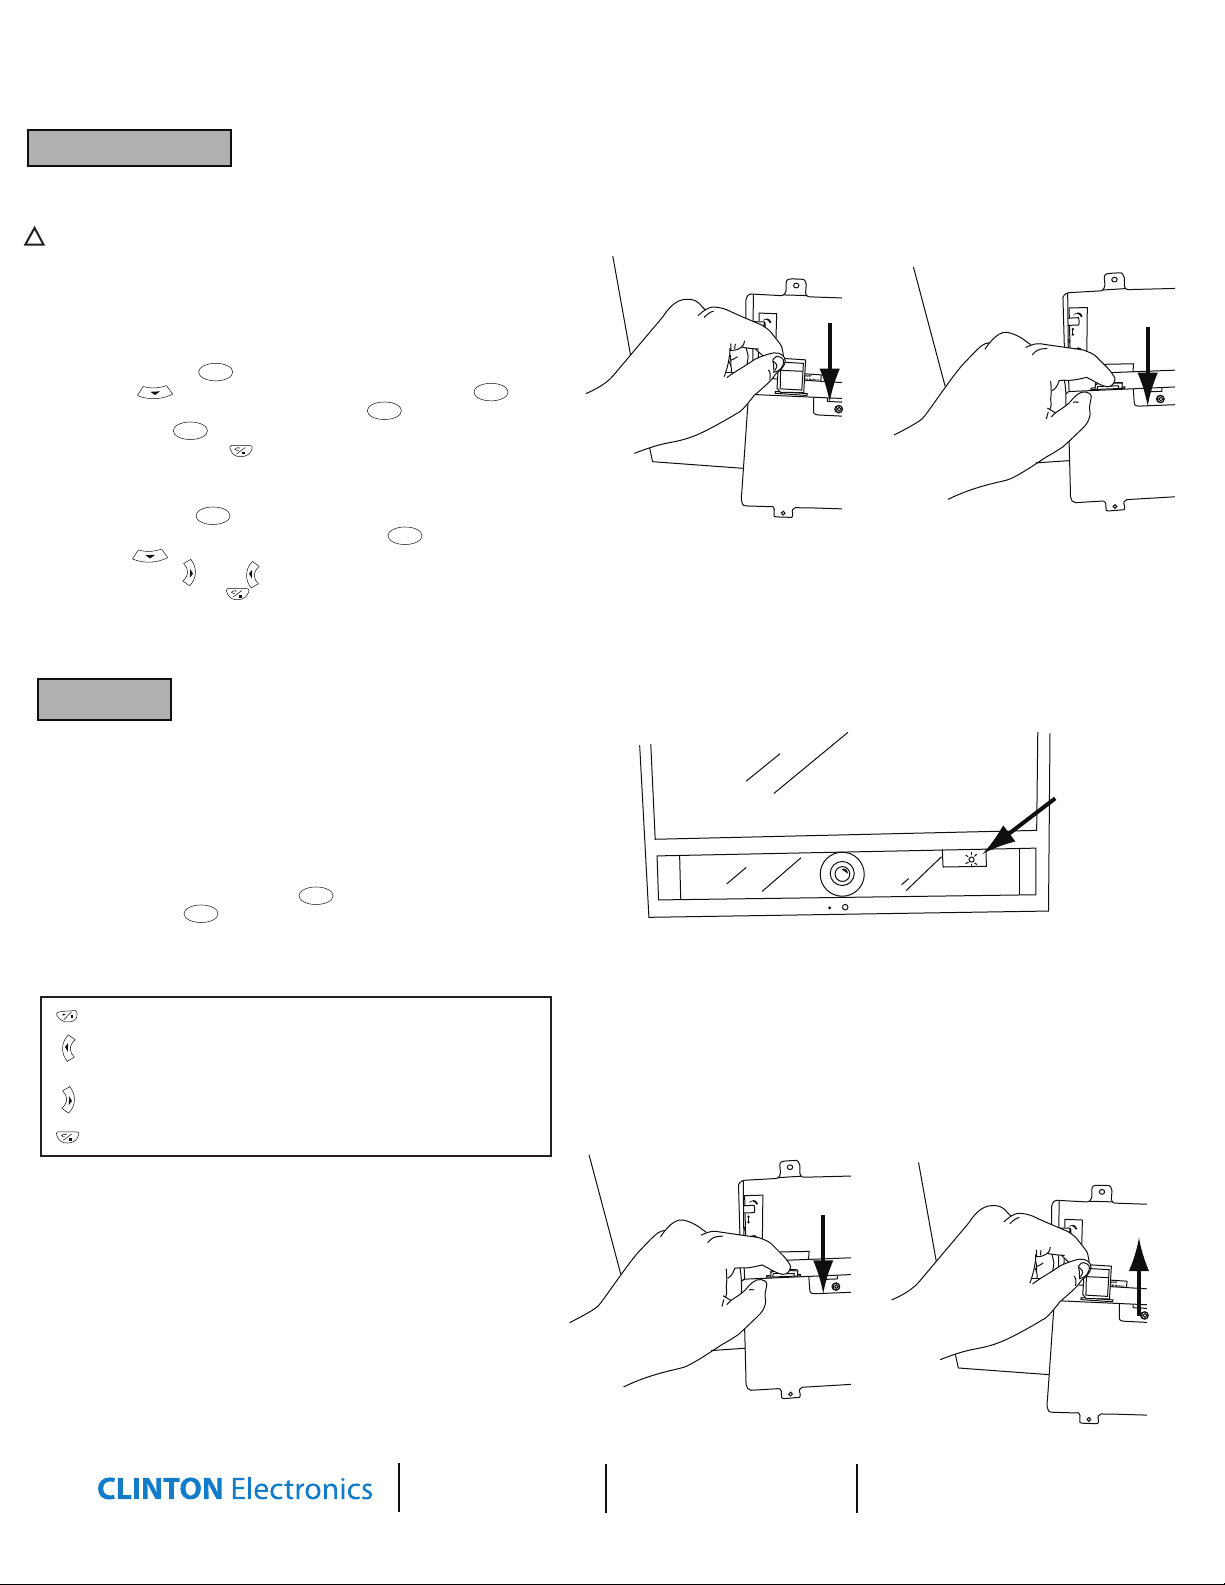
1. FORMATTING THE SD CARD
!
NOTE: The SD Card Must be formatted the rst time it is used in order to
be used in this device. Formatting the card will erase all data on the card.
To access the DVR screen press “TV” on the long remote until “AV2”
shows up in the upper left corner of the screen. When your nished with
setup, press “TV” again until “AV1“ shows up in the upper left corner of the screen.
Using the small remote:
• Press the “MENU/OK” button.
• Scroll down to “SD Card Options”, and press “MENU/OK” to enter.
• Scroll down to “Format”, and press “MENU/OK” to enter.
• Press “MENU/OK” once more to format the SD Card.
MENU/OK
MENU/OK
MENU/OK
MENU/OK
• Press the “RETURN/STOP” button to exit the menu.
2. SET DATE/TIME/DST
Using the small remote:
• Press the “MENU/OK” button.
• Scroll down to “Date/Time”, and press “MENU/OK” to enter.
MENU/OK
MENU/OK
• Scroll down to the selection you would like to change,
and press the right or left arrows to change your selection.
• Press the “RETURN/STOP” button to exit the menu, thus saving the new settings.
Inserting the SD Card
Dwell time
Insert
+
SD Card
16 GB
Dwell time
_
+
ON
Sensor
OFF
Sensitivity
Push to seed
D MEMORY
VE - CIF Memory
PLAYBACK
You can tell the PVR/DVM is recording by taking a quick glance at the LED
behind the tinted window on the front of the unit (see drawing on right for
location). When the DVR’s SD Card has been inserted and it is recording, this
LED will be a solid green. If the LED is off, an SD Card is not present, and the
unit is not recording.
1. TO VIEW RECORDED FOOTAGE ON THE UNIT
• On the long remote, press the “TV” button until you reach input “AV2”.
• On small remote press “MENU/OK” .
• Press “MENU/OK” again to enter the “Search and Play” menu.
MENU/OK
• With the arrow buttons select the desired date and le segment.
• Press “MENU/OK” to enter playback.
• Now you have the ability to use all playback features described below.
press once to playback, press again to pause.
press to fast rewind (when paused, press to step back one frame),
press play to return to normal speed playback.
press to fast forward (when paused, press to step forward one frame),
press play to return to normal speed playback.
press to stop playback, and return to previous menu.
2. TO VIEW RECORDED FOOTAGE ON YOU COMPUTER
• Push down on the SD Card to eject the card.
• Pull the card out and insert into your computer or SD Card reader.
• On your computer, select the SD Card folder and search through the
segmented les to nd your desired clip.
• Open the clip in Windows Media Player to view.
*NOTE: The last le on the SD Card may be corrupted due to pulling it
from the unit. This 3MB le will not affect the desired recording as it
is only the last few seconds before the SD Card was pulled.
*NOTE: The DVR uses an SDHC Card. You must have a computer or card
reader capable of reading an SDHC Card to view les on your computer.
MENU/OK
Removing the SD Card
Dwell time
_
Push to eject
+
ON
Sensor
OFF
Sensitivity
D MEMORY
VE - CIF Memory
LED location
Solid Green= Rec.
Off= Not Rec.
Dwell time
Pull out
+
SD Card
16 GB
CLINTON Electronics
6701 Clinton Road
Loves Park, IL 61111
1.800.447.3306 Sales
1.800.549.6396 Support
1.800.633.8712 Fax
www.clintonelectronics.com
v.01.20.10
Page 2
Quick Reference Guide for CE-20DVRPVM-HD & CE-8DVRPVM-HD
The DVR is set from the factory to record on motion. These settings have been pre-loaded and should not be changed.
The only required changes are formatting the SD card, setting the local time, and if daylight savings time (DST) is recognized in your area.
LCD CONTROLS
1. TURN THE FRONT LED FLASHING ON/OFF
Using the long remote:
• Press the “MENU” button.
• Scroll down to enter the “Feature Controls” menu.
• Press right to enter the feature selection.
• Press down until you reach the “LED Control”.
•Press right to switch the led to “OFF”.
• Press “MENU” to exit the menu, thus saving the new settings.
2. TURN THE BOTTOM SCREEN MESSAGE ON/OFF/SOLID
Using the long remote:
• Press the “MENU” button.
• Scroll down to enter the “Feature Controls” menu.
• Press right to enter the feature selection.
• Press down until you reach the “Message Control”.
•Press right to enter the message Control Settings.
•Press right to turn the message ON or OFF.
• Press down to select “Message”.
• Press right to change the message from
“RECORDING IN PROGRESS” to “WELCOME”.
• Press down to select “Flash”.
•Press right to a switch from a Flashing to a Steady-on message.
• Press “MENU” to exit the menu, thus saving the new settings.
MENU
CH PG
VOL
+
CH PG
VOL
+
MENU
MENU
CH PG
VOL
+
CH PG
VOL
+
VOL
+
CH PG
VOL
+
CH PG
VOL
+
MENU
PIR SENSOR CONTROLS
The PIR sensor (pinhole located front center on unit) controls the screen
switching of the ash card player to the built-in camera. It also controls
the audio. Be sure to keep the small hole open at all times and free of dust.
It does not control the DVR motion recording, the RECORDING IN PROGRESS
text on the screen, or the front LED.
1. CHANGE THE DURATION OF CAMERA IMAGE ON SCREEN
• Increase (turn clockwise) the “Dwell Time” dial to allow the
LCD to display the camera image longer on the screen.
• Decrease (turn counter-clockwise) the “Dwell Time” dial to
allow the LCD to display to cycle back to the pre-loaded JPEG image
on the SD Card more frequently.
2. TURN OFF THE STATIC JPEG- SD CARD IMAGE
Switching the “Sensor” switch to “OFF” disables the PIR Sensor, which
disables the JPEG image from appearing on the screen.
3. CHANGE THE SENSITIVITY OF THE MOTION SENSOR
• Turning the “Sensitivity” dial clockwise Increases the sensitivity.
• Turning the “Sensitivity” dial counter-clockwise Decreases the sensitivity.
4. TURN OFF THE MOTION AUDIO
Switching the “Chime” switch to “OFF” disables the audio that is
initiated by the motion sensor.
Dwell time
_
ON
Sensor
OFF
Sensitivity
_
ON
Chime
OFF
+
+
CHANGE JPEG IMAGE
3. CHANGE THE PRE-LOADED “WARNING” JPEG IMAGE:
• Insert the SD-Card into your computer or SD Card reader.
• Move your desired JPEG image onto the SD Card folder.
• Delete the original “WARNING” JPEG image.
• Leaving more than one JPEG image on the SD Card will result
in the device cycling through all loaded images.
• Insert the SD-Card back into the CE-DVRPVM with the contacts
facing out, as shown in the image to the right - DO NOT FORCE IT IN.
• WHEN SD CARD IS INSERTED,YOU MUST POWER CYCLE THE UNIT.
You can do this by pushing the POWER button on the long remote,
or by unplugging the power cord from the wall.
• An SD Card MUST be inserted, or you will see a “Settings” Menu when
the device is powered on.
WHEN SD CARD IS INSERTED,
YOU MUST POWER CYCLE.
You can do this by pushing the POWER
button on the long remote,
or by unplugging the power cord from the wall.
On the CE-8DVRPVM-HD, the JPEG IMAGE SD Card slot
is located on the upper side of the access panel.
CLINTON Electronics
6701 Clinton Road
Loves Park, IL 61111
1.800.447.3306 Sales
1.800.549.6396 Support
1.800.633.8712 Fax
www.clintonelectronics.com
v.01.20.10
 Loading...