

Page 1
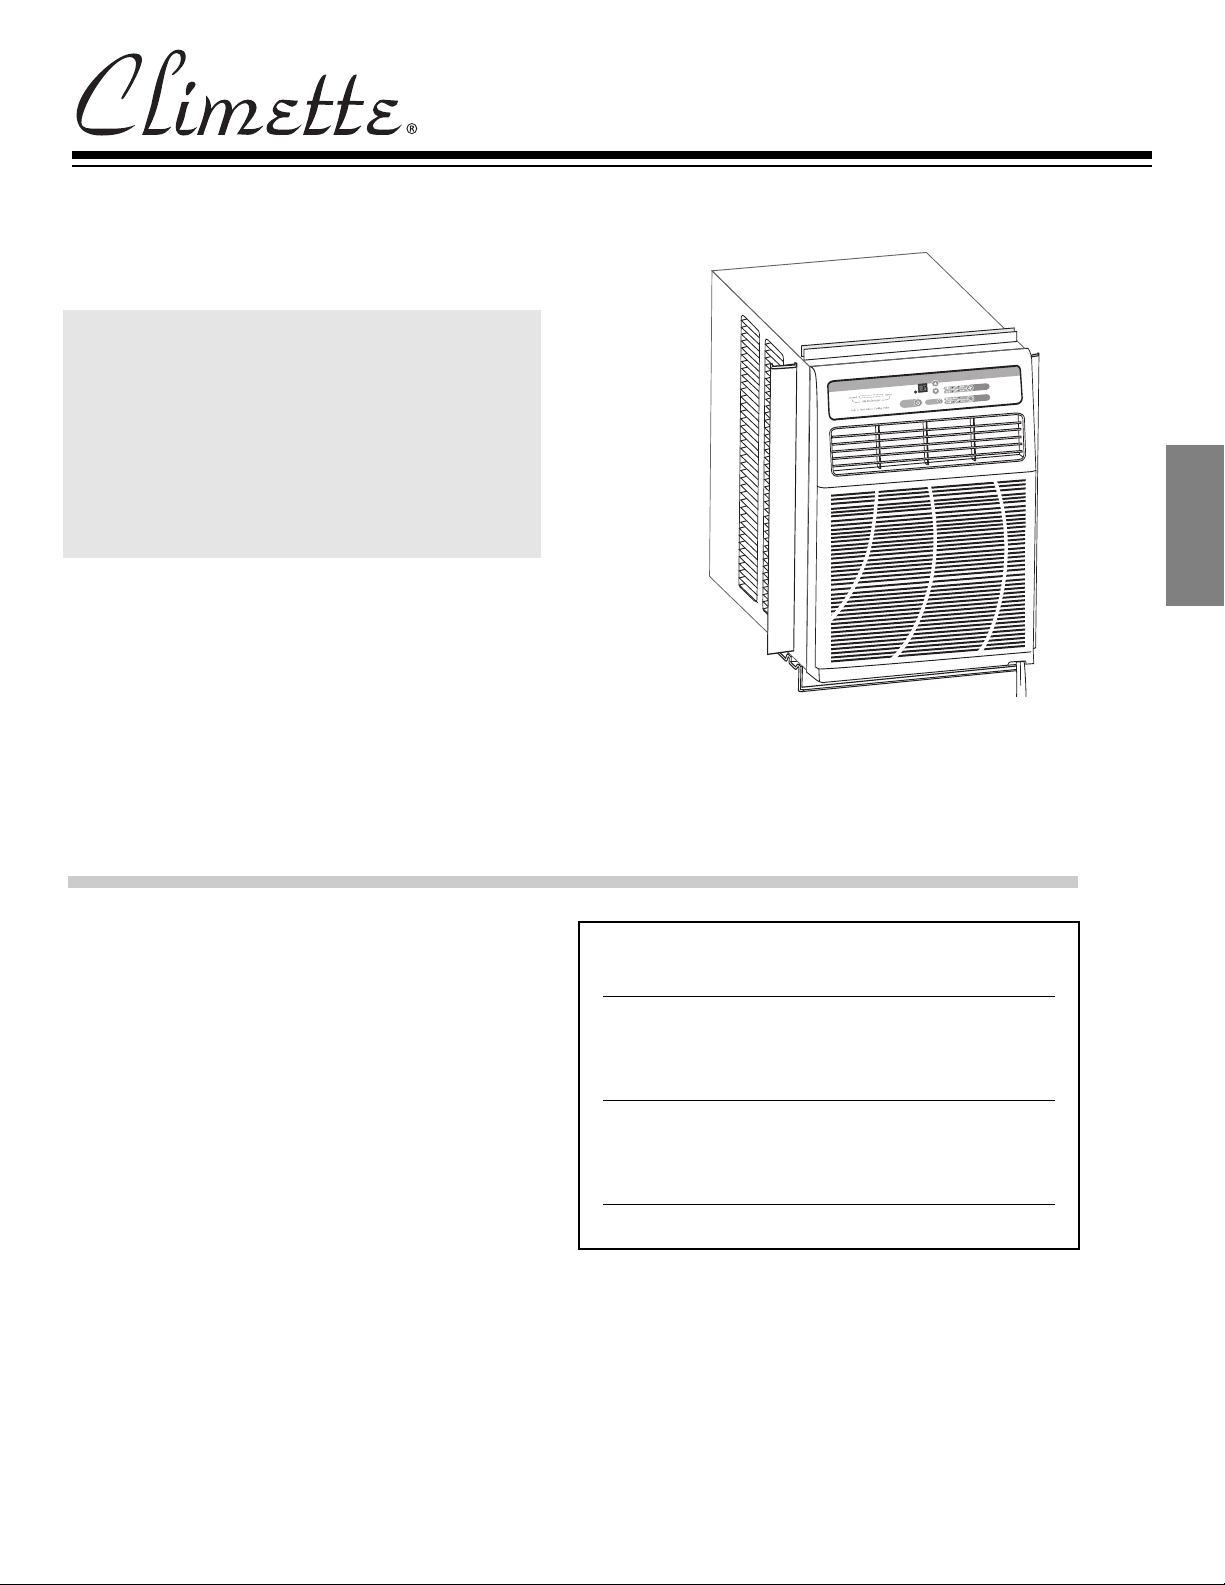
Installation and Operating Instructions
Room Air Conditioners for Slider &
Casement Windows
ENGLISH
Important Safety Instructions .............................. 2
Installation
Window installation .......................................... 4
Operation
Cleaning the air filter ........................................ 6
Electronic controls .............................................. 7
Service/Troubleshooting ........................................ 8
How to Obtain Warranty Service or Parts .......... 9
E
N
G
L
I
S
H
Keep these instructions for future reference
For Future Reference
Write down the model and serial numbers
The model and serial numbers can be found on the side of
the cabinet near the control panel. Use these numbers in
any correspondence or service calls concerning your air
conditioner
.
Model Number
Serial Number
Date of Purchase
Page 2
RECOGNIZE SAFETY SYMBOLS,
WORDS AND LABELS
What You Need To Know About
Safety Instructions
Warning and Important Safety Instructions appearing in
this manual are not meant to cover all possible
onditions and situations that may occur. Common
c
ense, caution and care must be exercised when
s
operating or cleaning tools and equipment.
Always contact your dealer, distributor, service agent or
manufacturer about problems or conditions you do not
understand.
This is the safety alert symbol. It is used to alert you
to potential personal injury hazards. Obey all safety
messages that follow this symbol to avoid possible
injury or death.
DANGER
DANGER indicates an imminently hazardous situation
which, if not avoided, will result in death or serious
injury.
WARNING
WARNING indicates a potentially hazardous situation
which, if not avoided, could result in death or serious
injury.
ANGER
D
Do not store or use gasoline or other flammable vapors
and liquids in the vicinity of this or any other appliance.
The fumes can create a fire hazard or explosion.
ANGER
D
Important Grounding Requirements
• Air conditioner has a three-prong grounding plug
on the power supply cord, which must be plugged
nto a properly grounded three-prong wall
i
receptacle for your protection against possible
hock hazard. For models up to and including 7.5
s
amperes, use a grounding type wall receptacle to
match the cord plug.
• For models above 7.5 amperes use a single outlet
grounding type wall receptacle to match the cord
plug.
Do not operate this air conditioner without proper
time delay circuit protection (circuit breaker or fuse).
Refer to serial plate for proper power supply
requirements.
Recommended Wire Sizes
(As installed per building code) :
PROTECTOR SIZEWIRE GAUGE
15 AMP #14 MINIMUM
20 AMP #12 MINIMUM
30 AMP #10 MINIMUM
125V
15A
250V
20A
250V
15A
250V
30A
CAUTION
CAUTION indicates an potentially hazardous situation
which, if not avoided, may result in minor or moderate
injury.
CAUTION
CAUTION used without the safety alert symbol
indicates a potentially hazardous situation which, if not
avoided, may result in property damage.
DANGER
Electrical Shock Hazard
• Plug unit only into a grounded electrical outlet.
• Do not use an extension cord or plug adapter with
this unit. Do not alter cord or plug end. Do not
remove warning label on cord.
• Do not operate unit with decorative front or filter
removed.
• If the air conditioner has a serial plate rating of 115
volts and greater than 7.5 amps, it must have its
own fuse or circuit breaker, and no other device or
unit should be operated on that fuse or circuit
breaker.
• If the air conditioner has a serial plate rating of 230
volts, it must have its own fuse or circuit breaker,
and no other device or unit should be operated on
that fuse or circuit breaker.
e recommend that a qualified electrician install
• W
unit in accordance with the National Electrical Code
and local codes and ordinances.
• Use copper conductors of correct wire gauge and
protector size only
.
2
Page 3
Power Cord with
Arc Detection Device
The power cord supplied with this air conditioner is
equipped with an Arc Detection Device designed to shut
ff power to the unit when it senses an arc fault condition.
o
An arc fault is an unintentional electrical discharge that
ccurs when electrical products or wires are damaged,
o
aged, or improperly used. An arc fault can be potentially
azardous if left undetected.
h
DANGER
• Do not remove or modify this plug
Do not use as an on/off switch
•
•
Do not use outdoors
Do not push furniture against or place furniture on the
•
electrical cord. This can trip the test switch and/or
damage the cord and become a potential condition
for arcing
Do not attempt to repair the cord. If the cord requires
•
replacement, call an authorized servicer.
• The Arc Detection Device is not a Ground Fault
Interrupter and should not be used as such
• The Arc Detection Device contains an electronic circuit
board and should not be submerged or exposed to
water spray
Resetting
If the Arc Detection Device has tripped, the reset
button will pop up.
Follow these steps to reset the Arc Detection Device:
1. Unplug unit from electrical outlet
2. Press the reset button
3. Plug the unit back into electrical outlet
4. Check to see if power has returned to the unit
Testing
You should test the Arc Detection Device equipped
power cord monthly, after every major electrical storm,
or if power to your Room Air Conditioner has been
interrupted.
Follow these steps to test the Arc Detection Device:
1. Unplug unit from electrical outlet
2. Press the reset button
3. Plug the unit back into electrical outlet
4. Press test button. Unit should trip and reset button will
pop up.
5. Press reset button again for use
ARNING
W
Use two or more people to move and install air
conditioner. Failure to do so can result in back or
other injury.
CAUTION
• Do not cut, alter or remove any of the expanded
polystyrene (styrofoam) inside this air conditioner.
o notintroduce objects in the air discharge area. This
•
D
ould cause permanent damage.
c
•
Do not pour liquids on the air conditioner as this could
cause a malfunction. With the unit unplugged, use a
damp cloth for cleaning the unit.
CAUTION
• Do not use strong solvents to clean the air conditioner.
• Clean the air conditioner filter every two weeks to
avoid overheating caused by air obstruction. Do not
operate without filter.
Do not obstruct the air intake area of your air
•
conditioner
activating the unit’s security switch and shutting off the
unit.
Do not block air circulation to outside louvers of
•
cabinet.
Do not block air flow inside with blinds, curtains, or
•
furniture, or outside with shrubs, enclosures, or other
buildings.
•
Do not run the air conditioner with an outside
protective cover in place. This could result in fire or
mechanical damage within the air conditioner.
• Carefully inspect the location where the air conditioner
will be installed. Be sure it will support the weight of
the unit over an extended period of time.
, as this could cause overheating, thus
E
N
G
L
I
S
H
If above test fails, stop using the air conditioner and
contact customer service by calling the following tollfree number:
1-866-629-8441
3
Page 4
WARRANTY
WINDOW INSTALLATON
INSTALLATION
Before you start:
X8 Filler Panels
X4 Support Bracket
X1 Cabinet Bottom Bar
X3 Filler panels to
sash
X2 Leveling Bolt
indow Requirements:
W
Your new room air conditioner is factory prepared for easy
installation in a horizontal sliding or casement type window with
minimum width of 15 1/2 inches. Unit will fit a 42 inch high
a
window opening as received from factory.
T
ools Needed
K
Screwdrivers
nife
D
Installation Parts Kit
Fastener Identification
A
B
C
E
Description Quantity
1” long wood screws 2
A
3/8” Self tapping screws 7
B
C
7/16” mach. screws/nuts 2
Leveling Bolt/ Nut 1
D
Speed Clips 2
E
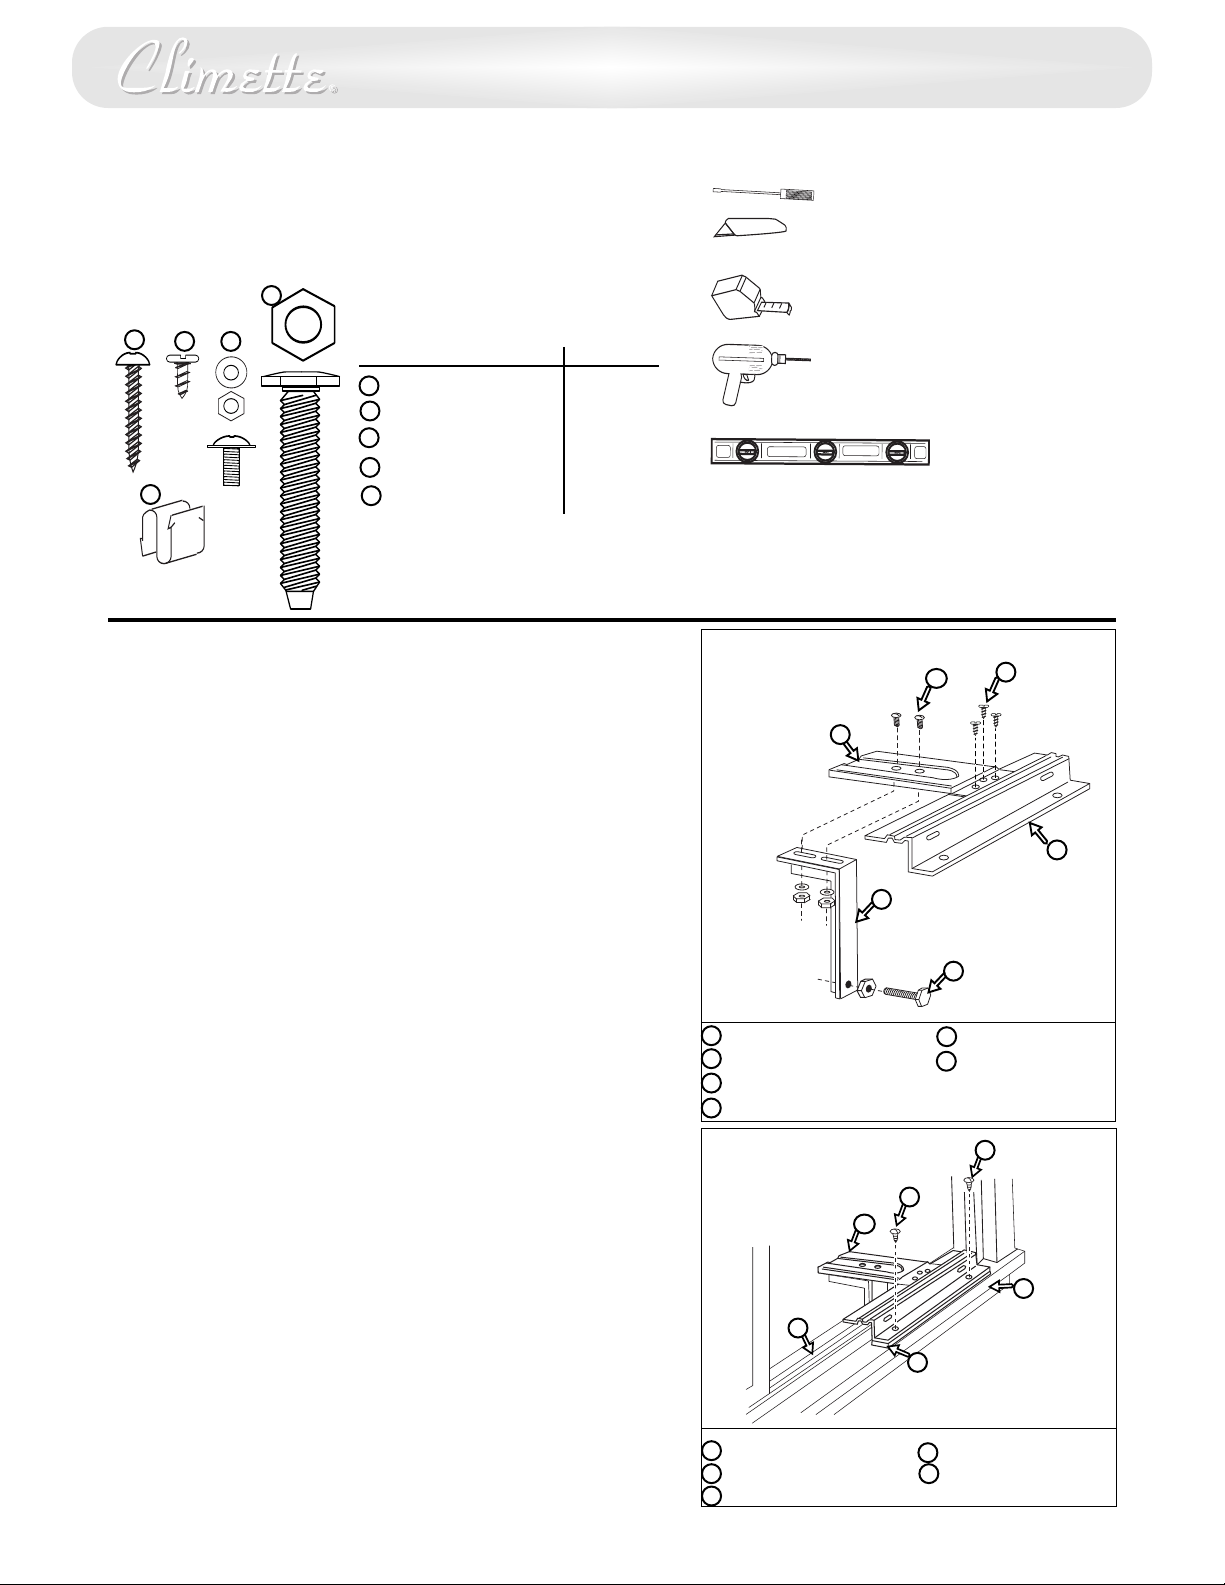
Sliding Window Installation
1. Choose the installation site. It is imperative that
window frame assembly and side of structure are
adequate to support weight of unit. Reinforce if
necessary.
2. Slide open one window sash to install support
platform.
3. Attach support platform to sill plate with three (3)
3/8” long self-tapping screws (Fig. 3).
4. Loosely attach support angle to bottom of support
platform using two (2) 7/16” long machine screws,
flat washers, and nuts.
5. Place support platform against lower window track
and firmly against vertical edge of window frame
(Fig. 4).
6. Attach support platform to window sill using two (2)
1” long self-tapping screws (Fig. 4).
If required, overcome interference of support
platform with window track or storm windows by
securely attaching a shim strip to the window sill.
Strip should be as long as width of support platform
and flush with back edge of sill. Thickness of strip
should be controlled by amount of interference.
Pull support angle against outside of structure.
7.
Tighten two (2) 7/16” long machine screws on top of
support platform (Fig. 3).
8. Adjust leveling bolt to position support angle in a
level plane. This will allow for proper angle. Tighten
leveling bolt locknut (Fig. 3).
Tape Measure
Drill
Carpenter’s Level
The installation is intended to be permanent, and when
installed in apartment or rental properties, permission to make
modifications should be obtained from owners or landlords of
buildings prior to installation of unit.
Fig. 3
A
Support Platform
B
7/16” mach. screws
C
3/8” Self tapping
screws
D
Fig. 4
SUPPORT PLATFORM ASSEMBLY
B
A
E
F
Sill plate
E
Support Angle
F
Leveling Bolt
A
A
B
C
C
D
D
E
A
1” long screws
Support Platform
B
Lower window track
C
4
Window Sill
D
Shim Strip
E
Page 5
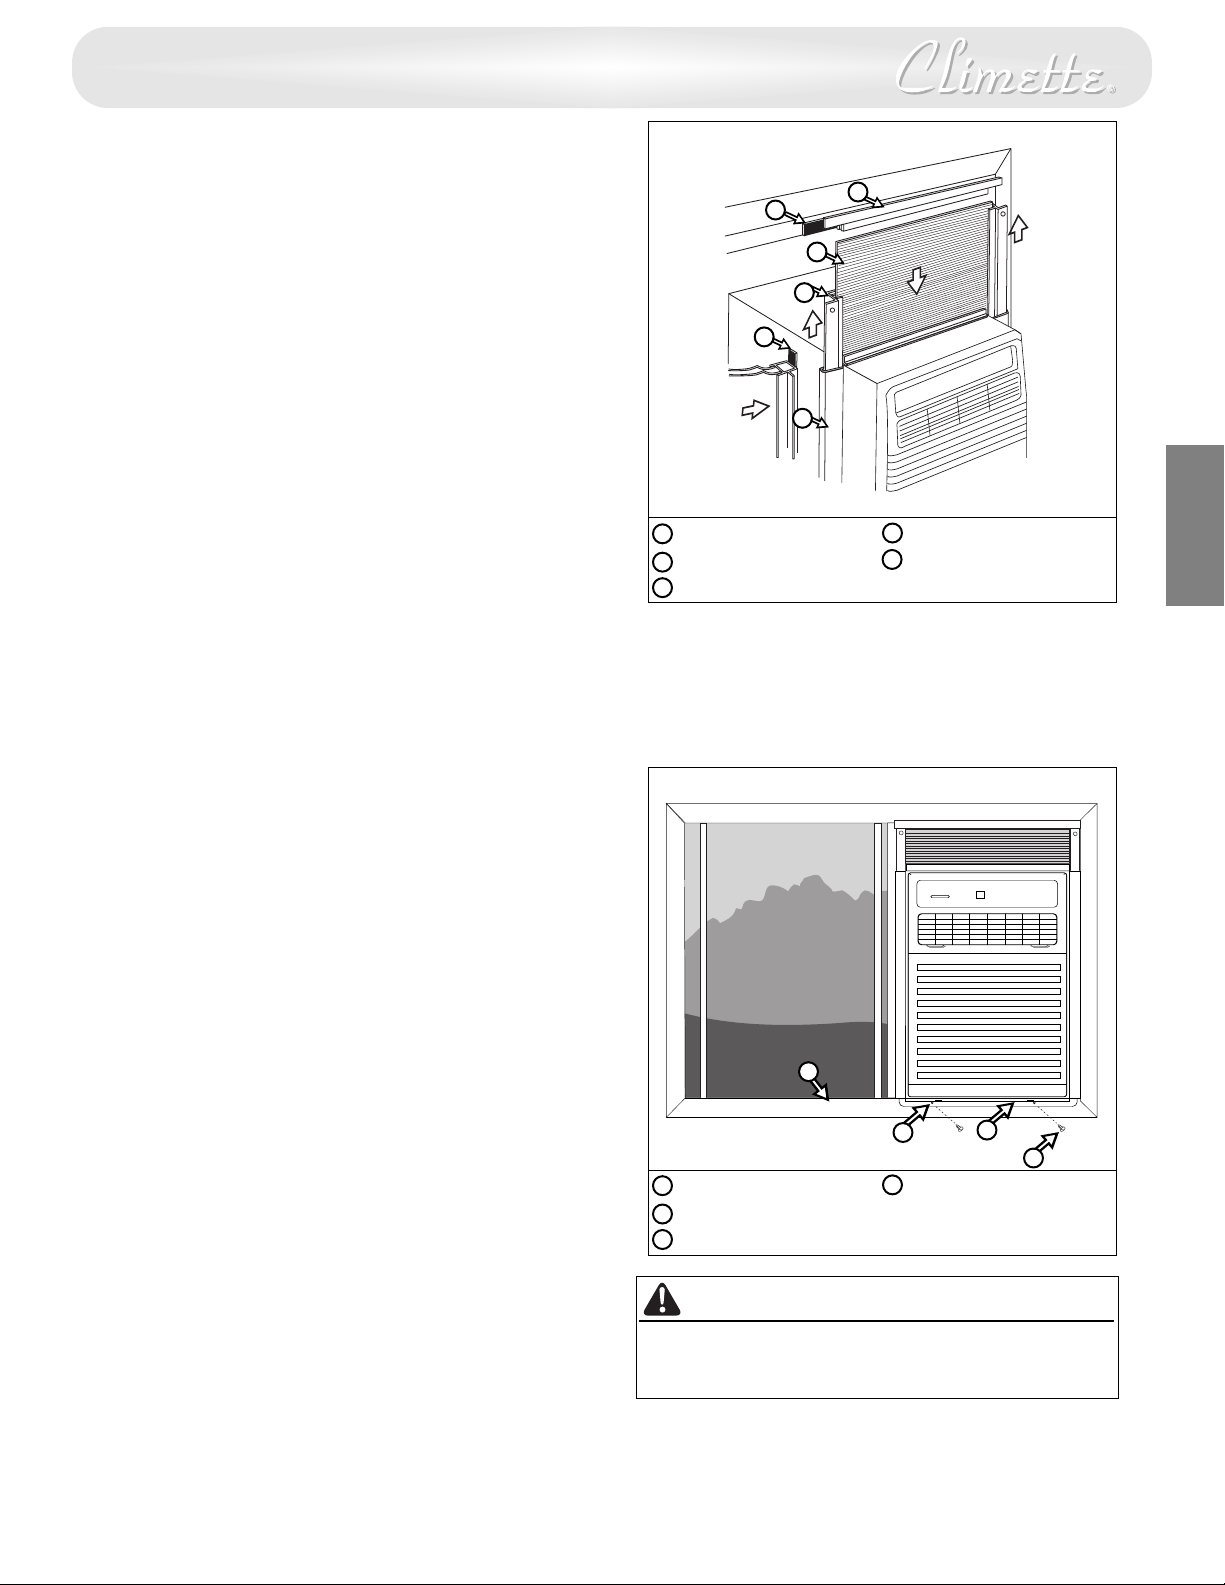
9. Cut two pieces of adhesive back foam seal to height
of window opening. Remove backing and apply to
window frame and sliding sash that will rest against
unit (Fig. 5).
0. Slide unit onto support platform. Be sure unit side
1
channel butts against vertical edge of window
frame.
Note: If unit side channel does not fit securely, remove unit and
eadjust leveling bolt.
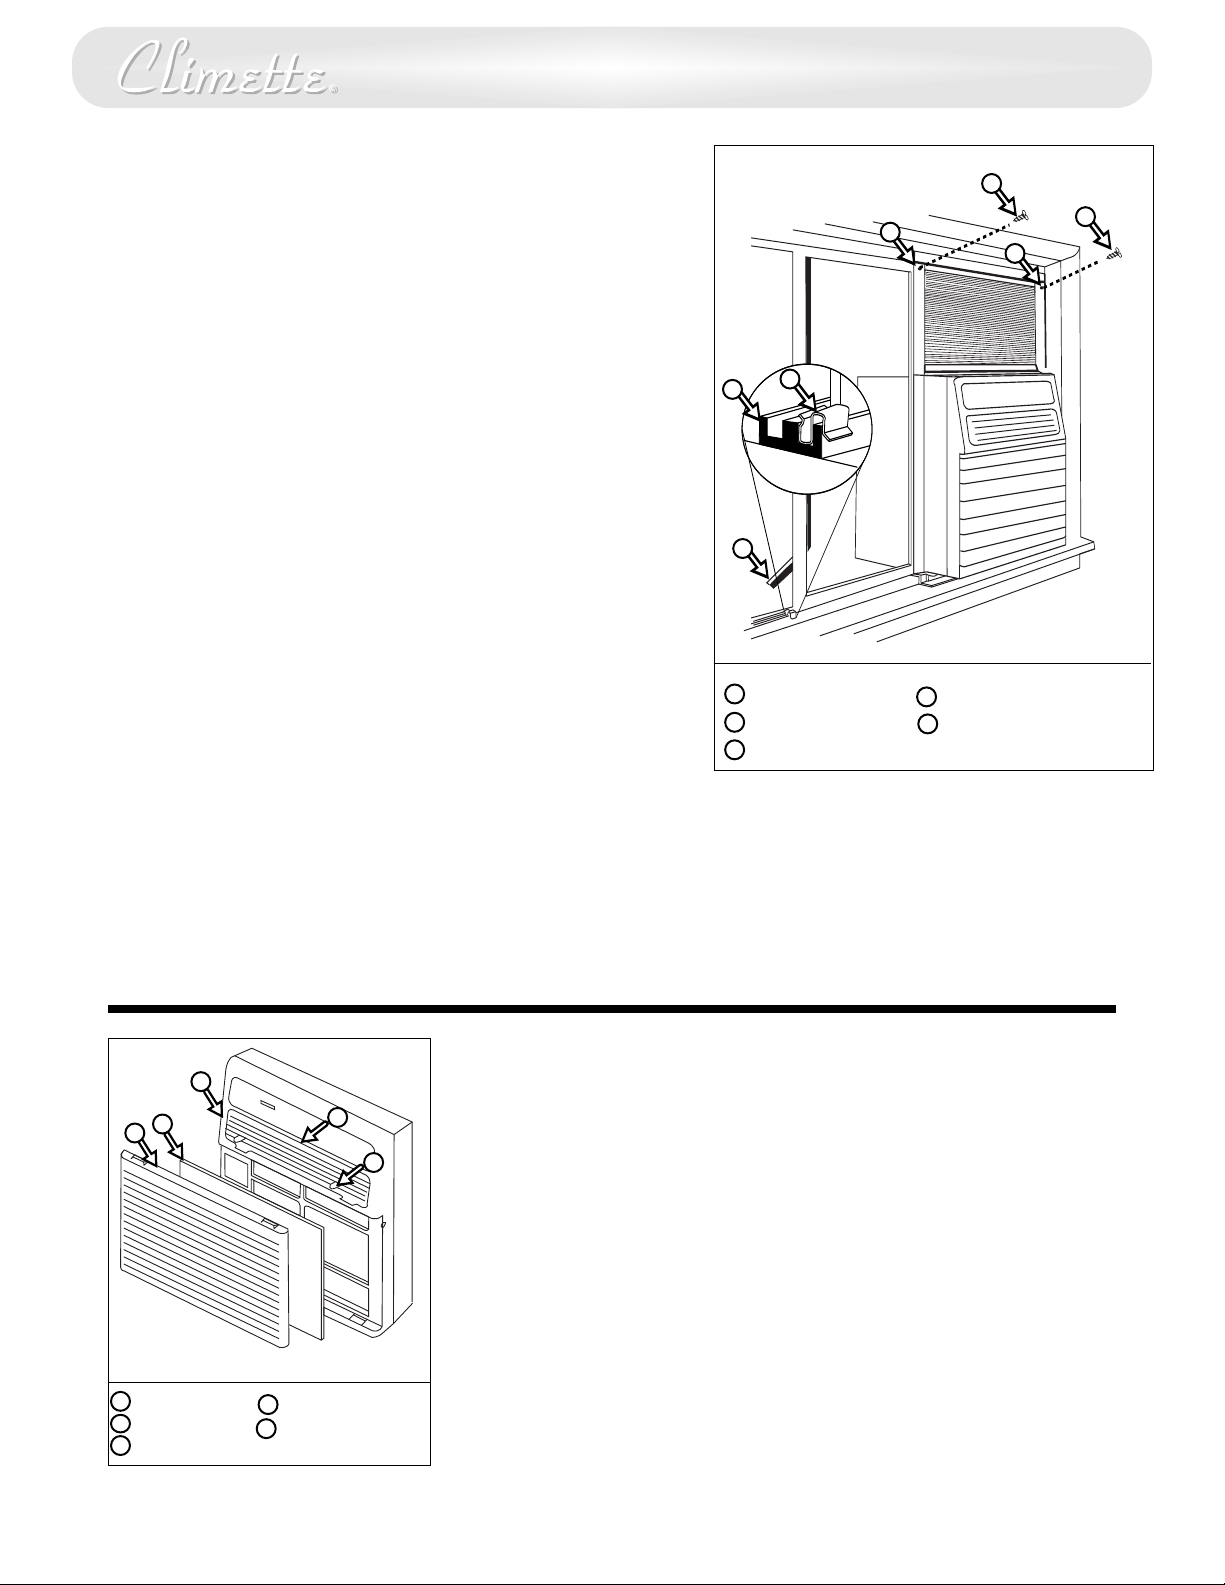
r
11. Drill two 1/8” holes through window channel frame
in alignment with existing holes in bottom bar.
nstall two (2) 3/8” long self-tapping screws through
I
these holes. If window channel frame is not tall
enough to use existing holes, drill (2) new holes off
to the side of the existing holes to attach the unit
bottom bar to the support platform. Unit should be
firmly anchored to window channel frame or
support platform (Fig. 6).
12. Slide inside window sash closed. Be sure vertical
edge of inside window sash is pressed firmly against
side of unit cabinet. Cut remaining adhesive back
foam seal to width of window opening. Remove
backing and apply to top inside edge of window
frame (Fig. 5).
13. Install speed clips on top and bottom inside edge of
window to provide locking (Fig. 7).
14. Using supplied plastic foam seal, cut to proper
length, insert between inside window sash and
outside window (Fig. 7).
15. Place top retainer on top edge of filler panel,
(Fig. 5) then place the bottom edge of filler panel
into groove of bottom retainer (mounted on unit).
Filler panel may be trimmed with knife or scissors to
fit window height.
16. Slide sliders upward making sure filler panel aligns
in sliders (Fig. 5).
17. With sliders up against top retainer, drill 1/8” hole
through window frame in alignment with existing
hole in slider. Install 3/8” long self-threading screw
in hole. Repeat for other slider (Fig. 6 & 7).
18. Check all seals and plug all air leaks around unit.
sealant to fill any minor openings.
Use
ig. 5
F
Foam Seal
A
Top Retainer
B
Filler Panel
C
Fig. 6
A
A
B
C
D
E
E
N
G
Sliders
D
Side Channel
E
L
I
S
H
A
C
D
Widow Channel Frame
A
Drilled Holes
B
Bottom Bar
C
B
3/8” long self tapping
D
screws
Caution
Do not drill a hole in the bottom pan. Unit is
designed to operate with approximately 1/2” of
water in bottom pan.
5
Page 6
WARRANTY
WINDOW INSTALLATON
INSTALLATION
Casement Window Installation
This air conditioner is designed to fit into most casement type
windows. As shipped from factory, unit will fit into a minimum
window opening
15 1/2” wide and 21” high. The preferred method of installation is
through a closed or stationary window. Installation in an open
window frame is also possible where open window can be secured
to outside of building or removed completely.
. Closed or Stationary Window: Install unit in stationary sash
1
to avoid crank handles or window latches. If unit is to be
installed in or next to a movable sash, it may be necessary to
emove catch,handle or both. Remove crank handle and
r
secure window in closed position. Remove glass panes and
separating strips to a height sufficient to mount unit.
2. Open Window Frame: Remove crank mechanism and catch
handles. Fold window sash back against exterior wall of
building and secure, or remove completely where possible.
3. A filler panel will be required at side of unit when installed
in windows having width greater than 15 1/2”. Filler panel
should be made from 3/4” thick wood securely anchored to
one side of opening so that 15 1/2” wide opening is
provided. Filler panel should run full length of window. Paint
to suit.
4. Install unit in same manner as described for sliding windows.
Installation in Wood Sliding or Wood Casement Windows
1. For wood frame casement windows, it is necessary to
construct a frame, using at least 1” thick wood with a 15 1/2”
wide opening.
2. Paint frame and fasten it securely, sealing it into window
opening.
3. Install unit into frame following procedures for metal sliding
and casement windows.
These installations are also typical, and since styles and sizes of
casement windows vary widely, it is advisable to have unit installed
by someone skilled in this type of installation. The dealer selling
these units can recommend or supply qualified people to install
your new unit.
Fig. 7
B
A
A
Foam Seal
B
Channel
C
Speed Clip
E
D
D
C
Drilled holes
D
3/8” long screw
E
E
Fig.8
B
A
A
Inlet Grill
Air filter
B
Front Panel
C
ecting Airflow
Dir
C
D
E
Air conditioner is engineered with adjustable louvers to direct discharge airflow
Louvers are manually adjusted by moving levers in direction of desired airflow.
Cleaning Air Filter
When air conditioner is operating, indoor air is filtered and refiltered
continuously trapping airborne dirt and dust in the washable filter. Therefore, the
filter should be inspected and cleaned weekly
Fig.8
.
Fig.8
.
1. Turn unit off.
Grasp both sides near top of inlet grill and pull forward. Inlet grill will pivot
2.
forward to reveal air filter
.
3. Remove air filter from tabs.
4. Carefully wash air filter with a mild detergent and warm water. Rinse with
clear water, squeeze dry and replace.
Replace inlet grill.
5.
Adjustable
D
louvers
E
Airflow levers
6
Page 7
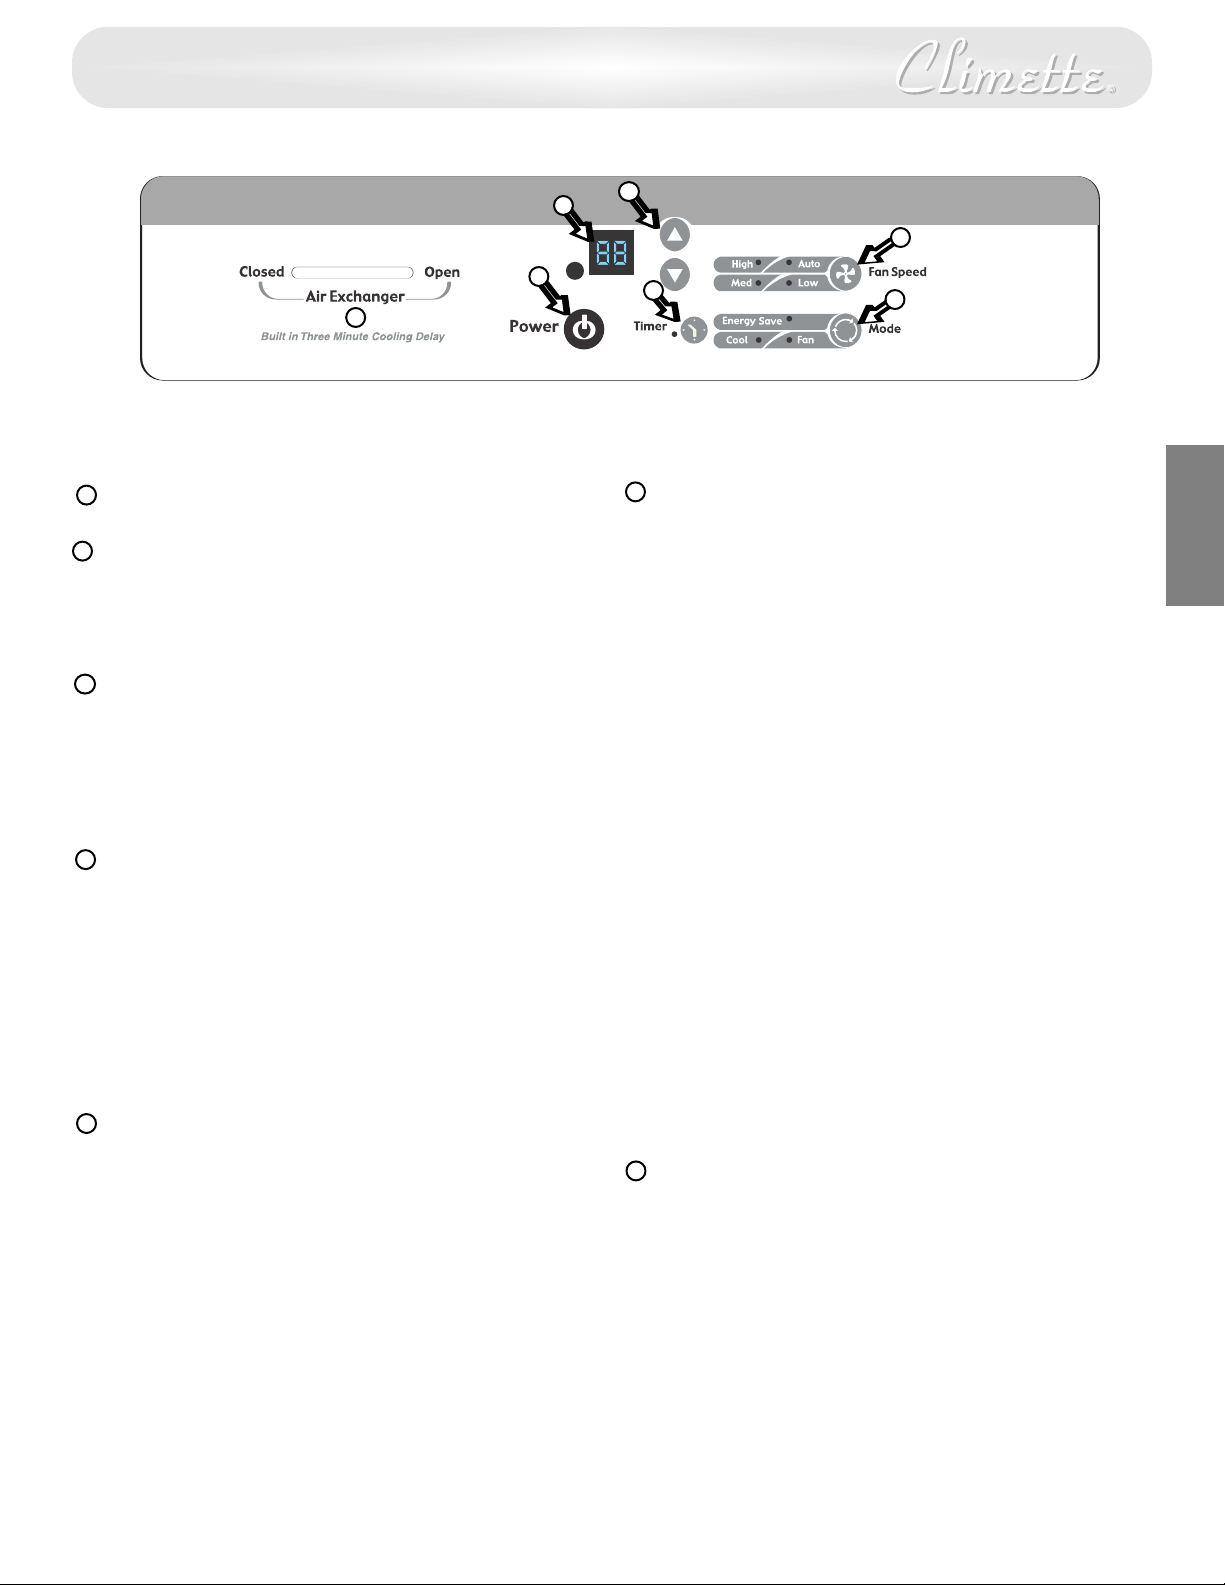
Electronic Control Panel
G
A
Power Control
The Power Control turns the unit on and off.
B
Set Temperature/ Timer Display
Shows the set temperature when the unit is in
operation and hours when the timer is being set.
THE TEMPERATURE DISPLAY ONLY SHOWS THE SET
TEMPERATURE, NOT THE ACTUAL ROOM
TEMPERATURE.
C
Temperature/ Timer Hour Controls
These buttons are used to raise or lower the set
temperature in increments of 1° from 66° to 88°.
By depressing both buttons at once, the display
will toggle between Celsius and Fahrenheit. When
the timer is being set, these buttons are used to
change the hour setting in increments of 1 from
00 to 24.
D
Mode Contr
ol
A green light will indicate which mode is currently
being utilized.
Cool Mode – The unit will circulate and cool the
air.
Fan Mode – The unit will only circulate the air.
Energy Saver Mode –
The fan will switch from the set fan speed to LOW
whenever the compressor turns off in response to
the thermostat. When the compressor cycles back
on, the unit will return to the original fan setting.
Fan Speed Control
E
High, Medium, Low and Auto
The settings are adjusted with the Fan Speed
Control, each time the button is depressed it
changes the setting. A green light will indicate
which setting is currently being used.
When the AUTO feature is selected while the air
conditioner is in the COOL or HEAT mode, the fan
speeds will change automatically as the
temperature in the room changes.
or more above the set temperature will use
°
7
•
HIGH F
AN
.
• 4° – 7° above the set temperature will use MED
FAN.
• 4° or less above the set temperature will use
LOW FAN.
B
A
C
E
F
D
E
F
Timer Control (The timer can be set to either
turn the unit on or off.)
To automatically START the unit using the
Timer mode:
1. Push the timer button while the power is OFF.
N
G
L
I
S
H
The display will read 00. Adjust the display to
show the desired number of hours before
START-UP using the Temperature/Timer
adjustment arrows.
2. The display will show the amount of time, in
hours, remaining until START-UP.
3. To exit Timer mode, push the Timer button.
4. A green light next to the Timer button
indicates that the timer is set.
To automatically SHUT-DOWN the unit using
the Timer mode:
1. Push the timer button while the power is ON.
The display will read 00. Adjust the display to
show the desired number of hours before
SHUT-DOWN using the Temperature/Timer
adjustment arrows. (The display will
automatically return to the set temperature
after 10 seconds.)
2. To display the amount of time left until SHUTDOWN, push the Timer button once.
3. To exit Timer mode, push the Timer button
twice.
4. A green light next to the Timer button
indicates that the timer is set.
G
Air Exchanger
Circulates fresh air and helps remove stale air
when in the open position. Maximum air
circulation and cooling occur when in the closed
position.
Built-in three minute timing delay.
If this electronic unit will not respond to touch pad or
remote control commands, it is necessary to unplug the
unit from the electrical outlet for five seconds and then
plug the unit back in.
Auto restart feature:
In the event of a power failure, this feature allows
the unit to resume operation once power has
been restored, retaining the most recent settings.
Upon restoration of power
, the timer mode may
need to be reset if being utilized
7
Page 8
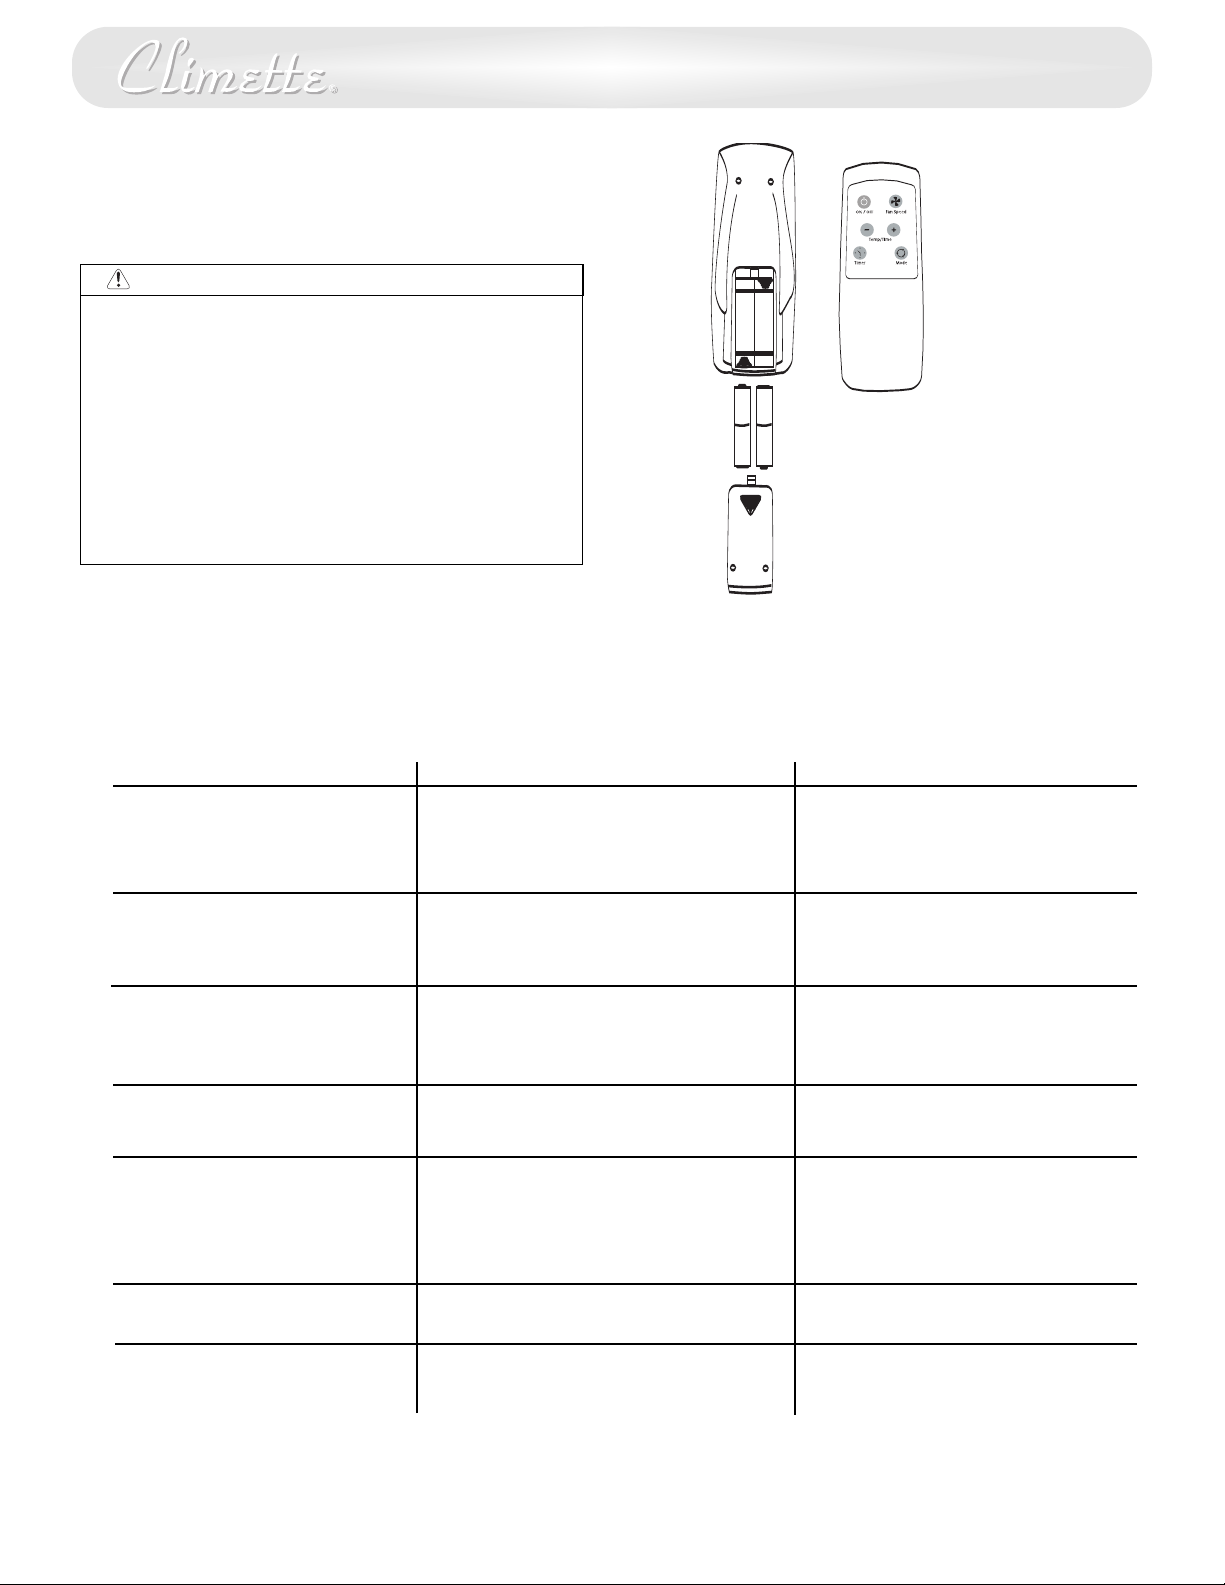
Air Conditioner Remote Control
AAA
IEC R031.5V
+
-
AAA
IEC R03
1.5V
The functions work the same as your air conditioner’s touch
controls.
WARNING
• Use only AAA or IEC R03 1.5V batteries.
• Remove the batteries if the remote controller is not used for a
month or longer.
• Do not mix alkaline, standard (carbon - zinc), or rechargeable
(nickle-cadmium) batteries.
• Do not attempt to recharge the supplied batteries
• All batteries should be replaced at the same time.
• Do not dispose of the batteries in a fire as they may explode.
• Do not mix old and new batteries.
• Do not install the batteries with the polarity (+/–) reversed.
• Keep batteries and other things that could be swallowed
away from young children. Contact a doctor immediately if
an object is swallowed.
Troubleshooting Guide
To save time and expense, check the following before calling an authorized service station.
Troubleshooting Guide
Occurrence Possible Cause Solutions
Air conditioner will not operate
• Wall plug disconnected.
• House fuse blown or circuit breaker tripped.
• Unit turned off and then on too quickly.
• Adjust thermostat to lower temperature.
Air from unit does not feel
cold enough
• Unit in Fan mode.
• Temperature set too high.
• Room temperature below 70°F.
Air conditioner cooling, but room is too
• Outdoor temperature below 70°F.
warm — ice forming on cooling coil
behind decorative front*
• Dirty air filter — air restricted.
Air conditioner cooling, but room is too
• Dirty air filter — air restricted.
warm — no ice forming on cooling coil
behind decorative front
Noise when unit is cooling
• Thermostat set too warm.
• Air movement sound.
• Sound of fan hitting water
-moisture removal
system.
Water dripping inside when unit is
• Window vibration — poor installation.
• Improper installation.
cooling
cooling
Water dripping outside when unit is
• Unit removing large quantity of moisture from
humid room.
• Push plug firmly into wall outlet.
• Replace fuse with time delay type
or reset circuit breaker.
• Wait 3 minutes before restarting.
• Adjust thermostat to lower temperature.
• Set Mode to Cool.
• Set thermostat to lower temperature.
• Cooling may not occur until room
temperature rises above 70°F.
• To defrost the coil, set mode to Fan.
Then, set thermostat to warmer
temperature.
• Clean filter
Filter”section. T
. See “Cleaning the Air
o defrost, set mode to Fan.
• Clean air filter.Refer to “Cleaning Air Filter”
section.
• Set thermostat to colder temperature.
• The sound of rushing air is normal.
If too loud, Fan Speed to Low setting.
• This is normal when humidity is high.
Close doors, windows and registers.
• Refer to installation instructions — check
with installer.
ilt air conditioner slightly to the outside to
• T
allow water drainage. Refer to installation
instructions — check with installer.
• This is normal during excessively
humid days.
8
Page 9

How to Obtain Warranty Service
ervice for your Room Air Conditioner will be provided by
S
CareCo through its network of Authorized Independent
Servicers nationwide.
ote: Before calling for service, carefully read the "Installation
N
and Operating Instructions" booklet. Then if you need service:
. Call a CareCo authorized service contractor and advise of
1
the model number, serial number, date of purchase and the
nature of your complaint. Service will be provided during
ormal working hours. Contact your dealer for the name of an
n
authorized service contractor, if unknown to you.
2. If your dealer is unable to give you the name of a service
contractor or if you need other assistance, call CareCo at
1-800-332-6658
or write:
CareCo
415 Wabash Avenue
Effingham, IL 62401
Proof of Purchase Date
It is the responsibility of the consumer to establish the original
purchase date for warranty purposes. We recommend that a
bill of sale, canceled check or some other appropriate
payment record be kept for that purpose.
E
N
G
L
I
S
H
9
 Loading...