

Page 1

November 28, 2019
7
Page 2

Table of Contents
INTRODUCTION ______________________________________________________________________________ 9
1. APPLICATION OVERVIEW ______________________________________________________________ 10
1.1. PARTS IDENTIFICATION __________________________________________________________10
1.2. LED INDICATOR ________________________________________________________________11
1.3. THE POWER SUPPLY ____________________________________________________________11
2. GETTING STARTED ____________________________________________________________________ 12
2.1. EQUIPMENT REQUIRED ___________________________________________________________12
2.2. HARDWARE INSTALLATION ________________________________________________________12
2.3. SETUP _______________________________________________________________________14
3. OPERATION ___________________________________________________________________________ 19
3.1. WEB BROWSER ACCESS _________________________________________________________19
3.2. SMARTPHONE ACCESS ___________________________________________________________21
3.3. DOORBELL NOTIFICATION _________________________________________________________24
3.4. VIDEO / PICTURE CAPTURE AND EVENT HISTORY ________________________________________26
4. REMOTE PROGRAMMING _______________________________________________________________ 27
4.1. APP USER SETTING _____________________________________________________________27
4.2. VIDEO SETTING ________________________________________________________________30
4.3. VDP SETTING _________________________________________________________________33
8
Page 3

Introduction
VDP-A1 Video Door Phone is designed to replace conventional doorbell by providing
remote video streaming access, two-way communication via Wi-Fi network. The Video
Door Phone functions either as a part of Climax alarm system by connecting to a Climax
security system Control Panel, or as a standalone device. Setup and remote access of
Video Door Phone is performed via smartphone applications developed by Climax
Technology.
9
Page 4

1. Application Overview
Front View
Back View
(Without Bracket)
Bracket (Inside)
Bracket (Outside)
Jumper On
The jumper link is inserted
connecting the two pins.
Jumper Off
If the jumper link is removed or
“parked” on one pin.
1.1. Parts Identification
1. Camera Lens
2. Night Light LED
3. LED Indicator (Blue / Amber)
4. Function Button
5. Bottom Screw
The bottom screw should be loosened before hooking the VDP onto mounting bracket, and
tightened after VDP is hooked to bracket.
When tightened, the bottom screw fixes VDP to mounting bracket. VDP cannot be detached
from bracket as long as screw is tightened.
6. Jumper Switch (Reserved)
The Jumper Switch is set to OFF position. Do NOT change the jumper setting or you may
damage the VDP when supplying power.
7. 12~24V DC/AC Power Input
Please note the torque on locknut should be less than 24.5 Nm (2.5 kg-m).
8. Reserved
9. Reserved
10. 12~24V DC/AC Power Input
Please note the torque on locknut should be less than 24.5 Nm (2.5 kg-m).
10
Page 5

1.2. LED Indicator
LED Color
Behavior
Indication
Blue
Flash every 3 seconds
VDP under Wi-Fi setup mode (AP mode)
Spinning
VDP button pressed, waiting for answer
ON
VDP under video streaming and two-way
communication
Amber
ON for 3 seconds
VDP finish warm up upon power on,
entering normal operation.
Flash every 3 seconds
Wi-Fi connectivity problem*
Flash every second
VDP unable to connect to server
3 Flash then ON for 6
seconds
VDP reset to factory default
The Video Door Phone has 2 sets of LED in Blue and Amber color, arranged in circular
pattern around the button to indicate device status.
*Note: It takes about 1 minute for VDP to connect to Wi-Fi after power on. Before the
Wi-Fi connection is established, the Amber LED may flash momentarily.
1.3. The Power Supply
The VDP uses 12~24V DC/AC power as its power source. Connect power to the
connector on the bracket; install the VDP on the bracket to power on the device.
11
Page 6

2. Getting Started
2.1. Equipment required
The following equipment is required to use VDP:
A router supporting 2.4 GHz Wi-Fi network. The Climax panel should be connected
to this router with access to internet and Home Portal Server.
An iPhone or Android smartphone
Android version requirement: Android 5.1 or above.
iPhone version requirement: iOS 9 or above.
If planning to use the VDP with your existing alarm system, a Climax IP based
security system alarm panel is required – The panel must be registered in Climax
Home Portal Server with a valid user account. Refer to panel and Home Portal
Server user guide to complete panel setup and registration process.
If planning to use VDP as a standalone device, no Climax security system device is
required.
2.2. Hardware Installation
1. Find the wall mounting bracket, connect 12~ 24V DC/AC power to the connector on
the bracket.
2. Switch off the circuit breaker first. Connect 12~24V DC/AC power to the connector
on the bracket as (Pic 1). Note: the torque on locknut should be less than 24.5 Nm
(2.5 kg-m).
The wiring should connect to the connector on the inside of bracket, pass through
the opening on the bracket and tucked into the bracket’s central cavity on the back.
12
Page 7

3. Locate the 4 mounting holes on the VDP and use them as template to mark
mounting location on the wall. Drill holes and insert wall plugs if needed.
4. Screw the mounting bracket onto marked location.
5. Hook VDP onto the bracket. Gently and firmly push the VDP downwards until you
hear a “click” sound.
6. Tighten the bottom screw to lock VDP onto bracket. Switch on the circuit breaker to
provide power to the VDP.
13
Page 8

2.3. Setup
The Video Door Phone can be either incorporated into existing Climax security system
as an accessory device, or used as a standalone device. Determine which application
should be used with your Video Door Phone before proceeding to setup process.
3.3.1. Video Door Phone as Alarm System Accessory
In order to incorporate Video Door Phone into existing Climax security system, the
control panel of the security system must be registered into Climax Home Portal Server
first with a functional user account.
A smartphone with Vesta Home 5 TW / Vesta Home 5 US or Vesta Home 5 EU app
installed is required to perform setup. Search for the app in Google Play or Apple App
Store, type Vesta Home 5 TW/US/EU on the search bar according to your server, then
download the app. Refer to Climax Home Portal Server user guide for detail.
1. Open Vesta Home 5 app and enter your existing user account & password of the
Control Panel you wish to use for further setup.
2. Tap the Camera icon in the navigation bar and the + icon on top right corner to add
the VDP into your existing system. Select the VDP icon and tap “Next”.
3. Power up the Video Doorbell by applying AC power. The device will first warm up for
about 30 seconds, and its Blue LED will begin to flash.
Flashing Blue LED indicates the Video Doorbell does not have a working Wi-Fi
setting yet. It will enter Wi-Fi setup mode (AP mode) automatically upon power-up.
4. Follow on-screen instructions and select the route to set up your Wi-Fi network.
Please note if the VDP has already been set up to another Wi-Fi network, ensure to
reset the device first before adding it into your existing alarm system.
14
Page 9

5. Connect to your Wi-Fi. Make sure your phone’s Wi-Fi is enabled. Follow on-screen
instructions. Select your VDP’s MAC address and your Wi-Fi network. Enter your
Wi-Fi network password and tap “Next”.
6. Wait for your VDP to connect to your Wi-Fi network. Tap “Done” when Wi- Fi setup is
complete.
15
Page 10

7. After successfully joining to your Wi-Fi network, the app proceeds to learn the Video
Doorbell into the Control Panel. When learning is complete, the app displays
success message. Re-login to the app to start using your Video Doorbell (The device
will reboot upon complete learning, you may need to wait a short time for it to
restart.)
16
Page 11

3.3.2. Video Door Phone as Standalone Device
Using Video Door Phone as standalone device does not require any other Climax
security system panels. A smartphone with Climax Video Door Phone app installed is
required to perform setup. Search for “Video Door Phone” in Google Play o Apple App
Store, download and install the application.
1. Power up the Video Doorbell by applying AC power. The device will first warm up for
about 30 seconds, and its Blue LED will begin to flash.
Flashing Blue LED indicates the Video Doorbell does not have a working Wi-Fi
setting yet. It will enter Wi-Fi setup mode (AP mode) automatically upon power up.
2. Open your Video Door Phone app. Tap “Wi-Fi Setup” and “Next” to continue.
3. Follow on-screen instructions and select the route to set up your Wi-Fi network.
Please note if the VDP has already been set up to another Wi-Fi network, ensure to
reset the device first before setting up a new Wi-Fi network.
4. Connect to your Wi-Fi. Make sure your phone’s Wi-Fi is enabled. Follow on-screen
instructions. Select your VDP’s MAC address and your Wi-Fi network. Enter your
Wi-Fi network password and tap “Next”.
8. Wait for your VDP to connect to your Wi-Fi network. Tap “Done” when Wi- Fi setup is
complete.
17
Page 12

9. Return to the main page of your app and tap “First Time Registration” to create your
user account and password. Tap “Next” to enter your registration information.
New User Setup
Please note that the Video Door Phone can only register an user account within 15
minutes after powering on and connecting to Home Portal Server. If it was powered on
for over 15 minutes, reboot the device.
Enter the registration information. After entering all info, tap “Submit” to proceed.
Username: Account user ID used for login
Password: Account login password.
Confirm Password: Repeat the login password.
Email: Account registration email
MAC Address: Video Door Phone’s MAC address.
Terms and Conditions: Check the box to confirm you agree to the terms and
conditions
10. When registration is done, the app will display successful message. A confirmation
email will be sent to registered email address of the Video Door Phone.
18
Page 13

3. Operation
The Video Door Phone can be accessed by web browser and or smartphone application.
Two-way voice communication function is only available via smartphone access.
3.1. Web Browser Access
3.1.1. Video Door Phone as Alarm System Accessory
When accessing the Home Portal Server account of the Control Panel using a web
browser, VDP is located under the Camera page and has the same function of a Climax
IP Camera.
Two-way voice and doorbell functions are not enabled for web browser access. To uses
these functions, a smartphone app is required. Please see 4.2. Smartphone Access for
detail.
Press the Record Video button to record a video clip.
Press the Setting button to access video adjustment, and time stamp setting,
adjust the setting and click Submit to confirm.
19
Page 14

3.1.2. Video Door Phone as Standalone Device
When using as a standalone device, accessing the Video Door Phone account via web
browser, the only available function is the account setting page.
The user may edit account information, create secondary user, change language and
Push Notification setting using the account page.
20
Page 15

3.2. Smartphone Access
Smartphone application access to VDP provides two-way voice and doorbell push
notification function.
3.2.1. Vesta Home 5 TW/US/EU App
Use Vesta Home 5 app to log into Home Portal Account registered by Control Panel.
Select Cam page to display VDP streaming thumbnail. Press the thumbnail image to
enlarge to full screen.
The VDP full screen has 4 function buttons:
Press the Record Video button to record a video clip.
The video clip length is set to 30 seconds by default, composed of 10 seconds
before button press and 20 seconds after button press.
Press the Camera button to take a single picture.
Press the Microphone button to toggle smartphone microphone.
Full screen VDP streaming will open voice channels automatically, allowing
smartphone user to converse with VDP. Use the microphone button to control
smartphone microphone and switch between one-way and two-way voice channel.
: Smartphone microphone OFF – One-way listen-in only.
: Smartphone Microphone ON – Two-way voice communication.
Press the Return button to return to camera thumbnail page.
21
Page 16

3.2.2. Climax Video Door Phone App
Open the Climax Video Door Phone app, enter the registered account username and
password to log into the account.
Upon login, the app will display thumbnail streaming VDP streaming thumbnail. Press
the thumbnail image to enlarge to full screen.
Press the Record Video button to record a video clip.
The video clip length is set to 30 seconds by default, composed of 10 seconds
before button press and 20 seconds after button press.
Press the Camera button to take a single picture.
Press the Microphone button to toggle smartphone microphone.
Full screen VDP streaming will open voice channels automatically, allowing
smartphone user to converse with VDP. Use the microphone button to control
smartphone microphone and switch between one-way and two-way voice channel.
22
Page 17

: Smartphone microphone OFF – One-way listen-in only.
: Smartphone Microphone ON – Two-way voice communication.
Press the Return button to return to camera thumbnail page.
23
Page 18

3.3. Doorbell Notification
The Doorbell Notification function allows VDP to inform the user remotely when its
doorbell button is pressed. With Doorbell Notification, the user will be able to answer the
doorbell remotely and converse with the guest via VDP using the smartphone even
when away from home.
Before using the Doorbell Notification, the following settings should be completed:
The VDP must be properly setup as described in previous chapter.
The Control Panel or Video Door Phone standalone Home Portal Server account
should be registered and working properly.
The Control Panel or Video Door Phone Home Portal Server account’s push
notification setting must be enabled. To enable push notification function, Log into
the user account, select Menu from top right and set Notification setting to All for
Vesta Home 5 app, or ON for Video Door Phone app.
You can also enable or disable email notification of VDP event with your app.
Vesta Home 5 app
24
Page 19

Video Door Phone app
1 Press the doorbell button on VDP, VDP will sound a door chime to indicate
activation. The Blue LED will start spinning.
2 The user will receive a push notification message from its panel Home Portal
Server Account, titled “Doorbell”
3 Press on the push notification message, the smartphone will launch Vesta Home 5
app and log into registered account automatically. After login, the app will
automatically jump to VDP page. VDP Blue LED will turn to steady ON to indicate.
4 After finishing conversation, press the return button to return to camera thumbnail
page.
<NOTE>
If the Doorbell Notification is not answered within 1 minute after button press,
the VDP will time out and the Blue LED will stop spinning
When the button is pressed, VDP will take a picture which will be uploaded to
the Home Portal Server.
25
Page 20

3.4. Video / Picture Capture and Event History
VDP will take a picture or video during following occasions. All pictures and video clips
taken will be uploaded to the server.
Picture
Press the function button in front of VDP to take a picture
Press the camera icon on the app when streaming video to take a picture
Video
Press the record video icon on the app or server webpage UI to record a video
Whenever an alarm is activated by the Control Panel, VDP will record a video
immediately.
All Video Door Phone activities, including doorbell notification, pictures and video clips,
are stored in Home Portal Server user account. Check the event log in smartphone apps
to access the operation history
Vesta Home 5 Climax Video Door Phone
26
Page 21

4. Remote Programming
1 2 3
4.1. App User Setting
The App User Setting function is only available for Video Door Phone app. For Vesta
Home 5 app user. Access the account via web Home Portal interface to setup user.
To access user setting, press the Menu button at top right of the app, then select “User
Info”
User setting includes following options:
1. Login password edit.
2. Email edit.
3. Secondary account edit.
27
Page 22
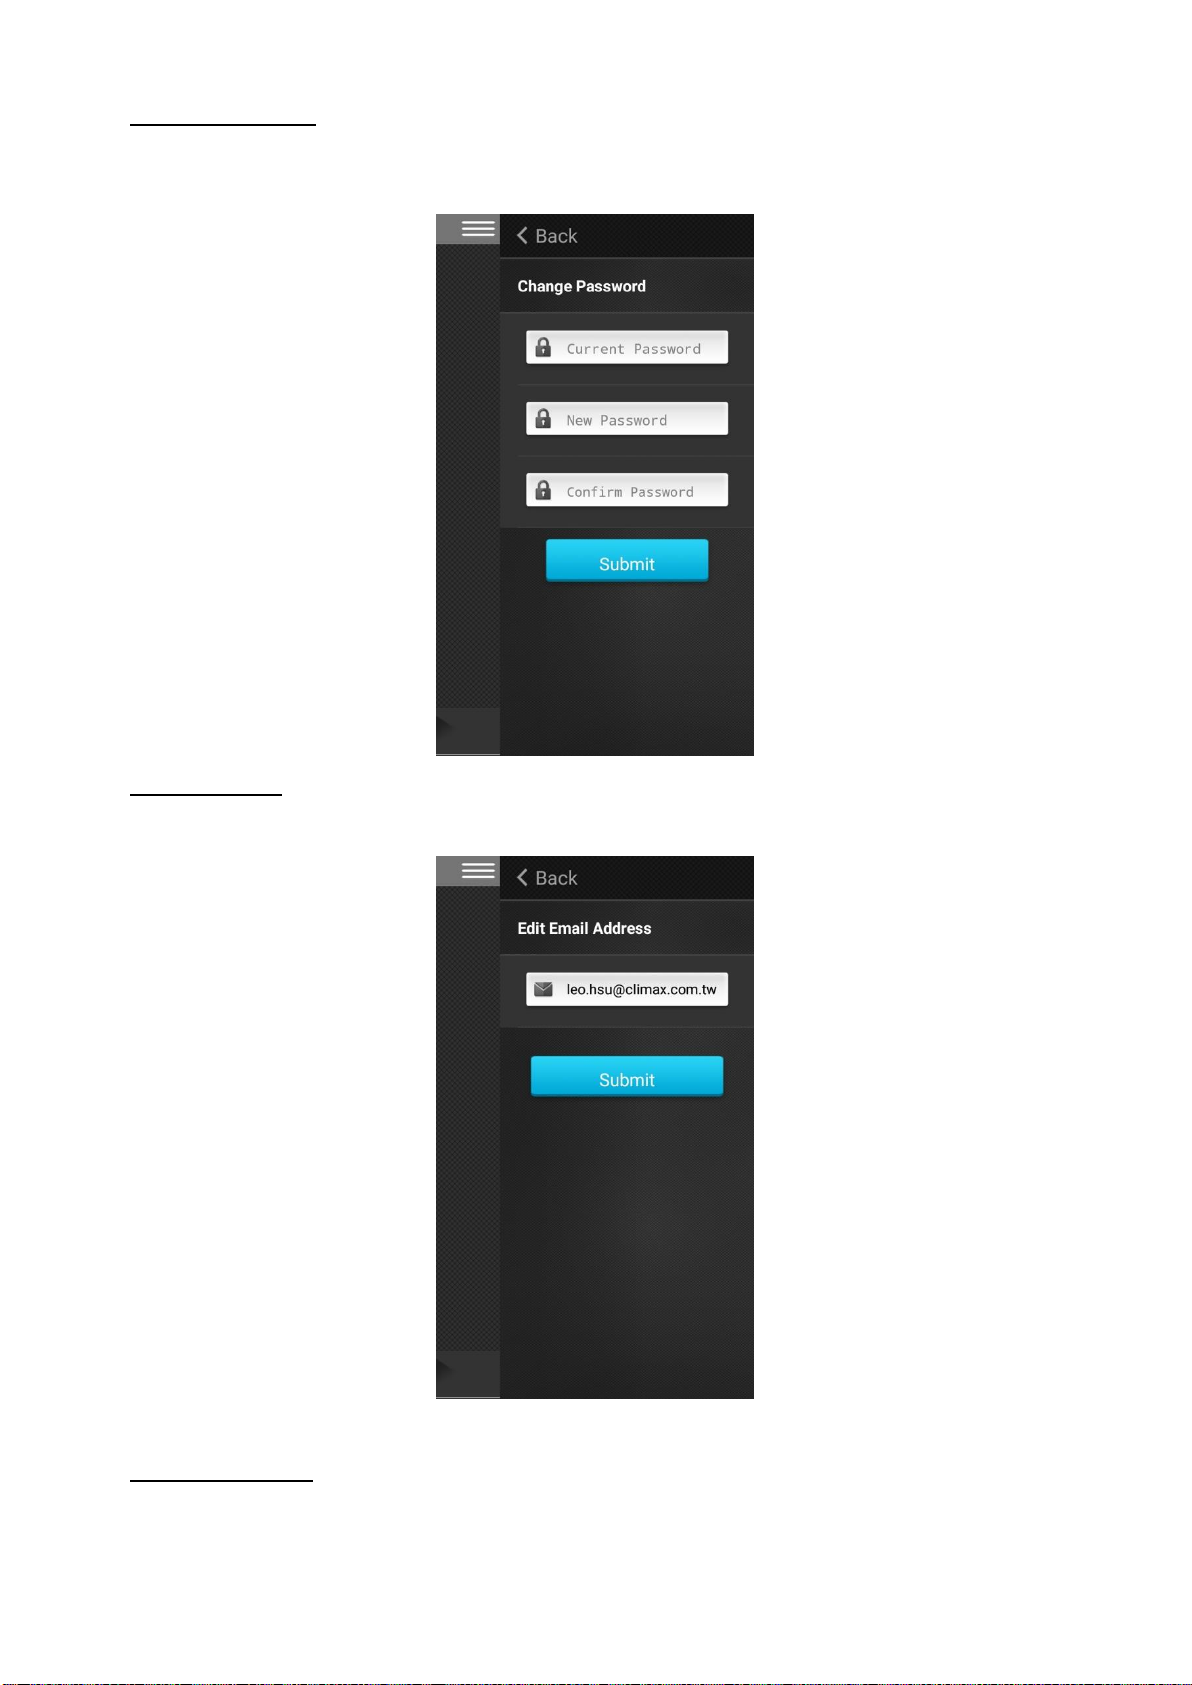
Login Password
Select “Change Password”. Enter your current password, then the new password and
repeat. Click “Submit” to confirm.
Email Setting
Enter your new email address and click “Submit” to confirm.
Secondary User
Only one smartphone can log into your registered account at a time. If multiple users
attempt to log into the same account, the latest login will kick out previous login. In order
to provide multi-user access to the VDP, multiple accounts must be created for one VDP.
28
Page 23

The first account you registered with the VDP is considered the Master user. This
account can be used to create other secondary user accounts. Select “Account List” to
add a new user.
Enter the new user ID, password and email address and click “Submit” to create user.
After creating a secondary account, the new account will be listed under “Account List”.
You can select the account to edit or delete it.
29
Page 24

4.2. Video Setting
Video Setting options are only available when VDP is included in a security system. The
options are accessed on the Home Portal Server web UI’s Camera page.
Press the Video Setting icon to adjust video configuration:
30
Page 25

Video Adjustment: For image tuning.
Time Stamp: Select the time stamp location on video.
31
Page 26

Press the Record icon to record a video clip
32
Page 27

4.3. VDP Setting
VDP’s own setting options are only available when included in security system and
accessed on the Home Portal Server web UI’s Edit Device page.
Setting
The setting page is used to set VDP zone number, device name and time zone
setting. Please refer to your Control Panel’s configuration webpage for option detail.
33
Page 28

Recorded Video
The Recorded Video page stores video clips previously taken by VDP for download.
Click the download link icon to down the file into your computer.
Recorded Setting
The Recorded setting page determines the video clip length when VDP is activated to
record a video.
Total Time:
The total time length of each recorded video (Default: 30 seconds) The total video
time length.
Pre-alarm:
This function is disabled for VDP, please ignore.
34
Page 29

Wireless and Network
The Wireless Network webpage display current VDP Wi-Fi setting.
Wi-Fi setting can only be changed by factory resetting VDP and using Vesta Home 5
app to reprogram Wi-Fi setting. Wi-Fi setting cannot be changed on the webpage.
35
 Loading...