

Page 1

Door Contact (DC-9) 315M
The Door Contact is used to detect the opening and closing of doors and windows. Typically the Door Contact is fixed to
the doorframe and the actuating magnet is fixed to the door. When the door opens, the magnet is moved away from the
Door Contact and an internal magnetic switch is activated causing the Door Contact to transmit an alarm.
The Door Contact can monitor a doorway for open or closed status and notify you of an open door when you wish to arm
your system. It can also alert you to signal communication problems and low battery situations.
The Door Contact consists of a two-part design made up of a cover and base. The cover contains all the electronics and
the base provides a means of fixing. A PCB tamper switch protects the enclosure from being opened or being removed
from the mounting surface.
z
z
IIddeennttiiffyyiinngg tthhee ppaarrttss
Remove the cover by loosening the bottom fixing screw,
the inside of the Door Contact will be revealed as shown.
LED indicator
Test button
Tamper Switch
Extension Terminal
JP 1 = Test / Normal Mode Jumper Switch
If the jumper is ON (the jumper link is inserted connecting the two pins), the Door Contact is in Test
mode.
If the jumper is OFF (if the jumper link is removed or “parked” on one pin), the Door Contact is in Normal
mode (factory default).
JP 2 = Supervision Enable/Disable Jumper Switch
If the jumper is ON (the jumper link is inserted connecting the two pins), the Supervision is disabled.
If the jumper is OFF (if the jumper link is removed or “parked” on one pin), the supervision is enabled.
(Factory default)
JP 3 = Internal Magnet Switch Bypass Jumper Switch
If the jumper is ON (the jumper link is inserted connecting the two pins), the internal magnet switch is
being bypassed. Only the device connected to the Extension Terminal will activate the Door Contact.
If the jumper is OFF ( if the jumper link is removed or “parked” on one pin), the internal magnet switch is
in use. (Factory Default)
JP 4 = Reserved
z
z
LLEEDD IInnddiiccaattoorr
In Normal operation mode, the LED indicator will not light except in the following situations:
z When the Door Contact is in Low battery condition, every time the Door Contact is activated (door opened or
door closed), the LED will light.
z When the cover is opened and the tamper switch is violated, the LED will light.
z When the tamper condition persists, every time the Door Contact is activated, the LED will light.
However, if the Door Contact is in Test mode, the LED will flash every time it is activated.
z
z
BBaatttteerryy
The Door Contact uses one 1/2 AA, 3.6V Lithium battery as its power source. The Door Contact will have a typical
battery life of over 3 years at an average of 50 activations a day. Please note to always replace battery with the
correct size and voltage.
Low battery detection operates at a threshold of 2.7V ±5 % where the Door Contact has enough reserve power to
typically operate for 1 month before complete exhaustion. When Door Contact is in low battery, the LED will flash and
a low battery signal will be sent to the Control Panel along with regular signal transmissions for the Control Panel to
display the status accordingly.
z
z
SSuuppeerrvviissoorryy SSiiggnnaall ((wwhheenn tthhee JJ22 iiss OOFFFF))
z After installation, the Door Contact will automatically transmit Supervisory Signals periodically to the Control
Panel at intervals of 30 min to 50 min randomly.
z
z
GGeettttiinngg SSttaarrtteedd
z Remove the fixing screw and cover assembly
z Insert the “1/2 AA” battery into the battery holder taking care to connect the polarity correctly.
z The LED indicator will flash briefly, then, wait for 10 seconds. It is then ready for operation in normal mode.
z
z
MMoouunnttiinngg MMeetthhooddss
There are two ways to mount the Door Contact, by either Self-adhesive installation or Screw mounting.
z Self adhesive mounting
1
5
3
4
2
7
6
8
Page 2
I. Clean the surface with a suitable degreaser.
II. Remove the protective covering from one side of the double-sided adhesive pad and firmly apply to the
back of the device.
III. Next remove the other cover and firmly press the item onto the desired location.
<<NNOOTTEE>>
) Do not use the adhesive pad method of installation on a surface with peeling or cra cked paint, or on a rough
surface.
z Screw mounting
The Base has two knockouts, where the plastic is thinner, for mounting purpose.
To mount the Door Contact
I. Remove the cover
II. Break through the knockouts on the base
III. Using the holes as a template, drill holes in the surface
IV. Insert the wall plugs if fixing into plaster or brick
V. Screw the base into the wall plugs
VI. Screw the cover back on to its base
z
z
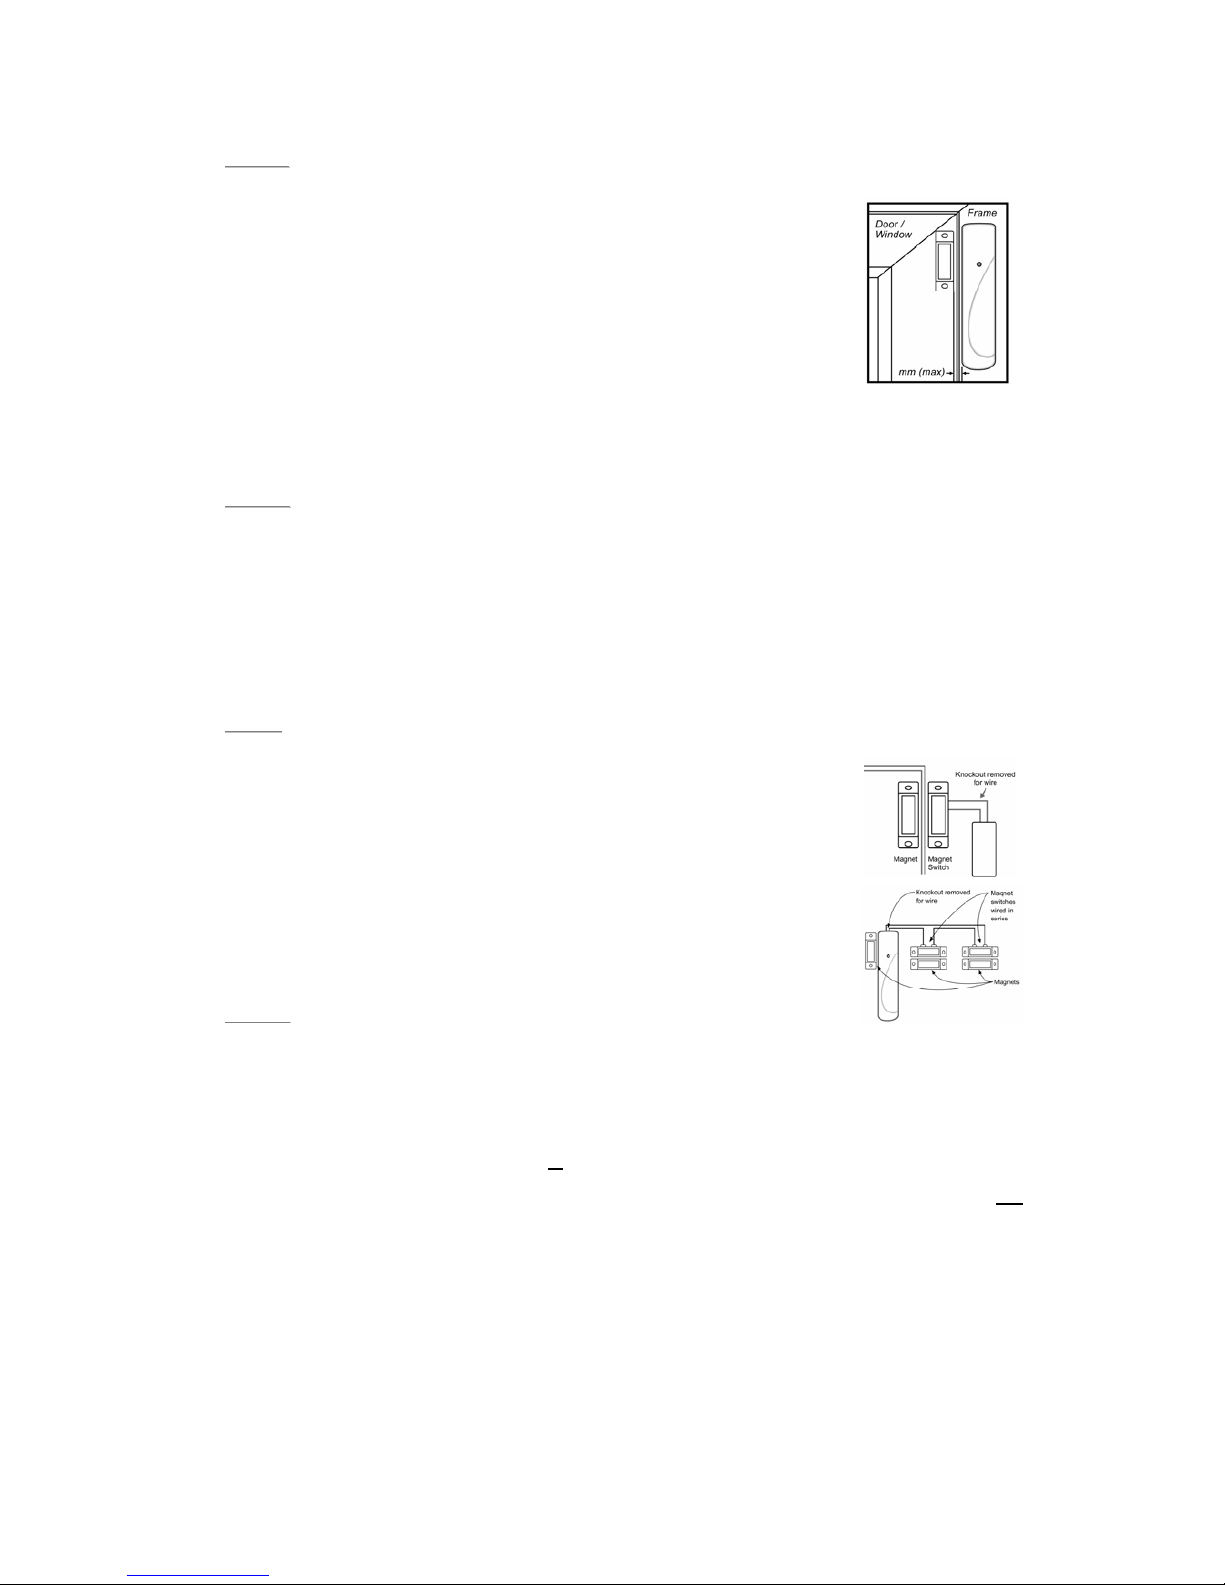
IInnssttaallllaattiioonn
Step 1. Ensure the Test/Normal mode jumper switch is in “ON” position. This is to enable the LED indicator to flash
every time the Door Contact is operated.
Step 2. Fit the base on the door frame using either the double sided adhesive pad or the screws provided.
Step 3. Fit the magnet on the door using the small double sided adhesive pad or the screws provided. Aligning
the magnet by the arrow as shown.
<< NNOOTTEE >
>
) The magnet should not be more than 30mm from the detector when the door is closed.
) Ensure the tamper switch spring is positioned so that it makes contact with the mounting surface through
the tamper switch aperture.
) Windows can be protected in a similar way to doors. When fitting to a window fix the magnet to the
moving part and the door switch to the frame.
Step 4. Fix the Cover assembly on its base and secure with the screw.
Step 5. Test the Door Contact by opening and closing the door or window when the Control Panel is in “Walk Test”
mode. The LED will flash every time the door is opened or closed.
Step 6. Remove the Cover assembly, put the TEST / NORMAL jumper switch (JP1) in the normal “Off“ position.
Screw the Cover assembly back onto its base.
Step 7. Installation is now completed.
<<NNOOTTEE>
>
) Ensure the TEST / NORMAL jumper is in the normal “Off” position when testing is finished.
z
z
UUssiinngg tthhee EExxtteennssiioonn TTeerrmmiinnaall..
The Extension Terminal is provided to enhance installation flexibility and to serve a wider
range of your meds.
The Extension terminal is most useful in the following cases.
z If the Door Contact cannot be mounted on the door frame, you can connect an
additional “extension magnet switch” to the “Extension Terminal” and mount the
Door Contact remotely.
z More than one window and door can be protected by a Door Contact using the
additional magnet and extension magnet switch. The switches must be wired to the
auxiliary terminal block as shown:
z Any device with N.C. (Normally Closed) dry contact, such as broken glass detectector,
Smoke Sensor, gas detector, water leabag detector etc, can be connected to the
“Extension Terminal” Making the Door Contact served as an “Universal Transmit”.
<< NNOOTTEE >
>
) The Extension Terminal form a closed loop with the device connected to it. When the Loop is opened (the
device is triggered), the Door Contact is activated.
) The device connected to the Extension Terminal is in series with the internal magnet Switch. That means
both of them can work together at the same time.
) You have the choice to Use the Extension Terminal alone with the internal magnet switch being bypassed or
to use both of them together.
If you choose to have both of the internal magnet Switch and Extension Terminal work together, then.
z When the protected door is being opened or
the enteral device is triggered, the Door Contact is activated and will
transmit a violation signal
z However The Door contact will transmit a “Door Closed” or “Restored Signal” only affer the protected door and
the violated device being restored.
FCC Caution :To assure continued compliance, any changes or modifications not expressly approved by the party
responsible for compliance could void the user's authority to operate this equipment. (Example - use only shielded interface
cables when connecting to computer or peripheral devices).
 Loading...