

Page 1

Manuel
d’utilisation
CLIMADIFF
SA
CLIMATISEUR MOBILE
Dans un souci d’amélioration constante de nos produits, nous nous réservons
la possibilité de modifier les caractéristiques techniques sans préavis.
143 Boulevard Pierre Lefaucheux
72230 Arnage – FRANCE
http://www.climadiff.com/
CLIMA18 / CLIMA19
Dans ce manuel, vous trouverez de nombreux conseils utiles sur la façon d'utiliser et d'entretenir votre
climatiseur correctement. Un peu de soin préventif de votre part peut vous faire économiser beaucoup
de temps et d'argent au cours de la vie de votre climatiseur. Avant d'utiliser ce produit, veillez à lire
attentivement les instructions et conserver ce manuel pour toute utilisation future.
Page 2
Page 3
Lisez attentivement ce manuel
Dans ce manuel, vous trouverez de nombreux conseils utiles sur la façon d'utiliser et
d'entretenir votre climatiseur correctement. Un peu de soin préventif de votre part
peut vous faire économiser beaucoup de temps et d'argent au cours de la vie de
votre climatiseur. Vous trouverez de nombreuses réponses aux problèmes communs
dans le guide de dépannage vous permettant peut-être de ne pas avoir à contacter
le SAV.
PROTECTION DE L’ENVIRONNEMENT
Protection de l’environnement
..............................................................................................................2
SOMMAIRE
PRECAUTIONS DE SECURITE
Règles de sécurité...............................................................................................................................3
Conditions d’utilisation.........................................................................................................................3
Informations électriques.......................................................................................................................4
!
ATTENTION
Contacter le service technique autorisé pour la réparation ou la maintenance
de votre appareil. Contacter un technicien si vous rencontrez un problème
pendant l’installation.
Lorsqu’il y a des différences entre le Manuel d’utilisation et la Notice d’utilisation de la
télécommande, la description du Manuel d’utilisation prévaut.
IDENTIFICATION DES PARTIES
Accessoires .......................................................................................................................................4
Noms des parties................................................................................................................................5
CARACTERISTIQUES DE L’APPAREIL
Instruction d’utilisation du contrôle électronique...................................................................................6
INSTRUCTIONS D’UTILISATION
Instructions d’utilisation .......................................................................................................................7
INSTRUCTIONS D’INSTALLATION
Localisation.........................................................................................................................................9
Installation du kit fenêtre…..................................................................................................................9
Installation de la gaine d’évacuation..................................................................................................12
Drainage de l’eau. ..............................................................................................................................13
NETTOYAGE ET MAINTENANCE
Nettoyage et maintenance ...............................................................................................................14
GUIDE DE DEPANNAGE
Guide de dépannage ..........................................................................................................................15
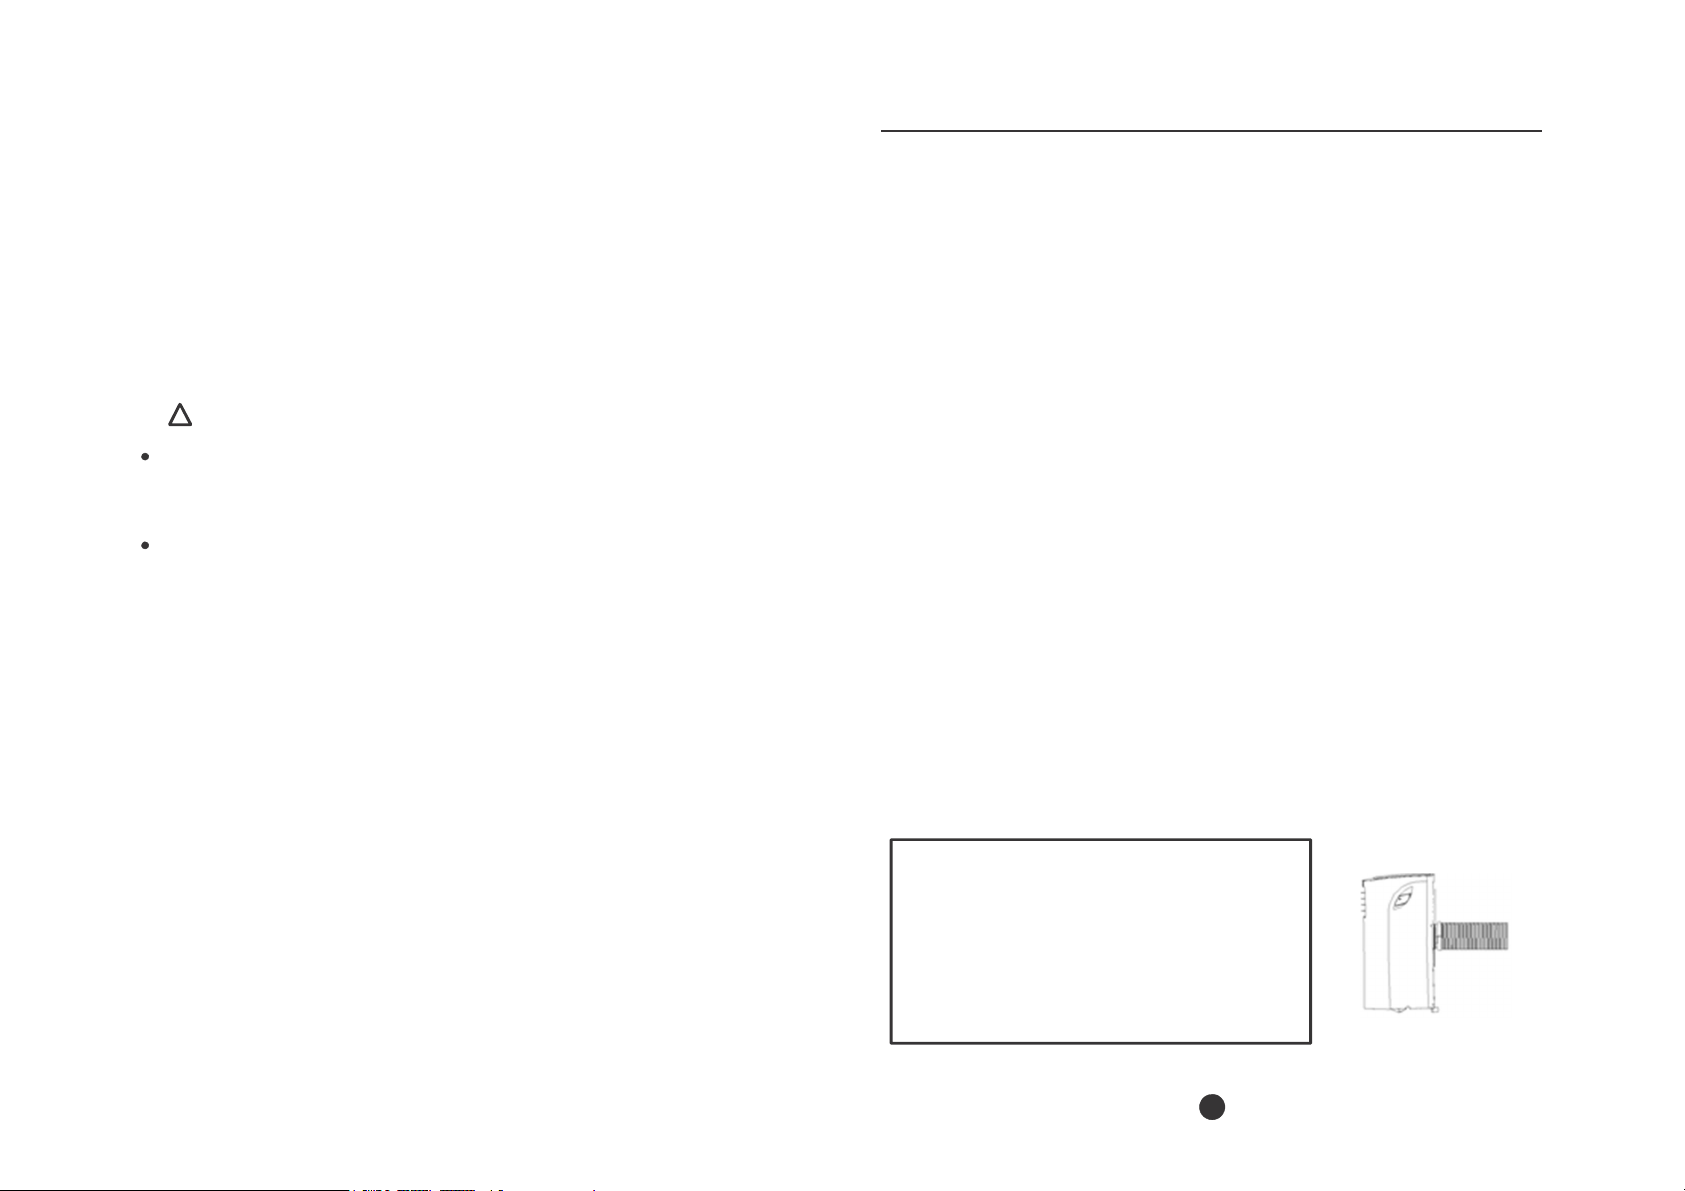
Les données de notation indiquées sur l'étiquette
d'énergie sont basées sur les conditions de tests de
l'installation du tuyau échappement d'air sans
adaptateur A & B (le tuyau et l'adaptateur A & B sont
répertoriés dans le tableau des accessoires du manuel
d'instructions). Voir l'image ci-contre. De façon
simultanée, le mode « COOL » (froid) et la
vitesse la plus élevée doivent être sélectionnés sur
la télécommande.
NOTE
1
Page 4
PROTECTION DE
L’ENVIRONNEMENT
Règles de sécurité
circulation de l'air.
l’intérieur et l’air chaud dehors.
de ciseaux.
Economie d
’
énergie
Les matériaux d’emballage de cet appareil sont recyclables.
Participez à leur recyclage et contribuez ainsi à la protection de l’environnement
en les déposant dans les conteneurs municipaux prévus à cet effet.
Votre appareil contient également de nombreux matériaux recyclables. Il est donc
marqué de ce logo afin de vous indiquer que les appareils usagés ne doivent pas être
mélangés avec d’autres déchets. Le recyclage des appareils qu’organise votre
fabricant sera ainsi réalisé dans les meilleures conditions, conformément à la directive
européenne 2002/96/CE sur les déchets d’équipements électriques et électroniques.
Adressez-vous à votre mairie ou à votre revendeur pour connaître les points de
collecte des appareils usagés les plus proches de votre domicile. Nous vous
remercions pour votre collaboration à la protection de l’environnement.
Afin d'éviter toute blessure pour l'utilisateur ou d'autres personnes, et des dommages sur l'appareil,
merci de suivre les instructions suivantes. Toute opération incorrecte due à l'ignorance de ces
instructions peut causer des blessures ou dommages.
Votre climatiseur doit être utilisé de telle sorte qu'il est protégé de
l'humidité : condensation, éclaboussures d'eau, etc. Ne pas
placer votre climatiseur où il peut tomber ou être tiré dans l'eau ou
tout autre liquide. Si cela arrive, débranchez immédiatement.
Toujours transporter votre climatiseur à la
verticale et le tenir debout sur une surface stable,
et à niveau pendant son utilisation.
Eteignez l'appareil lorsqu'il n’est pas en cours
d'utilisation.
Toujours contacter une personne qualifiée pour faire
les réparations. Si le cordon d'alimentation est
endommagé, il doit être réparé par un réparateur
qualifié.
Garder une distance d'au moins 30 cm tout autour de
l'appareil par rapport aux murs, meubles et rideaux.
Si le climatiseur est renversé lors de l'utilisation,
éteindre l'appareil et débrancher de l'alimentation
secteur immédiatement.
Toujours utiliser l’interrupteur du panneau de contrôle.
Utilisez l'appareil dans une pièce de taille recommandée.
Placez l'appareil où les meubles ne peuvent pas gêner la
Gardez stores / rideaux fermés pendant le moment le plus
Gardez les filtres propres.
Gardez les portes et fenêtres fermées pour garder l'air frais à
Co nditi on d’ ut ilisa tion
L’appareil doit être utilisé dans les conditions suivantes, sinon la performance peut être réduite :
MODE TEMPÉRATURE DE LA PIÈCE
Frais 17° (62F) à 35° (95F)
Froid 13° (55F) à 35° (95F)
Chaud (type pompe chaleur) 5° (41F) à 30° (88F)
Chaud (type chauffage électrique) 30° (88F)
Outils préconisés pour l’installation du kit fenêtre
1. Tournevis (taille moyenne Phillips)
2. Règle de mesure
3. Couteau ou paire
4. Scie (dans le cas où le kit fenêtre doit être coupé et ajusté si la fenêtre
est trop proche pour une installation directe)
2
!
A faire
PRECAUTIONS DE SECURITE
Economie d’énergie
N'utilisez pas l'appareil dans une pièce humide
comme une salle de bain ou buanderie.
Ne touchez pas l'appareil avec des mains
humides ou mouillées, ou pieds nus.
N'appuyez pas sur les boutons avec autre
chose que vos doigts. Ne retirez aucune partie
fixée.
N'utilisez jamais l'appareil s'il ne fonctionne
pas bien ou s'il a été abimé ou s'il est tombé
N’utilisez pas la prise pour allumer ou éteindre
l'appareil. Toujours utiliser le bouton.
Ne pas couvrir ou obstruer les grilles de sorties
et entrées d'air.
Ne pas utiliser de produits chimiques
dangereux pour nettoyer ou l'appareil. Ne pas
utiliser l'appareil en présence de substances
ou de la vapeur inflammables tels que l'alcool,
les insecticides, essence, etc.
Ne pas laisser les enfants utiliser l'appareil
sans surveillance.
Ne pas utiliser ce produit pour un autre but
que celui décrit dans ce manuel.
A ne jamais faire
ensoleillé de la journée au mur.
3
Page 5
IDENTIFICATION DES PARTIES
1
1
2
4 5
Pour votre sécurité
Ne pas entreposer ou utiliser d'essence ou d'autres vapeurs et liquides inflammables à proximité
de cet appareil ou de tout autre appareil.
Évitez tout risque d'incendie ou de choc électrique. Ne pas utiliser une rallonge ou un adaptateur.
ATTENTION
Assurez-vous que le service électrique est adéquat pour le modèle que vous avez choisi. Cette
information peut être trouvée sur la plaque signalétique, qui est située sur le côté du boîtier et derrière
la grille.
Assurez-vous que le climatiseur est correctement branché. Pour réduire les risques d'électrocution et
d'incendie, le branchement est important. Le cordon d'alimentation est équipé d'une prise de terre à
trois broches pour la protection contre les chocs.
Votre climatiseur doit être utilisé dans une prise murale correctement installée. Si la prise murale que
vous comptez utiliser ne est pas correctement installée ou protégée par un fusible de temporisation ou
un circuit, un électricien qualifié devra installer la prise appropriée.
Assurez-vous que le récipient est accessible après l'installation de l'appareil.
Inf or
ma tion électrique
ACCESSOIRES
ACCESSOIRES : NOM DES ACCESSOIRES
:
QUANTITE
IDENTIFICATION DES PARTIES
NOMS DES PARTIES
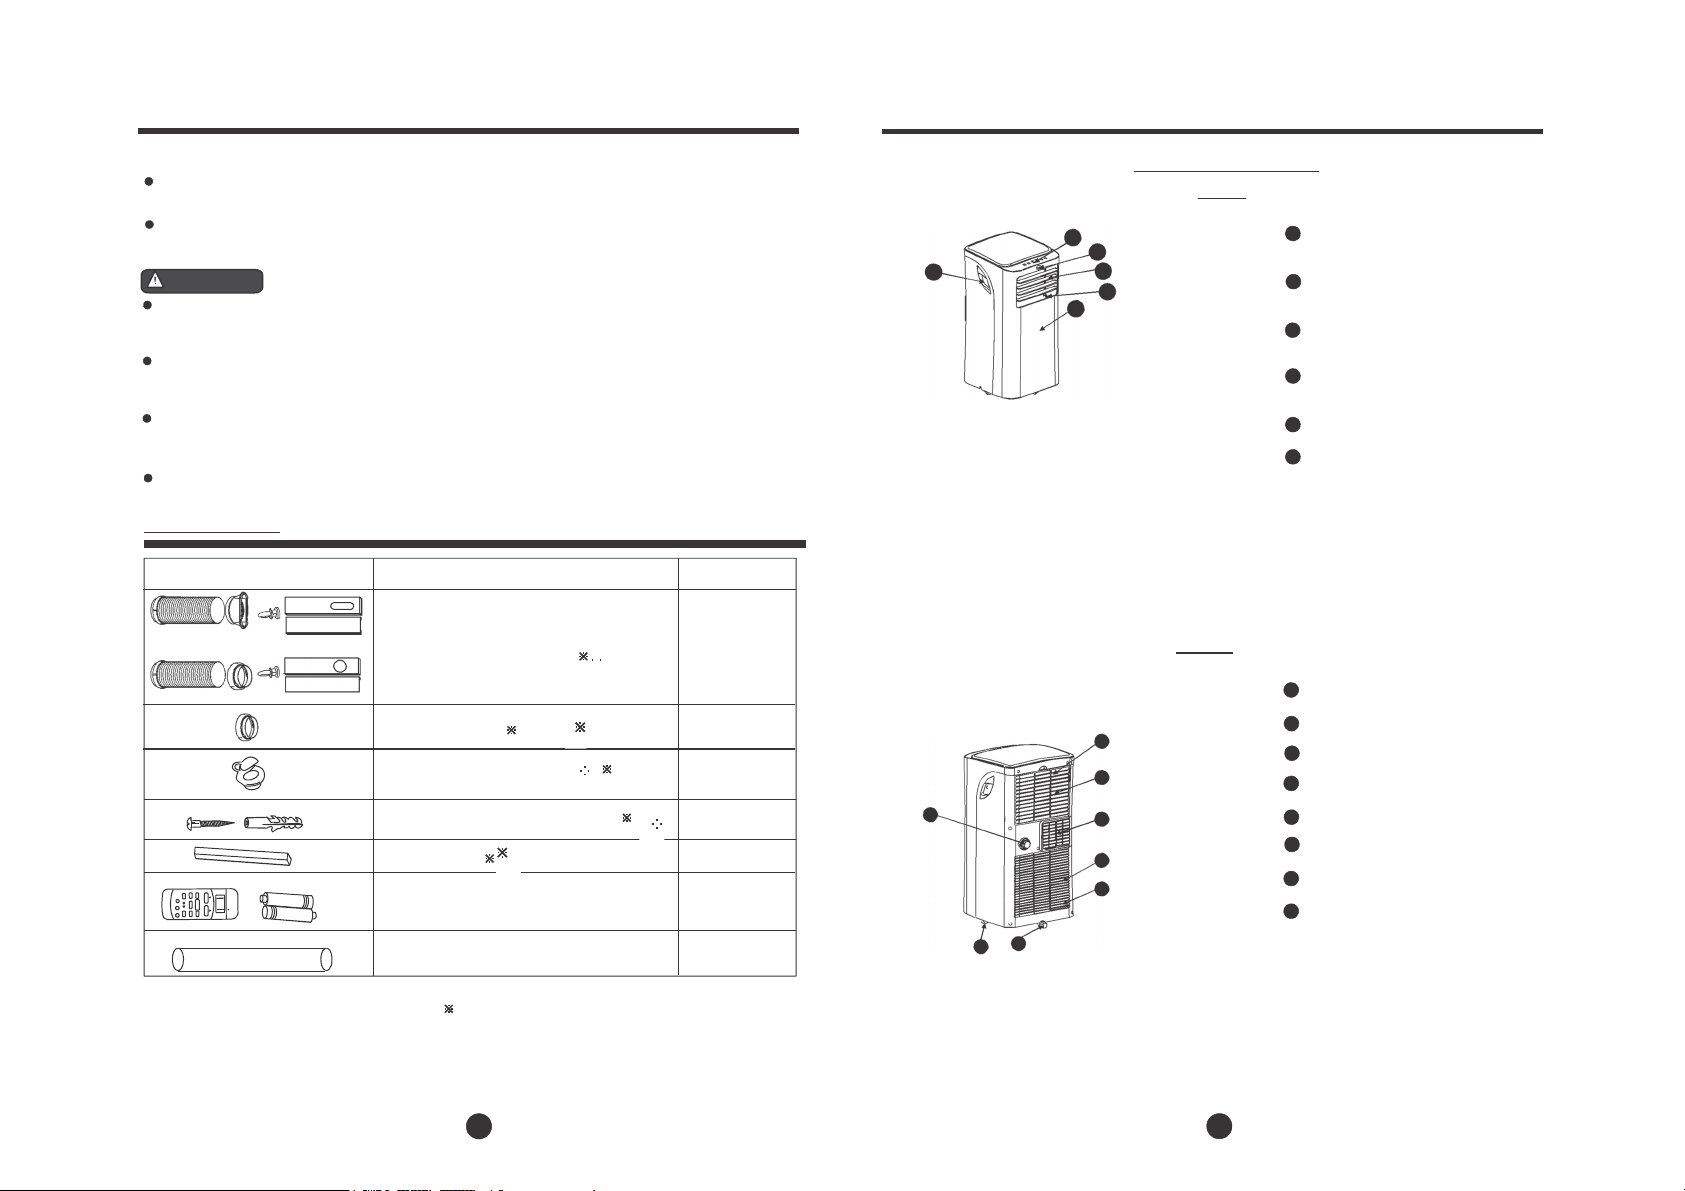
Avant
Panneau de contrôle
1
6 3
4
5
Fig.1
:
2
Signal de réception de la
télécommande
Volet d’air horizontal
3
(réglage manuel)
Volet d’air vertical
4
(réglage manuel)
5
Panneau avant
6
Poignées de transport
(des 2 côtés)
7
Filtre à air supérieur
(derrière la grille)
8
Entrée d’air supérieure
Sortie d’air
9
10
Filtre à air inférieur
(derrière la grille)
11
Entrée d’air inférieure
Sortie de vidange du bac du fond
12
13
Roulette
14
Sortie vidange
9
10
11
Fig.2
Arrière
7
8
Tuyau d'évacuation (fourni), adaptateur B
(rond ou plat selon les modèles)
Kit fenêtre coulissante + boulon
Adaptateur B (rond)
Adaptateur A d’évacuation au mur
Connecteur d’extension et vis en bois
AUTO FAN
COOL HIGH
DRY MED
HEAT LOW
SET TEMPERATURE( C)
MODE
SWING ECONOMY TIMER ON
ON/OFF
FAN SPEED
ION
FOLLOW L ED
ME DISPLA Y
RESET LOCK
TEMP
TIMER OFF
TURBO
Joint en mousse
Télécommande et batterie (pour les modèles
avec contrôle télécommande)
Tuyau de vidange
NOTE : certaines pièces sont en option selon les modèles. Vérifiez si tous
les accessoires sont inclus et référez-vous aux instructions d'installation
pour leur utilisation.
NOTE : toutes les illustrations de ce manuel sont à titre d'explication. Votre
climatiseur peut être légèrement différent.
1 kit
1 kit
1 pièce
4 pièces
3 pièces
1 kit
1 pièce
14
13
12
Page 6
CARACTERISTIQUES DE L’APPAREIL
BOU
TON DE SELECTION MODE
6 7
MODE D’EMPLOI DU CONTROLE ELECTRONIQUE
Avant de commencer, veillez à bien vous familiariser avec le panneau de commande et la
télécommande, puis suivez le symbole pour les fonctions que vous désirez.
L'appareil peut être commandé par le panneau de commande seul ou avec la
télécommande.
NOTE: ce manuel n'inclut pas les opérations télécommande, voir le livret "Instruction
de la télécommande" emballé avec l'appareil pour plus de détails.
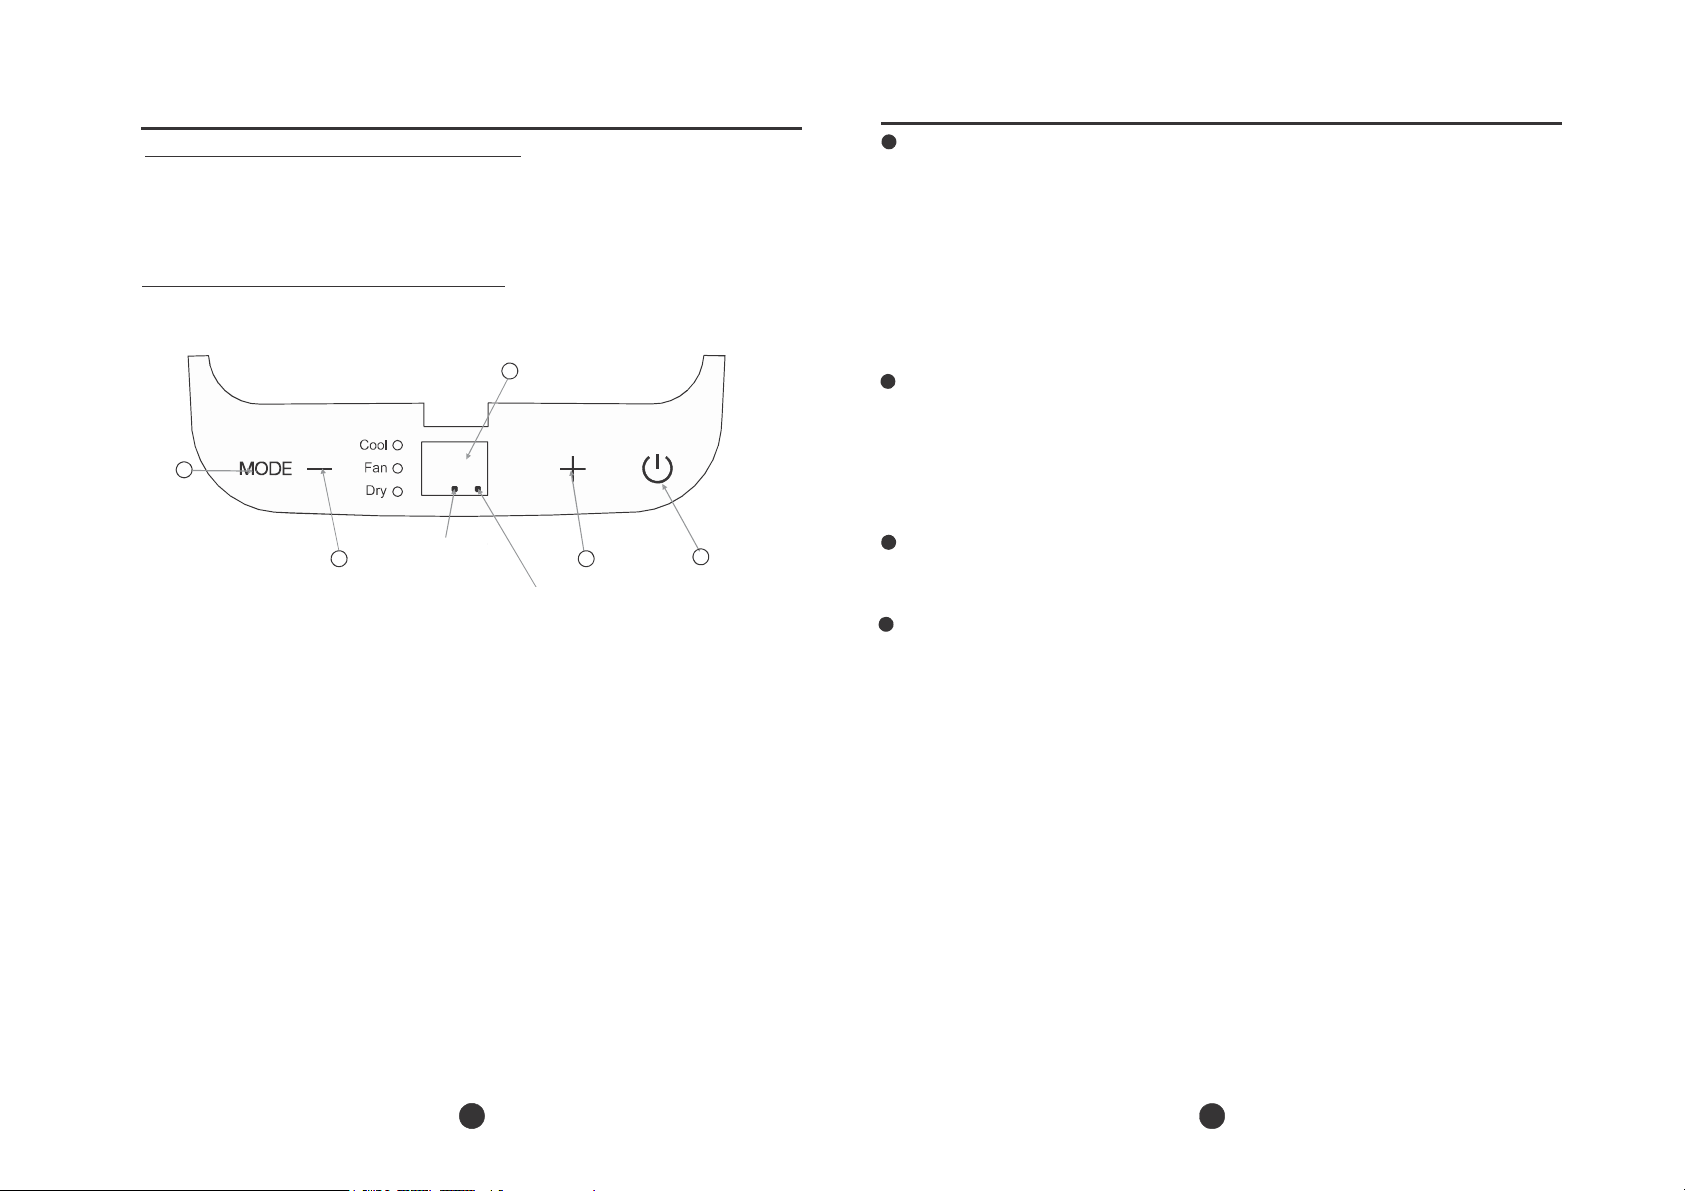
PANNEAU DE CONTROLE DU CLIMATISEUR
4
1
Fig.3
2
Power indicator
Indicateur de
puissance
light
lumineux
2
Indicateur minuteur
Timer mode indicator
lumineux
light (set only by remote
controller)
3
INSTRUCTIONS D’UTILISATION
MODE select
1
1
Sélectionne le mode de fonctionnement approprié.
Chaque fois que vous appuyez sur la touche, un
mode est sélectionné dans une séquence qui va de
COOL (froid), FAN (ventilation) et DRY (sec). Le
voyant du mode correspondant s'allume sous le
réglage choisi.
NOTE : sur ces modes, l’appareil fonctionne
automatiquement selon la vitesse de ventilation.
Vous pouvez régler la vitesse de ventilation
seulement avec la télécommande grâce aux
modes COOL (froid) et FAN (ventilation).
2
BOUTONS HAUT (+) ET BAS (-)
Ajustez (augmenter ou diminuer) les paramètres de
températures d’1°C ou 2°F (ou 1°F) dans une plage
de 17°C/62°F à 30°C/88°F (ou 86°F).
NOTE : Pour convertir les données en Celsius ou
Fahrenheit, appuyez et maintenez les touches
HAUT (+) et BAS (-) en même temps pendant 3
secondes.
3
BOUTON MARCHE/ARET
Pour mettre en marche ou éteindre l’appareil
4
ECRAN LCD
Affiche la température et le paramétrage du
minuteur. En mode SECHAGE ou VENTILATION,
l'écran affiche la température ambiante de la pièce.
Code erreur :
E1 =
sonde de température ambiante débranchez l'appareil et rebranchez-le.
Si l'erreur persiste, contactez le
service.
E2 =
évaporateur capteur de température débranchez l'appareil et rebranchez-le.
Si l'erreur persiste, contactez le
service.
E4 =
communication du panneau
d'affichage - débranchez l'appareil et
rebranchez-le. Si l'erreur se répète,
contactez le service.
Code de protection/sécurité :
P1=
bac du fond plein - connectez le tuyau
de drainage et drainez l’eau récupérée
en-dehors de l’appareil. Si l’erreur se
répète, contactez le service.
button
Instructions d’utilisation
Mode COOL (froid)
- Pressez le bouton MODE jusqu'à ce que le
voyant COOL (froid) s'allume.
- Appuyez sur les boutons + et - pour
sélectionner votre température, dans une
plage comprise entre 17°C et 30°C (62° à
88°F ou 86°F).
- Appuyez sur le bouton FAN (ventilation) pour
choisir la vitesse de ventilation.
Mode DRY (sec)
- Pressez le bouton MODE jusqu'à ce que
le voyant DRY (sec) s'allume.
- Dans ce mode, vous ne pouvez pas
sélectionner une vitesse du ventilateur ou
ajuster la température.
- Gardez les fenêtres et les portes fermées pour
un meilleur effet de déshumidification.
- Ne pas mettre le conduit à la fenêtre.
Mode FAN (ventilation)
- Appuyez sur le bouton MODE jusqu'à ce que le
- Press the "MODE" button until the "FAN
voyant FAN (ventilation) s'allume. L’appareil va
.
indicator light comes on. The unit will operate
automatiquement fonctionner selon la vitesse
the auto fan speed automatically. The
automatique de ventilation.
- La température ne peut pas être ajustée.
- Appuyez sur le bouton FAN (ventilation) de la
télécommande pour choisir la vitesse du
ventilateur.
- Ne pas mettre le conduit à la fenêtre.
Mode SLEEP (nuit)
Cette fonction peut seulement être activée
par la télécommande.
Appuyez sur ce bouton, la température réglée
augmentera de 1°C (1 ou 2°F) en 30 minutes. La
température paramétrée augmentera alors de 1°C
(1 ou 2°F) après 30 minutes supplémentaires. Cette
nouvelle température sera maintenue pendant 7
heures avant de revenir à la température
sélectionnée à l'origine. Ceci met fin au mode
SLEEP (nuit) et l'appareil continuera à fonctionner
comme programmé à l'origine.
REMARQUE : cette fonction n'est pas disponible
en mode FAN (ventilation) ou DRY (sec).
"
Page 7

INSTRUCTIONS D’UTILISATION
Fenêtre
ou
ou
Fig 6
Fig 7
Fig 7a
Kit fenêtre
coulissante
Kit fenêtre
coulissante
Fenêtre
Fenêtre
Kit fenêtre
coulissante
Kit fenêtre
coulissante
Installation du kit fenêtre
fenêtre coulissante.
Boulon
Boulon
Kit fenêtre
Kit fenêtre
ou
Ajustement
Adjust
manuel
manually
Adjust
Ajustement
Fig.4
Autres caractéristiques
Redémarrage automatique
Si l'appareil s'éteint de façon inattendue en
raison d'une coupure de courant, il
redémarrera avec la précédente mise en
fonction automatiquement lorsque le courant
revient.
Attendez 3 minutes avant de reprendre le
fonctionnement
Lorsque l'appareil est arrêté, il ne peut pas être
redémarré dans les 3 premières minutes, afin
de protéger l'appareil. Il redémarrera
automatiquement après 3 minutes.
Caractéristiques de la gestion de
l’alimentation
Lorsque la température ambiante est inférieure
à la température de réglage pour une période,
l'unité fonctionnera automatiquement en
fonction de la gestion de l'alimentation, le
compresseur et le moteur du ventilateur
s'arrêtent.
Lorsque la température ambiante est
supérieure à la température de réglage,
l'appareil quittera automatiquement la fonction
de gestion de l'alimentation. Le compresseur et
le moteur du ventilateur fonctionnent.
Réglage de la direction d'écoulement de
l'air
La direction du volet peut être réglée
manuellement (Fig. 4) :
Ne pas placer de lourds objets ou autres
charges sur le volet, ce qui pourrait
endommager l’appareil.
Vérifier que le volet est entièrement ouvert.
Maintenir le volet totalement ouvert
lors de l’utilisation de l’appareil.
Fenêtre
verticale
.
Minimum : 67,5cm(2.22ft).
Maximum : 123cm(4.04ft).
verticale
Minimum : 67,5cm(2.22ft).
Maximum : 123cm(4.04ft).
horizontale
Minimum : 67,5cm(2.22ft).
Maximum : 123cm(4.04ft).
ou
horizontale
Minimum : 67,5cm(2.22ft).
Maximum : 123cm(4.04ft).
INSTRUCTIONS D’INSTALLATION
INSTRUCTIONS D’INSTALLATION
Lo calisat ion
Fig.5
L'appareil doit être placé sur un sol ferme pour
limiter le bruit et les vibrations.
Pour une localisation en toute sécurité, placer
l’appareil sur un sol lisse et assez résistant pour
supporter le climatiseur.
L’appareil possède des roues pour faciliter le
déplacement, mais uniquement sur les surfaces
lisses et planes (attention aux tapis). Ne pas le
faire rouler sur des objets.
L'appareil doit être placé à proximité d'une prise
murale correctement installée.
Ne placer jamais d'obstacles autour de l'entrée
ou sortie d'air.
Laisser toujours au moins 30 cm à 100 cm
d'espace entre l'appareil et tout objet ou mur.
Votre kit fenêtre a été conçu pour répondre à des
fenêtres verticales et horizontales les plus
classiques. Cependant, il peut être nécessaire pour
vous d'improviser / modifier certains aspects des
procédures d'installation pour certains types de
fenêtre. Référez-vous aux Fig.6 et Fig.7 pour
l'installation et les dimensions. Le kit fenêtre
coulissante peut être fixé avec un boulon (Fig. 7a).
Note :
si l'ouverture de la fenêtre est inférieure à la
longueur minimale mentionnée du kit fenêtre
coulissante, couper légèrement celui-ci afin qu’il
corresponde aux dimensions de l’ouverture de la
fenêtre. Ne jamais découper le trou dans le kit
8
9
coulissante
(optionnel
)
coulissante
Page 8

Rebord de la
Kit fenêtre
Rebord de la
Rebord de la
Rebord de la
26,5’’ –
48,0’’
26,5’’ –
48,0’’
ou
ou
Kit fenêtre
Kit fenêtre
Jo
int en mousse
Fig 8
Fig 9
Fig 10
Fig 11
Kit fenêtre
Fig 12
Fig 13
Fig 14
Fig 15
Panneau de
Panneau de
26,5’’ –
48,0’’
26,5’’ –
48,0’’
Jo
int en mousse
ou
ou
10 11
INSTRUCTIONS D’ INSTALLATION (optionnel)
INSTRUCTIONS D’ INSTALLATION
(optionnel)
Joint en
mousse A
(type adhésif)
fenêtre
fenêtre
Installation dans une fenêtre à
guillotine
1. Couper le joint en mousse (type adhésif) à la
bonne longueur et le joindre au rebord de la
fenêtre. Fig.8
2. Attacher le kit fenêtre au rebord de la fenêtre.
Ajuster la longueur du kit fenêtre coulissante
selon la largeur de la fenêtre, réduire le kit
fenêtre réglable si la largeur de la fenêtre est
inférieure à 26,5 cm. Ouvrir le châssis de la
fenêtre et placez le kit de coulissement de
fenêtre sur le rebord de la fenêtre. Fig.9
3. Couper le joint en mousse à la bonne longueur et
l'attacher sur le haut de la fenêtre. Fig.10.
4. Fermer le châssis de fenêtre en toute
sécurité contre la fenêtre.
5. Couper le joint en mousse à une longueur
appropriée et sceller l'espace ouvert entre le
châssis de la fenêtre supérieure et le châssis de
la fenêtre extérieure. Fig.11.
la fenêtre
la fenêtre
Joint en
mousse A
(type adhésif)
Installation dans une fenêtre coulissante
1. Couper le joint en mousse (type adhésif) à la
bonne longueur et le joindre au rebord de la
fenêtre. Fig.12
2. Attacher le kit fenêtre au rebord de la fenêtre. Ajuster la
longueur du kit fenêtre à coulisse selon la largeur de la
fenêtre, réduire le kit fenêtre réglable si la largeur de la
fenêtre est inférieure à 26,5 cm. Ouvrez le châssis de la
fenêtre et placez le kit de coulissement de fenêtre sur le
rebord de la fenêtre. Fig.13
3. Couper le joint en mousse à la bonne longueur et
l'attacher sur le haut de la fenêtre. Fig.14
4. Fermer le châssis de fenêtre en toute sécurité
contre la fenêtre.
5. Couper le joint en mousse à une longueur
appropriée et sceller l'espace ouvert entre le
châssis de la fenêtre supérieure et le châssis de
la fenêtre extérieure. Fig.15
fenêtre
fenêtre
Page 9

INSTRUCTIONS D’INSTALLATION (optionnel)
er
12 13
Fig. 21
12
13
Installation du tuyau d’évacuation :
Fig.16
Cheville
d’expansion
Adaptateur
Bouchon
adaptateur
Fig.17
Fig.18
A
Le tuyau d'évacuation et l'adaptateur doivent être installés ou
enlevés en conformité avec le mode d'utilisation.
Modes COOL (froid), AUTO
Modes FAN (ventilation), DEHUMIDIFY
(déshumidification)
Install
le tuyau
Retirer
le tuyau
1. Installez le kit d'évacuation adaptateur B sur le tuyau
d'échappement comme le montre la Fig.16 ou Fig.17.
Reportez-vous aux pages précédentes pour
l'installation du kit de fenêtre.
2. Insérez le tuyau d'échappement dans l'ouverture de
sortie d'air le long de la direction de la flèche (Voir Fig.8).
Le tuyau d’évacuation peut être installé dans le mur
(Non applicable pour les appareils sans l’adaptateur A,
connecteurs d’extension et vis en bois)
1. Préparez un trou dans le mur. Installez l’adaptateur A du
tuyau sur le mur (à l'extérieur) en utilisant 4 chevilles à
expansion et vis à bois, assurez-vous de solidement fixer.
(Voir Fig.19)
max
min
Fig.19
NOTE : Couvrez le trou avec le bouchon adaptateur
lorsqu'il n’est pas en cours d'utilisation.
Le tuyau peut être comprimé ou étendu modérément
120CM
en fonction de la condition de l'installation, mais il
est souhaitable de maintenir le tuyau à un minimum.
30CM
IMPORTANT :
NE PAS TROP PLIER LE TUYAU (VOIR Fig.20)
ATTENTION :
Assurez-vous qu'il n'y a aucun obstacle autour de la sortie
d'air du tuyau d'évacuation (de l'ordre de 500mm) pour que le
système d'échappement fonctionne correctement.
INSTRUCTIONS D’ INSTALLATION
Drainage de l’eau :
Tuyau de
drainage
continu
Retirez le
bouchon de
vidange
Fig. 22
Fig. 23
Bouchon
de
vidange
de fond
- Pendant le mode de déshumidification, retirez le
bouchon de vidange à l'arrière de l'unité, installez le
raccord d'évacuation. Pour les modèles sans
connecteur de vidange, il suffit de connecter le
tuyau de vidange au le trou. Placez l'extrémité
ouverte du tuyau directement sur la zone de
drainage au niveau du sol. Référez-vous à Fig.21 et
Fig.22. Assurez-vous que la connexion du tuyau de
vidange et le trou de l'unité soient serrés pour éviter
une éventuelle fuite d'eau.
- Lorsque le niveau d’eau du plateau atteint un
niveau prédéterminé, l'appareil bip 8 fois, la zone
d'affichage numérique indique P1. A ce moment, le
processus de climatisation/déshumidification
s’arrête immédiatement. Cependant, le moteur du
ventilateur continue de fonctionner (ceci est
normal).
Déplacez doucement l'appareil à un endroit de
vidange, retirer le bouchon de vidange et laisser
l'évacuation de l'eau (Fig.23). Réinstallez le
bouchon de vidange de fond et redémarrez la
machine jusqu'à ce que le symbole P1 disparaisse.
Si l’erreur persiste, appelez un service qualifié.
REMARQUE: Assurez-vous de réinstaller le
bouchon de vidange correctement.
Fig. 20
Page 10

NETTOYAGE ET
15
MAINTENA
NCE
Fig. 25
14
Filtre à air
(retrait)
Fig.24
Filtre à air
(installation)
NETTOYAGE ET MAINTENANCE
IMPORTANT :
1) Assurez-vous de débrancher l'appareil avant de le
nettoyer ou le réparer.
2) Ne pas utiliser d'essence, de diluant ou d'autres produits
chimiques pour nettoyer l'appareil.
3) Ne pas laver l'appareil directement sous un robinet ou en
utilisant un tuyau. Cela peut causer un danger électrique.
4) Si le cordon d'alimentation est endommagé, il doit être
réparé ou remplacé par le fabriquant ou un service
qualifié.
1. Filtre à air
- Nettoyez le filtre au moins 1 fois tous les 15 jours pour
prévenir une vitesse de ventilation affaiblie à cause de la
poussière.
- Retrait : l’appareil a 2 filtres, retirez le filtre le long de la
direction de la flèche (Fig.24)
- Nettoyage : nettoyez le filtre en l’immergeant délicatement
dans l’eau chaude (40°C/104°F) avec un détergent
neutre. Rincez et séchez.
- Installation : installez le filtre à air après le nettoyage (voir
Fig.25).
NOTE :
être séparés
2. Boîtier de l’appareil
- Utilisez un chiffon non pelucheux imbibé de détergent
neutre pour nettoyer le boîtier de l’appareil. Terminez le
nettoyage par un chiffon propre et sec.
3. Appareil inactif pendant une longue période
- Retirez le bouchon de caoutchouc à l'arrière de l'appareil
et branchez le tuyau pour vidanger l’eau. Placez
l'extrémité ouverte du tuyau directement sur la zone de
drain (Voir Fig.22-23).
- Retirez la fiche de la prise de drain, toute l'eau dans le
bac inférieur va s’écouler (voir Fig.24).
- Gardez l'appareil fonctionnant en mode FAN (ventilation)
pour une demi-journée dans une pièce chaude pour
sécher l'intérieur de l'appareil et éviter la formation de
moisissure.
- Arrêtez l'appareil et débranchez-le, enroulez le cordon.
Retirez les piles de la télécommande.
- Nettoyez le filtre à air et le réinstaller.
la grille et le filtre à air sont connectés et peuvent
PROBLEMES
PROBLEMES
1. L’appareil ne démarre
pas lorsque vous
appuyez sur le bouton
Marche/Arrêt
2. Pas assez de froid
4. Bruit ou vibration
5. Gargouillement
CAUSES POSSIBLES
- Le code erreur P1 s’affiche
- La température ambiante est
inférieure à la température
programmée (mode COOLING/frais)
- Les fenêtres et/ou les portes de la
pièce ne sont pas fermées
-
Il y a des sources de chaleur
dans la pièce
-
Le tuyau d’évacuation d’air est
bloqué ou n’est pas connecté
-
La température programmée est trop élevée
- Le filtre à air est encombré de
poussière
-
Le sol n’est pas à niveau ou
n’est pas lisse
- Le son vient de l'écoulement du
fluide frigorigène à l'intérieur du
climatiseur
GUIDE DE DEPANNAGE
SOLUTIONS POSSIBLES
Drainez l’eau accumulée
Reprogrammez la température
Assurez-vous que toutes les fenêtres et
portes soient bien fermées
Retirer les sources de chaleur si possible
Connectez le tuyau et assurez-vous qu’il
fonctionne correctement
Baissez la température paramétrée
Nettoyez le filtre à air
Déplacez l’appareil sur une surface
lisse et à niveau si possible
Ceci est normal
Page 11

CLIMADIFF
SA
MOBI
LE
PE AIR
TY
COND
ITION
ERS
The design and specifications are subject to change without prior notice for
product improvement. Consult with the sales agency or manufacturer for details.
143 Boulevard Pierre Lefaucheux
72230 Arnage – FRANCE
http://www.climadiff.com/
CLIMA18 / CLIMA19
Inside you will find many helpful hints on how to use and maintain your air conditioner properly. Just
a little preventative care on your part can save you a great deal of time and money over the life of
your air conditioner. Before operating this product, please read the instructions carefully and save this
manual for future use.
Page 12

Read This Manual
Inside you will find many helpful hints on how to use and maintain your air conditioner
properly. Just a little preventive care on your part can save you a great deal of time
and money over the life of your air conditioner. You'll find many answers to common
problems in the chart of troubleshooting tips. If you review our chart of Troubleshooting
Tips first, you may not need to call for service at all.
SOCIABLE
Sociable remark..................................................................................................................................2
REMARK
CONTENTS
SAFETY
Safety rules .......................................................................................................................................3
Operating condition ...........................................................................................................................3
Electrical information .........................................................................................................................4
PRECAUTIONS
!
CAUTION
Contact the authorised service technician for repair or maintenance of this unit.
Contact the installer for installation of this unit.
The air conditioner is not intended for use by young children or infirm persons without
supervision.
Young children should be supervised to ensure that they do not play with the air
conditioner.
If the power cord is to be replaced, replacement work shall be performed by authorised
personnel only.
Installation work must be performed in accordance with the national wiring standards
by authorised personnel only.
When there are wide differences between USER S MANUAL and Remote controller
Illustration on function description, the description on USER S MANUAL shall prevail.
IDENTIFICATION OF
Accessories .......................................................................................................................................4
Names of parts...................................................................................................................................5
PARTS
AIR CONDITIONER
Electronic control operating instructions ...........................................................................................6
OPERATING
Operating instructions .......................................................................................................................7
INSTRUCTIONS
FEATURES
INSTALLATION
Location ............................................................................................................................................9
Window kit installation ......................................................................................................................9
Exhaust hose installation ................................................................................................................12
Water drainage ................................................................................................................................13
CARE AND
Care and maintenance ....................................................................................................................14
TROUBLESHOOTING TIPS
Trouble shooting ..............................................................................................................................15
The rating data indicated on the energy label is
on the testing condition of installing the
air exhaust duct without adaptor A & B (The duct
the adaptor A & B are listed in the accessories
of the Instruction Manual). See the right figure. At
same time, the unit must be operate on the
MODE and HIGH FAN SPEED by remote
INSTRUCTIONS
MAINTENANCE
NOTE
based
un-extended
COOL
controller.
and
chart
the
1
Page 13

SOCIABLE REMARK
When using this air conditioner in the European countries, the following information must be followed:
DISPOSAL:
such waste separately for special treatment is necessary.
Do not dispose this product as unsorted municipal waste. Collection of
It is prohibited to dispose of this appliance in domestic household waste.
For disposal, there are several possibilities:
A) The municipality has established collection systems, where electronic waste can be
disposed of at least free of charge to the user.
B) When buying a new product, the retailer will take back the old product at least free
of charge.
C) The manufacture will take back the old appliance for disposal at least free of charge
to the user.
D) As old products contain valuable resources, they can be sold to scrap metal dealers.
Wild disposal of waste in forests and landscapes endangers your health when
hazardous substances leak into the ground-water and find their way into the food chain.
Sa fe ty r ul es
To prevent injury to the user or other people and property damage, the following instructions must be
followed. Incorrect operation due to ignoring of instructions may cause harm or damage.
Your air conditioner should be used in such a way
that it is protected from moisture. e.g. condensation,
splashed water, etc.Do not place or store your air
conditioner where it can fall or be pulled into water
or any other
Always transport your air conditioner in a vertical
position and stand on a stable, level surface during
use.
Turn off the product when not in use.
Always contact a qualified person to carry out
repairs. If the damaged power supply cord must be
replaced with a new power supply cord obtained
from the product
Keep an air path of at least 30cm all around the
unit from walls, furniture and curtains.
If the air conditioner is knocked over during use,
turn off the unit and unplug from the mains supply
immediately.
Always use the switch on the control panel.
Always do this
!
liquid.Unplug
manufacturer
immediately if it occurs.
and not repaired.
Do not operate your air conditioner in a wet room
such as a bathroom or laundry room.
Do not touch the unit with wet or damp hands or
when barefoot.
Do not press the buttons on the control panel with
anything other than your fingers.
Do not remove any fixed covers. Never use this
appliance if it is not working properly, or if it has
been dropped or damaged.
Never use the plug to start and stop the unit.
Do not cover or obstruct the inlet or outlet grilles. Do
not use hazardous chemicals to clean or come into
contact with the unit. Do not use the unit in the
presence of inflammable substances or vapour such
as alcohol, insecticides, petrol,etc.
Do not allow children to operate the unit
unsupervised.
Do not use this product for functions other than
those described in this instruction manual.
SAFETY PRECAUTIONS
Never do this
Energy Save
Use the unit in the recommended room size.
Locate the unit where furniture cannot obstruct the air flow.
Keep blinds/curtains closed during the sunniest part of the day.
Keep the filters clean.
Keep doors and windows closed to keep cool air in and warm air out
(cooling mode) or keep warm air in and cool air out(heating mode)..
Op er atin g co nditi on
The air
conditioner
MODE
must be
operated
ROOM
within the
TEMPERATURE
temperature
range
indicated
below:
COOL 17OC(62OF)~35OC(95OF)
DRY
HEAT(heat
HEAT(electrical heat type)
pump type)
O O O O
13 C(55 F)~35 C(95 F)
5OC(41OF)~30OC(86OF)
<30 C/86 F
O
O
Suggested tools for window kit installation
1. Screwdriver(medium size Phillips)
2. Tape measure or ruler
3. Knife or scissors
4. Saw(In the event that the window kit needs to be cut down in size because
the window is too narrow for direct installation)
2
3
Page 14

IDENTIFICATION OF PARTS
For your s afet y
Do not store or use gasoline or other flammable vapors and liquids in the vicinity of this or any other
appliance.
Avoid fire hazard or electric shock. Do not use an extension cord or an adaptor plug. Do not remove
any prong from the power cord.
WARNI NG
Be sure the
on the serial plate, which is located on the side of the cabinet and behind the grille.
Be sure the air
important.
hazards.
Your air
to use is not
electrician
Ensure the
El ect ric al
electrical
service is
adequate
conditioner
The power cord is
conditioner
adequately grounded
install the proper receptacle.
receptacle
is
properly grounded.
equipped
must be used in a
is
accessible
Inf or
ma tion
for the model you have
To
with a
properly grounded
or
protected
after the unit installation.
minimize
three-prong grounding
by a time delay fuse or circuit
chosen.
shock and fire
wall
receptacle.
This
plug for
If the wall
information
hazards,
protection
breaker,
proper
against shock
receptacle
have a qualified
Accessories
PARTS : PARTS NAME :
can be found
grounding
you intend
QUANTITY
IDENTIFICATION OF
PARTS
NAMES OF PARTS
1
2
6 3
4
5
is
Fig.1
:
Front
1
Operation Panel
2
Remote Signal Receptor
Horizontal Louver Control Lever
3
(adjust manually)
4
Vertical Louver Control Lever
(adjust manually)
5
Panel
6
Carrying Handle
(both sides)
Exhaust hose(supplied), adapter
or
mouth
and
AUTO FAN
COOL HIGH
DRY MED
HEAT LOW
SET TEMPERATURE( C)
MODE
SWING ECONOMY TIMER ON
ION
FOLLOW L ED
ME DISPLA Y
RESET LOCK
TEMP
ON/OFF
FAN SPEED
TIMER OFF
TURBO
NOTE: Optional parts( ), some models
NOTE:
Check all the
their usage.
accessories
All the illustrations in this manual are for explanation purpose only. Your air
may be slightly different. The actual shape shall prevail.
are
included
B(round
or flat
month:depending
Window Slider Kit and bolt
Adaptor B(round mouth)
Wall Exhaust Adaptor A( ? )
Expansion Plug and wooden screw(? )
Foam seal (
Remote Controller and Battery
(For remote control models only)
Drain hose
in the
package
?
)
without.
and please refer to the
on models)
(
?
)
(
?
)
4
installation instructions
1 set
1 set
1 pc
4/ pc
3/pc
1set
1pc
for
conditioner
Rear
7
14
13
12
8
9
10
11
7
Upper Air Filter
(Behind the grille)
8
Air Intake
Air Outlet
9
10
Lower Air Filter
(Behind the grille)
11
Air Intake
Bottom tray drain outlet
12
13
Wheel
14
Drain Outlet
Fig.2
5
Page 15

AIR CONDITIONER FEATURES
E L E C T R ON I
Before you begin, thoroughly familiarize yourself with the control panel and remote controller
and all its functions, then follow the symbol for the functions you desire.
The unit can be controlled by the unit control panel alone or with the remote controller .
NOTE: This manual does not include Remote Controller Operations, see the <<Remote
Controller Instruction>> packed with the unit for details.
OPERATION PANEL OF THE AIR CONDITIONER
C C
ON T
ROL
OP E R ATI
NG
IN S T R UC T I ONS
4
1
Fig.3
2
Power indicator
light
2 3
Timer mode indicator
light (set only by remote
controller)
6
OPERATING
MODE select
1
MODE select
Selects the appropriate operating mode.
Each time you press the button, a mode
is selected in a sequence that goes
COOL, FAN and DRY .The mode indicator
light illuminates under the different mode
setting.
NOTE: On above modes, the unit operates
auto fan speed automatically. You can
set fan speed only by the remote controller on
COOL and FAN modes.
2
UP( ) and DOWN( )
Used to adjust (increasing/decreasing)
temperature settings in 1O C/2OF(or 1OF) increments
in a range of 17OC/62OF to 30OC/88OF (or 86OF).
NOTE:
temperature in degrees Fahrenheit or
Celsius. To convert from one to the other,
and hold the Up and Down buttons at the
time, for 3
3
ON-OFF
Power switch
LED
Display
4
Shows
While on
temperature.
Error
codes:
E1-
Room temperature sensor
Unplug the unit and plug it back
If error repeats, call for
E2-
Evaporator temperature sensor
Unplug the unit and plug it back
If error repeats, call for
E4- Display panel
Unplug the unit and plug it back
If error repeats, call for
Protection
P1-
Bottom tray is full - Connect
drain hose and drain the
water away. If error repeats,
for
service.
button
button
button
The control is capable of
seconds.
button
the set
DRY
codes:
on/off.
temperature
and FAN
communication
while on cool mode.
modes,
service.
service.
service.
collected
displaying
it
shows
error-
error-
the
call
from
degrees
in.
error-
in.
in.
the
press
same
the room
Operating Instructions
COOL
operation
- Press the "MODE" button until the "COOL"
indicator light comes on. The unit will operate
the auto fan speed automatically.
- Press the ADJUST buttons "▲" or " " to
select your desired room temperature. The
temperature can be set within a range of
17OC-30OC/62OF-88OF(or 86OF).
- Press the "FAN" button on the remote
controller to choose the fan speed.
DRY
operation
- Press the "MODE" button until the "DRY"
indicator light comes on.
- Under this mode, you cannot select a
speed or adjust the
- Keep windows and doors closed for the
dehumidifying
- Do not put the duct to
FAN
operation
- Press the "MODE" button until the "FAN "
indicator light comes on. The unit will operate
the auto fan speed automatically. The
temperature cannot be adjusted on fan mode.
- Press the "FAN" button on the remote
controller to choose the fan speed.
- Do not put the duct to window.
SLEEP
operation
This feature can be activated from the
remote control ONLY.
To activate SLEEP feature, the set
will increase by 1OC/2OF(or 1OF) in 30
The set temperature will then increase
another 1OC/2OF(or 1OF) after an additional 30
minutes. This new temperature will be
for 7 hours before it returns to the
selected temperature. This ends the Sleep
and the unit will continue to operate as
programmed.
NOTE:
DRY
This feature is unavailable under FAN or
mode.
INSTRUCTIONS
temperature.
effect.
window.
temperature
minutes.
by
maintained
originally
originally
fan
best
mode
7
Page 16

OPERATING INSTRUCTIONS
Adjust
manually
Adjust
Other features
Auto-Restart
If the unit breaks off unexpectedly due to the
power cut,it will restart with the previous
function setting automatically when the powe
resumes..
Wait 3 minutes before resuming operation
After the unit has stopped, it cannot be restarted
operation in the first 3 minutes. This is to protect
the unit. Operation will automatically start after
3 minutes.
POWER MANAGEMENT feature
When the ambient temperature
setting temperature for a period
will
be
feature. The compressor and fan motor
When the ambient temperature
setting temperature, the unit will
quit the power management feature.
compressor and (or) fan motor
Air flow direction adjustment
is
lower than
of
automatically operate power managemen
time, the
is
higher than
be automatically
run.
The
stop.
the
unit
the
t
(Fig.4):
The louver can be set to the desired position
manually.
Do not place any heavy objects or other loads
on the louver, doing so will cause damage to
the unit.
Ensure the louver is fully opened under
Keep the louver fully opened during
operation.
Horizontal
window
Window Slider
Minimum:67.5cm(2.22ft).
Maxmum:123cm(4.04ft).
Window Slider
Minimum:67.5cm(2.22ft).
Maxmum:123cm(4.04ft).
Kit
Horizontal
window
Kit
or
or
INSTALLATION INSTRUCTIONS
INSTALLATION
Lo cati on
Fig.5
The air
foundation
and
level floor strong enough
The unit has
only be
when
Do not
The unit
rated grounded
Never place
outlet
Allow
efficient
conditioner should
to
secure positioning, place
rolled
rolling
attempt
must
of the unit.
at
least 30cm
air-conditioning.
INSTRUCTIONS
minimize noise
casters
on
on
be
any
to
to aid
smooth,
carpet surfaces.
to roll the unit
placed within reach
socket.
obstacles around
of
space from
be
placed
and
the unit on a smooth,
support
placement,
flat
surfaces.
over
Window Slider kit Installation
Your
window
standard "Vertical" and "horizontal"window
applications,
improvise/modify
procedures
to Fig. 6& Fig.7 for
openings.Window
(see Fig.7a).
Note:
minimum length
slider kit has been
However,
for
certain
If the
window opening
it may be
some
aspects
types of
minimum
slider kit can be fixed with a bolt
of the
window. Please
and
is less than the mentioned
window
slider kit, cut that one
never cut out the hole in
window
(optional
on a firm
virbration.
designed
necessary
of the installation
maximum
slider kit.
For safe
the unit.
but it
should
Use
caution
objects.
of a properly
the air inlet or
the wall for
to fit most
for you to
refer
window
)
Fig.4
Horizontal
window
Window Slider
Maxmum:123cm(4.04ft).
Kit
or
bolt
8
Horizontal
window
Window Slider
Minimum:67.5cm(2.22ft).
Maxmum:123cm(4.04ft).
Kit
Fig.7
9
Window slider kit
or
Fig.7a
bolt
Window
slider kit
Page 17

2. Attach the window slider kit to the window stool.
Adjust the length of the window
slider kit according
Window
kit
kit if the width of window is less than 26.5
inches. Open
the window
sash and place the window
slider kit on
the window sash and place the window slider kit on the
26.5 ~ 48.0
the window
stool. See Fig.13.
window stool. See Fig.9.
INSTALLATION INSTRUCTIONS (optional)
INSTALLATION INSTRUCTIONS
(optional)
26.5 ~ 48.0
26.5 ~ 48.0
or
or
Foam seal
Foam seal A
(adhesive type)
Window stool
Window kit
Window stool
Fig.9
Window kit
Window stool
Window kit
Window stool
Fig.10
Fig.11
Fig.8
Installation in a double-hung sash
window
1. Cut the foam seal(adhesive type) to the proper
length and attach it to the window stool. Fig.8
Adjust the length of the window slider kit according
to the width of window, shorten the adjustable window
3. Cut the foam seal(adhesive type) to the proper
length and attach it on the top of the window. Shown
as in Fig.10.
4. Close the window sash securely against the
window.
5. Cut the foam seal to an appropriate length and
seal the open gap between the top window sash
and outer window sash. Shown as in Fig.11.
Window
panel
or
Window
panel
Foam seal
Foam seal A
(adhesive type)
Fig.12
26.5 ~ 48.0
Fig.13
or
Fig.14
Fig.15
10
Installation in a sliding
window
sash
1. Cut the foam seal(adhesive type) to the proper
length and attach it to the window frame,Fig.12.
2. Attach the window slider kit to the window stool.
to the width of window, shorten the adjustable window
kit if the width of window is less than 26.5 inches. Open
3. Cut the foam seal(adhesive type) to the proper
length and attach it on the top of the window.
Shown as in Fig.14.
4. Close the sliding sash securely against the window.
5. Cut the foam seal to an appropriate length and
seal the open gap between the top window sash
and outer window sash. Shown as in Fig.15.
11
Page 18

INSTALLATION INSTRUCTIONS (optional)
Exhaust hose installation:
Fig.16
Fig.17
Fig.18
Adaptor
Adaptor
cap
Expansion plug
position
A
max
min
Fig.19
The exhaust hose and adaptor must be installed or removed
in
accordance
COOL,
FAN,DEHUMIDIIFY mode
with the usage mode.
AUTO mode
1. Install the window
hose as shown in Fig.16. or Fig.17. Refer to the previous
pages for window kit installation.
2. Push the
the arrow
The exhaust hose can be installed into the wall
(Not
applicable
plugs and
1. Prepare a hole in the wall. Install the wall Exhaust
Note:
Cover the hole using the adaptor cap when not in use.
IMPORTANT:
wooden
onto the
wall(outside)
wooden
screws, be sure to fix
to wall Exhaust
The duct can be compressed or extended moderately
according to the installation requirement, but it is
desirable to keep the duct length to a minimum.
DO NOT OVER BEND THE DUCT (SEE Fig.20)
CAUTION:
120CM
30CM
Make sure that there is no
the
exhaust
exhaust
system works properly.
Exhaust
adaptor B onto the exhaust
Exhaust
hose into the
direction(See
to the units without
screws of
by using 4
adaptor
Fig.18).
Accessories ).
A.
hose (in the range of
obstacle
airoutlet opening
adaptor
expansion
thoroughly.
around the air outlet of
500mm)
Install
Remove
along the
A, expansion
adaptor
plugs and
(See Fig.19)
in order to the
Fig.20
12 13
INSTALLATION INSTRUCTIONS
Water drainage:
Fig.21
A
Continuous
drain hose
Remove the
drain plug
Fig.22
Bottom drain plug
Fig.23
- During dehumidifying modes, remove the
plug from the back of the unit, install the
connector(5/8 universal female mender)
3 4 hose(locally purchased). For the
without drain connector, just attach the
hose to the hole. Place the open end of
hose directly over the drain area in
basement floor. Please refer to Fig.21 &
models
your
drain
drain
with
drain
the
22.
- When the water level of the bottom tray reaches
a predetermined level, the unit beeps 8 times,
the digital display area shows "P1". At this time
the air conditioning/dehumidification process will
immediately stop. However, the fan motor will
continue to operate(this is normal).
Carefully move the unit to a drain location,
remove the bottom drain plug and let the
water drain away (Fig.23). Re-install the bottom
drain plug and Restart the machine until the "P1
symbol disappears. If the error repeats, call for
service.
NOTE: Be sure to reinstall the bottom drain plug
before using the unit.
"
Page 19

CARE AND MAINTENANCE
15
Air filter
(take out)
Fig.24
Air filter
(install)
Fig.25
CARE AND MAINTENANCE
IMPORTANT:
1) Be sure to unplug the unit before cleaning or servicing.
2) Do not use gasoline, thinner or other chemicals to clean
the unit.
3) Do not wash the unit directly under a tap or using a hose.
It may cause electrical danger.
4) If the damaged power supply cord must be replaced with
a new power supply cord obtained from the product
manufacturer
1. Air filter
- Clean the air filter at least once every two weeks to prevent
inferior fan operation because of dust.
- Removal
Take the air filter out along the arrow direction (Fig.24).
- Cleaning
Wash the air filter by immersing it gently in warm water
(about 40OC/104OF) with a neutral detergent. Rinse the filter
and dry it in a shady place.
- Mounting
Install the air filter after cleaning (see Fig.25).
NOTE:
2. Unit enclosure
- Use a lint-free cloth soaked with neutral detergent to clean
the unit enclosure. Finished by a dry clean cloth.
3. Unit idle for a long time
- Remove the rubber plug at the back of the unit and attach
a hose to drain outlet
directly
(See Fig.22 & 23).
- Remove the plug from the bottom drain outlet, all the water
in the bottom tray would drain out (See Fig.24).
- Keep the appliance running on FAN mode for half a day in
a warm room to dry the appliance inside and prevent mold
forming.
- Stop the appliance and unplug it, wrapped the cord and
bundle it with the tape. Remove the batteries from
the remote
- Clean the air filter and reinstall it.
and not repaired.
The grill and the air filter are connected and can be
separated.
.
Place
the
open
over the
controller.
drain area
in your
end of the hose
basement
floor
TROUBLE
14
TROUBLES
1.
Unit does
Start
when
Pressing
Button
2.
Not cool
4.
Noisy
or vibration
5.
Gurgling
6.
Power shut off at
Heating mode
SHOOTING
not
on/off
enough
sound
POSSIBLE
- P1
appears
-
Room temperature
the set
-
The windows
are not
-
There
room.
-
Exhaust
blocked.
-
Temperature setting
- Air
filter
-
The ground
enough.
-
The sound comes from
of the
air-conditioner.
-
The automatic over
protection function. When
temperature
exceed 70OC/158OF,the
wi ll stop.
CAUSES
in the
display
is
lower
temperature.(Cooling
or
doors
in
closed.
are
heat sources inside
air
duct
is not
connected
is too high.
is
blocked
by dust.
is not
level
or not flat
the flowing
refrigerant inside
the
heat
at the air outlet
TROUBLESHOOTING
window
than
mode)
the
room
the
device
the
or
SUGGEST
Drain the
Make sure
doors
Remove
Connect
sure
Decrease
Clean
Place
ground
It is normal.
Switch
has cool
REMEDIES
water
Reset
the temperature.
all the
are closed.
the
the
it
can function properly.
the set temperature.
the air filter.
the
unit
if possible.
on
again after
down.
in the
bottom
windows
heat sources
duct and
make
on a
flat,
level
the unit
TIPS
tray.
and
if possible.
Page 20

 Loading...