

Page 1

Con cept 600 Ta ble of Con tents
Stan dard Fea tures of the Con cept 600 ....................... 2
Wel come....................................... 3
Main te nance.....................................3
Built- in ve hi cle re cov ery/anti- carjacking fea ture.................. 4
En able/dis able the anti- carjacking fea ture ................................ 4
Your se cret dis arm ing code ....................................... 4
IM POR TANT: What you MUST do to drive your car ............................ 5
“Guess ing” your code won’t help a car jacker .............................. 5
How to set your own se cret dis arm ing code ............................... 5
Your re mote con trols................................. 6
How to use your MAS TER re mote con trol ................................. 7
How to use your COM PAN ION re mote con trol ............................. 7
Re motely con trol ling your Con cept 600 ................................. 7
Quick ref er ence: re mote con trol func tions ................................ 10
ACG 2™ (Anti- CodeGrabbing 2™) ................................... 10
Auto matic re mote con trol low- battery warn ing ............................. 11
Re mote con trol bat tery re place ment .................................. 11
Add ing new re mote con trols ...................................... 11
How to erase the codes of lost or sto len re mote con trols ........................ 11
Two- Point In ter nal Auto Im mo bi li sa tion ...................... 12
Wire less Fu el Guard Mod ule™ ........................... 12
En gine Re start Fea ture .........................................12
Auto matic Win dow Rol lUp .............................13
Auto matic Win dow Rol lUp In stant By pass ................................ 13
AutoArming™ .................................... 13
Plain View 2™ Coded Valet Mode .......................... 14
To en able valet mode.......................................... 14
Auto matic exit of the valet mode.....................................14
Re mote con trolled valet mode en try and exit .............................. 14
Key less en try in valet mode ...................................... 14
Digi tal Tilt/Mo tion Sen sor .............................15
Digi tal Dual- Zone Prox im ity Sen sor 4 ........................ 15
Re mote con trolled over ride of each Prox im ity Sen sor zone ........................ 15
False Alarm Pre ven tion & FACT™ ..........................16
How to in ter pret the chirps and in di ca tor light flashes .............. 16
How to in ter pret the LED status in di ca tor ..................... 16
Auto matic Battery- Saving Mode ....................................16
Smart Au toTest ing™.................................17
Auto matic mal func tion by pass with AutoRe Moni tor ing™ ......................... 17
Smart prior in tru sion at tempt alert .........................17
Multiple- event To tal Re call™ ............................ 18
AutoLock and Aut oUn Lock™ ............................18
Smart boot re lease op tion ............................. 18
Smart Powe rUp™ 2 ................................. 18
Op tional Cliff Net Wiz ard™ & Da ta Port ...................... 19
Timer options....................................19
Re mote con trolled timed head light ac ti va tion op tion .......................... 19
Smart Self- Powered Me dal lion Si ren with Digi tal Com Link ............ 20
User- selectable fea tures .............................. 21
Step- by- step pro gram ming in struc tions ................................. 21
Ta ble of User- Selectable Fea tures .................................... 22
Exam ple ................................................ 23
Re set All Fea tures ...........................................23
1
Page 2

Stan dard Fea tures of the Con cept 600
The fol low ing are stan dard fea tures of this sys tem. Some ve hi cles may re quire op tional par ts/wir ing and a few are in com pati ble with some fea tures.
þ Thatcham-Evaluatedþ
þ Lifetime Warranty
þ Up- to-£500 theft pro tec tion guar an tee
þ Two Remote Controls: one master remote, one companion remote
n ACG™ 2 (Anti-CodeGrabbing™)
n Extended Range
n Audible Low-Battery Warning
þ Built-In Two-Point AutoImmobiliser for Failure-Proof Driving Safety
þ Wireless FuelGuard Module
þ Patented PlainView 2™ Coded Valet Mode
n User-Selectable Remote Valet Mode Entry/Exit
n Automatic Re-Enabling of Full Security
þ Digital Dual-Zone Proximity Sensor 4 with Remote Zone Override
þ Digital Tilt/Motion Sensor
þ Built-In Window RollUp
þ BlackJax Anti-Carjacking Electronics
þ FACT — False Alarm Control and Test
þ Optional DataPort™ Interface to Your Own PC
n Point-and-Click Feature Programming with SecureAccess
þ Smart Self-Powered Medallion Siren with Unbreachable Digital ComLink
n Smart Self-Powered Circuitry with Automatic Low Battery Warning
n Dual-Mode “Chirp” Silencing
n QuietChirp™/LoudChirp™
n Remote Siren Silencing
þ Built-In Door Lock Electronics and Relays
n User-Selectable Automatic Door Locking/Unlocking
þ Remote Panic with Smart Locking/Unlocking
þ User-Selectable AutoArming™
n Lock upon AutoArming
n Instant AutoArm Bypass
þ Smart Remote Boot Release Capability
þ Integrated Electronic Timer for Optional Remote Headlight Activation
þ Built-In Indicator Light Flasher with On-Board Relay
þ Remote Controlled Courtesy Lighting
þ Smart AutoTesting™ with Malfunction AutoBypass™ & AutoReMonitoring
þ Smart Prior Intrusion Attempt Alert
þ Eight-Event TotalRecall™
þ High-Luminescence LED Status Indicator with Automatic Battery-Saving Mode
þ Remote Control Code Learning
þ Clear All Remotes
þ Multiple-Car Control
þ SmartPowerUp™ 2
þ Full-Time SecureAccess™ Programming
2
Page 3

Wel come to the world of
high- technology ve hi cle se cu rity and con ven ience
ongratulations on the purchase of your Concept 600, and thank you for choosing Clifford
Electronics World-Class Auto Security for your vehicle security needs! Clifford has long
C
been recognised as the world’s leading manufacturer of high-technology vehicle security
systems and accessories. Buying Clifford products has always meant buying the best, and
nowhere is our commitment to technological innovation, reliability and quality more evident
than in the astounding Concept 600 — our top-of-the-line Thatcham-evaluated model.
Concept 600 is loaded with protective features and convenience benefits, including: Window
RollUp that automatically closes the front two electric windows every time you remotely arm.
The remarkable self-adjusting Digital Tilt/Motion Sensor that detects any attempts to tow the
vehicle or remove its wheels. Our innovative Wireless FuelGuard Module that makes theft by
even the most skilled car thief virtually impossible since there are no wires for the thief to cut
or jump! BlackJax anti-carjacking and vehicle recovery system enhances your personal safety
and virtually assures your vehicle can be promptly recovered intact. Concept 600 also has our
ACG 2™ (Anti-CodeGrabbing) that fights off thieves with code-grabbers (a device similar to
those used to “clone” cellular phones). Clifford’s unique PlainView 2 Coded Valet Switch
ensures no thief, carjacker or joyrider can turn off your Concept 600 like they can with other
car alarm brands. The Smart Self-Powered Medallion Siren with Digital ComLink will detect
any theft-related wire tampering and will continue to sound even if the thief were to cut all
the wires! Our new optional CliffNet Wizard™ PC interface even lets you test and set all the
user-selectable features on your computer screen. Plus there’s remote controlled valet mode,
dual-point immobilisation in addition to the Wireless FuelGuard, an electronic interlock to
prevent accidental activation of the optional remote boot release, smart automatic
locking/unlocking if you ever need to “panic” the system, full-time programming access (even
whilst driving), and much, much more. Yet despite all the sophistication, you will find that
your Concept 600 is amazingly easy to use: never more difficult than a few presses of a button.
NOTE: Your sys tem MUST be in stalled by an Author ised Clif ford Dealer in
ac cor dance with the in struc tions we sup ply them. The sys tem is in tended for
auto mo biles with a 12- volt bat tery and petrol- or diesel- powered en gines.
(BlackJax works on electronic petrol-injected vehicles and will work on most
diesel-engine vehicles with the addition of our optional #60-226 adapter).
NOTE: The Installation Certificate document must be completed by your
installer at the Authorised Clifford Dealer. Other than the remote controls,
this system has no user-serviceable parts. Your Authorised Clifford Dealer
can correct any system wiring problems and, if ever needed, can return any
malfunctioning component to Clifford Electronics for repair/replacement
under the terms printed on the supplied warranty card. Any alterations or
additions would automatically invalidate the warranty, antitheft guarantee
(if applicable) and invalidate the Installation Certificate.
Main te nance
Your Concept 600 requires no maintenance except for replacement of remote control
batteries when they reach the end of their useful life; see the Automatic low battery
warning and Remote control battery replacement sections on page 11. This product, like any
electrical device in your vehicle, requires that your vehicle battery be in proper working
order and fully charged. To ensure proper operation, periodically have your vehicle
battery “load-checked” at any local garage/mechanic and ask them to verify that the
charging system (alternator, etc.) is working properly. Also make sure the battery cables
and connections are tight and free from corrosion.
3
Page 4

Built- in ve hi cle re cov ery/anti- carjacking fea ture
Concept 600’s built-in BlackJax feature provides a safe and effective means of recovering
your vehicle after a theft or carjacking. In a carjacking situation, the sooner you are out
of the car the better. Don’t resist or take anything with you, just get out and get away.
The instant the car door is opened, your Concept 600 takes charge. First it allows the
carjacker to drive a short distance, ensuring your safety. Then it repeatedly flashes the
brake lights and continuously sounds the siren to caution nearby drivers and draw
attention to your stolen vehicle. Then when the carjacker slows for a turn or traffic, it
safely shuts down the engine and dynamically prevents it from being restarted. The
system will ignore the remote control at this point (since the carjacker most likely took
your remote along with your keys).
Even if the carjacker is familiar with our system, your Concept 600 will assure that he
cannot restart the engine. Unable to do so, and with your stalled vehicle in the middle of
traffic — siren wailing and brake lights flashing — the carjacker has no choice but to
abandon your car. (The same occurs to anyone who steals your parked car from you at a
petrol station or in a car park, which are the most common carjacking sites). To recover
your vehicle, you simply walk a block or two to your car, enter your code, and the system
releases control of the vehicle to you.
VERY IMPORTANT: The factory setting for the anti-carjacking feature is OFF.
Once you are familiar with the following, we suggest you turn this feature ON
(see pages 21-22). When anti-carjacking is on, each time you begin driving
you MUST enter your disarming code via the PlainView 2 switch on the
dashboard or console (unless the system is in valet mode). You may turn this
feature on or off at any time.
Your secret disarming code tells the system that the car is being driven by an authorised
person. If you or a passenger opens and closes a car door at any point whilst the engine is
running (as would occur in a carjacking attempt), you must again enter your secret code.
En able/dis able the anti- carjacking fea ture
You may enable or disable the BlackJax anti-carjacking feature (see User-selectable
features on pages 21-22) or temporarily override it via PlainView 2 Coded Valet Mode
(see page 14).
Your se cret dis arm ing code
Unless the BlackJax anti-carjacking feature is turned off or the system is in valet mode
(see page 14), 20 seconds after you switch on the ignition and press the brake (or open
and close a door whilst the engine is running), you must enter your secret disarming code
to let the system know it is you who is driving.
Your sys tem’s factory- set dis arm ing code is noted on the back
cover of this man ual.
Defi ni tions
n Digit:A digit is defined as any number from 0 to 9, inclusive.
n Disarming code: A disarming code may be 1 to 4 digits in length, but the first digit
may not be a zero:
A 1-digit code = any number between 1-9
A 2-digit code = any number between 10-99
4
Page 5

A 3-digit code = any number between 100-999
A 4-digit code = any number between 1000-9999
n PlainView 2 switch: A two-button switch mounted on the dashboard or console.
One of the buttons is marked with a raised ✱, the other is unmarked. Each time you
drive your car, you must enter your secret disarming code via the PlainView 2 switch.
n Entering a digit: To enter a digit, you press and release the ✱ button of the
PlainView 2 switch the number of times of the digit to be entered, followed by pressing the
unmarked button. To enter a zero, you simply press and release the unmarked button.
n Entering a code: To enter your code, just repeat the above for each digit of your
code.
EX AM PLE: To en ter a code of 1203, you would press and re lease
the Plain View 2 switch but tons thusly: ✱ un marked, ✱✱ un marked, un marked, ✱✱✱ un marked.
NOTE: You may NOT se lect a code that be gins with a zero. The
first digit of your code must be 1–9.
IM POR TANT: What you MUST do to drive your car
If you have the BlackJax anti-carjacking feature turned on, until you set your own
disarming code, you will use the factory-set code noted on the back cover of this manual.
To drive your car, do the following:
1. Shut all doors, then start the engine.
2. Enter the factory-set disarming code noted on the back cover of this manual using the
Entering a code: information noted above (you may do this whilst driving, if you wish).
The LED will light.
3. The LED will flash on for an instant after entry of the final digit to confirm proper
code entry. You may now drive or continue driving the vehicle.
What you MUST do if you hear 5 si ren chirps while driv ing
If you forget to enter the code, the system will remind you to do so 20 seconds after you
begin driving by “chirping” the siren 5 times and flashing the dashboard LED. At this
point, you have another 20 seconds to enter your code. When entered, the LED will stop
flashing and the siren will chirp once to confirm proper code entry. If the proper code is
not entered within 20 seconds after the 5-chirp signal, the engine will shut down as soon
as you slow for traffic or a turn. You may enter your disarming code even after the engine
is shut down. Once the proper disarming code is entered, you will be able to resume
driving.
“Guess ing” your code won’t help a car jacker
What if the carjacker is familiar with Clifford’s patented PlainView 2 coding system and
tries guessing codes at random? No problem. After three incorrect codes are entered, the
system will ignore any further code entries for a short time. So even if the carjacker were
to actually stumble upon your code during this time, he would still not be able to silence
your system or restart the engine.
How to set your own se cret dis arm ing code
You may choose any 1-, 2-, 3- or 4-digit code, but the first digit must not be a zero (e.g.,
1023 is a valid code, 0123 would not be a valid code). You can also change your code
whenever and wherever you want with the procedure noted on pages 21-22.
con tin ued...
5
Page 6

Ex am ple
Let’s say you want to set a disarming code of 4301. To do so, you would do the following:
1. From the Table of user-selectable features on page 22, you would note that the Set a
new secret disarming/valet code feature is in column 2, row 7.
2. Enter program mode by turning on the ignition, entering your current disarming code,
then pressing and holding the PlainView 2 ✱ button for 3 seconds until you hear a chirp.
3. Select column 2 by pressing the unmarked button twice. After a brief pause, you will
hear 2 chirps to confirm that you have selected feature column 2.
4. Within 5 seconds, select row 7 by pressing and releasing the PlainView 2 ✱ button 7
times. To help you count, you will hear a chirp each time you press the ✱ button. After 7
presses, immediately press the unmarked button, then immediately enter your new code.
Example: To enter 4301 as your new code, you would press the switch buttons
in this manner: ✱✱✱✱ un marked, ✱✱✱ un marked, un marked, ✱ un marked.
5. Wait for the 2-chirp confirmation.
6. Turn off the ignition to exit program mode (you’ll hear a 3-chirp confirmation).
7. VERY IMPORTANT: You must immediately test your new valet code: Turn on
the ignition, enter your new code, then press and hold the unmarked button for 3
seconds. The LED will illuminate to indicate the system is in valet mode (see page 14
for information on valet mode). Turn the ignition off. The system is now in valet mode.
If the LED does not light, the new code you programmed and the one you just
entered do not match. In such a case, the system reverts to the previous code.
8.Turn the ignition on. The LED will turn off to indicate that the system has exited
valet mode and is now in normal operating mode. You may now turn off the ignition.
Your re mote con trols
The master remote control and the companion remote control are ultra-sophisticated
miniature radio transmitters powered by a single miniature battery (a 12-volt alkaline for
the master remote control; 3-volt lithium for the companion remote). A weak remote
control battery will reduce range (your Concept 600 system will warn you if the remote
control battery is nearing the end of its useful life, see page 11 for details). Electrical/radio
frequency interference, obstructions, weather conditions and even sunspots can interrupt
the signal from your remote control. If this happens, repeatedly press the remote control
button several times until the system responds (this works better than holding the button).
The remote controls are the keys to your system. But these remote controls are much
more secure than car keys because each incorporates Clifford’s ACG 2™
(Anti-CodeGrabbing 2™) technology with trillions of possible digital codes for the
ultimate protection. You will use your Concept 600 remote control to arm and disarm
the system, lock and unlock the doors, activate/deactivate the panic feature, close the
electric windows, enable/exit valet mode, override one or both Proximity Sensor zones
and command options such as a remote boot release, electric garage door interface and
even remote starting of the engine and heater or air conditioner, among other options.
TIP: If you press the top of the remote to your chin while pressing the button,
you can greatly increase the range since your body acts as a large radio
antenna (this is the same principle as a station coming in more clearly when
you touch the TV or radio antenna).
6
Page 7
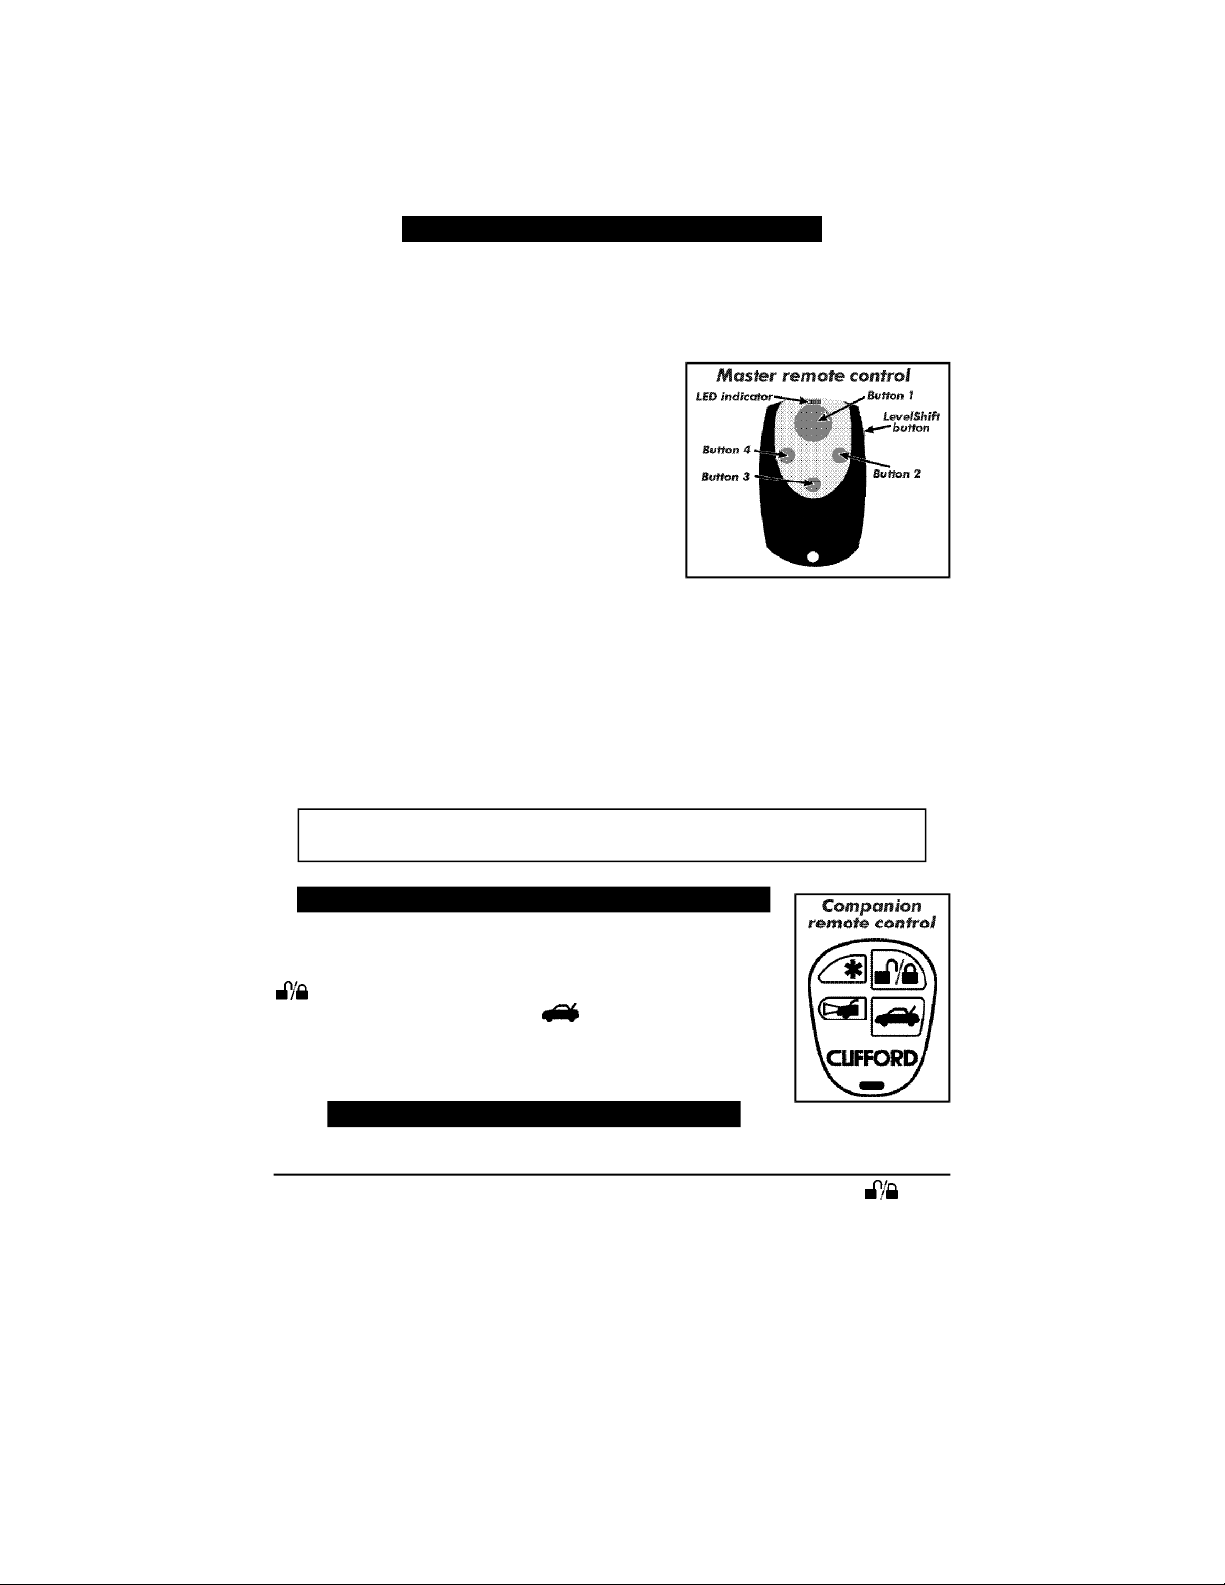
Your master remote control can command up to 16 different system functions and
options. But instead of putting 16 buttons on the remote control, we made it easy: First,
than the others. Buttons 2, 3 and 4 are the smaller buttons to the right, below and left of
button 1. The LevelShift
n To transmit either channel 1, 2, 3 or 4:
Just press either button 1, 2, 3 or 4. For instance,
to transmit channel 3, press button 3. Whilst you
transmit, the LED indicator will flash once every
n To transmit either channel 5, 6, 7 or 8:
Press the LevelShift button once. This shifts
buttons 1-4 to level 2 (channels 5-8). Then press
the desired button within the next 7 seconds. For
instance, to transmit channel 5, press the
LevelShift button once, then press button 1.
Whilst you transmit, you’ll notice that the LED
indicator flashes twice, pauses, flashes twice, etc.: this indicates level 2.
n To transmit channel 9, 10, 11 or 12: Press the LevelShift button twice. This
shifts buttons 1-4 to level 3 (channels 9-12). Then press the corresponding button
within the next 7 seconds. For instance, to transmit channel 10, press the LevelShift
button twice, then press button 2. Whilst you transmit, you’ll notice that the LED
flashes three times, pauses, flashes three times, etc.: this indicates level 3.
n To transmit channel 13, 14, 15 or 16: Press the LevelShift button three times.
This shifts buttons 1-4 to level 4 (channels 13-16). Then press the corresponding
button within the next 7 seconds. For instance, to transmit channel 16, press the LevelShift
button three times, then press button 4. Whilst you transmit, you’ll notice that the
LED flashes four times, pauses, flashes four times, etc.: this indicates level 4.
NOTE: One sec ond af ter you stop trans mit ting on level 2, 3 or 4 (chan nels
5-16), the re mote con trol auto mati cally re turns to level 1 (chan nels 1-4).
level 1 .
How to use your COMPANION re mote con trol
We made controlling basic system functions even easier with the
companion remote control. For example to arm/disarm and
lock/unlock, just press the button with the lock/unlock symbol:
; to activate the remote boot release option, just press the
button with the boot-open symbol: . For less frequently used
features, simultaneously pressing a combination of two buttons (as
specified in the following section) will do the job.
Re motely con trol ling your Con cept 600
Each of your two remote controls can command several different functions and options.
TO ARM: Press button 1 on the master remote control or button on
the companion remote control. You will hear two chirps and the
indicator lights will flash twice. The dashboard LED will flash
repeatedly, your vehicle’s power locks will automatically lock and
the two windows controlled by the Automatic Window RollUp
feature (see page 13) will close.
7
Page 8

REV C UPDATE PAGE: ONLY PAGES 8, 9, 10, 19 and
the back cover change, all other pages same as REV B.
TO DIS ARM: Press button 1 on the master remote control or button on
the companion remote. One chirp and one indicator light flash
confirms disarming. In addition, the doors will automatically unlock,
the LED will turn off and the interior lights will turn on and stay on
for 30 seconds or until you start the engine, whichever occurs first.
TO ARM OR
DIS ARM SI LENTLY:
TO AC TI VATE
THE PANIC
FEA TURE:
TO RE MOTELY
OPEN THE BOOT:
TO RE MOTELY
START THE EN GINE:
By pressing button 3 on the master remote or pressing both the
button and the ✱ button on the companion remote, you can
arm or disarm your Concept 600 with all the indications previously
noted except the chirps.
For three seconds, continually press button 1 on the master remote
or button on the companion remote. The indicator lights
will flash repeatedly and the siren will blare until you press the
button again to turn it off. If the ignition is on (indicating you are
in the car), the doors will lock to prevent an assailant from
entering (note: some vehicles are unable to lock the doors whilst
the ignition is on). If the ignition is off, the doors will unlock,
allowing you to enter immediately without fumbling with your keys.
If you have the remote boot release option, pressing button 2 on
the master remote or button on the companion remote
whilst the system is disarmed will release the boot latch (see Smart
boot release option on page 18 for more information). If you do not
have the boot release option, you may assign this button to activate
one of the other functions noted in column 4 of the Ta ble of
User- Selectable Fea tures on page 22, or it can be programmed into a
Clifford ACG 2 electric garage door/entry gate opener interface or
a Concept 100, 300, 400 or 600 system on your other vehicle.
Button 4 on the master remote or button ✱ on the companion
remote is factory-set to activate the IntelliStart 4* remote engine
starting accessory. If you do not have this option, you may assign
this button to activate one of the other functions noted in column
4 of the Ta ble of User- Selectable Fea tures on page 22, or it can be
programmed into a Clifford ACG 2 electric garage door/entry gate
opener interface or a Concept 100, 300, 400 or 600 system on
your other vehicle.
TO AC TI VATE THE
TIMED HEAD LIGHTS:
If you have this option, channel 7 (LevelShift button once, then
button 3) on the master remote or button on the companion
remote will turn on the headlights for any duration you wish
between one second and 4 minutes (the factory setting is 10
seconds; see User-selectable features on pages 21-22). If you do not
have this option, you may assign this button to activate one of the
other functions noted in column 4 of the Ta ble of User- Selectable
Fea tures on page 22, or it can be programmed into a Clifford ACG 2
electric garage door/entry gate opener interface or a Concept 100,
300, 400 or 600 system on your other vehicle.
* This fea ture/ac ces sory is not evalu ated by Thatcham.
8
Page 9

REV C UPDATE PAGE: ONLY PAGES 8, 9, 10, 19 and
the back cover change, all other pages same as REV B.
TO RE MOTELY
EN ABLE OR EXIT
VALET MODE:
TO RE MOTELY
VENT OR OPEN
THE WIN DOWS:
TO RE MOTELY
TURN SPEECH
ON OR OFF:
Channel 9 (LevelShift button twice, then button 1) on the master
remote or simultaneously pressing buttons and ✱ on the
companion remote is factory-set to enable/exit your Concept
600’s valet mode (see page 14 for details on valet mode). Two
indicator light flashes confirm remote enabled valet mode entry, a
single flash confirms valet mode exit. If you prefer, you may turn
off remote controlled valet mode as noted in the User-selectable
features section on pages 21-22 so that the system cannot be
placed in valet mode via the remote controls.
If you have the SmartWindows 4 option, channel 6 (LevelShift
button once, then button 2) on the master remote or
simultaneously pressing buttons and on the companion
remote is factory-set to fully open the electric windows if the
system is disarmed. If the system is in its armed state when you
press this channel or button combination, SmartWindows 4 will
vent the windows slightly for ventilation on hot days. Please note
that one SmartWindows 4 module will control two electric
windows, while the system’s built-in Window RollUp electronics
will control two others. Windows controlled by the system’s
Window RollUp electronics cannot be remotely opened or
vented, only those controlled by the SmartWindows 4 option.
SmartWindows 4 is not compatible with some vehicles.
If you have the IntelliVoice 4 speech synthesis option, channel 8
(LevelShift button once, then button 4) on the master remote or
simultaneously pressing buttons and on the companion
remote control will toggle the voice acknowledgments on/off (i.e.,
change the system’s arm/disarm confirmations from 2 chirps/1
chirp to verbal “ARMED”/“DISARMED ” confirmations and
vice-versa).
TO RE MOTELY
OVER RIDE
PROX IM ITY
SEN SOR ZONES
OTHER FEA TURES
AND OPTIONS
Channel 10 (LevelShift button twice, then button 2) on the
master remote control or simultaneously pressing buttons
and on the companion remote anytime after arming will
override the warning zone of the system’s Dual-Zone Proximity
Sensor 4. A second press will override both zones (see Re mote
con trolled over ride of each Prox im ity Sen sor zone on page 15).
Other features and options can be accessed from the companion
remote control and/or master remote control as noted in the chart
that follows:
9
Page 10

REV C UPDATE PAGE: ONLY PAGES 8, 9, 10, 19 and
the back cover change, all other pages same as REV B.
QUICK REF ER ENCE: RE MOTE CON TROL FUNC TIONS
Func tion
Arm or dis arm and lock or un lock the doors
Companion
Remote
Button(s)
Master Remote
LevelShift? Button
no 1
Optional wired ac ces sory #1 (usu ally re mote boot re lease)*
Silently arm or dis arm and lock or un lock the doors
Unassigned or IntelliStart 4** ac ces sory en gine start/stop*
Unassigned*
Unassigned or SmartWin dows 4 ac ces sory full open or vent*
Optional wired ac ces sory #2 (usu ally head light ac ti va tion)*
Optional wired ac ces sory #3
(usually IntelliVoice 4 ac ces sory speech on/off)*
Remote valet mode entry/exit (see page 14)
Remote Prox im ity Sen sor zone over ride (see page 15)
Unassigned or IntelliStart 4** LowBattery/LowTemp AutoStart as well as
standard transmission SafeStart (see IntelliStart 4 manual)
Unassigned*
Unassigned*
Unassigned*
* These but tons can be as signed to con trol Con cept 100, 300, 400 or 600 sys tems and ac ces so ries on your other ve hi cles.
** This fea ture/ac ces sory is not evalu ated by Thatcham.
+ ✱
✱
+ ✱
+
+
+ ✱
+
no 2
no 3
no 4
1 time 1
1 time 2
1 time 3
1 time 4
2 times 1
2 times 2
2 times 3
2 times 4
3 times 1
3 times 2
ACG 2™ (Anti- CodeGrabbing 2™)
ACG 2 protects you and your automobile from the most effective and onerous car
stealing device ever used by car thieves — a code-grabber.
Code-grabbers literally record, from hundreds of feet away, the code sent by your car
alarm remote control (code-grabbers are very similar to, but simpler than, cellphone
“cloning” devices). The thief then simply plays back the code when you’re gone, instantly
disarming the alarm and unlocking the doors. It’s like leaving your keys and remote on
the bonnet.
Many alarms can be defeated that easily, and some of the latest “smart” code-grabbers
can even decipher the code hopping/jumping sequence used by other car alarm
manufacturers. In contrast, Clifford Concept 100, 300, 400 or 600 systems use complex
digital signal processing and unbreachable code encryption to randomly change the
digital code every time you use the remote control. Your remote controls will never
transmit the same code twice, and the control unit will never accept the same remote
control code twice. Thus the code recorded and played back by the thief’s code-grabber
— even the latest generation smart code-grabbers — will never be accepted by your
Concept 600 system.
10
Page 11

Auto mat ic re mote con trol low- battery warn ing
If your remote control battery is very low, you will hear a low-pitched chirp whenever
you disarm rather than the high-pitched chirp that you normally hear. The system will
continue to sound this low-pitched chirp every time you disarm until you replace the
battery. Since this is a warning indication, you will hear this low-pitched chirp regardless
of whether you have the system set to QuietChirps, LoudChirps or no chirps and even if
you use the silent disarming feature (see page 8).
Re mote con trol bat tery re place ment
Replacement of a remote control battery is simple, but any Authorised Clifford Dealer will
be happy to do it for you without cost provided you buy the replacement battery at their
shop (it’s also a good idea to keep a spare of each battery type in your glove box just in case).
Mas ter re mote:
1.Unscrew the retaining screw on the back of the remote control.
2. Carefully pry apart the remote control case with your fingernails or a small, thin
screwdriver blade near the keyring opening (you may leave the keyring in place).
3. Remove the old battery noting the + and – indications and replace it with the new one.
4. Put the enclosure back together by first aligning the LevelShift button side, then the
top of the remote, then snap the case back together at the bottom.
5. Reinsert the retaining screw but DO NOT OVERTIGHTEN.
Com pan ion re mote:
1. Insert a small, thin screwdriver blade in the slot near the keyring opening (you may
leave the keyring in place) and turn it to separate the two halves.
2. Remove the old battery noting the + and – indications and replace it with the new one.
3. Put the enclosure back together by first aligning the top of the remote, then snapping
the case back together at the bottom.
Add ing new re mote con trols
For other drivers of the vehicle in your family, you can purchase additional remote controls
from any Clifford Dealer (or ring our UK Customer Service Department on 0800 929949
or 0181 646 8440). Concept 600 responds to as many as four remote controls.
NOTE: Your Concept 600 will re spond only to Concept 100, 300, 400 and 600
type ACG 2 re mote con trols. Older Clif ford ACG and non- ACG re mote
con trols are not com pati ble with the Concept 600.
To add a new remote, use the Add new remote feature (column 1, row 1) of the User-selectable
features on pages 21-22. You may also assign unused buttons and/or button combinations
from the remote controls of other Concept 100, 300, 400 and 600 systems to your
Concept 600 as noted in column 4 of the User-selectable features on pages 21-22.
How to erase the codes of lost or sto len re mote con trols
If one of your Concept 600 remote controls is ever lost or stolen, you can erase it from
the system memory to ensure that the missing remote can never again be used to disarm
your system. To do so, use the Clear All Remotes feature noted in the Table of
User-Selectable Features (feature column 2, row 6) on page 22. This Clear All Remotes
feature will erase all remote from the system memory. Then reprogram each remaining
and/or replacement remote control as noted in the Adding new remote controls section above.
11
Page 12

Two- Point In ter nal AutoIm mo bi li sa tion
Whilst armed, your Concept 600 assures that your vehicle is completely immobilised by
automatically locking out both the ignition system and starter motor. The system’s dual
internal immobilisation circuits ensure that a thief will not be able to start your vehicle’s
engine even if he had a duplicate of your car key. What’s more, even if he were to find
the system control unit and tear it out of your vehicle, he still would be unable to start
your car’s engine!
Please be aware that, unlike AutoArming described on page 13, AutoImmobilisation
occurs 30 seconds after you turn off the ignition regardless of whether you open or close
any doors. What’s more, disabling the AutoArming feature has no effect on
AutoImmobilisation.
When you remotely disarm your Concept 600 system, the AutoImmobilisation circuits
will automatically disengage. You then have 30 seconds in which to start the engine (or
turn the ignition switch to its “ON” position).
If more than 30 seconds pass, the immobiliser will automatically reactivate. This will be
visually indicated by the LED repeatedly flashing, but at a slower rate than that of the
normal rapid “armed” indication flash rate.
To dis arm the Auto Im mo bi liser if it has armed itself, use the re mote con trol to
arm and then disarm the system, or turn on the ignition and press button 1 on
the master remote control or button on the companion remote control.
Wire less Fu el Guard Mod ule™
Our ingenious Wireless FuelGuard Module makes your vehicle undrivable by
interrupting the fuel delivery system whilst the system is armed, and it can’t be defeated
even by the most sophisticated thief.
Why not? Because this unique Clifford innovation unfailingly provides reliable fuel pump
obstruction without any wires connecting it to the system control unit. That means that
a thief would not be able to find the Wireless FuelGuard Module even if he tried locating
and tracing the system wires, since there are no wires for him to trace!
Operation is completely automatic and user-transparent.
Make sure to keep the rec ord that your Clif ford in staller pro vides as to the
Wireless FuelGuard Module lo ca tion in case your ve hi cle needs fu ture
serv ic ing.
En gine Re start Fea ture
Thirty seconds after shutting down the engine, both the AutoImmobilisation electronics
and the Wireless FuelGuard Module will engage, preventing engine starting. To restart
the engine, simply do the following:
1. Turn your ignition switch to the “ON” position.
2. Press button 1 (master remote control) or button (companion remote control).
This will disengage the immobilisation.
3. You may now start the engine.
12
Page 13

Auto matic Win dow Rol lUp
Your Concept 600 has built-in electronics to automatically close two of your vehicle’s
electric windows every time you remotely arm the system (on some European vehicles,
the system can automatically close all electric windows and the power sunroof with the
addition of a relay). If you wish, an optional Window RollUp Module can be added to
close a second pair of electric windows.
For safety, the windows will roll up only when you actively arm the system with the remote
control; it will not close them if the system AutoArms (see below for more information on
AutoArming). Also for safety reasons, if there is an obstruction in one of the windows
that is preventing complete closure, the built-in Automatic Window RollUp electronics
will automatically halt the window closing.
Auto mat ic Win dow Rol lUp In stant By pass
If you wish, you may arm your Concept 600 without causing the system to automatically
close the two windows. This feature comes in handy on hot summer days by allowing you
to leave one or both windows slightly open for interior ventilation whilst the system
remains armed.
To remotely arm without Automatic Window RollUp, simply turn the vehicle’s ignition
switch to “ON” and then “OFF” rapidly. When you do so, you will hear a single chirp
confirmation (this action also activates the Instant AutoArming Bypass feature described
below). When you then exit the vehicle and arm with the remote control, the system
will not attempt to close the windows. The system automatically reverts to normal
operation the next time you arm.
AutoArming™
If this feature is enabled and you forget to remotely arm, the system automatically arms
itself 30 seconds after the vehicle doors are closed. For your convenience, if you re-open
any door(s) within the 30-second countdown, AutoArming restarts the 30-second delay
from the beginning after all doors are closed. Concept 600 has these additional
AutoArming features:
n AutoArming enable/disable: If you prefer, you may deactivate or reactivate the
AutoArming feature. See User-selectable features on pages 21-22.
n Visual acknowledgment: Five seconds after you exit the vehicle, close all the
doors and the interior light has turned off, the indicator lights will flash twice to
confirm the AutoArming countdown is progressing; 25 seconds later, the system will
AutoArm.
n Lock upon AutoArming: To ensure you can’t accidentally lock your keys inside
the car, the system is factory-set not to lock the doors upon AutoArming. To change
this setting, see User-selectable features on pages 21-22.
n Instant AutoArming bypass: Prevents AutoArming when fuelling the vehicle
and other times when you wish to temporarily bypass the AutoArming feature. To
activate Instant AutoArming Bypass, rapidly turn the ignition switch to “ON” then
“OFF.” You will hear a single siren chirp to confirm that the system will not AutoArm.
Your Concept 600 automatically reverts to its normal operating mode when you next
start the engine.
13
Page 14

REV B UPDATE PAGE: ONLY PAGE 8, 9, 10, 14, 19 and
the back cover change, all other pages same as REV A.
Plain View 2™ Coded Valet Mode
All car alarms have a valet mode that essentially turns off the security features. This
mode is also used to turn off the alarm if the system is not responding to the remote
control. However, thieves can disable other alarm brands in seconds by simply hotwiring
the ignition and flicking the alarm’s easy-to-find “hidden” valet switch.
In contrast, your Concept 600 system has safeguards that ensure a thief cannot enable the
valet mode as a way of “turning off” your system. How? To enable valet mode, the driver must
first enter the secret disarming code on the PlainView 2 switch (i.e., the same code you use
to turn off the BlackJax anti-carjacking feature; see page 4).
When the system is in valet mode, it overrides the anti-carjacking features (see pages
4-5), the AutoArming feature (see page 13) and all other security features. At various
times, you will need to switch the system off. For instance, when refuelling or washing
your car.
Your sys tem’s factory- set valet/dis arm ing code is noted on the
back cover of this man ual.
NOTE: If you tem po rar ily lose the use of your re mote con trols, you can dis arm
the sys tem by ena bling valet mode.
To en able valet mode
1. Turn the ignition switch to its “ON” position or start the engine if it is not already
running.
2. Enter your valet/disarming code on the PlainView 2 switch.
3. Continue pressing the unmarked button for 3-4 seconds. Release the button. The LED
will continue to remain on for ongoing visual confirmation of valet mode.
Auto matic exit of the valet mode
In com pli ance with Thatcham re quire ments, the sys tem will auto mati cally exit valet
mode the next time that the ig ni tion switch is turned to the “ON” po si tion (e.g., when
the en gine is started).
Re mote con trolled valet mode en try and exit
You can even enable or exit valet mode with your master remote control simply by
transmitting channel 9 (LevelShift twice, then button 1) on the master remote control
or the and ✱ on the companion remote. In addition to the LED indications noted
above, two indicator light flashes will confirm that you have remotely enabled valet
mode, a single flash confirms valet mode exit. If you prefer, you may turn off remote
controlled valet mode as noted in the User-selectable features section on pages 21-22 so
that the system cannot be placed in valet mode via the remote control.
Key less en try in valet mode
Even if valet mode is enabled, you can still remotely control the convenience features.
For instance, pressing button 1 on the master remote or button on the companion
remote as if you were disarming will unlock the doors (indicated by one indicator light
flash) and turn on the interior light(s). Press the button again and the doors will lock
(confirmed by two flashes). You may also use the other remote control buttons to
activate options such as a remote boot release or remote engine starting.
14
Page 15

Digi tal Tilt/Mo tion Sen sor
Your Concept 600 is supplied with an exclusive Clifford Electronics achievement in threedimensional movement sensing technology. Until now, the only way to detect jacking up
for towing or theft of the wheels was through unreliable mercury or mechanical pendulum
switches. These can best be categorized as “no-tech” sensors, since they are extremely
prone to both falsing and widely fluctuating sensitivity due to temperature changes. What’s
more, these primitive sensors required that the vehicle be parked on a level surface.
In contrast, Clifford’s Digital Tilt/Motion Sensor is truly a leading-edge, state-of-the-art
electronic device that integrates in one microchip nanomechanics and a digital signal
processing (DSP) microprocessor to instantly and continually analyze all pitch, yaw and
motion data. The result is a tilt/movement sensor that, regardless of the conditions,
unerringly detects less than one degree of lifting or any minute motion of the vehicle
whilst completely ignoring all other conditions that falsely set off all other sensors. Even
if you park your vehicle on the steepest hill, the remarkable Digital Tilt/Motion Sensor
will accurately respond to the first hint of tampering to reliably protect your vehicle
better than any other sensor, bar none. No need for sensitivity adjustments ever. This
intelligent sensor continually analyses all conditions and automatically adjusts itself for
the maximum sensitivity with absolutely no possibility of false alarms.
Digi tal Dual- Zone Prox im ity Sen sor 4
Your Concept 600 also has our unique Digital Dual-Zone Proximity Sensor 4, which uses
digital signal processing to detect movement inside the passenger compartment and very
near the vehicle. If a thief were to break a window and either enter or lean into the
passenger compartment, the primary zone of this sensor would trigger the full alarm.
However, if a thief was lingering very close to your windows, a warning tone would sound.
Be aware that this sensor uses radar waves to detect movement. These waves pass through
nonmetallic materials like plastic, carpet, glass and wood. However, metal and metalliccolored paint, metallic-colored plastic and even some metallic window tinting film will
interfere with or completely block the radar waves. As such, it is not unusual that the
Proximity Sensor may need a little readjustment soon after installation. In some instances,
your Clifford installer may need to try a different location for the sensor.
Metal objects above or near the Proximity Sensor will have a significant
impact on operation, so you should never place coins, CDs, cassettes (iron
oxide tape) or other metallic objects above or near where the sensor is mounted.
Your Authorised Clifford Dealer can make any sensor adjustments needed.
Re mote con trolled over ride of each Prox im ity Sen sor zone
Transmitting channel 10 on the master remote control (LevelShift button twice, then
button 2) or button combination and on the companion remote anytime after the
system has been armed will override the warning zone of the Proximity Sensor (confirmed
with 4 indicator light flashes). This prevents the system from sounding warnings if you
must park your vehicle in an area with heavy pedestrian traffic. A second transmission of
this channel or button combination will override both zones of the Proximity Sensor
(confirmed with another 4 flashes). This comes in handy when you must temporarily
leave a pet or a passenger in the vehicle. The sensor zones are automatically restored the
next time you arm.
15
Page 16

False Alarm Pre ven tion & FACT™
With Clifford’s patented FACT (False Alarm Control and Test) feature, you’ll never
experience repeated false alarms. If the siren sounds, DO NOT remotely disarm the
system; allow it to run for the full 30-second siren duration. Before sounding the siren a
second time, the system automatically checks for another activated sensor or trigger to
verify that an intrusion is in progress. Should the siren sound again, you will know for
sure that someone is tampering with your vehicle. (If you wish, you may turn off FACT,
see User-selectable features on pages 21-22.)
How to in ter pret the chirps and in di ca tor light flashes
When you use the remote control, the system responds with chirps (unless the chirp muting
feature is turned on) and indicator light flashes. These chirp/flash acknowledgments mean:
Chirps/flashes Meaning
1
2
2 and then 4
3
4
5
You have disarmed the system
OR (flash only) you have remotely exited valet mode (see page 14)
You have armed the system
OR (flashes only) you have remotely entered valet mode (see page 14)
Armed but there is a door open (if there was a 5-sec. delay)
OR the sensor is malfunctioning (if there was a 10-sec. delay) (see Smart
AutoTesting on page 17)
Disarmed but there was an intrusion attempt whilst you were away (see
Smart prior intrusion attempt on page 17)
Armed but the bonnet or boot is ajar (see Smart AutoTesting on page 17)
OR (flashes only) remote Proximity Sensor zone override (see page 15)
20 seconds to engine shutdown: enter your disarming code IMMEDIATELY
(see page 5)
How to in ter pret the LED status in di ca tor
The LED mounted on your car’s dashboard or console will inform you of the system status:
LED Condition Meaning
Off
On
Flashing rapidly
(ignition off)
Flashing slowly
(ignition on or off)
Flashing rapidly
(ignition on)
Pause between slow
flashes (ignition on)
To conserve vehicle battery power (the LED draws more current than the entire control
unit), if the system has remained continuously armed for 48 hours, the flash rate will
automatically slow to half the normal rate. After 96 hours, it slows to one-quarter.
System is disarmed and in normal operating mode (i.e., valet mode is off)
Valet mode is on, the vehicle may be entered without having to disarm
System is armed and protecting your vehicle
System is disarmed but the two AutoImmobilisation points and the
Wireless FuelGuard have been engaged (see page 12)
20-second countdown to engine shutdown: Enter your disarming code
IMMEDIATELY (see page 5)
Either a malfunction (see Smart AutoTesting on page 17) or an intrusion
was attempted (see Smart prior intrusion attempt alert on page 17)
Auto mat ic Battery- Saving Mode
16
Page 17

Smart Au toTest ing™
Each time you remotely arm the system, it tests all triggers and sensors. If the bonnet or
boot is open when you remotely arm, the system will immediately alert you of the
problem by sounding 4 chirps and 4 indicator light flashes instead of the usual 2 and 2. If
a door is ajar, you will receive the usual 2 chirps and flashes, then, 5 seconds later, there
will be 4 chirps and 4 flashes. (This door ajar warning will not work on vehicles that
have factory-delayed courtesy lights). If a sensor is malfunctioning, you will receive the
usual 2 chirps and 2 flashes, then, 10 seconds later, there will be 4 chirps and 4 flashes.
NOTE: Since this is a warn ing in di ca tion, you will hear the 4 chirps even if you
use the chirp muting feature.
n Specific malfunction identification: The system can also indicate the specific
trigger or sensor that is malfunctioning. If you get the 4-chirp/4-flash signal upon
arming, perform the following to identify the malfunctioning trigger or sensor:
1. Remotely disarm, then turn on the ignition. The LED status indicator inside your
vehicle will be flashing, pause, then repeat.
2. Count the number of flashes in one cycle between pauses (for your convenience, the
flash cycle repeats a total of 5 times) and refer to the chart below:
LED flashes Meaning
1 flash
2 flashes
3 flashes
4 flashes*
5 flashes
6 flashes
7 flashes
8 flashes
9 flashes
10 flashes
Activation of the Proximity Sensor
Activation of the optional vibration/impact sensor
Activation of the Tilt/Motion Sensor
Door open/ajar
Boot open/ajar
Bonnet open/ajar
Ignition switch was turned on whilst the system was armed
Three or more incorrect valet/disarming codes were entered
The BlackJax anti-carjacking countermeasure was triggered
Power tampering or the vehicle battery is very low
* If your ve hi cle has a factory- installed fea ture that turns off or dims the in te rior cour te sy lights
sev eral sec onds af ter you exit the ve hi cle, the sys tem can not pro vide this in di ca tion.
Auto mat ic mal func tion by pass with AutoRe Moni tor ing™
To provide the utmost protection even if a system component malfunctions, the system
will automatically bypass any faulty point and arm all other triggers and sensors to provide
the utmost possible protection until you can have the system serviced by your local
Authorised Clifford Dealer. If you accidentally armed with the bonnet, boot or a door
open, just close the open point (no need to disarm-and-rearm) and the system will again
monitor that point.
Smart prior in tru sion at tempt alert
If you hear three chirps when you remotely disarm, it means that a trigger or sensor was
activated in your absence. When you enter the vehicle and turn on the ignition (or start
the engine), the LED will flash 1-10 times, pause, then repeat the flash cycle 4 more
times. Count the number of flashes in one cycle and refer to the chart above.
17
Page 18

Multiple- event To tal Re call™
Your Concept 600 system’s memory records the identity of the last eight activated or
malfunctioning triggers and sensors, which allows your installer to instantly track down
malfunctions. To identify the triggers and sensors held in the system’s memory, use the
following procedure:
1. Remotely arm and disarm while pressing and holding the unmarked button on the
PlainView 2 switch.
2. The LED will flash 1-10 times to indicate the most recently activated point, pause,
flash 1-10 times to indicate the second most recently activated point, and so on.
3. Write down the number of flashes between pauses and refer to the chart on the
previous page.
AutoLock and Aut oUn Lock
Please note: The AutoLock and AutoUnLock features are not available on
some vehicles, such as Volkswagen and Audi.
For your safety and that of your passengers, the doors automatically lock after you begin
driving (when the engine reaches a predetermined RPM). If you prefer, you may set
AutoLock to lock the doors the instant you turn on the ignition (see User-selectable
features on pages 21-22). When you turn the ignition off, AutoUnLock automatically
unlocks the doors.
To suit your preferences, you may turn on or off either or both the AutoLock and/or
AutoUnLock features. If you have the optional DataPort connector and CliffNet Wizard
software you can even adjust whether the doors lock at a higher or lower engine speed
(see Optional CliffNet Wizard on page 19).
Smart boot re lease op tion
If the optional remote boot release feature was installed, you may use button 2 (master
remote control) or button (companion remote control) to remotely release the boot
latch.
Your system has a built-in electronic interlock to prevent unintentional activation of the
remote boot release when you drive, or when the system is armed. This interlock requires
installer programming, so if you have the remote boot release option, you may want to
verify that it will not activate when the system is armed.
Smart Powe rUp™ 2
If power to the system is ever removed, SmartPowerUp 2 ensures that your Concept 600
system automatically restores itself to its previous state when power is restored. So if a
thief disconnects the power and then restores it in an attempt to start the car, the system
will re-arm and instantly sound the siren whilst immobilising the vehicle. If your vehicle
is to be serviced, just put it in valet mode. If your mechanic must interrupt power, the
system will automatically return to its valet mode state when power is restored; there will
be no alarm activation.
18
Page 19

REV C UPDATE PAGE: ONLY PAGES 8, 9, 10, 19 and
the back cover change, all other pages same as REV B.
Op tional Cliff Net Wiz ard™ & Da ta Port
If you opted to have the Clifford DataPort interface connector installed with your
Concept 600 system, you can use our CliffNet Wizard software to access your system
through your PC (Microsoft Windows™ required). Doing so provides a wealth of
benefits:
n Point-and-Click Feature Programming — Programming the system’s many
user-selectable features is easy with the PlainView 2 Switch. But setting and selecting
these features via the optional CliffNet Wizard is a true joy. The intuitive graphical
user interface of CliffNet Wizard will actually show you, on your PC screen, the on/off
and other settings of each user-programmable feature. You can change programmable
settings simply by mouse-clicking the graphical button for each feature. Now you can
customise features, add or delete remote controls, change remote control button
assignments, set timers, adjust the RPM level at which the vehicle doors AutoLock
(something not possible via the standard PlainView 2 Switch programming), view a
chronological history of trigger and sensor activations, and much more whilst actually
having fun!
n SecureAccess™ — What if a clever thief were to try using his laptop to control your
Concept 600 system? We know that could happen. That’s why we doubly protect
access to your system. In order to “connect” with the control unit, the system must first
be disarmed with your remote control and your secret valet/disarming code must be
entered.
If you are interested in learning more about these software capabilities and feature
enhancements to your Concept 600, you’ll find extensive details at our Internet website
at www.clifford.com/wizard.
If you already have this option, please refer to the CliffNet Wizard manual and/or online
help for specific operating instructions (you may also download any enhancements or
revisions to CliffNet Wizard from our website at www.clifford.com/wizard).
Timer op tions
The system’s built-in electronic timer can be optionally wired to provide re mote
con trolled timed head light activation or one of several other custom functions. Ask your
Authorised Clifford Dealer for further details.
Re mote con trolled timed head light activation option
Your Concept 600 system’s built-in electronic timer can be wired through an optional
relay to provide remote controlled timed headlight activation for any duration you wish
between 1 second and 4 minutes. This handy feature allows you to remotely light your
way to and from the vehicle by pressing the LevelShift button once, then button 3
(master remote control) or button (companion remote control).
19
Page 20

Smart Self- Powered Me dal lion Si ren with Digi tal Com Link
This siren has its own built-in back-up battery, so even if a thief cuts all the wires, the
siren will continue to wail. Furthermore, this unique Clifford-designed and manufactured
siren has all these important additional enhancements:
n Unbreachable Digital ComLink: Clifford’s ingenious serial communications link
ensures that — if the system fuse is pulled, or if power to the system is interrupted, or if
any siren wire is tampered with whilst the system is armed — the siren will instantly
activate for five minutes. However, if the system is disarmed and power is interrupted
for authorised servicing, the siren remains silent. This eliminates the need for a special
separate shutoff key common to other battery-backed sirens. This ingenious Clifford
feature guards against any possibility of a thief tampering with your system siren.
n Smart-charging: Other battery-backed sirens continually draw charging current
from your vehicle’s battery. In time, this can drain the car’s battery. Clifford’s Smart
Self-Powered Medallion Siren only draws charging current whilst the vehicle’s ignition
is on, i.e., whilst you’re driving. This prevents battery drain.
n Automatic low battery warning: If at any time the siren’s back-up battery
voltage is very low, the usual arm and disarm chirps will be automatically muted to
alert you of the problem. Once the back-up battery is properly charged, the chirps will
automatically be restored.
n Remote siren silencing: If the system is triggered by a non-threatening event, you
can silence the siren without having to remotely disarm and then re-arm. Simply press
button 1 (master remote control) or button (companion remote control) whilst
the siren is sounding. You’ll hear two chirps (the usual armed indication) to confirm
the system has remained armed. If, however, you press this button whilst the siren is
sounding and either the vehicle’s ignition is on or the bonnet, boot or a door is open,
you will instead hear 4 chirps to indicate that this may indeed be a genuine theft
attempt.
n User-selectable chirp volume: As shipped from the factory, your system issues
QuietChirp™ acknowledgments. If you prefer, you may select full-volume LoudChirp™
acknowledgments. See the User-selectable features section on pages 21-22.
n Long-term chirp silencing: Whenever you wish, you may silence the arm and
disarm chirps until you decide to restore them. Indicator light flashes continue to
provide visual confirmation of remote arming and disarming. See User-selectable
features on pages 21-22.
n Remote controlled chirp muting: Remote chirp muting capabilities are
especially valuable when parking late at night in a quiet residential area or at any other
time when you want to arm or disarm silently. To arm or disarm silently, simply press
button 3 (master remote control) or simultaneously press buttons and ✱
(companion remote control) instead of the usual arming/disarming button.
n Patented automatic noise abatement: The siren electronics limit alarm
sounding to five 30-second siren duration cycles even if a door is left open in the wake
of an intrusion. This ensures against car battery drain or vehicle towing due to noise
pollution ordinances. Your Concept 600 will then automatically reset itself to monitor
all other triggers and sensor inputs to continue to provide the utmost possible
protection.
20
Page 21

User- selectable fea tures
Concept 600 lets you set many of its features to your own preferences. Once you’ve changed
a few settings, you’ll find that programming Concept 600 is so easy you can even do it
whilst driving! The system features are preprogrammed as noted by the bold type in the
Table of user-selectable features on page 22. To change any of the settings, use the steps
noted below. To restore the feature to its factory setting, just repeat the procedure.
NOTE: For even greater programming ease and even more system control,
consider the CliffNet Wizard option noted on page 19.
How to change a user- selectable fea ture:
Briefly, here’s how it will work:
• You will pick a feature from the Table on page 22, noting the feature’s column and
row numbers.
• You’ll enter program mode by entering your valet/disarming code (see pages 4-5)
and pressing the ✱ button of the PlainView 2 switch until you hear a chirp.
• Next you’ll press the unmarked button a number of times identical to the column
number, then the ✱ button a number of times equal to the row number.
That’s all there is to it! After you enter the feature’s column and row numbers, you’ll hear
either one chirp to indicate that the feature has been turned off, or two chirps if turned on.
Step- by- step pro gram ming in struc tions
1. Refer to the Table of user-selectable features on page 22 and make note of the column
(across) number and the row (down) number of the feature(s) you wish to program.
2. Turn the ignition on, or start the engine (skip this step if the engine is running).
3. Enter your valet/disarming code (see pages 4-5), then press and hold the ✱ button of
the PlainView 2 switch for about 3 seconds until you hear a siren chirp. Release the
button. You are now in the “Feature Select” position.
4. Select the feature column: Press and release the unmarked button of the PlainView 2 switch
the same number of times as the column number. Pause. You will hear the same number
of chirps as the column number you have selected, audibly confirming your selection.
5. Select the feature row: Press and release the ✱ button the same number of times as the
feature’s row number. You’ll will hear a chirp each time you press.
NOTE: You have 5 sec onds to en ter the row number af ter se lect ing the col umn
number. If you wait too long, the sys tem jumps back to the “Fea ture Se lect”
po si tion (this is in di cated with 3 chirps). If you wait an other 60 sec onds, the
sys tem will exit pro gram mode.
6. Pause . You will hear either one or two chirps: Two chirps = ON, one chirp = OFF
(If there is a NOTE for the selected feature, perform the actions noted).
Some fea tures, such as Chirps (col umn 2, row 1) have mul ti ple set tings.
Re se lect the fea ture ad di tional times to prog ress through each set ting.
7. You may now select another feature or exit program mode:
a. To select another feature in that same column, repeat step 5 within the next 5
seconds (after 5 seconds, 3 chirps mean you are back to the “Feature Select” position).
b.To select a different feature column, go to step 4.
c.To exit program mode, turn the ignition off (you’ll hear 3 chirps and the LED will
turn off). If driving, just wait 60 seconds for automatic exiting of program mode.
If you make an er ror, just turn off the ig ni tion and start again.
21
Page 22

Ta ble of User- Selectable Fea tures
Feature Select
1 ✱ press
2 ✱ presses
3 ✱ presses
4 ✱ presses
5 ✱ presses
6 ✱ presses
7 ✱ presses
NOTE 1: Press button 1 of the new MASTER 16-channel remote control. You will hear
one chirp. Press button 1 again. You’ll hear two chirps to confirm the new remote control
has been added.
NOTE 2: You’ll hear two chirps to indicate all remotes have been cleared from memory.
You must now add new/existing remotes with the “Add a new master remote” feature
and/or the “Add a companion remote” feature.
NOTE 3: Immediately press the unmarked button, enter your new code, wait for the two
chirps, then turn off the ignition (you’ll hear 3 chirps to confirm program mode exit). You
MUST now turn the ignition back on and then re-enter your new code. If the LED flashes
on, your new code has been accepted. If the LED does not light, the two codes did not
match and the system has reverted to your previous code.
1 unmarked press 2 unmarked presses 3 unmarked presses 4 unmarked presses
Add a master remote
NOTE 1
NOT USED NOT USED
NOT USED
NOT USED
AutoLock: off/instant/RPM-
dependent (1/2/3 chirps)
AutoUnlock: off/on
Reset all features (except remotes
and valet code) to factory settings
Chirps: off/loud/quiet
(1/2/3 chirps)
Remote valet mode via channel 9
and buttons and
AutoStart**: both off/both on/temp
only/battery only (1/2/3/4 chirps)
BlackJax anti-carjacking: off/on
Clear all remotes
Set a new secret
valet/disarming code NOTE 3
AutoArming: off/on
Lock upon AutoArming: off/on
✱ : off/on
NOTE 2
* Re quires an op tional ac ces sory: ask your Author ised Clif ford Dealer about this fea ture.
** Re quires the op tional Clif ford In tel liS tart 4 ac ces sory not evaluated by Thatcham
NOTE 4: This allows you to arm/disarm your system with a new companion remote or any
remote control of a Concept 100, 300, 400 or 600 system on your other vehicle(s). For
instance, to set channel 13 of the other car’s master remote to arm/disarm your Concept
600, select column 4, row 1, then transmit channel 13 (you’ll hear one chirp). Immediately
reselect channel 13 on the remote and transmit it a second time (you will hear a 2-chirp
confirmation). Channel 13 of the other car’s remote will now arm/disarm your Concept 600.
NOTE 5:The features in this column allow you to control your Concept 600 with a new
companion remote or any remote control of a Concept 100, 300, 400 or 600 system on
your other vehicle(s). Just select the function you wish, then transmit the unused channel
on the other remote that you want to use to perform that function (you’ll hear the chirps
noted). NOTE: You must first set a channel on the remote that will arm/disarm the system
(column 4, row 1) before these others will be accepted.
NOT USED
FACT: off/on
NOT USED
NOT USED
NOT USED
NOTE 4 — Add a companion remote:
arm/disarm (1 then 2 chirps)
NOTE 5 — Add a companion remote:
boot release* (2 chirps)
NOTE 5 — Add a companion remote:
silent arm and disarm (3 chirps)
NOTE 5 — Add a companion remote:
remote engine starting* (4 chirps)
NOTE 5 — Add a companion remote:
timed headlight activation** (5 chirps)
NOTE 5 — Add a companion remote:
window rolldown/venting* (6 chirps)
NOTE 5 — Add a companion remote:
remote valet mode (7 chirps)
Page 23

EX AM PLE: Se lect Loud Chirps,
turn off Re mote Valet Mode and turn on Lock upon AutoArming:
In the following example, we will change the settings of three different features in just one
programming session. Here’s all you have to do:
1. Enter program mode as previously noted (ignition on, enter your valet/disarming
code, press and hold the ✱ button on the PlainView 2 switch until you hear a chirp).
2.Since the Chirps feature selection is in column 2, row 1 of the Table, go to column
2 by pressing the unmarked button on the PlainView 2 switch twice. Wait for the
2-chirp/column 2 confirmation. Then press the ✱ button once (you’ll hear a chirp
each time you press the ✱ button to confirm the row selection). After a brief pause,
you’ll hear 2 chirps to confirm that LoudChirps have been selected.
3.Since Remote Valet Mode is also in column 2, there is no need to reselect column 2.
Therefore, you can go straight away to the row selection. Select row 3 by pressing
the ✱ button three times. After a brief pause, you’ll hear one chirp to confirm that
Remote Valet Mode is now off.
4. Note that the Lock upon AutoArming feature is at column 3, row 2. To change to
column 3, press the unmarked button three times, then wait for the 3-chirp/column 3
confirmation. Press the ✱ button twice to select row 2. After a brief pause, you’ll
hear 2 chirps to confirm that the Lock upon AutoArming feature is now turned on.
5. To exit the program mode, turn the ignition off. You’ll hear 3 chirps to confirm
program mode exit.
Re set All Fea tures
If you wish to reset all the user-selectable features to their normal factory presets, use the
Reset all features selection (column 1, row 7). All features — except the programmed
remote controls and your valet/disarming code — will be reset to the factory settings that
are indicated in BOLD type on the Table of User-Selectable Features. To reset all remote
controls, use the Clear all remotes feature in column 2, row 6. To reset your valet/disarming
code, use the Set a new secret valet/disarming code feature in column 2, row 7.
23
Page 24

Life time lim ited fac tory war ranty terms & con di tions
Clif ford ve hi cle se cu rity sys tems and ac ces so ries re quire pro fes sional in stal la tion by an Author ised Clif ford
Dealer. Un less the sys tem is sold and in stalled by an Author ised Clif ford Dealer, all prod uct war ran ties and
guar an tees are void. As the manu fac turer, Clif ford Elec tron ics war rants to the origi nal co n sumer pur chaser,
the sys tem con trol unit and re mote con trols to be free from de fects in ma te rial and work man ship for as long as
you own the ve hi cle in which the sys tem was origi nally in stalled. All other parts of the sys t em and ac ces so ries
to the sys tem are war ranted to be free from de fects in ma te rial and work man ship for one (1) year from the date
of pur chase. Clif ford Elec tron ics will re pair or re place, at its op tion and free of charge d ur ing the war ranty
pe riod, any sys tem com po nent that proves de fec tive in ma te rial or work man ship un der nor mal in stal la tion,
use, and serv ice, pro vided the prod uct is re turned to our fac tory by an Authorised Clifford De aler,
trans por ta tion charges pre paid. Prod ucts re turned to our fac tory must be ac com pa nied by a pho to copy of t he
pur chase re ceipt. In the ab sence of such pur chase re ceipt, the war ranty pe riod shall be one (1) year from the
date of manu fac ture. Any dam age to the prod uct(s) as a re sult of mis use, abuse, ne glect, ac ci dent, in cor rect
wir ing, im proper in stal la tion, de struc tion or al tera tion of the se rial number, re pair or al tera tion out side our
fac tory, or any use vio la tive of in struc tions fur nished by us will void the war ranty. This w ar ranty is lim ited to
de fec tive parts and spe cifi cally ex cludes any in ci den tal or con se quen tial dam ages con n ected there with. This
warranty is not transferable. Clif ford Elec tron ics makes no war ranty against theft. This war ra nty is not to be
con strued as an in sur ance pol icy against loss. War ranty on in stal la tion la bor, re moval an d re in stal la tion
charges are not the re spon si bil ity of Clif ford Elec tron ics, Inc.
Up- to-£500 theft pro tec tion guar an tee terms & con di tions
In the event that your automobile is stolen and not recovered within 30 days, Clifford Electronics will refund
to you, the original purchaser of the Clifford system, the first amount up to £500 of the theft cla im not covered
by the theft excess provision of your vehicle insurance. This guarantee applies only to the owner o f the vehicle
in which the Clifford system was originally installed and that you were the owner of this same vehi cle when it
was stolen. This guarantee is valid only in the United Kingdom and only if:
(1) Installation of the Clifford vehicle security product was performed by an Authorised Clifford deale r.
(2) Clifford Electronics window stickers are adhered to both the driver’s-side and curb-side windows an d
are clearly visible on both sides from outside the vehicle.
(3) At the time of the theft, the Clifford system was fully functional, armed and not in “valet mode.”
(4) Your insurance company and the police have been notified and a crime reference number was issued
by the police.
(5) No less than thirty (30) days after the crime reference number was issued, you mail to Clifford
Electronics at the address below clear photocopies of the following documents:
I. The crime reference number and location of the police station where the crime was reported.
II. A dated declaration signed by you, the owner of the vehicle, attesting that the vehicle has been
stolen for more than thirty (30) days and has not been recovered.
III.A photocopy of the cheque you received from your insurance company as payment for the loss of
your vehicle.
IV.A photocopy of your insurance policy clearly showing your name and the theft excess provision.
This guarantee is effective for 6 months from the date of purchase as indicated by your purchase re ceipt (or 12
months if you complete the online registration process at www.clifford.com/register within 10 days of
purchase), is limited to one claim and is valid only when the entire vehicle was stolen and not rec overed. This
guarantee is not transferable and specifically excludes any other consideration, including, but not limited to,
damage caused to the vehicle, theft of parts or contents, or any consequential damages. Once Cliffo rd
Electronics verifies the above listed requirements have been met, a payment will be made to you in
accordance with the above stated provisions.
BONUS IF YOU REGISTER ONLINE: Within 10 days of pur chase,
reg is ter your Clifford purchase online at www.clifford.com/register and, a s
a bonus for doing so, Clifford Electronics will double the duration of your
system’s theft pro tec tion guar an tee from 6 months to 12 months. If you do not
have direct access to the Internet, you can always get to our
www.clifford.com/register website address through a friend or relative who
can access the Internet or through most libraries, educational institutions,
etc. Thank you for choosing Clifford Electronics: World-Class Auto Security
for your vehicle security needs!
242526
Page 25

Page 26

Page 27

.
n
PLEASE NOTE: Your factory-set 4-digit valet code is noted below. See
pages 4-5 for information on using your valet code:
WARN ING: For se cu rity rea sons, do not keep this man ual in your
ve hi cle (since a thief could pos si bly ac cess it and see your se cret
valet code). Please keep this man ual in a safe place in your home.
Making changes to the existing security system will invalidate the certificate
of installation.
Should any fault with the security system occur, please contact your installing
Clifford agent as soon as is convenient.
Paste se rial number sticker here
Your se rial number is:
Bound ary Busi ness Court ❖ 92/94 Church Road
Mit cham, Sur rey CR4 3TD
All Con cept Se ries sys tems are cov ered by
one or more of the fol low ing Clif ford Elec tron ics USA pat ents:
4,158,874; 4,233,642; 4,327,444; 4,383,242; 4,430,685; 4,845,464; 4,887,064;
4,890,108; 4,922,224; 4,997,053; 5,081,667; 5,146,215; 5,157,375; 5,467,070; 5,650,744
and other pat ents pend ing.
© Copyright Clifford Electronics, Inc., 1999 31-830-1C/UKC6OM/0299
❖ 0800 929949 or 0181 646 8440
 Loading...