

Page 1
Maintenance Procedures
Cleveland
™
!
& Parts Lists
Metering Filling Station
For units built after August 2011
MFS
For your future reference.
Model # ______________________________________
Serial # _______________________________________
Model # & Serial #.
(Open front panel to view rating label.)
1333 East 179th St., Cleveland, Ohio, U.S.A. 44110
Ph: 216.481.4900 Fx: 216.481.3782
www.clevelandrange.com
This manual is to be used in conjunction with the
“Operators Manual”. See “Operators Manual” for
safety warnings, correct operation, installation
and preventative maintenance.
Read the manual thoroughly.
Improper installation, operation or
maintenance can cause property
damage, injury or death.
SE95019 Rev. 10,
July 2011
Page 2

STATEMENT OF RESPONSIBILITIES /
DÉCLARATION DES RESPONSABILITÉS /
DECLARACIÓN DE RESPONSABILIDADES
This document is for use by experienced
and trained Qualified Cleveland Range,
LLC Authorized Service Representatives
who are familiar with both the safety
procedures, and equipment they
service. Cleveland Range, LLC assumes
no liability for any death, injury,
equipment damage, or property damage
resulting from use of, improper use of,
or failure to use the information
contained in this document. Cleveland
Range, LLC has made every effort to
provide accurate information in this
document, but cannot guarantee that
this document does not contain
unintentional errors and omissions.
The information in this document may
be subject to technical and technological
changes, revisions, or updates.
Cleveland Range, LLC assumes no
liability or responsibility regarding errata,
changes, revisions, or updates.
Qualified Cleveland Range, LLC
Authorized Service Representatives are
obligated to follow industry standard
safety procedures, including, but not
limited to, OSHA regulations, and
disconnect / lock out / tag out
procedures for all utilities including
steam, and disconnect / lock out / tag
out procedures for gas, electric, and
steam powered equipment and / or
appliances.
All utilities (gas, electric, water and
steam) should be turned OFF to the
equipment and locked out of operation
according to OSHA approved practices
during any servicing of Cleveland Range
equipment
Qualified Cleveland Range, LLC
Authorized Service Representatives are
obligated to maintain up-to-date
knowledge, skills, materials and
equipment.
Ce document est destiné à l’usage des
Représentants de Service qualifiés et
autorisés de Cleveland Range, LLC qui
possèdent l’expérience et la formation ainsi
que la bonne connaissance des mesures
de sécurité et du matériel qu’ils
entretiennent.
Cleveland Range, LLC décline toute
responsabilité pour tout cas de décès,
blessure, dommage matériel ou dommage
aux biens résultant de l'utilisation, de la
mauvaise utilisation ou du manquement
d’utilisation des renseignements contenus
dans ce document.
Cleveland Range, LLC s’est efforcé à
fournir des renseignements précis dans ce
document mais ne peut garantir que ce
document soit exempt d’erreurs et
d’omissions non intentionnelles.
Les renseignements contenus dans ce
document peuvent être assujettis à des
changements techniques et technologiques,
des révisions ou des mises à jour.
Cleveland Range, LLC décline toute
obligation ou responsabilité concernant les
errata, modifications, révisions ou mises à
jour.
Les Représentants de Service qualifiés et
autorisés de Cleveland Range, LLC sont
tenus de se conformer aux mesures de
sécurité normalisées de l’industrie, y
compris, mais sans s'y limiter, les
réglementations de l'OSHA, les procédures
de débranchement / verrouillage /
étiquetage relatives à tous les services
publics, dont l’approvisionnement en
vapeur, et les procédures de
débranchement / verrouillage / étiquetage
relatives aux équipements et/ou appareils
fonctionnant au gaz, à l’électricité et à la
vapeur.
Au cours de tout entretien d’un appareil
Cleveland Range, tous les services publics
(gaz, électricité, eau et vapeur) doivent être
FERMÉS au niveau de l’appareil et le
dispositif de fonctionnement doit être
verrouillé suivant les pratiques approuvées
de l’OSHA.
Les Représentants de Service qualifiés et
autorisés de Cleveland Range, LLC sont
tenus d’actualiser en permanence leurs
connaissances, compétences, matériel et
équipement.
Este documento está destinado para el uso
de los Representantes de Servicio
calificados y autorizados de Cleveland
Range, LLC quienes cuentan con la
experiencia y la capacitación así como el
buen conocimiento de las medidas de
seguridad y de los equipos que mantienen.
Cleveland Range, LLC, declina toda
responsabilidad en caso de cualquier
fallecimiento, lesiones, daños al equipo o
daños a la propiedad resultantes de la
utilización, del uso indebido o de la falta de
utilización de la información provista en este
documento.
Cleveland Range, LLC se ha esforzado en
suministrar información precisa en este
documento, pero no puede garantizar que
este documento esté exento de errores y de
omisiones no intencionales.
La información contenida en este
documento podría estar sujeta a cambios
técnicos o tecnológicos, revisiones o
actualizaciones. Cleveland Range, LLC
declina toda obligación o responsabilidad
con respecto a erratas, modificaciones,
revisiones o actualizaciones.
Los Representantes de Servicio calificados y
autorizados de Cleveland Range, LLC tienen
la obligación de seguir los procedimientos
estándar de seguridad de la industria; los
cuales incluyen pero no se limitan a los
reglamentos de la OSHA (La Administración
de la Seguridad y Salud Ocupacionales), los
procedimientos de desconexión, cierre y
etiquetado relativos a todos los servicios
públicos incluyendo el suministro de vapor y
los procedimientos de desconexión, cierre y
etiquetado para los equipos y/o aparatos
que funcionan a base de gas, electricidad o
vapor.
Cuando se esté dando servicio o
mantenimiento a un aparato de Cleveland
Range, todos los servicios públicos (gas,
electricidad, agua y vapor) deben estar
APAGADOS para el equipo en cuestión y se
debe seguir el procedimiento de cierre de
operaciones de acuerdo con las prácticas
aprobadas por la OSHA.
Los Representantes de Servicio calificados y
autorizados de Cleveland Range, LLC tienen
la obligación de actualizar constantemente
sus conocimientos, destrezas, materiales y
equipamiento.
Page 3

OPEN
TROUBLESHOOTING
0
AND MAINTENANCE
PROCEDURES
The following trouble shooting guide
and maintenance procedures are meant
to be used by Qualified Service Technician.
For periodic maintenance recommendations see “Operators Manual”.
TROUBLE SHOOTING GUIDE
(reference drawings at back of manual)
1. If there is no air to unit check:
A/ Check that the kettle's Air Quick Connect
is pushed upward to the "OPEN" position.
B/ Open the back access doors and check that the 3
way spool valve is pressed inwards.
2. Make sure the air regulator (large black knob on
back of panel) is turned on for pressure to enter
system. To be sure enough pressure is in system,
check for min. 60 PSI, otherwise valves might not
shift.
3. Recommended operating pressure is 90 to 100 PSI.
4. If the unit seems to be covered in oil or the oil is
dripping out of the mufflers, then turn lubricator
output down. Correct setting is 1 drop every 10-15
strokes.
5. If the pump valve does not shift during operation or is
slow in shifting, make sure the two Legris flow
controls are not adjusted right in. If so, then back
them off.
6. If pump cylinder is too slow then adjust large Aro flow
controls to desired speed.
7. If a leak develops around the air valve 5 bank
manifold, tighten the screws on top of valve and
tighten manifold socket head bolts as these can
loosen over time.
NOTE: Be careful with socket head bolts - do not tighten
too much or clamps will bend on manifold increasing the
leak.
8. If cylinder cycles one way but not back, check that
the limit valves are hitting to make sure contact is
made and signal is sent to either port 19 or 26 of the
5 station valve bank.
9. If cylinder still does not cycle, check or replace
control valve assembly of the 5 station valve bank.
Page 4

BASIC OPERATION
Cushion
Adjustment
S
et Screw
T
ravel
Adjustment
Set Screw
1/8" 1/8"
Single Cycle Operation
Turn the selector switch to the single cycle. It will do the
following when the start switch is hit:
■ Shifts valve No. 2 second from the top which turns off
valve No. 1 and takes the signal away from Pt. 24.
■ Single cycle valve is now turned on. It gives a one shot
of air to valve No. 3 which shifts, and turns on Group A.
■ The pump valve now shifts (Airtec Valve) Pt. 1 and
valve No. 4 & 5 shifts Pt. 11 &12. This actuates Air
Cylinder & Rotary Actuator.
■ When the pump reaches its full stroke, it hits LV1. This
shifts valve No. 3 back through Pt. 19 which turns on
Group B which shifts the pump valve (Airtec Valve) at
Pt. 2 and shifts the valves NO. 4 & 5 back through Pt.
22 & 23 which actuates the Air Cylinder and Rotary
Actuator to complete the single cycle.
Constant Pumping Path:
Turn the selector switch to constant pumping cycle. It will
then do the following when the start switch is hit:
■ Valve No. 2 shifts which in turn shifts valve No. 1
through Pt. 31. This turns on valve No. 3 through Pt. 24
if LV2 is actuated which turns on Group A.
■ The pump valve now shifts (Airtec Valve) Pt. 1 and
valve No., 4 & 5 shifts Pt. 11 & 12 to actuate Air
Cylinder and Rotary Actuator.
■ When pump reaches the full stroke it hits LV1. This
shifts back Valve No. 3 through Pt. 19 which turns on
Group B which shifts pump valve (Airtec Valve) at Pt. 2
and shifts back valve No. 4 & 5 through Pt. 22 and Pt.
23 which actuates the Air Cylinder and Rotary Actuator.
■ When the pump completes the first cycle, LV2 is hit
again and turns valve No. 1 back on and shifts valve
No. 3 again through Pt. 24 and starts another cycle all
over again.
■ This will continue until the selector switch is turned off
which turns off the air to valve No. 2 and stops
supplying valve No. 1, which will not turn on valve No. 3
to start another cycle.
ADJUSTMENT & SETTING OF AIR
CUSHION EQUIPPED PUMP HEADS
igure 1
F
SECTION 1 - Adjustment of Valve Paddle Travel
NOTE: When looking at the pump head (paddle side), left
side paddle travel is affected by the right side air cylinder
travel adjustment set screw and vice versa.
1. Back off 9/16" lock nut on 3/8" dia. set screw as shown
in Figure 1.
2. Adjust set screw until valve paddle is l/8" away from
inside O-ring land edge as shown in Figure 2.
3. Secure lock nut.
4. Recheck l /8" distance between paddle and edge.
5. This side is now set. Follow the same procedure for the
other side.
SECTION 2 - Setting of Air Cushion
NOTE A: Again left side paddle cushioning is affected by
the right side air cylinder cushion set screw (3/16" dia.) and
vice versa as shown in Figure 1.
NOTE B: Turning set screw in increases air cushion action
and vice versa.
CAUTION: Avoid fingers around paddle travel area,
personal injury may result.
1. Support the head assembly securely and connect the air
lines to the rotary actuator air cylinders. Activate air to
start rotary action.
2. Observe air cushion action at the end of each swing.
Optimum cushion action can best be described as a
controlled deceleration of the paddle at the end of the
swing with complete elimination of rotational momentum
in the shortest time possible. Adjust set screw to achieve
results on both sides.
igure 2
F
Page 5
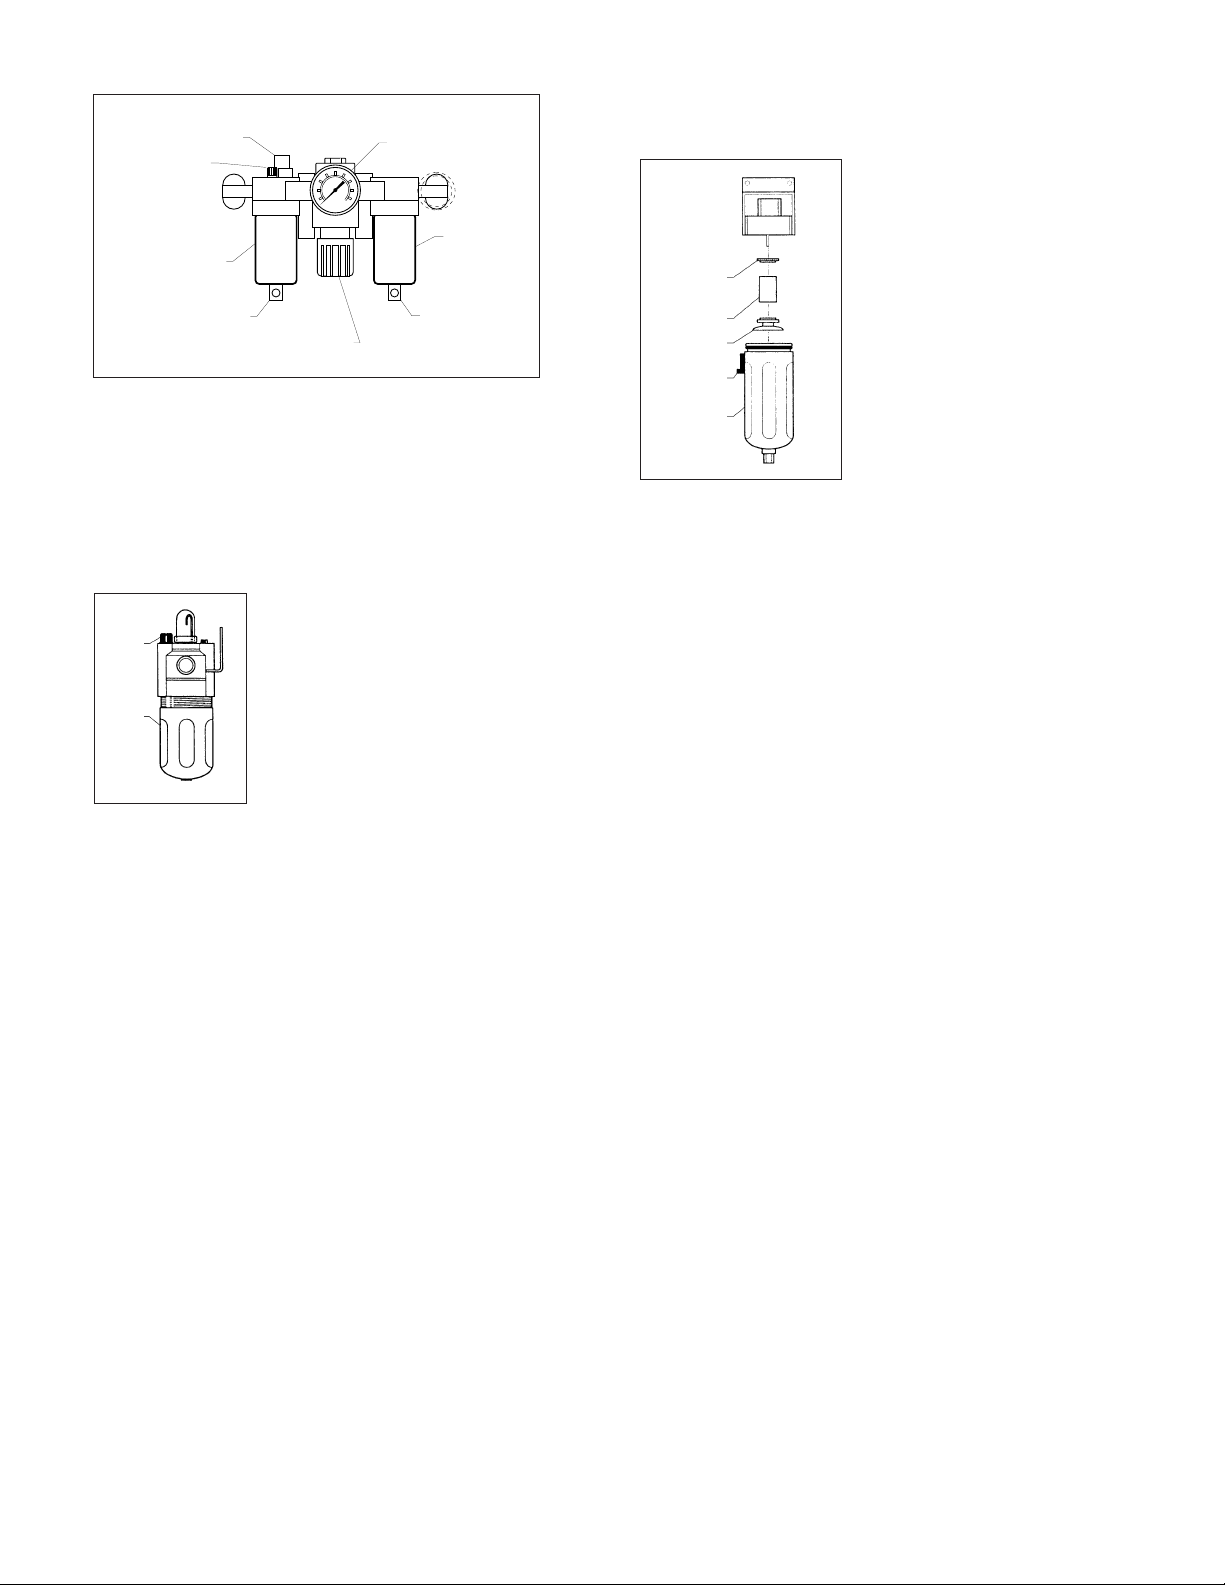
AIR PRESSURE
Deflector
Filter
Element
Baffle
Lever
Bowl/Guard
Assembly
Filler
Cap
Bowl
Oil Sight Bulb
Oil
Adjustor
Oil
Bowl
Blow Down Button
Pressure Regulator Dial
Pressure
Gauge
Oil
Bowl
Blow
D
own
Button
1. Adjust air regulator or line pressure so that air pressure
gauge reads 90 - 100 psi when unit is running on
continuous cycle (stroke selector switch is set on
"constant pumping").
OIL FILLING PROCEDURE
The lubricator puts one drop of oil into
the air lines for every ten to fifteen
cycles of the product piston. This ratio
should be checked weekly and the oil
level should be checked daily.
AIR FILTER REPLACEMENT
PROCEDURE
The air filter is designed to
separate a small amount of dirt
and water from the supply air.
This filter is NOT designed to
clean air straight from the
compressor. You must install a
separate filter and drier in the
supply line to deliver air with a
dew point of less than 65° F.
1. Check for water accumulation daily. If water is present,
push button at the bottom of bowl and allow the water
to spray out.
NOTE: If the bowl has to be drained regularly (more than
once a week) then the supply air has not been sufficiently
dried.
2. If the air cartridge is dirty then it should be replaced.
⇒ Remove air connection from unit.
⇒ Remove cage and bowl.
⇒ Turn disk to the left to remove.
⇒ Install new cartridge.
1. Drip Adjustment-
⇒ Observe the sight bulb on the top of the oiler. One
drop of oil into the lines for every ten to fifteen cycles of
the product piston.
⇒ If adjustment is necessary turn the adjustment knob
next to the sight bulb clockwise for more oil, counter
clockwise for less oil.
2. Adding Oil-
Use only mineral oil in th oiler.
⇒ Remove air supply from unit.
⇒ Remove oiler cage and bowl. Fill to line and replace.
PISTON TIMING
The amount of delay between the time the product piston
reaches the end of a half stroke and the reversing of
direction can be adjusted.
1. Remove the back panel.
2. The two flow controls are located to the left of the large
shuttle valve on the right.
NOTE: The left flow control controls the delay after the
discharge stroke is completed. The right flow control
controls the the delay after the suction stroke is completed.
3 Loosen locking nut.
4. Set selector switch to continuous and have someone
hold the tripper switch as you adjust the delay.
5. Retighten the locking nut.
Page 6
5
4
3
2
1
10
9
8
7
6
WARRANTY
SERVICE PARTS
Our Company supports a worldwide network
of Maintenance and Repair Centers. Contact
your nearest Maintenance and Repair Centre
for replacement parts, service, or information
regarding the proper maintenance and repair
of your cooking equipment
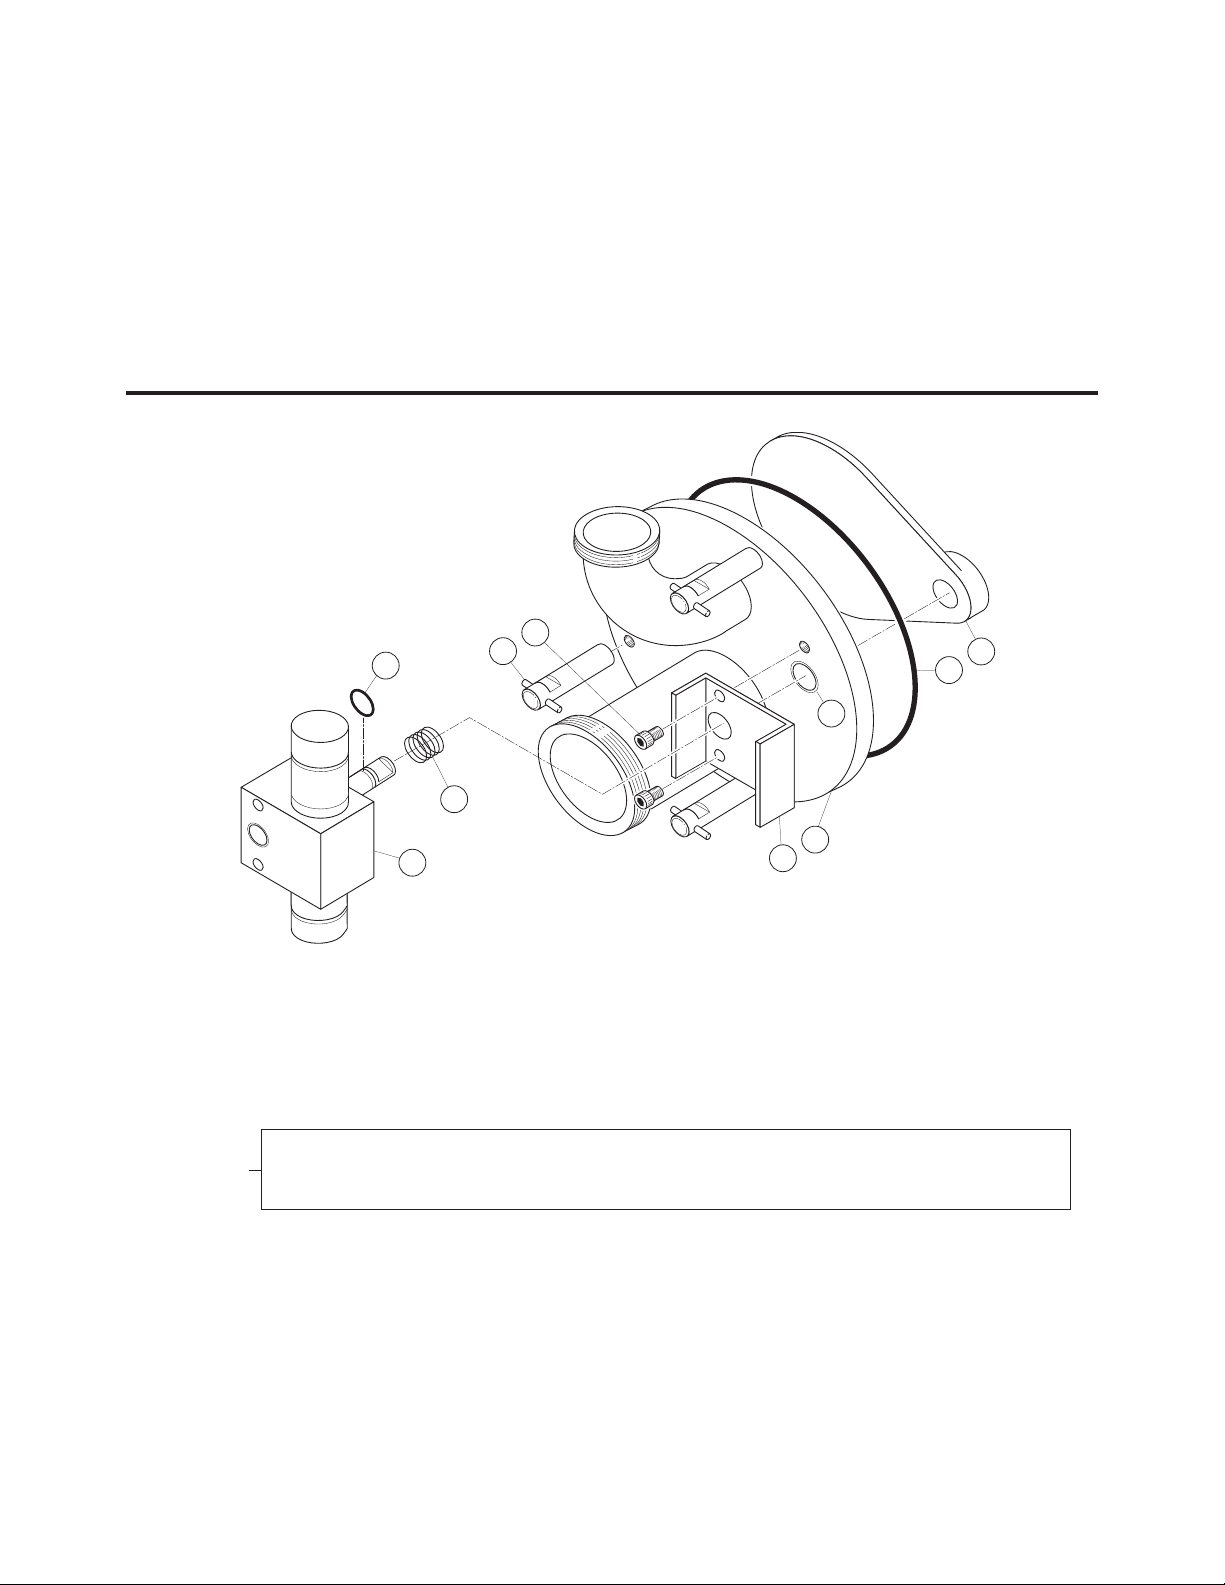
PISTON HEAD
ASSEMBLY
In order to preserve the various agency safety
certification (UL, NSF, ASME/Ntl. Bd., etc.),
only factory-supplied replacement parts
should be used. The use of other than factory
supplied replacement parts will void warranty.
PISTON HEAD ASSEMBLY
ITEM NO. PART NO. DESCRIPTION QTY.
1. - 10. SE00068-1 Pump head assembly . . . . . . . . . . . . . . . . . . . . . . . . . . . . . . . . . . . . . . . . . . . . .1
1. KE53014-1 Rotary actuator . . . . . . . . . . . . . . . . . . . . . . . . . . . . . . . . . . . . . . . . . . . . . . . . . .1
ROTARY ACTUATOR
REPAIR KITS
2. FA05002-24 "O" Ring, cylinder . . . . . . . . . . . . . . . . . . . . . . . . . . . . . . . . . . . . . . . . . . . . . . . .1
3. KE53056 Spring . . . . . . . . . . . . . . . . . . . . . . . . . . . . . . . . . . . . . . . . . . . . . . . . . . . . . . . . .1
4. KE01302 Lug nuts . . . . . . . . . . . . . . . . . . . . . . . . . . . . . . . . . . . . . . . . . . . . . . . . . . . . . . .3
5. FA11322-1 Hex cap screws . . . . . . . . . . . . . . . . . . . . . . . . . . . . . . . . . . . . . . . . . . . . . . . . .2
6. KE53659-1 Bracket . . . . . . . . . . . . . . . . . . . . . . . . . . . . . . . . . . . . . . . . . . . . . . . . . . . . . . . .1
7. KE003731 End plate, includes 5 & 6 . . . . . . . . . . . . . . . . . . . . . . . . . . . . . . . . . . . . . . . . . .1
8. KE53016 Bearing . . . . . . . . . . . . . . . . . . . . . . . . . . . . . . . . . . . . . . . . . . . . . . . . . . . . . . . .1
9. FA05002-2 "O" Ring, pump head . . . . . . . . . . . . . . . . . . . . . . . . . . . . . . . . . . . . . . . . . . . . .1
10. KE603701 Valve Paddle . . . . . . . . . . . . . . . . . . . . . . . . . . . . . . . . . . . . . . . . . . . . . . . . . . . .1-
SE50454 Bearing kit . . . . . . . . . . . . . . . . . . . . . . . . . . . . . . . . . . . . . . . . . . . . . . . . . . . . . .1
SE50455 Seal kit . . . . . . . . . . . . . . . . . . . . . . . . . . . . . . . . . . . . . . . . . . . . . . . . . . . . . . . . .1
SE50455-1 Gear shaft assembly . . . . . . . . . . . . . . . . . . . . . . . . . . . . . . . . . . . . . . . . . . . . . .1
Page 7

PUMP ASSEMBLY
14 15 8 6 18 5 3 2 10 22
9
23
17
1212
16
14 7
13 11
2120 19
Piston Head
Assembly
ITEM NO. PART NO. DESCRIPTION QTY.
1. KE53037 Centre Plate . . . . . . . . . . . . . . . . . . . . . . . . . . . . . . . . . . . . . . . . . . . . . . . . . . . . .1
2. KE53035 Piston Rod Bearing (Centre Plate) . . . . . . . . . . . . . . . . . . . . . . . . . . . . . . . . . . .1
3. FA05002-6 "O" Ring . . . . . . . . . . . . . . . . . . . . . . . . . . . . . . . . . . . . . . . . . . . . . . . . . . . . . . . .1
4. KE53036 Pneumatic End Plate . . . . . . . . . . . . . . . . . . . . . . . . . . . . . . . . . . . . . . . . . . . . . .1
5. KE53034 Piston Rod Bearing . . . . . . . . . . . . . . . . . . . . . . . . . . . . . . . . . . . . . . . . . . . . . . .1
6. FA05002-1 "O" Ring . . . . . . . . . . . . . . . . . . . . . . . . . . . . . . . . . . . . . . . . . . . . . . . . . . . . . . . .1
7. FA05002-2 "O" Ring . . . . . . . . . . . . . . . . . . . . . . . . . . . . . . . . . . . . . . . . . . . . . . . . . . . . . . . . 3
8. KE01305 Piston Rod Assembly . . . . . . . . . . . . . . . . . . . . . . . . . . . . . . . . . . . . . . . . . . . . .1
9. KE53031 Product Piston . . . . . . . . . . . . . . . . . . . . . . . . . . . . . . . . . . . . . . . . . . . . . . . . . . .1
10. FA22502-1 Locknut, 1 1/4-7 . . . . . . . . . . . . . . . . . . . . . . . . . . . . . . . . . . . . . . . . . . . . . . . . .1
11. KE53030 Pneumatic Piston . . . . . . . . . . . . . . . . . . . . . . . . . . . . . . . . . . . . . . . . . . . . . . . . .1
12. FA22502-2 Locknut, 1 5/8-12 . . . . . . . . . . . . . . . . . . . . . . . . . . . . . . . . . . . . . . . . . . . . . . . .1
13. FA05002-26 "O" Ring . . . . . . . . . . . . . . . . . . . . . . . . . . . . . . . . . . . . . . . . . . . . . . . . . . . . . . . .2
14. KE01301 Adjustment Rod Weldment . . . . . . . . . . . . . . . . . . . . . . . . . . . . . . . . . . . . . . . . .1
15. KE53051 Adjustment Lock Ring . . . . . . . . . . . . . . . . . . . . . . . . . . . . . . . . . . . . . . . . . . . . .1
16. KE53039 Cylinder . . . . . . . . . . . . . . . . . . . . . . . . . . . . . . . . . . . . . . . . . . . . . . . . . . . . . . . .1
17. KE53043 Reach Rod . . . . . . . . . . . . . . . . . . . . . . . . . . . . . . . . . . . . . . . . . . . . . . . . . . . . .6
18. FA21026 Hex Nut, 3/8-16 . . . . . . . . . . . . . . . . . . . . . . . . . . . . . . . . . . . . . . . . . . . . . . . . . .3
19. KE54401 Backing Plate . . . . . . . . . . . . . . . . . . . . . . . . . . . . . . . . . . . . . . . . . . . . . . . . . . .1
20. FA11258 Hex. Head Bolt, 1/4-20 . . . . . . . . . . . . . . . . . . . . . . . . . . . . . . . . . . . . . . . . . . . .6
21. FA32008 Tooth Lockwasher . . . . . . . . . . . . . . . . . . . . . . . . . . . . . . . . . . . . . . . . . . . . . . . .6
22. FA05002-5 "O" Ring . . . . . . . . . . . . . . . . . . . . . . . . . . . . . . . . . . . . . . . . . . . . . . . . . . . . . . . .1
23. KE02005 Product Culinder Assembly . . . . . . . . . . . . . . . . . . . . . . . . . . . . . . . . . . . . . . . .1
24. KE54735 Spacer Nut . . . . . . . . . . . . . . . . . . . . . . . . . . . . . . . . . . . . . . . . . . . . . . . . . . . . .1
Page 8

1
2
5 4 3
LABEL
1
7
5
6
18
12
5
3
21310
14
9
10
11
15
16
17
8
4
DISPENSER
ITEM NO. PART NO. DESCRIPTION QTY.
1-17 KE01387 Label Dispenser Assembly . . . . . . . . . . . . . . . . . . . . . . . . . . . . . . . . . . . . . . . . .1
1. KE53186 Hub Mounting Shaft . . . . . . . . . . . . . . . . . . . . . . . . . . . . . . . . . . . . . . . . . . . . . .1
2. KE53187 Labeller Back Plate . . . . . . . . . . . . . . . . . . . . . . . . . . . . . . . . . . . . . . . . . . . . . . .1
3. KE01386 Labeller Front Plate Assembly . . . . . . . . . . . . . . . . . . . . . . . . . . . . . . . . . . . . . .1
4. KE53268 Bar . . . . . . . . . . . . . . . . . . . . . . . . . . . . . . . . . . . . . . . . . . . . . . . . . . . . . . . . . . . .1
5. KE54139 Bushing . . . . . . . . . . . . . . . . . . . . . . . . . . . . . . . . . . . . . . . . . . . . . . . . . . . . . . . .1
6. KE53265 Core Holder . . . . . . . . . . . . . . . . . . . . . . . . . . . . . . . . . . . . . . . . . . . . . . . . . . . . .1
7. KE53266 Spring . . . . . . . . . . . . . . . . . . . . . . . . . . . . . . . . . . . . . . . . . . . . . . . . . . . . . . . . .1
8. KE01383 Labeller Mount . . . . . . . . . . . . . . . . . . . . . . . . . . . . . . . . . . . . . . . . . . . . . . . . . .1
9. FA11258 Hexhead Screw . . . . . . . . . . . . . . . . . . . . . . . . . . . . . . . . . . . . . . . . . . . . . . . . . .1
10. FA31029 Lock washer . . . . . . . . . . . . . . . . . . . . . . . . . . . . . . . . . . . . . . . . . . . . . . . . . . . .2
11. FA21008 Hex Nut, #1/4-20 . . . . . . . . . . . . . . . . . . . . . . . . . . . . . . . . . . . . . . . . . . . . . . . . .1
12. FA19500 Hex Socket . . . . . . . . . . . . . . . . . . . . . . . . . . . . . . . . . . . . . . . . . . . . . . . . . . . . .1
13. FA11056 Binding Head Screw, #6-32x1/2" lg. . . . . . . . . . . . . . . . . . . . . . . . . . . . . . . . . . .3
14. FA11260 Hexhead Screw, #1/4-20x1" lg. . . . . . . . . . . . . . . . . . . . . . . . . . . . . . . . . . . . . . .1
15. FA11328 Hex Head Screw . . . . . . . . . . . . . . . . . . . . . . . . . . . . . . . . . . . . . . . . . . . . . . . . .1
16. FA31030 Lock Washer . . . . . . . . . . . . . . . . . . . . . . . . . . . . . . . . . . . . . . . . . . . . . . . . . . . .1
17. FA21024 Hex Nut . . . . . . . . . . . . . . . . . . . . . . . . . . . . . . . . . . . . . . . . . . . . . . . . . . . . . . . .1
18. KE54751-2 Bushing . . . . . . . . . . . . . . . . . . . . . . . . . . . . . . . . . . . . . . . . . . . . . . . . . . . . . . . .1
HOSE ASSEMBLIES
CLEANING HOSE ACCESSORY
ITEM NO. PART NO. DESCRIPTION QTY.
1. KE01749-3 Food Hose Assembly, 3' . . . . . . . . . . . . . . . . . . . . . . . . . . . . . . . . . . . . . . . . . . .1
2. KE01749-2 Food Hose Assembly, 3' . . . . . . . . . . . . . . . . . . . . . . . . . . . . . . . . . . . . . . . . . . .1
3. KE55470-1 Cleaning Hose . . . . . . . . . . . . . . . . . . . . . . . . . . . . . . . . . . . . . . . . . . . . . . . . . . .1
4. FI05220-2 Hose Clamp . . . . . . . . . . . . . . . . . . . . . . . . . . . . . . . . . . . . . . . . . . . . . . . . . . . .1
5. FI05255 Hose Adapter 2" . . . . . . . . . . . . . . . . . . . . . . . . . . . . . . . . . . . . . . . . . . . . . . . . .1
Page 9

MISCELLANEOUS PARTS
KE52159
3" Wrench
KE01947
L
ug Wrench
K
E54166 - Brush Hanger
KE54163
Nylon Brush
for 3" Food
Product Hose
KE54164
12" Nylon Brush
1/2" dia.
KE54165
36" Nylon Brush
for 2" Piping
CB
Nylon Scrub Brush
KE52158
2" Wrench
KE01518
Hose for Clipper
3/8" dia.x 6' lg.
KE01750
Hose for Metering Filling Statiion/Kettle
1/2" dia. x 8' 6" lg.
SE95019-1 Rev.3
Service Manual
IN
S
T
A
LLAT
I
O
N
,
O
P
E
RA
T
I
O
N
A
N
D
R
E
P
A
I
R M
A
N
U
A
L
M
E
T
E
RIN
G
F
I
L
L
I
N
G
S
T
A
T
I
ON
M
O
D
E
L
:
M
F
S
C
LE
V
E
LA
N
D
R
A
N
G
E
I
N
C
.
1333
E
as
t
179t
h S
t
.
C
l
e
v
e
l
a
n
d
,
O
hi
o
U
.
S
.
A
.
44110
T
o
l
l
F
ree 1-800-338-220
4
AW
E
L
B
I
L
T
C
om
pany
S
t
eam
Cook
i
ng
S
pec
i
al
i
s
t
s
S
E
9
0
0
1
9
Re
v
0
Mineral
Oil
KE54167
Food Grade Grease
Mineral Oil
(purchaced locally)
KE55336-6
3" Elbow, 90°
Trash Container
KE603751 (new style)
KE53081 (old style)
KE003651-1RH
KE003651-2LH
Trash Container
Support Bar
(old style)
KE01776
Nylon Brush Kit
KE00911
Clipper Hanger
KE52095
Clipper Bar Clamp
KE52098
Hanger
KE52097
Swivel Plat
KE52096
Clipper Clamp Plate
FI05300
2" Elbow, 45°
Pan Filler
KE01316-3
2" Vertical Pipe
Page 10

PIPING
1
1B
A
2
B
3
4
6
5
C
8
9
10
7
C
C
C
E
D
D
ASSEMBLIES,
"O" RINGS,
GASKETS
& SEALS
PIPING ASSEMBLIES
ITEM NO. PART NO. DESCRIPTION QTY.
1. KE53270 Air Cylinder . . . . . . . . . . . . . . . . . . . . . . . . . . . . . . . . . . . . . . . . . . . . . . . . . . . . .1
1B. KE53249 Mounting Nut, Air Cylinder . . . . . . . . . . . . . . . . . . . . . . . . . . . . . . . . . . . . . . . . .1
2. KE53250 Plunger . . . . . . . . . . . . . . . . . . . . . . . . . . . . . . . . . . . . . . . . . . . . . . . . . . . . . . . .1
3. FI05144-1 Sani-clamp, 2" Standard Configuration . . . . . . . . . . . . . . . . . . .1
4. KE01385 Discharge Valve Body . . . . . . . . . . . . . . . . . . . . . . . . . . . . . . . . . . . . . . . . . . . . .1
5. KE54287 Start Switch . . . . . . . . . . . . . . . . . . . . . . . . . . . . . . . . . . . . . . . . . . . . . . . . . . . . .1
6. KE00905 Actuator Assembly . . . . . . . . . . . . . . . . . . . . . . . . . . . . . . . . . . . . . . . . . . . . . . .1
7. KE01384 Discharge Nozzle . . . . . . . . . . . . . . . . . . . . . . . . . . . . . . . . . . . . . . . . . . . . . . . .1
8. KE00920 Short Connector Pipe, 2" Standard Configuration . . . . . . . . . . . . . . . . . . .1
9 . KE01974 Elbow, 2" . . . . . . . . . . . . . . . . . . . . . . . . . . . . . . . . . . . . . . . . . . . . . . . . . . . . . . .1
10. KE01316-1 Long Connector Pipe, 2" Standard Configuration . . . . . . . . . . . . . . . . . . .1
Optional Strainer Configuration . . . . . . . . . . . . .3
"O" RINGS, GASKETS & SEALS
ITEM NO. PART NO. DESCRIPTION QTY.
A. FA05002-3 Upper Plunger "O" Ring . . . . . . . . . . . . . . . . . . . . . . . . . . . . . . . . . . . . . . . . . . .1
B. FA05002-7 Lower Plunger "O" Ring . . . . . . . . . . . . . . . . . . . . . . . . . . . . . . . . . . . . . . . . . . . .1
C. KE54810-2 Gasket, 2" Bevel Seat Standard Configuration . . . . . . . . . . . . . . . . . . .4
D. KE54810-3 Gasket, 3" Bevel Seat . . . . . . . . . . . . . . . . . . . . . . . . . . . . . . . . . . . . . . . . . . . . .2
E FA05002-5 Product Piston "O" Ring . . . . . . . . . . . . . . . . . . . . . . . . . . . . . . . . . . . . . . . . . . . .1
Optional Strainer Configuration . . . . . . . . . . . . .2
Page 11

HOSE ASSEMBLIES
ITEM NO. PART NO. DESCRIPTION QTY.
1. KE01749-2 Food Hose Assembly, 3' . . . . . . . . . . . . . . . . . . . . . . . . . . . . . . . . . . . . .1
2. KE01749-3 Food Hose Assembly, 3' . . . . . . . . . . . . . . . . . . . . . . . . . . . . . . . . . . . . .1
3. KE53099 Cleaning Hose . . . . . . . . . . . . . . . . . . . . . . . . . . . . . . . . . . . . . . . . . . . .1
4. FI05057 Hose Clamp . . . . . . . . . . . . . . . . . . . . . . . . . . . . . . . . . . . . . . . . . . . . . .1
5. FI05255 Hose Adapter 2" . . . . . . . . . . . . . . . . . . . . . . . . . . . . . . . . . . . . . . . . . . .1
CLEANING HOSE ACCESSORY
1
2
5 4 3
Page 12

"O" RINGS, GASKETS & SEALS
CUTAWAY
VIEW
A
FA05002-3
Upper Plunger
"0" Ring
CUTAWAY
VIEW
B
FA05002-7
Lower Plunger
"0" Ring
C
KE54810-2
2" Gasket
CUTAWAY
VIEW
D
KE54810-3
3" Gasket
CUTAWAY
VIEW
E
FA05002-5
Product Piston
"O" Ring
FA05002-26
Pneumatic Piston
"O" Ring
CUTAWAY
VIEW
Page 13

PNEUMATIC SCHEMATIC
Page 14

AIR PACKAGE
Page 15

POINT TO POINT
AIR TUBING
CONNECTIONS
Page 16

PUMP VALVE
ASSEMBLIES
Page 17

SPARE PARTS LIST
ITEM ON. DESCRIPTION QTY. QTY.
DOMESTIC OVERSEAS
Consumables
KE54810-3 Gasket, 3", Food Hose 10 50
KE54810-2 Gasket, 2", Piping Assembly 10 50
KE53056 Spring, Pump Head 2 10
KE54167 Food Grade Grease 1 10
FA05002-24 "O" Ring, Flapper Valve 4 20
FA05002-3 "O" Ring, Upper Plunger Seal 10 50
FA05002-2 "O" Ring, Pump Head 10 50
FA05002-7 "O" Ring, Lower Plunger Seal 10 50
FA05002-26 "O" Ring, Product Piston Head 10 50
Spare Parts
FA05002-6 "O" Ring, Rear Seal 12
FA05002-1 "O" Ring, Front Seal 12
KE01302 Lug Nut 12
KE54278 Removable Panel Stop 12
KE53266 Spring, Label Dispenser 12
KE53014-1 Rotary Actuator --- 1
KE01712 Air Cylinder, Discharge Head --- 1
KE01518 Hose for Clipper --- 1
KE01750 Hose for MFS to Kettle --- 1
KE54286 Air Limit Switch --- 1
KE54295 Air Flow Control --- 1
SE00090 Control Valve Assembly --- 1
SE00091 Pump Valve Assembly --- 1
OPTIONAL THERMO ASSURANCE PACKAGE PARTS
Consumables
FA05002-28 "O" Ring 5 20
Spare Parts
KE53206 RTD Sensor 11
KE53200 Bulb 12
KE53203 Clipper Lockout Valve --- 1
 Loading...