

Steamcraft II
COUNTER TYPE
CONVECTION STEAMER
SERVICE
MANUAL
Model CET5
Printed 02/90

Cleveland WARRANTY AND LIMITED EXTENDED
WARRANTY COVERAGE
LIMITED WARRANTY
Cleveland Range products are warranted to the onginal purchaser to be free from defects in material and work-
manship under normal use and service for the standard warranty period.
Cleveland Range agrees to repair or replace, at its option, f.o.b. factory, any part which proves to be defective
due to defects in material or workmanship during the warranty period, providing the equipment has been
unaltered, and has been PROPERLY INSTALLED, MAINTAINED, AND OPERATED IN ACCORDANCE
WITH THE CLEVELAND RANGE OWNER'S MANUAL.
CLEVELAND RANGE agrees to pay any FACTORY AUTHORIZED EQUIPMENT SERVICE AGENCY
(within the continental United States, Hawaii, and Canada) for reasonable labor required to repair or replace, at
our option, f.o.b.. factory, any pan which proves to be defective due to defects in material or workmanship,
during the labor warranty period, this warranty includes travel time not to exceed two hours and mileage not to
exceed 50 miles (100 miles round-trip), but does not include post start-up, tightening loose fittings, minor
adjustments, maintenance, cleaning or descaling.
The standard labor warranty allows factory payment of reasonable labor required to repair or replace such
defective parts. Cleveland Range will not reimburse the expense of labor required for the repair or replacement
of pans after the standard warranty period, unless an Extended Labor Warranty Contract has been purchased to
cover the equipmeny for the balance of the warranty period from the date of equipment installation. startup, or
demonstration
PROPER INSTALLATION IS THE RESPONSIBILITY OF THE DEALER, THE OWNER-USER, OR
INSTALLING CONTRACTOR, AND IS NOT COVERED BY THIS WARRANTY. Many local codes exist,
and it is the responsibility of the owner and installer to comply with these codes. Cleveland Range equipment is
built to comply with applicable standards tor manufacturers, including UL A.G.A.. NSF. ASME/NB. Bd., CSA.
CGA. ETL. and others.
BOILER (Steam Generator) MAINTENANCE IS THE RESPONSIBILITY OF THE OWNER-USER, AND
IS NOT COVERED BY THIS WARRANTY. The use of good quality feed water is the responsibility of the
Owner-User (see Water Quality Requirements below). THE USE OF POOR QUALITY FEED WATER WILL
VOID EQUIPMENT WAR RANTIES. Boiler maintenance supplies, including boiler hand gaskets, are not
warranted beyond the first 90 days after the date the equipment is placed into service if no preventive
maintenance records are available showing descaling every 90-120 days.
WATER QUALITY REQUIREMENTS
TOTAL DISSOLVED SOLIDS less than 60 pans per million
TOTAL ALKALINITY less than 20 parts per million
SILICA less than 13 parts per million
CHLORIDE less than 30 parts per million
pH FACTOR greater than 75
The foregoing shall constitute the sole and exclusive remedy of orginal purchaser and the full liability of
Cleveland Range tor any breach of warranty. THE FOREGOING IS EXCLUSIVE AND IN LIEU OF ALL
OTHER WARRANTIES, WHETHER WRITTEN, ORAL OR IMPLIED. INCLUDING ANY WARRANTY
OF PERFORMANCE. MERCHANTABILITY. OR FITNESS FOR PURPOSE. AND SUPERSEDES AND
EXCLUDES ANY ORAL WARRANTIES OR REPRESENTATIONS, OR WRITTEN WARRANTIES OR
REPRESENTATIONS. NOT EXPRESSLY DESIGNATED IN WRITING As A "WARRANTY" OR
"GUARANTEE" OF CLEVELAND RANGE MADE OR IMPLIED IN ANY MANUAL. LITERATURE.
ADVERTISING BROCHURE OR OTHER MATERIALS.
Cleveland Range's liability on any daim of any kind. including negligence, with respect to the goods or
services covered hereunder, shall in no case exceed the price of the goods or services, or part thereof, which
gives rise to the claim IN NO EVENT SHALL CLEVELAND RANGE BE LIABLE FOR SPECIAL,
INCIDENTAL OR CONSEQUENTIAL DAMAGES. OR ANY DAMAGES IN THE NATURE OF
PENALTIES.
LIMITED EXTENDED WARRANTY COVERAGE
The purchase of a Limited Extended Warranty Contract extends the standard warranty coverage to the purchased
period of time (one to four years) from the date of installation, start-up, or demonstration, whichever is sooner.
Revised 8/22/91
Next Page

INTRODUCTION
To get the full advantage of steam cooking, your Cleveland/ALCO equipment must be properly installed. A steamer which is
improperly installed, improperly used, improperly maintained, or improperly repaired will create a dangerous condition and
may cause injury to personnel.
Your Cleveland/ALCO equipment will require minimum servicing provided it is operated according to instructions
and given the care recommended.
Make sure that responsible personnel understand how your steam cooking equipment should be operated and cared tor.
Proper use and maintenance pay handsome dividends in long life and satisfactory performance.
Safe steam cooking equipment operation dictates that every owner of steam cooking equipment should follow these rules tor
operational safety:
1) Begin a comprehensive, continuous program of internal and external steam cooking equipment inspection.
2) Never allow untrained personnel to operate or experiment with a steamer.
3) At the end of each day's operation —
— Remove any spilled food, then wash the racks and compartment interiors thoroughly with mild detergent in warm
water.
— Rinse thoroughly with dean warm water.
— Let rinse water drain through compartment drain opening. If water does not drain freely, drain lines must be
cleaned out before cooking again. Clogged or slow drains are dangerous because hot water may spill out
when compartment doors are opened after a cooking cycle.
— When cleaning the steamer's exterior, never apply water to controls on the console. Use a damp clot h for
cleaning.
4) Always leave the compartment door ajar when the compartment is not in use.
5) Shut the unit down at the end of each day's operation as follows —
— On boiler-equipped steamers, blow down the boiler. For specific information, refer to "Steam Generators •
Maintenance Procedures."
— On direct-connected steamers, cut off the main steam supply with a valve ahead of the steamer's pressure
reducing valve.
— On SteamCraft II models, (one compartment counter-top model) depress the power switch to the "off"
position.
6) Read and follow The Cleveland/ALCO instructions on steamer and steam generator maintenance and servicing
in the Owners Manual before making any adjustments or replacement of pans, or decision to buy parts, or
before calling tor serv ice.
7) Use only replacement parts which are factory authorized as equivalent to the parts being replaced, to preserve
the certification of Underwriters Laboratories, American Gas Association, Canadian Standards Association or
Canadian Gas Association (as applicable).
8) Never allow unqualified personnel to tamper with the steamer or steam generator controls, or to replace worn-
out parts
9) For gas-fired steam generators (boilers): Post in a prominent location instructions to be followed in the event
the user smells gas. This information shall be obtained by consulting the local gas supplier.
LITHO IN USA. 0388
Next Page
FOR YOUR SAFETY
Do not store or use gasoline or other
flammable vapors and liquids in the
vicinity of this or any other appliance.
CLEVELAND RANGE, INC., 1333 EAST 179th ST., CLEVELAND, OHIO 44110
Manufacturer reserves right of design improvement or modification, as warranted.

For additional safety information on the steam generator (boiler), refer to Installation Instructions, Operating
Instructions, and Servicing Instructions.
For additional information on steamer safety, refer to the steamer operating procedure page.
Instructions tor the occasional servicing that will be needed are given on the following pages.
Servicing beyond these instructions should not be attempted without specialized skills and experience. Such
attempts may void the warranty on the equipment
Clevetend/ALCO) maintains a list or regional parts distributors and reputable service agency tor
servicing your equipment. For the names of those in your area, call or write to Cleveland/ALCO.
Parts
The parts breakdown in this manual consists of a series of illustrati ons with a parts listing tor each illustration. Each
page is titled by the major assemblies or components which are illustrated thereon.
Alternate pans. older designs, and parts used exclusively in specific models (when more than one model is covered
on the page) are, when necessary tor clarity, depicted within circles on the illustration page.
How To Use The Parts* Drawing
From the illustration, determine the reference number of the pan desired. Then refer to the pans listing and locate in
the left-hand column the reference number obtained from the illustration. There you will find the part number and
description of the pan.
Component parts of an assembly or sub-assembly are clearly identified in the description column. Such components
are listed directly below the assembly and are indented from the assembly description. If the assembly is ordered,
the shipment will include all parts which are indented below the assembly description.
Directions For Ordering Parts
To ensure prompt and accurate handling, the following data should be furnished in addition to the part number and
the description:
Serial Number Model Number Electrical
Specifications (where applicable)
LITHO IN U&A. 0388
Next Page
CLEVELAND RANGE, INC., 1333 EAST 179th ST., CLEVELAND, OHIO 44110
Manufacturer reserves right of design improvement or modification, as warranted.
Cleveland
TM
Steamcraft
II
INSTALLATION INSTRUCTIONS
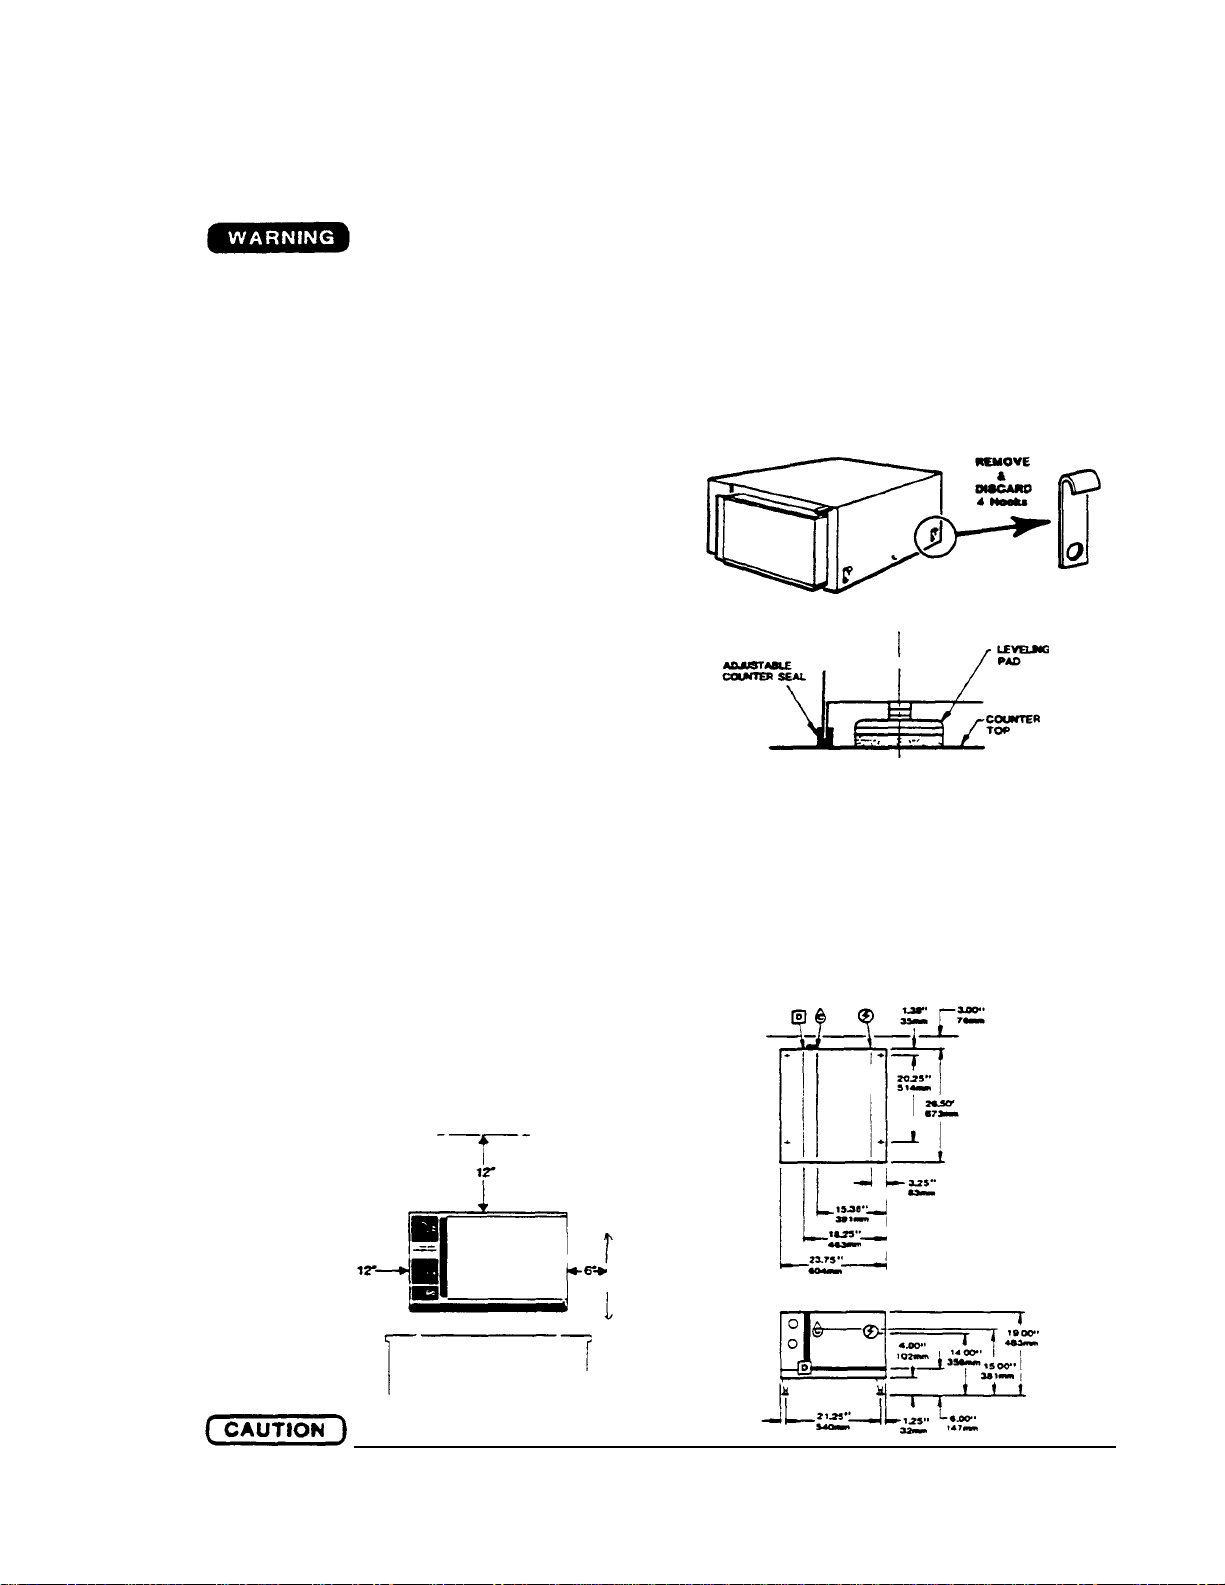
Installation of this unit must be done by qualified plumbing and electrical installation
Right
Side:
6"— 152mm
Rear:
3' 12'— 76mm
personnel working to all applicable local and national codes Improper installation of
this product could cause inury or damage.
Counter leveling pads with a steamer counter seal (or optional feet) are in a bag within the canon Locate this bag before discarding the
ASSEMBLY
shipping carton
NOTE: The use of leveling pads and steamer counter seat (gasket) on surfaces
other than stainless steel is not recommended
STEPS FOR ASSEMBLY
1) Carefully cut the shipping carton open for easy removal of the steamer. There are four clips mounted to the front two and rear two outer
sheeting mounting screws. These dips were used to lower the steamer
into the carton. They must be removed and discarded pnior to
installation. Reinstall the tour screws and tighten them securely, as
these screws also secure the outer sheet metal cover to the steamer.
2) Install the four leveling pads (or optional four legs) into the threaded
holes on the bottom of the steamer
3) (Omit this next step if optional 4' legs are supplied.) Install the
adjustable counter seal on the bottom edge of the body Begin by
pressing on one end of the sealing stnp at the middle of the bottomfront edge. Continue applying the seal in a clockwise direction.
NOTE: The purpose of the counter seal is to provide
a sealing stnp between the cooker and the surface on which it is placed.
Some surfaces will require the use of additional sealant
4) Remove the plastic dnp trough from the inside of the cooking compartment and install it by sliding it onto the mounting brackets
on the bottom-front of the steamer. Remove the fuse holder caps and fuses from the inside of the cooking compartment and
install them into the fuse holders on the back of the steamer.
The cooker should be placed in position and leveled left to right and front
POSITIONING
to rear. The required clearances are:
Left
Side:
12"—305mm
Vertical:
'—
Do not install any other equipment on
top of me Steamcraft II
Cleveland Range Company equipment is designed and built to comply with applicable standards for manufacturers. Included among
WATT
ONLY SUITABLE
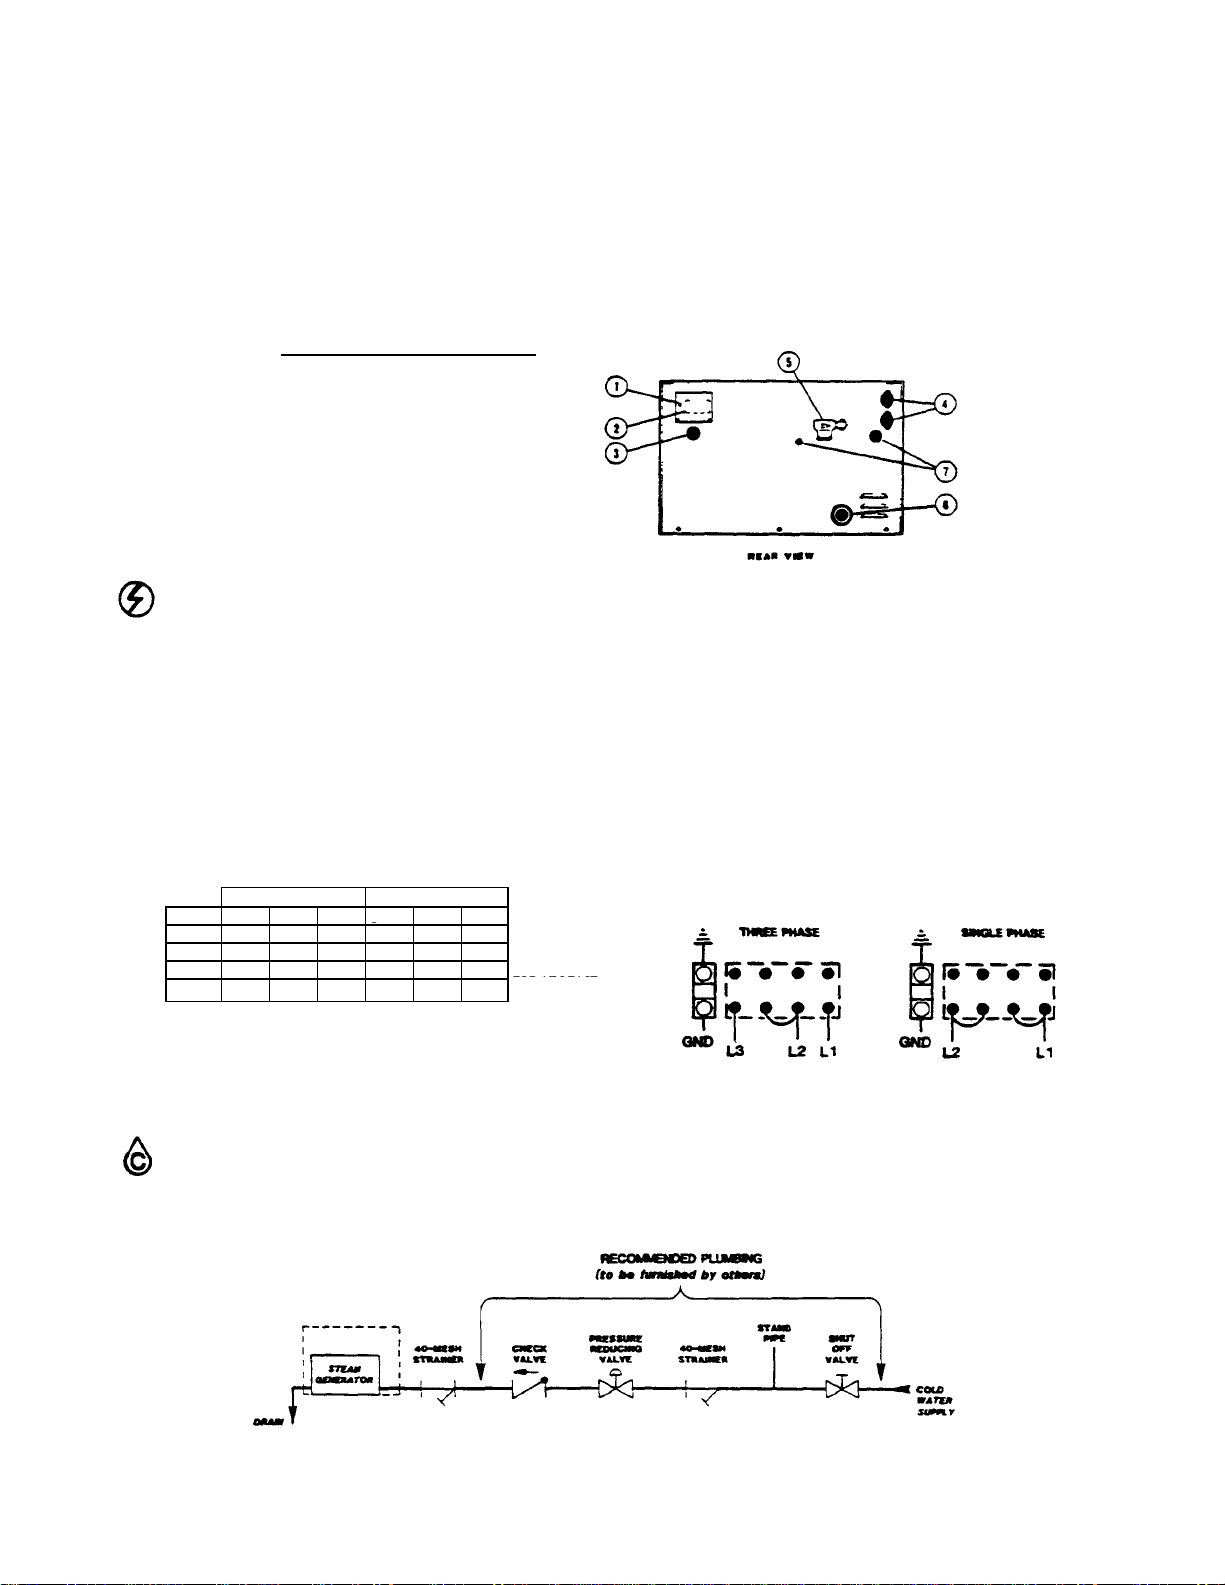
SERVICE CONNECTIONS
those certification agencies which have approved the safety of the equipment design and construction are: UL. A.G A., NSF, ASME,
CSA, CGA, and others.
Cleveland Range Company equipment is designed and certified for safe operation only when permanently installed in accordance with
local and/or national codes. Many local codes exist, and it is the responsibility of the owner and installer to comply with the
In no event shall Cleveland Range Company assume any liability for consequential damage or injury resulting from installations which
are not in strict compliance with our installation instructions. Specifically, the Cleveland Range Company will not assume any liability
for damage or injury resulting from improper installation of equipment, including, but not limited to. temporary or mobile installations
Ref. No. Qty. Description
1 1 Ground lug for ground w conne ction
2 1 terminal block for feed wire connection
3 1 Feedwire knockout hole—
4 2 Fuse holders with 2 amp type KTKR-2
5 1
6 1 Drawn plumbing
7 2 Venting outlets —No connections or re-
ELECTRICAL
Install in accordance with local codes and/or the National Electric Code ANSI/NFPA No 70-1984 (USA) or the Canadian Electrical Code CSA Standard C22.1 (Canada). A separate fused disconnect switch must be supplied and installed. The steamer must be
eiectncally grounded by the installer.
The electric supply must match the power requirements specified on the steamer's rating label. The copper wiring must be
adequate to carry the required current at the rated voltage.
Locate the terminal block cover and "knock-out" plug at the upper left corner of the steamer's back panel. Remove the two screws
securing the terminal block cover and remove the cover. Remove the "knock-out" plug. Feed permanent copper wiring through the
"knock-out." and fasten to the terminal block, in accordance with the wiring diagram affixed to the steamer's back panel. Be sure
to connect the ground wire to the separate ground terminal connecfor (ground lug). Replace the terminal block cover and secure it
with the two screws.
The steamer is— wired for 3-phase delta operation at the facfory. For single phase operation, the installer must change the
Two jumpers on the terminal block to that shown in the accompanying diagram (and on the steamer’s wiring diagram label.)
two jumpers on the terminal block to that shown in the accompanying diagram (and on the steamer's winng diagram label)
VOLTS Watts AMPS
206 5000 24 10 5000 14 14 SUPPLY USE
220 4202 19 10 4202 11 14 COPPEBWIRE
240 5000 21 10 5OOO 12 14
410 - - - 5000 6 14 75 Degrees C
1 PHASE
fuses (Part No 06344)
strictions should be made
3 PHASE 60 HZ-3 Wire—
AWG
AMPS
AWG
WATER
A 1/4" * IPS COLD water line is required. DO NOT USE HOT WATER. Minimum water pressure is 35 psi (2 4 kg/cm2), the
maximum water pressure is 60 psi (4.1 kg/cm2), measuring flow pressure, not static pressure Connect the cold water line to the
input side of the line strainer, located on the outside of the steamer's back panel, toward the top-center of the panel Refer to the
service connection drawing for precise location.
RECOMMENDED PLUMBING (furnished by the installer):
Shut-off Valve' The water supply can be shut off at this valve in the event that the steamer, or a plumbing component, requires service
RECOMMENDED PLUMBING (continued):
•
TO
TAL DISSOLVED
less than
60
parts per million
•SILICA
less than
13
parts per million
NOTE:
The outer shell must
be
installed in place
4 19993 On/Off power swi
tch
Stand Pipe: A vertical pipe holding a column of water, topped with a column of air. The air pocket provides a "shock absorber"
effect, to reduce or eliminate the possibility of "water hammering" in the plumbing.
Strainer Removes particles from the water supply which could result in damage to plumbing components.
Pressure Reducing Valve: Required if the incoming water pressure exceeds 60 psi.
Check Valve: Eliminates the possibility of steam generafor water backing up into the water supply plumbing. (This check valve
may be required by local plumbing codes.)
WATER QUALITY REQUIREMENTS
If the purity of the incoming water is good, the generafor, the heating element and the valves should give years of trouble free. efficient
service with a minimum of servicing.
The recommended minimum water quality standards, whether untreated or pretreated, based upon 4 hours of operation before the steamer is
shut off and allowed to drain, are as follows:
• TOTAL ALKALINITY less than 20 parts per million • pH FACFOR greater than 7.5
Consult a local water treatment specialist for an on-the-premises water analysis and for recommendations concerning steam
generafor feed water treatment (if required), in order to remove or reduce harmful concentrations of minerals. The use of a
poor quality (highly mineralized) water will mean that more frequent servicing of water sensitive components will be
necessary. The fact that a water supply is potable is not proof enough that it will not be detrimental to the water sensitive
components. The steamer should be shut off for 3 minutes every 4 hours, in order to minimize scale build-up.
DRAIN
A 1" N.P.T. fitting is provided. The drain termination must be free venting. Up to two elbows and a maximum of six feet of I* IP.S. pipe may be attached to the termination. However, the piping must have a gravity flow and vent freely to the air. Each steamer
requires its own 1" I.RS. drain extension. Do not interconnect any other drains to this steamer's drain extension.
If these instructions are nor complied with, there will be steam and water leakage past
the compartment door.
INSTALLATION CHECK
Installer must check out the steamer per the following procedure.
before proceeding.
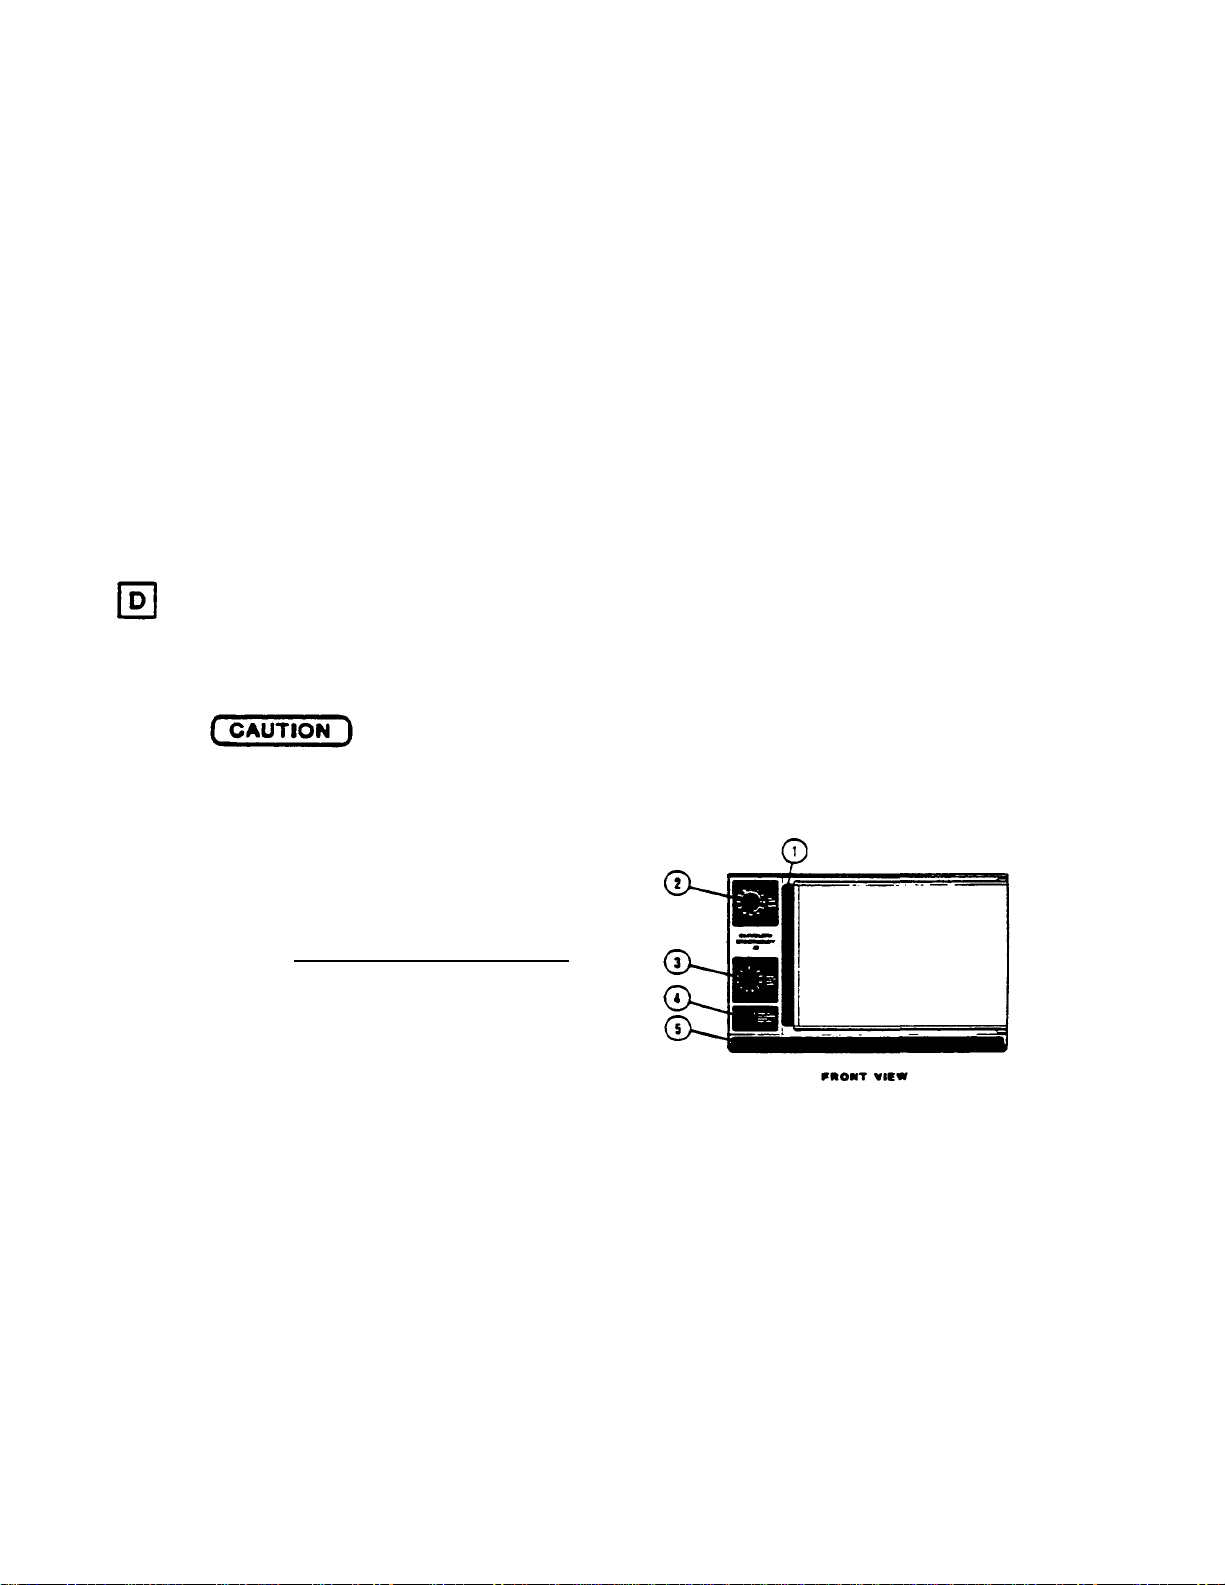
Ref. No. Part No. Description
1 SB110 Door handle
2 43905 Timer
3 40728 Steam— control
5 20602 PIastic dnp trough
CHECK OUT STEPS
1) Empty the cooking chamber of all literature and leave the door open.
2) Make sure the cold water supply line to the generafor is open.
3) Turn on the electrical service to the cooker at the fusible disconnect box.
4) Push the "water on" switch button to the right. The switch is illuminated when it is in the "ON" position.
5) Set the steam control at number ten. Steam should be visible inside the cooking chamber after five minutes of operation.
6) Let the steamer continue to operate for five additional minutes with the steam control set at ten. Steam flow should be visible for
this entire period of operation.
7) Set the steam control to number five. Steam will continue to flow but in a lesser amount.
8) To check the timer and buzzer, turn the timer past 10 minutes to wind it. Then reset the timer at three minutes. At the end of the
three minutes, the buzzer will sound for three seconds and then stop.
9) To completely shut down the steamer, push the "water on" switch button to the left (the light should go out), and turn the steam
control knob to zero. The steam generafor water will automatically drain out. At this time. the generafor flush cycle will be
energized. This system automatically flushes the generafor and drain line to assist in removal of lime deposits. After 3 minutes,
the flush cycle should end and the steamer should shut off completely.
If the cooker has functioned as described, it is ready for use.
Installer: Please complete and mail the Insialler's Checklist.

OPERATION
Operation of the Cleveland Steamcraft II is very easy. Each operator should be familiar with the following procedures to
effectively start operate, and shut down the steamer each day.
Start-up and Preheat
1 Push the "water on" switch to the right. The switch is illuminated when it is in the "on" position.
2 Turn the steam control knob to the number 10 setting. To monitor the start-up, leave the cooking compartment door open.
Steam should begin to appear inside the cooking compartment after approximately 5 minutes. Close the door and allow the
steam flow to continue for 5 more minutes to preheat the compartment. To close the door, swing it shut with a quick.
snapping motion.
3 The Steam Cooker is now ready for use. Either proceed with cooking, or turn the steam control knob to "stand-by" at the
number 1 setting.
WARNING:DO NOT PUT YOUR FACE OR HAND(S) INTO THE COOKING COMPARTMENT WHEN
THE STEAMER IS IN OPERATION. STEAM CAN CAUSE SERIOUS BURNS AND BODILY HARM.
Cooking Operation:
1. Check the cooking compartment to ensure it is warm. If it is cool perform the steps for preheating.
2. Place the pan(s) of food into the cooking compartment by sliding the pan(s) into the two slide racks, and secure the door.
Optimum steam heat transfer, and therefore a higher quality food product, is achieved when shallow, perforated, uncovered
pans are used.
3 Activate the steam flow by setting the steam control knob at number 10. The steam supply is variable from 10% at the
number 1 setting, to 100% at the number 10 se tting, to supply the precise volume of steam required for cooking. defrosting,
or preheating of fresh or frozen food. For cooking fresh or frozen food, set the steam control knob at number 10. To conserve
energy when cooking only one pan of fresh food. set tings lower than number 10 may be successfully used, but the timer
setting may have to be increased.
4. Turn the timer knob past 10 minutes to wind the timer spring, then set the timer at the cooking time required. A buzzer will
sound for 3 seconds at the end of the selected time, then it will stop buzzing automatically.
5. Remove the food from the cooking compartment promptly or it will continue cooking. Steam flow is not shut off by the timer.
Steam flow is only shut off when the steam control knob is set at zero.
6. After the cooking cycle is complete, set the steam control knob to "stand-by" at the number 1 setting to keep the
compartment warm, in preparation for the next cooking cycle.
7 The door may be opened any time during the cooking cycle to inspect season, add, or remove food. but keep hands out of
the cooking compartment to prevent burns. Frequent opening of the door may result in longer cooking times.
Short-Term Holding:
Some foods, after they have been prepared, can be returned to the cooking compartment to be kept hot for short periods of
time (up to 45 minutes) with minimum product change, by turning the steam control knob to the number 1 setting.
Shutdown:
The Steamcraft II must be shut off for three minutes every four hours to automatically drain highly mineralized water from
the steam generator. This is accomplished by pushing the lighted "water on" switch to the left. Turning the steam control knob
to zero does not shut-off the steamer, and therefore does not drain the steam generator.
CARE AND CLEANING
Your Steamcraft II must be cleaned regularly to maintain its fast efficient cooking performance and to minimize down time.
1. The steam generator must be drained every four hours, as well as at the end of the day to remove harmful highly mineralized
water. When steam is produced, the water in the generator is being distilled. During this process, the dissolved minerals that
come into the generator with the water remain in the generator as the water boiIs away as steam. When allowed to
accumulate, the water becomes highly mineralized, which will result in erratic operation, slower cooking times, accelerated
corrosion of the heater element, and ultimately, heater element failure. When the steamer is shut off, an automatic 3 minute
water purge cy cle will flush the scale out of the steam generator. Remember, turning the steam control knob to zero only
shuts off the steam supply. The steamer is shut off, and the generator is automatically drained and cleaned, only when the
lighted "water on" switch is pushed to the left.

• With the steamer off, open the cooking compartment door and allow the steamer to cool before cleaning the cooking
compartment and its components.
2. The steamer is equipped with a drain screen in the back of the cooking compartment. The steamer should never be
operated without the screen in place. This screen prevents large food particles from entering and possibly restricting the
drain line. Any restriction of the drain line may cause a slight build-up of back pressure in the compartment, resulting in
steam leaks around the door gasket. It also may adversely affect the convection action of the steam in the compartment,
which is necessary for optimum performance. Pouring USDA approved drain cleaner through the compartment drain once a
week will help to ensure an open drain.
3. At the end of each day's operation, remove any spilled food from the steamer, then wash the pan slide racks, drain screen,
door gasket, and compartment interior with mild detergent and warm water. Rinse thoroughly with clear water. Rinse water
should drain freely through the compartment drain opening. If it does not the drain must be cleaned before using the
steamer.
4. The pan slide racks are easily removed from the cooking compartment for thorough cleaning, and they are stainless st eel,
so they can be washed safely in a mechanical dishwasher.
5. Always leave the compartment door ajar when not in use, to extend gasket life and to prevent the gasket from adhering to
the steamer. Unnecessary compression of the gasket shortens its life.
6. Exterior Care: Allow steamer to cool before washing. Use the same cleaners and cleaning procedures as for other kitchen
surfaces of stainless steel and aluminum. Mild. soapy water, with a clear water rinse, is recommended. Do not allow water to
run into electrical controls. Always turn off equipment power before using water to wash equipment. Do not hose down the
steamer.
7. Once every three months, shut off the cold water supply to the steamer, and clean the water line strainer.
MAINTENANCE
Your Steamcraft II is equipped with an automatic 3 minute water purge system which will flush the highly mineralized water out
of the steam generator when the steamer is shut off. If the steamer's feedwater supply is of average hardness and mineral
content (less than 200 parts per million of total dissolved solids), and the steamer is shut off for three minutes every 4 hours,
this purge system should provide a maintenance free steam generator. However, if your water contains more than 200 parts per
million of total dissolved solids, additional maintenance may be required. In this case. your steamer should be shut off every 2
or 3 hours, depending upon the mineral content of the water. In addition, it may be necessary to periodically have a service
technician remove the steam generator's side panel and clean the scale accumulations on the inside.
The Cleveland Range Company supports a worldwide network of Maintenance and Repair Centers, which are regional
distributors of parts and service. Contact your nearest Maintenance and Repair Center for the name of an authorized service
agency in your area, or for replacement parts, or information regarding the proper maintenance and repair of your equipment. In
order to preserve the various agency safety certifications (UL. A.G.A, CSA, CGA. NSF, ASME/Ntl. Bd, etc.), only factory supplied replacement parts should be used. The use of other than factory -supplied replacement parts will void the warranty.
INSTALLATION CHECK
Proper operation of the Cleveland Steamcraft II is dependent upon proper installation. After the steamer has been installed, a
few quick checks could save unnecessary service calls.
1. The Steamcraft II requires a cold water connection at the rear of the steamer for proper efficient operation. DO NOT USE
HOT WATER. The cold water feed line should maintain 35 to 60 psi flow pressure, and not experience a pressure drop when
other appliances are used. Pressure in excess of 60 psi must be reduced (with a pressure reducing valve) to 35 to 60 psi.
2. The steamer must be level.
3. The supply voltage must agree with the voltage indicated on the rating label on the back of the steamer, and the voltage
shown on the packing slip. The steamer must be protected with a separate fused disconnect and be property grounded, in
accordance with the national electric code.
4. The termination of the drain extension must vent freely to the air (not plumbed solidly into the floor drain). It must have a
gravity flow, be 1" diameter minimum (IPS) and not exceed 6' in length, with no more than two elbows, before draining. Each
steamer requires its own 1" IPS drain extension. Do not interconnect any other drains to this steamer's drain extension.
CAUTION: IF THESE INSTRUCTIONS ARE NOT COMPLIED WITH. THERE WILL BE STEAM AND WATER LEAKAGE PAST THE
COMPARTMENT DOOR GASKET.
260-SO(R1| 0485 __________________________________________________________________________________
 Loading...