

ClearSpan 104450, 104448, 104447, 104449, 104451 Instruction Manual
...
Poly Shelters
Note: Photo may be of a different but similar model
© 2005 ClearSpan
All rights reserved. Reproduction prohibited without written permission.
Rev: 26 Jan 05
TM
Instruction Manual
for the ClearSpan
SKU #104447 21' Wide x 16' Long
SKU #104448 21' Wide x 24' Long
SKU #104449 21' Wide x 32' Long
SKU #104450 21' Wide x 40' Long
SKU #104451 21' Wide x 48' Long
SKU #104452 21' Wide x 56' Long
SKU #104453 21' Wide x 64' Long
SKU #104454 21' Wide x 72' Long
TM
Sunblocker Pavilion
Introduction
Thank you for purchasing the ClearSpanTM Poly Shelter. We appreciate your patronage. We hope
you enjoy building and utilizing your shelter. Please read this entire instruction manual before
starting to assemble your shelter. If you require assistance during the construction process you may
call us at 1-800-245-9881.
A Word About Safety
Just as we want you to be pleased with your assembled shelter, we donʼt want you to get hurt in the
process of building it! Our suggestions include the following:
• Wear eye protection when drilling and power-screwing.
• Wear head protection when working with/under heavy parts including metal tubing.
• Wear gloves when handling metal tubing due to sharp or rough ends.
• Use a portable GFCI when working with corded power tools.
• Never erect a shelter directly under power lines.
• Be careful not to drive anchors into buried power cables.
• Do not climb on the shelter or its frame. It is not designed to support human weight.
• If the shelter is enclosed, provide proper and adequate ventilation.
• Do not store hazardous materials in the shelter without proper ventilation and precautions.
• If both ends are covered, provide proper ingress and egress to prevent entrapment.
• Do not occupy the shelter during very high winds, hurricanes, or tornadoes.
• If shelter is moved after construction, inspect shelter thoroughly before reuse.
• Use common sense at all times.
Suggested Tools
Before you start to build your shelter you should assemble the following tools:
• Tape Measure
• Fine Point Marker to mark locations on tubing
• Step ladder tall enough to safely work at the height of your shelter
• Two or more 30-foot pieces of rope
• Allen Wrench Set
Page 2

IMPORTANT - Read Anchoring Instructions
You must read the anchoring instructions packed with your kit prior to shelter assembly!
For permanent installations, we recommend using ground posts at the bottoms of all legs.
They not only anchor your shelter but also make your pavilion easier to assemble.
Selecting a Location
It is important to select a proper location for your poly shelter. While the location may have been
predetermined before you even ordered your shelter, you may want to “improve” the location before
starting the assembly process.
One of the most important considerations is that the location should be level. If it is not, the shelterʼs
frame will not assemble or sit properly. If your location is not level, you should consider grading it
before building on it. Another alternative is to provide footings which are level to support the shelter.
These could be pressure-treated posts, precast concrete blocks, or poured in place footings.
Drainage is another important consideration. Rain flowing off your shelter should have a natural path
to flow away from the shelter and not under or into it.
Section A - Unpack & Identify Parts
Step 1: Before you begin to assemble your shelter you should first unpack the contents of your
shipment. During this process you will learn what all of the various parts look like.
Tip: We recommend you start by laying out the contents of your shipment in an orderly fashion
as shown in the photograph below. Note that your parts may look different from those shown.
Step 2: Carefully go through the bill of material that came with your shelter and verify that you
have all the required parts.
Tip: It is not necessary to open the plastic bags and count all of the fasteners at this time.
Page 3
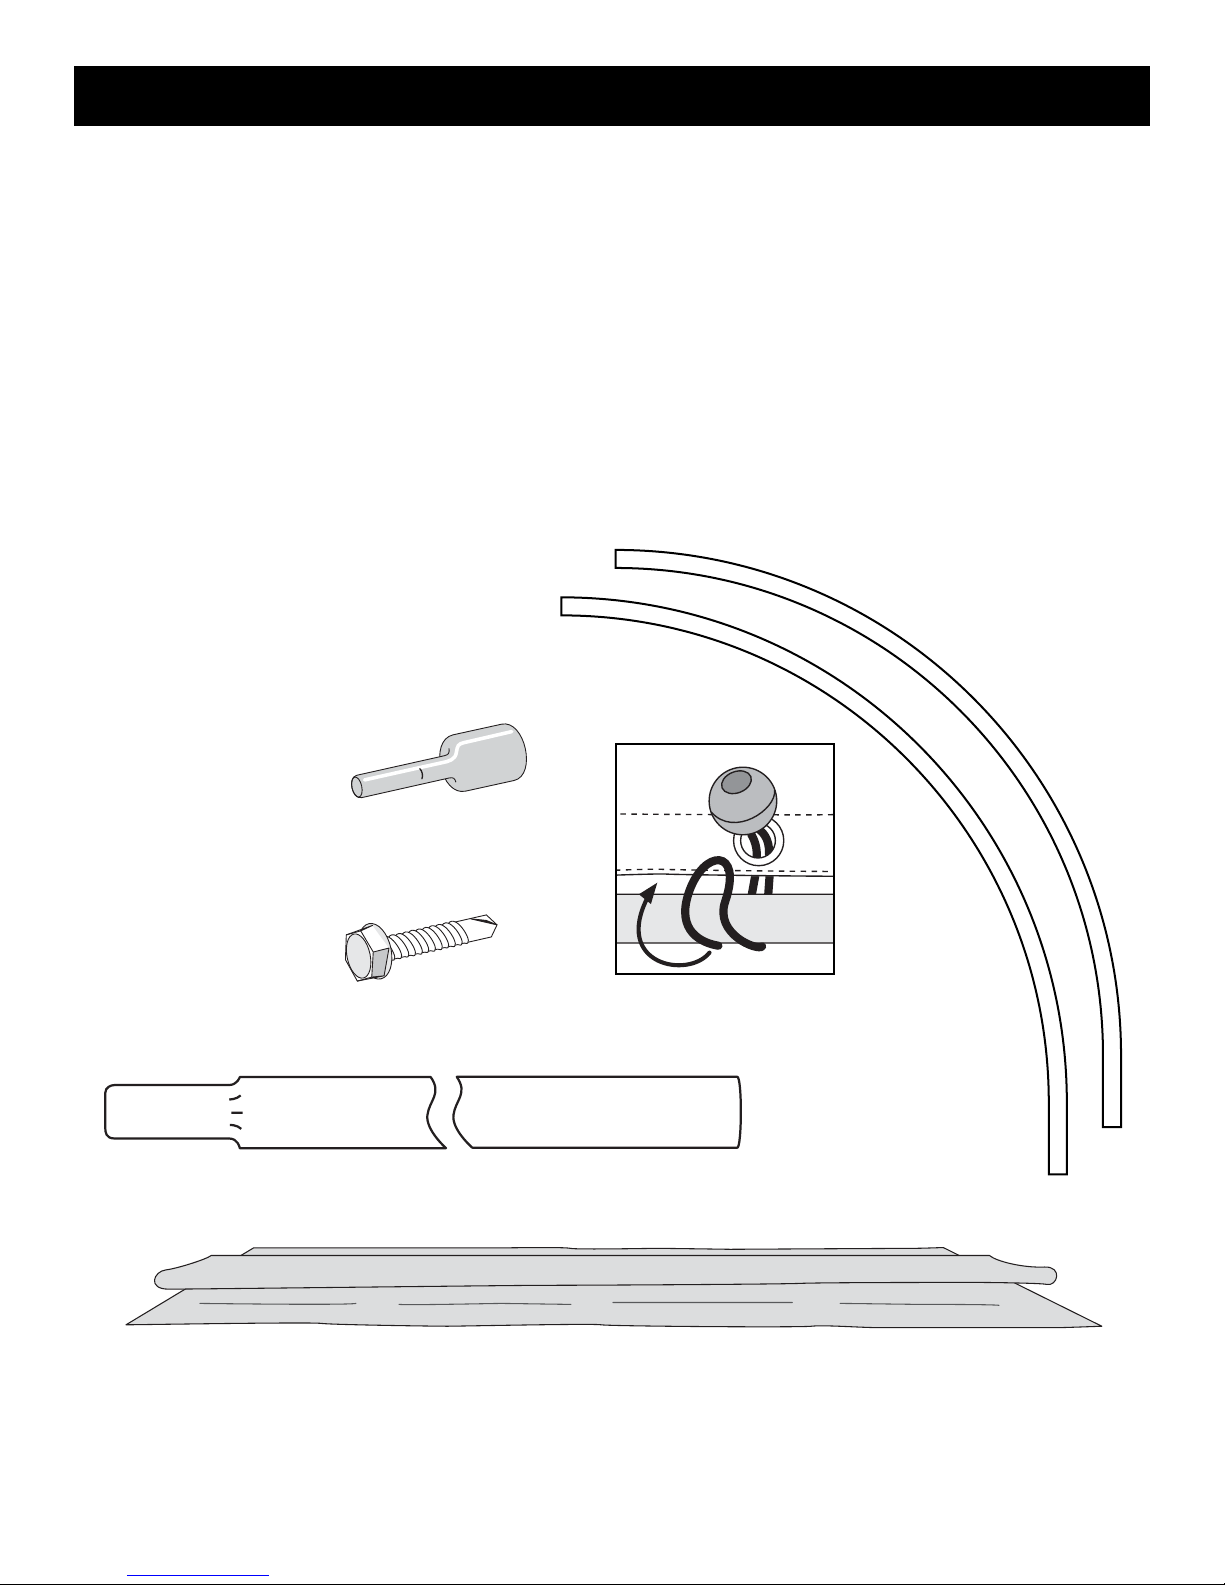
Parts Identification
3
8
Crossover
Socket T & Cross
Driver
Bit
Swivel Socket
2 Socket Cross
Straight Coupling
Rafter Sections
(all pieces
not shown)
Ground Post
(optional)
Pipe (only swaged is shown)
Tek Screw
Ball Tie Down
Cover
Note: Illustrations are not to scale.
Page 4

Assembly Diagrams
Your assembled shelter will be similar to the photo below:
Before installing your shade cover, you will assemble the frame:
Note: The number of rafters shown above may not match your shelter
Page 5
 Loading...