

Page 1
ClearCube Virtualization
Deployment Guide
ClearCube Technology, Inc.
Page 2

Copyright © 2006, 2007, ClearCube Technology, Inc. All rights reserved.
Under copyright laws, this publication may not be reproduced or transmitted in any form, electronic or mechanical,
including photocopying, recording, storing in an information retrieval system, or translating, in whole or in part,
without the prior written consent of ClearCube Technology, Inc.
This information is subject to change without notice and ClearCube shall not be liable for any direct, indirect,
special, incidental or consequential damages in connection with the use of this material.
Sentral™, ClearCube™, C3 Architecture™, Blade Switching BackPack™, PC Blade™, and C/Port™
are trademarks of ClearCube Technology Inc. Product and company names mentioned herein
The ClearCube Architecture and its components described in this user manual
are protected by numerous granted and pending U.S. and international patents.
Granted patents include: US05926172, US05966056, US05994952, US06012101, US06020839, US06037884,
US06038616, US06119146, US06148182, US06167241, US06385666, US06421393, US06426970,
US06633934, US06708247, US06735658, US06886055, and US06944826.
Trademarks
are trademarks or trade names of their respective companies.
Patents
Inquiries regarding patented technology should be directed to
ClearCube Corporate Headquarters.
Page 3

Contents
Understanding Virtualization in a ClearCube Environment. . . . . . . . . . . . . . . . . . . . . . . . . . . . 1
Using This Document. . . . . . . . . . . . . . . . . . . . . . . . . . . . . . . . . . . . . . . . . . . . . . . . . . . . . . . . . . . .1
Obtaining Documents Referenced in This Guide. . . . . . . . . . . . . . . . . . . . . . . . . . . . . . . . . . . . . . .2
Understanding the Virtualization Platforms . . . . . . . . . . . . . . . . . . . . . . . . . . . . . . . . . . . . . . . . . . .3
R2200 Blade Running VMware ESX Server . . . . . . . . . . . . . . . . . . . . . . . . . . . . . . . . . . . . . . .4
A1010, R1200, or R1300 Blade Running VMware Server (Formerly GSX). . . . . . . . . . . . . . . .5
Deploying ESX Server. . . . . . . . . . . . . . . . . . . . . . . . . . . . . . . . . . . . . . . . . . . . . . . . . . . . . . . . . .7
Installation Overview . . . . . . . . . . . . . . . . . . . . . . . . . . . . . . . . . . . . . . . . . . . . . . . . . . . . . . . . . . . .7
Satisfying Installation Prerequisites. . . . . . . . . . . . . . . . . . . . . . . . . . . . . . . . . . . . . . . . . . . . . .8
Creating Virtual Machines . . . . . . . . . . . . . . . . . . . . . . . . . . . . . . . . . . . . . . . . . . . . . . . . . . . . . . . .9
Deploying Virtual Machines in the ClearCube Environment . . . . . . . . . . . . . . . . . . . . . . . . . . .9
Setting up iSCSI Storage Volumes . . . . . . . . . . . . . . . . . . . . . . . . . . . . . . . . . . . . . . . . . . . . . . . . .9
Setting up iSCSI. . . . . . . . . . . . . . . . . . . . . . . . . . . . . . . . . . . . . . . . . . . . . . . . . . . . . . . . . . . .10
Understanding the iSCSI Storage System Components . . . . . . . . . . . . . . . . . . . . . . . . . .11
Obtaining EMC Documentation . . . . . . . . . . . . . . . . . . . . . . . . . . . . . . . . . . . . . . . . . . . . .11
Installing VMware ESX Server. . . . . . . . . . . . . . . . . . . . . . . . . . . . . . . . . . . . . . . . . . . . . . . . . . . .13
Installing Virtual Infrastructure Client. . . . . . . . . . . . . . . . . . . . . . . . . . . . . . . . . . . . . . . . . . . . . . .16
Completing Steps for USB Support . . . . . . . . . . . . . . . . . . . . . . . . . . . . . . . . . . . . . . . . . . . . . . . .21
Deploying VMware Server. . . . . . . . . . . . . . . . . . . . . . . . . . . . . . . . . . . . . . . . . . . . . . . . . . . . . .23
Overview . . . . . . . . . . . . . . . . . . . . . . . . . . . . . . . . . . . . . . . . . . . . . . . . . . . . . . . . . . . . . . . . . . . .23
Satisfying Installation Prerequisites. . . . . . . . . . . . . . . . . . . . . . . . . . . . . . . . . . . . . . . . . . . . .23
Installing VMware Server. . . . . . . . . . . . . . . . . . . . . . . . . . . . . . . . . . . . . . . . . . . . . . . . . . . . . . . .23
Installing Windows Server 2003. . . . . . . . . . . . . . . . . . . . . . . . . . . . . . . . . . . . . . . . . . . . . . . .23
Installing IIS 6.0 . . . . . . . . . . . . . . . . . . . . . . . . . . . . . . . . . . . . . . . . . . . . . . . . . . . . . . . . . . . . 24
Starting the Installation and Creating Virtual Machines. . . . . . . . . . . . . . . . . . . . . . . . . . . . . .24
Installing the Operating System. . . . . . . . . . . . . . . . . . . . . . . . . . . . . . . . . . . . . . . . . . . . . . . .27
Installing VMware Tools. . . . . . . . . . . . . . . . . . . . . . . . . . . . . . . . . . . . . . . . . . . . . . . . . . . . . .30
Deploying Virtual Machines . . . . . . . . . . . . . . . . . . . . . . . . . . . . . . . . . . . . . . . . . . . . . . . . . . .31
Setting up NFS for Demonstrations. . . . . . . . . . . . . . . . . . . . . . . . . . . . . . . . . . . . . . . . . . . . . . 33
Overview . . . . . . . . . . . . . . . . . . . . . . . . . . . . . . . . . . . . . . . . . . . . . . . . . . . . . . . . . . . . . . . . . . . .33
Setting up NFS. . . . . . . . . . . . . . . . . . . . . . . . . . . . . . . . . . . . . . . . . . . . . . . . . . . . . . . . . . . . . . . .33
Satisfying NFS Prerequisites. . . . . . . . . . . . . . . . . . . . . . . . . . . . . . . . . . . . . . . . . . . . . . . . . .34
Setting up NFS. . . . . . . . . . . . . . . . . . . . . . . . . . . . . . . . . . . . . . . . . . . . . . . . . . . . . . . . . . . . .34
Adding NFS to VMware Infrastruture 3 . . . . . . . . . . . . . . . . . . . . . . . . . . . . . . . . . . . . . . . . . . 36
Mounting NFS . . . . . . . . . . . . . . . . . . . . . . . . . . . . . . . . . . . . . . . . . . . . . . . . . . . . . . . . . . . . .38
ClearCube Virtualization Deployment Guide • iii
Page 4

iv • ClearCube Virtualization Deployment Guide
Page 5

Understanding Virtualization in a
ClearCube Environment
Using This Document
This document provides information about deploying virtual machines (VMs) on
ClearCube™ Blades in a VMware® environment.
VMware provides extensive documentation that explains how to install, configure, and
administer VMs and all of the software and hardware components of the VMware
Infrastruture 3 suite.
The following list describes how this document is organized.
•"Understanding Virtualization in a ClearCube Environment
the virtualization platforms that ClearCube supports. A general description of each
platform architecture is provided, and links to referenced and additional
documentation are provided.
•"Deploying ESX Server
Server installation process. It also provides installation instructions for EMC®
AX150i iSCSI data storage system, ESX Server and virtual machines, and the
Virtual Infrastructure Client.
•"Deploying VMware Server
Server installation process. The chapter details how to in stall VMware Server and
Windows® Server 2003; how to create a VM, install an operating system, and
then power on the VM; and how to install the VMware Tools utilities.
•"Setting up NFS for Demonstrations
Network File Structure® in demonstration environments.
‚" on page 7 provides an overview of the VMware ESX
‚" on page 23, provides an overview of the VMware
‚" on page 33, describes how to set up
‚" on page 1, describes
ClearCube Virtualization Deployment Guide Understanding Virtualization in a ClearCube Environment • 1
Page 6

Obtaining Documents Referenced in This Guide
This guide refers to several VMware Infrastructure documents located on the
documentation section of the VMware support site at the following URL:
http://www.vmware.com/support/pubs/
The following list details some of the documentation to which the site provides links.
• Introduction: ESX Server 3.0.1 and VirtualCenter 2.0.1—Describes the Virtual
Infrastructure components.
• Quick Start Guide: ESX Server 3.0.1 and VirtualCenter 2.0.1—Provides an
introduction to VMware Infrastructure for new users.
• Installation and Upgrade Guide: ESX Server 3.0.1 and VirtualCenter 2.0.1—Describes
how to install and upgrade VMware VirtualCenter and ESX Server.
• Basic System Administration: ESX Server 3.0.1 and VirtualCenter 2.0.1—Describes
how to manage the Virtual Infrastructure components
• Server Configuration Guide: ESX Server 3.0.1 and VirtualCenter 2.0.1—Describes
how to configure networking for ESX Server, virtual machines, VMotion, IP
storage, and the service console. It also covers configuring file system and
various types of storage, including iSCSI and Fibre Channel.
• Virtual Machine Backup Guide: ESX Server 3.0.1 and VirtualCenter 2.0.1—Describes
different strategies for performing backup and restore tasks.
SAN Configuration Guide—Describes how to design and deploy Virtual Infrastructure
systems using VMware Infrastruture 3 with SANs.
2 • Understanding Virtualization in a ClearCube Environment ClearCube Virtualization Deployment Guide
Page 7

Understanding the Virtualization Platforms
ClearCube supports two distinct platforms for virtualization:
• R2200 VM hosts running VMware Infrastruture 3 (includes ESX Server 3.0.1,
VirtualCenter 2.0.1, and VMware Consolidated Backup)
• A1010, R1200, or R1300 VM hosts running VMware Server (formerly GSX)
Both platforms follow a similar architecture that consists of:
• VM host system (such as a ClearCube R2200 Blade and ESX Server software)
• Network-attached data storage system (such as iSCSI or NAS)
• Sentral™ system
Users attach to VMs via Ethernet®. VM hosts provide a virtual router in each host,
and a virtual network interface controller (NIC) for each instantiated VM. Client
systems include:
• ClearCube Windows XPE or NeoLinux I/Ports™ connecting through Remote
Desktop Protocol (RDP) or the Sentral I/Port client
• ClearCube I8330 I/Ports connecting through Ethernet
• Desktop PCs connecting through RDP
Note: You can not use a C/Port™ to connect to a VM, because the C/Port digital link
uses USB redirection, not RDP. You can use C/Ports to manage the R-series
Blades on which the various components are installed, such as the ESX
Server, VMware Server, or a Linux-based NAS server.
ClearCube Virtualization Deployment Guide Understanding Virtualization in a ClearCube Environment • 3
Page 8

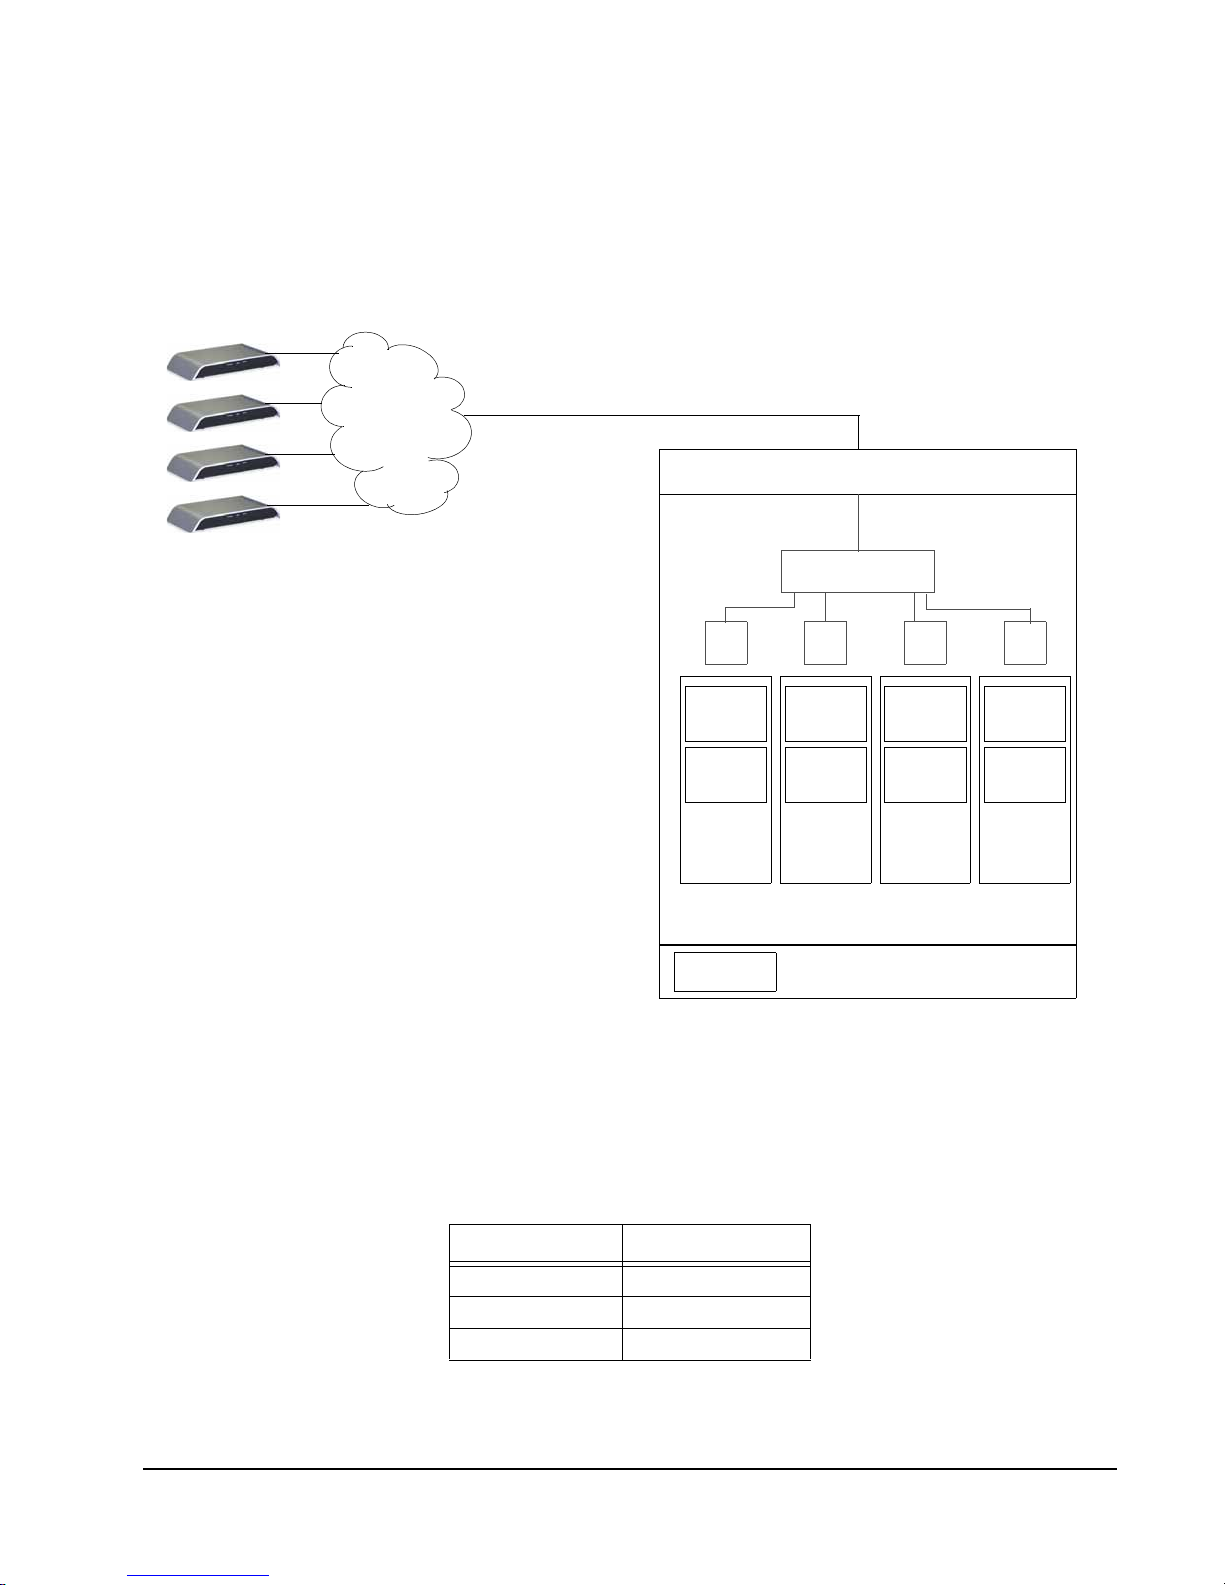
I/Port Users
R2200 Blade Running VMware ESX Server
This section provides a high-level overview of the ESX Server virtualization platform,
using R2200 Blades. The following figure shows the major components in the platform.
iSCSI
Volume
Ethernet
R2200 Blade
Ethernet
Physical NICs
Virtual Router
t
e
n
r
e
h
t
E
Sentral
Blade
License
Server
Client
User
Appli-
cations
XP OS
Virtual NICs
Sentral
Blade
Client
User
Appli-
cations
XP OS
Sentral
Blade
Client
User
Appli-
cations
XP OS
Sentral
Blade
Client
User
Appli-
cations
XP OS
VM1 VM2 VM3 VM4
VI-3 VM Host OS
Figure 1. VMs Hosted on ESX Server
For best performance, ClearCube recommends allocating a minimum of 512 MB of
RAM for the ESX VM Host, and 512 MB per VM. The following table lists the
recommended maximum number of VMs per RAM on an R2200 Blade.
Table 1. R2200 Recommended Maximum VMs
RAM Maximum VMs
4 GB 7
6 GB 12
8 GB 15
Power limitations on R2200 Blades with 3.8 GHz processors allow using only one
hard disk. Administrators may want to standardize on R2200s equipped with only one
hard drive.
4 • Understanding Virtualization in a ClearCube Environment ClearCube Virtualization Deployment Guide
Page 9
A1010, R1200, or R1300 Blade Running VMware Server
(Formerly GSX)
This section provides a high-level overview of the ESX Server virtualization platform,
using A1010, R1200, or R1300 Blades. The following figure shows the major
components in the platform.
Users
Ethernet
Ethernet
A1010, R1300, or R1200 Blade
Physical NIC
Virtual Router
Virtual NICs
Sentral
Blade
Client
User
Appli-
cations
XP OS
Sentral
Blade
Client
User
Appli-
cations
XP OS
Sentral
Blade
Client
User
Appli-
cations
XP OS
Sentral
Blade
Client
User
Appli-
cations
XP OS
VM1 VM2 VM3 VM4
GSX VM Host Application
Sentral
Blade Client
Windows Server 2003 OS
Figure 2. VMs Hosted on VMware Server
For best performance, ClearCube recommends allocating a minimum of 512 MB of
RAM for the VMware Server host, and 512 MB per VM. The following table lists the
recommended maximum number of VMs per RAM on an A1010 Blade.
Table 2. A1010 Recommended Maximum VMs
RAM Maximum VMs
2 GB 3
3 GB 5
4 GB 6
ClearCube Virtualization Deployment Guide Understanding Virtualization in a ClearCube Environment • 5
Page 10

6 • Understanding Virtualization in a ClearCube Environment ClearCube Virtualization Deployment Guide
Page 11

Deploying ESX Server
Installation Overview
When installing virtual machines in a ClearCube environment, virtual machine (VM)
and server installations differ from those in the typical VMware installation. The
following list provides a high-level overview of the installation tasks you must perform.
1. Prepare a disk for ESX Server installation
Before you can install ESX Server on a disk that uses the SATA interface, you
must configure the SATA disk BIOS. Use a BIOS configuration utility to set the
SATA disk mode to IDE Legacy. For more information, see the “Minimum Server
Hardware Requirements“ section of Installation and Upgrade Guide: ESX 3.0.1
and VirtualCenter 2.0.1, located in the documentation section of the VMware
support Web site:
http://www.vmware.com/support/pubs/vi_pubs.html
2. Install VMware ESX Server
Install VMware ESX Server on a ClearCube Blade using a static IP address. In the
ClearCube environment, you must install ESX Server on an R2200-series Blade
with a minimum of 4 GB RAM.
a. Configure USB settings during VI Client installation to enable your USB
mouse and keyboard to connect to your administrator C/Port. For more
information, see Step 9.
b. To install ESX Server from a CD-ROM, you must attach a CD-ROM drive to
the C/Port™ USB port.
c. Before you can install ESX Server on a disk that use the SATA interface, you
must configure the SATA disk BIOS. Use a BIOS configuration utility to set the
SATA disk mode to IDE Legacy. For more information, see the “Minimum
Server Hardware Requirements“ section of Installation and Upgrade Guide:
ESX 3.0.1 and VirtualCenter 2.0.1, located in the documentation section of the
VMware support Web site:
http://www.vmware.com/support/pubs/vi_pubs.html
You can now perform ESX Server installation, beginning at step 1, as
described in “ESX Server Installation Procedure” in the “Installing ESX Server“
section of Installation and Upgrade Guide: ESX 3.0.1 and VirtualCenter 2.0.1.
This document is located at the URL listed above.
3. Set up data storage volumes
Set up iSCSI data storage for virtual machines. For more information, see "Setting
up iSCSI Storage Volumes" on page 9.
on page 14.
ClearCube Virtualization Deployment Guide Deploying ESX Server • 7
Page 12

4. Install licenses or license server
You can point machines to license files or use a license server to provide licenses
for VMware ESX Server. For more information, see "Installing VMware ESX
Server" on page 13.
5. Install VI Client and configure related components
Virtual Infrastructure Client (VI Client) provides direct access ESX Server for
configuration and virtual machine management tasks. You must create and
configure settings for licensing and connections between VMware ESX Server
and data storage volumes. Items to create and configure include:
– License mechanism (files or server)
– Virtual network
– VMkernel
– Data storage volumes
For more information, see "Installing Virtual Infrastructure Client
" on page 16.
6. Create virtual machines
Use VI Client to create virtual machines. You can also create VM templates in
ESX Server. You must perform the following steps.
a. Mount floppy drive image to install OS.
b. In a ClearCube environment, VMware ESX Server sees virtual machines as
virtual small computer system interface (SCSI) drives. You must install the
SCSI drivers contained in the
lsi.flp floppy image file on a Blade before you
can install Windows on your virtual machines. The lsi.flp file virtualizes the
floppy disk driver.
c. Install host OS.
d. Power on VM.
For more information, see "Creating Virtual Machines" on page 9.
7. After installing VI Client, edit the ESX Server modules.conf file to ensure that
Blades provide USB support after ESX Server reboots. For more information, see
"Completing Steps for USB Support
" on page 21.
Satisfying Installation Prerequisites
Before you begin installing VMware ESX Server and virtual machines on ClearCube
Blades, ensure that you have met the following prerequisites.
• Working IP Ethernet network with communication between connected
components.
• Servers on which to install VMware ESX Server® and any license server
software.
• Adequate Network-Attached Storage (NAS) or Internet SCSI (iSCSI) storage
volume or volumes.
8 • Deploying ESX Server ClearCube Virtualization Deployment Guide
Page 13

• ClearCube R2200 Blades.
• Necessary software and licenses, including the operating systems and
applications for VMs that are appropriate for your environment.
Creating Virtual Machines
Before you can create a virtual machine (VM) in the ClearCube environment, you
must install VMware ESX Server and set up data storage attached to a network. For
more information about installing ESX Server and setting up data storage volumes,
see "Installation Overview
page 9.
Deploying Virtual Machines in the ClearCube Environment
After installing Windows XP Professional operating system on a single VM, you can
use the VM much like you would use a template or computer image to deploy to othe r
computers in a group on entire enterprise. To deploy VMs, you can:
" on page 7 and "Setting up iSCSI Storage Volumes" on
• Duplicate the VM on additional Blades by copying and pasting the appropriate VM
files (VMX and VMDK files).
Note: Do not copy VM configuration file (VMX file) or it will duplicate the MAC
address of the machine in the system, equal to the number of the same
configuration file.
• Use an imaging tool, such as Norton Ghost™, to deploy the VM and ESX Server
to Blades.
Setting up iSCSI Storage Volumes
When you virtualize ClearCube Blades in the Virtual Infrastruture 3 environment, you
must use a network-attached storage volume to store VM data. Cle arCube has tested
and supports the EMC Corporation iSCSI AX150i storage system.
Note: All ClearCube iSCSI testing was performed on a single network.
The following sections refer to documents included with AX150i storage system and
on the EMC Web site. Links are provided when possible. The following hardcopy
documents are referred to frequently:
ClearCube Virtualization Deployment Guide Deploying ESX Server • 9
Page 14

• Getting Started, P/N 300-002-955, Revision A02
• Planning Your AX150-Series iSCSI Storage-System Configuration, P/N
300-002-951, Revision A03
Setting up iSCSI
The “Minimum Server Hardware Requirements“ section of “ESX Server
Requirements” in Chapter 2, “System Requirements” of Installation and Upgrade
Guide: ESX 3.0.1 and VirtualCenter 2.0.1, located in the documentation section of the
VMware support Web site, http://www.vmware.com/support/pubs/vi_pubs.htm
provides the following datastore, or storage volume, minimum requirements.
• A SCSI adapter, internal RAID controller, or Fibre Channel adapter:
– Supported SCSI controllers include Adaptec Ultra160 and Ultra320, LSI Logic
FusionMPT, and most NCR/Symbios cards.
– Supported RAID adapters include HP Smart Array, Dell PercRAID (Adaptec
RAID and LSI MegaRAID), and IBM (Adaptec) ServeRAID controllers.
– Supported Fibre Channel adapters include Emulex and QLogic host bus
adapters (HBAs).
• A SCSI disk, Fibre Channel LUN, or RAID LUN with unpartitioned space. In a
minimum configuration, this disk or RAID is shared between the service console
and the virtual machines.
,
• For iSCSI, a disk attached to an iSCSI controller, such as the QLogic qla4010.
In the VI-3 environment, ESX Server requires one or multiple dedicated,
network-attached storage volumes for VMs. ClearCube supports EMC® AX150i
iSCSI storage system. To set up AX150i, you must:
1. Set up AX150i and Navisphere software
2. Configure ESX Server to recognize the volume
10 • Deploying ESX Server ClearCube Virtualization Deployment Guide
Page 15

Understanding the iSCSI Storage System Components
The following figure details the major components in the iSCSI storage system.
Volume
Ethernet
Switch
ESX
Server
ConsoleStorage
Figure 1. Major component in the iSCSI storage system
The following list describes significant items to consider when planning to use AX150i
iSCSI storage system in your environment.
• AX150i contains SATA drives, which use Small Computer System Interface
(SCSI).
• AX150i contains two processors. When you connect to AX150i, you must specify
the processor to which you connect.
• AX150i contains management ports and service ports. Ensure that you use
management ports to connect to the storage system for typical tasks.
• ClearCube does not support Challenge-Handshake Authentication Protocol
(CHAP) in VMware environments.
Obtaining EMC Documentation
The following list details the location of EMC documents that are referenced in the
following sections, and provides links to customized documentation.
• Documents referred to in this section are included on the EMC AX150-Series
Documentation CD-ROM included with the storage system, P/N 053-001-51 8 Rev
A01). To access the iSCSI_network_windows_install.pdf document on the
CD-ROM, click Windows server in the iSCSI: Network connection to a server
section of the CD-ROM’s documentation index page.
• You can obtain documentation from EMC that is generated according to the
environment specifications that you provide at the following URL:
http://www.emc.com/products/systems/clariion/ax150/support/install.jsp
ClearCube Virtualization Deployment Guide Deploying ESX Server • 11
Page 16

The following list describes the major steps you must perform to set up the iSCSI
datastore in the ClearCube environment.
Setting up the iSCSI Storage System
The EMC document, Getting Started, P/N 300-002-955, Revision A02, contains
detailed instructions about each of the tasks in the following list. For more information
about each task, see the document sections specified in this list.
1. Assemble and set up AX150i storage system and components.
For more information, see the following sections in the EMC Getting Started
document:
a. “Important”
b. “Administration Worksheet”
Note: Only use static IP addresses for values you supply on the worksheet.
c. “Step 1: Prepare your site”
d. “Step 2: Prepare your server (host)”
e. “Step 3: Unpack the storage system”
f. “Step 4: Install the AX150i/AX150SCi and UPS in a standard NEMA
cabinet/rack”
g. “Step 5: Connect ac power”
h. “Step 6: Power up the AX150i/AX150SCi and UPS”
i. “Step 7: Connect Management ports to a network”
2. Install storage system software.
For more information, see “Step 8: Initialize the AX150i/AX150SCi” in the EMC
Getting Started document.
3. Configure storage system software.
You can use Navisphere® Express, which you installed and configured earlier in
this section, to access AX150i storage using a Web browser. You can also use
ESX Server to configure AX150i.
For more information, see the following sections in the EMC Getting Started
document:
a. “Step 9: Connect the storage system to servers”
Note: After establishing a connection between ESX Server and AX150i, you
must assign a virtual disk to the server, or ESX Server does not detect
the iSCSI storage volume.
b. “Step 10: Verify data port connectivity”
c. “Step 11: Configure host iSCSI initiators”
4. Create a virtual disk.
5. Establish a connection between ESX Server and AX150i storage system.
You can use ESX Server or Navisphere Server Utility to create the connection.
12 • Deploying ESX Server ClearCube Virtualization Deployment Guide
Page 17

6. Assign the virtual disk you created in Step 4. on page 12 to ESX Server.
For more information, see “Step 12: Configure storage” in the EMC Getting Started
document.
Installing VMware ESX Server
The following steps describe how to install ESX Server.
1. Insert the ESX Server CD-ROM in your CD-ROM drive to display the installation
start screen.
Figure 2. ESX Server installation start screen
2. You must type exactly one of the following lines to start installation in the graphical
or text mode.
Note: The text displayed that describes how to specify installation mode does
not work in the ClearCube environment. Type one of the lines shown
below. These instructions describe the graphical installation.
– For graphical mode, type esx noapic and press the ENTER key.
—OR—
– For text mode, type esx noapic text and press the ENTER key.
ClearCube Virtualization Deployment Guide Deploying ESX Server • 13
Page 18

3. You can optionally perform a CD media test if you are from installing from an ISO
image.
4. Click Next after the installation welcome screen appears.
5. Select the appropriate keyboard and click Next. Then select the appropriate
mouse configuration and click Next.
6. Accept the EULA and click Next. The installation Wizard displays a warning
before it initializes the drive. Click Yes to display the partitioning options screen.
7. ClearCube recommends selecting the Recommended partitioning options. Click
the Install ESX Server on drop-down box to specify the device on which to install
ESX Server and then click Next.
8. The installation Wizard displays a warning. Click Yes to display the Partition Disks
screen. Follow the on-screen instructions to make any changes. Click Next to
display the Advanced Options screen.
9. Select the boot specification appropriate for your environment.
Note: You must type the following line to enable USB connectivity after reboot
and subsequent reboots.
To enable USB connectivity, type vmnixACPI in the General kernel parameters
text box under Boot Options
.
IDE Hard Disk
vmnixACPI
Figure 3. Specifying kernel parameters to enable USB connectivity
Note: To complete the process of enabling USB support, you must additionally
configure the ESX Server /etc/modules.conf file. For more information, see
"Completing Steps for USB Support
" on page 21.
14 • Deploying ESX Server ClearCube Virtualization Deployment Guide
Page 19

Click Next to display the Network Configuration screen.
10. Use the Device drop-down box to select the NIC and then specify the address
and host name as appropriate for your environment. Check Create a default
network for virtual machines and then click Next.
11. Select the time zone appropriate for your environment. If your system clock uses
UTC, check the option at the bottom-left portion of the screen. Click Next.
12. Set the root password and click next.
13. Review your selections and click Back to make changes, or click Next to install
ESX Server and display the installation progress meter.
14. The wizard should display a screen indicating that installation is complete. Point
your browser to the URL indicated on the screen. The URL displays a page that
enables you to download Virtual Infrastructure Client, which you can use to
manage and configure ESX Server. For information about installing VI Client, see
"Installing Virtual Infrastructure Client
" on page 16.
15. Optionally, you can use the command line to log in to ESX Server.
ClearCube Virtualization Deployment Guide Deploying ESX Server • 15
Page 20

Installing Virtual Infrastructure Client
Perform the following steps to install Virtual Infrastructure Client (VI Client).
1. The VI Client download page is automatically displayed after installing ESX
Server. Click Download the Virtual Infrastructure Client and install the
executable.
Figure 4. Downloading the VI Client
2. Double-click the VI Client icon located on your desktop after VI Client installation
to display the VI Client login screen. Perform the following steps:
a. Type the IP address of your ESX Server.
b. Type the your username and password.
16 • Deploying ESX Server ClearCube Virtualization Deployment Guide
Page 21

c. Click Log In.
Figure 5. VI Client Icon and Logon Screen
3. Click the Inventory button in the upper-left portion of the screen, and then click
your ESX Server icon. Click the Configuration tab, and then click the Add
Networking link on the right side of the screen to open the Connection Type
window.
Figure 6. Adding virtual network components
4. To specify a static IP address for the VMkernel, choose the VMkernel option.
Ensure that you add the VMkernel to the same switch the service console uses.
Click Next to open the VMkernel - Network Access window.
5. Choose Create a Virtual Switch and then click Next.
ClearCube Virtualization Deployment Guide Deploying ESX Server • 17
Page 22

6. Type a name in the Network Label text box that you can use to identify VMkernel
connections. Type the IP address and subnet mask of the VMkernel port, and
then click Next. Ensure that IP addresses are static.
7. Review the information and click Finish to create the virtual switch, or click Back
to make corrections.
8. Click Yes to set a default gateway.
9. Type the static IP address of the default gateway for the Service Console and the
VMkernel. Click OK.
10. In the Configuration tab, click Licensed Features in the Software panel. Then
click the Edit link in the upper-right portion of the window to open the License
Sources window.
11. Choose the license server or license file option as appropriate for your
environment, and then click OK.
12. In the Configuration tab, click Storage (SCSI, SAN, and NFS) in the Hardware
panel. Then click the Add Storage link in the upper-right portion of the window to
open the Select Storage Type window.
13. Choose the storage option appropriate for your environment, and then click Next.
14. Provide the values appropriate for your storage volume and then click Next.
15. Review the values displayed and click Finish to add the volume to the Virtual
Infrastruture 3 environment, or click Back to make corrections.
16. In the Inventory view, right-click the ESX Server icon and click New Virtual
Machine to open the Virtual Machine Wizard.
Figure 7. Opening the Virtual Machine Wizard
18 • Deploying ESX Server ClearCube Virtualization Deployment Guide
Page 23

17. Choose the VM configuration option appropriate for your environment, and then
click Next. (This procedure describes the typical configuration option.)
18. Type a VM name in the Virtual Machine Name text box and specify the VM
location, if applicable. Click Next.
19. Select a datastore in which to store all VM data. You must have set up a datastore
and added it to the Virtual Infrastruture 3 environment to select a datastore, as
described earlier in the procedure. Click Next.
20. Choose the Microsoft Windows operating system option, and then select
Microsoft Windows XP Professional. Click Next.
21. Specify the appropriate number of virtual processors and then click Next.
22. Use the slider bar to specify the appropriate memory for the VM, and then click
Next.
23. Use the drop-down boxes to specify the number of virtual NICs for the VM and the
network each NIC will use. Click Next.
24. Specify the size of the virtual disk for the VM, and then click Next.
25. Review the information displayed and click Finish to create the VM, or click Back
to make corrections.
ClearCube Virtualization Deployment Guide Deploying ESX Server • 19
Page 24

26. The Inventory view shows a VM icon below the ESX Server icon on the left-hand
portion of the screen. A progress meter is shown in the Recent Tasks area at the
bottom of the window.
Figure 8. Summary screen showing VM icon and ESX Server attributes
27. To install Windows XP Professional operating system from an ISO file, perform
the following steps.
Note: These instructions assume that you are installing the operating system
from an ISO image, not from a physical CD-ROM. The instructions also
assume that the OS and floppy files are located on the machine that runs
the VI Client. Locating these files on the VI Client machine ensures their
accessibility during installation.
a. Right-click the VM and select Open Console to open a console window.
b. On the console Toolbar, click the Power On button to display the VMware
startup screen.
c. Click the Virtual CDROM button, and then click Connect to ISO image.
20 • Deploying ESX Server ClearCube Virtualization Deployment Guide
Page 25

d. Browse to the ISO image and select it. Then click Open.
e. In the console menu, click VM > Send Ctrl+Alt+Del. The VM restarts and
detects the virtual CD-ROM drive.
f. Click in the console window and press the F6 button when the
you need to install a third party SCSI or RAID driver
displayed at the bottom of the screen.
g. Windows Setup displays a screen indicating that it can not determine the type
of one or more mass storage devices. Click the Virtual Floppy button on the
console Toolbar. Click Connect to floppy image and then browse to the
floppy image. Select the lis.flp file and then click Open.
h. Click in the console window and then press the S key to specify an additional
device.
i. Windows Setup displays a message requesting you to insert a disk in the
drive. Press the ENTER key to display the SCSI Adapter screen.
j. Press the ENTER key to specify the LSI Logic driver, and then press the
ENTER key again to install the operating system.
Install Windows XP Professional as appropriate for your environment.
Press F6 if
message is
Completing Steps for USB Support
To enable USB support on Blades and C/Ports when virtualizing Blades in the
ClearCube environment, you must perform the following steps:
1. Specify the vmnixACPI kernel parameter when installing the VI Client, as
described in Step 9.
2. Log in to ESX Server and use the vi text editor to open the /etc/modules.conf file.
a. Save a copy of the file in case you need to restore it.
b. Type the following lines at the end of the file:
• alias usb-controller usb-ohci
• alias usb-controller1 ehci-hcd
c. Save the /etc/modules.conf file.
When you reboot ESX Server, all USB connectors on the Blade and the C/Port should
operate.
on page 14.
ClearCube Virtualization Deployment Guide Deploying ESX Server • 21
Page 26

22 • Deploying ESX Server ClearCube Virtualization Deployment Guide
Page 27

Deploying VMware Server
Overview
This section describes how to install VMware Server® (formerly GSX).
Satisfying Installation Prerequisites
Before you begin installing VMware Server and virtual machines on ClearCube
Blades, ensure that you have met the following prerequisites.
• Working IP Ethernet network with communication between connected
components
• Machine on which to install VMware Server
• Necessary operating system software and licenses
Installing VMware Server
This section describes all the steps you must perform to install VMware Server.
Installing Windows Server 2003
Install Microsoft® Windows® Server 2003 as appropriate for your environment,
ensuring that you have all necessary drivers. Accepting all defaults is appropriate for
many installations.
Note: ClearCube also supports Windows Server 2000.
ClearCube Virtualization Deployment Guide Deploying VMware Server • 23
Page 28

Installing IIS 6.0
Internet Information Services (IIS) version 6.0 provides the following Inte rnet services:
• World Wide Web Publishing Service (WWW service)—Serves Internet and intranet
content
• File Transfer Protocol (FTP) service—Enables users to upload and download files
• Network News T ransfer Protocol (NNTP) serv ice—Enables discussion group hosting
• Simple Mail Transfer Protocol (SMTP) service—Enables sending and receiving e-mail
IIS is located on Windows Server 2003 installation CD-ROM.
Note: ClearCube also supports IIS 5.0.
Starting the Installation and Creating Virtual Machines
1. Double-click the VMware Server executable to display the VMware Server
Console.
Figure 1. Connecting to VMware host
24 • Deploying VMware Server ClearCube Virtualization Deployment Guide
Page 29

2. From the VMware Server Console menu, click File > New > Virtual Machine to
open the New Virtual Machine Wizard.
Figure 2. Creating a new virtual machine
3. Click Next to open the Select the Appropriate Configuration window.
4. Select Typical, and then click Next to open the Select a Guest Operating System window.
5. Choose the Microsoft Windows option, and then select Windows XP
Professional in the Version drop-down box.
Windows XP Professional
Figure 3. Specifying the OS for a virtual machine
ClearCube Virtualization Deployment Guide Deploying VMware Server • 25
Page 30

6. Type a name for the virtual machine in the Virtual machine name text box, and
then click Browse to specify the directory where VMware Server will place the
VM. Click Next to open the Network Type window.
Figure 4. Specifying the name and location of the virtual machine
7. Choose Use bridged networking, and then click Next to open the Specify Disk
Capacity window.
26 • Deploying VMware Server ClearCube Virtualization Deployment Guide
Page 31

8. Specify the virtual disk capacity and disk allocation technique as appropriate for
your environment. Click Finish to create your virtual machine. VMware Server
displays a progress meter while creating the VM.
Figure 5. Indicating VM creation progress
VMware Server is now creating the VM’s file structure. Once th e virtual machine is
created, you can install the operating system on the VM.
Installing the Operating System
This section assumes that you are using a disk image (ISO) to install Windows XP
Professional on your virtual machine.
Perform the following steps to install the Windows XP Professional operating system
on a virtual machine.
ClearCube Virtualization Deployment Guide Deploying VMware Server • 27
Page 32

1. Right-click the VM on which you are installing the OS, and click Settings. You can
specify the location of the operating system disk image that you are going to
install on the VM.
Figure 6. Locating the OS disk image
28 • Deploying VMware Server ClearCube Virtualization Deployment Guide
Page 33

2. Click CD-ROM on the Hardware tab, and then choose Use ISO in the Connection
pane. Click Browse to find the XP Professional ISO.
Figure 7. Installing the operating system
ClearCube Virtualization Deployment Guide Deploying VMware Server • 29
Page 34

3. Power on the VM to begin OS installation.
a. In the left-hand Inventory pane, select the VM you want to power on.
b. Click File > Power > Power On.
Installation screens are displayed under the VM tab, as shown in Figure 8.
on page 30.
Note:You must click in the VM portion of the window to gain keyboard and mo use
focus so you can respond to the interactive installation.
Figure 8. Viewing Windows XP Professional setup on a VM
Installing VMware Tools
VMware Tools is a suite of utilities that significantly improves the performance of the
OS on a VM. The Virtual Machine Guide, located on VMware Server Online Library,
describes how to download and install VMware Tools. Perform the following steps to
access the guide:
30 • Deploying VMware Server ClearCube Virtualization Deployment Guide
Page 35

1. Go to the following URL:
http://www.vmware.com/support/pubs/server_pubs.html
2. Click the VMware Server Online Library (HTML) link to open the documentation
library.
3. Click “Chapter 3. Using VMware Tools,” shown below the red arrow in the
following figure, for information about how to install VMware Tools.
Figure 9. Using VMware Tools section of Virtual Machine Guide
Deploying Virtual Machines
To deploy a VM, you can:
• Copy and paste an existing VM.
• Using VI Client GUI.
Note: Do not copy VM configuration file or it will duplicate the MAC address of the
machine in the system, equal to the number of the same configuration file.
ClearCube Virtualization Deployment Guide Deploying VMware Server • 31
Page 36

32 • Deploying VMware Server ClearCube Virtualization Deployment Guide
Page 37

Setting up NFS for Demonstrations
Overview
This appendix describes how to set up Network File System® (NFS®) on SUSE®
Linux® Enterprise 10 running KDE®.
Note: ClearCube Technology, Inc. does not recommend using NFS in production
environments.
When you virtualize ClearCube Blades in the VMware Infrastruture 3 environment,
you must use a network-attached storage volume to store virtual machine data. You
can use NFS for demonstration purposes; however, ClearCube does not support NFS
in deployments.
The following instructions detail:
• NFS version 3 over TCP
• SUSE Linux Enterprise 10
Setting up NFS
ClearCube has tested SUSE Linux Enterprise 10 running:
• NFS versions 2, 3, and 4
• Kernel version 2.6.13
• KDE 3.4.2 level b (K Desktop Environment incorporated society [KDE e.V.])
When setting up and configuring an NFS server disable Hyper-Threading, if
applicable, to significantly improve server performance.
ClearCube Virtualization Deployment Guide Setting up NFS for Demonstrations • 33
Page 38

Satisfying NFS Prerequisites
The following list details prerequisites you must meet before you can mount an NFS.
Ensure that you have:
• Created and configured a virtual network during ESX Server inst allation. For more
information about creating a virtual network, see "Installing Virtual Infrastructure
Client" on page 16.
• Licensing for the host server.
• Created and configured the VMkernel properly during ESX Server installation.
NFS uses the VMkernel when connecting to data storage volumes. The data
storage IP address must be static to ensure that connections to data storage are
not lost. For more information about the VMkernel, see "Installing VMware ESX
Server" on page 13.
Setting up NFS
The following steps describe how to set up NFS on SUSE Linux Enterprise 10,
running the K Desktop Environment (KDE), Release 3.4.2 level b. If you are working
in a different environment, perform the same steps using the interface that your
environment provides. Perform the following steps to set up NFS:
1. Login to SUSE as root user.
2. From the KDE desktop, click K Menu > System > YaST to open the YaST Control
Center window. Figure 1.
Figure 1. Opening YaST from the KDE Desktop
3. In the YaST Control Center, double-click Network Services in the left-hand pane.
4. Double-click NFS Server to open the NFS Server Configuration dialog box.
shows the location of the K Menu.
34 • Setting up NFS for Demonstrations ClearCube Virtualization Deployment Guide
Page 39

5. Choose the Start option in the NFS Server section. Ensure that the firewall option
is disabled, and then click Next.
6. Click the Add Directory button beneath the Directories panel, and then browse to
the root directory, as shown in Figure 2.
Figure 2. Specifying VM directory permissions
7. The directory beneath the root directory that you specify or create in this step is a
shared directory. ESX Server creates a folder for each VM in your environment in
this directory and stores all VM-related data there. Type a forward slash (
/) in the
directory text box, and then type the name of a new subdirectory beneath the root
directory.
/root/myVMdirectory/
Where myVMdirectory is the name of the directory that contains all VM-related
data. Use any name that is consistent with your naming standards.
Note: Ensure that you type the final forward slash (/) at the end of the line.
8. Click the Edit button in the panel at the bottom of the screen that specifies the
directory you are creating, as shown in Figure 2.
Leave the asterisk (*) in the Host
ClearCube Virtualization Deployment Guide Setting up NFS for Demonstrations • 35
Page 40

Wild Card text box, and then type rw,no_root_squash,sync in the Options text
box, as shown in Figure 3.
Then click OK.
Figure 3. Specifying directory permissions
9. Click Finish on the lower-right portion of the dialog box to start NFS on SUSE You
must now use VI Client to add NFS to the VMware environment.
Adding NFS to VMware Infrastruture 3
The directory you created in the previous section is shared, so any computer running
Linux with an NFS client (including ESX Server) can access the directory. You can
now use VI Client to add the directory to the VMware environment. The following
steps assume that VI Client is on a computer running Windows XP Professional.
Perform the following steps:
1. Double-click the VI Client icon to start the client, and log in to ESX Server using
the appropriate IP address.
Figure 4. The VI Client icon
36 • Setting up NFS for Demonstrations ClearCube Virtualization Deployment Guide
Page 41

2. Click the Inventory button at the upper-left portion of the window, then click the
Configuration tab. Click the blue Storage link in the Hardware pane.
Figure 5. Adding NFS storage in the VI Client
3. Click the blue Add Storage link on the upper-right portion of the window to display
the Add Storage dialog box.
4. Click Network File System in the Storage Type pane, and then click Next to
display the Locate Network File System dialog box.
5. Type the IP address of the ESX Server in the Server text box, and then type path
of the directory your created in "
Setting up NFS" on page 34 in the Folder text
box.
Note: Ensure that you type the final forward slash (
/) at the end of the line.
Leave Mount NFS read only unchecked.
6. Type a name for the NFS data store in the Datastore Name text box, and then
click Next.
7. Review the properties of the NFS datastore and click Finish to add the datastore
to the VMware environment, or click Back to make corrections.
ClearCube Virtualization Deployment Guide Setting up NFS for Demonstrations • 37
Page 42

Mounting NFS
Perform the following tasks from the KDE desktop running on SUSE 10 to mount
NFS.
1. Open YaST setup tool on SUSE.
2. Double-click NFS on Servers.
3. In the root directory, create the folder
/root/myFolder/, where myFolder is the
folder in which all VM-related data is stored.
Note: Ensure that you include the final forward slash ( / ) at the end of the line,
especially if you create a VM data folder using VI Client. Using VI Client, it
is possible that the correct permission are not applied to the folder if you
omit the final forward slash.
4. Type the following line to apply the appropriate read and write permissions to the
folder you created in the previous step:
rw,no_root_squash,sync
5. Specify a static IP address.
Note: Ensure that you specify a static IP address. If the IP address changes,
connections to data storage volumes are lost.
38 • Setting up NFS for Demonstrations ClearCube Virtualization Deployment Guide
Page 43

Page 44

8834 Capital of Texas Highway North Austin, Texas 78759 voice 512.652.3500
ClearCube Technology, Inc.
www.clearcube.com
Rev. 04/17/2007P/N G0400021-B
 Loading...