

Page 1

Fixed Wireless Terminal
Model : WF-105
User Guide
Important Safety Instructions: Read carefully and keep for future reference
Page 2

Contents
1. Introduction............................................................................................ 3
1.1 Safety instructions.................................................................. 3
1.2 Cleaning and Maintenance .................................................... 4
1.3 Technical parameters and Service conditions .......................4
1.4 Contents of package .............................................................. 5
1.5 Installation .............................................................................. 5
2. Getting to know your phone .................................................................. 8
3. Functions of Keys.................................................................................. 9
4. Basic Functions................................................................................... 11
4.1 On/Off................................................................................... 11
4.2 Making a call ........................................................................ 11
4.3 Receiving a call.................................................................... 11
4.4 Redialing .............................................................................. 11
4.5 Calls menu ........................................................................... 11
4.6 M1/M2/M3/M4 function ........................................................12
4.7 Call waiting...........................................................................12
4.8 Making a multiparty call .......................................................12
4.9 Low-power indicator............................................................. 12
4.10 Charge indicator................................................................... 12
5. Text Input.............................................................................................13
5.1 Input Mode ........................................................................... 13
5.1.1 Write with text input “Abc”. ...........................................13
5.1.2 Write with text input "abc"............................................. 13
5.1.3 Write with text input “ABC”. ..........................................13
5.1.4 Write with text input " PreAbc "..................................... 13
5.1.5 Write with text input "Preabc " ......................................13
5.1.6 Write with text input "PreABC " ....................................14
5.1.7 Insert number 123 ........................................................14
5.2 Character list ........................................................................ 14
6. Function Menu..................................................................................... 15
6.1 Call log .................................................................................15
6.1.1 Missed calls .................................................................. 15
6.1.2 Outgoing calls............................................................... 15
6.1.3 Incoming calls............................................................... 15
6.1.4 All calls .........................................................................15
6.1.5 Call duration ................................................................. 15
6.2 Contacts............................................................................... 15
6.2.1 Phone ...........................................................................15
6.2.2 USIM............................................................................. 16
6.2.3 All.................................................................................. 16
6.2.4 Group............................................................................ 16
6.3 Alarm....................................................................................16
1
Page 3

6.4 Messages.............................................................................16
6.4.1 New ..............................................................................16
6.4.2 Inbox.............................................................................17
6.4.3 Outbox ..........................................................................17
6.4.4 Sentbox ........................................................................17
6.4.5 Draftbox ........................................................................ 18
6.4.6 Tem pl at es .....................................................................18
6.4.7 Cell broadcast...............................................................18
6.4.8 Voice mail .....................................................................18
6.4.9 Settings......................................................................... 18
6.4.10 Memory status ......................................................18
6.5 Settings ................................................................................19
6.5.1 Sounds .........................................................................19
6.5.2 Display settings ............................................................19
6.5.3 Phone settings..............................................................19
6.5.4 Call Settings ................................................................. 19
6.5.5 Network settings........................................................... 20
6.5.6 Security settings ........................................................... 21
6.5.7 Reset settings...............................................................21
7. GPRS/UMTS/HSDPA installation........................................................ 22
8. Troubleshooting...................................................................................25
2
Page 4

1. Introduction
Thank you for using the GSM Fixed Wireless Terminal (FWT). To guarantee that
your phone is always in its best condition, please read this manual carefully. Since
the pictures, symbols and contents in this manual are just for your reference, they
might not be completely identical with your phone.
FWT is designed mainly for office use and rural area use. Its wireless feature makes
it possible to be used in some occasional places (such as large gatherings or
temporary offices) when needed, or installed in vehicles or ships as office phones
and commercial phones.
FWT has some practical features as follows:
1. Speaker phone
2. Signal strength indicator
3. Redial
4. Volume control
5. Battery power backup
6. Speed dial
7. M1/M2/M3/M4
8. Alarm/Time & Date setting
9. Short message service, message template
10. Call log
11. Call barring/Call waiting/Call divert
12. Sounds
13. Multiparty call
14. GPRS/UMTS/HSDPA
1.1 Safety instructions
¾ Some electronic devices are susceptible to electromagnetic interference sent
by the FWT if inappropriately shielded; Try to use the phone at least 20 cm
away from ordinary telephones, TV sets, radios and other automated office
equipment so as to avoid electromagnetic interference.
¾ Since operation of the FWT may interfere with medical devices like hearing
aids and pacemakers, it is advised to consult a physician or the manufacturer
of the medical device before using the FWT.
¾ Be aware of the usage limitation when using the FWT at places such as oil
warehouses or chemical factories, where there are explosive gases or
explosive products. Even if your phone is in idle state, it still can transmit radio
frequency (RF) energy.
¾ Do not touch the antenna while calling.
¾ Keep the antenna free from obstructions and position the antenna straight up.
This will ensure best call quality.
¾ Please put the phone in safe places. The phone may cause injury if used as a
toy by children.
3
Page 5

¾ Please use original or authorized accessories only. Using any unauthorized
accessories may affect your FWT’s performance and damage your phone.
¾ As your FWT can produce electromagnetic field, do not place it near magnetic
items such as computer disks.
¾ Do not expose your FWT to direct sunlight or store it in hot areas. High
temperatures can shorten the life of electronic devices.
¾ Prevent liquid from leaking into your phone.
¾ Do not attempt to disassemble the FWT by yourself. Non-expert handling of the
devices may damage them.
¾ Unplug the external power adapter and remove the battery before you put the
phone out of use for a long period of time.
¾ It is highly recommended to charge the battery before initial use. The battery
might have been discharged during storage and delivery. Please charge the
battery for 12 hours or more before its first use. Fully-charged batteries could
maintain more than 3 hours communication time, or more than 48 hours
standby time.
¾ Do not unplug the connector of the data cable from the phone when the power
is on.
1.2 Cleaning and Maintenance
¾ The phone is not water-resistant, so do not use it in high humidity places such
as bathrooms.
¾ Only use a damp cloth to clean the phone. Turn your phone off before cleaning
it.
¾ Do not use harsh chemical cleaning solvents or strong detergents, such as
alcohol, dilution agent or benzene, to clean your phone.
1.3 Technical parameters and Service conditions
¾ Technical parameters
Work frequency: GSM 850/900/1800/1900MHz
WCDMA 850/2100MHz
Delivered power: MAX: 2W (850/900MHz-GSM), 1W (1800/1900MHz-GSM)
GSM Channel interval: 200KHz
HSDPA data rate: download up to 3.6Mbps, upload up to 384kps
WCDMA Channel interval: 100KHz
¾ Applicable conditions
Environmental temperature: -10~+40
Ambient noise: ≤60db (A)
Relative humidity: 10%~95%
Atmospheric pressure: 86~106KPa
Power adapter: 100V~240V AC, 50Hz/60Hz
4
Page 6
Phone: DC 5V 1000mA
Battery: 3.6V 800mAH rechargeable Ni-MH battery
Note: Your telephone is guaranteed for a period of 12 calendar months from the
date of purchase as indicated on your till slip. Keep your till slip in a safe place as it
will be required for guarantee repairs. It is however not guaranteed against damage
caused by misuse, riot damage, lightning or power surge damage, damage caused
by using the unit for purposes other that which it was intended or any damage that
can be deemed an act of God.
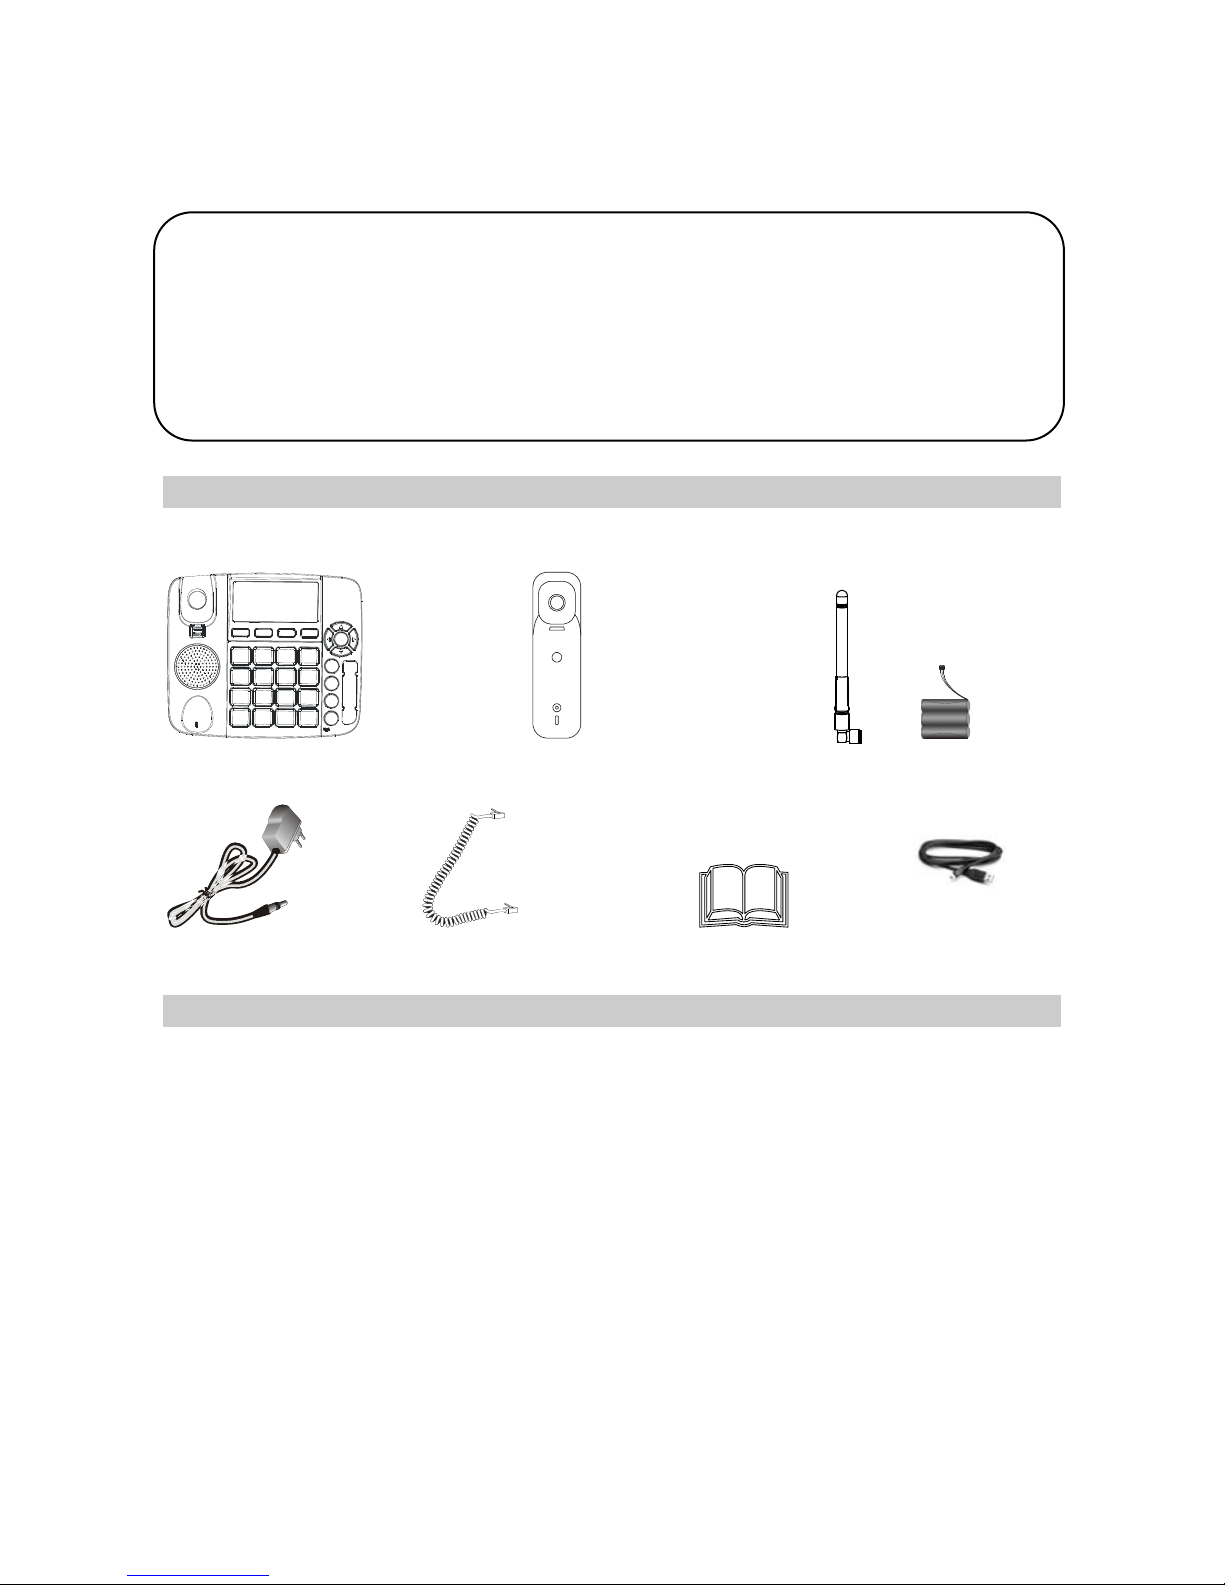
1.4 Contents of package
The package contains:
1. The phone 2. Handset 3. Antenna and battery
4. Adapter 5.Handset cord 6.Instruction Manual 7. USB cable
1.5 Installation
¾ Handset and handset cord
Plug one end of the coil cord into the socket on the side of the telephone.
Plug the other end of the coil cord into the handset socket.
Connect the antenna to the antenna connector. Hold the plastic stick of
the antenna and rotate the metal screw cap in a clockwise direction.
Do not rotate antenna directly.
5
Page 7
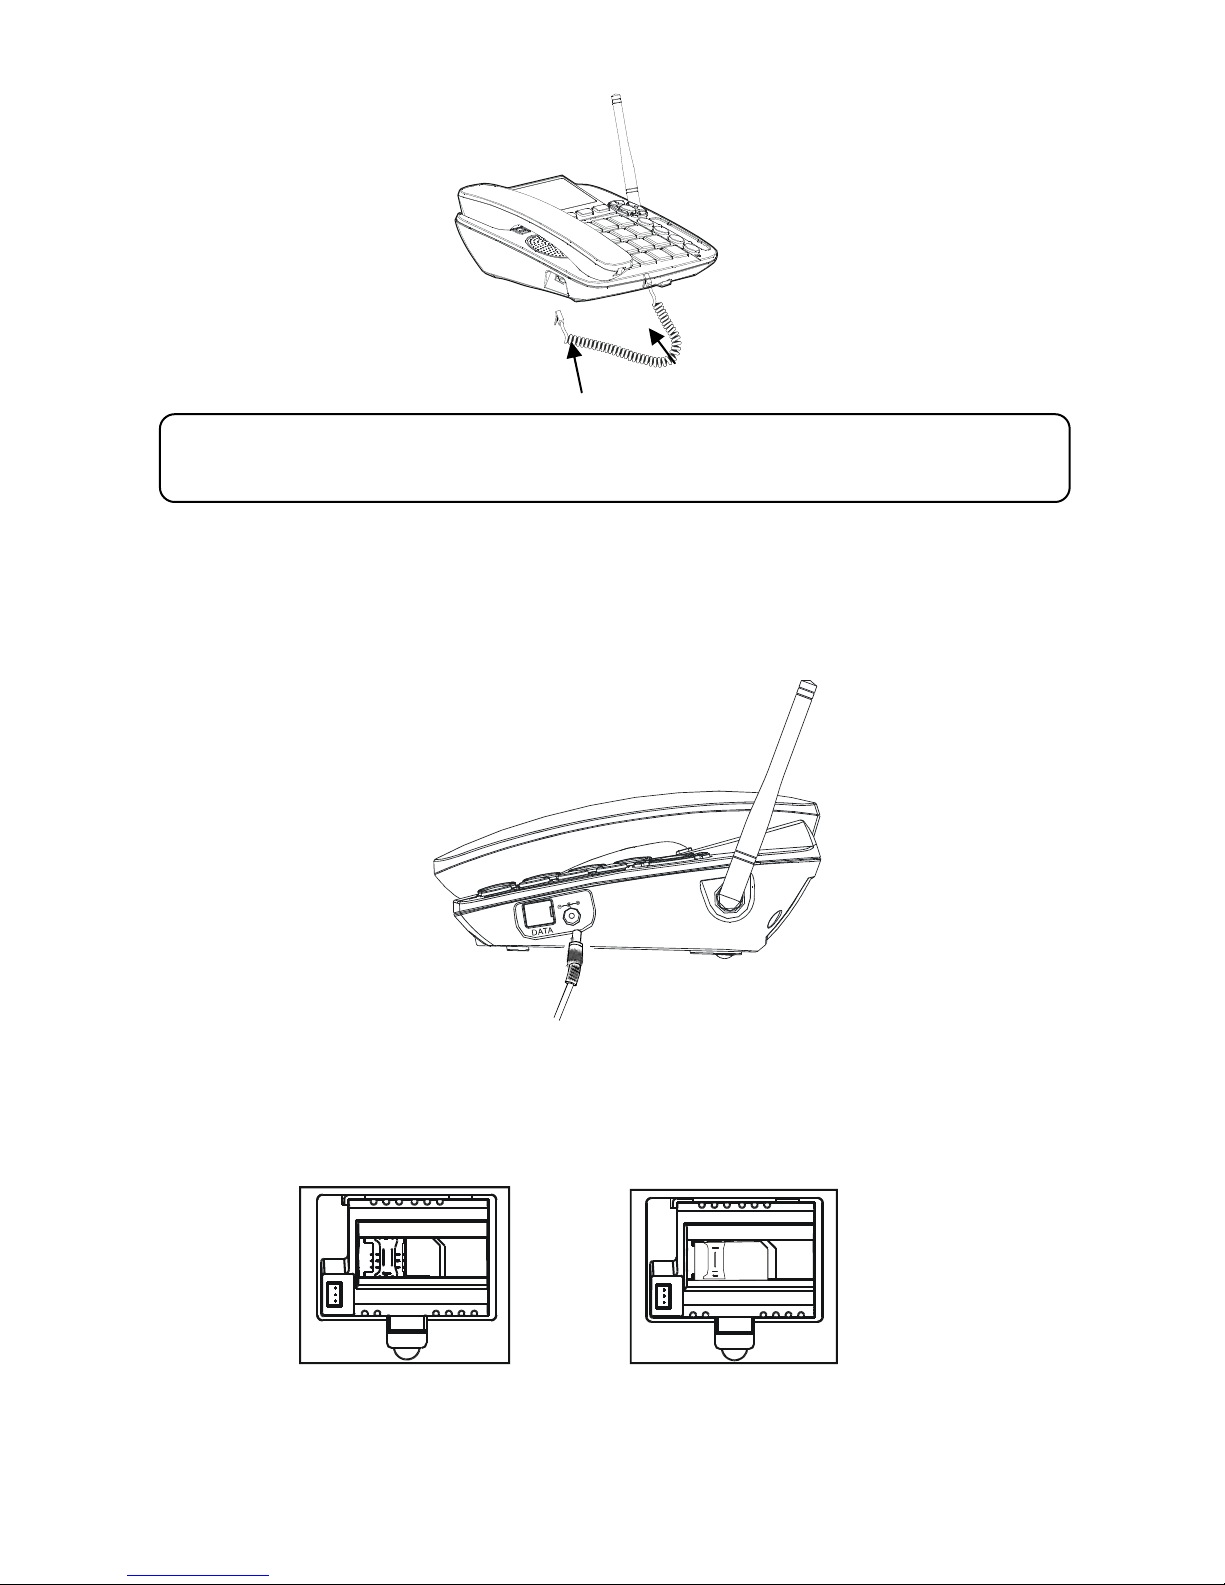
Impo rtant War n i ng: If an outdoor antenna is used, a suitable lightning protection
device must be fitted.
¾ Adapter
Insert the plug of the power supply cord into the socket marked DC 5.0V on the
side of the telephone and plug the power supply into a properly installed mains
socket.
D
C
5
.
0
V
¾ Installing SIM card
Open the battery cover at the back of the phone.
Hold your SIM card with the chamfer oriented as seen in the picture below
and slide it into the card holder with the metal interface down.
6
Page 8
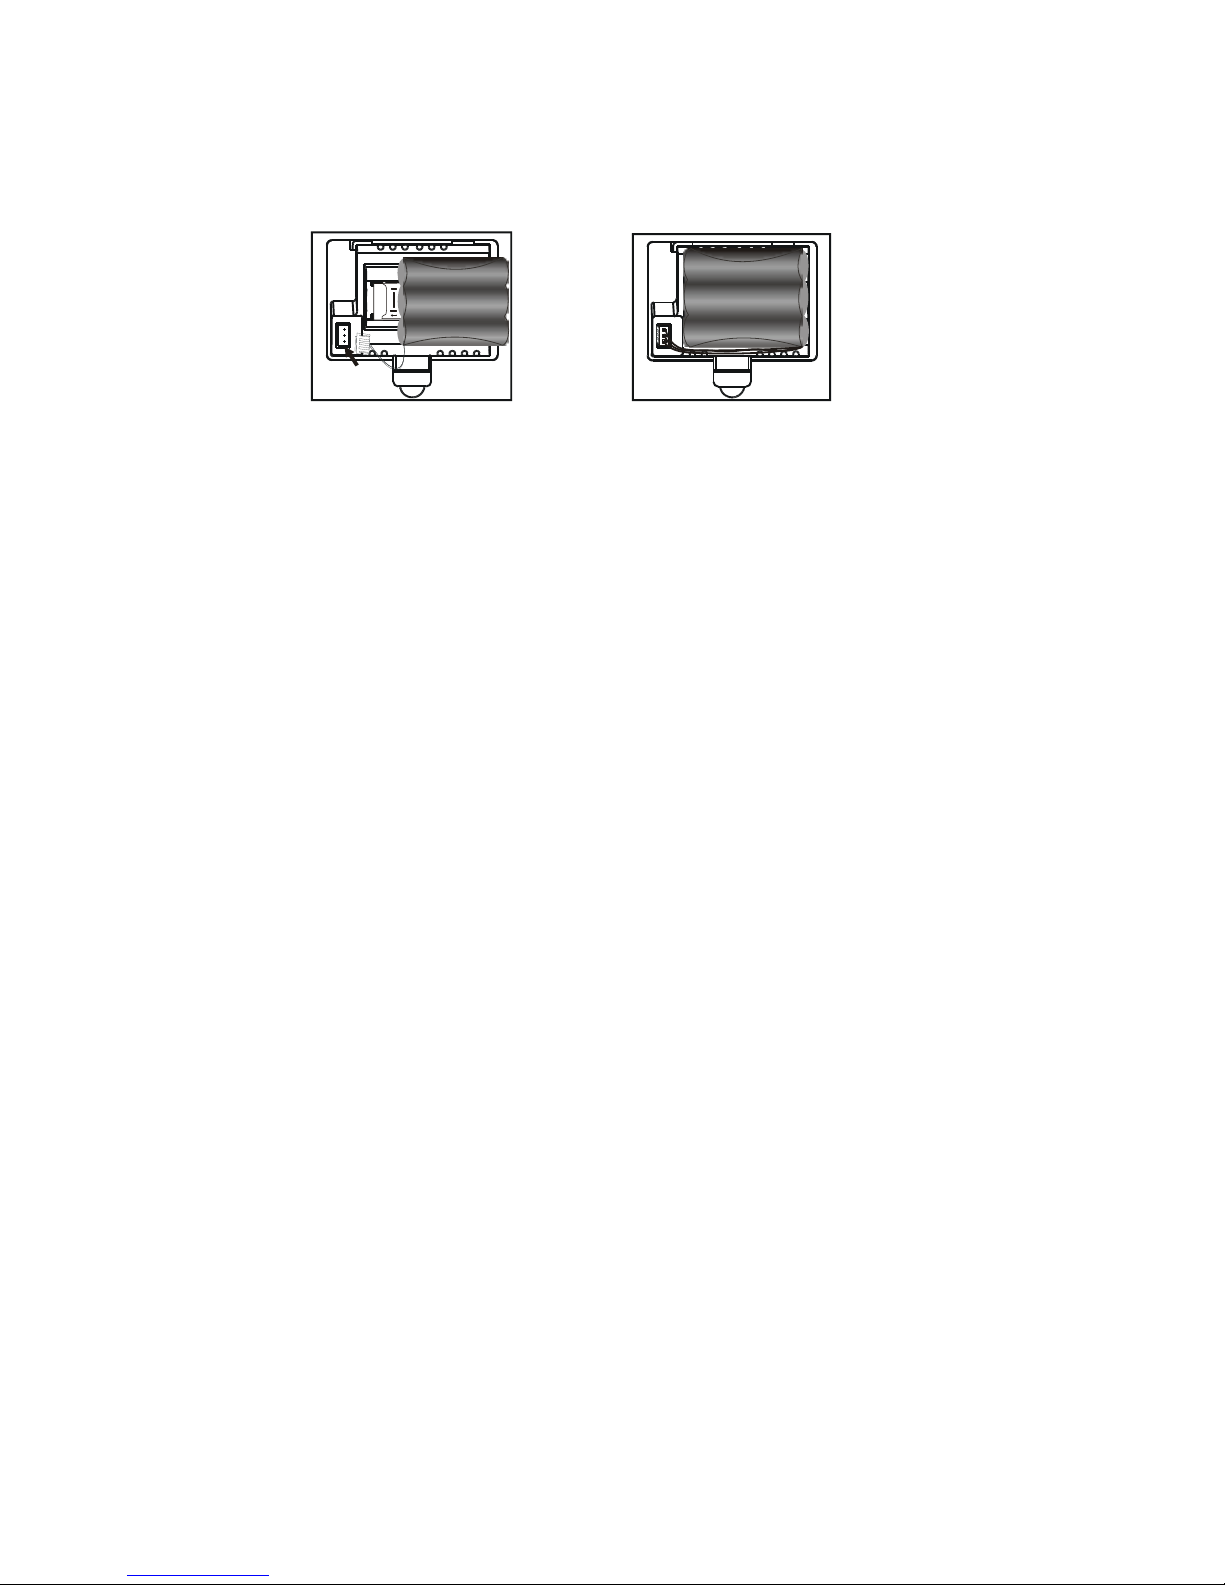
¾ Installing battery
Insert the BNC connector of the battery into the corresponding socket in the
battery compartment, and then close the battery cover.
7
Page 9
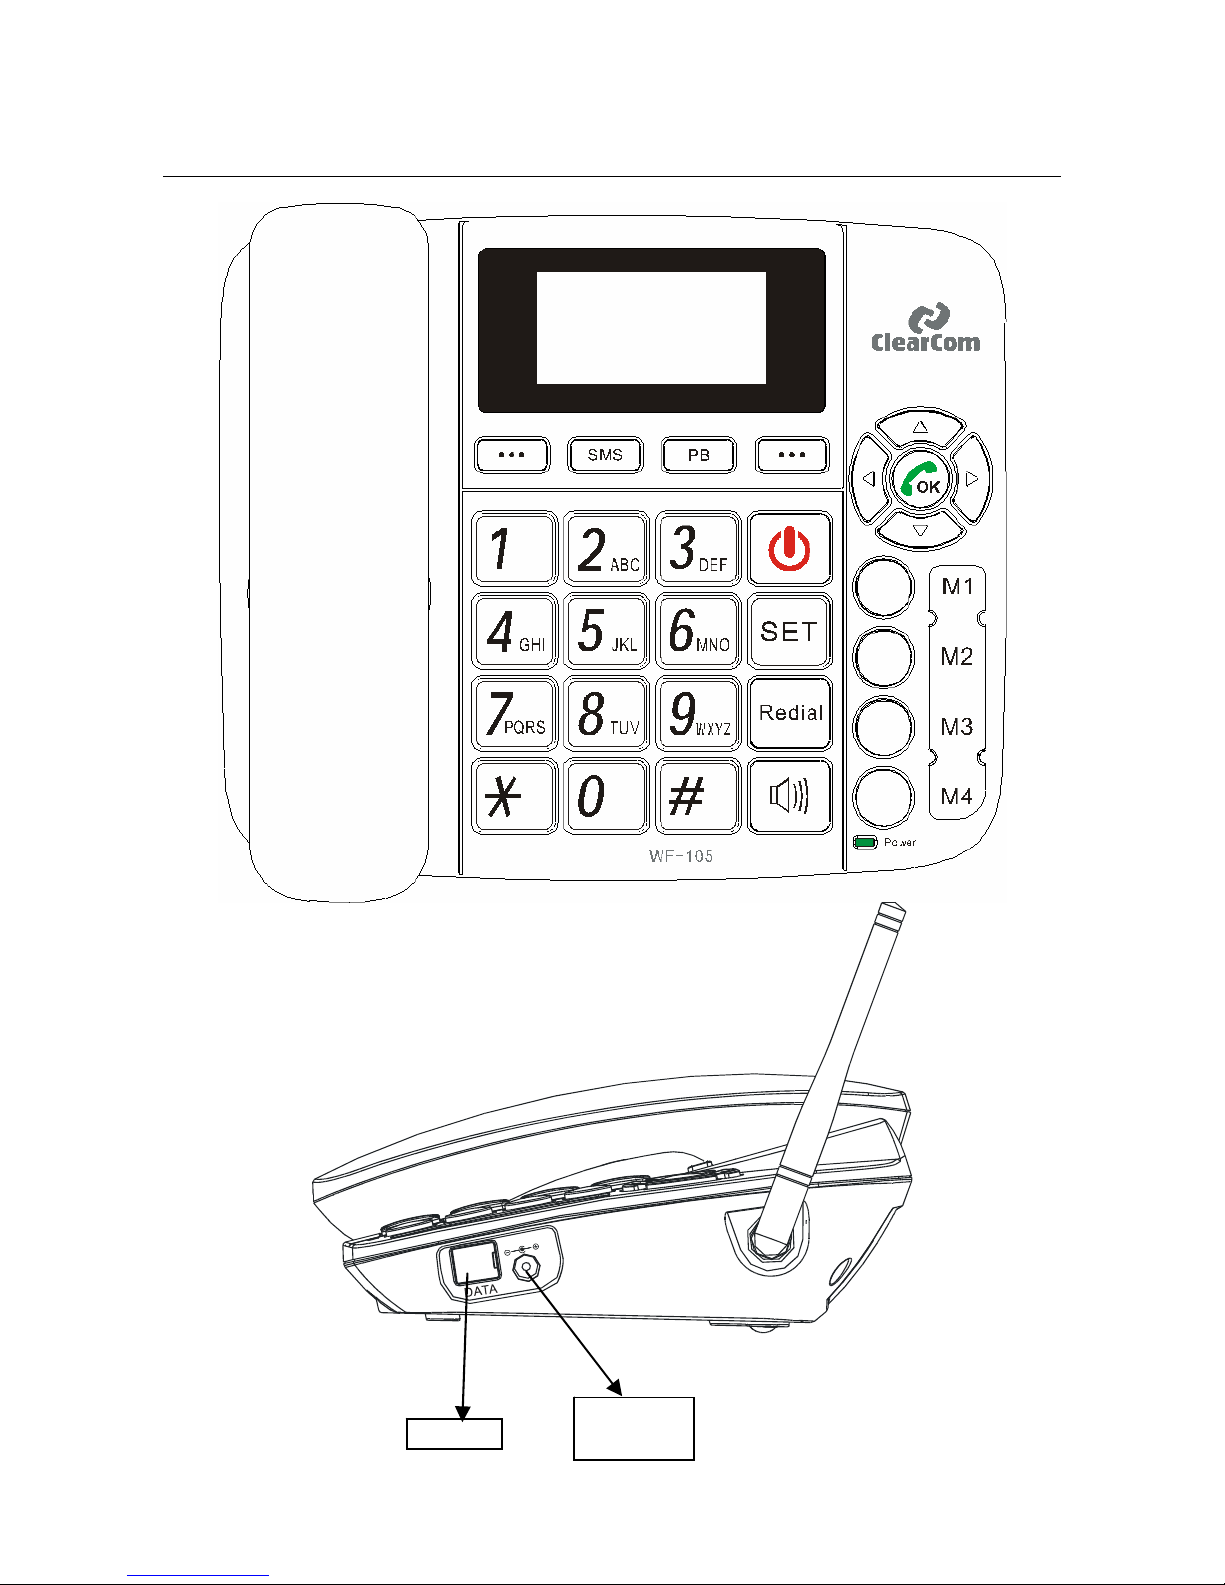
2. Getting to know your phone
D
C
5
.
0
V
Data port
External
power port
8
Page 10

3. Functions of Keys
1. The left soft key
By pressing this key:
¾ In standby mode, enter the main menu.
¾ After entering a number, select Save number, Send message or Voice call.
¾ At the menu state, enter sub-menu.
¾ At the submenu state, select the function shown above it on the bottom left of
the screen.
2. The right soft key
By pressing this key:
¾ In standby mode, used to access the Call log.
¾ At the edit state, delete the character before the cursor. Hold down this key to
delete all characters before the cursor.
¾ During calls, hold or retrieve the call.
¾ When a new incoming call is received, you can press this key to reject the call.
¾ At the submenu state, select the function shown above it on the bottom right of
the screen.
3. ON/OFF
After connecting the AC adapter, the backlight will light up but the phone will remain in
standby mode.
¾ Press and hold the
key or press the left soft key to power up the phone.
¾ In the on state, press and hold the
key, to power down the phone.
¾ In menu state, press to return to standby mode.
4. OK key
¾ Used after dialed digits to dial out the number immediately.
¾ Used in standby to enter the main menu.
¾ Used in submenu to select the highlighted function shown on the screen.
5. Arrow keys
¾ ▲ / ▼ key: When the user is in the call history (or specifically submenu), this
key allows moving the cursor up and down.
¾ ◄ / ► key: When the user is writing a message (or specifically submenu) this
key allows moving the cursor left and right.
9
Page 11

¾ During a call, you can press the◄ / ► key to adjust the volume.
¾ In standby mode, press the ▲ / ▼ key to enter the call log.
6. SMS
In standby mode, press this key to enter the message menu.
7. SET
SET
In standby mode, press this key to enter the M1/M2/M3/M4 settings menu.
8. Redial
Press to redial the last dialed number.
9. Hands-free
In standby mode, press this key and dial the number. Hands-free allows you to have
a conversation without lifting the handset. (The ◄ / ► keys are used in hands-free to
adjust the volume during the call.) Press this key again to end the call.
10. M1/M2/M3/M4 keys
In the off-hook or hands-free state, press either M1/M2/M3/M4 to dial the
corresponding number. (Must set the M1/M2/M3/M4 number before using it)
11. Digit keys
[0-9]
¾ In the off-hook or hands-free state, enter the calling number using these keys.
¾ Enter corresponding characters in all input modes and select the character you
want to input. In the English input state, “1” can be used to input special
characters. (except 123 state)
¾ In the off-hook or hands-free state, press and hold the “1” key to startup voice
mail server. (You must set the number in Menu→ Messages→ Voice mail
before using it)
¾ Press and hold any [2-9] key to dial the associated speed dial number in the
off-hook or hands-free state. (You can set speed dial numbers in: Menu→
Contacts→ Select anyone menu→ Select a contact→ Settings→ Speed dial.)
12. * key
¾ Used in standby mode, to get “*”/“+”/“P”/“W” respectively.
¾ In the edit state, press this key to switch to the Symbol Input Interface.
13. # key
¾ In the on-hook state, it is equivalent to a number key when you enter a number.
¾ In the edit state, press this key to switch between different input modes.
10
Page 12

4. Basic Functions
4.1 On/Off
Firstly, please ensure the battery and SIM card has been inserted properly into the
telephone. Press the On/Off key to power the phone, and then wait until the
name of the network provider appears on the display before use.
If the phone is powered without a SIM card, the phone will display a message to
insert a USIM card.
Press the key for 3 seconds to turn the phone off.
4.2 Making a call
¾ Number editing
In the off-hook or hands-free state, enter the number to be dialed, and then press the
◄ / ► key to move your cursor, press the right soft key to delete the number before
the cursor. Press and hold the right soft key to delete all the numbers before the cursor.
¾ Calling
In the off-hook or hands-free state, enter the number to be dialed and press OK.
Replace the handset or press the hands-free key to end the call.
¾ Speed dial
In the off-hook or hands-free state, press and hold any key (2-9) to dial that number
preset in the Speed dial submenu.
¾ Dial saved "Contacts"
In standby mode, press the “PB” (phone book) soft key. Press the ▲or ▼ keys to
select the location where the number is saved, then press OK. Search for the name,
and then press the left soft key to view the number options. Press this key again to
dial this number. The desired name can also be located by just pressing the first
letter of the corresponding name in the Contacts list menu.
4.3 Receiving a call
When a call is received, answer the call by lifting the handset or pressing the
hands-free key. Replace the handset or press the hands-free key to end the call.
When a call is received the right soft key can be used to reject the incoming call.
4.4 Redialing
In the off-hook or hands-free state, press the Redial key to make a call to the last
dialed number.
4.5 Calls menu
During a call, press the left soft key for one of the following operations in the call
menu:
11
Page 13

Mute on: It does not send local voice. (On/Off)
End call: End the current call.
New call: Dialed a new call.
New message: Enter write message interface.
Send DTMF: Send DTMF.
Contacts: Enter contacts list.
Volume: Change volume.
4.6 M1/M2/M3/M4 function
You can store up to 4 numbers in your phone’s direct memory for quick and easy
dialing.
In the off-hook or hands-free state, press either M1/M2/M3/M4 to dial the
corresponding number. If you have not set the number, press the SET key to
program the number, then press the left soft key to save it.
4.7 Call waiting
You can use this feature to put a call on hold (by pressing the right soft key) and
answer another call on the same line. Contact your service provider to subscribe to
the Call waiting service.
Location: MenuÆ SettingsÆ Call settingsÆ Call waitingÆOn/Off/Check status.
4.8 Making a multiparty call
Multiparty Calling is a feature that enables you to set up a three-way conversation
with two other users. Contact your service provider to activate or deactivate
Three-way Calling. Please make sure your SIM card supports the call waiting and
multiparty function.
1. Power on your phone, and make the first call.
2. Keep the communication connected and dial another telephone number (the
first call will be put on hold while making the second call). Repeat this step to
invite a third party to the conversation. (Up to 6 members could be in a
conference).
After all the required numbers were dialed, press the left soft key to select call
meeting, and then press the left soft key to enter this menu. The relevant function
could then be selected.
4.9 Low-power indicator
When the battery is exhausted the phone will sound an alarm and show "Low
battery" on the screen.
4.10 Charge indicator
When using the battery as power source, the AC adapter should be used for charging
the battery when it’s exhausted. The battery power indicator bar will start to flicker. The
indicator will stop flickering when the battery is fully charged.
12
Page 14

5. Text Input
5.1 Input Mode
At the input state, press the # key to alter the input mode. The right soft key can be
used to delete the character in front of the cursor. Press and hold the right soft key to
delete all characters in front of the cursor.
The ◄ key is used to move the cursor to the left, and the ► key is used to move the
cursor to the right.
5.1.1 Write with text input “Abc”.
“Abc” text input is the default mode for entering text. When using the text input mode,
the icon Abc appears in the upper right corner of the phone’s screen.
Press the corresponding key to get the letter needed.
Press it several times until the desired letter appears on the screen.
Example: Press the “2” key three time to enter the letter C. The first letter will be in
upper case.
5.1.2 Write with text input "abc"
Press # until the "abc" icon appears in the right corner of the phone screen, press the
corresponding key to get the desired letter.
Press it several times until the desired letter appears on the screen.
Example: Press the “2” key three time to enter the letter C.
5.1.3 Write with text input “ABC”.
Press # until the "ABC" icon appears in the right corner of the phone screen, press
the corresponding key to get the desired letter.
This input mode is the same as "abc" mode, but only provides letters in upper case.
5.1.4 Write with text input " PreAbc "
Press # until the “PreAbc” appears in the right corner of the phone screen. Press
each key carrying the desired letter once. The predictive text function will present the
available word automatically. The UP / DOWN arrows can be used to change the
character if needed.
5.1.5 Write with text input "Preabc "
Press # until the “Preabc” appears in the right corner of the phone screen. Press
each key carrying the desired letter once. The predictive text function will present the
available word automatically. The UP / DOWN arrows can be used to change the
character if needed.
13
Page 15

5.1.6 Write with text input "PreABC "
Press # until the “PreABC” appears in the right corner of the phone screen. Press
each key carrying the desired letter once. The predictive text function will present the
available word automatically. The UP / DOWN arrows can be used to change the
character if needed.
5.1.7 Insert number 123
Press # until the "123" appears on the right corner of the screen and then enter the
desired digits.
Press 0 key to get a blank space. (Except 123 input mode)
5.2 Character list
In the English input state, press ‘1’ to get a particular character. Press ‘1’ repeatedly
to select the character to be used. (1.,?!:/@-_~)
In all input states, press * to get other characters, and then use the ▲/▼/◄ / ► keys
to select the character to be used.
14
Page 16

6. Function Menu
In standby mode, press the left soft key to enter the main menu. The ▲ and ▼ keys
can be used to scroll through the menu. Press the left soft key to enter this menu or
press the right soft key to return to the previous menu level.
6.1 Call log
This function allows you to view a list of the last 20 missed calls or incoming calls
and the last 20 outgoing calls.
Press the left soft key to enter the Call log menu. Scroll through the menu options
with the ▲or ▼ keys and select the desired option by pressing the left soft key.
6.1.1 Missed calls
In the Missed calls menu, the left soft key can be used to view the call information.
6.1.2 Outgoing calls
In the Outgoing calls menu, the left soft key can be used to view the call information.
6.1.3 Incoming calls
In the Incoming calls menu, the left soft key can be used to view the call information.
6.1.4 All calls
Allow the viewing of all calls, and the left soft key can be used to view the call
information of the selected call.
6.1.5 Call duration
When entering the Call duration menu, the duration for the last call will be displayed.
Press the ▲ or ▼ button to alter between Last call time, All outgoing voice calls, All
incoming voice calls or to Reset all stored call durations.
6.2 Contacts
You can store desired names and their associated phone number, mobile phone
number etc. Press the left soft key to enter the menu, and then select the contacts
menu. In standby mode the PB soft key could also be used to enter contacts directly.
6.2.1 Phone
Press the left soft key to enter this menu. If this menu has no contacts, press the OK
key to add a new contact.
¾ Save: Save the contact to phone or SIM card.
¾ Name: Edit the contact name.
¾ Mobile number: Edit the contact mobile number.
¾ Home number: Edit the contact home number.
¾ Number type: Select number type.
¾ Group: Select group.
¾ Email: Save the contact email.
¾ URL: Save URL.
15
Page 17

¾ Birthday: Save the contact birthday.
¾ Ringtone: Set ring tone.
¾ Notes: Edit note.
6.2.2 USIM
You can view a contact that is stored on the USIM card. Select a contact and then
press the left soft key to:
¾ Call: Dial the contact number.
¾ Send message: Send a message to the contact.
¾ New: Add a new contact.
¾ Edit: Edit the contact name and number.
¾ Delete: Delete the contact.
¾ Copy to mobile: Copy the contact or batch contacts to the phone.
¾ Send: Send the contact.
¾ Memory status: Check the store information about the SIM card and phone.
¾ Settings: Set the contact.
6.2.3 All
In this menu all contacts from the SIM and the phone can be viewed together.
6.2.4 Group
You can set a group in this menu. Press the left soft key to enter this menu. Press the
left soft key again and choose Edit or New.
6.3 Alarm
You can set Alarm1/Alarm2/Alarm3. Select one to set:
¾ Time: You can set the alarm time (00:00)
¾ Alarm type: You can select alarm type. (Once/Everyday/Days)
¾ Alarm interval: You can select alarm interval. (5 minutes/10 minutes/15
minutes)
¾ Alarm alert: You can set alarm alert.
Press the left soft key to save.
6.4 Messages
If the network supports SMS, the WF105 phone can send and receive short
messages and receive voice mail messages. Please consult with the local operator
for the details.
Press the SMS key to enter the messages menu. Use the ▲or ▼ keys to select the
next option and press the left soft key to confirm your selection.
6.4.1 New
The Short Message Service (SMS) network service allows you to send an SMS to
another phone. Text messages may consist of up to 160 characters.
In the New submenu, press the left soft key and then input the message.
16
Page 18

The phone is preset with 10 commonly used phrases that can be used on SMS. To
add a stored phrase, press the left soft key to select options “Insert→SMS
templates”, you can then select a stored message template. Press the left soft key to
confirm the message.
¾ Send: You can send this message
¾ Insert: You can select to insert contacts or SMS templates
¾ Save to draft: You can save the current message to draft
¾ Input mode: You can switch input mode
¾ Insert symbol: You can insert a symbol
¾ Input settings: You can select default input mode
6.4.2 Inbox
Scroll to the desired message and press the OK key to read it, and you can browse
through the message and its related information, such as the sender’s phone
number and the date and time it was received. One of the following options could be
selected with the left soft key:
¾ Reply: You can reply to sender
¾ Forward: Forward the short message to others
¾ Delete: Delete the short message
¾ Delete all: Delete all short messages
¾ Call: Dial the sender’s number
¾ View mode: Select to sort by date or subject
¾ Details: View the message details
6.4.3 Outbox
Scroll to the desired message and press the OK key to read it, and you can browse
through the message and its related information, such as the receiver’s phone
number and the date and time it was sent. One of the following options could be
selected with the left soft key:
¾ Resend: You can resend the message
¾ Delete: Delete this message
¾ Delete all: Delete all short messages
¾ View mode: Select to sort by date or subject
¾ Details: View the message details
6.4.4 Sentbox
Scroll to the desired message and press the OK key to read it, and you can browse
through the message and its related information, such as the receiver’s phone
number and the date and time it was sent. One of the following options could be
selected with the left soft key:
¾ Forward: Forward the short message to others
¾ Delete: Delete the short message
17
Page 19

¾ Delete all: Delete all short messages
¾ Call: Dial the receiver’s number
¾ View mode: Select to sort by date or subject
¾ Details: View the message details
6.4.5 Draftbox
Scroll to the desired message and press the OK key to read it. One of the following
options could be selected with the left soft key:
¾ Send: can send this message
¾ Delete: Delete the short message
¾ Delete all: Delete all short messages
¾ View mode: Select to sort by date or subject
¾ Details: View the message details
6.4.6 Templates
Press the left soft key to enter the Templates menu. This menu has 10 templates.
Press the left soft key to select Send, Delete or Delete all. A template can be edited
by pressing the OK button.
6.4.7 Cell broadcast
This function only works if it is supported by the service provider’s network. Press
the left soft key to enter this menu.
6.4.8 Voice mail
¾ This function only works if it is supported by the service provider’s network.
Press the left soft key to enter this menu. Input voice mail number, then press
the left soft key to save it.
Note: This function needs the support of the service provider.
6.4.9 Settings
In the Settings menu, you can select:
¾ Text message
Press the left soft key to enter the submenu, then select Setting, Send settings,
Default storage or Optimization.
¾ Broadcast settings
Press the left soft key to enter the submenu, then select Receive, Channel or
Language.
6.4.10 Memory status
The memory status indicates the amount of used and available storage space on the
phone and SIM card. The phone memory could accommodate up to 255 records and
the storage capacity of the SIM card is dependent on the card type.
18
Page 20

6.5 Settings
This menu offers you a convenient setting to your preference. Press the left soft key
to obtain the submenu as below:
6.5.1 Sounds
In this submenu, you can set the tone.
¾ Voice call ring: You can set the voice call ring tone
¾ Volume: You can adjust the ring volume
¾ Message alert: Set the sound for message alerts
¾ Key tone: You can enable or disable the keypad tone
¾ Warning tone: You can set the warning tone
6.5.2 Display settings
In this submenu, you can set the screen display.
¾ Idle screen: Select to set Clock display or Date display
¾ Backlight time: Press the left soft key to select the backlight display time. You
can select 5 sec, 10 sec, 20 sec or always.
6.5.3 Phone settings
In this submenu the following options can be selected:
¾ Language: Press the left soft key to select the desired language
¾ Time and date: You can set the Time, Date, Time format, Date format or
summer time
6.5.4 Call Settings
In this submenu, you can set these options:
¾ Phone number
You can select Network control, Display or Hide.
¾ Call waiting
During a call, use Call waiting to answer a second incoming call while putting the first call
on hold. The user can alternate between the two calls.
Note: This function only works if it is supported by the service provider’s network.
Please consult with the network service provider to get the corresponding service
application.
z On: Activate Call waiting function.
z Off: Cancel Call waiting function.
z Check status: Check whether Call waiting is activated or not.
Select “On” to activate the Call waiting function. The network will notify you of an
incoming call while you have a call in progress. You can press the left soft key to get
through the waiting call and select option to alternate between the calls.
19
Page 21

¾ Answer mode
Selection can be made to answer an incoming call with “Any key” or “Send” key.
When “Any key” is selected, the call is answered by pressing any key (except for the
right soft key or the On/Off key). By selecting the “Send” key, calls can be answered
by the OK key, the left soft key or the hands-free key.
¾ Auto redial
You can set the auto redial On/Off.
¾ Minute prompt
You can set the minute prompt On/Off.
¾ Answer prompt
You can set the answer prompt On/Off.
¾ Call divert
This network service is used to forward some of the incoming calls to another
assigned telephone number. Please contact to your service provider and get the
function activated.
Select call divert menu and then press the left soft key. The divert modes are
available as follows:
z All calls: Divert all calls
z If busy: Divert the incoming call when busy
z If not answered: Divert the incoming call when not answered
z If not available: Divert not available calls
z Cancel all: All diverts are off
¾ Call barring
This network service is used to bar outgoing calls or incoming calls. Please contact
your service provider and get the function activated.
Select call barring menu and then press the left soft key. The barring modes are
available as follows:
z All outgoing: Barring all outgoing calls
z International: Barring international calls
z Int’l but home: Barring int’l but home calls
z All incoming: Barring all incoming calls
z Abroad inco min g: Barring abroad incoming calls
z Cancel all: All barring are off
6.5.5 Network settings
You can select Network mode/Search mode/Preferred network. (need local network
support)
20
Page 22

6.5.6 Security settings
Your phone is equipped with a versatile security system to prevent unauthorized use
of the phone or the SIM card. (Need local network support)
¾ Automatic keylock
You can set the automatic keylock On/Off.
¾ Phone lock
Phone lock can prevent your phone from illegal use. Select On/Off to enable or disable
handset lock protection. When “On” is selected, you will be prompted to enter the password
before you could log on to the GSM network.
¾ PIN lock
PIN lock can prevent illegal usage on your SIM card. Select On/Off to enable or disable
SIM password protection. If you select “On”, you will be prompted to enter the PIN code
when the phone is powering up.
¾ Change phone code
You can change the phone code in this submenu.
¾ Change PIN
You can change the PIN code in this submenu.
¾ Change PIN2
You can change PIN2 code in this submenu.
6.5.7 Reset settings
You can restore specific or restore all settings. The phone will restore to original factory
setting.
The default password is 0000.
Note: Please be careful to use this function because some user defined settings will
be erased.
21
Page 23

7. GPRS/UMTS/HSDPA installation
This section explains how to use the WF105 Phone to access the internet from a PC.
PC Requirement: The USB Modem software is supported by all versions of Win XP,
Win Vista and Win 7.
1) Insert the data-enabled SIM in the compartment underneath the battery
compartment in the bottom of the phone.
2) Connect the antenna to the connector on the side of the phone.
3) Connect the battery, and replace the battery cover.
4) Connect the power supply.
5) Press the Power button on the phone to power up the phone. (Enter the pin
number of the SIM on the phone keypad if requested)
6) Disable Anti-Virus software on the PC for the duration of the installation.
7) Connect the USB cable to the phone and PC
8) A) On the PC, Run the “ShowModem.exe” to install the application and drivers.
B) If the “autorun” is not enabled on the PC, the popup would not occur
automatically. In this case the installer needs to run it manually for the virtual CD
drive. Use the “Computer” or “My Computer shortcut to view the new drive, then
click on the “Modem” icon
A) Autorun Pop-Up
B) Example of Virtual CD (Drive J:) drive as seen in “My Computer”
If this step cannot be executed, try to download the application and drivers from the
www.telkomphones.co.za website and do the installation manually.
22
Page 24

9) Follow the installation instructions and restart the PC when prompted.
10) Restart the phone. (And enter the SIM card’s PIN on the phone if requested)
11) Use the “USB Modem” shortcut on the desktop (Or the “Showmodem” popup)
to open the application.
23
Page 25

12) View the bar at the bottom of the application to ensure that the network was
discovered and ready for connection.
13) Use the “Connect” button to initiate the connection.
24
Page 26

8. Troubleshooting
Problem
Possible
Cause
Correction
Unable to turn on
No power
Connect the battery and power
adapter.
Unable to connect
to the network
Poor signal
See “Poor Signal” solutions below.
Poor signal
Try to adjust the antenna direction and
phone location.
Poor signal
reception
Poor connection Try to tweak the antenna contra rotate
tightly.
Low power
Please charge up first.
Unable to make a
call or to answer a
call
Rechargeable
battery is faulty
Contact the helpdesk for information
on how to purchase a replacement
battery.
Poor connection
between handset
cord and the
phone or handset
Re-connect the handset cord again.
No dialing tone
The handset cord
was broken or
poor connection to
the inner
earphone of
handset
Contact the helpdesk for support.
Poor connection
between handset
and the phone
Re-connect the handset cord again.
The called
terminal can’t hear
any voice
The coil was
broken or the
microphone of the
handset was
damaged
Contact the helpdesk for support.
Volume set too
loud
Try to decrease volume.
Poor quality of the
network trunk of
your network
service provider
Echo or noise
Poor signal Try to move your phone
Out of order
accidentally
Try to turn off and
wait for a
moment/Reboot
25
Page 27

Troubleshooting specific to internet access problems
Blue screen or
error messages
received when
connecting the
USB to the PC
Conflicting driver or
application on the
PC
Download the “USB Modem” application
and drivers from the website
(www.telkomphones.co.za
), and then try
to install the application and drivers
manually. Contact the helpdesk for
support if needed.
It might be necessary to do the
installation on the pc after a fresh
installation of Windows.
USB not connected Ensure the USB cable is connected to
the phone and PC.
Ensure the phone is powered on, and
the SIM pin entered on the phone.
Unplug and re-connect the USB cable.
USB Modem
shows “No
Device” found
Driver could not
install correctly in
Windows
Un-install “USB Modem”, then re-install
it. Pay special attention to the last part of
the driver installation for a brief message
that would show if the drivers were
installed correctly, or if the driver
installation failed.
If re-installing the application does not
resolve the problem, download the
application and drivers from the support
website and install them manually.
Windows cannot
address the
modem correctly
Restart the PC and phone, and then try
again to connect.
Internet not
connecting.
(Failing to dial /
connect)
The default profile
was changed or
deleted
Uninstall then re-install the USB Modem
program, or check the settings manually
as described in Trouble shooting the
“Default profile”.
USB Modem
application was
closed
Open the application again, and click on
the connect button. (The USB Modem
program can be minimized, but not
closed for the duration that internet
access is required.)
Internet
connection lost.
Internet is Capped
– Usage limit is
reached
If a Telkom or 8ta SIM card is used, Dial
*188# OK on the phone Keypad. An
SMS will be returned from Telkom to
show the amount of available data.
If another service provider’s SIM is used,
contact their service center to confirm
the data limit available.
26
Page 28

Troubleshooting: Default profile.
If any connection problems (Dial-up failures) are experienced, ensure that the
correct settings are used in the default connection:
• Click on the Settings (Gear) button, and select connection profile.
• Select the default connection (named Internet)
• Ensure the following details are correct:
Profile name: Internet
Dial: *99#
APN: Internet
Auth Type: CHAP
27
Page 29

Checking the available Data limit:
• If a Telkom or 8ta SIM card is used, Dial *188# OK on the phone Keypad. An
SMS will be returned from Telkom to show the amount of available data.
• If another service provider’s SIM is used, contact their service center to confirm
the data limit available.
For any service or product information queries relating to this telephone, please
call our SharedCall number 0860 2C HELP (0860 22 43 57) or visit our website
on www.telkomphones.co.za
28
 Loading...