

Page 1
Multi Installation Gauge
User manual
Bedienungsanleitung
© clearaudio electronic GmbH, 2018/12 Made in Germany
Page 2

User manual / Bedienungsanleitung
User manual .......................................................... 2 - 6
Bedienungsanleitung ............................................ 7 - 11
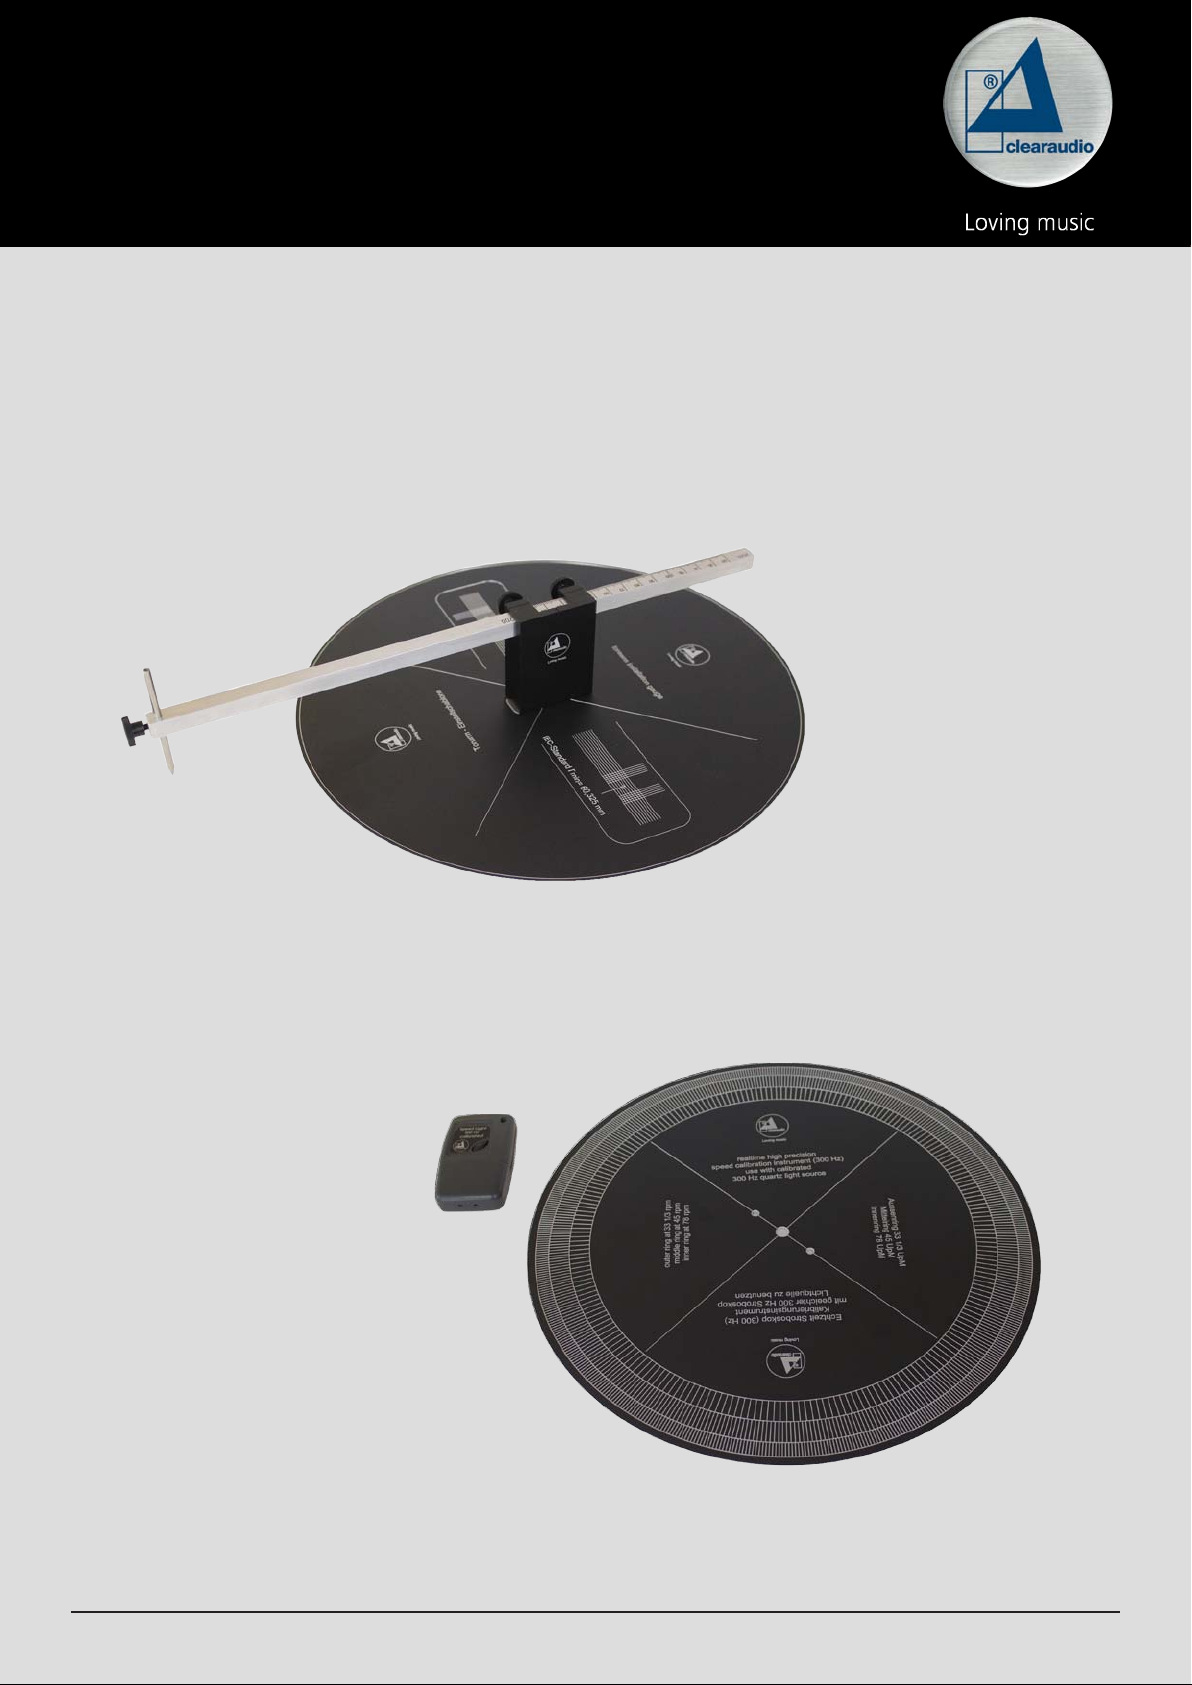
1. Package contents
1
2
3
4
1. Scale plate
Side A: Cartridge alignment gauge
Side B: Stroboscope test record
2. Speed light 5. User manual
3. Mounting block
4. Ruler with pre-mounted centre pin
(not shown)
Page / Seite 2 © clearaudio electronic GmbH, 2018/12
Page 3
User manual / Bedienungsanleitung
2. Cartridge alignment gauge
Made in Germany Page / Seite 3
Page 4

User manual / Bedienungsanleitung
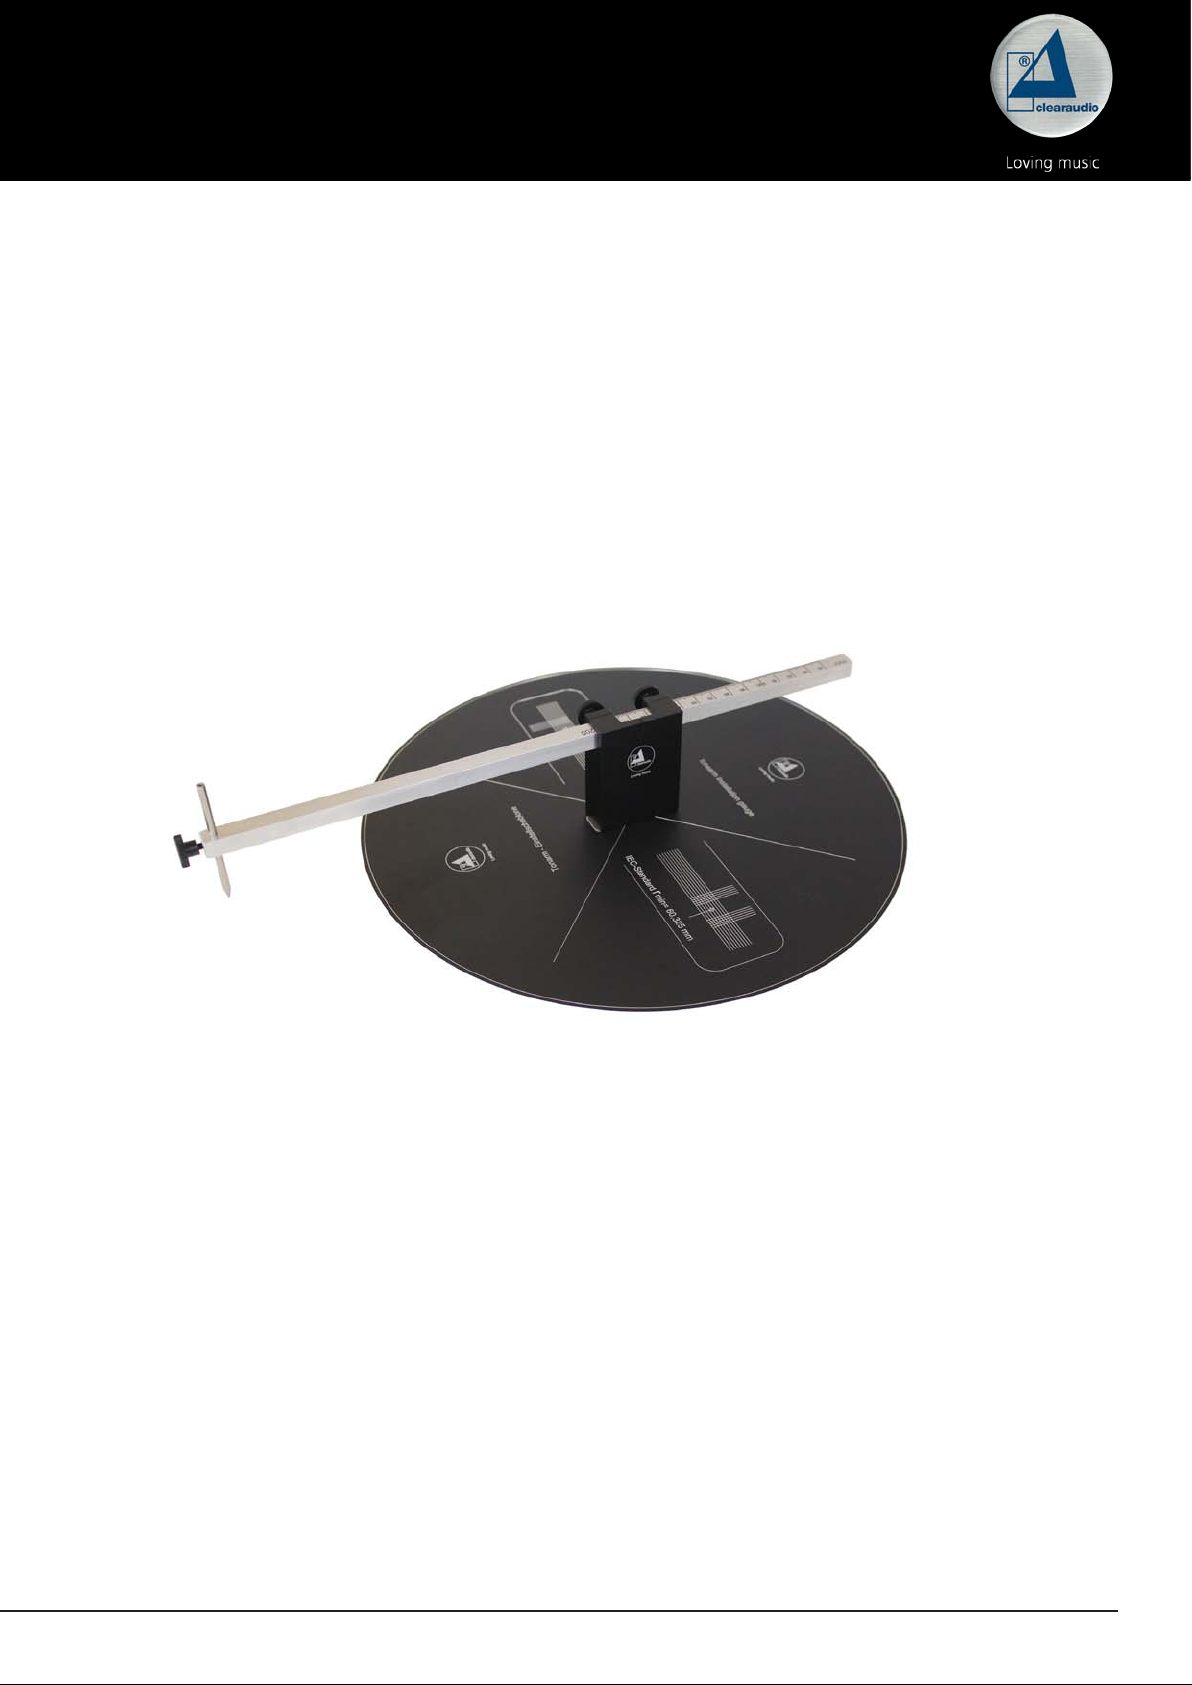
Using the Clearaudio cartridge alignment gauge
It is essential to ensure that the distance between the turntable spindle and the centre of the
tonearm bearing is correct (as per the arm manufacturer’s instructions). For Clearaudio radial
tonearms this distance is 222mm for 9” models or 295mm for 12” models. For dierent tonearm
lengths and/or for other manufacturers’ tonearms, please refer to the relevant user manual.
To measure the distance, place the alignment gauge on the turntable spindle and align the centre
pin with the centre of the tonearm bearing. Use the ruler to measure the distance between the
turntable spindle and the centre of the tonearm bearing. If the distance is not correct then the
tonearm must be adjusted, again following the guidelines from the relevant user manual.
Once the tonearm is correctly positioned you can lock the ruler in place using the two knurled
screws on the mounting block.
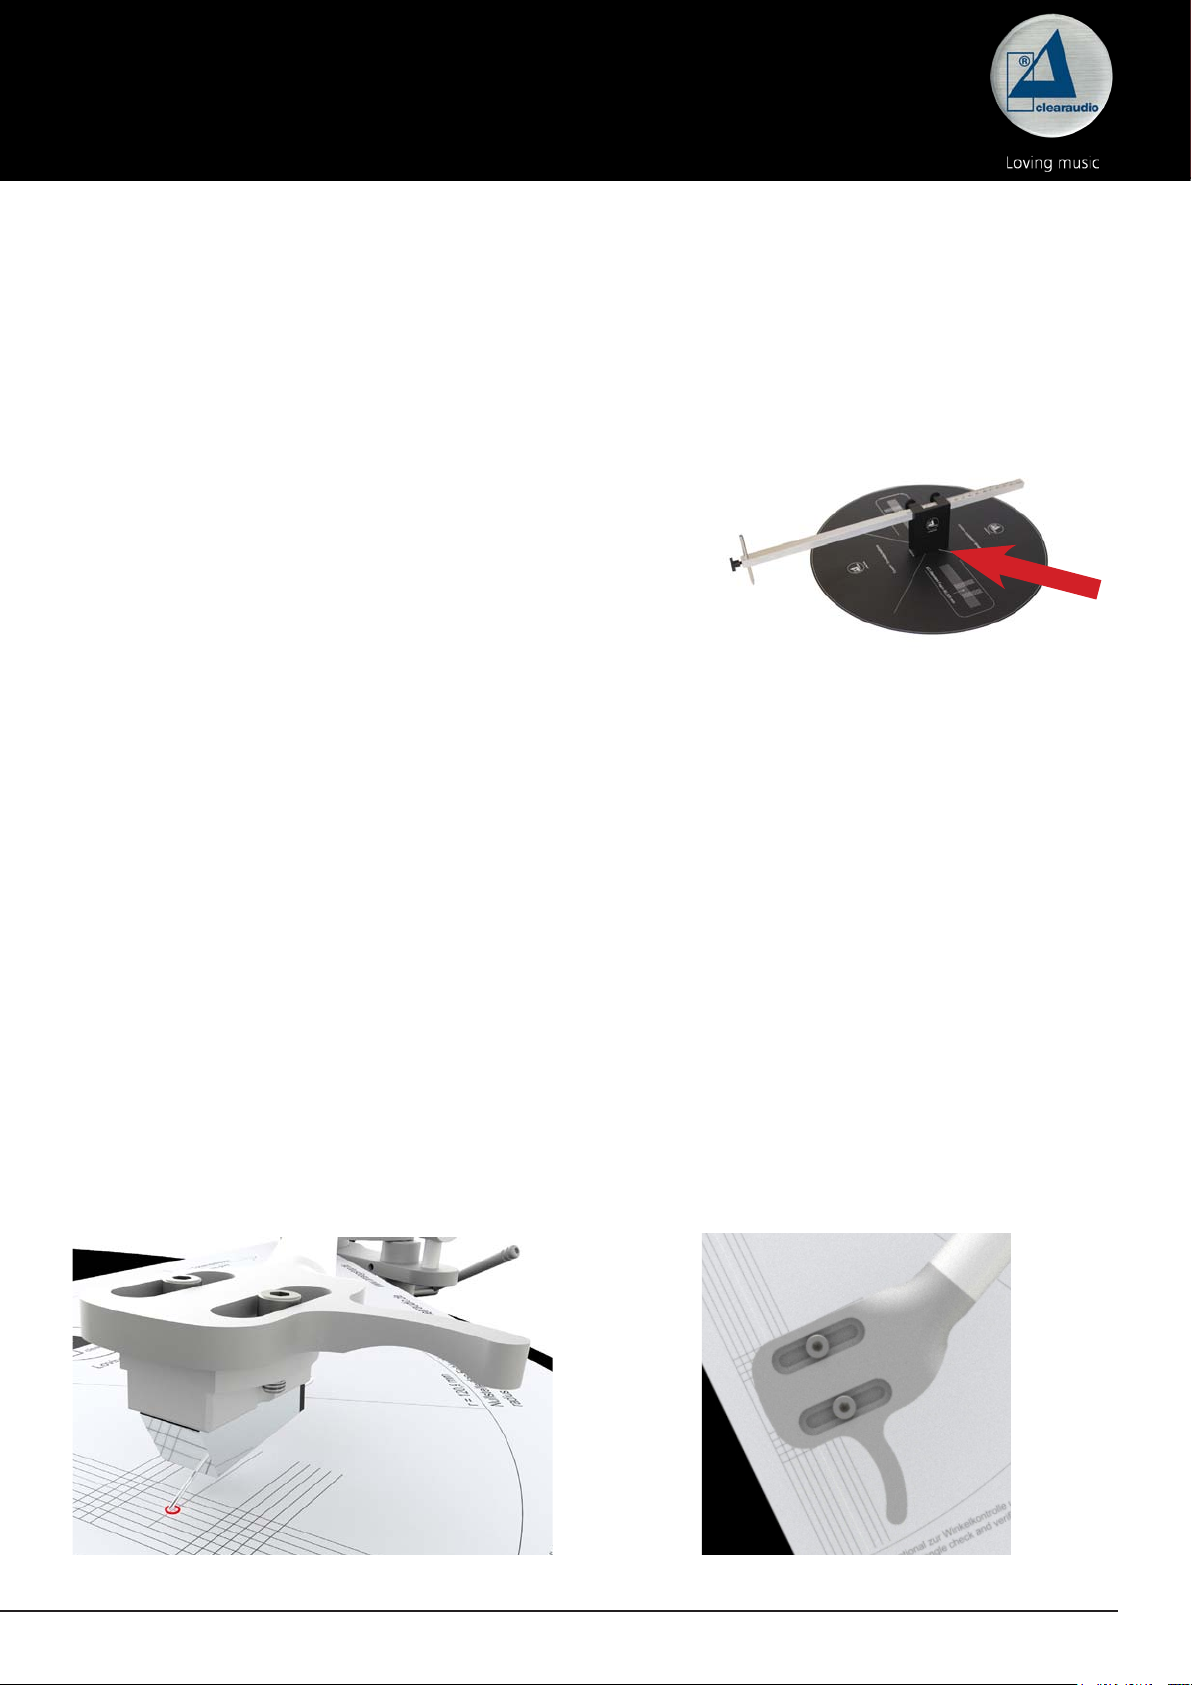
Now you can remove the stylus protector and begin the
adjustment of the cartridge.
Please proceed carefully so as not to damage the
cartridge.
Make sure that the cartridge is loosely mounted in the
headshell. Carefully lower the cartridge onto the scale plate.
The goal is for the stylus to land in the centre of the reference point (Pic. 1) and for the cartridge
body to be parallel to the lines on the scale plate (Pic. 2). To achieve this, you will need to gently
move the cartridge within the headshell: backwards, forwards and rotationally.
Please note:
Do not adjust the cartridge while it is resting on the scale plate; always use the lever to
lift it before adjusting, then lower it again afterwards to check.
After completing the adjustment, tighten the cartridge mounting screws to secure the cartridge in
the headshell. Check the alignment again after tightening the screws (as the action of tightening
can cause a very slight movement) and adjust again if necessary.
You have now completed the alignment of your tonearm and cartridge.
Pic. 1: Reference point
Page / Seite 4 © clearaudio electronic GmbH, 2018/12
Pic. 2: Alignment of the cartridge
Page 5

User manual / Bedienungsanleitung
3. Stroboscope test record
Made in Germany Page / Seite 5
Page 6

User manual / Bedienungsanleitung
The Clearaudio
precise speed adjustments to your turntable.
Dramatic sound improvements can be achieved with precisely calibrated speeds. There are three
speed settings: 33.3rpm, 45rpm and 78rpm (starting from the outer diameter).
Please put the
facing upward. The
indicates the speed at 33.3rpm, the middle ring 45rpm and the innermost ring indicates the speed
at 78rpm.
Stroboscope test record
By using the
setting, completely independent of the mains electricity frequency of
your country . The 300Hz calibrated light, used as an external light source,
is unaected by the potential power uctuations that can inuence the
result when using regular mains powered light. The 300Hz frequency of
the
speed light
a very exact adjustment.
Stroboscope test record
Stroboscope test record
and 300Hz
speed light
is generated by a stabilized quartz oscillator and enables
on your turntable with the rings of ne stroboscope lines
will measure three dierent speeds: the outer ring
speed light
(AC039) you achieve an even more accurate
enable you to make extremely
Now start the turntable motor and select the speed that you wish to measure.
Press the button of the speed light and hold it over the scale so that it shines onto the strobe ring.
The lines of the strobe ring indicating the chosen speed should appear to be stationary. If they are
moving, then adjust the turntable speed according to the turntable user manual until the lines do
not appear to move.
- If the lines move clockwise, the speed is too fast.
- If the lines move anti-clockwise, the speed is too slow.
Once you have set the exact speed, you can enjoy the full potential of your vinyl collection.
Technical data:
Speed light
Light source: Blue LED / 300Hz precision light source (calibrated)
Battery: V 23GA – 12V – alkaline (Art.-No.: AC039/B)
Please note:
An insucient battery voltage can lead to inaccurate measurement results, even if the voltage is still
sucient to light the blue LED.
In case of extreme uctuations of the measurement results, we recommend replacing the battery.
Page / Seite 6 © clearaudio electronic GmbH, 2018/12
Page 7

User manual / Bedienungsanleitung
Bedienungsanleitung ............................................ 7 - 11
1. Lieferumfang
1
2
3
4
1. Skalenplatte
Seite A: Cartridge alignment gauge
Seite B: Stroboscope Testrecord
2. Speed Light 5. Nicht abgebildet:
3. Halteblock
4. Lineal mit vormontierten Einstelldorn
Bedienungsanleitung
Made in Germany Page / Seite 7
Page 8

User manual / Bedienungsanleitung
2. Cartridge alignment gauge
Page / Seite 8 © clearaudio electronic GmbH, 2018/12
Page 9
User manual / Bedienungsanleitung
Benutzung der clearaudio IEC Einstellschablone
Um die IEC Einstellschablone verwenden zu können, stellen Sie zuerst den benötigten Abstand
zwischen Plattentellerspindel und Drehpunkt des Tonarms, mithilfe des Lineals ein und xieren Sie
diesen Punkt mit den beiden Rändelschrauben des Halteblocks.
Für alle clearaudio 9 Zoll Radialtonarme ist der Abstand 222 mm. (Für andere Tonarmlängen
oder Tonarme anderer Hersteller, beachten Sie bitte den
Hinweis in der jeweiligen Bedienungsanleitung.)
Setzen Sie nun die Einstellschablone auf die
Plattentellerspindel und richten Sie den Einstelldorn auf
den Drehpunkt des Tonarmes aus.
Sollte der Abstand nicht stimmen, muss der Tonarm
nachjustiert werden, auch hier halten Sie sich an die
Vorgaben der jeweiligen Bedienungsanleitung.
Nachdem Sie den Abstand korrekt eingestellt haben, können Sie nun den Nadelschutz entfernen
und mit der Justage des Tonabnehmers beginnen.
Gehen Sie hierbei bitte äußerst vorsichtig vor, um den Tonabnehmer nicht zu
beschädigen!
Stellen Sie sicher , dass der Tonabnehmer locker im Headshell montiert ist. Senken Sie den T onabnehmer
vorsichtig über der Skalenplatte ab, so dass der Diamant mittig auf dem Referenzpunkt liegt (Abb.
1). Nun können Sie auch die Ausrichtung des Tonabnehmers kontrollieren, in dem Sie von oben auf
den Tonabnehmer schauen und den Körper parallel zu den Linien auf der Skalenplatte zentrieren
(Abb.2).
Bitte beachten:
Richten Sie Tonabnehmer niemals aus solange dieser abgesenkt ist, zur Justage immer
den Lift betätigen und anschließend zur Kontrolle erneut absenken.
Abb. 1: Referenzpunkt
Made in Germany Page / Seite 9
Abb. 2: Ausrichtung des Tonabnehmers
Page 10
User manual / Bedienungsanleitung
3. Stroboscope Testrecord
Page / Seite 10 © clearaudio electronic GmbH, 2018/12
Page 11

User manual / Bedienungsanleitung
Die clearaudio
der Geschwindigkeit Ihres Plattenspielermotors. Ein optimales Klangerlebnis kann nur mit einer
exakt eingestellten Motordrehzahl erreicht werden.
Zur Einstellung der exakten Geschwindigkeit wählen Sie bitte zunächst die Plattenseite mit der
Skalierung zur Geschwindigkeiteinstellung.
Die Skala ist noch einmal in drei verschiedene Ablesemöglichkeiten eingeteilt: 33,3 Hz, 45 Hz
und 78 Hz (von Außen nach Innen). Schalten Sie Ihren Plattenspieler ein und warten Sie bis der
Plattenspieler seine Nenndrehzahl erreicht hat.
Stroboscope Testrecord
Mit Hilfe des mitgelieferten
eine Einstellung der genauen Geschwindigkeit, unabhängig von der
Netzfrequenz Ihres Landes. Das blaue 300 Hz Licht dieser externe
Lichtquelle ist auch von eventuellen Netzschwankungen unabhängig, die
bei normalem Licht das Ergebnis verfälschen könnten. Die 300 Hz des
Speed Lights
und ermöglichen somit eine sehr exakte Einstellung.
erfüllt die höchsten Ansprüche an eine exakte Einstellung
Speed Lights
werden durch einen quarzstabilisierten Oszillator erzeugt
(AC039) erreichen Sie
Wenn der Eindruck entsteht, dass die waagrechten Striche auf der Skala wandern, so sollte die
Geschwindigkeit des Motors anhand der Anleitung des Laufwerkes nachreguliert werden.
Hierbei ist zu beachten:
- Wandern die Striche im Uhrzeigersinn, so ist die Geschwindigkeit zu schnell eingestellt.
- Bewegen sie sich entgegen dem Uhrzeigersinn, so ist die Geschwindigkeit zu langsam.
Bitte regulieren Sie die Geschwindigkeit so lange, bis der Eindruck entsteht dass die Striche stehen.
Dann haben Sie die exakte Geschwindigkeit erreicht.
Technische Daten :
Speed Light
Lichtquelle: Blaue LED / geeicht auf 300 Hz (für Stroboscope Speed Light)
Batterie: V 23GA – 12 V – Alkaline (Art.-Nr.: AC039/B)
Bitte beachten:
Eine zu niedrige Batteriespannung kann zu fehlerhaften Messergebnissen führen, auch wenn die
blaue LED durch die Restspannung noch leuchtet.
Bei extremen Schwankungen der Messergebnisse, empfehlen wir die Batterie zu erneuern.
Made in Germany Page / Seite 11
Page 12

clearaudio electronic GmbH
Spardorfer Straße 150
91054 Erlangen
Germany
Phone/Tel.: +49 9131 40300 100
Fax: +49 9131 40300 119
www.clearaudio.de
www.analogshop.de
info@clearaudio.de
Handmade in Germany
(Änderungen bleiben vorbehalten. Lieferbar solange Vorrat reicht. Für Druckfehler keine Haftung.
Irrtümer vorbehalten- Kopien und Abdrucke – auch nur auszugsweise – bedürfen der schriftlichen
Genehmigung durch die clearaudio electronic GmbH. /
Clearaudio electronic is not responsible for typographical errors in descriptions.
Technical specications are subject to change or improvement without prior notice.
Product availability is as long as stock lasts.
Copies and reprints of this document, including extracts, require written consent from
Clearaudio electronic GmbH
)
2018
© clearaudio electronic GmbH, 2018/12 Made in Germany
 Loading...