


Emotion Start Smart
User manual
Bedienungsanleitung
Emotion Start Smart
Bluemotion |
Emotion Black |
|
Start Smart |
||
Start Smart |
||
|
Emotion Red |
|
Start Smart |
Made in Germany |
|
Hi-Fi Components clearaudio electronic GmbH
Spardorfer Str. 150 ● D-91054 Erlangen ● Tel. +49(0) 1805/059595 ● FAX +49(0) 09131/51683 www.clearaudio.de ● www.analogshop.de ● info@clearaudio.de ● copyright clearaudio 2008
Version 1.5_27.10.08_E+D

Emotion
User manual / Bedienungsanleitung
Dear clearaudio customer,
Congratulation’s to your choice of the Emotion-Start Smart turntable, a world class turntable, made by clearaudio electronic GmbH.
Resonance minimized shape in combination with a stand alone motor unit, guarantees total isolation of resonances from the turntable chassis, providing the best music reproduction and authentic High End imaging. A high precision, maintenance free sinter bronze bearing is completing the analogue pleasure.
Please read this instructions carefully, to avoid any damages or loss of warranty. These instructions will help you with an easy set-up and guarantee the highest pleasure for a long time.
We wish you a lot of musical enjoyments with your new clearaudio Emotion-Start Smart turntable.
clearaudio electronic GmbH
WARNINGS
Don’t expose your turntable to rain or humidity. Don’t handle the mains leads with wet hands.
Don’t place or insert anything into the equipment or through ventilation holes.
No naked flame sources, such as lighted candles, should be placed on the equipment.
CE-MARKING
The clearaudio Emotion Start Smart meets the regulations concerning electromagnetic disturbance (EMC) and low-voltage appliances.
COPYRIGHT
Recording und reproduction of any sound-material may require the consent of the creator.
Please acknowledge the information given in the
-Copyright Act 1956,
-Dramatic and Musical Performers Act 1958,
-Performers Protection Acts 1963 and 1072, any more recent legal regulations.
Page / Seite 1 |
clearaudio electronic GmbH 2008 |

|
|
Emotion |
|
|
|
User manual / Bedienungsanleitung |
|
Contents |
|||
|
|||
User manual |
3 – 12 |
||
Bedienungsanleitung |
13 - 26 |
||
1. |
Packing overview |
3 |
2. |
Packing contents |
4 |
3. |
Installation and set up |
6 |
4. |
Service |
9 |
5. |
Special directions |
11 |
6. |
Technical data |
12 |
Warranty information |
26 |
|
Page / Seite 2 |
clearaudio electronic GmbH 2008 |

1. Packing overview
Layers:
Top layer
Accessories,
motor, tonearm, user manual, warranty card
(pic. 1)
Middle layer
Turntable chassis incl. mounted lower and upper bearing part
(pic. 2)
Bottom layer
Turntable
Platter
(pic. 3)
1
3
Emotion
User manual / Bedienungsanleitung
2
Picture 1: Packing overview
Page / Seite 3 |
clearaudio electronic GmbH 2008 |
Emotion
User manual / Bedienungsanleitung
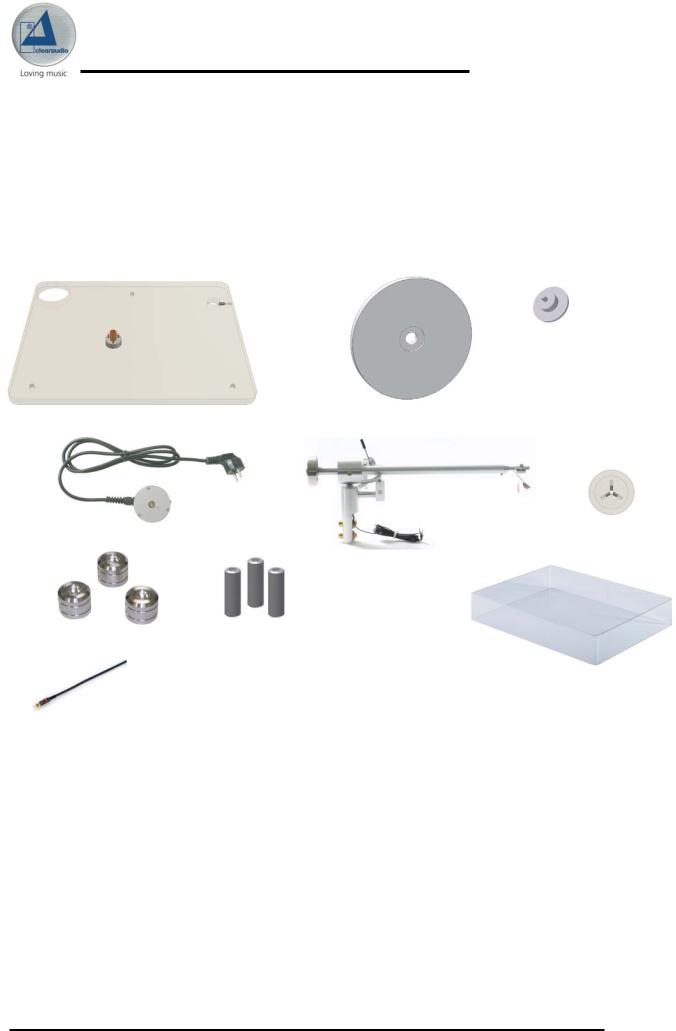
2. Packing contents
clearaudio has developed a special and secure turntable packing for your Emotion Start Smart turntable, to avoid any transportation-damages. Please store this original packing, in case you need to ship the turntable.
Below you can find the content of delivery of the clearaudio Emotion Start Smart turntable:
1 |
3 |
2 |
4 |
5 / 5a |
6 |
|
|
7 |
8 |
9 |
|
10
1. |
Turntable body with mounted lower |
2. |
Turntable-Platter |
|
bearing part |
|
|
3. |
Bearing (upper part) with adjusted |
4. |
Motor drive unit with feeder |
|
bearing shaft |
|
|
5. |
Satisfy Tonearm (direct-wired) |
5a. |
Counterweight to adjust the |
|
|
|
tracking force |
6. |
Acrylic motor pulley |
7. |
3 x Aluminium feet |
8. |
3 x Stainless steel threaded bolts |
9. |
Emotion Acrylic dust cover |
|
(metric) |
|
|
10. |
Smart Wire 1 m |
|
|
Page / Seite 4 |
clearaudio electronic GmbH 2008 |

Emotion
User manual / Bedienungsanleitung
11
12
13 |
14 |
15 |
|
||
|
|
16 |
17 |
18 |
19 |
20 |
21 |
11. |
clearaudio Smart phono |
12. |
Cartridge |
||
|
|
|
|
clearaudio MM Classic Wood |
|
13. |
1 Pair of white gloves |
14. |
grounding - wire for the Emotion- |
||
|
|
|
|
Start Smart Turntable (connect to in |
|
|
|
|
|
the bottom bearing part) |
|
15. |
clearaudio logo, self - adhesive |
16. |
Level gauge for the turntable |
||
|
|
|
|
alignment and for tonearm height |
|
|
|
|
|
adjustment |
|
17. |
2 pcs. drive belts |
18. |
3 pcs. Allen – key |
||
|
|
|
|
(sizes: 1.5 / 2.5 / 3) |
|
19. |
Aluminium precision screw driver |
20. |
Bearing oil for occasional use |
||
21. |
Record clamp “Clever Clamp” |
22. |
No illustration: User Manual |
||
23. |
No illustration: warranty card, |
24. |
No illustration: cartridge alignment |
||
|
|
clearaudio Quality Card |
|
gauge for Satisfy-tonearm |
|
|
|
|
|
|
|
|
Page / Seite 5 |
|
clearaudio electronic GmbH 2008 |
||
Emotion
User manual / Bedienungsanleitung
3. Installation and set up
The Emotion Start Smart -turntable comes in several pre mounted parts, as described under chapter 2 (Scope of supply). The set up and installation is done quickly and very easy. Please use the white gloves during this procedure, to avoid scratches.
You should consider a safe and clean working area for the installation, in spite, as near as possible to the final position of the Emotion Start Smart turntable.
1.) First take out the motor and tonearm of the packing. Now you should take out the first packing layer. After that you can take out the Emotion Start Smart turntable body from the next packing layer. Place the turntable body on a on a clean underlay so that the bearing hole is facing upside.
2.) In the accessory bag (placed in the top packing layer) you will find 3 aluminium feet and 3 stainless steel threaded bolts. Screw the 3 bolts about 10 millimetre inwards into the aluminium feet. Screw the 3 feet into the pre drilled holes of the turntable body, while tightening them gently. Then take the turntable body and place it on the area where the final position of your Emotion Start
Smart turntable will be.
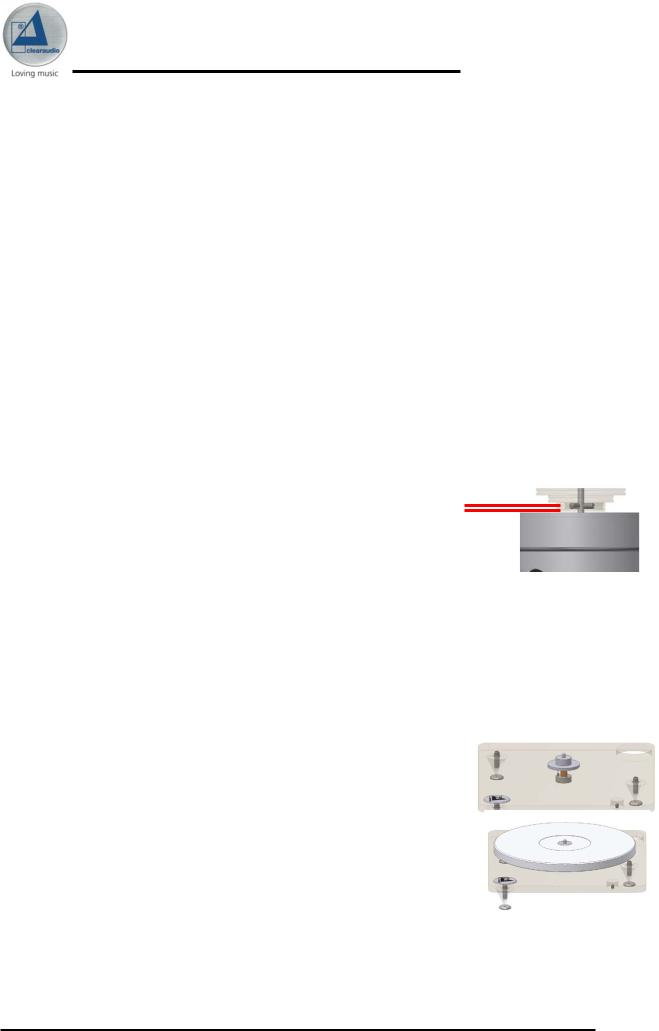
3.) Now take the motor-pulley out of the accessory bag 1 mm
and shift the motor pulley as far as on the motors shaft until you have a distance of approximately 1 mm between the upper edge of the motor and the lower edge of the pulley. Now screw the three screws in the pulley one
after the other with the precision screw driver.
Picture 2: Mounting the pulley
4.) Lift the turntable chassis and slide it over the motor unit through the motorposition hole in the turntable body so that the rubber-o- ring around the housing of the motor is fixing the final position. Please pay attention, that the switch of the motor is outside on the left side of the record player body.
Tip: You have also the possibility to take off the rubber-o-ring of the motor’s housing to centre the motor in the motorposition hole without any contact to the turntable chassis ! This way you can use your Emotion Start Smart turntable perfectly decoupled from the motor.
5.) Now you can connect the power cord to your power outlet. On the bottom packing layer you will find the turntable platter.
Please take the platter with both hands and place it on the bearing upper part. Through a lightly up and down movement the platter
will slip onto the bearing upper part. Picture 3+4: Make sure with a gently pressure that the platter is applying on
the complete surface of the bearing.
Placing the platter on the bearing upper part
Page / Seite 6 |
clearaudio electronic GmbH 2008 |
Emotion
User manual / Bedienungsanleitung
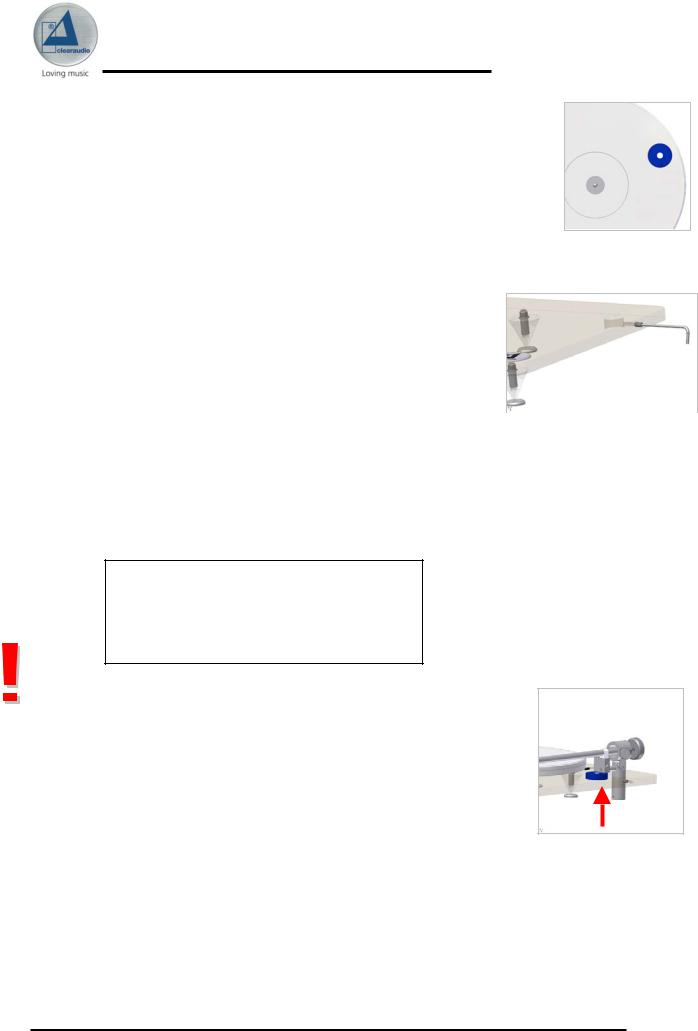
6.) Place the clearaudio level gauge on the platter and bring the turntable in level by turning the corresponding spikes in the right direction.
The following adjustment is very important:
should the air bubble in the level gauge not be in the black circle (see at the blow up), please ensure then that your underground so will be according aligned. Only if the turntable will be aligned you will receive the optimum on sound.
7.) Take the threaded bolt (metric winding size 6) out of your accessory bag and screw it with the adequate allen key into the winding near the tonearm cut of the turntable chassis, so that the front of the bolt is not facing out the inner side of the tonearm cut.
Picture 5: Alignment of the
turntable
8.) Now it’s the right time to mount your cartridge on your |
Picture 6: To screw the threaded bolt |
Satisfy-tonearm. |
|
Please use the manufacturer’s instruction manual while this |
|
installation procedure and follow the appropriate instructions. |
|
The headshell wires (cartridge connection leads) are colour coded according to the international
standard :
Colour code of the Satisfy tonearm wire:
Signal |
left channel (L+) |
→ |
white |
Signal ground left channel (L -) |
→ |
blue |
|
Signal |
right channel (R+) |
→ |
red |
Signal ground right channel (R -) |
→ |
green |
|
Please pay attention on every step to avoid any damages to the cartridge !
9.) Now take the Satisfy-tonearm with the mounted cartridge (and the stylus protector on it!) and slide first the signal cable and then the tonearm shaft into the pre-drilled hole on the right side of the Emotion Start Smart turntable body. Let the tonearm slide as far into the hole as the cuing lever unit sits on the clearaudio level gauge (accessorie box) as shown in the beneath picture. If you like to use a
mat on the turntable platter, please consider to add the thickness of
the mat while adjusting the tonearm height. Picture 7: Tonearm height adjustment Please ensure that the tonearm tube is in parallel to the right edge of the turntable
body. Fix this position while
gently locking the allen screw in the turntable-body’s edge.
Now adjust the tracking force of the cartridge. Please follow the instructions according the manual of the cartridge you use.
If you are using a clearaudio Moving Magnet cartridge (e.g. clearaudio Aurum classics Wood) you can adjust the force (about 20 mN), by turning the tonearm`s
Page / Seite 7 |
clearaudio electronic GmbH 2008 |
Emotion
User manual / Bedienungsanleitung
counter weight on the threaded bolt until you can see approximately eight threads (backside view of the tonearm). This works only if the lead plate, which is part of delivery of the clearaudio cartridge, is not mounted under the cartridge. If you have problems with the adjustment of the tracking force you can also use tools like the clearaudio Weight Watcher gauge (Art. No. AC094). For more informations on that, please contact your specialist dealer or directly clearaudio.
For contact address see page 11.
For the next settings place any LP. Now you can remove the stylus protector.
If you now lift down the cartridge to the middle of the turntable platter, you must see (from the side) that the upper edge of the tonearm tube is parallel to the surface of the record.
10.) You can use the tonearm tube as orientation. If it is necessary you can adjust the height of the tonearm. For that you have to move the tonearm in chassis’s hole in the right direction and to fix these position through locking the allen screw in the edge of the turntable chassis.
If you now lift down the cartridge again and take a look at the front side of the cartridge you have to make sure that the upper edge of the cartridge is parallel to the record surface. This adjustment had been set up perfectly by clearaudio. Only if it is necessary, you can adjust the cartridge position, while carefully screw the small allen screw on the bottom side of the tonearm tube near the headshell (Caution: please don’t unscrew the allen screw completely). Now you can twist the headshell with the mounted cartridge around his roll-axis. To achieve the most precise adjustment you can use a set square.
If you have found the right position you can carefully lock the small allen screw without changing the position defined before.
Don’t twist the headshell when the cartridge is lifted down and the diamante tip is on the record. It is necessary to lift the tip from the record, before you can prove the position again.
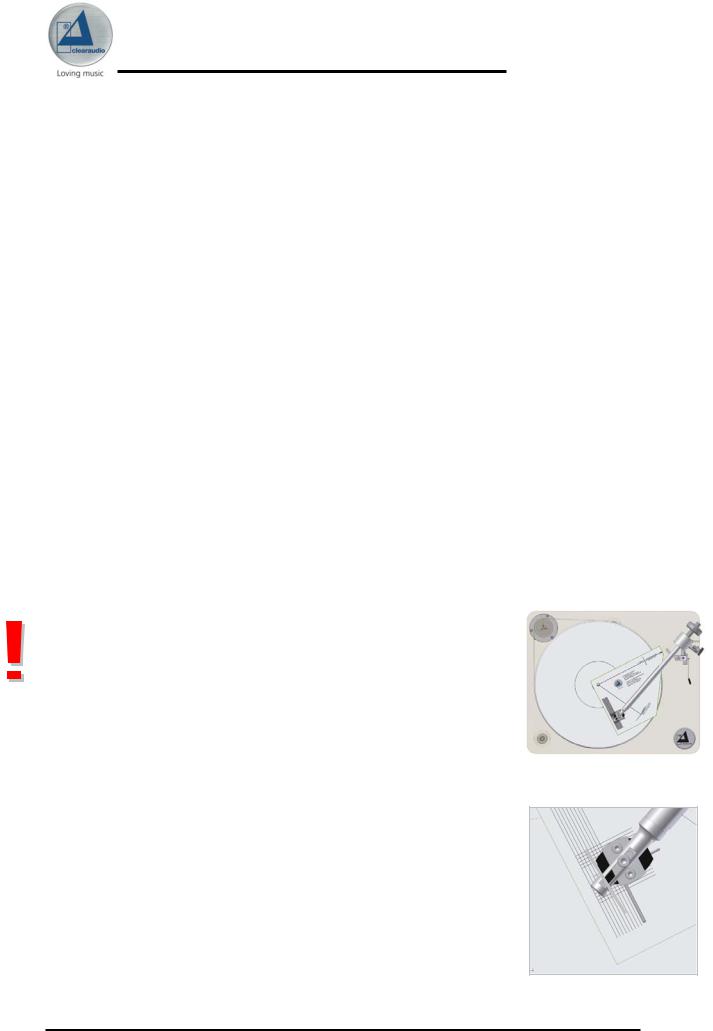
11.) For the final set-up of the tonearm, you need the cartridge alignment gauge which is included as well. Slide the gauge over the spindle of the turntable platter and turn the platter into the position as shown on the beneath picture.
Picture 8: Alignment of the tonearm
12.) Lift down the cartridge and place the diamond tip of the cartridge on the reference point on the alignment gauge and make sure that the edges of the tonearm tube are absolutely parallel to the marking lines printed on the cartridge alignment gauge. For that adjustment it is necessary to take a look directly from the top on the tonearm and the alignment gauge.
13.) If you have to change the position of the diamond tip you can unscrew the allen screw on the top of the tonearm`s
headshell and move the cartridge into the corresponding position. Please make also sure that the leading edge of the
Picture 9: The tonearm tube must be absolute parallel
Page / Seite 8 |
clearaudio electronic GmbH 2008 |
 Loading...