

Page 1
User manual
Made in Germany
Version-1.2_10.12.13_E
Performance SE
Spardorfer Str. 150 D-91054 Erlangen Tel. +49 9131 40300100 FAX +49 9131 40300119
Hi-Fi Components clearaudio electronic GmbH
www.clearaudio.de www.analogshop.de info@clearaudio.de /clearaudio copyright 2013
Page 2

Performance SE
WARNINGS
Don’t expose your performance-turntable to rain or humidity.
Don’t handle the mains leads with wet hands.
Don’t place or insert anything into the equipment or through ventilation holes.
No naked flame sources, such as lighted candles, should be placed on the equipment.
User manual
Dear Clearaudio-customer,
you have purchased a state-of-the-art turntable, the
of Clearaudio electronic GmbH.
The special resonance-optimised construction, the external motor-unit and the patented
Clearaudio - CMB-bearing-technology guarantees absolute speed stability, pure pleasure in
listening and reproduction in accordance to the original.
Thank you very much for your confidence.
Please read this user manual carefully so that you can enjoy all advantages of your
Performance SE
any possible damages.
We hope you will enjoy your new Clearaudio
Clearaudio electronic GmbH
Please read the warnings before connecting your
supply.
-turntable. All information given will help to generate best set up and avoid
Performance SE
Performance SE
Performance SE
, a world class product
-turntable.
-turntable to the mains
CE-MARKING
The Clearaudio
disturbance (EMC) and low-voltage appliances.
COPYRIGHT
Recording und reproduction of any sound-material may require the consent of the creator.
Please acknowledge the information given in the
- Copyright Act 1956,
- Dramatic and Musical Performers Act 1958,
- Performers Protection Acts 1963 and 1072,
- any more recent legal regulations.
Page 2 clearaudio electronic GmbH 2013
Performance SE
meets the regulations concerning electromagnetic
Page 3

Performance SE
User manual
Contents
1. Packaging overview 4
2. Packing contents 5
3. Set-up and operation 7
4. Tonearm- and pick-up setting 9
5. Azimuth-setting 17
6. Antiskating-setting 17
7. Service 18
8. Special directions 19
9. Technical data 20
Warranty information 21
Page 3 clearaudio electronic GmbH 2013
Page 4

Performance SE
1. Packaging overview
1. Layer (top):
Motor-unit, motor-basis (not shown)
top of bearing, belt, pulley, fittings
and accessories
If ordered as set: satisfy tonearm
and/or pickup
2. Layer (middle):
Turntable - chassis
3. Layer (bottom):
Platter
User manual
Page 4 clearaudio electronic GmbH 2013
Page 5

Performance SE
1
Chassis with built-in bearing
and tone arm base
2
Turntable platter
3
Top of the CMB - bearing
4
6-cut pulley for 230V motor or 2-cut
pulley for 110 V motor, incl. fixing
screws
5
Motor-unit with attached power cord
6
Motor stand, made out of stainless
steel
5
1 5 3 2 4
6
User manual
2. Packing contents
The Clearaudio
packaging.
Please check the contents according to the following list before you set up your new
Clearaudio
Performance SE
Performance SE
-turntable is delivered in a especially designed and custom
-turntable.
Page 5 clearaudio electronic GmbH 2013
Page 6

Performance SE
7
Synthetic bearing oil (2,5 ml)
8
Level gauge
9
Optional: Satisfy Tonearm
10
Ground wire ( if hum occures )
(drilling for ground wire on the backside
of the tonearmbase)
11
Clearaudio Smart Stylus Gauge
(without cartridge)
12
Optional: Maestro MM pick-up
13
2 Silent belts 2mm (1 for replacement)
14
Pair of white gloves
15
Allen wrench size 3
16
Screwdriver ( for fixing the pulley )
17
Warranty-certificate ( card )
7
10
8
9
12
13
14
15
11
16
User manual
Page 6 clearaudio electronic GmbH 2013
Page 7

Performance SE
12,99 inch / 33 cm
16,54 inch
/ 42 cm
Picture 1: Setting up space
User manual
3. Set-up and operation
The
Performance SE
content).
The set up is easy as some of the components are pre-assembled at the factory.
Please make use of the white gloves enclosed in order to avoid scratches or unwanted
fingerprints (platter).
Please follow the description step by step:
The
Performance SE
-turntable consists of several devices, as described in No 2 (Packing
requires a space of at least 16,54 inch x 12,99 inch for positioning.
Page 7 clearaudio electronic GmbH 2013
Page 8

Performance SE
Picture 2: Performance SE chassis
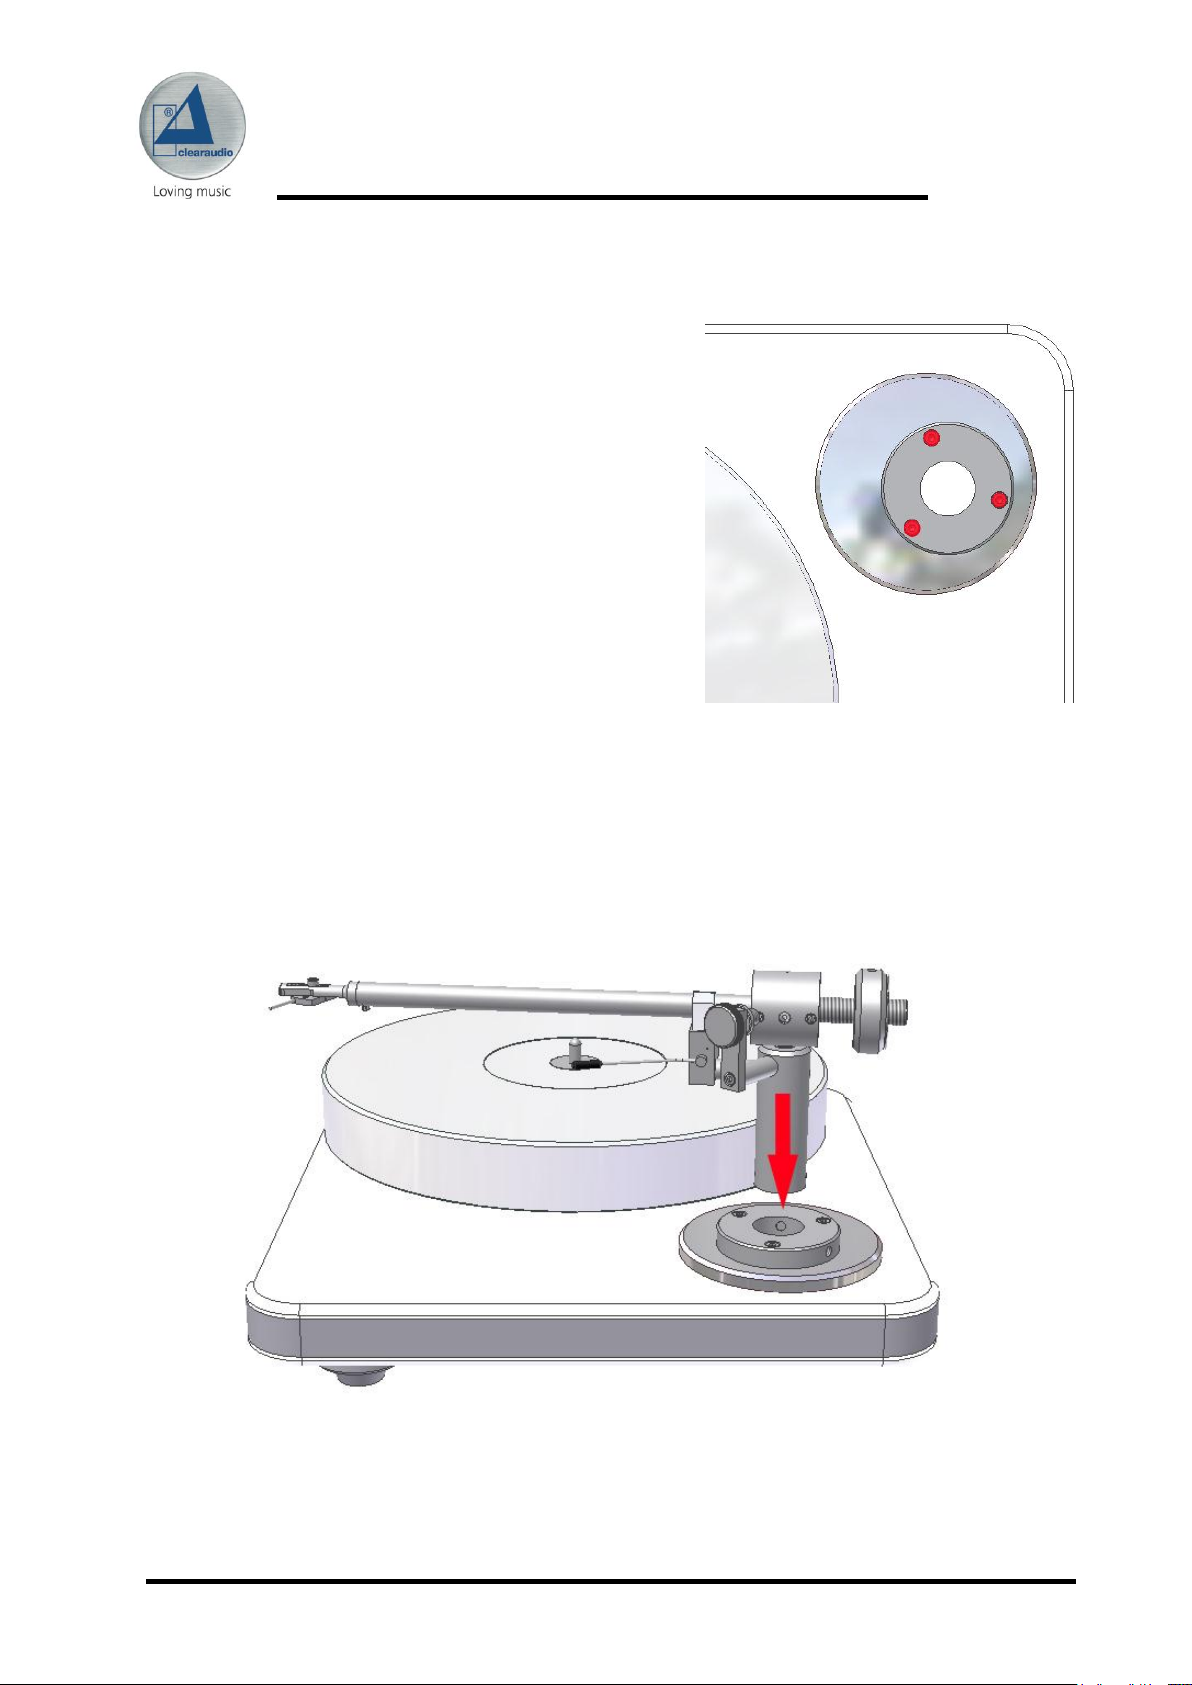
Picture 3: Setting the platter onto
the bearing
Picture 4: Congruence of platter and
bearing
User manual
Place the pre-mounted chassis on your hifi-rack or another suitable base.
Please remove the protective seal from the bearing shaft and place two drops of the
synthetic bearing oil on the ceramic bearing shaft. Slip the bearing top onto the bearing
shaft of the turntable (please remove the safety strip first). Now you can set the platter
carefully onto the bearing. To avoid damages make sure you slide the inverted bearing
slowly and cautiously on the polished ceramic shaft. Hold the platter in one hand while with
the other is securing the bearing top so it can neither slip and nor fall on your turntable.
The marks (dots) on the platter and the top of the bearing have been carefully measured.
Please make sure they align exactly as shown in the picture.
Page 8 clearaudio electronic GmbH 2013
Page 9
Performance SE
Picture 5: Satisfy - tonearm mount
base
Picture 6: Passing the Satisfy – tonearm through the tonearm base
4. Tonearm- and pick-up setting
Satisfy-Tonearm mounting
Please fix the base of the satisfy-tonearm on the basis
on your
short screws (M4x20).
Tighten the screws of the satisfy-tonearm base using
the allen screwdriver enclosed.
Pass the cables of the satisfy-tonearm carefully through the tonearm base.
Please make sure that the cables will not damaged or bent too much.
Performance SE
-turntable chassis using the
User manual
Page 9 clearaudio electronic GmbH 2013
Page 10

Performance SE
1
2
The exact setting of the tonearm requires the installation of the pick-
up/cartridge. Please follow the instructions given by the
pick- up manufacturer !
Colour code key of the satisfy-tonearm cables:
Left channel (L+) white
Left channel (L -) blue
Right channel (R+) red
Right channel (R -) green
Picture 7: Fixing screw (1) for exact adjustment
Picture 8: Fixing screw (2) for exact adjustment
Drilling for the
ground wire
Secure the tonearm only slightly using the fixing screws (marked red in the picture 1 and 2)
so you can still move it for exact adjustment. After adjusting the vertical position you should
tighten the fixing screws to place the tonearm in it’s final position.
The right vertical position of the tonearm depends on the height of the pickup/cartridge.
Therefore the pick-up-cartridge has to be installed next.
When installing the pick-up/cartridge connect the four coloured cables of the tonearm to the
four coloured connection pins of the pick-up/cartridge.
Page 10 clearaudio electronic GmbH 2013
User manual
Page 11

Performance SE
Picture 9: Mounting the cartridge
This position of the diamond correlates to a
tracking force of 20 mN (2.0g).
The tracking force is set, when the Smart
Stylus gauge is parallel to the surface of the
platter.
In this position the tracking force is too high.
You can correct the adjustment with your
tonearm weight.
In this position the tracking force is too low.
You can correct the adjustment with your
tonearm weight.
Picture 10: Use of the Smart Stylus gauge
User manual
Use the enclosed headshell screws (2x M 2,5) to fix the
pick-up/cartridge to the headshell of the tonearm.
For a more comfortable adjustment, please take the delivered “Smart Stylus gauge” and
adjust the tracking force by using the gauge.
Please place the Smart Stylus gauge on the platter and put the cartridge on the fine line
which is marked with the recommend tracking force for your cartridge (e.g. clearaudio MM
cartridge 20 mN (2,0 gram)).
Page 11 clearaudio electronic GmbH 2013
Page 12

Performance SE
Top view
Picture 11: Exact position of the Satisfy-tonearm
User manual
For pre-setting the tracking force, screw the counter weight on to the threaded back of the
tonearm.
Take the tonearm tube from the armrest and support it with one hand while screwing the
counter
weight with the other hand cautiously towards the centre of rotation of the tonearm. When
the tonearm is balanced, the tracking force is should be zero. If you screw the counter
weight four full turns towards
the centre of rotation axle of the tonearm, the tracking force will be about 2g. This means,
one turn is 0.5 g. Now you can continue the installation. The exact and final adjustment will
be done now later.
In order to adjust the correct vertical position of the tone
arm, please place a record on the turntable platter and lower
the pick-up on to the record.
Now you have to find the correct horizontal position of the
tonearm, which should be, that the tonearm tube is parallel
to the record surface.
Alter the vertical position of the tone arm by loosening the
adjusting screws in the base a little, so that tonearm can be
moved up and down. Tighten these screws when you reach
the final horizontal position.
When the screws are tightened the satisfy-tone arm should
be installed on your
as shown in the top view picture.
Performance SE
Page 12 clearaudio electronic GmbH 2013
Page 13

Performance SE
1
2
Picture 12: Cartridge alignment gauge
Picture 13: Adjustment of cartridge
Picture 14: Adjustment of cartridge
User manual
In order to align the cartridge now, push the enclosed template on the turntable spindle as
shown in the picture. The arrow must point to the centre of the rotation axle of the tonearm.
Position the pick-up/cartridge in the aligning area of the template marked by a pattern of
lines.
Page 13 clearaudio electronic GmbH 2013
Page 14

Performance SE
Picture 15: Detail view of cartridge adjustment
Picture 16: Using the level gauge
User manual
The pick-up/cartridge is adjusted correctly, if the
needle points to the reference centre on the
template and the printed lines are parallel to the
sides and front of the pick-up/cartridge. The front
of the pick-up/cartridge system should be parallel to
the printed lines when looked at from above.
When loosening the central screw on the headshell
you can adjust the position of the pick-up/
cartridge. Tighten the screw on the headshell again
to secure the position. Check the position again.
TIP:
For even better and more easy adjustment of the pick-up/cartridge and tonearm we
recommend the clearaudio installation gauge (Art.-Nr. AC 005) .
The following adjustment is very important:
Please make sure that your
turntable is in a leveled position by using the levelgauge.
Should the bubble of the level-gauge not be in the
centre of the black circle, generate the perfect
position by screwing the feet of your
SE
–turntable, while turning them clock or counter
clock wise, till you reach the levelled position.
Only if the turntable is in the ideal position you will
get the best results with your performance.
Now you can set the exact tracking force, use the recommended one, which is provided from
the manufacturer of the pick-up/cartridge.
Put the scales (optional smart stylus gauge) on the surface of the platter and lower the
needle of the pick-up/ cartridge to the number of the tracking weight / force you want. The
tracking force is correctly adjusted if the scale / gauge is exactly in parallel level position to
the surface of the platter when you have lowered the needle onto the gauge.
Performance SE
Performance
-
Page 14 clearaudio electronic GmbH 2013
Page 15

Performance SE
3 x
Picture 17: Changing the tracking force
Picture 18: Adjustment of the 6-cut pulley
Picture 19: Positioning the motor- unit
into the stainless steel
motor stand
Picture 20: Positioning of the motor-unit
User manual
Turning the counter weight forward or backward (green arrow = more tracking
force/backward = less tracking force) you can now set the exact weight of the pick-up
/cartridge.
Now mount the pulley on the motor-unit. Slide the pulley onto the motor axis. Make sure the
distance between the bottom of the pulley and the motor-chassis is about 3 mm. Tighten
the pre-mounted screws with the enclosed screwdriver.
Please use for 230 Volt motor the 6-cut pulley (e.g. Germany, Switzerland …):
Please place first the motor unit into the stainless steel motor stand and
fix it with the two screws on the side of the motor stand.
Place the motor into the cut out on the left of chassis.
Page 15 clearaudio electronic GmbH 2013
Page 16

Performance SE
33 1/3 ++
33 1/3
33 1/3 --
45 ++
45
45 --
Picture 21: Adjustment possibilities for speed changing
Picture 22: 2-cut pulley
User manual
Put the belt around the platter and the pulley. The pulley is equipped with 6 little grooves
fort the belt. Those with a smaller diameter are used for the speed 33 1/3 U/m, those with
the bigger diameter are used for the speed 45 U/m.
The middle groove is used for the exact speed. The upper groove increases the
speed a little bit, the lower groove reduces the speed a little.
Important:
Turn the platter now by hand, to ensure the perfect positioning of the belt around the
platter.
Please use for 110 Volt motors the 2-cut pulley (e.g. USA):
Place the pulley on the motor spindle. The distance between the pulley and the motor
housing should be approx. 1mm. Tighten the little screws inside the pulley with the
aluminium screwdriver provided.
Speed calibration:
Install the drive belt, first around the platter, then around the motor pulley. There are two
diameters on the motor pulley:
smaller for 33 1/3 rpm
larger for 45 rpm
To correctly adjust the belt tension, turn the motor around its axis. Proper tension will be
achieved through eccentric placement of the motor pulley or if you have enough space on
your platform, just change the distance between the motor and the turntable chassis. The
belt tension is correct if the belt can be deflected by approximately ¾inch by a finger.
Page 16 clearaudio electronic GmbH 2013
Page 17

Performance SE
Antiskating: Tracking force: Position of the antiskating-screw:
Minimal antiskating 10-15mN see picture 1
Medium antiskating 15-20mN see picture 2
Maximum antiskating 20mN and more see picture 3
Picture 23 + 24: Loosen the screw to set the azimuth
Picture 25: Antiskating
5. Azimuth-setting
Please note that the azimuth is pre-set exactly. If for any reason the azimuth must be
altered to compensate the geometry of some pick-up/cartridges, follow these steps:
loosen the screw on the bottom side of the tone arm near the headshell. Now you can adjust
the azimuth by turning the headshell gently in the tonearm. When finished, lock the screw
again.
6. Antiskating-setting
Now you can set the antiskating. It must be set in accordance to the tracking force:
picture 1 picture 2 picture 3
(minimal anti-skating) (medium anti-skating) (maximum anti-skating)
The tonearm is adjusted now.
Connect the power cord of the motor platter to the power supply.
Place a record on the turntable and fix it with the Clearaudio clever clamp (enclosed).
Your
Performance SE
We wish you a lot of listening pleasure!
Page 17 clearaudio electronic GmbH 2013
-turntable is completely set up and ready to play.
User manual
Page 18

Performance SE
User manual
7. Service
If any service or repair on all Clearaudio products is necessary, please contact your dealer /
distributor or contact Clearaudio directly. We can inform you as well about your nearest
service location.
Transportation advice:
If any transportation of the
remove the turntable platter. Otherwise serious damage can occur!
The bearing hole needs to be covered as well, to avoid any dust coming into the bearing.
Always take of the pulley of the motor unit as well, to prevent the motor shaft from any
damages.
PLEASE RETAIN ALL ORIGINAL PACKAGING. You will need it if this unit has to be
transported and/or shipped. Any further questions you may have about this turntable should
be directed to the distributor or directly to Clearaudio at
Performance SE
-turntable should be necessary, please always
Clearaudio electronic GmbH
Spardorfer Str. 150
91054 Erlangen
Germany
Tel/Phone: +49 9131 40300100
Fax: +49 9131 40300119
www.clearaudio.de
www.analogshop.de
info@clearaudio.de
Page 18 clearaudio electronic GmbH 2013
Page 19

Performance SE
User manual
8. Special directions
The Clearaudio
If the
Performance SE
from the mains supply.
Every two years you can lubricate (only if you will recognize speed variations) the bearing of
the turntable platter with the supplied oil. In this case it is enough to put 4 or 5 drops of the
oil onto the bearing shaft.
Don’t use aggressive cleaning fluid for the
cleaner in a glass of water is fully enough.
Please dry all cleaned parts with a fine cotton kerchief carefully.
Please use for cleaning the acrylic parts only special acrylic cleaning fluids an under no
circumstances spirit or fluids based on alcohol. (Danger of surface damages!)
You will find suitable cleaning fluids either in specialised shops or in the Clearaudio online
shop: www.analogshop.de .
Please take special caution to any damages of the power cord.
Any damages should only be repaired only by authorized personal.
A damaged power cord must be exchanged immediately!
Performance SE
-turntable is for a longer time not in use, please disconnect the motor
does not require an extensive maintenance.
Performance SE
turntable. A few drops of window
To achieve the full Clearaudio warranty, it is necessary that you fill out and send the
corresponding part of the warranty registration certificate /card back to Clearaudio, within
two weeks after purchase. Only if the product is returned in it’s original packing Clearaudio
can provide the warranty.
Transportation advice:
If any transportation of the
remove the turntable platter. Otherwise serious damage can occur!
The bearing hole needs to be covered as well, to avoid any dust coming into the bearing.
Always take of the pulley of the motor unit as well, to prevent the motor shaft from any
damages.
Performance SE
-turntable should be necessary, please always
Page 19 clearaudio electronic GmbH 2013
Page 20

Performance SE
Construction:
Resonance-optimised chassis, highly
compressed wood with aluminium frame
sandwiched in two aluminium plates
Versions:
Performance SE aluminium silver
Performance SE Aluminium black
Speed ranges:
33 1/3 RPM or 45 RPM
Drive unit (motor):
Decoupled motor-unit, synchronous-motor,
belt-drive
Rumble:
DIN IEC 98 by method A / 92 dB
Bearing:
Patented, Inverted bearing and polished
ceramic axle, incl. CMB-magnetic-bearingtechnology
Platter:
GS-PMMA / acryl, CNC-precision-cut, height
40 mm,
dynamically balanced
Speed variation:
+- 0,1 %
Weight:
approx. 10 kg incl. motor
Dimensions:
In mm approx. 420 mm x 330 mm x 130 mm
in inch approx: 16,54 x 12,99 x 5,12
Warranty*:
5* years
9. Technical data
User manual
* Only if the warranty card is filled out correctly and sent back in time to Clearaudio within 14
days.
Clearaudio electronic is not responsible for typographical errors in descriptions. Technical
specifications subject to change or improvement without prior notice. Availability as long as stock
lasts. Copies and imprints- also only in extracts – require written conformation through Clearaudio
electronic GmbH; Germany Clearaudio electronic GmbH 2012
Page 20 clearaudio electronic GmbH 2013
Version: December 2013
Page 21

Performance SE
User manual
To achieve the full Clearaudio warranty (Performance SE 5 years), it is necessary that you
fill out and send the corresponding part of the warranty registration certificate /card back to
Clearaudio, within two weeks after purchase. Only if the product is returned in it’s original
packing Clearaudio can provide the warranty of 5 years.
ENGLISH
WARRANTY
For warranty information, contact your local Clearaudio distributor.
RETAIN YOUR PURCHASE RECEIPT
Your purchase receipt is your permanent record of a valuable purchase.
It should be kept in a safe place to be referred to as necessary for insurance purposes or when corresponding with Clearaudio.
IMPORTANT
When seeking warranty service, it is the responsibility of the consumer to establish proof and date of purchase. Your purchase receipt or invoice is
adequate for such proof.
FOR U.K. ONLY
This undertaking is in addition to a consumer's statutory rights and does not affect those rights in any way.
FRANÇAIS
GARANTIE
Pour des informations sur la garantie, contacter le distributeur local clearaudio.
CONSERVER L'ATTESTATION D'ACHAT
L'attestation d'achat est la preuve permanente d'un achat de valeur. La conserver en lieu sur pour s'y reporter aux fins d'obtention d'une
couverture d'assurance ou dans le cadre de correspondances avec clearaudio.
IMPORTANT
Pour l'obtention d'un service couvert par la garantie, il incombe au client d'établir la preuve de l'achat et d'en corroborer la date. Le reçu ou la
facture constituent des preuves suffisantes.
DEUTSCH
GARANTIE
Bei Garantiefragen wenden Sie sich bitte zunächst an Ihren clearaudio-Händler.
Heben Sie Ihren Kaufbeleg gut auf.
WICHTIG!
Die Angaben auf Ihrer Quittung erlauben uns die Identifizierung Ihres Gerätes und belegen mit dem Kaufdatum die Dauer Ihrer GarantieAnsprüche.
Für Serviceleistungen benötigen wir stets die Gerätenummer.
Diese finden Sie auf dem Typenschild auf der Rückseite des Gerätes oder auch in der beigefügten Garantie-Registrierkarte.
NEDERLANDS
GARANTIE
Voor inlichtingen omtrent garantie dient u zich tot uw plaatselijke clearaudio.
UW KWITANTIE, KASSABON E.D. BEWAREN
Uw kwitantie, kassabon e.d. vormen uw bewijs van aankoop van een waardevol artikel en dienen op een veilige plaats bewaard te worden voor
evt, verwijzing bijv, in verbend met verzekering of bij correspondentie met clearaudio.
BELANGRIJK
Bij een evt, beroep op de garantie is het de verantwoordelijkheid van de consument een gedateerd bewijs van aankoop te tonen. Uw
kassabon of factuurzijn voldoende bewijs.
ITALIANO
GARANZIA
L’apparecchio è coperto da una garanzia di buon funzionamento della durata di un anno, o del periodo previsto dalla legge, a partire dalla data di
acquisto comprovata da un documento attestante il nominativo del Rivenditore e la data di vendita. La garanzia sarà prestata con la sostituzione o
la riparazione gratuita delle parti difettose.
Non sono coperti da garanzia difetti derivanti da uso improprio, errata installazione, manutenzione effettuata da personale non autorizzato o,
comunque, da circostanze che non possano riferirsi a difetti di funzionamento dell’apparecchio. Sono inoltre esclusi dalla garanzia gli interventi
inerenti l’installazione e l’allacciamento agli impianti di alimentazione.
Gli apparecchi verranno riparati presso i nostri Centri di Assistenza Autorizzati. Le spese ed i rischi di trasporto sono a carico del cliente. La casa
costruttrice declina ogni responsabilità per danni diretti o indiretti provocati dalla inosservanza delle prescrizioni di installazione, uso e
manutenzione dettagliate nel presente manuale o per guasti dovuti ad uso continuato a fini professionali.
ESPAÑOL
GARANTIA
Para obtener información acerca de la garantia póngase en contacto con su distribuidor clearaudio.
GUARDE SU RECIBO DE COMPRA
Su recibo de compra es su prueba permanente de haber adquirido un aparato de valor, Este recibo deberá guardarlo en un lugar seguro y utilizarlo
como referencia cuando tenga que hacer uso del seguro o se ponga en contacto con clearaudio.
IMPORTANTE
Cuando solicite el servicio otorgado por la garantia el usuario tiene la responsabilidad de demonstrar cuándo efectuó la compra. En este caso, su
recibo de compra será la prueba apropiada.
Page 21 clearaudio electronic GmbH 2013
 Loading...