

Page 1
®
ALPHA WASH 300
#
#
)
-!.5!,%æ$)æ)3425:)/.) ).3425#4)/.æ-!.5!,
&
-!.5%,æ$g).3425#4)/.3 "%$)%.5.'3!.,%)45.' -!.5!,æ$%æ).3425##)/.%3
$ %
3/--!)2% ).(!,4æææ ).$)#%ææ
0AGE #ONTENUTOææææ#ONTENTSææææ#ONTENUææææ)NHALTææææ#ONTENIDO
Informazioni di sicurezza - Safety information
2
Informations de sécurité - Informationen über Sicherheit - Información de seguridad
Disimballo e predisposizione - Unpacking and preparation
4
Déballage et préparation - Auspacken und Vorbereiten - Desembalaje y preparación
Installazione e messa in funzione - Installation and start-up
6
Installation et mise en fonction - Installation und Inbetriebnahme - Instalación y puesta en función
Pannello di controllo - Control panel - Panneau de controle
8
Steuerpult - Pannel de control
Impostazione menu - Menu setting - Sélection menu - Einstellung Menü - Programación menú
12
Funzioni canali - Channel functions - Fonction des canaux - Kanalfunktionen - Funcion de los canales
26
Manutenzione - Maintenance - Entretien - Wartung - Mantenimiento
31
Dati Tecnici - Technical data - Données techniques - Technische Daten - Datos técnicos
38
Causa e soluzione dei problemi - Cause and solution of problems - Cause et solution des problèmes
40
Ursachen und Abhilfe bei Betriebsstörungen - Causas y soluciones de problemas
'"
) '"
).$)#% ).$%8
$ %&
Complimenti per aver scelto un prodotto Clay Paky! La ringraziamo per la preferenza e La informiamo che anche questo prodotto, come tutti gli altri della ricca gamma
Clay Paky, è stato progettato e realizzato nel segno della qualità, per garantirLe sempre l’eccellenza delle prestazioni e rispondere meglio alle Sue aspettative ed esigenze.
Leggere attentamente in tutte le sue parti il presente manuale d’istruzioni e conservarlo accuratamente per riferimenti futuri. La conoscenza delle informazioni ed il rispetto
delle prescrizioni contenute in questa pubblicazione sono essenziali per garantire la correttezza e la sicurezza delle operazioni di installazione, uso e manutenzione
)
dell’apparecchio.
CLAY PAKY S.p.A. declina ogni responsabilità per danni all’apparecchio o ad altre cose o persone, derivanti da installazione, uso e manutenzione effettuate non in
conformità con quanto riportato sul presente manuale di istruzioni, che deve sempre accompagnare l’apparecchio.
CLAY PAKY S.p.A. si riserva la facoltà di modificare, in qualunque momento e senza preavviso, le caratteristiche menzionate nel presente manuale di istruzioni.
Congratulations on choosing a Clay Paky product! We thank you for your custom. Please note that this product, as all the others in the rich Clay Paky range, has been
designed and made with total quality to ensure excellent performance and best meet your expectations and requirements.
Carefully read this instruction manual in its entirety and keep it safe for future reference. It is essential to know the information and comply with the instructions given in this
'"
manual to ensure the fitting is installed, used and serviced correctly and safely.
CLAY PAKY S.p.A. disclaims all liability for damage to the fitting or to other property or persons deriving from installation, use and maintenance that have not been carried
out in conformity with this instruction manual, which must always accompany the fitting.
CLAY PAKY S.p.A. reserves the right to modify the characteristics stated in this instruction manual at any time and without prior notice.
Félicitations, vous venez de choisir un produit Clay Paky! Nous vous remercions de votre préférence et vous informons que comme tous les autres produits de la vaste
gamme Clay Paky, ce produit a lui aussi été conçu et réalisé sous le signe de la qualité, afin de vous garantir en toutes occasions l'excellence des performances, et
d'apporter une réponse plus précise à vos attentes et exigences.
Lire attentivement et entièrement le présent manuel d'instructions, et le conserver soigneusement pour toutes références futures. La connaissance des informations et le
&
respect des prescriptions contenues dans la présente publication sont essentiels afin de garantir la correction et la sécurité des opérations d'installation, d'utilisation et
d'entretien de l'appareil.
CLAY PAKY S.p.A. décline toute responsabilité en cas de dommages causés à l'appareil, à des personnes ou à des choses par une installation, une utilisation ou un
entretien n'ayant pas été réalisés conformément aux indications fournies dans le présent manuel d'instructions, qui doit toujours accompagner l'appareil.
CLAY PAKY S.p.A. se réserve la faculté de modifier, à tout moment et sans préavis, les caractéristiques mentionnées dans le présent manuel d'instructions.
Kompliment für Ihre Wahl eines Produkts von Clay Paky! Wir danken Ihnen für das entgegengebrachte Vertrauen und möchten Sie daran erinnern, dass bei der Herstellung
auch dieses Produkts - wie bei allen Produkten des großen Sortiments von Clay Paky - auf erste Qualität Wert gelegt wurde, um Ihnen immer hervorragende Leistungen
garantieren, und Ihre Erwartungen und Anforderungen stets bestens erfüllen zu können.
Lesen Sie diese Bedienungsanleitung bitte vollständig durch und bewahren Sie sie für späteres Nachschlagen sorgfältig auf. Die Kenntnis der darin enthaltenen
$
Informationen und die strikte Befolgung der Anweisungen ist die Voraussetzung für eine korrekte und sichere Installation, Benutzung und Wartung des Geräts.
Die Firma CLAY PAKY S.p.A. lehnt jede Haftung für Schäden an dem Gerät bzw. sonstige Sach- und Personenschäden ab, die durch eine nicht mit den Anweisungen
dieser Bedienungsanleitung konforme Installation, Benutzung und Wartung verursacht werden. Die Bedienungsanleitung muss immer bei dem Gerät bleiben.
Die Firma CLAY PAKY S.p.A. behält sich das Recht vor, die in der vorliegenden Bedienungsanleitung enthaltenen Daten jederzeit und ohne vorherige Benachrichtigung zu
ändern.
Enhorabuena por haber elegido un artículo Clay Paky y gracias por honrarnos con su preferencia. Este producto, como todos los demás de esta marca, ha sido proyectado
y realizado con los más elevados criterios de calidad para garantizarle siempre unas prestaciones excelentes y satisfacer mejor sus expectativas y exigencias.
Lea atentamente todo el manual de instrucciones y guárdelo para futuras consultas. Las informaciones e indicaciones que figuran en esta publicación son esenciales para
%
efectuar de modo correcto y seguro las operaciones de instalación, uso y mantenimiento del aparato.
CLAY PAKY S.p.A. declina toda responsabilidad ante daños sufridos por el proyector, por personas u objetos, que puedan atribuirse a operaciones de instalación, uso o
mantenimiento no conformes a lo indicado en este manual, el cual debe guardarse siempre junto con el aparato.
CLAY PAKY S.p.A. se reserva el derecho de modificar, en cualquier momento y sin aviso previo, las características mencionadas en el presente manual de instrucciones.
1
Page 2
).&/2-!:)/.)æ$)æ3)#52%::! 3!&%49æ).&/2-!4)/.
) '"
7
2
ta 35°C
IP20
tc 120°C
sæ)NSTALLAZIONE
Assicurarsi che tutte le parti per il fissaggio del proiettore siano
in buona condizione.
Assicurarsi della stabilità del punto di ancoraggio prima di
posizionare il proiettore.
La fune di sicurezza, debitamente agganciata all’apparecchio e
fissata alla struttura di sostegno, deve essere installata in modo
che, in caso di cedimento del sistema di supporto primario, si
abbia la minor caduta possibile dell’apparecchio. Dopo un
eventuale intervento la fune di sicurezza deve essere sostituita
con il ricambio originale.
sæ$ISTANZAæMINIMAæDEGLIæOGGETTIæILLUMINATI
Il proiettore deve essere posizionato in modo tale che gli oggetti
colpiti dal fascio luminoso siano distanti almeno 2 metri
dall’obiettivo del proiettore stesso.
sæ$ISTANZAæMINIMAæDEIæMATERIALIæINFIAMMABILI
Il proiettore deve essere posizionato in modo tale che i materiali
infiammabili siano distanti almeno 0,20 metri da ogni punto
della superficie dell’apparecchio.
sæ3UPERFICIEæDIæMONTAGGIO
È consentito il montaggio dell’apparecchio su superfici
normalmente infiammabili.
sæ-ASSIMAæTEMPERATURAæAMBIENTE
Per un migliore e affidabile funzionamento dell’apparecchio, la
temperatura ambiente non deve superare i 35° C.
sæ'RADOæDIæPROTEZIONEæ)0
L’apparecchio è protetto contro la penetrazione di corpi solidi di
dimensione superiore a 12mm (prima cifra 2), mentre teme lo
stillicidio, la pioggia, gli spruzzi e i getti d’acqua (seconda cifra 0).
sæ0ROTEZIONEæCONTROæLAæSCOSSAæELETTRICA
È obbligatorio effettuare il collegamento ad un impianto di
alimentazione dotato di un’efficiente messa a terra
(apparecchio di #LASSEæ) secondo la norma EN 60598-1).
Si raccomanda, inoltre, di proteggere le linee di alimentazione
dei proiettori dai contatti indiretti e/o cortocircuiti verso massa
tramite l’uso di interruttori differenziali opportunamente
dimensionati.
sæ#OLLEGAMENTOæALLAæRETEæDIæALIMENTAZIONE
Le operazioni di collegamento alla rete di distribuzione
dell’energia elettrica devono essere effettuate da un installatore
elettrico qualificato.
Verificare che frequenza e tensione della rete corrispondano
alla frequenza ed alla tensione per cui il proiettore è
predisposto ed indicate sulla targhetta dei dati elettrici.
Sulla medesima targhetta è pure indicata la potenza assorbita.
Fare riferimento a quest’ultima per valutare il numero massimo
di apparecchi da collegare alla linea elettrica, al fine di evitare
sovraccarichi.
sæ4EMPERATURAæDELLAæSUPERFICIEæESTERNA
La temperatura massima raggiungibile sulla superficie esterna
dell’apparecchio, in condizioni di regime termico, è di 120°C.
sæ-ANUTENZIONE
Prima di iniziare qualsiasi operazione di manutenzione o pulizia
sul proiettore togliere la tensione dalla rete di alimentazione.
Dopo lo spegnimento non rimuovere alcuna parte dell’apparecchio per 10 minuti. Trascorso tale tempo la probabilità di
esplosione della lampada è praticamente nulla. Se è necessario
sostituire la lampada, aspettare ulteriori 15 minuti per evitare
scottature.
L’apparecchio è progettato in modo da trattenere le schegge
prodotte dall’eventuale scoppio della lampada. Le lenti devono
essere obbligatoriamente montate; devono inoltre, se
visibilmente danneggiate, essere sostituite con ricambi originali.
sæ
)NSTALLATION
Make sure all parts for fixing the projector are in a good
state of repair.
Make sure the point of anchorage is stable before
positioning the projector.
The safety chain must be properly hooked onto the fitting
and secured to the framework, so that, if the primary
support system fails, the fitting falls as little as possible.
If the safety chain gets used, it needs to be replaced with a
genuine spare.
sæ
-INIMUMæDISTANCEæOFæILLUMINATEDæOBJECTS
The projector needs to be positioned so that the objects hit
by the beam of light are at least 2 metres (6’ 7”) from the
lens of the projector.
sæ-INIMUMæDISTANCEæFROMæFLAMMABLEæMATERIALS
The projector must be positioned so that any flammable
materials are at least 0.20 metres (8") from every point on the
surface of the fitting.
sæ-OUNTINGæSURFACES
It is permissible to mount the fitting on normally flammable
surfaces.
sæ-AXIMUMæAMBIENTæTEMPERATURE
For the fitting to operate well and reliably, the ambient
temperature should not exceed 35°C (95°F).
sæ)0æPROTECTIONæRATING
The fitting is protected against penetration by solid bodies of
over 12mm (0.47”) in diameter (first digit 2), but not against
dripping water, rain, splashes or jets of water (second digit 0).
sæ0ROTECTIONæAGAINSTæELECTRICALæSHOCK
Connection must be made to a power supply system fitted with
efficient earthing (#LASSæ) appliance according to standard
EN 60598-1).
It is, moreover, recommended to protect the supply lines of the
projectors from indirect contact and/or shorting to earth by
using appropriately sized residual current devices.
sæ(OOKINGæUPæTOæTHEæSUPPLYæMAINS
Connection to the electricity mains must be carried out by a
qualified electrical installer.
Check that the mains frequency and voltage correspond to
those for which the projector is designed as given on the
electrical data label.
This label also gives the input power to which you need to refer
to evaluate the maximum number of fittings to connect to the
electricity line, in order to avoid overloading.
sæ4EMPERATUREæOFæTHEæEXTERNALæSURFACE
The maximum temperature that can be reached on the external
surface of the fitting, in a thermally steady state, is 120°C
(248°F).
sæ-AINTENANCE
Before starting any maintenance work or cleaning the projector,
cut off power from the mains supply.
After switching off, do not remove any parts of the fitting for at
least 10 minutes. After this time the likelihood of the lamp
exploding is virtually nill. If it is necessary to replace the lamp,
wait for another 15 minutes to avoid getting burnt.
The fitting is designed to hold in any splinters produced by a
lamp exploding. The lenses must be mounted and, if visibly
damaged, they have to be replaced with genuine spares.
ALPHA WASH 300
Pb
sæ,AMPADA
L’apparecchio monta una lampada ad alta pressione che richiede un
accenditore esterno. Tale accenditore è incorporato nell’apparecchio.
- Leggere attentamente le “istruzioni d’uso” fornite dal
costruttore della lampada.
- Sostituire immediatamente la lampada se danneggiata o
deformata dal calore.
sæ"ATTERIA
Questo prodotto contiene una batteria ricaricabile piomboacido. A tutela dell'ambiente si prega di smaltire la batteria a
fine vita in conformità alla normativa vigente. Le istruzioni sulla
modalità con cui rimuovere la batteria dell'apparecchio sono
disponibili su WWWCLAYPAKYIT
I prodotti a cui questo manuale si riferisce sono conformi
alle Direttive Europee di cui sono oggetto:
• 2006/95/CE - Sicurezza delle apparecchiature alimentate
in Bassa Tensione (LVD)
• 2004/108/CE - Compatibilità Elettromagnetica (EMC)
• 2011/65/UE - Restrizione d’uso di determinate sostanze
pericolose (RoHS)
sæ,AMP
The fitting mounts a high-pressure lamp that needs an external
igniter. This igniter is fitted onto the apparatus.
- Carefully read the "operating instructions" provided by the
lamp manufacturer.
- Immediately replace the lamp if damaged or deformed by
heat.
sæ"ATTERY
This product contains a rechargeable lead-acid battery. To
preserve the environment, please dispose the battery at the
end of its life according to the regulation in force. Instructions
on how to remove the battery from the product are available
on WWWCLAYPAKYIT
The products to which this manual refers comply with the
European Directives pursuant to:
• 2006/95/EC - Safety of electrical equipment supplied at
low voltage (LVD)
• 2004/108/EC - Electromagnetic Compatibility (EMC)
• 2011/65/EU - Restriction of the use of certain hazardous
substances (RoHS)
2
Page 3

).&/2-!4)/.%.æ:52æ3)#(%2(%)4 ).&/2-!#)/.%3æ$%æ3%'52)$!$).&/2-!4)/.3æ$%æ3%#52)4%
$ %&
sæ)NSTALLATION
S'assurer que tous les éléments concernés par la fixation du
projecteur sont en bon état.
Avant d'installer le projecteur, s'assurer de la stabilité du point
d'ancrage.
Le câble de sécurité, dûment fixé à l'appareil et à la structure
de soutien, doit être installé de façon à limiter au maximum la
chute de l'appareil si le système de support principal devait
céder. Après tout incident éventuel, remplacer le câble de
sécurité en utilisant une pièce d'origine.
sæ$ISTANCEæMINIMUMæDESæOBJETSæ£CLAIR£S
Installer le projecteur de façon à ce que son objectif se trouve à
au moins 2 des objets que devra atteindre le faisceau lumineux.
sæ$ISTANCEæMINIMUMæDESæMAT£RIAUXæINFLAMMABLES
Installer le projecteur de façon à ce que les matériaux
inflammables se trouvent à une distance d'au moins 0,20 par
rapport à un point quelconque de la surface de l'appareil.
sæ3URFACEæDEæMONTAGE
Il est permis de monter l'appareil sur des surfaces normalement
inflammables.
sæ4EMP£RATUREæAMBIANTEæMAXIMALE
Pour assurer le fonctionnement et la fiabilité de l'appareil, la
température ambiante ne doit pas dépasser 35°C.
sæ$EGR£æDEæPROTECTIONæ)0
L'appareil est protégé contre la pénétration de corps solides de
plus de 12 mm de diamètre (premier chiffre 2), il craint en
revanche les suintements, la pluie, les éclaboussures et les jets
d'eau (deuxième chiffre 0).
sææ0ROTECTIONæCONTREæLESæD£CHARGESææ£LECTRIQUES
Il est obligatoire d’effectuer le branchement à une installation
d’alimentation équipée d’une mise à la terre efficace (appareil
de #LASSEæ), conformément à la norme EN 60598-1).
De plus, il est recommandé de protéger les lignes
d’alimentation des projecteurs contre les contacts indirects
et/ou les courts-circuits vers la masse au moyen de
disjoncteurs différentiels correctement dimensionnés.
sæ"RANCHEMENTæAUæR£SEAUæDgALIMENTATION
Les opérations de branchement au réseau de distribution de
l'énergie électrique doivent être effectuées par un installateur
électricien qualifié.
Vérifier que la fréquence et la tension du réseau correspondent à
la fréquence et à la tension pour lesquelles le projecteur est prévu
et qui sont indiquées sur la plaquette des données électriques.
Cette même plaquette reporte également la puissance
absorbée. Faire référence à cette indication pour évaluer le
nombre maximum d'appareils à brancher sur la ligne électrique,
afin d'éviter les surcharges.
sæ4EMP£RATUREæDEæLAæSURFACEæEXTERNE
La température maximale de la surface externe de l'appareil,
en conditions de régime thermique, est de 120°C.
sæ%NTRETIEN
Avant toute opération d'entretien ou de nettoyage sur le
projecteur, couper la tension du réseau.
Après avoir éteint le projecteur, ne démonter aucun élément de
l'appareil pendant les 10 minutes qui suivent. Au-delà de ce laps
de temps, la probabilité d'explosion de la lampe est pratiquement
nulle. S'il s'avère nécessaire de remplacer la lampe, attendre
encore 15 minutes pour éviter tout risque de brûlures.
L'appareil a été conçu de façon à retenir les éclats produits en
cas d'explosion de l'ampoule. Les lentilles doivent
obligatoirement être montées sur l'appareil et doivent être
remplacées par des pièces d'origine dès qu'elles sont
visiblement endommagées.
sæ,AMPE
L'appareil fonctionne avec une lampe haute pression avec
allumeur externe. Ce dernier est incorporé dans l’appareil.
- Lire attentivement les "instructions d'utilisation" fournies par
le fabricant de la lampe.
- Remplacer la lampe dès qu'elle est endommagée ou
déformée par la chaleur.
sæ"ATTERIE
Ce produit contient une batterie rechargeable au plombacide. Une fois la batterie arrivée à la fin de sa durée de vie,
procéder à son élimination conformément à la norme en
vigueur de manière à éviter toute pollution. Les instructions
pour le retrait de la batterie de l’appareil sont disponibles
sur WWWCLAYPAKYIT
sæ)NSTALLATION
Sicherstellen, dass alle Teile für die Befestigung des Projektors
in einwandfreiem Zustand sind.
Vor der Installation des Projektors die Stabilität der
Verankerungsstelle überprüfen.
Das korrekt am Gerät eingehakte und an der Haltestruktur
befestigte Fangseil muss so installiert werden, dass bei einem
Nachgeben der Haupthalterung die Fallhöhe des Gerätes so
gering wie möglich ist. Nach einem eventuellen Einsatz muss
das Sicherheitsseil durch ein Originalersatzteil ersetzt werden.
sæ-INDESTABSTANDæZUæBELEUCHTETENæ/BJEKTEN
Der Projektor muss so installiert werden dass der Abstand
zwischen den vom Lichtstrahl beleuchteten Objekten und dem
Objektiv des Projektors mindestens 2 Meter beträgt.
sæ-INDESTABSTANDæZUæENTZÔNDBARENæ-ATERIALIEN
Der Projektor muss so installiert werden, dass entzündbare
Materialien mindestens 0,20 Meter von jedem Punkt der
Geräteoberfläche entfernt sind.
sæ-ONTAGEOBERFLÜCHE
Die Montage des Geräts auf normal entzündbaren Oberflächen
ist zulässig.
sæ-AXæ2AUMTEMPERATUR
Für einen optimalen und zuverlässigen Betrieb des Geräts darf
die Raumtemperatur 35°C nicht überschreiten.
sæ3CHUTZKLASSEæ)0
Das Gerät ist gegen das Eindringen von festen Fremdkörpern
mit Durchmesser über 12 mm (erste Kennziffer 2) geschützt,
während es gegen Tropf,- Regen- und Spritzwasser sowie
Wasserstrahlen (zweite Kennziffer 0) empfindlich ist.
sææ3CHUTZæGEGENæ3TROMSCHLAG
Es ist Pflicht, das Gerät an eine Stromversorgungsanlage
anzuschließen, die mit einer leistungsfähigen Erdung ausgestattet
ist (Gerät der +LASSEæ) gemäß Richtlinie EN 60598-1).
Darüber hinaus wird empfohlen, die Zuleitungen der
Projektoren mit korrekt bemessenen Fehlerstromschutzschaltern
vor indirekten Kontakten und/oder Erdschlüssen zu schützen
sæ.ETZANSCHLUSS
Der Anschluss an das Stromnetz muss von einem kompetenten
Elektroinstallateur ausgeführt werden.
Vergewissern Sie sich, dass Spannung und Frequenz der
Netzversorgung mit den Werten übereinstimmen, für die der
Projektor ausgelegt ist, und die auf dem Typenschild
angegeben sind.
Ebenfalls auf dem Typenschild ist die Leistungsaufnahme
angegeben. Um zu beurteilen, wie viele Geräte maximal an die
Stromleitung angeschlossen werden können, ist auf diese
Angaben Bezug zu nehmen, um Überlastungen zu vermeiden.
sæ4EMPERATURæDERæ!UENFLÜCHE
Die Außenfläche des Geräts kann im Wärmebetrieb eine
Höchsttemperatur von 120°C erreichen.
sæ7ARTUNG
Vor Beginn von Wartungs- oder Reinigungsarbeiten am
Projektor stets die Stromversorgung abschalten.
Nach dem Abschalten 10 Minuten lang keine Geräteteile
abnehmen. Nach Ablauf dieser Zeit besteht praktisch keine
Gefahr mehr, dass die Lampe birst. Falls die Lampe ersetzt
werden muss, weitere 15 Minuten warten, um
Verbrennungsgefahr zu vermeiden.
Das Gerät wurde so konzipiert, dass es die Splitter bei einem
eventuellen Bersten der Lampe zurückhält. Die Montage der
Linsen ist obligatorisch vorgeschrieben; des Weiteren müssen
sie bei sichtbarer Beschädigung durch Originalersatzteile
ersetzt werden.
sæ,AMPE
Das Gerät ist mit einer Hochdrucklampe bestückt, die eine externe
Zündeinheit verlangt. Diese Zündeinheit ist in das Gerät eingebaut.
- Lesen Sie die vom Lampenhersteller gelieferte
"Bedienungsanleitung" aufmerksam durch.
- Eine beschädigte oder von der Hitze verformte Lampe muss
sofort ersetzt werden.
sæ"ATTERIE
Dieses Produkt enthält eine wiederaufladbare Blei-SäureBatterie. Zum Schutz der Umwelt bitten wir Sie, diese
Batterie, nachdem sie verbraucht ist, gemäß den geltenden
Vorschriften zu entsorgen. Die Anleitungen, wie die Batterie
aus dem Gerät zu nehmen ist, finden Sie auf
WWWCLAYPAKYIT
sæ)NSTALACIN
Controle que todos los elementos de fijación del proyector
estén en buenas condiciones.
Compruebe la estabilidad del punto de anclaje antes de instalar
el proyector.
La cuerda de seguridad, correctamente enganchada al aparato
y fijada a la estructura de soporte, debe colocarse de modo
que, si el soporte principal cede, el aparato sufra la menor
caída posible. En caso de desgaste de la cuerda de seguridad,
sustitúyala con el recambio original.
sæ$ISTANCIAæM¤NIMAæDEæLOSæOBJETOSæILUMINADOS
El proyector debe ubicarse de modo tal que ningún punto de su
superficie quede a menos de 2 metros del objetivo.
sæ$ISTANCIAæM¤NIMAæDEæMATERIALESæINFLAMABLES
El proyector debe ubicarse de manera que ningún punto de su
superficie quede a menos de 0,20 metros de cualquier material
inflamable.
sæ3UPERFICIEæDEæMONTAJE
El aparato puede montarse sobre superficies normalmente
inflamables.
sæ4EMPERATURAæAMBIENTEæM×XIMA
Para asegurar un funcionamiento óptimo y fiable del aparato, la
temperatura ambiente no debe superar los 35°C.
sæ'RADOæDEæPROTECCINæ)0
El aparato está protegido contra la penetración de objetos
sólidos de dimensiones superiores a 12mm (primer dígito "2"),
mientras que debe ser resguardado de goteo, lluvia,
salpicaduras y chorros de agua (segundo dígito "0").
sææ0ROTECCINæCONTRAæDESCARGASæEL£CTRICAS
Es obligatorio efectuar la conexión a una instalación eléctrica
dotada de eficiente puesta a tierra (aparato de Clase I según la
norma EN 60598-1).
Además es aconsejable proteger las líneas de alimentación de
los proyectores contra contactos indirectos y cortocircuitos
.
hacia masa, mediante el uso de interruptores diferenciales
correctamente dimensionados.
sæ#ONEXINæAæLAæREDæDEæALIMENTACIN
El conexionado a la red de distribución de la energía eléctrica
debe ser efectuado por un instalador electricista cualificado.
Constate que los valores de frecuencia y tensión de la red sean
iguales a los que figuran en la etiqueta de datos eléctricos del
proyector.
En la misma etiqueta se indica la potencia absorbida. Tenga en
cuenta este dato para calcular el número máximo de aparatos
que puede conectar a la línea sin provocar sobrecargas.
sæ4EMPERATURAæDEæLAæSUPERFICIEæEXTERIOR
La temperatura máxima que puede alcanzar la superficie
exterior del aparato, en condiciones de régimen térmico, es de
120° C.
sæ-ANTENIMIENTO
Antes de comenzar cualquier operación de mantenimiento o
limpieza, desconecte el aparato de la alimentación eléctrica.
Después del apagado, no quite ninguna parte del aparato
durante 10 minutos. Transcurrido dicho tiempo, la probabilidad
de que la lámpara explote es prácticamente nula. Si debe
sustituir la lámpara, espere 15 minutos más para evitar
quemarse.
El aparato está diseñado de manera tal que retenga las astillas
producidas por un eventual estallido de la lámpara. Las lentes
deben montarse obligatoriamente; además, si están
visiblemente dañadas se las debe sustituir utilizando recambios
originales.
sæ,×MPARA
El aparato utiliza una lámpara de alta presión que requiere un
arrancador externo, incorporado en el aparato.
- Lea atentamente las instrucciones suministradas por el
fabricante de la lámpara.
- Sustituya inmediatamente la lámpara si está dañada o
deformada por el calor.
sæ"ATER¤A
Este producto contiene una batería recargable plomo-ácido. Para
proteger el ambiente se ruega eliminar la batería conforme a la
normativa vigente. Las instrucciones sobre la modalidad con la
que eliminar la batería del aparato están disponibles en
WWWCLAYPAKYIT
Les produits auxquels ce manuel se rapporte sont
conformes aux Directives Européennes dont ils font l’objet :
• 2006/95/CE - Sécurité des matériels électriques de
Basse Tension (BT)
• 2004/108/CE - Compatibilité Électromagnétique (CEM)
• 2011/65/UE - Limitation de l’utilisation de certaines
substances dangereuses (RoHS)
ALPHA WASH 300
Die Produkte, auf die dieses Handbuch sich bezieht,
entsprechen den Europäischen Richtlinien, denen sie
unterliegen:
• 2006/95/EG - Niederspannungsrichtlinie (LVD)
• 2004/108/EG - Elektromagnetische Kompatibilität (EMC)
• 2011/65/EU - Beschränkung der Verwendung bestimmter
gefährlicher Stoffe (RoHS)
3
Los productos a los que se refiere este manual son conformes
a las Directivas Europeas de las cuales son objeto:
• 2006/95/CE - Seguridad de los equipos alimenticios de
Baja Tensión (LVD)
• 2004/108/CE - Compatibilidad Electromagnética (EMC)
• 2011/65/UE - Restricción del uso de determinadas
sustancias peligrosas (RoHS)
Page 4

) '"
A
L
PHA
WA
S
H
3
0
0
C
6
1
0
9
2
C
6
1
0
9
4
1
I
G
B
D
E
F
C
o
m
p
l
i
m
e
n
t
i
p
er
av
e
r
s
c
e
l
t
o
u
n
p
r
o
d
ot
t
o
C
l
a
y
P
a
k
y
!
L
a
r
i
n
g
r
a
z
i
a
m
o
p
e
r
l
a
p
re
f
e
r
e
n
z
a
e
L
a
i
n
f
o
rm
i
a
m
o
c
he
an
c
he
q
u
e
s
t
o
pr
o
d
o
t
t
o,
c
om
e
t
u
t
ti
g
l
i
a
l
tr
i
d
el
l
a
r
ic
c
a g
a
m
m
a
C
l
a
y
P
a
k
y
,
è
s
t
a
to
p
r
o
g
e
t
t
a
t
o
e
r
e
a
l
i
z
z
a
t
o
n
e
l
s
e
gn
o
d
e
l
l
a
q
u
a
l
i
t
à
,
p
e
r
g
a
r
a
n
t
i
r
L
e
s
e
mpr
e
l
’
e
c
c
e
l
l
e
n
z
a
d
e
l
l
e
pr
e
s
t
a
zi
o
ni
e
ri
s
p
o
n
d
e
r
e
m
e
g
l
i
o
a
l
l
e
S
u
e
a
s
p
e
t
t
a
ti
v
e
e
d
e
s
i
g
e
n
z
e.
L
e
gg
er
e
a
t
t
en
t
am
e
n
t
e
i
n
t
u
t
t
e
l
e
s
u
e
p
a
r
t
i
i
l
p
r
e
s
e
n
t
e
m
a
n
u
a
l
e
d
’
i
s
t
r
u
z
i
on
i
e
c
o
ns
e
r
v
a
r
l
o
a
c
c
u
r
a
t
am
e
n
t
e
p
e
r
r
i
f
e
r
i
m
e
n
t
i
f
u
t
u
r
i.
La
c
o
n
o
s
c
e
n
z
a
del
l
e
i
n
f
o
r
m
a
z
io
n
i
e
d
i
l
r
i
s
p
et
t
o
d
e
l
l
e
p
r
e
s
c
r
i
z
i
o
n
i
c
o
n
t
e
n
u
t
e
i
n
q
u
e
s
t
a
p
u
b
b
l
i
c
a
z
i
o
n
e
s
o
n
o
e
s
s
e
n
z
i
a
l
i
p
e
r
g
a
r
a
n
t
i
r
e
la
c
o
r
r
e
t
t
e
z
z
a
e
l
a
s
i
c
u
r
e
z
z
a
d
e
l
l
e
o
p
e
r
a
z
i
o
n
i
d
i
in
s
t
a
l
l
a
z
i
o
n
e
,
u
s
o
e
m
a
n
u
t
e
n
z
i
o
n
e
d
e
l
l
’
a
pp
a
re
c
c
h
i
o.
C
L
A
Y
P
A
K
Y
S
.p
.
A
.
d
e
c
l
i
n
a
o
gn
i
r
e
s
p
o
n
s
a
b
i
l
i
t
à
p
e
r
d
a
n
n
i
a
l
l
’ap
p
a
rec
c
h
i
o
o
a
d
a
l
t
r
e
c
o
s
e
o
p
e
r
s
o
n
e
,
d
e
r
i
v
a
n
t
i
d
a
i
n
s
t
al
l
a
z
i
o
n
e
,
u
s
o
e
m
a
n
u
t
e
nz
i
o
ne
e
f
f
e
t
t
u
a
t
e
n
o
n
i
n
c
o
n
f
o
r
mi
t
à
c
on
q
u
an
t
o
r
i
p
o
r
ta
t
o
s
u
l
p
r
e
s
e
n
t
e
m
a
n
u
a
l
e
d
i
i
s
t
r
u
z
i
o
ni
,
c
h
e
d
e
v
e
s
e
m
pr
e
a
c
c
o
m
pa
g
n
a
r
e
l
’
a
p
par
e
c
c
h
i
o
.
C
LA
Y
PA
K
Y
S
.
p
.
A
.
s
i
r
is
er
v
a
l
a
f
a
c
ol
t
à
d
i
m
o
d
if
i
c
a
r
e,
i
n
qua
l
u
n
q
u
e
m
om
e
n
t
o
e
s
en
z
a
pr
e
a
v
v
i
s
o
,
le
c
a
r
a
t
t
e
r
is
t
i
c
h
e
m
e
n
z
i
o
n
a
t
e
n
e
l
p
r
e
s
e
nt
e
m
a
n
u
a
l
e
d
i
i
s
t
r
u
z
i
o
n
i.
C
o
n
g
r
a
t
u
l
a
t
i
on
s
o
n
c
h
oo
s
i
ng
a
C
l
ay
P
ak
y
p
r
o
d
u
c
t
!
W
e
t
h
a
n
k
y
o
u
f
or
y
ou
r
c
u
s
t
om
.
P
l
e
a
s
e
n
o
t
e
t
h
a
t
t
h
i
s
pr
o
d
u
c
t
,
a
s
a
l
l
t
h
e
o
t
h
e
r
s
i
n
t
h
e
ri
c
h
Cl
a
y
Pa
k
y
r
a
n
g
e
,
h
as
b
e
e
n
d
e
s
i
g
n
e
d
a
n
d
m
a
d
e
w
i
t
h
to
t
a
l
q
u
a
l
i
t
y
t
o
e
n
s
u
r
e
e
x
c
e
l
l
e
n
t
p
e
r
f
o
r
m
a
n
c
e
a
n
d
b
e
s
t
m
e
e
t
y
o
u
r
e
x
p
e
c
t
at
io
n
s
a
n
d
r
e
q
u
ir
em
e
n
t
s
.
Ca
r
ef
u
l
l
y
r
e
a
d
t
h
i
s
i
n
s
t
r
u
c
t
i
on
m
a
n
u
a
l
i
n
it
s
e
n
t
i
r
e
t
y
a
nd
k
e
e
p
i
t
s
a
f
e
f
or
f
u
t
u
r
e
re
f
e
r
en
c
e
.
It
is
e
s
s
e
n
t
i
a
l
t
o
kn
o
w
t
h
e
i
n
f
o
r
mat
i
o
n
a
n
d c
o
m
p
l
y
w
i
t
h
t
he
i
n
s
t
r
u
c
t
i
o
ns
g
i
v
e
n
i
n
t
h
is
m
a
n
u
al
to
e
n
s
u
r
e
t
h
e
f
i
t
t
i
n
g
i
s
i
n
s
t
al
l
ed
,
u
s
e
d
a
n
d
s
e
r
v
i
c
e
d
c
o
rr
e
c
tl
y
a
n
d
s
a
f
e
ly
.
C
L
A
Y
P
A
K
Y
S
.
p
.
A
.
d
i
s
c
l
a
i
m
s
a
l
l
l
i
a
b
i
lit
y
fo
r
d
a
m
a
g
e
t
o
t
h
e
f
i
t
t
i
n
g o
r
t
o
o
t
h
e
r
p
r
o
pe
r
t
y
o
r
p
er
s
o
n
s
d
e
r
i
v
i
n
g
f
r
o
m i
n
s
t
a
l
l
a
t
i
o
n
,
u
s
e
a
nd
m
a
i
n
t
e
na
nc
e
t
h
a
t
ha
v
e
n
o
t
b
e
e
n
c
a
r
r
i
e
d
o
u
t
i
n
c
o
n
f
o
r
m
i
t
y
w
i
t
h
t
h
i
s
i
n
s
t
r
u
c
t
i
o
n
m
a
n
ua
l
,
w
h
i
c
h
m
u
s
t
a
l
w
a
y
s
ac
c
om
p
a
n
y
t
h
e
f
it
t
i
n
g.
C
L
A
Y
P
A
K
Y
S
.
p.
A
.
r
e
s
e
r
v
es
t
h
e
r
i
g
h
t
t
o
m
o
di
f
y
t
h
e
c
h
a
r
ac
t
e
r
i
s
ti
c
s
s
t
a
t
e
d
i
n
t
h
i
s
i
n
s
t
r
u
c
t
i
on
m
a
n
ua
l
a
t
a
n
y
t
i
m
e
a
n
d
w
i
t
h
o
u
t
p
ri
o
r
n
o
t
i
c
e
.
F
é
l
i
c
i
t
a
t
i
o
n
s
,
v
o
u
s
v
e
n
e
z
d
e
c
h
o
i
si
r
u
n
p
r
o
d
u
i
t
C
l
a
y
P
a
k
y
!
N
o
us
v
o
u
s
r
eme
r
c
i
o
n
s
d
e
v
o
t
r
e
p
r
é
f
é
r
e
n
c
e
e
t
v
o
u
s
i
nf
o
r
m
o
ns
q
u
e
c
o
m
m
e
t
ou
s
l
es
a
u
t
r
e
s
p
r
o
d
u
it
s
d
e
la
v
a
s
t
e
g
am
m
e
C
l
a
y
P
ak
y
,
c
e
p
r
o
d
u
i
t
a
l
u
i
a
u
s
s
i
é
t
é
c
o
n
ç
u
e
t
r
é
a
l
i
s
é
s
ou
s
l
e
s
i
g
n
e
de
l
a
qua
l
i
t
é
,
a
f
i
n
d
e
v
o
u
s
g
a
r
a
n
t
i
r
e
n
t
o
u
t
e
s
o
c
c
a
s
i
o
n
s
l
'
e
x
c
e
l
l
e
n
c
e
d
e
s
p
er
f
o
r
m
a
n
c
e
s
,
e
t
d
'
a
p
p
o
r
t
e
r
u
n
e
r
é
p
o
ns
e
pl
u
s
p
ré
c
i
s
e
à
v
o
s
a
t
t
e
n
t
es
et
e
x
i
g
e
n
c
e
s
.
L
i
r
e
a
t
t
e
nt
i
v
e
me
n
t
e
t
e
n
t
i
è
r
e
m
e
n
t
l
e
p
r
é
s
e
nt
m
an
u
e
l
d
'
i
n
s
t
r
u
c
t
i
o
n
s
,
e
t
l
e
c
o
n
s
e
r
v
e
r
s
o
i
gn
e
u
s
e
m
e
n
t
p
our
t
ou
t
e
s
r
é
f
ér
e
n
c
e
s
f
u
t
u
r
es
.
L
a
c
o
n
n
a
i
s
s
a
n
c
e
d
es
i
n
f
o
r
m
a
t
i
o
n
s
e
t
l
e
r
e
s
p
e
c
t
d
es
p
r
e
s
c
r
i
p
t
i
on
s
c
on
t
e
n
u
e
s
d
an
s
l
a
pr
é
s
e
n
t
e
pu
b
lic
a
t
i
o
n
s
ont
e
s
s
en
ti
e
ls
a
f
i
n
d
e
g
a
r
an
t
i
r
l
a
c
o
r
r
e
c
t
i
o
n e
t
l
a
s
é
c
ur
i
t
é
d
e
s
o
pé
r
a
t
i
o
n
s
d
'
i
n
s
t
a
l
l
a
t
i
o
n,
d
'
u
t
i
l
i
s
a
t
i
o
n
e
t
d'
e
nt
r
e
t
i
en
d
e
l
'
a
p
p
a
r
e
i
l
.
C
L
A
Y
P
A
K
Y
S
.
p
.
A
.
dé
c
l
i
n
e
t
o
u
t
e
re
s
p
o
n
s
a
b
i
l
i
té
e
n
c
a
s
d
e
d
o
m
m
ag
e
s
c
a
us
é
s
à
l'
a
p
p
a
r
e
i
l
,
à d
e
s
p
er
s
o
nn
e
s
o
u
à
d
e
s
c
h
o
s
e
s
p
a
r
u
n
e
i
n
s
t
a
l
l
at
i
o
n
,
u
n
e
u
t
i
l
i
s
a
t
i
o
n o
u
un
e
n
t
r
e
t
i
e
n
n
'
a
y
a
n
t
p
a
s
é
t
é
r
é
a
l
i
s
é
s
c
o
n
f
o
r
m
é
m
e
nt
a
u
x
i
n
d
i
c
a
t
i
o
n
s
f
o
u
r
n
i
e
s
d
a
n
s
l
e
p
r
é
s
e
n
t
m
a
n
u
e
l
d
'
i
n
s
t
r
u
c
t
i
o
n
s
, q
u
i
do
i
t
t
o
u
j
o
u
r
s
a
c
c
o
m
p
a
gn
e
r
l'
app
a
r
e
i
l
.
C
L
A
Y
P
A
K
Y
S
.p
.
A
.
s
e
r
é
s
e
r
v
e
l
a
f
a
c
u
l
t
é
d
e
m
o
d
i
f
i
e
r
,
à
t
ou
t
m
o
m
e
n
t
e
t
s
a
n
s
p
r
é
a
v
i
s
,
l
e
s
c
a
r
a
c
t
é
r
i
s
t
i
q
u
es
m
e
n
t
i
on
n
é
e
s
d
a
n
s
l
e
p
ré
s
e
n
t
m
a
n
u
e
l
d
'
in
st
r
uc
t
i
o
n
s
.
K
om
p
l
i
m
e
n
t
f
ü
r
I
hr
e
W
a
hl
e
i
n
e
s
P
r
o
du
k
t
s
v
o
n
C
l
a
y
P
ak
y!
W
i
r
d
a
n
k
e
n
Ih
n
e
n
fü
r
das
e
n
t
ge
geng
e
b
r
a
c
h
te
V
e
rt
r
a
u
e
n
u
n
d
m
ö
c
h
t
e
n
S
i
e
d
a
r
a
n er
i
nne
r
n,
d
a
s
s
b
e
i
de
r
H
e
r
s
t
e
l
l
un
g
a
u
c
h
d
i
e
s
e
s
P
r
o
d
u
k
t
s
-
w
i
e
b
e
i
a
l
l
e
n
P
r
o
d
uk
t
e
n
d
e
s
g
r
o
ß
en
S
o
r
t
i
m
e
n
t
s
v
o
n
C
l
a
y
P
a
k
y
-
a
u
f
e
r
s
t
e
Q
u
a
l
i
t
ä
t
We
r
t
g
e
l
e
g
t
w
u
r
de
,
u
m
I
h
n
e
n
i
m
m
e
r
h
e
r
v
o
r
ra
g
e
n
d
e
L
ei
s
t
u
nge
n
g
a
r
a
n
t
i
e
r
e
n
,
u
nd
I
h
r
e
E
r
w
a
r
t
u
n
g
e
n
un
d
A
n
f
o
r
d
er
u
n
g
e
n
s
t
e
t
s
b
e
s
t
en
s
e
r
f
ül
l
e
n
z
u
k
ön
ne
n
.
L
e
s
e
n
S
i
e
d
i
e
s
e
B
e
d
i
e
n
u
n
g
s
a
n
l
e
i
t
u
n
g
b
i
t
t
e
vo
l
l
s
t
ä
n
d
i
g
d
ur
c
h
un
d
b
e
w
a
h
r
e
n
S
i
e
s
i
e
f
ü
r
sp
ä
t
er
e
s
N
a
c
h
s
c
h
l
a
g
e
n
s
o
r
g
f
ä
l
t
i
g
a
u
f
.
D
i
e
K
e
n
n
t
n
i
s
d
e
r
d
a
r
i
n
en
t
h
a
l
t
e
n
e
n
In
f
o
r
ma
t
i
o
n
e
n
un
d
d
i
e
s
t
r
i
k
te
B
e
f
o
l
g
u
n
g
d
er
A
n
w
e
i
s
u
n
g
e
n
is
t
d
i
e
V
o
r
a
u
s
s
e
t
z
u
n
g
f
ü
r
ei
n
e
k
o
r
r
e
k
t
e
u
n
d
s
i
c
h
e
re
I
n
s
t
a
l
l
at
i
on
,
B
e
nut
z
un
g
u
n
d
W
a
r
t
un
g
d
e
s
G
e
r
ä
t
s
.
D
i
e
F
i
r
m
a
C
L
A
Y
P
A
K
Y
S
.
p
.A
.
l
e
h
n
t
j
e
d
e
H
a
f
t
u
ng
f
ü
r
S
c
h
ä
de
n
a
n
d
e
m
G
e
r
ät
b
z
w
.
s
o
ns
t
i
g
e
S
a
c
h
-
u
n
d
P
e
r
s
o
n
en
s
c
h
ä
d
e
n
a
b
,
di
e
d
u
r
c
h
e
i
n
e
n
i
c
h
t
m
i
t
d
e
n
An
w
ei
s
u
n
g
e
n
d
i
e
s
e
r
B
e
d
i
e
n
u
ng
s
a
n
l
e
i
t
un
g
k
o
n
f
or
m
e
I
n
s
tal
l
a
t
i
o
n
,
B
e
n
u
t
z
u
n
g
u
n
d
W
a
r
t
u
n
g
v
e
r
u
rs
a
c
h
t
we
r
d
e
n
.
D
i
e
B
e
d
i
e
n
u
n
g
s
a
n
l
e
i
t
u
n
g
m
u
s
s
i
mm
er
b
e
i
d
e
m
G
e
r
ä
t
b
l
e
i
b
e
n
.
Di
e
F
i
r
m
a
C
L
A
Y
P
A
K
Y
S
.
p
.
A
.
b
e
hä
l
t
s
i
c
h
d
a
s
R
e
c
h
t
v
o
r
,
d
i
e
i
n
d
e
r
v
o
r
l
i
e
g
en
d
e
n
B
e
di
e
n
u
n
g
s
a
n
l
e
i
t
u
ng
e
ntha
l
t
e
n
en
D
a
t
e
n
j
e
d
er
z
e
it
u
n
d
o
h
n
e
v
or
h
e
r
i
g
e
B
e
n
a
c
h
r
i
c
h
t
i
g
un
g
z
u
ä
n
d
e
r
n
.
E
nho
r
a
b
u
e
n
a
po
r
h
a
b
er
e
l
e
g
i
d
o
u
n
a
r
t
íc
u
l
o
C
l
ay
P
a
k
y
y
g
r
a
c
i
a
s
p
o
r
h
o
n
r
a
r
n
o
s
c
o
n
s
u
p
r
e
f
e
r
e
n
c
i
a
.
E
s
t
e
p
r
o
d
u
c
t
o
,
c
o
m
o
t
o
d
o
s
l
o
s
d
emá
s
d
e
e
s
t
a
m
a
r
c
a
,
h
a
s
i
d
o
p
r
oy
e
c
t
a
do
y
r
e
a
l
i
z
ad
o
c
o
n
l
o
s
má
s
e
l
e
v
a
d
o
s
c
r
i
t
e
r
i
os
d
e
c
a
l
i
da
d p
ar
a
g
a
r
a
n
t
i
z
a
r
le
s
i
e
m
pr
e
u
n
a
s
pr
e
s
t
ac
i
o
n
e
s
e
x
c
e
l
en
t
e
s
y
s
a
t
i
s
f
a
c
e
r
me
j
o
r
s
u
s
e
x
p
ec
t
a
t
i
v
as
y
e
x
i
g
e
n
c
i
as
.
Le
a
a
t
e
n
ta
m
en
t
e
t
o
d
o
e
l
m
a
n
ua
l
d
e
i
n
s
t
r
u
c
c
io
n
e
s
y
g
u
ár
d
e
l
o
p
a
r
a
f
u
t
ur
a
s
c
o
n
s
u
l
t
a
s
.
L
a
s
i
n
f
o
r
m
a
c
i
o
n
e
s
e
i
n
d
i
c
a
c
i
o
n
e
s
q
u
e
f
i
g
u
r
an
e
n
e
s
t
a
pu
b
l
i
c
ac
i
ó
n
s
o
n
es
e
n
c
i
a
l
e
s
p
a
r
a
e
f
e
c
t
uar
d
e
mo
d
o
c
o
r
r
e
c
t
o
y
s
e
g
u
r
o
l
a
s
o
p
e
r
a
c
i
o
nes
d
e
i
n
s
ta
l
a
ci
ón
,
u
s
o
y
m
an
t
e
n
i
m
i
e
n
t
o
d
e
l
a
p
a
r
a
t
o
.
CL
A
Y
P
A
K
Y
S
.p
.
A
.
de
cl
i
n
a
t
o
da
re
s
p
on
s
a
b
i
l
i
d
a
d
an
t
e
d
a
ños
s
u
f
r
i
do
s
po
r
e
l
pr
o
y
e
c
t
o
r
,
p
o
r
p
e
r
s
o
n
as
u
o
bj
et
o
s
,
q
u
e
p
u
e
d
a
n
a
t
r
i
b
u
i
r
s
e
a
o
pe
ra
c
io
n
es
d
e
i
n
s
ta
l
ac
i
ó
n
,
u
s
o
o
m
a
n
te
n
i
m
i
e
n
t
o
n
o
c
on
f
o
r
m
e
s
a l
o
i
n
d
i
c
a
do
e
n
e
s
t
e
m
an
u
a
l
,
e
l
c
u
al
d
e
be
g
u
a
r
d
a
r
s
e
s
i
e
m
p
r
e
j
u
n
t
o
c
o
n
el
a
p
a
r
at
o.
C
L
A
Y
P
A
K
Y
S
.
p
.
A
.
s
e
re
s
er
v
a
e
l
d
e
r
e
c
h
o
d
e
mo
d
i
f
i
c
a
r
,
e
n
c
u
a
l
q
u
i
e
r
m
o
m
e
n
t
o
y
s
i
n
a
v
i
s
o
pr
e
v
i
o
,
l
a
s
c
a
r
a
c
t
e
r
í
s
ti
c
as
m
e
n
c
i
o
n
ad
a
s
e
n
e
l
p
r
e
s
e
nt
e
m
a
n
u
a
l
d
e
i
n
s
t
r
u
c
c
i
o
n
es
.
MA
N
U
A
L
E
D
I
I
S
T
RU
Z
I
ON
I
I
N
S
T
R
UC
TI
O
N
M
A
N
U
AL
M
A
N
U
E
L
D
'
I
N
S
T
RU
C
T
IO
N
S
B
E
D
I
E
N
U
N
G
SA
N
L
E
I
T
U
N
G
MA
NU
A
L
D
E
I
N
S
T
RUC
C
ION
E
S
I
F
G
B
D
E
I
N
D
I
C
E
I
N
D
EX
S
O
M
M
A
I
R
E
IN
H
A
L
T
IN
D
I
C
E
I
G
B
D
E
F
2
4
6
8
1
2
2
6
3
1
3
9
4
0
In
fo
rm
az
i
o
n
i
d
i
s
i
cu
r
e
zz
a
-
S
a
f
e
t
y
i
n
f
o
rma
t
i
o
n
In
fo
r
m
a
tio
n
s
d
e
s
éc
u
r
i
té
-
In
f
orm
at
i
o
n
e
n
ü
b
e
r
S
i
c
h
er
h
e
i
t
-
I
nf
o
rma
c
i
ó
n
d
e
s
e
g
u
ri
d
a
d
In
s
t
a
l
l
a
z
i
o
n
e
e
m
e
s
sa
i
n fu
n
z
i
o
n
e
-
In
s
ta
l
l
a
ti
o
n
a
n
d
s
ta
rt
-
u
p
In
s
t
a
l
l
a
t
i
o
n
e
t m
i
s
e
e
n
fo
n
c
t
i
o
n
-
In
s
t
a
l
l
a
t
i
o
n
u
n
d
I
n
b
e
tr
i
e
bn
a
h
m
e
-
In
s
t
a
l
a
c
i
ó
n
y
p
u
e
s
ta
e
n
fu
n
c
i
ó
n
F
u
n
z
i
o
n
i
c
a
n
a
l
i
-
C
ha
n
n
e
l
f
u
n
c
t
i
on
s
-
F
o
n
c
t
i
o
n
d
e
s
c
ana
u
x
-
K
a
n
a
l
f
u
n
k
t
i
o
n
e
n
-
F
u
n
c
i
o
n
d
e
l
o
s
ca
n
a
l
e
s
I
m
p
o
s
t
a
z
i
o
n
e
m
e
n
u
-
M
e
n
u
s
e
t
t
i
n
g
-
S
é
l
e
c
t
i
o
n
m
e
n
u
-
E
i
n
s
t
e
l
l
u
n
g
M
e
n
ü
-
P
r
o
gr
a
m
a
c
i
ó
n
m
e
nú
P
a
n
n
e
l
l
o
d
i
c
on
tr
o
l
l
o
-
C
o
n
t
ro
l
p
a
n
e
l
-
P
a
n
n
e
a
u
d
e
c
o
n
t
ro
l
e
S
te
u
e
r
p
u
l
t -
P
a
n
n
e
l
d
e
c
o
n
tr
ol
M
a
n
u
t
en
z
i
o
n
e
-
M
a
i
n
t
e
n
a
n
c
e
-
E
n
tr
e
ti
e
n
-
W
a
rtu
n
g
-
M
a
n
t
e
n
i
m
i
e
n
t
o
C
a
u
s
a
e
s
o
lu
z
i
o
n
e
d
e
i
p
r
o
b
l
e
m
i
-
C
au
s
e
an
d
s
o
l
u
t
i
o
n
o
f
p
r
o
b
l
e
m
s
-
C
a
u
s
e
e
t
s
o
lu
ti
o
n
d
e
s
p
ro
bl
è
m
e
s
U
r
s
ac
he
n
u
n
d
A
b
h
i
l
f
e
b
ei
B
e
t
r
i
eb
s
s
t
ö
r
u
n
g
e
n
-
C
a
u
s
a
s
y
s
o
lu
c
i
o
n
e
s
d
e
p
ro
b
lem
a
s
P
a
ge C
o
n
te
n
u
t
o
-
C
o
n
te
n
ts
-
C
on
tenu
-
Inh
a
l
t
-
C
o
n
ten
id
o
D
i
s
i
m
ba
l
l
o
e
p
r
ed
i
s
p
o
s
i
z
i
on
e
-
U
n
p
a
c
ki
n
g
a
n
d
p
r
e
p
a
ra
t
io
n
D
é
b
a
l
l
ag
e
e
t
p
r
é
p
a
r
a
ti
o
n
-
A
u
s
p
a
c
k
e
n
u
n
d
V
o
rb
e
re
i
t
e
n
-
D
e
s
e
m
b
a
l
a
j
e
y
p
r
e
p
a
r
a
c
i
ó
n
D
ati
T
e
c
n
i
c
i
-
Te
c
h
n
i
c
a
l
d
a
ta
- D
o
n
n
é
e
s
t
e
c
h
n
i
q
u
e
s
-
T
e
c
h
n
i
s
c
h
e
D
a
te
n
-
D
a
t
o
s
té
c
n
i
c
o
s
$)3)-"!,,/æ%æ02%$)30/3):)/.%
$%"!,,!'%æ%4æ02%0!2!4)/. !530!#+%.æ5.$æ6/2"%2%)4%. $%3%-"!,!*%æ9æ02%0!2!#)/.
$
5.0!#+).'æ!.$æ02%0!2!4)/.
%&
1
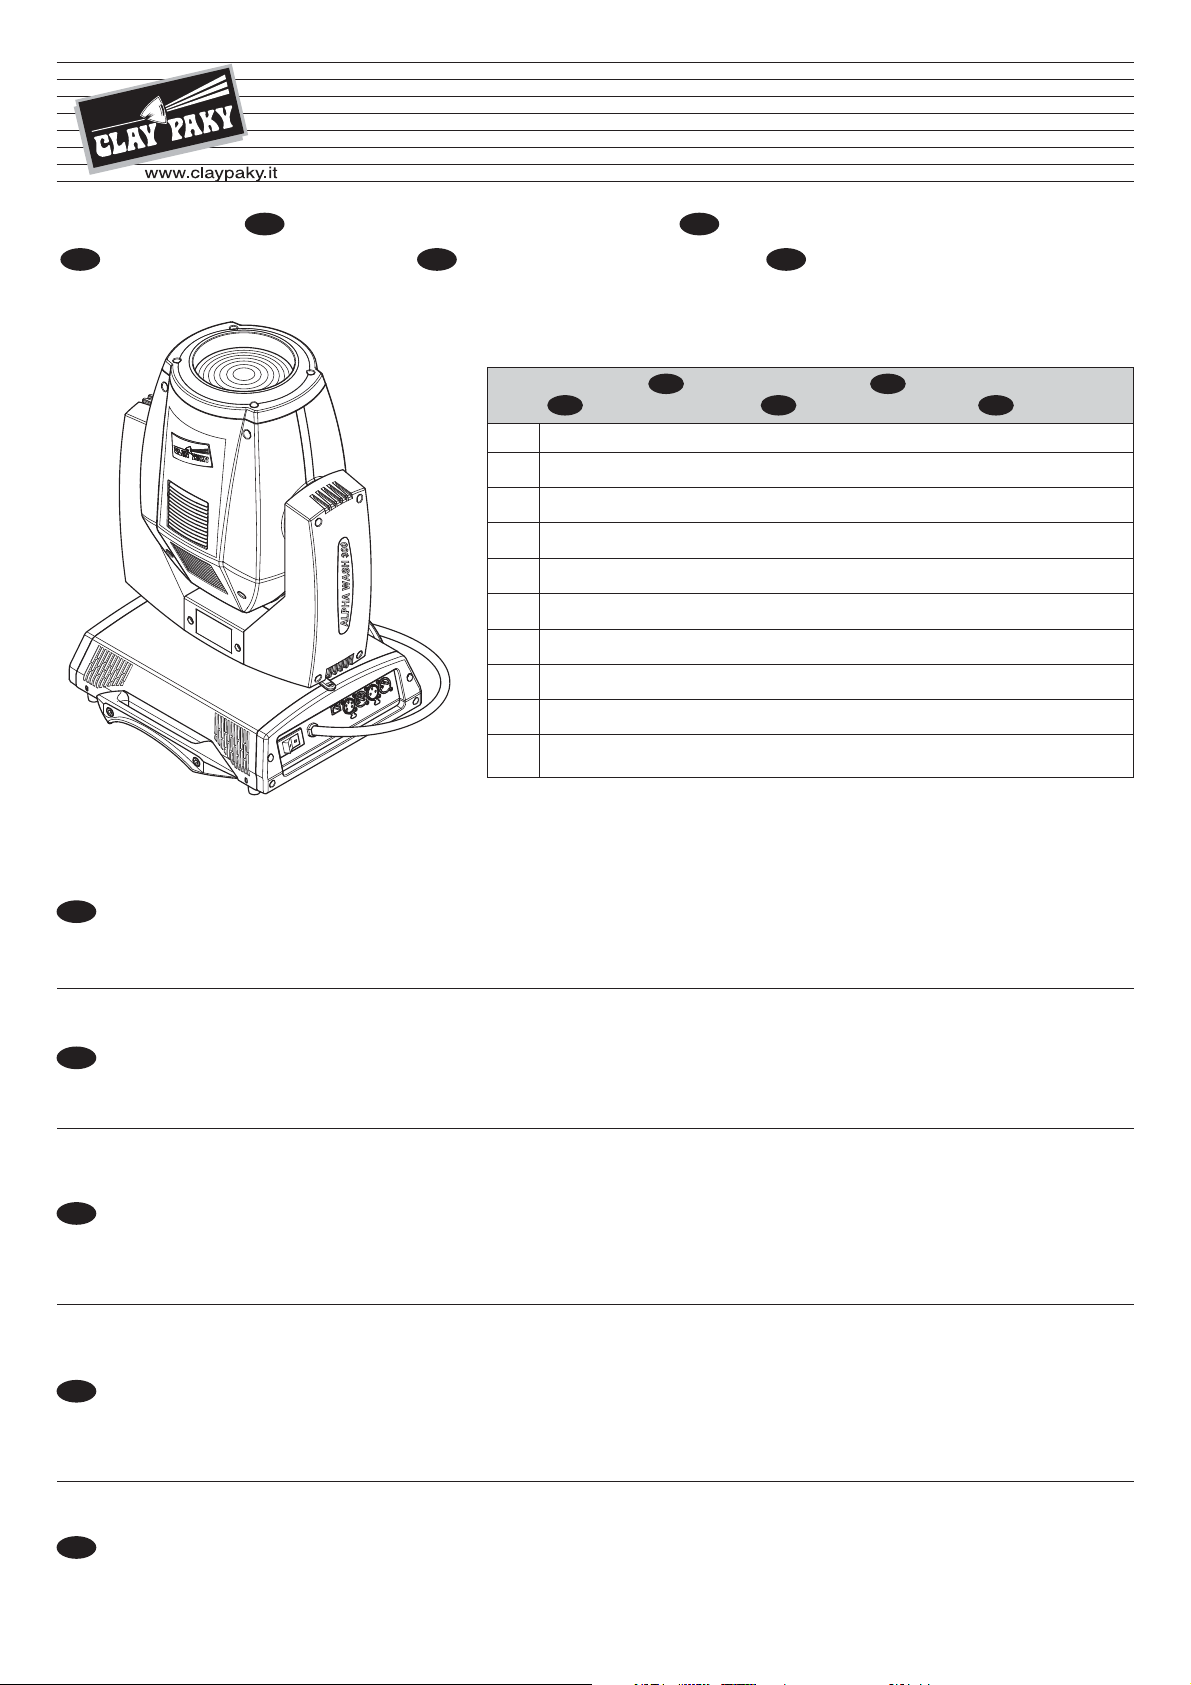
#ONTENUTOæDELLIMBALLO - Figura 1
)
0ACKINGæCONTENTS - Fig. 1
'"
#ONTENUæDEæLgEMBALLAGE - Figure 1
&
0ACKUNGSINHALTæ - Abb. 1
$
®
099392
Lamp 300W
(fitted into projector)
2 x 183102/805
%
ALPHA WASH 300
#ONTENIDOæDELæEMBALAJE - Figura 1
4
Page 5
2 3
45˚
45˚
LOCKED
UNLOCKED
45˚
45˚
45˚
45˚
LOCKED
UNLOCKED
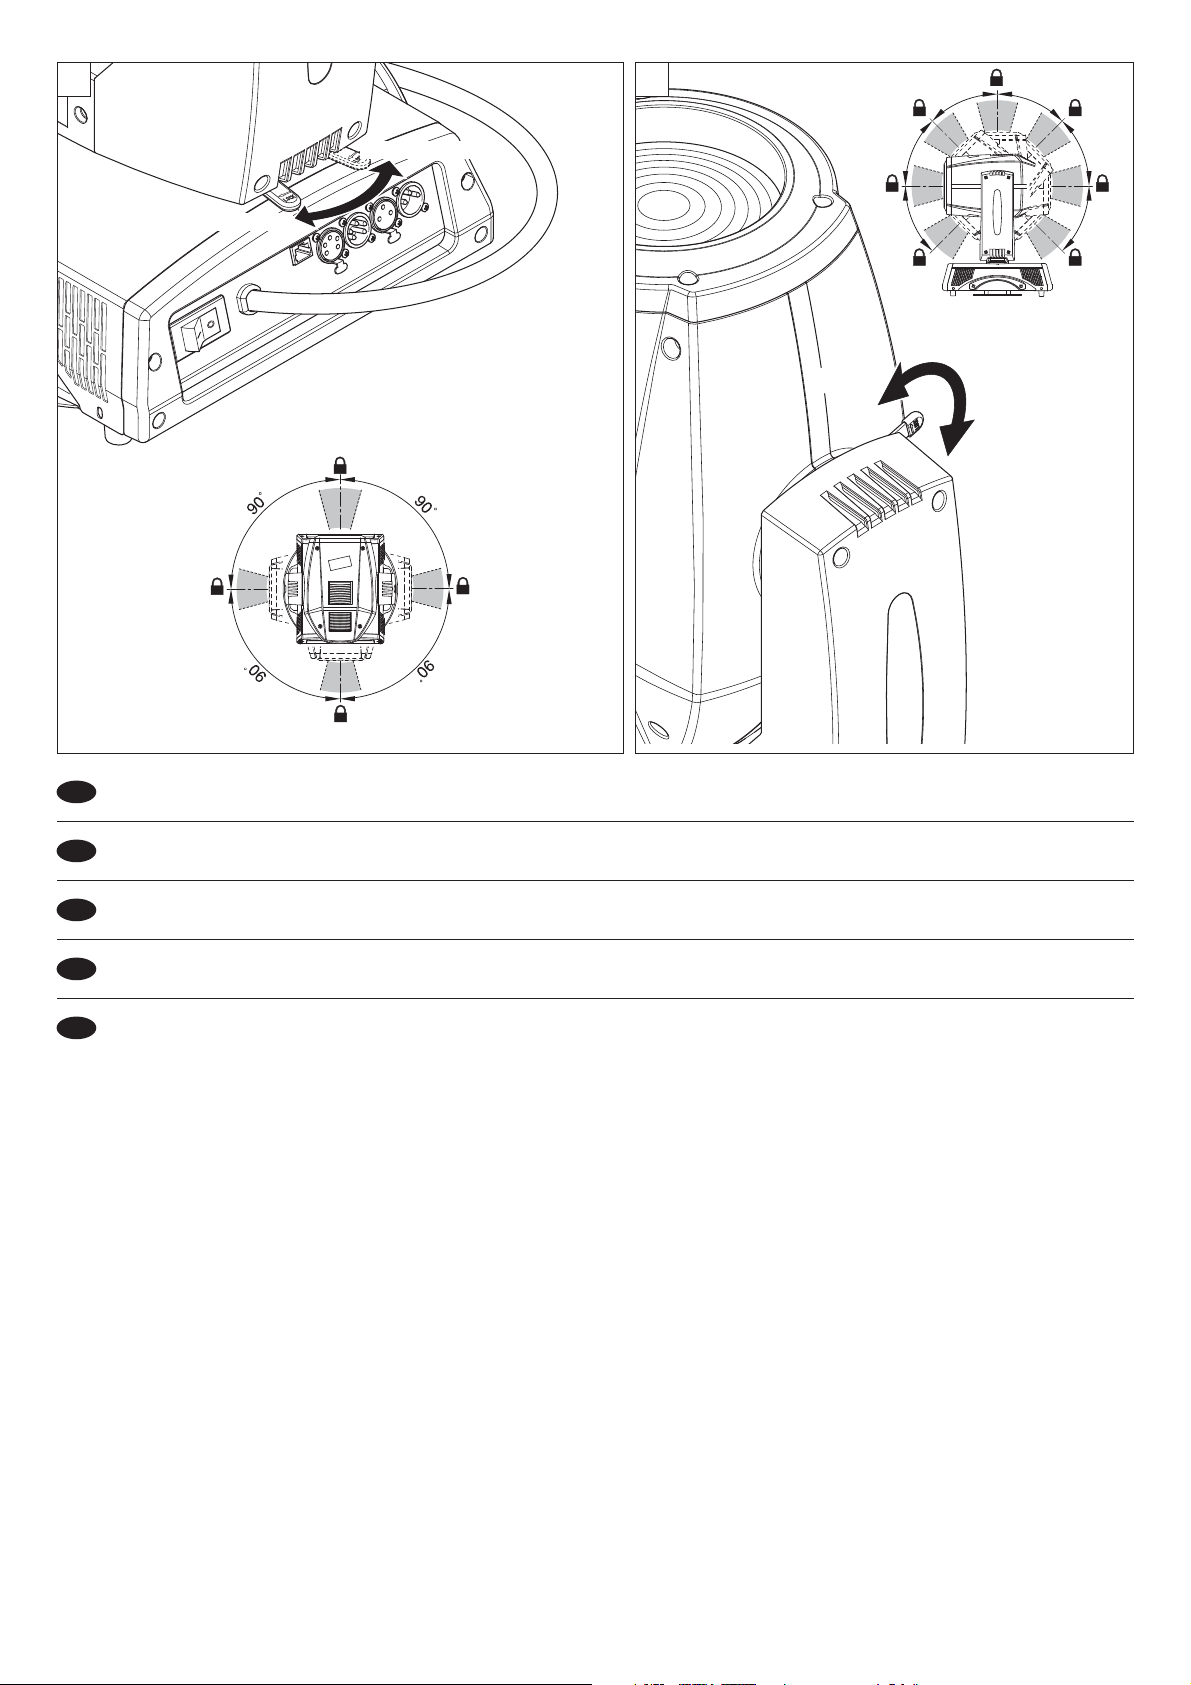
"LOCCOæEæSBLOCCOæMOVIMENTOæ0!.æOGNIææ- Figura 2
)
"LOCCOæEæSBLOCCOæMOVIMENTOæ4),4æOGNIæ- Figura 3
0!.æ-ECHANISMæ,OCKæANDæ2ELEASEæEVERYææ- Fig. 2
'"
4),4æ-ECHANISMæ,OCKæANDæ2ELEASEæEVERYææ- Fig. 3
"LOCAGEæETæ$£BLOCAGEæMOUVEMENTæ0!.æTOUSæLESææ- Figure 2
&
"LOCAGEæETæ$£BLOCAGEæMOUVEMENTæ4),4æTOUSæLESææ- Figure 3
"LOCKIERUNGæUNDæ&REIGABEæDERæ0!."EWEGUNGæJEææ- Abb. 2
$
"LOCKIERENæUNDæ&REIGABEæDERæ4),4"EWEGUNGæJEææ- Abb. 3
"LOQUEOæYæDESBLOQUEOæDELæMOVIMIENTOæDEæ')2/æCADAææ- Figura 2
%
"LOQUEOæYæDESBLOQUEOæDELæMOVIMIENTOæDEæ).#,).!#)Ê.æCADAææ- Figura 3
ALPHA WASH 300
5
Page 6
) '"
).34!,,!:)/.%æ%æ-%33!æ).æ&5.:)/.%
).34!,,!4)/.æ%4æ-)3%æ%.æ&/.#4)/. ).34!,,!4)/.æ5.$æ)."%42)%".!(-%ææææ ).34!,!#)/.æ9æ05%34!æ%.æ&5.#)/.
$
).34!,,!4)/.æ!.$æ34!2450
%&
4
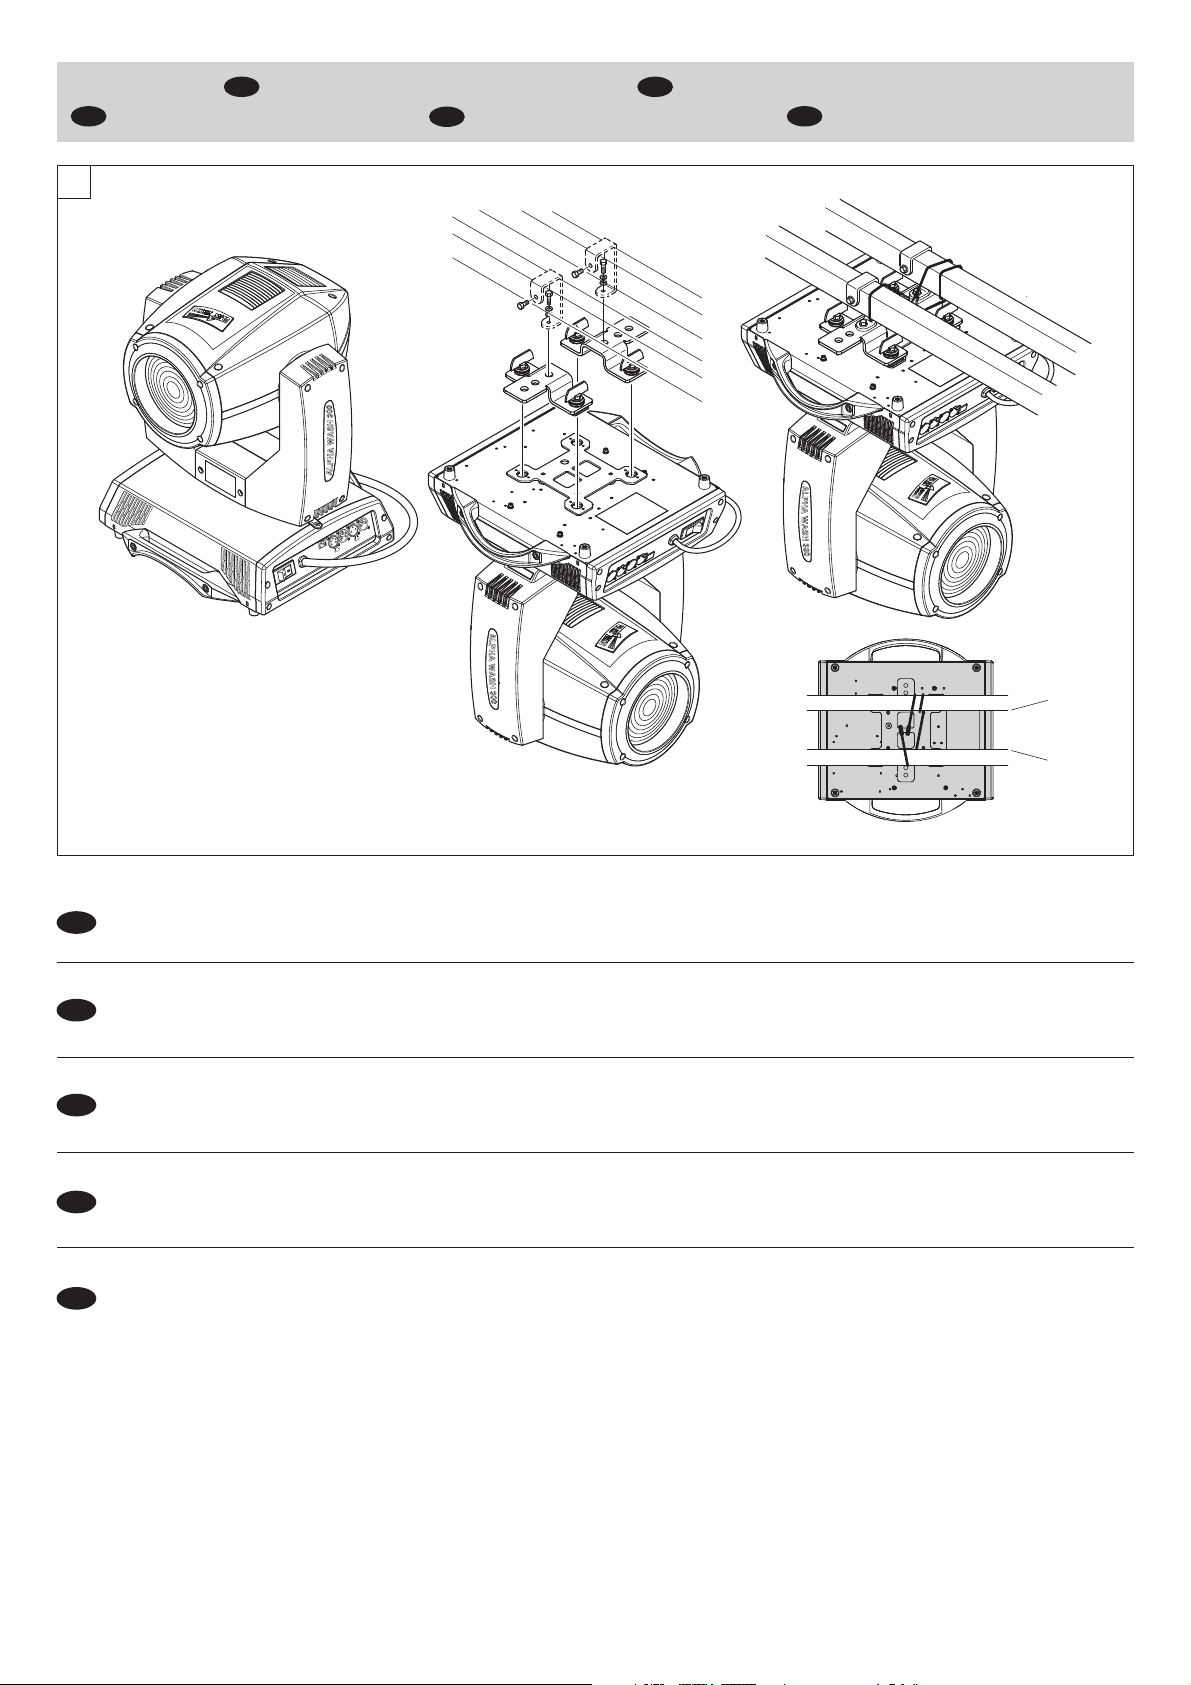
)NSTALLAZIONEæPROIETTORE – Figura 4
Il proiettore può essere istallato a pavimento in appoggio sugli appositi gommini,su truss, a soffitto o a parete.
)
!44%.:)/.%æ
Questa deve essere assicurata alla struttura di sostegno del proiettore e quindi agganciata nel punto di fissaggio presente al centro della base.
)NSTALLINGæTHEæPROJECTOR - Fig. 4
The projector can be installed on the floor resting on special rubber feet, on a truss or on the ceiling or wall.
'"
7!2.).'
This must be securely fixed to the support structure of the projector and then connected to the fixing point at the centre of the base.
)NSTALLATIONæDUæPROJECTEUR - Figure 4
Le projecteur peut être installé au sol, posé sur les petits caoutchoucs prévus à cet effet, sur structures, au mur ou au plafond.
&
!44%.4)/.æ
Fixer ce câble à la structure de soutien du projecteur, puis l’accrocher au point de fixation au centre de la base.
%INBAUæDESæ0ROJEKTORS - Abb. 4
Der Projektor kann direkt auf dem Fußboden auf den hierzu vorgesehenen Gummifüßen an Rohrträgern, an der Wand oder an der Decke installiert werden.
$
!#(45.'æ
Diese muss an der Haltestruktur des Projektors gesichert und dann im Befestigungspunkt im Zentrum der Basis eingehakt werden.
)NSTALACINæDELæPROYECTOR - Figura 4
El proyector puede instalarse en el pavimento apoyándolo en sus correspondientes pies de goma, en truss, en el techo o en la pared.
%
!4%.#)Ê.
Este se deberá fijar en la estructura de soporte del proyector y engancharlo en el punto de fijación del centro de la base.
ad eccezione di quando il proiettore è appoggiato a pavimento, il montaggio della fune di sicurezza è obbligatorio. (Cod. 105041/003 disponibile a richiesta).
with the exception of when the projector is positioned on the floor, the safety cable must be fitted. (Cod. 105041/003 available on request).
l'installation du câble de sécurité est obligatoire, sauf lorsque le projecteur est installé au sol. (Cod. 105041/003 disponible sur demande).
Sofern der Projektor nicht auf dem Fußboden installiert ist, ist die Montage der Sicherheitsseile zwingend vorgeschrieben. (Cod. 105041/003 vorhanden auf Anfrage).
salvo cuando el proyector se apoya en el suelo, el montaje del cable de seguridad es obligatorio. (Cod. 105041/003 disponible por encargo).
ALPHA WASH 300
6
Page 7

5
Alimentazione
Mains
Alimentation
Netz
Alimentación
{
=
MARRONE
L
N
BLU
GIALLO
VERDE
MARRON
BLEU
JAUNE
VERT
MARRÓN
AZUL
AMARILLO
VERDE
BROWN
BLUE
YELLOW
GREEN
BRAUN
BLAU
GELB
GRÜN
L
=
N
=
=
L
=
N
=
=
L
=
N
=
=
L
=
N
=
=
L
=
N
=
6
DMX 512
5 PIN
1
5
2
4
3
SCREEN
SIGNAL
SIGNAL
DMX 512
DMX 512
3 PIN
SIGNAL
SIGNAL
#OLLEGAMENTOæALLAæLINEAæDIæALIMENTAZIONE - Figura 5
#OLLEGAMENTOæALLAæLINEAæDELæSEGNALEæDIæCONTROLLOæ$-8 - Figura 6
Utilizzare un cavo conforme alle specifiche EIA RS-485: bipolare intrecciato, schermato, 120Ω di impedenza caratteristica, 22-24 AWG, bassa capacità. Non utilizzare cavo
)
microfonico o altro cavo con caratteristiche diverse da quelle specificate. Le terminazioni devono essere effettuate con connettori maschio/femmina tipo XLR a 5 pin o a 3 pin.
È necessario inserire sull’ultimo apparecchio uno spinotto terminale con una resistenza da 120Ω (minimo 1/4 W) tra i terminali 2 e 3.
)-0/24!.4% I fili non devono fare contatto tra di loro o con l’involucro metallico dei connettori. L’involucro stesso deve essere collegato alla calza di schermo ed al piedino 1 dei connettori.
#ONNECTINGæTOæTHEæMAINSæSUPPLYæ- Fig. 5
#ONNECTINGæTOæTHEæCONTROLæSIGNALæLINEæ$-8 - Fig. 6
Use a cable conforming to specifications EIA RS-485: 2-pole twisted, shielded, 120Ω characteristic impedance, 22-24 AWG, low capacity. Do not use microphone cable or other cable
'"
with characteristics differing from those specified. The end connections must be made using XLR type 3 or 5-pin male/female connectors. A terminating plug must be inserted into the
last projector with a resistance of 120Ω (minimum 1/4 W) between terminals 2 and 3.
)-0/24!.4 The wires must not make contact with each other or with the metal casing of the connectors. The casing itself must be connected to the shield braid and to pin 1 of the connectors.
1
2
3
SCREEN
"RANCHEMENTæAUæR£SEAUæDgALIMENTATION - Figure 5
"RANCHEMENTæÝæLAæLIGNEæDUæSIGNALæDEæCONTR¹LEæ$-8 - Figure 6
Utiliser un câble conforme aux spécifications EIA RS-485: bipolaire tressé, blindé, 120Ω d’impédance caractéristique, 22-24 AWG, basse capacité. Ne pas utiliser un câble
&
microphonique ou un autre câble ayant des caractéristiques différentes de celles spécifiées. Les terminaisons doivent être réalisées avec des connecteurs mâle/femelle du type XLR à
3 ou 5 broches. Insérer sur le dernier appareil une fiche terminale, avec une résistance de 120Ω (minimum 1/4 W) entre les bornes 2 et 3.
)-0/24!.4 S'assurer que les fils n'entrent pas en contact entre eux ou avec l'enveloppe métallique des connecteurs. Relier l'enveloppe de la fiche/prise à la gaine de blindage et au
contact 1 des connecteurs.
!NSCHLUSSæANæDASæ3TROMNETZ - Abb. 5
!NSCHLUSSæANæDIEæ,EITUNGæDERæ3TEUERSIGNALEæ$-8 - Abb. 6
Ein Kabel mit der Kennzeichnung EIA RS-485 verwenden: verdrilltes, abgeschirmtes Zweileiterkabel, 120Ω charakteristische Impedanz, 22-24 AWG, niedrige Kapazität. Kein
$
Mikrofonkabel oder sonstige Kabel mit anderen Charakteristiken als angegeben verwenden. Die Kabelabschlüsse müssen mit Steckverbindern (Steckern/Buchsen) Typ XLR 3 oder 5
pin erfolgen. Ein Endstecker mit einem Widerstand 120Ω (mindestens 1/4 W) in das letzte Gerät der Reihe zwischen die Klemmen 2 und 3 einsetzen.
7)#(4)' Die Leiter dürfen weder untereinander, noch mit dem Metallgehäuse der Steckverbinder Kontakt haben. Das Gehäuse muss mit dem Schirmgeflecht und dem Kontakt 1 der
Verbinder verbunden werden.
#ONEXINæAæLAæREDæDEæALIMENTACIN - Figura 5
#ONEXINæDEæLASæSE®ALESæDEæCONTROLæ$-8æ - Figura 6
Utilice un cable conforme a las normas EIA RS-485: bipolar trenzado y apantallado, 120Ω de impedancia característica, 22-24 AWG, baja capacidad. No utilice cable microfónico ni
%
otros con características distintas de las anteriormente indicadas. Las uniones deben efectuarse con conectores macho-hembra tipo XLR de 3 o 5 pin. Es necesario montar en el
último aparato una clavija terminal con una resistencia de 120Ω (mínimo 1/4 W) entre los terminales 2 y 3.
)-0/24!.4% los cables no deben hacer contacto entre sí ni con la funda metálica de los conectores. La funda debe conectarse a la trenza de blindaje y al pin 1 de los conectores.
ALPHA WASH 300
7
Page 8
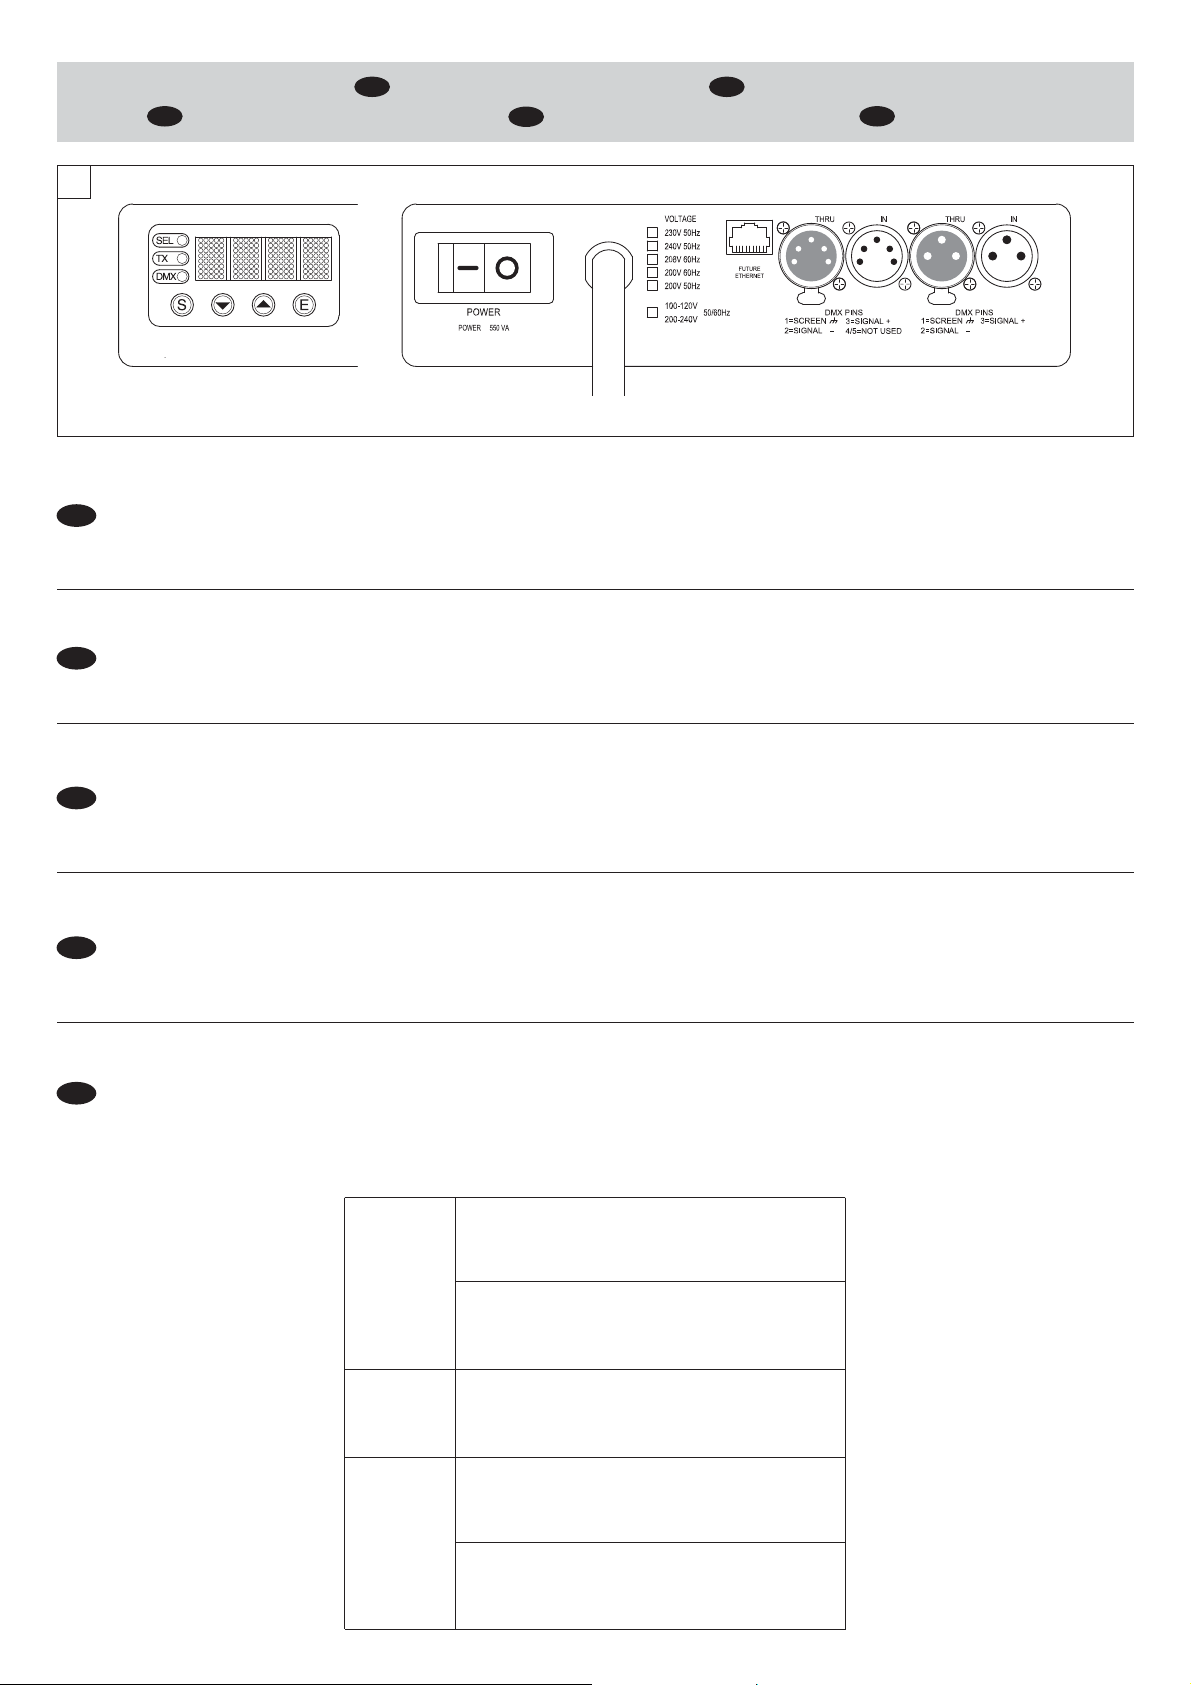
) '"
0!..%,,/æ$)æ#/.42/,,/ #/.42/,æ0!.%,
0!..%!5æ$%æ#/.42/,% 34%5%205,4 0!..%,æ$%æ#/.42/,
$
%&
7
!CCENSIONEæDELæPROIETTORE - Figura 7
Premere l’interruttore. Il proiettore inizia la procedura di azzeramento degli effetti. Contemporaneamente sul display scorrono le seguenti informazioni:
#LAYж0AKYжжжжжжжжжжжжж!LPHAж7ASHжжжжжжжжжжжжжж0ARTIALжLAMPжTIMEжXXXжжжжжжжжжжжжж4OTALжLIFEжTIMEжXXXжжжжжжжжжжжжж!DDRESSжXXX
Terminato l'azzeramento in caso di assenza del segnale dmx Pan e Tilt si spostano in posizione di "Home" (Pan 50% - Tilt 50%). Sul pannello di controllo (Figura 7) sono presenti il
)
display, i led ed i pulsanti che permettono la completa programmazione e gestione del menu del proiettore. Il display può trovarsi in due condizioni: lo stato di riposo e lo stato di
impostazione. Quando si trova nello stato di riposo, il display mostra l’indirizzo DMX del proiettore. Durante lo stato di impostazione del menù,quando trascorre un tempo di attesa (circa
1 minuto) senza che venga premuto alcun tasto, la visualizzazione torna automaticamente allo stato di riposo. Si noti che al verificarsi di questa condizione, un eventuale valore
modificato ma non ancora confermato con il tasto ENTER verrà annullato.
3WITCHINGæONæTHEæPROJECTOR - Fig. 7
Press the switch. The projector starts resetting the effects. At the same time, the following information scrolls on the display:
'"
&
$
%
ALPHA WASH 300
#LAYж0AKYжжжжжжжжжжжжж!LPHAж7ASHжжжжжжжжжжжжжж0ARTIALжLAMPжTIMEжXXXжжжжжжжжжжжжж4OTALжLIFEжTIMEжXXXжжжжжжжжжжжжж!DDRESSжXXX
On conclusion of resetting in the case of the absence of the dmx signal, Pan and Tilt move to the “Home” position (Pan 50% - Tilt 50%). The control panel (Fig. 7) has a display, LEDs
and buttons for the complete programming and management of the projector menu. The display can be in one of two conditions: rest status and setting status. When it is in the rest
status, the display shows the projector’s DMX address. During menu setting status, after a wait time (about 1 minute) without any key having been pressed, the display automatically
returns to rest status. It should be noted than when this condition occurs, any possible value that has been modified but not yet confirmed with the ENTER key will be cancelled.
!LLUMAGEæDUæPROJECTEUR - Figure 7
Appuyer sur l'interrupteur. Le projecteur entame la procédure de remise à zéro des effets. En même temps les informations suivantes défilent sur l'afficheur:
#LAYж0AKYжжжжжжжжжжжжж!LPHAж7ASHжжжжжжжжжжжжжж0ARTIALжLAMPжTIMEжXXXжжжжжжжжжжжжж4OTALжLIFEжTIMEжXXXжжжжжжжжжжжжж!DDRESSжXXX
Quand la réinitialisation est terminée, en cas d’absence du signal dmx, Pan et Tilt se mettent en position de « Home » (Pan 50% - Tilt 50%). Le panneau de contrôle (Fig. 7) comprend
l’afficheur, les del et les poussoirs qui permettent la programmation et la gestion complètes du menu du projecteur. L’afficheur peut se trouver en deux conditions différentes : l'état de
repos et l’état de sélection. Quand l'afficheur se trouve en état de repos, il montre l’adresse DMX du projecteur. Pendant l’état de sélection du menu, si un certain temps d’attente
s'écoule (environ 1 minute) sans qu'on n'appuie sur aucune touche, l'affichage retourne automatiquement en état de repos. Remarquez que, si cette dernière condition se produit, toute
valeur éventuellement modifiée mais pas encore confirmée par la touche ENTER sera annulée.
%INSCHALTENæDESæ0ROJEKTORS - Abb. 7
Den Schalter drücken. Der Projektor beginnt den Ablauf der Nullstellung der Effekte. Gleichzeitig laufen am Display die folgenden Informationen ab.
#LAYж0AKYжжжжжжжжжжжжж!LPHAж7ASHжжжжжжжжжжжжжж0ARTIALжLAMPжTIMEжXXXжжжжжжжжжжжжж4OTALжLIFEжTIMEжXXXжжжжжжжжжжжжж!DDRESSжXXX
Nach der Rückstellung bewegen sich Pan und Tilt bei fehlendem dmx Signal zur „Home“ Position (Pan 50% - Tilt 50%). Auf dem Steuerpult (Abb. 7) befinden sich das Display, die Led
und die Tasten, mit denen man die Programmierung und das Management des Projektormenüs vollkommen einstellen kann. Das Display kann sich in zwei Zuständen befinden:
Ruhezustand und Eingabezustand. Wenn es sich im Ruhezustand befindet, zeigt das Display die DMX-Adresse des Projektors. Befindet es sich hingegen im Eingabemodus für das
Menü, kehrt die Anzeige automatisch in den Ruhezustand zurück, sofern nach Ablauf einer Wartezeit von circa 1 Minute keine Taste gedrückt wurde. Wenn dieser Fall eintritt, wird ein
eventuell geänderter Wert, der jedoch noch nicht durch Drücken der Taste ENTER bestätigt wurde, annulliert.
%NCENDIDOæDELæPROYECTOR - Figura 7
Presionar el interruptor. El proyector inicia el procedimiento de puesta a cero de los efectos. Al mismo tiempo, en la pantalla aparecen las siguientes informaciones:
#LAYж0AKYжжжжжжжжжжжжж!LPHAж7ASHжжжжжжжжжжжжжж0ARTIALжLAMPжTIMEжXXXжжжжжжжжжжжжж4OTALжLIFEжTIMEжXXXжжжжжжжжжжжжж!DDRESSжXXX
Terminada la puesta a cero en caso de ausencia de la señal dmx Pan y Tilt se desplazan en posición de “Home" (Pan 50% - Tilt 50%). En el panel de control (Figura 7) están presentes
la pantalla, los led y los pulsadores que permiten la completa programación y gestión del menú del proyector. La pantalla puede encontrarse en dos condiciones: el estado de reposo y
el estado de programación. Cuando se encuentra en estado de reposo, la pantalla muestra la dirección DMX del proyector. Durante el estado de programación del menú, cuando
transcurre un tiempo de espera (1 minuto aproximadamente) sin que se presione ninguna tecla, la visualización vuelve automáticamente al estado de reposo. Al verificarse esta
condición, un posible valor modificado pero todavía sin confirmar con la tecla ENTER se anulará.
,%$
Acceso se il segnale DMX è presente
DMX
TX
SEL
Verde
Green
Vert
Grün
Verde
Giallo
Yellow
Jaune
Gelb
Amarillo
Rosso
Red
Rouge
Rojo
Rot
Is lit if the DMX signal is present
Allumé si le signal DMX est présent
Leuchtet, wenn das Signal DMX vorhanden ist
Encendido si la señal DMX está presente
Lampeggia se il segnale DMX è assente
Blinks if the DMX signal is not present
Clignote si le signal DMX est présent
Blinkt, wenn das Signal DMX fehlt
Parpadea si la señal DMX no está presente
Non usato
Not used
Non utilisé
Nicht belegt
No utilizada
Acceso quando il display è in fase di impostazione
Is lit when the display is in the setting phase
Allumé quand l’afficheur est en phase de sélection
Leuchtet, wenn sich das Display in der Einstellphase befindet
Encendido cuando la pantalla está en fase de programación
Spento quando il display è in fase di riposo
Is off when the display is in the rest mode
Éteint quand l’afficheur est en état de repos
Ist ausgeschaltet, wenn sich das Display in Ruhestellung befindet
Apagado cuando la pantalla está en estado de reposo
8
Page 9
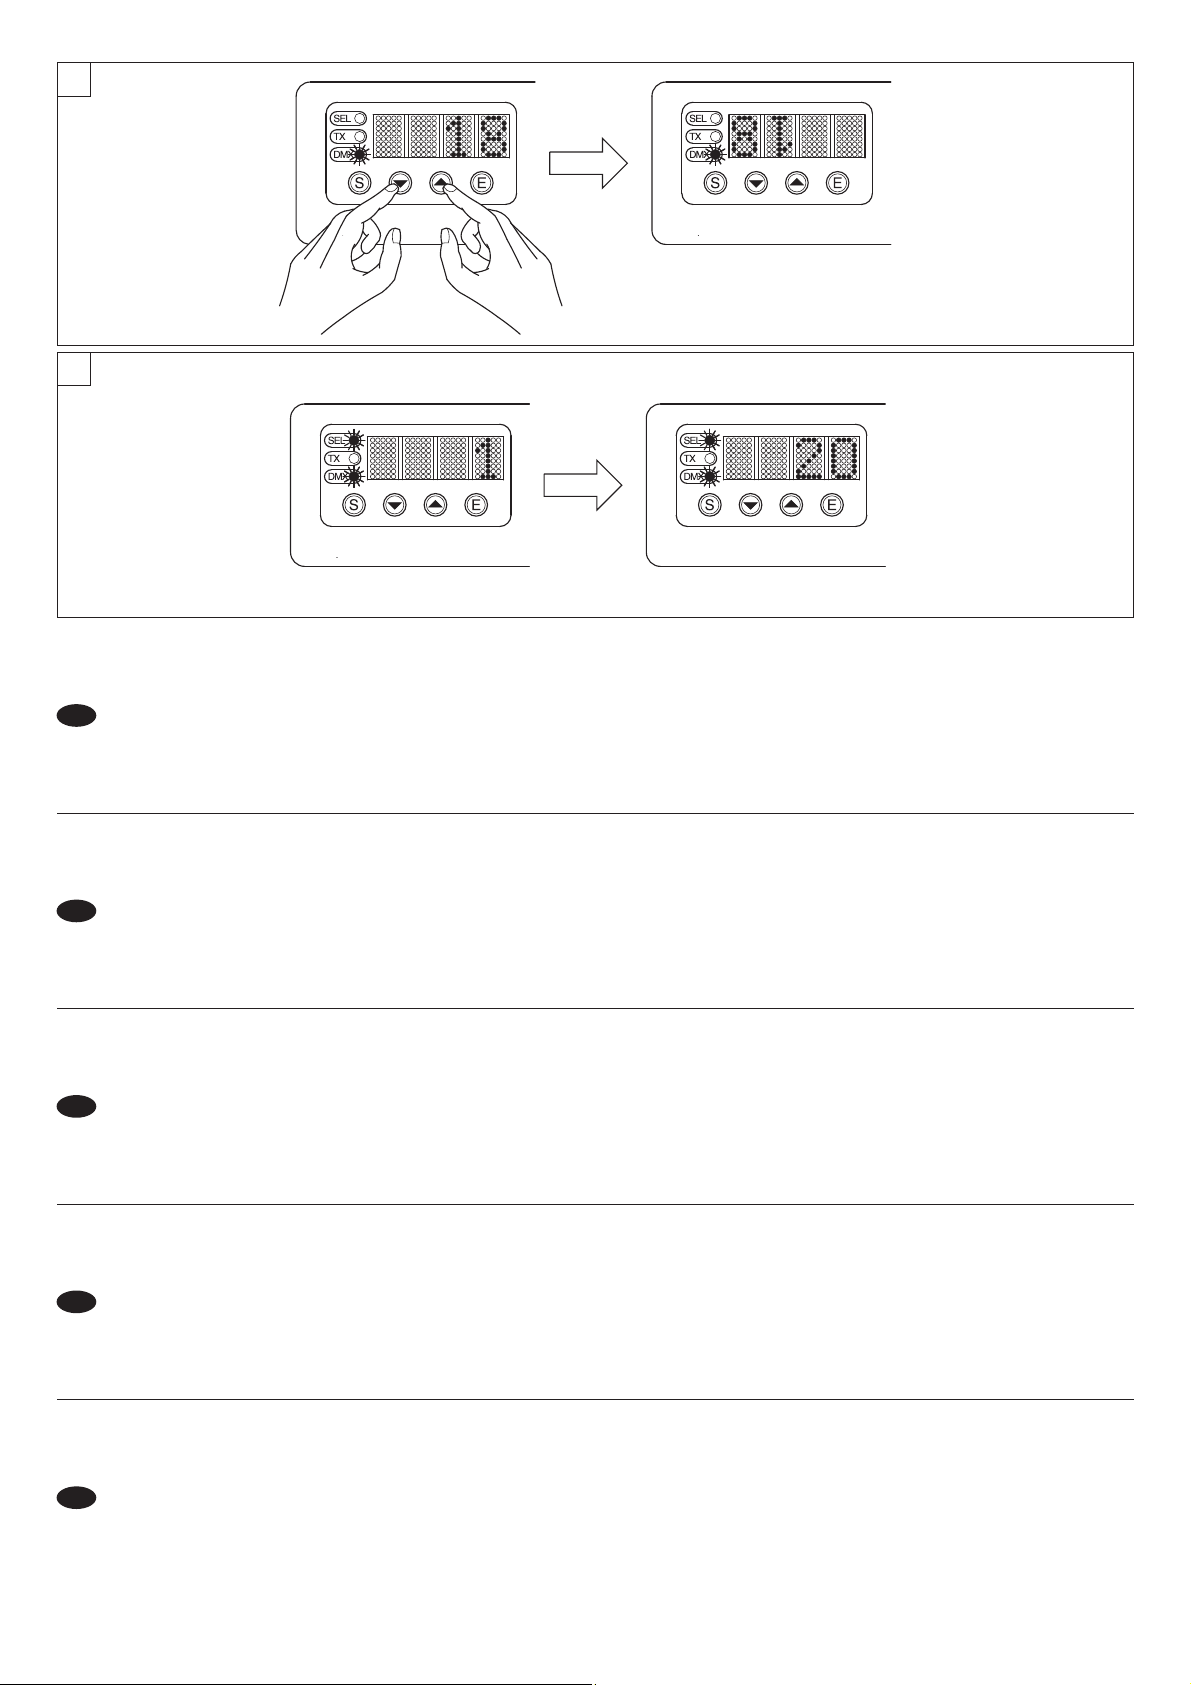
8
9
)NVERSIONEæDELæDISPLAYæ- Figura 8
Per attivare questa funzione, premere contemporaneamente UP e DOWN mentre il display si trova nello stato di riposo. La condizione viene memorizzata e viene mantenuta anche alle
successive accensioni. Per tornare allo stato iniziale, ripetere nuovamente l’operazione.
)MPOSTAZIONEæDELLINDIRIZZOæDIæPARTENZAæDELæPROIETTOREæ- Figura 9
Su ogni singolo proiettore deve essere impostato l’indirizzo iniziale per il segnale di controllo (indirizzi validi da 1 a 496) considerando che ogni Alpha Wash 300 occupa max 17 canali.
)
Questa operazione può essere effettuata anche a proiettore spento.
Impostazione indirizzo:
1) Premere il tasto SELECT per entrare nella modalità impostazione indirizzo.
2) Con i tasto UP e DOWN impostare l’indirizzo.
3) Premere ENTER per confermare la selezione (il display lampeggia per alcuni istanti);oppure SELECT per mantenere l’indirizzo impostato.
2EVERSALæOFæTHEæDISPLAYæ- Fig. 8
To activate this function, press UP and DOWN buttons simultaneously while the display is in the rest mode. This status will be memorised and maintained even for the next time it will be
switched on. To return to the initial state, repeat the operation all over again.
3ETTINGæTHEæPROJECTORæSTARTINGæADDRESS - Fig. 9
On each projector, the starting address must be set for the control signal (addresses from 1 to 496) considering that each Alpha Wash 300 occupies max 17 channels. The address can
'"
also be set with the projector switched off.
Setting the address:
1) Press SELECT to enter address setting mode.
2) Set the address using the UP and DOWN keys.
3) Press ENTER to confirm the selection (the display will blink for a few seconds) or SELECT to retain the address set.
)NVERSIONæDEæLAFFICHEUR - Figure 8
Pour activer cette fonction, appuyer en même temps sur les touches UP et DOWN pendant que l’afficheur se trouve en état de repos. La condition est mémorisée et se maintien lors des
allumages successifs. Pour retourner à l’état initial, répéter à nouveau l’opération.
3£LECTIONæDEæLADRESSEæDEæD£PARTæDUæPROJECTEUR - Figure 9
Sur chaque projecteur il faut sélectionner l’adresse de départ pour le signal de contrôle (adresses valides de 1 à 496) en considérant que chaque Alpha Wash 300 occupe max 17
&
canaux. La sélection de l’adresse peut également être effectuée avec le projecteur éteint.
Sélection adresse:
1) Pour accéder à la modalité sélection adresse, il faut appuyer sur la touche SELECT.
2) Sélectionner l’adresse avec les touches UP/DOWN.
3) Pour valider la sélection appuyer sur la touche ENTER (l’afficheur va clignoter pour quelques instants); ou bien appuyer sur la touche SELECT pour maintenir l’adresse sélectionnée.
5MSCHALTUNGæDESæ$ISPLAY - Abb. 8
Um diese Funktion zu aktivieren, drückt man gleichzeitig UP und DOWN, während sich das Display in Ruhestellung befindet. Der Status wird gespeichert und bleibt auch bei den
folgenden Einschaltungen erhalten. Um bei den folgenden Einschaltungen zum ursprünglichen Status zurückzukehren, wiederholt man die Operation.
%INSTELLUNGæDERæ3TARTADRESSEæDESæ0ROJEKTORS - Abb. 9
Bei jedem Projektor muss die Startadresse für das Kontrollsignal eingestellt werden (Adressen gültig von 1 bis 496) dabei ist darauf zu achten, dass jeder Alpha Wash 300 max 17
$
Kanäle belegt. Die Einstellung der Ausgangsadresse kann auch bei ausgeschaltetem Projektor erfolgen.
Einstellung Adresse:
1) Man muss die Taste SELECT drücken, um sich in die Modalität Einstellung Adresse zu begeben.
2) Mit den Tasten UP/ DOWN die geforderte Adresse wählen.
3) ENTER drücken, um die Wahl zu bestätigen (das Display blinkt einige Augenblicke lang) oder SELECT zur Beibehaltung der eingestellte Adresse.
)NVERSINæDEæLAæPANTALLA - Figura 8
Para activar esta función, presionar contemporáneamente UP y DOWN mientras la pantalla se encuentra en el estado de reposo. La condición se memoriza e incluso se mantiene en
los sucesivos encendidos. Para volver al estado inicial, repetir nuevamente la operación.
0ROGRAMACINæDEæLAæDIRECCINæDEæPARTIDAæDELæPROYECTOR - Figura 9
En cada proyector se debe efectuar la programación de la dirección de salida para la señal de control (direcciones válidas de 1 a 496) considerando que cada Alpha Wash 300 ocupa
%
max 17 canales. Esta programación también se puede realizar con el proyector apagado.
Programación dirección:
1) Presionar la tecla SELECT para entrar en la modalidad de programación de dirección.
2) Con las teclas UP y DOWN programar la dirección.
3) Presionar ENTER para confirmar la selección (la pantalla parpadea durante algunos instantes); o SELECT para mantener la dirección programada.
ALPHA WASH 300
9
Continua / Continue
➔
Page 10

)4!,)!./
&UNZIONEæDEIæTASTI
3%,%#4
sæ3EæVIENEæPREMUTOæINæSTATOæDIæRIPOSO Commuta ciclicamente fra lo stato di riposo, l’impostazione dell’indirizzo DMX e le impostazioni nei menu.
sæ3EæVIENEæPREMUTOæDURANTEæLIMPOSTAZIONEæDIæUNæMENUæSale di un livello senza modificare nulla (esce dalla funzione).
$/7.
50
%.4%2
&UNZIONEæDIæ(ELP
Il proiettore dispone di una funzione Help che consente di visualizzare una breve descrizione di una qualsiasi voce del menu. Per attivare la funzione Help, premere e mantenere premuto il tasto
ENTER mentre si sta premendo UP o DOWN durante lo scorrimento, che descrive il significato della voce di menu su cui si è posizionati in quel momento. È possibile visualizzare nuovamente il
messaggio di Help semplicemente rilasciando e premendo nuovamente il tasto ENTER.
)MPOSTAZIONIæINDIRIZZIæEæOPZIONIæCONæPROIETTOREæNONæCOLLEGATO
È possibile impostare l’indirizzo DMX del proiettore, nonché eventuali altre opzioni di funzionamento, anche quando l’apparecchio è sconnesso dalla rete elettrica. Per attivare momentaneamente il
display ed accedere quindi alle impostazioni basta premere un tasto qualsiasi. Una volta effettuate le operazioni desiderate, il display si spegnerà nuovamente dopo un tempo di attesa di 15 secondi.
Decrementa il valore visualizzato (con auto-ripetizione), oppure passa alla voce seguente di un menu
Per passare rapidamente al valore minimo di un parametro, oppure alla prima voce di un menu, premere il tasto UP mentre si tiene premuto DOWN.
Incrementa il valore visualizzato (con auto-ripetizione), oppure passa alla voce precedente di un menu
Per passare rapidamente al valore massimo di un parametro, oppure all’ultima voce di un menu, premere il tasto DOWN mentre si tiene premuto UP.
Conferma il valore visualizzato, oppure attiva la funzione visualizzata, oppure entra nel menu successivo. Si noti che fino a quando non si preme ENTER, nessuna
impostazione viene confermata e memorizzata.
%.',)3(
&UNCTIONSæOFæTHEæBUTTONS
3%,%#4
$/7.
sæ)FæITæISæPRESSEDæTOæTHEæRESTæMODEæSwitches over in cyclical movements between rest mode, DMX address setting and the settings in the menu.
sæ)FæITæISæPRESSEDæWHILEæSETTINGæAæMENUæGoes to the upper level without changing anything (exits from the function).
Decreases the value displayed (with auto-repetitions) or passes to the next item in the menu.
For a quick access to a parameter’s minimum value or to the first item of a menu, press the UP button while holding down the DOWN button.
50
Increases the value displayed (with auto-repetitions) or passes to the next item in a menu.
For a quick access to a parameter’s maximum value or to the first item of a menu, press the DOWN button while pressing the UP button.
%.4%2
Confirms the displayed value, or activates the displayed function, or enters the successive menu. If ENTER is not pressed no settings will be confirmed.
4HEæ(ELPæFUNCTION
The projector has a Help function that can be used to display a short description of any menu item. To activate the Help function, press the ENTER key and keep it pressed while pressing UP or DOWN during
scrolling. This describes the significance of the menu item on which one is positioned at that time. The Help message can be displayed again by simply releasing the ENTER key and then pressing it again.
3ETTINGæADDRESSESæANDæOPTIONSæWITHæTHEæPROJECTORæDISCONNECTED
The projector’s DMX address, as well as other possible operating options, can also be set when the appliance is disconnected from the electricity supply. All that is needed is to press any key to
momentarily activate the display and thus access the settings. Once the required operations have been carried out, the display will switch off again after a wait time of 15 seconds.
&2!.!)3
&ONCTIONSæDESæTOUCHES
3%,%#4
$/7.
50
sæ3IæLAæTOUCHEæESTæAPPUY£EæENæ£TATæDEæREPOSæPasse cycliquement entre l’état de repos, la sélection de l’adresse DMX et les sélections dans les menus
sæ3IæLAæTOUCHEæESTæAPPUY£EæPENDANTæLAæS£LECTIONæDUæMENUææMonte d’un niveau sans rien modifier (sort de la fonction).
Diminue la valeur visualisée (avec répétition automatique), ou passe à la voix suivante d’un menu.
Pour passer rapidement à la valeur minimum d’un paramètre, ou à la première voix d’un menu, appuyer sur la touche UP en maintenant la touche DOWN appuyée.
Augmente la valeur visualisée (avec répétition automatique), ou passe à la voix précédente d’un menu.
Pour passer rapidement à la valeur maximum d’un paramètre, ou à la dernière voix d’un menu, appuyer sur la touche UP en maintenant la touche UP appuyée.
%.4%2
&ONCTIONæ(ELP
Le projecteur dispose de la fonction Help, qui permet d’afficher une brève description de n’importe quel article du menu. Pour activer la fonction Help, appuyer sur la touche ENTER et la maintenir
appuyée, tout en appuyant en même temps sur les touches UP ou DOWN pendant le défilement, qui décrit la signification de l’article du menu sur lequel on est positionnés à cet instant. Il est
possible d'afficher à nouveau le message de Help, en relâchant et en appuyant simplement la touche ENTER.
0ROGRAMMATIONæDESæADRESSESæETæOPTIONSæAVECæLEæPROJECTEURæNONæBRANCH£
Il est possible de sélectionner l’adresse DMX du projecteur, ainsi que d’autres options de fonctionnement éventuelles, même si l’appareil est déconnecté du réseau électrique. Pour activer
l’afficheur momentanément et pouvoir accéder aux sélections, il suffit d’appuyer sur une touche quelle qu’elle soit. Quand on a effectué les opérations désirées, l’afficheur s’éteindra à nouveau
après un délai d’attente de 15 secondes.
ALPHA WASH 300
Confirme la valeur visualisée, ou active la fonction visualisée, ou entre dans le menu suivant. Remarque : avant d’appuyer sur ENTER, aucune sélection n’est
confirmée.
10
Page 11

$%543#(
&UNKTIONENæDERæ4ASTEN
3%,%#4
sæ7ENNæMANæSIEæINæ2UHESTELLUNGæDRÔCKTæWird im Zyklus zwischen Ruhestellung, Einstellung der Adresse DMX und den Einstellungen in den Menüs umgeschaltet.
sæ7ENNæMANæSIEæWÜHRENDæDERæ%INSTELLUNGæEINESæ-ENÔSæDRÔCKTæWird die nächst höhere Ebene erreicht, ohne etwas zu ändern (Austritt aus der Funktion).
$/7.
50
%.4%2
&UNKTIONæ(ELP
Der Projektor ist mit einer Help-Funktion ausgestattet, mit der eine kurze Beschreibung jedes beliebigen Menüpunktes angezeigt werden kann. Zum Aufrufen der Help-Funktion die Taste ENTER
drücken und gedrückt halten, während beim Scrollen UP oder DOWN gedrückt werden, wo die Bedeutung des Menüpunkts beschrieben wird, auf dem man sich gerade befindet. Die HelpMeldung kann erneut angezeigt werden, wenn man einfach die Taste ENTER loslässt und erneut drückt.
6ORGABEæDERæ!DRESSENæUNDæ/PTIONENæBEIæNICHTæANGESCHLOSSENEMæ0ROJEKTOR
Die DMX-Adresse des Projektors sowie ggf. weitere Betriebsoptionen können auch dann eingegeben werden, wenn das Gerät nicht an das Stromnetz angeschlossen ist. Um das Display
vorübergehend einzuschalten und damit Zugriff auf die Vorgaben zu erhalten, muss nur eine beliebige Taste gedrückt werden. Sobald die gewünschten Vorgänge ausgeführt wurden, schaltet
sich das Display erneut nach Ablauf einer Wartezeit von 15 Sekunden ab.
Vermindert den angezeigten Wert (Funktion wiederholt sich automatisch), oder geht zum nächsten Befehl eines Menüs weiter.
Um schnell zum niedrigsten Wert eines Parameters zu wechseln, oder zum ersten Befehl eines Menüs, die Taste UP drücken, während man die Taste DOWN
gedrückt hält.
Erhöht den angezeigten Wert (Funktion wiederholt sich automatisch), oder kehrt zum vorausgehenden Befehl eines Menüs zurück.
Um schnell zum höchsten Wert eines Parameters zu wechseln, oder zum letzten Befehl eines Menüs, die Taste DOWN drücken, während man die Taste UP gedrückt
hält.
Bestätigt den angezeigten Wert, oder aktiviert die angezeigte Funktion, oder tritt in das nächste Menü ein. Es ist darauf zu achten, dass keine Einstellung bestätigt
wird, solange ENTER nicht gedrückt wird.
%30!¶/,
&UNCIONESæDEæLASæTECLAS
3%,%#4
$/7.
sæ3IæSEæPULSAæENæESTADOæDEæREPOSOæConmuta ciclicamente entre el estado de reposo, la programación de la dirección DMX y las programaciones en los menús.
sæ3IæSEæPULSAæDURANTEæLAæPROGRAMACINæDEæUNæMEN¢æSube un nivel sin modificar nada (sale de la función).
Disminuye el valor visualizado (con autorepetición), o pasa a la voz siguiente de un menú
Para pasar rápidamente al valor mínimo de un parámetro, o a la primera voz de un menú, pulsar la tecla UP mientras se mantiene presionado DOWN.
50
%.4%2
&UNCINæDEæ(ELP
El proyector dispone de una función Help que permite la visualización de una breve descripción de cualquier voz del menú. Para activar la función Help, presionar y mantener presionada la tecla
ENTER mientras se presionan UP o DOWN durante el desplazamiento, que describe el significado de la voz de menú en la que se ha posicionado en ese momento. Es posible visualizar
nuevamente el mensaje de Help simplemente dejando y presionando nuevamente la tecla ENTER.
0ROGRAMACINæDIRECCIONESæYæOPCIONESæCONæPROYECTORæNOæCONECTADO
Es posible programar la dirección DMX del proyector, y otras opciones posibles de funcionamiento, incluso cuando el aparato está desconectado de la red eléctrica. Para activar
momentáneamente la pantalla y acceder a las programaciones basta presionar una tecla cualquiera. Una vez realizadas las operaciones deseadas, la pantalla se apagará de nuevo después de
un tiempo de espera de 15 segundos.
Aumenta el valor visualizado (con autorepetición), o pasa a la voz precedente de un menú
Para pasar rápidamente al valor mínimo de un parámetro, o a la última voz de un menú, pulsar la tecla DOWN mientras se mantiene presionado UP.
Confirma el valor visualizado, o activa la función visualizada, o entra en el menú sucesivo. Si comprueba que hasta cuando no se pulsa ENTER, ninguna
programación se confirma.
ALPHA WASH 300
11
Page 12
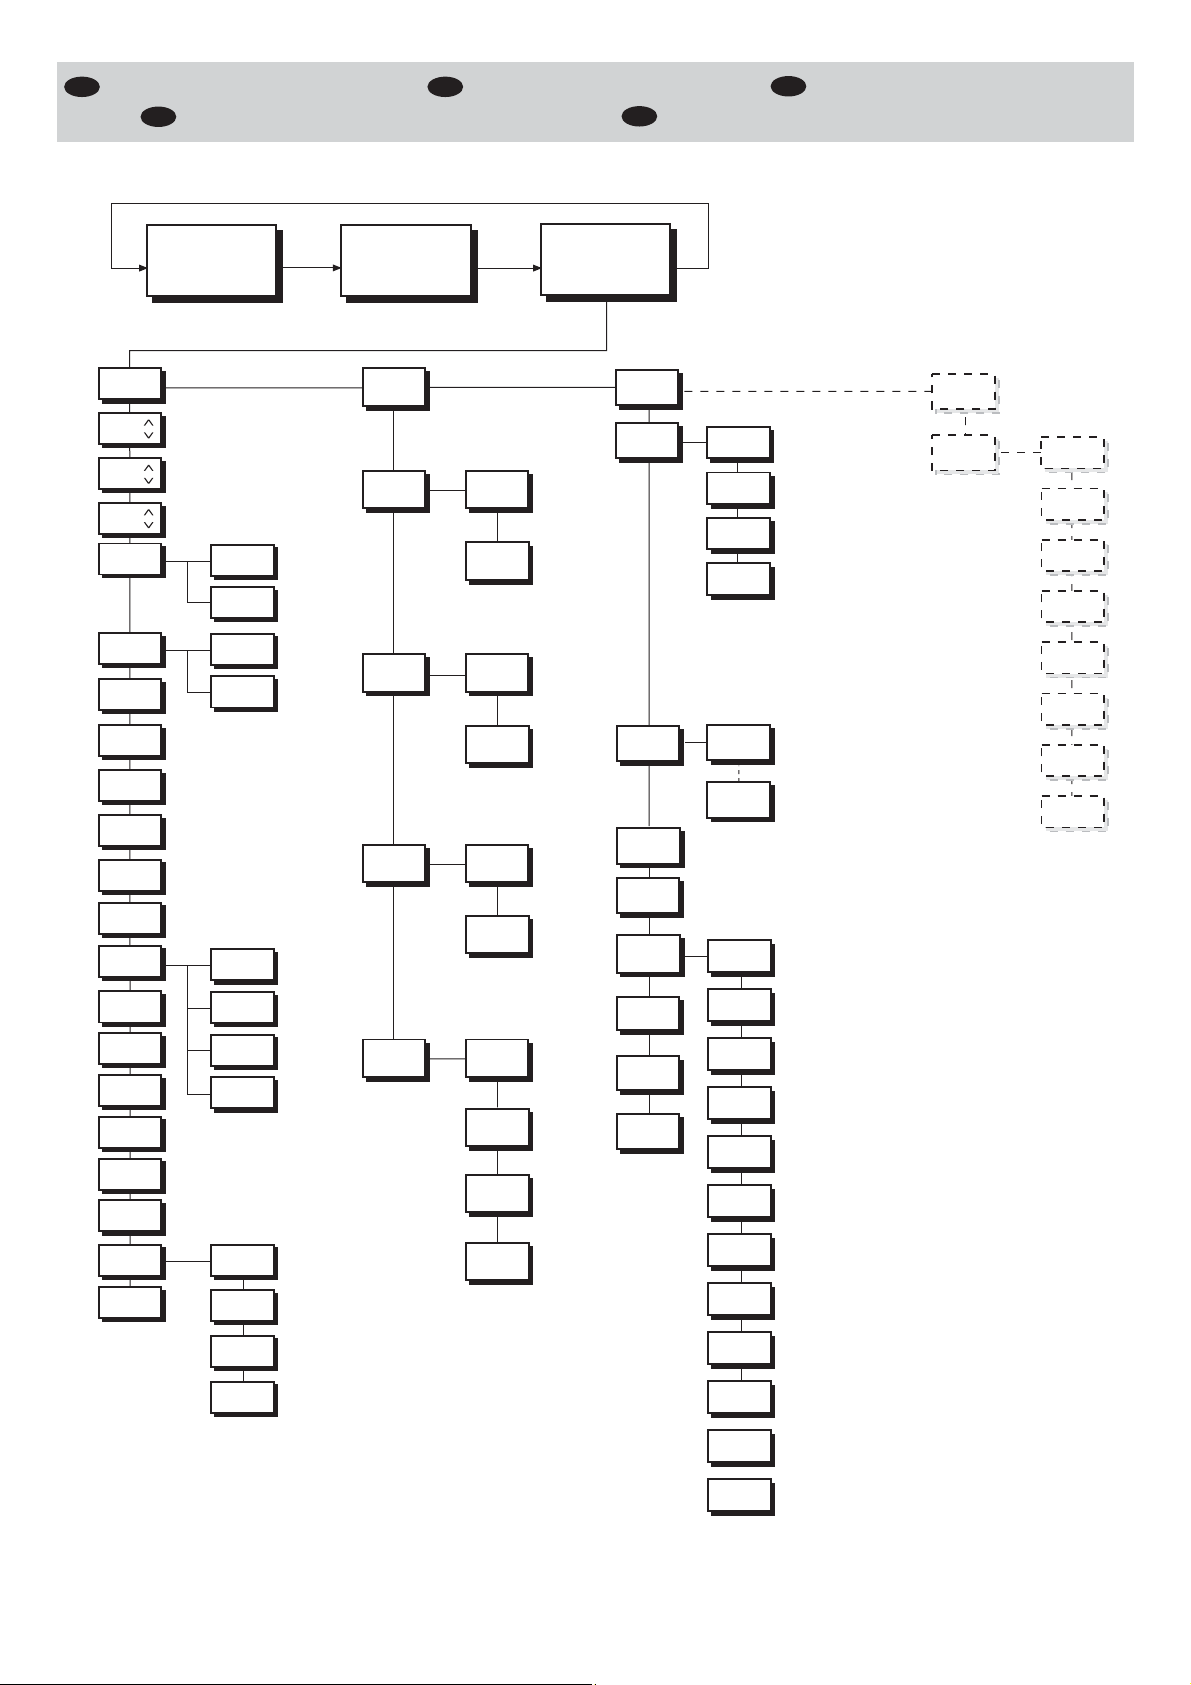
)
)-0/34!:)/.%æ-%.5 -%.5æ3%44).' 3»,%#4)/.æ-%.5
$
%).34%,,5.'æ-%.äæ 02/'2!-!#)Ê.æ-%.·æ
'"
%
&
-%.5æ.!6)'!4)/.
Wait state
(red led off) (red led on)
OPTIONS MENU
Opt
Pan
Til
P-T
PTSp
DmxM
CMY
LinC
FulC
Rain
ShDi
DiSh
Lon
Stnd
Fast
Vect
Stnd
PwUp
DMX start
adress setting
(red led on)
INFORMATIONS MENU
Info
HrPr
HrLa
Strk
Totl
Part
Totl
Part
Totl
Part
MENU
TEST FUNCTIONS MENU ( )
Test
Sens
DMX
Rst
Lamp
Ctrl
Cyan
Mgnt
Yelw
Col
Ch 1
Ch 17
Pan
*
SERVICE MENU ( )
Srvc
Cal
*
Pan
Tilt
Dimr
Cyan
Mgnt
Yelw
Col
Fact
LDmx
Enc
ShEr
Memo
Dmax
Doff
Set.
Fact
Dly
No
Auto
*
Set1
Set2
Set3
Set4
Vers
Brd0
Brd1
Brd2
HwB0
*
*
EncP
EncT
Auto
PanF
Tilt
TltF
Shut
Dimr
Col
Cyan
Mgnt
Yelw
Wid1
Wid2
ALPHA WASH 300
THE PROJECTOR MUST BE POWERED
*
12
Page 13

54),)::/æ$%,æ-%.5æ
1) Premere due volte il tasto SELECT – sul display appare “Opt”.
2) Con i tasti UP e DOWN selezionare il menu su cui si desidera operare:
• Opt (Options Menu): Impostazione delle opzioni di funzionamento.
• Info (Informations Menu): Lettura dei contatori,versione software ed altre informazioni.
• Test (Test functions Menu): Attivazione delle funzioni di test e di controllo manuale.
3) Premere il tasto ENTER per visualizzare la prima voce del menu selezionato.
4) Con i tasti UP e DOWN selezionare le voci del menu.
)
54),)::/æ$%,æ-%.5æ3%26)#%æ3RVCæ
!44%.:)/.%æ,ACCESSOæALæ-ENUæ3ERVICEæâæCONSIGLIATOæAæPERSONALEæTECNICOæQUALIFICATO
Per abilitare il menu Srvc tenere premuto contemporaneamente per qualche secondo i tasti S ed E durante l’accensione del proiettore.
1) Premere due volte il tasto SELECT – sul display appare “Opt”.
2) Con i tasti UP e DOWN selezionare il menu Srvc.
3) Premere il tasto ENTER per visualizzare la prima voce del menu.
4) Con i tasti UP e DOWN selezionare le voci del menu.
53).'æ4(%æ-%.5æ
1) Press SELECT twice – “Opt” appears on the display.
2) Use the UP and DOWN keys to select the menu to be used:
• Opt (Options Menu): To set the operating options.
• Info (Informations Menu): To read the counters, software version and other information.
• Test (Test functions Menu): To trigger the test and manual control functions.
3) Press ENTER to display the first item in the selected menu.
4)
'"
Use the UP and DOWN keys to select the MENU items.
53%æ/&æ4(%æ3%26)#%æ-%.5 3RVCæ
7!2.).'æ!CCESSæTOæTHEæ3ERVICEæ-ENUæISæRECOMMENDEDæFORæTRAINEDæTECHNICALæPERSONNEL
To enable the Srvc menu press keys S and E simultaneously for a few seconds while the projector is being switched on.
1) Press SELECT twice – “Opt” appears on the display.
2) Use the UP and DOWN keys to select the Srvc menu.
3) Press ENTER to display the first item in the menu.
4) Use the UP and DOWN keys to select the menu items..
54),)3!4)/.æ$5æ-%.5æ
1) Appuyer deux fois sur la touche SELECT – sur l’afficheur apparaît “Opt”.
2) Avec les touches UP et DOWN, s
• Opt (Options Menu) : Programmation des options de fonctionnement.
• Info (Informations Menu) : Lecture des compteurs, version du logicien et autres informations.
• Test (Test functions Menu): Activation des fonctions de test et de contrôle manuel.
3) Appuyer sur la touche de VALIDATION pour afficher le premier article du menu sélectionné.
Avec les touches UP et DOWN sélectionner les articles du MENU.
4)
&
électionner le menu sur lequel on désire opérer
:
54),)3!4)/.æ$5æ-%.5æ3%26)#% 3RVCææ
!44%.4)/.ææ,ACCâSæAUæ-ENUæ3ERVICEæESTæCONSEILL£æAUæPERSONNELæTECHNIQUEæQUALIFI£
Pour activer le menu Srvc, maintenir appuyées en même temps pendant quelques secondes les touches S et E pendant l’allumage du projecteur.
1) Appuyer deux fois sur la touche SELECT – sur l'afficheur apparaît “Opt”.
2) Avec les touches UP et DOWN, sélectionner le menu Srvc.
3) Appuyer sur la touche ENTER pour afficher le premier article du menu.
4) Avec les touches UP et DOWN sélectionner les articles du menu.
!.,%)45.'%.æ:52æ"%.54:5.'æ$%3æ-%.ä3æ
1) Die Taste SELECT zweimal drücken – auf dem Display erscheint „Opt.”.
2) Mit den Tasten UP und DOWN,
• Opt. (Options Menu): Einstellung der Funktionsoptionen
• Info (Informations Menu): Ablesen der Zähler, Software-Version und weitere Informationen
• Test (Test functions Menu): Aktivieren der Testfunktionen und der manuellen Steuerung
3) Die EINGABE-Taste (ENTER) drücken, um das erste Element des gewählten Menüs anzuzeigen.
Mit den Tasten UP und DOWN wähle man die Stichworte des MENÜS.
4)
$
man wähle das Menü auf dem man arbeiten möchte
:
"%.54:5.'æ$%2æ-%.5æ3%26)#% 3RVCæ
!#(45.'æ$ERæ:UGRIFFæAUFæDASæ-ENÔæ3ERVICEæWIRDæNURæQUALIFIZIERTENæ3ERVICETECHNIKERNæEMPFOHLEN
Um das Menü Srvc zu aktivieren, müssen während dem Einschalten des Projektors für einige Sekunden gleichzeitig die Tasten S und E gedrückt werden.
1) Zweimal die Taste SELECT drücken - auf dem Display erscheint „Opt“.
2) Mit den Tasten UP und DOWN den Menu Srvc wählen.
3) Die EINGABE-Taste (ENTER) drücken, um das erste Element des gewählten Menüs anzuzeigen.
4) Mit den Tasten UP und DOWN die Menüpunkte auswählen.
53/æ$%,æ-%.·æ
1) Presionar dos veces la tecla SELECT – en la pantalla aparece “Opt”.
2) Con las teclas UP y DOWN
• Opt (Options Menu): Programación de las opciones de funcionamiento.
• Info (Informations Menu): Lectura de los contadores, versión software y otras informaciones.
• Test (Test functions Menu): Activación de las funciones de test y de control manual.
3) Presionar la tecla ENTER para visualizar la primera voz del menú seleccionado.
Con las teclas UP y DOWN seleccionar las voces del MENÚ.
4)
%
seleccionar el menú en el que se desea trabajar:
53/æ$%,æ-%.·æ3%26)#% 3VRC
_!4%.#)Ê.æ%LæACCESOæALæ-EN¢æ3ERVICEæSEæACONSEJAæAæPERSONALæT£CNICOæCUALIFICADO
Para habilitar el menú Srvc pulse contemporáneamente durante cualquier segundo las teclas S y E durante el encendido del proyector.
1) Presione dos veces la tecla SELECT – en la pantalla aparece “Opt”.
2) Con las teclas UP y DOWN seleccione el menú Srvc.
3) Presione la tecla ENTER para visualizar la primera entrada del menú.
4) Con las teclas UP y DOWN seleccione las entradas del menú.
ALPHA WASH 300
13
Continua / Continue
➔
Page 14

-%.5æ/0:)/.) /04)/.3æ-%.5
) '"
Pna
Ti l
P
T
-
PST
0ANæINVERSION
Permette l’inversione del movimento Pan.
1) Premere ENTER - sul display appare l’impostazione corrente (On o Off).
2) Con i tasti UP e DOWN abilitare (On) o disabilitare (Off)
l’inversione del movimento PAN.
3) Premere ENTER per confermare la selezione (il display
lampeggia per alcuni istanti), oppure SELECT per mantenere l’impostazione corrente.
4ILTæINVERSION
Permette l’inversione del movimento Tilt.
1) Premere ENTER - sul display appare l’impostazione corrente (On o Off).
2) Con i tasti UP e DOWN abilitare (On) o disabilitare (Off)
l’inversione del movimento Tilt.
3) Premere ENTER per confermare la selezione (il display
lampeggia per alcuni istanti), oppure SELECT per mantenere l’impostazione corrente.
3WAPæ0ANææ4ILT
Permette di scambiare i canali Pan e Tilt (e contemporaneamente Pan fine e Tilt fine).
1) Premere ENTER - sul display appare l’impostazione corrente (On o Off).
2) Con i tasti UP e DOWN abilitare (On) o disabilitare (Off)
lo scambio dei canali Pan e Tilt.
3) Premere ENTER per confermare la selezione (il display
lampeggia per alcuni istanti), oppure SELECT per mantenere l’impostazione corrente.
p
Stnd
Fast
0ANææ4ILTæ3PEED
Permette di selezionare la velocità di movimento Pan e Tilt
tra le due disponibili.
1) Premere ENTER - sul display appare l’impostazione corrente (Stnd o Fast).
2) Con i tasti UP e DOWN selezionare una delle seguenti
impostazioni:
Stnd: Velocità di Pan e Tilt standard.
Fast: Velocità di Pan e Tilt accelerata.
3) Premere ENTER per confermare la selezione (il display
lampeggia per alcuni istanti), oppure SELECT per mantenere l’impostazione corrente .
0ANæINVERSION
Used for reversing Pan movement.
1)Press ENTER – the current settings appear on the
display (On or Off).
2) Use the UP and DOWN keys to enable (On) or disable
(Off) PAN inversion.
3) Press ENTER to confirm the selection (the display blinks
for several seconds), or SELECT to keep current
settings.
4ILTæINVERSION
Used for reversing tilt movement.
1)Press ENTER – the current settings appear on the
display (On or Off).
2) Use the UP and DOWN keys to enable (On) or disable
(Off) Tilt inversion.
3) Press ENTER to confirm the selection (the display blinks
for several seconds), or SELECT to keep current
settings.
3WAPæ0ANææ4ILT
Used for swapping Pan and Tilt channels (as well as Pan
fine and Tilt fine).
1)Press ENTER – the current settings appear on the
display (On or Off).
2) Use the UP and DOWN keys to enable (On) or disable
(Off) Pan and Tilt channel swap.
3) Press ENTER to confirm the selection (the display blinks
for several seconds), or SELECT to keep current
settings.
0ANææ4ILTæ3PEED
Allows you to select the Pan and Tilt movement speed from
the two available.
1)Press ENTER – the current setting appears on the
display (Stnd or Fast).
2)Use the UP and DOWN keys to select one of the
following settings:
Stnd: Standard Pan and Tilt speed.
Fast: Fast Pan and Tilt speed.
3) Press ENTER to confirm the selection (the display blinks
for some seconds), or SELECT to keep current setting.
DmxM
C
M
Y
Lnci
Fulc
Pna
Stnd
$MXæ-ODALITY
Permette di selezionare la disposizione dei canali fra le due
disponibili.
1) Premere ENTER - sul display appare l’impostazione corrente (Stnd, Vect).
2) Con i tasti UP e DOWN selezionare una delle seguenti
impostazioni:
æ6ECTORæMODALITY
æ3TANDARD
3) Premere ENTER per confermare la selezione (il display
lampeggia per alcuni istanti),oppure SELECT per mantenere l’impostazione corrente.
#-9æ#OLORæMIXING
Permette l’inversione del sistema di miscelazione colori CMY.
1) Premere ENTER - sul display appare l’impostazione corrente (On o Off).
2) Con i tasti UP e DOWN abilitare (On) o disabilitare (Off)
la modalità di miscelazione colori CMY.
3) Premere ENTER per confermare la selezione (il display
lampeggia per alcuni istanti), oppure SELECT per mantenere l’impostazione corrente.
,INEARæ#OLOURS
Permette il movimento in modo lineare del disco colori .
1) Premere ENTER - sul display appare l’impostazione corrente (On o Off).
2) Con i tasti UP e DOWN abilitare (On) o disabilitare (Off) il
movimento lineare del disco colori.
3) Premere ENTER per confermare la selezione (il display
lampeggia per alcuni istanti), oppure SELECT per mantenere l’impostazione corrente.
&ULLæ#OLOUR
Permette il posizionamento del disco colori solo su colori pieni.
1) Premere ENTER - sul display appare l’impostazione corrente (On o Off).
2) Con i tasti UP e DOWN abilitare (On) o disabilitare (Off) il
posizionamento del disco su colori pieni.
3) Premere ENTER per confermare la selezione (il display
lampeggia per alcuni istanti), oppure SELECT per mantenere l’impostazione corrente.
$MXæ-ODALITY
Allows you to select a channel arrangement from the two
available.
Press ENTER – the current settings appear on the display
1)
(Stnd, Vect).
Use the UP and DOWN keys to select one of the following
2)
:
settings
æ6ECTORæMODALITY
æ3TANDARD
3) Press ENTER to confirm the selection (the display blinks for
several seconds), or SELECT to keep current settings.
#-9æ#OLORæMIXING
Used for reversing the CMY color mixing system.
1)Press ENTER – the current settings appear on the
display (On or Off).
2) Use the UP and DOWN keys to enable (On) or disable
(Off) CMY color mixing mode.
3) Press ENTER to confirm the selection (the display blinks
for several seconds), or SELECT to keep current
settings.
,INEARæ#OLOURS
Used to enable linear movement of the colour disc.
1)Press ENTER – the current settings appear on the
display (On or Off).
2) Use the UP and DOWN keys to enable (On) or disable
(Off) linear movement of the colour disc.
3) Press ENTER to confirm the selection (the display blinks
some
seconds), or SELECT to keep current settings.
for
&ULLæ#OLOUR
Used to enable colour disc positioning only on solid colours.
1)Press ENTER – the current settings appear on the
display (On or Off).
2) Use the UP and DOWN keys to enable (On) or disable
(Off) colour disc positioning only on solid colours.
3) Press ENTER to confirm the selection (the display blinks
some
seconds), or SELECT to keep current settings.
for
ALPHA WASH 300
14
Page 15

-%.äæ/04)/.%. -%.·æ/0#)/.%3-%.5æ$%3æ/04)/.3æ
$ %&
0ANæ)NVERSION
Permet l’inversion du mouvement Pan.
1) Appuyer sur la touche de VALIDATION – sur l’afficheur
apparaît la sélection courante (On ou Off).
2) Avec les touches UP et DOWN activer (On) ou désactiver
(Off) l’inversion du mouvement PAN.
Appuyer sur la touche de VALIDATION pour confirmer la sélec-
3)
tion (l’afficheur clignote pendant quelques instants), ou bien sur
la touche SELECT pour maintenir la sélection courante.
4ILTæ)NVERSIONæ
Permet l’inversion du mouvement Tilt.
1) Appuyer sur la touche de VALIDATION – sur l’afficheur
apparaît la sélection courante (On ou Off).
2) Avec les touches UP et DOWN activer (On) ou désactiver
(Off) l’inversion du mouvement Tilt.
Appuyer sur la touche de VALIDATION pour confirmer la sélec-
3)
tion (l’afficheur clignote pendant quelques instants), ou bien sur
la touche SELECT pour maintenir la sélection courante.
3WAPæ0ANææ4ILTæ
Permet de permuter les canaux Pan et Tilt (et en même temps
Pan fine et Tilt fine).
1) Appuyer sur la touche de VALIDATION – sur l’afficheur
apparaît la sélection courante (On ou Off).
2) Avec les touches UP et DOWN activer (On) ou désactiver
(Off) la permutation des canaux Pan et Tilt.
Appuyer sur la touche de VALIDATION pour confirmer la sélec-
3)
tion (l’afficheur clignote pendant quelques instants), ou bien sur
la touche SELECT pour maintenir la sélection courante.
0ANææ4ILTæ3PEED
Permet de choisir la vitesse de mouvement Pan et Tilt parmi les
deux vitesses disponibles.
1) Appuyer sur la touche de VALIDATION – sur l’afficheur
apparaît la programmation courante (Standard ou Fast).
2) Avec les touches UP et DOWN, sélectionner une des programmations suivantes :
Standard : Vitesses de Pan et de Tilt standard.
Fast : Vitesses de Pan et de Tilt accélérées.
3) Appuyer sur la touche de VALIDATION pour confirmer la
sélection (l’afficheur clignote pendant quelques instants), ou
bien sur la touche SELECT pour maintenir la programmation
courante.
0ANæINVERSION
Ermöglicht die Umkehrung der Pan Bewegung.
1) ENTER drücken – auf dem Display erscheint die laufende
2) Mit den Tasten UP und DOWN die Umkehrung der PAN
3) ENTER drücken um die Wahl zu bestätigen (das Display
4ILTæINVERSION
Ermöglicht die Umkehrung der Tilt Bewegung.
1) ENTER drücken – auf dem Display erscheint die laufende
2) Mit den Tasten UP und DOWN die Umkehrung der Tilt
3) ENTER drücken um die Wahl zu bestätigen (das Display
3WAPæ0ANææ4ILTæ
Ermöglicht die Kanäle Pan und Tilt (und gleichzeitig Pan Ende
und Tilt Ende) untereinander auszutauschen.
1) ENTER drücken – auf dem Display erscheint die laufende
2) Mit den Tasten UP und DOWN die Umschaltung zwischen
3) ENTER drücken um die Wahl zu bestätigen (das Display
0ANææ4ILTæ3PEED
Erlaubt die Auswahl einer der zwei verfügbaren
Bewegungsgeschwindigkeiten für Pan und Tilt
1) ENTER drücken – auf dem Display erscheint die laufende
2)Mit den Tasten UP und DOWN eine der folgenden
Standard: Standardgeschwindigkeit für Pan und Tilt.
Schnell: Beschleunigte Geschwindigkeit für Pan und Tilt.
3) ENTER drücken, um die Wahl zu bestätigen (das Display
0ANæINVERSION
Permite la inversión del movimiento Pan.
1) Presionar ENTER – en la pantalla aparece la programación
Einstellung (On oder Off).
2) Con las teclas UP y DOWN habilitar (On) o deshabilitar (Off)
Bewegung freigeben (On) oder sperren (Off).
3) Presionar ENTER para confirmar la selección (la pantalla
blinkt einige Momente lang), oder SELECT drücken, um die
laufende Einstellung beizubehalten.
4ILTæINVERSION
Permite la inversión del movimiento Tilt.
1) Presionar ENTER – en la pantalla aparece la programación
Einstellung (On oder Off).
2) Con las teclas UP y DOWN habilitar (On) o deshabilitar (Off)
Bewegung freigeben (On) oder sperren (Off).
3) Presionar ENTER para confirmar la selección (la pantalla
blinkt einige Momente lang), oder SELECT drücken, um die
laufende Einstellung beizubehalten.
3WAPæ0ANææ4ILTæ
Permite intercambiar los canales Pan y Tilt (y contemporáneamente Pan fine y Tilt fine).
1) Presionar ENTER – en la pantalla aparece la programación
Einstellung (On oder Off).
2) Con las teclas UP y DOWN habilitar (On) o deshabilitar (Off)
den Kanälen PAN und Tilt freigeben (On) oder sperren (Off).
3) Presionar ENTER para confirmar la selección (la pantalla
blinkt einige Momente lang), oder SELECT drücken, um die
laufende Einstellung beizubehalten.
0ANææ4ILTæ3PEED
Permite seleccionar la velocidad de movimiento Pan y Tilt entre
las dos disponibles.
1) Presionar ENTER – en la pantalla aparece la programación
Einstellung (Stnd oder Fast).
2) Con las teclas UP y DOWN seleccionar una de las siguienEinstellungen wählen:
Stnd: Velocidad de Pan y Tilt estándar.
Fast: Velocidad de Pan y Tilt acelerada.
3) Presionar ENTER para confirmar la selección (la pantalla
blinkt einige Momente lang), oder SELECT drücken, um die
laufende Einstellung beizubehalten.
actual (On o Off).
la inversión del movimiento PAN.
parpadea durante algunos instantes) o SELECT para mantener la programación actual.
actual (On o Off).
la inversión del movimiento Tilt.
parpadea durante algunos instantes) o SELECT para mantener la programación actual.
actual (On o Off).
el intercambio de los canales Pan y Tilt.
parpadea durante algunos instantes) o SELECT para mantener la programación actual.
corriente (Stnd o Fast)
tes configuraciones:
parpadea durante algunos instantes), o SELECT para mantener la programación corriente.
$MXæ-ODALITY
Permet de sélectionner la disposition des canaux entre les
deux qui sont disponibles.
Appuyer sur la touche de VALIDATION – sur l’afficheur
1)
apparaît la sélection courante
Avec les touches UP et DOWN, sélectionner l’une des pro-
2)
grammations suivantes
æ6ECTORæMODALITY
æ3TANDARD
Appuyer sur la touche de VALIDATION pour confirmer la sélec-
3)
tion (l’afficheur clignote pendant quelques instants), ou bien sur
la touche SELECT pour maintenir la sélection courante
#-9æ#OLORæMIXING
Permet l’inversion du système de mélange des couleurs CMY.
1) Appuyer sur la touche de VALIDATION – sur l’afficheur
apparaît la sélection courante (On ou Off).
2) Avec les touches UP et DOWN, activer (On) ou désactiver
(Off) la modalité de mélange des couleurs CMY.
Appuyer sur la touche de VALIDATION pour confirmer la sélec-
3)
tion (l’afficheur clignote pendant quelques instants), ou bien sur
la touche SELECT pour maintenir la sélection courante.
,INEARæ#OLOURS
Permet un mouvement linéaire de la roue couleurs.
1) Appuyer sur la touche de VALIDATION – sur l’afficheur
apparaît la sélection courante (On ou Off).
2) Avec les touches UP et DOWN activer (On) ou désactiver
(Off) le mouvement linéaire de la roue couleurs.
Appuyer sur la touche de VALIDATION pour confirmer la sélec-
3)
tion (l’afficheur clignote pendant quelques instants), ou bien sur
la touche SELECT pour maintenir la sélection courante.
&ULLæ#OLOUR
Permet le positionnement disque couleurs uniquement sur couleurs pleines.
1) Appuyer sur la touche de VALIDATION – sur l’afficheur
apparaît la sélection courante (On ou Off).
2) Avec les touches UP et DOWN, activer (On) ou désactiver
(Off) le positionnement disque couleurs sur couleurs pleines.
Appuyer sur la touche de VALIDATION pour confirmer la sélec-
3)
tion (l’afficheur clignote pendant quelques instants), ou bien sur
la touche SELECT pour maintenir la sélection courante.
ALPHA WASH 300
(Stnd, Vect).
:
.
$MXæ-ODALITY
Erlaubt die Auswahl der Kanalanordnung aus den zwei
verfügbaren.
1)
2)
3)
#-9æ#OLORæMIXING
Ermöglicht die Umkehrung des CMY Farbmischsystems.
1) ENTER drücken – auf dem Display erscheint die laufende
2) Mit den Tasten UP und DOWN die CMY Modalität der
3) ENTER drücken um die Wahl zu bestätigen (das Display
,INEARæ#OLOURS
Ermöglicht die lineare Bewegung der Farbscheibe.
1) ENTER drücken – auf dem Display erscheint die laufende
2) Mit den Tasten UP und DOWN die lineare Bewegung der
3) ENTER drücken um die Wahl zu bestätigen (das Display
&ULLæ#OLOUR
Ermöglicht die Positionierung der Farbscheibe nur auf volle
Farben.
1) ENTER drücken – auf dem Display erscheint die laufende
2) Mit den Tasten UP und DOWN die Positionierung der
3) ENTER drücken um die Wahl zu bestätigen (das Display
$MXæ-ODALITY
Permite seleccionar la disposición de los canales entre las
ENTER drücken – auf dem Display erscheint die laufende
Einstellung
Mit den Tasten UP und DOWN eine der folgenden
Einstellungen wählen
æ6ECTORæMODALITY
æ3TANDARD
ENTER drücken um die Wahl zu bestätigen (das Display
blinkt einige Momente lang), oder SELECT drücken, um die
laufende Einstellung beizubehalten
Einstellung (On oder Off).
Farbmischung freigeben (On) oder sperren (Off).
blinkt einige Momente lang), oder SELECT drücken, um die
laufende Einstellung beizubehalten.
Einstellung (On oder Off).
Farbscheibe freigeben (On) oder sperren (Off).
blinkt einige Momente lang), oder SELECT drücken, um die
laufende Einstellung beizubehalten.
Einstellung (On oder Off).
Farbscheibe auf volle Farben freigeben (On) oder sperren (Off).
blinkt einige Momente lang), oder SELECT drücken, um die
laufende Einstellung beizubehalten.
(Stnd, Vect).
:
.
dos que están disponibles.
1)
2)
3)
#-9æ#OLORæMIXING
Permite la inversión del sistema de mezclado de colores CMY.
1) Presionar ENTER – en la pantalla aparece la programación
2) Con las teclas UP y DOWN habilitar (On) o deshabilitar (Off)
3) Presionar ENTER para confirmar la selección (la pantalla
,INEARæ#OLOURS
Permite el movimiento de manera lineal del disco de colores.
1) Presionar ENTER – en la pantalla aparece la programación
2) Con las teclas UP y DOWN habilitar (On) o deahabilitar (Off)
3) Presionar ENTER para confirmar la selección (la pantalla
&ULLæ#OLOUR
Permite el posicionamiento del disco de colores solo en colores
puros.
1) Presionar ENTER – en la pantalla aparece la programación
2) Con las teclas UP y DOWN habilitar (On) o deshabilitar (Off)
3) Presionar ENTER para confirmar la selección (la pantalla
15
Presionar ENTER – en la pantalla aparece la modalidad
(Stnd, Vect).
actual
Con las teclas UP y DOWN seleccionar una de las siguientes modalidades
æ6ECTORæMODALITY
æ3TANDARD
Presionar ENTER para confirmar la selección (la pantalla
parpadea durante algunos instantes) o SELECT para mantener la programación actual
actual (On o Off).
la modalidad de mezclado de colores CMY.
parpadea durante algunos instantes) o SELECT para mantener la programación actual.
actual (On o Off).
el movimiento lineal del disco de colores.
parpadea durante algunos instantes) o SELECT para mantener la programación actual.
actual (On o Off).
el posicionamiento del disco en colores puros.
parpadea durante algunos instantes) o SELECT para mantener la programación actual.
:
.
Continua / Continue
➔
Page 16

Rina
2AINBOWæEFFECT
Permette l’abilitazione dell’effetto rainbow (rotazione continua del disco colori).
1) Premere ENTER - sul display appare l’impostazione corrente (On o Off).
2) Con i tasti UP e DOWN abilitare (On) o disabilitare (Off)
l’effetto rainbow.
3) Premere ENTER per confermare la selezione (il display
lampeggia per alcuni istanti), oppure SELECT per mantenere l’impostazione corrente.
2AINBOWæEFFECT
Used for enabling the rainbow effect (continual rotation of
the color disc).
1)Press ENTER – the current settings appear on the
display (On or Off).
2) Use the UP and DOWN keys to enable (On) or disable
(Off) the rainbow effect.
3) Press ENTER to confirm the selection (the display blinks
for several seconds), or SELECT to keep current
settings.
ShDi
ShD i
Lon
PwU
y
Dl
3HUTTERæONæ$IMMER
Abilita la chiusura automatica dello strobo quando il dimmer è
completamente chiuso.
1) Premere ENTER - sul display appare l’impostazione corrente
(On o Off).
2) Con i tasti UP e DOWN abilitare (On) o disabilitare (Off) la
chiusura automatica dello strobo.
3) Premere ENTER per confermare la selezione (il display lampeggia per alcuni istanti), oppure SELECT per mantenere
l’impostazione corrente.
$IMMERæONæ3HUTTERæ
Abilta la chiusura automatica del dimmer quando lo strobo è
completamente chiuso.
1) Premere ENTER sul display appare l’impostazione corrente
(On o Off).
2) Con i tasti UP e DOWN abilitare (On) o disabilitare (Off) la
chiusura automatica del dimmer.
3) Premere ENTER per confermare la selezione (il display lampeggia per alcuni istanti), oppure SELECT per mantenere
l’impostazione corrente.
,AMPæONæMODE
Permette di selezionare la modalità di accensione della lampada.
1) Premere ENTER - sul display appare l’impostazione corrente
(PwUp, Dly, No o Auto).
2) Con i tasti UP e DOWN selezionare una delle seguenti impostazioni:
p
0OWERæUP
Alimentando il proiettore la lampada si accende con un ritardo
fisso di 10 secondi.
0OWERæUPæWITHæDELAY
Alimentando il proiettore la lampada si accende con un ritardo
fisso di 10 secondi più un ritardo variabile proporzionale all’indirizzo DMX del proiettore stesso. Il ritardo variabile vale 50ms
per ogni canale, di conseguenza il ritardo fra l’accensione della
lampada di un proiettore ed il successivo è di circa 0.8 secondi
(es: 50ms x16chs. = 0.8sec).
3HUTTERæONæ$IMMER
Enables automatic strobe closing when the dimmer is completely closed.
1) Press ENTER – the current settings appear on the display
(On or Off).
2) Use the UP and DOWN keys to enable (On) or disable (Off)
automatic strobe closing.
3) Press ENTER to confirm the selection (the display blinks for
several seconds), or SELECT to keep current settings.
$IMMERæONæ3HUTTERæ
Enables automatic closing of the dimmer when the strobe is
completely closed.
1) Press ENTER - the current setting appears on the display
(On or Off).
2) Use the UP and DOWN keys to enable (On) o disable (Off)
the automatic closing of the dimmer.
3) Press ENTER to confirm the selection (the display blinks for
some seconds), or SELECT to keep current settings.
,AMPæONæMODE
Used for selecting lamp lighting mode.
1) Press ENTER – the current settings appear on the display
(PwUp, Dly, No or Auto).
2) Use the UP and DOWN keys to select one of the following
settings:
0OWERæUP
When the projector is turned on the lamp lights with a fixed 10
second delay.
0OWERæUPæWITHæDELAY
When the projector is turned on the lamp lights with a fixed 10
second delay plus a variable delay proportionate to the projector’s DMX address. The variable delay is 50ms for each channel, consequently the delay between one projector lamp lighting
and the next is about 0.8 second (i.e.: 50ms x 16chs. = 0.8sec).
LDmx
Enc
N
A
o
t
u
o
.OæLAMPæON
Alimentando il proiettore la lampada rimane spenta.
!UTOæ$-8
La lampada si accende quando viene collegato un segnale
DMX (sempre con il ritardo fisso di 10 secondi). Si spegne se in
seguito il segnale DMX resta assente per più di 15 minuti.
3) Premere ENTER per confermare la selezione (il display lampeggia per alcuni istanti), oppure SELECT per mantenere
l’impostazione corrente.
%NABLEæLAMPæCONTROLæDMXæCHANNEL
Permette l’abilitazione del canale di controllo remoto della lampada.
1) Premere ENTER - sul display appare l’impostazione corrente
(On o Off).
2) Con i tasti UP e DOWN abilitare (On) o disabilitare (Off) il
canale di controllo remoto della lampada.
3) Premere ENTER per confermare la selezione (il display lampeggia per alcuni istanti), oppure SELECT per mantenere
l’impostazione corrente.
%NABLEæENCODER
Permette l’abilitazione degli encoder Pan / Tilt.
1) Premere ENTER - sul display appare l’impostazione corrente
(On o Off).
2) Con i tasti UP e DOWN abilitare (On) o disabilitare (Off) gli
encoder Pan / Tilt (ad ogni nuova accensione del proiettore
questa opzione assume il valore On).
3) Premere ENTER per confermare la selezione (il display lampeggia per alcuni istanti), oppure SELECT per mantenere
l’impostazione corrente.
.OæLAMPæON
The lamp remains off when the projector is turned on.
!UTOæ$-8
The lamp turns on when a DMX signal is connected (always
with the 10 second fixed delay). It turns off if there is no DMX
signal for more than 15 minutes.
3) Press ENTER to confirm the selection (the display blinks for
several seconds), or SELECT to keep current settings.
%NABLEæLAMPæCONTROLæDMXæCHANNEL
Used for enabling lamp remote control channel.
1) Press ENTER – the current settings appear on the display
(On or Off).
2) Use the UP and DOWN keys to enable (On) or disable (Off)
the lamp remote control channel.
3) Press ENTER to confirm the selection (the display blinks for
several seconds), or SELECT to keep current settings.
%NABLEæENCODER
Used for enabling the Pan / Tilt encoders.
1) Press ENTER – the current settings appear on the display
(On or Off).
2) Use the UP and DOWN keys to enable (On) or disable (Off)
Pan / Tilt encoders (every time the projector is turned on this
option is set to On).
3) Press ENTER to confirm the selection (the display blinks for
several seconds), or SELECT to keep current settings.
ALPHA WASH 300
16
Page 17

2AINBOWæEFFECT
Permet d’activer l’effet rainbow (rotation continue du disque
couleurs).
1) Appuyer sur la touche de VALIDATION – sur l’afficheur
apparaît la sélection courante (On ou Off).
2) Avec les touches UP et DOWN, activer (On) ou désactiver
(Off) l’effet rainbow.
3)
Appuyer sur la touche de VALIDATION pour confirmer la sélection (l’afficheur clignote pendant quelques instants), ou bien sur
la touche SELECT pour maintenir la sélection courante.
2AINBOWæEFFECT
Ermöglicht die Aktivierung des Rainbow Effekts (ständige
Rotation der Farbscheibe).
1) ENTER drücken – auf dem Display erscheint die laufende
2) Mit den Tasten UP und DOWN den Rainbow Effekt freige-
3) ENTER drücken um die Wahl zu bestätigen (das Display
2AINBOWæEFFECT
Permite la habilitación del efecto rainbow (rotación continua del
disco de colores).
1) Presionar ENTER – en la pantalla aparece la programación
Einstellung (On oder Off).
2) Con las teclas UP y DOWN habilitar (On) o deshabilitar (Off)
ben (On) oder sperren (Off).
3) Presionar ENTER para confirmar la selección (la pantalla
blinkt einige Momente lang), oder SELECT drücken, um die
laufende Einstellung beizubehalten.
actual (On o Off).
el efecto rainbow.
parpadea durante algunos instantes) o SELECT para mantener la programación actual.
3HUTTERæONæ$IMMER
Active la fermeture automatique du strobe lorsque le gradateur
est complètement fermé.
1) Appuyer sur la touche de VALIDATION – sur l’afficheur
apparaît la sélection courante (On ou Off).
2) Avec les touches UP et DOWN, activer (On) ou désactiver
(Off) la fermeture automatique du strobe.
3) Appuyer sur VALIDATION pour confirmer la sélection (l’afficheur clignote pendant quelques instants), ou bien sur
SELECT pour maintenir la sélection courante.
$IMMERæONæ3HUTTERæ
Active la fermeture automatique du gradateur quand le strobe
est complètement fermé.
1) Appuyer sur la touche de VALIDATION – sur l’afficheur
apparaît la programmation courante (On ou Off).
2) Avec les touches UP et DOWN, activer (On) ou désactiver
(Off) la fermeture automatique du dimmer.
3) Appuyer sur la touche de VALIDATION pour confirmer la sélection (l’afficheur clignote pendant quelques instants), ou bien sur
la touche SELECT pour maintenir la programmation courante.
,AMPæONæMODE
Permet de sélectionner la modalité d’allumage de la lampe.
1) Appuyer sur la touche de VALIDATION – sur l’afficheur
apparaît la sélection courante (PwUp, Dly, No, ou Auto).
2) Avec les touches UP et DOWN, sélectionner l’une des programmations suivantes :
0OWERæUP
Quand on alimente le projecteur la lampe s’allume avec un
retard fixe de 10 secondes.
0OWERæUPæWITHæDELAY
Quand on alimente le projecteur la lampe s’allume avec un
retard fixe de 10 secondes, plus un retard variable proportionnel à l’adresse DMX du projecteur. Le retard variable vaut 50
ms pour chaque canal, par conséquent le retard entre l’allumage de la lampe d’un projecteur et l'allumage suivant est d’environ 0.8 seconde (ex : 50 ms x 16 chs. = 0.8 sec).
.OæLAMPæON
Si on alimente le projecteur la lampe reste éteinte.
!UTOæ$-8
La lampe s’allume quand on connecte un signal DMX (toujours
avec le retard fixe de 10 secondes). Elle s’éteint si ensuite le
signal DMX reste absent pendant plus de 15 minutes.
3)
Appuyer sur la touche de VALIDATION pour confirmer la sélection (l’afficheur clignote pendant quelques instants), ou bien sur
la touche SELECT pour maintenir la sélection courante.
3HUTTERæONæ$IMMER
Gibt die automatische Verschließung des Strobe frei, wenn der
Dimmer völlig geschlossen ist.
1) ENTER drücken – auf dem Display erscheint die laufende
Einstellung (On oder Off).
2) Mit den Tasten UP und DOWN die automatische
Verschließung des Strobe freigeben (On) oder sperren (Off).
3) ENTER drücken um die Wahl zu bestätigen (das Display
blinkt einige Momente lang), oder SELECT drücken, um die
laufende Einstellung beizubehalten.
$IMMERæONæ3HUTTERæ
Befähigt die automatische Schließung des Dimmer, wenn der
strobe ganz geschlossen ist.
1) ENTER drücken – auf dem Display erscheint die laufende
Einstellung (On oder Off).
2) Mit den Tasten UP und DOWN die automatische Schließung
des Dimmers freigeben (On) oder sperren (Off).
3) ENTER drücken, um die Wahl zu bestätigen (das Display
blinkt einige Momente lang), oder SELECT drücken, um die
laufende Einstellung beizubehalten.
,AMPæONæMODE
Ermöglicht die Wahl der Einschaltungsmodalität der Lampe zu wählen.
1) ENTER drücken – auf dem Display erscheint die laufende
Einstellung (PwUp, Dly, No oder Auto).
2)Mit den Tasten UP und DOWN eine der folgenden
Einstellungen wählen:
0OWERæUP
Die Lampe schaltet sich mit einer fixen Verspätung von 10
Sekunden ein, wenn man den Projektor versorgt.
0OWERæUPæWITHæDELAY
Wenn man den Projektor versorgt, schaltet sich die Lampe mit
einer fixen Verspätung von 10 Sekunden und einer variablen
Verspätung ein, die im Verhältnis zur DMX Adresse des
Projektors selbst ist. Die variable Verspätung gilt 50ms für
jeden Kanal, daher beträgt die Verspätung zwischen dem
Einschalten der Lampe eines Projektors und dem nächsten
circa 0.8 Sekunde (zum Beispiel: 50ms x 16chs = 0.8Sek).
.OæLAMPæON
Wenn man den Projektor mit Strom versorgt bleibt die Lampe
ausgeschaltet.
!UTOæ$-8
Die Lampe schaltet sich ein, wenn ein DMX Signal angeschlossen wird (immer mit einer fixen Verspätung von 10 Sekunden).
Sie schaltet sich im Nachhinein aus, wenn das DMX für mehr
als 15 Minuten abwesend bleibt.
3) ENTER drücken um die Wahl zu bestätigen (das Display
blinkt einige Momente lang), oder SELECT drücken, um die
laufende Einstellung beizubehalten.
3HUTTERæONæ$IMMER
Habilita el cierre automático del estrobo cuando el dímer está
cerrado completamente.
1) Presionar ENTER – en la pantalla aparece la programación
actual (On o Off).
2) Con las teclas UP y DOWN habilitar (On) o deshabilitar (Off)
el cierre automático del estrobo.
3) Presionar ENTER para confirmar la selección (la pantalla
parpadea durante algunos instantes) o SELECT para mantener la programación actual.
$IMMERæONæ3HUTTERæ
Habilita el cierre automático del dímer cuando el estrobo está
cerrado completamente.
1) Presionar ENTER – en la pantalla aparece la programación
corriente (On u Off).
2) Con las teclas UP y DOWN habilitar (On) o deshabilitar (Off)
el cierre automático del dímer.
3) Presionar ENTER para confirmar la selección (la pantalla
parpadea durante algunos instantes), o SELECT para mantener la programación corriente.
,AMPæONæMODE
Permite seleccionar la modalidad de encendido de la lámpara.
1) Presionar ENTER – en la pantalla aparece la modalidad
actual (PwUp, Dly, No o Auto ).
2) Con las teclas UP y DOWN seleccionar una de las siguientes modalidades:
0OWERæUP
Alimentando el proyector la lámpara se enciende con un retraso fijo de 10 segundos.
0OWERæUPæWITHæDELAY
Alimentando el proyector la lámpara se enciende con un retraso fijo de 10 segundos más un retraso variable proporcional a
la dirección DMX del mismo proyector. El retraso variable vale
50ms para cada canal; como consecuencia el retraso entre el
encendido de la lámpara de un proyector y el sucesivo es de
casi 0.8 segundo (ej: 50ms x 16chs. = 0.8seg).
.OæLAMPæON
Alimentando el proyector la lámpara se queda apagada.
!UTOæ$-8
La lámpara se enciende cuando se conecta una señal DMX
(siempre con el retraso fijo de 10 segundos). Se apaga si, a continuación, la señal DMX se ausenta durante más de 15 minutos.
3) Presionar ENTER para confirmar la selección (la pantalla
parpadea durante algunos instantes) o SELECT para mantener la programación actual.
%NABLEæLAMPæCONTROLæDMXæCHANNEL
Permet d’activer le canal de télécommande de la lampe.
1) Appuyer sur la touche de VALIDATION – sur l’afficheur
apparaît la sélection courante (On ou Off).
2) Avec les touches UP et DOWN, activer (On) ou désactiver
(Off) le canal de télécommande de la lampe.
3)
Appuyer sur la touche de VALIDATION pour confirmer la sélection (l’afficheur clignote pendant quelques instants), ou bien sur
la touche SELECT pour maintenir la sélection courante.
%NABLEæENCODER
Permet d’activer les encoders Pan / Tilt.
1) Appuyer sur la touche de VALIDATION – sur l’afficheur
apparaît la sélection courante (On ou Off).
2) Avec les touches UP et DOWN, activer (On) ou désactiver
(Off) les encoders Pan / Tilt (à chaque nouvel allumage du
projecteur cette option assume la valeur On).
3)
Appuyer sur la touche de VALIDATION pour confirmer la sélection (l’afficheur clignote pendant quelques instants), ou bien sur
la touche SELECT pour maintenir la sélection courante.
ALPHA WASH 300
%NABLEæLAMPæCONTROLæDMXæCHANNEL
Ermöglicht die Aktivierung des Kanals zur Fernbedienung der Lampe.
1) ENTER drücken – auf dem Display erscheint die laufende
2)Mit den Tasten UP und DOWN den Kanal zur
3) ENTER drücken um die Wahl zu bestätigen (das Display
%NABLEæENCODER
Ermöglicht die Aktivierung der Pan / Tilt Encoder:
1) ENTER drücken – auf dem Display erscheint die laufende
2) Mit den Tasten UP und DOWN die Encoder Pan / Tilt freige-
3) ENTER drücken um die Wahl zu bestätigen (das Display
%NABLEæLAMPæCONTROLæDMXæCHANNEL
Permite la habilitación del canal de control remoto de la lámpara.
1) Presionar ENTER – en la pantalla aparece la programación
Einstellung (On oder Off).
2) Con las teclas UP y DOWN habilitar (On) o deshabilitar (Off)
Fernbedienung der Lampe freigeben (On) oder sperren (Off).
3) Presionar ENTER para confirmar la selección (la pantalla
blinkt einige Momente lang), oder SELECT drücken, um die
laufende Einstellung beizubehalten.
%NABLEæENCODER
Permite la habilitación de los encoder Pan / Tilt.
1) Presionar ENTER – en la pantalla aparece la programación
Einstellung (On oder Off).
2) Con las teclas UP y DOWN habilitar (On) o deshabilitar (Off)
ben (On) oder sperren (Off) (bei jeder neuen Einschaltung
des Projektors nimmt diese Option den Wert On an).
3) Presionar ENTER para confirmar la selección (la pantalla
blinkt einige Momente lang), oder SELECT drücken, um die
laufende Einstellung beizubehalten.
17
actual (On o Off).
el canal de control remoto de la lámpara.
parpadea durante algunos instantes) o SELECT para mantener la programación actual.
actual (On o Off).
los encoder Pan / Tilt (para cada nuevo encendido del
proyector esta opción asume el valor On).
parpadea durante algunos instantes) o SELECT para mantener la programación actual.
Continua / Continue
➔
Page 18

ShEr
M
m oe
D
mxa
Do
S
f
t .
e
3HUTTERæONæERROR
Permette la chiusura automatica dello stop/strobo in caso di
errore di posizione Pan/Tilt.
1) Premere ENTER - sul display appare l’impostazione corrente
(On o Off).
2) Con i tasti UP e DOWN abilitare (On) o disabilitare (Off) la
chiusura automatica dello stop/strobo in caso di errore di
posizione Pan/Tilt.
3) Premere ENTER per confermare la selezione (il display lampeggia per alcuni istanti), oppure SELECT per mantenere
l’impostazione corrente.
$-8æLEVELSæMEMORY
Permette la memorizzazione dei livelli attuali dei canali. I livelli
dei canali possono essere impostati sia tramite un controller
esterno sia tramite la funzione di controllo manuale. Questa
funzione viene sempre disattivata non appena il proiettore torna
a ricevere un segnale DMX.
1) Premere ENTER - sul display appare l’impostazione corrente
(On o Off).
2) Con i tasti UP e DOWN abilitare (On) o disabilitare (Off) la
memorizzazione dei valori DMX attuali.
3) Premere ENTER per confermare la selezione (il display lampeggia per alcuni istanti), oppure SELECT per mantenere
l’impostazione corrente.
$ISPLAYæMAX
Permette di visualizzare il display sempre alla massima luminosità.
1) Premere ENTER - sul display appare l’impostazione corrente
(On o Off).
2) Con i tasti UP e DOWN abilitare (On) o disabilitare (Off) la
luminosità massima del display. (Se off, dopo un tempo di
circa 20 secondi nello stato di riposo la luminosità si riduce
ad un valore minimo).
3) Premere ENTER per confermare la selezione (il display lampeggia per alcuni istanti), oppure SELECT per mantenere
l’impostazione corrente.
f
S
t 1
e
Set2
Set3
Set4
$ISPLAYæ/FF
Permette lo spegnimento automatico del display trascorso un
tempo di circa 20 secondi nello stato di riposo. Per la riaccensione è sufficiente premere un qualsiasi tasto.
1) Premere ENTER - sul display appare l’impostazione corrente
(On o Off).
2) Con i tasti UP e DOWN abilitare (On) o disabilitare (Off) lo
spegnimento automatico del display.
3) Premere ENTER per confermare la selezione (il display lampeggia per alcuni istanti), oppure SELECT per mantenere
l’impostazione corrente.
3ETæUSERæSETTING
Permette di salvare quattro diversi settaggi delle voci del menu
opzioni e dei relativi sottomenu.
1) Premere ENTER – sul display appare “Set1”.
2) Con i tasti UP e DOWN selezionare una delle seguenti con-
figurazioni:
æ3ET
æ3ET
æ3ET
æ3ET
3) Premere ENTER – sul display appare “Load”
4) Con i tasti UP e DOWN selezionare:
æ,OAD per richiamare una configurazione precedentemente
memorizzata.
æ3AVE per memorizzare la configurazione corrente.
sul display appare un messaggio di conferma (Ok?)
5) Premere ENTER per confermare la selezione (Il display
lampeggia per alcuni istanti), oppure SELECT per mantenere l’impostazione corrente e tornare al livello superiore.
3HUTTERæONæERROR
Used for automatically closing the stop/strobe in the event of
Pan/Tilt position error.
1) Press ENTER – the current settings appear on the display
(On or Off).
2) Use the UP and DOWN keys to enable (On) or disable (Off)
automatic stop/strobe closing in the event of Pan/Tilt position
error.
3) Press ENTER to confirm the selection (the display blinks for
several seconds), or SELECT to keep current settings.
$-8æLEVELSæMEMORY
Used for saving current channel levels. Channel levels can be
set using both the external controller and the manual control
function. This function is always disabled as soon as the projector receives a DMX signal.
1) Press ENTER – the current settings appear on the display
(On or Off).
2) Use the UP and DOWN keys to enable (On) or disable (Off)
current DMX value saving.
3) Press ENTER to confirm the selection (the display blinks for
several seconds), or SELECT to keep current settings.
$ISPLAYæMAX
Used for displaying at maximum brightness.
1) Press ENTER – the current settings appear on the display
(On or Off).
2) Use the UP and DOWN keys to enable (On) or disable (Off)
maximum display brightness. (If off, brightness lowers to
minimum after about 20 seconds in idle).
3) Press ENTER to confirm the selection (the display blinks for
several seconds), or SELECT to keep current settings.
$ISPLAYæ/FF
Used for automatically turning off the display after about 20
seconds in idle. Press any key to turn back on.
1) Press ENTER – the current settings appear on the display
(On or Off).
2) Use the UP and DOWN keys to enable (On) or disable (Off)
the display to turn off automatically.
3) Press ENTER to confirm the selection (the display blinks for
several seconds), or SELECT to keep current settings.
3ETæUSERæSETTING
Used to save four different settings of the items in the options
menu and relative submenus.
1) Press ENTER – “Set1” appears on the display.
2) Use the UP and DOWN keys to select one of the following
configurations:
æ3ET
æ3ET
æ3ET
æ3ET
3) Press ENTER – “Load” appears on the display.
4) Use the UP and DOWN keys to select:
æ,OADæto recall a previously stored configuration.
æ3AVE to store the current configuration.
a confirmation message (OK?) appears on the display.
5) Press ENTER to confirm the selection (the display blinks for
a few instants) or SELECT to keep the current setting and
return to the next higher level.
at
c
F
ALPHA WASH 300
&ACTORYæSETTINGS
Permette di ripristinare i valori di default su tutte le voci del
menu opzioni e dei relativi sottomenu.
1) Premere ENTER - sul display appare un messaggio di conferma (Ok?).
2) Premere ENTER per confermare la selezione (il display lampeggia per alcuni istanti), oppure SELECT per mantenere
l’impostazione corrente.
/PTION $EFAULT
Pan Off
G
Tilt Off
G
P – T Off
G
PTSp Stnd
DmxM Vect
CMY On
LinC Off
FulC Off
Rain On
/PTION $EFAULT
ShDi On
DiSh On
Lon PwUp
LDmx Off
Enc On
ShEr Off
Memo Off
Dmax Off
Doff Off
&ACTORYæSETTINGS
Used for restoring default values on all options menu items and
relevant submenus.
1) Press ENTER – a confirmation message appears on the
2) Press ENTER to confirm the selection (the display blinks for
18
display (Ok?).
several seconds), or SELECT to keep current settings.
/PTION $EFAULT
Pan Off
G
Tilt Off
G
P – T Off
G
PTSp Stnd
DmxM Vect
CMY On
LinC Off
FulC Off
Rain On
/PTION $EFAULT
ShDi On
DiSh On
Lon PwUp
LDmx Off
Enc On
ShEr Off
Memo Off
Dmax Off
Doff Off
Page 19

3HUTTERæONæERROR
Permet la fermeture automatique du shutter/strobe en cas
d’erreur de position Pan/Tilt.
1) Appuyer sur la touche de VALIDATION – sur l’afficheur
apparaît la sélection courante (On ou Off).
2) Avec les touches UP et DOWN, activer (On) ou désactiver
(Off) la fermeture automatique du shutter/strobe en cas
d’erreur de position Pan/Tilt.
Appuyer sur la touche de VALIDATION pour confirmer la sélec-
3)
tion (l’afficheur clignote pendant quelques instants), ou bien sur
la touche SELECT pour maintenir la sélection courante.
$-8æLEVELSæMEMORY
Permet de mémoriser les niveaux actuels des canaux. Il est
possible de programmer les niveaux des canaux soit par un
contrôleur externe soit par la fonction de contrôle manuel. Cette
fonction se désactive toujours dès que le projecteur recommence à recevoir un signal DMX.
1) Appuyer sur la touche de VALIDATION – sur l’afficheur
apparaît la sélection courante (On ou Off).
2) Avec les touches UP et DOWN, activer (On) ou désactiver
(Off) la mémorisation des valeurs DMX actuelles.
Appuyer sur la touche de VALIDATION pour confirmer la sélec-
3)
tion (l’afficheur clignote pendant quelques instants), ou bien sur
la touche SELECT pour maintenir la sélection courante.
$ISPLAYæMAX
Permet de visualiser toujours l'afficheur à la luminosité maximale.
1) Appuyer sur la touche de VALIDATION – sur l’afficheur
apparaît la sélection courante (On ou Off).
2) Avec les touches UP et DOWN, activer (On) ou désactiver
(Off) la luminosité maximale de l’afficheur. (Si on sélectionne
off, après un temps d’environ 20 secondes en état de repos,
la luminosité se réduit à une valeur minimale).
Appuyer sur la touche de VALIDATION pour confirmer la sélec-
3)
tion (l’afficheur clignote pendant quelques instants), ou bien sur
la touche SELECT pour maintenir la sélection courante.
$ISPLAYæ/FF
Permet d’éteindre automatiquement l’afficheur après un laps de
temps d’environ 20 secondes en état de repos. Pour le rallumer, il suffit d’appuyer sur n’importe quelle touche.
1) Appuyer sur la touche de VALIDATION – sur l’afficheur
apparaît la sélection courante (On ou Off).
2) Avec les touches UP et DOWN activer (On) ou désactiver
(Off) l’extinction automatique de l’afficheur.
Appuyer sur la touche de VALIDATION pour confirmer la sélec-
3)
tion (l’afficheur clignote pendant quelques instants), ou bien sur
la touche SELECT pour maintenir la sélection courante.
3ETæUSERæSETTING
Permet d’enregistrer quatre différents réglages des articles du
menu des options et des sous-menus relatifs.
1) Appuyer sur la touche de VALIDATION – sur l’afficheur
apparaît « Set1 ».
2) Avec les touches UP et DOWN, sélectionner une des confi-
gurations suivantes :
æ3ET
æ3ET
æ3ET
æ3ET
3) Appuyer sur la touche de VALIDATION – sur l’afficheur
apparaît « Load ».
4) Avec les touches UP et DOWN, sélectionner :
,OADæpour rappeler une configuration mise en mémoire
æ
précédemment.
æ3AVE pour mettre en mémoire la configuration courante ;
sur l’afficheur apparaît un message de confirmation (Ok ?).
5) Appuyer sur la touche de VALIDATION pour confirmer la
sélection (l’afficheur clignote pendant quelques instants), ou
bien sur la touche SELECT pour maintenir la programmation
courante et retourner au niveau supérieur.
&ACTORYæSETTINGS
Permet de rétablir les valeurs par défaut sur tous les articles du
menu options et sous-menus relatifs.
1) Appuyer sur la touche de VALIDATION – sur l’afficheur
apparaît un message de confirmation (Ok ?).
2) Appuyer sur VALIDATION pour confirmer la sélection (l’afficheur clignote pendant quelques instants), ou bien sur
SELECT pour maintenir la sélection courante.
3HUTTERæONæERROR
Ermöglicht die automatische Schließung der Stop/Strobe im
Falle eines Pan/Tilt Positionierungsfehlers.
1) ENTER drücken – auf dem Display erscheint die laufende
Einstellung (On oder Off).
2)Mit den Tasten UP und DOWN die automatische
Verschließung der Stop/Strobe, im Falle eines Pan/Tilt
Positionierungsfehlers, freigeben (On) oder sperren (Off).
3) ENTER drücken um die Wahl zu bestätigen (das Display
blinkt einige Momente lang), oder SELECT drücken, um die
laufende Einstellung beizubehalten.
$-8æLEVELSæMEMORY
Ermöglicht die Speicherung der aktuellen Stände der Kanäle.
Die Stände der Kanäle können sowohl durch einen
Außensteuerschalter, als auch durch den Handbetrieb eingestellt werden. Diese Funktion wird immer deaktiviert, sobald der
Projektor ein neues DMX Signal erhält.
1) ENTER drücken – auf dem Display erscheint die laufende
Einstellung (On oder Off).
2) Mit den Tasten UP und DOWN die Speicherung der aktuellen DMX Werte freigeben (On) oder sperren (Off).
3) ENTER drücken um die Wahl zu bestätigen (das Display
blinkt einige Momente lang), oder SELECT drücken, um die
laufende Einstellung beizubehalten.
$ISPLAYæMAX
Ermöglicht das Display immer mit maximaler Leuchtkraft anzuzeigen.
1) ENTER drücken – auf dem Display erscheint die laufende
Einstellung (On oder Off).
2) Mit den Tasten UP und DOWN die maximale Leuchtkraft des
Displays freigeben (On) oder sperren (Off). (Nach einer Zeit
von circa 20 Sekunden im Ruhezustand reduziert sich die
Leuchtkraft bei Off auf einen Mindestwert.
3) ENTER drücken um die Wahl zu bestätigen (das Display
blinkt einige Momente lang), oder SELECT drücken, um die
laufende Einstellung beizubehalten.
$ISPLAYæ/FF
Ermöglicht das automatische Ausschalten des Displays, wenn eine Zeit
von circa 20 Sekunden im Ruhezustand vergangen ist. Zum
Wiedereinschalten ist es ausreichend eine beliebige Taste zu betätigen.
1) ENTER drücken – auf dem Display erscheint die laufende
Einstellung (On oder Off).
2)Mit den Tasten UP und DOWN das automatische
Ausschalten des Displays freigeben (On) oder sperren (Off).
3) ENTER drücken um die Wahl zu bestätigen (das Display
blinkt einige Momente lang), oder SELECT drücken, um die
laufende Einstellung beizubehalten.
3ETæUSERæSETTING
Ermöglicht das Speichern von vier verschiedenen
Menüpunkteinstellungen des Menüs Optionen und der entsprechenden Untermenüs.
1) ENTER drücken – am Display erscheint „Set1“.
2) Mit den Tasten UP und DOWN eine der folgenden
Konfigurationen wählen:
æ3ET
æ3ET
æ3ET
æ3ET
3) ENTER drücken – am Display erscheint „Load“.
4) Mit den Tasten UP und DOWN Auswahl von:
æ,OADæ, um eine zuvor gespeicherte Konfiguration aufzurufen.
æ3AVE , um die aktuelle Konfiguration zu speichern.
Am Display erscheint eine Bestätigungsmeldung (OK?)
5) ENTER drücken, um die Auswahl (das Display blinkt kurz) zu
bestätigen, oder SELECT, um die aktuelle Einstellung beizubehalten, und zur nächst höheren Ebene zurück zu kehren.
&ACTORYæSETTINGS
Ermöglicht die Defaultwerte auf allen Positionen des Optionsmenü
und auf den jeweiligen Untermenüs wiederherzustellen.
1)ENTER drücken – auf dem Display erscheint eine
Bestätigungsmitteilung (OK?).
2) ENTER drücken um die Wahl zu bestätigen (das Display
blinkt einige Momente lang), oder SELECT drücken, um die
laufende Einstellung beizubehalten.
3HUTTERæONæERROR
Permite el cierre automático del stop/estrobo en caso de error
de posición Pan/Tilt.
1) Presionar ENTER – en la pantalla aparece la programación
actual (On o Off).
2) Con las teclas UP y DOWN habilitar (On) o deshabilitar (Off)
el cierre automático del stop/estrobo en caso de error de
posición Pan y Tilt.
3) Presionar ENTER para confirmar la selección (la pantalla
parpadea durante algunos instantes) o SELECT para mantener la programación actual.
$-8æLEVELSæMEMORY
Permite la memorización de los niveles actuales de los canales. Los niveles de los canales pueden programarse mediante
un controler externo o mediante la función de control manual.
Esta función se desactiva cuando el proyector vuelve a recibir
una señal DMX.
1) Presionar ENTER – en la pantalla aparece la programación
actual (On o Off).
2) Con las teclas UP y DOWN habilitar (On) o deshabilitar (Off)
la memorización de los valores DMX actuales.
3) Presionar ENTER para confirmar la selección (la pantalla
parpadea durante algunos instantes) o SELECT para mantener la programación actual.
$ISPLAYæMAX
Permite visualizar la pantalla siempre con la máxima luminosidad.
1) Presionar ENTER – en la pantalla aparece la programación
actual (On o Off).
2) Con las teclas UP y DOWN habilitar (On) o deshabilitar (Off)
la luminosidad máxima de la pantalla. (Si off, después de un
tiempo de casi 20 segundos en estado de reposo la luminosidad se reduce a un valor mínimo).
3) Presionar ENTER para confirmar la selección (la pantalla
parpadea durante algunos instantes) o SELECT para mantener la programación actual.
$ISPLAYæ/FF
Permite el apagado automático de la pantalla transcurrido un
tiempo de casi 20 segundos en el estado de reposo. Para el
reencendido basta presionar una tecla cualquiera.
1) Presionar ENTER – en la pantalla aparece la programación
actual (On o Off).
2) Con las teclas UP y DOWN habilitar (On) o deshabilitar (Off)
el apagado automático de la pantalla.
3) Presionar ENTER para confirmar la selección (la pantalla
parpadea durante algunos instantes) o SELECT para mantener la programación actual.
3ETæUSERæSETTING
Permite guardar cuatro diferentes reajustes de las entradas del
menú opciones y de los relativos submenús.
1) Presionar ENTER – en la pantalla aparece “Set1”.
2) Con las teclas UP y DOWN seleccionar una de las siguien-
tes configuraciones:
æ3ET
æ3ET
æ3ET
æ3ET
3) Presionar ENTER – en la pantalla aparece “Load”.
4) Con las teclas UP y DOWN seleccionar:
æ,OADæpara recuperar una configuración precedentemente
memorizada.
æ3AVE para memorizar la configuración corriente.
en la pantalla aparece un mensaje de confirmación (Ok?)
5) Presionar ENTER para confirmar la selección (La pantalla
parpadea durante algunos instantes), o SELECT para mantener la programación corriente y volver al nivel superior.
&ACTORYæSETTINGS
Permite el reajuste de los valores de defecto en todas las
voces del menú opciones y de los relativos submenús.
1) Pulsar ENTER – en la pantalla aparece un mensaje de confirmación (Ok?).
2) Presionar ENTER para confirmar la selección (la pantalla
parpadea durante algunos instantes) o SELECT para mantener la programación actual.
/PTION $EFAULT
Pan Off
G
Tilt Off
G
P – T Off
G
PTSp Stnd
DmxM Vect
CMY On
LinC Off
FulC Off
Rain On
ALPHA WASH 300
/PTION $EFAULT
ShDi On
DiSh On
Lon PwUp
LDmx Off
Enc On
ShEr Off
Memo Off
Dmax Off
Doff Off
/PTION $EFAULT
Pan Off
G
Tilt Off
G
P – T Off
G
PTSp Stnd
DmxM Vect
CMY On
LinC Off
FulC Off
Rain On
/PTION $EFAULT
ShDi On
DiSh On
Lon PwUp
LDmx Off
Enc On
ShEr Off
Memo Off
Dmax Off
Doff Off
19
/PTION $EFAULT
Pan Off
G
Tilt Off
G
P – T Off
G
PTSp Stnd
DmxM Vect
CMY On
LinC Off
FulC Off
Rain On
/PTION $EFAULT
ShDi On
DiSh On
Lon PwUp
LDmx Off
Enc On
ShEr Off
Memo Off
Dmax Off
Doff Off
Continua / Continue
➔
Page 20

-%.5æ$%,,%æ).&/2-!:)/.) ).&/2-!4)/.æ-%.5
) '"
HrP r
HrL
(OURSæCOUNTERæFORæPROJECTOR
Permette di visualizzare le ore di funzionamento (totali e parziali) del proiettore.
1) Premere ENTER - sul display appare ”Totl”.
2) Con i tasti UP e DOWN selezionare uno dei seguenti contatori.
T
olt
Prat
a
To lt
Prat
4OTALæCOUNTER
Conta il numero di ore di vita del proiettore (dalla costruzione
ad oggi).
0ARTIALæCOUNTER
Conta il numero di ore parziali di vita del proiettore dall’ultimo
azzeramento ad oggi.
3) Premere ENTER per visualizzare il numero di ore e premere
SELECT per salire al livello superiore del menu.
(OURSæCOUNTERæFORæLAMP
Permette di visualizzare le ore di funzionamento (totali e parziali) della lampada.
1) Premere ENTER - sul display appare ”Totl”.
2) Con i tasti UP e DOWN selezionare uno dei seguenti contatori.
4OTALæCOUNTER
Conta il numero di ore di funzionamento del proiettore con lampada accesa (dalla costruzione ad oggi).
0ARTIALæCOUNTER
Conta il numero di ore di funzionamento della lampada dall’ultimo azzeramento ad oggi.
3) Premere ENTER per visualizzare il numero di ore e premere
SELECT per salire al livello superiore del menu.
(OURSæCOUNTERæFORæPROJECTOR
Used for displaying projector operating hours (total and partial).
1) Press ENTER - ”Totl” appears on the display.
2) Use the UP and DOWN keys to select one of the following
counters.
4OTALæCOUNTER
Counts the number of projector working life hours (from
manufacture to date).
0ARTIALæCOUNTER
Counts the number of partial projector working life hours since
the last reset to date.
3) Press ENTER to display the number of hours and press
SELECT to go to the top menu level.
(OURSæCOUNTERæFORæLAMP
Used for displaying the lamp working hours (total and partial).
1) Press ENTER - ”Totl” appears on the display.
2) Use the UP and DOWN keys to select one of the following
counters.
4OTALæCOUNTER
Counts the number of projector working hours with the lamp on
(from manufacture to date).
0ARTIALæCOUNTER
Counts the number of lamp working hours since the last reset
to date.
3) Press ENTER to display the number of hours and press
SELECT to go to the top menu level.
Srkt
Vrse
To lt
Prta
Brd0
Brd1
Brd2
,AMPæSTRIKES
Permette di visualizzare il numero di accensioni (totali e parziali) della lampada.
1) Premere ENTER - sul display appare “Totl”.
2) Con i tasti UP e DOWN selezionare uno dei seguenti contatori.
4OTALæCOUNTER
Conta il numero di accensioni della lampada (dalla costruzione
ad oggi).
0ARTIALæCOUNTER
Conta il numero di accensioni della lampada dall’ultimo azzeramento ad oggi.
3) Premere ENTER per visualizzare il numero di accensioni e
premere SELECT per salire al livello superiore del menu.
3OFTWAREææ(ARDWAREæVERSIONS
3OFTWAREæVERSIONS
Permette di visualizzare la versione di software di ciascuna
delle schede a microprocessore installate nel proiettore.
1) Premere ENTER - sul display appare “Brd0”.
2) Con i tasti UP e DOWN selezionare la scheda.
3) Premere ENTER per visualizzare la versione di software
istallato. Premere SELECT per tornare al livello superiore del
menu.
,AMPæSTRIKES
Used for displaying the number of times the lamp was turned
on (total and partial).
1) Press ENTER - ”Totl” appears on the display.
2) Use the UP and DOWN keys to select one of the following
4OTALæCOUNTER
Counts the number of times the lamp was turned on (from
manufacture to date).
0ARTIALæCOUNTER
Counts the number of times the lamp was turned on since the
last reset to date.
3) Press ENTER to display the number of times it was turned
3OFTWAREææ(ARDWAREæVERSIONS
3OFTWAREæVERSIONS
Used for displaying the software versions of each
microprocessor installed in the projector.
1) Press ENTER - “Brd0” appears on the display.
2) Use the UP and DOWN keys to select the board.
3) Press ENTER to display the installed software version. Press
counters.
on and press SELECT to go to the top menu level.
SELECT to return to the top menu level.
ALPHA WASH 300
HwB0
(ARDWAREæVERSIONS
Permette di visualizzare la versione hardware della scheda
"Brd0" installata nel proiettore.
1) Premere ENTER - sul display appare "Brd0".
2) Con i tasti UP e DOWN selezionare "HwB0".
3) Premere ENTER per visualizzare la versione hardware della
scheda Brd0.
Hw A : Hardware tipo A
Hw B : Hardware tipo B
Premere SELECT per tornare al livello superiore del menu.
(ARDWAREæVERSIONS
Used to display the hardware version of the “Brd0” board
installed in the projector.
1) Press ENTER - “Brd0” appears on the display.
2) Use the UP and DOWN keys to select “HwB0”.
3) Press ENTER to display the Hardware version of the “Brd0”
Hw A : Type A hardware
Hw B : Type B hardware
Press SELECT to return to the top menu level.
20
board.
Page 21

-%.äæ).&/2-!4)/.%. -%.·æ$%æ,!3æ).&/2-!#)/.%3æ-%.5æ$%3æ).&/2-!4)/.3æ
$ %&
(OURSæCOUNTERæFORæPROJECTOR
Permet d’afficher les heures de fonctionnement (totales et partielles) du projecteur.
1) Appuyer sur la touche de VALIDATION – sur l’afficheur
apparaît ”Totl”.
2) Avec les touches UP et DOWN, sélectionner l’un des compteurs suivants.
4OTALæCOUNTER
Compte le nombre d’heures de vie du projecteur (de sa fabrication jusqu’à maintenant).
0ARTIALæCOUNTER
Compte le nombre d’heures partielles de vie du projecteur de la
dernière mise à zéro jusqu’à maintenant.
3) Appuyer sur la touche de VALIDATION pour afficher le nombre d’heures et appuyer sur SELECT pour monter au niveau
supérieur du menu.
(OURSæCOUNTERæFORæLAMP
Permet d’afficher les heures de fonctionnement (totales et partielles) de la lampe.
1) Appuyer sur la touche de VALIDATION – sur l’afficheur
apparaît ”Totl”.
2) Avec les touches UP et DOWN, sélectionner un des compteurs suivants.
4OTALæCOUNTER
Compte le nombre d’heures de fonctionnement du projecteur
avec la lampe allumée (de sa fabrication jusqu’à maintenant).
0ARTIALæCOUNTER
Compte le nombre d’heures de fonctionnement de la lampe de
la dernière mise à zéro jusqu’à maintenant.
3) Appuyer sur la touche de VALIDATION pour afficher le nombre d’heures et appuyer sur SELECT pour monter au niveau
supérieur du menu.
(OURSæCOUNTERæFORæPROJECTOR
Ermöglicht die (Gesamt- und Teil-) Betriebsstunden des
Projektors anzuzeigen.
1) ENTER drücken – auf dem Display erscheint „Totl“.
2) Mit den Tasten UP und DOWN einen der folgenden Zähler
4OTALæCOUNTER
Zählt die Lebensstunden des Projektors (vom Bau bis heute).
0ARTIALæCOUNTER
Zählt die Teillebensstunden des Projektors von der letzten
Nullstellung bis heute.
3) ENTER drücken um die Anzahl der Stunden anzuzeigen und
(OURSæCOUNTERæFORæLAMP
Ermöglicht die (Gesamt- und Teil-) Betriebsstunden der Lampe
anzuzeigen.
1) ENTER drücken – auf dem Display erscheint „Totl”.
2) Mit den Tasten UP und DOWN einen der folgenden Zähler
4OTALæCOUNTER
Zählt die Anzahl der Betriebsstunden des Projektors mit eingeschalteter Lampe (vom Bau bis heute).
0ARTIALæCOUNTER
Zählt die Betriebsstunden der Lampe von der letzten
Nullstellung bis heute.
3) ENTER drücken um die Anzahl der Stunden anzuzeigen und
(OURSæCOUNTERæFORæPROJECTOR
Permite visualizar las horas de funcionamiento (totales y parciales) del proyector.
wählen.
SELECT drücken, um auf den oberen Stand des Menüs
umzuschalten.
wählen.
SELECT drücken, um auf den oberen Stand des Menüs
umzuschalten.
1) Presionar ENTER – en la pantalla aparece ”Totl”.
2) Con las teclas UP y DOWN seleccionar uno de los siguien-
4OTALæCOUNTER
Cuenta el número de horas de vida del proyector (desde la
construcción hasta el momento).
0ARTIALæCOUNTER
Cuenta el número de horas parciales de vida del proyector
desde la última puesta a cero hasta el momento.
3) Presionar ENTER para visualizar el número de horas y pre-
(OURSæCOUNTERæFORæLAMP
Permite visualizar las horas de funcionamiento (totales y parciales) de la lámpara.
1) Presionar ENTER – en la pantalla aparece ”Totl”.
2) Con las teclas UP y DOWN seleccionar uno de los siguien-
4OTALæCOUNTER
Cuenta el número de horas de funcionamiento del proyector
con la lámpara encendida (desde la construcción hasta el
momento).
0ARTIALæCOUNTER
Cuenta el número de horas de funcionamiento de la lámpara
desde la última puesta a cero hasta el momento.
3) Presionar ENTER para visualizar el número de horas y presionar SELECT para subir al nivel superior del menú.
tes contadores:
sionar SELECT para subir al nivel superior del menú.
tes contadores:
,AMPæSTRIKES
Permet d’afficher le nombre d’allumages (totaux et partiels) de
la lampe.
1) Appuyer sur la touche de VALIDATION – sur l’afficheur
apparaît ”Totl”.
2) Avec les touches UP et DOWN, sélectionner l’un des compteurs suivants.
4OTALæCOUNTER
Compte le nombre d’allumages de la lampe (de sa fabrication
jusqu’à maintenant).
0ARTIALæCOUNTER
Compte le nombre d’allumages de la lampe de la dernière mise
à zéro jusqu’à maintenant.
3) Appuyer sur la touche de VALIDATION pour afficher le nombre d’allumages et appuyer sur SELECT pour monter au
niveau supérieur du menu.
3OFTWAREææ(ARDWAREæVERSIONS
3OFTWAREææVERSIONS
Permet d’afficher la version du logicien de chacune des cartes
microprocesseur qui sont installées dans le projecteur.
1) Appuyer sur la touche de VALIDATION – sur l’afficheur
apparaît ” Brd0”.
2) Avec les touches UP et DOWN, sélectionner la carte.
3) Appuyer sur la touche de VALIDATION pour afficher la version du logicien installé. Appuyer sur SELECT pour retourner
au niveau supérieur du menu.
,AMPæSTRIKES
Ermöglicht die (Gesamt- und Teil-) Anzahl der Einschaltungen
der Lampe anzuzeigen.
1) ENTER drücken – auf dem Display erscheint „Totl”.
2) Mit den Tasten UP und DOWN einen der folgenden Zähler
4OTALæCOUNTER
Zählt die Anzahl der Einschaltungen der Lampe (vom Bau bis
heute).
0ARTIALæCOUNTER
Zählt die Anzahl der Einschaltungen der Lampe von der letzten
Nullstellung bis heute.
3) ENTER drücken, um die Anzahl der Einschaltungen anzuzei-
3OFTWAREææ(ARDWAREæVERSIONS
3OFTWAREæVERSIONS
Ermöglicht die Softwareversion jeder Mikroprozessorkarte, die
im Projektor installiert wurde anzuzeigen.
1) ENTER drücken – auf dem Display erscheint „Brd0”.
2) Mit den Tasten UP und DOWN die Karte wählen.
3) ENTER drücken, um die installierte Softwareversion anzu-
,AMPæSTRIKES
Permite visualizar el número de encendidos (totales y parciales) de la lámpara.
1) Presionar ENTER – en la pantalla aparece ”Totl”.
wählen.
gen und SELECT drücken, um auf den oberen Stand des
Menüs umzuschalten.
zeigen. SELECT drücken, um zum oberen Stand des Menüs
zurückzukehren.
2) Con las teclas UP y DOWN seleccionar uno de los siguien-
4OTALæCOUNTER
Cuenta el número de encendidos de la lámpara (desde la construcción hasta el momento).
0ARTIALæCOUNTER
Cuenta el número de encendidos de la lámpara desde la última
puesta a cero hasta el momento.
3) Presionar ENTER para visualizar el número de encendidos y
presionar SELECT para subir al nivel superior del menú.
3OFTWAREææ(ARDWAREæVERSIONS
3OFTWAREæVERSIONS
Permite visualizar la versión de software de cada una de las
tarjetas con microprocesor instaladas en el proyector.
1) Presionar ENTER – en la pantalla aparece “Brd0”.
2) Con las teclas UP y DOWN seleccionar la tarjeta
3) Presionar ENTER para visualizar la versión de software
tes contadores:
instalado. Presionar SELECT para volver al nivel superior
del menú.
(ARDWAREæVERSIONS
Permet d’afficher la version de hardware de la carte “Brd0” qui
est installée dans le projecteur.
1) Appuyer sur la touche de VALIDATION – sur l’afficheur
apparaît “Brd0”.
2) Avec les touches UP et DOWN, sélectionner “HwB0”.
3) Appuyer sur ENTER pour afficher la version de Hardware
de la carte «Brd0».
Hw A : Hardware du type A
Hw B : Hardware du type B
Appuyer sur SELECT pour retourner au niveau supérieur du
menu.
ALPHA WASH 300
(ARDWAREæVERSIONS
Ermöglicht es, die Hardwareversion der Karte “Brd0”, die im
Projektor installiert wurde, anzuzeigen
1) ENTER drücken – auf dem Display erscheint “Brd0”.
2) Mit den Tasten UP und DOWN “HwB0” wählen.
3) ENTER betätigen, um die Hardwareversion der Karte “Brd0”
(ARDWAREæVERSIONS
Permite visualizar la versión hardware de la tarjeta “Brd0”instalada en el proyector
1) Presionar ENTER – en la pantalla aparece “Brd0”.
2) Con las teclas UP y DOWN seleccionar “HwB0”.
3) Presionar ENTER para visualizar la versión Hardware de la
anzuzeigen.
Hw A : Hardware Typ A
Hw B : Hardware Typ B
SELECT drücken, um zum oberen Stand des Menüs zurückzukehren.
21
tarjeta “Brd0”.
Hw A : Hardware tipo A
Hw B : Hardware tipo B
Presionar SELECT para volver al nivel superior del menú.
Continua / Continue
➔
Page 22

-%.5æ$%,,%æ&5.:)/.)æ$)æ4%34 4%34æ&5.#4)/.3æ-%.5æ
) '"
Snse
Dmx
Rst
y
n
a
C
g
n
M
t
elwY
Clo
Ch1
Ch17
3ENSORæMONITOR
Permette di visualizzare lo stato (On o Off ) dei sensori di azzeramento presenti sugli effetti. Il proiettore può operare normalmente anche durante la visualizzazione dello stato dei sensori.
1) Premere ENTER - sul display appare “Cyan”.
2) Con i tasti UP e DOWN selezionare il sensore che si desidera verificare.
#YAN Cyan filter
-GNT Magenta filter
9ELW Yellow filter
#OL Colour wheel
3) Premere ENTER per visualizzare lo stato del sensore (On o
Off) - Premere SELECT per tornare al livello superiore del
menu.
$MXæMONITOR
Permette di visualizzare il livello dei canali DMX del proiettore.
Il canale indicato con Ch1 corrisponde al primo canale a partire
dall’indirizzo impostato.
1) Premere ENTER - sul display appare il primo canale (Ch1).
2) Con i tasti UP e DOWN selezionare il canale.
3) Premere ENTER per visualizzare il livello del canale (valore
fra 0 e 255) - Premere SELECT per tornare al livello superiore del menu.
2ESETæPROJECTOR
Permette di eseguire il reset del proiettore.
1) Premere ENTER - sul display appare un messaggio di conferma (Ok?).
2) Premere ENTER per eseguire il reset (il display lampeggia
per alcuni istanti), oppure SELECT per tornare al livello
superiore senza eseguire l’operazione.
3ENSORæMONITOR
Used for displaying reset sensor status (On or Off ) on effects.
The projector can also normally operate during sensor status
display.
1) Press ENTER - “Cyan” appears on the display.
2) Use the UP and DOWN keys to select the sensor to be
3) Press ENTER to display the sensor status (On or Off) -
$MXæMONITOR
Used for displaying the projector DMX channel level. The
channel indicated with Ch1 corresponds to the first channel
from the set address.
1) Press ENTER – the first channel appears on the display
2) Use the UP and DOWN keys to select the channel.
3) Press ENTER to display the channel level (value between 0
2ESETæPROJECTOR
Used for resetting the projector.
1) Press ENTER – a confirmation message appears on the
2) Press ENTER to reset (the display blinks for several
checked.
#YAN Cyan filter
-GNT Magenta filter
9ELW Yellow filter
#OL Colour wheel
Press SELECT to return to the top menu level.
(Ch1).
and 255) - Press SELECT to return to the top menu level.
display (Ok?).
seconds), or SELECT to return to the top level without
resetting.
L m
a
C rlt
E
n
E cTn
p
c
P
,AMPæ/.ææ/&&
Permette l’accensione o lo spegnimento della lampada dal pannello comandi del proiettore.
1) Premere ENTER - sul display appare l’impostazione corrente
(On o Off).
2) Con i tasti UP e DOWN accendere (On) o spegnere (Off) la
lampada – sul display appare un messaggio di conferma
(Ok?)
3) Premere ENTER per confermare la selezione (il display lampeggia per alcuni istanti), oppure SELECT per mantenere
l’impostazione corrente e tornare al livello superiore.
-ANUALæCONTROL
Permette di impostare il livello dei canali dal pannello comandi
del proiettore.
1) Premere ENTER - sul display appare il primo canale (Pan).
2) Con i tasti UP e DOWN selezionare il canale desiderato.
3) Premere ENTER e con i tasti UP e DOWN selezionare il
livello DMX desiderato (valore tra 0 e 255).
4) Premere SELECT per tornare al livello superiore.
%NCODERæ0AN
Permette di visualizzare la posizione dell’encoder del Pan.
1) Premere ENTER - sul display appare il valore dell’encoder
del Pan.
2) Premere SELECT per tornare al livello superiore.
%NCODERæ4ILT
Permette di visualizzare la posizione dell’encoder del Tilt.
1) Premere ENTER - sul display appare il valore dell’encoder
del Tilt.
2) Premere SELECT per tornare al livello superiore.
,AMPæ/.ææ/&&
Used for turning lamp on and off from the projector control
panel.
1) Press ENTER – the current settings appear on the display
(On or Off).
2) Use the UP and DOWN keys to turn the lamp on (On) or off
(Off) – a confirmation message appears on the display (Ok?)
3) Press ENTER to confirm the selection (the display blinks for
several seconds), or SELECT to keep current settings and
return to the top level.
-ANUALæCONTROL
Used for setting channel levels from the projector control panel.
1) Press ENTER – the first channel appears on the display
(Pan).
2) Use the UP and DOWN keys to select the required channel.
3) Press ENTER and use the UP and DOWN keys to select the
required DMX level (value between 0 and 255).
4) Press SELECT to return to the top menu level.
%NCODERæ0AN
Used for displaying the Pan encoder position.
1) Press ENTER – the Pan encoder value appears on the
display.
2) Press SELECT to return to the top menu level.
%NCODERæ4ILT
Used for displaying the Tilt encoder position.
1) Press ENTER – the Tilt encoder value appears on the
display.
2) Press SELECT to return to the top menu level.
ALPHA WASH 300
22
Page 23

-%.äæ$%2æ4%34&5.+4)/.%.æ -%.·æ$%æ,!3æ&5.#)/.%3æ$%æ4%34æ-%.5æ$%3æ&/.#4)/.3æ$%æ4%34æ
$ %&
3ENSORæMONITOR
Permet d'afficher l’état (On ou Off) des capteurs de mise à zéro
présents sur les effets. Le projecteur peut opérer normalement
même pendant l’affichage de l’état des capteurs.
1) Appuyer sur la touche de VALIDATION – sur l’afficheur
apparaît ” Cyan”.
2) Avec les touches UP et DOWN, sélectionner le capteur que
l’on désire vérifier.
#YAN Cyan filter
-GNT Magenta filter
9ELW Yellow filter
#OL Colour wheel
3) Appuyer sur la touche de VALIDATION pour afficher l’état du
capteur (On ou Off) - Appuyer sur SELECT pour retourner
au niveau supérieur du menu.
$MXæMONITOR
Permet d’afficher le niveau des canaux DMX du projecteur. Le
canal indiqué par Ch1 correspond au premier canal à partir de
l’adresse programmée.
1) Appuyer sur la touche de VALIDATION – sur l’afficheur
apparaît le premier canal (Ch1).
2) Avec les touches UP et DOWN, sélectionner le canal.
3) Appuyer sur la touche de VALIDATION pour afficher le
niveau du canal (valeur entre 0 et 255) - Appuyer sur
SELECT pour retourner au niveau supérieur du menu.
2ESETæPROJECTOR
Permet d’exécuter la remise à zéro du projecteur.
1) Appuyer sur la touche de VALIDATION – sur l’afficheur
apparaît un message de confirmation (Ok ?).
2) Appuyer sur la touche de VALIDATION pour exécuter la
remise à zéro (l’afficheur clignote pendant quelques
instants), ou bien sur SELECT pour retourner au niveau
supérieur sans exécuter l’opération.
3ENSORæMONITOR
Ermöglicht den Zustand (On oder Off) der
Nullstellungssensoren, die auf den Effekten anwesend sind,
anzuzeigen. Der Projektor kann auch während der Anzeige des
Zustands der Sensoren normal arbeiten.
1) ENTER drücken – auf dem Display erscheint „Cyan”.
2) Mit den Tasten UP und DOWN den Sensor den man über-
3) ENTER drücken, um den Zustand des Sensors (On oder
$MXæMONITOR
Ermöglicht den Stand der DMX Kanäle des Projektors anzuzeigen. Der, mit Ch1, angezeigte Kanal stimmt mit dem ersten
Kanal ab der eingestellten Adresse überein.
1) ENTER drücken – auf dem Display erscheint der erste Kanal
2) Mit den Tasten UP und DOWN den Kanal wählen.
3) ENTER drücken, um den Stand des Kanals anzuzeigen
2ESETæPROJECTOR
Ermöglicht die Nullstellung des Projektors durchzuführen.
1)ENTER drücken – auf dem Display erscheint eine
2) ENTER drücken, um Reset durchzuführen (das Display
3ENSORæMONITOR
Permite visualizar el estado (On u Off) de los sensores de puesta a cero presentes en los efectos. El proyector puede trabajar
normalmente incluso durante la visualización del estado de los
sensores.
1) Presionar ENTER – en la pantalla aparece ” Cyan ”.
2) Con las teclas UP y DOWN seleccionar el sensor que se
prüfen möchte wählen.
#YAN Cyan filter
-GNT Magenta filter
9ELW Yellow filter
#OL Colour wheel
3) Presionar ENTER para visualizar el estado del sensor (On u
OFF) anzuzeigen – SELECT drücken, um zum oberen Stand
des Menüs zurückzukehren.
$MXæMONITOR
Permite visualizar el nivel de los canales DMX del proyector. El
canal indicado con Ch1 corresponde al primer canal a partir de
la dirección programada.
1) Presionar ENTER – en la pantalla aparece el primer canal
(Ch1).
2) Con las teclas UP y DOWN seleccionar el canal.
3) Presionar ENTER para visualizar el nivel del canal (valor
(Wert zwischen 0 und 255) – SELECT drücken, um zum
oberen Stand des Menüs zurückzukehren.
2ESETæPROJECTOR
Permite llevar a cabo el reset del proyector
1) Pulsar ENTER – en la pantalla aparece un mensaje de conBestätigungsmitteilung (OK?).
2) Presionar ENTER para efectuar el reset (la pantalla parpablinkt einige Momente lang), oder SELECT drücken um auf
den oberen Stand zurückzukehren, ohne die Operation durchzuführen.
desea comprobar.
#YAN Cyan filter
-GNT Magenta filter
9ELW Yellow filter
#OL Colour wheel
Off) - Presionar SELECT para volver al nivel superior del
menú.
(Ch1).
entre 0 y 255) - Presionar SELECT para volver al nivel superior del menú.
firmación (Ok?).
dea durante algunos instantes) o SELECT para volver al
nivel superior sin realizar la operación.
,AMPæ/.ææ/&&
Permet d’allumer ou d’éteindre la lampe à partir du panneau de
commandes du projecteur.
1) Appuyer sur la touche de VALIDATION – sur l’afficheur
apparaît la sélection courante (On ou Off).
2) Avec les touches UP et DOWN, allumer (On) ou éteindre
(Off) la lampe - sur l’afficheur apparaît un message de confirmation (Ok ?).
3) Appuyer sur la touche de VALIDATION pour confirmer la
sélection (l’afficheur clignote pendant quelques instants), ou
bien sur la touche SELECT pour maintenir la sélection courante et retourner au niveau supérieur.
-ANUALæCONTROL
Permet de programmer le niveau des canaux à partir du panneau de commandes du projecteur.
1) Appuyer sur la touche de VALIDATION – sur l’afficheur
apparaît le premier canal (Pan).
2) Avec les touches UP et DOWN, sélectionner le canal désiré.
3) Appuyer sur la touche de VALIDATION, et avec les touches
UP et DOWN sélectionner le niveau DMX désiré (valeur
entre 0 et 255).
4) Appuyer sur SELECT pour retourner au niveau supérieur.
%NCODERæ0AN
Permet d’afficher la position de l’encodeur du Pan.
1) Appuyer sur la touche de VALIDATION – sur l’afficheur
apparaît la valeur de l’encodeur du Pan.
2) Appuyer sur SELECT pour retourner au niveau supérieur.
%NCODERæ4ILT
Permet d’afficher la position de l’encodeur du Tilt.
1) Appuyer sur la touche de VALIDATION – sur l’afficheur
apparaît la valeur de l’encodeur du Tilt.
2) Appuyer sur SELECT pour retourner au niveau supérieur.
,AMPæ/.ææ/&&
Ermöglicht das Ein- oder das Ausschalten der Lampe von der
Schalttafel des Projektors aus.
1) ENTER drücken – auf dem Display erscheint die laufende
2) Mit den Tasten UP und DOWN die Lampe ein- (On) oder
3) ENTER drücken, um die Wahl zu bestätigen (das Display
-ANUALæCONTROL
Ermöglicht den Stand der Kanäle von der Schalttafel des
Projektors aus einzustellen.
1) ENTER drücken – auf dem Display erscheint der erste Kanal
2) Mit den Tasten UP und DOWN den gewünschten Kanal
3)
4) SELECT drücken, um zum oberen Stand zurückzukehren.
%NCODERæ0AN
Ermöglicht die Position des Pan Encoders anzuzeigen.
1) ENTER drücken – auf dem Display erscheint der Wert des
2) SELECT drücken, um zum oberen Stand zurückzukehren.
%NCODERæ4ILT
Ermöglicht die Position des Tilt Encoders anzuzeigen.
1) ENTER drücken – auf dem Display erscheint der Wert des
2) SELECT drücken, um zum oberen Stand zurückzukehren.
,AMPæ/.ææ/&&
Permite el encendido o el apagado de la lámpara desde el
panel de mandos del proyector.
1) Presionar ENTER – en la pantalla aparece la programación
Einstellung (On oder Off).
ausschalten (Off) – auf dem Display erscheint eine
Bestätigungsmitteilung (Ok?)
blinkt einige Momente lang), oder SELECT drücken, um die
laufende Einstellung beizubehalten und zum oberen Stand
zurückzukehren.
(Pan).
wählen.
ENTER drücken und mit den Tasten UP und DOWN den
gewünschten DMX Stand wählen (Wert zwischen 0 und 255).
Pan Encoders.
Tilt Encoders.
actual (On o Off).
2) Con las teclas UP y DOWN encender (On) o apagar (Off) la
lámpara – en la pantalla aparece un mensaje de confirmación (Ok?)
3) Presionar ENTER para confirmar la selección (la pantalla
parpadea durante algunos instantes) o SELECT para mantener la programación actual y volver al nivel superior.
-ANUALæCONTROL
Permite programar el nivel de los canales del panel de mandos
del proyector.
1) Presionar ENTER – en la pantalla aparece el primer canal
(Pan).
2) Con las teclas UP y DOWN seleccionar el canal deseado.
3) Presionar ENTER y con las teclas Up y DOWN seleccionar
el nivel DMX deseado (valor entre 0 y 255).
4) Presionar SELECT para volver al nivel superior.
%NCODERæ0AN
Permite visualizar la posición del encoder del Pan.
1) Presionar ENTER – en la pantalla aparece el valor del encoder del Pan.
2) Presionar SELECT para volver al nivel superior.
%NCODERæ4ILT
Permite visualizar la posición del encoder del Tilt.
1) Presionar ENTER – en la pantalla aparece el valor del encoder del Tilt.
2) Presionar SELECT para volver al nivel superior.
ALPHA WASH 300
23
Continua / Continue
➔
Page 24

y
e
A uot
!UTOTEST
Permette di verificare il corretto funzionamento degli effetti.
1) Premere ENTER - sul display appare l’impostazione corrente
(On o Off).
2) Con i tasti UP e DOWN attivare (On) o disattivare (Off) la
funzione Auto Test.
3) Premere ENTER per confermare la selezione (il display lampeggia per alcuni istanti), oppure SELECT per mantenere
l’impostazione corrente.
!UTOTEST
Allows you to check the proper functioning of effects.
1) Press ENTER – the current setting appears on the display
2) Use the UP and DOWN keys to enable (On) or disable (Off)
3) Press ENTER to confirm the selection (the display blinks for
(On or Off).
the Auto Test function.
several seconds), or SELECT to keep current settings.
Cal
Pan
Ti lt
Dimr
C
an
Mgnt
Sequenza di test:
Pan
Tilt
Cyan filter
Magenta filter
Yellow filter
Colour wheel
Stop/Strobe
Dimmer
Frost 1
Frost 2
-%.5æ3%26)#%æ 3%26)#%æ-%.5
)
#ALIBRATIONæ
Permette di eseguire tramite pannello comandi delle piccole
regolazioni meccaniche di alcuni effetti per ottenere una perfetta uniformità tra i proiettori.
1) Premere ENTER - sul display appare “Pan”.
2) Con i tasti UP e DOWN selezionare l’effetto sul quale si desidera eseguire la regolazione.
0AN Pan
4ILTæ Tilt
$IMR Dimmer
#YAN Cyan filter
-GNT Magenta filter
9ELW Yellow filter
#OL Colour wheel
Test sequence:
Pan
Tilt
Cyan filter
Magenta filter
Yellow filter
Colour wheel
Stop/Strobe
Dimmer
Frost 1
Frost 2
'"
#ALIBRATIONæ
Allows you to adjust effects from the control panel to obtain perfect uniformity between the projectors.
1) Press ENTER - “Pan” appears on the display.
2) Using the UP and DOWN buttons, select the effect you wish
to regulate.
0AN Pan
4ILTæ Tilt
$IMR Dimmer
#YAN Cyan filter
-GNT Magenta filter
9ELW Yellow filter
#OL Colour wheel
Y
lw
Col
Fact
3) Premere ENTER e con i tasti UP e DOWN eseguire la calibrazione impostando un valore fra 0 e 255.
4) Premere ENTER per confermare la scelta (il display lampeggia per alcuni istanti),oppure SELECT per mantenere l’impostazione corrente e tornare al livello superiore.
&ACTORYæSETTINGSæ&ACTæ
Permette di ripristinare i valori di default del Pan (128) e del Tilt
(128).
1) Premere ENTER - sul display appare un messaggio di conferma “Ok?”.
2) Premere ENTER per confermare la selezione (il display lampeggia per alcuni istanti),oppure SELECT per mantenere
l’impostazione corrente.
3) Press ENTER and use the UP and DOWN buttons to make
4) Press ENTER to confirm the selection (the display blinks for
&ACTORYæSETTINGSæ&ACTæ
Allows you to restore default values of Pan (128) and Tilt (128).
1) Press ENTER – a confirmation message appears on the
2) Press ENTER to confirm the selection (the display blinks for
the adjustment by setting a value between 0 and 255.
several seconds), or SELECT to keep current settings and
return to the top level.
display (Ok?).
several seconds), or SELECT to keep current settings.
ALPHA WASH 300
24
Page 25

!UTOTEST
Permet de vérifier le fonctionnement correct des effets.
1) Appuyer sur la touche de VALIDATION – sur l’afficheur
apparaît la sélection courante (On ou Off).
2) Avec les touches UP et DOWN, activer (On) ou désactiver
(Off) la fonction Auto Test.
3) Appuyer sur VALIDATION pour confirmer la sélection (l’afficheur clignote pendant quelques instants), ou bien sur
SELECT pour maintenir la sélection courante.
!UTOTEST
Ermöglicht es den korrekten Betrieb der Effekte zu überprüfen.
1) ENTER drücken – auf dem Display erscheint die laufende
2) Mit den UP und DOWN Tasten aktiviere (On) oder deaktivie-
3) ENTER drücken um die Wahl zu bestätigen (das Display
!UTOTEST
Permite comprobar el correcto funcionamiento de los efectos.
1) Presionar ENTER – en la pantalla aparece la programación
Einstellung (On oder Off).
2) Con las teclas UP y DOWN activar (On) o desactivar (Off) la
re (Off) man die Auto Test Funktion.
3) Presionar ENTER para confirmar la selección (la pantalla
blinkt einige Momente lang), oder SELECT drücken, um die
laufende Einstellung beizubehalten.
actual (On o Off).
función Auto Test.
parpadea durante algunos instantes) o SELECT para mantener la programación actual.
Séquence de test :
Pan
Tilt
Cyan filter
Magenta filter
Yellow filter
Colour wheel
Stop/Strobe
Dimmer
Frost 1
Frost 2
#ALIBRATIONæ
Permet d’exécuter, avec le panneau des commandes, de petits
réglages mécaniques de certains effets pour obtenir une parfaite uniformité entre les projecteurs.
1) Appuyer sur la touche de VALIDATION – sur l’afficheur
apparaît ”Pan”.
2) Avec les touches UP et DOWN sélectionner l’effet sur lequel
on désire exécuter le réglage.
Testsequenz:
Pan
Tilt
Cyan filter
Magenta filter
Yellow filter
Colour wheel
Stop/Strobe
Dimmer
Frost 1
Frost 2
#ALIBRATIONæ
Erlaubt kleine mechanische Einstellungen bestimmter Effekte
über das Bedienpult, um eine Einheitlichkeit der Projektoren zu
erhalten.
1) ENTER drücken – auf dem Display erscheint „Pan”.
2) Mit den Tasten UP und DOWN den Effekt auswählen, der
-%.5æ3%26)#%æ -%.5æ3%26)#%æ-%.5æ3%26)#%æ
$ %&
eingestellt werden soll.
Secuencia de test:
Pan
Tilt
Cyan filter
Magenta filter
Yellow filter
Colour wheel
Stop/Strobe
Dimmer
Frost 1
Frost 2
#ALIBRATIONæ
Permite llevar a cabo mediante el panel de mandos pequeños
ajustes mecánicos de algunos efectos para obtener una perfecta uniformidad entre los proyectores.
1) Presionar ENTER – en la pantalla aparece ”Pan ”.
2) Con las teclas UP y DOWN seleccione el efecto sobre el
cual desea efectuar el ajuste.
0AN Pan
4ILTæ Tilt
$IMR Dimmer
#YAN Cyan filter
-GNT Magenta filter
9ELW Yellow filter
#OL Colour wheel
3) Appuyer sur ENTER et avec les touches UP et DOWN exécuter la calibration en programmant une valeur entre 0 et
255.
4) Appuyer sur la touche de VALIDATION pour confirmer la
sélection (l’afficheur clignote pendant quelques instants), ou
bien sur la touche SELECT pour maintenir la sélection courante et retourner au niveau supérieur.
&ACTORYæSETTINGSæ&ACTæ
Permet de rétablir les valeurs par défaut du Pan (128) et du Tilt
(128).
1) Appuyer sur la touche de VALIDATION – sur l’afficheur
apparaît un message de confirmation (Ok ?).
2) Appuyer sur VALIDATION pour confirmer la sélection (l’afficheur clignote pendant quelques instants), ou bien sur
SELECT pour maintenir la sélection courante.
3) ENTER drücken und mit den Tasten UP und DOWN einen
4) ENTER drücken, um die Wahl zu bestätigen (das Display
&ACTORYæSETTINGSæ&ACTæ
Ermöglicht es die Defaultwerte Pan (128) und Tilt (128) wiederherzustellen.
1)ENTER drücken – auf dem Display erscheint eine
2) ENTER drücken um die Wahl zu bestätigen (das Display
0AN Pan
4ILTæ Tilt
$IMR Dimmer
#YAN Cyan filter
-GNT Magenta filter
9ELW Yellow filter
#OL Colour wheel
Wert zwischen 0 und 255 einstellen, und die Kalibrierung
ausführen.
blinkt einige Momente lang), oder SELECT drücken, um die
laufende Einstellung beizubehalten und zum oberen Stand
zurückzukehren.
Bestätigungsmitteilung (OK?).
blinkt einige Momente lang), oder SELECT drücken, um die
laufende Einstellung beizubehalten.
3) Presione ENTER y con las teclas UP y DOWN lleve a cabo
4) Presionar ENTER para confirmar la selección (la pantalla
&ACTORYæSETTINGSæ&ACTæ
Permite el reajuste de los valores de defecto del Pan (128) y
del Tilt (128).
1) Pulsar ENTER – en la pantalla aparece un mensaje de con-
2) Presione ENTER para confirmar la selección (la pantalla
0AN Pan
4ILTæ Tilt
$IMR Dimmer
#YAN Cyan filter
-GNT Magenta filter
9ELW Yellow filter
#OL Colour wheel
el ajuste programando un valor entre 0 y 255.
parpadea durante algunos instantes) o SELECT para mantener la programación actual y volver al nivel superior.
firmación (Ok?).
parpadea durante algunos instantes), o SELECT para mantener la programación actual.
ALPHA WASH 300
25
Page 26

)
&5.:)/.%æ#!.!,)æ #(!..%,æ&5.#4)/.æ &/.#4)/.æ$%3æ#!.!58æ
$
+!.!,&5.+4)/.%.æ &5.#)/.æ$%æ,/3æ#!.!,%3æ
'"
%
&
!,0(!æ7!3(æ
#(!..%,
CYAN
MAGENTA
YELLOW
COLOUR WHEEL
STOP/STROBE
DIMMER
LIGHT FROST
HEAVY FROST
PAN
PAN FINE
TILT
TILT FINE
RESET
/PTIONæ6ECT
$MXæ-/$!,)49
y
nCa
g
n
M
t
elwY
Clo
S uth
D mri
W di1
W di2
P na
P naF
T itl
T lFt
CYAN
MAGENTA
YELLOW
COLOUR WHEEL
STOP/STROBE
DIMMER
LIGHT FROST
HEAVY FROST
PAN
PAN FINE
TILT
TILT FINE
RESET
/PTIONæ3TND
y
nCa
g
n
M
t
elwY
Clo
S uth
D mri
W di1
W di2
P na
P naF
T itl
T lFt
LAMP CONTROL (with option LDmx ON)
PAN - TILT TIME
COLOUR TIME
BEAM TIME
LAMP CONTROL (with option LDmx ON)
ALPHA WASH 300
26
Page 27

s #/,/52æ-)8).' æCHANNEL ææææ
Operation with option CMY On
CHANNEL 1
CYAN
CHANNEL 2
MAGENTA
CHANNEL 3
YELLOW
BIT
255 100
0 0.0
% EFFECT
COLOUR INSERTED
COLOUR EXCLUDED
Operation with option LinC On Rain On
BIT % EFFECT
255
100
FAST ROTATION (167 rpm)
128
50
127
0
SLOW ROTATION (0.2 rpm)
49.7
BLUE + WHITE
0
WHITE
Operation with option CMY Off
CHANNEL 1
CYAN
CHANNEL 2
MAGENTA
CHANNEL 3
YELLOW
BIT % EFFECT
255 100
0 0.0
s #/,/52æ7(%%, æCHANNEL
Operation with option FulC Off LinC Off Rain On
BIT % EFFECT
255
128
119-127
112-118
105-111
98-104
91-97
84-90
77-83
70-76
63-69
56-62
49-55
42-48
35-41
28-34
21-27
14-20
7-13
0-6
100
50.0
46.7-49.7
44.0-46.2
41.2-43.7
38.2-41.0
35.5-38.0
33.0-35.0
30.0-32.5
27.5-29.7
24.7-27.0
22.0-24.2
19.0-21.7
16.2-18.7
13.7-16.0
11.0-13.2
8.2-10.5
5.5-8.0
3.0-5.0
0.0-2.5
COLOUR EXCLUDED
COLOUR INSERTED
FAST ROTATION (167 rpm)
SLOW ROTATION (0.2 rpm)
BLUE + WHITE
BLUE
ORANGE+ BLUE
ORANGE
AQUAMARINE + ORANGE
AQUAMARINE
GREEN + AQUAMARINE
GREEN
CTO 2500 + GREEN
CTO 2500
CTO 3200 + CTO 2500
CTO 3200
CTB + CTO 3200
CTB
RED + CTB
RED
WHITE + RED
WHITE
Operation with option FulC Off LinC Off Rain Off
BIT % EFFECT
238-255
224-237
210-223
196-209
182-195
168-181
154-167
140-153
126-139
112-125
98-111
84-97
70-83
56-69
42-55
28-41
14-27
0-14
Operation with option FulC On LinC Off Rain Off
BIT % EFFECT
224-255
196-223
168-195
140-167
112-139
84-111
56-83
28-55
0-27
93.2-100
88.0-93.0
82.5-87.5
76.7-82.0
71.2-76.2
66.0-71.0
60.5-65.5
54.7-60.0
49.5-54.2
44.0-49.0
38.2-43.7
33.0-38.0
27.5-32.5
22.0-27.0
16.2-21.7
11.0-16.0
5.5-10.5
0.0-5.0
88.0-100
76.7-87.5
66.0-76.2
54.7-65.5
44.0-54.2
33.0-43.7
22.0-32.5
11.0-21.7
0.0-10.5
BLUE + WHITE
BLUE
ORANGE + BLUE
ORANGE
AQUAMARINE + ORANGE
AQUAMARINE
GREEN + AQUAMARINE
GREEN
CTO 2500 + GREEN
CTO 2500
CTO 3200 + CTO 2500
CTO 3200
CTB + CTO 3200
CTB
RED + CTB
RED
WHITE + RED
WHITE
BLUE
ORANGE
AQUAMARINE
GREEN
CTO 2500
CTO 3200
CTB
RED
WHITE
Operation with option FulC On LinC Off Rain On
ALPHA WASH 300
BIT % EFFECT
50.0
44.0 – 49.7
38.2 – 43.7
33.0 – 38.0
27.5 – 32.5
22.0 – 27.0
16.2 – 21.7
11.0 – 16.0
5.5 – 10.5
0.0 – 5.0
FAST ROTATION (167 rpm)
SLOW ROTATION (0.2 rpm)
BLUE
ORANGE
AQUAMARINE
GREEN
CTO 2500
CTO 3200
CTB
RED
WHITE
255 100
128
112 - 127
98 - 111
84 - 97
70 - 83
56 - 69
42 - 55
28 - 41
14 - 27
0 - 13
Operation with option LinC On Rain Off
27
BIT % EFFECT
2550100
0.0
BLUE + WHITE
WHITE
Continua / Continue
➔
Page 28

sæ34/0ææ342/"% æCHANNELæ
MACRO
BIT % EFFECT
252 - 255 98.7 - 100
239 - 251 93.7 - 98.2
226 - 238 88.7 - 93.2
213 - 225 83.7 - 88.2
208 - 212 81.7 - 83.2
207 81.2
OPEN
RANDOM FAST STROBE
RANDOM MEDIUM STROBE
RANDOM SLOW STROBE
OPEN
FAST PULSATION
sæ0!. æCHANNELæ
Operation with option Pan
(Tilt conventionally represented at 15% and option Til
G
Off
G
Off)
BIT %
255 100
sæ$)--%2 æCHANNEL
108 42.5
104 - 107 41.0 - 42.0
103 40.5
4 1.7
0 - 3 0.0 - 1.2
BIT % EFFECT
255 100
0 0.0
SLOW PULSATION
OPEN
FAST STROBE (13 flash/sec)
SLOW STROBE (1 flash/sec)
CLOSED
DIMMER OPEN
DIMMER CLOSED
Operation with option PanGOn
(Tilt conventionally represented at 15% and option Til
G
0 0.0
Off)
BIT %
255 100
0 0.0
sæ,)'(4æ&2/34ææCHANNELæ
sæ(%!69æ&2/34ææCHANNELæ
BIT % EFFECT
255 100
0 0.0
BIT % EFFECT
255 100
FROST INSERTED
FROST EXCLUDED
FROST INSERTED
sæ0!. &).%ææCHANNELæ
Operation with option Pan
(Tilt conventionally represented at 15% and option Til
G
Off
G
Operation with option PanGOn
(Tilt conventionally represented at 15% and option Til
G
Off)
BIT %
255 100
0 0.0
Off)
BIT %
255 100
ALPHA WASH 300
0 0.0
FROST EXCLUDED
0 0.0
28
Page 29

sæ4),4 æCHANNELæ
Operation with option Til
(Pan conventionally represented at 0% and option Pan
G
Off
G
Off)
BIT %
255 100
128 50.0
0 0.0
s 2%3%4 CHANNELæ
BIT % EFFECT
255 100
128 50.0
127 49.7
77
76 29.7
26 10.0
25 9.7
0 0.0
COMPLETE RESET
Complete reset is activated passing
throug the unused range and staying
5 seconds in complete reset levels.
COMPLETE RESET
PAN / TILT RESET
Pan / Tilt reset is activated passing
throug the unused range and staying
5 seconds in Pan / Tilt reset levels.
PAN / TILT RESET
30.0
EFFECTS RESET
Effects reset is activated passing
throug the unused range and staying
5 seconds in Effects reset levels.
EFFECTS RESET
UNUSED RANGE
Operation with option TilGOn
sæ4),4æ&).% æCHANNELæ
Operation with option Til
(Pan conventionally represented at 0% and option PanGOff)
G
Off
BIT %
255 100
128 50.0
0 0.0
BIT %
255 100
sæ,!-0æ#/.42/,æONLYæWITHæOPTIONæ,DMXæ/NææCHANNELæ
)-0/24!.4æAlpha Wash 300 is not provided with hot restrike igniter
ON
ON
OFF
OFF
BIT % EFFECT
255 100
180 70.5
179 70.0
101 39.5
100 39.0
26 10.0
25 9.7
0 0.0
LAMP ON
The function is activated
staying 5 s in Lamp ON levels.
LAMP ON
UNUSED RANGE 2
LAMP OFF
The function is activated
passing throug the unused
range 1 and staying 5s in
Lamp OFF levels.
LAMP OFF
UNUSED RANGE 1
Operation with option TilGOn
(Pan conventionally represented at 0% and option Pan
G
ALPHA WASH 300
Off)
BIT %
255 100
0 0.0
0 0.0
29
Continua / Continue
➔
Page 30

4)-).'æ#(!..%,3
4IMINGæ#HANNEL #HANNELæFUNCTION
Pan - Tilt time Pan - Tilt - (Pan fine - Tilt fine)
Colour time CMY - Colour wheel
Beam time Light Frost - Heavy Frost - Dimmer
4)-%æ4!",%
")4 3ECONDS
0 Full
1 0.2
2 0.4
3 0.6
4 0.8
51
6 1.2
7 1.4
8 1.6
9 1.8
10 2
11 2.2
12 2.4
13 2.6
14 2.8
15 3
16 3.2
17 3.4
18 3.6
19 3.8
20 4
21 4.2
22 4.4
23 4.6
24 4.8
25 5
26 5.2
27 5.4
28 5.6
29 5.8
30 6
31 6.2
32 6.4
33 6.6
34 6.8
35 7
36 7.2
37 7.4
38 7.6
39 7.8
40 8
41 8.2
42 8.4
")4 3ECONDS
43 8.6
44 8.8
45 9
46 9.2
47 9.4
48 9.6
49 9.8
50 10
51 10.2
52 10.4
53 10.6
54
55
56
57
58
59
11
12
13
60
61 14
62
63
64
15
65
66 16
67
68
69
17
70
71 18
72
73
74
19
75
76 20
77
78
79 21
80
81
82
22
83
84 23
85
")4 3ECONDS
86
87
24
88
89 25
90
91
92
26
93
94 27
95
96
97
28
98
99 29
100
101
102 30
103
104
105
31
106
107 32
108
109
110
33
111
112 34
113
114
115
35
116
117 36
118
119
120
37
121
122 38
123
124
125 39
126
127
128
40
")4 3ECONDS
129
130 41
131
132
133
42
134
135 43
136
137
138
44
139
140 45
141
142
143
46
144
145 47
146
147
148
48
149
150 49
151
152
153 50
154
155
156
51
157
158 52
159
160
161
53
162
163 54
164
165
166
55
167
168 56
169
170
171
57
")4 3ECONDS
172
173 58
174
175
176 59
177
178
179
60
180
181 65
182
183
184
70
185
186 75
187
188
189
80
190
191 85
192
193
194
90
195
196 95
197
198
199
100
200
201 110
202
203
204 120
205
206
207
130
208
209 140
210
211
212
150
213
214 160
215
")4 3ECONDS
216
217
170
218
219 180
220
221
222
190
223
224 200
225
226
227 210
228
229
230
220
231
232 230
233
234
235
240
236
237 250
238
239
240
260
241
242 270
243
244
245
280
246
247 290
248
249
250
300
251
252
253
310
254
Follow cue
255
Data
ALPHA WASH 300
30
Page 31

4
) '"
-!.54%.:)/.% -!).4%.!.#%
%.42%4)%. 7!245.' -!.4%.)-)%.4/
$
10 11
%&
1
1/4 Turn
2
1
2
3
"LOCCOæEæSBLOCCOæMOVIMENTIæ0ANæEæ4ILT - Consultare le istruzioni al paragrafo
!PERTURAæCOPERCHIæLATERALI - Figura 10.
)
#HIUSURAæCOPERCHIæLATERALI - Figura 11.
,OCKINGæANDæRELEASINGæ0ANæANDæ4ILTæMOVEMENTS - Refer to the instructions in the UNPACKING AND PREPARATION section.
/PENINGæTHEæSIDEæCOVERS - Fig. 10.
'"
#LOSINGæTHEæSIDEæCOVERS - Fig. 11.
"LOCAGEæETæD£BLOCAGEæMOUVEMENTSæ0ANæETæ4ILT - Consulter les instructions reportées dans le paragraphe
&
/UVERTUREæDESæCOUVERCLESæLAT£RAUX - Figure 10.
&ERMETUREæDESæCOUVERCLESæLAT£RAUX - Figure 11.
DISIMBALLO E PREDISPOSIZIONE
.
DEBALLAGE ET PREPARATION
1/4 Turn
.
3PERRENæUNDæ%NTSPERRENæDERæ"EWEGUNGENæ0ANæUNDæ4ILT - Siehe die Anweisungen im Abschnitt
FFNENæDERæSEITLICHENæ!BDECKUNGEN - Abb. 10.
$
3CHLIEENæDERæSEITLICHENæ!BDECKUNGEN - Abb. 11.
"LOQUEOæYæDESBLOQUEOæDEæLOSæMOVIMIENTOSæ0ANæYæ4ILTæ- Consulte las instrucciones el punto
%
!PERTURAæDEæLASæTAPASæLATERALES - Figura 10.
#IERREæDEæLASæTAPASæLATERALES - Figura 11.
ALPHA WASH 300
AUSPACKEN UND VORBEREITEN
DESEMBALAJE Y PREPARACION
31
.
.
Continua / Continue
➔
Page 32

12
13
14
1
Upper Side
2
Lower Side
1
/+ ./ ./
2
!PERTURAæEæCHIUSURAæVANOæLAMPADAæ- Figura 12
3OSTITUZIONEæLAMPADA - Figura 13
Togliere la lampada nuova dalla confezione ed inserirla nell’attacco.
!44%.:)/.%æILæBULBOæDELLAæLAMPADAæNONæDEVEæESSEREæTOCCATOæAæMANIæNUDEæ3EæCIÓæTUTTAVIAæDOVESSEæVERIFICARSIæPULIREæILæBULBOæSTESSOæCONæUNæPANNOæIMBEVUTOæDIæALCOOLæED
)
ASCIUGARLOæCONæUNæPANNOæPULITOæEDæASCIUTTO
#ENTRATURAæLAMPADA - Figura 14
Per centrare la lampada agire sulle tre viti di regolazione come indicato in figura.
/PENINGæANDæCLOSINGæLAMPæCOMPARTMENTæ- Fig. 12
,AMPæCHANGE - Fig 13
Take the new lamp out of its package and insert in the fitting.
'"
7!2.).' do not touch the lamp’s envelope with bare hands. Should this happen, clean the bulb with a cloth soaked in alcohol and dry it with a clean, dry cloth.
,AMPæREGULATION - Fig. 14
To centre the lamp, turn the three adjusting screws as shown in the figure.
/UVERTUREæETæFERMETUREæLOGEMENTæDEæLAæLAMPEæ- Figure 12
2EMPLACEMENTæLAMPE - Figure 13
Extraire l'ampoule neuve de la boîte et installer dans son raccord.
&
!44%.4)/.æne pas toucher le bulbe de la lampe avec les doigts. Si cela se produit, nettoyer le bulbe avec un chiffon imbibé d’alcool et le sécher avec un chiffon sec et propre.
2£GLAGEæLAMPE - Figure 14
Pour centrer la lampe, agir sur les trois vis de réglage de la façon indiquée sur la figure.
FFNENæUNDæ3CHLIEENæ,AMPENFACHæ- Abb. 12
,AMPENWECHSEL - Abb. 13
Die neue Lampe aus der Verpackung nehmen und in die Sockel einsetzen.
!#(45.'æ$ERæ,AMPENKOLBENæDARFæNICHTæMITæBLOENæ(ÜNDENæ BERÔHRTæWERDENæ 7ENNæDIESæDENNOCHæPASSIERENæSOLLTEæDENæ,AMPENKOLBENæMITæEINEMæMITæ!LKOHOLæGETRÜNKTEN
$
4UCHæREINIGENæUNDæIHNæMITæEINEMæSAUBERENæUNDæTROCKENENæ4UCHæABTROCKNEN
%INSTELLUNGæDESæ,AMPEN - Abb. 14
Zum Zentrieren der Lampe die drei Einstellschrauben regulieren, wie in der Abbildung dargestellt.
!PERTURAæYæCIERREæCOMPARTIMIENTOæDEæLAæL×MPARAæ- Figura 12
#AMBIOæDEæLAæL×MPARA - Figura 13
Saque la lámpara nueva del embalaye y monte en la base.
%
!4%.#)Ê. el bulbo de la lámpara no se debe tocar con las manos desnudas. En este caso, limpie el bulbo con un paño humedecido en alcohol y séquela con un paño
limpio y seco.
2EGULACINæDEæLAæL×MPARA - Figura 14
Para centrar la lámpara manipule los tres tornillos de regulación como se indica en la figura.
ALPHA WASH 300
32
Page 33

15
!ZZERAMENTOæDEIæCONTATORIæPARZIALI - Figura 15
Per azzerare il conteggio parziale delle ore di funzionamento del proiettore o della lampada eseguire le seguenti operazioni.
1. Selezionare il contatore parziale dal menu Info.
2. Tenere premuti contemporaneamente i tasti UP e DOWN per circa 5 secondi – sul display appare “Rst?”
)
3. Premere ENTER (il display lampeggia per alcuni istanti) per azzerare il contatore; oppure SELECT per mantenere il conteggio corrente.
4. Premere SELECT per tornare al livello superiore del menu.
Il conteggio parziale del numero di accensioni della lampada si azzera automaticamente azzerando il contatore parziale delle ore di funzionamento della lampada.
2ESETTINGæTHEæPARTIALæCOUNTERS - Fig. 15
Proceed as follows to reset the partial counts of the operating time of the projector or the lamp.
1. Select the partial counter from the Info menu.
2. Keep the UP and DOWN keys pressed simultaneously for about 5 seconds – “Rst?” appears on the display.
'"
3. Press ENTER (the display will blink for a few seconds) to reset the counter or SELECT to retain the current count.
4. Press SELECT to return to the top menu level.
The partial count of the number of times the lamp has been switched on is reset automatically when the partial counter of lamp operating hours is reset.
2EMISEæÝæZ£ROæDESæCOMPTEURSæPARTIELS - Figure 15
Pour remettre à zéro le comptage partiel des heures de fonctionnement du projecteur ou de la lampe, effectuer les opérations suivantes.
1. Dans le menu Info sélectionner le compteur partiel.
2. Maintenir appuyées en même temps les touches UP et DOWN pour environ 5 secondes - « Rst ? » apparaît sur l'afficheur.
&
3. Appuyer sur ENTER (l’afficheur va clignoter pour quelques instants) pour remettre à zéro le compteur ou sur SELECT pour maintenir le comptage actuel.
4. Appuyer sur la touche SELECT pour revenir niveau supérieur du menu.
Le comptage partiel du nombre d’allumages de la lampe se remet automatiquement à zéro quand on remet à zéro le compteur partiel des heures de fonctionnement de la lampe.
.ULLSTELLUNGæDERæ4EILZÜHLER - Abb. 15
Um die Teilzählung der Betriebsstunden des Projektors oder der Lampe Null zu setzen, gehen Sie folgendermaßen vor:
1. Den Teilzähler vom Menü Info aus anwählen.
2. Gleichzeitig die Taste UP und DOWN circa 5 Sekunden lang gedrückt halten – auf dem Display erscheint “Rst?”
$
3. ENTER drücken (das Display blinkt einige Augenblicke lang), um den Zähler Null zu setzen, oder aber SELECT, um die augenblickliche Zählung beizubehalten.
4. Um zum Menü auf der darüber liegenden Ebene zurückzukehren, die Taste SELECT drücken.
Die Teilzählung der Anzahl von Einschaltvorgängen der Lampe wird automatisch Null gesetzt, wenn der Teilzähler der Betriebsstunden der Lampe Null gesetzt wird.
0UESTAæAæCEROæDEæLOSæCONTADORESæPARCIALESæ- Figura 15
Para poner a cero el recuento parcial de las horas de funcionamiento del proyector o de la lámpara realizar las siguientes operaciones.
1. Seleccionar el contador parcial del menú Info.
2. Mantener presionadas contemporáneamente las teclas UP y DOWN durante unos 5 segundos – en la pantalla aparece “Rst?”
%
3. Presionar ENTER (la pantalla parpadea durante algunos instantes) para poner a cero el contador; o SELECT para mantener el recuento actual.
4. Presionar SELECT para volver al nivel superior del menú.
El recuento parcial del número de encendidos de la lámpara se pone a cero automáticamente poniendo a cero el contador parcial de las horas de funcionamiento de la lámpara.
ALPHA WASH 300
33
Continua / Continue
Continua / Continue
➔
➔
Page 34

16
Upper Side
Parti che necessitano di una pulizia frequente.
Parts requiring frequent cleaning.
Pièces qui doivent être nettoyées fréquemment.
Teile, die häufig gereinigt werden müssen.
Partes que necesitan limpieza frecuente.
0ULIZIAæPERIODICA
Per mantenere funzionalità e rendimento ottimali per lungo tempo è indispensabile effettuare una pulizia periodica delle parti soggette all’accumulo di polveri e grassi. La frequenza
con la quale effettuare le operazioni sotto indicate dipende da diversi fattori, quali la quantità di movimenti degli effetti e la qualità dell’ambiente di lavoro (umidità dell’aria, presenza di
polvere, salsedine, ecc.). Per rimuovere lo sporco dal riflettore, dalle lenti e dai filtri usare un panno morbido inumidito di un qualsiasi liquido detergente per la pulizia del vetro.
Annualmente si consiglia di sottoporre il proiettore a personale tecnico qualificato per una manutenzione straordinaria consistente almeno nelle seguenti operazioni:
)
s Pulizia generale delle parti interne.
s Ripristino della lubrificazione di tutte le parti soggette ad attrito tramite l’utilizzo di lubrificanti appositamente forniti da Clay Paky.
s Controllo visivo generale di componenti interni, cablaggio, parti meccaniche, ecc.
s Controlli elettrici, fotometrici e funzionali; eventuali riparazioni.
0ERIODICALæCLEANING
To ensure optimal operation and performance for a long time it is essential to periodically clean the parts subject to dust and grease deposits. The frequency with which the following
operations are to be carried out depends on various factors, such as the amount of the effects and the quality of the working environment (air humidity, presence of dust, salinity, etc.).
Use a soft cloth dampened with any detergent liquid for cleaning glass to remove the dirt from the reflectors, from the lenses and filters. It is recommended that the projector undergoes
an annual service by a qualified technician for special maintenance involving at least the following operations:
'"
s General cleaning of internal parts.
s Restoring lubrication of all parts subject to friction, using lubricants specifically supplied by Clay Paky.
s General visual check of the internal components, cabling, mechanical parts, etc.
s Electrical, photometric and functional checks; eventual repairs.
.ETTOYAGEæP£RIODIQUE
Pour ne pas compromettre le bon fonctionnement et le rendement de l'appareil, nettoyer régulièrement les parties sur lesquelles la poussière et la graisse ont tendance à s'accumuler. La
fréquence avec laquelle il faut effectuer les opérations indiquées ci-après dépend de plusieurs facteurs comme la quantité de mouvements des effets et la qualité du lieu d’installation
(humidité de l’air, présence de poussière, salinité, etc.). Pour enlever la saleté du réflecteur, des lentilles et des filtres, utiliser un chiffon doux imbibé d’un liquide détergent pour le nettoyage
des vitres. Il est conseillé de confier une fois par an le projecteur à du personnel technique qualifié pour un entretien extraordinaire qui devra comporter au moins les opérations suivantes:
&
s Nettoyage général des parties internes.
s Rétablissement de la lubrification de toutes les parties sujettes à un frottement à l'aide de lubrifiants spécialement fournis par Clay Paky.
s Contrôle visuel général des composants internes, du câblage, des pièces mécaniques, etc..
s Contrôles électriques, photométriques et fonctionnels; éventuelles réparations.
2EGELMÜIGEæ2EINIGUNG
Um die optimale Funktionalität und Leistung des Geräts für lange Zeit zu bewahren, ist eine regelmäßige Reinigung der Teile, an denen sich leicht Staub und Fett ansammeln,
unverzichtbar. Die Häufigkeit, mit der die nachstehenden Vorgänge durchzuführen sind, hängt von verschiedenen Faktoren ab, wie die Menge Bewegungen der Effektmodule und die
Beschaffenheit der Arbeitsumgebung (Luftfeuchtigkeit, Staub- und Salzhaltigkeit usw.). Zum Reinigen des Reflektors, den Linsen und der Filter ein weiches Tuch verwenden, das mit
einem gängigen Glasreinigungsmittel angefeuchtet ist. Einmal jährlich sollte der Projektor außerdem qualifiziertem Fachpersonal übergeben werden, um ihn einer außerordentlichen
$
Wartung zu unterziehen, die mindestens folgende Arbeiten umfasst:
s Allgemeine Reinigung der Innenteile.
s Nachschmierung aller Teile, die ständiger Reibung ausgesetzt sind, mit den von Clay Paky gelieferten speziellen Schmiermitteln.
s Allgemeine Sichtkontrolle der inneren Bauteile, Verdrahtungen, mechanischen Teile usw.
s Elektrische, fotometrische und funktionelle Kontrollen; eventuelle Reparaturen.
,IMPIEZAæPERIDICA
Para conservar las prestaciones y el rendimiento del proyector durante mucho tiempo, es indispensable limpiar periódicamente las partes donde se depositan polvos y grasas. La
frecuencia de la limpieza depende de varios factores, como la cantidad de movimientos de los efectos y las características del ambiente de trabajo (humedad del aire, presencia de
polvo, salinidad, etc.). Para limpiar el reflector, las lentes y los filtros, utilice un paño suave humedecido en cualquier limpiacristales no corrosivo. Se aconseja hacer revisar el
proyector una vez al año par personal técnico cualificado para que realice un mantenimiento extraordinario consistente, como mínimo, en las siguientes operaciones:
%
s Limpieza general de las partes internas.
s Lubricación de todas las partes sujetas a fricción, con los productos suministrados por Clay Paky.
s Control visual general de componentes internos, cableado, partes mecánicas, etc.
s Controles eléctricos, fotométricos y de funcionamiento; posibles reparaciones.
- Figura 16
- Fig. 16
- Figure 16
- Abb. 16
- Figura 16
ALPHA WASH 300
34
Page 35

17
Lower Side
1
2
Upper Side
%STRAZIONEæMODULIæEFFETTIæ/PERAZIONIæPRELIMINARIæ- Figura 17
)
3
%XTRACTIONæOFæTHEæEFFECTæMODULESæ0RELIMINARYæOPERATIONSæ- Fig. 17
'"
%XTRACTIONæDESæMODULESæDEFFETSææOP£RATIONSæPR£LIMINAIRES - Figure 17
&
!USZUGæ%FFEKTEMODULEæ0RÜLIMINAROPERATIONENæ- Abb. 17
$
%XTRACCINæMDULOSæDEæEFECTOSæOPERACIONESæPRELIMINARESæ- Figura 17
%
ALPHA WASH 300
35
Continua / Continue
➔
Page 36

18
Lower Side
1
Upper Side
Upper Side
3
2
%STRAZIONEæMODULIæEFFETTIæ- Figura 18-19
)
)-0/24!.4%æ!FFERRAREæIæMODULIæTRAMITEæLAæSTRUTTURAæDIæSOSTEGNOæEæNONæTRAMITEæPARTICOLARIæCHEæPOTREBBEROæDANNEGGIARSI
)NSERIMENTOæMODULIæEFFETTIæripetere in ordine inverso le operazioni indicate alle figure 17 - 18 e 19.
%XTRACTIONæOFæTHEæEFFECTæMODULESæ- Fig. 18-19
'"
)-0/24!.4æ'RASPæTHEæMODULESæUSINGæTHEæSUPPORTæSTRUCTUREæANDæNOTæTHEæDETAILSæWHICHæCOULDæGETæDAMAGED
)NSERTIONæOFæTHEæEFFECTæMODULESæRepeat the operations indicated in Fig. 17 - 18 and 19 in reverse order.
%XTRACTIONæDESæMODULESæDEFFETSæ- Figure 18-19
)-0/24!.4æ3AISIRæLESæMODULESæPARæLAæSTRUCTUREæDEæSOUTIENæETæNONæPASæPARæDESæ£L£MENTSæQUIæPOURRAIENTæSgAB¦MER
&
)NSERTIONæDESæMODULESæDEFFETSææRépéter les opérations indiquées sur les figures 17 - 18 et 19, mais en sens inverse.
!USZUGæ%FFEKTEMODULEæ- Abb. 18-19
7)#(4)'æ$IEæ-ODULEæANæDERæ(ALTERUNGæUNDæNICHTæANæ$ETAILSæANPACKENæDIEæBESCHÜDIGTæWERDENæKNNTEN
$
%INSATZæDERæ%FFEKTEMODULEæGemäß den Abbildungen 17 - 18 und 19 in entgegengesetzter Reihenfolge die angezeigten Operationen durchführen.
%XTRACCINæMDULOSæEFECTOS - Figura 18-19
)-0/24!.4%æ3UJETARæLOSæMDULOSæMEDIANTEæLAæESTRUCTURAæDEæSOPORTEæYæNOæMEDIANTEæPIEZASæQUEæPUEDANæDA®ARSE
%
)NTRODUCCINæMDULOSæDEæEFECTOSæRepetir en orden inverso las operaciones indicadas en las figuras 17 - 18 y 19.
ALPHA WASH 300
36
Page 37

19
Lower SideLower Side
5
4
Lower Side
Lower Side
7
6
%STRAZIONEæMODULIæEFFETTIæ- Figura 18-19
)
)-0/24!.4%æ!FFERRAREæIæMODULIæTRAMITEæLAæSTRUTTURAæDIæSOSTEGNOæEæNONæTRAMITEæPARTICOLARIæCHEæPOTREBBEROæDANNEGGIARSI
)NSERIMENTOæMODULIæEFFETTIæripetere in ordine inverso le operazioni indicate alle figure 17 - 18 e 19.
%XTRACTIONæOFæTHEæEFFECTæMODULESæ- Fig. 18-19
'"
)-0/24!.4æ'RASPæTHEæMODULESæUSINGæTHEæSUPPORTæSTRUCTUREæANDæNOTæTHEæDETAILSæWHICHæCOULDæGETæDAMAGED
)NSERTIONæOFæTHEæEFFECTæMODULESæRepeat the operations indicated in Fig. 17 - 18 and 19 in reverse order.
%XTRACTIONæDESæMODULESæDEFFETSæ- Figure 18-19
)-0/24!.4æ3AISIRæLESæMODULESæPARæLAæSTRUCTUREæDEæSOUTIENæETæNONæPASæPARæDESæ£L£MENTSæQUIæPOURRAIENTæSgAB¦MER
&
)NSERTIONæDESæMODULESæDEFFETSææRépéter les opérations indiquées sur les figures 17 - 18 et 19, mais en sens inverse.
!USZUGæ%FFEKTEMODULEæ- Abb. 18-19
7)#(4)'æ$IEæ-ODULEæANæDERæ(ALTERUNGæUNDæNICHTæANæ$ETAILSæANPACKENæDIEæBESCHÜDIGTæWERDENæKNNTEN
$
%INSATZæDERæ%FFEKTEMODULEæGemäß den Abbildungen 17 - 18 und 19 in entgegengesetzter Reihenfolge die angezeigten Operationen durchführen.
%XTRACCINæMDULOSæEFECTOS - Figura 18-19
)-0/24!.4%æ3UJETARæLOSæMDULOSæMEDIANTEæLAæESTRUCTURAæDEæSOPORTEæYæNOæMEDIANTEæPIEZASæQUEæPUEDANæDA®ARSE
%
)NTRODUCCINæMDULOSæDEæEFECTOSæRepetir en orden inverso las operaciones indicadas en las figuras 17 - 18 y 19.
ALPHA WASH 300
37
Page 38

a
) '"
$!4)æ4%#.)#) 4%#(.)#!,æ).&/2-!4)/.
380
(15")
200 - 240V
100 - 120V
230V 50Hz
240V 50Hz
208V 50Hz
200V 60Hz
200V 50Hz
(19,68")
500
!LIMENTAZIONIæDISPONIBILI
Versione con ballast elettronico:
-100-120V 50/60Hz
-200-240V 50/60Hz
Versione con ballast elettromagnetico:
-230V 50Hz
-240V 50Hz
-208V 60Hz
-200V 60Hz
-200V 50Hz
Il proiettore è predisposto per il funzionamento a tensione e
frequenza indicate sull'etichetta dei dati elettrici posta sulla
base dell'apparecchio
0OTENZAæASSORBITA
• 550VA a 230V 50Hz.
,AMPADA
A ioduri metallici alimentata tramite speciale alimentatore
elettronico incorporato.
• Tipo MSR Gold 300/2 MiniFastFit (L10087)
- Attacco PGjX28
- Temperatura colore 9300 K
- Flusso luminoso 23000 lm
- Vita media 750 h
- Posizione di lavoro qualsiasi
• Tipo MSD Gold 300/2 MiniFastFit (L10091)
- Attacco PGjX28
- Temperatura colore 8600 K
- Flusso luminoso 22000 lm
- Vita media 2000 h
- Posizione di lavoro qualsiasi
-OTORI
N. 13 motori passo-passo, funzionanti a micropassi, totalmente controllati da microprocessore.
'RUPPOæOTTICO
• Riflettore ellittico ad elevata resa luminosa.
#ANALI
Max 17 canali di controllo.
)NGRESSI
• DMX 512
#ORPOæMOBILE
• Movimento tramite due motori a micropassi, controllati da
microprocessore.
• Riposizionamento automatico di PAN e TILT in seguito a
spostamenti accidentali non comandati da centralina.
• Escursione:
- PAN = 540°
- TILT = 250°
• Velocità massime:
- PAN = 3.15 sec (Stnd) / 2.75 sec (Fast)
- TILT = 1.95 sec (Stnd) / 1.65 sec (Fast)
• Risoluzione:
- PAN = 2.11°
- PAN FINE = 0.008°
- TILT = 0.98°
- TILT FINE = 0.004°
0OWERæSUPPLIESæAVAILABLE
• Version with electronic ballast (with PFC):
- 200-240V 50/60Hz
- 100-120V 50/60Hz
• Version with electromagnetic ballast:
- 230V 50Hz
- 240V 50Hz
- 208V 60Hz
- 200V 50Hz
- 200V 60Hz
The projector is designed to operate at the mains frequency
and voltage given on the electrical data label on the base of
the appliance.
)NPUTæPOWER
• 550VA at 230V 50Hz.
,AMP
Discharge lamp with built-in power supply unit.
• Type MSR Gold 300/2 MiniFastFit (L10087)
- Cap PGjX28
- Colour temperature 9300 K
- Luminous flux 23000 lm
- Average life 750 h
- Any working position
• Type MSD Gold 300/2 MiniFastFit (L10091)
- Cap PGjX28
- Colour temperature 8600 K
- Luminous flux 22000 lm
- Average life 2000 h
- Any working position
-OTORS
13 stepper motors, operating with microsteps, totally
microprocessor controlled.
/PTICALæUNIT
• Elliptic reflector with high luminous efficiency
#HANNELS
Max 17 control channels.
)NPUTS
• DMX 512
-OVABLEæBODY
• Movement by means of two stepper motors, controlled by
microprocessor.
• Automatic repositioning of PAN and TILT after accidental
movement not controlled by control unit.
• Travel:
- PAN = 540°
- TILT = 250°
• Maximum speeds:
- PAN = 3.15 sec (Stnd) / 2.75 sec (Fast)
- TILT = 1.95 sec (Stnd) / 1.65 sec (Fast)
• Resolution:
- PAN = 2.11°
- PAN FINE = 0.008°
- TILT = 0.98°
- TILT FINE = 0.004°
575
(22.64")
385
(15,16")
ALPHA WASH 300
220
(8,66")
390
(15,35")
405
(16")
'RADOæDIæPROTEZIONEæ)0
• Protetto contro la penetrazione di corpi solidi di
dimensione superiore a 12mm.
• Nessuna protezione contro la penetrazione di liquidi
-ARCATURAæ#%
Conforme alle Direttive Europee di
- 2006/95/CE (LVD)
- 2004/108/CE (EMC)
- 2011/65/UE (RoHS).
$ISPOSITIVIæDIæSICUREZZA
• Interruttore automatico bipolare a protezione termica.
•
Interruzione automatica dell’alimentazione in caso di surriscaldamento o di mancato funzionamento del sistema di raffreddamento.
2AFFREDDAMENTO
A ventilazione forzata tramite ventole assiali.
#ORPO
• Struttura in alluminio con coperture in plastica pressofusa.
• Due maniglie laterali per il trasporto.
• Dispositivo di bloccaggio dei movimenti PAN e TILT per
trasporto e manutenzione.
0OSIZIONEæDIæLAVORO
Funzionamento in qualsiasi posizione.
0ESIæEæDIMENSIONI
• Versione con ballast elettronico: circa 18.2 Kg
• Versione con ballast elettromagnetico: circa 21.9 Kg
)0æPROTECTIONæRATING
• Protected against the entry of solid bodies larger than
12mm (0.47”).
• No protection against the entry of liquids.
#%æ-ARKING
Complies with the following European Directives
- 2006/95/EC (LVD)
- 2004/108/EC (EMC)
- 2011/65/EU (RoHS).
3AFETYæ$EVICES
• Bipolar circuit breaker with thermal protection.
• Automatic break in power supply in case of overheating or
failed operation of cooling system.
#OOLING
Forced ventilation with axial fans.
"ODY
• Aluminium structure with die-cast plastic cover.
• Two side handles for transportation.
• Device locking PAN and TILT mechanisms for
transportation and maintenance.
7ORKINGæPOSITION
Functioning in any position.
7EIGHTSæANDæDIMENSIONS
• Version with electronic ballast: about 18.2 kg (40 Ibs 1 ozs).
• Version with electromagnetic ballast: about 21.9 kg (48 Ibs 3 ozs).
38
Page 39

$/..%%3æ4%#(.)15%3
$ %&
4%#(.)3#(%æ$!4%. $!4/3æ4»#.)#/3
!LIMENTATIONSæDISPONIBLES
• Version avec ballast électronique (avec PFC):
- 200-240V 50/60Hz
- 100-120V 50/60Hz
• Version avec ballast électromagnétique:
- 230V 50Hz
- 240V 50Hz
- 208V 60Hz
- 200V 50Hz
- 200V 60Hz
Le projecteur est prédisposé pour le fonctionnement aux
valeurs de tension et de fréquence indiquées sur l'étiquette
des données électriques située sur la base de l'appareil.
0UISSANCEæABSORB£E
• 550VA à 230V 50Hz.
,AMPE
A iodures métalliques, alimentée par un dispositif spécial
incorporé dans l'appareil.
• Type MSR Gold 300/2 MiniFastFit (L10087)
- Culot PGjX28
- Température couleur 9300 K
- Flux lumineux 23000 lm
- Durée de Vie moyenne 750 h
- Toutes les positions de travail
• Type MSD Gold 300/2 MiniFastFit (L10091)
- Culot PGjX28
- Température couleur 8600 K
- Flux lumineux 22000 lm
- Durée de Vie moyenne 2000 h
- Toutes les positions de travail
-OTEURS
N. 13 moteurs pas-à-pas, fonctionnant par micropas,
totalement contrôlés par microprocesseur.
'ROUPEæOPTIQUE
• Réflecteur elliptique à haut rendement lumineux.
#ANAUX
Max 17 canaux de contrôle.
%NTR£ES
• DMX 512
#ORPSæMOBILE
• Mouvement fourni par deux moteurs à micropas
commandés par micro-processeur.
• Remise en position automatique de PAN et TILT après des
déplacements accidentels non commandés par la centrale.
• Excursion:
- PAN = 540°
- TILT = 250°
• Vitesses maximum:
- PAN = 3.15 sec (Stnd) / 2.75 sec (Fast)
- TILT = 1.95 sec (Stnd) / 1.65 sec (Fast)
• Résolution:
- PAN = 2.11°
- PAN FINE = 0.008°
- TILT = 0.98°
- TILT FINE = 0.004°
$EGR£æDEæPROTECTIONæ)0
• Protégé contre la pénétration de corps solides ayant une
dimension supérieure à 12mm.
• Aucune protection contre la pénétration de liquides.
-ARQUAGEæ#%
Conforme aux Directives Européennes de
- 2006/95/CE (BT)
- 2004/108/CE (CEM)
- 2011/65/UE (RoHS).
$ISPOSITIFSæDEæS£CURIT£
• Interrupteur automatique bipolaire à protection thermique.
• Coupure automatique de l'alimenta-tion en cas de
surchauffe ou de panne du système de refroidissement.
2EFROIDISSEMENT
A ventilation forcée par ventilateurs axiaux.
#ORPS
• Structure en aluminium avec couvertures en plastique
moulée sous pression.
• Deux poignées latérales pour le transport.
• Dispositif de blocage des mouvements PAN et TILT pour
transport et entretien.
0OSITIONæDEæTRAVAIL
Fonctionne dans toutes les positions.
0OIDSæETæDIMENSIONS
• Version avec ballast électronique: 18.2 kg environ.
• Version avec ballast électromagnétique: 21.9 kg environ.
6ORHANDENEæ.ETZVERSORGUNG
• Version mit elektronischem Vorschaltgerät
(mit Blindstromkompensation):
- 200-240V 50/60Hz
- 100-120V 50/60Hz
• Version mit elektromagnetischem Vorschaltgerät:
- 230V 50Hz
- 240V 50Hz
- 208V 60Hz
- 200V 50Hz
- 200V 60Hz
Der Projektor ist für den Betrieb bei der auf dem
Typenschild an dem Gerätesockel angegebenen Spannung
und Frequenz ausgelegt.
,EISTUNGSAUFNAHME
• 550VA a 230V 50Hz.
,AMPE
Jodid-Metalldampflampen, Versorgung mit speziellem, in
das Gerät eingebautem orschaltgerät.
• Typ MSR Gold 300/2 MiniFastFit (L10087)
- Sockel PGjX28
- Farbtemperatur 9300 K
- Lichtfluss 23000 lm
- Durchschnittliche Lebensdauer 750 h
- Beliebige Einbauposition
• Typ MSD Gold 300/2 MiniFastFit (L10091)
- Sockel PGjX28
- Farbtemperatur 8600 K
- Lichtfluss 22000 lm
- Durchschnittliche Lebensdauer 2000 h
- Beliebige Einbauposition
-OTOREN
Mikro-Schrittmotoren, vollständig mikroprozessorgesteuert.
13
/PTIKGRUPPE
• Elliptischer Reflektor mit hoher Lichtausbeute.
+ANÜLE
Max 17 Kontrollkanäle.
%INGÜNGE
• DMX 512
"EWEGLICHERæ+OPF
• Bewegung durch zwei mikroprozes-sorgesteuerte MikroSchrittmotoren.
• Automatische Rückpositionierung von PAN und TILT nach
unbeabsichtigten, nicht vom Regiepult betätigten
Bewegungen.
• Aktionsradius:
- PAN = 540°
- TILT = 250°
• Höchstgeschwindigkeit:
- PAN = 3.15 sec (Stnd) / 2.75 sec (Fast)
- TILT = 1.95 sec (Stnd) / 1.65 sec (Fast)
• Auflösung:
- PAN = 2.11°
- PAN FINE = 0.008°
- TILT = 0.98°
- TILT FINE = 0.004°
3CHUTZKLASSEæ)0
• Schutz gegen das Eindringen fester Körper, die größer sind
als 12mm.
• Kein Schutz gegen das Eindringen von Flüssigkeiten.
#%+ENNZEICHNUNG
Entspricht den folgenden Europäischen Richtlinien:
- 2006/95/EG (LVD)
- 2004/108/EG (EMC)
- 2011/65/EU (RoHS).
3ICHERHEITSVORRICHTUNGEN
• Zweipoliger Wärmeschutz-Sicherheitsschalter.
• Automatische Abschaltung der Stromzufuhr bei
Überhitzung oder Ausfall des Kühlsystems.
+ÔHLUNG
Kühlsystem mit Zwangslüftung durch Axiallüfter.
'EHÜUSE
• Struktur aus Aluminium mit Abdeckungen aus Pressdruck-Kunststoff.
• Zwei seitliche Tragegriffe.
• PAN- und TILT-Arretierung für Transport und Wartung.
%INBAUPOSITION
Beliebig.
-AEæUNDæ'EWICHTE
• Version mit elektronischem Vorschaltgerät: rund 18.2 kg.
• Version mit elektromagnetischem Vorschaltgerät: rund 21.9 kg.
!LIMENTACIONESæDISPONIBLES
• Versión con balasto electrónico (con PFC):
- 200-240V 50/60Hz
- 100-120V 50/60Hz
• Versión con balasto electromagnético:
- 230V 50Hz
- 240V 50Hz
- 208V 60Hz
- 200V 50Hz
- 200V 60Hz
El proyector está preparado para funcionar a la tensión y
frecuencia indicadas en la etiqueta de datos eléctricos que
se encuentra sobre la base del aparato.
0OTENCIAæABSORBIDA
• 550VA a 230V 50Hz.
,×MPARA
De yoduros metálicos, abastecida por un alimentador
especial incorporado en el aparato.
• Tipo MSR Gold 300/2 MiniFastFit (L10087)
- Casquillo PGjX28
- Temperatura de color 9300 K
- Flujo luminoso 23000 lm
- Vida media 750 h
- Posición de trabajo: cualquiera
• Tipo MSD Gold 300/2 MiniFastFit (L10091)
- Casquillo PGjX28
- Temperatura de color 8600 K
- Flujo luminoso 22000 lm
- Vida media 2000 h
- Posición de trabajo: cualquiera
-OTORES
N. 13 motores de micropasos totalmente controlados por
microprocesador.
'RUPOæPTICO
• Reflector elíptico de elevado rendimiento lumínico.
#ANALES
Max 17 canales de contrtol.
%NTRADAS
• DMX 512
#UERPOæMVIL
• Movimiento mediante dos motores de micropasos
controlados por microprocesador.
• Reposicionamiento automático de giro e inclinación tras
desplazamientos accidentales no accionados desde la consola.
• Excursión:
- GIRO = 540°
- INCLINACIÓN = 250°
• Velocidades máximas:
- GIRO = 3.15 sec (Stnd) / 2.75 sec (Fast)
- INCLINACIÓN = 1.95 sec (Stnd) / 1.65 sec (Fast)
• Resolución:
- GIRO = 2.11°
- GIRO FINO = 0.008°
- INCLINACIÓN = 0.98°
- INCLINACIÓN FINA = 0.004°
'RADOæDEæPROTECCINæ)0
• Protegido contra la entrada de cuerpos sólidos de
dimensiones superiores a 12 mm.
• Ninguna protección contra la entrada de agua.
-ARCAæ#%
Conforme a las Directivas Europeas de
- 2006/95/CE (LVD)
- 2004/108/CE (EMC)
- 2011/65/UE (RoHS).
$ISPOSITIVOSæDEæSEGURIDAD
• Interruptor automático bipolar con protección térmica.
• Desconexión automática de la alimentación en caso de
recalentamiento o de fallo del sistema de enfriamiento.
%NFRIAMIENTO
Por ventilación forzada con ventiladores axiales.
#UERPO
• Estructura en aluminio con cubiertas en plástico moldeado a
presión.
• Dos asas laterales para el transporte.
• Dispositivo de bloqueo de los movimientos de giro e
inclinación para transporte y mantenimiento.
0OSICINæDEæTRABAJO
Funciona en cualquier posición.
0ESOSæYæMEDIDAS
• Versión con balasto electrónico: unos 18.2 kg.
• Versión con balasto electromagnético: unos 21.9 kg.
ALPHA WASH 300
39
Page 40

) '"
#!53!æ%æ3/,5:)/.%æ$%)æ02/",%-) #!53%æ!.$æ3/,54)/.æ/&æ02/",%-3
#!53%ж%4ж3/,54)/.ж$%3ж02/",%-%3жжжжжжжжжжжжжжжжж523!#(%.ж5.$ж!"(),&%ж"%)ж"%42)%"33425.'%.жжжжжжжжжжжжжææææ#!53!3æ9æ3/,5#)/.%3æ$%æ02/",%-!3
IL PROIETTORE NON SI ACCENDE
L’ELETTRONICA NON FUNZIONA
PROIEZIONE DIFETTOSA
LUMINOSITÀ RIDOTTA
$
%&
ANOMALIE
POSSIBILI CAUSE CONTROLLI E RIMEDI
)
THE PROJECTOR WILL NOT SWITCH ON
Mancanza di alimentazione di rete.
Lampada esaurita o difettosa.
Cavo di trasmissione dei segnali guasto o scollegato.
Indirizzamento errato.
Difetto nei circuiti elettronici.
Rottura lenti o riflettore.
Deposito di polveri o grasso.
ELECTRONICS NON-OPERATIONAL
DEFECTIVE PROJECTION
REDUCED LUMINOSITY
Verificare la presenza della tensione alimentazione.
Sostituire lampada (vedi istruzioni).
Sostituire cavi.
Verificare indirizzi (vedi istruzioni).
Interpellare tecnico autorizzato.
Interpellare tecnico autorizzato.
Procedere alla pulizia (vedi istruzioni).
PROBLEMS
POSSIBLE CAUSES CHECKS AND REMEDIES
'"
No mains supply.
Lamp exhausted or defective.
Signal transmission cable faulty or disconnected.
Incorrect addressing.
Fault in the electronic circuits.
Lenses or reflector broken
Dust or grease deposited.
Check the power supply voltage.
Replace the lamp. (See instructions).
Replace the cables.
Check addresses (see instructions).
Call an authorised technician.
Call an authorised technician.
Clean (see instructions).
LE PROJECTEUR NE S'ALLUME PAS
L'ELECTRONIQUE NE FONCTIONNE PAS
PROJECTION DEFECTUEUSE
REDUCTION DE LA LUMINOSITE
ANOMALIES
CAUSES POSSIBLES CONTROLES ET REMEDES
&
DER PROJEKTOR SCHALTET SICH NICHT EIN
Absence de courant.
Lampe déchargée ou défectueuse.
Câble de transmiss. des signaux en panne ou déconnecté.
Adressage erroné.
Problèmes sur les circuits électroniques.
Lentilles ou réflecteure casses.
Dépôt de poussière ou de graisse.
ELEKTRONIK FUNKTIONIERT NICHT
FEHLERHAFTE PROJEKTION
VERRINGERTE LEUCHTKRAFT
Vérifier la présence de la tension d’alimentation.
Remplacer la lampe (voir instructions).
Remplacer les câbles.
Vérifier adresses (voir instructions).
Faire appel à un technicien autorisé.
Faire appel à un technicien autorisé.
Nettoyer (voir instructions).
STÖRUNGEN
MÖGLICHE URSACHE KONTROLLEN UND ABHILFE
$
Keine Stromversorgung.
Lampe erschöpft oder defekt.
Übertragungskabel der Signale defekt oder nicht verbunden.
Fehlerhafte Adressierung.
Defekt in den Elektronikschaltungen.
Bruch der linsen oder der Reflektors.
Ablagerungen von Staub oder Fett.
Das Vorhandensein der Versorgungsspannung.
Lampe ersetzen (siehe Anweisungen).
Kabel ersetzen.
Codierung überprüfen (siehe Anweisungen).
Einen autorisierten Techniker anfordern.
Einen autorisierten Techniker anfordern.
Reinigen (siehe Anweisungen).
EL PROYECTOR NO SE ENCIENDE
EL SISTEMA ELECTRÓNICO NO FUNCIONA
PROYECCIÓN DEFECTUOSA
POCA LUMINOSIDAD
ANOMALIAS
CAUSAS POSIBLES CONTROLES Y SOLUCIONES
%
Falta de alimentación de la red.
Lámpara agotada o defectuosa.
Cable de transmisión de las señales averiado o desconectado.
Direccionamiento erróneo.
Fallo de los circuitos electrónicos.
Rotura de las lentes o del reflector.
Acumulación de polvo o grasa.
Compruebe la presencia de la tensión de alimentación y/o conductividad del fusible.
Sustituya la lámpara según las instrucciones.
Sustituya el cable.
Controlar direcciones (véanse instrucciones).
Consulte a un técnico autorizado.
Consulte a un técnico autorizado.
Limpie según las instrucciones.
099392 - Rev.4 11/13
#,!9 0!+9 3P! - Via Pastrengo,3/b - 24068 Seriate (BG) Italy - Tel. +39-035-654311 - Fax +39-035-301876 - WWWCLAYPAKYIT
 Loading...