

Page 1
Bedienungsanleitung/Garantie
Gebruiksaanwijzing/Garantie • Mode d’emploi/Garantie
Instrucciones de servicio/Garantía • Manual de instruções/Garantia
Istruzioni per l’uso/Garanzia • Bruksanvisning/Garanti
Instruction Manual/Guarantee • Instrukcja obsługi/Gwarancja
Návod k použití/Záruka • A használati utasítás/Garancia
Руководство по эксплуатации/Гарантия
Sandwichtoaster/Waffelautomat
Sandwichtoaster/ wafelautomaat • Toaster à sandwichs/gaufrier
Aparato para hacer sandwiches/goffres • Sanduicheira/Máquina de waffl es
Tostapane/Macchina per le cialde • Smørbrød-/vaffeljern
Sandwich toaster/waffl e maker • Toster do kanapek/gofrownica
Automat pro přípravu sendvičů/vaflí • Melegszendvics- és ostyasütő
Тостер для сандвичей/автоматическая вафельница
ST/WA 2942
6....-05-STWA 2942 1 02.12.2004, 10:52:06 Uhr
Page 2

Inhalt
Inhoud • Sommaire • Indice • Índice • Indice • Innhold
Contents • Spis treści • Obsah • Tartalom • Содержание
Übersicht Bedienelemente . . . . . . . . . . . . . . . . . . . . . . . . . . Seite 3
D
Bedienungsanleitung . . . . . . . . . . . . . . . . . . . . . . . . . . . . . . . Seite 4
Garantie . . . . . . . . . . . . . . . . . . . . . . . . . . . . . . . . . . . . . . . . . Seite 7
Overzicht bedieningselementen . . . . . . . . . . . . . . . . . . . . . . Pagina 3
NL
Gebruiksaanwijzing . . . . . . . . . . . . . . . . . . . . . . . . . . . . . . . . Pagina 8
Garanties . . . . . . . . . . . . . . . . . . . . . . . . . . . . . . . . . . . . . . . . Pagina 11
Aperçu des éléments de commande . . . . . . . . . . . . . . . . . . Page 3
F
Mode d’emploi . . . . . . . . . . . . . . . . . . . . . . . . . . . . . . . . . . . . Page 12
Garantie . . . . . . . . . . . . . . . . . . . . . . . . . . . . . . . . . . . . . . . . . Page 15
Vista de conjunto Elementos de mando . . . . . . . . . . . . . . . . Página 3
E
Instrucciones de servicio . . . . . . . . . . . . . . . . . . . . . . . . . . . . Página 16
Garantia . . . . . . . . . . . . . . . . . . . . . . . . . . . . . . . . . . . . . . . . . Página 19
Vista geral dos elemntos de comando . . . . . . . . . . . . . . . . . Página 3
P
Manual de instruções . . . . . . . . . . . . . . . . . . . . . . . . . . . . . . Página 21
Garantía . . . . . . . . . . . . . . . . . . . . . . . . . . . . . . . . . . . . . . . . . Página 24
I Descrizione dei singoli pezzi . . . . . . . . . . . . . . . . . . . . . . . . Pagina 3
Istruzioni per l’uso . . . . . . . . . . . . . . . . . . . . . . . . . . . . . . . . . Pagina 26
Garanzia . . . . . . . . . . . . . . . . . . . . . . . . . . . . . . . . . . . . . . . . . Pagina 29
Oversikt over betjeningselementer . . . . . . . . . . . . . . . . . . . . Side 3
N
Bruksanvisning . . . . . . . . . . . . . . . . . . . . . . . . . . . . . . . . . . . . Side 31
Garanti . . . . . . . . . . . . . . . . . . . . . . . . . . . . . . . . . . . . . . . . . . Side 34
Control element overview . . . . . . . . . . . . . . . . . . . . . . . . . . . Page 3
GB
Instruction Manual . . . . . . . . . . . . . . . . . . . . . . . . . . . . . . . . . Page 35
Guarantee . . . . . . . . . . . . . . . . . . . . . . . . . . . . . . . . . . . . . . . Page 38
Przegląd elemetów obsługi . . . . . . . . . . . . . . . . . . . . . . . Strona 3
PL
Instrukcja obsługi . . . . . . . . . . . . . . . . . . . . . . . . . . . . . .Strona 39
Gwarancja . . . . . . . . . . . . . . . . . . . . . . . . . . . . . . . . . . . . Strona 42
Přehled obsluhovací prvky . . . . . . . . . . . . . . . . . . . . . . . . Strana 3
CZ
Návod k použití . . . . . . . . . . . . . . . . . . . . . . . . . . . . . . . . Strana 44
Záruka . . . . . . . . . . . . . . . . . . . . . . . . . . . . . . . . . . . . . . Strana 47
A hasznalt elemek megtekintése . . . . . . . . . . . . . . . . . . . Oldal 3
H
A hasznalati utasítás . . . . . . . . . . . . . . . . . . . . . . . . . . . . Oldal 48
Garancia . . . . . . . . . . . . . . . . . . . . . . . . . . . . . . . . . . . . . Oldal 51
Обзор управляющих элементов . . . . . . . . . . . . . . . . . . . . стр. 3
RUS
Руководство по эксплуатации . . . . . . . . . . . . . . . . . . . . . . стр. 52
Гарантия . . . . . . . . . . . . . . . . . . . . . . . . . . . . . . . . . . . . . . . . . стр. 56
2
6....-05-STWA 2942 2 02.12.2004, 10:52:08 Uhr
Page 3
Übersicht der Bedienelemente
Overzicht van de bedieningselementen • Liste des différents éléments de commande
Indicación de los elementos de manejo • Descrição dos elementos
Elementi di comando • Oversikt over betjeningselementene
Overview of the Components • Przegld elementów obłsugi
Přehled ovládacích prvků • A kezelő elemek áttekintéseé
Обзор деталей прибора
3
6....-05-STWA 2942 3 02.12.2004, 10:52:10 Uhr
Page 4

D
• Lesen Sie vor Inbetriebnahme dieses Gerätes die Bedienungsanleitung sehr
sorgfältig durch und bewahren Sie diese inkl. Garantieschein, Kassenbon und
nach Möglichkeit den Karton mit Innenverpackung gut auf.
• Benutzen Sie das Gerät ausschließlich für den privaten und den dafür
vorgesehenen Zweck. Dieses Gerät ist nicht für den gewerblichen Gebrauch
bestimmt. Benutzen Sie es nicht im Freien (außer es ist für den bedingten
Einsatz im Freien vorgesehen). Halten Sie es vor Hitze, direkter Sonneneinstrahlung, Feuchtigkeit (auf keinen Fall in Flüssigkeiten tauchen) und scharfen
Kanten fern. Benutzen Sie das Gerät nicht mit feuchten Händen. Bei feucht
oder nass gewordenem Gerät sofort den Netzstecker ziehen. Nicht ins Wasser greifen.
• Schalten Sie das Gerät aus und ziehen Sie immer den Stecker aus der
Steckdose (ziehen Sie am Stecker, nicht am Kabel) wenn Sie das Gerät nicht
benutzen, Zubehörteile anbringen, zur Reinigung oder bei Störung.
• Betreiben Sie das Gerät nicht unbeaufsichtigt. Sollten Sie den Arbeitsplatz
verlassen, schalten Sie das Gerät bitte immer aus, bzw. ziehen Sie den Stecker aus der Steckdose (ziehen Sie am Stecker, nicht am Kabel).
• Um Kinder vor Gefahren elektrischer Geräte zu schützen, sorgen Sie bitte
dafür, dass das Kabel nicht herunter hängt und Kinder keinen Zugriff auf das
Gerät haben.
• Prüfen Sie Gerät und Kabel regelmäßig auf Schäden. Ein beschädigtes Gerät
bitte nicht in Betrieb nehmen.
• Reparieren Sie das Gerät nicht selbst, sondern suchen Sie bitte einen
autorisierten Fachmann auf. Um Gefährdungen zu vermeiden, ein defektes
Netzkabel bitte nur vom Hersteller, unserem Kundendienst oder einer ähnlich
qualifi zierten Person durch ein gleichwertiges Kabel ersetzen lassen.
• Verwenden Sie nur Original-Zubehör.
• Beachten Sie bitte die nachfolgenden „Speziellen Sicherheitshinweise...“.
Allgemeine Sicherheitshinweise
Spezielle Sicherheitshinweise
• Die Backfl ächen werden sehr heiß! Fassen Sie nur die Griffe an.
• Stellen Sie das Gerät auf eine hitzebeständige Unterlage!
• Um einen Hitzestau zu vermeiden, das Gerät nicht direkt unter einen Schrank
stellen. Sorgen Sie für genügend Freiraum!
• Achten Sie beim Öffnen der Backfl ächen auf den austretenden Dampf.
• Brot ist brennbar. Deshalb das Gerät nie in der Nähe oder unterhalb von
Gardinen und anderen brennbaren Materialien verwenden!
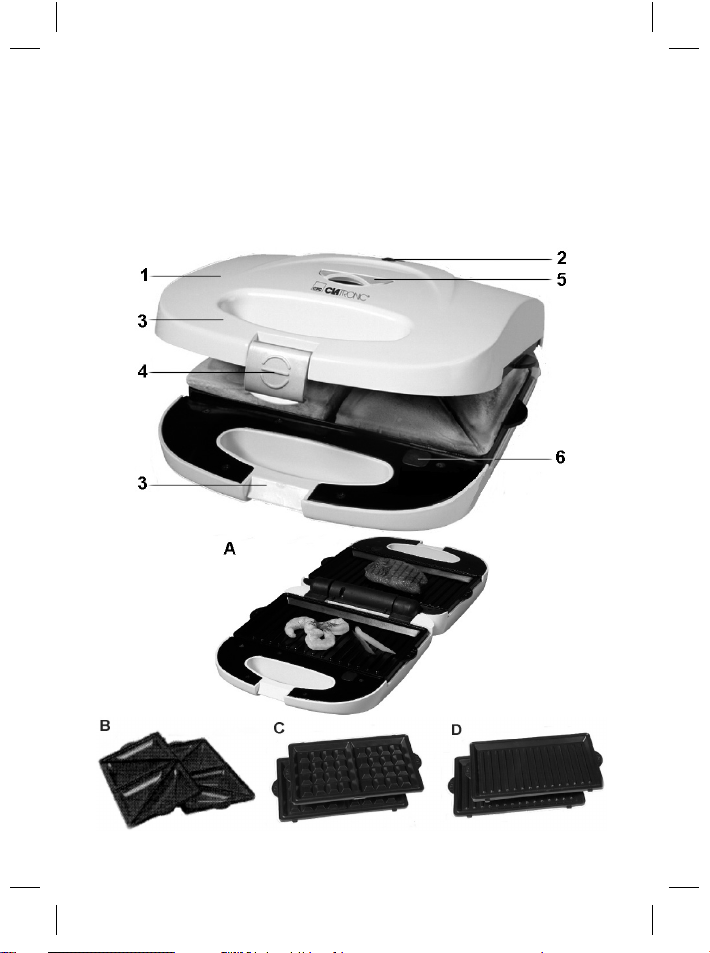
Darstellung der Bedienelemente
1 Deckel 4 Verriegelungssystem
2 Kontrollleuchten 5 Abstandhalter
3 “Cool Touch“ (wärmeisolierte) Griffe 6 Entriegelungstaste
4
6....-05-STWA 2942 4 02.12.2004, 10:52:11 Uhr
Page 5

Inbetriebnahme des Gerätes
ANTI-HAFTBESCHICHTUNG!
• Fetten Sie die Backfl ächen vor dem 1. Gebrauch leicht ein. Betreiben Sie das
Gerät mit geschlossenen Backfl ächen ca. 10 Minuten (siehe Benutzung des
Gerätes). Danach mit einem feuchten Spültuch nachwischen.
• Die ersten Toasts/Waffeln oder das erste Grillgut bitte nicht verzehren.
Benutzung des Gerätes
Backplatten einsetzen / auswechseln
Achten Sie darauf, dass während des Einsetzens bzw. Auswechselns der Netzstecker gezogen ist.
Achtung: Das Gerät und die Backplatten müssen komplett abgekühlt sein!
1. Lösen Sie das Verriegelungssystem (4) und klappen sie den Deckel (1) nach
oben.
2. Sind bereits Backplatten im Gerät eingesetzt, drücken Sie bitte die Entriegelungstaste (6) an den Innenseiten der Griffe nach unten, um die Backplatten
zu lösen. Halten Sie die Backplatten an den Griffen und nehmen Sie sie aus
dem Gerät heraus.
3. Setzen Sie nun die gewünschten Backplatten ein, bis diese einrasten. Beachten Sie bitte die Zapfen am Rand der Backplatten. Dem Gerät liegt jeweils ein
Satz Backplatten für Sandwichs (B), Waffeln (C) und für das Grillen (D) bei.
4. Schließen Sie das Gerät wieder.
Sandwich toasten
Tipp: Bestreichen Sie die Außenseite des Toastbrots (die später mit den Back-
fl ächen in Berührung kommen) leicht mit Butter oder Margarine. So lässt sich Ihr
Sandwich später ohne Probleme von den Backplatten entnehmen.
1. Wickeln Sie das Kabel bitte vollständig ab.
2. Schließen Sie das Gerät an eine vorschriftsmäßig installierte Schutzkontaktsteckdose 230 V, 50 Hz an. Die rote Netz-Kontrollleuchte (2) leuchtet.
3. Halten Sie während der Aufheizzeit die Backfl ächen geschlossen. Wenn die
grüne Kontrollleuchte (2) leuchtet, ist die Backtemperatur erreicht.
4. Deckel öffnen und je einen belegten, doppelten Toast einlegen. Deckel sanft
schließen. Die Griffe mit dem Scharnier arretieren.
5. Die grüne Kontrollleuchte (2) schaltet während des Backvorgangs an und aus,
um die Backtemperatur beizubehalten. Die Backdauer hängt vom individuellen Geschmack ab. Je länger die Sandwichs im Gerät verbleiben, desto
intensiver wird die Bräunung.
6. Deckel öffnen und die Toasts mit einer Holzgabel o.ä. entnehmen. Keine
spitzen oder schneidenden Gegenstände benutzen, so vermeiden Sie die
Beschädigung der Backfl ächenbeschichtung.
D
5
6....-05-STWA 2942 5 02.12.2004, 10:52:11 Uhr
Page 6

7. Fetten Sie die Backfl ächen, nach den einzelnen Backvorgängen, nach Bedarf
D
erneut leicht ein.
8. Die Backfl ächen sollten in den Backpausen immer geschlossen bleiben.
Waffeln backen
1. Wiederholen Sie Schritt 1 und 3, wie unter Sandwich toasten beschrieben.
2. Öffnen Sie den Deckel (1), geben Sie ca. 1 EL Teig in die Mitte der unteren
Backfl äche. Der Einfüllvorgang sollte rasch erfolgen, da sonst die Waffeln
nicht gleichmäßig braun werden. Achten Sie bitte darauf, die Teigmenge richtig zu dosieren, überschüssiger Teig läuft am Rand heraus und verunreinigt
das Gerät. Deckel sanft schließen. Die Griffe nicht zusammendrücken.
3. Gehen Sie bitte weiter vor, wie unter „Sandwich toasten“, Punkt 4 bis 7,
beschrieben.
Rezept für Biskuitwaffeln
5 Eigelb, 5 EL heißes Wasser, 100g Zucker und 1 geriebene Zitronenschale
schaumig schlagen und mit einer Mischung von 1/2 TL Backpulver und 150g
Mehl unterrühren, 5 Eiweiß steif schlagen und unter den Teig ziehen.
Weitere Rezepte entnehmen Sie bitte Rezeptbüchern oder verwenden Sie Backmischungen.
Grillen
1. Legen Sie die Grillplatten wie bereits unter „Benutzen des Gerätes“ beschrieben ein.
2. Gehen Sie weiterhin vor wie unter Punkt 1 und 3 „Sandwich toasten“ beschrieben.
3. Legen Sie das Grillgut auf die untere Grillplatte und schließen Sie sanft den
Deckel. Die Griffe bitte nicht zusammendrücken. Eine weitere Möglichkeit ist
beide Flächen zu nutzen (siehe Abb. A). Stellen Sie dazu den Abstandhalter
(5) senkrecht auf. Öffnen Sie den Deckel ganz, ziehen Sie ihn leicht nach
oben, so das sich die Arretierung löst, und öffnen Sie diesen dann um 180°.
Legen Sie nun das Grillgut auf.
4. Die Garzeit hängt vom individuellen Geschmack ab.
5. Hat das Grillgut die gewünschte Garstufe erreicht, entnehmen Sie es mit einer
Holzgabel. Benutzen Sie keine spitzen, scharfen oder schneidenden Gegenstände.
Reinigung
• Ziehen Sie den Netzstecker und lassen Sie das Gerät abkühlen.
• Pinseln Sie Krümel oder Reste von den Backfl ächen und den Rändern.
• Reinigen Sie das komplette Gerät nur mit einem leicht feuchten Tuch.
• Verwenden Sie keine scharfen Reinigungsmittel.
• Tauchen Sie das Gerät nicht ins Wasser!
6
6....-05-STWA 2942 6 02.12.2004, 10:52:12 Uhr
Page 7

Garantie
Wir übernehmen für das von uns vertriebene Gerät eine Garantie von 24 Monaten
ab Kaufdatum (Kassenbon).
Innerhalb der Garantiezeit beseitigen wir unentgeltlich die Mängel des Gerätes
oder des Zubehörs*), die auf Material- oder Herstellungsfehler beruhen, durch
Reparatur oder, nach unserem Ermessen, durch Umtausch. Garantieleistungen
bewirken weder eine Verlängerung der Garantiefrist, noch beginnt dadurch ein
Anspruch auf eine neue Garantie!
Als Garantienachweis gilt der Kaufbeleg. Ohne diesen Nachweis kann ein kostenloser Austausch oder eine kostenlose Reparatur nicht erfolgen.
Im Garantiefall geben Sie bitte das komplette Gerät in der Originalverpackung
zusammen mit dem Kassenbon an Ihren Händler.
*) Schäden an Zubehörteilen führen nicht automatisch zum kostenlosen Umtausch
des kompletten Gerätes. Wenden Sie sich in diesem Fall bitte an unsere Hotline!
Glasbruchschäden bzw. Brüche von Kunststoffteilen sind grundsätzlich kostenpfl ichtig!
Sowohl Defekte an Verbrauchszubehör bzw. Verschleißteilen (z.B. Motorkohlen,
Knethaken, Antriebsriemen, Ersatzfernbedienung, Ersatzzahnbürsten, Sägeblättern usw.), als auch Reinigung, Wartung oder der Austausch von Verschleißteilen,
fallen nicht unter die Garantie und sind deshalb kostenpfl ichtig!
Die Garantie erlischt bei Fremdeingriff.
Nach der Garantie
Nach Ablauf der Garantiezeit können Reparaturen kostenpfl ichtig vom entsprechenden Fachhandel oder Reparaturservice ausgeführt werden.
D
7
6....-05-STWA 2942 7 02.12.2004, 10:52:12 Uhr
Page 8

NL
• Lees vóór de ingebruikname van dit apparaat de handleiding uiterst zorgvuldig door en bewaar deze goed, samen met het garantiebewijs, de kassabon
en zo mogelijk de doos met de binnenverpakking.
• Gebruik het apparaat uitsluitend privé en uitsluitend voor de voorgeschreven
toepassing. Dit apparaat is niet geschikt voor commercieel gebruik (tenzij het
bedoeld is voor beperkt gebruik in de buitenlucht). Bescherm het tegen hitte,
directe zonnestralen, vocht (i geen geval in vloeistoffen dompelen) en scherpe
kanten. Gebruik het apparaat niet met vochtige handen. Bij vochtig of nat
geworden apparaat onmiddellijk de stroomtoevoer onderbreken. Niet in het
water grijpen.
• Schakel het apparaat uit en onderbreek altijd de stroomtoevoer (trek aan de
steker, nooit aan de kabel) wanneer u het apparaat niet gebruikt, hulpstukken
aanbrengt, reinigt of wanneer storingen optreden.
• Laat het ingeschakelde apparaat niet zonder toezicht werken. Schakel het
apparaat altijd uit of trek de steker uit de contactdoos (trek aan de steker, niet
aan de kabel) voordat u de werkplek verlaat.
• Bescherm kinderen tegen gevaren en zorg ervoor dat kabels nooit los omlaag
hangen en dat het apparaat buiten het bereik van kinderen blijft.
• Controleer regelmatig of het apparaat beschadigingen vertoont. Een beschadigd apparaat mag niet in gebruik worden genomen.
• Repareer het apparaat nooit zelf, maar breng het naar een geautoriseerde
vakman. Voorkom gevaren en laat een defecte kabel altijd alleen door de
fabrikant, onze technische dienst of een eender gekwalifi ceerde persoon
vervangen door een soortgelijke kabel.
• Gebruik alleen originele reserveonderdelen.
• Neem de onderstaande “Speciale veiligheidsinstructies“ in acht.
Algemene veiligheidsinstructies
Speciale veiligheidsinstructies
• De bakplaten worden zeer heet. Pakt u alleen de grepen beet.
• Plaatst u het apparaat op een hittebestendige ondergrond.
• Om een opeenhoping van hitte te voorkomen, mag u het apparaat niet direct
onder een kast plaatsen. Zorgt u voor voldoende ventilatieruimte.
• Past u bij openen van de bakplaten op voor de vrijkomende damp.
• Brood is brandbaar. Gebruik het apparaat dan ook nooit in de buurt van of
onder gordijnen en andere brandbare materialen!
Overzicht van de bedieningselementen
1 Deksel 4 Blokkeersysteem
2 Controlelampjes 5 Afstandhouder
3 „Cool Touch“
(warmtegeïsoleerde) handgrepen
8
6....-05-STWA 2942 8 02.12.2004, 10:52:12 Uhr
6 Ontgrendelingstoets
Page 9

Ingebruikname van het apparaat
NIET HECHTENDE LAAG
• Vóór de eerste ingebruikname vet u de bakplaten enigszins in. Laat het
apparaat ca. 10 minuten ingeschakeld met gesloten bakplaten (zie “Bediening
van het apparaat”). Daarna veegt u het schoon met een vochtige doek
• De eerste toasts/wafels of het eerste gegrilde product a.u.b. niet eten.
Bediening van het apparaat
Bakplaten aanbrengen / vervangen
Onderbreek altijd eerst de stroomtoevoer voordat u bakplaten aanbrengt of
vervangt.
Let op! Het apparaat en de bakplaten moeten volledig zijn afgekoeld
1. Maak het vergrendelingssysteem (4) los en klap het deksel (1) naar boven.
2. Wanneer u reeds bakplaten in het apparaat hebt geplaatst, drukt u de ontgrendelingstoets (6) aan de binnenzijde van de handgrepen naar benden om
de bakplaten los te maken. Houd de bakplaten aan de handgrepen vast en
neem deze het uit het apparaat.
3. Plaats nu de gewenste bakplaten totdat deze inklikken. Let op de tappen
aan de rand van de bakplaten. Bij het apparaat is telkens een set bakplaten
gevoegd voor sandwiches (B), wafels (C) en voor het grillen (D).
4. Sluit het apparaat weer.
Sandwiches toasten
Tip: smeer een beetje boter of margarine op de buitenzijde van de toast (die later
met de toaster in contact komt). U kunt de sandwich dan later zonder problemen
van de bakplaat nemen.
1. Rol de kabel volledig af.
2. Sluit de netsteker aan op een correct geïnstalleerde contactdoos
230 V / 50 Hz. Het rode controlelampje (2) brandt.
3. Houdt de bakplaten gesloten tijdens het verwarmen. Wanneer het groene
controlelampje (2) brandt, is de baktemperatuur bereikt.
4. Het deksel openen en aan beide zijden een belegde, dubbele boterham in de
toaster leggen. Deksel voorzichtig sluiten. Zet de grepen vast met het scharnier.
5. Het groene controlelampje (2) schakelt tijdens het bakproces aan en uit en
geeft daardoor aan dat de baktemperatuur in stand wordt gehouden. De
baktijd is afhankelijk van de individuele smaak. Hoe langer de sandwiches in
het apparaat blijven, hoe intensiever de bruinering wordt.
NL
9
6....-05-STWA 2942 9 02.12.2004, 10:52:13 Uhr
Page 10

6. Deksel openen en de toasts met een houten vork of iets dergelijks eruit
NL
nemen. Geen spitse of snijdende voorwerpen gebruiken omdat daardoor de
beschermlaag van de bakvormen wordt beschadigd.
7. Vet de bakoppervlakken na de afzonderlijke bakprocessen zo nodig opnieuw
iets in.
8. De bakplaten moeten tijdens de bakpauzes altijd gesloten zijn.
Wafels bakken
1. Herhaal de stappen 1 en 3 zoals onder „Sandwich toasten“ beschreven.
2. Open het deksel (1) en vul ca. 1 el deeg in het midden van het onderste bakoppervlak. Het vulproces dient vlug te geschieden omdat de wafels anders
niet gelijkmatig bruin worden. Let op dat u de deegmassa goed doseert,
overtollig deeg loopt aan de rand over en verontreinigt het apparaat. Nu sluit
u het deksel zacht, zonder de grepen vast samen te drukken.
3. Ga a.u.b. te werk zoals onder „Sandwich toasten“, punt 4 tot 7 beschreven.
Recept voor biscuitwafels
5 Eidooiers, 5 eetlepels heet water, 100 g suiker en 1 geraspte citroenschil tot
schuim kloppen en met een mengsel van 1/2 theelepel bakpoeder en 150 g meel
mengen. 5 Eiwitten stijf kloppen en onder het deeg roeren.
U kunt uiteraard andere recepten uit kookboeken of een voorbereide bakmix
gebruiken.
Grillen
1. Plaats de grillplaten zoals reeds onder „Bediening van het apparaat“ beschreven.
2. Ga verder te werk zoals onder punt 1 en 3 zoals onder „Sandwich toasten“
beschreven.
3. Leg het te grillen product op de onderste grilplaat en sluit het deksel voorzichtig. Druk de handgrepen niet samen. U kunt ook beide oppervlakken
gebruiken (zie afb. A). Zet daarvoor de afstandhouder (5) verticaal omhoog.
Open het deksel volledig, trek het iets naar boven, zodat de vergrendeling loslaat en open het deksel vervolgens 180°. Leg nu het te grillen product op het
oppervlak.
4. De gaartijd is afhankelijk van de individuele tijd.
5. Wanneer het te grillen product de gewenste gaarstand heeft bereikt, verwijdert u het met een houten vork. Gebruik geen spitse, scherpe of snijdende
voorwerpen.
10
6....-05-STWA 2942 10 02.12.2004, 10:52:13 Uhr
Page 11

Reiniging en onderhoud
• U verwijdert de netstekker en laat het apparaat afkoelen.
• Verwijder met een kwast kruimels en resten van het bakoppervlak en van de
randen.
• Reinig het complete apparaat alléén met een enigszins vochtige doek.
• Gebruik geen agressieve reinigingsmiddelen.
• Dompel het apparaat nooit onder water!
Dit apparaat is gekeurd conform de op dit moment van toepassing zijnde CErichtlijnen zoals bijvoorbeeld elektromagnetische compatibiliteit en laagspanningsvoorschriften en is geconstrueerd volgens de nieuwste veiligheidstechnische voorschriften.
Technische wijzigingen voorbehouden!
Garantie
Voor het door ons geleverde apparaat verlenen wij een garantie van 24 maanden
vanaf koopdatum (kassabon).
Eventuele gebreken aan het apparaat of aan het toebehoren*) die zijn ontstaan
door productie- of materiaalfouten verhelpen wij binnen deze periode kosteloos
door middel van reparatie of, naar ons oordeel, door vervanging. Eventuele
garantiegevallen verlengen noch de geldigheidsduur van de garantie, noch begint
daardoor een nieuwe garantieperiode!
Het koopbewijs geldt als garantiebewijs. Zonder dit bewijs kan geen kosteloze
reparatie of vervanging plaatsvinden.
Geef in garantiegevallen het complete apparaat in de originele verpakking samen
met de kassabon af bij uw handelaar.
*) Schade aan onderdelen leidt niet automatisch tot kosteloze vervanging van het
complete apparaat. Neem in dit geval contact op met onze hotline! De reparatie
van glasbreuk of breuk van kunststofonderdelen wordt altijd berekend!
Niet defecten aan de hulpstukken of aan de slijtende onderdelen (bijv. koolborstels, deeghaken, drijfriemen, reserveafstandsbediening, reservetandenborstels,
zaag bladen enz.), maar ook reiniging, onderhoud of de vervanging van slijtende
delen vallen niet onder de garantie en geschieden altijd tegen berekening!
Bij ingrepen door derden komt de garantieverlening te vervallen.
NL
Na de garantieperiode
Na afl oop van de garantieperiode kunnen reparaties tegen berekening worden
uitgevoerd door de betreffende vakhandelaar of de technische dienst.
11
6....-05-STWA 2942 11 02.12.2004, 10:52:14 Uhr
Page 12

F
• Lisez attentivement ce mode d’emploi avant de mettre l’appareil en marche
pour la première fois. Conservez le mode d’emploi ainsi que le bon de garantie, votre ticket de caisse et si possible, le carton avec l’emballage se trouvant
à l’intérieur.
• N’utilisez cet appareil que pour un usage privé et pour les taches auxquelles il
est destiné. Cet appareil n’est pas prévu pour une utilisation professionnelle.
Ne l’utilisez pas en plein air (sauf s’il est indiqué que vous pouvez le faire).
Protégez-le de la chaleur, des rayons directs du soleil, de l’humidité (ne le
plongez en aucun cas dans l’eau) et des objets tranchants. N’utilisez pas cet
appareil avec des mains humides. S’il arrive que de l’humidité ou de l’eau
atteignent l’appareil, débranchez aussitôt le câble d’alimentation. Ne touchez
pas les parties mouillées.
• Arrêtez l’appareil et débranchez toujours le câble d’alimentation de la prise de
courant (tirez sur la fi che, pas sur le câble) si vous n’utilisez pas l’appareil, si
vous installez les accessoires, pour le nettoyage ou en cas de panne.
• Ne laissez jamais fonctionner l’appareil sans surveillance. Arrêtez toujours
l’appareil ou débranchez le câble d’alimentation (en tirant sur la fi che et non
pas sur le câble) si vous devez vous absenter.
• Pour protéger les enfants des risques engendrés par les appareils électriques
, veillez à ce que le câble ne pende pas de l’appareil et que l’appareil ne soit
pas à portée des enfants.
• Contrôlez régulièrement l’appareil et le câble. Ne mettez pas l’appareil en
marche s’il est endommagé.
• Ne réparez pas l’appareil vous-même. Contactez plutôt un technicien qualifi é.
Pour éviter toute mise en danger, ne faites remplacer le câble défectueux que
par un câble équivalent et que par le fabricant, notre service après-vente ou
toute personne de qualifi cation similaire.
• N’utilisez que les accessoires d’origine.
• Respectez les „conseils de sécurité spécifi ques à cet appareil“ ci-dessous ...
Conseils généraux de sécurité
Conseils spécifi ques de sécurité
• Les plaques de cuisson deviennent brûlantes. Ne touchez que les poignées.
• Placez l’appareil sur une surface résistant aux températures élevées.
• Ne mettez pas l’appareil sous un meuble afi n d’éviter toute accumulation de
chaleur. Prévoyez un espace libre suffi sant.
• Faites attention aux vapeurs qui se répandent lorsque vous ouvrez les
plaques de cuisson.
• Le pain est infl ammable. Donc, ne jamais utiliser l’appareil à proximité ou en
dessous de rideaux ou d’autres matériaux infl ammables!
12
6....-05-STWA 2942 12 02.12.2004, 10:52:14 Uhr
Page 13

Liste des différents éléments de commande
1 Couvercle 4 Système de verrouillage
2 Voyants de contrôle 5 Écarteur
3 « Cool Touch » poignées (isolées) 6 Touche de déblocage
Avant la première utilisation
COUCHE ANTIADHESIVE
• Graissez légèrement les plaques de cuisson avant la première utilisation. Laissez fonctionner l’appareil env. 10 minutes, en laissant les plaques de cuisson
fermées (voir Utilisation de l’appareil). Essuyez ensuite avec un torchon
humide.
• Prière de ne pas consommer les premiers pains grillés / gaufres ou les premiers aliments grillés.
Utilisation de l’appareil
Montage et démontage des plaques de cuisson
Veillez à ce que le câble d’alimentation ne soit pas branché pendant le montage
et démontage des plaques.
Attention: L’appareil et la plaque de cuisson doivent être complètement refroidis!
1. Débloquer le système de verrouillage (4) et ouvrir le couvercle (1) vers le haut.
2. S’il y a déjà des plaques de cuisson placées dans l’appareil, veuillez pousser
la touche de déblocage (6) sur les faces intérieures des poignées vers le bas
pour débloquer la plaque de cuisson. Tenir les plaques de cuisson par les
poignées et ôter l’appareil.
3. Placer maintenant les plaques de cuisson souhaitées jusqu’à ce qu’elles
s’enclenchent. Veuillez tenir compte des tourillons sur les bords des plaques de
cuisson. L’appareil est fourni avec respectivement un ensemble de plaques de
cuisson pour sandwichs (B), pour gaufres (C) et pour le barbecue (D).
4. Refermez l’appareil.
Pour faire des sandwichs
Conseil: étalez un peu de beurre ou de margarine sur le côté extérieur des tran-
ches de pain (qui seront en contact avec la plaque de cuisson dans l’appareil).
Cela permet de retirer sans problème les sandwichs de l’appareil.
1. Déroulez complètement le câble d’alimentation.
2. Branchez le câble d’alimentation dans une prise de courant en bon ètat de
fonctionnement de 230 V, 50 Hz. Le voyant de contrôle (2) rouge de raccordement au secteur s’allume.
3. Laissez l‘appareil fermé pendant le préchauffage. La température de cuisson
est atteinte lorsque le voyant de contrôle (2) vert s’allume.
F
13
6....-05-STWA 2942 13 02.12.2004, 10:52:14 Uhr
Page 14

4. Ouvrez le couvercle et déposez un sandwich garni, composé de 2 tranches de
F
pain. Refermer doucement le couvercle. Bloquez les poignées avec la charnière.
5. Pendant la cuisson, le voyant de contrôle (2) vert s’allume et s’éteint en vue
de maintenir la température de cuisson. Le temps de cuisson dépend du goût
de chacun. Plus les sandwichs restent dans l’appareil, plus leur dorage sera
prononcé.
6. Ouvrir le couvercle et prélever les toasts avec une fourchette en bois ou
similaire. N’utilisez jamais d’objets pointus ou coupant, de façon à éviter
d’endommager la surface de cuisson de l’appareil.
7. Graissez éventuellement les plaques de cuisson avant de versez de la pâte.
8. Les plaques de cuisson doivent rester fermées entre deux cuissons.
Pour faire des gaufres
1. Répéter les étapes 1 et 3 conformément à la description faite pour griller des
sandwichs.
2. Ouvrir le couvercle (1), placer env. 1 cuillère à soupe de pâte au centre de la
plaque de cuisson inférieure. Il convient de procéder rapidement pour assurer
un dorage uniforme des gaufres. Prière de veiller à doser correctement la
quantité de la pâte, la pâte excédentaire débordant de l’appareil et provoquant des souillures de celui-ci. Refermez doucement l’appareil. Ne serrez
pas les poignées ensemble.
3. Continuer à procéder comme pour « griller des sandwichs », points 4 à 7.
Recette des gaufres
Mélangez 5 jaunes d’oeuf, 5 cuil. à soupe d’eau chaude, 100 g de sucre et 1
zeste de citron jusqu’à ce que le mélange deviennent mousseux. Ajoutez 1/2 cuil.
à café de levure et 150 g de farine préalablement mélangés. Montez les 5 blancs
d’oeuf en neige et mélangez à la préparation.
Pour d’autres idées, référez-vous à un livre de recettes ou utilisez des sachets de
préparation.
Barbecue
1. Placer les plaques à barbecue comme dans la description faite sous « utilisation de l’appareil ».
2. Continuer à procéder comme sous les points 1 et 3 « griller des sandwichs ».
3. Placer les aliments à griller sous la plaque inférieure et fermer le couvercle
doucement. Veuillez ne pas comprimer les poignées. Vous pouvez aussi vous
servir des deux faces (cf. fi g. A). Pour ce faire, placer l’écarteur (5) à la verticale.
Ouvrir grandement le couvercle, tirez-le légèrement vers le haut pour débloquer
l’arrêt et ouvrez-le alors à 180°. Maintenant, placer les aliments à griller.
4. Le temps de cuisson est fonction du goût individuel.
5. Une fois les aliments suffi samment cuits, enlevez-les à l’aide d’une fourchette
en bois. Ne pas utiliser d’objets pointus, tranchants ou coupants.
14
6....-05-STWA 2942 14 02.12.2004, 10:52:15 Uhr
Page 15

Entretien & rangement
• Débranchez toujours l’appareil avant de le nettoyer et laissez-le refroidir.
• Eliminez à l’aide d’un pinceau les miettes et restes de pâte se trouvant sur les
plaques de cuisson ou sur les bords de l’appareil.
• Nettoyer tout l’appareil à l’aide d’un chiffon légèrement mouillé seulement.
• N’utilisez aucun produit d’entretien abrasif.
• Ne plongez jamais l’appareil dans l’eau!
Cet appareil a été contrôlé d’après toutes les directives européennes actuelles
applicables, comme par exemple concernant la compatibilité électromagnétique
et la basse tension. Cet appareil a été fabriqué en respect des réglementations
techniques de sécurité les plus récentes.
Sous réserve de modifi cations techniques.
Garantie
Nous accordons une garantie de 24 mois à dater de la date d’achat (ticket de
caisse) pour l’appareil que nous vendons.
Pendant la durée de la garantie, nous éliminons gratuitement les défauts de
l’appa reil ou des accessoires *) découlant d’un vice de matériau ou de fabrication
au moyen d’une réparation ou, selon notre estimation, au moyen d’un remplacement. Les prestations dans le cadre de la garantie n’entraînent aucune prorogation de la durée de garantie et ne donnent pas droit à une nouvelle garantie !
Le justifi catif de garantie est le reçu. Sans ce justifi catif, aucun remplacement
gratuit ni aucune réparation gratuite ne peuvent être effectués.
En cas de recours à la garantie, ramenez votre appareil complet, dans son
emballage d‘origine, accompagné de votre preuve d‘achat, à votre revendeur.
*) Les endommagements de pièces d’accessoires ne justifi ent pas automatiquement
l’échange gratuit de l’appareil complet. Contactez alors notre centrale téléphonique!
La casse de pièces en verre ou en plastique est dans tous les cas à votre charge!
Les défauts sur les accessoires ou les pièces d’usure (p.ex. les charbons de moteurs, crochets, courroies d’entraînement, télécommande de rechange, brosses
à dents de rechange, lames de scies etc.) ainsi que le nettoyage, l’entretien ou le
remplacement de pièces d’usure ne sont pas garantis et sont donc payants !
En cas d’intervention étrangère, la garantie devient caduque.
F
Après la garantie
Après écoulement de la durée de garantie, les réparations peuvent être effectuées, contre paiement, par le commerce spécialisé ou le service de réparation.
15
6....-05-STWA 2942 15 02.12.2004, 10:52:15 Uhr
Page 16

E
• Antes de la puesta en servicio de este aparato lea detenidamente el manual
de instrucciones y guarde este bien incluido la garantía, el recibo de pago y si
es posible también el cartón de embalaje con el embalaje interior.
• Solamente utilice el aparato para el uso privado y para el fi n previsto. Este
aparato no está destinado para el uso profesional. No lo utilice al aire libre (en
excepto que esté destinado para el uso limitado al aire libre). No lo exponga
al calor, a la entrada directa de rayos de sol, a la humedad ( en ningún caso
sumerja el aparato en agua) y a los cantos agudos. No utilice el aparato con
las manos húmedas. En caso de que el aparato esté húmedo o mojado retire
de momento la clavija de la caja de enchufe. No tocar el agua.
• Desconecte el aparato y siempre retire la clavija de la caja de enchufe (tire de
la clavija no del cable), cuando no quiera utilizar el aparato, montar piezas o
en caso de limpieza o defectos.
• No utilice el aparato sin vigilancia. En caso de que tenga que dejar su lugar
de trabajo, desconecte siempre el aparato o retire la clavija de la caja de
enchufe (por favor tire de la clavija y no del cable).
• Para evitar que los niños se hagan daños eléctricos, siempre tenga atención, que
el cable no cuelgue hacia abajo y que los niños no tengan acceso al aparato.
• Controle regularmente si el aparato o el cable tiene defectos. No ponga en
servicio un aparato defecto.
• No repare el aparato por su cuenta, sino vaya a un establecimiento autorizado. Para evitar peligros, deje sustituir un cable defecto por uno de la misma
calidad solamente por el fabricante, nuestro servicio al cliente o una similar
persona cualifi cada.
• Solamente utilice accesorios originales.
• Por favor tenga atención a las “Indicaciones especiales de seguridad…“
indicadas a continuación.
Indicaciones generales de seguridad
Indicaciones especiales de seguridad
• Las planchas de horneado se tornan bien calientes. Tocar solamente las
manillas.
• Colocar el equipo sobre un apoyo resistente al calor.
• Para evitar acumulación de calor, no colocar el equipo directamente debajo
de un armario. Proveer de sufi ciente espacio libre.
• Tener cuidado del vapor saliente al abrir las planchas de horneado.
• Pan es infl amable. ¡Por ello, no se debe utilizar el aparato en la cercan’a o
debajo de cortinas y otros materiales infl amables!
16
6....-05-STWA 2942 16 02.12.2004, 10:52:16 Uhr
Page 17

Representación de los elementos de mando
1 Tapa 4 Sistema de bloqueo
2 Lámparas de control 5 Espaciador
3 ”Cool Touch” (aislamiento térmico)
de las empu–aduras
6 Tecla de desbloqueo
Puesta en operación del equipo
RECUBRIMIENTO ANTI-ADHERENTE
• Engrasar ligeramente las planchas de horneado antes de usarse la primera
vez. Utilice el aparato unos 10 minutos con las caras de cocción cerradas (ver
instrucciones del equipo). Después limpiar con un paño de enjuague húmedo.
• No debe consumir la primera tostada/gofre o el primer alimento que haya
asado.
Uso del aparato
Colocar / recambiar las placas de cocción
Tenga atención que durante la introducción o también durante el recambio el
enchufe no esté introducido a la red.
Atención:
El aparato y las placas de cocción deben estar enfriadas por completo!
1. Suelte el sistema de desbloqueo (4) y alce la tapadera (1) hacia arriba.
2. Si ya están las placas de cocción introducidas en el aparato, por favor presione hacia abajo la tecla de desbloqueo (6) en la parte interior de las empuñaduras, para soltar las placas de cocción. Agarre las placas de cocción por las
empuñaduras y extraiga éstas del aparato.
3. Ahora coloque las placas de cocción deseadas, hasta que éstas encajen.
Para ello, preste atención con los pernos a los lados de las placas de cocción. El aparato dispone de un juego de placas de cocción para sándwiches
(B), gofres (C) y un juego para asar a la parrilla (D).
4. Cierre otra vez el aparato.
Tostar sandwiches
Consejo: Unte en la parte exterior de la tostada (que más tarde entrará en con-
tacto con las superfi cies de cocción) un poco de mantequilla o de margerina. De
esta manera se dejará apartar después el sandwich sin problemas de las placas
de cocción.
1. Por favor desenrolle el cable por completo.
2. Introduzca la clavija de red en una caja de enchufe de contacto de protección
e instalada por la norma 230 V, 50 Hz. La lámpara roja de control de red (2)
se ilumina.
17
E
6....-05-STWA 2942 17 02.12.2004, 10:52:16 Uhr
Page 18

3. Mantenga cerrados los moldes durante el período de calentamiento. Si se
E
ilumina la lámpara verde de control (2), se ha alcanzado la temperatura de
cocción.
4. Abra la tapadera e introduzca en cada sitio una tostada doble untada. Cerrar
la tapa suavemente. Se bloquean los asideros con la bisagra.
5. La lámpara de control verde se apaga y se enciende durante el proceso de
cocción, para mantener la temperatura de cocción. El tiempo de cocción
depende del gusto personal. Cuanto más tiempo estén los sándwiches en el
aparato, más intenso será el dorado.
6. Abrir la tapa y sacar las tostadas con un tenedor de madera o con semejante
cosa. No utilice objetos agudos o que corten, para que no se dañe el recubrimiento con capas de las zonas de tostar.
7. En caso de que sea necesario, engrase las superfi cies de cocción después
de cada proceso de cocción.
8. En las pausas de preparación, los moldes siempre deben estar cerrados.
Cocer goffres
1. Repita los pasos 1 y 3, como indicado bajo el apartado tostar sándwiches.
2. Abra la tapadera (1), introduzca aprox. 1 cucharada de masa en el centro de
las placas de cocción inferiores. El proceso de llenado debería realizarse de
forma rápida, ya que si no, no se obtendrá un dorado homogéneo. Tenga
atención de dosifi car bien la cantidad de masa, ya que el exceso de masa se
derramará por los lados y ensuciará el aparato. Cerrar suavemente la tapa.
No juntar las manillas.
3. Por favor continué, como indicado bajo “tostar sándwiches”, punto 4 a 7.
Receta para waffels de biscocho
Batir hasta espumar 5 yemas de huevo, 5 cucharas de agua caliente, 100 g de
azúcar y una concha de limón molida, y adicionar a una mezcla con 1/2 cucharilla
de polvo de hornear y 150 g de harina. Batir 5 claras de huevo y vertirlas debajo
de la masa.
Tomar recetas adicionales de recetarios o utilice mezclas/masas para hornear.
Asar a la parrilla
1. Coloque por favor las placas de asar a la parrilla como explicado ya bajo
“Uso del aparato”.
2. Siga como indicado bajo los puntos 1 a 3 “tostar sándwiches”.
3. Coloque la pieza a asar sobre la placa inferior y cierre con cuidado la tapadera. Por favor no presione las empuñaduras. Otra posibilidad sería usar ambas
superfi cies (véase imagen A). Para ello, coloque el espaciador (5) de forma
vertical. Abra por completo la tapadera, tire de ella levemente hacia arriba, de
forma que el bloqueo se suelte y abra ahora ésta en un ángulo de 180°. Ahora
coloque la pieza de asar.
18
6....-05-STWA 2942 18 02.12.2004, 10:52:16 Uhr
Page 19

4. El tiempo de cocción depende del gusto del consumidor.
5. Si la pieza de asar ha alcanzado el grado deseado de cocción, retire ésta con
un tenedor de madera. No utilice objetos agudos, afi lados o cortantes.
Limpieza y mantenimiento
• Desenchufar el equipo y dejarlo enfriar.
• Retire con un pincel las migas o los restos de la superfi cie de cocción y de
los bordes.
• Limpie el aparato completo solamente con un paño levemente humedecido.
• No utilice detergentes agresivos.
• ¡No sumerja el aparato en agua!
Este aparato se ha examinado según las normativas actuales y vigentes de la
Comunidad Europea, como p.ej. compatibilidad electromagnética y directiva de
baja tensión y se ha construido según las más nuevas especifi caciones en razón
de la seguridad.
No reservamos el derecho de efectuar modifi caciones técnicas.
Garantía
Para el aparato comercializado por nosotros nos responsabilizamos con una
garantía de 24 meses a partir de la fecha de compra (factura de compra).
Durante el período de garantía nos encargamos gratuítamente de los defectos del aparato y de los accesorios*), que se hayan originado por defectos del
material o de la fabricación. Dependiendo de nuestra estimación se realizará una
reparación o un cambio. ¡Los servicios de garantía no prolangan la garantía, ni se
incia por ello un período nuevo de garantía!
Como comprobante para la garantía es válido la factura de compra. Sin este
comprobante no se podrá realizar un cambio o una reparación gratuíta.
En caso de garantía entregue el aparato completo en su embalaje original
junto con la factura a su agente comerciante.
*) Defectos en las piezas de accesorio, no signifi can automáticamente el recambio gratuito del aparato completo. ¡En este caso dirijase por favor a nuestra linea
de atención al cliente! ¡Rotos de vidrio o roturas en las piezas de plástico deben
pagarse siempre por el cliente !
Defectos en los accesorios de uso o en las piezas de desgaste (p.ej. escobillas
de carbón del motor, varillas amasadoras, correas de transmisión, mando a distancia de repuesto, cepillos de dientes de repuesto, hojas de sierra etc.), como
también la limpieza, mantenimiento o el recambio de piezas de desgaste no recaen en la garantía e irán al cargo del cliente!
19
E
6....-05-STWA 2942 19 02.12.2004, 10:52:17 Uhr
Page 20

En caso de intervención ajena se expira la garantía.
E
Después de la garantía
Después de haber expirado la garantía se pueden realizar las reparaciones por
el concesionario o por el servicio de reparaciones. Los gastos irán al cargo del
cliente.
20
6....-05-STWA 2942 20 02.12.2004, 10:52:17 Uhr
Page 21

Instruções gerais de segurança
• Antes de pôr este aparelho a funcionar, leia muito atentamente as instruções
de emprego e guarde-as muito bem, juntamente com o talão de garantia, o
talão de compra e, tanto quanto possível, a embalagem com os elementos
interiores.
• Utilize o aparelho exclusivamente para fi ns privados e para a fi nalidade para a
qual o mesmo foi concebido. Este aparelho não se destina a fi ns comerciais.
Não o utilize ao ar livre (a não ser que o mesmo possa ser usado ao ar livre
sob determinadas condições). Mantenha-o protegido do calor, de irradiação
solar directa, da humidade (não o imergir de forma alguma em quaisquer
líquidos) e de arestas aguçadas. Não utilize o aparelho com as mãos molhadas. No caso de o aparelho fi car húmido ou molhado, retire imediatamente a
fi cha da tomada. Não tocar na água.
• Sempre que não utilizar o aparelho, ou desejar montar acessórios, ou queira
limpá-lo, ou ainda em caso de avarias, deverá desligá-lo e retirar a fi cha da
tomada (puxe pela fi cha e não pelo fi o).
• O aparelho não deverá funcionar sem vigilância. No caso de ter de se ausen-
tar do local onde o aparelho estiver a funcionar, desligue-o sempre ou retire a
fi cha da tomada (puxe pela fi cha e não pelo fi o).
• Para proteger as crianças dos perigos relacionados com aparelhos eléctricos,
nunca deixe os fi os pendurados e atente em que as crianças não possam
chegar a tais aparelhos.
• Verifi que regularmente se o aparelho ou o fi o têm alguns danos. Nunca ponha
a funcionar um aparelho com quaisquer danos.
• Não tente reparar o aparelho, dirija-se a um técnico da especialidade,
devidamente autorizado. Para evitar quaisquer perigos, é favor substituir um
fi o danifi cado por um fi o da mesma qualidade. Tal deverá ser efectuado pelo
fabricante, pelos nossos serviços de assistência ou por outra pessoa com as
mesmas qualifi cações.
• Utilize apenas acessórios de origem.
• É favor observar as seguintes „Instruções especiais de segurança...“.
Instruções especiais de segurança
• As superfícies de cozedura fi cam muito quentes. Tocar apenas nas pegas.
• Colocar o aparelho sobre uma superfície resistente ao calor.
• Para se evitar uma acumulação de calor, não colocar o aparelho directamente
por baixo de um armário. É necessário espaço livre sufi ciente.
• Cuidado ao abrir as superfícies de cozedura: haverá saída de vapor muito
quente.
• O pão pode arder. Por isso não se deverá utilizar nunca o aparelho nas
proximidades de cortinas e outros materiais infl amáveis, nem por baixo dos
mesmos!
P
21
6....-05-STWA 2942 21 02.12.2004, 10:52:17 Uhr
Page 22

P
1 Tampa 4 Sistema de bloqueio
2 Lâmpadas piloto 5 Separador
3 Asas “cool touch” (termoisoladas) 6 Tecla de desbloqueio
Elementos do aparelho
Primeira utilização do aparelho
REVESTIMENTO ANTIADERENTE
• Untar ligeiramente as superfícies de cozedura antes de se usar o aparelho
pela primeira vez. Pôr o aparelho a funcionar, com as superfícies de tostagem
fechadas, durante aprox. 10 minutos (consultar a rubrica sobre a utilização do
aparelho). Limpar em seguida com um pano húmido.
• Não consumir as primeiras torradas/waffl es, nem os primeiros alimentos
grelhados.
Utilização do aparelho
Colocar/substituir as formas
A fi cha terá de estar fora da tomada, durante a colocação/substituição das
formas.
Atenção: O aparelho e as placas deverão estar completamente arrefecidas!
1. Proceda à desactivação do sistema de bloqueio (4) e abra a tampa (1).
2. Se já se encontrarem no aparelho placas de cozedura, pressione a tecla
de desbloqueio (6) que se encontra nas partes interiores das asas, a fi m de
soltar tais placas. Segure-as pelas asas e retire-as do aparelho.
3. Introduza agora as placas de cozedura pretendidas, fi xando-as bem. Dê
atenção aos pinos que se encontram nos bordos das placas. Pertencem ao
aparelho um conjunto de placas para sanduíches (B), outro para waffl es (C) e
outro para grelhados (D).
4. Tornar a fechar o aparelho.
Torrar sandes
Dica: Barre ligeiramente as partes de fora das torradas (que fi carão mais tarde
sobre as superfícies de tostagem) com manteiga ou margarina. Desta forma, as
mesmas soltar-se-ão mais facilmente das formas.
1. Desenrole completamente o fi o.
2. Introduza a fi cha numa tomada com protecção de contactos de 230 V, 50 Hz
instalada convenientemente. A lâmpada piloto (2) vermelha acender-se-á.
3. Durante o período de aquecimento, mantenha as placas de cozedura
fechadas. Quando a lâmpada piloto verde se iluminar, terá sido atingida a
temperatura de funcionamento.
22
6....-05-STWA 2942 22 02.12.2004, 10:52:18 Uhr
Page 23

4. Abrir a tampa e colocar, de cada lado, uma torrada dupla com os ingredientes desejados no meio de cada uma. Fechar a tampa devagar. Bloquear as
pegas com o gancho.
5. A lâmpada piloto verde (2), ligar-se-á e apagar-se-á durante o funcionamento, a fi m de ser mantida a temperatura necessária. O tempo de cozedura
depende do gosto individual. Quanto mais tempo as sanduíches fi carem no
aparelho, mais intensa será a tostagem.
6. Abrir a tampa e retirar as torradas com um garfo de madeira ou semelhante.
Não utilizar objectos aguçados ou cortantes, para que o revestimento não
seja danifi cado.
7. Se necessário, torne a untar as placas após as cozeduras.
8. Durante os intervalos, as placas deverão fi car fechadas.
Fazer waffl es
1. Repita as acções mencionadas nos números 1 e 3 da rubrica sobre tostagem
de sanduíches.
2. Abra a tampa (1) e deite aproximadamente uma colher de sopa de massa
no meio da placa inferior. Proceda rapidamente para que as waffl es fi quem
cozidas homogeneamente. Não deite massa demais na placa, de contrário
a mesma irá por fora e sujará o aparelho. Fechar a tampa com cuidado. Não
comprimir.
3. Continue da forma descrita na rubrica “Tostagem de sanduíches”, números 4
a 7.
Receita para crepes à alemã
Bater 5 gemas, 5 colheres de sopa de água quente, 100 de açúcar e raspa de
1 limão, até fi car uma massa com um pouco de espuma. Juntar 150g de farinha
com meia colher de chá de fermento em pó. Bater 5 claras em castelo e misturar
cuidadosamente à massa.
Para outras receitas, consultar livros de cozinha ou comprar misturas já prontas.
Grelhar
1. Introduza as placas para grelhar da forma descrita já na rubrica “Utilização do
aparelho”.
2. Continue da forma descrita na rubrica “Tostagem de sanduíches”, números 1
a 3.
3. Coloque os alimentos para grelhar na placa inferior e feche a tampa com cuidado. Não aperte as asas. Terá igualmente a possibilidade de utilizar ambas
as superfícies (consulte a fi g. A). Para tal, coloque o separador (5) na vertical.
Abra a tampa completamente, puxe-a ligeiramente para cima de forma a
desbloqueá-la, e abra-a então num ângulo de 180º. Poderá agora colocar os
alimentos sobre as placas.
P
23
6....-05-STWA 2942 23 02.12.2004, 10:52:18 Uhr
Page 24

4. O tempo de cozedura depende do gosto individual.
P
5. Logo que os alimentos estejam grelhados a seu gosto, retire-os, utilizando o
garfo de madeira. Não use objectos aguçados, pontiagudos ou cortantes.
Limpeza & manutenção
• Retirar a fi cha da tomada e deixar o aparelho arrefecer.
• Retire as migalhas ou os restos das placas e das bordas com um pincel.
• Para limpar o aparelho, use apenas um pano ligeiramente húmido.
• Não utilizar detergentes corrosivos.
• Não mergulhe o aparelho em água!
Este aparelho foi controlado nos termos das actuais directivas da CEE aplicáveis,
tais como inocuidade electromagnética e directiva sobre baixa tensão, e fabricado de acordo com as mais novas prescrições da segurança técnica.
Reserva-se o direito de alterações!
Garantia
O aparelho vendido pela nossa empresa tem uma garantia de 24 meses a partir
da data da compra (talão).
Durante o período de garantia, procederemos à remoção grátis - por reparação,
ou, segundo a nossa decisão, por substituição - das defi ciências do aparelho
ou dos acessórios*) que provenham de erros de material ou de fabricação. A
prestação de serviços relacionados com a garantia não prolongarão a mesma,
nem iniciarão um novo prazo de garantia!
O talão de compra consistirá prova desta garantia. Sem o mesmo, não será
possível proceder-se a qualquer troca ou reparação grátis.
Em caso de garantia, entregue o aparelho completo, juntamente com o talão de
compra, na loja onde o mesmo foi comprado.
*) No caso de danos em quaisquer acessórios, não será efectuada automáticamente uma substituição completa do aparelho. Contacte neste caso a nossa
hotline! Danos causados por quebras de peças de vidro ou de plástico terão de
ser pagos pelo cliente!
Não estão incluídos na garantia quaisquer defeitos de acessórios ou de peças
que se desgastem (como, por exemplo, carvões do motor, varinhas, correias do
motor, telecomandos, escovas de dentes, folhas de serra, etc.), nem a limpeza, a
manutenção ou a substituição de peças que se desgastem, devendo tais despesas ser reembolsadas!
A garantia terminará sempre que tenha havido intervenção alheia nos aparelhos.
24
6....-05-STWA 2942 24 02.12.2004, 10:52:18 Uhr
Page 25

Após a garantia
Após a expiração do prazo de garantia, poderão ser efectuados arranjos por pessoal especializado, ou pelos nossos serviços de reparações, contra reembolso.
P
25
6....-05-STWA 2942 25 02.12.2004, 10:52:19 Uhr
Page 26

I
• Prima di mettere in funzione questo apparecchio, leggere molto attentamente
le istruzioni per l’uso e conservarle con cura unitamente al certifi cato di garanzia, allo scontrino e, se possibile, alla scatola di cartone con la confezione
interna.
• Utilizzare l’apparecchio esclusivamente per scopi privati e conformemente al
tipo di applicazione previsto. Questo prodotto non è stato concepito ai fi ni di
un impiego in ambito industriale. Non utilizzarlo all’aperto (a meno che non
sia contemplato un particolare tipo di uso all’aperto nel rispetto di specifi che condizioni). Proteggerlo dal calore, nonché dall’esposizione diretta ai
raggi solari e dall’umidità (non immergerlo mai in sostanze liquide) e tenerlo
a distanza da oggetti con spigoli affi lati. Non utilizzare l’apparecchio con le
mani umide. Nel caso in cui si bagni o si inumidisca l’apparecchio, staccare
immediatamente la spina. Evitare il contatto con l’acqua.
• Disattivare l’apparecchio e staccare sempre la spina dalla relativa presa
(si raccomanda di afferrare il connettore e non il cavo quando si effettua
questa operazione) allorché non si utilizza l’apparecchio, quando si applicano
degli accessori oppure nel caso in cui lo si debba pulire o si siano manifestate
anomalie.
• Non mettere in funzione l’ apparecchio senza sorveglianza. Se si dovesse assentarsi dal posto di lavoro, spegnere e disconnettere sempre l’ apparecchio,
(prendendo in mano la spina, non tirando il cavo).
• Allo scopo di proteggere i bambini contro i pericoli che possono derivare dagli
apparecchi elettrici, accertarsi che non vi siano cavi pendenti e che i bambini
non possano accedere in alcun modo all’apparecchio stesso.
• Controllare periodicamente l’apparecchio per verifi care che non vi siano
danni. Non mettere in funzione l’apparecchio nel caso in cui sia guasto.
• Non tentare di riparare l’apparecchio, bensì rivolgersi a un tecnico autorizzato. Al fi ne di evitare l’insorgere di situazioni di pericolo, si raccomanda di
contattare il costruttore, il nostro servizio di assistenza tecnica o un tecnico
ugualmente qualifi cato per la sostituzione del cavo di alimentazione difettoso
con un cavo equivalente.
• Utilizzare esclusivamente accessori originali.
• Rispettare le seguenti “Speciali norme di sicurezza...“.
Norme di sicurezza generali
Avvertenze di sicurezza
• Le piastre di cottura diventano estremamente calde. Maneggiarle solamente
con le apposite maniglie.
• Porre l’apparecchio su una superfi cie resistente al calore.
• Per evitare un eventuale blocco termico, non mettere l’apparecchio direttamente sotto un mobile. Assicurarsi che ci sia spazio libero suffi ciente.
• Fare attenzione alla fuoruscita di vapore quando si aprono le piastre di cottura.
• Il pane è combustibile. Perciò non impiegare mai l’apparecchio in prossimità
o sotto tende o altri materiali combustibili!
26
6....-05-STWA 2942 26 02.12.2004, 10:52:19 Uhr
Page 27

Elementi di comando
1 Coperchio 4 Sistema di blocco
2 Indicatori luminosi di controllo 5 Distanziatore
3 Manici ”Cool Touch”
(con isolamento termico)
6 Tasto di sblocco
Messa in funzione dell’apparecchio
RIVESTIMENTO ANTI-ADERENTE
• Ungere leggermente le piastre di cottura prima di usare l’apparecchio per la
prima volta. Mettere in funzione l‘ apparecchio solo con le piastre di cottura
chiuse per ca. 10 min (vedi Uso dell’apparecchio). Pulire poi con una pezza
umida.
• Non consumare i primi toast, le prime cialde o i primi alimenti grigliati.
Uso dell’apparecchio
Inserimento e sostituzione delle piastre di cottura
Fare attenzione che durante l’inserimento, ovvero durante la sostituzione, la spina
sia staccata.
Attenzione:
L’apparecchio e le piastre di cottura devono essere completamente raffreddati!
1. Sbloccare il sistema di bloccaggio (4) e sollevare il coperchio (1) verso l’alto.
2. Se sono già state inserite le piastre di cottura nell’apparecchio, premere verso
il basso il tasto di sblocco (6) sul lato interno dei manici per staccarle. Afferrare le piastre di cottura ai manici ed estrarle dall’apparecchio.
3. Inserire ora le piastre di cottura desiderate fi no al punto di arresto meccanico.
Fare attenzione ai perni sul bordo delle piastre medesime. All’apparecchio
sono acclusi un set di piastre di cottura per sandwich (B), uno per cialde (C) e
uno per grigliare (D).
4. Richiudere quindi l’apparecchio.
Tostare i sandwich
Consiglio: spalmare con burro o margarina la parte esterna del pane per toast
(ovvero la parte che verrà successivamente a contatto con la superfi cie di cottura). In questo modo, sarà in seguito possibile staccare il toast dalle piastre di
cottura senza alcun problema.
1. Svolgere completamente il cavo.
2. Inserire la spina in una presa con contatto di terra regolarmente installata da
230 V, 50 Hz. La spia luminosa di controllo rossa (2) è accesa.
3. Durante il riscaldamento tenere le piastre chiuse. L’indicatore luminoso di
controllo verde (2) si accende al raggiungimento della temperatura di cottura.
27
I
6....-05-STWA 2942 27 02.12.2004, 10:52:19 Uhr
Page 28

4. Aprire il coperchio ed inserire un toast doppio, farcito. Chiudere delicatamen-
I
te il coperchio. Bloccare le impugnature con la cerniera.
5. Durante la cottura l’indicatore luminoso di controllo verde (2) si accende
e si spegne per conservare la temperatura di cottura. Il tempo di cottura
dipende dal gusto individuale. Quanto più a lungo i sandwich rimangono
nell’apparecchio, tanto più intensa risulta la doratura.
6. Aprire il coperchio e togliere il panino con una forchetta di legno o altro
utensile da cucina. Non usare oggetti appuntiti o pungenti, per non rovinare lo
strato delle superfi ci di cottura.
7. Se necessario, cospargere nuovamente di grasso le superfi ci di cottura dopo
ogni cottura.
8. Durante le pause di cottura le superfi ci dovrebbero essere sempre chiuse.
Cuocere le cialde
1. Ripetere i punti 1 e 3 come descritto in ”Tostare sandwich”.
2. Sollevare il coperchio (1), mettere 1 cucchiaio ca. di impasto al centro della
superfi cie di cottura. La procedura di riempimento deve essere rapida
altrimenti la doratura delle cialde non risulta uniforme. Dosare la quantità
di pasta correttamente, la pasta in eccesso fuoriesce dal bordo e sporca
l’apparecchio. Abbassate il coperchio con cautela. Non esercitate pressione
sui manici.
3. Procedere come descritto in ”Tostare sandwich”, punto 4-7.
Ricetta per cialde
Mescolate bene 5 tuorli d’uovo, 5 cucchiai di acqua calda, 100 g di zucchero e 1
buccia di limone grattuggiata ed aggiungete 150 g di farina con 1/2 cucchiaino di
lievito per dolci. Montate a neve 5 albumi ed aggiungeteli all’impasto.
Per avere ulteriori ricette consultate per cortesia un ricettario oppure utilizzate
miscele già pronte.
Cuocere alla griglia
1. Inserire le piastre grill come già descritto in ”Uso dell’apparecchio”.
2. Procedere come descritto nei punti 1 e 3 ”Tostare sandwich”.
3. Porre gli alimenti da grigliare sulla piastra grill inferiore ed abbassare delicatamente il coperchio. Non premere i manici. Un’altra possibilità è di utilizzare
entrambe le superfi ci (v. fi g. A). A questo scopo montare il distanziatore (5) in
posizione verticale. Sollevare del tutto il coperchio, tirarlo leggermente verso
l’alto in modo che l’arresto si sblocchi e aprire poi a 180°. Ora appoggiare gli
alimenti da grigliare.
4. Il tempo di cottura dipende dal gusto individuale.
5. Quando gli alimenti hanno raggiunto il grado di cottura desiderato, toglierli
con una forchetta di legno. Non usare oggetti appuntiti, affi lati o taglienti.
28
6....-05-STWA 2942 28 02.12.2004, 10:52:20 Uhr
Page 29

Pulizia e cura
• Rimuovere la spina e lasciare raffreddare l’apparecchio.
• Con un pennello rimuovere briciole o altri resti dalle superfi ci di cottura e dai
bordi.
• Pulire l’apparecchio solo con un panno leggermente inumidito.
• Non usare detergenti abrasivi.
• Non immergere mai l’apparecchio in acqua!
Questo apparecchio è stato controllato sulla base di tutte le direttive CE attuali in
vigore in questo settore, quali per esempio la normativa in materia di compatibilità elettromagnetica e la direttiva in materia di bassa tensione, ed è stato costruito
conformemente alle norme di sicurezza più moderne.
Con riserva di apportare modifi che tecniche.
Garanzia
Per l’apparecchio da noi messo in commercio ci assumiamo una garanzia di
24 mesi dalla data di acquisto (scontrino).
Durante la garanzia noi ci impegniamo ad eliminare gratuitamente i guasti
dell’apparecchio o degli accessori*), dovuti a difetti di materiale o di fabbricazione, riparandoli o, a nostra discrezione, sostituendoli. Le prestazioni in garanzia
danno luogo a una proroga della garanzia né danno diritto ad una nuova garanzia!
Per la garanzia è suffi ciente lo scontrino di acquisto. Senza questo scontrino non
sussiste il diritto né ad una sostituzione né ad una riparazione gratuita.
Nel caso si ricorra alla garanzia, restituire al rivenditore l’apparecchio completo in
ogni sua parte, nell’imballaggio originale unitamente allo scontrino.
*) Danni agli accessori non giustifi cano automaticamente lo scambio gratuito
dell’apparecchio completo. Si prega di mettersi in contatto con la nostra centrale
telefonica. Danni alle parti di vetro oppure fratture ai pezzi di materia plastica
sono obbligatoriamente a spese del cliente.
La riparazione di pezzi d’uso ovvero soggetti a logoramento (cursori, ganci impastatori, cinghie di trasmissione, telecomandi di ricambio, spazzolini di ricambio,
lame di seghe ecc.) come anche operazioni di pulizia e manutenzione o la sostituzione di pezzi soggetti a logoramento non rientrano nella garanzia e quindi sono
a pagamento!
La garanzia si annulla nel caso di intervento da parte di terzi.
I
29
6....-05-STWA 2942 29 02.12.2004, 10:52:20 Uhr
Page 30

I
Al termine della garanzia le riparazioni possono essere eseguite dietro pagamento
dal corrispettivo negozio specializzato o servizio riparazioni.
Dopo la garanzia
30
6....-05-STWA 2942 30 02.12.2004, 10:52:20 Uhr
Page 31

Generelle sikkerhetsanvisninger
• Les nøye gjennom bruksanvisningen før du tar apparatet i bruk. Ta godt vare
på bruksanvisningen, garantibeviset, kassalappen og helst også esken med
innvendig emballasje.
• Apparatet må bare brukes til private formål og de formål det der er beregnet
på. Dette apparatet er ikke ment for industriell bruk. Det må ikke benyttes
utendørs (bortsett fra hvis det bare er beregnet på utendørs bruk). Hold det
unna varme, direkte solskinn, fuktighet (senk det aldri ned i væsker) og skarpe
kanter. Ikke bruk apparatet hvis du er fuktig på hendende. Hvis apparatet har
blitt fuktig eller vått, må du trekke ut støpselet med en gang. Ikke kom borti
vannet.
• Slå av apparatet og trekk alltid støpselet ut av stikkontakten (trekk i støpselet,
ikke i ledningen) når du ikke bruker apparatet, fest tilbehørsdeler for rengjøring eller ved feil.
• Ikke bruk apparatet uten oppsikt. Hvis du forlater arbeidsplassen, må du alltid
slå apparatet av eller trekke støpselet ut av stikkontakten (trekk i støpselet,
ikke i ledningen.
• For å beskytte barn mot farer forbundet med elektriske apparater, må du alltid
sørge for at ledningen ikke henger ned, og at apparatet ikke er tilgjengelig for
barn.
• Kontroller jevnlig om det er skader på apparat og ledning. Skadede apparater
må ikke brukes.
• Ikke reparer apparatet selv. Oppsøk en autorisert fagmann. Hvis en nettledning er defekt, må du sørge for at den kun skiftes ut med en lik ledning, for
slik å unngå farer. Dette må gjøres av produsenten, vår kundetjeneste eller en
lignende kvalifi sert person.
• Bruk bare originaltilbehør.
• Legg merke til “Spesielle sikkerhetsanvisninger” nedenfor.
Spesielle sikkerhetsanvisninger
• Steikefl atene blir veldig varme! Ikke ta på noe annet enn håndtaket.
• Sett apparatet på et ildfast underlag!
• Ikke sett apparatet rett under et skap – dette for å unngå opphopning av
varme. Sørg for tilstrekkelig ledig plass!
• Vær oppmerksom på at det kommer ut damp når stekefl atene åpnes.
• Brød er brennbart. Derfor må apparatet aldri brukes i nærheten av eller under
gardiner og andre brennbare materialer!
N
Oversikt over betjeningselementene
1 Lokk 4 Låsesystem
2 Kontrollamper 5 Avstandsholder
3 ”Cool touch” (varmeisolerte)
håndtak
6....-05-STWA 2942 31 02.12.2004, 10:52:20 Uhr
6 Frigjøringsknapp
31
Page 32

N
KLEBEFRI OVERFLATE
• Smør stekefl atene lett før første gangs bruk. La apparatet stå på med lukkede
stekefl ater i ca. 10 minutter (se Bruk av apparatet). Tørk deretter av med en
fuktig oppvaskklut.
• De første smørbrødene/vafl ene eller det første du griller, må ikke spises.
Ta i bruk apparatet
Bruk av apparatet
Sette inn / skifte steikeplater
Sjekk at stikkontakten er tatt ut når du skal sette inn eller skifte steikeplater.
OBS!: Apparatet og steikeplatene må være helt avkjølte!
1. Løsne låsesystemet (4) og vipp opp lokket (1).
2. Hvis det ligger steikeplater i apparatet fra før, trykker du ned frigjøringsknappen (6) på innsiden av håndtakene, slik at steikeplatene løsner. Hold steikeplatene etter håndtakene og ta dem ut av apparatet.
3. Sett så inn de steikeplatene du vil bruke. Pass på at de går i lås. Legg merke
til tappene på kanten av steikeplatene. Apparatet leveres med ett sett steikeplater til smørbrød (B), ett til vafl er (C) og ett til grilling (D).
4. Lukk apparatet igjen.
Steike smørbrød
Tips: Smør utsiden av toastbrødet (som senere kommer i kontakt med steikeplatene) med litt smør eller margarin. Da kan du løsne smørbrødet fra steikeplatene
uten problemer.
1. Vikle ledningen helt ut.
2. Stikk støpselet inn i en forskriftsmessig installert jordet kontakt, 230 V, 50 Hz.
Den røde kontrollampen for strøm (2) lyser.
3. Hold steikefl atene lukket under oppvarming. Når den grønne kontrollampen
(2) lyser, har apparatet riktig steiketemperatur.
4. Åpne lokket og legg inn doble toastsmørbrød med det pålegget du ønsker.
Lukk lokket godt. Lås håndtakene med hengselen.
5. Den grønne kontrollampen (2) kobler seg inn og ut under steiking for at steiketemperaturen skal være stabil. Steiketiden kan variere med smak og behag.
Jo lenger du lar smørbrødene ligge i apparatet, jo mørkere blir de.
6. Åpne lokket og ta ut smørbrødene med en tregaffel eller lignende. Ikke bruk
spisse eller skarpe gjenstander. Da unngår du å skade overfl aten på steikefl atene.
7. Smør steikefl atene mellom steiking etter behov.
8. Steikefl atene bør alltid være lukket mellom steiking.
32
6....-05-STWA 2942 32 02.12.2004, 10:52:21 Uhr
Page 33

Steike vafl er
1. Gjenta trinn 1 og 3 under ”Steike smørbrød”.
2. Åpne lokket (1), hell ca. 1 ss røre midt på den nederste steikeplaten. Vær rask
når du heller på røren, da unngår du å få ujevne vafl er. Pass på å dosere riktig
mengde røre. Overfl ødig røre renner ut på kanten og griser til apparatet.
3. Gå fram slik det er beskrevet under ”Steike smørbrød”, punkt 4 til 7.
Oppskrift på vaffelkjeks
Pisk sammen 5 eggeplommer, 5 ss varmt vann, 100 g sukker og revet skall av
1 sitron til det skummer. Rør inn en blanding av 1/2 ts bakepulver og 150 g mel.
Stivpisk 5 eggehviter og bland dem inn i røren.
Flere oppskrifter fi nner du i kokebøker. Du kan også bruke ferdigblandinger.
Grille
1. Legg inn grillplatene slik det er beskrevet under ”Bruke apparatet”.
2. Fortsett slik det er beskrevet i punkt 1 og 3 under ”Steike smørbrød”.
3. Legg grillmaten på den nederste grillplaten og lukk lokket godt. Ikke press
sammen håndtakene. En annen mulighet er å bruke begge fl atene (se ill.
A). Da setter du avstandsholderen (5) loddrett på. Åpne lokket helt. Dra det
forsiktig opp, slik at låsen løsner, og åpne det så 180°. Legg så på grillmaten.
4. Hvor lenge du vil steike maten, er en smakssak.
5. Når du synes grillmaten er godt nok steikt, tar du den av med en tregaffel.
Ikke bruk spisse eller skarpe gjenstander.
Rengjøring og vedlikehold
• Trekk ut støpselet og la apparatet avkjøles.
• Fjern smuler eller rester fra steikefl atene og kantene med en pensel.
• Hele apparatet rengjør du ganske enkelt med en fuktig klut.
• Ikke bruk sterke rengjøringsmidler.
• Apparatet må aldri dyppes i vann!
Dette apparatet har blitt testet i henhold til alle aktuelle CE-retningslinjer som det
rammes av, f.eks. elektromagnetisk toleranse og direktiver om lavspenning. Det
er laget i henhold til dagens nyeste sikkerhetstekniske forskrifter.
Med forbehold om tekniske endringer!
N
33
6....-05-STWA 2942 33 02.12.2004, 10:52:21 Uhr
Page 34

N
For apparat som vi har solgt, påtar vi oss en garanti på 24 måneder fra kjøpsdato
(kassalapp).
Innenfor garantitiden fjerner vi mangler på apparat eller tilbehør*) uten omkostninger hvis manglene skyldes material- eller produksjonsfeil. Dette gjør vi ved
reparasjon eller – etter vår vurdering – bytting.
Garantiytelser medfører ingen forlengelse av garantitiden, og det oppstår heller
ikke noe krav på en ny garanti på grunn av dette!
Som garantibevis gjelder kjøpsbeviset. Uten dette beviset kan du ikke få byttet
eller reparert apparatet gratis.
I forbindelse med garanti ber vi om at du gir hele apparatet i originalemballasjen
sammen med kassalappen til din forhandler.
*) Skader på tilbehørsdeler fører ikke automatisk til at du får byttet hele apparatet
gratis. I slike tilfeller ber vi deg om å henvende deg til vår hotline! Glasskader eller
sprekker i plastdeler er i prinsippet kostnadspliktige!
Verken defekter på forbrukstilbehør og slitasjedeler (for eksempel motorkull,
eltekroker, drivremmer, ekstra fjernbetjening, ekstra tannbørster, sagblader osv.)
eller rengjøring, vedlikehold og utskifting av slitasjedeler går inn under garantien.
Slike ting er derfor kostnadspliktige!
Garantien utgår ved inngrep utenfra.
Garanti
Etter garantien
Etter at garantitiden har gått ut, kan reparasjoner utføres av den aktuelle faghandelen eller reparasjonsservice mot betaling.
34
6....-05-STWA 2942 34 02.12.2004, 10:52:22 Uhr
Page 35

General Safety Instructions
• Read the operating instructions carefully before putting the appliance into
operation and keep the instructions including the warranty, the receipt and, if
possible, the box with the internal packing.
• The appliance is designed exclusively for private use and for the envisaged
purpose. This appliance is not fi t for commercial use. Do not use it outdoors
(except if it is designed to be used outdoors). Keep it away from sources of
heat, direct sunlight, humidity (never dip it into any liquid) and sharp edges.
Do not use the appliance with wet hands. If the appliance is humid or wet,
unplug it immediately. Do not put it in water.
• When cleaning or putting it away, switch off the appliance and always pull out
the plug from the socket (pull on the plug, not the cable) if the appliance is not
being used and remove the attached accessories.
• Do not operate the machine without supervision. If you should leave the
workplace, always switch the machine off or remove the plug from the socket
(pull the plug itself, not the lead).
• To protect children from the dangers posed by electrical appliances, make
sure that the cable is hanging low and that children do not have access to the
appliance.
• Check the appliance and the cable for damage on a regular basis. Do not use
the appliance if it is damaged.
• Do not try to repair the appliance on your own. Always contact an authorized
technician. To avoid the exposure to danger, always have a faulty cable be
replaced only by the manufacturer, by our customer service or by a qualifi ed
person and with a cable of the same type.
• Use only original spare parts.
• Pay careful attention to the following “Special Safety Instructions“.
Special safety notes
• The baking surfaces get very hot. Touch the handles only.
• Put the unit down onto a heat-resistant surface or mat.
• In order to prevent heat from building up, do not put the unit directly underneath a cupboard. Ensure that there is enough space all around.
• Beware of steam coming out when you open the baking section.
• Bread is combustible. Therefore the device should never be used in the vicinity of or below curtains and other combustible materials!
GB
Overview of the Components
1 Lid 4 Locking device
2 Control lamps 5 Distance piece
3 „Cool Touch“ (heat-insulated)
handles
6....-05-STWA 2942 35 02.12.2004, 10:52:22 Uhr
6 Release button
35
Page 36

GB
NON-STICK COATING
• Lightly grease the baking surfaces before the unit is used for the fi rst time.
Use the appliance for about 10 minutes with the toasting surfaces closed (see
„Using the unit“). Then wipe it down with a damp cloth.
• Please do not eat the fi rst pieces of toast/wafers or the fi rst grilled food.
Starting-up the unit
Using the unit
Inserting/changing of the cooking plates
Make sure that the plug is not inserted when inserting or changing the cooking
plates.
Note: The machine and the baking plates must have cooled down completely!
1. Release the unlocking system (4) and fold the lid (1) upwards.
2. If the baking plates have already been inserted into the device please press
down the release buttons (6) on the insides of the handles in order to release
the baking plates. Hold the baking plates by the handles and take them out of
the device.
3. Now insert the desired baking plates until they lock in place. Please note the
pins on the edge of the baking plates. The device is supplied with one set of
baking plates each for sandwiches (B), wafers (C) and for grilling (D).
4. Close the appliance again.
Toasting sandwiches
Our tip: Lightly spread the outside of the bread (the side coming into contact with
the toasting surfaces) with butter or margarine. That way your sandwich can be
easily removed afterwards from the sandwich toaster.
1. Please unwind the lead completely.
2. Insert the plug in a duly installed 230V/50Hz protective contact socket. The
red mains control lamp (2) lights up.
3. eep the baking surfaces closed while heating. When the green control lamp
(2) lights up the baking temperature has been reached.
4. Open the cover and place each toast. Then close the lid gently. Lock the
handle with the hinge.
5. The green control lamp (2) switches on and off during baking in order to
maintain the baking temperature. The baking time depends on your individual
taste. The longer the sandwiches remain in the device, the greater the level of
browning.
6. Open the lid and remove the slices of toast with a wooden fork or the like. Do
not use pointed or sharp objects to avoid damaging the coating of the baking
surfaces.
36
6....-05-STWA 2942 36 02.12.2004, 10:52:22 Uhr
Page 37

7. Lightly grease the baking surfaces again as required after each baking process.
8. The baking surfaces must always be kept closed during pauses in the baking.
Baking waffl es
1. Repeat steps 1 and 3, as described under „Toasting Sandwiches“.
2. Open the lid (1) and place approx. 1 tablespoon of dough in the middle of the
lower baking surface. The dough should be fi lled in quickly as otherwise the
wafers will not brown evenly. Please ensure that you measure in the quantity
of dough correctly, as excess dough runs over the edges and soils the device.
Gently close the cover. Do not press the handles together.
3. Please proceed as described under „Toasting Sandwiches“, points 4 to 7.
Recipe for waffl es
5 egg yolks, 5 dessertspoons of hot water, 100 g sugar and 1 grated lemon peel
should be mixed together until frothy and then a mixture of 1/2 teaspoon baking
powder and 150 g fl our should be stirred in. Beat the 5 egg whites stiff and fold
them into the batter.
You can fi nd further recipes in our recipe books or else you can use a readymade baking mix.
Grilling
1. Insert the grilling plates as described under “Using the unit”.
2. Continue proceeding as described under points 1 and 3 “Toasting Sandwiches”.
3. Place the food to be grilled on the lower grilling plate and then close the lid.
Please do not press the handles together. It is also possible to use both surfaces (see illustration A). In order to do so please place the distance piece (5)
in a vertical position. Open the lid completely, pull it slightly upwards so that
the locking device is released and then open the lid through 180°. Now place
the food to be grilled on top.
4. The cooking time depends on your individual taste.
5. Once the food has been grilled enough, remove it with a wooden fork. Do not
use any pointed, sharp or cutting objects.
GB
Cleaning & maintenance
• Pull out the mains plug and allow the unit to cool down.
• Brush off the crumbs or residues from the baking surfaces and the edges.
• The entire device should only be cleaned with a slightly damp cloth.
• Do not use abrasive detergents.
• The machine must never be immersed in water!
37
6....-05-STWA 2942 37 02.12.2004, 10:52:23 Uhr
Page 38

This device has been tested according to all relevant current CE guidelines,
GB
such as electromagnetic compatibility and low voltage directives, and has been
constructed in accordance with the latest safety regulations.
Subject to technical changes without prior notice!
Guarantee
The device supplied by our Company is covered by a 24 month guarantee starting on the date of purchase (receipt).
During the life of the guarantee any fault of the device or its accessories *)
ascribable to material or manufacturing defects will be eliminated free of charge
by repairing or, at our discretion, by replacing it. The guarantee services do not
entail an extension of the life of the guarantee nor do they give rise to any right to
a new guarantee!
Proof of the guarantee is provided by the proof of purchase. Without proof of
purchase no free replacement or repair will be carried out.
If you wish to make a claim under the guarantee please return the entire machine
in the original packaging to your dealer together with the receipt.
*) Damage to accessories does not mean automatic free replacement of the whole machine. In such cases please contact our hotline. Broken glass or breakage
of plastic parts are always subject to a charge.
Defects to consumables or parts subject to wearing (e.g. motor pistons, kneading
blades, drive shafts, spare remote control, spare toothbrushes, saw blades, etc.)
as well as cleaning, maintenance or the replacement of said parts are not covered
by the guarantee and hence are to be paid!
The guarantee lapses in case of unauthorized tampering.
After the expiry of the guarantee
After the expiry of the guarantee repairs can be carried by the competent dealer
or repair service against the payment of the ensuing costs.
38
6....-05-STWA 2942 38 02.12.2004, 10:52:23 Uhr
Page 39

Ogólne wskazówki bezpieczeństwa
• Przed uruchomieniem urządzenia proszę bardzo dokładnie przeczytać
instrukcję obsługi.Proszę zachować ją wraz z kartą gwarancyjną, paragonem i w miarę możliwości również kartonem z opakowaniem wewnętrznym.
• Proszę wykorzystywać urządzenie jedynie dla prywatnego celu,jaki został
przewidziany dla urządzenia.Urządzenie to nie zostało przewidziane
do użytku w ramach działalności gospodarczej.Proszę nie korzystać z
urządzenia na zewnątrz (chyba że w określonych warunkach).Proszę
trzymać urządzenie z daleka od ciepła,bezpośredniego promieniowania
słonecznego,wilgoci (w żadnym wypadku nie zanurzać w substancjach
płynnych)oraz ostrych krawędzi.Proszę nie obsługiwać urządzenia wilgotnymi dłońmi.Jeżeli urządzenie jest wilgotne lub mokre,proszę natychmiast
wyciągnąć wtyczkę.
• Jeżeli nie korzystacie Państwo z urządzenia,jeżeli chcecie Państwo
zamontować jakieś akcesoria,w celu wyczyszczenia lub w przypadku jakichkolwiek zakłóceń,proszę zawsze wyłączyć urządzenie i wyjąć wtyczkę z
gniazdka (proszę pociągnąć za wtyczkę,nie za przewód zasilający).
• Pracującego urządzenia nie należy pozostawiać bez nadzoru. Jeżeli
opuszczają Państwo miejsce pracy, należy zawsze pamiętać o wyłączeniu
urządzenia, wzgl. wyjęciu wtyczki z gniazda (należy ciągnąć za wtyczkę, nie
za przewód).
• Aby uchronić dzieci przed niebezpieczeństwem związanym z elektrycznymi
urządzeniami,proszę zadbać o to,aby przewód zasilający nigdy nie wisiał
luźno,oraz aby dzieci nie miały dostępu do urządzenia.
• Proszę regularnie kontrolować urządzenie pod kątem uszkodzeń.Proszę nie
uruchamiać uszkodzonego urządzenia.
• W razie awarii proszę nie naprawiać urządzenia samemu lecz skorzystać
z pomocy autoryzowanego specjalisty. Jeżeli przewód zasilający
nieodłączalny ulegnie uszkodzeniu, to powinien on być wymieniony u producenta lub w specjalnym zakładzie naprawczym albo przez
wykwalifikowaną osobę w celu uniknięcia zagrożenia.
• Proszę stosować tylko oryginalne akcesoria.
• Prosimy pamiętać o podanych dalej „Specjalnych wskazówkach
dotyczących bezpiecznego użytkowania“.
Wskazówki dotyczące bezpieczeństwa obsługi
• Powierzchnie smażące stają się bardzo gorące. Używać wyłącznie uchwytów.
• Urządzenie stawiać na odpornej na ciepło podkładce.
• Aby uniknąć nadmiernego nagrzewania, nie stawiać bezpośrednio pod
szafką. Zadbać o odpowiednią przestrzeń.
• Uwaga na wydostającą się w chwili otwarcia parę.
• Chleb jest palny. Dlatego urządzenia nie wolno używać w pobliżu lub pod
firankami/zasłonami i innymi palnymi materiałami!
PL
39
6....-05-STWA 2942 39 02.12.2004, 10:52:23 Uhr
Page 40

PL
1 Pokrywa 4 System blokujący zapiekających
2 Lampki kontrolne 5 Rozpórki
3 Uchwyty typu „Cool Touch“
(z izolacją cieplną)
Schemat elementów obsługi
6 Przycisk odryglowujący
Przygotowanie do użytkowania urządzenia
POWIERZCHNIA NIEPRZYWIERAJĄCA
• Natłuścić lekko powierzchnie smażące przed pierwszym użyciem.
Na około 10 minut włącz urządzenie z zamkniętymi powierzchniami
zapiekającymi (patrz użytkowanie). Następnie przetrzeć wilgotną szmatką.
• Nie należy spożywać pierwszych tostów/wafli lub pierwszej opiekanej potrawy.
Użytkowanie urządzenia
Zakładanie / wymiana płytek zapiekających
Należy zwrócić uwagę na to, aby podczas wkładania wzgl. wymieniania płytek
nie była podłączona wtyczka przewodu zasilającego.
Uwaga: Urządzenie i płyty do pieczenia muszą być całkowicie ostygnięte.
1. Zwolnij system blokady (4) i odchyl pokrywę (1) do góry.
2. Jeżeli płyty do pieczenia są już włożone do urządzenia, naciśnij do dołu
przyciski odryglowujące (6) na wewnętrznych płaszczyznach uchwytów,
aby zwolnić płyty do pieczenia. Trzymając płyty do pieczenia za uchwyty,
wyjmij je z urządzenia.
3. Załóż wybrane płyty tak, aby zatrzasnęły się. Zwróćuwagę na czopy na
krawędzi płyt do pieczenia. W komplecie urządzenia znajdują się płyty do
tostów (B), wafli (C) i do opiekania (D).
4. Ponownie zamknij urządzenie.
Tostowanie kanapek
Typ: proszę posmarować zewnętrzną stronę kanapki (stronę dotykającą opie-
kacza) niewielką ilością masła lub margaryny. W ten sposób będą Państwo
mogli później wyjąć z opiekacza bez problemu całą kanapkę.
1. Odwiń kabel zasilający na całą długość.
2. Urządzenie wolno podłączyć tylko do przepisowo zainstalowanego, gniazda
wtykowego z uziemieniem o napięciu 230 V, 50 Hz. Świeci czerwona lampka kontrolna zasilania (2).
3. W trakcie rozgrzewania proszę utrzymywać powierzchnie do pieczenia
zamknięte. Świecenie zielonej lampki kontrolnej (2) oznacza, że została
osiągnięta wymagana temperatura pieczenia.
40
6....-05-STWA 2942 40 02.12.2004, 10:52:24 Uhr
Page 41

4. Unieść pokrywę i umieścić w tosterze po jednej przybranej, podwójnej kanapce. Delikatnie zamknąć pokrywę. Zablokuj uchwyty za pomocą zawiasu.
5. W czasie pieczenia zielona lampka kontrolna (2) zapala się i gaśnie,
co sygnalizuje regulację temperatury pieczenia. Czas pieczenia można
dostosować do indywidualnych upodobań. Im dłuższy czas przebywania
tostów w urządzeniu, tym bardziej będą przyrumienione.
6. Unieść pokrywę i umieścić w tosterze po jednej przybranej, podwójnej kanapce. Delikatnie zamknąć pokrywę. Zablokuj uchwyty za pomocą zawiasu.
7. Po kolejnych cyklach pieczenia w razie potrzeby nasmaruj jeszcze raz
powierzchnie płyt do pieczenia niewielką ilością tłuszczu.
8. Powierzchnie wypiekania w przerwach między wypiekami powinny
pozostawać zawsze zamknięte.
Smażenie gofrów
1. Powtórz czynności 1 i 3, opisane w punkcie “Opiekanie tostów”.
2. Otwórz pokrywę (1), umieść ok. 1 łyżki stołowej ciasta pośrodku dolnej
płyty. Czynność ta musi być wykonywana szybko, ponieważ w przeciwnym
razie wafle nie przyrumienią się równomiernie. Uważaj, aby ilość ciasta była
prawidłowa, ponieważ nadmiar ciasta wypłynie na krawędziach i zanieczyści
urządzenie. Zamknąć ostrożnie pokrywę. Nie ściskać za uchwyty.
3. Dalej postępuj wg opisu w części “Opiekanie tostów”, punkty 4 do 7.
Recepta na wafle biszkoptowe
5 żółtek, 5 łyżek stołowych wody, 100gr cukru i 1 startą skórkę od cytryny
ubić na pianę oraz dodać mieszankę 1/2 łyżeczki proszku do pieczenia z
150gr mąki, zmieszać. 5 białek zbić na sztywno i przepuścić przez ciasto.
Inne recepty znajdziecie Państwo w książkach kucharskich lub używajcie
gotowych mieszanek.
Opiekanie (grillowanie)
1. Włóż płyty do opiekania wg opisu w części “Użytkowanie urządzenia”.
2. Następnie wykonaj czynności opisane w punktach 1 i 3 w części “Opiekanie
tostów”.
3. Połóż przeznaczony do opiekania produkt na dolnej płycie i delikatnie
zamknij pokrywę. Nie ściskaj uchwytów. Można też wykorzystać obie
powierzchnie (patrz rys. A). W tym celu ustaw rozpórkę (5) w pozycji pionowej. Całkiem otwórz pokrywę, pociągając lekko do góry tak, aby została
zwolniona blokada, a następnie odchyl pokrywę o 180°. Teraz włóż produkt
przeznaczony do opiekania.
4. Czas opiekania zależy od indywidualnych upodobań.
5. Gdy opiekany produkt osiągnie pożądany stan, zdejmij go widelcem drewnianym. Nie używaj ostro zakończonych, ostrych lub tnących przemdiotów.
PL
41
6....-05-STWA 2942 41 02.12.2004, 10:52:24 Uhr
Page 42

PL
• Wyjąć wtyczkę z gniazdka sieciowego i pozostawić urządzenie do
wystygnięcia.
• Usuń pędzelkiem okruchy lub resztki ciasta z powierzchni płyt do pieczenia
i ich brzegów.
• Całe urządzenie czyść tylko lekko zwilżoną szmatką.
• Nie stosuj żadnych ostrych środków czyszczących.
• Proszę nie zanurzać urządzenia w wodzie!
Niniejsze urządzenie odpowiada wymaganiom normy bezpieczeństwa
użytkowania oraz spełnia wymagania dyrektywy niskonapięciowej i
kompatybilności elektromagnetycznej.
Zastrzega się prawo do zmian technicznych!
Czyszczenie i konserwacja
WARUNKI GWARANCJI
Przyznajemy 24 miesiące gwarancji na produkt licząc od daty zakupu.
W tym okresie będziemy bezpłatnie usuwać w terminie 14 dni od daty dostarc-
zenia wadliwego sprzętu z kartą gwarancyjną do miejsca zakupu wszystkie
uszkodzenia powstałe w tym urządzeniu na skutek wady materiałów lub
wadliwego wykonania, naprawiając oraz wymieniając wadliwe części lub (jeśli
uznamy za stosowne) wymieniając całe urządzenie na nowe.
Sprzęt do naprawy powinien być dostarczony w komplecie wraz z dowodem zakupu oraz z ważną kartą gwarancyjną do sprzedawcy w miarę
możliwości w oryginalnym opakowaniu lub innym odpowiednim dla zabezpieczenia przed uszkodzeniem. W razie braku kompletnego opakowania fabrycznego, ryzyko uszkodzenia sprzętu podczas transportu do i z miejsca zakupu
ponosi reklamujący.
Naprawa gwarancyjna nie dotyczy czynności przewidzianych w instrukcji
obsługi, do wykonania których zobowiązany jest użytkownik we własnym
zakresie i na własny koszt.
Gwarancja nie obejmuje:
• mechanicznych, termicznych, chemicznych uszkodzeń sprzętu i
wywołanych nimi wad,
• uszkodzeń powstałych w wyniku działania sił zewnętrznych takich jak
wyładowania atmosferyczne, zmiana napięcia zasilania i innych zdarzeń
losowych,
• nieprawidłowego ustawienia wartości napięcia elektrycznego, zasilanie z
nieodpowiedniego gniazda zasilania,
• sznurów połączeniowych, sieciowych, żarówek, baterii, akumulatorów,
42
6....-05-STWA 2942 42 02.12.2004, 10:52:25 Uhr
Page 43

• uszkodzeń wyrobu powstałych w wyniku niewłaściwego lub niezgodnego z
instrukcją jego użytkowania, przechowywania, konserwacji, samowolnego
zrywania plomb oraz wszelkich przeróbek i zmian konstrukcyjnych dokonanych przez użytkownika lub osoby niepowołane,
• roszczeń z tytułu parametrów technicznych wyrobu, o ile są one zgodne z
podanymi przez producenta,
• prawidłowego zużycia i uszkodzeń, które mają nieistotny wpływ na wartość
lub działanie tego urządzenia.
Karta gwarancyjna bez pieczątki sklepu, daty sprzedaży, nie wypełniona,
źle wypełniona, ze śladami poprawek, nieczytelna wskutek zniszczenia, bez
możliwości ustalenia miejsca sprzedaży oraz dołączonego dowodu zakupu jest
nieważna.
Korzystanie z usług gwarancyjnych nie jest możliwe po upływie daty ważności
gwarancji. Gwarancja na części lub całe urządzenie, które są wymieniane
kończy się, wraz z końcem gwarancji na to urządzenie.
Wszystkie inne roszczenia, wliczając w to odszkodowania są wykluczone chyba, że prawo przewiduje inaczej. Roszczenia wykraczające poza tą umowę nie
są uwzględniane przez tą gwarancję.
Gwarancja na sprzedany towar konsumpcyjny nie wyłącza, nie ogranicza ani
nie zawiesza uprawnień kupującego wynikających z niezgodności towaru z
umową.
Gwarancja oraz zawarte w niej warunki obowiązują na terenie Rzeczpospolitej
Polskiej.
PL
43
6....-05-STWA 2942 43 02.12.2004, 10:52:25 Uhr
Page 44

CZ
• Před uvedením tohoto přístroje do provozu si velmi pozorně přečtěte návod
k obsluze a tento návod spolu se záručním listem, pokladním blokem a
podle možností i s obalem a vnitřním vybavením obalu dobře uschovejte.
• Používejte tento přístroj výlučně pro soukromou potřebu a pro stanovené
účely. Tento přístroj není určen pro komerční použití. Nepoužívejte jej v
otevřeném prostoru (s výjimkou přístrojů, které jsou podmíněné používání
venku určeny). Chraňte jej před horkem, přímým slunečním zářením,
vlhkostí (v žádném případě jej neponořujte do kapalin) a stykem s ostrými
hranami. Nepoužívejte přístroj v případě, že máte vlhké ruce. Jestliže
dojde k navlhčení nebo namočení přístroje, okamžitě vytáhněte zástrčku ze
zásuvky. Vyvarujte se styku s vodou.
• Přístroj vypněte a vždy vytáhněte zástrčku ze zásuvky (tahejte jen za
zástrčku, nikdy ne za kabel), jestliže nebudete přístroj používat, chcete-li
namontovat příslušenství, přístroj vyčistit nebo v případě poruchy.
• Přístroj nesmí zůstat v provozu bez dozoru. Jestliže musíte pracoviště
opustit, vždy přístroj vypněte, resp. vytáhněte zástrčku ze zásuvky (vždy
tahejte za zástrčku, nikdy ne za kabel).
• Abyste ochránili děti před riziky spojenými s elektrickými přístroji, postarejte se o to, aby kabel nevisel dolů a děti na přístroj nedosáhly.
• Pravidelně kontrolujte přístroj a přívodní kabel z hlediska poškození.
Jestliže přístroj vykazuje nějakou závadu, neuvádějte jej do provozu.
• Neopravujte přístroj vlastními silami, nýbrž vyhledejte autorizovaného
opraváře. Abyste eliminovali rizika, nechejte poškozený přívodní kabel nahradit kabelem se stejnými hodnotami a to jen výrobcem, naším servisem pro
zákazníky nebo jinou kvalifikovanou osobou.
• Používejte jen originální příslušenství.
• Respektujte, prosím, následující „Speciální bezpečnostní pokyny ...“.
Všeobecné bezpečnostní pokyny
Speciální bezpečnostní pokyny
• Pečící plochy se velmi silně zahřívají. Při manipulaci používejte vždy jen rukojeti.
• Instalujte přístroj na žáruvzdorný podklad.
• K zamezení městnání tepla nesmí být přístroj zabudován přímo do nábytku,
ale vždy kolem něho musí být dostatečný volný prostor.
• Mějte na paměti, že při otevírání pečících ploch dojde k úniku páry.
• Chléb je hořlavý. Proto přístroj nikdy nepoužívejte v blízkosti záclon a jiných
hořlavých materiálů nebo pod nimi!
Vyobrazení ovládacích prvků
1 Víko 4 Zajišťovací systém
2 Kontrolní svítilny 5 Rozpěrka
3 (Tepelně izolovaná) rukojeť typu
“Cool Touch”
44
6....-05-STWA 2942 44 02.12.2004, 10:52:25 Uhr
6 Odjišťovací tlačítko
Page 45

Uvedení přístroje do provozu
ANTIADHÉZNÍ VRSTVA
• Před prvním použitím pečící plochy lehce potřete tukem. S uzavřenými
pečícími plochami smí být přístroj v provozu ca. 10 minut (viz kapitola
Používání přístroje). Poté je otřete vlhkým hadříkem.
• První tousty/vafle nebo první grilovanou potravinu nepožívejte.
Používání přístroje
Nasazování/výměna pečících desek
Při nasazování/výměně nesmí být zástrčka zastrčena do zásuvky.
Pozor: Přístroj a pečící desky musí zcela vychladnout!
1. Uvolněte zajišťovací systém (4) a vyklopte víko (1) směrem nahoru.
2. Jestliže jsou nějaké pečící desky už nasazeny v přístroji, stiskněte
odjišťovací tlačítko (6) na vnitřních stranách rukojetí směrem dolů, aby
došlo k uvolnění pečících desek. Uchopte pečící desky u rukojetí a vyjměte
je z přístroje.
3. Nasaďte nyní požadované pečící desky tak, aby zaklaply. Dávejte pozor na
čepy na okrajích pečících desek. S přístrojem je dodávána vždy jedna sada
pečících desek pro přípravu sendvičů (B), vaflí (C) a pro grilování (D).
4. Přístroj opět zavřete.
Příprava sendvičů
Tip: Potřete vnější stranu toastového chleba (která později přijde do styku s
pečícími plochami) lehce máslem nebo margarínem. Po upečení pak budete
moci sendvič bez problémů oddělit od pečících ploch.
1. Kabel zcela odviňte.
2. Zastrčte zástrčku do předpisově instalované zásuvky 230 V, 50 Hz. Červená
kontrolní svítilna, indikující připojení k elektrické síti, svítí.
3. Během doby zahřívání dbejte na to, aby pečící plochy byly uzavřeny.
Jestliže svítí zelená kontrolní svítilna (2), je dosaženo teploty pro pečení.
4. Otevřete víko a vložte vždy jeden proložený dvojitý toast. Víko opatrně
uzavřete. Rukojeti zajistěte pomocí kloubového závěsu.
5. Zelená kontrolní svítilna (2) se během procesu pečení střídavě rozsvěcuje
a zhasíná, protože je prováděno udržování teploty potřebné pro pečení.
Doba pečení závisí na individuální chuti. Čím déle zůstanou sendviče
v přístroji, tím intenzivnější je jejich zhnědnutí.
6. Víko otevřete a připravený sendvič vyjměte pomocí dřevěné vidličky nebo
pod. Nepoužívejte žádné špičaté nebo ostré předměty, aby nedošlo k
poškození povrchu pečících ploch.
7. Podle potřeby po každém procesu pečení lehce potřete pečící plochy tukem.
8. V přestávkách mezi pečením by pečící plochy měly být vždy zavřeny.
45
CZ
6....-05-STWA 2942 45 02.12.2004, 10:52:26 Uhr
Page 46

CZ
1. Opakujte kroky 1 a 3 tak, jak je popsáno v oddíle Sendviče.
2. Otevřete víko (1) a vložte přibl. 1 polévkovou lžíci těsta do středu dolní
pečící plochy. Tento proces plnění by se měl uskutečnit rychle, protože
jinak vafle nezhnědnou rovnoměrně. Dbejte na to, aby množství těsta bylo
správně dávkováno, protože přebytečné těsto přeteče přes okraj a znečistí
přístroj. Víko poté měkce zavřete. Rukojeti nestlačujte.
3. Dále postupujte tak, jak je popsáno v oddíle “Opékání sendvičů”, bod 4 až 7.
Pečení vaflí
Recept na piškotové vafle
5 vaječných žloutků, 5 polévkových lžic vřelé vody, 100 g cukru a nastrouhanou kůru z 1 citrónu vyšlehejte do pěny, přidejte půl čajové lžičky prášku do
pečiva a 150 g mouky a zpracujte do těsta. 5 vaječných bílků utřete do tuha a
vmíchejte do těsta.
Další recepty si najděte, prosím, v receptáři nebo použijte prodávané, již
připravené směsi.
Grilování
1. Vložte grilovací desky tak, jak je už popsáno v oddíle “Používání přístroje”.
2. Dále postupujte tak, jak je popsáno v bodech 1 a 3 oddílu “Opékání
sendvičů”.
3. Položte grilovanou surovinu na dolní grilovací desku a jemně zavřete víko.
Rukojeti nestlačujte. Další možností je použití obou ploch (viz obr. A).
K tomuto účelu postavte rozpěrku (5) svisle. Víko zcela otevřete, vytáhněte
jej lehce nahoru, aby se tak uvolnila aretace, a otevřete je pak o 180s. Nyní
vložte grilovanou surovinu.
4. Doba přípravy závisí na individuálním přání.
5. Jestliže bylo dosaženo požadovaného stupně přípravy grilované suroviny,
vyjměte grilovanou surovinu pomocí dřevěné vidličky. Nepoužívejte žádné
špičaté, ostré nebo podobné předměty, které by mohly poškodit povrchovou vrstvu.
Čištění a údržba
• Vytáhněte zástrčku ze zásuvky a nechte přístroj vychladnout.
• Drobky nebo zbytky odstraňte z pečících ploch a okrajů pomocí štětečku.
• Celý přístroj čistěte jen pomocí lehce navlhčeného hadříku.
• Nepoužívejte žádné drsné čistící prostředky.
• Nikdy neponořujte přístroj do vody!
46
6....-05-STWA 2942 46 02.12.2004, 10:52:26 Uhr
Page 47

Tento přístroj byl testován podle všech příslušných, v současné době platných směrnic CE, jako je např. elektromagnetická kompatibilita a direktiva o nízkonapěťové bezpečnosti, a byl zkonstruován podle nejnovějších
bezpečnostně-technických předpisů.
Vyhrazujeme si technické změny!
Záruka
Na námi prodaný přístroj poskytujeme záruku v trvání 24 měsíců od data
prodeje (pokladní doklad).
Během záruční lhůty odstraníme bezplatně všechny vady přístroje nebo
příslušenství*), které vzniknou v důsledku vad materiálu nebo výrobních vad, a
to opravou nebo, podle našeho uvážení, formou výměny. Záruční plnění nemají
za následek ani prodloužení záruční doby ani tím nevzniká nárok na novou
záruku!
Jako záruční doklad slouží doklad o koupi. Bez tohoto dokladu nelze uskutečnit
bezplatnou výměnu nebo bezplatnou opravu.
V případě uplatnění záruky předejte, prosím, kompletní přístroj v originálním
obalu spolu s pokladním dokladem Vašemu obchodníkovi.
*) Poškození příslušenství není automaticky důvodem pro bezplatnou výměnu
kompletního přístroje. V takovém případě se obraťte na naši Hotline! Prasklé
skleněné resp. plastové díly zásadně podléhají povinnosti úhrady!
Jak na vady na spotřebním příslušenství, resp. dílech podléhajících rychlému
opotřebení (např. uhlíky motoru, hnětací háky, hnací řemeny, náhradní dálkové
ovládání, náhradní zubní kartáčky, pilové listy atd.), tak i na čištění, údržbu
nebo výměnu dílů podléhajících rychlému opotřebení se záruka nevztahuje a je
proto nutno je uhradit!
Záruka zaniká v případě, že dojde k zásahu neautorizovanou osobou.
Po uplynutí záruky
Po uplynutí záruční doby je možno za úplatu provést opravy v příslušném
odborném obchodě nebo opravně.
CZ
47
6....-05-STWA 2942 47 02.12.2004, 10:52:27 Uhr
Page 48

H
• A készülék használatba vétele előtt gondosan olvassa végig a használati utasítást, és őrizze meg a garancialevéllel, a pénztári nyugtával és
lehetőleg a csomagolókartonnal, ill. az abban lévő bélésanyaggal együtt!
• Kizárólag személyi célra használja a készüléket, és csupán arra, amire való!
A készülék nem ipari jellegű használatra készült. Ne használja a szabadban
(hacsak nem a szabadban való, meghatározott korlátok közötti használatra van szánva)! Ne tegye ki erős hőhatásnak, közvetlen napsugárzásnak
és nedvességnek (semmi esetre se mártsa folyadékba), és óvja az éles
szélektől! Ne használja a készüléket vizes kézzel! Ha a készülék vizes vagy
nedves lett, azonnal húzza ki a konnektorból! Ne nyúljon bele a vízbe!
• Kapcsolja ki a készüléket, és amikor nem használja, tartozékokat helyez
rá, tisztítja, vagy ha zavart észlel, mindig húzza ki a csatlakozó dugaszt a
konnektorból!
• Ne működtesse a készüléket felügyelet nélkül! Ha elhagyja a munkahelyet,
mindig kapcsolja ki a készüléket, ill. húzza ki a dugaszt a konnektorból (a
dugasznál, és nem a kábelnél fogva)!
• Annak érdekében, hogy a gyermekeket megvédje az elektromos készülékek okozta veszélyektől, soha ne hagyja a kábeleket szabadon lógva, és
olyan helyre tegye a készüléket, ahol gyermekek nem férhetnek hozzá!
• Rendszeresen ellenőrizze, hogy nincs-e a készüléken vagy a kábelen sérülés! Sérült készüléket soha ne helyezzen üzembe!
• A kockázatok elkerülése végett ne maga javítsa a készüléket, hanem keressen fel egy erre kiképzett szakembert! Ha hibás a csatlakozó kábel, csak
a gyártótól, a vevőszolgálatunktól vagy hasonló képzettségű személytől
kérjen helyette azonos értékű másik kábelt!
• Csak eredeti tartozékokat használjon!
• Tartsa be az itt következő „Speciális biztonsági rendszabályokat“ ...
Általános biztonsági rendszabályok
Speciális biztonsági intézkedések
• A sütőfelületek nagyon felforrósodnak. Csak a fogantyúkat fogja meg.
• A készüléket egy hőálló alapra állítsa.
• A nagyfokú hőképződés miatt a készüléket nem szabad közvetlenül egy
szekrény alá állítani. Gondoskodni kell a készülék körüli elegendő szabad
helyről.
• A sütőfelületek kinyitásakor ügyeljen a kiáramló gőzre.
• A kenyér éghető. Soha ne használja ezért a készüléket függönyök vagy
egyéb éghető anyagok közelében vagy alatt!
A kezelő elemek bemutatása
1 Fedél 4 Reteszelő rendszer
2 Ellenőrző lámpák 5 Távolságtartó
3 ”Cool touch” (hőszigetelt) fülek 6 Reteszelés-kioldó gomb
48
6....-05-STWA 2942 48 02.12.2004, 10:52:27 Uhr
Page 49

A készülék üzembevétele
LETAPADÁSMENTES BEVONAT
• Az első használat előtt vékonyan zsírozza be a sütőfelületeket. Működtesse
kb. 10 percig a készüléket zárt sütőfelületekkel. (lásd: A készülék használata). Ezután törölje le azt egy nedves törlőkendővel.
• Ne fogyassza el az első pirítósokat/ostyalapokat vagy az első grillezett
ételt!
A készülék használata
A sütőlapok behelyezése / cseréje
Ügyeljen rá, hogy a behelyezéskor, ill. kicseréléskor a készülék ne legyen a
konnektorba dugva!
Figyelem:
A készüléknek és a sütőlapoknak teljesen lehűlt állapotban kell lenniük!
1. Oldja ki a reteszelő rendszert (4), és billentse fel a fedelet (1)!
2. Ha a sütőlapok már be vannak helyezve a készülékbe, nyomja le a fülek
belső felén található reteszelésoldó gombot (6), hogy ki tudja venni a sütőlapokat. A sütőlapokat a fülek mellett tartva, vegye ki őket a
készülékből!
3. Helyezze most be a kívánt sütőlapokat úgy, hogy bekattanjanak! Ügyeljen a
sütőlapok szélén lévő csapocskákra! Minden készülékhez egy-egy melegszendvics-készítéshez (B), ostyalap- ill. goffrykészítéshez (C) és grillezéshez
(D) való sütőlapkészlet van mellékelve.
4. Zárja ezután ismét a készüléket!
Szendvicssütés
Tipp: Kenje be vékonyan vajjal vagy margarinnal a szendvicskenyér külső felét
(azt, amelyik később érintkezésbe kerül a sütőfelülettel)! Így később problémamentesen le tudja venni a szendvicset a sütőlapról.
1. Tekerje le a kábelt teljes hosszában!
2. Dugja a hálózati csatlakozó dugaszt előírásszerűen szerelt, földelt,
230 V, 50 Hz-es konnektorba! A piros hálózati ellenőrző lámpa (2) ég.
3. A felfűtési idő alatt tartsa csukva a sütőfelületeket! Amikor kigyullad a zöld
ellenőrző lámpa (2), a készülék felmelegedett a sütési hőmérsékletre.
4. Nyissuk fel a fedőt, és tegyünk be egy-egy elkészített dupla szendvicset. A
fedelet óvatosan csukja be. A zsanérokkal reteszelje a füleket!
5. A sütési (pirítási) folyamat alatt a zöld ellenőrző lámpa (2) váltakozva be- és
kikapcsol, hogy megtartsa a sütési hőmérsékletet. A sütési idő az egyéni
ízlés függvénye. Minél hosszabb ideig marad a szendvics a készülékben,
annál sötétebbre sül (jobban megpirul).
H
49
6....-05-STWA 2942 49 02.12.2004, 10:52:27 Uhr
Page 50

6. Nyissa ki a fedelet, és a pirított kenyeret egy favillával, vagy hasonlóval
H
vegye ki. Ne használjunk hegyes vagy éles tárgyakat, hogy meg ne sérüljön
a sütőfelületek rétegbevonata.
7. Az egyes sütési szakaszok után szükség szerint zsírozza be ismét vékonyan
a sütőfelületeket!
8. Amikor éppen nem süt, tartsa a sütőfelületeket mindig zárva!
Ostyasütés
1. Ismételje meg az 1-3. lépést a melegszendvics-készítésnél leírtak szerint!
2. Nyissa fel a fedelet (1), és tegyen kb. 1 evőkanálnyi tésztát az alsó sütőlap
közepére! Lehetőség szerint gyorsan végezze el a betöltést, mert ellenkező
esetben az ostyalapok nem sülnek egyenletesen barnára. Ügyeljen a tészta
helyes adagolására! A felesleges massza ugyanis kifolyik a széleken, és
beszennyezi a készüléket. Finoman zárjuk le a fedelet. A nyeleket ne
nyomjuk össze.
3. A továbbiakban úgy járjon el, ahogyan a “Melegszendvics-készítés” 4-7.
pontjában olvasható.
Piskótaostya-recept
5 tojássárgáját, 5 evőkanálnyi forró vizet, 10 dkg cukrot és 1 citrom lereszelt
héját verjük fel habosra, és kavarjuk bele egy 1/2 sütőpor és 15 dkg liszt keverékét. Verjünk fel kemény habbá 5 tojásfehérjét, és adjuk hozzá a tésztához.
További recepteket receptkönyvekben találhat, vagy használjon sütésre kész
keverékeket.
Grillezés
1. Helyezze be a grillező lapokat “A készülék használata” c. részben leírtak
szerint!
2. A továbbiakban úgy járjon el, ahogyan a “Melegszendvics-készítés” 1-3.
pontjában olvasható.
3. Helyezze a grillezendő ételt az alsó sütőlapra, és finoman csukja le a fedelet! Nem nyomja össze a készülék füleit! További lehetőséget kínál a két
lap együttes használata (lásd “A” ábra). Állítsa ehhez a távolságtartót (5)
függőleges helyzetbe! Nyissa fel teljesen a fedelet, húzza enyhén felfelé,
hogy kioldódjon a reteszelésből, majd nyissa ki 180°-ban! Ezután tegye rá a
grillezendő élelmiszert!
4. Az elkészítési idő az egyéni ízléstől függ.
5. Amikor a grillezett étel elérte a kívánt puhasági fokot, favillával vegye ki! Ne
használjon erre a célra hegyes vagy éles tárgyakat!
50
6....-05-STWA 2942 50 02.12.2004, 10:52:28 Uhr
Page 51

Tisztítás & Karbantartás
• Húzza ki a hálózati dugaszt, és hagyja a készüléket lehűlni.
• Ecsettel távolítsa el a sütőfelületekről és a szélekről a morzsákat vagy
egyéb maradványokat!
• Az egész készüléket mindig csak enyhén nedves ruhával tisztítsa!
• Ne használjon erős mosogatószert!
• Soha ne tegye a készüléket vízbe!
Ezt a készüléket az Európa Tanács minden vonatkozó aktuális irányelve szerint
(pl. elektromágnesesség-elviselő képesség vagy kisfeszültség-elviselő képesség) ellenőriztük, és a legújabb biztonságtechnikai előírások szerint készült.
Megjegyezzük az esetleges müszaki változásokat!
Garancia
Az általunk forgalmazott készülékre a vétel időpontjától (pénztári nyugta)
számított 24 havi garanciát vállalunk.
A garanciális időn belül saját mérlegelésünk szerint javítással vagy cserével
díjtalanul megszüntetjük a készülék vagy a tartozék *) olyan hiányosságait,
amelyek anyaghibára vagy gyártási hibára vezethetők vissza. A garanciális
szolgáltatások sem a garanciális idő meghosszabbítását nem eredményezik,
sem nem alapoznak meg újabb garanciára való igényt!
A garancia igazolására a pénztári nyugta szolgál. E nélkül az igazolás nélkül
sem díjmentes csere, sem díjtalan javítás nem végezhető.
Garanciális esetben szíveskedjék az alapkészüléket eredeti csomagolásában a
pénztári nyugtával együtt átadni a kereskedőjének!
*) A tartozékok a jogszabályban előírt szavatossági kötelezettség (6 hónap)
hatálya alá tartoznak, és nem vezetnek az egész készülék díjtalan cseréjére. Ilyen esetben ne a készüléket küldje be, ill. rendelje meg, hanem
vevőszolgálatunkkal egyeztetve csak a hibás tartozékot! Az üvegtörés okozta
hibák mindig térítéskötelesek!
Sem az elhasználódó tartozékokban, ill. kopó alkatrészekben (pl. szénkefe, dagasztóhorog, hajtószíj, póttávvezérlő, pótfogkefe, fűrészlap stb.) bekövetkező
hibák, sem a tisztítás, karbantartás vagy a kopó alkatrészek cseréje nem esik a
garancia hatálya alá, következésképp térítésköteles.
Illetéktelen beavatkozás a garancia megszűnését eredményezi.
H
A garanciális idő után
A garanciális idő eltelte után a megfelelő szakkereskedésben vagy javítószolgálatnál végeztethet térítésköteles javításokat.
51
6....-05-STWA 2942 51 02.12.2004, 10:52:28 Uhr
Page 52

RUS
Общие указания по технике безопасности
• Перед началом эксплуатации прибора внимательно прочитайте
прилагаемую инструкцию по эксплуатации и сохраните ее в надежном
месте, вместе с гарантийным талоном, кассовым чеком и, по
возможности, картонной коробкой с упаковочным материалом.
• Пользуйтесь прибором только частным образом и по назначению.
Прибор не предназначен для коммерческого использования. Не
пользуйтесь прибором под открытым небом (исключая приборы,
эксплуатация которых под открытым небом допустима). Предохраняйте
прибор от жары, прямых солнечных лучей, влажности (ни в коем случае
не погружайте его в воду) и ударов об острые углы. Не прикасайтесь к
прибору влажными руками. Если прибор увлажнился или намок, тут же
выньте вилку из розетки. Не прикасайтесь к мокрым местам.
• После эксплуатации, монтаже принадлежностей, чистке или поломке
прибора всегда вынимайте вилку из розетки (тяните за вилку, а не за
кабель).
• Не оставляйте включенные электроприборы без присмотра. Если
возникнет необходимость отлучиться, то выключите электроприбор или
выньте вилку из розетки (тяните за вилку, а не за кабель).
• Для защиты детей от поражений электротоком, следите за тем, чтобы
кабель не висел где попало и дети не имели доступа к прибору.
• Регулярно осматривайте прибор и кабель на предмет возможных
повреждений. Ни в коем случае не включайте прибор, имеющий
повреждения.
• Ни в коем случае не ремонтируйте прибор самостоятельно, а
обращайтесь в таком случае за помощью к специалисту, имеющему
соответствующий допуск. Из соображений безопасности, замена
сетевого шнура на равнозначный допускается только через заводизготовитель, нашу сервисную мастерскую или соответствующего
квалифицированного специалиста.
• Используйте только оригинальные запчасти.
• Пожалуйста, соблюдайте нижеследующие ”Специальные указания по
технике безопасности ...“.
Специальные требования безопасности
• Плита (полуформы) сильно нагревается. Прикасайтесь к прибору
только за ручки.
• Устанавливайте прибор на жароустойчивое основание/подставку.
• Для предотвращения тепловой пробки, не устанавливайте прибор
непосредственно под полками/шкафами. Обеспечьте достаточно
свободного места.
• При открывании полуформ остерегайтесь выступающего пара.
52
6....-05-STWA 2942 52 02.12.2004, 10:52:29 Uhr
Page 53

• Хлеб может воспламениться. Поэтому, никогда не включайте
изделие в близи или непосредственно под занавесями или другими
легковоспламеняющимися предметами!
Изображение конрольных деталей
1 Крышка 4 Запорный механизм
2 Контрольные лампочки 5 Ограничитель
3 Ручки ”Cool Touch“
(теплоизолированные)
6 Кнопка разблокировки
Подготовка прибора к работе
НЕПОДГОРАЕМАЯ ПОВЕРХНОСТЬ
• При первом пользовании смажьте поверхности полуформ жиром.
Включите прибор с закрытыми половинками прим. на 10 минут (см.
эксплуатация/порядок работы). В заключении протрите прибор
влажной тряпкой.
• Первый тост/вафли и первый продукт, поджаренный на гриле, в пищу не
употреблять.
Эксплуатация / порядок работы
Вставление/замена полуформ
Перед вставлением или заменой полуформ убедитесь в том, что сетевая
вилка вынута из розетки.
Внимание: Дайте изделию и плиткам полностью остыть!
1. Разблокируйте систему (4) и откиньте крышку (1) вверх.
2. Если в изделии уже находятся формы для выпечки, то нажмите вниз
кнопку разблокировки (6), находящуюся на внутренней стороне ручки,
чтобы разблокировать формы. Возьмите формы за ручки и выньте их из
изделия.
3. Вставьте необходимую форму для выпечки, до фиксации. Обратите
внимание на выступы на кромках форм. Изделие укомплектовано
различными формами для выпечки: для сандвичей (В), вафель (С) и для
поджаривания на гриле (D).
4. Закройте прибор.
RUS
Приготовление сандвичей
Совет: намажьте внешнюю сторону сандвича (сторону, которая войдет в
контакт с полуформой) сливочным маслом или маргарином. Это позволит
впоследствии без труда отделить сандвич от формы.
53
6....-05-STWA 2942 53 02.12.2004, 10:52:29 Uhr
Page 54

1. Полностью размотайте сетевой шнур.
RUS
2. Вставьте сетевую вилку в розетку с напряжением сети 230 В, 50 Гц,
оснащенную защитными контактами и установленную в соответствии с
предписаниями. Загорается красная контрольная лампочка сети (2).
3. Во время разогрева держите полуформы вафельницы закрытыми.
Когда загорится зеленая контрольная лампочка (2), рабочая
температура достигнута.
4. Откройте крышку и вложьте в каждое отделение по двойному тосту
(бутерброду). Плавно закройте крышку. Ручки необходимо застопорить
в шарнире.
5. Зеленая контрольная лампочка (2) включается и выключается во время
работы, чтобы поддержать установленную температуру выпечки.
Время выпечки дело личного вкуса. Чем дольше сандвич находится в
печи, тем темней он поджаривается.
6. Откройте крышку и выньте садвич при помощи деревянной вилки
или т.п. предмета. Ни в коем случае не пользуйтесь острыми или
режущими предметами, это может повредить непригораемое покрытие
поверхностей тостера.
7. После каждого прохода, по потребности, слегка смазывайте
полуформы маслом.
8. Полуформы вафельницы должны быть в перерывах закрыты.
Выпечка вафель
1. Повторите шаги 1-3, как это было описано в главе ”Поджаривание
сандвичей“.
2. Откройте крышку (1), налейте примерно 1 столовую ложку теста в
середину нижней полуформы. Наливать необходимо быстро, иначе
вафли не получат равномерную, коричневую окраску. Дозируйте
тесто правильно, излишки теста будут выдавлены за края и загрязнят
изделие. Плавно закройте крышку. Ручки при этом не сжимайте.
3. Поступайте, как это было описано в подпунктах 4-7 главы
”Поджаривание сандвичей“.
Рецепт бисквитных вафель
Смешайте и взбейте до пены: 5 яичных желтков, 5 ст. ложек горячей воды,
100 г сахара и протёртую шкурку лимона, затем замесите тесто со 150 г
муки и 1/2 чайной ложки порошка для выпечки. Хорошо взбейте 5 яичных
белков и замесите их в тесто.
Другие рецепты Вы найдёте в рецептурных справочниках или применяйте
готовые смеси, предлагаемые торговлей.
54
6....-05-STWA 2942 54 02.12.2004, 10:52:30 Uhr
Page 55

Поджаривание на гриле
1. Установите плитку-гриль, как это уже было описано в главе
”Эксплуатация изделия“.
2. Далее поступайте, как это было описано в подпунктах 1-3 главы
Поджаривание сандвичей“.
3. Разместите продукты на нижней полуформе и осторожно закройте
крышку. Ручки вместе не сжимать. Другая возможность, это
использовать обе полуформы (см. рис А). Для этого установите
ограничитель (5) вертикально. Откройте полностью крышку, слегка
потяните ее вверх, так чтобы открылся фиксатор и откройте ее на 180°.
Разместите продукты на полуформах.
4. Время поджаривания индивидуальное.
5. Когда продукты достаточно прожарятся, снимите их с формы при
помощи деревянной вилки. Не пользуйтесь для этого острыми,
заточенными или режущими предметами.
Уход за прибором
• Вытащите вилку из розетки и дайте прибору остыть.
• При помощи кисточки смахните крошки или остатки вафель с полуформ
или их краев.
• Протрите все изделие слегка влажной тряпкой.
• Не применяйте сильных моющих средств.
• Не погружайте электроприборы в воду!
Это изделение прошло все необходимые и актуальные проверки,
предписанные директивой СЕ, к прим. на электромагнитную
совместимость и соответствие требованиям к низковольтной технике, оно
было также сконструировано и построено с учетом последних требований
по технике безопасности.
Мы оставляем за собой право на технические изменения!
RUS
55
6....-05-STWA 2942 55 02.12.2004, 10:52:30 Uhr
Page 56

RUS
Гарантийный срок на территории Российской Федерации устанавливается
полномочными представителями.
Кассовый чек является гарантийным талоном. Без него невозможен
бесплатный ремонт или замена изделия.
В случае возникновжния притензий по гарантии, предъявите изделие
в полнойкомплектации, с оригинальной упаковкой и кассовым чеком
торговой точке, продавшей это изделие.
*) Дефекты принадлежностей не служат причиной для автоматической
замены всего изделия. В этом случае позвоните нам, пожалуйста, по
горячей линии! Разбитые стеклянные и поломаные пластмассовые детали
возмещаются только за дополнительную оплату!
Дефекты изнашиваемых принадлежностей или трущихся деталей
(например контактные щетки моторов, смесительные крюки, приводные
ремни, запасные пульты управления, запасные зубные щетки, пильные
полотна и т.д.), а также чистка, техобслуживание или замена трущихся
деталей не попадают под гарантию, и поэтому проводятся за отдельную
оплату!
Гарантия теряется при вскрытии изделия посторонними лицами.
Гарантийное обязательство
После гарантии
После окончания срока гарантии, ремонт изделий производится за оплату,
соответствующими мастерскими или пунктами сервисного обслуживания.
56
6....-05-STWA 2942 56 02.12.2004, 10:52:30 Uhr
Page 57

6....-05-STWA 2942 57 02.12.2004, 10:52:31 Uhr
Page 58

Technische Daten
Modell: ST/WA 2942
Spannungsversorgung: 220-240 V,
50-60 Hz
Leistungsaufnahme: 750 W
Schutzklasse: Ι
Dieses Gerät wurde nach allen zutreffenden, aktuellen CE-Richtlinien geprüft, wie
z.B. elektromagnetische Verträglichkeit
und Niederspannungsdirektive und wurde
nach den neuesten sicherheitstechnischen Vorschriften gebaut.
Technische Änderungen vorbehalten!
Bitte führen Sie das ausgediente Gerät
einer umweltgerechten Entsorgung zu.
D-47906 Kempen/Germany · Industriering Ost 40
Telefon 02152/2006-888
Internet: http://www.clatronic.de · email: info@clatronic.de
6....-05-STWA 2942 58 02.12.2004, 10:52:31 Uhr
Stünings Medien, Krefeld • 11/04
 Loading...