

Page 1

R
4....-05-SRC 539 CD 06.08.2002 10:21 Uhr Seite 1
Bedienungsanleitung/Garantie
Gebruiksaanwijzing/Garantie • Mode d’emploi/Garantie
Instrucciones de servicio/Garantía • Istruzioni per l’uso/Garanzia
Instruction Manual/Guarantee • Instrukcja obsługi/Gwarancja
A használati utasítás/garancia
Stereo-Uhrenradio mit CD
Stereo-clockradio med cd-afspiller • Radio-réveil stereo avec lecteur CD
Stereo Clock Radio with CD • Stereofoniczne radio z zegarem i odtwarzaczem CD
Radioreloj estereo con CD • Radiosveglia stereo con CD
Sztereo órás rádió CD-lejátszóval
SRC 539 CD
Page 2

4....-05-SRC 539 CD 06.08.2002 10:21 Uhr Seite 2
Inhalt
Inhoud • Sommaire • Indice • Indice • Contents • Spis treści • Tartalom
Übersicht Bedienelemente . . . . . . . . . . . . . . . . . . . . . . . . . .Seite 3
D
Bedienungsanleitung . . . . . . . . . . . . . . . . . . . . . . . . . . . . . . .Seite 4
Garantie . . . . . . . . . . . . . . . . . . . . . . . . . . . . . . . . . . . . . . . .Seite 8
Overzicht bedieningselementen . . . . . . . . . . . . . . . . . . . . . .Pagina 3
NL
Gebruiksaanwijzing . . . . . . . . . . . . . . . . . . . . . . . . . . . . . . . .Pagina 10
Garantie . . . . . . . . . . . . . . . . . . . . . . . . . . . . . . . . . . . . . . . .Pagina 14
Aperçu des éléments de commande . . . . . . . . . . . . . . . . . . .Page 3
F
Mode d’emploi . . . . . . . . . . . . . . . . . . . . . . . . . . . . . . . . . . .Page 16
Garantie . . . . . . . . . . . . . . . . . . . . . . . . . . . . . . . . . . . . . . . .Page 20
Vista de conjunto Elementos de mando . . . . . . . . . . . . . . . .Página 3
E
Instrucciones de servicio . . . . . . . . . . . . . . . . . . . . . . . . . . . .Página 22
Garantia . . . . . . . . . . . . . . . . . . . . . . . . . . . . . . . . . . . . . . . .Página 27
I Descrizione dei singoli pezzi . . . . . . . . . . . . . . . . . . . . . . . .Pagina 3
Istruzioni per l’uso . . . . . . . . . . . . . . . . . . . . . . . . . . . . . . . . .Pagina 28
Garanzia . . . . . . . . . . . . . . . . . . . . . . . . . . . . . . . . . . . .Pagina 32
Control element overview . . . . . . . . . . . . . . . . . . . . . . . . . . .Page 3
GB
Instruction Manual . . . . . . . . . . . . . . . . . . . . . . . . . . . . . . . . .Page 34
Guarantee . . . . . . . . . . . . . . . . . . . . . . . . . . . . . . . . . . . . . .Page 38
Przegląd elemetów obsługi . . . . . . . . . . . . . . . . . . . . . . . . .Strona 3
PL
Instrukcja obsługi . . . . . . . . . . . . . . . . . . . . . . . . . . . . . . . .Strona 40
Gwarancja . . . . . . . . . . . . . . . . . . . . . . . . . . . . . . . . . . .Strona 45
A hasznalt elemek megtekintése . . . . . . . . . . . . . . . . . . . . .Oldal 3
H
A hasznalati utasítás . . . . . . . . . . . . . . . . . . . . . . . . . . . . . .Oldal 47
Garancia . . . . . . . . . . . . . . . . . . . . . . . . . . . . . . . . . . . . . . . .Oldal 51
Page 3
4....-05-SRC 539 CD 06.08.2002 10:21 Uhr Seite 3
17
6
13
327812
D
9
18
4
14
11
22
23
24
25
26
16151029281
5
19
20
21
27
3
Page 4
4....-05-SRC 539 CD 06.08.2002 10:21 Uhr Seite 4
D
Um das Risiko von Feuer oder einem elektrischen Schlag zu vermeiden, sollten
Sie das Gerät nicht Regen oder Feuchtigkeit aussetzen. Das Gerät nicht in
unmittelbarer Nähe von Wasser betreiben (z.B. Badezimmer, Schwimmbecken,
feuchte Keller).
Verwenden Sie das Gerät nur für den vorgesehenen Zweck.
Das Gerät ausschließlich an eine vorschriftsmäßig installierte Steckdose
anschließen. Achten Sie darauf, dass die angegebene Spannung mit der Spannung
der Steckdose übereinstimmt.
Bei Verwendung von externen Netzteilen auf die richtige Polarität und Spannung
achten, Batterien stets richtigherum einlegen.
Das Gerät so aufstellen, dass vorhandene Lüftungsöffnungen nicht verdeckt werden.
Niemals das Gehäuse des Gerätes öffnen. Durch unsachgemäße Reparaturen
können erhebliche Gefahren für den Benutzer entstehen. Bei Beschädigung des
Gerätes, insbesondere des Netzkabels, das Gerät nicht mehr in Betrieb nehmen,
sondern von einem Fachmann reparieren lassen. Netzkabel regelmäßig auf
Beschädigungen prüfen.
Ein defektes Netzkabel darf nur vom Hersteller, unserem Kundendienst oder einer
ähnlich qualifizierten Person durch ein gleichwertiges Kabel ersetzt werden, um
Gefährdungen zu vermeiden.
Benutzen Sie das Gerät längere Zeit nicht, ziehen Sie den Netzstecker aus der
Steckdose, bzw. entnehmen Sie die Batterien.
Diese Symbole können sich ggfs. auf dem Gerät befinden und sollen Sie auf folgendes hinweisen:
Diese Sicherheitsschalter sollten auf keinen Fall überbrückt oder manipuliert werden, sonst besteht die Gefahr, dass Sie sich dem Laser-Licht aussetzen.
Allgemeine Sicherheitshinweise
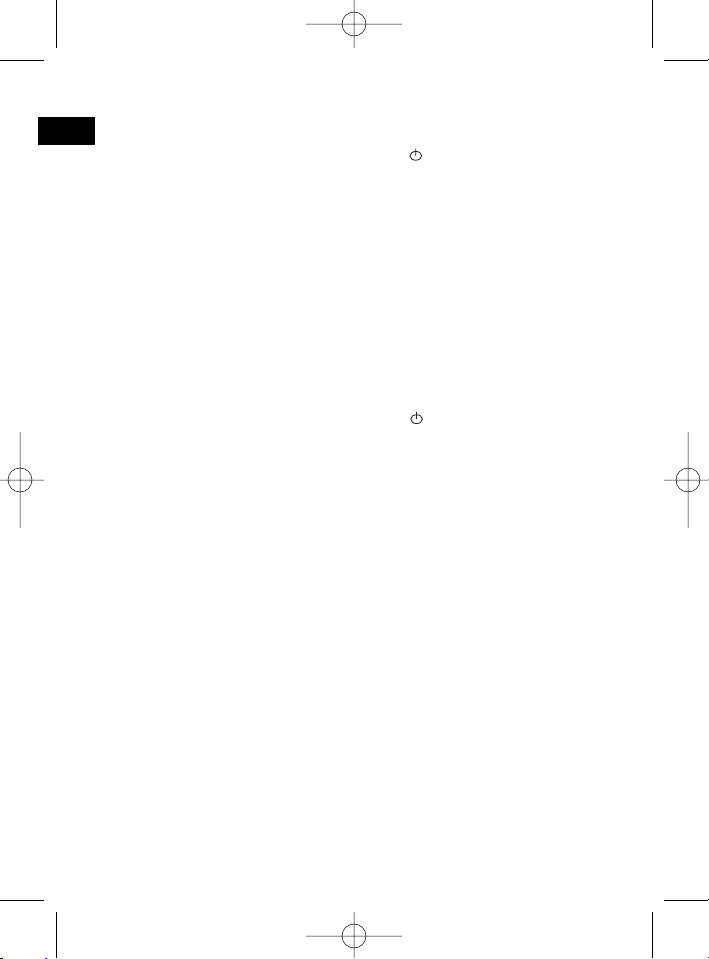
Das Blitz-Symbol soll den Benutzer auf Teile im Inneren des Gerätes hinweisen, die gefährlich hohe Spannungen führen.
Das Symbol mit Ausrufezeichen soll den Benutzer auf wichtige
Bedienungs- oder Wartungs-Hinweise in den Begleitpapieren hinweisen.
Geräte mit diesem Symbol arbeiten mit einem „Klasse 1-Laser“ zur
Abtastung der CD. Die eingebauten Sicherheitsschalter sollen verhindern,
dass der Benutzer gefährlichem, für das menschliche Auge nicht sichtbarem Laserlicht ausgesetzt wird, wenn das CD-Fach geöffnet ist.
4
Page 5
4....-05-SRC 539 CD 06.08.2002 10:21 Uhr Seite 5
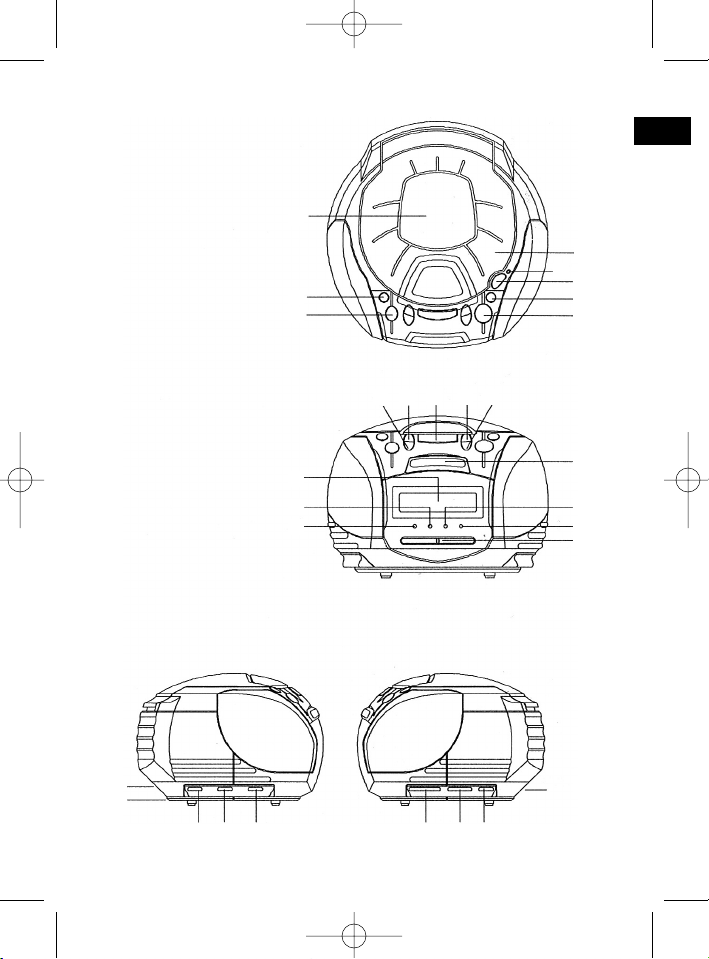
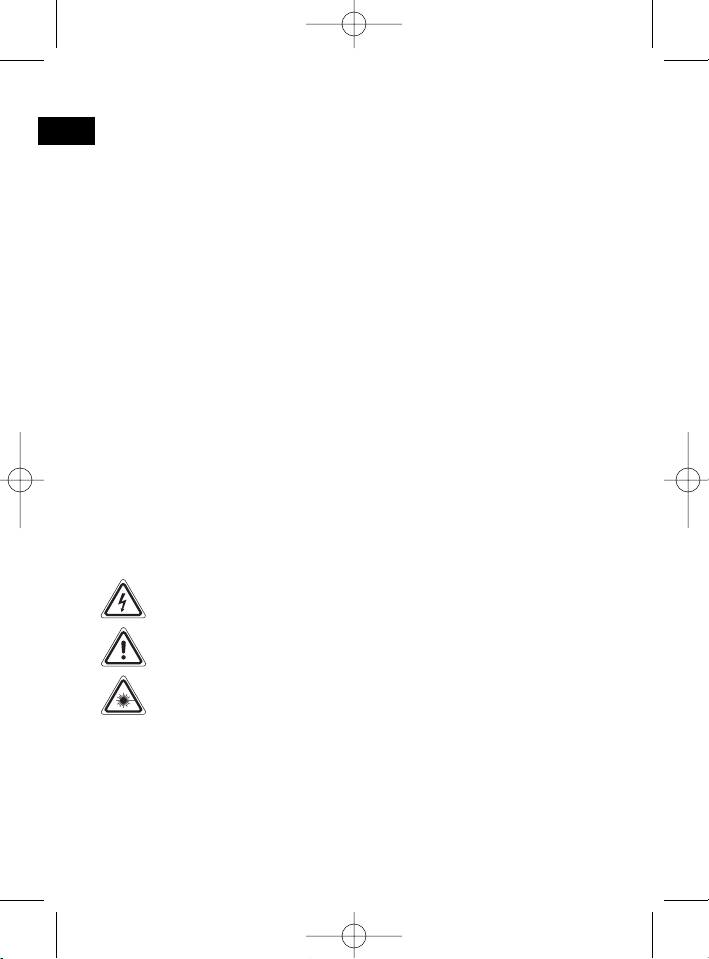
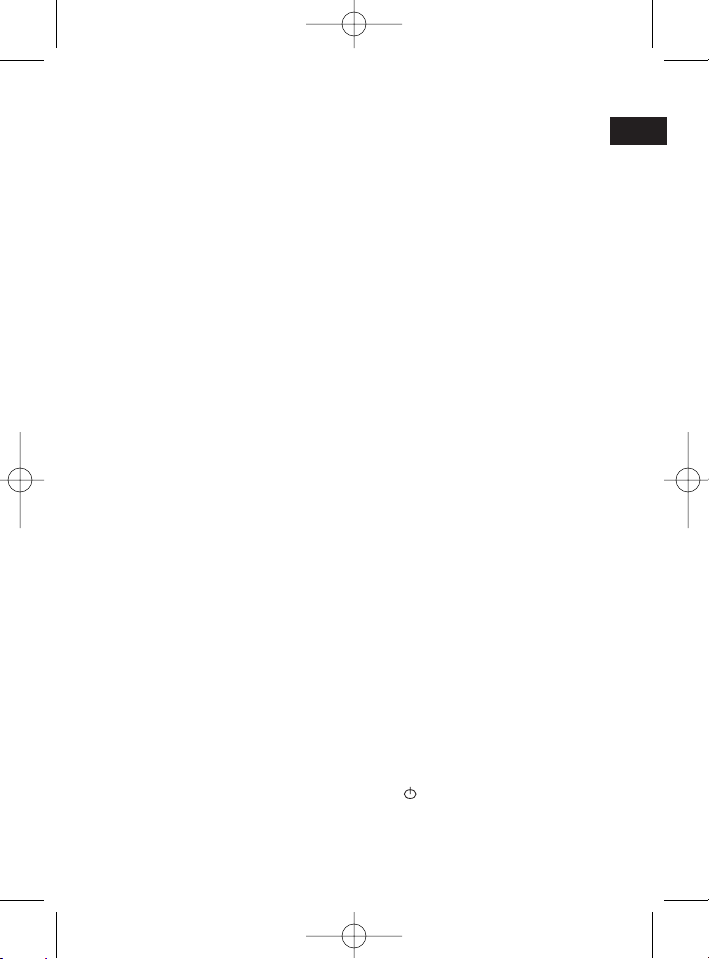
Übersicht der Bedienelemente
1. MUSIC/BUZZER-Funktionsschalter 15. VOLUME-Regler
2. Auswahltaste (CD SKIP / TIME SET) 16. Funktionswahlschalter
3. Auswahltaste 17. Deckel CD-Fach
4. POWER-Taste 18. Leuchte STANDBY / ALARM
(STANDBY/ON ALARM OFF) 19. Kontrollleuchte PROGRAM
5. SNOOZE-Taste 20. Kontrollleuchte FM STEREO
6. SLEEP-Taste 21. Frequenzskala
7. CLK ADJ-Taste 22. Display
8. CD DISPLAY-Taste 23. Kontrollleuchte REPEAT
9. CD OPEN/PUSH/CLOSE-Taste 24. Kontrollleuchte SLEEP
10. TUNING-Regler 25. Netzanschluss
11. PLAY/PAUSE-Taste 26. Kopfhöreranschluss
12. REPEAT-Taste 27. Batteriefach
13. PROG-Taste 28. Schalter ALARM 2
14. STOP-Taste 29. Schalter ALARM 1
Inbetriebnahme
Batterien zur Gangreserve einlegen
Sollte es zu einem Stromausfall kommen oder wird der Netzstecker des Gerätes
aus der Steckdose gezogen, kann das Gerät bei eingelegten Gangreservebatterien
die Einstellungen beibehalten.
• Öffnen Sie den Batteriefachdeckel auf der Rückseite.
• Legen Sie 1 Blockbatterie(n) des Typs 6 LR 61 AM6 bzw. C ein. Achten Sie auf
die richtige Polarität. Wird dass Gerät längere Zeit nicht benutzt, entnehmen Sie
bitte die Batterien, um ein "Auslaufen" zu vermeiden.
• Haben Sie ein Netzkabel angeschlossen, werden die Batterien automatisch
abgeschaltet.
Bitte geben Sie verbrauchte Batterien nicht in den Hausmüll.
Führen sie Altbatterien einer umweltgerechten Entsorgung zu.
Einstellen der Uhrzeit:
Stunden (H): CLOCK ADJ- Taste und Auswahltaste I gleichzeitig drücken.
Minuten (M): CLOCK ADJ- Taste und Auswahltaste I gleichzeitig drücken.
D
Radio-Betrieb
1. Schieben Sie den Funktionsschalter, auf der rechten Seite des Gerätes, in
Position "AM" oder "FM. ST". FM = UKW, AM = MW.
2. Drücken Sie zum Einschalten des Gerätes die -Taste.
3. Die Leuchte STANDBY/ON, ALARM/OFF leuchtet auf.
4. Stellen Sie mit dem TUNING-Regler den gewünschten Sender ein.
5
Page 6
4....-05-SRC 539 CD 06.08.2002 10:21 Uhr Seite 6
5. Mit dem VOLUME-Regler auf der rechten Seite des Gerätes, können Sie die
D
Lautstärke einstellen.
6. Um das Gerät auszuschalten, drücken Sie die -Taste.
Bei FM-Betrieb:
Um die Empfangslage zu verbessern, sollten Sie die Wurfantenne ausrichten, bzw.
einen anderen Standort für das Gerät wählen. Bei Empfang eines Stereosenders,
leuchtet unter dem Display die Kontrollleuchte (FM.ST).
Bei AM-Betrieb:
Für den AM-Betrieb ist eine entsprechende Antenne im Gerät intrigiert. Um diese
Antenne für einen besseren Empfang auszurichten, drehen Sie das Gerät in eine
andere Position oder wählen Sie einen anderen Standort aus.
CD-Betrieb
1. Schieben Sie den Funktionsschalter, auf der rechten Seite des Gerätes, zur
Position "CD".
2. Drücken Sie zum Einschalten des Gerätes die -Taste.
3. Öffnen Sie durch Drücken der PUSH/OPEN/CLOSE-Taste das CD-Fach und
legen Sie eine CD, mit der beschrifteten Seite nach oben, ein. Schließen Sie
das CD-Fach wieder.Nach einigen Sekunden liest das Gerät die CD automatisch ein.
4. Durch Drücken der CD DISPLAY-Taste, wird die Anzahl der Titel im Display
angezeigt. Nach einigen Sekunden wechselt das Display wieder zur Zeitanzeige
um!
5. Mit der PLAY/PAUSE-Taste starten Sie die Wiedergabe der CD. Alle Titel der
CD werden nacheinander wiedergegeben, danach stoppt die Wiedergabe automatisch.
6. Mit den Auswahltasten (I I) können Sie einen Titel überspringen, bzw.
zu einem Titel zurückkehren. Halten Sie eine der Tasten länger gedrückt, setzt
ein Titelsuchlauf ein. Der Titelsuchlauf wird beendet, sobald Sie die Taste wieder loslassen.
7. Um die Wiedergabe vorzeitig zu beenden, drücken Sie die STOP-Taste.
Halten Sie den CD-Deckel stets geschlossen!
PAUSE:
Drücken Sie die PLAY/PAUSE- Taste während der Wiedergabe, wird der aktuell
wiedergegebene Titel unterbrochen.
REPEAT:
1 x drücken (REPEAT-LED blinkt): Das aktuelle Lied wird ständig wiederholt.
2 x drücken (REPEAT-LED leuchtet): Die komplette CD wird ständig wiederholt.
3 x drücken: Die Funktion ist deaktiviert.
6
Page 7

4....-05-SRC 539 CD 06.08.2002 10:21 Uhr Seite 7
PROGRAM:
Lässt die Programmierung einer beliebigen Titelfolge zu.
1. Drücken Sie im Stop-Modus die PROG-Taste und wählen Sie mit den
Auswahltasten (I I) das gewünschte Lied an.
2. Drücken Sie erneut die PROG-Taste Die Anzeige im Display wechselt auf
"PR 01". Geben Sie den nächsten Titel an usw.....
3. Starten Sie den CD-Player durch Drücken der PLAY/PAUSE-Taste. Das
Programm wird wiedergegeben. Unter dem Display leuchtet die Kontrollleuchte.
Um ein Programm zu löschen, drücken Sie die STOP-Taste, danach die
PROGRAM-Taste und erneut die STOP-Taste. Die Kontrollleuchte erlischt.
Wecken
Einstellen der Weckzeit:
Sie haben die Möglichkeit bis zu zwei Weckzeiten einzustellen. Gehen Sie dazu wie
folgt vor:
• Schieben Sie den ALARM1-Schalter, auf der linken Seite des Gerätes, in
Position "ADJUST". Die Anzeige im LED-Display blinkt.
• Mit den Auswahltasten (I I) wählen Sie die gewünschte Weckzeit aus.
• Schieben Sie den ALARM1-Schalter in Position "ON". Links im LED-Display
leuchtet ein Punkt auf (ALM 1). Die erste Weckfunktion ist nun aktiv!
Falls gewünscht die zweite Weckzeit einstellen:
• Schieben Sie den ALARM2-Schalter, auf der linken Seite des Gerätes, in
Position "ADJUST". Die Anzeige im LED-Display blinkt.
• Mit den Auswahltasten (I I) wählen Sie die gewünschte Weckzeit aus.
• Schieben Sie den ALARM2-Schalter in Position "ON". Rechts im LED-Display
leuchtet ein Punkt auf (ALM 2). Die zweite Weckzeit ist nun aktiv.
Um eine oder beide Weckfunktionen auszuschalten, schieben Sie den jeweiligen
Schalter (ALARM1 oder ALARM2) in Position "OFF". Der, bzw. die Punkte im
Display erlöschen.
Wecken mit Musik oder Summer
Nachdem Sie die Weckzeit eingestellt und aktiviert haben, wählen Sie nun mit der
MUSIC/BUZZER-Funktionsschalter den Alarmmodus aus.
Mit Musik wecken:
• Schieben Sie den MUSIC/BUZZER-Funktionsschalter auf Position "MUSIC".
• Wählen Sie mit dem Funktionsschalter, an der rechten Seite des Gerätes, die
Tonquelle aus. Um mit einer eingelegten CD geweckt zu werden, schieben Sie
den Funktionsschalter in Position "CD", um mit einem eingestellten
D
7
Page 8
4....-05-SRC 539 CD 06.08.2002 10:21 Uhr Seite 8
Radiosender geweckt zu werden, schieben Sie den Funktionsschalter in
D
Position "FM.ST" oder "AM".
• Achten Sie darauf, das eine CD im CD-Fach korrekt eingelegt ist!
Mit dem Summer wecken:
Schieben Sie den MUSIC/BUZZER-Funktionsschalter auf Position "BUZZER".
Alarm beenden:
Mit der -Taste können Sie den Alarmton abschalten.
Intervall-Weckautomatik
Die automatisch eingeschaltete Weckfunktion kann durch Drücken der SNOOZETaste für ca. 6 Minuten ausgeschaltet werden.
Verzögertes Ausschalten
Durch Drücken der SLEEP-Taste schalten Sie das Gerät um die folgenden Minuten
ein:
1 X drücken der SLEEP-Taste = Es erscheint im Display "—".
2 X drücken der SLEEP-Taste = 90 Minuten
3 X drücken der SLEEP-Taste = 60 Minuten
4 X drücken der SLEEP-Taste = 30 Minuten
Nach Ablauf der eingestellten Minuten, schaltet das Gerät automatisch ab. Möchten
Sie das Gerät vor Ablauf der eingestellten Minuten abschalten, drücken Sie die Taste.
Garantie
Wir übernehmen für das von uns vertriebene Gerät eine Garantie von 24 Monaten
ab Kaufdatum (Kassenbon).
Innerhalb der Garantiezeit beseitigen wir unentgeltlich die Mängel des Gerätes oder
des Zubehörs*), die auf Material- oder Herstellungsfehler beruhen, durch Reparatur
oder, nach unserem Ermessen, durch Umtausch. Garantieleistungen bewirken
weder eine Verlängerung der Garantiefrist, noch beginnt dadurch ein Anspruch auf
eine neue Garantie!
Als Garantienachweis gilt der Kaufbeleg. Ohne diesen Nachweis kann ein kostenloser Austausch oder eine kostenlose Reparatur nicht erfolgen.
Im Garantiefall geben Sie bitte das Grundgerät in der Originalverpackung zusammen
mit dem Kassenbon an Ihren Händler.
8
Page 9

4....-05-SRC 539 CD 06.08.2002 10:21 Uhr Seite 9
*) Schäden an Zubehörteilen führen nicht automatisch zum kostenlosen Umtausch
des kompletten Gerätes. Wenden Sie sich in desem Fall bitte an unsere Hotline!
Glasbruchschäden bzw. Brüche von Kunststoffteilen sind grundsätzlich kostenpflichtig!
Sowohl Defekte an Verbrauchszubehör bzw. Verschleißteilen (z.B. Motorkohlen,
Knethaken, Antriebsriemen, Ersatzfernbedienung, Ersatzzahnbürsten, Sägeblättern
usw.), als auch Reinigung, Wartung oder der Austausch von Verschleißteilen, fallen
nicht unter die Garantie und sind deshalb kostenpflichtig!
Die Garantie erlischt bei Fremdeingriff.
Nach der Garantie
Nach Ablauf der Garantiezeit können Reparaturen kostenpflichtig vom entsprechenden Fachhandel oder Reparaturservice ausgeführt werden.
Service für unsere
Haushaltsartikel
Verschleißteile für Haushaltsartikel
(soweit diese nicht vom Fachmann
ausgewechselt werden müssen),
Ersatzkannen, Staubsaugerfilterbeutel
usw.können Sie mit Angabe des
Gerätetyps unter folgender TelefonHotline bestellen:
0 21 52 / 2006 – 888
Für technische Fragen haben wir für Sie folgende e-mail-Adresse eingerichtet:
hotline@clatronic.de
Interessieren Sie sich für weitere Clatronic-Produkte?
Besuchen Sie doch einmal unsere Homepage unter
www.clatronic.de oder www.clatronic.com
Auch Ihre Bestellungen nehmen wir gerne unter o. g. Homepage-Adresse entgegen.
Service für unsere
Unterhaltungselektronik
Verschleißteile und Ersatzteile für
unsere Unterhaltungselektronik (soweit
diese nicht vom Fachmann ausgewechselt werden müssen) wie z. B.
Fernbedienungen, Bedienteilklappen,
Lautsprecherblenden usw. können Sie
mit Angabe des Gerätetyps unter folgender Telefon-Hotline bestellen:
0 21 52 / 2006 – 666
D
9
Page 10
4....-05-SRC 539 CD 06.08.2002 10:21 Uhr Seite 10
NL
Voorkom risico’s voor brand en elektrische schokken en stel het apparaat niet bloot
aan regen of vocht. Gebruik het apparaat niet in de directe nabijheid van water
(bijv. badkamer, zwembad, vochtige kelder).
Gebruik het apparaat uitsluitend voor het daarvoor bestemde doel.
Sluit het apparaat uitsluitend aan op een correct geïnstalleerde contactdoos. Let op
dat de aangegeven spanning overeenstemt met de spanning van de contactdoos.
Let bij het gebruik van externe adapters op de juiste polariteit en spanning en
plaats batterijen altijd in de juiste richting.
Plaats het apparaat zodanig dat de aangebrachte luchtopeningen niet worden afgedekt.
Open nooit de behuizing van het apparaat. Door ondeskundige reparaties kunnen
aanzienlijke gevaren voor de gebruiker ontstaan. Neem het apparaat niet meer in
gebruik wanneer het apparaat - en in het bijzonder de kabel - beschadigingen vertoont, maar laat het eerst door een vakman repareren. Controleer de kabel regelmatig op beschadigingen.
Een defecte kabel mag alleen door de fabrikant, onze technische dienst of een
soortgelijk gekwalificeerd persoon worden vervangen. Alleen zo kunnen gevaren
vermeden worden.
Onderbreek de stroomtoevoer of verwijder de batterijen wanneer u denkt, het apparaat langere tijd niet te gebruiken.
Volgende symbolen kunnen op uw apparaat zijn aangebracht. Zij hebben de volgende betekenis:
Deze veiligheidsschakelaars mogen in geen geval overbrugd of gemanipuleerd
worden omdat u anders gevaar loopt, aan het laserlicht te worden blootgesteld.
Algemene veiligheidsinstructies
Het bliksemsymbool wijst de gebruiker op onderdelen in het inwendige
van het apparaat die gevaarlijk hoge spanning voeren.
Het symbool met het uitroepteken verwijst naar belangrijke
bedienings- en onderhoudsinstructies in de begeleidende documentatie.
Apparaten met dit symbool werken met een „klasse 1-laser„ voor de aftasting van de CD. De ingebouwde veiligheidsschakelaars moeten voorkomen dat de gebruiker wordt blootgesteld aan gevaarlijke, voor het menselijk oog onzichtbaar laserlicht wanneer het CD-vak geopend is.
10
Page 11

4....-05-SRC 539 CD 06.08.2002 10:21 Uhr Seite 11
Overzicht van de bedieningselementen
1. MUSIC/BUZZER-functietoets 15. VOLUME-regelaar
2. Keuzetoets (CD SKIP / TIME SET) 16. Functieschakelaar
3. Keuzetoets 17. Deksel van de CD-lade
4. POWER-toets 18. Lampje STANDBY / ALARM
(STANDBY/ON ALARM OFF) 19. Controlelampje PROGRAM
5. SNOOZE-toets 20. Controlelampje FM STEREO
6. SLEEP-toets 21. Frequentieschaal
7. CLK ADJ-toets 22. Display
8. CD DISPLAY-toets 23. Controlelampje REPEAT
9. CD OPEN/PUSH/CLOSE-toets 24. Controlelampje SLEEP
10. TUNING-regelaar 25. Netaansluiting
11. PLAY/PAUSE-toets 26. Aansluiting koptelefoon
12. REPEAT-toets 27. Batterijenvakje
13. PROG-toets 28. Schakelaar ALARM 2
14. STOP-toets 29. Schakelaar ALARM 1
Ingebruikname
Bufferbatterij voor de gangreserve plaatsen.
Bij geplaatste bufferbatterij blijven de apparaatinstellingen behouden indien de
stroom uitvalt of de netsteker van het apparaat uit de contactdoos getrokken wordt.
• Open het deksel van het batterijenvakje aan de achterzijde.
• Plaats 1 blokbatterij van het type 6 LR 61 AM6 of C. Let goed op de juiste polariteit. Verwijder de batterij wanneer het apparaat gedurende een langere periode
niet wordt gebruikt. Zo voorkomt u lekkage van batterijzuur.
• De batterij wordt automatisch uitgeschakeld wanneer een netkabel is aangesloten.
Verbruikte batterijen horen niet in het huisafval.
Geef oude batterijen af bij het milieupark of bij de handelaar.
De kloktijd instellen:
Uren (H): druk de CLOCK ADJ-toets en de keuzetoets I gelijktijdig in.
Minuten (M): druk de CLOCK ADJ-toets en de keuzetoets I gelijktijdig in.
NL
Radiomodus
1. Schuif de functieschakelaar aan de rechterzijde van het apparaat naar de stand
“AM” of “FM”. ST". FM = UKW, AM = MW.
2. Druk de -toets in om het apparaat in te schakelen.
3. Het lampje STANDBY/ON, ALARM/OFF brandt.
4. Stel met de TUNING-regelaar de gewenste zender in.
11
Page 12
4....-05-SRC 539 CD 06.08.2002 10:21 Uhr Seite 12
5. Met de VOLUME-regelaar aan de rechterzijde van het apparaat kunt u de
NL
geluidssterkte regelen.
6. Druk de -toets in om het apparaat uit te schakelen.
FM-modus
Richt de draadantenne om de ontvangst te verbeteren of kies een andere plaats
voor het apparaat. Bij ontvangst van een stereozender brandt het controlelampje
(FM.ST) onder het display.
AM-modus
Voor de AM-modus beschikt het apparaat over een ingebouwde antenne.
Voor een betere ontvangst draait u het apparaat naar een andere positie of kiest u
een andere plaats.
CD-modus
1. Schuif de functieschakelaar aan de rechterzijde van het apparaat naar de stand
“CD”.
2. Druk de -toets in om het apparaat in te schakelen.
3. Druk de PUSH/OPEN/CLOSE-toets om in de CD-lade te openen en plaats een
CD met het opschrift naar boven. Sluit de CD-lade weer. Na enkele seconden
leest het apparaat de CD automatisch.
4. Druk de CD DISPLAY-toets in om het aantal titels in het display op te roepen.
Enkele seconden later schakelt het display terug naar de tijdweergave!
5. Druk de PLAY/PAUSE-toets in om de weergave van de CD te starten. Alle titels
van de CD worden na elkaar afgespeeld, daarna stopt de weergave automatisch.
6. Met de keuzetoetsen (I I) kunt u een titel overslaan of naar een titel
terugschakelen. Wanneer u een van de toetsen langer ingedrukt houdt, wordt
een titelzoekfunctie geactiveerd. De titelzoekfunctie stopt zodra u de toets weer
loslaat.
7. Druk de STOP-toets in om de weergave voortijdig af te breken.
Houd de CD-lade steeds gesloten!
PAUZE:
Druk tijdens de weergave de PLAY/PAUSE-toets in om de weergave van de huidige
titel kortstondig te onderbreken.
REPEAT:
1 x indrukken (REPEAT-LED knippert): de huidige titel wordt steeds herhaald.
2 x indrukken (REPEAT-LED knippert): de complete CD wordt steeds herhaald.
3 x indrukken: de functie wordt gedeactiveerd.
12
Page 13

4....-05-SRC 539 CD 06.08.2002 10:21 Uhr Seite 13
PROGRAM:
Biedt de mogelijkheid om een willekeurige titelvolgorde te programmeren.
1. Druk de PROG-toets in de Stop-modus in en kies de gewenste titel met de keu-
zetoetsen (I I).
2. Druk de PROG-toets opnieuw in. De weergave op het display schakelt naar “PR
01”. Kies de volgende titel enz…..
3. Start de CD-speler door de PLAY/PAUSE-toets in te drukken. Het programma
wordt weergegeven. Het controlelampje onder het display brandt.
Druk de STOP-toets in, daarna de PROGRAM-toets en opnieuw de STOP-toets
om een programma te wissen. Het controlelampje dooft.
Wekken
De wektijd instellen
U hebt de mogelijkheid om twee wektijden in te stellen. Doe dit als volgt:
• Schuif de ALARM1-toets aan de linkerzijde van het apparaat naar de stand
“ADJUST”. De weergave op het LED-display knippert.
• Kies met de keuzetoetsen (I I) de gewenste wektijd.
• Schuif de ALARM1-schakelaar naar de stand “ON”. Links op het LED-display
verschijnt een punt (ALM 1). De eerste wekfunctie is nu actief!
Indien gewenst kan een tweede wektijd worden ingesteld:
• Schuif de ALARM2-toets aan de linkerzijde van het apparaat naar de stand
“ADJUST”. De weergave op het LED-display knippert.
• Kies met de keuzetoetsen (I I) de gewenste wektijd.
• Schuif de ALARM2-schakelaar naar de stand “ON”. Rechts op het LED-display
verschijnt een punt (ALM 2). De tweede wektijd is nu actief.
Schuif de desbetreffende schakelaar (ALARM 1 of ALARM 2) naar de stand “OFF”
om één of alle twee wekfuncties uit te schakelen. De punt of punten op het display
verdwijnen.
Wekken met muziek of zoemer
Nadat u de wektijd hebt ingesteld en geactiveerd, kiest u met de functieschakelaar
MUSIC/BUZZER de alarmmodus.
Wekken met muziek
• Schuif de functieschakelaar MUSIC/BUZZER naar de stand “MUSIC”.
• Kies de geluidsbron met de functieschakelaar aan de rechterzijde van het apparaat. Schuif de functieschakelaar naar de stand “CD” om door een geplaatste
CD te worden gewekt of schuif de functieschakelaar naar de stand “FM.ST” of
“AM”.
13
NL
Page 14

4....-05-SRC 539 CD 06.08.2002 10:21 Uhr Seite 14
• Let er vooral op dat de CD correct in de CD-lade is geplaatst.
NL
Wekken met de zoemer
Schuif de functieschakelaar MUSIC/BUZZER naar de stand “BUZZER”.
Alarm uitschakelen
Druk de -toets in om het alarm uit te schakelen.
Automatisch wekinterval
De automatisch ingestelde wekfunctie kan door het indrukken van de SNOOZEtoets ca. 6 minuten worden uitgeschakeld.
Inslaapfunctie
Druk de SLEEP-toets in om de volgende tijden in te stellen:
1 x indrukken van de SLEEP-toets = op het display verschijnt “—”.
2 x indrukken van de SLEEP-toets = 90 minuten
3 x indrukken van de SLEEP-toets = 60 minuten
4 x indrukken van de SLEEP-toets = 30 minuten
Na afloop van de ingestelde tijd schakelt het apparaat automatisch uit. Druk de toets in om het apparaat vóór afloop van de ingestelde minuten uit te schakelen.
Dit apparaat is gekeurd conform de op dit moment van toepassing zijnde CErichtlijnen zoals bijvoorbeeld elektromagnetische compatibiliteit en laagspanningsvoorschriften en is geconstrueerd volgens de nieuwste veiligheidstechnische voorschriften.
Technische wijzigingen voorbehouden!
Garantie
Voor het door ons geleverde apparaat verlenen wij een garantie van 24 maanden
vanaf koopdatum (kassabon).
Eventuele gebreken aan het apparaat of aan het toebehoren*) die zijn ontstaan
door productie- of materiaalfouten verhelpen wij binnen deze periode kosteloos
door middel van reparatie of, naar ons oordeel, door vervanging. Eventuele garantiegevallen verlengen noch de geldigheidsduur van de garantie, noch begint daardoor een nieuwe garantieperiode!
Het koopbewijs geldt als garantiebewijs. Zonder dit bewijs kan geen kosteloze
reparatie of vervanging plaatsvinden.
Geef in geval van garantie het apparaat met de kassabon en in de originele verpakking af bij uw handelaar.
14
Page 15

4....-05-SRC 539 CD 06.08.2002 10:21 Uhr Seite 15
*) Schade aan onderdelen leidt niet automatisch tot kosteloze vervanging van het
complete apparaat. Neem in dit geval contact op met onze hotline! De reparatie van
glasbreuk of breuk van kunststofonderdelen wordt altijd berekend!
Niet defecten aan de hulpstukken of aan de slijtende onderdelen (bijv. koolborstels,
deeghaken, drijfriemen, reserveafstandsbediening, reservetandenborstels, zaagbladen enz.), maar ook reiniging, onderhoud of de vervanging van slijtende delen
vallen niet onder de garantie en geschieden altijd tegen berekening!
Bij ingrepen door derden komt de garantieverlening te vervallen.
Na de garantieperiode
Na afloop van de garantieperiode kunnen reparaties tegen berekening worden uitgevoerd door de betreffende vakhandelaar of de technische dienst.
NL
15
Page 16
4....-05-SRC 539 CD 06.08.2002 10:21 Uhr Seite 16
F
Pour éviter tout risque d’incendie ou d’électrocution ne mettez en aucun cas votre
appareil en contact avec la pluie ou de l’humidité. Ne laissez jamais fonctionner
votre appareil à proximité d’eau (par ex. salle de bains, bassin de piscine, cave
humide).
N’utilisez l’appareil qu’aux fins auxquelles il est destiné.
Ne branchez l’appareil que dans une prise de courant en bon état de fonctionne-
ment. Veillez à ce que la tension électrique de l’appareil corresponde à celle indiquée sur la prise de courant.
Si vous utilisez une alimentation électrique externe, vérifiez la polarité et la tension
électrique. Placez toujours correctement les piles.
Installez toujours l’appareil de façon à ce que les ouvertures de ventilation ne
soient pas obstruées.
N’ouvrez jamais le bloc moteur de l’appareil. Des réparations mal appropriées peuvent entraîner des risques importants pour l’utilisateur. En cas d’endommagement
de l’appareil, en particulier du câble d’alimentation, ne mettez plus l’appareil en
marche et laissez un spécialiste se charger de la réparation. Contrôlez régulièrement le bon état du câble d’alimentation.
Pour éviter tout risque, seul le fabricant, son service après-vente ou un spécialiste
à qualification similaire sont aptes à remplacer un câble défectueux par un câble
équivalent.
Si l’appareil n’est pas utiliser pendant assez longtemps, débranchez le câble d’alimentation ou retirez les piles.
Vous pouvez éventuellement trouver ces symboles sur l’appareil, qui ont la signification suivante:
L’éclair indique à l’utilisateur les pièces dangereuses, situées à l’intérieur
de l’appareil, qui conduisent de hautes tensions.
Le point d’exclamation attire l’attention de l’utilisateur sur les remarques
importantes d’utilisation et d’entretien données dans les documents de
l’appareil.
Les appareils dotés de ce symbole fonctionnent avec un „laser de la classe 1“ pour la lecture des disques CD. Les boutons de sécurité intégrés
sont chargés d’éviter qu’à l’ouverture du compartiment à CD l’utilisateur
entre en contact avec la lumière laser qui est dangereuse et invisible à
l’oeil humain.
Il est absolument interdit de court-circuiter ou manipuler ces boutons de sécurité,
ce qui risquerait sinon de mettre l’utilisateur en contact avec la lumière laser.
Conseils de sécurité
16
Page 17

4....-05-SRC 539 CD 06.08.2002 10:21 Uhr Seite 17
Liste des différents éléments de commande
1. Sélecteur de fonctions 15. Régulateur du VOLUME
MUSIC/BUZZER 16. Sélecteur de fonctions
2. Sélecteur (CD SKIP / TIME SET) 17. Compartiment à couvercle CD
3. Sélecteur 18. Lampes témoin STANDBY/ALARM
4. Touche POWER 19. Lampe témoin PROGRAM
(STANDBY/ON ALARM OFF) 20. Lampe témoin FM STEREO
5. Touche SNOOZE 21. Bande de fréquence
6. Touche SLEEP 22. Affichage
7. Touche CLK ADJ 23. Lampe témoin REPEAT
8. Touche CD DISPLAY 24. Lampe témoin SLEEP
9. Touche CD OPEN/PUSH/CLOSE 25. Raccordement électrique
10. Régulateur TUNING 26. Raccordement casque
11. Touche PLAY/PAUSE 27. Compartiment à piles
12. Touche REPEAT 28. Interrupteur ALARM 2
13. Touche PROG. 29. Interrupteur ALARM 1
14. Touche STOP
Avant la première utilisation
Installez les piles relais dans l’appareil.
En cas de panne de courant ou au cas où le câble d’alimentation de l’appareil
serait débranché, grâce aux piles relais l’appareil conserve les réglages effectués.
• Ouvrez le compartiment à piles situé à l’arrière.
• Installez 1 pile(s) monobloc de type 6 LR 61 AM6 ou C.Veillez à respecter la
polarité. Si l’appareil ne doit pas être utilisé pendant une période prolongée,
retirez les piles pour éviter qu’elles “coulent”.
• Si vous branchez le câble d’alimentation, les piles sont automatiquement sans
tension.
Vous êtes priés de ne pas jeter vos piles avec les ordures ménagères.
Veillez à vous débarrasser de vos piles de façon écologique.
Programmation de l’heure:
Heures (H): enfoncez simultanément la touche CLOCK ADJ et le sélecteur I.
Minutes (M): enfoncez simultanément la touche CLOCK ADJ et le sélecteur I.
F
Fonction radio
1. Réglez le sélecteur de fonctions situé sur le côté droit de l’appareil sur la position “AM” ou “FM.ST”.FM = UKW, AM = MW.
2. Pour mettre l’appareil en marche, enfoncez la touche .
3. Les lampes témoin STANDBY/ON et ALARM/OFF s’allument.
4. Sélectionnez l’émetteur désiré grâce au régulateur TUNING.
17
Page 18

4....-05-SRC 539 CD 06.08.2002 10:21 Uhr Seite 18
5. Vous pouvez réglez l’intensité du son à l’aide du régulateur de VOLUME situé
F
sur le côté droit de l’appareil.
6. Pour arrêter l’appareil, enfoncez la touche .
Fonctionnement FM:
Pour améliorer la qualité de réception, changez l’orientation de l’antenne ou changez votre appareil d’emplacement. Pour la réception d’un émetteur en stéréo, la
lampe témoin (FM.ST) s’éclaire sur l’affichage.
Fonctionnement AM:
Une antenne spécifique est intégrée à l’appareil pour le fonctionnement AM. Pour
changer l’orientation de cette antenne, en vue d’une meilleure réception, tournez
l’appareil vers une autre direction ou changez-le d’emplacement.
Fonctionnement CD:
1. Enfoncez le sélecteur de fonctions situé sur le côté droit de l’appareil sur la
position “CD”.
2. Enfoncez la touche pour mettre l’appareil en marche.
3. Ouvrez le compartiment à CD en enfonçant la touche PUSH/OPEN/CLOSE et
placez un disque à l’intérieur, en orientant la face illustrée vers le haut.
Refermez le compartiment. L’appareil se met après quelques secondes automatiquement à identifier le disque.
4. En appuyant sur la touche CD DISPLAY, le nombre de titres apparaît sur l’affichage. Après quelques secondes, l’écran passe à nouveau à l’affichage de
l’heure!
5. Pour commencer la lecture du disque, enfoncez la touche PLAY/PAUSE. Tous
les titres du disque sont lus les uns après les autres. La lecture s’arrête automatiquement après le dernier titre.
6. Pour changer rapidement de titre, vers l’avant ou l’arrière, utilisez les sélecteurs
(I I). Si vous maintenez une de deux touches enfoncée plus longtemps,
la recherche automatique démarre. Cette recherche s’arrête dès que vous
lâchez la touche.
7. Pour interrompre la lecture, enfoncez la touche STOP.
Maintenez le couvercle du compartiment à CD toujours fermé!
PAUSE:
Si vous enfoncez la touche PLAY/PAUSE pendant la lecture, le titre en cours est
aussitôt interrompu.
REPEAT:
1 pulsion (REPEAT-LED clignote): le titre en cours sera sans cesse répété.
2 pulsions (REPEAT-LED s’éclaire): le disque complet sera sans cesse répété.
18
Page 19

4....-05-SRC 539 CD 06.08.2002 10:21 Uhr Seite 19
3 pulsions: la fonction est désactivée.
PROGRAM:
Permet une programmation des titres dans l’ordre souhaité.
1. Enfoncez la touche PROG en mode Stop puis choisissez, à l’aide des sélec-
teurs (I I) le titre souhaité.
2. Enfoncez à nouveau la touche PROG. L’affichage passe à “PR 01”. Choisissez
alors le titre suivant et ainsi de suite ...
3. Mettez le lecteur de CD en marche à l’aide de la touche PLAY/PAUSE. La programmation sera restituée. La lampe témoin située sous l’affichage s’éclaire.
Pour effacer une programmation, enfoncez la touche STOP puis la touche PROGRAM et enfin à nouveau la touche STOP. La lampe témoin s’éteint.
Réveil
Programmation de l’heure de réveil:
Vous avez la possibilité de programmer jusqu’à deux heures de réveil. Procédez
pour cela de la façon suivante:
• Déplacez l’interrupteur ALARM 1, situé sur le côté gauche de l’appareil, sur la
position “ADJUST”. L’indication sur l’écran lumineux clignote.
• Programmez l’heure de réveil désirée à l’aide des sélecteurs (I I).
• Déplacez l’interrupteur ALARM 1 sur la position “ON”. Un point (ALM 1) s’éclaire sur la gauche de l’écran. La première fonction réveil est maintenant activée!
Pour programmer la deuxième heure de réveil, si désiré:
• Déplacez l’interrupteur ALARM 2, situé sur le côté gauche de l’appareil, sur la
position “ADJUST”. L’indication sur l’écran lumineux clignote.
• Programmez l’heure de réveil désirée à l’aide des sélecteurs (I I).
• Déplacez l’interrupteur ALARM 2 sur la position “ON”. Un point (ALM 2) s’éclaire sur
• La droite de l’écran. La deuxième fonction réveil est maintenant activée.
Pour désactiver une ou les deux fonctions réveil, déplacez l’interrupteur concerné
(ALARM1 ou ALARM 2) sur la position “OFF”. Le ou les point(s) disparaissent de
l’écran.
Réveil en musique ou avec signal sonore
Après avoir réglé puis activé l’heure de réveil, vous pouvez maintenant choisir le
mode d’alarme à l’aide du sélecteur de fonctions MUSIC/BUZZER.
F
19
Page 20

4....-05-SRC 539 CD 06.08.2002 10:21 Uhr Seite 20
Réveil en musique:
F
• Déplacez le sélecteur de fonctions MUSIC/BUZZER sur la position “MUSIC”.
• Choisissez la source sonore à l’aide du sélecteur de fonctions situé sur le côté
droit de l’appareil. Pour vous faire réveiller par un disque que vous avez placé
dans le lecteur, il vous suffit de placer le sélecteur de fonctions sur la position
“CD”. vous faire réveiller par une station de radio que vous avez réglée, il vous
suffit de placer le sélecteur de fonctions sur la position “FM.ST” ou “AM”.
• Veillez à ce que le disque soit correctement placé dans le lecteur!
Réveil avec signal sonore:
Déplacez le sélecteur de fonctions MUSIC/BUZZER sur la position “BUZZER”.
Fin de l’alarme:
Pour arrêter le signal sonore, enfoncez la touche .
Réveil automatique à intervalles
En appuyant sur la touche SNOOZE, la fonction réveil automatique peut être
arrêtée pour env.6 minutes.
Arrêt différé
En appuyant sur la touche SLEEP, l’appareil continue à fonctionner pendant le
nombre de minutes suivant:
1 pulsion de la touche SLEEP = “—“ apparaît sur l’écran.
2 pulsions de la touche SLEEP = 90 minutes
3 pulsions de la touche SLEEP = 60 minutes
4 pulsions de la touche SLEEP = 30 minutes
L’appareil s’arrête automatiquement à la fin du temps programmé. Pour arrêter l’appareil avant la fin du temps programmé, enfoncez la touche .
Cet appareil a été contrôlé d’après toutes les directives européennes actuelles
applicables, comme par exemple concernant la compatibilité électromagnétique et
la basse tension. Cet appareil a été fabriqué en respect des réglementations techniques de sécurité les plus récentes.
Sous réserve de modifications techniques.
Garantie
Nous accordons une garantie de 24 mois à dater de la date d’achat (ticket de
caisse) pour l’appareil que nous vendons.
Pendant la durée de la garantie, nous éliminons gratuitement les défauts de l’appareil ou des accessoires *) découlant d’un vice de matériau ou de fabrication au
20
Page 21

4....-05-SRC 539 CD 06.08.2002 10:21 Uhr Seite 21
moyen d’une réparation ou, selon notre estimation, au moyen d’un remplacement.
Les prestations dans le cadre de la garantie n’entraînent aucune prorogation de la
durée de garantie et ne donnent pas droit à une nouvelle garantie !
Le justificatif de garantie est le reçu. Sans ce justificatif, aucun remplacement
gratuit ni aucune réparation gratuite ne peuvent être effectués.
En cas de recours à la garantie, rapportez l’appareil dans son emballage d’origine
accompagné du ticket de caisse à votre revendeur.
*) Les endommagements de pièces d’accessoires ne justifient pas automatiquement l’échange gratuit de l’appareil complet. Contactez alors notre centrale téléphonique! La casse de pièces en verre ou en plastique est dans tous les cas à votre
charge!
Les défauts sur les accessoires ou les pièces d’usure (p.ex. les charbons de
moteurs, crochets, courroies d’entraînement, télécommande de rechange, brosses
à dents de rechange, lames de scies etc.) ainsi que le nettoyage, l’entretien ou le
remplacement de pièces d’usure ne sont pas garantis et sont donc payants !
En cas d’intervention étrangère, la garantie devient caduque.
Après la garantie
Après écoulement de la durée de garantie, les réparations peuvent être effectuées,
contre paiement, par le commerce spécialisé ou le service de réparation.
F
21
Page 22

4....-05-SRC 539 CD 06.08.2002 10:21 Uhr Seite 22
E
Indicaciones generales para su seguridad
Vd. no debe dejar expuesto el aparato ni a la lluvia ni a la humedad, a fin de disminuir así el riesgo de incendio o de sacudida eléctrica.
Por tanto, no debe utilizar el aparato cerca de agua – por ejemplo, cerca de la
bañera, de una piscina o de un sótano húmedo.
Utilice el aparato únicamente para la finalidad para la que ha sido construido.
El aparato se ha de conectar únicamente a una caja de toma de corriente instalada
reglamentariamente. Cerciórese de que la tensión indicada concuerda con la tensión de la caja de enchufe.
Preste atención a que sea correcta la polaridad cuando se empleen fuentes de alimentación externas. Las pilas se han de introducir siempre correctamente.
El aparato se ha de dejar puesto de modo que no se tapen los orificios de aireación existentes.
Jamás se abrirá la carcasa del cuerpo del aparato. Las reparaciones mal hechas
pueden generar considerables peligros para el usuario.
En caso de estar deteriorado el aparato, en especial el cable de conectar a red, ya
no se ha de poner más en servicio el aparato, sino que se hará que lo repare un
especialista. Controle periódicamente el cable de conexión a red para ver si se ha
deteriorado.
Sólo el fabricante, nuestro servicio posventa o un técnico con una cualificación
similar pueden cambiar un cable defectuoso por otro similar, para evitar todo tipo
de riesgo.
Saque de la toma de corriente la clavija de conectar a la red o bien quite las pilas
cuando no se vaya a usar el aparato durante largo tiempo.
Estos símbolos pueden encontrarse en caso dado en el aparato, y son para indicar
lo siguiente:
El símbolo del rayo advierte al usuario que hay componentes internos del
aparato que pueden tener tensiones peligrosamente altas.
El símbolo con el signo de exclamación advierte al usuario que hay
instrucciones de manejo y de mantenimiento importantes en la documentación que va adjunta.
Aparatos que llevan puesto este símbolo operan con un ”Lector Clase 1”
para explorar el CD. Los interruptores de seguridad incorporados sirven
para impedir que el usuario esté expuesto a luz láser invisible peligrosa
para la vista del usuario cuando está abierto el compartimiento del CD.
Bajo ningún concepto se ha de hacer un puenteado sobre estos interruptores de
seguridad ni deben ser manipulados. De hacerlo, existe el peligro de que Vd. esté
expuesto a la luz láser.
22
Page 23

4....-05-SRC 539 CD 06.08.2002 10:21 Uhr Seite 23
Vista general de los elementos de mando
1. Selector de función MUSIC/BUZZER 15. Regulador-VOLUME
2. Tecla de selección 16. Selector de funciones
(CD SKIP / TIME SET) 17. Tapadera portadisco
3. Tecla de selección 18. Lámpara STANDBY / ALARM
4. Tecla-POWER 19. Lámpara de control PROGRAM
(STANDBY/ON ALARM OFF) 20. Lámpara de control FM STEREO
5. Tecla-SNOOZE 21. Escala de frecuencias
6. Tecla-SLEEP 22. Visualizador
7. Tecla-CLK ADJ 23. Lámpara de control REPEAT
8. Tecla-CD DISPLAY 24. Lámpara de control SLEEP
9. Tecla-CD OPEN/PUSH/CLOSE 25. Conexión a la red
10. Regulador-TUNING 26. Toma para auriculares
11. Tecla-PLAY/PAUSE 27. Cámara para baterías
12. Tecla-REPEAT 28. Interruptor ALARM 2
13. Tecla-PROG 29. Interruptor ALARM 1
14. Tecla-STOP
Puesta en servicio
Introducir baterías para la reserva de cuerda
En caso de que haya un corte de corriente o se saque la clavija del aparato de la
caja de enchufe, sigue manteniendo el aparato sus ajustaciones por haber introducido baterías para la reserva de cuerda.
• Abra la tapadera de la cámara para baterías que se encuentra en el lado
posterior.
• Coloque una batería monobloque del tipo 6 LR 61 AM6 o C.Tenga atención
con la polaridad correcta. En caso de que no utilice el aparato durante un periodo largo de tiempo, retire las baterías para evitar un “derrame”.
• Si ha conectado el cable de la red, las baterías se desconectarán de forma
automática.
Por favor no tire las baterías viejas a los desechos caseros, sino a una eliminación
ecológica de residuos.
Ajuste del horario
Horas (H): Presione la tecla-CLOCK ADJ y la tecla de selección I al mismo
tiempo.
Minutos (M): Presione la tecla-CLOCK ADJ y la tecla de selección I al mismo
tiempo
E
23
Page 24

4....-05-SRC 539 CD 06.08.2002 10:21 Uhr Seite 24
E
1. Empuje el selector de funciones que se encuentra en la parte derecha del aparato en posición "AM" o "FM. ST". FM=ondas ultracortas, AM=ondas medias
2. Para conectar el aparato, presione la tecla- .
3. Se ilumina la lámpara STANDBY/ON, ALARM/OFF.
4. Ajuste el emisor deseado con el regulador-TUNING.
5. Con el regulador de volumen a mano derecha, puede regular el volumen.
6. Para desconectar el aparato, presione la tecla- .
En funcionamiento de ondas ultracortas
Para mejorar la situación de recepción, debería orientar la antena de cable o elegir
una ubicación nueva para el aparato. Al recibir un emisor estereo, se ilumina la
lámpara de control (FM.ST) que se encuentra debajo del visualizador.
En funcionamiento de ondas medias
Para el funcionamiento de ondas medias hay una antena correspondiente integrada en el aparato. Para orientar esta antena y mejorar la recepción, debe girar el
aparato en otra posición o elegir una ubicación adecuada.
Funcionamiento de radio
Funcionamiento de CD
1. Empuje el interruptor de función que está en la parte derecha del aparato en
posición "CD".
2. Para conectar el aparato, presione la tecla- .
3. Abra el portadisco presionando la tecla-PUSH/OPEN/CLOSE y coloque un CD,
con la cara rotulada hacia arriba. Después de unos segundos el aparato lee el
CD de forma automática.
4. Presionando la tecla CD DISPLAY, aparecerá el número de títulos en el visualizador. ¡Después de unos segundos aparecerá en el visualizador de nuevo el
horario!
5. Con la tecla-PLAY/PAUSE inicia la reproducción del CD.
Todos los títulos se reproducerán de forma sucesiva, después se para la reproducción de forma automática.
6. Con las teclas de selección (I I) puede saltarse un título o regresar a
uno reproducido. Si presiona una de las teclas un poco más, se inicia la búsqueda de un título. La búsqueda de un título se finaliza, en cuanto haya soltado
la tecla.
7. Para parar la reproducción antes de tiempo, presione la tecla-STOP.
¡Mantenga la tapadera del portadisco siempre cerrada!
PAUSE:
Si presiona la tecla PLAY/PAUSE durante la reproducción, se interrumpe el título
actualmente reproducido.
24
Page 25

4....-05-SRC 539 CD 06.08.2002 10:21 Uhr Seite 25
REPEAT:
1 x presionar (parpadea el LED-REPEAT): El título actual se repite continuamente.
2 x presionar (se ilumina el LED-REPEAT):El CD completo se repite continuamente.
3 x presionar: La función está desactivada.
PROGRAM:
Permite la programación de una sucesión de títulos discrecional.
1. Presione en el modo Stop la tecla PROG y elija con las teclas selectoras
(I I) el título deseado.
2. Presione de nuevo la tecla PROG. La indicación en el visualizador cambia a
"PR 01". Introduzca el siguiente título. Etc… Puede programar hasta 20 títulos.
3. Conecte el reproductor de CD presionando la tecla PLAY/PAUSE. El programa
se reproduce. Debajo del visualizador se ilumina la lámpara de control.
Para borrar un programa, presione la tecla-STOP, después la tecla-PROGRAM y
de nuevo la tecla-STOP. La lámpara de control se apaga.
Despertar
Ajustación del horario de despertar
Tiene la posibilidad de ajustar dos horarios para ser despertado. Para ello proceda
de siguiente manera:
• Empuje el interruptor-ALARM1, que está en la parte izquierda del aparato, en
posición "ADJUST". La indicación en el visualizador LED parpadea.
• Con las teclas de selección (I I) elige el tiempo de despertar deseado.
• Empuje el interruptor-ALARM1 en posición "ON". A la izquierda en el visualizador-LED se ilumina un punto (ALM1). ¡Ahora está la primera función de despertar activada!
En caso de que sea deseado, se puede ajustar el segundo horario de despertar:
• Empuje el interruptor-ALARM2, que está en la parte izquierda del aparato, en
posición "ADJUST ". La indicación en el visualizador LED parpadea.
• Con las teclas de selección (I I) elige el tiempo de despertar deseado.
• Empuje el interruptor-ALARM2 en posición "ON". A la derecha en el visualizador-LED se ilumina un punto (ALM2). ¡Ahora está la segunda función de despertar activada!
Para desconectar una de las dos funciones de despertar, empuje el interruptor correspondiente (ALARM1 o ALARM2) en posición "OFF". ¡El o los puntos se apagan
en el visualizador!
E
25
Page 26

4....-05-SRC 539 CD 06.08.2002 10:21 Uhr Seite 26
Despertar con música o zumbido
E
Después de haber ajustado y activado el horario de llamada, elija ahora con el selector de función MUSIC/BUZZER el modo de alarma.
Despertar con música:
• Empuje el selector de función MUSIC/BUZZER a la posición “MUSIC”.
• Elija la fuente de sonido con el selector de funciones a mano derecha del aparato. Para ser despertado con un CD, empuje el selector de función a la posición “CD”, para ser despertado con una emisora de radio regulada, empuje el
selector de función a la posición “FM.ST” o “AM”.
• ¡Tenga atención que el CD esté correctamente introducido en el portadisco!
Despertar con el zumbido:
Empuje el selector de función MUSIC/BUZZER a la posición “BUZZER”.
Finalizar el alarma:
Con la tecla puede desconectar el tono de alarma.
Automática de despertar en intervalos
La función de despertar automática y activada, se puede desactivar por unos
6 minutos presionando la tecla-SNOOZE.
Desconexión retardada
Presionando la tecla-SLEEP, activa el aparato por los minutos siguientes:
1 x presionar la tecla-SLEEP = En el visualizador aparecerá "—".
2 x presionar la tecla-SLEEP = 90 minutos
3 x presionar la tecla-SLEEP = 60 minutos
4 x presionar la tecla-SLEEP = 30 minutos
Después del transcurso del tiempo ajustado, se desconecta de forma automática el
aparato. En caso de que quiera desconectar el aparato antes de haberse transcurrido los minutos ajustados, presione la tecla- .
Este aparato se ha examinado según las normativas actuales y vigentes de la
Comunidad Europea, como p.ej. compatibilidad electromagnética y directiva de
baja tensión y se ha construido según las más nuevas especificaciones en razón
de la seguridad.
No reservamos el derecho de efectuar modificaciones técnicas.
26
Page 27

4....-05-SRC 539 CD 06.08.2002 10:21 Uhr Seite 27
Garantía
Para el aparato comercializado por nosotros nos responsabilizamos con una
garantía de 24 meses a partir de la fecha de compra (factura de compra).
Durante el período de garantía nos encargamos gratuítamente de los defectos del
aparato y de los accesorios*), que se hayan originado por defectos del material o
de la fabricación. Dependiendo de nuestra estimación se realizará una reparación
o un cambio. ¡Los servicios de garantía no prolangan la garantía, ni se incia por
ello un período nuevo de garantía!
Como comprobante para la garantía es válido la factura de compra. Sin este comprobante no se podrá realizar un cambio o una reparación gratuíta.
En el caso de garantía lleve el aparato base en el embalaje original y la factura de
compra a su concesionario.
*) Defectos en los accesorios de uso o en las piezas de desgaste (p.ej. escobillas
de carbón del motor, varillas amasadoras, correas de transmisión, mando a
distancia de repuesto, cepillos de dientes de repuesto, hojas de sierra etc.), como
también la limpieza, mantenimiento o el recambio de piezas de desgaste no recaen en la garantía e irán al cargo del cliente!
En caso de intervención ajena se expira la garantía.
Después de la garantía
Después de haber expirado la garantía se pueden realizar las reparaciones por el
concesionario o por el servicio de reparaciones. Los gastos irán al cargo del cliente.
E
27
Page 28
4....-05-SRC 539 CD 06.08.2002 10:21 Uhr Seite 28
I
Per evitare il rischio di incendio o di scosse, non si deve mai tenere l’apparecchio
sotto la pioggia o in ambienti umidi. Quindi non usare l’apparecchio nelle immediate
vicinanze di acqua, per esempio in prossimità di una vasca, di una piscina o in una
cantina umida.
Utilizzare l’apparecchio solo per l’uso previsto.
Collegare l’apparecchio esclusivamente ad una presa installata a norma. Fare
attenzione a che la tensione indicata corrisponda alla tensione della presa. Se si
impiegano alimentatori esterni, fare attenzione all’esattezza di polarità e di tensione, inserire le batterie sempre correttamente.
Collocare l’apparecchio in modo che le aperture per l’aerazione esistenti non vengano coperte.
Non togliere mai la protezione dell’apparecchio. Riparazioni non a regola d’arte
possono causare notevoli pericoli per l’utente. Se l’apparecchio presenta danni,
soprattutto nella zona del cavo di collegamento, non metterlo più in funzione, ma
farlo riparare prima da un esperto. Esaminare regolarmente il cavo di collegamento
alla rete per verificare che non ci siano danni.
Un cavo di collegamento difettoso può essere sostituito con un cavo equivalente
solo dal produttore, dal nostro servizio assistenza o da persone similmente qualificate, al fine di evitare pericoli.
Se l’apparecchio non viene usato per un periodo di tempo prolungato, togliere il
blocchetto alimentatore dalla presa ovvero estrarre le batterie.
Questi simboli possono trovarsi eventualmente sull’apparecchio e rimandano ai
seguenti elementi:
Questi interruttori di sicurezza non devono mai essere cavallottati né manipolati
perché altrimenti sussiste il rischio di esposizione alla luce del laser.
Avvertenze generali per la sicurezza
Il simbolo del lampo fa presente all’utente la presenza di pezzi all’interno
dell’apparecchio che possono produrre alte tensioni pericolose.
Il simbolo con il punto esclamativo fa presente all’utente la presenza di
importanti avvertenze per l’uso e la manutenzione nei fogli di accompagnamento dell’apparecchio.
Gli apparecchi dotati di questo simbolo lavorano con un „Laser classe 1“
per riprodurre i CD. Gli interruttori di sicurezza integrati hanno lo scopo di
impedire che l’utente venga esposto alla luce non visibile del laser, pericolosa per l’occhio umano, aprendo lo scomparto per i CD.
28
Page 29

4....-05-SRC 539 CD 06.08.2002 10:21 Uhr Seite 29
Schema degli elementi di comando
1. Selettore funzioni MUSIC/BUZZER 15. Manopola di regolazione VOLUME
2. Tasto di selezione 16. Selettore funzioni
(CD SKIP / TIME SET) 17. Coperchio vano CD
3. Tasto di selezione 18. Indicatore luminoso
4. Tasto POWER STANDBY / ALARM
(STANDBY/ON ALARM OFF) 19. Indicatore luminoso PROGRAM
5. Tasto SNOOZE 20. Indicatore luminoso FM STEREO
6. Tasto SLEEP 21. Scala frequenza
7. Tasto CLK ADJ 22. Display
8. Tasto DISPLAY CD 23. Indicatore luminoso REPEAT
9. Tasto CD OPEN/PUSH/CLOSE 24. Indicatore luminoso SLEEP
10. Manopola di regolazione TUNING 25. Collegamento rete
11. Tasto PLAY/PAUSE 26. Collegamento cuffie
12. Tasto REPEAT 27. Vano batterie
13. Tasto PROG 28. Interruttore ALARM 2
14. Tasto STOP 29. Interruttore ALARM 1
Messa in funzione
Inserimento delle batterie di riserva
Nel caso manchi la corrente o se si stacca la spina di collegamento alla rete elettrica, l'apparecchio può conservare le impostazioni regolate grazie alle batterie di
riserva inserite.
• Aprire il coperchio del vano batterie sulla parte posteriore.
• Aprire il vano batterie sul retro. Inserire un blocco batteria(e) tipo 6 LR 61 AM6
o C. Fare attenzione che i poli siano inseriti correttamente. Se l’apparecchio non
viene utilizzato per un periodo di tempo prolungato, togliere le batterie per evitare l’ossidazione.
• Dopo il collegamento alla rete tramite cavo, le batterie si spengono automaticamente.
Non gettare le batterie usate nei rifiuti domestici, portatele in un centro di raccolta
rifiuti per lo smaltimento corretto.
Impostare l'ora:
Ora (H): premere contemporaneamente il tasto CLOCK ADJ e il tasto di selezione
I.
Minuti(M): premere contemporaneamente il tasto CLOCK ADJ e il tasto di selezione
I.
I
29
Page 30

4....-05-SRC 539 CD 06.08.2002 10:21 Uhr Seite 30
I
1. Spingere il selettore funzione sul lato destro dell'apparecchio nella posizione
"AM" o "FM. ST". FM = UKW, AM = MW.
2. Per accendere l'apparecchio premere il tasto .
3. L’indicatore luminoso STANDBY/ON, ALARM/OFF si accende.
4. Con la manopola di regolazione TUNING selezionare l'emittente desiderata.
5. Con la manopola VOLUME sul lato destro dell’apparecchio si può regolare il
volume.
6. Per spegnere l'apparecchio premere il tasto .
Funzionamento FM
Per migliorare la ricezione si dovrebbe girare l'antenna a filo o scegliere un altro
posto per l'apparecchio. Quando si riceve un'emittente stereo, sotto il display si
accende l'indicatore luminoso di controllo (FM.ST).
Funzionamento AM
Per il funzionamento AM è integrata nell'apparecchio una corrispettiva antenna. Per
orientare questa antenna ai fini di una ricezione migliore, cambiare la posizione
dell'apparecchio o scegliere un posto adatto.
Funzionamento radio
Funzionamento CD
1. Portare il commutatore di funzione sul lato destro dell'apparecchio su "CD".
2. Per accendere l'apparecchio premere il tasto .
3. Premere il tasto PUSH/OPEN/CLOSE per aprire il vano CD ed inserire il CD
con la scritta rivolta verso l'alto. Reinserire il vano CD. Dopo alcuni secondi l'apparecchio inizia automaticamente la lettura del CD.
4. Premendo il tasto CD DISPLAY, nel display viene visualizzato il numero dei
brani. Dopo alcuni secondi il display visualizza di nuovo l'ora!
5. Con il tasto PLAY/PAUSE si dà avvio alla riproduzione del CD. Tutti i brani vengono riprodotti uno dopo l'altro e alla fine la riproduzione si arresta automaticamente.
6. Con i tasti di selezione (I I) si può saltare un brano o ritornare indietro di
un brano. Se si tiene premuto uno dei tasti più a lungo, inizia la ricerca dei
brani. La ricerca termina non appena si rilascia il tasto.
7. Per terminare la riproduzione antitempo, premere il tasto STOP).
Tenere sempre chiuso il coperchio CD!
PAUSE:
Premendo il tasto PLAY/PAUSE durante la riproduzione, si interrompe il brano
attualmente riprodotto.
30
Page 31

4....-05-SRC 539 CD 06.08.2002 10:21 Uhr Seite 31
REPEAT:
Premendo 1 x (il LED REPEAT lampeggia) il brano attuale viene riprodotto in
continuazione.
Premendo 2 x (il LED REPEAT rimane acceso) tutto il CD viene continuamente
riprodotto.
Premendo 3 x la funzione è disattivata.
PROGRAM:
Consente la programmazione di una successione qualsiasi di brani.
1. Nella modalità Stop premere il tasto PROG e con il tasto di selezione
(I I) scegliere il brano che si desidera ascoltare.
2. Premere nuovamente il tasto PROG. Il display visualizza "PR 01". Inserire il
brano successivo.
3. Avviare il lettore CD premendo il tasto PLAY/PAUSE (11). Si riproduce il programma. L’indicatore luminoso sotto il display si accende.
Per cancellare un programma premere il tasto STOP, poi il tasto PROGRAM e poi
di nuovo STOP. L'indicatore luminoso si spegne.
Sveglia
Impostare l'allarme
È possibile impostare due orari di sveglia. A questo scopo procedere come qui di
seguito descritto:
• Portare ALARM 1 sul lato sinistro dell'apparecchio nella posizione "ADJUST".
La scritta nel display LED lampeggia.
• Con i tasti di selezione (I I) selezionare l'ora di sveglia desiderata.
• Portare ALARM1 nella posizione "ON". A sinistra nel display LED lampeggia un
punto (ALM1). La prima sveglia ora è attiva!
Se si desidera impostare la seconda sveglia:
• Portare ALARM2 sul lato sinistro dell'apparecchio nella posizione "ADJUST". La
scritta nel display LED lampeggia.
• Con i tasti di selezione (I I) selezionare l'ora di sveglia desiderata.
• Portare ALARM2 nella posizione "ON". A destra nel display LED lampeggia un
punto (ALM2). La seconda sveglia ora è attiva!
Per spegnere una od entrambe le sveglie, portare il relativo commutatore (ALARM1
o ALARM2) su "OFF". Il punto o i punti nel display si spengono!
Sveglia con musica o ronzio
Dopo aver impostato e attivato la sveglia, con il selettore funzioni MUSIC/BUZZER
selezionare la modalità di allarme.
I
31
Page 32

4....-05-SRC 539 CD 06.08.2002 10:21 Uhr Seite 32
Sveglia con musica:
I
• Portare il selettore funzioni MUSIC/BUZZER sulla posizione "MUSIC".
• Con il selettore funzioni sul lato destro dell’apparecchio selezionare la sorgente
acustica. Per essere svegliati con un CD inserito, portare il selettore funzioni
nella posizione “CD”. Per avere la sveglia con una stazione radio impostata,
portare il selettore funzioni nella posizione "FM.ST" o "AM".
• Fare attenzione che ci sia un CD inserito correttamente nell'apposito vano!
Sveglia con ronzio:
Spingere il selettore funzioni MUSIC/BUZZER sulla posizione "BUZZER".
Terminare l’allarme:
Con il tasto si può spegnere l’allarme.
Sveglia automatica ad intervalli
La sveglia impostata automaticamente può essere spenta per circa 6 minuti premendo il tasto SNOOZE.
Spegnimento dilazionato
Premendo il tasto SLEEP l'apparecchio si spegne per:
Premendo 1 x il tasto SLEEP = Nel display compare "—".
Premendo 2 x il tasto SLEEP = 90 minuti
Premendo 3 x il tasto SLEEP = 60 minuti
Premendo 4 x il tasto SLEEP = 30 minuti
Trascorsi i minuti impostati l'apparecchio si spegne automaticamente. Se si desidera spegnere prima che siano trascorsi i minuti impostati, premere il tasto- .
Questo apparecchio è stato controllato sulla base di tutte le direttive CE attuali in
vigore in questo settore, quali per esempio la normativa in materia di compatibilità
elettromagnetica e la direttiva in materia di bassa tensione, ed è stato costruito
conformemente alle norme di sicurezza più moderne.
Con riserva di apportare modifiche tecniche.
Garanzia
Per l’apparecchio da noi messo in commercio ci assumiamo una garanzia di
24 mesi dalla data di acquisto (scontrino).
Durante la garanzia noi ci impegniamo ad eliminare gratuitamente i guasti dell’apparecchio o degli accessori*), dovuti a difetti di materiale o di fabbricazione, riparandoli o, a nostra discrezione, sostituendoli. Le prestazioni in garanzia danno luogo a
una proroga della garanzia né danno diritto ad una nuova garanzia!
32
Page 33
4....-05-SRC 539 CD 06.08.2002 10:21 Uhr Seite 33
Per la garanzia è sufficiente lo scontrino di acquisto. Senza questo scontrino non
sussiste il diritto né ad una sostituzione né ad una riparazione gratuita.
In caso di garanzia consegnare al vostro rivenditore l’apparecchio base nell’imballaggio originale unitamente allo scontrino.
*) Danni agli accessori non giustificano automaticamente lo scambio gratuito dell’apparecchio completo. Si prega di mettersi in contatto con la nostra centrale telefonica. Danni alle parti di vetro oppure fratture ai pezzi di materia plastica sono obbligatoriamente a spese del cliente.
La riparazione di pezzi d’uso ovvero soggetti a logoramento (cursori, ganci impastatori, cinghie di trasmissione, telecomandi di ricambio, spazzolini di ricambio,
lame di seghe ecc.) come anche operazioni di pulizia e manutenzione o la sostituzione di pezzi soggetti a logoramento non rientrano nella garanzia e quindi sono a
pagamento!
La garanzia si annulla nel caso di intervento da parte di terzi.
Dopo la garanzia
Al termine della garanzia le riparazioni possono essere eseguite dietro pagamento
dal corrispettivo negozio specializzato o servizio riparazioni.
I
33
Page 34

4....-05-SRC 539 CD 06.08.2002 10:21 Uhr Seite 34
GB
To avoid the risk of fire or an electric shock, you should not expose the device to
rain or moisture. Consequently, do not use the device in the immediate vicinity of
water - for example near a bath tub, a swimming pool or in a damp cellar.
Use the device only for the intended purpose.
Only connect the device at a properly installed plug socket. Pay attention that the
specified voltage corresponds to the voltage of the plug socket.
When using external mains supply, pay attention to the correct polarity and voltage.
Always place the batteries in the correct direction.
Assemble the device in such a way that the available ventilation openings are not
covered.
Never open the housing of the device. Incorrect repairs can constitute a considerable risk for the user. Should the device become damaged, in particular the mains
supply cable, do not operate the device any longer, but rather have it repaired by an
expert. Check the mains supply cable regularly for damage.
For safety reasons a broken or damaged mains lead may only be replaced by an
equivalent lead from the manufacturer, our customer service department or a
similary qualified person.
If the device is not used for a longer period, remove the plug connector from the
plug socket or take out the batteries.
These symbols may be found on the machine and are intended to indicate the
following:
The lightning symbol should advise the user of parts in the inside of the
device which carry dangerously high voltage levels.
The symbol with an exclamation mark should advise the user of important
operation or maintenance instructions in the accompanying documentation.
Devices bearing this symbol work with a „class 1 laser“ for tracing the CD.
The built-in safety switches should prevent the user being exposed to dangerous laser light, which is invisible to the human eye, when the CD compartment is opened.
Under no circumstances should these safety switches be bypassed or manipulated,
as this could result in a danger of exposure to the laser light.
General safety instructions
34
Page 35

4....-05-SRC 539 CD 06.08.2002 10:21 Uhr Seite 35
Overview of Parts
1. MUSIC/BUZZER function switch 15. VOLUME knob
2. Selector (CD SKIP / TIME SET) 16. Function selector switch
3. Selector 17. Lid of CD compartment
4. POWER key 18. STANDBY/ALARM lamp
(STANDBY/ON ALARM OFF) 19. PROGRAM control lamp
5. SNOOZE key 20. FM STEREO control lamp
6. SLEEP key 21. Frequency scale
7. CLK ADJ key 22. Display
8. CD DISPLAY key 23. REPEAT control lamp
9. CD OPEN/PUSH/CLOSE key 24. SLEEP control lamp
10. TUNER 25. Mains power connection
11. PLAY/PAUSE key 26. Headphone connection
12. REPEAT key 27. Battery compartment
13. PROG key 28. ALARM 2 switch
14. STOP key 29. ALARM 1 switch
Putting into operation
Inserting the power reserve batteries
In case of a power failure or if the plug is pulled out of the socket, the device can
maintain its settings with the inserted power reserve batteries.
• Open the battery compartment lid on the back.
• Insert 1 block battery of type 6 LR 61 AM6 or C. Ensure the correct polarity. If
the machine is not used for a prolonged period, please remove the batteries in
order to avoid "leakage".
• If you have a mains power lead connected, the batteries are automatically switched off.
Please do not dispose of used batteries in the normal domestic waste.
Old batteries should be returned for environmentally-friendly disposal.
Setting the time
Hour (H): Press the CLOCK ADJ key and the selector I simultaneously.
Minutes (M): Press the CLOCK ADJ key and the selector I simultaneously.
GB
Radio function
1. Shift the function selector on the right side of the device to "AM" or "FM. ST".
FM = VHF, AM = MW.
2. Press the key to switch on the device.
3. The STANDBY/ON, ALARM/OFF lamp lights up.
4. Choose the desired broadcasting station with the TUNER.
35
Page 36

4....-05-SRC 539 CD 06.08.2002 10:21 Uhr Seite 36
5. You can adjust the volume with the VOLUME regulator on the right side of the
GB
machine.
6. To switch off the device, press the key.
FM Mode:
To improve reception, pull out the extendible antenna or change the position of the
device.The reception of a radio station in stereo quality is signaled by the lighting of
the LED (FM.ST) on the display.
AM Mode:
A specific antenna is incorporated in the device for AM mode. In order to direct this
antenna to improve reception, change the position of the device or choose a different room.
CD Mode
1. Shift the function selector on the right side of the appliance to "CD" position.
2. Press the key to switch on the device.
3. Open the CD compartment by pressing the PUSH/OPEN/CLOSE key and insert a CD with the label facing up. Close the CD compartment again. After a few
seconds the device reads the CD automatically.
4. By pressing the CD DISPLAY button the number of tracks is shown in the display. After a few seconds the display switched back to the time display!
5. Start the playing of the CD by pressing the PLAY/PAUSE key. All the CD tracks
are played one after the other. At the end the playing stops automatically.
6. You can skip forward or backward from one track to another with the selector
keys (I I). Keep one of the keys pressed to search through a track. The
track search stops as soon as the key is released.
7. To stop the playing before the end, press the STOP key.
Always keep the CD deck cover closed!
PAUSE:
Press the PLAY/PAUSE key while the CD is playing to stop the track being played.
REPEAT:
Press once (the REPEAT LED flashes): the current track is repeated continuously.
Press a second time
(the REPEAT LED emits a fixed light): the whole CD is played continuously.
Press a third time: the function is deactivated.
36
Page 37

4....-05-SRC 539 CD 06.08.2002 10:21 Uhr Seite 37
PROGRAM:
It provides for the programming of your favorite sequence of tracks.
1. When the machine is in the stop mode, press the PROG button and select the
desired track with the selector buttons (I I).
2. Press the PROG key again.The display changes upt oi "PR 01". Enter the next
track and so on.
3. Start the CD player by pressing the PLAY/PAUSE key. The program is played.
The control lamp lights up under the display.
To delete a program press the STOP key, then the PROGRAM key and the STOP
key again. The LED is shut off.
Alarm
Setting the alarm:
You have the opportunity of setting two alarms. Proceed as follows:
Shift the ALARM1 switch on the left side of the device to "ADJUST". The LED on
the display starts to flash.
Select the desired time with the selector keys (I I).
Switch the ALARM1 switch to "ON". A point on the left hand of the LED display
lights up (ALM1). The first alarm is now active!
To set also the second alarm:
Shift the ALARM2 switch on the left side of the device to "ADJUST". The LED on
the display starts to flash.
Select the desired time with the selector keys (I I).
Switch the ALARM2 switch to "ON". A point on the right hand of the LED display
lights up (ALM2). The first alarm is now active!
To switch off the alarms, shift the relevant switch (ALARM1 or ALARM2) to "OFF".
The point/s on the display disappear/s.
Alarm with Music or Buzzer
After you have set and activated the time at which you wish to be woken, use the
MUSIC/BUZZER function switch to select the ALARM mode.
Music Mode:
• Push the MUSIC/BUZZER function switch to the "MUSIC" position.
• Use the function switch on the right-hand side of the machine to select the
sound source. If you would like to be woken up by one of the inserted CDs,
push the function switch to the "CD" position. If you would prefer to be woken
up by a radio station, push the function switch to the "FM.ST" or "AM" position.
• Make sure that the CD is inserted correctly in the CD compartment!
GB
37
Page 38

4....-05-SRC 539 CD 06.08.2002 10:21 Uhr Seite 38
Buzzer Mode:
GB
Push the MUSIC/BUZZER function switch to the "BUZZER" position.
Switching off the alarm:
You can switch off the alarm with the button.
Interval Alarm Function
The automatically activated alarm can be shut off for approx. 6 minutes by pressing
the SNOOZE key.
Delayed Shut-off
By pressing the SLEEP key the device is shut off after the set number of minutes:
Press the SLEEP key once = "—" appears in the display.
Press the SLEEP key a second time = 90 minutes;
Press the SLEEP key a third time = 60 minutes;
Press the SLEEP key a fourth time = 30 minutes.
Once the set minutes have elapsed, the device is shut automatically off.To switch
of the device before the set number of minutes, press the key.
This device has been tested according to all relevant current CE guidelines,
such as electromagnetic compatibility and low voltage directives, and has been
constructed in accordance with the latest safety regulations.
Subject to technical changes without prior notice!
Guarantee
The device supplied by our Company is covered by a 24 month guarantee starting
on the date of purchase (receipt).
During the life of the guarantee any fault of the device or its accessories *) ascribable to material or manufacturing defects will be eliminated free of charge by repairing or, at our discretion, by replacing it. The guarantee services do not entail an
extension of the life of the guarantee nor do they give rise to any right to a new
guarantee!
Proof of the guarantee is provided by the proof of purchase. Without proof of
purchase no free replacement or repair will be carried out.
For repairs or replacement during the life of the guarantee return the device in its
original packing together with the proof of purchase to your dealer.
38
Page 39
4....-05-SRC 539 CD 06.08.2002 10:21 Uhr Seite 39
*) Damage to accessories does not mean automatic free replacement of the whole
machine. In such cases please contact our hotline. Broken glass or breakage of
plastic parts are always subject to a charge.
Defects to consumables or parts subject to wearing (e.g. motor pistons, kneading
blades, drive shafts, spare remote control, spare toothbrushes, saw blades, etc.) as
well as cleaning, maintenance or the replacement of said parts are not covered by
the guarantee and hence are to be paid!
The guarantee lapses in case of unauthorized tampering.
After the expiry of the guarantee
After the expiry of the guarantee repairs can be carried by the competent dealer or
repair service against the payment of the ensuing costs.
GB
39
Page 40

4....-05-SRC 539 CD 06.08.2002 10:21 Uhr Seite 40
Ogólne wskazówki związane z bezpieczną obsługą
PL
Urządzenie chronić należy przed deszczem i wilgocią, aby zapobiec groźbie
pożaru lub porażeniu prądem. Nie należy go więc używać w pobliżu wody, a
więc przykładowo w pobliżu wanny, basenu lub w zawilgoconej piwnicy.
Urządzenie należy używać tylko zgodnie z jego przeznaczeniem.
Urządzenie należy podłączyć tylko i wyłącznie do przepisowo zamontowanego
gniazdka.
Proszę zwrócić uwagę na to, żeby podane napięcie zgadzało się z napięciem w
gniazdku.
W przypadku używania oddzielnych zasilaczy należy zwrócić uwagę na biegunowość i napięcie, baterie muszą zostać włożone do urządzenia zgodnie z oznaczoną biegunowością.
Urządzenie należy w taki sposób ustawić, żeby istniejące otwory wentylacyjne
nie zostały przykryte.
Nigdy nie wolno otwierać obudowy urządzenia. Niefachowo przeprowadzone
naprawy mogą być groźne w skutkach dla użytkownika. Przy uszkodzeniu
urządzenia, w szczególności kabla sieciowego, urządzenie nie może być
używane dopóki nie zostanie naprawione przez osobę z wymaganymi uprawnieniami. Przewód zasilający należy regularnie sprawdzać, czy nie jest uszkodzony.
W razie awarii proszę nie naprawiać urządzenia samemu lecz skorzystać z
pomocy autoryzowanego specjalisty.Jeżeli przewód zasilający nieodłączalny
ulegnie uszkodzeniu, to powinien on być wymieniony u wytwórcy lub w specjalnym zakładzie naprawczym albo przez wykwalifikowaną osobę w celu uniknięcia zagrożenia.
Jeżeli urządzenie nie będzie przez dłuższy czas używane, należy wyciągnąć
wtyczkę z gniazdka lub wyjąć baterie.
Poniższe symbole mogą znajdować się na urządzeniu i mają zwracać Państwa
uwagę na:
Symbol błyskawicy ma zwrócić uwagę użytkownika na znajdujące się
we wnętrzu urządzenia części, które są pod niebezpiecznie wysokim
napięciem.
Symbol z wykrzyknikiem ma zwrócić uwagę użytkownika na znajdujące
się w załączonych dokumentach ważne wskazówki związane z
obsługą i konserwacją urządzenia.
Urządzenia z tym symbolem używają do odczytywania dźwięku z płyty
kompaktowej „Lasera klasy A“. Wbudowany wyłącznik bezpieczeństwa
ma zapobiec temu, żeby użytkownik w czasie otwierania kieszeni odtwarzacza płyt kompaktowych został poddany niebezpiecznemu dla
ludzkich oczu oddziaływaniu niewidocznego światła lasera.
40
Page 41

4....-05-SRC 539 CD 06.08.2002 10:21 Uhr Seite 41
Wyłącznika tego nie należy w żadnym wypadku zmostkować lub też przy nim
manipulować, ponieważ grozi to niebezpieczeństwem, że użytkownik poddany
zostanie oddziaływaniu niebezpiecznego dla ludzkich oczu niewidocznego
światła lasera.
Przegląd elementów obsługi
1. MUSIC/BUZZER- przełącznik funkcyjny 15. Przycisk VOLUME
2. Przycisk wyboru 16. Przełącznik wyboru funkcji
(CD SKIP / TIME SET) 17.Pokrywa kieszeni CD-
3. Przycisk wyboru 18. Lampki STANDBY / ALARM
4. Przycisk POWER 19. Lampka kontrolna PROGRAM
(STANDBY/ON ALARM OFF) 20.Lampka kontrolna FM STEREO
5. Przycisk SNOOZE 21.Zakres częstotliwości
6. Przycisk SLEEP 22. Wyświetlacz
7. Przycisk CLK ADJ 23. Lampka kontrolna REPEAT
8. Przycisk wyświetlacza CD 24. Lampka kontrolna SLEEP
9. Przycisk CD OPEN/PUSH/CLOSE 25. Podłączenie do sieci
10. Regulator TUNING 26.Podłączenie dla słuchawek
11. Przycisk PLAY/PAUSE 27. Kieszeń na baterie
12. Przycisk REPEAT 28. Przełącznik ALARM 2
13. Przycisk PROG 29.Przełącznik ALARM 1
14. Przycisk STOP
Uruchomienie
Założenie baterii rezerwowych
Na wypadek awarii zasilania lub wyciągnięcia wtyczki z kontaktu, urządzenie z
założonymi bateriami rezerwowymi zachowa ustawienia.
• Proszę otworzyć kieszeń na baterie znajdującą się z tyłu urządzenia.
• Proszę umieścić w środku 1 baterię blokową typu 6 LR 61 AM6 ewent. C.
Proszę pamiętać o właściwej polarności. Jeżeli urządzenie nie jest użytkowane przez dłuższy czas proszę wyjąć baterie, aby zapobiec „wyciekowi”
kwasu akumulatorowego.
• Jeżeli urządzenie zasilane jest przez kabel z sieci, baterie są automatycznie
wyłączane.
Proszę nie wyrzucać zużytych baterii do kosza na śmieci. Baterii takich należy
się pozbywać w sposób ekologiczny, oddając je do właściwych punktów skupu.
Ustawianie godziny:
Godziny (H): przycisk CLOCK ADJ i przycisk wyboru I należy nacisnąć jed-
nocześnie.
Minuty (M): przycisk CLOCK ADJ i przycisk wyboru I należy nacisnąć jed-
nocześnie.
41
PL
Page 42

4....-05-SRC 539 CD 06.08.2002 10:21 Uhr Seite 42
PL
1. Proszę przesunąć przełącznik funkcyjny, znajdujący się z prawej strony
urządzenia, na pozycję "AM" lub "FM. ST". FM = UKF, AM = fale średnie.
2. Aby włączyć urządzenie proszę wcisnąć przycisk .
3. Zaświeci się lampka STANDBY/ON, ALARM/OFF.
4. Przy pomocy regulatora TUNING proszę ustawić wybraną stację nadawania.
5. Przy pomocy regulatora VOLUME znajdującego się z prawej strony urządzenia mogą Państwo ustawić siłę głosu.
6. Aby wyłączyć urządzenie proszę nacisnąć przycisk .
Odbiór FM:
Aby poprawić odbiór należy zamontować antenę rzucaną, ewent. wybrać dla
urządzenia inne miejsce ustawienia. Przy odbiorze stacji nadającej w stereo pod
wyświetlaczem zapali się lampka kontrolna (FM.ST).
Odbiór AM:
Dla odbioru AM w urządzeniu zintegrowana została odpowiednia antena. Aby
dzięki tej antenie był możliwy lepszy odbiór, proszę ustawić urządzenie w innej
pozycji, lub wybrać lepsze miejsce ustawienia.
Radio
Odtwarzanie CD
1. Proszę przesunąć przełącznik funkcyjny znajdujący się z prawej strony
urządzenia, na pozycję "CD".
2. W celu włączenia urządzenia proszę wcisnąć przycisk .
3. Naciskając przycisk PUSH/OPEN/CLOSE proszę otworzyć kieszeń CD i
umieścić w niej CD stroną opisaną do góry. Następnie proszę zamknąć
kieszeń CD. Po kilku sekundach urządzenie automatycznie zacznie odczytywać CD.
4. Po naciśnięciu przycisku CD DISPLAY- na wyświetlaczu pojawi się liczba
tytułów utworów. Po kilku sekundach na wyświetlaczu ponownie pojawi się
wskazanie czasu!
5. Przy pomocy przyciska START/PAUZA uruchamiają Państwo odtwarzanie
CD. Po kolei będą odtwarzane wszystkie utwory, a następnie odtwarzanie
wyłączy się automatycznie.
6. Przy pomocy przycisków wyboru (I I) mogą Państwo przeskoczyć do
następnego utworu, ewent. wrócić do poprzedniego. Jeżeli przytrzymają
Państwo jeden z przycisków dłużej, włączy się wyszukiwanie utworów.
Wyszukiwanie utworów zakończy się, gdy puszczą Państwo przycisk.
7. Aby wcześniej zakończyć odtwarzanie proszę wcisnąć przycisk STOP.
Proszę zawsze pamiętać o zamykaniu osłony CD!
42
Page 43

4....-05-SRC 539 CD 06.08.2002 10:21 Uhr Seite 43
PAUSE:
Jeżeli nacisną państwo przycisk PLAY/PAUZA w trakcie odtwarzania, aktualnie
odtwarzany utwór zostanie przerwany.
REPEAT:
Naciśnięcie 1 x (dioda elektroluminescencyjna REPEAT miga): aktualnie odtwarzany utwór będzie stale powtarzany.
Naciśnięcie 2 x (dioda elektroluminescencyjna REPEAT świeci się): powtarzane
są wszystkie nagrania CD.
Naciśnięcie 3 x: dezaktywacja funkcji.
PROGRAM:
Umożliwia programowanie dowolnej kolejności utworów.
1. Proszę nacisnąć przycisk PROG w trybie Stop i wybrać przy pomocy przy-
cisków wyboru (I I) żądany utwór.
2. Proszę ponownie wcisnąć przycisk PROG. Na wyświetlaczu pojawi się infor-
macja "PR 01 ". Proszę wprowadzić następny utwór, itd....
3. Proszę uruchomić odtwarzacz CD wciskając przycisk START/PAUZA.
Rozpocznie się odtwarzanie programu. Pod wyświetlaczem pali się lampka
kontrolna.
Aby wykasować program proszę wcisnąć przycisk STOP (15), a następnie przycisk PROGRAM i ponownie przycisk STOP (15). Lampka kontrolna zgaśnie.
Budzenie
Ustawianie godziny budzenia:
Mają Państwo możliwość ustawienia dwóch godzin budzenia. W tym celu proszę
postępować w następujący sposób:
• Proszę przesunąć przycisk ALARM1 znajdujący się z lewej strony urządzenia,
na pozycję "ADJUST". Na wyświetlaczu pojawi się migająca informacja.
• Przy pomocy przycisków wyboru (I I) proszę wybrać żądaną godzinę
budzenia.
• Proszę przesunąć przełącznik ALARM1 - na pozycję "ON". Z lewej strony na
wyświetlaczu pojawi się informacja (ALM1). Uaktywniona została pierwsza
godzina budzenia!
Jeżeli chcą Państwo ustawić drugą godzinę budzenia:
• Proszę przesunąć przełącznik ALARM2, znajdujący się z lewej strony urządzenia, na pozycję "ADJUST". Na wyświetlaczu pojawi się migająca informacja.
• MPrzy pomocy przycisków wyboru (I I) proszę wybrać żądaną godzinę budzenia.
PL
43
Page 44

4....-05-SRC 539 CD 06.08.2002 10:21 Uhr Seite 44
• Proszę przesunąć przełącznik ALARM1 na pozycję "ON". Z prawej strony na
PL
wyświetlaczu zaświeci się informacja (ALM2). Uaktywniona została druga
godzina budzenia!
Aby wyłączyć jedną z dwu godzin budzenia, proszę przesunąć odpowiedni
przełącznik (ALARM1 lub ALARM2) na pozycję "OFF". Punktowa informacja,
ewent. punktowe informacje na wyświetlaczu zgasną!
Budzenie przy pomocy muzyki lub brzęczyka
Po ustawieniu i aktywowaniu czasu budzenia proszę przy pomocy przełącznika
funkcyjnego MUSIC/BUZZER- wybrać tryb alarmu.
Budzenie przy pomocy muzyki:
• Proszę przesunąć przełącznik funkcyjny MUSIC/BUZZER- na pozycję
"MUSIC".
• Przy pomocy przełącznika funkcyjnego, znajdującego się z prawej strony
urządzenia, proszę wybrać źródło dźwięku. Aby budziła Państwa włożona
płyta CD należy przesunąć przełącznik funkcyjny na pozycję "CD", aby zaś
budziła Państwa ustawiona stacja radiowa, proszę przesunąć przełącznik
funkcyjny na pozycję "FM.ST" lub "AM".
• Proszę pamiętać, aby prawidłowo umieścić CD w kieszeni CD!
Budzenie przy pomocy brzęczyka:
Proszę przesunąć przełącznik funkcyjny MUSIC/BUZZER- na pozycję „BUZZER".
Koniec alarmu:
Przy pomocy przycisku - mogą Państwo wyłączyć alarm.
Automatyczne budzenie w określonych odstępach czasu
Ustawiona automatyczna funkcja budzenia może być wyłączona przez
wciśnięcie przycisku SNOOZE na ok. 6 minut.
Wyłączanie z opóźnieniem:
Poprzez naciśnięcie przycisku SLEEP uruchamiają Państwo wyłączenie urządzenia z opóźnieniem:
Naciśnięcie 1 X przycisku SLEEP = Na wyświetlaczu pojawi się "—".
Naciśnięcie 2 X przycisku SLEEP = 90 minut
Naciśnięcie 3 X przycisku SLEEP = 60 minut
Naciśnięcie 4 X przycisku SLEEP = 30 minut
Po upływie ustawionych minut, urządzenie automatycznie się wyłącza. Jeżeli
chcą Państwo wyłączyć urządzenie przed ustawionym czasem, proszę wcisnąć
przycisk .
44
Page 45

4....-05-SRC 539 CD 06.08.2002 10:21 Uhr Seite 45
Niniejsze urządzenie odpowiada wymaganiom normy bezpieczeństwa użytkowania oraz spełnia wymagania dyrektywy niskonapięciowej i kompatybilności elektromagnetycznej.
Zastrzega się prawo do zmian technicznych!
WARUNKI GWARANCJI
Przyznajemy 24 miesięcy gwarancji na produkt licząc od daty zakupu.
W tym okresie będziemy bezpłatnie usuwać w terminie 14 dni od daty dostarczenia wadliwego sprzętu z kartą gwarancyjną do miejsca zakupu wszystkie uszkodzenia powstałe w tym urządzeniu na skutek wady materiałów lub wadliwego
wykonania, naprawiając oraz wymieniając wadliwe części lub (jeśli uznamy za stosowne) wymieniając całe urządzenie na nowe.
Sprzęt do naprawy powinien być dostarczony w komplecie wraz z dowodem
zakupu oraz z ważną kartą gwarancyjną do sprzedawcy w miarę możliwości w
oryginalnym opakowaniu lub innym odpowiednim dla zabezpieczenia przed uszkodzeniem. W razie braku kompletnego opakowania fabrycznego, ryzyko uszkodzenia sprzętu podczas transportu do i z miejsca zakupu ponosi reklamujący.
Naprawa gwarancyjna nie dotyczy czynności przewidzianych w instrukcji obsługi,
do wykonania których zobowiązany jest użytkownik we własnym zakresie i na
własny koszt.
Gwarancja nie obejmuje:
• mechanicznych, termicznych, chemicznych uszkodzeń sprzętu i wywołanych
nimi wad,
• uszkodzeń powstałych w wyniku działania sił zewnętrznych takich jak wyładowania atmosferyczne, zmiana napięcia zasilania i innych zdarzeń losowych,
• nieprawidłowego ustawienia wartości napięcia elektrycznego, zasilanie z nieodpowiedniego gniazda zasilania,
• sznurów połączeniowych, sieciowych, żarówek, baterii, akumulatorów,
• uszkodzeń wyrobu powstałych w wyniku niewłaściwego lub niezgodnego z
instrukcją jego użytkowania, przechowywania, konserwacji, samowolnego
zrywania plomb oraz wszelkich przeróbek i zmian konstrukcyjnych dokonanych
przez użytkownika lub osoby niepowołane,
• roszczeń z tytułu parametrów technicznych wyrobu, o ile są one zgodne z
podanymi przez producenta,
• prawidłowego zużycia i uszkodzeń, które mają nieistotny wpływ na wartość
lub działanie tego urządzenia.
Karta gwarancyjna bez pieczątki sklepu, daty sprzedaży, nie wypełniona, źle
wypełniona, ze śladami poprawek, nieczytelna wskutek zniszczenia, bez
możliwości ustalenia miejsca sprzedaży oraz dołączonego dowodu zakupu jest
nieważna.
Korzystanie z usług gwarancyjnych nie jest możliwe po upływie daty ważności
gwarancji. Gwarancja na części lub całe urządzenie, które są wymieniane kończy
się, wraz z końcem gwarancji na to urządzenie.
PL
45
Page 46

4....-05-SRC 539 CD 06.08.2002 10:21 Uhr Seite 46
Wszystkie inne roszczenia, wliczając w to odszkodowania są wykluczone chyba, że
PL
prawo przewiduje inaczej. Roszczenia wykraczające poza tą umowę nie są
uwzględniane przez tą gwarancję.
Gwarancja oraz zawarte w niej warunki obowiązują na terenie Rzeczpospolitej
Polskiej.
46
Page 47

4....-05-SRC 539 CD 06.08.2002 10:21 Uhr Seite 47
Általános biztonsági rendszabályok
A tűzkeletkezés vagy az áramütés kockázatának elkerülése végett ne tegye ki a
készüléket esőnek vagy nedvességnek! Ne működtesse a készüléket víz közvetlen közelében (pl. fürdőszobában, úszómedence mellett, nedves pincében).
Csak arra a célra használja a készüléket, mire készült!
Mindig csak előírásszerűen szerelt konnektorba csatlakoztassa a készüléket!
Ügyeljen rá, hogy a megadott feszültség egyezzen a hálózati feszültséggel!
Külső áramforrás használata esetén ügyeljen a megfelelő polaritásra és fes-
zültségre, az elemeket mindig jó irányban helyezze be!
Úgy állítsa fel a készüléket, hogy ne záródjanak el a meglévő szellőzőnyílások!
Soha ne nyissa ki a készülék burkolatát! A szakszerűtlen javítások jelentős ves-
zély forrásai lehetnek a használók számára. Ha a készülék, különösen a hálózati
csatlakozó kábel megsérült, a készüléket nem szabad üzembe helyezni, hanem
előbb szakemberrel meg kell javíttatni. Rendszeresen ellenőrizendő, hogy a
hálózati csatlakozó kábelen nincs-e sérülés.
Veszélyhelyzetek elkerülése végett a hibás csatlakozó kábelt csak a gyártóval, a
mi vevőszolgálatunkkal vagy hasonló szakképzettségű más személlyel szabad
pótoltatni azonos értékű kábellel.
Ha hosszabb időn át nem használja a készüléket, húzza ki a csatlakozó dugaszt
a konnektorból, ill. vegye ki belőle az elemeket!
Adott esetben a készüléken az alábbi szimbólumokat láthatja, amelyek a
következőkre hívják fel az Ön figyelmét:
A villám-szimbólum olyan alkatrészekre figyelmeztet a készülék belsejében, amelyek veszélyesen nagy feszültséget vezetnek.
A felkiáltójellel ellátott szimbólum a kísérőpapírokban található fontos
kezelési vagy karbantartási útmutatásokra hívja fel a használó figyelmét.
Az ezzel a szimbólummal jelzett készülékek „1. osztályú lézerrel“
működve tapogatják le a CD-t. A beépített biztonsági kapcsolók megakadályozzák, hogy a használó emberi szemmel nem látható, veszélyes
lézersugárzás hatásának legyen kitéve, amikor a CD-rekesz fel van
nyitva.
Ezeket a biztonsági kapcsolókat semmi esetre sem szabad „megpatkolni“ vagy
más módon manipulálni, különben Ön lézersugárhatás veszélyének teheti ki
magát.
H
47
Page 48

4....-05-SRC 539 CD 06.08.2002 10:21 Uhr Seite 48
H
1. MUSIC/BUZZER funkciókapcsoló^ 15. VOLUME szabályozó
2. Választógomb (CD SKIP / TIME SET) 16. Funkcióválasztó kapcsoló
3. Választógomb 17. CD- fiók fedele
4. POWER- gomb 18. STANDBY / ALARM jelzőlámpa
(STANDBY/ON ALARM OFF) 19. PROGRAM ellenőrző lámpa
5. SNOOZE- gomb 20. FM STEREO ellenőrző lámpa
6. SLEEP- gomb 21. Frekvenciaskála
7. CLK ADJ- gomb 22.Display
8. CD DISPLAY- gomb 23.REPEAT ellenőrző lámpa
9. CD OPEN/PUSH/CLOSE- gomb 24. SLEEP ellenőrző lámpa
10. TUNING szabályozó 25. Hálózati csatlakozó
11. PLAY/PAUSE- gomb 26. Fejhallgató-csatlakozó
12. REPEAT- gomb 27. Elemtartó rekesz
13. PROG- gomb 28. ALARM 2 kapcsoló
14. STOP- gomb 29. ALARM 1 kapcsoló
A kezelő elemek áttekintése
Üzembe helyezés
Helyezze be a működésbiztosító tartalékelemet!
Ha áramkimaradás következne be, vagy ha kihúzzák a készüléket a konnektorból, működésbiztosító tartalékelem behelyezése esetén a készülék megőrzi a
beállításokat.
• Nyissa ki a hátlapon lévő elemtartó rekesz fedelét!
• Tegyen be 1 db 6 LR 61 AM6, ill. C típusú lapos elemet! Ügyeljen a
megfelelő polaritásra! Ha hosszabb ideig nem használja a készüléket, vegye
ki belőle az elemet, hogy a sav esetleges „kifutását“ elkerülje!
• Ha hálózatra csatlakoztatta a készüléket, az elem automatikusan kikapcsol.
Ne dobja az elhasznált elemeket a háztartási szemétbe! Gondoskodjék a környezetvédelmi szempontoknak megfelelő ártalmatlanításukról!
Az óraidő beállítása:
Óra (H): A CLOCK ADJ-gomb és az I választógomb egyidejű megny-
Perc (M): A CLOCK ADJ- gomb és az I választógomb egyidejű megny-
omásával
omásával
Rádióműködés
1. Tolja a készülék jobb oldalán lévő funkciókapcsolót "AM" vagy "FM. ST"
állásba! FM = URH, AM = középhullám.
2. Kapcsolja be a készüléket a -gombbal!
3. A STANDBY/ON, ALARM/OFF jelzőlámpa kigyullad.
48
Page 49

4....-05-SRC 539 CD 06.08.2002 10:21 Uhr Seite 49
4. A TUNING szabályozóval állítsa be a kívánt rádióadót!
5. A készülék jobb oldalán lévő VOLUME szabályozóval állíthatja be a hangerőt.
6. Ha ki akarja kapcsolni a készüléket, nyomja meg a -gombot!
FM-használatkor:
A vétel javítására igazítsa be a kivetőantennát, ill. vigye másik helyre a készüléket! Ha sztereo-műsort fog, a display alatt ég az ellenőrző lámpa (FM.ST).
AM-használatkor:
AM-üzemre megfelelő antenna van a készülékbe építve. Ha ezt az antennát
kívánja a jobb vétel végett igazgatni. fordítsa másik irányba a készüléket, vagy
válasszon neki másik helyet!
CD-hallgatás esetén
1. Tolja a készülék jobb oldalán lévő funkciókapcsolót "CD" állásba!
2. Kapcsolja be a készüléket a -gombbal!
3. A PUSH/OPEN/CLOSE gomb megnyomásával nyissa ki a CD-fiókot, és
tegyen be egy CD-t írásos oldalával felfelé! Csukja vissza a CD-fiókot!
Néhány másodperc elteltével a készülék automatikusan beolvassa a CD-t.
4. Ha megnyomja a CD DISPLAY gombot! A display kijelzi a korongon lévő
címek számát. Néhány másodperc elteltével a display visszavált az óraidő
kijelzésére.
5. A CD lejátszását a PLAY/PAUSE gombbal lehet elindítani. Sorban végigfut a
CD-n lévő összes szám, utána pedig automatikusan leáll a lejátszás.
6. A választógombokkal (I I) átugorhat egy-egy számot, ill. visszatérhet
az előző számhoz. Ha valamelyik gombot hosszabban lenyomva tartja, folyamatos keresés indul el. A folyamatos keresés félbeszakad, mihelyt a gombot
felengedi.
7. Ha előbb akarja befejezni a lejátszást, nyomja meg a STOP- gombot!
Tartsa a CD-fedelet mindig lezárva!
PAUSE :
Ha a PLAY/PAUSE -gombot a lejátszás alatt lenyomja, félbeszakad az éppen
forgó szám lejátszása.
REPEAT:
1 x megnyomva (REPEAT-LED villog): Állandóan ismétli az éppen forgó számot.
2 x megnyomva (REPEAT-LED ég): Állandó ismétli az egész CD-t.
3 x megnyomva: A funkció ki van kapcsolva.
PROGRAM:
Lehetővé teszi tetszés szerint címsor programozását.
H
49
Page 50

4....-05-SRC 539 CD 06.08.2002 10:21 Uhr Seite 50
1. Stop- üzemmódban nyomja meg a PROG gombot, és a választógombokkal
H
(I I) válassza ki a kívánt számot!
2. Nyomja meg újra a PROG gombot! A display-n lévő kijelzés "PR 01"-re vált.
Táplálja be a következő számot és így tovább...
3. A PLAY/PAUSE- gombot megnyomva, indítsa el a CD-lejátszót! Le fogja
játszani a programot. A display alatt ég az ellenőrző lámpa.
A program törléséhez nyomja meg a STOP gombot, utána a PROGRAM- gombot, majd ismét a STOP gombot! Az ellenőrző lámpa kialszik.
Ébresztés
Az ébresztési idő beállítása:
Lehetősége van, hogy két ébresztési időt állítson be. Ehhez a következőképpen
kell eljárnia:
• Tolja a készülék bal oldalán lévő ALARM1 kapcsolót "ADJUST" állásba! A
LED-display villog.
• A választógombokkal (I I) válassza meg a kívánt ébresztési időt!
• Tolja az ALARM1 kapcsolót "ON" állásba! Bal oldalt a LED-display-n kigyullad egy pont (ALM 1). Ezzel az első ébresztő funkció aktív.
Ha szükséges, be lehet állítani a második ébresztési időt:
• Tolja a készülék bal oldalán lévő ALARM2 kapcsolót "ADJUST" állásba! A
LED-display villog.
• A választógombokkal (I I) válassza meg a kívánt ébresztési időt!
• Tolja az ALARM1 kapcsolót "ON" állásba! Jobb oldalt a LED-display-n
kigyullad egy pont (ALM 2). Ezzel a második ébresztési idő aktív.
Ha ki akarja kapcsolni az egyik vagy a másik ébresztési időt, tolja a megfelelő
kapcsolót (ALARM1 vagy ALARM2) "OFF" állásba! A display-n lévő pont, ill.
pontok kialszanak.
Ébresztés zenével vagy zümmögővel
Miután beállította és aktiválta az ébresztési időt, válassza ki a MUSIC/BUZZERfunkciókapcsolóval az ébresztési módozatot!
Zenés ébresztés:
• Tolja a MUSIC/BUZZER- funkciókapcsolót "MUSIC" állásba!
• A készülék jobb oldalán lévő funkciókapcsolóval válassza meg a hangforrást!
Ha azt kívánja, hogy egy behelyezett CD ébressze, tolja a funkciókapcsolót
„CD“ állásba, ha egy beállított rádióadó hangjára kíván ébredni, akkor tolja a
funkciókapcsolót "FM.ST" vagy "AM" állásba!
• Ügyeljen rá, hogy megfelelően be legyen helyezve egy CD a CD-fiókba!
50
Page 51

4....-05-SRC 539 CD 06.08.2002 10:21 Uhr Seite 51
Ébresztés zümmögővel:
Tolja a MUSIC/BUZZER funkciókapcsolót "BUZZER" állásba!
Ébresztés befejezése:
Az ébresztő hang a -gombbal kapcsolható ki.
Az ébresztő automatika késleltetése
A SNOOZE-gomb lenyomásával az automatikusra állított ébresztő funkciót kb. 6
percre ki lehet kapcsolni.
Késleltetett kikapcsolás
A SLEEP gomb lenyomásával a következő percekkel későbbre állíthatja be a
készülék kikapcsolását:
A SLEEP gombot 1 X megnyomva = A display-n "---" jelenik meg.
A SLEEP gombot 2 X megnyomva = 90 perc
A SLEEP gombot 3 X megnyomva = 60 perc
A SLEEP gombot 4 X megnyomva = 30 perc
A beállított percek eltelte után a készülék magától kikapcsol. Ha már a beállított
percek letelte előtt ki akarja kapcsolni a készüléket, nyomja meg a -gombot!
Ezt a készüléket az Európa Tanács minden vonatkozó aktuális irányelve szerint
(pl. elektromágnesesség-elviselő képesség vagy kisfeszültség-elviselő képesség) ellenőriztük, és a legújabb biztonságtechnikai előírások szerint készült.
Megjegyezzük az esetleges müszaki változásokat!
Garancia
Garanciális igényeivel forduljon, kérem, a szerződéses kereskedőjéhez!
A garancia igazolására a pénztári nyugta szolgál. E nélkül az igazolás nélkül sem
díjmentes csere, sem díjtalan javítás nem végezhető.
Garanciális esetben eredeti csomagolásában adja át az alapkészüléket a pénz-
tári bizonylattal együtt annak a kereskedőnek, akitől a készüléket vásárolta!
*) A tartozékok hibái nem eredményezik automatikusan az egész készülék
díjtalan cseréjét. Ilyen esetekben forduljon „forró vonalunkhoz”! Az üvegtörésből,
ill. a műanyag alkatrészek töréséből eredő hibák megszüntetése mindenkor
térítésköteles.
Sem az elhasználódó tartozékokban, ill. kopó alkatrészekben (pl. szénkefe,
dagasztóhorog, hajtószíj, póttávvezérlő, pótfogkefe, fűrészlap stb.) bekövetkező
H
51
Page 52

4....-05-SRC 539 CD 06.08.2002 10:21 Uhr Seite 52
hibák, sem a tisztítás, karbantartás vagy a kopó alkatrészek cseréje nem esik a
H
garancia hatálya alá, következésképp térítésköteles.
Illetéktelen beavatkozás a garancia megszűnését eredményezi.
A garanciális idő után
A garanciális idő eltelte után a megfelelő szakkereskedésben vagy javítószolgálatnál végeztethet térítésköteles javításokat.
52
Page 53

4....-05-SRC 539 CD 06.08.2002 10:21 Uhr Seite 53
Technische Daten
Modell: SRC 539 CD
Spannungsversorgung: 230 V, 50 Hz
Frequenzbereiche: UKW/FM 88-108 MHz
MW/AM 540-1600 KHz
Batterie Gangreserve: 6 LR 61 / 6 AM 6
Schutzklasse:
Dieses Gerät wurde nach allen zutreffenden,
aktuellen CE-Richtlinien geprüft, wie z.B.
elektromagnetische Verträglichkeit und
Niederspannungsdirektive und wurde nach den
neuesten sicherheitstechnischen Vorschriften
gebaut.
Technische Änderungen vorbehalten!
Bitte führen Sie das ausgediente Gerät
einer umweltgerechten Entsorgung zu.
Blockbatterie
ΙΙ
D-47906 Kempen/Germany · Industriering Ost 40
Internet: http://www.clatronic.de · email: info@clatronic.de
Stünings, Krefeld • 07/02
 Loading...