

Page 1

SLS 618
Bedienungsanleitung/Garantie
Gebruiksaanwijzing/Garantie • Mode d’emploi/Garantie
Instrucciones de servicio/Garantía • Istruzioni per l’uso/Garanzia
Instruction Manual/Guarantee • Instrukcja obsługi/Gwarancja
A használati utasítás/garancia
Lautsprecher-System
Luidsprekersysteem • Système haut-parleurs
Sistema de altavoces • Sistema di altoparlanti
Loudspeaker System • Zestaw głośnikowy
Hangszórórendszer
5....-05-SLS 618 27.04.2004 16:44 Uhr Seite 1
Page 2
Allgemeine Sicherheitshinweise
Um das Risiko von Feuer oder einem elektrischen Schlag zu vermeiden, sollten
Sie das Gerät nicht Regen oder Feuchtigkeit aussetzen. Das Gerät nicht in
unmittelbarer Nähe von Wasser betreiben (z.B. Badezimmer, Schwimmbecken,
feuchte Keller).
Verwenden Sie das Gerät nur für den vorgesehenen Zweck.
Das Gerät ausschließlich an eine vorschriftsmäßig installierte Steckdose ansch-
ließen. Achten Sie darauf, dass die angegebene Spannung mit der Spannung der
Steckdose übereinstimmt.
Bei Verwendung von externen Netzteilen auf die richtige Polarität und Spannung
achten, Batterien stets richtigherum einlegen.
Das Gerät so aufstellen, dass vorhandene Lüftungsöffnungen nicht verdeckt werden.
Niemals das Gehäuse des Gerätes öffnen. Durch unsachgemäße Reparaturen
können erhebliche Gefahren für den Benutzer entstehen. Bei Beschädigung des
Gerätes, insbesondere des Netzkabels, das Gerät nicht mehr in Betrieb nehmen,
sondern von einem Fachmann reparieren lassen. Netzkabel regelmäßig auf
Beschädigungen prüfen.
Ein defektes Netzkabel darf nur vom Hersteller, unserem Kundendienst oder einer
ähnlich qualifizierten Person durch ein gleichwertiges Kabel ersetzt werden, um
Gefährdungen zu vermeiden.
Benutzen Sie das Gerät längere Zeit nicht, ziehen Sie den Netzstecker aus der
Steckdose, bzw.entnehmen Sie die Batterien.
Diese Symbole können sich ggfs. auf dem Gerät befinden und sollen Sie auf folgendes hinweisen:
Das Blitz-Symbol soll den Benutzer auf Teile im Inneren des Gerätes hinweisen, die gefährlich hohe Spannungen führen.
Das Symbol mit Ausrufezeichen soll den Benutzer auf wichtige
Bedienungs- oder Wartungs-Hinweise in den Begleitpapieren hinweisen.
Geräte mit diesem Symbol arbeiten mit einem „Klasse 1-Laser“ zur
Abtastung der CD. Die eingebauten Sicherheitsschalter sollen verhindern,
dass der Benutzer gefährlichem, für das menschliche Auge nicht sichtbarem Laserlicht ausgesetzt wird, wenn das CD-Fach geöffnet ist.
Diese Sicherheitsschalter sollten auf keinen Fall überbrückt oder manipuliert werden, sonst besteht die Gefahr, dass Sie sich dem Laser-Licht aussetzen.
2
D
5....-05-SLS 618 27.04.2004 16:44 Uhr Seite 2
Page 3
Aufbauen
• Entnehmen Sie alle Geräte der Verpackung und legen Sie das
Innenverpackungsmaterial zurück in den Karton.
• Verwahren Sie die Verpackung nach Möglichkeit während der gesamten
Garantie auf!
• Stecken Sie den Stecker des Subwoofers erst in die Steckdose, wenn alle
Lautsprecherboxen und Anschlüsse korrekt verkabelt sind!
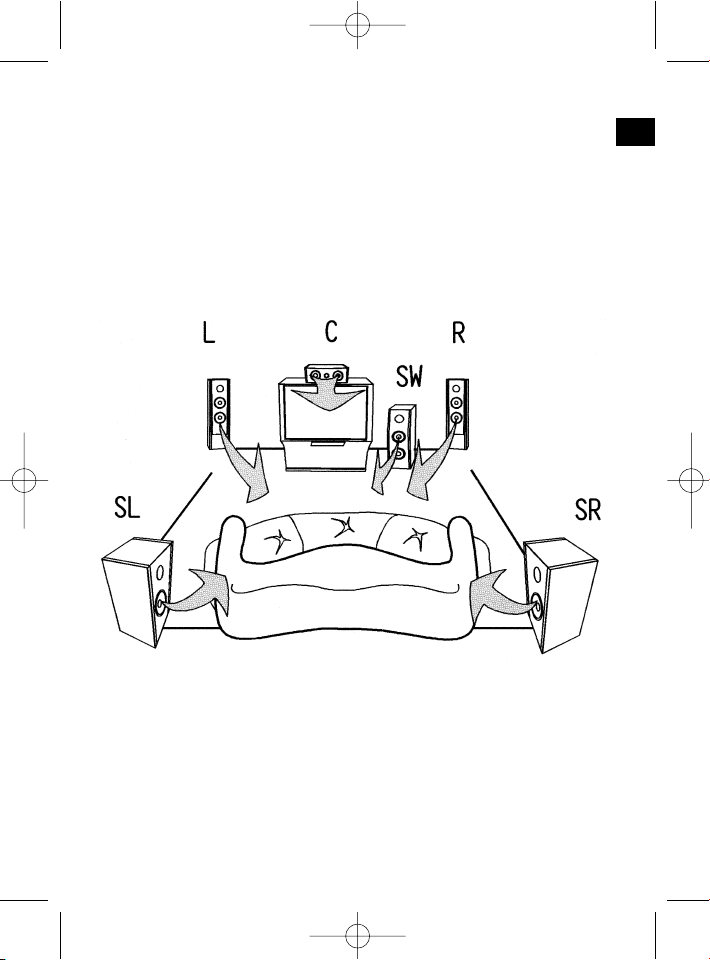
Eine optimale Aufstellung der Lautsprecherboxen kann wie folgt aussehen:
3
D
5....-05-SLS 618 27.04.2004 16:44 Uhr Seite 3
Page 4
Montage der Standfüße und
Anschluss der Lautsprecher
1. Montieren Sie jeweils den Standfuß mit den zwei beiliegenden Rohren.
2. Führen Sie nun das beiliegende Lautsprecher Kabel von unten in den Ständer
ein und am oberen Ende durch die Bohrung nach hinten hinaus.
Tipp: Das Durchführen dieser Leitungen wird erleichtert, wenn Sie vorher einen
starren Draht (z. B.Blumendraht) von oben in Öffnung am Standrohr einführen.
Mit Hilfe eines Klebestreifens befestigen Sie dann unten die
Lautsprecherleitungen an Ihrem Zugdraht. Führen Sie die
Lautsprecherleitungen nach, während Sie sie mit dem Draht einziehen.
3. Befestigen Sie den Lautsprecherhalter (Winkel) am oberen Ende des
Standfußes und schieben den Lautsprecher in die Halterung ein.
4. Klemmen Sie nun das Kabel an die Lautsprecher an. Achten Sie dabei auf die
richtige Polarität (schwarz an schwarz und rot an rot anschließen).
5. Die Chinch- Stecker des Lautsprecherkabels schließen Sie nun entsprechend
der Lautsprecher an den AUDIO OUTPUT des Subwoofers an.
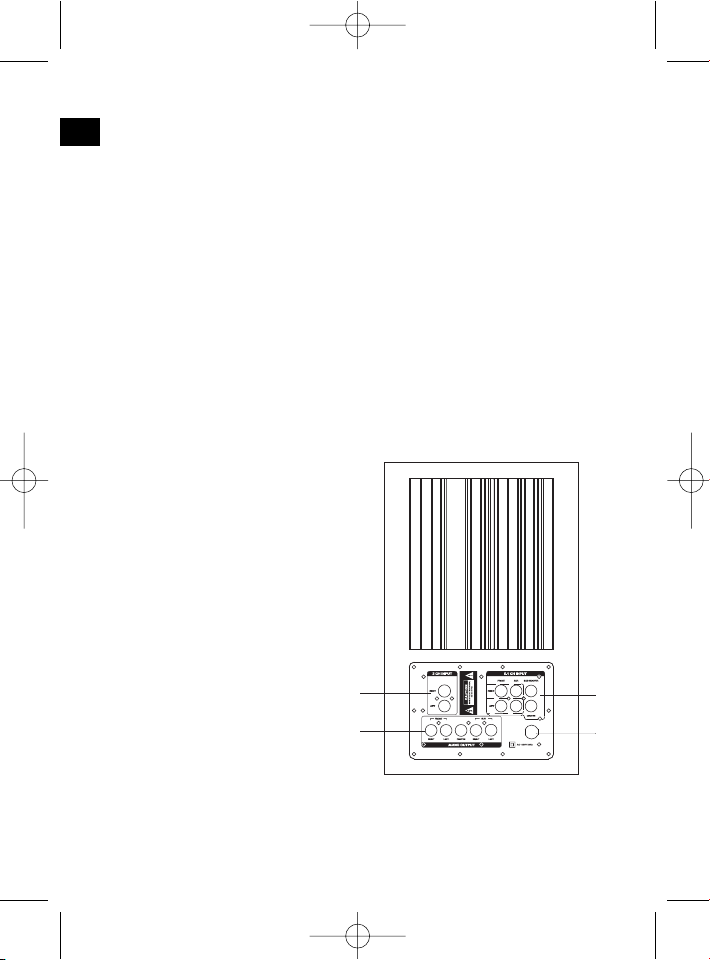
Anschließen
Hinweis: Achten Sie darauf, dass die Steckverbindungen fest sitzen. Schlechte
Verbindungen können zu Störgeräuschen führen.
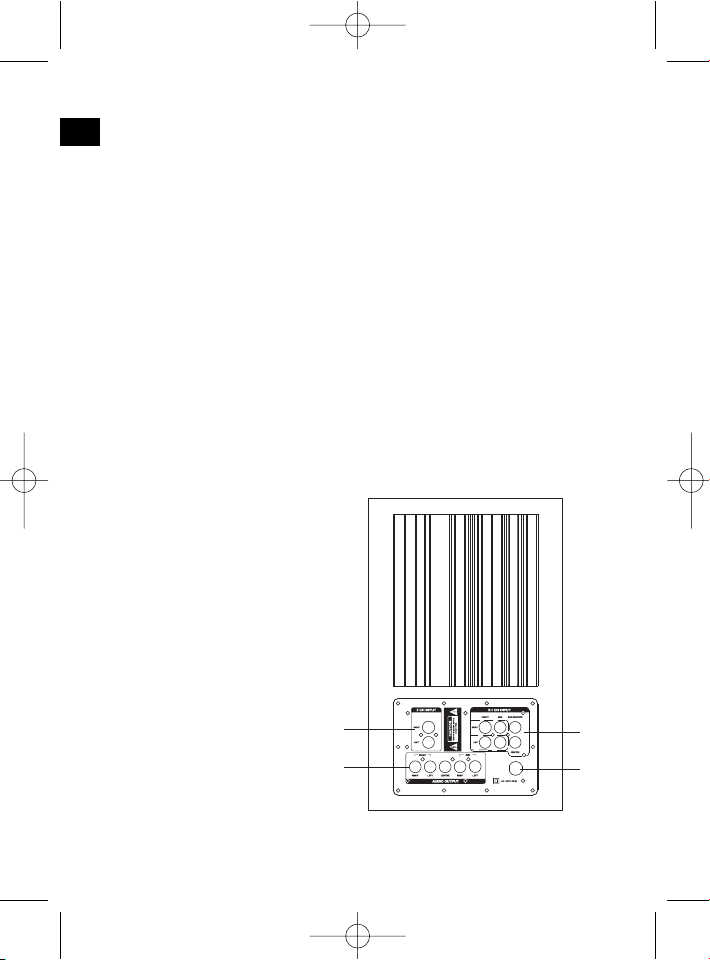
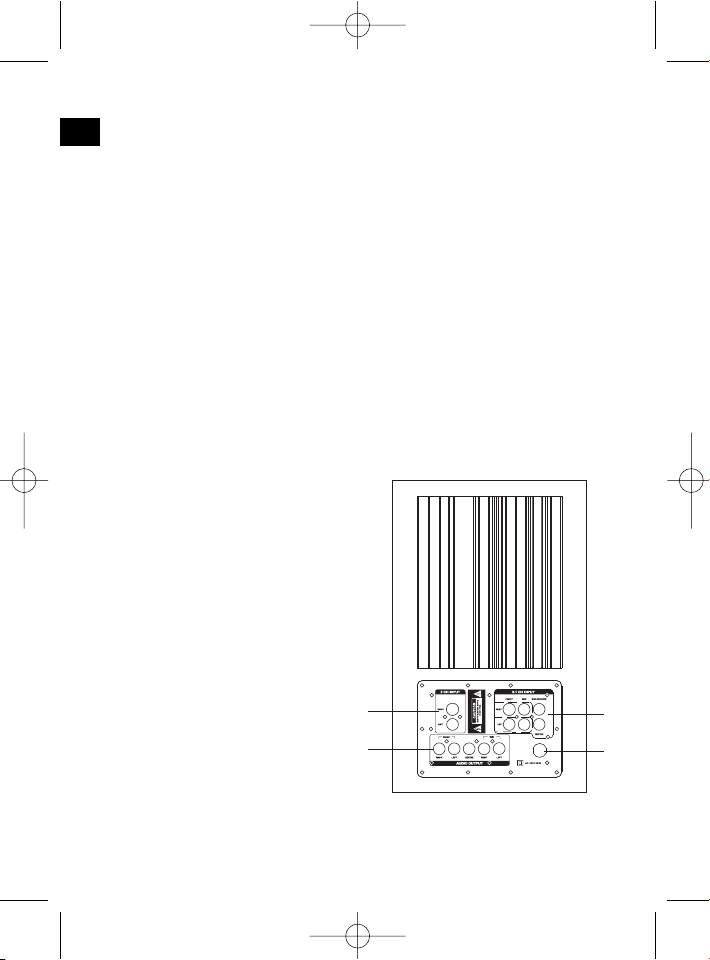
1. 2CH INPUT: Dient zum Anschluss
einer externen Klangquelle über
Cinch (z.B. Hifi-Videorekorder).
2. 5.1CH INPUT: Dient zum
Anschluss einer externen
Klangquelle mit einem 5.1Ausgang (z.B. DVD-Player).
3 AUDIO OUTPUT: Ausgänge
rechts und links zum Anschluss
der Frontlautsprecherboxen
(R Front right, L Front left).
Ausgang zum Anschluss der
Centerlautsprecherbox
(CEN Center). Ausgang zum
Anschluss der Surroundlautsprecherboxen rechts und links
(RS Surround right speaker,
LS Surround left speaker)
4. Netzkabel
4
D
5....-05-SLS 618 27.04.2004 16:44 Uhr Seite 4
1
3
2
4
Page 5

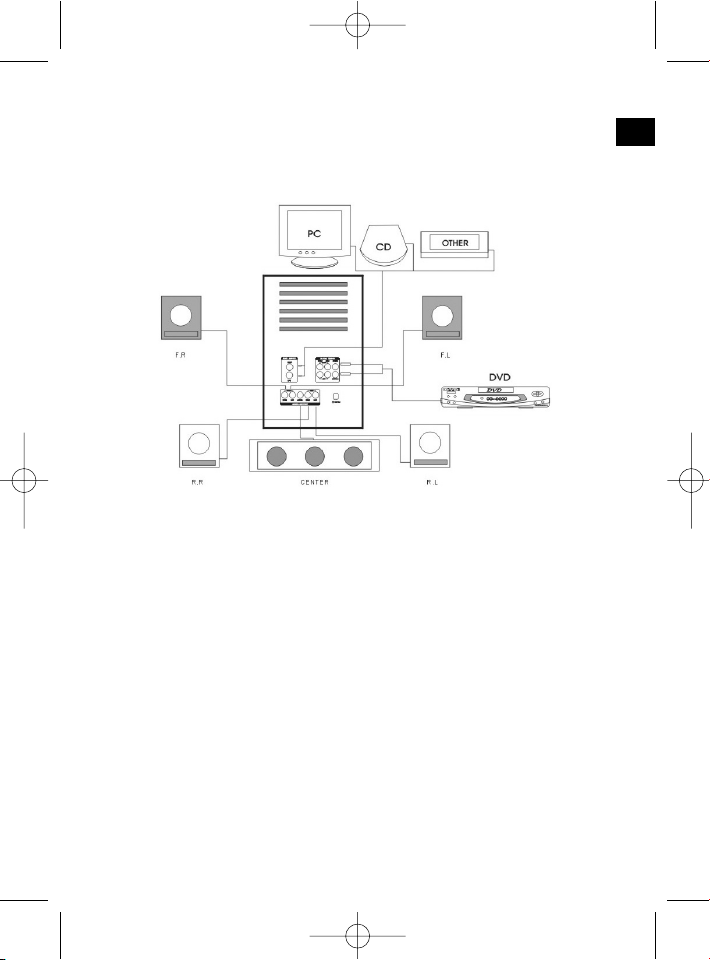
Die korrekte Verkabelung sieht wie folgt aus:
Wenn Sie alle Lautsprecherboxen und Geräte wie beschrieben angeschlossen
haben, können Sie den Netzstecker des Subwoofers in eine vorschriftsmäßig installierte Schutzkontaktsteckdose 230 V, 50 Hz einstecken.
Fernbedienung
Batterien einlegen (Batterien nicht im Lieferumfang enthalten)
• Öffnen Sie den Batteriefachdeckel auf der Rückseite der Fernbedienung.
• Legen Sie 2 Micro Batterien des Typs LR3 „AAA“ 1,5V ein. Achten Sie auf die
richtige Polarität (siehe Batteriefachboden)! Wird die Fernbedienung längere
Zeit nicht genutzt, entnehmen Sie bitte die Batterien, um ein „Auslaufen“ von
Batteriesäure zu vermeiden.
• Wechseln Sie immer den kompletten Batteriesatz aus, erneuern Sie nicht nur
eine Batterie.
Achtung: Batterien gehören nicht in den Hausmüll. Bitte geben Sie verbrauchte
Batterien bei zuständigen Sammelstellen oder beim Händler ab. Werfen Sie
Batterien niemals ins Feuer.
Bei Verwendung der Fernbedienung sollten Sie darauf achten, dass zwischen
Fernbedienung und Subwoofer keine Gegenstände (z.B.Tisch, Stuhl, usw.) gestellt
werden. Diese Gegenstände verhindern das der Infrarotlichtstrahl der
Fernbedienung zum Empfänger des Subwoofers gelangt. Eine Steuerung ist dann
nicht möglich.
5
D
5....-05-SLS 618 27.04.2004 16:45 Uhr Seite 5
Page 6
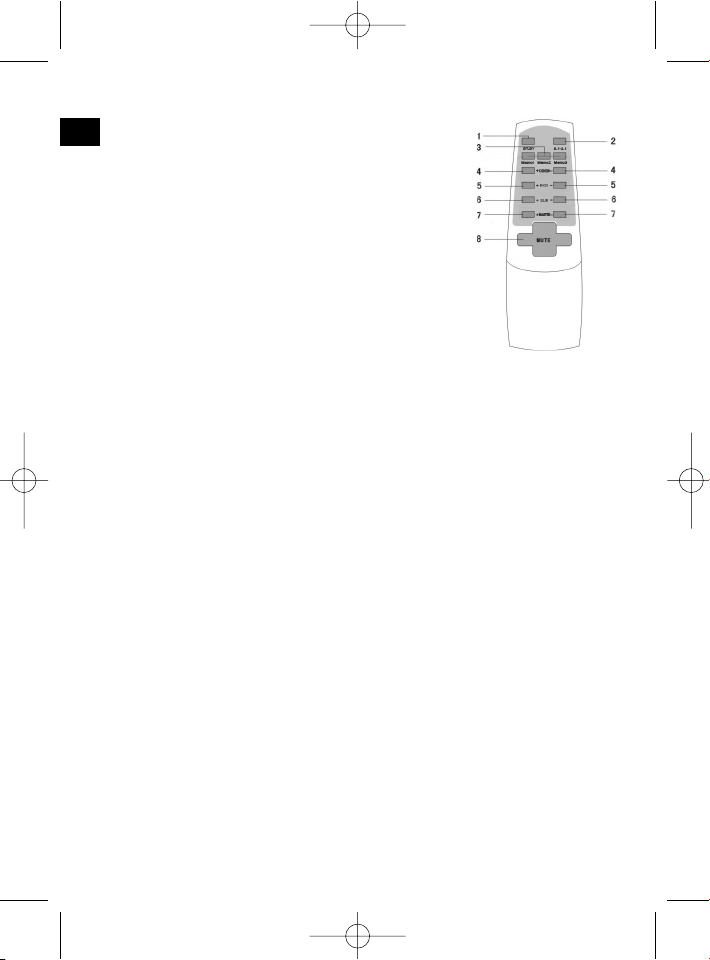
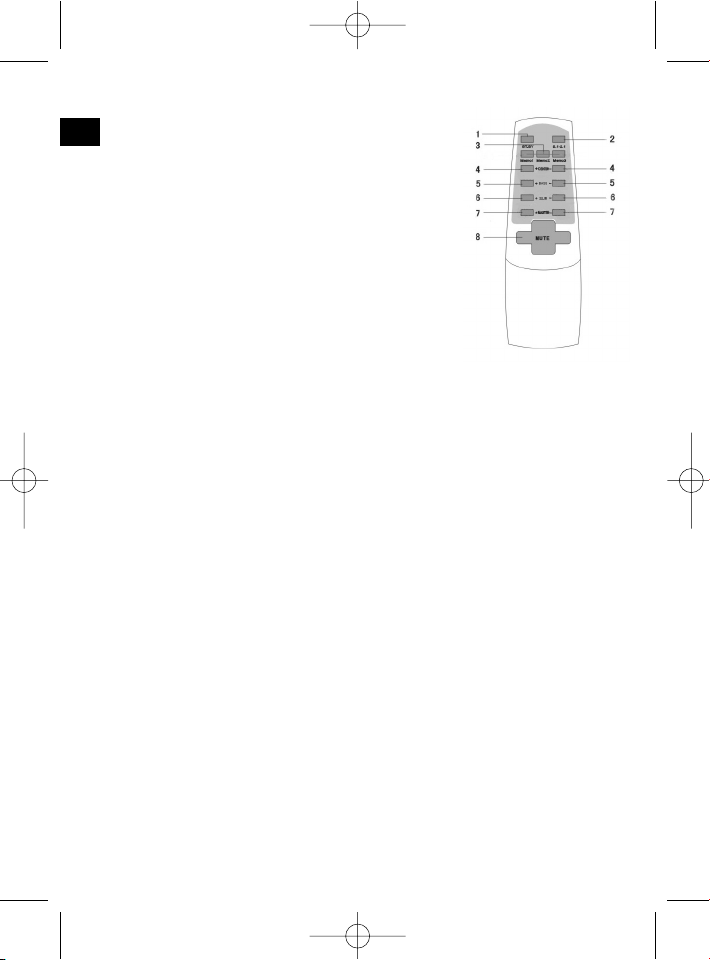
1 ST.BY: Schaltet die Anlage in den STANDBY- Modus.
2 5.1/2.1: Umschaltung zwischen AC3/DTS, 2.1 und
5.1.
3 MEMO 1-2-3: Zur Anwahl von 3 voreingestellten
Lautstärkepegeln.
Hinweis: Diese voreingestellten Werte können nicht
verändert werden.
4 CENTER +/-: Mit diesen Tasten stellen Sie die
Lautstärke der Centerlautsprecherbox ein.
5 BASS (SUBWOOFER) +/-: Mit diesen Tasten stellen
Sie die Lautstärke des Subwoofers ein.
6 SUR (SURROUND) +/-: Mit diesen Tasten stellen Sie
die Lautstärke der Surroundlautsprecher ein.
7 MASTER +/-: Tasten zur Lautstärkeeinstellung.
8 MUTE: Mit dieser Taste können Sie die Lautsprecher,
ohne die Lautstärke zu verändern, ausschalten.
HINWEIS: Achten Sie beim Ausschalten dieser Funktion darauf, dass die
Gesamtlautstärke nicht auf maximal gestellt wurde!
Hinweis: Einige Tasten finden Sie sowohl an der Frontblende des Gerätes als
auch auf der Fernbedienung. Gleichlautende Tasten bewirken die gleiche
Funktion.
Inbetriebnahme
Stecken Sie den Netzstecker in eine vorschriftsmäßig installierte
Schutzkontaktsteckdose 230 V, 50 Hz.
1. Schalten Sie Ihre Klangquelle (z.B. DVD-Player) ein und starten Sie diese.
2. Schalten Sie den Subwoofer, mit dem Ein-Ausschalter auf der Vorderseite des
Gerätes, ein.
3. Wählen Sie über die Taste 5.1/ 2.1 die gewünschte Eingangsquelle an.
4. Mit dem MASTER +/- Regler können Sie die Gesamtlautstärke einstellen.
5. Durch Drücken der Tasten 4 bis 7 an der Fernbedienung oder der entsprechenden Tasten an der Vorderseite des Subwoofers, können Sie die Lautstärke der
Center-, Surround- und Subwoofer-Lautsprecher einstellen.
6. Möchten Sie den Betrieb beenden, schalten Sie den Subwoofer mit dem Ein-/
Ausschalter aus.
6
D
5....-05-SLS 618 27.04.2004 16:45 Uhr Seite 6
Page 7

7
D
Garantie
Wir übernehmen für das von uns vertriebene Gerät eine Garantie von 24 Monaten
ab Kaufdatum (Kassenbon).
Innerhalb der Garantiezeit beseitigen wir unentgeltlich die Mängel des Gerätes oder
des Zubehörs*), die auf Material- oder Herstellungsfehler beruhen, durch Reparatur
oder, nach unserem Ermessen, durch Umtausch. Garantieleistungen bewirken
weder eine Verlängerung der Garantiefrist, noch beginnt dadurch ein Anspruch auf
eine neue Garantie!
Als Garantienachweis gilt der Kaufbeleg. Ohne diesen Nachweis kann ein kostenloser Austausch oder eine kostenlose Reparatur nicht erfolgen.
Im Garantiefall geben Sie bitte das Grundgerät in der Originalverpackung zusammen
mit dem Kassenbon an Ihren Händler.
*) Schäden an Zubehörteilen führen nicht automatisch zum kostenlosen Umtausch
des kompletten Gerätes. Wenden Sie sich in desem Fall bitte an unsere Hotline!
Glasbruchschäden bzw. Brüche von Kunststoffteilen sind grundsätzlich kostenpflichtig!
Sowohl Defekte an Verbrauchszubehör bzw. Verschleißteilen (z.B. Motorkohlen,
Knethaken, Antriebsriemen, Ersatzfernbedienung, Ersatzzahnbürsten, Sägeblättern
usw.), als auch Reinigung, Wartung oder der Austausch von Verschleißteilen, fallen
nicht unter die Garantie und sind deshalb kostenpflichtig!
Die Garantie erlischt bei Fremdeingriff.
Nach der Garantie
Nach Ablauf der Garantiezeit können Reparaturen kostenpflichtig vom entsprechenden Fachhandel oder Reparaturservice ausgeführt werden.
Service für unsere Haushaltsartikel
und Unterhaltungselektronik
Zu technischen Fragen oder zur Bestellung von Verschleißteilen (soweit diese nicht
vom Fachmann ausgewechselt werden müssen), wie z.B. Ersatzkannen,
Staubsaugerfilterbeutel, Fernbedienung usw. können Sie sich, mit Angabe des
Gerätetyps, an unsere u. g. Telefon-Hotline oder an die e-mail-Adresse wenden:
Tel. 0 21 52 - 20 06 666 oder hotline@clatronic.de
Interessieren Sie sich für weitere Clatronic-Produkte?
Besuchen Sie doch einmal unsere Homepage unter
www.clatronic.de oder www.clatronic.com
5....-05-SLS 618 27.04.2004 16:45 Uhr Seite 7
Page 8

Algemene veiligheidsinstructies
Voorkom risico’s voor brand en elektrische schokken en stel het apparaat niet bloot
aan regen of vocht. Gebruik het apparaat niet in de directe nabijheid van water
(bijv. badkamer, zwembad, vochtige kelder).
Gebruik het apparaat uitsluitend voor het daarvoor bestemde doel.
Sluit het apparaat uitsluitend aan op een correct geïnstalleerde contactdoos. Let op
dat de aangegeven spanning overeenstemt met de spanning van de contactdoos.
Let bij het gebruik van externe adapters op de juiste polariteit en spanning en
plaats batterijen altijd in de juiste richting.
Plaats het apparaat zodanig dat de aangebrachte luchtopeningen niet worden afgedekt.
Open nooit de behuizing van het apparaat. Door ondeskundige reparaties kunnen
aanzienlijke gevaren voor de gebruiker ontstaan. Neem het apparaat niet meer in
gebruik wanneer het apparaat - en in het bijzonder de kabel - beschadigingen vertoont, maar laat het eerst door een vakman repareren. Controleer de kabel regelmatig op beschadigingen.
Een defecte kabel mag alleen door de fabrikant, onze technische dienst of een
soortgelijk gekwalificeerd persoon worden vervangen. Alleen zo kunnen gevaren
vermeden worden.
Onderbreek de stroomtoevoer of verwijder de batterijen wanneer u denkt, het apparaat langere tijd niet te gebruiken.
Volgende symbolen kunnen op uw apparaat zijn aangebracht. Zij hebben de volgende betekenis:
Het bliksemsymbool wijst de gebruiker op onderdelen in het inwendige
van het apparaat die gevaarlijk hoge spanning voeren.
Het symbool met het uitroepteken verwijst naar belangrijke
bedienings- en onderhoudsinstructies in de begeleidende documentatie.
Apparaten met dit symbool werken met een „klasse 1-laser„ voor de aftasting van de CD.De ingebouwde veiligheidsschakelaars moeten voorkomen dat de gebruiker wordt blootgesteld aan gevaarlijke, voor het menselijk oog onzichtbaar laserlicht wanneer het CD-vak geopend is.
Deze veiligheidsschakelaars mogen in geen geval overbrugd of gemanipuleerd
worden omdat u anders gevaar loopt, aan het laserlicht te worden blootgesteld.
8
NL
5....-05-SLS 618 27.04.2004 16:45 Uhr Seite 8
Page 9

Montage
• Verwijder alle apparaten uit de verpakking en plaats het binnenverpakkingsmateriaal terug in het karton.
• Bewaar de verpakking indien mogelijk gedurende de hele garantieperiode!
• Steek de steker van de subwoofer pas in de contactdoos wanneer alle luidsprekerboxen en aansluitingen correct verbonden zijn!
Een optimale plaatsing van de luidsprekerboxen kan er als volgt uitzien:
9
NL
5....-05-SLS 618 27.04.2004 16:45 Uhr Seite 9
Page 10
Montage van de standvoeten en aansluiting
van de luidsprekers
1. Monteer telkens de standvoet met de twee bijgeleverde buizen.
2. Voer nu het bijgeleverde luidsprekerkabel van onderaf in de standaard en aan
het bovenste einde door de boring naar achter.
Tip: het doorvoeren van deze leidingen wordt vereenvoudigd wanneer u eerst
een stevige draad (bijv. bloemendraad) van bovenaf door de opening van de
standbuis voert. Met behulp van een plakstrip bevestigt u vervolgens de luidsprekerleidingen aan de trekdraad. Schuif de luidsprekerleiding na terwijl u deze
met draad naar binnen trekt.
3. Bevestig de luidsprekerhouder (hoek) aan het bovenste einde van de standvoet
en schuif de luidspreker in de houder.
4. Sluit nu de kabel aan op de luidsprekers. Let daarbij op de juiste polariteit
(zwart op zwart en rood op rood aansluiten).
5. De cinchstekers van de luidsprekerkabels sluit u nu overeenkomstig aan op de
AUDIO OUTPUT van de subwoofer.
Aansluiten
Opmerking: let op dat de steekverbindingen vast gemonteerd zijn. Slechte verbindingen kunnen tot storingsgeluiden leiden.
1 2.1CH INPUT: is bedoeld voor de
aansluiting op een externe geluidsbron via cinch (bijv. hifi-videorecorder).
2 5.1CH INPUT: is bedoeld voor de
aansluiting op een externe geluidsbron met een 5.1 uitgang (bijv.
DVD-speler).
3 AUDIO OUTPUT: uitgang rechts
en links voor de aansluiting van de
frontluidsprekers (R front right,
L front left). Uitgang voor de aansluiting van de centerluidsprekers
(CEN center). Uitgang voor de
aansluiting van de surroundluidsprekers rechts en links (RS surro-
und rigth speaker, LS surround left
speaker).
4 Netkabel
10
NL
5....-05-SLS 618 27.04.2004 16:45 Uhr Seite 10
1
3
2
4
Page 11
De correcte aansluiting ziet er als volgt uit:
Wanneer u alle luidsprekers en apparaten zoals beschreven hebt aangesloten, kunt
u de netsteker van de subwoofer in een correct geïnstalleerde en geaarde contactdoos, 230V, 50Hz steken.
Afstandsbediening
Plaatsen van de batterijen (niet bij levering inbegrepen)
• Open het deksel van het batterijenvakje aan de achterzijde van de afstandsbediening.
• Plaats 2 microbatterijen van het type LR 3 „AAA“ 1,5V. Let goed op de juiste
polariteit (zie bodem van het batterijenvakje)! Verwijder de batterij wanneer de
afstandsbediening gedurende een langere periode niet wordt gebruikt. Zo voorkomt u lekkage van batterijzuur.
• Wissel altijd het complete batterijset uit, vervang nooit alleen maar één batterij.
Let op: batterijen horen niet in het huisafval. Geef verbruikte batterijen af bij het
gemeentelijke milieupark of bij de handelaar. Gooi batterijen nooit in het vuur.
Bij het gebruik van de afstandsbediening dient u erop te letten dat tussen de
afstandsbediening en de subwoofer géén voorwerpen (bij. tafel, stoel, enz.)
geplaatst worden. Deze voorwerpen voorkomen dat de infrarood-lichtstraal van de
afstandsbediening naar de ontvanger van de subwoofer komt. Een bediening is dan
niet mogelijk.
11
NL
5....-05-SLS 618 27.04.2004 16:45 Uhr Seite 11
Page 12
1 ST.BY: schakelt de installatie in de STANDBY-modus.
2 5.1/2.1: omschakeling tussen AC3/DTS, 2.1 en 5.1.
3 MEMO 1-2-3: voor de keuze van 3 vooringestelde
volumepegels.
Opmerking: deze vooringestelde waarden kunnen
niet worden veranderd.
4 CENTER +/-: met deze toetsen stelt u het volume van
de centerluidspreker in.
5 BASS (SUBWOOFER) +/-: met deze toetsen stelt u
het volume van de subwoofer in.
6 SUR (SURROUND) +/-: met deze toetsen stelt u het
volume van de surroundluidsprekers in.
7 MASTER +/-: toetsen voor de volumeregeling.
8 MUTE: met deze toets kunt u de luidsprekers uitscha-
kelen zonder het volume te veranderen.
OPMERKING: let bij het uitschakelen van deze functie
op dat het totale volume (van de hele installatie) niet op maximaal werd gezet!
Opmerking: sommige toetsen bevinden zich zowel op de voorzijde van het
apparaat als op de afstandsbediening. Eensluidende toetsen hebben dezelfde
functie.
Ingebruikname
Steek de netsteker in een correct geïnstalleerde contactdoos 230 V 50 Hz.
1. Schakel uw geluidsbron (bijv. DVD-speler) in en start deze.
2. Schakel de subwoofer in met de aan-/uitschakelaar aan de voorzijde van het
apparaat.
3. Selecteer via de toets 5.1/ 2.1 de gewenste ingangsbron.
4. Met de MASTER +/- regelaar op de afstandsbediening kunt u het totale volume
instellen.
5. Door op de toetsen 4 tot 7 op de afstandsbediening of de desbetreffende toets
op de voorzijde van de subwoofer te drukken, kunt u het volume van de center-,
surround- en de subwoofer-luidsprekers instellen.
6. Wanneer u het bedrijf wilt beëindigen, schakelt u de subwoofer uit door middel
van de aan-/uitschakelaar.
12
NL
5....-05-SLS 618 27.04.2004 16:45 Uhr Seite 12
Page 13
Dit apparaat is gekeurd conform de op dit moment van toepassing zijnde CErichtlijnen zoals bijvoorbeeld elektromagnetische compatibiliteit en laagspanningsvoorschriften en is geconstrueerd volgens de nieuwste veiligheidstechnische voorschriften.
Technische wijzigingen voorbehouden!
Garantie
Voor het door ons geleverde apparaat verlenen wij een garantie van 24 maanden
vanaf koopdatum (kassabon).
Eventuele gebreken aan het apparaat of aan het toebehoren*) die zijn ontstaan
door productie- of materiaalfouten verhelpen wij binnen deze periode kosteloos
door middel van reparatie of, naar ons oordeel, door vervanging. Eventuele garantiegevallen verlengen noch de geldigheidsduur van de garantie, noch begint daardoor een nieuwe garantieperiode!
Het koopbewijs geldt als garantiebewijs. Zonder dit bewijs kan geen kosteloze
reparatie of vervanging plaatsvinden.
Geef in geval van garantie het apparaat met de kassabon en in de originele verpakking af bij uw handelaar.
*) Schade aan onderdelen leidt niet automatisch tot kosteloze vervanging van het
complete apparaat. Neem in dit geval contact op met onze hotline! De reparatie van
glasbreuk of breuk van kunststofonderdelen wordt altijd berekend!
Niet defecten aan de hulpstukken of aan de slijtende onderdelen (bijv. koolborstels,
deeghaken, drijfriemen, reserveafstandsbediening, reservetandenborstels, zaagbladen enz.), maar ook reiniging, onderhoud of de vervanging van slijtende delen
vallen niet onder de garantie en geschieden altijd tegen berekening!
Bij ingrepen door derden komt de garantieverlening te vervallen.
Na de garantieperiode
Na afloop van de garantieperiode kunnen reparaties tegen berekening worden uitgevoerd door de betreffende vakhandelaar of de technische dienst.
13
NL
5....-05-SLS 618 27.04.2004 16:45 Uhr Seite 13
Page 14
Conseils de sécurité
Pour éviter tout risque d’incendie ou d’électrocution ne mettez en aucun cas votre
appareil en contact avec la pluie ou de l’humidité. Ne laissez jamais fonctionner
votre appareil à proximité d’eau (par ex. salle de bains, bassin de piscine, cave
humide).
N’utilisez l’appareil qu’aux fins auxquelles il est destiné.
Ne branchez l’appareil que dans une prise de courant en bon état de fonctionne-
ment. Veillez à ce que la tension électrique de l’appareil corresponde à celle indiquée sur la prise de courant.
Si vous utilisez une alimentation électrique externe, vérifiez la polarité et la tension
électrique. Placez toujours correctement les piles.
Installez toujours l’appareil de façon à ce que les ouvertures de ventilation ne
soient pas obstruées.
N’ouvrez jamais le bloc moteur de l’appareil. Des réparations mal appropriées peuvent entraîner des risques importants pour l’utilisateur. En cas d’endommagement
de l’appareil, en particulier du câble d’alimentation, ne mettez plus l’appareil en
marche et laissez un spécialiste se charger de la réparation. Contrôlez régulièrement le bon état du câble d’alimentation.
Pour éviter tout risque, seul le fabricant, son service après-vente ou un spécialiste
à qualification similaire sont aptes à remplacer un câble défectueux par un câble
équivalent.
Si l’appareil n’est pas utiliser pendant assez longtemps, débranchez le câble d’alimentation ou retirez les piles.
Vous pouvez éventuellement trouver ces symboles sur l’appareil, qui ont la signification suivante:
L’éclair indique à l’utilisateur les pièces dangereuses, situées à l’intérieur
de l’appareil, qui conduisent de hautes tensions.
Le point d’exclamation attire l’attention de l’utilisateur sur les remarques
importantes d’utilisation et d’entretien données dans les documents de
l’appareil.
Les appareils dotés de ce symbole fonctionnent avec un „laser de la classe 1“ pour la lecture des disques CD. Les boutons de sécurité intégrés
sont chargés d’éviter qu’à l’ouverture du compartiment à CD l’utilisateur
entre en contact avec la lumière laser qui est dangereuse et invisible à
l’oeil humain.
Il est absolument interdit de court-circuiter ou manipuler ces boutons de sécurité,
ce qui risquerait sinon de mettre l’utilisateur en contact avec la lumière laser.
14
F
5....-05-SLS 618 27.04.2004 16:45 Uhr Seite 14
Page 15

Montage
• Retirez toutes les pièces de l’appareil de l’emballage puis replacez les
matériaux d’emballage de protection à nouveau dans le carton.
• Conservez dans la mesure du possible le carton d’emballage pendant toute la
durée de la garantie !
• Ne branchez la fiche du subwoofer dans la prise de courant que lorsque tous
les haut-parleurs et raccordements sont correctement câblés !
Une disposition optimale des haut-parleurs pourrait être la suivante:
15
F
5....-05-SLS 618 27.04.2004 16:45 Uhr Seite 15
Page 16
Montage des pieds et raccordement
des haut-parleurs
1. Montez les pieds des haut-parleurs à l’aide des 2 tubes livrés.
2. Vous pouvez maintenant introduire le câble des haut-parleurs dans les tubes,
du bas vers le haut, puis à travers le trou vers l’arrière des haut-parleurs.
CONSEIL : pour faciliter le guidage du câble, introduisez un fil de fer (par ex. un
tuteur) par le haut du tube. Fixez à l’aide d’une bande de scotch le câble à hautparleur à l’extrémité du fil de fer.Guidez ensuite le câble dans le tube tout en
tirant sur le fil de fer à l’autre extrémité.
3. Fixez le support à haut-parleurs (angle) sur la partie supérieure du pied des
haut-parleurs puis faites glisser le haut-parleur dans la fixation.
4. Connectez maintenant le câble aux haut-parleurs. Veillez alors à respecter la
polarité (le noir raccordé au noir, le rouge au rouge).
5. Raccordez la fiche Cinch du câble à haut-parleur dans les prises correspondantes AUDIO OUTPUT du subwoofer.
Raccordement
Remarque: veillez à ce que les raccords mâle-femelle soient corrects.
De mauvais raccordements peuvent entraîner des grésillements.
1 2CH INPUT: pour le raccordement
d’une source sonore externe par
Cinch (par ex. magnétoscope hi-fi).
2 5.1CH INPUT: pour le raccorde-
ment d’une source sonore externe
avec une sortie 5.1 (par ex. lecteur
de DVD).
3 AUDIO OUTPUT: sorties droite et
gauche pour le raccordement des
haut-parleurs avant (R avant droit,
L avant gauche). Sortie pour le
raccordement du haut-parleur central (CEN centre). Sortie pour le
raccordement des haut-parleurs
surround droit et gauche (RS haut-
parleur surround droit, LS haut-
parleur surround gauche).
4 Câble d’alimentation
16
F
5....-05-SLS 618 27.04.2004 16:45 Uhr Seite 16
1
3
2
4
Page 17

Le câblage doit être effectué de la façon suivante:
Après avoir connecté tous les haut-parleurs et l’ensemble de l’appareil conformément aux instructions données, vous pouvez brancher le câble du subwoofer dans
une prise de courant de 230 V, 50 Hz en bon état de fonctionnement.
Télécommande
Pose des piles (non compris dans la livraison)
• Ouvrez le couvercle du compartiment à piles situé au dos de la télécommande.
• Installez 2 piles micro de type LR 3 « AAA » 1,5 V. Veillez à respecter la polarité
(voir au fond du compartiment) ! Si la télécommande n’est pas utilisée pendant
un certain temps, retirez les piles pour éviter que l’acide des piles ne coule.
• Changez toujours le jeu complet de piles et pas seulement une seule d’entre
elles.
Attention: ne jetez pas vos piles dans les ordures ménagères. Nous vous prions
de les ramener à un centre de recyclage approprié ou chez le fabricant. Ne jetez
jamais les piles dans le feu.
Veillez, lors de l’utilisation de la télécommande, à ce qu’il n’y ait pas d’obstacle (par
ex. table, chaise, etc.) entre la télécommande et le subwoofer. Ces obstacles
empêchent la réception du rayon à infrarouge de la télécommande vers le subwoofer. La télécommande ne peut donc pas fonctionner.
17
F
5....-05-SLS 618 27.04.2004 16:45 Uhr Seite 17
Page 18

1 ST.BY: pour activer le mode STANDBY
2 5.1/2.1: changement de AC3/DTS, 2.1 à 5.1.
3 MEMO 1-2-3: sélection d’un des 3 réglages program-
més.
Remarque: Ces valeurs préprogrammées ne peuvent
pas être modifiées.
4 CENTER +/-: vous pouvez, grâce à ces touches, régler
le son du haut-parleur central.
5 BASS (SUBWOOFER) +/-: vous pouvez, grâce à ces
touches, régler le son du haut-parleur du subwoofer.
6 SUR (SURROUND) +/-: vous pouvez, grâce à ces tou-
ches, régler le son du haut-parleur surround.
7 MASTER +/-: touches de réglage du volume.
8 MUTE: vous pouvez, grâce à cette touche, arrêter les
haut-parleurs sans modifier le son.
REMARQUE : veillez, lorsque vous activez cette fonction, à ce que le son de l’appareil ne soit pas réglé au maximum!
Remarque : certaines touches se trouvent à la fois sur la façade de l’appareil
et sur la télécommande. Les touches ayant la même dénomination ont la
même fonction.
Avant la première utilisation
Branchez l’appareil dans une prise de courant en bon état de fonctionnement
de 230V, 50Hz.
1. Réglez l’appareil sur la source musicale de votre choix (par ex. lecteur de DVD)
puis mettez l’appareil en marche.
2. Mettez le subwoofer en marche à l’aide du bouton marche-arrêt situé sur le
devant de l’appareil.
3. Sélectionnez à l’aide des touches 5.1/2.1 la source sonore de votre souhait.
4. Vous pouvez, grâce au bouton MASTER +/- de la télécommande, réglez l’ensemble du volume de l’appareil.
5. Vous pouvez, grâce aux touches 4 à 7 de la télécommande ou les touches correspondantes sur la façade du subwoofer, régler le volume des haut-parleurs
du centre, surround et subwoofer.
6. Si vous souhaitez arrêter l’appareil, placez l’interrupteur du subwoofer sur la
position arrêt.
18
F
5....-05-SLS 618 27.04.2004 16:45 Uhr Seite 18
Page 19

Cet appareil a été contrôlé d’après toutes les directives européennes actuelles
applicables, comme par exemple concernant la compatibilité électromagnétique et
la basse tension. Cet appareil a été fabriqué en respect des réglementations techniques de sécurité les plus récentes.
Sous réserve de modifications techniques.
Garantie
Nous accordons une garantie de 24 mois à dater de la date d’achat (ticket de
caisse) pour l’appareil que nous vendons.
Pendant la durée de la garantie, nous éliminons gratuitement les défauts de l’appareil ou des accessoires *) découlant d’un vice de matériau ou de fabrication au
moyen d’une réparation ou, selon notre estimation, au moyen d’un remplacement.
Les prestations dans le cadre de la garantie n’entraînent aucune prorogation de la
durée de garantie et ne donnent pas droit à une nouvelle garantie !
Le justificatif de garantie est le reçu. Sans ce justificatif, aucun remplacement
gratuit ni aucune réparation gratuite ne peuvent être effectués.
En cas de recours à la garantie, rapportez l’appareil dans son emballage d’origine
accompagné du ticket de caisse à votre revendeur.
*) Les endommagements de pièces d’accessoires ne justifient pas automatiquement l’échange gratuit de l’appareil complet. Contactez alors notre centrale téléphonique! La casse de pièces en verre ou en plastique est dans tous les cas à votre
charge!
Les défauts sur les accessoires ou les pièces d’usure (p.ex.les charbons de
moteurs, crochets, courroies d’entraînement, télécommande de rechange, brosses
à dents de rechange, lames de scies etc.) ainsi que le nettoyage, l’entretien ou le
remplacement de pièces d’usure ne sont pas garantis et sont donc payants !
En cas d’intervention étrangère, la garantie devient caduque.
Après la garantie
Après écoulement de la durée de garantie, les réparations peuvent être effectuées,
contre paiement, par le commerce spécialisé ou le service de réparation.
19
F
5....-05-SLS 618 27.04.2004 16:45 Uhr Seite 19
Page 20

Indicaciones generales para su seguridad
Vd. no debe dejar expuesto el aparato ni a la lluvia ni a la humedad, a fin de disminuir así el riesgo de incendio o de sacudida eléctrica.
Por tanto, no debe utilizar el aparato cerca de agua – por ejemplo, cerca de la
bañera, de una piscina o de un sótano húmedo.
Utilice el aparato únicamente para la finalidad para la que ha sido construido.
El aparato se ha de conectar únicamente a una caja de toma de corriente instalada
reglamentariamente. Cerciórese de que la tensión indicada concuerda con la tensión de la caja de enchufe.
Preste atención a que sea correcta la polaridad cuando se empleen fuentes de alimentación externas. Las pilas se han de introducir siempre correctamente.
El aparato se ha de dejar puesto de modo que no se tapen los orificios de aireación existentes.
Jamás se abrirá la carcasa del cuerpo del aparato. Las reparaciones mal hechas
pueden generar considerables peligros para el usuario.
En caso de estar deteriorado el aparato, en especial el cable de conectar a red, ya
no se ha de poner más en servicio el aparato, sino que se hará que lo repare un
especialista. Controle periódicamente el cable de conexión a red para ver si se ha
deteriorado.
Sólo el fabricante, nuestro servicio posventa o un técnico con una cualificación
similar pueden cambiar un cable defectuoso por otro similar, para evitar todo tipo
de riesgo.
Saque de la toma de corriente la clavija de conectar a la red o bien quite las pilas
cuando no se vaya a usar el aparato durante largo tiempo.
Estos símbolos pueden encontrarse en caso dado en el aparato, y son para indicar
lo siguiente:
El símbolo del rayo advierte al usuario que hay componentes internos del
aparato que pueden tener tensiones peligrosamente altas.
El símbolo con el signo de exclamación advierte al usuario que hay
instrucciones de manejo y de mantenimiento importantes en la documentación que va adjunta.
Aparatos que llevan puesto este símbolo operan con un ”Lector Clase 1”
para explorar el CD. Los interruptores de seguridad incorporados sirven
para impedir que el usuario esté expuesto a luz láser invisible peligrosa
para la vista del usuario cuando está abierto el compartimiento del CD.
Bajo ningún concepto se ha de hacer un puenteado sobre estos interruptores de
seguridad ni deben ser manipulados. De hacerlo, existe el peligro de que Vd. esté
expuesto a la luz láser.
20
E
5....-05-SLS 618 27.04.2004 16:45 Uhr Seite 20
Page 21

Montaje
• Retire todos los aparatos del embalaje y coloque el material de embalaje interior de nuevo en el cartón.
• ¡Si es posible guarde el embalaje durante todo el tiempo de garantía!
• ¡Para que pueda introducir la clavija del altavoz de bajos cúbico en la caja de
enchufe, tiene que poner primero todas las cajas acústicas y conexiones bajo
cable!
Una colocación óptima de las cajas acústicas podría ser la siguiente:
21
E
5....-05-SLS 618 27.04.2004 16:45 Uhr Seite 21
Page 22

Montaje de los pies y conexión de los altavoces
1. Monte cada pie con los dos tubos suministrados.
2. Ahora introduzca el cable suministrado por abajo en el pie y saque éste hacia
atrás por la perforación en el extremo superior.
Consejo: Se facilita la introducción de estas conducciones eléctricas, si introduce anteriormente un alambre rígido (p.ej. alambre de flores) desde arriba en la
abertura del tubo. Con ayuda de una cinta adhesiva fije por abajo las conducciones con su alambre de tiro. Mientras que va metiendo el alambre, las conducciones eléctricas se introducirán también.
3. Fije el soporte del altavoz (ángulo) en el extremo superior del pie y meta el altavoz en el soporte.
4. Ahora empalme el cable a los altavoces.Para ello, tenga atención con la polaridad correcta (conectar negro con negro y rojo con rojo).
5. La clavija Cinch del cable de altavoz se conectará ahora según los altavoces en
el AUDIO OUTPUT del altavoz de bajos cúbico.
Conexión
Nota: Tenga atención que los manguitos de unión estén bien encajados. Enlaces
malos pueden originar interferencias.
1 2CH INPUT: Sirve para la conexión
de una fuente de sonido externa a
través de Cinch (p.ej. videograbador
HiFi).
2 5.1CH INPUT: Sirve para la cone-
xión de una fuente de sonido externa con una salida 5.1 (p.ej. reproductor DVD).
3 AUDIO OUTPUT: Salidas derecha
e izquierda para la conexión de las
cajas acústicas frontales (R Front
right, L Front left). Salida para la
conexión de la caja acústica central (CEN Center). Salida para la
conexión de las cajas acústicas
envolventes derecha e izquierda
(RS Surround right speaker,
LS Surround left speaker).
4 Cable de la red
22
E
5....-05-SLS 618 27.04.2004 16:45 Uhr Seite 22
1
3
2
4
Page 23

El cableado correcto se presenta de siguiente manera:
Si ha conectado todas las cajas acústicas y aparatos como indicado, puede introducir la clavija del altavoz de bajos cúbico en una caja de enchufe con tomatierra e
instalada por la norma 230 V, 50 Hz.
Mando a distancia
Introducir baterías (no está incluido en el suministro)
• Abra la cámara de baterías que se encuentra en la parte trasera del mando a
distancia.
• Introduzca 2 baterías del tipo UM4 „AAA“ 1,5V D. ¡Tenga atención con la polaridad correcta (vea la indicación en el suelo del compartimento de baterías o la
estampación en la parte exterior)! En caso de que no utilice el mando a
distancia durante un largo periodo de tiempo, aparte las baterías, para evitar un
derrame del líquido de las baterías.
• Siempre cambie el paquete de baterías por completo, no sólo una.
Atención: Las baterías no se deben tirar a la basura doméstica. Por favor lleve las
baterías usadas a sitios especiales de recogida o a su concesionario.
Nunca tire las baterías al fuego.
Al utilizar el mando a distancia debería tener atención que entre el mando a
distancia y el altavoz de bajos cúbico no estén colocados objetos (p.ej. mesa, silla
etc.). Estos objetos evitan que el rayo infrarrojo del mando a distancia consiga llegar al receptor del altavoz de bajos cúbico. El control entonces no será posible.
23
E
5....-05-SLS 618 27.04.2004 16:45 Uhr Seite 23
Page 24

1 ST.BY: Conmuta el equipo al Modo-STANDBY.
2 5.1/2.1: Conmutación entre AC3/DTS, 2.1 y 5.1.
3 MEMO 1-2-3: Para la selección de 3 niveles de volu-
men preajustados.
Nota: Los valores preajustados no se podrán cambiar.
4 CENTER +/-: Con estas teclas puede ajustar el volu-
men de la caja acústica central.
5 BASS (SUBWOOFER) +/-: Con estas teclas puede
ajustar el volumen del altavoz de bajos cúbico.
6 SUR (SURROUND) +/-: Con estas teclas puede aju-
star el volumen de las cajas acústicas envolventes.
7 MASTER +/-: Teclas para la regulación del volumen.
8 MUTE: Con esta tecla puede desconectar los altavo-
ces, sin haber cambiado el volumen.
NOTA: ¡Al desconectar esta función, tenga atención
que el volumen total no haya sido ajustado al máximo!
Nota: Algunas teclas se encontrarán en el panel frontal del aparato como
también en el mando a distancia. Teclas idénticas realizan la misma función.
Puesta en marcha
Introduzca la clavija de la red en una caja de enchufe 230 V, 50Hz instalada
por la norma.
1. Conecte su fuente de sonido (p.ej. reproductor DVD) e inicie ésta.
2. Conecte el altavoz de bajos cúbico con el conectador/desconectador en la
parte frontal del aparato.
3. Seleccione mediante la tecla 5.1/2.1 la fuente de entrada deseada.
4. Con el regulador MASTER +/- en el mando a distancia puede ajustar el volumen total.
5. Pulsando las teclas 4 a 7 en el mando a distancia o las correspondientes teclas
en la parte frontal del altavoz de bajos cúbico, podrá ajustar el volumen del
altavoz central, de los altavoces envolventes y del altavoz de bajos cúbico.
6. Si desea finalizar el funcionamiento, desconecte el altavoz de bajos cúbico con
el conectador/desconectador.
24
E
5....-05-SLS 618 27.04.2004 16:45 Uhr Seite 24
Page 25

Este aparato se ha examinado según las normativas actuales y vigentes de la
Comunidad Europea, como p.ej. compatibilidad electromagnética y directiva de
baja tensión y se ha construido según las más nuevas especificaciones en razón
de la seguridad.
No reservamos el derecho de efectuar modificaciones técnicas.
Garantía
Para el aparato comercializado por nosotros nos responsabilizamos con una
garantía de 24 meses a partir de la fecha de compra (factura de compra).
Durante el período de garantía nos encargamos gratuítamente de los defectos del
aparato y de los accesorios*), que se hayan originado por defectos del material o
de la fabricación. Dependiendo de nuestra estimación se realizará una reparación
o un cambio. ¡Los servicios de garantía no prolangan la garantía, ni se incia por
ello un período nuevo de garantía!
Como comprobante para la garantía es válido la factura de compra. Sin este comprobante no se podrá realizar un cambio o una reparación gratuíta.
En el caso de garantía lleve el aparato base en el embalaje original y la factura de
compra a su concesionario.
*) Defectos en los accesorios de uso o en las piezas de desgaste (p.ej. escobillas
de carbón del motor, varillas amasadoras, correas de transmisión, mando a
distancia de repuesto, cepillos de dientes de repuesto, hojas de sierra etc.), como
también la limpieza, mantenimiento o el recambio de piezas de desgaste no recaen en la garantía e irán al cargo del cliente!
En caso de intervención ajena se expira la garantía.
Después de la garantía
Después de haber expirado la garantía se pueden realizar las reparaciones por el
concesionario o por el servicio de reparaciones. Los gastos irán al cargo del cliente.
25
E
5....-05-SLS 618 27.04.2004 16:45 Uhr Seite 25
Page 26

Avvertenze generali per la sicurezza
Per evitare il rischio di incendio o di scosse, non si deve mai tenere l’apparecchio
sotto la pioggia o in ambienti umidi. Quindi non usare l’apparecchio nelle immediate
vicinanze di acqua, per esempio in prossimità di una vasca, di una piscina o in una
cantina umida.
Utilizzare l’apparecchio solo per l’uso previsto.
Collegare l’apparecchio esclusivamente ad una presa installata a norma. Fare
attenzione a che la tensione indicata corrisponda alla tensione della presa. Se si
impiegano alimentatori esterni, fare attenzione all’esattezza di polarità e di tensione, inserire le batterie sempre correttamente.
Collocare l’apparecchio in modo che le aperture per l’aerazione esistenti non vengano coperte.
Non togliere mai la protezione dell’apparecchio. Riparazioni non a regola d’arte
possono causare notevoli pericoli per l’utente. Se l’apparecchio presenta danni,
soprattutto nella zona del cavo di collegamento, non metterlo più in funzione, ma
farlo riparare prima da un esperto. Esaminare regolarmente il cavo di collegamento
alla rete per verificare che non ci siano danni.
Un cavo di collegamento difettoso può essere sostituito con un cavo equivalente
solo dal produttore, dal nostro servizio assistenza o da persone similmente qualificate, al fine di evitare pericoli.
Se l’apparecchio non viene usato per un periodo di tempo prolungato, togliere il
blocchetto alimentatore dalla presa ovvero estrarre le batterie.
Questi simboli possono trovarsi eventualmente sull’apparecchio e rimandano ai
seguenti elementi:
Il simbolo del lampo fa presente all’utente la presenza di pezzi all’interno
dell’apparecchio che possono produrre alte tensioni pericolose.
Il simbolo con il punto esclamativo fa presente all’utente la presenza di
importanti avvertenze per l’uso e la manutenzione nei fogli di accompagnamento dell’apparecchio.
Gli apparecchi dotati di questo simbolo lavorano con un „Laser classe 1“
per riprodurre i CD. Gli interruttori di sicurezza integrati hanno lo scopo di
impedire che l’utente venga esposto alla luce non visibile del laser, pericolosa per l’occhio umano, aprendo lo scomparto per i CD.
Questi interruttori di sicurezza non devono mai essere cavallottati né manipolati
perché altrimenti sussiste il rischio di esposizione alla luce del laser.
26
I
5....-05-SLS 618 27.04.2004 16:45 Uhr Seite 26
Page 27

Montaggio
• Togliere tutti gli apparecchi dall’imballaggio e riporre il materiale di imballaggio
nello scatolone.
• Se possibile, conservare il materiale di imballaggio per tutto il periodo della
garanzia!
• Inserire la spina del subwoofer nella presa solo quando tutti gli altoparlanti e i
collegamenti sono correttamente cablati!
Un posizionamento ottimale degli altoparlanti può essere il seguente:
27
I
5....-05-SLS 618 27.04.2004 16:45 Uhr Seite 27
Page 28

Montaggio dei piedi di appoggio e
collegamento degli altoparlanti
1. Montare ogni piede d’appoggio con i due tubi acclusi.
2. Infilare ora il cavo per gli altoparlanti accluso nel supporto dal basso facendolo
uscire attraverso il foro dietro, sull’estremità superiore.
Consiglio: lo scorrimento di questi cavi è facilitato se prima si introduce dall’alto
del tubo nell’apertura un filo metallico rigido (p.e. per i fiori). Con l’aiuto di una
striscia adesiva si fissano poi i cavi degli altoparlanti a questo filo trainante. Far
scorrere i cavi degli altoparlanti tirandoli con il filo.
3. Fissare il supporto degli altoparlanti (angolo) all’estremità superiore del piede
d’appoggio e spingere l’altoparlante nel supporto.
4. Fissare ora il cavo agli altoparlanti. Fare attenzione all’inserimento corretto dei
poli (collegare nero su nero e rosso su rosso).
5. Collegare ora la spina RCA del cavo dell’altoparlante al corrispettivo altoparlante inserendola nell’AUDIO OUTPUT del subwoofer.
Collegamento
Nota: fare attenzione che i collegamenti ad innesto siano inseriti bene.
Collegamenti difettosi possono causare disturbi.
1 2CH INPUT: serve per il collega-
mento di una sorgente sonora
esterna mediante RCA (p.e. videoregistratore Hifi).
2 5.1CH INPUT: serve per il collega-
mento di una sorgente sonora
esterna mediante un’uscita 5.1 (p.e.
lettore DVD).
3 AUDIO OUTPUT: uscite destra e
sinistra per il collegamento degli
altoparlanti anteriori (R Front right,
L Front left). Uscita per il collegamento dell’altoparlante centrale
(CEN Center). Uscita per il collega-
mento degli altoparlanti surround
destro e sinistro (RS Surround right
speaker, LS Surround left speaker).
4 Cavo di alimentazione
28
I
5....-05-SLS 618 27.04.2004 16:45 Uhr Seite 28
1
3
2
4
Page 29

Il cablaggio corretto si esegue così:
Quando tutti gli altoparlanti e tutti gli apparecchi sono stati collegati come descritto,
si può inserire la presa di alimentazione del subwoofer in una presa con contatto di
terra regolarmente installata da 230 V, 50 Hz.
Telecomando
Inserire le batterie (non incluso nella fornitura)
• Aprire il coperchio dello scomparto portabatterie sul lato posteriore del telecomando.
• Inserire 2 batterie del tipo UM4 „AAA“ 1,5V.Fare attenzione ad inserire i poli
correttamente (fondo del vano batterie o incisione sul lato esterno)! Nel caso in
cui il telecomando non venga utilizzato per periodi di tempo prolungati, si consiglia di estrarre le batterie allo scopo di evitare che si verifichi una fuoriuscita
dell’acido delle batterie.
• Quando si sostituiscono le batterie, si raccomanda di effettuare sempre la sostituzione dell’intero set e di non limitarsi a sostituire soltanto una delle batterie.
Attenzione: non gettare le batterie nei rifiuti domestici. Buttare le batterie usate
negli appositi contenitori o restituirle al negoziante.
Non buttare mai le batterie nel fuoco.
Quando si impiega il telecomando fare attenzione che tra telecomando e subwoofer
non ci siano oggetti (per esempio tavolo, sedia, ecc.). Questi oggetti impediscono
che il raggio infrarossi del telecomando arrivi al ricevitore del subwoofer. In tal caso
il comando non è possibile.
29
I
5....-05-SLS 618 27.04.2004 16:45 Uhr Seite 29
Page 30

1 ST.BY: accende l’impianto nel modo STANDBY.
2 5.1/2.1: passaggio da AC3/DTS, 2.1 a 5.1 e vicever-
sa.
3 MEMO 1-2-3: per selezionare 3 livelli di volume
preimpostati.
Nota: questi valori preimpostati non possono essere
modificati.
4 CENTER +/-: con questi tasti si imposta il volume
dell’altoparlante centrale.
5 BASS (SUBWOOFER) +/-: con questi tasti si
imposta il volume del subwoofer.
6 SUR (SURROUND) +/-: con questi tasti si imposta il
volume degli altoparlanti surround.
7 MASTER +/-: tasti per la regolazione del volume.
8 MUTE: con questo tasto si possono spegnere gli
altoparlanti senza modificare il volume.
NOTA: quando si disattiva questa funzione, prestare attenzione che il volume
totale non sia stato regolato al massimo!
Nota: alcuni tasti si trovano sia sul frontalino dell’apparecchio sia sul telecomando. I tasti uguali hanno la stessa funzione.
Messa in funzione
Collegare la spina a una presa di rete da 230 V, 50 Hz installata conformemente alle disposizione in materia.
1. Accendere la sorgente sonora (p.e. lettore DVD) ed avviarla.
2. Accendere il subwoofer con il tasto On/Off sul lato anteriore dell’apparecchio.
3. Mediante il tasto 5.1/ 2.1 selezionare la sorgente di ingresso desiderata.
4. Con il regolatore MASTER +/- sul telecomando si può impostare il volume totale.
5. Premendo i tasti 4 - 7 sul telecomando o i corrispettivi tasti sul lato anteriore del
subwoofer si può impostare il volume degli altoparlanti centrale, surround e subwoofer.
6. Se si desidera porre termine al funzionamento, spegnere con l’interruttore
On/Off.
30
I
5....-05-SLS 618 27.04.2004 16:45 Uhr Seite 30
Page 31

Questo apparecchio è stato controllato sulla base di tutte le direttive CE attuali in
vigore in questo settore, quali per esempio la normativa in materia di compatibilità
elettromagnetica e la direttiva in materia di bassa tensione, ed è stato costruito
conformemente alle norme di sicurezza più moderne.
Con riserva di apportare modifiche tecniche.
Garanzia
Per l’apparecchio da noi messo in commercio ci assumiamo una garanzia di
24 mesi dalla data di acquisto (scontrino).
Durante la garanzia noi ci impegniamo ad eliminare gratuitamente i guasti dell’apparecchio o degli accessori*), dovuti a difetti di materiale o di fabbricazione, riparandoli o, a nostra discrezione, sostituendoli. Le prestazioni in garanzia danno luogo a
una proroga della garanzia né danno diritto ad una nuova garanzia!
Per la garanzia è sufficiente lo scontrino di acquisto. Senza questo scontrino non
sussiste il diritto né ad una sostituzione né ad una riparazione gratuita.
In caso di garanzia consegnare al vostro rivenditore l’apparecchio base nell’imballaggio originale unitamente allo scontrino.
*) Danni agli accessori non giustificano automaticamente lo scambio gratuito dell’apparecchio completo. Si prega di mettersi in contatto con la nostra centrale telefonica. Danni alle parti di vetro oppure fratture ai pezzi di materia plastica sono obbligatoriamente a spese del cliente.
La riparazione di pezzi d’uso ovvero soggetti a logoramento (cursori, ganci impastatori, cinghie di trasmissione, telecomandi di ricambio, spazzolini di ricambio,
lame di seghe ecc.) come anche operazioni di pulizia e manutenzione o la sostituzione di pezzi soggetti a logoramento non rientrano nella garanzia e quindi sono a
pagamento!
La garanzia si annulla nel caso di intervento da parte di terzi.
Dopo la garanzia
Al termine della garanzia le riparazioni possono essere eseguite dietro pagamento
dal corrispettivo negozio specializzato o servizio riparazioni.
31
I
5....-05-SLS 618 27.04.2004 16:45 Uhr Seite 31
Page 32

General safety instructions
To avoid the risk of fire or an electric shock, you should not expose the device to
rain or moisture. Consequently, do not use the device in the immediate vicinity of
water - for example near a bath tub, a swimming pool or in a damp cellar.
Use the device only for the intended purpose.
Only connect the device at a properly installed plug socket. Pay attention that the
specified voltage corresponds to the voltage of the plug socket.
When using external mains supply, pay attention to the correct polarity and voltage.
Always place the batteries in the correct direction.
Assemble the device in such a way that the available ventilation openings are not
covered.
Never open the housing of the device. Incorrect repairs can constitute a considerable risk for the user. Should the device become damaged, in particular the mains
supply cable, do not operate the device any longer, but rather have it repaired by an
expert. Check the mains supply cable regularly for damage.
For safety reasons a broken or damaged mains lead may only be replaced by an
equivalent lead from the manufacturer, our customer service department or a
similary qualified person.
If the device is not used for a longer period, remove the plug connector from the
plug socket or take out the batteries.
These symbols may be found on the machine and are intended to indicate the
following:
The lightning symbol should advise the user of parts in the inside of the
device which carry dangerously high voltage levels.
The symbol with an exclamation mark should advise the user of important
operation or maintenance instructions in the accompanying documentation.
Devices bearing this symbol work with a „class 1 laser“ for tracing the CD.
The built-in safety switches should prevent the user being exposed to dangerous laser light, which is invisible to the human eye, when the CD compartment is opened.
Under no circumstances should these safety switches be bypassed or manipulated,
as this could result in a danger of exposure to the laser light.
32
GB
5....-05-SLS 618 27.04.2004 16:45 Uhr Seite 32
Page 33

Installation
• Remove all devices from the packing and replace the internal packaging material back in the box.
• Retain the packaging if possible during the entire guarantee period!
• Do not insert the plug of the subwoofer into the socket until all loudspeakers
and connections have been correctly made!
For optimum installation of the loudspeakers, please follow the instructions
below:
33
GB
5....-05-SLS 618 27.04.2004 16:45 Uhr Seite 33
Page 34

Assembly of the Feet and
Connection of the Loudspeakers
1. Assemble each foot with the two tubes supplied.
2. Insert the loudspeaker cable supplied into the stand from below and out at the
top through the borehole.
Tip: It is easier to pass the cables through the tubes if you insert a rigid wire
(e.g. florist's binding wire) into the hole of the upright tube beforehand from the
top. With the help of an adhesive strip you can then attach the loudspeaker
wires to the bottom of your wire. Then guide the loudspeaker wires through the
tube by pulling on the wire.
3. Attach the loudspeaker holder (bracket) to the upper end of the foot and insert
the loudspeaker into the mounting.
4. Now connect the cable to the loudspeakers. Ensure the correct polarity
(connect black to black and red to red).
5. The cinch plug of the loudspeaker cable is now connected to the AUDIO OUTPUT of the subwoofer according to the loudspeakers.
Connection
Note: Please ensure that the plug connections are firm. Bad connections may lead
to poor sound quality.
1 2CH INPUT: Used for connecting
an external sound source via cinch
(e.g. hi-fi video recorder).
2 5.1CH INPUT: Used for connec-
ting an external sound source to a
5.1 output (e.g. DVD player).
3 AUDIO OUTPUT: Outputs on the
right and left for connection of the
front loudspeakers (R Front right,
L Front left). Output for connection
of the centre loudspeaker (CEN
Centre) output for connection of
the surround loudspeakers on the
right and left (RS Surround right
speaker, LS Surround left speaker)
4 Mains lead
34
GB
5....-05-SLS 618 27.04.2004 16:45 Uhr Seite 34
1
3
2
4
Page 35

Correct connection is as follows:
When you have connected all loudspeakers and devices as described you can insert the mains plug of the subwoofer into a correctly installed 230 volt, 50 hertz
power socket.
Remote Control
Inserting the Batteries (not supplied)
• Open the lid of the battery compartment on the back of the remote control.
• Insert 2 batteries of type UM4 „AAA“ 1.5V. Please ensure that the polarity is
correct (see the floor of the battery compartment or the inscription on the outside)! If the remote control is not used for a prolonged period, remove the batteries in order to prevent battery acid leaking.
• Always replace the complete set of batteries. Do not replace just one battery.
Warning: batteries are not to be disposed of together with domestic wastes.
Dispose of the used batteries at the relevant collection bin or at your dealer’s.
Never throw batteries into the fire.
When the remote control is used, care should be taken that there are no objects
between the remote control and the central loudspeaker.(e.g. table, chair, etc.).
These objects prevent the infrared beam of the remote control from reaching the
receiver of the central loudspeaker. It is then not possible to control the television
with the remote control.
35
GB
5....-05-SLS 618 27.04.2004 16:45 Uhr Seite 35
Page 36

1 ST.BY: Switches the system to the standby mode.
2 5.1/2.1: Switches between AC3/DTS, 2.1 and 5.1.
3 MEMO 1-2-3: For selection of three preset volume
levels. Note: These preset values cannot be changed.
4 CENTER +/-: With these buttons you can set the volu-
me of the centre loudspeaker.
5 BASS (SUBWOOFER) +/-: With these buttons you can
set the volume of the subwoofer.
6 SUR (SURROUND) +/-: With these buttons you can
set the volume of the surround loudspeakers.
7 MASTER +/-: Buttons for volume adjustment.
8 MUTE: With this button you can switch off the louds-
peakers without changing the volume.
NOTE: When switching off this function ensure that the
overall volume is not set to maximum!
Note: Some buttons are located both on the front panel of the device and on
the remote control.The buttons with the same designation have the same
function.
Initial Operation
Insert the plug in a duly installed 230V/50Hz socket.
1. Switch on your sound source (e.g. DVD player) and start it.
2. Switch on the subwoofer with the on/off switch on the front of the device.
3. Use the 5.1/2.1 button to select the desired input source.
4. With the MASTER +/- regulator on the remote control you can set the overall
volume.
5. By pressing buttons 4 to 7 on the remote control or the corresponding buttons
on the front of the subwoofer, you can set the volume of the centre, surround
and subwoofer loudspeakers.
6. To stop operation, turn off the subwoofer with the on/off switch.
36
GB
5....-05-SLS 618 27.04.2004 16:45 Uhr Seite 36
Page 37

This device has been tested according to all relevant current CE guidelines,
such as electromagnetic compatibility and low voltage directives, and has been
constructed in accordance with the latest safety regulations.
Subject to technical changes without prior notice!
Guarantee
The device supplied by our Company is covered by a 24 month guarantee starting
on the date of purchase (receipt).
During the life of the guarantee any fault of the device or its accessories *) ascribable to material or manufacturing defects will be eliminated free of charge by repairing or, at our discretion, by replacing it.The guarantee services do not entail an
extension of the life of the guarantee nor do they give rise to any right to a new
guarantee!
Proof of the guarantee is provided by the proof of purchase.Without proof of
purchase no free replacement or repair will be carried out.
For repairs or replacement during the life of the guarantee return the device in its
original packing together with the proof of purchase to your dealer.
*) Damage to accessories does not mean automatic free replacement of the whole
machine. In such cases please contact our hotline.Broken glass or breakage of
plastic parts are always subject to a charge.
Defects to consumables or parts subject to wearing (e.g. motor pistons, kneading
blades, drive shafts, spare remote control, spare toothbrushes, saw blades, etc.) as
well as cleaning, maintenance or the replacement of said parts are not covered by
the guarantee and hence are to be paid!
The guarantee lapses in case of unauthorized tampering.
After the expiry of the guarantee
After the expiry of the guarantee repairs can be carried by the competent dealer or
repair service against the payment of the ensuing costs.
37
GB
5....-05-SLS 618 27.04.2004 16:45 Uhr Seite 37
Page 38

Ogólne wskazówki związane z bezpieczną obsługą
Urządzenie chronić należy przed deszczem i wilgocią, aby zapobiec groźbie
pożaru lub porażeniu prądem. Nie należy go więc używać w pobliżu wody, a
więc przykładowo w pobliżu wanny, basenu lub w zawilgoconej piwnicy.
Urządzenie należy używać tylko zgodnie z jego przeznaczeniem.
Urządzenie należy podłączyć tylko i wyłącznie do przepisowo zamontowanego
gniazdka.
Proszę zwrócić uwagę na to, żeby podane napięcie zgadzało się z napięciem w
gniazdku.
W przypadku używania oddzielnych zasilaczy należy zwrócić uwagę na biegunowość i napięcie, baterie muszą zostać włożone do urządzenia zgodnie z oznaczoną biegunowością.
Urządzenie należy w taki sposób ustawić, żeby istniejące otwory wentylacyjne
nie zostały przykryte.
Nigdy nie wolno otwierać obudowy urządzenia. Niefachowo przeprowadzone
naprawy mogą być groźne w skutkach dla użytkownika. Przy uszkodzeniu
urządzenia, w szczególności kabla sieciowego, urządzenie nie może być
używane dopóki nie zostanie naprawione przez osobę z wymaganymi uprawnieniami. Przewód zasilający należy regularnie sprawdzać, czy nie jest uszkodzony.
W razie awarii proszę nie naprawiać urządzenia samemu lecz skorzystać z
pomocy autoryzowanego specjalisty.Jeżeli przewód zasilający nieodłączalny
ulegnie uszkodzeniu, to powinien on być wymieniony u wytwórcy lub w specjalnym zakładzie naprawczym albo przez wykwalifikowaną osobę w celu uniknięcia zagrożenia.
Jeżeli urządzenie nie będzie przez dłuższy czas używane, należy wyciągnąć
wtyczkę z gniazdka lub wyjąć baterie.
Poniższe symbole mogą znajdować się na urządzeniu i mają zwracać Państwa
uwagę na:
Symbol błyskawicy ma zwrócić uwagę użytkownika na znajdujące się
we wnętrzu urządzenia części, które są pod niebezpiecznie wysokim
napięciem.
Symbol z wykrzyknikiem ma zwrócić uwagę użytkownika na znajdujące
się w załączonych dokumentach ważne wskazówki związane z
obsługą i konserwacją urządzenia.
Urządzenia z tym symbolem używają do odczytywania dźwięku z płyty
kompaktowej „Lasera klasy A“. Wbudowany wyłącznik bezpieczeństwa
ma zapobiec temu, żeby użytkownik w czasie otwierania kieszeni odtwarzacza płyt kompaktowych został poddany niebezpiecznemu dla
ludzkich oczu oddziaływaniu niewidocznego światła lasera.
38
PL
5....-05-SLS 618 27.04.2004 16:45 Uhr Seite 38
Page 39

Wyłącznika tego nie należy w żadnym wypadku zmostkować lub też przy nim
manipulować, ponieważ grozi to niebezpieczeństwem, że użytkownik poddany
zostanie oddziaływaniu niebezpiecznego dla ludzkich oczu niewidocznego
światła lasera.
Montaż
• Proszę wyjąć wszystkie części sprzętu z opakowania, a wewnętrzny materiał
opakowaniowy włożyć z powrotem do kartonu.
• Proszę przechować opakowanie w miarę możliwości przez cały okres gwarancyjny!
• Proszę włożyć wtyczkę głośnika niskotonowego (subwoofera) do gniazdka
dopiero po przepisowym połączeniu kablami wszystkich kolumn głośnikowych i podłączeń!
Optymalne ustawienie kolumn głośnikowych może wyglądać następująco:
39
PL
5....-05-SLS 618 27.04.2004 16:45 Uhr Seite 39
Page 40

Montaż nóg stojaka i podłączenie głośników
1. Każdą nogę stojaka proszę montować z dwoma załączonymi rurkami.
2. Następnie załączony kabel głośnikowy proszę wprowadzić od dołu do stojaka i wyprowadzić go na górnym końcu przez wywiercony otwór do tyłu.
Wskazówka: Przeprowadzenie tych przewodów jest łatwiejsze, jeżeli wcześniej wprowadzi się sztywny drut (np. drut do wiązania kwiatów) z góry do
otworu w rurce stojaka. Następnie przy pomocy taśmy przylepnej proszę
przymocować przewody głośnikowe na dole do tego drutu. Przewody te
proszę popuszczać w miarę wciągania ich przy pomocy drutu.
3. Proszę przymocować uchwyt głośnika (kątownik) na górnym końcu nogi
stojaka, a następnie wsunąć głośnik w zamocowanie.
4. Teraz proszę przyłączyć kabel zaciskając go przy głośnikach. Proszę
uważać przy tym na właściwe ułożenie biegunów (czarne do czarnego, a
czerwone do czerwonego).
5. Wtyczki typu cinch kabla głośnikowego proszę podłączyć, uwzględniając
odpowiednio głośniki, do AUDIO OUTPUT w głośniku niskotonowym (subwoofer).
Podłączenie
Wskazówka: Proszę uważać na to, by połączenia wtykowe nie miały luzu. Złe
połączenia mogą prowadzić do zakłóceń dźwiękowych.
1 2CH INPUT: Służy do podłącze-
nia zewnętrznego źródła dźwięku
poprzez złącze typu cinch (np.
magnetowid HiFi).
2 5.1CH INPUT: Służy do
podłączenia zewnętrznego
źródła dźwięku, posiadającego
wyjście 5.1 (np. odtwarzacz
DVD).
3 AUDIO OUTPUT: Wyjścia, prawy
i lewy, do podłączenia przednich
kolumn głośnikowych (R Front
right, L Front left). Wyjście do
podłączenia kolumny głośnika
centralnego (CEN Center).
Wyjście do podłączenia prawej i
lewej kolumny głośnikowej
dźwięku przestrzennego
(RS Surround right speaker,
LS Surround left speaker).
4 Kabel sieciowy
40
PL
5....-05-SLS 618 27.04.2004 16:45 Uhr Seite 40
1
3
2
4
Page 41

Właściwe ułożenie kabli wygląda następująco:
Po podłączeniu wszystkich kolumn głośnikowych i sprzętu zgodnie z opisem
mogą Państwo włożyć wtyczkę sieciową subwoofera do przepisowo zainstalowanego gniazdka z uziemieniem na 230 V, 50 Hz.
Zdalne sterowanie
Wkładanie baterii (nie objęte dostawą)
• Proszę zdjąć osłonę kieszeni na baterie znajdującą się z tyłu pilota.
• Proszę umieścić w środku 2 baterii typu UM4 „AAA“ 1,5V. Proszę pamiętać
o właściwej polarności (patrz spód kieszeni na baterie ewent. wytłoczenie
na stronie zewnętrznej)! Jeżeli przez dłuższy czas nie korzystają Państwo z
pilota proszę wyjąć baterie, aby zapobiec „wyciekowi” kwasu akumulatorowego.
• Proszę zawsze wymieniać komplet baterii, proszę nie zmieniać tylko jednej
baterii.
Uwaga: Baterii nie należy wrzucać do śmieci. Zużyte baterie proszę oddać do
punktu zbiórki odpadów specjalnych lub do punktu sprzedaży. Nigdy nie wrzucaj baterii do ognia.
Używając pilota powinni Państwo zwrócić uwagę na to, by między nim a subwooferem nie znajdowały się przedmioty (np. stół, krzesło itd.). Przedmioty te
przeszkadzają dotrzeć promieniowi podczerwieni z pilota do odbiornika w subwooferze. W takim przypadku zdalne sterowanie nie jest możliwe.
41
PL
5....-05-SLS 618 27.04.2004 16:45 Uhr Seite 41
Page 42

1 ST.BY: Przełącza urządzenie na tryb STANDBY.
2 5.1/2.1: Przełączanie między AC3/DTS, 2.1 i 5.1.
3 MEMO 1-2-3: Do wyboru trzech ustalonych stan-
dardowo poziomów głośności.
Wskazówka: Te standardowo ustawione parametry
nie mogą być zmienione.
4 CENTER +/-: Tymi przyciskami ustawia się
głośność kolumny głośnika centralnego.
5 BASS (SUBWOOFER) +/-: Tymi przyciskami usta-
wia się głośność subwoofera.
6 SUR (SURROUND) +/-: Tymi przyciskami ustawia
się głośność głośników dźwięku przestrzennego.
7 MASTER +/-: Przyciski do ustawiania głośności.
8 MUTE: Tym przyciskiem można wyłączyć głośniki
bez zmieniania głośności.
WSKAZÓWKA: Wyłączając tą funkcję proszę
pamiętać, by głośność całkowita nie była ustawiona na maksimum!
Wskazówka: Niektóre przyciski znajdują się zarówno na przednim panelu
sterowania urządzenia jak i na pilocie zdalnego sterowania. Przyciski
oznaczone tak samo mają to samo działanie.
Uruchomienie
Proszę podłączyć wtyczkę do przepisowo zainstalowanego gniazdka o
napięciu 230V, 50 Hz.
1. Proszę włączyć źródło dźwięku (np. odtwarzacz DVD) i uruchomić je.
2. Proszę włączyć głośnik niskotonowy (subwoofer) włącznikiem/ wyłącznikiem z przodu urządzenia.
3. Przyciskami 5.1/ 2.1 proszę wybrać pożądane źródło na wejściu.
4. Regulatorem MASTER +/- na pilocie mogą Państwo ustawić głośność
całkowitą.
5. Wciskając przyciski 4 do 7 na pilocie zdalnego sterowania lub odpowiednie
przyciski w przodu subwoofera mogą Państwo ustawić głośność głośnika
centralnego, głośników dźwięku przestrzennego i subwoofera.
6. Jeśli chcą Państwo zakończyć pracę urządzenia, proszę wyłączyć subwoofer włącznikiem/ wyłącznikiem.
42
PL
5....-05-SLS 618 27.04.2004 16:45 Uhr Seite 42
Page 43

Niniejsze urządzenie odpowiada wymaganiom normy bezpieczeństwa użytkowania oraz spełnia wymagania dyrektywy niskonapięciowej i kompatybilności elektromagnetycznej.
Zastrzega się prawo do zmian technicznych!
WARUNKI GWARANCJI
Przyznajemy 24 miesiące gwarancji na produkt licząc od daty zakupu.
W tym okresie będziemy bezpłatnie usuwać w terminie 14 dni od daty dostarczenia wadliwego sprzętu z kartą gwarancyjną do miejsca zakupu wszystkie uszkodzenia powstałe w tym urządzeniu na skutek wady materiałów lub wadliwego
wykonania, naprawiając oraz wymieniając wadliwe części lub (jeśli uznamy za stosowne) wymieniając całe urządzenie na nowe.
Sprzęt do naprawy powinien być dostarczony w komplecie wraz z dowodem
zakupu oraz z ważną kartą gwarancyjną do sprzedawcy w miarę możliwości w
oryginalnym opakowaniu lub innym odpowiednim dla zabezpieczenia przed uszkodzeniem. W razie braku kompletnego opakowania fabrycznego, ryzyko uszkodzenia sprzętu podczas transportu do i z miejsca zakupu ponosi reklamujący.
Naprawa gwarancyjna nie dotyczy czynności przewidzianych w instrukcji obsługi,
do wykonania których zobowiązany jest użytkownik we własnym zakresie i na
własny koszt.
Gwarancja nie obejmuje:
• mechanicznych, termicznych, chemicznych uszkodzeń sprzętu i wywołanych
nimi wad,
• uszkodzeń powstałych w wyniku działania sił zewnętrznych takich jak wyładowania atmosferyczne, zmiana napięcia zasilania i innych zdarzeń losowych,
• nieprawidłowego ustawienia wartości napięcia elektrycznego, zasilanie z nieodpowiedniego gniazda zasilania,
• sznurów połączeniowych, sieciowych, żarówek, baterii, akumulatorów,
• uszkodzeń wyrobu powstałych w wyniku niewłaściwego lub niezgodnego z
instrukcją jego użytkowania, przechowywania, konserwacji, samowolnego
zrywania plomb oraz wszelkich przeróbek i zmian konstrukcyjnych dokonanych
przez użytkownika lub osoby niepowołane,
• roszczeń z tytułu parametrów technicznych wyrobu, o ile są one zgodne z
podanymi przez producenta,
• prawidłowego zużycia i uszkodzeń, które mają nieistotny wpływ na wartość
lub działanie tego urządzenia.
Karta gwarancyjna bez pieczątki sklepu, daty sprzedaży, nie wypełniona, źle
wypełniona, ze śladami poprawek, nieczytelna wskutek zniszczenia, bez możliwości ustalenia miejsca sprzedaży oraz dołączonego dowodu zakupu jest nieważna.
Korzystanie z usług gwarancyjnych nie jest możliwe po upływie daty ważności
gwarancji. Gwarancja na części lub całe urządzenie, które są wymieniane kończy
się, wraz z końcem gwarancji na to urządzenie.
43
PL
5....-05-SLS 618 27.04.2004 16:45 Uhr Seite 43
Page 44

Wszystkie inne roszczenia, wliczając w to odszkodowania są wykluczone chyba, że
prawo przewiduje inaczej. Roszczenia wykraczające poza tą umowę nie są
uwzględniane przez tą gwarancję.
Gwarancja na sprzedany towar konsumpcyjny nie wyłącza, nie ogranicza ani
nie zawiesza uprawnień kupującego wynikających z niezgodności towaru z umową.
Gwarancja oraz zawarte w niej warunki obowiązują na terenie Rzeczpospolitej
Polskiej.
44
PL
5....-05-SLS 618 27.04.2004 16:45 Uhr Seite 44
Page 45

Általános biztonsági rendszabályok
A tűzkeletkezés vagy az áramütés kockázatának elkerülése végett ne tegye ki a
készüléket esőnek vagy nedvességnek! Ne működtesse a készüléket víz közvetlen közelében (pl. fürdőszobában, úszómedence mellett, nedves pincében).
Csak arra a célra használja a készüléket, mire készült!
Mindig csak előírásszerűen szerelt konnektorba csatlakoztassa a készüléket!
Ügyeljen rá, hogy a megadott feszültség egyezzen a hálózati feszültséggel!
Külső áramforrás használata esetén ügyeljen a megfelelő polaritásra és fes-
zültségre, az elemeket mindig jó irányban helyezze be!
Úgy állítsa fel a készüléket, hogy ne záródjanak el a meglévő szellőzőnyílások!
Soha ne nyissa ki a készülék burkolatát! A szakszerűtlen javítások jelentős ves-
zély forrásai lehetnek a használók számára. Ha a készülék, különösen a hálózati
csatlakozó kábel megsérült, a készüléket nem szabad üzembe helyezni, hanem
előbb szakemberrel meg kell javíttatni. Rendszeresen ellenőrizendő, hogy a
hálózati csatlakozó kábelen nincs-e sérülés.
Veszélyhelyzetek elkerülése végett a hibás csatlakozó kábelt csak a gyártóval, a
mi vevőszolgálatunkkal vagy hasonló szakképzettségű más személlyel szabad
pótoltatni azonos értékű kábellel.
Ha hosszabb időn át nem használja a készüléket, húzza ki a csatlakozó dugaszt
a konnektorból, ill. vegye ki belőle az elemeket!
Adott esetben a készüléken az alábbi szimbólumokat láthatja, amelyek a
következőkre hívják fel az Ön figyelmét:
A villám-szimbólum olyan alkatrészekre figyelmeztet a készülék belsejében, amelyek veszélyesen nagy feszültséget vezetnek.
A felkiáltójellel ellátott szimbólum a kísérőpapírokban található fontos
kezelési vagy karbantartási útmutatásokra hívja fel a használó figyelmét.
Az ezzel a szimbólummal jelzett készülékek „1. osztályú lézerrel“
működve tapogatják le a CD-t. A beépített biztonsági kapcsolók megakadályozzák, hogy a használó emberi szemmel nem látható, veszélyes
lézersugárzás hatásának legyen kitéve, amikor a CD-rekesz fel van
nyitva.
Ezeket a biztonsági kapcsolókat semmi esetre sem szabad „megpatkolni“ vagy
más módon manipulálni, különben Ön lézersugárhatás veszélyének teheti ki
magát.
45
H
5....-05-SLS 618 27.04.2004 16:45 Uhr Seite 45
Page 46

Összeállítás
• Vegye ki az összes készüléket a csomagolásból, és a belső csomagolóanyagot tegye vissza a dobozba!
• Lehetőleg őrizze meg a csomagolást a garanciális idő végéig!
• A subwoofer dugaszát csak akkor dugja a konnektorba, amikor már az
összes hangszóródoboz és csatlakozás helyesen össze van kötve a kábelekkel!
A hangszóródobozok optimális felállítása például a következő képet
mutathatja:
46
H
5....-05-SLS 618 27.04.2004 16:45 Uhr Seite 46
Page 47

A hangszórók lábainak és csatlakozásának felszerelése
1. A lábat mindig a két hozzá adott csővel szerelje fel!
2. Ezután bevezesse be a mellékelt hangszórókábelt alulról a lábba, majd a
felső végén lévő furaton keresztül hátrafelé húzza ki!
Tipp: A vezetékek keresztülhúzását megkönnyíti, ha előzőleg merev huzalt
(pl. virágdrótot) vezet be felülről a csőállvány nyílásába. Ezután alul ragasztószalaggal rögzíti a hangszóróvezetékeket a megvezető huzalon. Így a huzallal húzva, keresztülvezetheti a hangszóróvezetékeket a csőlábon.
3. Rögzítse a hangszórótartót (szögvas) a láb felső végén, és tolja be a hangszórót a tartóba!
4. Csíptesse rá ezután a kábelt a hangszóróra! Ügyeljen a helyes polaritásra (a
feketét a feketére, a pirosat a pirosra kell csatlakoztatni)!
5. Most dugja a hangszórókábel chinch-dugaszait a hangszóróknak
megfelelően a subwoofer AUDIO OUTPUT kimenetébe!
Csatlakoztatás
Figyelem: Ügyeljen rá, hogy a dugaszolt csatlakozások jól tartsanak. A laza
összekapcsolások zavaró mellékzörejeket okozhatnak.
1 2CH INPUT: Külső hangforrás (pl.
hifi-videorekorder) chinch-es csatlakoztatására szolgál.
2 5.1CH INPUT: 5.1-es kimenettel
rendelkező külső hangforrás (pl.
DVD-lejátszó) csatlakoztatására
szolgál.
3 AUDIO OUTPUT: Jobb és bal
oldali kimenet a fronthangszóródobozok csatlakoztatására (R front
right, L front left). Kimenet a központi hangszóródoboz csatlakoztatására (CEN Center).
Kimenet a jobb és bal oldali surround hangszóródobozok csatlakoztatására (RS surround right
speaker, LS surround left speaker).
4 Hálózati csatlakozó kábel
47
H
5....-05-SLS 618 27.04.2004 16:45 Uhr Seite 47
1
3
2
4
Page 48

A korrekt kábelezés a következő képet mutatja:
Miután a leírtak szerint összekötötte valamennyi hangszóródobozt, bedughatja a
subwoofer dugaszát egy előírásszerűen szerelt, érintésvédett 230 V, 50 Hz-es
konnektorba.
Távkapcsoló
Az elemek behelyezése (nem hozzá adott tartozék)
• Nyissa ki a távkapcsoló hátlapján lévő elemtartó rekesz fedelét!
• Tegyen be 2 db LR 3 „AAA” típusú 1,5 V-os elemet! Ügyeljen a helyes polaritásra (lásd az elemtartó rekesz fenekén)! Ha hosszabb időn át nem használja a távkapcsolót, vegye ki belőle az elemeket, nehogy az akkumulátorsav
„kifusson”!
• Mindig a teljes elemkészletet cserélje, ne csak az egyik elemet!
Figyelem: A használt elem nem a háztartási szemétbe való! Adja le a használt
elemeket az illetékes gyűjtőhelyen vagy a kereskedőnél! Soha ne dobjon elemet
a tűzbe!
Ha távkapcsolót használ, ügyeljen rá, hogy a távkapcsoló és a subwoofer között
semmilyen tárgy (pl. asztal, szék stb.) ne álljon az útban. Az ilyen tárgyak akadályozzák, hogy a távkapcsoló infravörös sugara elérje a subwoofer vevőjét.
Márpedig akkor a távirányítás nem működik.
48
H
5....-05-SLS 618 27.04.2004 16:45 Uhr Seite 48
Page 49

1 ST.BY: A berendezést STANDBY-üzemódra kapcsol-
ja.
2 5.1/2.1: Átkapcsolás az AC3/DTS, 2.1 és 5.1 között.
3 MEMO 1-2-3: A 3 előre beállított hangerőszint
közötti választásra.
Figyelem: Ezek az előre beállított értékek nem
módosíthatók.
4 CENTER +/-: Ezekkel a gombokkal lehet a központi
hangszóródoboz hangerejét beállítani.
5 BASS (SUBWOOFER) +/-: Ezekkel a gombokkal
lehet a subwoofer hangerejét beállítani.
6 SUR (SURROUND) +/-: Ezekkel a gombokkal lehet a
surround hangszórók hangerejét beállítani.
7 MASTER +/-: A hangerő beállítására szolgáló gom-
bok.
8 MUTE: Ezzel a gombbal a beállított hangerő vál-
toztatása nélkül kikapcsolhatja a hangszórókat.
FIGYELEM: E funkció kikapcsolásakor ügyeljen arra, hogy a teljes hangerő
ne a maximumra legyen beállítva!
Figyelem: Néhány gombot megtalál mind a készülék homloklapján, mind
pedig a távkapcsolón. Az azonosan jelölt gombok azonos hatást váltanak
ki.
Üzembe helyezés
Dugja a hálózati csatlakozó dugót előírásszerűen szerelt 230 V, 50 Hz-es
konnektorba!
1. Kapcsolja be és indítsa meg a hangforrását (pl. a DVD-lejátszót)!
2. A készülék elülső oldalán lévő ki-/bekapcsológombbal kapcsolja be a subwoofert!
3. Az 5.1/ 2.1 gombbal állítsa be a kívánt bemenő hangforrást!
4. A távkapcsolón lévő MASTER +/- szabályozóval lehet beállítani a teljes
hangerőt.
5. A távkapcsoló 4 - 7 jelű gombjai vagy a subwoofer elülső oldalán található
megfelelő gombok nyomogatásával lehet beállítani a központi, a surround
és a subwoofer hangszóró hangerejét.
6. Ha be akarja fejezni az üzemeltetést, a ki-/bekapcsológombbal kapcsolja ki
a subwoofert!
49
H
5....-05-SLS 618 27.04.2004 16:45 Uhr Seite 49
Page 50

Ezt a készüléket az Európa Tanács minden vonatkozó aktuális irányelve szerint
(pl. elektromágnesesség-elviselő képesség vagy kisfeszültség-elviselő képesség) ellenőriztük, és a legújabb biztonságtechnikai előírások szerint készült.
Megjegyezzük az esetleges müszaki változásokat!
Garancia
Garanciális igényeivel forduljon, kérem, a szerződéses kereskedőjéhez!
A garancia igazolására a pénztári nyugta szolgál. E nélkül az igazolás nélkül sem
díjmentes csere, sem díjtalan javítás nem végezhető.
Garanciális esetben eredeti csomagolásában adja át az alapkészüléket a pénz-
tári bizonylattal együtt annak a kereskedőnek, akitől a készüléket vásárolta!
*) A tartozékok hibái nem eredményezik automatikusan az egész készülék
díjtalan cseréjét. Ilyen esetekben forduljon „forró vonalunkhoz”! Az üvegtörésből,
ill. a műanyag alkatrészek töréséből eredő hibák megszüntetése mindenkor
térítésköteles.
Sem az elhasználódó tartozékokban, ill. kopó alkatrészekben (pl. szénkefe,
dagasztóhorog, hajtószíj, póttávvezérlő, pótfogkefe, fűrészlap stb.) bekövetkező
hibák, sem a tisztítás, karbantartás vagy a kopó alkatrészek cseréje nem esik a
garancia hatálya alá, következésképp térítésköteles.
Illetéktelen beavatkozás a garancia megszűnését eredményezi.
A garanciális idő után
A garanciális idő eltelte után a megfelelő szakkereskedésben vagy javítószolgálatnál végeztethet térítésköteles javításokat.
50
H
5....-05-SLS 618 27.04.2004 16:45 Uhr Seite 50
Page 51

Stünings Medien, Krefeld • 04/04
D-47906 Kempen/Germany · Industriering Ost 40
Internet: http://www.clatronic.de · email: info@clatronic.de
Technische Daten
Modell: SLS 618
Spannungsversorgung: 230 V, 50 Hz
Leistungsausgänge
L, R, C, LS, RS: 5 x 8 W
Subwoofer: 20 W
Rauschabstand: 60 dB
Dieses Gerät wurde nach allen zutreffenden,
aktuellen CE-Richtlinien geprüft, wie z.B.
elektromagnetische Verträglichkeit und
Niederspannungsdirektive und wurde nach den
neuesten sicherheitstechnischen Vorschriften
gebaut.
Technische Änderungen vorbehalten!
Bitte führen Sie das ausgediente Gerät
einer umweltgerechten Entsorgung zu.
5....-05-SLS 618 27.04.2004 16:45 Uhr Seite 52
 Loading...