

Page 1
Bedienungsanleitung/Garantie
Gebruiksaanwijzing/Garantie • Mode d’emploi/Garantie
Instrucciones de servicio/Garantía • Istruzioni per l’uso/Garanzia
Instruction Manual/Guarantee • Instrukcja obsługi/Gwarancja
A használati utasítás/garancia
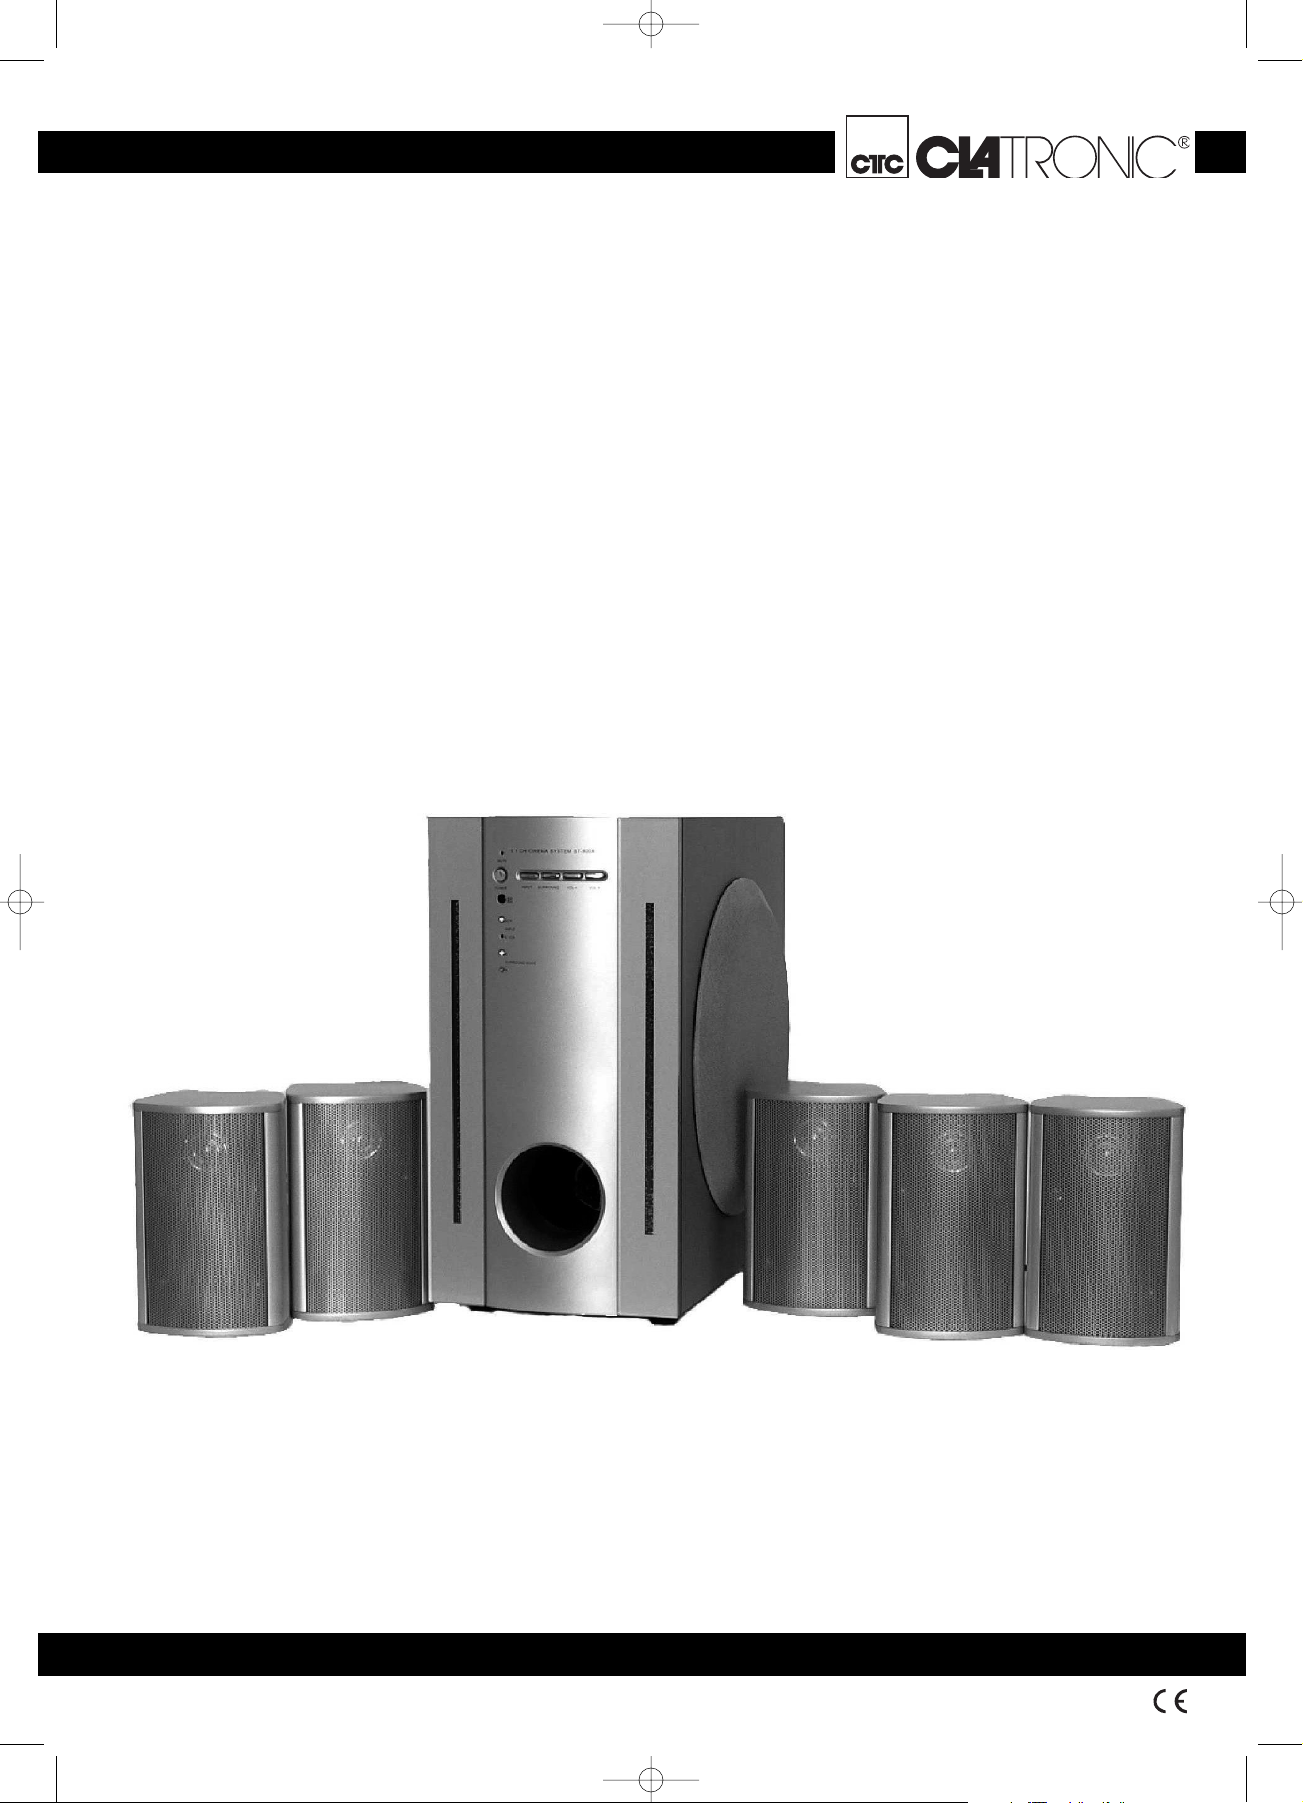
Surround-Lautsprecher-System
Surround luidsprekersysteem • Haut-parleur surround
Sistema de altavoces envolventes • Sistema di casse Surround
Surround Loudspeaker System • Zestaw nagłaśniający Surround
Surround-hangszórórendszer
SLS 570
5....-05-SLS 570 10.09.2003 14:21 Uhr Seite 1
Page 2

2
D
Allgemeine Sicherheitshinweise 3
Funktionen und Anwendung 3
Inhalt 3
Installation 3
Lautsprecher und Anordnung 3
Bedienelemente an der Gerätevorderseite 4
Anschlüsse an der Geräterückseite 4
Fernbedienung 4
Lautsprecheranschluss 4
Bedienungsanleitung 5
Checkliste für die Fehlersuche 5
Technische Spezifikationen 5
Garantie 6
NL
Algemene veiligheidsinstructies 7
Functies en bediening 7
Inhoud 7
Installatie 7
Luidsprekers en plaatsing 7
Bedieningselementen aan de voorzijde 8
Aansluitingen op de achterzijde 8
Afstandsbediening 8
Aansluiting luidsprekers 8
Handleiding 9
Checklist voor het opsporen van storingen 9
Technische beschrijving 9
Garantie 10
F
Conseils généraux de sécurité 11
Fonctions et utilisation 11
Contenu de l’emballage 11
Installation 11
Haut-parleurs et disposition 11
Eléments de commande sur le devant de l’appareil 12
Raccordements à l’arrière de l’appareil 12
Télécommande 12
Raccordement haut-parleurs 12
Mode d’emploi 13
Liste de contrôle en cas de problème 13
Spécifications techniques 13
Garantie 14
E
Advertencias generales sobre la seguridad 15
Funciones y aplicación 15
Contenido 15
Instalación 15
Altavoces y disposición 15
Elementos de manejo en el frontal del aparato 16
Conexiones en la trasera del aparato 16
Mando a distancia 16
Conexión de los altavoces 17
Instrucciones de Manejo 17
Lista de chequeo para buscar los errores 17
Especificaciones técnicas 18
Garantía 18
I
Norme generali di sicurezza 19
Funzioni e uso 19
Contenuto 19
Installazione 19
Altoparlanti e disposizione 19
Comandi sul lato anteriore dell’apparecchio 20
Collegamenti sul lato posteriore dell’apparecchio 20
Telecomando 20
Collegamento altoparlanti 20
Istruzioni per l’uso 21
Checklist per la ricerca dei guasti 21
Specifiche tecniche 21
Garanzia 22
GB
General safety instructions 23
Features and applications 23
Packing list 23
Installation 23
Speakers and placement 23
Front panel controls 24
Rear panel connectors 24
Remote control 24
Connecting speakers 24
Operation instructions 25
Trouble shooting Guide 25
Technical specifications 25
Guarantee 26
PL
Ogólne wskazówki dotyczące bezpieczeństwa 27
Fukcje i zastosowanie 27
Zawartość 27
Instalacja 27
Głośniki i rozmieszczenie 27
Elementy obsługi z przodu urządzenia 28
Podłączenia na tyle urządzenia 28
Pilot 28
Podłączenie głośników 29
Instrukcja obsługi 29
Lista kontrolna defektów 29
Specyfikacja techniczna 30
Gwarancja 30
H
Általános biztonsági előírások 31
Funkciók és alkalmazás 31
Tartalom 31
Installáció 31
Hangszórók és elrendezés 31
Kezelőelemek a készülék homloklapján 32
Csatlakozások a készülék hátlapján 32
Távkapcsoló 32
Hangszóró-csatlakozás 33
Kezelési utasítás 33
Ellenőrző lista a hibakereséshez 33
Műszaki specifikációk 34
Garancia 34
Inhalt
Inhoud • Sommaire • Indice • Indice • Contents • Spis treści • Tartalom
5....-05-SLS 570 10.09.2003 14:21 Uhr Seite 2
Page 3
Herzlichen Glückwunsch zum Kauf dieses Produkts!
Bitte lesen Sie diese Bedienungsanleitung sorgfältig
durch, bevor Sie das Gerät in Gebrauch nehmen.
Wenn Sie Fragen zu Ihrer Anlage haben, wenden Sie
sich an Ihren Händler oder direkt an uns. Wir handeln
entsprechend unserer Unternehmensstrategie "Gutes
Design und hochwertige Verarbeitung!" und bieten Ihnen
eine Reihe von audio-visuellen Produkten höchster Qualität. Ihre Anmerkungen und Anregungen zu unseren Produkten sind uns immer willkommen.
Bitte bewahren Sie diese Bedienungsanleitung an einem
sicheren Ort auf. Vielen Dank!
Allgemeine Sicherheitshinweise
Um das Brand- oder Stromschlagrisiko gering zu halten,
die Anlage nicht dem Regen oder Feuchtigkeit
aussetzen. Somit die Anlage auch nicht in unmittelbarer
Nachbarschaft zu Wasser einsetzen, wie z.B. neben der
Badewanne, einem Swimmingpool oder in einem feuchten Keller.
Anlage nur entsprechend ihrem Verwendungszweck einsetzen.
Die Anlage nur an eine ordnungsgemäß installierte
Schutzkontaktsteckdose anschließen. Achtgeben, dass
die spezifizierte Netzspannung mit der Netzspannung an
der Steckdose übereinstimmt.
Wenn ein externer Hauptnetzanschluss verwendet wird,
auf korrekte Polarität und Spannung achten.
Batterien stets entsprechend der Polrichtung einlegen.
Anlage stets so installieren, dass vorhandene
Ventilationsöffnungen nicht verdeckt sind.
Niemals das Gehäuse des Gerätes öffnen.
Unsachgemäße Reparaturen können ein beträchtliches
Risiko für den Nutzer darstellen. Sollte das Gerät defekt
sein, was insbesondere für das Netzanschlusskabel gilt,
nicht länger in Betrieb nehmen, sondern von einem Fachmann reparieren lassen. Das Netzanschlusskabel regelmäßig auf Beschädigung prüfen.
Gleichwertiges Kabel vom Hersteller, unserer Kundenserviceabteilung oder einer ähnlich qualifizierten Person beziehen.
Wenn die Anlage längere Zeit nicht benutzt wird, den
Netzstecker aus der Steckdose ziehen oder Batterien
herausnehmen.
Diese Symbole sind eventuell am Gerät angebracht und
dienen als Hinweis auf folgende Punkte:
Das Blitzzeichen weist den Nutzer auf Teile
innerhalb des Gerätes hin, die gefährlich hohe Spannungspegel aufweisen.
Das Symbol des Ausrufezeichens weist den
Nutzer auf wichtige Bedienungs- und
Wartungsanleitungen in der Begleitdokumentation hin.
Funktionen und Anwendung
• 5.1 Kanaleingang kann an einen DVD Player mit eingebauten Decoder angeschlossen werden.
• Es sind 2 analoge Eingänge und ein 5.1CH-Audio-Eingang vorhanden.
• Dolby Surround Pro Logic.
• Linker und rechter Frontlautsprecher-, Subwoofer-,
Center-, Surround-Kanal-Niveaueinstellung (Pegeleinstellung)
• Fernbedienung
• Sparsamer Standby-Modus erfüllt die Anforderungen
gemäß dem europäischen "Blauen Engel" Symbol.
• Blaue Spiegellinse.
Die Front- und Surround Lautsprecher sind für Fuss- und
Wandmontage geeignet.
Inhalt
5 Satelliten-Lautsprecher
(einschließlich Lautsprecherkabel)
1 Subwoofer
1 Bedienungsanleitung
1 Fernbedienung
4 Ständersets
Installation
Sämtliche Anlagenteile aus der Packung nehmen und
das innere Verpackungsmaterial wieder in den Kasten
legen.
Die Verpackung sofern möglich während der
Garantielaufzeit aufheben.
Den Stecker des Subwoofers erst dann in die Steckdose
stecken, wenn alle Lautsprecher und Anschlüsse korrekt
verbunden sind!
Zwecks optimaler Installation der Lautsprecheranlage bitte folgender Anleitung folgen:
LS: linker Surround-Lautsprecher (hinten)
L: Lautsprecher vorne links
SW: Subwoofer
C: Center/Mitte Lautsprecher
R: Lautsprecher vorne rechts
RS: rechter Surround-Lautsprecher (hinten)
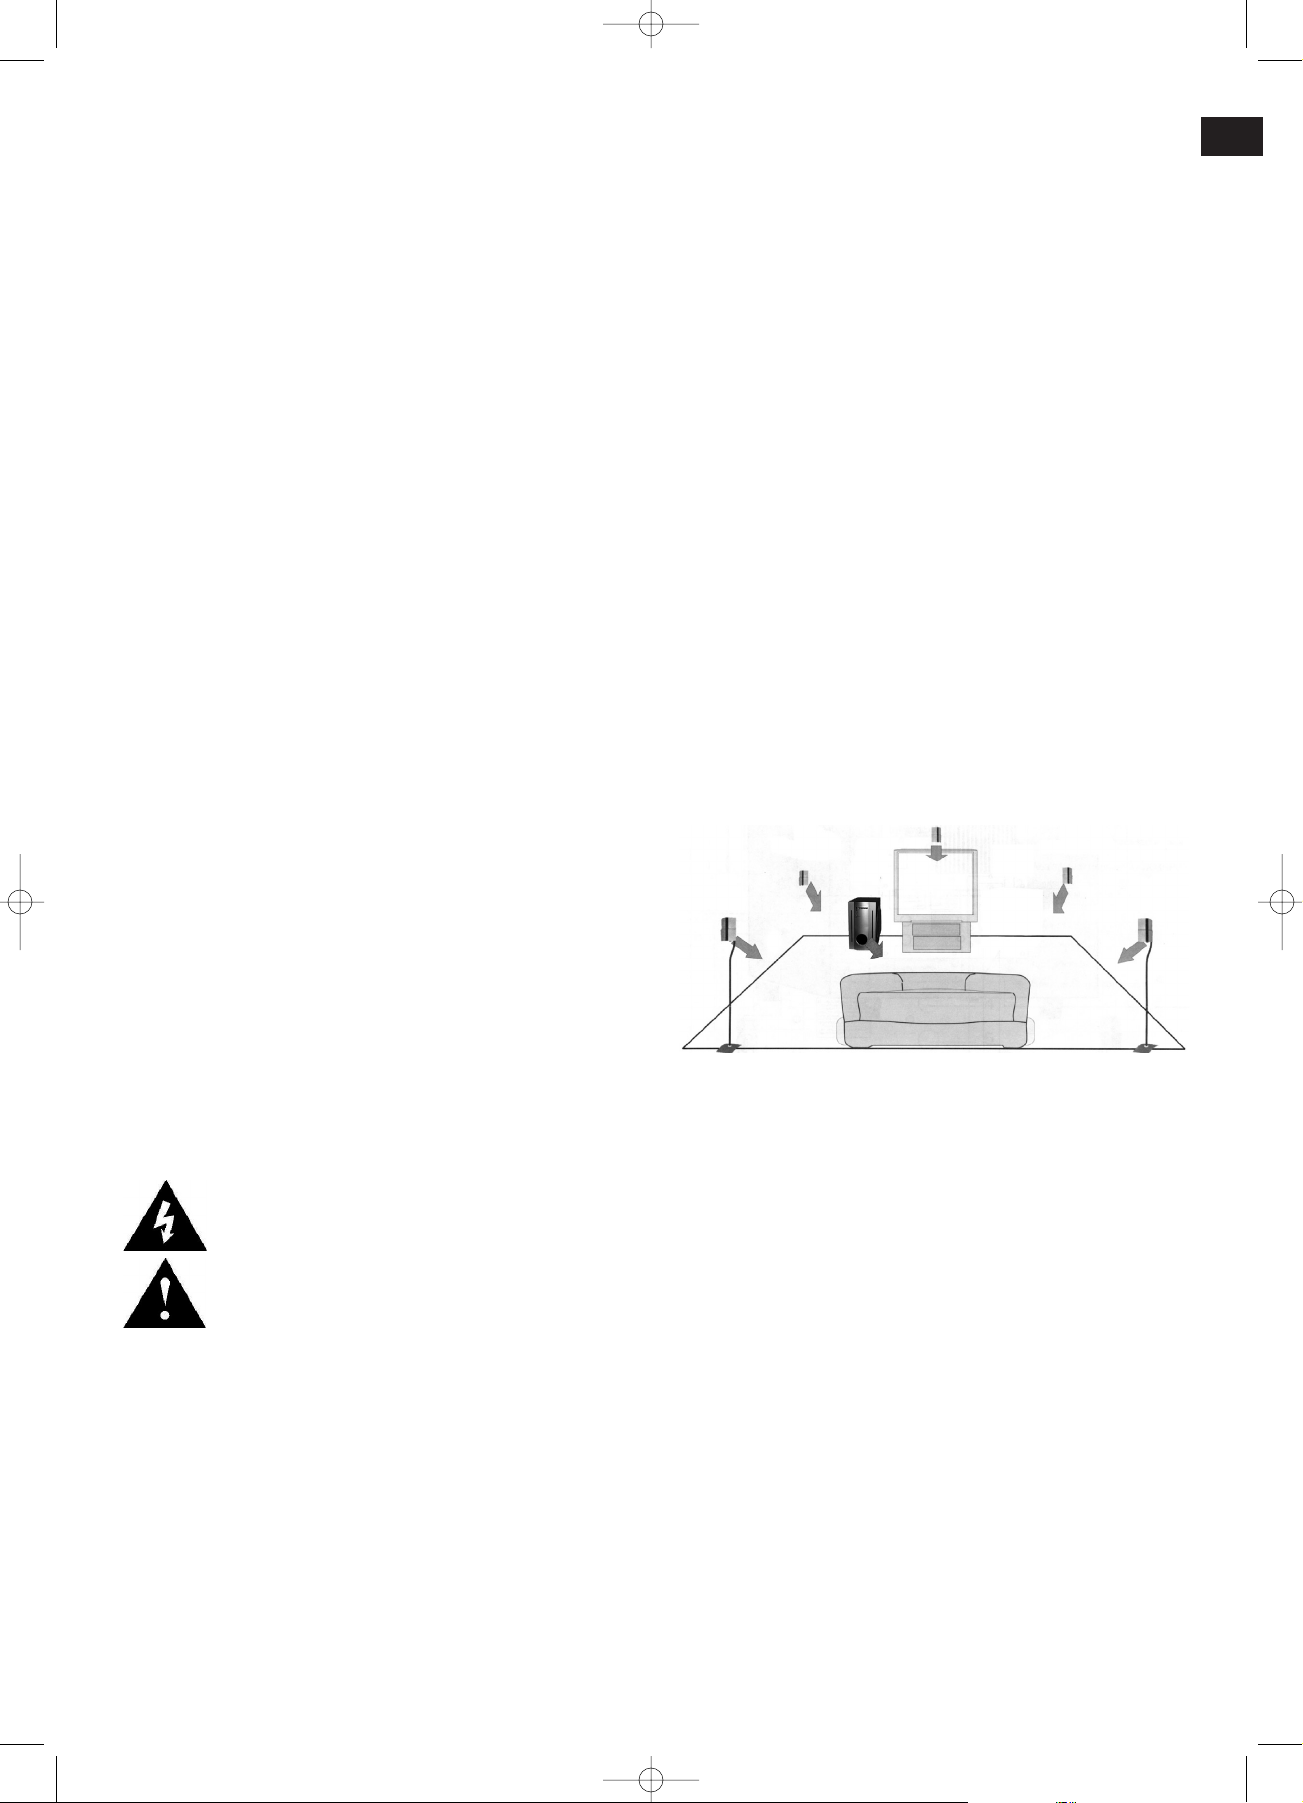
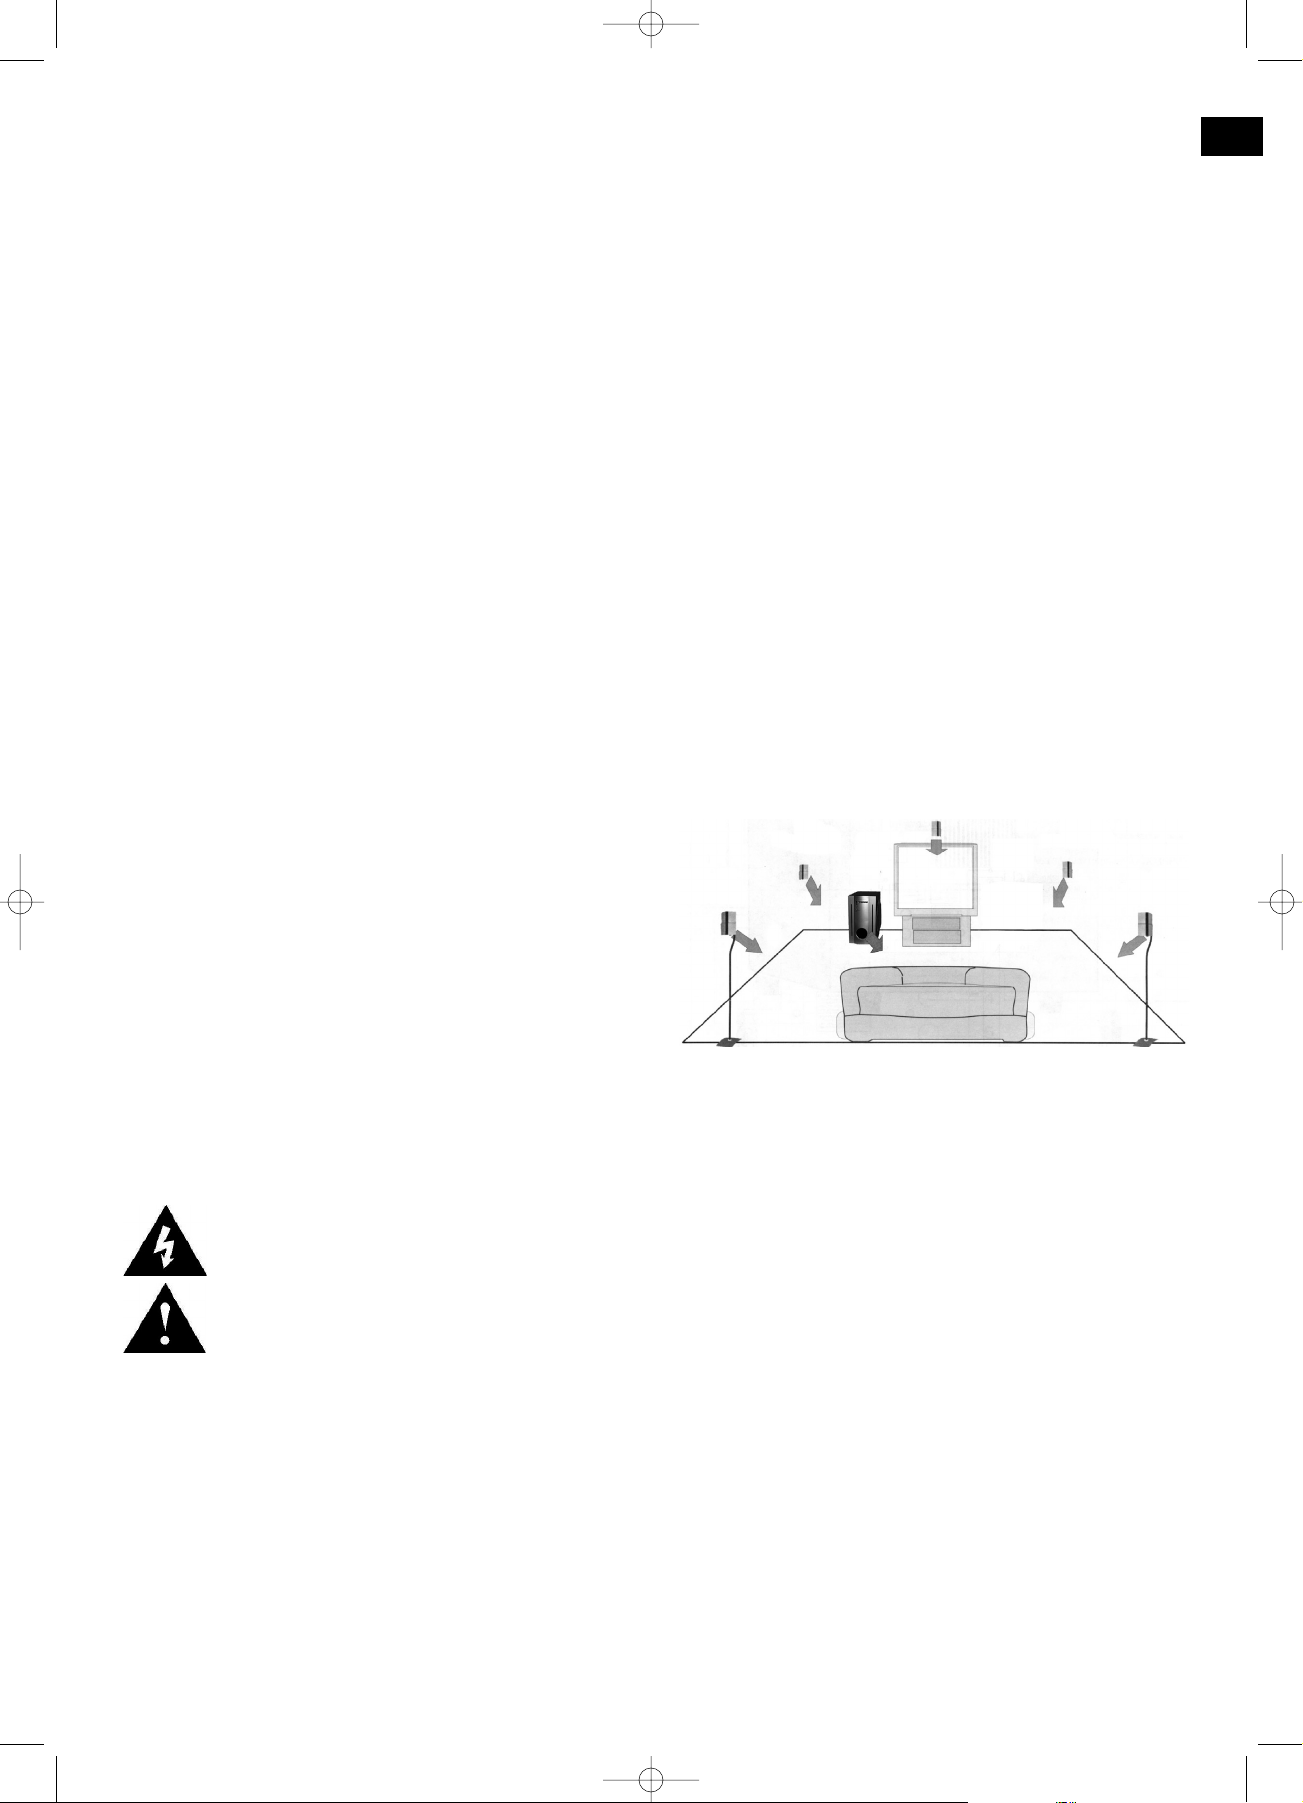
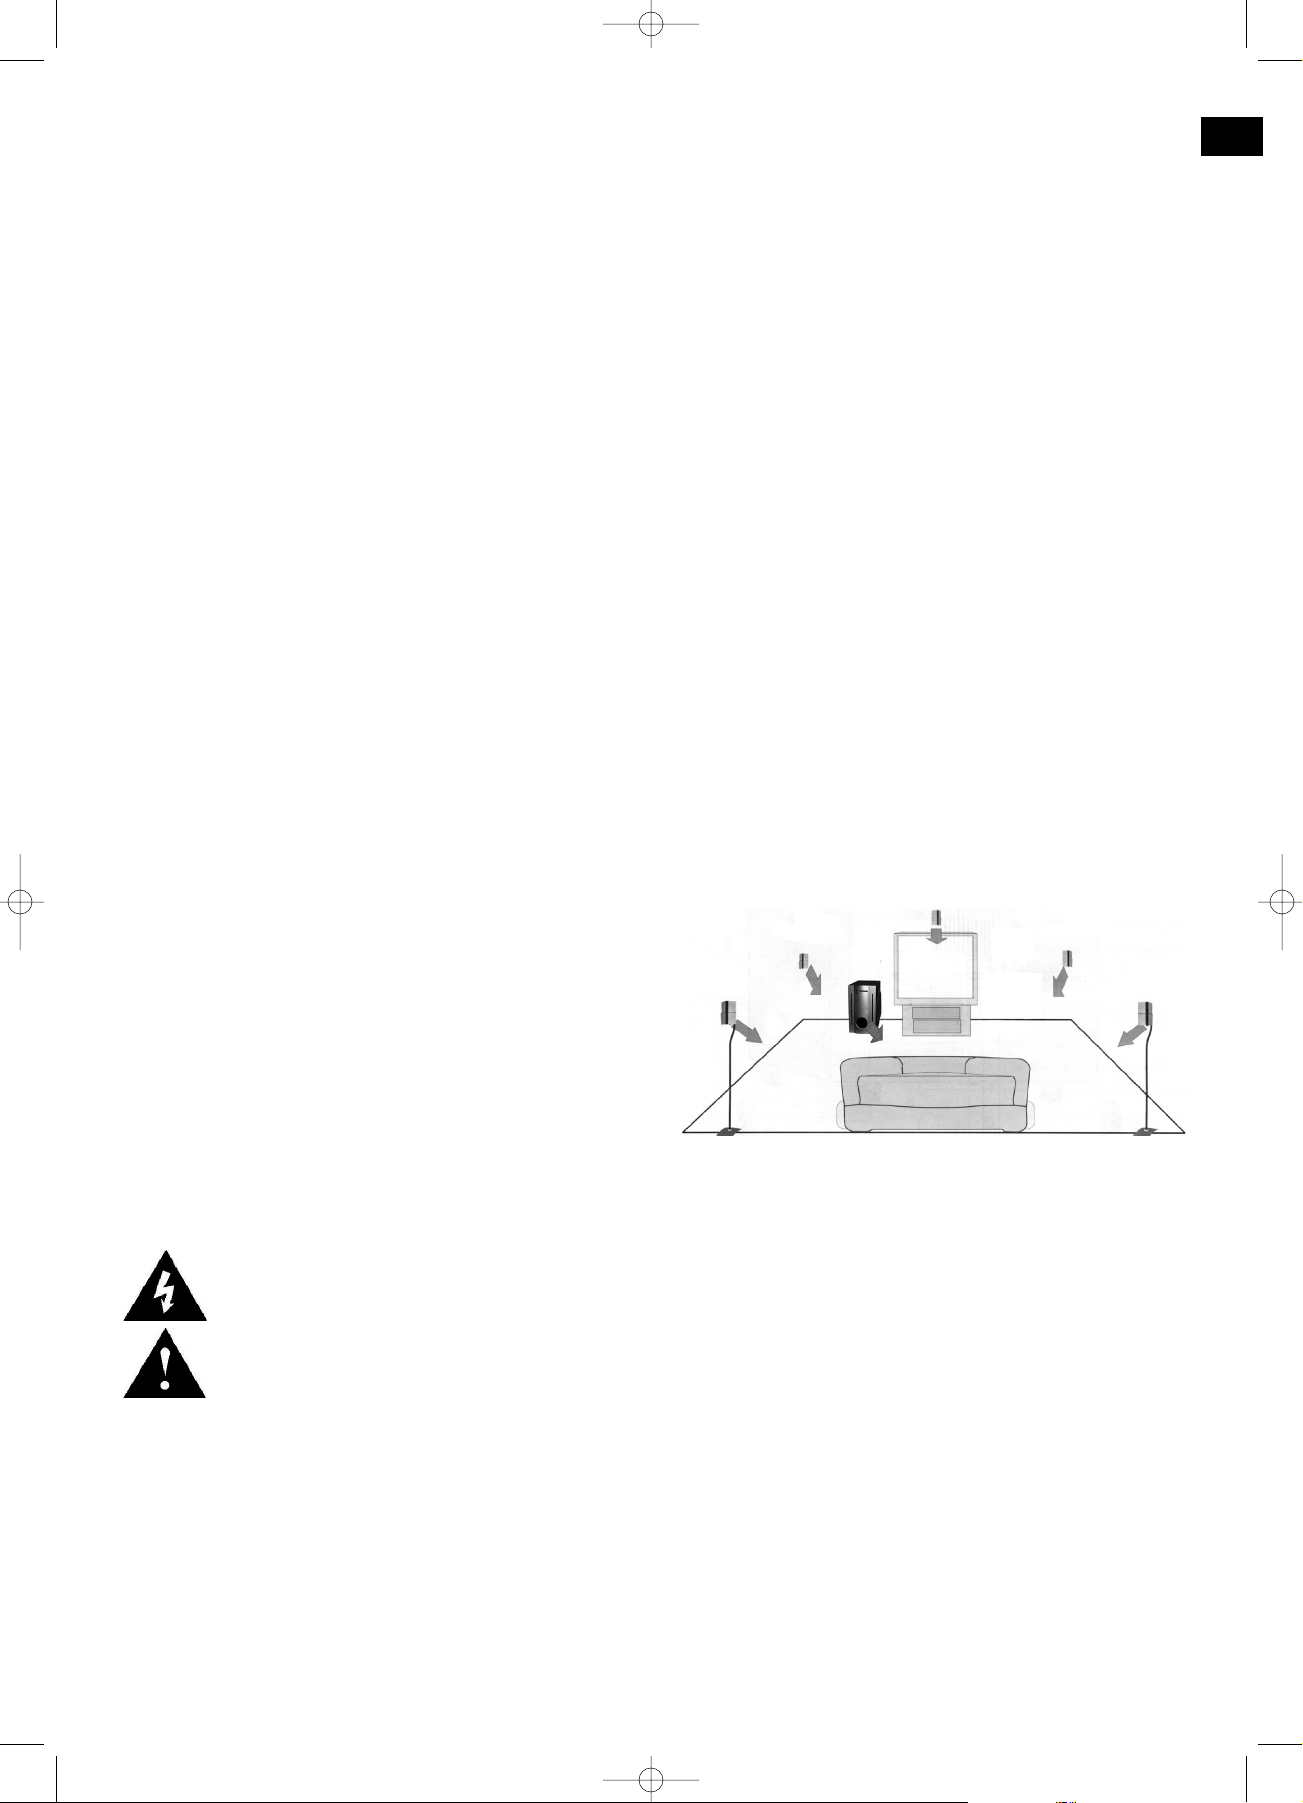
Lautsprecher und Anordnung
1. Vordere Lautsprecherkanäle: Geben die
Hauptbestandteile des Stereotons wieder, z. B.
Sprache und Musik. Deshalb sollten Sie die Lautsprecher wie bei einer normalen Stereoanlage links und
rechts gegenüber der Hörposition anbringen.
2. Center-Lautsprecherkanal: Gibt im wesentlichen bei
einem Film die Sprache wieder. Deshalb ist dieser
Lautsprecher direkt vor dem Hörer zu platzieren. Normalerweise kann er einfach auf das Fernsehgerät gestellt werden.
3. Hintere Lautsprecherkanäle: Geben einen Teil der
Umgebungs-(Rundum-)-geräusche eines Films, sowie
spezielle Toneffekte hinter dem Hörer wieder. Dieser
Teil des Tons ist normalerweise leiser als andere
Kanäle. Die hinteren Lautsprecher sind hinter dem Hörer zu montieren.
4. Subwoofer: verstärkt hauptsächlich den Bassanteil,
um eine Atmosphäre wie im Kinosaal zu erzeugen. Die
Abbildung zeigt beispielsweise die Anordnung in einem
normalen Wohnzimmer.
Um den Kinosound besser wiederzugeben, schlagen wir
vor, dass Sie Ihre Lautsprecher entsprechend der oben
gezeigten Darstellung aufstellen. Da der CenterLautsprecher (C ) ein antimagnetisches Gerät ist, kann er
3
D
C
Center/MitteLautsprecher
L
Front-
Lautsprecher
links
LS
Surround-
Lautsprecher
links
R
Front-
Lautsprecher
rechts
RS
Surround-
Lautsprecher
rechts
SW
Subwoofer
5....-05-SLS 570 10.09.2003 14:21 Uhr Seite 3
Page 4
einfach auf ein Fernsehgerät gestellt werden. Dank des
Center-Lautsprechers können Sie die vorderen linken (L)
und rechten (R) Lautsprecher ordnungsgemäß weit voneinander entfernt aufstellen. Da die Richtungswirkung der
mittleren und hohen Frequenzen stärker ist, als die der
Bassfrequenzen kann der Subwoofer (SW) auch in einer
Raumecke angeordnet sein.Wenn Sie einen stärkeren
Bass mögen, können Sie den Subwoofer näher an die
Hörposition rücken. Außer beim Subwoofer sollten sämtliche Mittelachsen der Lautsprecher in Ohrhöhe des Zuhörers platziert werden. Die Surround-Lautsprecher (LS)
und (RS) sind an zwei Seiten hinter dem Hör-/Zuschauerplatz anzuordnen, wobei sie mit der Vorderseite in Richtung der Hörposition zu drehen sind.
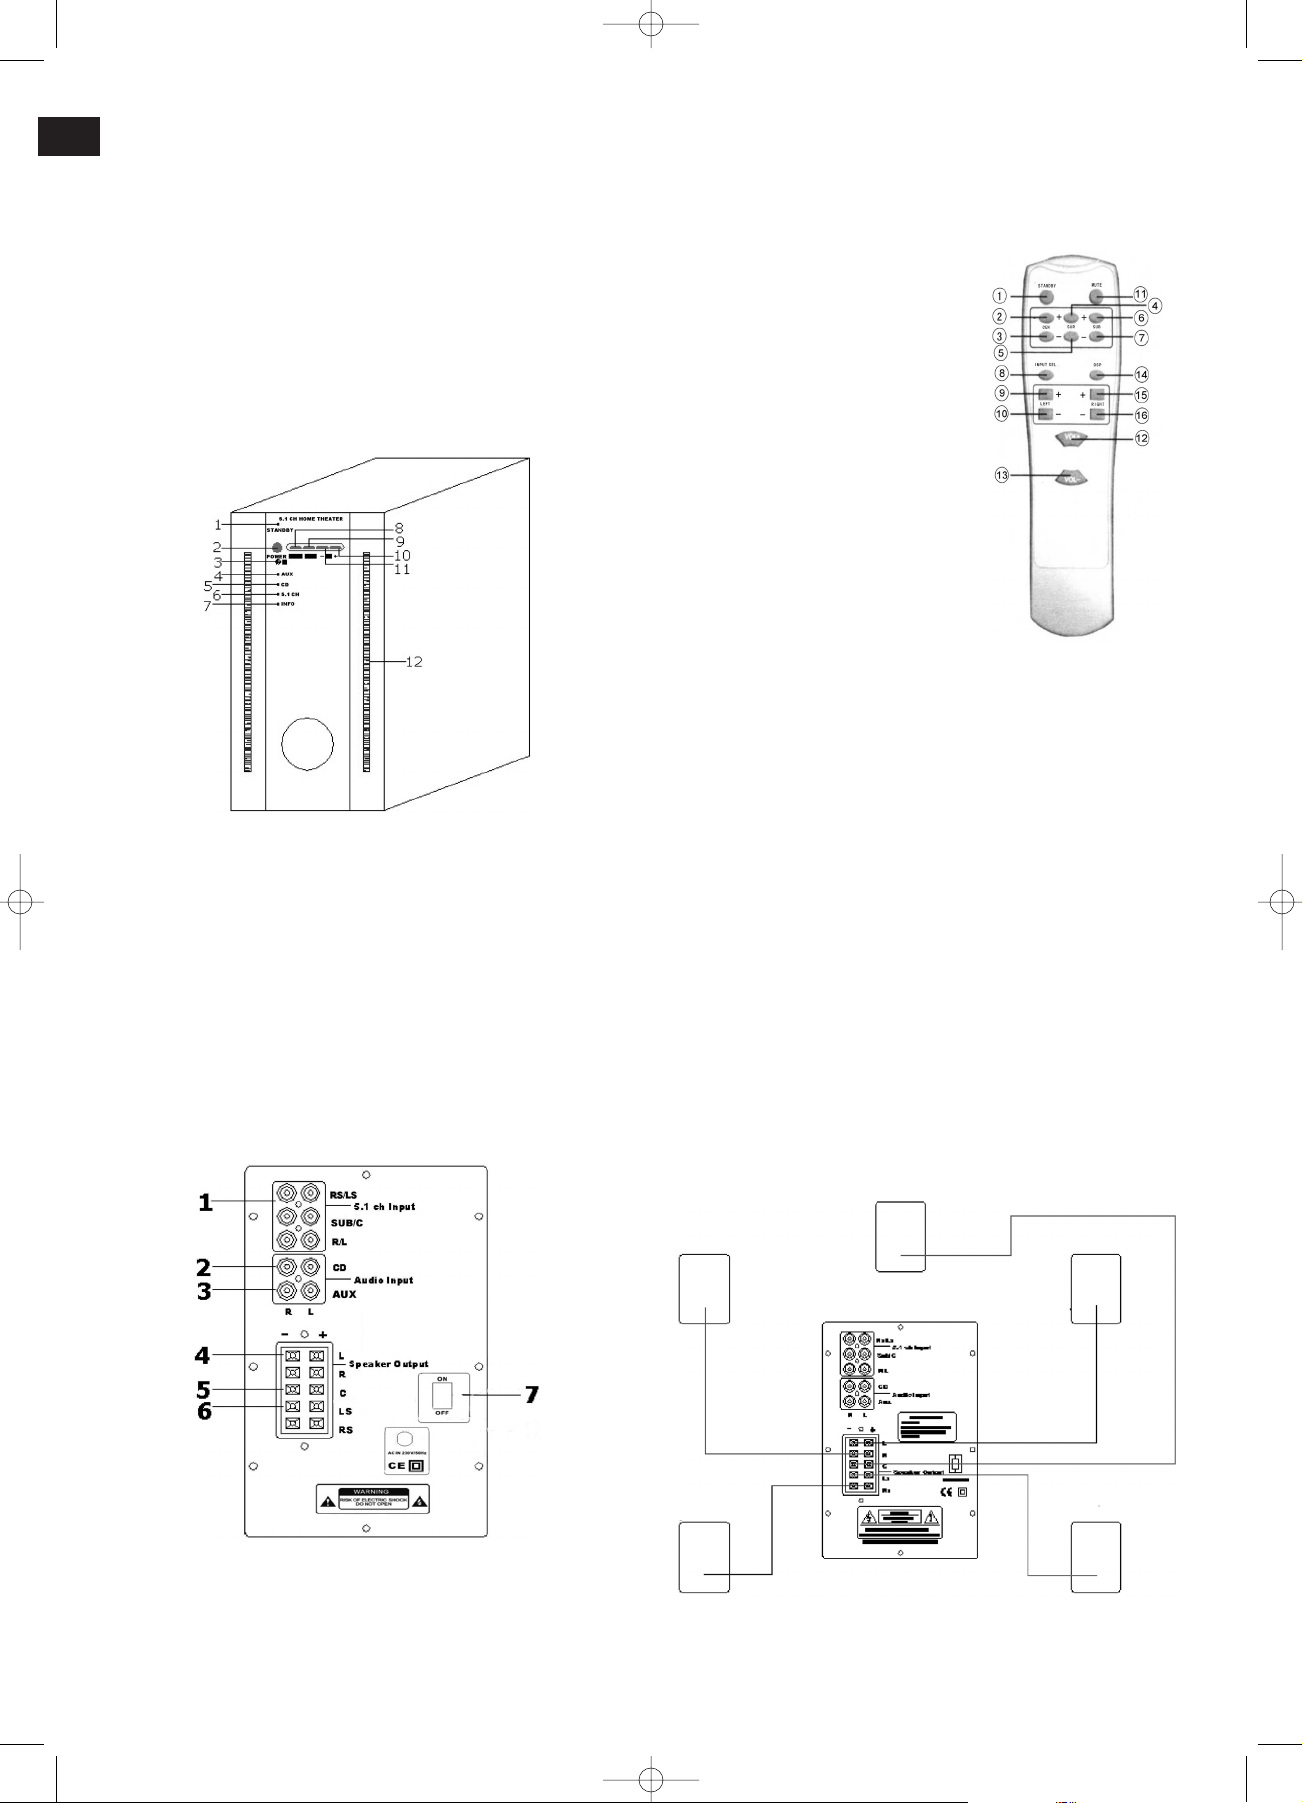
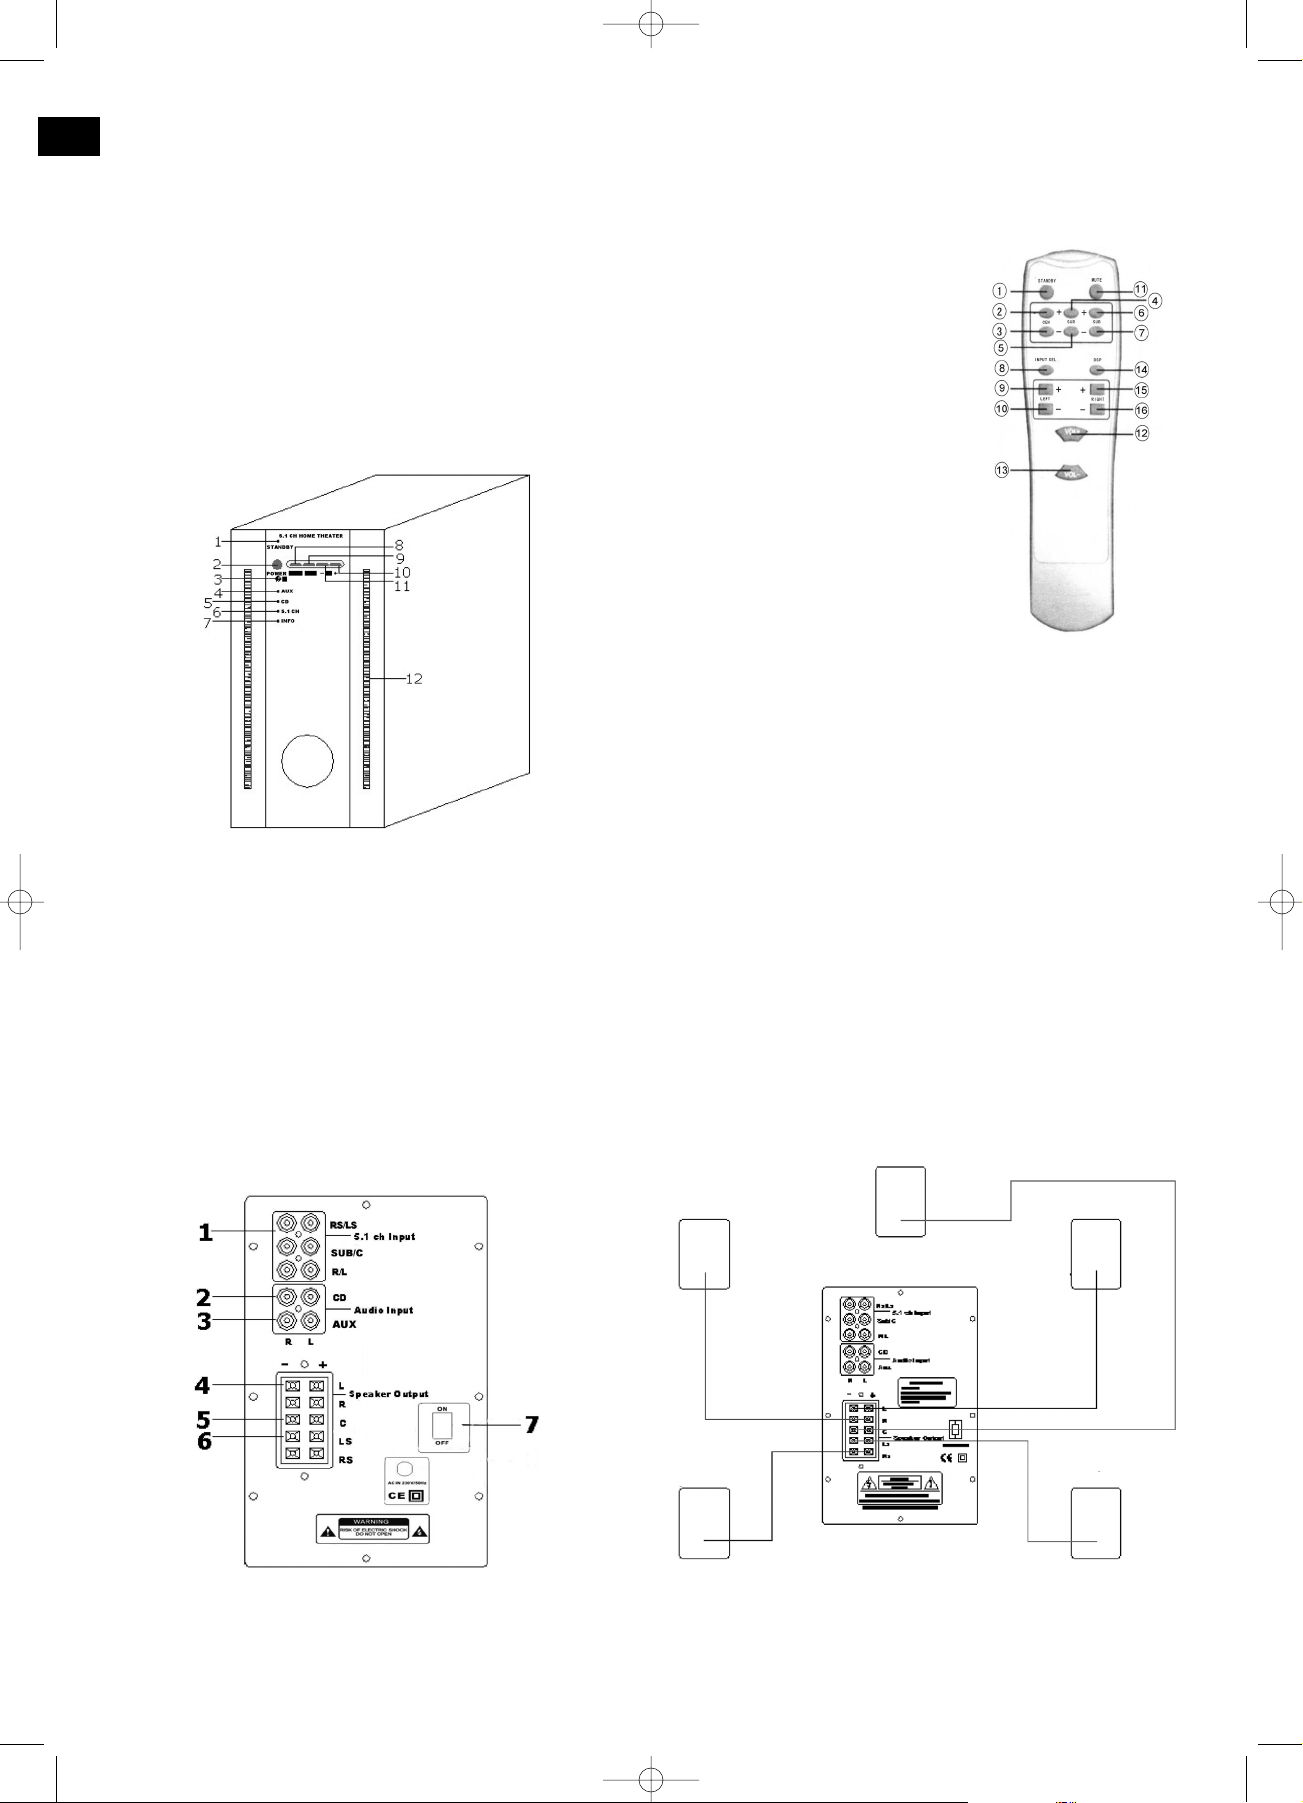
Bedienelemente an der Gerätevorderseite
1. STANDBY-Anzeige
2. POWER Taste (An/Aus)
3. Fernbedienungssensor
4. AUX-Eingang
5. CD-Eingang
6. 5.1 CH-Eingang
7. INFO Informationsanzeige
8. INPUT Quellenwahlschalter
9. MUTE Stummschalter
10. VOL + Hauptlautstärke erhöhen
11. VOL - Hauptlautstärke vermindern
12. Blaues Licht
Anschlüsse an der Geräterückseite
1. Audio-Eingang – 5.1 Kanäle
2. Audio-Eingang – CD (2-CH-Stereo)
3. Audio-Eingang – AUX (2-CH-Stereo)
4. Audio-Ausgang – FL/FR (Front-Lautsprecher)
5. Audio-Ausgang – C (Center-Lautsprecher)
6. Audio-Ausgang – LS/RS (Surround-Lautsprecher)
7. ON/OFF – Ein-/Ausschalter
Fernbedienung
1. STANDBY
2. CEN + / Lautstärke erhöhen –
Center-Lautsprecher
3. CEN - / Lautstärke mindern –
Center-Lautsprecher
4. SUR +/ Lautstärke erhöhen –
Surround-Lautsprecher
5. SUR - / Lautstärke mindern –
Surround-Lautsprecher
6. SUB + / Lautstärke erhöhen –
Subwoofer
7. SUB - / Lautstärke mindern –
Subwoofer
8. INPUT SEL Audio-Eingang
Quellenwahlschalter
9. LEFT + / Level erhöhen
10. LEFT - / Level vermindern
11. MUTE Stummschalterung
12. VOL + / Hauptlautstärke
erhöhen
13. VOL - / Hauptlautstärke mindern
14. DSP-Steuerung
15. RIGHT + / Level erhöhen
16. RIGHT - / Level vermindern
Batterien einlegen (Batterien nicht im Lieferumfang
enthalten)
• Öffnen Sie den Batteriefachdeckel auf der Rückseite
der Fernbedienung.
• Legen Sie 2 Micro Batterien des Typs LR3 „AAA“ 1,5V
ein. Achten Sie auf die richtige Polarität (siehe Batteriefachboden)! Wird die Fernbedienung längere Zeit nicht
genutzt, entnehmen Sie bitte die Batterien, um ein
„Auslaufen“ von Batteriesäure zu vermeiden.
• Wechseln Sie immer den kompletten Batteriesatz aus,
erneuern Sie nicht nur eine Batterie.
Achtung: Batterien gehören nicht in den Hausmüll. Bitte
geben Sie verbrauchte Batterien bei zuständigen Sammelstellen oder beim Händler ab.Werfen Sie Batterien niemals
ins Feuer.
Lautsprecheranschluss
1. 5.1ch input: Der Eingang dient zum Anschluss einer
externen Tonquelle an einen 5.1-Ausgang (z.B. DVDPlayer).
4
D
Center/MitteLautsprecher
Front-
Lautsprecher
links
Surround-
Lautsprecher
links
FrontLautsprecher
rechts
Surround-
Lautsprecher
rechts
5....-05-SLS 570 10.09.2003 14:21 Uhr Seite 4
Page 5

2. CD: Der CD-Eingang dient zum Anschluss einer exter-
nen Tonquelle an einen CD-Ausgang (z. B. CD-Player)
3. AUX input: Der AUX-Eingang dient zum Anschluss ei-
ner externen Tonquelle an einen CD-Ausgang (z.B. HiFi-Video-Recorder).
4. L & R: Linker und Rechter Ausgang für den Anschluss
der Front-Lautsprecher (linker Frontlautsprecher =
weiß, rechter Frontlautsprecher = rot).
5. C: Ausgang für den Anschluss des CenterLautsprechers (Center-Kanal = gelb).
6. LS & RS: Ausgang für den Anschluss des linken und
rechten Surround-Lautsprechers (Surround links =
grün, Surround rechts = braun).
• Hinweis: Beim Anschluss der Kabel auf die richtige Polarität der Ausgangsbuchsen achten! Die jeweiligen Anschlussfarben der Lautsprecherausgänge am Subwoofer müssen mit den entsprechend farbigen
Anschlussbuchsen des entsprechenden Lautsprechers
verbunden werden!
• Dies gilt ebenso für die schwarzen Buchsen (schwarz
an schwarz anschließen)!
Montage der Front- und Surround-Lautsprecher
1. Stecken Sie bitte die beiden Teile des Standrohres zusammen. Schrauben Sie den Standfuß an das
Standrohr.
2. Führen Sie bitte die Lautsprecherleitung durch das
Standrohr.
3. Stecken Sie anschließend den Lautsprecher auf den
Halter.
Bedienungsanleitung
1. Tonquelle (z. B. DVD-Player) anschließen.
2. Das Netzkabel an eine vorschriftsmäßig installierte
Schutzkontaktsteckdose 230 V/ 50Hz anschließen.
Schalten Sie mit dem Ein-/Ausschalter auf der Rückseite des Gerätes ein. Die STANDBY-Anzeige leuchtet.
3. Tonquelle starten.
4. An der Fernbedienung die STANDBY Taste oder am
Gerät die POWER Taste drücken. Die blauen Lichtleisten des Subwoofers leuchten auf.
5. Über INPUT SEL Taste an der Fernbedienung oder am
Gerät die gewünschte Tonquelle anwählen.
6. Mit VOLUME/ADJ-Steuertasten kann die Gesamtlautstärke eingestellt werden.
7. Durch Drücken der Tasten CEN +/-, SUR+/-, SUB +/-,
LEFT +/- und RIGHT +/- an der Fernbedienung, können Sie die Lautstärke der einzelnen Lautsprecher einstellen.
8. Wenn Sie sich im CD/AUX-Eingangs-Modus befinden,
können Sie durch Drücken der DSP Taste die Dolby
Surround Pro Logic-Funktion (DSP) aktivieren.
9. Wenn in irgendeinem Betriebsmodus die MUTE Taste
gedrückt wird, schaltet die Anlage stumm.
10. Der Modus INFO-Anzeige:
Schnelles Blinken:
• Währenddessen Sie die Tasten VOL+/-, CEN +/-,
SUR+/-, SUB +/-, LEFT +/- oder RIGHT +/- drücken.
Bei Maximum oder Minimum ist die Anzeige aus.
Langsames Blinken:
• Durch Drücken der MUTE Taste wird die Anlage
stumm geschaltet.
11. Durch Drücken der STANDBY Taste oder der POWER
Taste am Gerät können Sie die Anlage in den StandbyModus schalten.
12. Um das Gerät auszuschalten stellen Sie den Ein-/Ausschalter auf OFF.
13. Wenn sämtliche LED-Anzeigen für AUX/CD/5.1CH und
INFO leuchten, ist der Systemschutz aktiviert, es liegt
ein Fehler vor: z. B. Kurzschluss am Lautsprecherkabel.
Technische Spezifikationen
Lautsprecher-Set
Satelliten-Box
+ Typ: versiegelt
+ Material: Aluminium
+ Antriebseinheit: 23/4 inch Vollbereich
+ Empfindlichkeit: 84dB/1 W @ 1 M
+ Impedanz: 4 Ohm
+ Leistungsabgabe: 10 W
+ Oberfläche: silberfarben
+ Abmessungen: 140 mm x 90 mm x 42 mm (H x B x T)
+ Lautsprecherdraht: Metallnetz
Subwoofer-Box
+ Typ: Reflex
+ Antriebseinheit: 51/
4 inch
+ Empfindlichkeit: 8 Ohm
+ Leistungsabgabe: 40 W
+ Abmessungen: 310 mm x 155 mm x 290 mm
(H x B x T)
5
D
Problem
Kein Ton und
keine Anzeige
Kein Ton,
jedoch Anzeige
vorhanden
Kein Ton aus
den Frontlautsprechern
Kein Ton aus
einem Frontlaut-
sprecher
Kein Ton vom
Center-
Lautsprecher
Kein Ton von den
Surround-Laut-
sprechern
Kein Surround-
Effekt
Mögliche Ursache
und Abhilfemaßnahme
Netzstecker ist nicht richtig in die
Steckdose gesteckt.
Netzschalter steht auf OFF.
Die Lautstärke steht auf 0.
Das Lautsprecherkabel ist gelöst.
RCA-Kabel prüfen.
Lautsprecherkabel schlecht
angeschlossen.
Lautsprecherkabel wieder korrekt
anschließen.
RCA-Kabel wieder korrekt
anschließen.
Lautsprecherkabel schlecht
angeschlossen (positiv und negativ).
Lautsprecher ist nur an einem Punkt
angeschlossen.
RCA-Kabel auf losen Anschluss
prüfen.
Der Modus ist nicht korrekt eingestellt.
Richtig einstellen.
Center-Lautstärke steht auf 0.
Das Lautsprecherkabel (positiv und
negativ) ist nur an einem Punkt angeschlossen.
Der Modus ist nicht korrekt eingestellt.
Richtig einstellen.
Surround-Lautstärke steht auf 0.
Das Lautsprecherkabel (positiv und
negativ) ist nur an einem Punkt angeschlossen.
Der Modus ist nicht korrekt eingestellt.
Das Lautsprecherkabel (positiv und
negativ) ist nur an einem Punkt
angeschlossen.
Checkliste für die Fehlersuche
5....-05-SLS 570 10.09.2003 14:21 Uhr Seite 5
Page 6

+ Oberfläche: silberfarben
+ eingebauter Multi-Kanal-Leistungsverstärker
Multi-Kanal-Leistungsverstärkereinheit
+ Input-Quelle: 3 Gruppen 5.1Kanal/CD/AUX
+ DSP-Modus: (nur CD/AUX in)
+ Leistungsabgabe:
2 x 10 W (THD = 1%, 8 Ohm) Frontkanal
1 x 10 W (THD = 1%, 8 Ohm) Centerkanal
2 x 10 W (THD = 1%, 8 Ohm) Hinterer Kanal
1 x 30 W (THD = 1%, 8 Ohm) Subwoofer-Kanal
+ Frequenzrespons
150 Hz – 20000 Hz/+3dB 5 Kanal-Satellit
20 Hz – 200 Hz/+3dB Subwoofer
+ Soundlevel Einstellbereiche +/- 8 dB/Kanal
+ Vollfunktions-Schutzkreis: Die Anlage wurde entspre-
chend sämtlicher, aktuell geltender CE-Richtlinien wie
z. B. hinsichtlich der elektromagnetischen Verträglich-
keit und Niedrigstromrichtlinien geprüft, es können je-
doch ohne nähere Hinweise technische Veränderun-
gen vorgenommen werden.
Garantie
Wir übernehmen für das von uns vertriebene Gerät eine
Garantie von 24 Monaten ab Kaufdatum (Kassenbon).
Innerhalb der Garantiezeit beseitigen wir unentgeltlich die
Mängel des Gerätes oder des Zubehörs*), die auf Materialoder Herstellungsfehler beruhen, durch Reparatur oder,
nach unserem Ermessen, durch Umtausch.
Garantieleistungen bewirken weder eine Verlängerung der
Garantiefrist, noch beginnt dadurch ein Anspruch auf eine
neue Garantie!
Als Garantienachweis gilt der Kaufbeleg. Ohne diesen
Nachweis kann ein kostenloser Austausch oder eine
kostenlose Reparatur nicht erfolgen.
Im Garantiefall geben Sie bitte das Grundgerät in der Originalverpackung zusammen mit dem Kassenbon an Ihren
Händler.
*) Schäden an Zubehörteilen führen nicht automatisch zum
kostenlosen Umtausch des kompletten Gerätes.Wenden
Sie sich in desem Fall bitte an unsere Hotline! Glasbruchschäden bzw. Brüche von Kunststoffteilen sind grundsätzlich kostenpflichtig!
Sowohl Defekte an Verbrauchszubehör bzw. Verschleißteilen (z.B. Motorkohlen, Knethaken, Antriebsriemen, Ersatzfernbedienung, Ersatzzahnbürsten, Sägeblättern usw.), als
auch Reinigung, Wartung oder der Austausch von
Verschleißteilen, fallen nicht unter die Garantie und sind
deshalb kostenpflichtig!
Die Garantie erlischt bei Fremdeingriff.
Nach der Garantie
Nach Ablauf der Garantiezeit können Reparaturen kostenpflichtig vom entsprechenden Fachhandel oder Reparaturservice ausgeführt werden.
Service
für unsere Haushaltsartikel
Verschleißteile für Haushaltsartikel (soweit diese nicht vom
Fachmann ausgewechselt werden müssen), Ersatzkannen,
Staubsaugerfilterbeutel usw. können Sie mit Angabe des
Gerätetyps unter folgender Telefon-Hotline bestellen:
0 21 52 / 20 06 – 888
Service
für unsere Unterhaltungselektronik
Verschleißteile und Ersatzteile für unsere Unterhaltungselektronik (soweit diese nicht vom Fachmann ausgewechselt
werden müssen) wie z. B. Fernbedienungen,
Bedienteilklappen, Lautsprecherblenden usw. können Sie
mit Angabe des Gerätetyps unter folgender Telefon-Hotline
bestellen:
0 21 52 / 20 06 – 666
Für technische Fragen haben wir für Sie folgende e-mailAdresse eingerichtet:
hotline@clatronic.de
Interessieren Sie sich für weitere Clatronic-Produkte?
Besuchen Sie doch einmal unsere Homepage unter
www.clatronic.de oder www.clatronic.com
Auch Ihre Bestellungen nehmen wir gerne unter o. g. Homepage-Adresse entgegen.
6
D
5....-05-SLS 570 10.09.2003 14:21 Uhr Seite 6
Page 7
Van harte proficiat met uw aankoop van dit product!
Lees de veiligheidsinstructies en de handleiding zorgvuldig
door, voordat u het apparaat aansluit of inschakelt.
Bij vragen over uw installatie kunt u contact opnemen met
uw speciaalzaak of direct met ons. Wij handelen volgens
onze ondernemingsstrategie "Goed design en uitstekende
afwerking!" en bieden u een assortiment audiovisuele producten van topkwaliteit. Uw aanmerkingen en tips met betrekking tot onze producten zijn altijd van harte welkom.
Bewaar deze handleiding op een veilige plaats.
Hartelijk dank!
Algemene veiligheidsinstructies
Houd het risico voor elektrische schokken en brand zo klein
mogelijk en stel het toestel niet bloot aan vocht of regen.
Plaats de installatie ook niet in de directe nabijheid van water zoals bijv. een badkuip, zwembad of in een vochtige kelder.
Gebruik de installatie alleen voor het beschreven doel.
Sluit de installatie alleen aan op een volgens de voorschrif-
ten geïnstalleerde en geaarde contactdoos. Let op dat de
aangegeven netspanning overeenstemt met de
netspanning aan de contactdoos.
Let bij het gebruik van een externe hoofdaansluiting op de
juiste polariteit en spanning.
Plaats batterijen altijd in de juiste poolrichting.
Plaats de installatie altijd zodanig dat de aangebrachte
ventilatieopeningen niet afgedekt zijn.
Open nooit de behuizing van het toestel. Ondeskundige reparaties vormen een aanzienlijk risico voor toestel en gebruiker. Neem een defect toestel - en vooral een toestel
met een defecte stroomkabel - niet meer in gebruik, maar
laat het door een vakman repareren. Controleer de netkabel regelmatig op beschadigingen.
Koop alleen een gelijkwaardige kabel van de fabrikant, van
onze technische dienst of van een soortgelijk
gekwalificeerd persoon.
Onderbreek de stroomtoevoer en verwijder de batterijen uit
het toestel wanneer u het langere tijd niet gebruikt.
Mogelijk zijn deze symbolen aan het toestel aangebracht.
Zij dienen als verwijzing naar het volgende:
Het bliksemsymbool wijst de gebruiker op delen in het toestel die gevaarlijke hoge spanningen voeren.
Het uitroepteken verwijst naar belangrijke bedienings- en onderhoudsaanwijzingen in de bijgevoegde documentatie.
Functies en bediening
• 5.1 Kanaalingang kan worden aangesloten op een
DVD-speler met ingebouwde decoder.
• Er zijn 2 analoge ingangen en een 5.1CH-audio-ingang
beschikbaar.
• Dolby Surround Pro Logic.
• Linker- en rechter-frontluidspreker-, subwoofer-, Center-, Surround-kanaal-niveau-instelling (pegelinstelling)
• Afstandsbediening
• Zuinige standby-modus voldoet aan de vereisten
volgens het Europese "Blauwe engel"-zegel.
• Blauwe spiegellens.
De front- en Surround-luidsprekers zijn geschikt voor montage op een voet of aan de wand.
Inhoud
5 satellietluidsprekers (inclusief luidsprekerkabel)
1 Subwoofer
1 Handleiding
1 afstandsbediening
4 sets standaards
Installatie
Neem alle onderdelen uit de verpakking en plaats de binnenverpakking weer in box.
Bewaar zo mogelijk de originele verpakking voor de duur
van de garantieperiode. Steek de steker van de subwoofer
pas in de contactdoos als alle luidsprekers en aansluitingen
correct verbonden zijn!
Ga als volgt te werk om het luidsprekersysteem optimaal te
installeren:
LS: linker Surround-luidspreker (achter)
L: luidspreker vóór links
SW: subwoofer
C: Center-/middenluidspreker
R: luidspreker vóór rechts
RS: rechter Surround-luidspreker (achter)
Luidsprekers en plaatsing
1. Voorste luidsprekerkanalen: Geven de
hoofdbestanddelen van het stereogeluid weer, bijv. gesproken taal en muziek. Daarom moeten deze luidsprekers - net als bij een normale stereo.installatie - links en
rechts tegenover de hoorpositie worden geplaatst.
2. Center-luidsprekerkanaal: Geeft voornamelijk bij een
film de gesproken taal weer. Daarom moet deze
luidspreker direct vóór de toehoorder geplaatst worden.
Gebruikelijk is dat hij gewoon op de televisie wordt geplaatst.
3. Achterste luidsprekerkanalen: Geven een deel van
de omgevings-(surround)geluiden van een film en speciale geluidseffecten achter de toehoorder weer. Dit
deel van het geluid is gewoonlijk zachter dan de andere kanalen. De achterste luidsprekers moeten achter de
toehoorder worden gemonteerd.
4. Subwoofer: versterkt voornamelijk de bassen en
creëert zo een bioscoopsfeer. Op de afbeelding ziet u
een voorbeeld voor de plaatsing in een normale woonkamer.
Voor een betere weergave van het bioscoopgeluid adviseren wij, uw luidsprekers volgens dit getoonde voorbeeldschema te plaatsen. Aangezien de Center-luidspreker (C )
een antimagnetisch apparaat is, kan hij gewoon op de tele-
7
NL
C
Center/
middenluidspreker
L
Frontluid-
spreker links
LS
Surround-
luidspreker
links
R
Front-luid-
spreker
rechts
RS
Surround-
luidspreker
rechts
SW
Subwoofer
5....-05-SLS 570 10.09.2003 14:21 Uhr Seite 7
Page 8
visie worden geplaatst. Dankzij de Center-luidspreker kunt
u de voorste linker (L) en rechter (R) luidspreker ook goed
ver van elkaar verwijderd plaatsen. Omdat het richtingseffect van de hoge en de middenfrequenties sterker is dan
die van de basfrequenties, kan de subwoofer (SW) ook in
een hoek van het vertrek worden geplaatst. Wanneer u
houdt van een sterke bas, kunt u de subwoofer ook dichter
bij de hoorpositie plaatsen. Behalve bij de subwoofer moeten alle middenassen van de luidspreker op oorhoogte van
de luisteraar geplaatst worden. De Surround-luidsprekers
(LS) en (RS) moeten op twee punten achter de luister-/kijkplaats worden aangebracht met de voorzijde in de richting
van de hoorpositie.
Bedieningselementen aan de voorzijde
1. STANDBY-weergave
2. POWER-toets (Aan/Uit)
3. Sensor afstandsbediening
4. AUX-ingang
5. CD-ingang
6. 5.1 CH-ingang
7. INFO - informatieweergave
8. INPUT - bronschakelaar
9. MUTE - geluidsuitschakeling
10. VOL + hoofdvolume verhogen
11. VOL + hoofdvolume verlagen
12. Blauw licht
Aansluitingen op de achterzijde
1. Audio-ingang – 5.1-kanalen
2. Audio-ingang – CD (2-CH-stereo)
3. Audio-ingang – AUX (2-CH-stereo)
4. Audio-uitgang – FL/FR (frontluidsprekers)
5. Audio-uitgang – C (Center-luidspreker)
6. Audio-uitgang – LS/RS (Surround-luidsprekers)
7. ON/OFF – Aan-/uit-schakelaar
Afstandsbediening
1. STANDBY
2. CEN + / volume verhogen –
Center-luidspreker
3. CEN - / volume verlagen –
Center-luidspreker
4. SUR + / volume verhogen –
Surround-luidsprekers
5. SUR - / volume verlagen –
Surround-luidsprekers
6. SUB + / volume verhogen –
subwoofer
7. SUB - / volume verlagen –
subwoofer
8. INPUT SEL / audio-ingang
bronschakelaar
9. LEFT + / level verhogen
10. LEFT – / level verlagen
11. MUTE / geluidsuitschakeling
12. VOL + / hoofdvolume verhogen
13. VOL – / hoofdvolume verlagen
14. DSP-regeling
15. RIGHT + / level verhogen
16. RIGHT – / level verlagen
Plaatsen van de batterijen (niet bij levering inbegrepen)
• Open het deksel van het batterijenvakje aan de achterzijde van de afstandsbediening.
• Plaats 2 microbatterijen van het type LR 3 „AAA“ 1,5V.
Let goed op de juiste polariteit (zie bodem van het batterijenvakje)! Verwijder de batterij wanneer de afstandsbediening gedurende een langere periode niet wordt
gebruikt. Zo voorkomt u lekkage van batterijzuur.
• Wissel altijd het complete batterijset uit, vervang nooit
alleen maar één batterij.
Let op: batterijen horen niet in het huisafval. Geef verbruikte batterijen af bij het gemeentelijke milieupark of bij de
handelaar. Gooi batterijen nooit in het vuur.
Aansluiting luidsprekers
1. 5.1ch input: ingang voor de aansluiting van een externe geluidsbron op een 5.1-uitgang (bijv. DVD-speler)
2. CD: CD-ingang voor de aansluiting van een externe
geluidsbron op een CD-uitgang (bijv. CD-speler).
8
NL
Center/midden-
luidspreker
Frontluidspreker
links
Surround-
luidspreker
links
Front-luidspreker
rechts
Surround-
luidspreker
rechts
5....-05-SLS 570 10.09.2003 14:21 Uhr Seite 8
Page 9
3. AUX input: AUX-ingang voor de aansluiting van een
externe geluidsbron op een CD-uitgang (bijv. hifi-recorder).
4. L & R: linker en rechter uitgang voor de aansluiting van
de frontluidsprekers (linker frontluidspreker = wit, rechter frontluidspreker = rood).
5. C: uitgang voor de aansluiting van de Center-luidspre-
ker (Center-kanaal = geel).
6. LS & RS: uitgang voor de aansluiting van de linker en
rechter Surround-luidspreker (Surround links = groen,
Surround rechts = bruin).
• Opmerking: Let bij de aansluiting van de netkabel op
de juiste polariteit van de uitgangsbussen! De desbetreffende aansluitkleuren van de luidsprekeruitgangen
aan de subwoofer moeten worden verbonden met de
dienovereenkomstige aansluitbussen van de desbetreffende luidspreker!
• Dit geldt eveneens voor de zwarte bussen (zwart sluit
aan op zwart)!
Montage van de front- en de Surround-luidsprekers
1. Steek de beide delen van de standbuis in elkaar.
Schroef de standbuis aan de voet.
2. Voer de luidsprekerleiding door de buis.
3. Plaats vervolgens de luidspreker op de standaard.
Handleiding
1. Geluidsbron (bijv. DVD-speler aansluiten)
2. Sluit de netkabel aan op een volgens de voorschriften
geïnstalleerde en geaarde contactdoos 230V/50Hz.
Schakel het toestel in met de Aan-/Uitschakelaar op de
achterzijde. Het STANDBY-lampje brandt
3. Start de geluidsbron.
4. Druk op de afstandsbediening de toets STANDBY of
aan het apparaat de toets POWER in. De blauwe lichtbalken van de subwoofer lichten op.
5. Kies de gewenste geluidsbron via de INPUT SEL toets
op de afstandsbediening of aan het apparaat.
6. Met de VOLUME/ADJ-toetsen kunt u de algemene geluidssterkte regelen.
7. Door het indrukken van de toetsen CEN +/-, SUR+/-,
SUB +/-, LEFT +/- en RIGHT +/- op de afstandsbediening kunt u de geluidssterkte van elke afzonderlijke
luidspreker instellen.
8. Wanneer u zich in de CD/AUX-ingangsmodus bevindt,
kunt u door het indrukken van de DSP-toets de Dolby
Surround Pro Logic-functie (DSP) activeren.
9. Wanneer u in ongeachte welke modus op de MUTEtoets drukt, wordt het geluid van de installatie
uitgeschakeld.
10. De modus INFO-weergave:
snel knipperen:
• terwijl u de toetsen VOL+/-, CEN +/-, SUR+/-, SUB +/-
, LEFT +/- of RIGHT +/- indrukt. Bij maximum of minimum is de weergave uit.
langzaam knipperen:
• door het indrukken van de MUTE-toets wordt het ge-
luid van de installatie uitgeschakeld.
11. Door het indrukken van de toets STANDBY of POWER
aan het apparaat kunt u de installatie naar de standbymodus schakelen.
12. Zet de Aan-/Uitschakelaar op OFF om het toestel uit te
schakelen.
13. Wanneer alle LED’s voor AUX/CD/5.1CH en INFO
branden, is het veiligheidssysteem geactiveerd en is er
sprake van een storing: bijv. een kortsluiting in een luidsprekerkabel.
Technische beschrijving
luidsprekerset
Satellietbox
+ Type: verzegeld
+ Materiaal: aluminium
+ Aandrijfeenheid: 23/4 inch vol bereik
+ Gevoeligheid: 84dB/1 W @ 1 M
+ Impedantie: 4 Ohm
+ Uitgaand vermogen: 10 W
+ Oppervlak: zilverkleur
+ Afmetingen 140 mm x 90 mm x 42 mm (H x B x D)
+ luidsprekerdraad metalen netwerk
Subwoofer-box
+ Type: reflex
+ Aandrijfeenheid: 51/4 inch
+ Gevoeligheid: 8 Ohm
+ Uitgaand vermogen: 40 W
+ Afmetingen 310 mm x 155 mm x 290 mm (H x B x D)
+ Oppervlak: zilverkleur
+ ingebouwde multikanaalversterker
9
NL
Probleem
Geen geluid en
geen weergave
Geen geluid,
maar wel
weergave
Geen geluid uit
de frontluidsprekers
Geen geluid uit
één van de
frontluidsprekers
Geen geluid uit
de Centerluidspreker
Geen geluid uit
de Surroundluidsprekers
Geen
Surround-effect
Mogelijke oorzaak
en vereiste handelwijze
De netsteker is niet correct in de
contactdoos gestoken.
Netschakelaar staat op OFF.
Het geluidsvolume staat op 0.
De luidsprekerkabel is losgeraakt.
RCA-kabel controleren.
Luidsprekerkabel niet goed aangesloten.
Luidsprekerkabel correct aansluiten.
RCA-kabel correct aansluiten.
Luidsprekerkabel niet goed aangesloten (positief en negatief).
Luidsprekerkabel is slecht op één punt
aangesloten.
RCA-kabel op losgeraakte aansluiting
controleren.
De modus is niet correct ingesteld.
Correct instellen.
Center-geluidsvolume staat op 0.
Luidsprekerkabel (positief en negatief)
is slecht op één punt aangesloten.
De modus is niet correct ingesteld.
Correct instellen.
Surround-geluidsvolume staat op 0.
Luidsprekerkabel (positief en negatief)
is slecht op één punt aangesloten.
De modus is niet correct ingesteld.
Luidsprekerkabel (positief en negatief)
is slecht op één punt aangesloten.
Checklist
voor het opsporen van storingen
5....-05-SLS 570 10.09.2003 14:21 Uhr Seite 9
Page 10

Multikanaal-versterkereenheid
+ Input-bron: 3 groepen 5.1kanaal/CD/AUX
+ DSP-modus: (alleen CD/AUX in)
+ Uitgaand vermogen:
2 x 10 W (THD = 1%, 8 Ohm) frontkanaal
1 x 10 W (THD = 1%, 8 Ohm) Centerkanaal
2 x 10 W (THD = 1%, 8 Ohm) achterkanaal
1 x 30 W (THD = 1%, 8 Ohm) Subwoofer-kanaal
+ Frequentierespons
150 Hz --- 20000 Hz/+3dB 5 kanaal-satelliet
20 Hz --- 200 Hz/+3dB Subwoofer
+ soundlevel instelbereiken +/- 8 dB/kanaal
+ Volledig veiligheidscircuit. De installatie is gecontroleerd
volgens alle van toepassing zijnde CE-richtlijnen zoals
bijv. ten aanzien van de elektromagnetische compatibi-
liteit en de laagspanningsrichtlijnen. Wij kunnen echter
zonder voorafgaande kennisgeving technische wijzigin-
gen aanbrengen.
Dit apparaat is gekeurd conform de op dit moment van toepassing zijnde CE-richtlijnen zoals bijvoorbeeld elektromagnetische compatibiliteit en laagspanningsvoorschriften en
is geconstrueerd volgens de nieuwste
veiligheidstechnische voorschriften.
Technische wijzigingen voorbehouden!
Garantie
Voor het door ons geleverde apparaat verlenen wij een garantie van 24 maanden vanaf koopdatum (kassabon).
Eventuele gebreken aan het apparaat of aan het toebehoren*) die zijn ontstaan door productie- of materiaalfouten
verhelpen wij binnen deze periode kosteloos door middel
van reparatie of, naar ons oordeel, door vervanging. Eventuele garantiegevallen verlengen noch de geldigheidsduur
van de garantie, noch begint daardoor een nieuwe garantieperiode!
Het koopbewijs geldt als garantiebewijs. Zonder dit bewijs
kan geen kosteloze reparatie of vervanging plaatsvinden.
Geef in geval van garantie het apparaat met de kassabon
en in de originele verpakking af bij uw handelaar.
*) Schade aan onderdelen leidt niet automatisch tot
kosteloze vervanging van het complete apparaat. Neem in
dit geval contact op met onze hotline! De reparatie van
glasbreuk of breuk van kunststofonderdelen wordt altijd berekend!
Niet defecten aan de hulpstukken of aan de slijtende
onderdelen (bijv. koolborstels, deeghaken, drijfriemen, reserveafstandsbediening, reservetandenborstels, zaagbladen enz.), maar ook reiniging, onderhoud of de vervanging van slijtende delen vallen niet onder de garantie en
geschieden altijd tegen berekening!
Bij ingrepen door derden komt de garantieverlening te vervallen.
Na de garantieperiode
Na afloop van de garantieperiode kunnen reparaties tegen
berekening worden uitgevoerd door de betreffende vakhandelaar of de technische dienst.
10
NL
5....-05-SLS 570 10.09.2003 14:21 Uhr Seite 10
Page 11
Félicitations pour l’achat de ce produit!
Nous vous prions de lire ce mode d’emploi attentivement
avant de mettre votre appareil en marche.
Si vous avez des questions sur votre appareil, adressezvous au fabricant ou directement à nous. Nous agissons
conformément à notre stratégie d’entreprise „ Un beau design et une excellente fabrication!“ et nous vous proposons
toute une gamme de produits audiovisuels de haute qualité. Nous nous réjouissons de vos remarques et suggestions sur nos produits.
Nous vous prions de conserver ce mode d’emploi dans un
endroit sûr. Merci!
Conseils généraux de sécurité
Pour éviter tout risque d’incendie ou de court-circuit, n’exposez pas l’appareil à la pluie ou l’humidité. Il est de même
déconseillé de placer l’appareil à proximité d’eau, comme
par ex. près d’une baignoire, d’une piscine ou dans une cave humide.
N’utilisez cet appareil que pour les applications auxquelles
il convient.
Ne branchez l’appareil que dans une prise de courant en
bon état de fonctionnement.Veillez à ce que la tension spécifiée soit conforme à celle de la prise de courant.
Si vous utilisez un raccordement extérieur de réseau principal, veillez à respecter la polarité et la tension.
Placez toujours les piles selon la polarité indiquée.
Installez toujours l’appareil de façon à ce que les ouvertures de ventilation ne soient pas obstruées.
N’ouvrez jamais l’habillage de l’appareil. Des réparations
non conformes peuvent causer des risques sérieux à l’utilisateur. En cas de panne de l’appareil, en particulier
d’endommagement du câble d’alimentation, n’utilisez plus
votre appareil et faîtes-le réparer par un technicien.Vérifiez
régulièrement que le câble d’alimentation n’est pas endommagé.
Ne le faîtes remplacer par un câble similaire que par le fabricant, notre service après-vente ou toute autre personne
qualifiée.
Si l’appareil ne doit pas être utilisé pendant un certain temps,
débranchez le câble d’alimentation ou retirez les piles.
Ces symboles se trouvent éventuellement sur l’appareil et
donnent une indication pour les points suivants:
L’éclair indique à l’utilisateur les pièces de l’appareil ayant un niveau de tension extrêmement
dangereux.
Le point d’exclamation indique à l’utilisateur
des informations importantes d’utilisation et
d’entretien se trouvant dans la documentation
jointe.
Fonctions et utilisation
• Entrée de canal 5.1, qui peut être raccordée à un lecteur DVD équipé d’un décodeur.
• 2 entrées analogiques et une entrée audio 5.1 CH.
• Dolby Surround Pro Logic.
• Réglage de niveau des haut-parleurs droit et gauche,
du subwoofer, du canal central et surround (réglage de
niveau)
• Télécommande
• Mode Standby économique, conforme aux exigences
du symbole européen de „l’ange bleu“.
• Miroir-lentilles bleu
Les haut-parleurs avant et surround conviennent à une installation sur support ou fixation murale.
Contenu de l’emballage
5 haut-parleurs satellite (y compris le câble haut-parleurs)
1 subwoofer
1 mode d’emploi
1 télécommande
4 jeux de supports
Installation
Sortez toutes les pièces de l’appareil de l’emballage puis
replacez à nouveau les protections d’emballage dans le
carton.
Conservez, dans la mesure du possible, les emballages
pendant toute la durée de la garantie.
Ne branchez la prise du subwoofer que lorsque tous les
haut-parleurs et raccordements sont correctement reliés!
Pour une installation optimale des haut-parleurs, suivez les
indications suivantes:
LS: haut-parleur surround gauche (arrière)
L: haut-parleur avant gauche
SW: subwoofer
C: haut-parleur central/milieu
R: haut-parleur avant droit
RS: haut-parleur surround droit (arrière)
Haut-parleurs et disposition
1. Canaux avant de haut-parleurs: ils restituent les
éléments essentiels du son stéréo, par ex.la voix et la
musique. Il est donc conseillé de placer les hautparleurs, comme pour une chaîne hi-fi normale,
à droite et à gauche de l’emplacement d’écoute.
2. Canal central de haut-parleurs: il restitue essentiellement les dialogues d’un film. Il doit donc être placé
directement en face du spectateur. Il peut normalement
tout simplement être placé sur le téléviseur.
3. Canaux arrière de haut-parleurs: ils restituent une
partie des bruits d’ambiance d’un film ainsi que les
effets sonores spéciaux derrière le spectateur.Cette
partie du son est normalement plus faible que les
autres canaux. Les haut-parleurs arrière doivent être
placés derrière le spectateur.
4. Subwoofer: il renforce essentiellement les graves pour
créer ainsi une ambiance de cinéma. Le schéma indique par exemple la disposition dans un salon normal.
Pour une restitution optimale du son comme au cinéma,
nous vous conseillons de placer vos haut-parleurs comme
11
F
C
Haut-parleur
central/milieu
L
Haut-parleur
avant gauche
LS
Haut-parleur
surround
gauche
R
Haut-parleur
avant droit
RS
Haut-parleur
surround
droit
SW
Subwoofer
5....-05-SLS 570 10.09.2003 14:21 Uhr Seite 11
Page 12

indiqué ci-dessus. Le haut-parleur central (c) est un
appareil antimagnétique et peut donc tout simplement être
placé sur un téléviseur. Grâce au haut-parleur central vous
pouvez installer les haut-parleurs avant gauche (L) et droit
(R) éloignés l’un de l’autre, comme il convient. L’effet d’orientation des fréquences moyennes et des aiguës étant
supérieur à celui des fréquences des graves, le subwoofer
(SW) peut aussi être placé dans le coin d’une pièce. Si
vous appréciez particulièrement les graves, vous pouvez
rapprocher le subwoofer de l’emplacement d’écoute. Hormis pour le subwoofer, les axes moyens des haut-parleurs
doivent être à la hauteur des oreilles du spectateur. Les
haut-parleurs surround (LS) et (RS) doivent être placés des
deux côtés derrière l’emplacement d’écoute/du spectateur.
L’avant des haut-parleurs doit être orienté vers l’emplacement d’écoute.
Eléments de commande à l’avant de l’appareil
1. Affichage STANDBY
2. Touche POWER (Marche/Arrêt)
3. Capteur télécommande
4. Entrée AUX
5. Entrée CD
6. Entrée 5.1 CH
7. Affichage d’informations INFO
8. Sélecteur sources INPUT
9. Touche coupure du son MUTE
10. Augmenter le son VOL +
11. Diminuer le son VOL -
12. Lumière bleue
Raccordements au dos de l’appareil
1. Entrée audio - canaux 5.1
2. Entrée audio - CD (stéréo 2-CH)
3. Entrée audio - AUX (stéréo 2-CH)
4. Sortie audio - FL/FR (haut-parleur avant)
5. Sortie audio - C (haut-parleur central)
6. Sortie audio - LS/RS (haut-parleur surround)
7. ON/OFF – Bouton marche / arrêt.
Télécommande
1. STANDBY
2. CEN + / augmenter le son haut-parleur central
3. CEN – / diminuer le son haut-parleur central
4. SUR + / augmenter le son haut-parleur surround
5. SUR - / diminuer le son haut-parleur surround
6. SUB + / augmenter le son subwoofer
7. SUB - / diminuer le son subwoofer
8. INPUT SEL sélecteur de
sources entrée audio
9. LEFT + / augmenter le niveau
10. LEFT - / diminuer le niveau
11. MUTE coupure du son
12. VOL + / augmenter le son
13. VOL - / diminuer le son
14. Commande DSP
15. RIGHT + / augmenter le niveau
16. RIGHT - / diminuer le niveau
Pose des piles (non compris dans la livraison)
• Ouvrez le couvercle du compartiment à piles situé au
dos de la télécommande.
• Installez 2 piles micro de type LR 3 « AAA » 1,5 V.Veillez à respecter la polarité (voir au fond du
compartiment) ! Si la télécommande n’est pas utilisée
pendant un certain temps, retirez les piles pour éviter
que l’acide des piles ne coule.
• Changez toujours le jeu complet de piles et pas seulement une seule d’entre elles.
Attention: ne jetez pas vos piles dans les ordures
ménagères. Nous vous prions de les ramener à un centre
de recyclage approprié ou chez le fabricant. Ne jetez
jamais les piles dans le feu.
Raccordement des haut-parleurs
1. Input 5.1ch: l’entrée sert au raccordement d’une source sonore extérieure pour une sortie 5.1 (par ex.
lecteur DVD).
12
F
Haut-parleur
central/milieu
Haut-parleur
avant gauche
Haut-parleur
surround
gauche
Haut-parleur
avant droit
Haut-parleur
surround
droit
5....-05-SLS 570 10.09.2003 14:21 Uhr Seite 12
Page 13

2. CD: l’entrée CD sert au raccordement d’une source ex-
térieure pour une sortie CD (par ex. lecteur CD).
3. Input AUX: l’entrée AUX sert au raccordement d’une
source sonore extérieure pour une sortie CD (par ex.
magnétoscope hi-fi-vidéo).
4. L & R: sortie gauche et droite pour le raccordement du
haut-parleur avant (haut-parleur avant gauche = blanc,
haut-parleur avant droit = rouge).
5. C: sortie pour le raccordement du haut-parleur central
(canal central = jaune).
6. LS & RS: sortie pour le raccordement du haut-parleur
gauche et droit surround (surround gauche = vert, surround droit = marron).
• Remarque: veillez à respecter la polarité des prises de
sortie lors du raccordement des câbles! Les couleurs
de raccordement des sorties de haut-parleurs du subwoofer doivent être reliées aux prises de raccordement
de la même couleur des haut-parleurs!
• Cela vaut également pour les prises noires (raccordement du noir avec le noir)!
Installation des haut-parleurs avant et surround
1. Emboîtez les deux parties du tube support l’une dans
l’autre.Vissez le pied de support au tube.
2. Faîtes passer le câble du haut-parleur dans le tube.
3. Branchez ensuite le haut-parleur sur son support.
Mode d’emploi
1. Raccordez la source sonore (par ex. lecteur DVD).
2. Branchez le câble d’alimentation à une prise de
courant de 230V/50Hz en bon état de fonctionnement.
Mettez l’appareil en marche à l’aide du bouton Marche
/ Arrêt situé à l’arrière. L’affichage STANDBY est
allumé.
3. Mettez la source sonore en marche.
4. Enfoncez la touche STANDBY de la télécommande ou
la touche POWER sur l’appareil. Les lumières bleues
du subwoofer s’allument.
5. Réglez le son grâce à la touche INPUT SEL sur la télécommande ou sur l’appareil.
6. Vous pouvez régler le son global de votre installation
grâce aux touches VOLUME/ADJ.
7. Vous pouvez régler le volume de chacun des haut-parleurs grâce aux touches CEN +/-, SUR +/-, SUB +/-,
LEFT +/-, RIGHT +/- de votre télécommande.
8. Vous pouvez, en mode entrée CD/AUX, activer la fonction Dolby Surround Pro Logic (DSP) grâce à la touche
DSP.
9. Si vous enfoncez la touche MUTE, quel que soit le mode de fonctionnement, le son est coupé.
10. Le mode INFO:
Clignotement rapide:
• lorsque vous enfoncez les touches VOL +/-, CEN +/-,
SUR +/-, SUB +/-, LEFT +/- ou RIGHT +/-. L’affichage
disparaît pour le maximum et le minimum.
Clignotement lent:
• Le son est coupé lorsque vous enfoncez le touche
MUTE.
11. Vous pouvez passer en mode Standby en appuyant sur
la touche STANDBY ou POWER sur l’appareil.
12. Pour arrêter l’appareil enfoncez la touche Marche /
Arrêt pour la positionner sur OFF.
13. Lorsque les affichages lumineux pour AUX/CD/5.1CH
et INFO sont éclairés, le système de protection de l’appareil est activé et il y a un problème: par ex. un courtcircuit au niveau d’un câble de haut-parleur.
Spécifications techniques
du jeu de haut-parleurs
Boîtier satellites
+ Type: verrouillé
+ Matériau: aluminium
+ Unité de commande: 23/4 inch champ complet
+ Sensibilité: 84dB/1 W @ 1 M
+ Impédance: 4 ohm
+ Puissance: 10 W
+ Surface: argentée
+ Dimensions: 140 mm x 90 mm x 42 mm (HxLxL)
+ Fil haut-parleurs: métallique
Boîtier subwoofer
+ Type: reflex
+ Unité de commande: 51/4 inch
+ Sensibilité: 8 ohm
+ Puissance: 40 W
+ Dimensions: 310 mm x 155 mm x 290 mm (HxLxL)
+ Surface: argentée
+ Amplificateur de puissance multi-canal intégré
13
F
Problème
Pas de son et
pas d’affichage
Pas de son,
mais l’affichage
fonctionne
Pas de son des
haut-parleurs
avant
Pas de son d’un
haut-parleur
avant
Pas de son du
haut-parleur
central
Pas de son des
haut-parleurs
surround
Pas d’effet
surround
Causes éventuelles
et mesure à prendre
Le câble d’alimentation n’est pas
correctement introduit dans la prise.
Le bouton d’alimentation est sur OFF.
Le volume est réglé sur 0.
Le câble de haut-parleur n’est pas
branché.
Vérifiez le câble RCA.
Le câble de haut-parleur est mal
branché.
Branchez correctement le câble du
haut-parleur.
Branchez correctement le câble RCA.
Le câble de haut-parleur est mal
branché (positif et négatif).
Le haut-parleur n’est branché qu’à
une extrémité.
Vérifiez que le câble RCA est
correctement raccordé.
Le réglage du mode n’est pas correct.
Corrigez le réglage.
Le volume du centre est sur 0.
Le câble du haut-parleur (positif et
négatif) n’est branché qu’à une
extrémité.
Le réglage du mode n’est pas correct.
Corrigez le réglage.
Le volume surround est sur 0.
Le câble du haut-parleur (positif et
négatif) n’est branché qu’à une
extrémité.
Le réglage du mode n’est pas correct.
Le câble du haut-parleur (positif et
négatif) n’est branché qu’à une
extrémité.
Liste de contrôle en cas de problème
5....-05-SLS 570 10.09.2003 14:21 Uhr Seite 13
Page 14

Amplificateur de puissance multi-canal intégré
+ Source input: 3 groupes 5.1 canal/CD/AUX
+ Mode DSP: (seulement CD/AUX in)
+ Puissance:
2 x 10 W (THD = 1%, 8 ohm) canal avant
1 x 10 W (THD = 1%, 8 ohm) canal central
2 x 10 W (THD = 1%, 8 ohm) canal arrière
1 x 30 W (THD = 1%, 8 ohm) canal subwoofer
+ Réponse de fréquence
150 Hz--- 20000 Hz/+3dB 5 canal satellite
20 Hz --- 200 Hz/+3dB subwoofer
+ Réglage du son +/- 8 dB/ canal
+ Système de protection complet de fonctionnement.
Cet appareil a été vérifié conformément aux directives
européennes actuellement en vigueur, comme par ex.
la compatibilité électromagnétique et les directives bas-
se tension. Il est néanmoins possible d’effectuer des
modifications techniques.
Cet appareil a été contrôlé d’après toutes les directives européennes actuelles applicables, comme par exemple concernant la compatibilité électromagnétique et la basse tension. Cet appareil a été fabriqué en respect des réglementations techniques de sécurité les plus récentes.
Sous réserve de modifications techniques.
Garantie
Nous accordons une garantie de 24 mois à dater de la date
d’achat (ticket de caisse) pour l’appareil que nous vendons.
Pendant la durée de la garantie, nous éliminons
gratuitement les défauts de l’appareil ou des accessoires *)
découlant d’un vice de matériau ou de fabrication au moyen d’une réparation ou, selon notre estimation, au moyen
d’un remplacement. Les prestations dans le cadre de la garantie n’entraînent aucune prorogation de la durée de garantie et ne donnent pas droit à une nouvelle garantie !
Le justificatif de garantie est le reçu. Sans ce justificatif, aucun remplacement gratuit ni aucune réparation gratuite ne
peuvent être effectués.
En cas de recours à la garantie, rapportez l’appareil dans
son emballage d’origine accompagné du ticket de caisse à
votre revendeur.
*) Les endommagements de pièces d’accessoires ne justifient pas automatiquement l’échange gratuit de l’appareil
complet. Contactez alors notre centrale téléphonique! La
casse de pièces en verre ou en plastique est dans tous les
cas à votre charge!
Les défauts sur les accessoires ou les pièces d’usure (p.ex.
les charbons de moteurs, crochets, courroies
d’entraînement, télécommande de rechange, brosses à
dents de rechange, lames de scies etc.) ainsi que le
nettoyage, l’entretien ou le remplacement de pièces d’usure ne sont pas garantis et sont donc payants !
En cas d’intervention étrangère, la garantie devient caduque.
Après la garantie
Après écoulement de la durée de garantie, les réparations
peuvent être effectuées, contre paiement, par le commerce spécialisé ou le service de réparation.
14
F
5....-05-SLS 570 10.09.2003 14:21 Uhr Seite 14
Page 15

¡Le felicitamos sinceramente por la compra de este producto!
Le rogamos lea poniendo suma atención estas Instruccio-
nes de Manejo antes de que use el aparato.
Si tiene alguna pregunta que hacernos referente al equipo,
le rogamos se dirija a su concesionario o directamente a
nosotros. Obramos en correspondencia a la estrategia de
nuestra empresa “Buen diseño y elaboración de alto valor”
y le ofrecemos toda una serie de productos audiovisuales
de máxima calidad. Apreciamos siempre sus observaciones y sugerencias sobre nuestros productos.
Le rogamos guarde estas Instrucciones de manejo en un
lugar seguro. ¡Muchas gracias!
Advertencias generales
sobre la seguridad
Para mantener tan pequeño como sea posible el riesgo de
incendio y de electrocución, no exponer el equipo ni a la
lluvia ni a la humedad. Por lo tanto, no usar el equipo tampoco directamente al lado del agua tal y como, p.ej., al lado
de la bañera, de la piscina o en un sótano húmedo.
Use el equipo sólo en correspondencia al que está determinado.
Conecte el equipo sólo a una caja de enchufe con puesta a
tierra instalada reglamentariamente. Ponga atención en
que la tensión específica de la red coincida con la tensión
de la red existente en la caja de enchufe.
Si se usa una conexión a la red principal externa, ponga
atención en que sean correctas la polaridad y la tensión.
Coloque siempre las pilas en correspondencia a la
dirección de los polos.
Instale siempre el equipo de forma que no se tapen las
aberturas de ventilación existentes.
No abra jamás la caja del aparato. Las reparaciones
irreglamentarias pueden suponer un considerable riesgo
para el usuario. Si el aparato sufre defectos, lo cual vale
especialmente para el cable de conexión a la red, no lo vuelva a usar, sino deje que le arregle un especialista en la
materia. Verificar con regularidad si está dañado el cable
de conexión a la red.
Adquiera un cable equivalente del fabricante, de nuestro
Departamento de Atención al Cliente o de una persona
con una calificación similar.
Si no se usa el equipo por un tiempo prolongado,
desenchufe el enchufe de la red de la caja de enchufe o
quite las pilas.
Eventualmente, estos símbolos se encuentran en el aparato y sirven de advertencia a los siguientes puntos:
El símbolo del relámpago indica al usuario a
partes del aparato que tiene un nivel de
tensión de una altura peligrosa.
El símbolo del punto de admiración indica al
usuario a importantes instrucciones de manejo
y mantenimiento en la documentación incluida.
Funciones y aplicación
•
La entrada de canal 5.1 puede conectarse a un DVD
Player (reproductor de DVD) con decodificador integrado.
• Se tienen 2 entradas analógicas y una entrada audio
5.1CH.
• Dolby Surround Pro Logic.
• Ajuste del nivel del canal de los altavoces frontales izquierdo y derecho, subwoofer, Center, surround (ajuste
del nivel)
• Mando a distancia
•
El modo standby económico satisface las exigencias de
conformidad con el símbolo europeo del “Ángel Azul”.
• Lente de espejo azul.
Los altavoces frontales y de surround se apropian para el
montaje sobre patas y mural.
Contenido
5 altavoces satélite (incluso sus cables)
1 subwoofer
1 Instrucciones de Manejo
1 mando a distancia
4 juegos de soportes
Instalación
Saque del envase todas las partes del equipo y vuelva a
meter en la caja el material de embalaje que se encontraba
dentro.
Siempre que sea posible, conserve el envase durante el
tiempo que dure la garantía. ¡Meta el enchufe del subwoofer en la caja de enchufe primeramente después de que se
hayan unido correctamente todos los altavoces y conexiones! Con el fin de conseguir una instalación óptima del
equipo de altavoces, rogamos siga las siguientes instrucciones:
LS: altavoz surround izquierdo (detrás)
L: altavoz delante a la izquierda
SW: subwoofer
C: altavoz Center/Centro
R: altavoz delante a la derecha
RS: altavoz surround derecho (detrás)
Altavoces y disposición
1. Canales de los altavoces delanteros: reproducen los
componentes principales del sonido estéreo, p.ej., idioma y música. Por esta razón debe colocar los
altavoces a la izquierda y derecha frente a la posición
de audición, como se hace habitualmente en los equipos estéreo normales.
2. Canal del altavoz Center: en lo importante reproduce
el idioma en un filme. Por esta razón, este altavoz se
coloca directamente delante del oyente.Normalmente
puede colocarse encima del televisor.
3. Canales de los altavoces traseros: reproducen una
parte de los ruidos ambientales (omnidireccionales) del
entorno de un filme, así como efectos especiales auditivos detrás del oyente. Normalmente, esta parte del
sonido es más baja que en otros canales. Los altavoces traseros se montan detrás del oyente.
15
E
C
Altavoz
Center/Centro
L
Altavoz
frontal
izquierdo
LS
Altavoz
surround
izquierdo
R
Altavoz
frontal
derecho
RS
Altavoz
surround
derecho
SW
Subwoofer
5....-05-SLS 570 10.09.2003 14:21 Uhr Seite 15
Page 16

4. Subwoofer: amplifica principalmente la cuota de los
tonos bajos para crear un ambiente como en la sala de
un cine. Por ejemplo, la ilustración muestra la disposición en un salón normal y corriente.
Para poder reproducir mejor el sonido de cine, proponemos que coloque sus altavoces en correspondencia a la
ilustración sobre estas líneas. Debido a que el altavoz Center (C) es un aparato antimagnético, se le puede colocar
sencillamente sobre el televisor. Gracias al altavoz Center
puede colocar reglamentariamente y muy separados entre
sí los altavoces delanteros izquierdo (L) y derecho (R).Ya
que el efecto de dirección de las frecuencias media y alta
es más fuerte que el de las frecuencias de los tonos
graves, el subwoofer (SW) puede disponerse también en
un rincón de la habitación. Si le gustan los tonos graves
más fuertes, entonces puede acercar el subwoofer a la posición auditiva. A excepción del subwoofer, todos los ejes
centrales de los auriculares deben posicionarse a la altura
del oído del oyente.Los altavoces surround (LS) y (RS) se
disponen en dos lados detrás del oyente/espectador,
teniéndolos que girar con el frontal en dirección a la posición de audición.
Elementos de manejo en el frontal de aparato
1. Visualización STANDBY
2. Tecla POWER (CO./DESCO.)
3. Sensor del mando a distancia
4. Entrada AUX
5. Entrada CD
6. Entrada 5.1 CH
7. INFO Visualización de informaciones
8. INPUT Selector original
9. MUTE Interruptor mudo
10. VOL + Subir el volumen principal
11. VOL - Bajar el volumen principal
12. Luz azul
Conexiones en la trasera del aparato
1. Entrada audio – canales 5.1
2. Entrada audio – CD (estéreo 2-CH)
3. Entrada audio – AUX (estéreo 2-CH)
4. Salida audio – FL/FR (altavoz frontal)
5. Salida audio – C (altavoz Center)
6. Salida audio – LS/RS (altavoces surround)
7. ON/OFF – Conector / desconector
Mando a distancia
1. STANDBY
2. CEN + /Subir el volumen –
altavoz Center
3. CEN - /Bajar el volumen –
altavoz Center
4. SUR +/ Subir el volumen –
altavoz surround
5. SUR - /Bajar el volumen –
altavoz surround
6. SUB +/Subir el volumen –
subwoofer
7. SUB -/Bajar el volumen –
subwoofer
8. INPUT SEL Entrada audio
selector original
9. LEFT +/Subir el nivel
10. LEFT -/Bajar el nivel
11. MUTE Interruptor mudo
12. VOL +/Subir el volumen principal
13. VOL -/Bajar el volumen principal
14. Control DSP
15. RIGHT +/Subir el nivel
16. RIGHT -/Bajar el nivel
Introducir baterías (no está incluido en el suministro)
• Abra la cámara de baterías que se encuentra en la parte trasera del mando a distancia.
• Introduzca 2 baterías del tipo UM4 „AAA“ 1,5V D.¡Tenga atención con la polaridad correcta (vea la indicación
en el suelo del compartimento de baterías o la estampación en la parte exterior)! En caso de que no utilice
el mando a distancia durante un largo periodo de tiempo, aparte las baterías, para evitar un derrame del
líquido de las baterías.
• Siempre cambie el paquete de baterías por completo,
no sólo una.
Atención: Las baterías no se deben tirar a la basura
doméstica. Por favor lleve las baterías usadas a sitios especiales de recogida o a su concesionario.
Nunca tire las baterías al fuego.
16
E
5....-05-SLS 570 10.09.2003 14:21 Uhr Seite 16
Page 17

Conexión de los altavoces
1. 5.1ch input: la entrada sirve para conectar una fuente
acústica externa a una salida 5.1 (p.ej., DVD Player).
2. CD: la entrada CD sirve para conectar una fuente acú-
stica externa a una salida CD (p.ej., CD Player).
3. AUX input: la salida AUX sirve para conectar una fu-
ente acústica externa a una salida CD (p.ej., videograbador de alta fidelidad).
4. L & R: salidas izquierda y derecha para conectar los
altavoces frontales (altavoz frontal izquierdo = blanco,
altavoz frontal derecho = rojo).
5. C: salida para conectar el altavoz Center (canal Center
= amarillo).
6. LS & RS: salida para conectar los altavoces surround
izquierdo y derecho (surround izquierdo = verde, surround derecho = marrón).
• Advertencia: ¡al conectar los cables ponga atención en
la polaridad correcta de los jacks de salida! ¡Los
respectivos colores de conexión de las salidas de los
altavoces en el subwoofer tienen que conectarse a los
jacks de conexión de los colores correspondientes del
altavoz respectivo!
• Lo dicho vale igualmente para los jacks negros (conectar negro con negro)!
Cómo montar los altavoces frontales y surround
1. Unir ambas partes del tubo soporte. Enrosque la pata
al tubo soporte.
2. Pase el cable del altavoz por el tubo soporte.
3. A continuación, meta el altavoz en el soporte.
Instrucciones de manejo
1. Conecte la fuente acústica (p.ej., DVD Player).
2. Conecte el cable de la red a una caja de enchufe con
puesta a tierra, instalada reglamentariamente, de 230
V/50 Hz. La conexión se realiza a través del interruptor
conectador/desconectador en la parte posterior del
aparato. Se enciende la indicación STANDBY.
3. Inicie la fuente acústica.
4. Presione en el mando a distancia la tecla STANDBY o
en el aparato la tecla POWER. Se encienden las regletas luminosas azules del subwoofer.
5. Elija mediante la tecla INPUT SEL en el mando a
distancia o en el aparato la fuente de sonido deseada.
6. Con las teclas de control VOLUME/ADJ se puede ajustar el volumen total.
7. Pulsando las teclas CEN +/-, SUR +/-, SUB +/-, LEFT
+/- y RIGHT +/- en el mando a distancia, puede ajustar
el volumen de cada uno de los altavoces.
8. Si se encuentra en un modo de entrada CD/AUX,
pulsando la tecla DSP puede activar la función Dolby
Surround Pro Logic (DSP).
9. Si en uno de los modos operativos pulsa la tecla MUTE, enmudece el equipo.
10. El modo indicación INFO:
Parpadeo rápido:
• Mientras que pulsa las teclas VOL+/-, CEN+/-,
SUR+/-, SUB+/-, LEFT+/- o RIGHT+/-. Al alcanzar el
máximo o el mínimo se desconecta la visualización.
Parpadeo lento:
• Pulsando la tecla MUTE se enmudece el equipo.
11. Presionando la tecla STANDBY o la tecla POWER en
el aparato puede conmutar el equipo al modo Standby.
12. Para desconectar el aparato coloque el conectador /
desconectador a la posición OFF.
13. Si se encienden todas las indicaciones LED para
AUX/CD/5.1CH e INFO, significa que está activada la
protección del sistema, se tiene un fallo: p.ej., cortocircuito en el cable del altavoz.
17
E
Altavoz
Center/Centro
Altavoz
frontal
izquierdo
Altavoz
surround
izquierdo
Altavoz
frontal
derecho
Altavoz
surround
derecho
Lista de chequeo para buscar
los errores
Problema
No se tiene
sonido ni
visualización
No se tiene
sonido, pero sí
visualización
No se tiene
sonido de los
altavoces
frontales
No se tiene
sonido de un
altavoz frontal
No se tiene
sonido del
altavoz Center
No se tiene
sonido de los
altavoces
surround
No se tiene
ningún efecto
surround
Causas posibles y su remedio
No se ha introducido bien el
interruptor de la red en la caja de
enchufe.
El conmutador está en OFF..
El volumen se encuentra en 0.
Se ha soltado el cable del altavoz.
Revise el cable RCA.
Se ha conectado mal el cable del
altavoz.
Conectar correctamente el cable del
altavoz.
Conectar correctamente el cable
RCA.
Se ha conectado mal el cable del
altavoz (positivo y negativo).
El altavoz está conectado sólo en un
punto.
Controle si se ha soltado la conexión
del cable RCA.
El modo está ajustado incorrectamente. Ajústelo correctamente.
El altavoz Center se encuentra en 0.
El cable del altavoz (positivo y negativo) está conectado sólo en un punto.
El modo está ajustado incorrectamente. Ajústelo correctamente.
El volumen del surround se encuentra
en 0.
El cable del altavoz (positivo y negativo) está conectado sólo en un punto.
El modo está ajustado incorrectamente.
El cable del altavoz (positivo y negativo) está conectado sólo en un punto.
5....-05-SLS 570 10.09.2003 14:21 Uhr Seite 17
Page 18

Especificaciones técnicas
Juego de altavoces
Box vía satélite
+ Tipo: sellado
+ Material: aluminio
+ Unidad motriz: 23/4 pulgadas de gama plena
+ Sensibilidad: 84dB/1 W @ 1 M
+ Impedancia: 4 ohmios
+ Potencia suministrada: 10 W
+ Superficie: color plateado
+ Dimensiones: 140 mm x 90 mm x 42 mm (al x an x pr)
+ Alambre del altavoz: red metálica
Box subwoofer
+ Tipo: Reflex
+ Unidad motriz: 51/4 pulgadas
+ Sensibilidad: 8 ohmios
+ Potencia suministrada: 40 W
+ Dimensiones: 310 mm x 155 mm x 290 mm
(al x an x pr)
+ Superficie: color plateado
+ Amplificador de potencia multicanal integrado
Unidad de amplificador de potencia multicanal
+ Fuente input: 3 grupos canal 5.1/CD/AUX
+ Modo DSP:(sólo CD/AUX in)
+ Potencia absorbida:
2 x 10 W (THD = 1 %, 8 ohmios) canal frontal
1 x 10 W (THD = 1 %, 8 ohmios) canal Center
2 x 10 W (THD = 1 %, 8 ohmios) canal trasero
1 x 30 W (THD = 1 %, 8 ohmios) canal subwoofer
+ Respuestas de frecuencias
150 Hz --- 20000 Hz/+3dB 5 canales-satélite
20 Hz --- 200 Hz/+3dB subwoofer
+ Gamas de ajuste del nivel acústico +/- 8 dB/canal
+ Circuito protector de función plena. El equipo ha sido
homologado en correspondencia a todas las directrices
de la CE válidas en la actualidad tales como, p.ej., res-
pecto a la compatibilidad electromagnética y directrices
de corriente de baja intensidad, pero pueden efectuar-
se modificaciones técnicas sin hacer ningunas otras
advertencias detalladas.
Este aparato se ha examinado según las normativas
actuales y vigentes de la Comunidad Europea, como p.ej.
compatibilidad electromagnética y directiva de baja tensión
y se ha construido según las más nuevas especificaciones
en razón de la seguridad.
No reservamos el derecho de efectuar modificaciones técnicas.
Garantía
Para el aparato comercializado por nosotros nos responsabilizamos con una garantía de 24 meses a partir de la
fecha de compra (factura de compra).
Durante el período de garantía nos encargamos gratuítamente de los defectos del aparato y de los accesorios*),
que se hayan originado por defectos del material o de la fabricación. Dependiendo de nuestra estimación se realizará
una reparación o un cambio. ¡Los servicios de garantía no
prolangan la garantía, ni se incia por ello un período nuevo
de garantía!
Como comprobante para la garantía es válido la factura de
compra. Sin este comprobante no se podrá realizar un
cambio o una reparación gratuíta.
En el caso de garantía lleve el aparato base en el embalaje
original y la factura de compra a su concesionario.
*) Defectos en los accesorios de uso o en las piezas de
desgaste (p.ej. escobillas de carbón del motor, varillas
amasadoras, correas de transmisión, mando a distancia de
repuesto, cepillos de dientes de repuesto, hojas de sierra
etc.), como también la limpieza, mantenimiento o el recambio de piezas de desgaste no recaen en la garantía e irán
al cargo del cliente!
En caso de intervención ajena se expira la garantía.
Después de la garantía
Después de haber expirado la garantía se pueden realizar
las reparaciones por el concesionario o por el servicio de
reparaciones. Los gastos irán al cargo del cliente.
18
E
5....-05-SLS 570 10.09.2003 14:21 Uhr Seite 18
Page 19

Congratulazioni per l’acquisto di questo prodotto!
Per cortesia leggere attentamente queste istruzioni per l’uso prima di mettere in funzione l’apparecchio.
Se avete domande sull’impianto rivolgetevi al rivenditore o
direttamente a noi. Noi operiamo conformemente alla nostra strategia aziendale “Buon design e lavorazione di pregio!” e offriamo una serie di prodotti audiovisivi di alta qualità. Siamo sempre lieti di ricevere osservazioni e consigli
sui nostri prodotti.
Per cortesia conservare queste istruzioni per l’uso in un
luogo sicuro.
Grazie!
Norme generali di sicurezza
Per ridurre al minimo il rischio di incendio o scossa, non esporre l’impianto alla pioggia o all’umidità. Non lasciare l’impianto nemmeno in prossimità di acqua, come per esempio
accanto alla vasca da bagno, ad una piscina o in una cantina umida.
Usare l’impianto solo conformemente allo scopo previsto.
Collegare l’impianto solo ad una presa con contatto di terra
regolarmente installata. Fare attenzione che la tensione di
rete specificata coincida con la tensione di rete della presa.
Se si usa un collegamento esterno al collegamento di rete
principale, badare che la polarità e la tensione coincidano.
Inserire le batterie sempre conforme ai poli.
Installare sempre l’impianto in modo che le aperture di ventilazione esistenti non vengano coperte.
Non aprire mai la custodia dell’apparecchio. Riparazioni
non a regola d’arte possono costituire un notevole rischio
per l’utente. Se un apparecchio dovesse essere guasto, in
particolare il cavo di collegamento alla rete elettrica, non
metterlo più in funzione ma farlo riparare da un esperto.
Controllare regolarmente che il cavo di collegamento alla
rete elettrica non presenti danni.
Richiedere un cavo equivalente al produttore, al nostro servizio clienti o ad una persona parimenti qualificata.
Se l’impianto non viene usato per un periodo di tempo prolungato, staccare la spina o togliere le batterie.
Questi simboli sono eventualmente applicati
all’apparecchio e servono da avviso per i seguenti punti:
Il simbolo del fulmine rimanda l’utente a parti
all’interno dell’apparecchio che presentano livelli di tensione pericolosamente alti.
Il simbolo del punto esclamativo rimanda
l’utente a importanti istruzioni per l’uso e la manutenzione contenute nei documenti di accompagnamento.
Funzioni e uso
• L’ingresso del canale 5.1 può essere collegato ad un
lettore DVD con decoder integrato.
• Ci sono 2 ingressi analogici e un ingresso audio 5.1CH.
• Dolby Surround Pro Logic.
• Regolazione di livello altoparlanti anteriori sin. e ds.,
subwoofer, centre, surround canale
• Telecomando
• Modalità di risparmio standby conforme ai requisiti del
simbolo europeo “Angelo Azzurro“.
• Riflettore blu.
Gli altoparlanti frontali e surround sono idonei per il
montaggio su supporti e parete.
Contenuto
5 Altoparlanti satellitari (compreso cavo altoparlanti)
1 Subwoofer
1 Istruzioni per l’uso
1 Telecomando
4 Set supporti
Installazione
Estrarre tutti i pezzi dell’impianto dall’imballaggio e rimettere il materiale di imballaggio interno nella scatola.
Possibilmente conservare l’imballaggio per il periodo della
garanzia.
Mettere la spina del subwoofers nella presa solo quando
tutti gli altoparlanti e i collegamenti sono collegati correttamente!
Per un’installazione ottimale dell’impianto di altoparlanti seguire le seguenti indicazioni:
LS: Altoparlante sin. surround (dietro)
L: Altoparlante anteriore sin.
SW: Subwoofer
C: Altoparlante centrale
R: Altoparlante anteriore ds.
RS: Altoparlante surround ds. (dietro)
Altoparlanti e disposizione
1. Canali altoparlanti anteriori: riproducono i componenti
principali della tonalità stereo, p.e. lingua e musica. Perciò gli altoparlanti dovrebbero essere posti di fronte alla
posizione di ascolto, a sinistra e a destra come in un
normale impianto stereo.
2. Canale altoparlante centrale: sostanzialmente riproduce la lingua in un film. Perciò questo altoparlante deve
essere posto direttamente davanti all’ascoltatore. Normalmente può essere posto sull’apparecchio televisivo.
3. Canali altoparlanti posteriori: riproducono una parte dei
rumori dell’ambiente di un film ed effetti speciali dietro
l’ascoltatore. Normalmente questa parte del tono è meno forte degli altri canali. Gli altoparlanti posteriori devono essere montati dietro l’ascoltatore.
4. Subwoofer: intensifica soprattutto i toni bassi per produrre un’atmosfera come nella sala cinematografica.
L’immagine mostra per esempio la disposizione in un
soggiorno normale.
Per riprodurre meglio il suono del cinema, noi proponiamo
che voi montiate i vostri altoparlanti conforme nell’immagine indicata. Siccome l’altoparlante centrale (C) è un apparecchio antimagnetico, può essere posto semplicemente su
un televisore. Grazie all’altoparlante centrale potete porre
19
I
C
Altoparlante
centrale
L
Altoparlante
anteriore sin.
LS
Altoparlante
surround sin.
R
Altoparlante
anteriore ds.
RS
Altoparlante
surround ds.
SW
Subwoofer
5....-05-SLS 570 10.09.2003 14:21 Uhr Seite 19
Page 20

gli altoparlanti anteriori sinistro (L) e destro (R) regolarmente distanti tra loro. L’effetto direttivo delle frequenze centrali
e alte è più forte di quello delle basse frequenze, quindi il
subwoofer (SW) può essere posto anche in un angolo del
locale. Se si desidera un basso intenso, porre il subwoofer
più vicino alla posizione di ascolto.Tranne che per il subwoofer, tutti gli assi centrali degli altoparlanti dovrebbero essere posizionati all’altezza delle orecchie dell’ascoltatore. Gli
altoparlanti surround (LS) e (RS) devono essere posti su
due lati dietro il posto dell’ascoltatore/spettatore e il lato anteriore deve essere girato nella direzione della posizione di
ascolto.
Comandi sul lato anteriore dell’apparecchio
1. Visore STANDBY
2. Tasto POWER (On/Off)
3. Sensore telecomando
4. Ingresso AUX
5. Ingresso CD
6. Ingresso 5.1 CH
7. Display informazioni INFO
8. Selettore fonti INPUT
9. Tasto MUTE
10. Alzare il volume VOL +
11. Abbassare il volume VOL -
12. Luce blu
Collegamenti sul retro dell’apparecchio
1. Ingresso audio – 5.1 canali
2. Ingresso audio– CD (2-CH-Stereo)
3. Ingresso audio– AUX (2-CH-Stereo)
4. Uscita audio – FL/FR (altoparlanti frontali)
5. Uscita audio – C (altoparlante centrale)
6. Uscita audio– LS/RS (altoparlante surround)
7. ON/OFF – On/Off manopola
Telecomando
1. STANDBY
2. CEN + / alzare il volume –
altoparlante centrale
3. CEN - / abbassare il volume –
altoparlante centrale
4. SUR +/ alzare il volume –
altoparlanti surround
5. SUR - / abbassare il volume –
altoparlanti surround
6. SUB + / alzare il volume –
subwoofer
7. SUB - / abbassare il volume –
subwoofer
8. INPUT SEL Ingresso audio
selettore fonti
9. LEFT + / alzare il livello
10. LEFT - / abbassare il livello
11. MUTE sospensione volume
12. VOL + / alzare il volume
13. VOL - / abbassare il volume
14. Comando DSP
15. RIGHT + / alzare il livello
16. RIGHT - / abbassare il livello
Inserire le batterie (non incluso nella fornitura)
• Aprire il coperchio dello scomparto portabatterie sul lato posteriore del telecomando.
• Inserire 2 batterie del tipo UM4 „AAA“ 1,5V. Fare attenzione ad inserire i poli correttamente (fondo del vano
batterie o incisione sul lato esterno)! Nel caso in cui il
telecomando non venga utilizzato per periodi di tempo
prolungati, si consiglia di estrarre le batterie allo scopo
di evitare che si verifichi una fuoriuscita dell’acido delle
batterie.
• Quando si sostituiscono le batterie, si raccomanda di
effettuare sempre la sostituzione dell’intero set e di non
limitarsi a sostituire soltanto una delle batterie.
Attenzione: non gettare le batterie nei rifiuti domestici. Buttare le batterie usate negli appositi contenitori o restituirle al
negoziante.
Non buttare mai le batterie nel fuoco.
Collegamento altoparlanti
1. 5.1ch input: l’ingresso serve per collegare una sorgente sonora esterna ad un’uscita 5.1 (p.e. lettore DVD).
20
I
Altoparlante
centrale
Altoparlante
anteriore sin.
Altoparlante
surround sin.
Altoparlante
anteriore ds.
Altoparlante
surround ds.
5....-05-SLS 570 10.09.2003 14:21 Uhr Seite 20
Page 21

2. CD: l’ingresso CD serve per collegare una sorgente so-
nora esterna ad un’uscita CD (p.e. lettore CD)
3. AUX input: l’ingresso AUX serve per collegare una
sorgente sonora esterna ad un’uscita CD (p.e. videoregistratore Hi-Fi).
4. L & R: uscita sin. e ds. per il collegamento degli
altoparlanti anteriori (altoparlante frontale sinistro = bianco, altoparlante frontale destro = rosso)
5. C: uscita per il collegamento dell’altoparlante centrale
(canale centrale = giallo).
6. LS & RS: uscita per il collegamento dell’altoparlante
sin. e ds. surround (surround sin. = verde, surround ds.
= marrone).
• Attenzione: quando si collegano i cavi badare che i poli
delle prese di uscita coincidano! I relativi colori dei collegamenti delle uscite sul subwoofer devono essere
collegati con le prese degli stessi colori del corrispettivo
altoparlante!
• Lo stesso vale anche per le prese nere (collegare nero
con nero)!
Montaggio degli altoparlanti frontali e surround
1. Montare i due pezzi del tubo di supporto.
Avvitare il piede di appoggio al tubo.
2. Passare il cavo di collegamento dell’altoparlante attraverso il tubo.
3. Infine fissare l’altoparlante sul supporto.
Istruzioni per l’uso
1. Collegare la sorgente sonora (p.e. lettore DVD).
2. Collegare il cavo di collegamento alla rete elettrica ad
una presa di terra regolarmente installata da 230 V/
50Hz. Mettere l’apparecchio in funzione con l’ interruttore 0n/off sul retro dell’ apparecchio. L’indicatore luminoso STANDBY è acceso.
3. Avviare la sorgente sonora.
4. Premere il tasto STANDBY sul telecomando oppure
premere suu’ apparecchio il tasto POWER. Le strisce
luminose blu del subwoofer si accendono.
5. Scegliere la fonte del suono desiderata premendo il
tasto INPUT SEL sul telecomando o sull’ apparecchio.
6. Con i tasti di comando VOLUME/ADJ si può regolare il
volume generale.
7. Premendo i tasti CEN +/-, SUR+/-, SUB +/-, LEFT +/- e
RIGHT +/- sul telecomando si può regolare il volume
dei singoli altoparlanti.
8. Se siete nella modalità di ingresso CD/AUX premendo
il tasto DSP potete attivare la funzione Dolby Surround
Pro Logic (DSP).
9. Se in una modalità di funzionamento qualsiasi viene
premuto il tasto MUTE, l’audio è soppresso.
10. La modalità nel display INFO:
Lampeggio rapido:
• Mentre si premono i tasti VOL+/-, CEN +/-, SUR+/-,
SUB +/-, LEFT +/- o RIGHT +/-. Al massimo o al minimo il display si spegne.
Lampeggio lento:
• Premendo il tasto MUTE l’audio è soppresso.
11. Premendo il tasto STANDBY o il tasto POWER sull’ apparecchio potete commutare l’ impianto sul modulo
Standby.
12. Per spegnere l’apparecchio posizionare l’ interruttore
su on/off su OFF.
13. Se tutti i display LED per AUX/CD/5.1CH e INFO sono
accesi, la protezione di sistema è attivata e c’è un guasto: per esempio un corto circuito nel cavo degli
altoparlanti.
Specifiche tecniche
del set altoparlanti
Box satellite
ª Tipo: sigillato
ª Materiale: Alluminio
ª Unità di controllo: 23/4 inch settore completo
ª Sensibilità: 84dB/1 W @ 1 M
ª Impedenza: 4 Ohm
ª Erogazione di potenza: 10 W
ª Superficie: color argento
ª Misure: 140 mm x 90 mm x 42 mm (alt. x largh. x prof.)
ª Filo altoparlanti: rete metallica
Subwoofer Box
ª Tipo: reflex
ª Unità di controllo: 51/4 inch
ª Sensibilità: 8 Ohm
ª Erogazione di potenza: 40 W
ª Misure: 310 mm x 155 mm x 290 mm
(alt. x largh. x prof.)
ª Superficie: color argento
ª Amplificatore di potenza multi-canali integrato
21
I
Problema
Nessun suono e
nessun display
Nessun suono,
display funzionante
Nessun suono
dagli altoparlanti
anteriori
Nessun suono da
un altoparlante
anteriore
Nessun suono
dall’altoparlante
centrale
Nessun suono
dagli altoparlanti
surround
Nessun effetto
surround
Possibili cause e rimedi
La spina non è inserita correttamente
nella presa.
Il commutatore si trova su OFF.
Il volume è su 0.
Il cavo dell’altoparlante è staccato.
Controllare il cavo RCA.
Il cavo degli altoparlanti non è collegato bene.
Collegare correttamente il cavo degli
altoparlanti.
Collegare correttamente il cavo RCA.
Il cavo degli altoparlanti non è
collegato correttamente (positivo
e negativo).
L’altoparlante è collegato in un solo
punto.
Controllare che il collegamento del
cavo RCA non sia staccato.
La modalità non è impostata correttamente. Impostare correttamente.
Il volume dell’altoparlante centrale
è su 0.
Il cavo dell’altoparlante (positivo
e negativo) è collegato in un unico
punto.
La modalità non è impostata correttamente. Impostare correttamente.
Il volume surround è su 0.
Il cavo degli altoparlanti (positivo e
negativo) è collegato in un solo punto.
La modalità non è impostata correttamente.
Il cavo degli altoparlanti (positivo
e negativo) è collegato in un solo
punto.
Checklist per la ricerca guasti
5....-05-SLS 570 10.09.2003 14:21 Uhr Seite 21
Page 22

Unità amplificatore di potenza multi-canale
ª Sorgente Input: 3 gruppi 5.1 canale/CD/AUX
ª Modalità DSP: (solo CD/AUX in)
ª Erogazione di potenza:
2 x 10 W (THD = 1%, 8 Ohm) canale frontale
1 x 10 W (THD = 1%, 8 Ohm) canale centrale
2 x 10 W (THD = 1%, 8 Ohm) canale posteriore
1 x 30 W (THD = 1%, 8 Ohm) canale subwoofer
ª Responso di frequenza
150 Hz --- 20000 Hz/+3dB 5 canale satellitare
20 Hz --- 200 Hz/+3dB subwoofer
ª Margini di regolazione soundlevel +/- 8 dB/canale
ª Circuito di protezione funzione piena. L’impianto è stato
controllato conforme a tutte le direttive CE attualmente
in vigore, come per esempio la tollerabilità
elettromagnetica e le direttive sulla bassa tensione, tut-
tavia possono essere effettuate modifiche tecniche
senza ulteriori avvertenze.
Questo apparecchio è stato controllato sulla base di tutte le
direttive CE attuali in vigore in questo settore, quali per
esempio la normativa in materia di compatibilità elettromagnetica e la direttiva in materia di bassa tensione, ed è stato costruito conformemente alle norme di sicurezza più moderne.
Con riserva di apportare modifiche tecniche.
Garanzia
Per l’apparecchio da noi messo in commercio ci
assumiamo una garanzia di 24 mesi dalla data di acquisto
(scontrino).
Durante la garanzia noi ci impegniamo ad eliminare gratuitamente i guasti dell’apparecchio o degli accessori*), dovuti
a difetti di materiale o di fabbricazione, riparandoli o, a nostra discrezione, sostituendoli. Le prestazioni in garanzia
danno luogo a una proroga della garanzia né danno diritto
ad una nuova garanzia!
Per la garanzia è sufficiente lo scontrino di acquisto. Senza
questo scontrino non sussiste il diritto né ad una sostituzione né ad una riparazione gratuita.
In caso di garanzia consegnare al vostro rivenditore l’apparecchio base nell’imballaggio originale unitamente allo
scontrino.
*) Danni agli accessori non giustificano automaticamente lo
scambio gratuito dell’apparecchio completo. Si prega di
mettersi in contatto con la nostra centrale telefonica. Danni
alle parti di vetro oppure fratture ai pezzi di materia plastica
sono obbligatoriamente a spese del cliente.
La riparazione di pezzi d’uso ovvero soggetti a logoramento (cursori, ganci impastatori, cinghie di trasmissione, telecomandi di ricambio, spazzolini di ricambio, lame di seghe
ecc.) come anche operazioni di pulizia e manutenzione o la
sostituzione di pezzi soggetti a logoramento non rientrano
nella garanzia e quindi sono a pagamento!
La garanzia si annulla nel caso di intervento da parte di terzi.
Dopo la garanzia
Al termine della garanzia le riparazioni possono essere
eseguite dietro pagamento dal corrispettivo negozio
specializzato o servizio riparazioni.
22
I
5....-05-SLS 570 10.09.2003 14:21 Uhr Seite 22
Page 23

Thank you very much for you choosing the products!
Please read this operation manual carefully before using
the unit.
If you have any question about this unit, enquire your retailer, or contact us directly. We follow company’s "serious design and precious manufacture” policy and will offer you a
series of high quality audio-visual products.Your comment
and suggestion about our products are always welcome.
Please retain this operation manual in safe place for reference.Thanks!
General safety instructions
To avoid the risk of fire or an electric shock, you should not
expose the device to rain or moisture. Consequently, does
not use the device in the immediate vicinity of water for example near a bath tub, a swimming pool or in a damp cellar.
Use the device only for the intended purpose.
The system should only be connected to a properly instal-
led shockproof socket. Pay attention that the specified voltage corresponds to the voltage of the plug socket.
When using external mains supply, pay attention to the correct polarity and Voltage, Always place the batteries in the
correct direction.
Assemble the device in such a Way that the available ventilation openings are not covered.
Never open the housing of the device. Incorrect repairs can
constitute a considerable risk for the user. Should the device become damaged, in particular the mains supply cable,
do not operate the device any longer' but rather have it repaired by an expert. Check the mains supply cable regularly for damage.
Equivalent lead from the manufacture, our customer service department or a similarly qualified person.
If the device is not used for a longer period, remove the
plug connector from the plug socket or take out the batteries.
These symbols may be found on the machine and are intended to indicate the following:
The lightning symbol should advise the user of parts in the
inside of the device which carry dangerously
high voltage levels.
The symbol with an exclamation mark should
advise the user of important
Operation or maintenance instructions in the
accompanying documentation.
Features and applications
• 5.1 The channel input can be connected to a DVD player with integrated decoder.
• There are 2 analog inputs and 5.1CH audio input.
• Dolby Surround Pro Logic
• Front left, Front right, Subwoofer, Center, Surround
channel level adjustment (Level adjustment)
• Full function remote control.
• Bass Management meet Dolby/DTS requirement
• Economy Standby mode, meet Europe blue angle
standard
• Super blue light bar
The front and surround loudspeakers are suitable for floor
and wall installation.
Packing list
5 Satellite speaker (including speaker cable)
1 Subwoofer
1 Instruction manual
1 Remote control
4 Sets stand
Installation
Remove all devices from the packing and replace the internal packing material back in the box.
Retain the packaging if possible during the entire guarantee period!
Do not insert the plug of the subwoofer into the socket until
all loudspeakers and connections have been correctly made!
For optimum installation of the loudspeakers, please follow
the instructions below:
LS: Left surround speaker (back)
L: Front left speaker
SW: Subwoofer
C: Center speaker (middle)
R: Front right speaker
RS: Right surround speaker (back)
Speakers and placement
1. Front channel speaker: reproduce the main parts of
stereo sound, e.g. speech and music. So, you should
place the speakers on the left and right in front of a listening location as normal stereo systems.
2. Center channel speaker: mainly reproduces the
speech in a movie. So, this speaker should be set on
straight ahead the listener. Normally you can put it on
top of a TV set.
3. Rear channel speakers: mainly reproduce some am-
bient (surround) sound in a movie, and specially sound
effects behind the listener. This part of sound is normally lower than other channels.The rear speakers should
be placed behind the listener.
4. Subwoofer: mainly emphases the bass part, to esta-
blish an ambience of a movie theater. Following figure
shows the placing method in a normal home, for your
reference.
To reproduce sound of movie much better, we suggest that
you setup your speakers as above diagram. Because the
center speaker(C) is an anti-magnetic unit, so you can put
it on the top of TV. Due to the center speaker you can place
main speakers (front speakers) (L) and (R) far from each
other properly. Because the directionality of mid/high
23
GB
C
Center
Speaker
L
Front left
speaker
LS
Left
surround
speaker
R
Front right
speaker
RS
Right
surround
speaker
SW
Subwoofer
5....-05-SLS 570 10.09.2003 14:21 Uhr Seite 23
Page 24

frequency is stronger than the bass, so you can place the
subwoofer (SW) at any corner in a room. If you like stronger
sub-bass, you can place the subwoofer near listener. Besides subwoofer all speakers’center axis should be placed
on height of listener’s ear. Surround speakers (LS) and
(RS) should be put two sides behind viewing place and let
the speakers face to listener’s location.
Front panel controls
1. STANDBY indicate
2. POWER button (On/Off)
3. Remote sensor
4. AUX Input
5. CD Input
6. 5.1 CH Input
7. INFO Information indicate
8. INPUT Selector
9. MUTE Control
10. VOL. + Master Volume down
11. VOL. – Master Volume up
12. Blue light
Rear panel connectors
1. Audio Input – 5.1 Channels
2. Audio Input – CD (2-CH Stereo)
3. Audio Input – AUX (2-CH Stereo)
4. Audio Output – FL/FR (Front Speaker)
5. Audio Output – C (Center Speaker)
6. Audio Output – Ls/Rs (Surround Speaker)
7. ON/OFF – On/off switch
Remote Control
1. STANDBY
2. CEN + / increase volume central loudspeaker
3. CEN - / decrease volume central loudspeaker
4. SUR + / increase volume surround loudspeaker
5. SUR - / decrease volume surround loudspeaker
6. SUB + / increase volume subwoofer
7. SUB - / decrease volume subwoofer
8. INPUT SEL audio input source selector switch
9. LEFT + / increase level
10. LEFT - / decrease level
11. MUTE switch off sound
12. VOL + / increase main volume
13. VOL - / decrease main volume
14. DSP control
15. RIGHT + / increase level
16. RIGHT - / decrease level
Inserting the Batteries (not supplied)
• Open the lid of the battery compartment on the back of
the remote control.
• Insert 2 batteries of type UM4 „AAA“ 1.5V.Please ensure that the polarity is correct (see the floor of the battery compartment or the inscription on the outside)! If
the remote control is not used for a prolonged period,
remove the batteries in order to prevent battery acid leaking.
• Always replace the complete set of batteries. Do not replace just one battery.
Warning: batteries are not to be disposed of together with
domestic wastes. Dispose of the used batteries at the relevant collection bin or at your dealer’s.
Never throw batteries into the fire.
Connecting speakers
1. 5.1ch input: used for connecting an external sound
source to a 5.1 output (e.g. DVD player)
2. CD: used for connecting an external sound source to a
CD output (e.g. CD player)
3. AUX input: used for connecting an external sound
source to a CD output (e.g. Hi-Fi video recorder)
24
GB
Center
Speaker
Front
left
speaker
Left
surround
speaker
Front
right
speaker
Right
surround
speaker
5....-05-SLS 570 10.09.2003 14:21 Uhr Seite 24
Page 25

4. L & R: Left & Right output for connecting the front loud-
speakers (front left channel use white color, front right
channel use red color)
5. C: Output for connecting the center loudspeaker (Center channel use yellow color)
6. LS & RS: Output for connecting the Left & Right surround loudspeakers (surround left channel use green color, surround right channel use brown color)
• Note: When connecting the lead, ensure the correct polarity of the output sockets! The each color connections
of the loudspeaker outputs on the subwoofer must be
connected to the each color sockets of the appropriate
loudspeaker!
• The above also applies to the black sockets (black
connected to black)!
Installation of the Front and Surround Loudspeakers
1. Please insert the two parts of the upright tube into one
another.
Screw the foot on to the upright tube.
2. Please pass the loudspeaker cable through the upright
tube.
3. Then insert the loudspeaker on to the holder.
Operation instructions
1. Connect the sound source (e.g. DVD player).
2. Connect the mains lead to a properly installed 230 V/
50 Hz shockproof socket. Switch on the device with the
on/off switch on the rear. The STANDBY display lights
up.
3. Start the sound source.
4. Press the STANDBY button on the remote control or
the POWER button on the device. The blue light strips
of the subwoofer light up.
5. Select the desired sound source using the INPUT SEL
button on the remote control or on the device.
6. With the VOLUME/ADJ control keys on the remote control you can set the overall volume.
7. By pressing the buttons CEN +/-, SUR +/-, SUB +/-,
LEFT +/- and RIGHT +/- on the remote control it is possible to adjust the volume of the individual
loudspeakers.
8. If you are in the CD/AUX input mode you can activate
the Dolby Surround Pro Logic function (DSP) by pressing the DSP button.
9. When during any operate condition pressing the MUTE
key the system will be silence.
10. The INFO indicator condition:
Flashing quickly:
• In the meantime press the buttons VOL +/-, CEN +/-,
SUR +/-, SUB +/-, LEFT +/- or RIGHT +/-. For maximum or minimum the display is off.
Flashing slowly:
• The sound of the system is switched off by pressing
the MUTE button.
11. The system can be switched to the standby mode by
pressing the STANDBY button or the POWER button
on the device.
12. In order to switch off the device, turn the on/off switch
to OFF.
13. When all the LED displays for AUX/CD/5.1CH and
INFO light up the system protection is activated; there
is a fault: e.g. short-circuit of the loudspeaker cable.
Technical specification
speaker set
Satellite Box
+ Type: Sealed
+ Material: Aluminum
+ Driver Unit: 23/4 inch full range
+ Sensitivity: 84dB/1W@1M
+ Impedance: 4 ohm
+ Power handing: 10w
+ Finished Color: Silver
+ Size: 140mm x 90mm x 42mm (H x W x D)
+ Speaker Grill: Metal Net
Subwoofer Box
+ Type: Reflex
+ Driver Unit: 51/
4 inch
+ Sensitivity: 87dB/1W@1M
+ Impedance: 8 ohm
+ Power handing: 40W
+ Size: 310mm x 155mm x 290mm (H x W x D)
+ Finished Color: Silver
+ Built-in multi-channel power amplifier
25
GB
Problem
No sound and
display
No sound but with
display
No sound from
the front speakers
No sound from
one of the front
speakers
No sound from
the Center
speakers
No sound from
the surround
speakers
No surround
effects
Possible Cause and Remedy
Poor connection from power plug and
socket.
The main switch is in the OFF
position.
The volume keys is set to Min.
The speaker cable is disconnected.
Check RCA cable.
Poor connection from speaker cable.
Reconnect the speaker cable
correctly.
Reconnect the RCA cable correctly.
Poor connection of speaker cable
(positive and negative) is connected
to one point.
Check RCA cable for loose
connection.
MODE is not set correctly.
Reset correctly.
Center Volume is set to Min.
The speaker cable (positive and
negative) is connected to one point.
MODE is not set correctly. Reset
correctly.
Surround Volume is set to Min.
The speaker cable (positive and
negative) is connected to one point.
The MODE is wrongly selected.
The speaker cable (positive and
negative) is connected to one point.
Trouble shooting Guide
5....-05-SLS 570 10.09.2003 14:21 Uhr Seite 25
Page 26

Multi Channel Power Amplifier Section
+ Input Source: 3 group 5.1channel/CD/AUX
+ DSP mode: Halfer matrix (Only CD/AUX in)
+ Power Output
2X10W (THD=1%, 8 OHM) Front channel
1X10W (THD=1%. 8 OHM) Center Channel
2X10W (THD=1%, 8 OHM) Rear channel
1X30W (THD=1%, 8 OHM) Subwoofer Channel
+ Frequency Response
150HZ----20000 Hz/±3dB 5 Channel Satellite
20HZ-----200 Hz/±3dB Subwoofer
+ Sound Level trim ranges +/- 8 dB/Channel
+ Full Function Protect Circuit
This device has been tested according to all relevant
current CE guidelines, such as electro magnetic compatibility and low voltage directives, and has been subject go
technical changes without prior notice!
Guarantee
The device supplied by our Company is covered by a 24
month guarantee starting on the date of purchase (receipt).
During the life of the guarantee any fault of the device or its
accessories *) ascribable to material or manufacturing defects will be eliminated free of charge by repairing or, at our
discretion, by replacing it.The guarantee services do not
entail an extension of the life of the guarantee nor do they
give rise to any right to a new guarantee!
Proof of the guarantee is provided by the proof of purchase. Without proof of purchase no free replacement or repair
will be carried out.
For repairs or replacement during the life of the guarantee
return the device in its original packing together with the
proof of purchase to your dealer.
*) Damage to accessories does not mean automatic free
replacement of the whole machine. In such cases please
contact our hotline. Broken glass or breakage of plastic
parts are always subject to a charge.
Defects to consumables or parts subject to wearing (e.g.
motor pistons, kneading blades, drive shafts, spare remote
control, spare toothbrushes, saw blades, etc.) as well as
cleaning, maintenance or the replacement of said parts are
not covered by the guarantee and hence are to be paid!
The guarantee lapses in case of unauthorized tampering.
After the expiry of the guarantee
After the expiry of the guarantee repairs can be carried by
the competent dealer or repair service against the payment
of the ensuing costs.
26
GB
5....-05-SLS 570 10.09.2003 14:21 Uhr Seite 26
Page 27

Serdecznie gratulujemy Państwu zakupu tego produktu!
Zanim zaczną Państwo używać sprzęt, proszę dokładnie
przeczytać instrukcję obsługi.
Jeżeli mają Państwo pytania dotyczące tego urządzenia,
to proszę zwracać się do sklepu, w którym kupiono
sprzęt, lub bezpośrednio do nas. My działamy zgodnie
ze strategią naszego przedsiębiorstwa „Dobry Design i
wysoka jakość w procesie produkcji!” i oferujemy Państwu szereg produktów audiowizualnych najwyższej
jakości. Uwagi i propozycje odnośnie naszych produktów
są u nas zawsze mile widziane.
Proszę zachować tą instrukcję obsługi w bezpiecznym
miejscu. Dziękujemy!
Ogólne wskazówki związane z
bezpieczną obsługą
Urządzenie chronić należy przed deszczem i wilgocią,
aby zapobiec groźbie pożaru lub porażeniu prądem. Nie
należy go więc używać w pobliżu wody, np. wanny,
basenu lub w zawilgoconej piwnicy. Urządzenie należy
używać tylko zgodnie z jego przeznaczeniem.
Urządzenie należy podłączyć tylko i wyłącznie do
przepisowo zamontowanego gniazdka.
Proszę zwrócić uwagę na to, żeby podane napięcie
zgadzało się z napięciem w gniazdku. W przypadku
używania oddzielnych zasilaczy należy zwrócić uwagę na
biegunowość i napięcie, baterie muszą zostać włożone
do urządzenia zgodnie z oznaczoną biegunowością.
Urządzenie należy w taki sposób ustawić, żeby istniejące
otwory wentylacyjne nie zostały przykryte.
Nigdy nie wolno otwierać obudowy urządzenia.
Niefachowo przeprowadzone naprawy mogą być groźne
w skutkach dla użytkownika. Przy uszkodzeniu urządzenia, w szczególności przewodu zasilającego , urządzenie
nie może być używane dopóki nie zostanie naprawione
przez osobę z wymaganymi uprawnieniami. Przewód zasilający należy regularnie sprawdzać, czy nie jest
uszkodzony. W razie awarii proszę nie naprawiać urządzenia samemu lecz skorzystać z pomocy autoryzowanego specjalisty.
Jeżeli przewód zasilający nieodłączalny ulegnie uszkodzeniu, to powinien on być wymieniony u wytwórcy lub w
specjalnym zakładzie naprawczym albo przez wykwalifikowaną osobę w celu uniknięcia zagrożenia.
Jeżeli urządzenie nie będzie przez dłuższy czas używane,
należy wyciągnąć wtyczkę z gniazdka lub wyjąć baterie.
Poniższe symbole mogą znajdować się na urządzeniu i
mają zwracać Państwa uwagę na:
Symbol błyskawicy ma zwrócić uwagę użytkownika na
znajdujące się we wnętrzu urządzenia części,
które są pod niebezpiecznie wysokim
napięciem.
Symbol z wykrzyknikiem ma zwrócić uwagę
użytkownika na znajdujące się w załączonych dokumentach ważne wskazówki związane z obsługą i konserwacją urządzenia.
Fukcje i zastosowanie
• Wejście kanału 5.1 może być podłączone do
odtwarzacza DVD z wbudowanym dekoderem.
• Są 2 wejścia analogowe i jedno wejście audio 5.1
CH.
• Dolby Surround Pro Logic.
• Ustawienie poziomu lewego i prawego głośnika przedniego, głośnika niskotonowego (subwoofera),
głośnika centralnego i poziomu kanału dźwięku przestrzennego (ustawienie poziomu sygnału).
• Zdalne sterowanie.
• Oszczędny tryb „Standby” spełnia wymagania zgodnie z europejskim symbolem „Niebieski anioł”.
• Niebieskie zwierciadło kuliste.
Głośniki przednie i głośniki dźwięku przestrzennego nadają się do montażu na stojakach i na ścianie.
Zawartość
5 głośników satelitarnych (łącznie z przewodem do
głośników)
1 głośnik niskotonowy (subwoofer)
1 instrukcja obsługi
1 pilot
4 zestawy stojaków
Instalacja
Wszystkie części urządzenia wyjąć z opakowania i
wewnętrzny materiał opakowaniowy włożyć z powrotem
do pudła.
Opakowanie w miarę możliwości zachować przez okres
gwarancyjny.
Wtyczkę głośnika niskotonowego włożyć do gniazdka
dopiero po właściwym połączeniu wszystkich głośników
i podłączeń!
W celu optymalnej instalacji zestawu głośnikowego
proszę zastosować się do następującej instrukcji:
LS: lewy głośnik dźwięku przestrzennego (z tyłu)
L: lewy przedni głośnik
SW: głośnik niskotonowy (subwoofer)
C: głośnik centralny (środkowy)
R: prawy przedni głośnik
RS: prawy głośnik dźwięku przestrzennego (z tyłu)
Głośniki i rozmieszczenie
1. Przednie kanały głośnikowe: odtwarzają główne
części dźwięku stereo, np. mowę i muzykę. Z tego
względu, tak jak w przypadku normalnego sprzętu
stereo, powinni Państwo umieścić te głośniki po lewej i prawej stronie naprzeciw pozycji słuchacza.
27
PL
C
Głośnik centralny
(środkowy)
L
Głośnik
przedni
lewy
LS
Głośnik
dźwięku
przestrzen-
nego lewy
R
Głośnik
przedni
prawy
RS
Głośnik
dźwięku
przestrzen-
nego prawy
SW
Głośnik
niskotonowy
(subwoofer)
5....-05-SLS 570 10.09.2003 14:21 Uhr Seite 27
Page 28

2. Kanał głośnika centralnego: odtwarza zasadniczo
mowę w czasie filmu. Z tego względu głośnik ten należy umieścić bezpośrednio przed słuchaczem. Normalnie można go postawić po prostu na telewizorze.
3. Tylne kanały głośnikowe: odtwarzają dźwięki
otoczenia w filmie, jak i specjalne efekty dźwiękowe
za słuchaczem. Ta część dźwięków jest normalnie
bardziej cicha niż inne kanały. Tylne głośniki należy
montować za słuchaczem.
4. Głośnik niskotonowy (subwoofer): wzmacnia
głównie basy celem stworzenia atmosfery przypominającej salę kinową. Rysunek pokazuje dla przykładu
rozmieszczenie w normalnym pokoju.
Dla lepszego odtworzenia brzmienia kinowego proponujemy, by głośniki rozstawili Państwo tak, jak
przedstawiono wyżej. Ponieważ głośnik centralny (C)
jest urządzeniem antymagnetycznym, może stać po prostu na telewizorze. Dzięki głośnikowi centralnemu
głośnik przedni lewy (L) i głośnik przedni prawy (R) mogą Państwo ustawić przepisowo w dużym oddaleniu od
siebie. Ponieważ oddziaływanie kierunkowe
częstotliwości średnich i wysokich jest silniejsze niż
częstotliwości w zakresie basów, głośnik niskotonowy
(SW) może być też ustawiony w rogu pomieszczenia.
Jeśli lubią Państwo mocniejsze basy, to subwoofer mogą
Państwo przesunąć bliżej pozycji słuchającego. Oprócz
głośnika niskotonowego wszystkie osie środkowe
głośników powinny być umieszczone na wysokości uszu
słuchacza. Głośniki dźwięku przestrzennego (LS) i (RS)
należy umieścić po dwóch stronach za słuchaczem/widzem, przy czym powinno się je przekręcić przodem w
kierunku pozycji słuchającego.
Elementy obsługi z przodu urządzenia
1. STANDBY lampka kontrolna
2. POWER przycisk (włączyć/ wyłączyć)
3. Sensor zdalnego sterowania
4. AUX wejście
5. CD wejście
6. 5.1 CH wejście
7. INFO wyświetlacz informacji
8. INPUT przełącznik źródła
9. MUTE przycisk wyciszania
10. VOL + zwiększenie głośności głównej
11. VOL - zmniejszenie głośności głównej
12. Niebieskie światło
Podłączenia na tyle urządzenia
1. Wejście audio – kanały 5.1.
2. Wejście audio – CD (2-CH-Stereo)
3. Wejście audio – AUX (2-CH-Stereo)
4. Wyjście audio – FL/FR (głośnik przedni)
5. Wyjście audio – C (głośnik centralny)
6. Wyjście audio – LS/RS (głośniki dźwięku
przestrzennego)
7. ON/OFF – Włącznik/ wyłącznik
Pilot
1. STANDBY
2. CEN + / Zwiększenie głośności
– głośnik centralny
3. CEN - / Zmniejszenie głośności
– głośnik centralny
4. SUR + / Zwiększenie głośności
– głośnik dźwięku
przestrzennego
5. SUR - / Zmniejszenie głośności
– głośnik dźwięku
przestrzennego
6. SUB + / Zwiększenie głośności
– głośnik niskotonowy
7. SUB - / Zmniejszenie głośności
– głośnik niskotonowy
8. INPUT SEL Przełącznik źródła
na wejściu audio
9. LEFT + / podnieść poziom
10. LEFT - / obniżyć poziom
11. MUTE Wyciszanie
12. VOL + / Zwiększenie głośności głównej
13. VOL - / Zmniejszenie głośności głównej
14. DSP - Sterowanie
15. RIGHT + / podnieść poziom
16. RIGHT - / obniżyć poziom
Wkładanie baterii (nie objęte dostawą)
• Proszę zdjąć osłonę kieszeni na baterie znajdującą
się z tyłu pilota.
• Proszę umieścić w środku 2 baterii typu UM4 „AAA“
1,5V. Proszę pamiętać o właściwej polarności (patrz
spód kieszeni na baterie ewent. wytłoczenie na stronie zewnętrznej)! Jeżeli przez dłuższy czas nie korzystają Państwo z pilota proszę wyjąć baterie, aby zapobiec „wyciekowi” kwasu akumulatorowego.
• Proszę zawsze wymieniać komplet baterii, proszę nie
zmieniać tylko jednej baterii.
Uwaga: Baterii nie należy wrzucać do śmieci. Zużyte baterie
proszę oddać do punktu zbiórki odpadów specjalnych lub
do punktu sprzedaży. Nigdy nie wrzucaj baterii do ognia.
28
PL
5....-05-SLS 570 10.09.2003 14:21 Uhr Seite 28
Page 29

Podłączenie głośników
1. 5.1ch input: wejście służy do podłączenia
zewnętrznego źródła dźwięku do wyjścia 5.1 (np.
odtwarzacz DVD).
2. CD: wejście CD służy do podłączenia zewnętrznego
źródła dźwięku do wyjścia CD (np. odtwarzacz CD)
3. AUX input: wejście AUX służy do podłączenia
zewnętrznego źródła dźwięku do wyjścia CD (np.
magnetowid HiFi).
4. L & R: lewe i prawe wyjście do podłączenia głośni-
ków przednich (lewy głośnik przedni = kolor biały,
prawy głośnik przedni = kolor czerwony).
5. C: wyjście do podłączenia głośnika centralnego
(kanał centralny = kolor żółty).
6. LS & RS: wyjście do podłączenia lewego i prawego
głośnika dźwięku przestrzennego (Surround lewy =
kolor zielony, Surround prawy = kolor brązowy).
• Wskazówka: przy podłączaniu przewodów uważać
na właściwe położenie biegunów w gniazdkach
wyjściowych! Zaznaczone różnymi kolorami wyjścia
głośnikowe w subwooferze muszą być połączone z
gniazdkami w odpowiednim kolorze, znajdującymi się
we właściwym głośniku!
• To samo dotyczy czarnych gniazdek (podłączyć
czarne do czarnego)!
Montaż głośników przednich i głośników dźwięku
przestrzennego
1. Proszę połączyć ze sobą wsuwając wzajemnie obie
części stojaka rurkowego. Proszę przykręcić nogę
stojaka do stojaka rurkowego.
2. Proszę przeprowadzić przewód głośnikowy przez
stojak rurkowy.
3. Następnie proszę zamocować głośnik na uchwycie.
Instrukcja obsługi
1. Podłączyć źródło dźwięku (np. odtwarzacz DVD).
2. Podłączyć przewód zasilający z sieci do przepisowo
zainstalowanego gniazdka wtykowego o napięciu
230V/ 50Hz. Proszę włączać włącznikiem/wyłącznikiem z tyłu urządzenia. Zapala się lampka kontrolna
STANDBY.
3. Uruchomić źródło dźwięku.
4. Proszę wcisnąć przycisk STANDBY na pilocie lub przycisk POWER w urządzeniu. Niebieskie paski świetlne subwoofera zapalają się.
5. Proszę wybrać pożądane źródło dźwięku
przyciskiem INPUT SEL na pilocie lub w urządzeniu.
6. Przyciskami sterowania VOLUME/ADJ można ustawić
głośność całkowitą.
7. Naciskając na pilocie przyciski CEN +/-, SUR +/-,
SUB +/-, LEFT +/- i RIGHT +/- mogą Państwo ustawiać głośność poszczególnych głośników.
8. Jeśli znajdują się Państwo w trybie „Wejście
CD/AUX”, to naciskając przycisk DSP mogą Państwo
włączyć funkcję Dolby Surround Pro Logic (DSP).
9. Jeśli w którymkolwiek trybie pracy sprzętu wciśnięty
zostanie przycisk MUTE, to urządzenie się wycisza.
10. Tryb Wyświetlacz INFO:
Szybkie miganie:
• Podczas gdy naciskają Państwo przyciski VOL +/-,
CEN +/-, SUR +/-, SUB +/-, LEFT +/- lub RIGHT
+/-. Po osiągnięciu maksimum lub minimum
wskaźnik wyłącza się.
Powolne miganie:
• Przez naciśnięcie przycisku MUTE urządzenie wy-
cisza się.
11. Wciskając przycisk STANDBY lub POWER w urządzeniu mogą Państwo przełączyć je na tryb Standby.
12. By urządzenie wyłączyć, włącznik/wyłącznik proszę
ustawić na OFF.
13. Jeżeli świecą się wszystkie wskaźniki diodowe
AUX/CD/5.1CH i INFO, to włączyła się ochrona systemu, gdyż wystąpił jakiś defekt, np. zwarcie przy
kablu głośnikowym.
PL
Głośnik centralny
(środkowy)
Głośnik
przedni
lewy
Głośnik dźwięku
przestrzennego
lewy
Głośnik
przedni
prawy
Głośnik
dźwięku
przestrzennego
prawy
Lista kontrolna defektów
Problem
Brak dźwięku
i wyświetlacza
Brak dźwięku,
jednak wyświetlacz działa
Brak dźwięku
z głośników
przednich
Brak dźwięku
z jednego
głośnika
przedniego
Brak dźwięku
z głośnika
centralnego
Brak dźwięku
z głośników
dźwięku
przestrzennego
Brak efektu
przestrzennego
Możliwa przyczyna i środki
zaradcze
Wtyczka do prądu nie tkwi dobrze w
gniazdku.
Wyłącznik sieciowy jest w pozycji
OFF.
Głośność ustawiona na 0.
Przewód głośnikowy jest
poluzowany.
Sprawdzić przewód RCA.
Przewód głośnikowy źle
podłączony.
Podłączyć ponownie przewód
głośnikowy we właściwy sposób.
Podłączyć ponownie przewód RCA
we właściwy sposób.
Przewód głośnikowy źle podłączony
(plus i minus).
Głośnik podłączony tylko w jednym
punkcie.
Sprawdzić przewód RCA pod kątem
luźnego połączenia.
Tryb pracy urządzenia ustawiony
niewłaściwie. Ustawić poprawnie.
Głośność głośnika centralnego
ustawiona na 0.
Przewód głośnikowy (plus i minus)
podłączony tylko w jednym punkcie.
Tryb pracy urządzenia ustawiony
niewłaściwie. Ustawić poprawnie.
Głośność głośników dźwięku
przestrzennego ustawiona na 0.
Przewód głośnikowy (plus i minus)
podłączony tylko w jednym punkcie.
Tryb pracy urządzenia ustawiony
niewłaściwie.
Przewód głośnikowy (plus i minus)
podłączony tylko w jednym punkcie.
29
5....-05-SLS 570 10.09.2003 14:21 Uhr Seite 29
Page 30

Specyfikacja techniczna zestawu
głośnikowego
Kolumna głośnika satelitarnego
+ typ: zamknięty
+ materiał: aluminium
+ jednostka napędowa: 23/4 inch w pełnym zakresie
+ skuteczność: 84 dB/1 W @ 1 M
+ impendancja: 4 W
+ moc użyteczna: 10 W
+ powierzchnia: kolor srebrny
+ wymiary: 140 mm x 90 mm x 42 mm (wysokość x
szerokość x głębokość)
+ drut głośnikowy: siatka metalowa
Kolumna subwoofera
+ typ: refleks
+ jednostka napędowa: 51/4 inch
+ skuteczność: 8 W
+ moc użyteczna: 40 W
+ wymiary: 310 mm x 155 mm x 290 mm
(wysokość x szerokość x głębokość)
+ powierzchnia: kolor srebrny
+ wbudowany wielokanałowy wzmacniacz mocy
Jednostka wielokanałowego wzmacniacza mocy
+ źródło wejścia (input): 3 grupy kanał 5.1 /CD/AUX
+ tryb DSP: (tylko CD/AUX in)
+ moc użyteczna:
2 x 10 W (THD = 1%, 8 W) kanał przedni
1 x 10 W (THD = 1%, 8 W) kanał centralny
2 x 10 W (THD = 1%, 8 W) kanał tylny
1 x 30 W (THD = 1%, 8 W) kanał subwoofera,
+ zakresy (?) częstotliwości:
150 Hz --- 20000 Hz/+3dB satelita 5-kanałowy
20 Hz --- 200 Hz/+3dB subwoofer
+ zakres regulacji poziomu głośności dźwięku +/-
8dB/kanał
+ pełnofunkcyjny obwód ochronny. Urządzenie
zostało sprawdzone zgodnie z wszelkimi aktualnie
obowiązującymi wytycznymi CE, jak np. pod
względem tolerancji elektromagnetycznej i
wytycznych dotyczących prądu niskiego napięcia (?),
jednak zmiany techniczne mogą być dokonywane
bez bliższych wskazówek.
Niniejsze urządzenie odpowiada wymaganiom normy
bezpieczeństwa użytkowania oraz spełnia wymagania
dyrektywy niskonapięciowej i kompatybilności
elektromagnetycznej.
Zastrzega się prawo do zmian technicznych!
WARUNKI GWARANCJI
Przyznajemy 24 miesiące gwarancji na produkt licząc od
daty zakupu.
W tym okresie będziemy bezpłatnie usuwać w terminie
14 dni od daty dostarczenia wadliwego sprzętu z kartą
gwarancyjną do miejsca zakupu wszystkie uszkodzenia
powstałe w tym urządzeniu na skutek wady materiałów
lub wadliwego wykonania, naprawiając oraz wymieniając
wadliwe części lub (jeśli uznamy za stosowne) wymieniając całe urządzenie na nowe.
Sprzęt do naprawy powinien być dostarczony w komplecie wraz z dowodem zakupu oraz z ważną kartą gwarancyjną do sprzedawcy w miarę możliwości w oryginalnym
opakowaniu lub innym odpowiednim dla zabezpieczenia
przed uszkodzeniem. W razie braku kompletnego opakowania fabrycznego, ryzyko uszkodzenia sprzętu podczas
transportu do i z miejsca zakupu ponosi reklamujący.
Naprawa gwarancyjna nie dotyczy czynności przewidzianych w instrukcji obsługi, do wykonania których zobowiązany jest użytkownik we własnym zakresie i na własny koszt.
Gwarancja nie obejmuje:
• mechanicznych, termicznych, chemicznych uszkodzeń sprzętu i wywołanych nimi wad,
• uszkodzeń powstałych w wyniku działania sił
zewnętrznych takich jak wyładowania atmosferyczne, zmiana napięcia zasilania i innych zdarzeń losowych,
• nieprawidłowego ustawienia wartości napięcia elektrycznego, zasilanie z nieodpowiedniego gniazda zasilania,
• sznurów połączeniowych, sieciowych, żarówek, baterii, akumulatorów,
• uszkodzeń wyrobu powstałych w wyniku niewłaściwego lub niezgodnego z instrukcją jego użytkowania,
przechowywania, konserwacji, samowolnego zrywania plomb oraz wszelkich przeróbek i zmian
konstrukcyjnych dokonanych przez użytkownika lub
osoby niepowołane,
• roszczeń z tytułu parametrów technicznych wyrobu,
o ile są one zgodne z podanymi przez producenta,
• prawidłowego zużycia i uszkodzeń, które mają nieistotny wpływ na wartość lub działanie tego urządzenia.
Karta gwarancyjna bez pieczątki sklepu, daty sprzedaży,
nie wypełniona, źle wypełniona, ze śladami poprawek,
nieczytelna wskutek zniszczenia, bez możliwości ustalenia miejsca sprzedaży oraz dołączonego dowodu zakupu jest nieważna.
Korzystanie z usług gwarancyjnych nie jest możliwe po
upływie daty ważności gwarancji. Gwarancja na części
lub całe urządzenie, które są wymieniane kończy się,
wraz z końcem gwarancji na to urządzenie.
Wszystkie inne roszczenia, wliczając w to odszkodowania
są wykluczone chyba, że prawo przewiduje inaczej.
Roszczenia wykraczające poza tą umowę nie są
uwzględniane przez tą gwarancję.
Gwarancja na sprzedany towar konsumpcyjny nie
wyłącza, nie ogranicza ani nie zawiesza uprawnień
kupującego wynikających z niezgodności towaru z
umową
Gwarancja oraz zawarte w niej warunki obowiązują na
terenie Rzeczpospolitej Polskiej.
30
PL
5....-05-SLS 570 10.09.2003 14:21 Uhr Seite 30
Page 31

Szívből gratulálunk e termék megvételéhez!
Kérjük, olvassa gondosan végig ezt a kezelési utasítást,
mielőtt használatba venné a készüléket.
Ha berendezésével kapcsolatban kérdései lennének, forduljon a kereskedőjéhez vagy közvetlenül hozzánk!
Vállalati stratégiánknak megfelelően "Jól tervezett formát
és kiváló megmunkálást" árusítunk, és a legjobb
minőségű audiovizuális termékek egész sorát kínáljuk
Önnek. Termékeinkkel kapcsolatos megjegyzéseit és
ösztönzéseit mindig szívesen fogadjuk.
Kérjük, őrizze meg biztonságos helyen ezt a kezelési
utasítást! Nagyon köszönjük.
Általános biztonsági előírások
A tűz vagy az áramütés kockázatának csökkentése
végett nem szabad kitenni a berendezést esőnek vagy
nedvességnek. Ne használjuk ezért a berendezést víz
közvetlen közelében se, tehát pl. a fürdőkád,
úszómedence mellett vagy nedves pincében.
A berendezést csak arra a célra szabad használni, amire
készült.
Csak szabályszerűen felszerelt, földelt konnektorba csatlakoztassuk! Ügyeljünk rá, hogy a specifikált hálózati feszültség megegyezzék a konnektor hálózati
feszültségével.
Külső főhálózati csatlakoztatás esetén ügyeljünk a helyes
polaritásra és feszültségre!
Az elemeket mindig a pólusok irányának megfelelően
helyezzük be!
A berendezést mindig úgy kell installálni, hogy ne legyenek elfedve a meglévő szellőzőnyílások.
Soha ne nyissuk fel a készülék dobozát! A szakszerűtlen
javítás számottevő kockázattal járhat a használóra nézve.
Ha a készülék meghibásodna, ne működtessük tovább,
hanem javíttassuk meg szakemberrel! Különösen áll ez a
hálózati csatlakozó kábelre. Ellenőrizzük rendszeresen,
nincs-e rajta meghibásodás.
Azonos értékű kábelt a gyártótól, az ügyfélszolgálatunktól vagy más, hasonlóan kvalifikált helyről kell beszerezni.
Ha hosszabb időn át nem használjuk a készüléket, ki kell
húzni a konnektorból, vagy ki kell venni belőle az elemeket.
A készüléken esetleg az alábbi szimbólumok láthatók,
amelyek a következő pontokra figyelmeztetnek:
A villám jele azokat a készülékben lévő alkatrészeket mutatja a használónak,
amelyekben veszélyesen nagy a feszültség.
A felkiáltójel a kísérő dokumentációban található fontos kezelési és karbantartási utasításokra hívja fel a figyelmet.
Funkciók és alkalmazás
• 5.1-es csatornabemenet, amely beépített dekóderrel
ellátott DVD-lejátszóhoz csatlakoztatható.
• 2 analóg bemenet és egy 5.1CH audio bemenet áll
rendelkezésre.
• Dolby Surround Pro Logic.
• Bal és jobb oldali fronthangszóró-, subwoofer-,
center-, surround-csatorna-szintbeállítás (hangzáskiegyenlítés)
• Távkapcsoló
• Takarékos standby-üzemmód tesz eleget az európai
"Kék angyal" szimbólumnak megfelelő követelményeknek.
• Kék tükörlencse.
A front- és a surround-hangszórók egyaránt alkalmasak
padlón való elhelyezésre vagy falra szerelésre.
Tartalom
5 szatelit-hangszóró (hangszórókábellel együtt)
1 subwoofer
1 kezelési utasítás
1 távkapcsoló
4 állványszet
Installáció
Vegyük ki a csomagolásból az összes
berendezéselemet, és a belső csomagolóanyagot
tegyük vissza a kartonba!
Hacsak lehetséges, őrizzük meg a csomagolást a garancia egész ideje alatt!
A subwoofer dugaszát csak akkor dugjuk a konnektorba,
amikor már az összes hangszóró és csatlakozás megfelelően össze van kötve!
A hangszóró-berendezés optimális installációja érdekében a következőképpen járjunk el:
LS: bal oldali surround-hangszóró (hátul)
L: bal elülső hangszóró
SW: subwoofer
C: center/középső hangszóró
R: jobb elülső hangszóró
RS: jobb oldali surround-hangszóró (hátul)
Hangszórók és elrendezés
1. Elülső hangszórócsatornák: A sztereó hang fő alkotóelemeit, pl. a beszédet és a zenét adják vissza.
Célszerű ezért őket a szokásos sztereó berendezéshez hasonlóan a hallgatási pozícióval szemben balra
és jobbra elhelyezni.
2. Center-hangszórócsatorna: Film esetén lényegében ez adja vissza a beszédet. Ezt a hangszórót
ezért közvetlenül a hallgató előtt kell elhelyezni. Rendes körülmények között egyszerűen a tévé-készülék
tetejére állítható.
3. Hátsó hangszórócsatornák: A hallgató mögött adják vissza a film környezeti (körkörös) zörejeinek egy
részét, valamint a speciális hangeffektusokat. A
hangnak ez a része rendes körülmények között halkabban szól, mint a többi csatorna. A hátsó
hangszórókat a hallgató mögött kell felszerelni.
31
H
C
Center/középső
hangszóró
L
Bal oldali
front-
hangszóró
LS
Bal oldali
surround-
hangszóró
R
Jobb oldali
front-
hangszóró
RS
Jobb oldali
surround-
hangszóró
SW
Subwoofer
5....-05-SLS 570 10.09.2003 14:21 Uhr Seite 31
Page 32

4. Subwoofer: főként a basszust erősíti fel, hogy ugya-
nolyan légkört teremtsen, mint a moziteremé. Az
ábra példát mutat egy szokásos nappaliban való elrendezésre.
A mozihangzás jobb reprodukálása érdekében ajánljuk,
hogy a fenti ábrázolásnak megfelelően állítsa fel a
hangszórókat.
Minthogy a center-hangszóró (C ) antimagnetikus készülék, egyszerűen a tévé-készülék tetejére állítható. A
center-hangszórónak köszönhetően az elülső bal oldali
(L) és jobb oldali (R) hangszórót egymástól szabályszerű
távolságban lehet felállítani. Mivel a középső és a magas
frekvenciák irányhatása erősebb, mint a mély
frekvenciáké, a subwoofert (SW) a helyiség sarkában is
el lehet helyezni. Ha szereti az erősebb basszust, közelebb is hozhatja a subwoofert a hallgatási pozícióhoz. A
subwoofert kivéve, a hangszórók valamennyi középső
tengelyét a hallgató füle magasságában célszerű elhelyezni. A surround-hangszórókat [(LS) és (RS)] kétoldalt, a
hallgató/néző helye mögött kell elhelyezni úgy, hogy
elülső oldalukkal a hallgatói pozíció felé vannak fordítva.
Kezelőelemek a készülék homloklapján
1. STANDBY-kijelzés
2. POWER gomb (be/ki)
3. Távkapcsoló-érzékelő
4. AUX-bemenet
5. CD-bemenet
6. 5.1 CH-bemenet
7. INFO Információkijelző
8. INPUT Forrásválasztó kapcsoló
9. MUTE Elnémító kapcsoló
10. VOL + Fő hangerősség növelése
11. VOL – Fő hangerősség csökkentése
12. Kék lámpa
Csatlakozások a készülék hátlapján
1. Audio-bemenet – 5.1 csatornák
2. Audio-bemenet – CD (2-CH sztereó)
3. Audio-bemenet – AUX (2-CH sztereó)
4. Audio-kimenet – FL/FR (fronthangszóró)
5. Audio-kimenet – C (center-hangszóró)
6. Audio-kimenet – LS/RS (surround-hangszórók)
7. ON/OFF – Be-/kikapcsoló
Távkapcsoló
1. STANDBY
2. CEN + / hangerő-növelés –
center-hangszóró
3. CEN - / hangerő-csökkentés
– center-hangszóró
4. SUR +/ hangerő-növelés –
surround-hangszóró
5. SUR - / hangerő-csökkentés
– surround-hangszóró
6. SUB + / hangerő-növelés –
subwoofer
7. SUB - / hangerő-csökkentés
– subwoofer
8. INPUT SEL audio-bemenet
forrásválasztó kapcsoló
9. LEFT + / szintnövelés
10. LEFT - / szintcsökkentés
11 MUTE elnémítás
12. VOL + / főhangerő növelése
13. VOL - / főhangerő csökkentése
14. DSP-vezérlés
15. RIGHT + / szintnövelés
16. RIGHT - / szintcsökkentés
Az elemek behelyezése (nem hozzá adott tartozék)
• Nyissa ki a távkapcsoló hátlapján lévő elemtartó rekesz fedelét!
• Tegyen be 2 db LR 3 „AAA” típusú 1,5 V-os elemet!
Ügyeljen a helyes polaritásra (lásd az elemtartó
rekesz fenekén)! Ha hosszabb időn át nem használja
a távkapcsolót, vegye ki belőle az elemeket, nehogy
az akkumulátorsav „kifusson”!
• Mindig a teljes elemkészletet cserélje, ne csak az
egyik elemet!
Figyelem: A használt elem nem a háztartási szemétbe
való! Adja le a használt elemeket az illetékes gyűjtőhelyen vagy a kereskedőnél! Soha ne dobjon elemet a tűzbe!
32
H
5....-05-SLS 570 10.09.2003 14:21 Uhr Seite 32
Page 33

Hangszóró-csatlakozás
1. 5.1ch input: Ez a bemenet külső hangforrásnak egy
5.1-es kimenethez (pl. DVD-lejátszó) aló
csatlakoztatására szolgál.
2. CD: A CD-bemenet külső hangforrásnak egy CD-ki-
menethez (pl. CD-lejátszó) való csatlakoztatására
szolgál.
3. AUX input: Az AUX-bemenet külső hangforrásnak
egy CD-kimenethez (pl. hifi videorekorder) való csatlakoztatására szolgál.
4. L & R: A fronthangszórók csatlakoztatására szolgáló
bal és jobb oldali kimenet (bal fronthanszóró = fehér,
jobb fronthangszóró = piros).
5. C: Kimenet a center-hangszóró csatlakoztatásához
(center-csatorna = sárga).
6. LS & RS: A bal és a jobb oldali surround-hangszóró
csatlakoztatására szolgáló kimenet (bal surround =
zöld, jobb surround = barna).
• Figyelem: A kábel csatlakoztatásakor ügyelni kell a
kimeneti hüvelyek helyes polaritására! A subwooferen lévő hangszórókimeneteket a megfelelő hangszóró azonos színű csatlakozóhüvelyébe kell kötni!
• Ugyanez érvényes a fekete hüvelyekre is (feketét a
feketéhez csatlakoztatni)!
A front- és surround-hangszórók felszerelése
1. Dugja össze a csőláb két részét! Csavarja a talpat a
csőlábra!
2. Húzza keresztül a hangszóró vezetékét a csőlábon!
3. Ezután húzza rá a hangszórót a tartóra!
Kezelési utasítás
1. Csatlakoztassa a hangforrást (pl. DVD-lejátszót)!
2. Dugja a hálózati kábelt előírásszerűen szerelt,
230 V/ 50 Hz-es földelt konnektorba! Kapcsolja be
a készüléket a hátlapján található ki/bekapcsológombbal! A STANDBY-kijelző kigyullad.
3. Indítsa el a hangforrást!
4. Nyomja meg a távkapcsolón a STANDBY gombot
vagy a készüléken a POWER gombot! Kigyulladnak
a subwoofer kék fénylécei.
5. A távkapcsolón vagy a készüléken lévő INPUT SEL
gombbal válassza meg a kívánt hangforrást!
6. A teljes hangerőt a VOLUME/ADJ vezérlőgombbal
lehet beállítani.
7. Az egyes hangszórók hangerejét a távkapcsolón
található CEN +/-, SUR+/-, SUB +/-, LEFT +/- és
RIGHT +/- gombok nyomogatásával lehet beállítani.
8. Ha a készülék CD/AUX-bemeneti üzemmódban van,
a DSP gomb megnyomásával aktiválhatja a Dolby
Surround Pro Logic funkciót (DSP).
9. Ha bármelyik üzemmódban megnyomják a MUTE
gombot, a berendezés elnémul.
10. INFO-kijelző üzemmód:
Gyors villogás:
• Miközben a VOL+/-, CEN +/-, SUR+/-, SUB +/-,
LEFT +/- vagy RIGHT +/- gombokat nyomogatja.
Maximum vagy minimum esetén a kijelző kikapcsol.
Lassú villogás:
• A MUTE gomb megnyomásával a berendezést
elnémították.
11. A STANDBY gombbal vagy a készüléken lévő
POWER gombbal standby üzemmódba kapcsolhatja
a berendezést.
12. Ha ki akarja kapcsolni a készüléket, állítsa OFF-ra a
ki-/bekapcsológombot!
13. Ha az AUX/CD/5.1CH vagy az INFO összes LED-kijelzője ég, aktiválódott a rendszervédelem, meghibásodás történt, pl. rövidzárlat a hangszórókábelben.
33
H
A probléma
Nincs hang és
kijelzés
Nincs hang,
mégis van
kijelzés
Nem jön hang
a fronthangszórókból
Nem jön hang
az egyik
fronthangszóróból
Nem jön hang
a center-hangszóróból
Nem jön hang
a surroundhangszórókból
Nincs surroundeffektus
Lehetséges ok és orvosolás
A hálózati dugasz nincs jól bedugva
a konnektorba.
A hálózati kapcsoló OFF-on áll.
A hangerő 0-n áll.
Kioldódott a hangszórókábel.
Ellenőrizendő az RCA-kábel.
A hangszórókábel rosszul van
csatlakoztatva.
A hangszórókábelt ismét jól
csatlakoztatni.
Az RCA-kábelt ismét jól
csatlakoztatni.
A hangszórókábel rosszul van
csatlakoztatva (pozitív és negatív).
A hangszóró csak egy ponton van
csatlakoztatva.
Ellenőrizendő, hogy nem laza-e az
RCA-kábel csatlakozása.
Az üzemmód hibásan van beállítva.
Jól beállítani.
A center-hangerő 0-n áll.
A hangszórókábel (pozitív és
negatív) csak egy ponton van
csatlakoztatva.
Az üzemmód hibásan van beállítva.
Jól beállítani.
A surround-hangerő 0-n áll.
A hangszórókábel (pozitív és
negatív) csak egy ponton van
csatlakoztatva.
Az üzemmód hibásan van beállítva.
A hangszórókábel (pozitív és
negatív) csak egy ponton van
csatlakoztatva.
Ellenőrző lista a hibakereséshez
Center/középső
hangszóró
Bal oldali
fronthangszóró
Bal oldali
surround-
hangszóró
Jobb oldali
fronthangszóró
Jobb oldali
surround-
hangszóró
5....-05-SLS 570 10.09.2003 14:21 Uhr Seite 33
Page 34

Hangszórószet műszaki specifikációk
Szatelit-doboz
+ Típus: lepecsételt
+ Anyag: alumínium
+ Meghajtóegység: 23/4 inch teljes tartomány
+ Érzékenység: 84dB/1 W @ 1 M
+ Impedancia: 4 Ohm
+ Leadott teljesítmény: 10 W
+ Felület: ezüstszínű
+ Méretek: 140 mm x 90 mm x 42 mm (ma x szé x mé)
+ Hangszóróhuzal: fémhálós
Subwoofer-box
+ Típus: reflex
+ Meghajtóegyég: 51/
4 inch
+ Érzékenység: 8 Ohm
+ Leadott teljesítmény: 40 W
+ Méretek: 310 mm x 155 mm x 290 mm
(ma x szé x mé)
+ Felület: ezüstszínű
+ beépített többcsatornás teljesítményfokozó
Többcsatornás teljesítményfokozó egység
+ Input-forrás: 3 csoport 5.1 Kanal/CD/AUX
+ DSP-üzemmód: (csak CD/AUX in)
+ Leadott teljesítmény:
2 x 10 W (THD = 1%, 8 Ohm) frontcsatorna
1 x 10 W (THD = 1%, 8 Ohm) centercsatorna
2 x 10 W (THD = 1%, 8 Ohm) hátsó csatorna
1 x 30 W (THD = 1%, 8 Ohm) subwoofer csatorna
+ Frekvenciarespons
150 Hz --- 20000 Hz/+3dB 5 Kanal-Satellit
20 Hz --- 200 Hz/+3dB Subwoofer
+ Soundlevel beállítási tartományok +/- 8 dB/csatorna
+ Összfunkciós védőkör. A berendezést minden jelen-
leg érvényben lévő CE-irányelvnek megfelelően, így
pl. az elektromágneses összeférhetőség és a
kisáram-irányelv tekintetében is bevizsgáltuk, mégis
előfordulhatnak műszaki változtatások közelebbi
figyelmeztetés nélkül.
Ezt a készüléket az Európa Tanács minden vonatkozó
aktuális irányelve szerint (pl. elektromágnesességelviselő képesség vagy kisfeszültség-elviselő képesség)
ellenőriztük, és a legújabb biztonságtechnikai előírások
szerint készült.
Megjegyezzük az esetleges müszaki változásokat!
Garancia
Garanciális igényeivel forduljon, kérem, a szerződéses
kereskedőjéhez!
A garancia igazolására a pénztári nyugta szolgál. E nélkül az igazolás nélkül sem díjmentes csere, sem díjtalan
javítás nem végezhető.
Garanciális esetben eredeti csomagolásában adja át az
alapkészüléket a pénztári bizonylattal együtt annak a kereskedőnek, akitől a készüléket vásárolta!
*) A tartozékok hibái nem eredményezik automatikusan
az egész készülék díjtalan cseréjét. Ilyen esetekben forduljon „forró vonalunkhoz”! Az üvegtörésből, ill. a
műanyag alkatrészek töréséből eredő hibák
megszüntetése mindenkor térítésköteles.
Sem az elhasználódó tartozékokban, ill. kopó
alkatrészekben (pl. szénkefe, dagasztóhorog, hajtószíj,
póttávvezérlő, pótfogkefe, fűrészlap stb.) bekövetkező
hibák, sem a tisztítás, karbantartás vagy a kopó alkatrészek cseréje nem esik a garancia hatálya alá, következésképp térítésköteles.
Illetéktelen beavatkozás a garancia megszűnését eredményezi.
A garanciális idő után
A garanciális idő eltelte után a megfelelő
szakkereskedésben vagy javítószolgálatnál végeztethet
térítésköteles javításokat.
34
H
5....-05-SLS 570 10.09.2003 14:21 Uhr Seite 34
Page 35

35
5....-05-SLS 570 10.09.2003 14:21 Uhr Seite 35
Page 36

D-47906 Kempen/Germany · Industriering Ost 40
Internet: http://www.clatronic.de · email: info@clatronic.de
Stünings, Krefeld • 08/03
Dieses Gerät wurde nach allen zutreffenden, aktuellen
CE-Richtlinien geprüft, wie z.B. elektromagnetische
Verträglichkeit und Niederspannungsdirektive und
wurde nach den neuesten sicherheitstechnischen
Vorschriften gebaut.
Technische Änderungen vorbehalten!
Bitte führen Sie das ausgediente Gerät
einer umweltgerechten Entsorgung zu.
5....-05-SLS 570 10.09.2003 14:21 Uhr Seite 36
 Loading...