

Page 1

Bluetooth Car Stereo
Bilstereo med Bluetooth
EnglishSvenska
Art.no. Model
38-3385 SM-8366UBR
Ver. 201002
Page 2

Bluetooth Car Stereo
Art. No. 38-3385 Model SM-8366UBR
English
Please read the entire instruction manual before using the product and save it for future
reference. We reserve the right for any errors in text or images and any necessary
changes made to technical data. If you have any questions regarding technical problems
please contact Customer Services.
Safety
Read the entire manual before installing!
N.B.
- Incorrect installation invalidates the warranty!
- Cutting the cables invalidates the warranty.
- If you do not have any existing ISO connectors use the included ISO harness
for installation.
Product description
Car stereo with:
- CD player
- Bluetooth
- MP3 playback capabilities
- WMA playback
- USB and SD memory card connections
- FM radio with RDS
- Removable front panel
- Power: 4 x 40 W
2
Page 3
182
53
182
Installation
Dash mounting in your existing (DIN) frame
- Only use the included or recommended mounting accessories for correct installation.
- Do not install the car stereo in a way that interferes with the driver’s visibility or that
may pose a physical danger to the passenger or driver during quick deceleration.
- Avoid installation where the car stereo may be exposed to direct sunlight, extreme
heat or vibrations.
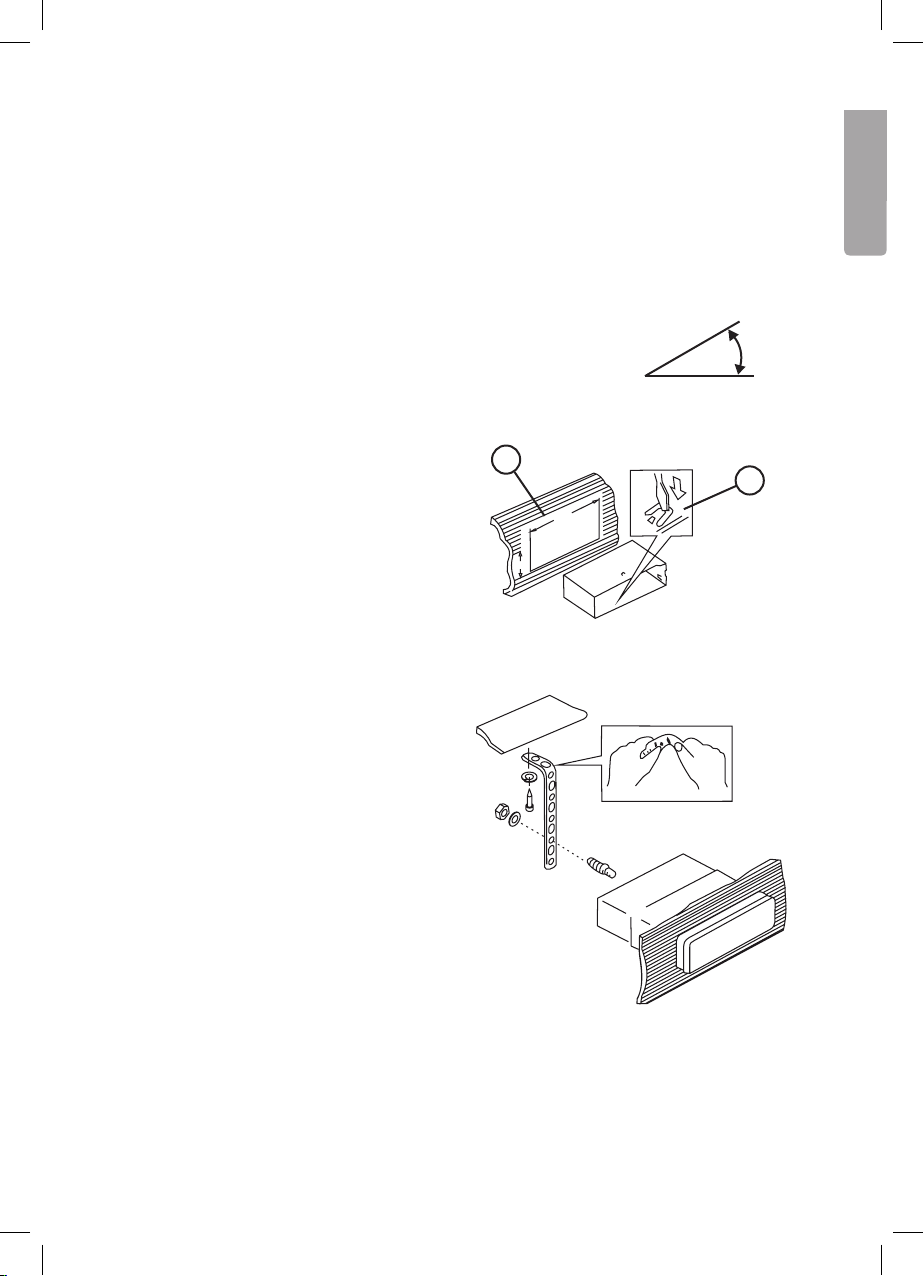
- If the installation angle exceeds 30° the device’s proper functioning
can not be guaranteed.
30°
English
1. Remove the mounting frame from the
stereo by inserting the included keys,
releasing the holding pins, and pull
the frame out from the stereo.
2. Insert the mounting frame into your
car’s dash space and fold out the
locking flaps ( 2 ) to hold the car
stereo in position in the mounting
space ( 1 ).
3. Thread the car’s ISO harness through
the mounting frame.
4. Connect the ISO connectors and
antenna and try all functions.
5. Insert the car stereo into the mounting
frame so the holding pins on the sides
are aligned correctly.
1
2
5
3
Page 4
RESET
Removal
C
English
A
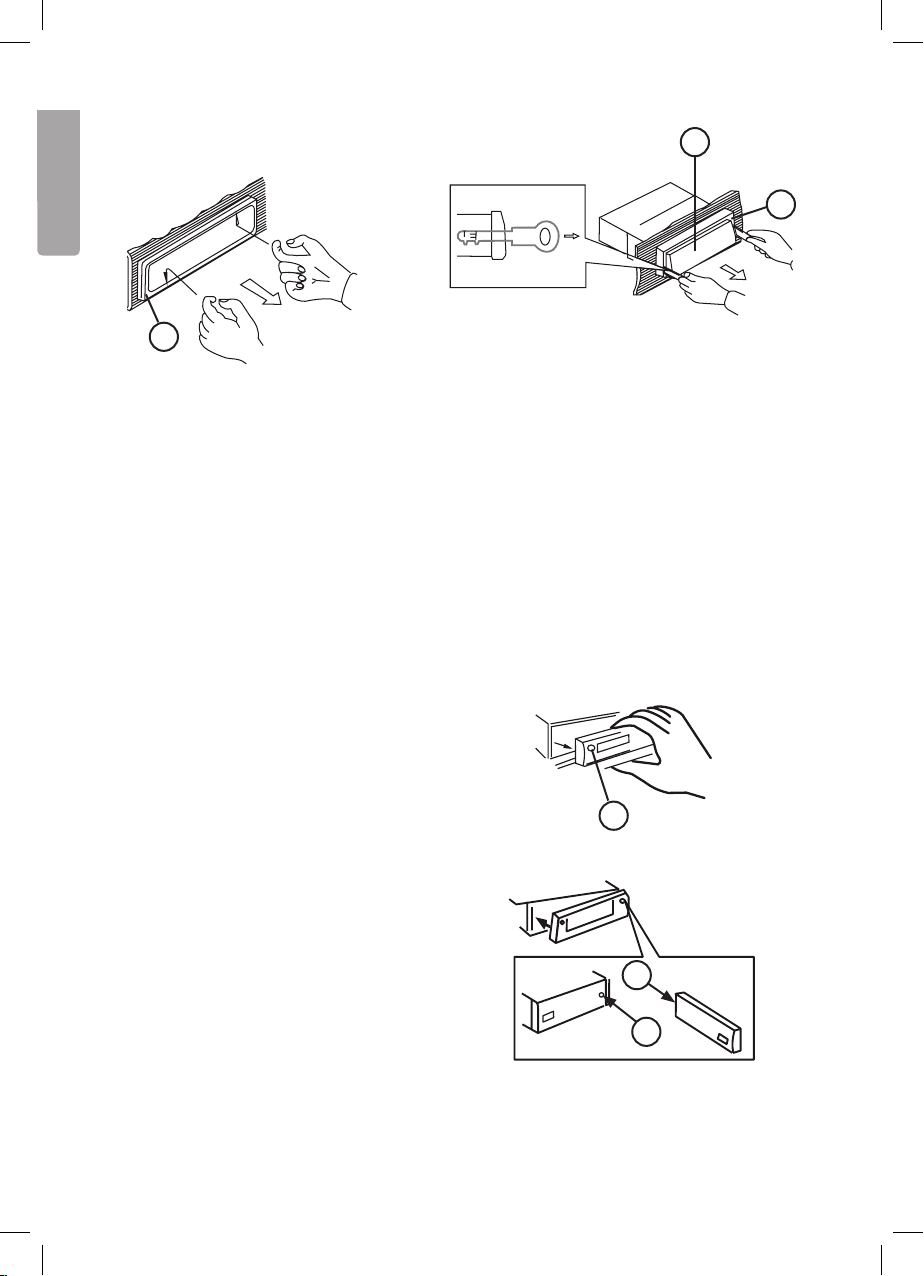
1. Remove the front panel and
remove the outer frame ( A )
carefully with your fingers at the
places marked in the figure (b).
3. Carefully pull out the keys to remove the stereo.
4. Disconnect the ISO and antenna connectors.
Removable front panel
Removal
1. Turn off the device with the ON/OFF button.
2. Press the panel release button (1).
3. Carefully remove the front panel.
B
2. Insert the included keys in the space
between the mounting frame ( B ) and
the car stereo ( C ) . Push the keys in
until a “click” sound is heard.
Attachment
1. Attach the front panel with the right
side first as shown by arrow A and B
in the figure.
2. Press in the front panel’s left side
carefully until a “click” sound
is heard.
1
A
B
4
Page 5
Connections
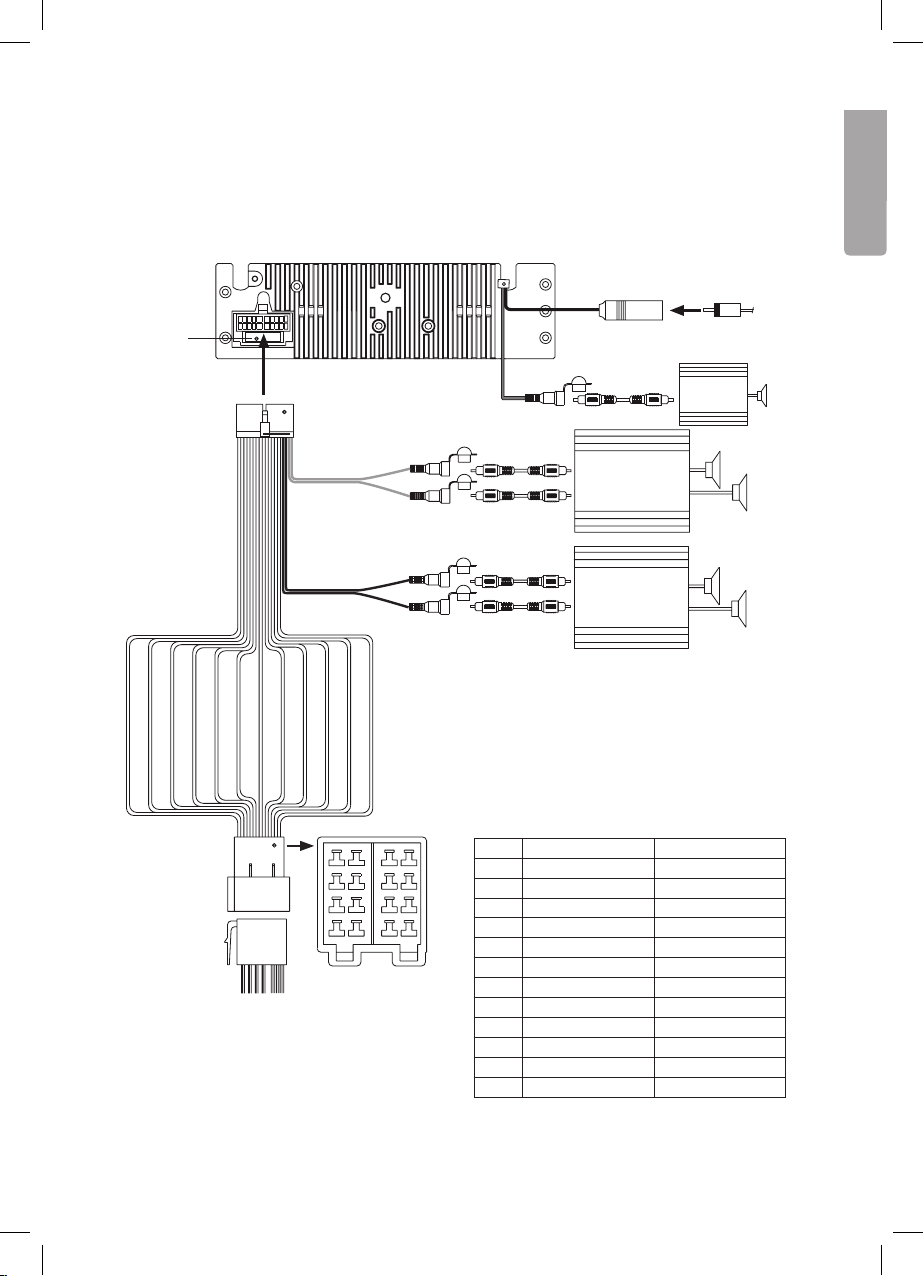
The car stereo has the following connections: Aerial, ISO quick connectors,
5 channel speaker output (front, rear, sub-w).
Aerial input
English
Fuse
20-pin connector
Rear line-out,
Grey
Front line-out,
black
7
87
8
5 6
5
6
3 4
3
4
1 2
1
2
A B
ISO connection
4 pin + 8 pin
White
HC-L
HC-R
Red
Low level RCA/
RCA leads
White
(not included)
HC-L
HC-R
Red
Low level RCA/
RCA leads
(not included)
ISO connection
Aerial lead
Low level RCA/
HC-L
(not included)
(not included)
RCA leads
(not included)
Amplifier
Amplifier
Amplifier
(not included)
Blue
Subwoofer
Pin Cable colour Connect to
A4 Yellow +12 Volt continuous
A5 Blue Motor antenna
A7 Red + 12 V via ignition
A8 Black (-) Earth
B1 Purple Rear right speaker (+)
B2 Purple with black stripe Rear right speaker (-)
B3 Gray Front right speaker (+)
B4 Grey with black stripe Front right speaker (-)
B5 White Front left speaker (+)
B6 White with black stripe Front left speaker (-)
B7 Green Rear left speaker (+)
B8 Green with black stripe Rear left speaker (-)
5
Page 6
Basic functions
1 2
3 4 5
6 7 8 9
English
MU T E
AS/PS
DISP
BAND
ANSWER
TRANSFER
1
II
2
3
INT RPT RDM
4
5
6
COPY SUB-W i x-BASS
TA AF
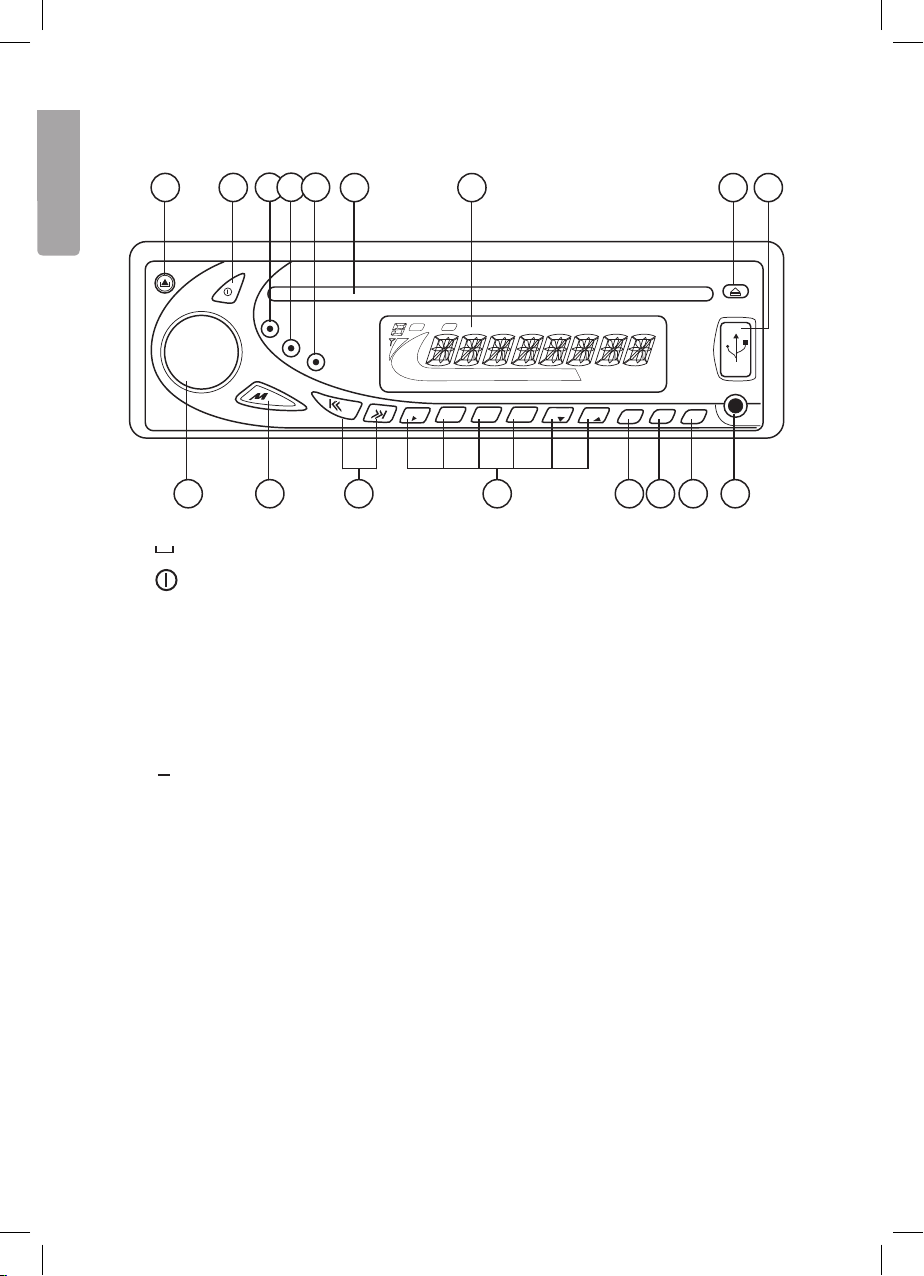
1. ▲ Panel lock – Press to release the front panel.
Power – ON/OFF button.
2.
3. ID3/AS/PS – Displays ID-3 tags. Selects AS/PS setting in radio mode.
4. MENU/DISP – Selects display mode (frequency, track, playback time, time, etc.).
5. CLEAR/BAND – Selects radio bandwidths (AM/FM).
6. Disc tray
7. Display
▲
EJECT – Press to remove/insert a CD.
8.
9. USB – USB memory connection.
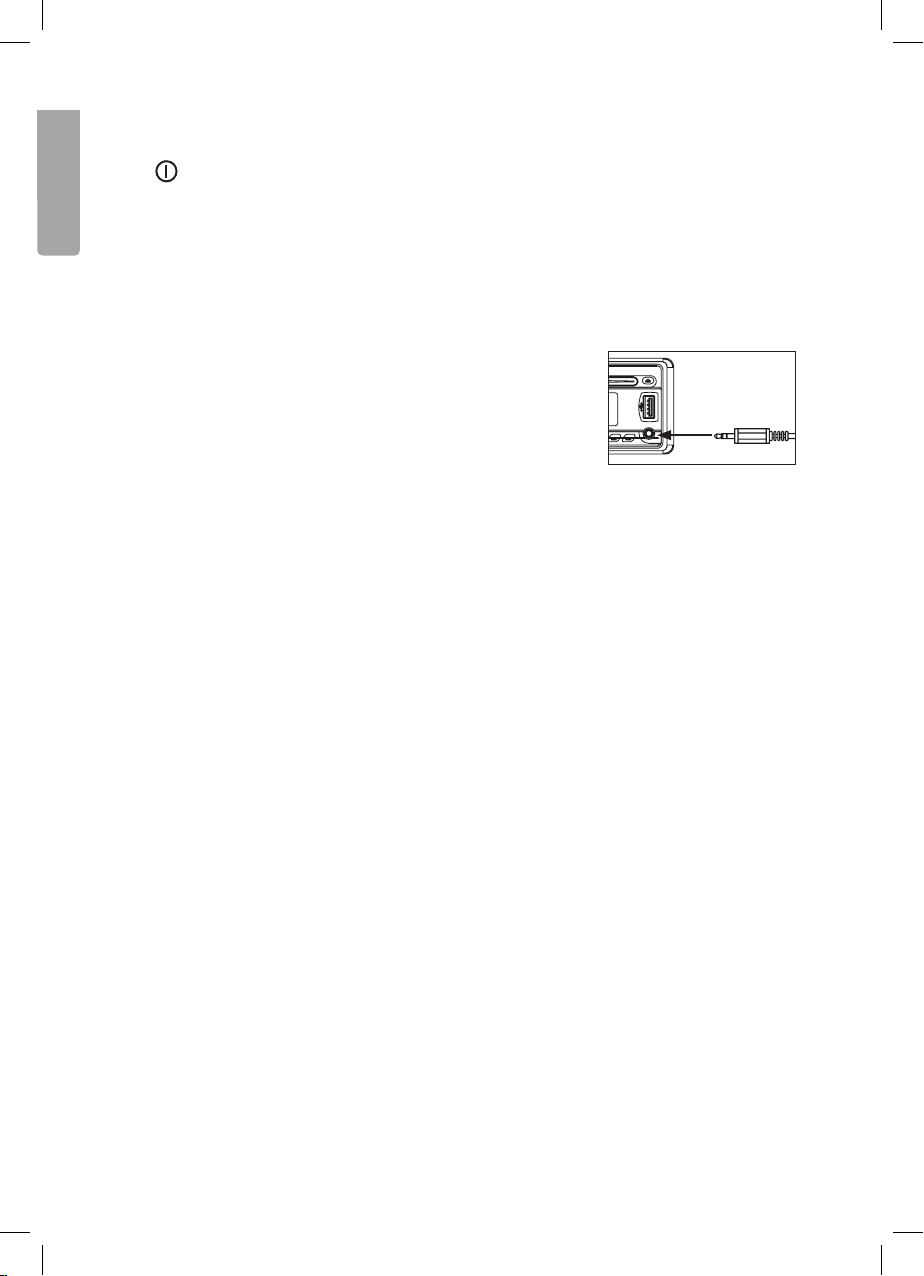
10. AUX – (external sound input). Connection for external sound sources, e.g. MP3 players.
11. PTY Programme type
Categories for different types of programme that makes it possible to search for
desired categories of information.
Press the required number of times to choose the desired mode: PTY Music Group
→ PTY Speech Group → PTY Off. The current PTY code will be shown on the display.
• Press any button from [ M1 ] to [ M6 ] to choose between different PTY codes:
Buttons Music type Programme type
M1 Pop, Rock News, information
M2 Popular music Sports, Education
M3 Classical Culture
M4 Jazz, Country Weather, Finance, Children’s programmes
M5 National, Oldies Religion, Debate
M6 Folk music Travel
MMC
PTY
1011121314151617
6
Page 7

Choosing PTY causes the radio to search for a matching programme on the current
frequency band.
12. AF Alternative frequency
Displays all receivable FM frequencies that transmit the same station. The radio will
automatically switch to the strongest transmission.
• Press to turn on/off AF mode. “AF” is indicated on the display when this function
is activated.
13. TA Traffic announcement
Has the same functions as MENU/DISP.
14. M1 – M6 Station memory
Press to jump to the saved frequency.
Saving stations into memory: 1. Select the desired frequency/station with
the tuner (15).
2. Press and hold the desired memory button for
approx. 2 seconds to save the frequency/station.
15. I◄◄ / ►►I Switches tracks/Searches for stations
• Push to automatically scan for a station.
• Hold depressed to select manual search. Push required number of times to
browse the frequency band.
16. MODE/TRANSFER
• Press MODE in order to select an audio source: Radio, CD, USB, SD/MMC,
BT-Audio or external (AUX In).
17. Volume control/Equalizer
• Adjusts the volume.
• Press the volume control knob (17) to reach menu mode and navigate using
I◄◄ / ►►I (15): VOL > BAS > TRB > BAL > FAD (other settings addressed
later in this manual).
• Adjust the selected setting by turning the volume control. There is 5 second
window in order to enter a setting.
18. SD/MMC memory card connection (behind the front panel)
Releasing the front panel allows for SD/MMC card insertion.
19. RESET (reset button)
Resets the device to factory settings. Located on the car stereo behind
the front panel.
English
7
Page 8
Dual function buttons
2. MUTE. Turns off the volume completely.
11. iX-Bass. Hold depressed to activate the iX-Bass feature. iX-Bass icon will appear on
English
the display. Press again to turn off this feature.
12. Subwoofer. Hold depressed to activate the subwoofer function. The Sub-w icon will
appear on the display. Press again to turn off this function.
13. COPY. Used for copying files.
14. PLAY/PAUSE. Starts and pauses playback.
16. TRANSFER. Used for receiving calls.
AUX-INPUT (10)
Used to connect external audio sources. Pressing MODE selects
AUX mode. Pressing again returns to the previous mode.
Menu commands
The following menu commands are accessible in the same way as the audio settings.
• Press the volume control knob (17) to reach menu mode and navigate using
I◄◄ / ►►I (15). When the desired function is reached use the volume control knob
(17) to make your selection. After 5 seconds it will revert back to the previous mode.
Synchronising (PAIR HF)
Used to synchronise your mobile phone or other Bluetooth device to the stereo.
(RE-CON)
Manual Bluetooth reconnection.
Ringtone volume (BT VOL)
Used to adjust the ringtone volume. The pre-installed setting is 20. Use the volume
control knob (17) to adjust between 00 and 38.
Setting the time (CLK)
The factory setting is set to 12.00. Minutes are adjusted by turning the volume control knob
(17) clockwise. Hours are adjusted by turning the volume control knob (17) anticlockwise.
AREA (EUR/RUS/USA/LAT)
Selects the region for correct frequency band setting when setting the frequency.
8
Page 9

DISTANT/LOCAL
Switches between receiving EON information from strong to weaker staions.
REG
Selects whether regional broadcasts/programmes will be received or not.
TA
Turns the traffic announcement on/off.
Power-on volume level setting (P-VOL)
The volume level is preset to 12 when the stereo is turned on. In order to programme
in another level, select VOLUME LEVEL and turn the volume control knob. You have
5 seconds to make your selection.
Button tones (BEEP)
The stereo is preset with the button tones activated. In this mode, turn the volume
control knob to select BEEP TONE Off to turn deactivate the button tones.
English
9
Page 10

Radio
• Press [ CLEAR/BAND ] (5) to switch between [FM1], [FM2], [FM3] and [MW](AM).
• To switch to manual search, depress and hold I◄◄ or ►►I. You have a 3 second
English
window to set desired frequency using I◄◄ or ►►I.
• To scan automatically press I◄◄ or ►►I to scan to the next station.
• Press [ M1 ] to [ M6 ] (14) in order to select a preset station from memory.
• To save a current radio station, depress one of the preset station buttons [ M1 ] to
[ M6 ] (14) for 3 seconds.
• AUTOMATICALLY STORE/PRESET SCAN (AS/PS).
AS (auto save): Automatically selects 6 strongly transmitted stations. Depress ID3/AS/PS
(3) for 3 seconds. A-STORE will begin flashing on the display. Saved stations will flash on
the display during scanning. The old stations will now be replaced with the newly scanned
stations.
PS (preset scan): Depress ID3/AS/PS (3) for less than 3 seconds. The radio will pause for
10 seconds at each stored station. Current stations will flash on the display during scanning. Press again to listen to the chosen station. When the stereo has gone through the
preset stations 1-6 the scanning will automatically stop.
STEREO
The stereo automatically receives stereo signals. The ST icon will show in the display. In those
cases where only a mono-signal can be received the ST icon will disappear from the display.
RDS FUNCTIONS
This car stereo is equipped with the following RDS functions.
1. AF Alternative frequency – Automatically switches to the same station sending on
an alternative frequency. Provides uninterrupted listening.
2. CT Automatic time setting.
3. EON Allows the stereo to temporarily jump to stations carrying vital
traffic information.
4. PI Unique code used to identify the station’s country of origin, etc.
5. PS Displays the radio station’s name.
6. PTY Programme type.
7. REG Regional broadcasts/programme.
8. TA Traffic announcements.
9. TP Traffic programme.
• AFfunction
Press [ AF ] (12) for less than 3 seconds to activate the AF function. When this function
is activated the AF icon will appear on the display. If the signal is weak the stereo will
automatically switch to another station with a stronger signal on the same network.
The stereo is preset with AF activated.
10
Page 11

• TA function (traffic announcements)
Press the volume control and browse with I◄◄ or ►►I in the menu until TA appears
and then turn the knob to set TA standby mode. The TA icon will appear on the display
for 5 seconds. In this mode the stereo will receive traffic announcements regardless
of which mode it is set to. ”TRAFFIC INFO” will appear on the display before each
announcement. You can turn off a current message manually by pressing TA (13). The
stereo will then return to TA standby mode. An audible beep indicates that the traffic
announcement reception has been broken. ”Lost TP, TA” will then appear on the display.
• PTY(refertopoint11underBasicfunctions)
CD player
1. Insert a CD into the CD slot with the label facing up.
2. The playback starts automatically beginning with the first track.
3. Quick presses on I◄◄ or ►►I ( 15 ) selects the previous or next track. Depress and
hold I◄◄ or ►►I to quick search backwards or forwards within a track.
4. Use [ M1 ] to [ M6 ] (14) to control playback:
a. [1 ►/II] PAUSE – Press to pause playback.
b. [2 INT] INTRO SCAN – Press to play the rst 10 seconds of every track.
c. [3 RPT] REPEAT – Repeats the current track.
d. [4 RDM] RANDOM – Press for random playback.
▲
5. Press
CD playback of MP3/WMA files
1. Insert a CD containing MP3/WMA files into the CD slot with the label facing upwards.
2. “READING” will appear on the display shortly followed by “Fxx Txx” before playback
automatically begins from the first file. Fxx=Number of folders and Txx=Number of files.
3. Press [ M5 ] ▼ or [ M6 ] ▲ to select the desired folder on the CD.
4. Quick presses on I◄◄ or ►►I [15] selects the previous or next track.
Press and hold I◄◄ or ►►I to quick search back or forward in a track.
5. Use [ M1 ] to [ M6 ] (14) to control playback:
a. [1 ►/II] PAUSE – Press to pause playback.
b. [2 INT] INTRO – Press to play the rst 10 seconds of every track.
c. [3 RPT] REPEAT – Repeats the current track.
d. [4 RDM] RANDOM – Press for random playback.
( 8 ) if to remove/insert a CD.
English
6. Press repeatedly on the button [ ID3/AS/PS ] ( 3 ) to show the MP3 information*, also
known as the ID3-TAG, in the following order: TITEL → ARTIST → ALBUM NAME.
* requires that this information is already saved on the file.
7. Press [ M6 ]
▲
( 8 ) if to remove/insert a CD.
11
Page 12
FRONT CABINET
RIGHT TRACK
GROUND
AUX IN
LEFT TRACK
AUX IN
2
MP3/WMA file or folder search
Searching by file/track numbers
Press [ CLEAR/BAND ] (5). ”NUMBER” will show on the display. Use the volume
English
control knob (17) to select the desired file/track number. Confirm by pushing in the volume
control knob (17).
Browsing through files and folders
• Press [ CLEAR/BAND ] (5) twice. ”FILE” will show on the display. Turn the volume
control knob to navigate the available folders and files.
• Press the volume control knob (17) for less than 3 seconds in order to access
subfolders or files.
• Conrm by pressing the volume control knob (17).
• While browsing press [ ID3/AS/PS ] (3) or turn the volume control knob (17)
anticlockwise to reach the upper level of a folder.
ID3 information
If any file contains ID3 information such as album title, song, artist, etc. this will
automatically appear on the display. You can also view this information manually by
pressing AS/PS (3).
USB
Note: The same principles apply here as with CD playback of MP3/WMA files.
Refer to that section for more information.
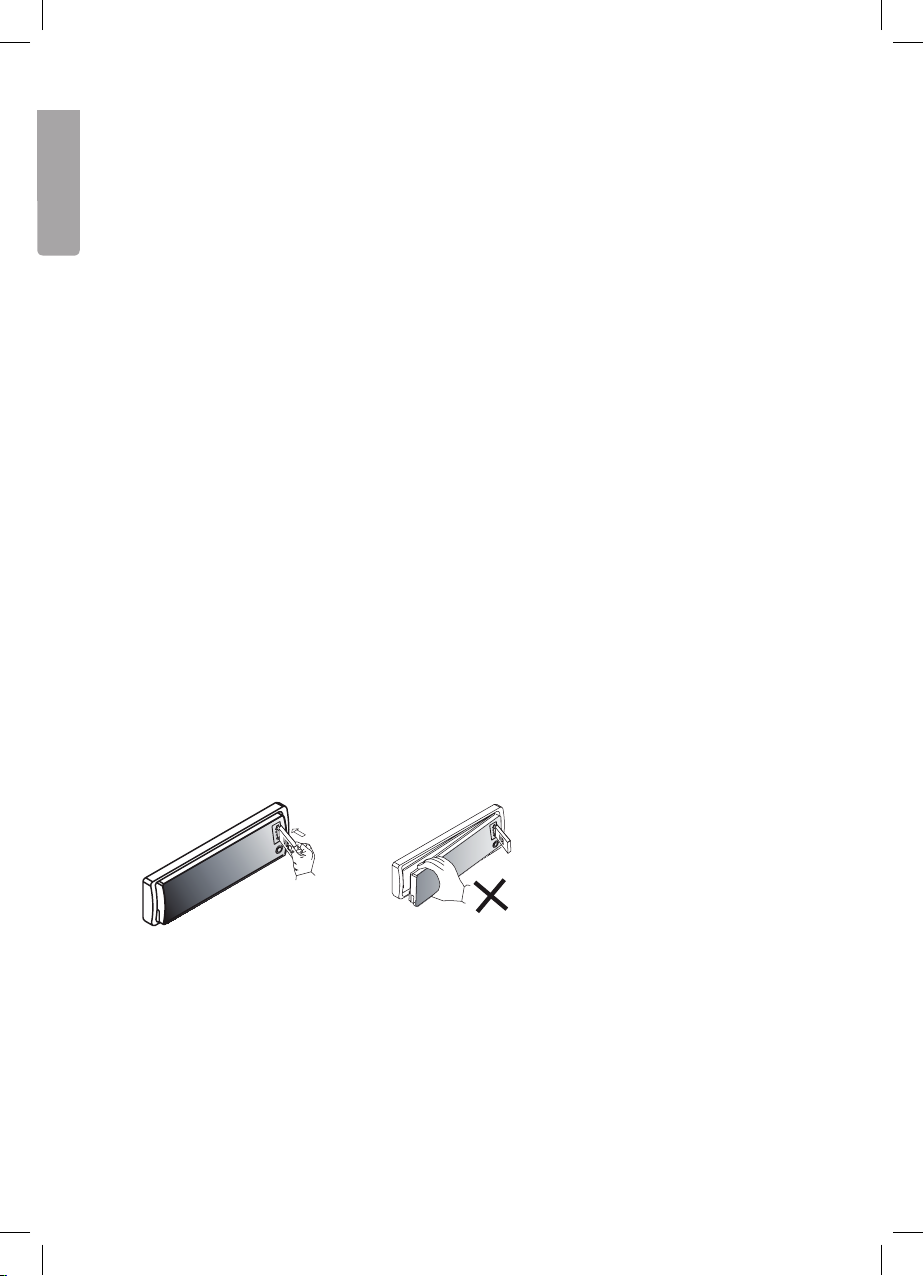
Inserting/removing a USB drive
Insert a USB drive. Warning: Never remove the front panel (1)
with a USB drive still connected.
WARNING:
Remember to turn off the power to the stereo or change modes before removing the
USB drive. Never try to remove the USB when it is playing. It can damage the memory.
12
Page 13
FRONT CABINET
RIGHT TRACK
GROUND
AUX IN
LEFT TRACK
AUX IN
2
FRONT CABINET
RIGHT TRACK
GROUND
AUX IN
LEFT TRACK
AUX IN
2
Click
SD/MMC memory cards
Note: The same principles apply here as with CD playback of MP3/WMA files. Refer to
that section for more information.
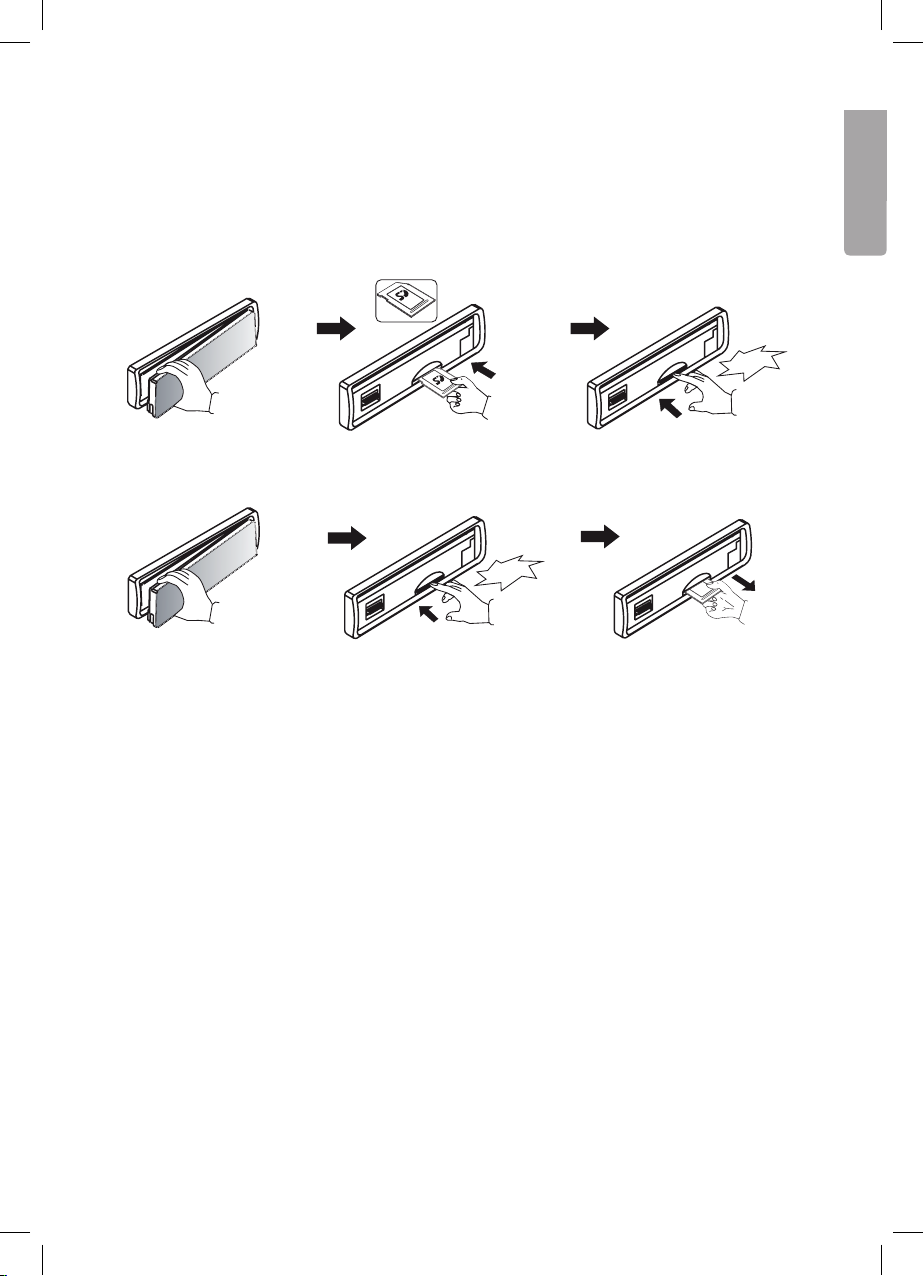
Inserting/removing SD/MMC memory cards
Click
English
Remove the front panel (1). Insert a memory card with
Remove the front panel (1). Insert the card into the
the label facing upwards.
Click
slot until a click is heard.
Insert the card into the
slot until a click is heard.
Remove the memory card.
Copying audio files
MP3 and WMA files are supported for file transfer.
Copying MP3/WMA files from CD
1. Start playback of a file and depress and hold TA (COPY) (13) to activate file transfer.
2. The display will show
C › › USB. Turn the volume control knob (17) to select between
C › › USB / C › › CARD.
3. Once the storage media has been selected press the volume control knob (17) to
confirm and start file transfer. If no button is pressed within 10 seconds the device will
revert back to the previous mode.
4. If the memory card is full
back to the previous mode.
MEM FULL will be displayed. The device will then revert
13
Page 14

5. After pressing the volume control knob (17) playback will cease and file transfer
will begin.
6. File transfer progress will be shown on the display.
English
7. When transfer is complete
will automatically be saved with the following filenames “MY_MP3” or “MY-WMA” on the
chosen storage media.
COPY OK will be shown on the display. The transferred files
8. To stop le transfer press and hold [ TA ] (COPY) (13) again.
the display. Files that are not completely transferred will be deleted.
STOP OI will show on
Transferring MP3/WMA files between storage media
Select the desired storage media with [MODE/TRANSFER] (16) and begin playback of the
desired file you wish to transfer.
1. Start playback of a le and depress and hold [TA] (COPY) (13) to activate le transfer.
2. The display will show
C › › USB. Turn the volume control knob (17) to select between
C › › USB / C › › CARD.
3. Once the storage media has been selected press the volume control knob (17) to
confirm and start file transfer. If no button is pressed within 10 seconds the device will
revert back to the previous mode.
4. If the memory card is full
back to the previous mode.
5. After pressing the volume control knob (17) playback will cease and file transfer
will begin.
6. File transfer progress will be shown on the display.
7. When transfer is complete
will automatically be saved with the following filenames “MY_MP3” or “MY-WMA” on the
chosen storage media.
8. To stop file transfer press and hold [ TA ] (COPY) (13) again.
the display. Files that are not completely transferred will be deleted.
MEM FULL will be displayed. The device will then revert
COPY OK will be shown on the display. The transferred files
STOP OI will show on
14
Page 15

Deleting files
Files from USBs and memory cards can be deleted. Files from a CD cannot.
There are different methods available for deleting files.
1. Deleting during playback
• Depress and hold [ CLEAR/BAND ] (5) to reach ERASE mode.
English
• The display will show
• Press the volume control knob (17) shortly to reach ERASE mode.
• Turn the volume control knob (17) to select
within 5 seconds the device will revert back to the previous mode.
• When
• Once the volume control knob (17) has been pressed, playback will cease and
appears on the display, press the volume control knob (17) again to confirm
deletion of the file being played.
ERASEXXX (XXX is the current track).
or N to cancel. If no button is pressed
ERASE 0K will appear on the display. The next file will then begin playback.
2. Deleting in file search mode
File numbers/files can be searched and deleted in file search/navigation mode.
• In le search/naviagation mode depress and hold [ CLEAR/BAND ] (5) to reach
ERASE mode.
• The display will show
• Press the volume control knob (17) shortly to reach ERASE mode.
• Turn the volume control knob (17) to select
within 5 seconds the device will revert back to the previous mode.
• When
• Once the volume control knob (17) has been pressed, playback will cease and
appears on the display, press the volume control knob (17) again to confirm
deletion of the file being played.
ERASEXXX (XXX is the current track).
or N to cancel. If no button is pressed
ERASE 0K will appear on the display. The next file will then begin playback.
15
Page 16

Organising folders and files
The stereo has a feature that allows folders and files to be arranged exactly as they
would on a computer.
English
Folders
The device automatically creates folders on the USB/SD/MMC storage media.
MY_MP3: Used to save all MP3 files from a USB drive or memory card.
MY_WMA: Used to save all WMA files from a USB drive or memory card.
MY_AUX: Used to save all files from the AUX LINE IN source.
Files
The device will automatically create file names followed by a folder name. For example
a file transferred from a CD will be given the filename “CD0001.MP3”. This file will be
created and automatically stored in a folder.
Bluetooth handsfree
Instructions for Bluetooth handsfree.
1. First make sure that your mobile supports Bluetooth.
2. Make sure that your mobile is synchronised to the device you will be using.
3. “BT60A” is the name of the device and will also be displayed on your mobile.
4. For the best results hold the telephone within a 3 metre range from the device.
5. Certain brands, for example Sony Ericsson have a “Power Saving Mode”. Do not use
this function as it can interfere with the Bluetooth Handsfree.
6. For the best results do not wander more than 1 metre away from the device when
making/receivning calls.
7. To finish a Bluetooth call turn it off manually on your mobile or select disconnect or
select “disconnect” in the system menu.
8. Certain brands of mobiles like Nokia support “IN BAND RING TONE”, which means that
the ringtone used in your mobile can also be used in the device. Otherwise a standard
ringtone is heard in the device.
9. In order to avoid an echo effect, the volume on the device should be set to under 30.
10. If any function does not work properly, a SOFT-RESET may be in order. This is done by
removing the stereo’s front panel and waiting 1 minute before replacing it. Replace the
front panel and try again. If necessary you may also do a full reset by pressing RESET
(19) found behind the front panel.
16
Page 17

Synchronising
Synchronising the device to your mobile
1. Enter the menu and select PAIRING (synchronising).
2. When
3. Press [ CLEAR/BAND ] (5) whenever you wish to cancel.
4. Search for Bluetooth devices on your mobile (refer to you mobile phone’s manual).
5. “BT60A” will appear. Select “BT60A” and enter 1234 as the password.
6.
P A I R H F appears in the display, press the volume control knob (17) to
activate pairing mode.
P A I R F A I L will flash for 3 seconds if synchronisation is unsuccessful. The device will
then revert back to the previous mode.
Bluetooth reconnect system
The device has an automatic reconnect system. In certain cases it is necessary to do
this manually.
1. Enter the menu and select RE-CON.
R E - C O N will show on the display. Press MODE/TRANSFER [16] to activate
2.
automatic reconnect mode.
W A I T › › › will appear on the display first and then O K .
3.
Incoming calls
English
Answering incoming calls
1. During incoming calls the caller ID will show in the display. If the caller is anonymous
P H O N E I N will show on the display. Press volume control knob (17) to answer an
incoming call.
2. Anything that is playing on the stereo will be muted during an incoming call.
3. The volume control knob (17) can be used for volume adjustment.
4. Press [ CLEAR/BAND ] (5) to end the call. Anything that was playing on the stereo prior
will return.
Refusing an incoming call
1. Press [ CLEAR/BAND ] (5) to refuse a call.
17
Page 18

Making a call
1. Make a normal call with your mobile. When you hear a ring signal C A L L will appear.
2. Anything that is playing on the stereo will be muted.
English
3. The volume control knob (17) can be used for volume adjustment.
4. Depress and hold [ CLEAR/BAND ] (5) to end the call. Anything that was playing on the
stereo prior will return.
Transferring a call to your mobile
1. During a current call depress and hold [ MODE/TRANSFER ] (16) in order to transfer the
call from the stereo to your mobile. This will take approximately 3 seconds. Your stereo
will be muted and ”MUTE” will appear on the display. Repeat the same procedure in
order to transfer the call to your stereo.
2. Anything that was playing on the stereo will continue to be muted. Press ON/OFF/
MUTE ( 2 ) to turn on the volume again.
Bluetooth Audio Streaming A2DP
(Advanced Audio Distribution Profile)
It is possible to stream audio from your mobile (if A2DP is supported) to the stereo.
Refer to the section on Synchronising on how to get started.
Note: If your mobile has both HFP (Hands Free Profile) and A2DP then both will be
synchronised simultaneously. You will not need to synchronise this separately.
Transffering music from your mobile to your stereo
1. Synchronise your mobile to the stereo.
2. Press [ MODE/TRANSFER ] (16) until “BT AUDIO” appears in the display.
3. If synchronisation is successful “BT AUDIO” will appear in the display. You will now be
able to transfer music from your mobile to your stereo.
Your regular telephone functions will continue to work even in this mode.
18
Page 19

4
5
6
TA AF
MMC
COPY SUB-W i x-BASS
PTY
Remote control
1. ON/OFF
Turns the power on/off
2. EJECT
Ejects the disc
3. MENU/DISP
Selects display mode
(frequency, track, playback
time, time, etc.)
4. MODE
Sets the desired mode: CD,
USB, etc.
5. MUTE
Mutes the stereo
6. + Increases the volume
7. – Decreases the volume
10
12
18
14
20
16
1
3
7
5
MUTE
9
AUDIO
ENTE R
AF
SUB- W
TA
U
L
O
V
DI SP
ME NU
•
TR ACK
I◄◄
PAU
1
RPT RD M
3
F-DN
5
M
E
MUTE
INT
2
4
F-UP
6
EJECT
+
MODE
•
2
6
4
8
E
BAND
R
H
A
C
S
R
E
A
E
S
AS / PS
ID3
PTY
X-BA SSCOPY
11
13
19
15
21
17
English
8. ►►I
Jumps to the next track/fast searches in a track/scans for stations.
9. I◄◄
Jumps to the previous track/fast searches in a track/scans for stations.
10. AUDIO/ENTER Redials the last number dialled.
11. BAND/ERASE/SEARCH Selects AM/FM/searches folders and files.
12. PAU/M1 Pause/preset radio station.
13. INT/M2 Intro/preset radio station.
14. RPT/M3 Repeat/preset radio station.
15. RDM/M4 Random playback/preset radio station.
16. F-DN/M5 Browses down a folder level/preset radio station.
17. F-UP/M6 Browses up a folder level/preset radio station.
18. AF/SUB-W Selects AF mode for the radio/subwoofer.
19. AS/PS/ID3 Selects AS/PS setting in radio mode. Displays ID-3 tags.
20. TA/COPY Selects TA mode for the radio/copies files.
21. PTY/X-BASS Selects PTY mode for the radio/bass boost
19
Page 20

Care and maintenance
Use a soft damp cloth to wipe the product. Never use solvents or strong detergents.
English
Troubleshooting guide
Problem Possible cause Solution
The device does
not start.
The disc cannot
be played.
No sound. The volume is turned down. Adjust the volume.
The buttons do
not work.
The sound
disappears.
No radio
reception.
The display will
show ERROR 1.
An echo is heard
during calls.
The clock displays no time
(”NO CLOCK”).
The car’s ignition is not turned on. Turn on the ignition.
The fuse is broken. Check and change the fuse.
The disc is wrong. Try another disc.
The disc is not properly inserted. Insert the disc with the text up.
The disc is dirty. Clean the disc.
The car’s interior is too hot. Wait until the car has
cooled down.
Condensation on the lens. Turn off the device and
wait an hour.
The speakers are not connected
properly.
The micro processor may need to
be reset.
The front panel is loose. Attach the front panel properly.
The device is angled too much
(max 30°).
The disc is dirty or faulty. Clean or replace the CD.
Antenna cord is not connected. Check the connections.
The signals are too weak. Choose another
The micro processor may need to
be reset.
The volume is set too high. Reduce the volume to under 30.
The clock is set automatically by
the RDS information The radio
station may not be transmitting
RDS information or the reception
is too weak.
Check the connections.
Press “Reset” behind the
front panel.
Adjust the installation.
frequency/station.
Press “Reset” behind the front
panel.
Switch to a stronger signal.
20
Page 21

Disposal
Follow local ordinances when disposing of this product. If you are unsure of how to
dispose of this product, please contact your municipality.
Specifications
FM
Frequency Range: 87.5 – 108 MHz
Signal-to-noise ratio 50 dB
CD player
Signal-to-noise ratio 70 dB
Frequency response 5 – 20,000 Hz
Bluetooth
Range 3 metres (unobstructed)
General
Operating voltage 11 – 14 V DC
Polarity Negative earth
Speaker impedance 4 Ohms
Output 4 x 40 W
English
21
Page 22

Bilstereo med Bluetooth
Art.nr 38-3385 Modell SM-8366UBR
Läs igenom hela bruksanvisningen före användning och spara den sedan för framtida
bruk. Vi reserverar oss för ev. text- och bildfel samt ändringar av tekniska data.
Vid tekniska problem eller andra frågor, kontakta vår kundtjänst (se adressuppgifter
på baksidan).
Svenska
Säkerhet
Läs igenom hela bruksanvisningen innan montering!
OBS!
- Vid felaktig inkoppling upphör garantin att gälla!
- Om kablarna på bilstereon klipps upphör garantin att gälla.
- Om platsen för montering saknar ISO-kontakter, använd de medföljande
lösa ISO-kontakterna med kabel för montering.
Produktbeskrivning
Bilstereo med:
- CD-spelare
- Bluetooth
- Uppspelning av MP3
- Uppspelning av WMA
- Anslutning för USB-minne och SD-minneskort
- FM-radio med RDS
- Löstagbar stöldfront
- Effekt 4 x 40 W
22
Page 23

182
53
182
Installation
Montering i monteringsram (DIN)
- Använd endast medföljande eller rekommenderade monteringstillbehör för
korrekt installation.
- Installera inte bilstereon så att den skymmer förarens sikt eller så att den kan skada
förare eller passagerare vid eventuell snabb inbromsning.
- Undvik att installera bilstereon på sådant sätt att den utsätts för direkt solljus, stark
värme eller starka vibrationer.
- Om installationsvinkeln överstiger mer än 30° kan apparatens
funktioner ej garanteras.
30˚
Svenska
1. Ta av monteringsramen från stereon
(tryck in de medföljande nycklarna
så att spärrarna släpper, och dra
ramen bakåt).
2. Tryck in den lösa monteringsramen
i bilens uttag och vik ut några av
låsflikarna (2) så att de låser fast
monteringsramen i monteringshålet
(1).
3. Dra fram bilens ISO-kontakter genom
monteringsramen.
4. Anslut ISO-kontakterna och
antennen och prova alla funktioner.
5. Tryck in bilstereon i monteringsramen
så att spärrarna på sidorna kommer
i läge.
1
2
5
23
Page 24

Borttagning av bilstereon
RESET
C
B
A
Svenska
1. Ta bort frontpanelen och avlägsna
den yttre ramen (A) försiktigt med
fingrarna vid markeringarna enligt
bilden.
3. Dra försiktigt i nycklarna och bilstereon för att avlägsna bilstereon.
4. Ta bort ISO-kontakterna och antennkontakten.
2. Sätt i de medföljande nycklarna i
springorna mellan monteringsramen
(B) och bilstereon (C). Nycklarna ska
tryckas in tills ett klickljud hörs.
Löstagbar frontpanel
Ta bort frontpanelen
Panelspärr
1. Stäng av apparaten med AV/PÅ-knappen.
2. Tryck in panelspärren (1).
3. Ta bort frontpanelen försiktigt.
Sätta dit frontpanelen
1. Sätt dit frontpanelen med den högra
sidan först med pilen A mot pilen B
enligt figuren.
2. Tryck försiktigt på frontpanelens vänstra
sida tills ett klickljud hörs.
1
A
24
B
Page 25

Anslutningar
Bilstereoapparaten har följande anslutningar: Antennanslutning, snabbkoppling ISO,
5-kanals lågnivåutgång (fram, bak, sub-w).
Antenningång
Säkring
20-stiftskontakt
Lågnivåutgång
bakre, grå
Lågnivåutgång
främre, svart
7
87
8
5 6
5
6
3 4
3
4
1 2
1
2
A B
ISO-anslutning
4 stift + 8 stift
Vit
HC-L
HC-R
Röd
Vit
HC-L
HC-R
Röd
Antennkabel
Lågnivåkabel
HC-L
RCA/RCA
(medföljer ej)
Slutsteg
(medföljer ej)
Blå
Subwoofer
Slutsteg
(medföljer ej)
Lågnivåkabel
RCA/RCA
(medföljer ej)
Slutsteg
(medföljer ej)
Lågnivåkabel
RCA/RCA
(medföljer ej)
ISO-anslutning
Stift Kabelfärg Kopplas till
A4 Gul +12 Volt kontinuerligt
A5 Blå Motorantenn
A7 Röd + 12 Volt via tändning
A8 Svart (-) Jord
B1 Lila Höger bakre högtalare (+)
B2 Lila med svart rand Höger bakre högtalare (-)
B3 Grå Höger främre högtalare (+)
B4 Grå med svart rand Höger främre högtalare (-)
B5 Vit Vänster främre högtalare (+)
B6 Vit med svart rand Vänster främre högtalare (-)
B7 Grön Vänster bakre högtalare (+)
B8 Grön med svart rand Vänster bakre högtalare (-)
Svenska
25
Page 26

Grundfunktioner
1 2
Svenska
ANSWER
3 4 5
MU T E
AS/PS
TRANSFER
6 7 8 9
DISP
BAND
2
1
II
3
INT RPT RDM
4
5
6
1. ▲ Panelspärr – Tryck på knappen för att lossa frontpanelen.
Strömbrytare – Av/På-knapp
2.
3. ID3/AS/PS – Visar ID-3 tag/ väljer AS/PS-läge på radion.
4. MENU/DISP – Ändrar visningsläge i displayen (frekvens, spår, speltid, klocka etc.).
5. CLEAR/BAND – Växla mellan olika radioband.
6. Skivfack
7. Display
▲
EJECT –Tryck för att ta ur CD-skivan.
8.
9. USB – Anslutning för USB-minne.
10. AUX – (extern ljudingång), anslutning för extern ljudkälla, t.ex. MP3-spelare.
11. PTY – Programtyp
Koder för olika typer av program som gör det möjligt att söka önskad information.
Tryck upprepade gånger för att välja läge: PTY Music Group → PTY Speech Group →
PTY Off. Aktuell PTY-kod visas på displayen.
• Tryck på någon av knapparna [ M1 ] till [ M6 ] för att välja bland de olika PTY-koderna:
Knapp Musiktyp Programtyp
M1 Pop, rock Nyheter, information
M2 Populärmusik Sport, utbildning
M3 Klassiskt Kultur
M4 Jazz, country Väder, finans, barnprogram
M5 Nationell, äldre musik Religion, debatt
M6 Folkmusik Reseprogram
MMC
COPY SUB-W i x-BASS
TA AF
PTY
1011121314151617
26
Page 27

När du valt PTY-kod söker radion igenom frekvensbandet för att försöka hitta en
station som har matchande program.
12. AF Alternativ frekvens
Visar alla hörbara FM-stationer som sänder samma information. Radion byter
automatiskt till den starkaste sändaren.
• Tryck för att slå på eller av AF-läget. ”AF” visas i displayen när funktionen
är aktiverad.
13. TA
Denna knapp har samma funktion som MENU/DISP.
14. M1 – M6 Stationsminnen
Tryck på en minnesknapp för att snabbt ta fram den lagrade frekvensen.
Lagra frekvenser: 1. Välj önskad frekvens med frekvensväljaren (15).
2. Tryck och håll in önskad minnesknapp i ca 2 sekunder för
att lagra frekvensen.
15. I◄◄ - ►►I Byt spår/Sök frekvens
• Tryck för att automatiskt söka station.
• Tryck och håll in för att välja manuell sökning. Tryck sedan upprepade gånger för
att välja frekvens uppåt/nedåt.
16. MODE/TRANSFER
• Tryck på MODE-knappen för att välja vilken ljudkälla som ska användas, Radio,
CD, USB, SD/MMC, BT-Audio eller extern ljudkälla (AUX In).
17. Volymratt/Equalizer
• Vrid för att justera ljudvolymen.
• Tryck på volymratten (17) för att komma in i menyn och navigera med
I◄◄ /►►I (15) : VOL → BAS → TRB → BAL → FAD (övriga inställningar tas upp
längre fram i bruksanvisningen).
• Justera vald ljudinställning med volymratten. Vänta sedan 5 sekunder så sparas
inställningarna automatiskt.
18. Anslutning för SD/MMC-minneskort (bakom frontpanelen)
Tag loss frontpanelen och sätt i ett SD-kort i anslutningen.
19. RESET (återställningsknapp)
Återställer apparaten till fabriksinställningar. Knappen är placerad på bilstereon bakom
frontpanelen.
Svenska
27
Page 28

Knappar med dubbla funktioner
2. MUTE. Tystar ljudet helt.
11. iX-Bass. Ett långt tryck på knappen aktiverar iX-Bass-funktionen. iX-Bass-symbolen
visas i displayen. Tryck igen för att stänga av funktionen.
12. Subwoofer. Ett långt tryck på knappen aktiverar subwoofer-funktionen.
Sub-w-symbolen visas i displayen. Tryck igen för att stänga av funktionen.
13. COPY. Används för kopiering av filer.
14. PLAY/PAUSE. Startar och pausar uppspelning.
Svenska
(2) INT – Intro.
3) RPT – Repeat.
(4) RDM – Random
(5-6) ▼och ▲ - Bläddring bland mappar vid MP3-uppspelning.
16. TRANSFER. Tryck för att svara på ett samtal.
AUX-INGÅNG (10)
Anslut den externa ljudkällan till ingången på fronten. Tryck
sedan på MODE-knappen för att välja AUX-läge. Tryck igen för
att återgå till föregående läge.
Menyfunktioner
Följande menyfunktioner är tillgängliga och nås på samma sätt som ljudinställningarna.
• Tryck på volymratten (17) för att komma in i menyn och navigera med I◄◄ / ►►I (15).
När den önskade funktionen visas, justera med volymratten (17) inom 5 sekunder. Efter
5 sekunder sparas inställningarna automatiskt.
Länkning (PAIR HF)
Denna funktion används för att länka din mobiltelefon eller annan Bluetooth-apparat
med bilstereon.
(RE-CON)
Manuell återkoppling av Bluetooth-anslutning.
Ringvolym på inkommande samtal (BT VOL)
Enheten kan ha en förinställd ringvolym. Standardinställningen är 20. Använd volymratten
(17) för att justera mellan 00 och 38 i ringvolym.
Ställa in klockan (CLK)
Klockan är förinställd på 12.00. Justera minuterna genom att vrida volymratten (17)
medsols. Justera timmarna genom att vrida volymratten (17) motsols.
28
Page 29

AREA (EUR/RUS/USA/LAT)
Välj område för rätt decimaler vid frekvensinställning.
DISTANT/LOCAL
Växla mellan att ta emot EON-information från endast starka eller svagare radiostationer.
REG
Välj om regionala sändningar/program ska mottas eller ej.
TA
Trafikmeddelande på eller av.
Volymläge vid påslagning av bilstereon (P-VOL)
Volymen är förinställd på 12 när radion slås på. För att programmera en annan nivå, välj
VOLUME LEVEL och vrid på volymratten inom 5 sekunder.
Knappljud (BEEP)
Bilstereon är förinställd med knappljud på. I detta läge, vrid volymratten till BEEP TONE Off
för att stänga av knappljudet.
Svenska
29
Page 30

Lyssna till radion
• Tryck på [ CLEAR/BAND ]-knappen (5) för att växla mellan FM1, FM2, FM3 och MW (AM).
• För att växla till manuellt sökläge, tryck och håll in I◄◄ eller ►►I. Ställ sedan inom
3 sekunder in önskad frekvens med knapparna I◄◄ och ►►I.
• För automatisk sökning tryck på I◄◄ eller ►►I för att komma till nästa station.
• Tryck på en av minnesknapparna [ M1 ] till [ M6 ] (14) för att snabbt ta fram en lagrad
frekvens från minnet.
• För att spara den radiostation du lyssnar på, håll ned en minnesknapp av [ M1 ] till
Svenska
[ M6 ] (14) i 3 sekunder.
• AUTOMATICALLY STORE/PRESET SCAN (AS/PS).
AS (spara automatiskt): Väljer automatiskt 6 st. starka stationer. Håll ned ID3/AS/PSknappen (3) i 3 sekunder. A-STORE blinkar i displayen. Lagrade stationer blinkar i displayen
under sökningen. De nya stationerna ersätter de gamla lagrade.
PS (förinställd sökning): Håll ned ID3/AS/PS-knappen (3) i mindre än 3 sekunder. Radion
pausar i 10 sekunder för varje förinställd radiokanal. Aktuell station blinkar i displayen under
pågående sökning. Tryck på knappen igen för att lyssna på önskad station. När bilstereon
har gått igenom minnesplats 1-6 så avslutas sökningen automatiskt.
STEREO
Bilstereon tar automatiskt emot stereosignalen. ST-ikonen visas då i displayen. I de fall då
det bara kan tas emot monosignal försvinner ikonen.
RDS FUNKTIONER
Bilstereon är utrustad med följande RDS funktioner.
1. AF: Alternativ frekvens gör att du behåller samma kanal om du åker in i t.ex.
ett annat län och frekvensen ändrar sig.
2. CT: Automatisk klockinställning.
3. EON: Tillåter bilstereon att tillfälligt och automatiskt gå in på andra stationer
för trafikmeddelanden.
4. PI: Unik kod för att identifiera stationen beroende på land etc.
5. PS: Namn på radiostationen i displayen.
6. PTY: Programtyp.
7. REG: Regionala sändningar/program.
8. TA: Trafikmeddelande.
9. TP: Trafikprogram.
• AF-funktion
Tryck på [ AF ]-knappen (12) i mindre än 3 sekunder för att välja om AF-funktionen ska
vara aktiv. När funktionen är aktiverad visas symbolen AF i displayen. Om signalen är
svag så byter bilstereon automatiskt till en annan station i samma nätverk. Bilstereon är
förinställd med AF aktiverat.
30
Page 31

• TA-funktion(trakmeddelande)
Tryck på volymratten och bläddra med I◄◄ eller ►►I i menyn tills TA visas och
vrid sedan på volymratten för att slå på TA standbyläge. TA-ikonen visas i displayen
i 5 sekunder. I detta läge mottas trafikmeddelanden oavsett vilket läge bilstereon
är inställd i. ”TRAFFIC INFO” visas i displayen före ett meddelande. Det går att
avsluta meddelandet genom att trycka på TA-knappen (13). Bilstereon återgår till TA
standbyläge. Ett pipljud indikerar att trafikmeddelandet avbröts och displayen visar
”Lost TP, TA”.
• PTY(sepunkt11igrundfunktioner)
CD-uppspelning
1. Sätt i en CD-skiva i CD-facket med etiketten vänd uppåt.
2. Uppspelningen startar automatiskt från det första spåret.
3. Tryck kort på I◄◄ eller ►►I [15] för att välja föregående eller nästa spår.
Tryck och håll in I◄◄ eller ►►I för att snabbspola bakåt eller framåt i spåret.
4. Använd funktionsknapparna [ M1 ] till [ M6 ] (14) för att styra uppspelningen:
a. [1 ►/II] PAUSE– Tryck för att pausa uppspelningen.
b. [2 INT] INTRO SCAN – Tryck för att spela upp de 10 första sekunderna på alla spår.
c. [3 RPT] REPEAT – Repetition av aktuellt spår.
d. [4 RDM] RANDOM – Tryck för att välja slumpvis uppspelning.
▲
5. Tryck på
MP3/WMA-uppspelning från CD-skiva
1. Sätt i en CD-skiva innehållande MP3-filer i CD-facket med etiketten vänd uppåt.
2. Displayen visar en kort stund ”READING” och sedan ” Fxx Txx” innan uppspelningen
startar automatiskt från den första filen. Fxx=antalet mappar och Txx=antal filer.
3. Tryck på knapparna [M5] ▼ eller [ M6 ] ▲ för att välja önskad mapp på CD-skivan.
4. Tryck kort på I◄◄ eller ►►I [15] för att välja föregående eller nästa spår. Tryck och håll
I◄◄ eller ►►I in för att snabbspola bakåt eller framåt i spåret.
5. Använd funktionsknapparna [ M1 ] till [ M6 ] (14) för att styra uppspelningen:
a. [1 ►/II] PAUSE – Tryck för att pausa uppspelningen.
b. [2 INT] INTRO – Tryck för att spela upp de 10 första sekunderna på alla spår.
c. [3 RPT] REPEAT – Repetition av aktuellt spår.
d. [4 RDM] RANDOM – Tryck för att välja slumpvis uppspelning.
6. Tryck upprepade gånger på knappen ID3/AS/PS ( 3 ) för att visa MP3-
7. Tryck på [ M6 ]
( 8 ) om du vill ta ur CD-skivan.
informationen*, s.k. ID3-TAG, i följande ordning: TITEL → ARTIST → ALBUMNAMN
* Krävs att information finns sparad på filen.
▲
( 8 ) om du vill ta ur CD-skivan.
Svenska
31
Page 32

MP3/WMA söka efter fil eller mapp
FRONT CABINET
RIGHT TRACK
GROUND
AUX IN
LEFT TRACK
AUX IN
2
Söka direkt efter filnummer
Tryck på [ CLEAR/BAND ]-knappen (5). ”NUMBER” visas i displayen. Vrid på volymratten
(17) för att komma till önskat nummer. Avsluta med att trycka ned volymratten (17) för att
bekräfta valet.
Navigera i mappar och filer
• Tryck två gånger på [ CLEAR/BAND ]-knappen (5). ”FILE” visas i displayen. Vrid på
volymratten för att navigera mellan de mappar och filer som finns tillgängliga.
Svenska
• Tryck på volymratten (17) i mindre än 3 sekunder för att komma in i undermappar
eller filer.
• Bekräfta val genom att trycka ned volymratten (17).
• Under navigering, tryck på [ ID3/AS/PS ]-knappen (3) eller vrid på volymratten (17)
motsols för att komma tillbaka till toppen på foldern.
ID3 information i displayen
Om någon fil innehåller ID3-information som till exempel albumtitel, låt, artist, etc. så
visas det automatiskt i displayen. Det går också att använda [ AS/PS ] (3) för att se
informationen manuellt.
Uppspelning från USB
Observera! Tillvägagångssättet är likadant som för ”MP3/WMA-uppspelning från CD-skiva.
Se det avsnittet för info.
Sätta i och ta bort USB enhet
Sätt i USB-minnet. Varning: Ta aldrig bort frontpanelen (1) när
ett USB-minne är inkopplat.
VARNING:
Kom alltid ihåg att stänga av strömmen till bilstereon eller byta till annat läge innan
USB-enheten tas bort. Försök aldrig ta bort USB-enheten när en låt spelas, det kan
skada minnet.
32
Page 33

Uppspelning från minneskort
FRONT CABINET
RIGHT TRACK
GROUND
AUX IN
LEFT TRACK
AUX IN
2
FRONT CABINET
RIGHT TRACK
GROUND
AUX IN
LEFT TRACK
AUX IN
2
Click
Observera! Tillvägagångssättet är likadant som för ”MP3/WMA-uppspelning från CD-skiva.
Se det avsnittet för info.
Sätta i och ta bort SD-eller MMC-minne
Ta bort frontpanelen (1). Sätt i minneskortet med
Ta bort frontpanelen (1). Tryck in minneskortet
texten uppåt.
tills ett klickljud hörs.
Click
Tryck in kortet tills ett
klickljud hörs.
Ta ur minneskortet.
Kopiera musikfiler
Musikfiler som stöder kopiering är MP3 och WMA.
Kopiera MP3-eller WMA-filer från CD
1. Spela upp en musikl och tryck och håll ned [ TA ] (COPY)-knappen (13) för att
aktivera överflyttningsläge.
2. Displayen visar
C › › USB →, C › › CARD.
3. När valet av lagringsmedia har gjorts, tryck på volymratten (17) för att bekräfta och
starta överföringen. Om ingen annan knapp trycks ned inom 10 sekunder återgår
enheten automatiskt till föregående läge.
C › › USB, vrid på volymratten (17) för att välja mellan
Click
Svenska
4. Om till exempel SD-kortet är fullt visas
föregående läge.
MEM FULL. Enheten återgår automatiskt till
33
Page 34

5. Efter att volymratten (17) har tryckts ned stannar uppspelningen och
överflyttningen startar.
6. Under överföringen visas i displayen hur mycket som utförts.
7. När överföringen är klar visas
i ”MY_MP3” eller ”MY-WMA” på lagringsmediats minne.
8. För att stoppa överföringen tryck och håll ned [ TA ] (COPY)-knappen (13) igen.
COPY OK . Den överflyttade filen sparas automatiskt ned
STOP OI visas i displayen. Filer som inte flyttats över helt raderas.
Flytta MP3-eller WMA-filer mellan lagringsmedia
Svenska
Välj lagringsmedia med [ MODE/TRANSFER ]-knappen (16) och spela upp len
du vill flytta.
1. Spela upp en musikl och tryck och håll ned [ TA ] (COPY)-knappen (13) för att
aktivera överflyttningsläge.
2. Displayen visar
C › › USB →, C › › CARD.
3. När valet av lagringsmedia har gjorts, tryck på volymratten (17) för att bekräfta och
starta överföringen. Om ingen annan knapp trycks ned inom 10 sekunder återgår
enheten automatiskt till föregående läge.
4. Om till exempel SD-kortet är fullt visas
föregående läge.
5. Efter att volymratten (17) har tryckts ned stannar uppspelningen och
överflyttningen startar.
6. Under överföringen visas i displayen hur mycket som utförts.
7. När överföringen är klar visas
automatiskt ned i ”MY_MP3” eller ”MY-WMA” på lagringsmediats minne.
C › › USB, vrid på volymratten (17) för att välja mellan
MEM FULL. Enheten återgår automatiskt till
COPY OK i displayen. Den överflyttade filen sparas
8. För att stoppa överföringen tryck och håll ned TA (COPY)-knappen (13) igen.
visas i displayen. Filer som inte flyttats över helt raderas.
34
STOP OI
Page 35

Radera filer (ERASING)
Det går att radera filer från USB-minne eller minneskort. Det går dock inte att radera spår
på CD. Det finns olika metoder för att radera.
1. Radera under uppspelning
• Tryck och håll ned [ CLEAR/BAND ]-knappen (5) för att komma in i ERASE-läge.
• Displayen visar
• Tryck snabbt på volymratten (17) för att komma in i ERASE-läge.
• Vrid på volymratten (17) för att välja
trycks ned inom 5 sekunder återgår enheten automatiskt till föregående läge.
• När
• Efter att volymratten (17) har tryckts ned så stannar uppspelningen och
visas i displayen, tryck på volymratten (17) igen för att bekräfta radering av den fil
som spelas.
ERASE 0K visas i displayen. Nästa låt spelas sedan upp.
ERASEXXX. (xxx motsvarar aktuellt spår).
eller välj N för att avbryta. Om ingen annan knapp
2. Radera i filsökningsläge/navigeringsläge
Det går att välja filnummer/filnamn och radera i filsökningsläge/navigeringsläge.
• I filsöknings/navigeringsläge, tryck och håll ned [CLEAR/BAND]-knappen (5) för att
komma in i ERASE-läge.
• Displayen visar
• Tryck snabbt på volymratten (17) för att komma in i ERASE-läge.
• Vrid på volymratten (17) för att välja
trycks ned inom 5 sekunder återgår enheten automatiskt till föregående läge.
• När
• Efter att volymratten (17) har tryckts ned stannar uppspelningen och
visas i displayen tryck på volymratten (17) igen för att bekräfta radering av den fil
som spelas.
ERASEXXX. (XXX motsvarar aktuellt spår).
eller välj N för att avbryta. Om ingen annan knapp
Svenska
ERASE 0K visas i displayen. Nästa låt spelas sedan upp.
35
Page 36

Organisera mappar och filer
Stereon har en funktion som gör att mappar och filer ordnas precis som på en dator.
Mappar
Enheten skapar automatiskt mappar på USB/SD/MMC-lagringsmedia.
MY_MP3: för att spara alla MP3-filer.
MY_WMA: för att spara alla WMA-filer.
MY_AUX: för att spara alla filer från AUX LINE IN.
Svenska
Filer
Enheten skapar automatiskt filnamn följt av foldernamn. Till exempel på en musikfil överflyttad
från en CD ger filnamnet ”CD0001.MP3”. Den skapas och sparas automatiskt i en mapp.
Användning av Bluetooth handsfree
Användarguide för Bluetooth.
1. Kontrollera först att din mobiltelefon stödjer Bluetooth.
2. Se till att mobiltelefonen är länkad med enheten innan användning.
3. ”BT60A” är enhetens namn som även visas i mobiltelefonen.
4. För bästa resultat, håll inte mobiltelefonen mer än 3 meter från enheten.
5. Vissa märken som till exempel Sony Ericsson har ”Power Saving Mode”
(energisparläge). Använd inte det eftersom det kan försämra funktionen.
6. Prata inte längre än 1 meter från enheten för bästa resultat.
7. För att avsluta ett samtal via Bluetooth med enheten, stäng av manuellt på
mobiltelefonen eller välj ”disconnect” på enheten.
8. Vissa märken av mobiltelefoner som till exempel Nokia stödjer ”IN BAND RING TONE”,
vilket betyder att den ringsignalen du har på mobiltelefonen också fungerar i enheten.
Annars används en standardsignal.
9. För att undvika eko under ett samtal bör volymen vara inställd under
30 på enheten.
10. Om någon funktion inte fungerar som det ska, kan man göra en SOFT-RESET av
enheten genom att ta bort frontpanelen från bilstereon och vänta 1 minut. Sätt sedan
tillbaka frontpanelen och försök igen. Det går även att göra en full återställning genom
att trycka på [ RESET ]-knappen (19) bakom frontpanelen.
36
Page 37

Länkning
Länka Bluetoothsystemet med användarens mobiltelefon och enheten
1. Gå in i menyn och välj PAIRING-läge (länkning).
P A I R H F visas i displayen, tryck på volymratten (17) för att aktivera
2. När
länknings-läge.
3. Tryck på [ CLEAR/BAND ] (5) när som helst för att avbryta.
4. Sök efter bluetoothenheter på mobiltelefonen (se mobiltelefonens bruksanvisning).
5. ”BT60A” visas. Välj ”BT60A” och skriv in lösenordet 1234.
6. Om länkningen misslyckades blinkar
automatiskt till föregående läge.
P A I R F A I L i 3 sekunder . Enheten återgår
Återkoppling av Bluetoothsystemet
Enheten har en automatisk återkopplingsfunktion. I vissa fall måste man
återkoppla manuellt.
1. Gå in i menyn och välj RE-CON-läge.
R E - C O N visas i displayen. Tryck på MODE/TRANSFER-knappen (16) för att aktivera
2.
automatiskt återkopplingsläge.
W A I T › › › visas i displayen och sedan O K .
3.
Inkommande samtal
Svenska
Svara på ett inkommande samtal
1. Vid inkommande samtal visas telefonnumret i displayen. Om det är ett anonymt samtal
P H O N E I N i displayen. Tryck snabbt på volymratten-knappen (17) för att svara
visas
på samtalet.
2. Det som spelas upp i bilstereon tystnar vid ett inkommande samtal.
3. volymratten (17) används för att justera ljudnivån.
4. Tryck på [ CLEAR/BAND ]-knappen (5) för att avsluta. Det som spelas upp i bilstereon
startar igen.
Neka ett inkommande samtal
1. Tryck på [ CLEAR/BAND ]-knappen (5) för att avböja ett samtal.
37
Page 38

Ringa ett samtal
1. Använd mobiltelefonen för att ringa ett samtal. När uppringningen sker visas C A L L .
2. Det som spelas upp i bilstereon tystnar när man ringer ett samtal.
3. volymratten (17) används för att justera ljudnivån.
4. Tryck på och håll in [ CLEAR/BAND ]-knappen (5) för att avsluta. Det som spelas
upp i bilstereon startar igen.
Flytta ett samtal till mobiltelefonen
Svenska
1. Under ett samtal tryck och håll in [MODE/TRANSFER]-knappen (16) för att flytta
samtalet från bilstereon till mobiltelefonen. Det tar cirka 3 sekunder. Ljudet tystnar
på bilstereon och ”MUTE” visas i displayen. Upprepa samma procedur för att åter
överföra samtalet till bilstereon.
2. Det som spelas upp i bilstereon förblir tyst. Tryck på [ON/OFF/MUTE]-knappen (2) för
att slå på ljudet igen.
Bluetooth Audio Streaming A2DP
(Advanced Audio Distribution Profile)
Det går att streama musik från mobiltelefonen (om den stöder A2DP) till bilstereon.
Se avsnittet om länkning för information hur man kommer igång.
Observera! Om mobiltelefonen har både HFP (Hands Free Profile) och A2DP länkas de
samtidigt. Man behöver alltså inte göra en separat länkning.
Lyssna på musik från en mobiltelefon i bilstereon
1. Länka samman mobiltelefonen med bilstereon.
2. Tryck på MODE/TRANSFER-knappen ( 16 ) tills ”BT AUDIO” visas i displayen.
3. Om länkningen fungerar visas ”BT AUDIO” i displayen och musiken kan spelas upp.
Telefonfunktionerna fungerar även när du befinner dig i detta läge.
38
Page 39

Fjärrkontrollen
4
5
6
TA AF
MMC
COPY SUB-W i x-BASS
PTY
1. ON/OFF
Slår på eller av strömmen
2. EJECT
Tar ut skivan
3. MENU/DISP
Ändrar visnings läge
i displayen (frekvens, spår,
speltid, klocka etc.)
4. MODE
Ställer in önskat läge,
till exempel CD, USB, etc.
5. MUTE
Tystar ljudet i bilstereon
6. + Höjer volymen
7. – Sänker volymen
8. ►►I
Går till nästa spår/spolar
framåt i spår/söker radiostation
9. I◄◄ Går till föregående spår/spolar bakåt i spår/söker radiostation
10. AUDIO /ENTER Återuppringning av senast slagna nummer.
11. BAND/ERASE/SEARCH Väljer AM/FM/söker mappar och filer
12. PAU/M1 Paus/förinställd radiostation
13. INT/M2 Intro/förinställd radiostation
14. RPT/M3 Repetition/förinställd radiostation
15. RDM/M4 Slumpmässig uppspelning/förinställd radiostation
16. F-DN/M5 Bläddrar nedåt i mapp/förinställd radiostation
17. F-UP/M6 Bläddrar uppåt i mapp/förinställd radiostation
18. AF/SUB-W Väljer AF-läge på radion/subwoofer
19. AS/PS/ID3 Väljer AS/PS-läge på radion/visar ID-3 tag
20. TA/COPY Väljer TA-läge på radion/kopierar fil
21. PTY/X-BASS Väljer PTY-läge på radion/extra basljud
1
3
7
5
9
10
12
18
14
20
16
MUTE
AUDIO
ENTE R
SUB- W
U
M
L
O
E
MUTE
INT
2
4
F-UP
6
EJECT
+
MODE
•
E
BAND
R
H
A
C
S
R
E
A
E
S
AS / PS
ID3
PTY
X-BA SSCOPY
2
6
4
8
11
13
19
15
21
Svenska
V
DI SP
ME NU
•
TR ACK
I◄◄
PAU
1
AF
RPT RD M
3
TA
F-DN
5
17
39
Page 40

Skötsel och underhåll
Torka av bilstereon med en mjuk lätt fuktad trasa. Använd aldrig lösningsmedel eller starka
rengöringsmedel.
Felsökningsschema
Felsymptom Möjlig orsak Åtgärd
Enheten
startar ej.
Svenska
Skivan kan inte
spelas upp.
Inget ljud. Volymen nedställd. Justera volymen uppåt.
Knapparna
fungerar ej.
Ljudet försvinner ibland.
Ingen radiomottagning.
Displayen visar
ERROR 1.
Det ekar under
ett samtal.
Klockan visar
ingen tid
(”NO CLOCK”).
Bilens tändning är inte påslagen. Slå på bilens tändning.
Säkringen är trasig. Kontrollera och byt säkringen.
Skivan är felaktig. Prova med en annan skiva.
Skivan felaktigt isatt. Sätt i skivan med etiketten uppåt.
Skivan är smutsig. Rengör skivan.
Temperaturen i bilen är för hög. Vänta tills bilen svalnat.
Kondens på linsen. Låt enheten vara avslagen och
vänta i minst en timme.
Högtalarna är inte korrekt
anslutna.
Mikroprocessorn kan behöva
återställas.
Frontpanelen sitter löst. Sätt fast frontpanelen riktigt.
Enheten lutar för mycket (max 30°). Justera installationen.
Skivan är smutsig eller felaktig. Rengör eller byt skivan.
Antennkabeln är inte ansluten. Se över anslutningarna.
Signalerna är för svaga. Välj en annan frekvens/station.
Mikroprocessorn kan behöva
återställas.
För hög volym inställd. Sänk volymen till under 30.
Klockan ställs in automatiskt
av RDS-informationen. Radiostationen sänder kanske inte
RDS-information eller så är mottagningen för svag.
Se över anslutningarna.
Tryck på ”Reset” bakom
frontpanelen.
Tryck på ”Reset” bakom
frontpanelen.
Byt till en starkare radiostation.
40
Page 41

Avfallshantering
När du ska göra dig av med produkten ska detta ske enligt lokala föreskrifter.
Är du osäker på hur du ska gå tillväga, kontakta din kommun.
Specifikationer
FM
Frekvensområde 87,5 – 108 MHz
Signalbrusförhållande 50 dB
CD-spelare
Signalbrusförhållande 70 dB
Frekvensåtergivning 5 – 20 000 Hz
Bluetooth
Räckvidd 3 meter (oblockerad)
Allmänt
Drivspänning 11 – 14 V DC
Polaritet Minus till jord
Högtalarimpedans 4 Ohm
Uteffekt 4 x 40 Watt
Svenska
41
Page 42

42
Page 43

43
Page 44

Sverige
Kundtjänst Tel: 0247/445 00
Fax: 0247/445 09
E-post: kundtjanst@clasohlson.se
Internet www.clasohlson.se
Post Clas Ohlson AB, 793 85 INSJÖN
Norge
Kundesenter Tlf.: 23 21 40 00
Faks: 23 21 40 80
E-post: kundesenter@clasohlson.no
Internett www.clasohlson.no
Post Clas Ohlson AS, Postboks 485 Sentrum, 0105 OSLO
Suomi
Asiakaspalvelu Puh: 020 111 2222
Faksi: 020 111 2221
Sähköposti: info@clasohlson.fi
Internet www.clasohlson.fi
Osoite Clas Ohlson Oy, Yrjönkatu 23 A, 00100 HELSINKI
Great Britain
For consumer contact, please visit
www.clasohlson.co.uk and click on
customer service.
Internet www.clasohlson.co.uk
 Loading...