

Page 1
Surveillance &
Game Hunting Camera
Övervaknings- och viltkamera
Overvåknings- og viltkamera
Valvonta- ja riistakamera
Überwachungs- und Wildkamera
EnglishSvenskaNorskSuomiDeutsch
Art.no Model
36-5761 SG560K-8mHD
Ver. 20141103
Page 2

2
Page 3

Surveillance & Game Hunting Camera
Art.no 36-5761 Model SG560K-8mHD
Please read theentire instruction manual before using theproduct and then save
it for future reference. We reserve theright for any errors in text or images and any
necessary changes made to technical data. If you have any questions concerning
technical problems please contact our Customer Services.
Contents
1. Description of function ............................................................................4
1.1 General information ........................................................................................................4
2. Description ..............................................................................................4
3. Getting started .........................................................................................6
3.1 Inserting batteries ..........................................................................................................6
3.2 Inserting amemory card ................................................................................................6
3.3 Formatting thememory card .........................................................................................6
4. Setup ........................................................................................................7
4.1 Camera Mode (function) ................................................................................................7
4.2 Format SD (formatting thememory card) .....................................................................8
4.3 Photo Size (image size) ..................................................................................................8
4.4 Video Size (video quality and file size) ..........................................................................8
4.5 Set Clock (setting thetime and date) ............................................................................8
4.6 Photo Burst (number of exposures on each activation) ...............................................9
4.7 Video Length (length of video recording) ......................................................................9
4.8 Sensitivity (sensitivity of motion detector) ....................................................................9
4.9 PIR Interval (interval until re-activation after detection) ...............................................9
4.10 Timer Interval (time lapse function) ...........................................................................10
4.11 Timer Switch (switch-off at acertain time of day) ....................................................10
4.12 Flash Range (range of flash function) ........................................................................10
4.13 Time Stamp (insert atime stamp in thestill image) ..................................................10
4.14 Default Set (restores manufacturer’s settings) ..........................................................11
4.15 Example in use ...........................................................................................................11
5. Operating instructions ...........................................................................11
5.1 Picture preview (before taking thephoto) ...................................................................11
5.2 Taking aphoto/video sequence manually ...................................................................11
5.3 Displaying astill image/video sequence .....................................................................12
5.4 Delete (erasing aphoto/video sequence) ...................................................................13
5.5 Default Set (restores manufacturer’s settings) ............................................................13
6. Positioning/attaching thecamera ........................................................13
7. Care and maintenance ..........................................................................14
8. Troubleshooting guide ...........................................................................14
9. Disposal .................................................................................................15
10. Specifications ......................................................................................15
English
3
Page 4
English
1. Description of function
• 8 MP night-vision camera perfect for monitoring hunting spots.
• Images and video can be captured at set times or motion triggered and saved
to aSD card (max 32 GB, sold separately).
• Motion detector with sensitivity up to 20 m. 40 black IR LEDs for proper night-vision.
• Camouflaged housing. Integrated colour screen, memory card and battery holder.
Operates on 8 x AA/LR6 batteries (sold separately) or a6 V external power source.
• Comes with fastening strap and USB cable.
1.1 General information
Note: The Data Protection Act 1998 (DPA) imposes strict rules on the use of
security cameras. Make sure your setup is in accordance with the DPA. Contact
therelevant responsible person at your local authority or county council if you
are at all uncertain. Cameras which have been set up without alicence may be
confiscated and theowner held liable under law.
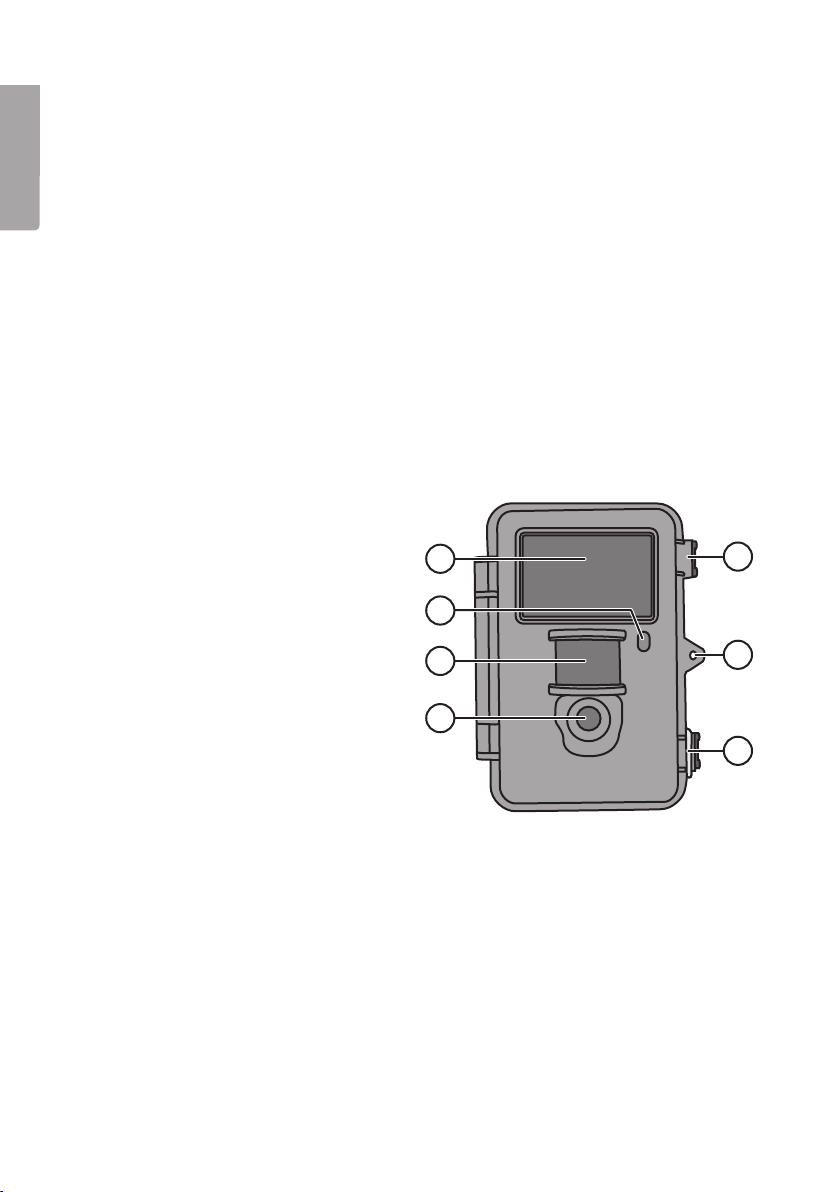
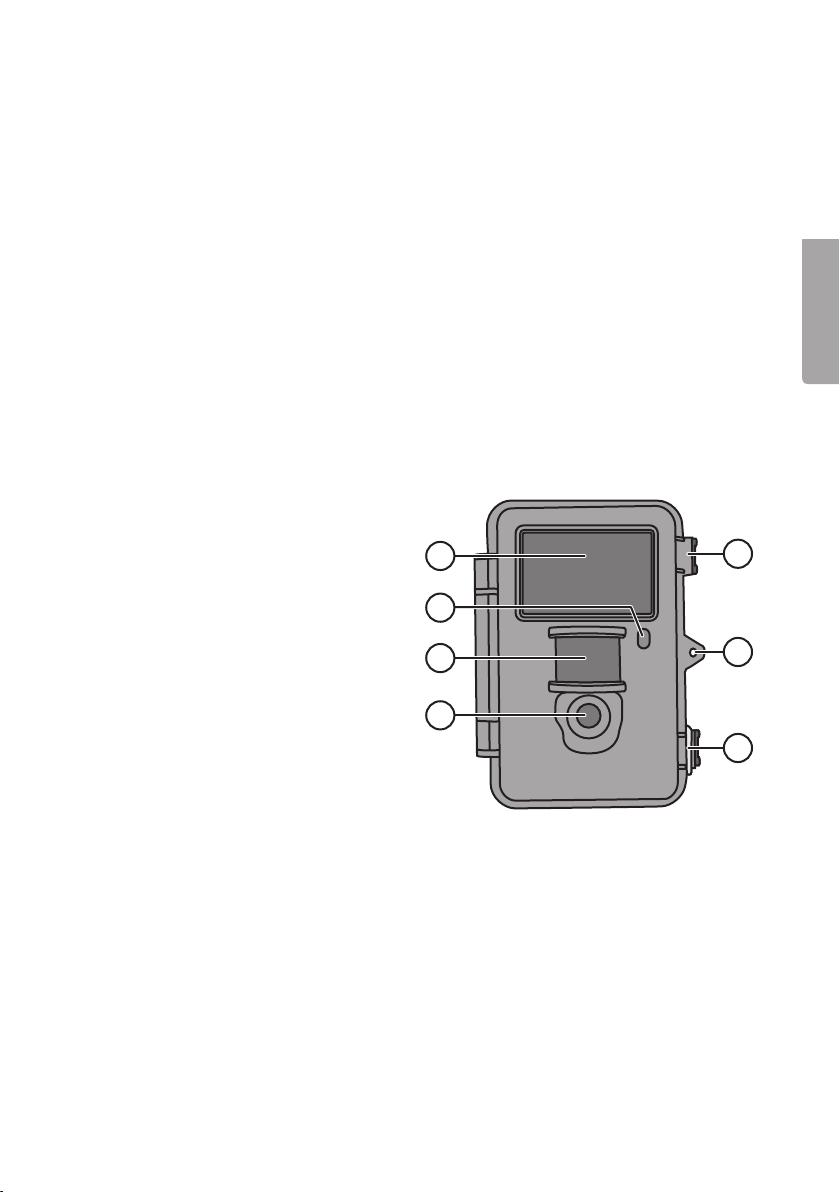
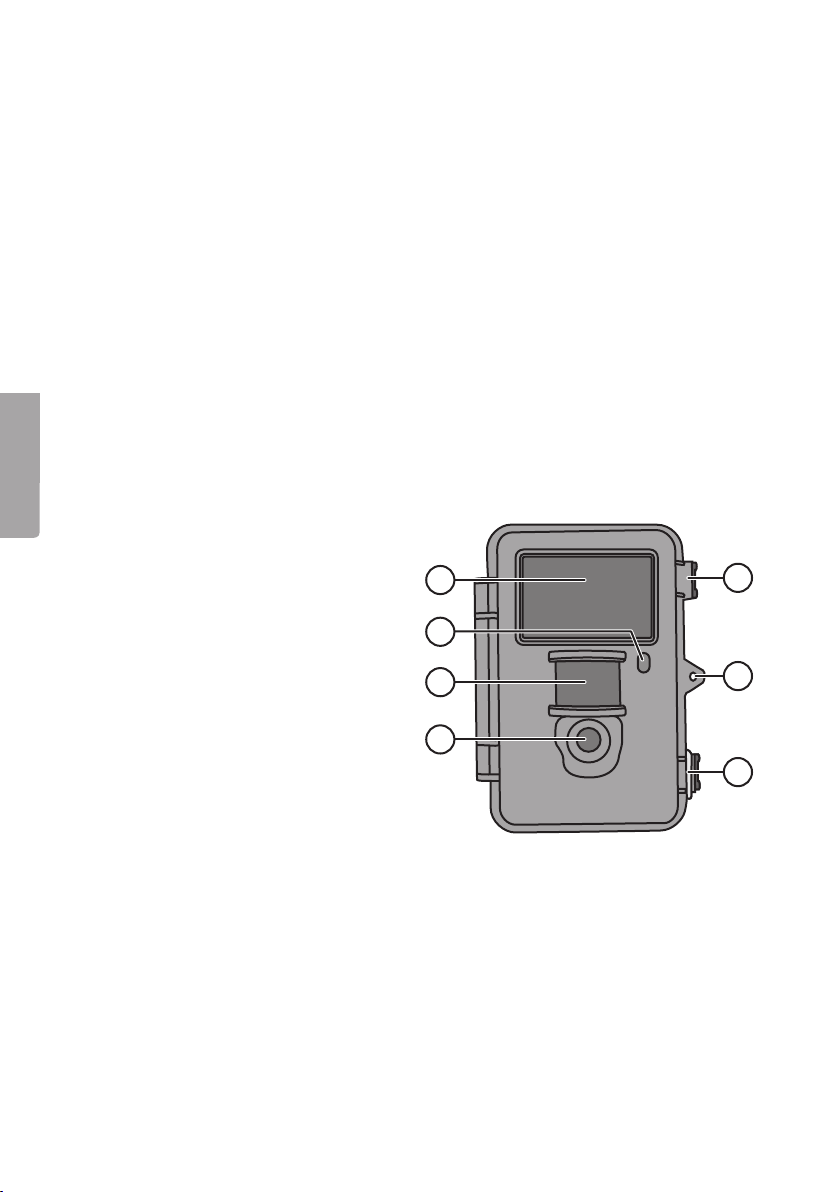
2. Description
1. IR diodes
2. Indicator light
3. Motion detector
4. Camera lens
5. Drawbolt catch
6. Lock eyelet for padlock
1
2
3
5
6
4
5
4
Page 5
7
8
9
10
MENU
DEL
OK
11
ON
12
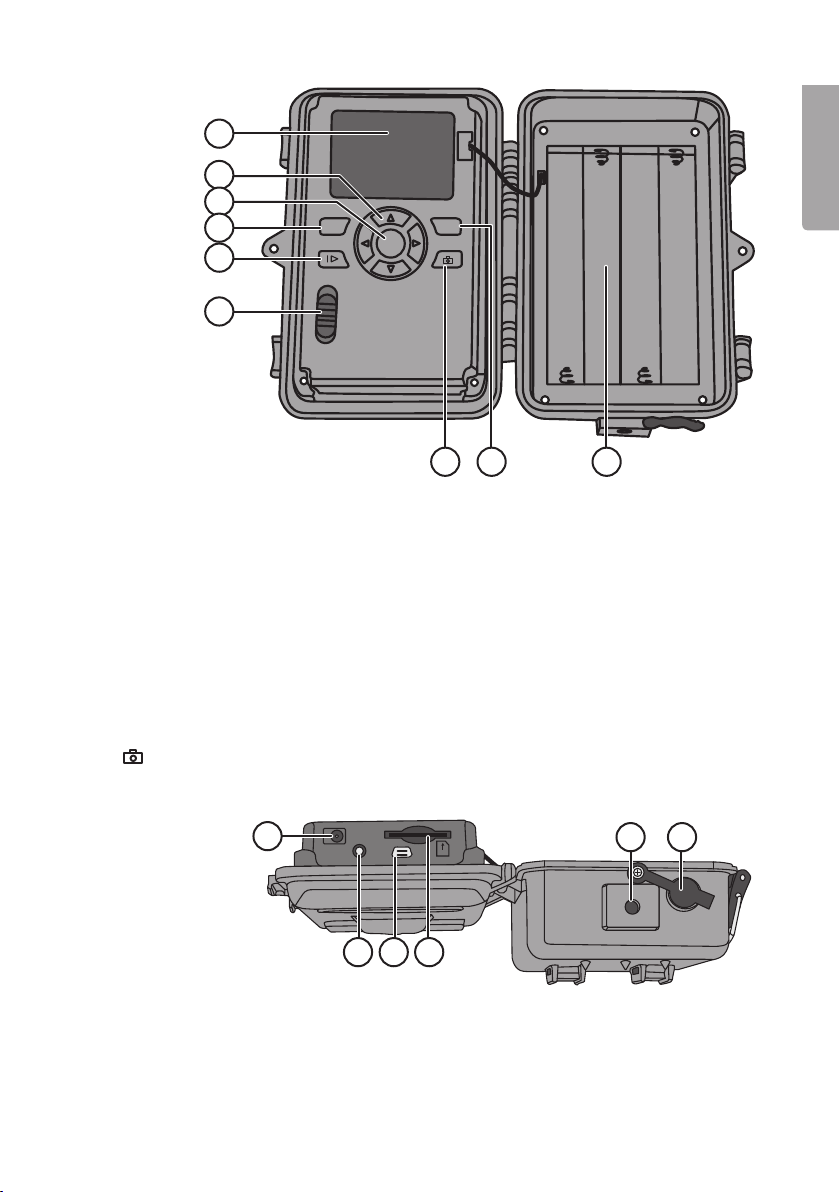
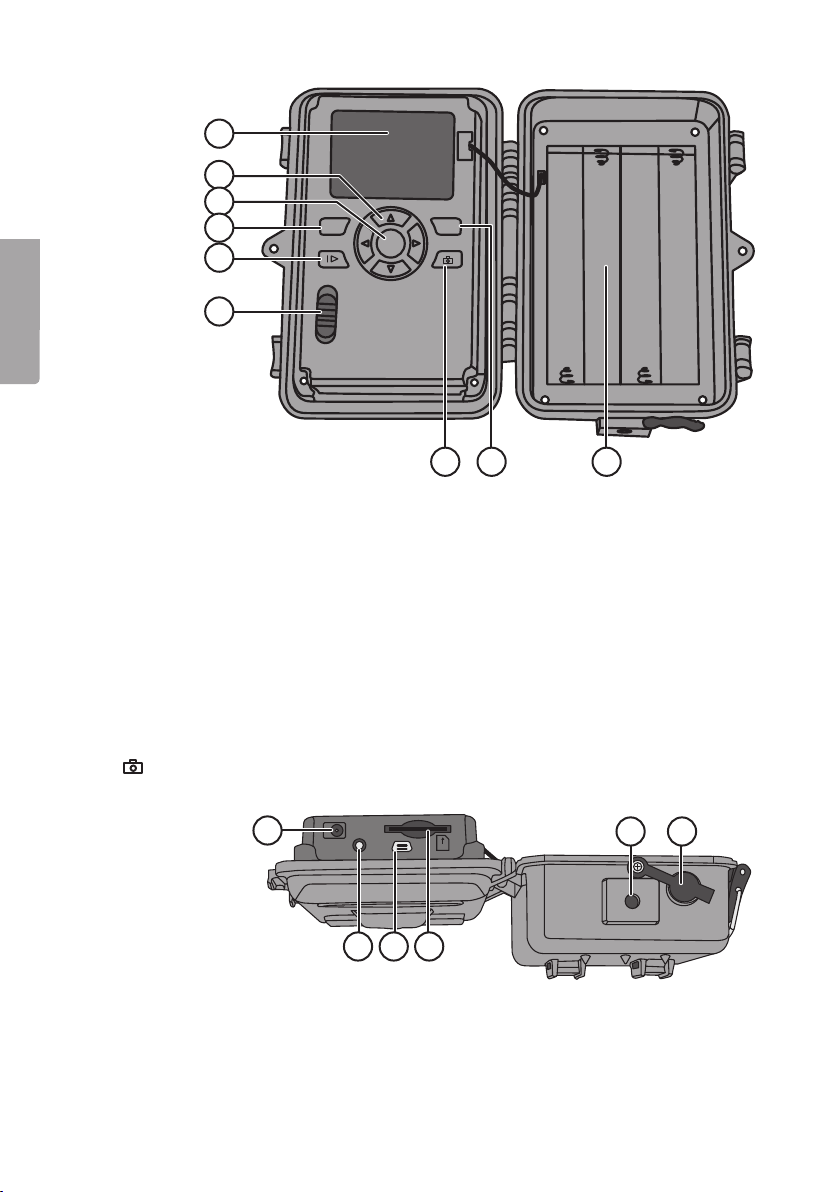
7. Display screen
8. [ ▲ ][ ▼ ] Toggle between thesub-menus, [ ► ][ ◄ ] – change setting
9. [ OK ] Confirm
10. [ MENU ] Open/exit menu
11. [ I► ] Switch between playback and showing current view
12. Function switch with 3 settings:
ON (camera is activated according to thesetting, thedisplay does not come on)
SETUP (preview, setting or manual exposure)
a) Previews current view through thecamera.
b) Press [ MENU ] to show menus/sub-menus and settings.
c) Press [ ▲ ] or [ ▼ ] to switch quickly between Photo and Video mode to take
astill image/video sequence manually without having to enter themenu.
OFF Camera switched off
13. [ ] Take aphoto or start video recording manually
14. [ DEL ] Delete still image or video sequence
15. Battery compartment
SETUP
OFF
13 1514
English
16
DC 6V
16. Adaptor connection (6 V DC,
+ in thecentre of theconnection)
17. TV out Video output (3.5 mm)
18. USB plug
TV
OUT
USB
17 18 19
5
SD
20 21
19. SD card slot
20. Tripod thread
21. Rubber grommet over DC connection
Page 6

English
3. Getting started
3.1 Inserting batteries
Open thedrawbolt catch and open up thefront.
Insert 8×AA/LR6 batteries into thebattery compartment as
shown in theillustration.
Replace thebatteries as soon as they begin to lose power.
Thecamera can be damaged if old batteries start leaking.
Do not mix new and old batteries or different types of batteries.
Batteries can last up to 6 months, but it depends on operating
temperature and thenumber of exposures.
Note: Thedisplay only comes on in SETUP mode but does NOT come on in theON
setting. Thedisplay will turn blank approximately 3 minutes after thelast time abutton
is pressed in SETUP mode.
If necessary, thecamera can be powered by 4×AA/LR6 batteries in theright or left
side of thebattery compartment. If this is thecase, all batteries must be replaced with
new ones thenext time batteries are changed.
Thecamera can be powered by anexternal mains adapter via thesocket (16), 6 V DC
(+ in thecentre of theconnection).
3.2 Inserting amemory card
Thecamera is intended for use with SD/SDHC memory cards ranging from 8 MB to 32 GB.
First use acard reader to check that thememory card is working and is empty.
Make sure thememory card’s write protection “Lock” is NOT activated.
Open thecamera and insert aSD/SDHC card into thecard slot (19) as indicated in
theillustration next to thelatter. Push thecard in until a “click” sound is heard.
3.3 Formatting thememory card
Format thememory card before use. Formatting means that anything saved on
thecard will be deleted so as to make room for new files.
1. Move thefunction selector to SETUP mode.
2. Press [ MENU ]. Menu 1 is displayed with thefirst sub-menu (Camera Mode) highlighted.
3. Toggle to Format SD with [ ▼ ].
4. Press [ OK ].
5. Select Yes or No using [ ► ] or [ ◄ ].
6. Press [ OK ] to confirm (or [ MENU ] to discontinue).
6
Page 7

4. Setup
Note: Themenu is only displayed in SETUP mode.
1. Move thefunction selector to SETUP mode.
2. Press [ MENU ]. Menu 1 is displayed with thefirst sub-menu (Mode) highlighted.
3. Toggle to thedesired sub-menu using [ ▲ ] or [ ▼ ].
Menu 1
• Camera Mode (function)
• Format (format thememory card)
• Photo Size (image size)
• Video Size (video resolution)
Menu 2
• Set Clock (time display)
• Photo Burst (number of still images in series of images)
• Video Length (length of video recording)
• Sensitivity (sensitivity of motion detector)
Menu 3
• PIR Interval (interval until re-activation after detection)
• Timer Interval (interval-controlled exposure)
• Timer Switch (switch-off at acertain time of day)
• Flash Range (range of flash function)
Menu 4
• Time Stamp (time stamp in theimage)
• Default Set (restores manufacturer’s settings)
English
4. Thecurrent setting for thedesired sub-menu is highlighted on thedisplay.
5. If you want to change thesetting for thedesired sub-menu, press [ ◄ ] or [ ► ]
to make thechange. Each press will change thesetting one step.
4.1 Camera Mode (function)
1. Press [ ► ] to choose theCamera (still
images) or Video (video recording) function.
2. Confirm by pressing [ OK ] (or [ MENU ]
to discontinue).
(Thedefault value is Camera.)
7
Page 8
English
4.2 Format SD (formatting thememory card)
Formatting means that anything saved on thecard will be deleted so as to make room
for new files.
1. Press [ OK ].
2. Select Yes or No using [ ► ] or [ ◄ ].
3. Press [ OK ] to confirm (or [ MENU ] to discontinue).
4.3 Photo Size (image size)
1. Select photo size 8 MP, 1.3 MP or 5 MP using [ ► ] or [ ◄ ].
2. Press [ OK ] to confirm (or [ MENU ] to discontinue). (Thedefault value is 5 MP.)
4.4 Video Size (video quality and file size)
1. Press video size 1280×720p or 640×480p using [ ► ] or [ ◄ ].
2. Press [ OK ] to confirm (or [ MENU ] to discontinue).
3. (Thedefault value is 1280×720p.)
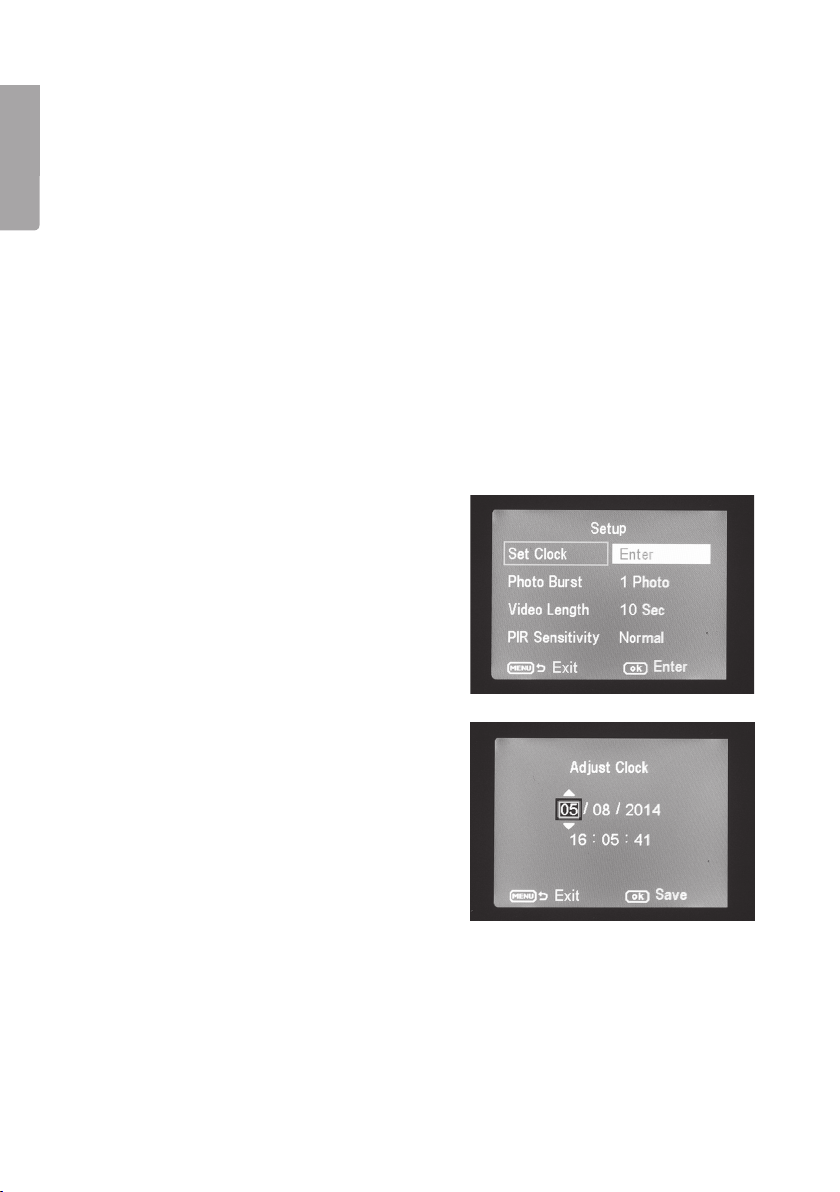
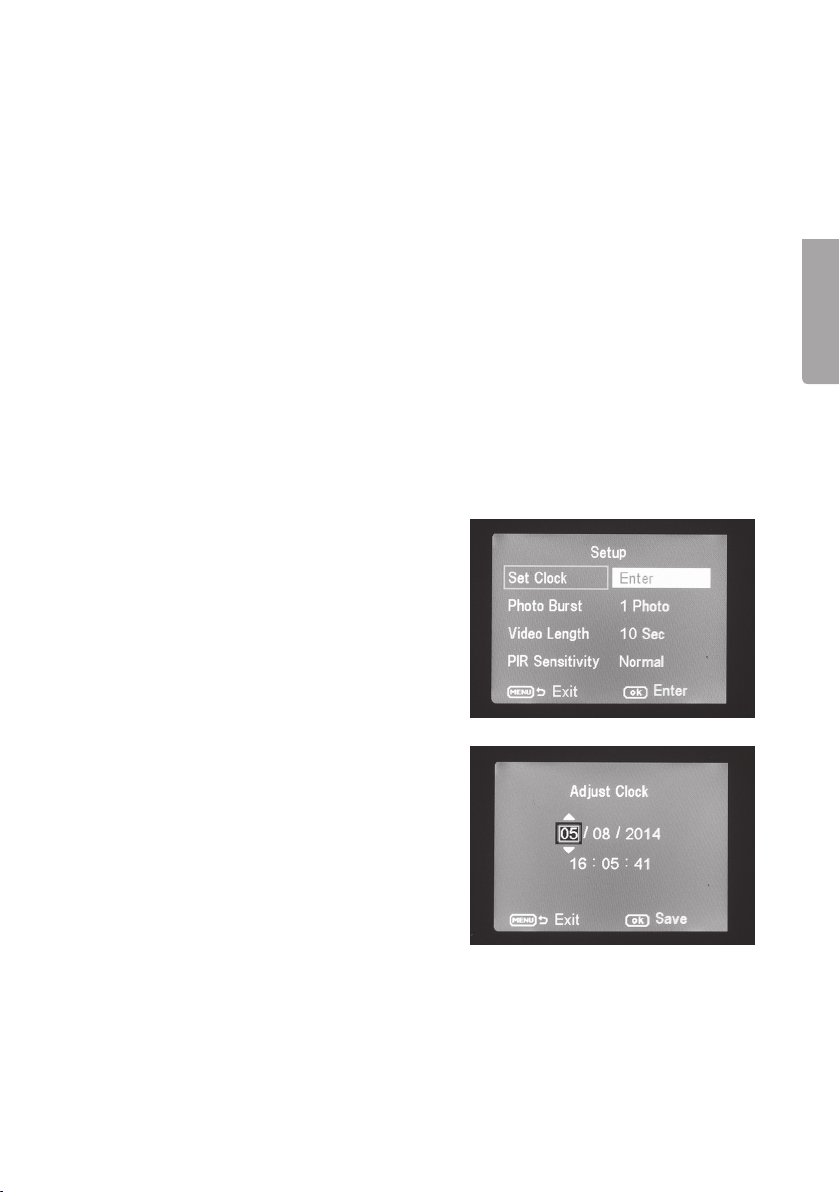
4.5 Set Clock (setting thetime and date)
1. Move thefunction selector to SETUP mode.
2. Press [ MENU ] and toggle to thesetting
for Set Clock (time setting) using [ ▼ ].
3. Press [ OK ] to open thetime setting (or
[ MENU ] to discontinue).
- First set themonth using [ ▼ ] and [ ▲ ].
- Use [ ► ] to toggle to thedate, and
set thedate and year in thesame way
as you did themonth.
- Follow thesame procedures for time
(hours : minutes : seconds).
- Confirm thesetting by pressing [ OK ].
- Thedisplay switches off automatically
approximately 3 minutes after thelast
time abutton is pressed, in which
case set-up must be recommenced
from thebeginning.
8
Page 9
4.6 Photo Burst (number of exposures on each activation)
1. Select thenumber of exposures which are to be made on each activation of
thecamera: 3 Photos, 2 Photos or 1 Photo (3, 2 or 1 exposure) using [ ► ] or [ ◄ ].
2. Press [ OK ] to confirm (or [ MENU ] to discontinue). (Thedefault value is 1 Photo.)
4.7 Video Length (length of video recording)
1. Select how long thevideo recording is to be on each activation of thecamera:
Settings range from 1 to 60 s using [ ► ] or [ ◄ ].
2. Press [ OK ] to confirm (or [ MENU ] to discontinue). (Thedefault value is 10 s.)
4.8 Sensitivity (sensitivity of motion detector)
Thegreater thesensitivity selected, theeasier thecamera is activated, e.g. when
thewind moves branches. Thehigher thesetting, themore photos will be taken.
Sensitivity normally decreases as thetemperature rises. If thecamera is to be used at
high temperatures, theHigh sensitivity setting should be selected.
1. Select sensitivity for activation of thecamera. Select thesetting: PIR off (motion
detector deactivated), Normal (normal sensitivity), High (high sensitivity) and
Low (low sensitivity) using [ ► ] or [ ◄ ].
2. Press [ OK ] to confirm (or [ MENU ] to discontinue). (Thedefault value is Normal.)
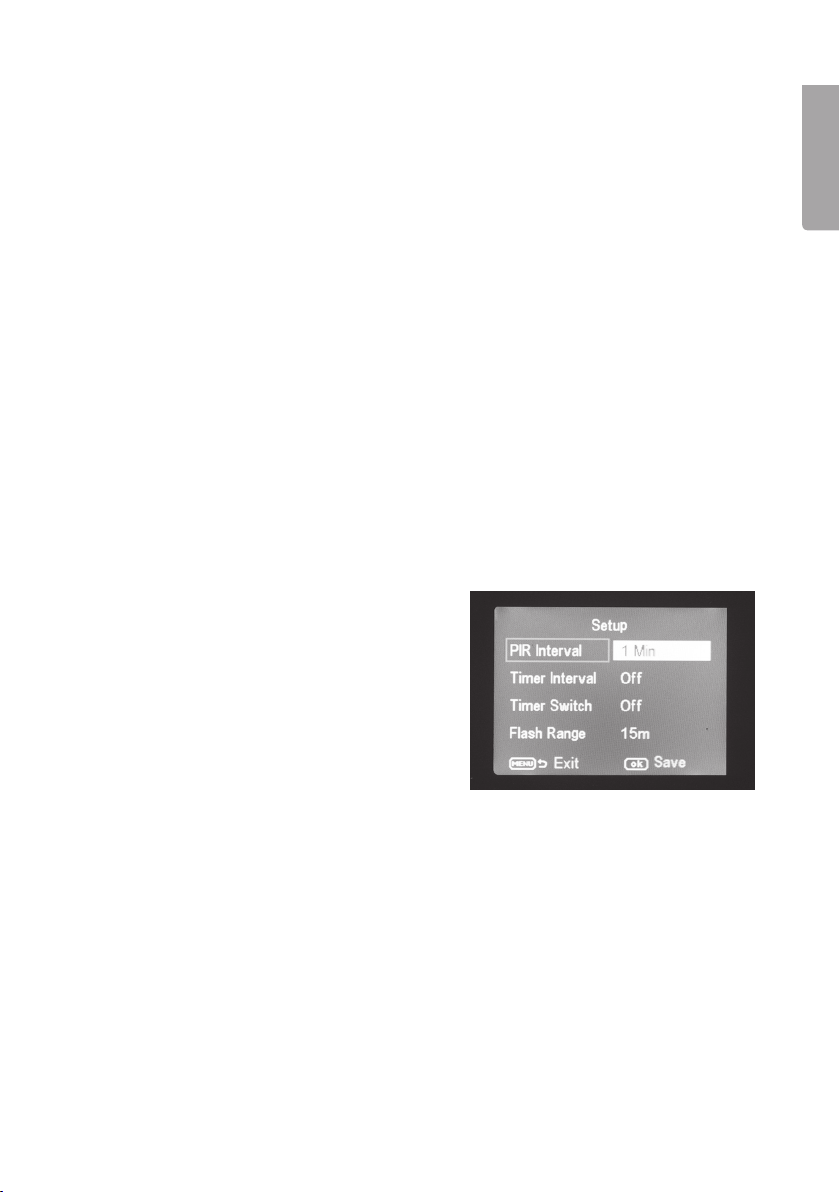
4.9 PIR Interval (interval until re-activation after detection)
On activation thecamera takes aset number
of still images (or avideo sequence), but if
themotion detector detects movement all
thetime, thecamera will continue to make
exposures of thesame subject in uninterrupted
fashion. There is therefore theoption of
setting atime delay until thenext activation of
thecamera, regardless of whether themotion
detector is activated.
English
1. Select how long there should be between thelast activation of thecamera and
next re-activation. Settings range from 0 s to 60 min using [ ► ] or [ ◄ ].
2. Press [ OK ] to confirm (or [ MENU ] to discontinue). (Thedefault value is 0 s.)
9
Page 10
English
4.10 Timer Interval (time lapse function)
Interval-controlled exposure (independently of themotion detector). This function allows
you to take photos at given intervals, e.g. to take aseries of images every 5 minutes.
1. Select how long there should be between exposures. Setting options: Off or
intervals ranging from 5 min to 8 hours using [ ► ] or [ ◄ ].
2. Press [ OK ] to confirm (or [ MENU ] to discontinue). (Thedefault value is Off.)
Note: Remember that this setting must be set at Off, otherwise thecamera’s motion
detector will not be able to activate thecamera except at theset time intervals.
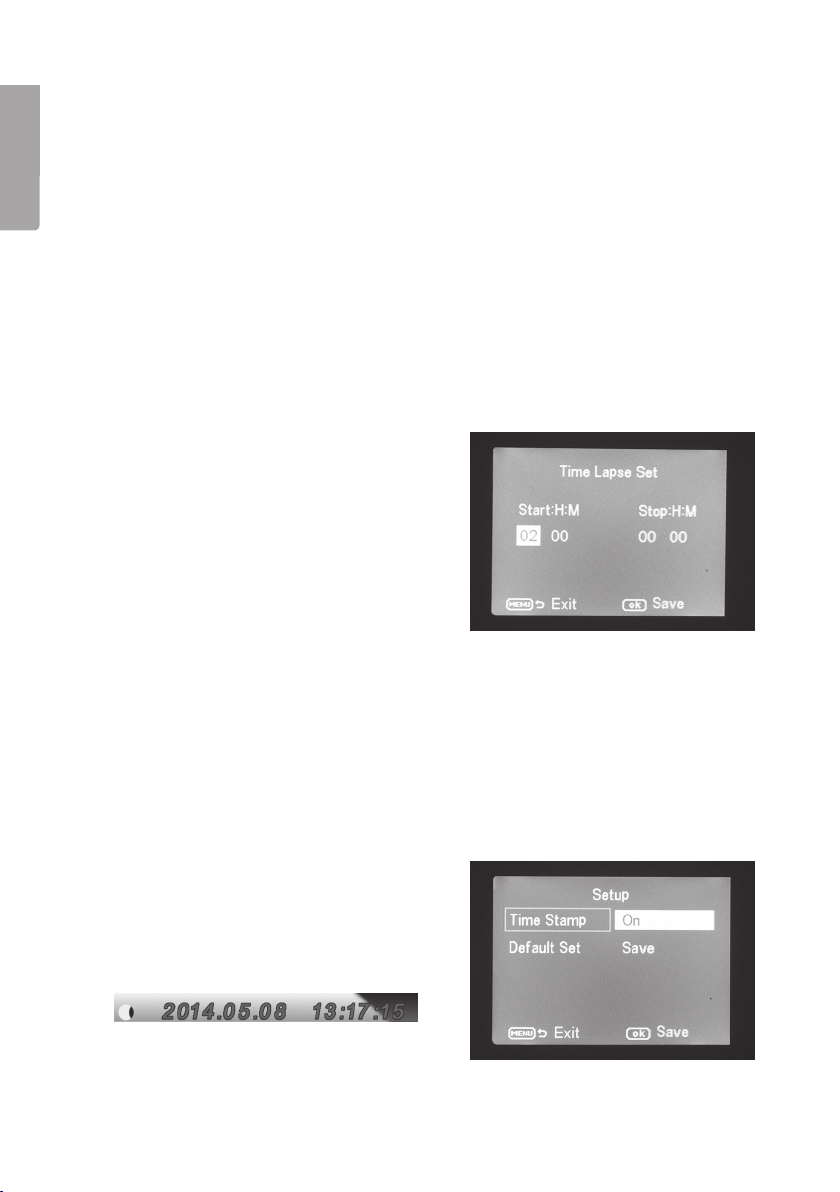
4.11 Timer Switch (switch-off at acertain time of day)
Set thetime of day thecamera is to be active, from 00:00 to 23:59.
1. Activate (On) or switch off thefunction (Off) using [ ► ] or [ ◄ ].
2. Press [ OK ] to confirm (or [ MENU ] to discontinue).
3. Set thestart time (if you have activated thefunction using On).
- Set thestart time (Time Lapse Set)
- Start: H:M Set thehour and minutes
for thedesired switch-on time.
Use the [ ▼ ][ ▲ ] buttons to set
thevalue. Use [ ► ][ ◄ ] to toggle
between hours and minutes.
- Use [ ► ][ ◄ ] to toggle between start
and stop.
- Press [ OK ] to confirm and save
thesetting (or [ MENU ] to discontinue).
4.12 Flash Range (range of flash function)
Set theflash range so that it reaches thesubject. Setting options: 15 or 8 metres.
Select 8 indoors and 15 outdoors. Try to take afew pictures with different settings
under theworst possible conditions if you are unsure.
1. Press [ ▲ ] or [ ▼ ] to select 15 or 8 metres.
2. Press [ OK ] to confirm (or [ MENU ] to discontinue).
4.13 Time Stamp (insert atime stamp in thestill image)
Choose whether atime stamp is to be
inserted in theimage. It will be inserted in
thelower right-hand corner and will show
thetime and date.
1. Press [ ► ] or [ ◄ ] to select On (insert) or
Off (not inserted).
2. Press [ OK ] to confirm (or [ MENU ]
to discontinue).
10
Page 11

4.14 Default Set (restores manufacturer’s settings)
Press [ OK ] to confirm that you want to restore themanufacturer’s settings
(or [ MENU ] to discontinue). Note: All personal settings will be erased.
4.15 Example in use
Assumption: you want to check that atime stamp is inserted in theimage and
that thetime and date have been correctly set.
1. Move thefunction selector to SETUP mode.
2. Press [ MENU ].
3. Toggle to Time Stamp using [ ▲ ] (press twice). Check that “On” is highlighted
after Time Stamp. If not: press [ ► ] once to change from Off to On.
4. Press [ ▼ ] to toggle to Set Clock.
5. Press [ OK ] to show theset time and date.
6. Check thesetting for time and date.
a) If thesetting is correct, press [ MENU ] to discontinue.
b) If thesetting is wrong, change thesetting as follows:
- First set themonth using [ ▼ ] and [ ▲ ].
- Use [ ► ] to toggle to thedate, and set thedate and year in thesame way as
you did themonth.
- Follow thesame procedures for time (hours : minutes : seconds).
- Confirm thesetting by pressing [ OK ].
5. Operating instructions
5.1 Picture preview (before taking thephoto)
1. Move thefunction selector to SETUP mode.
2. Thecurrent view through thecamera is shown on thedisplay. This is agood aid
when choosing where to position thecamera.
3. Thedisplay will turn blank approximately 3 minutes after thelast time abutton is pressed.
English
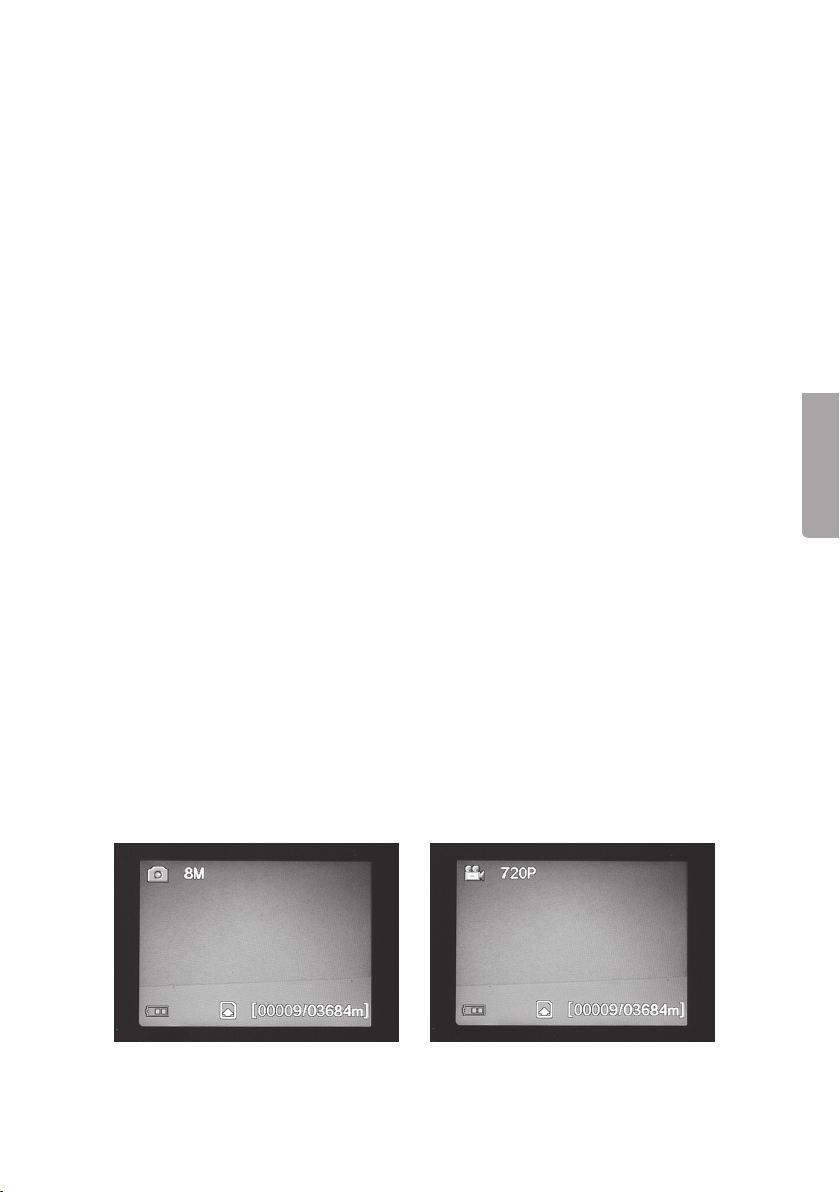
5.2 Taking aphoto/video sequence manually
1. Move thefunction selector to SETUP mode.
2. Thecurrent view through thecamera is shown on thedisplay.
3. Press [ ▼ ] to select taking aphoto, or [ ▲ ] to select recording of avideo sequence.
11
Page 12
English
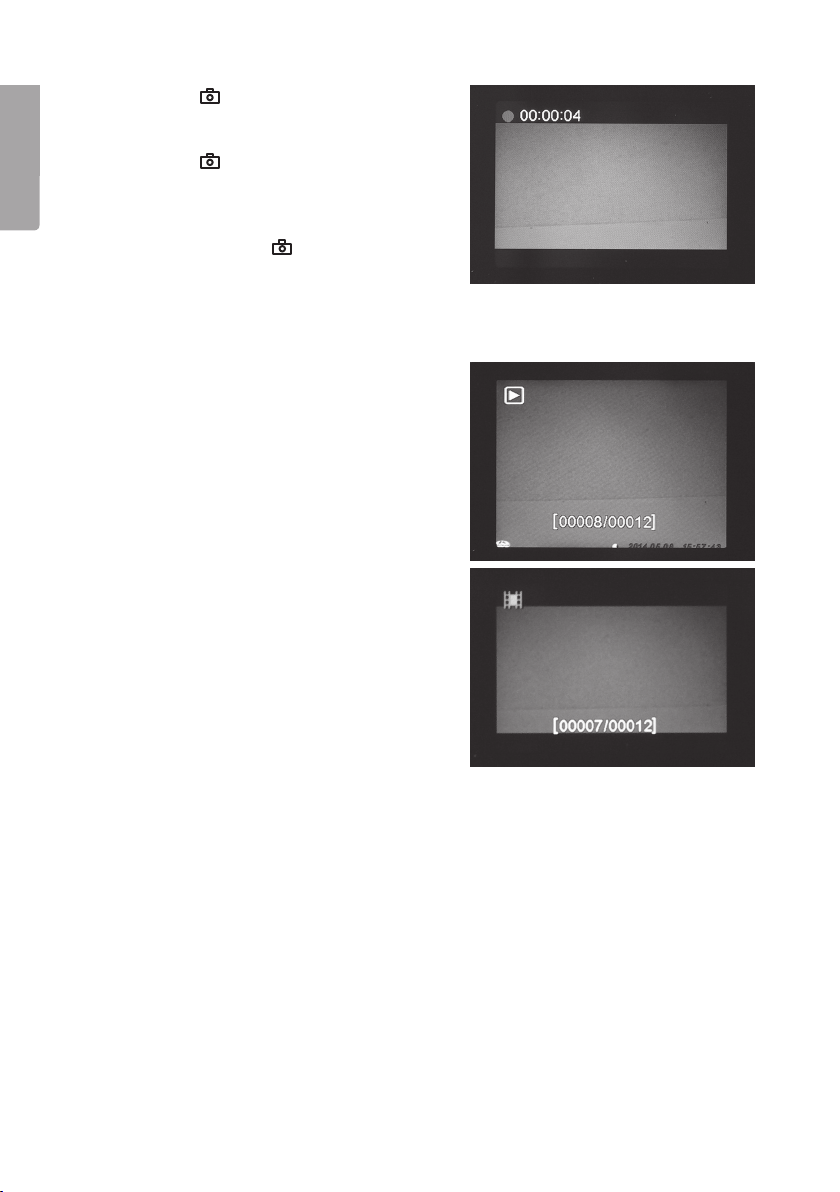
- Press [ ] (13) to take aphoto.
Theimage will be shown on
thedisplay after ashort while.
- Press [ ] (13) to start video
recording. While video recording is
in progress, ared dot will be shown
continuously on thedisplay along with
thetime. Press [ ] again to discontinue and save thevideo recording.
5.3 Displaying astill image/video sequence
Display thefiles on thedisplay
1. Move thefunction selector to SETUP mode.
2. Thecurrent view through thecamera
is shown on thedisplay. This is agood
aid when choosing where to position
thecamera.
3. Press [ I► ] (10) once to launch Playback.
4. Use [ ▲ ][ ▼ ] to toggle between thesaved
files. Still files have anarrow symbol in
thetop left corner and video files have
ablue film strip symbol. Thefile number
is displayed at thebottom. First theserial
number of thedisplayed file is shown
and finally thetotal number of files on
thememory card.
Display thefiles on acomputer
1. Connect thecamera to avacant USB port on your computer using aUSB cable.
Once thecamera is properly connected to thecomputer “Mass Storage” appears
on thedisplay.
2. Thecamera is displayed as e.g. “Removable storage device” in Explorer. Click on
Removable storage device and open thefolder on thememory card to show
thesaved files.
3. You can save thefiles to thecomputer or simply show theimages from thecamera
on thecomputer.
12
Page 13

5.4 Delete (erasing aphoto/video sequence)
1. Move thefunction selector to SETUP mode.
2. Press [ I► ] (10) once to launch playback.
3. Use [ ▲ ][ ▼ ] to toggle between thesaved files. Still files have anarrow symbol in
thetop left corner and video files have ablue film strip symbol.
4. Press [ DEL ] to delete theimage/video sequence displayed.
5. “Del One” (delete one image) appears on thedisplay.
Warning: If you press [ ► ] or [ ◄ ] again and select Del All and continue, all files on
thememory card will be deleted.
6. Press [ OK ] to confirm deletion.
7. Select Yes to continue or No to discontinue, using [ ► ] or [ ◄ ]. Press [ OK ].
8. If you select Yes and press [ OK ], thefile will be deleted.
5.5 Default Set (restores manufacturer’s settings)
Restoration of manufacturer’s settings involves deleting all personal settings and
returning to themanufacturer’s settings.
Press [ OK ] to confirm restoration of manufacturer’s settings (or [ MENU ] to
discontinue).
6. Positioning/attaching thecamera
• Thecamera can be attached to e.g. atree using thestrap. Secure thecamera in
astable position so that it will not move due to thewind or vibrations. Remember
to position thecamera to give it thebest possible protection from theelements.
Asuitable distance to thesubject is approximately 5 metres; secure thecamera
approximately 1.5 to 2 metres above theground.
• Thecamera can be attached to acamera tripod/bracket with a1/4″ tripod thread.
English
Note!
• Thecamera is affected by temperature. Thecapacity and range of thePIR
sensor is affected by theambient temperature relative to theanimal’s body heat.
Thegreater thedifference, theeasier it is for thecamera to capture thetarget over
alonger distance.
• Thecamera produces colour images in daylight and black and white ones in darkness.
• Remember where thesun rises and sets, and position thecamera with thesun
behind it. This will prevent direct light spoiling your photos.
• If possible, position thecamera in anortherly direction to prevent direct light
spoiling your photos and false indications from thePIR sensor.
• Remove twigs in front of thecamera; twigs with leaves on them can cause
false indications.
• Always take test photos to test thecorrect setting and positioning of thecamera.
Note: Remember to set theswitch to theON setting before closing thecamera and
going home.
13
Page 14

English
PIR sensor range:
24 m
22 m
20 m
18 m
16 m
14 m
12 m
10 m
8 m
6 m
4 m
2 m
7. Care and maintenance
Clean thecamera using asoft, moist cloth. Use amild detergent – never use asolvent
or strong, abrasive detergent, as this may damage theproduct.
8. Troubleshooting guide
Something is obscuring
thecamera lens.
• Thecamera lens has anIR filter
which, when thecamera is
switched off, can end up in
aposition where it obscures
thelens. When thecamera is
turned on, thefilter returns to its correct position.
No photos taken. • Switch in SETUP or OFF setting.
• Memory card write-protected.
• Low batteries.
Many empty images. • False indication.
• Sensitivity incorrectly set.
• Camera aimed incorrectly.
Black and white images. • In darkness thephotos will be black and white.
Poorly defined images. • Incorrect distance to subject, dirty lens.
Thecomputer cannot find
• Incorrect formatting of memory card.
thecamera (memory card).
Camera cannot find
thememory card.
• Incorrect formatting – format thememory card
in thecamera.
• Memory card too big – themaximum thecamera
can handle is 32 GB.
• Check that thememory card is not locked.
• Defective memory card – try another memory card.
Thecamera (memory card) is
not found when thecamera
is connected to acomputer.
• Check that theUSB cable is intact and properly
connected to both thecamera and computer.
• Incorrect formatting of memory card.
14
Page 15

9. Disposal
This product should be disposed of in accordance with local regulations.
If you are unsure how to proceed, contact your local council.
10. Specifications
Image sensor 5 MP colour CMOS
Lens F/NO 2.2 mm, field of view = 60°
PIR detection distance Up to 25 m
Display 2.0″ TFT
Memory card SD/SDHC from 8 MB to 32 GB
Still-image resolution 8 MP = 3328×2496p interpolated
5 MP = 2560×1920p
1.3 MP = 1280×960p
Video resolution 720p HD (1280×720p)
VGA (640×480p)
PIR sensor Multizone
PIR sensitivity Adjustable High/normal/low
Work light 40 black IR diodes (night vision)
Reaction time 1.2 sec
Weight Approx. 250 g (without batteries)
Operating/storage temperature −20 °C to +60 °C / −30 °C to +70 °C
Time setting for operation 1 s to 60 min
Still image series 1 to 3
Video sequence 1 to 60 s
Power supply Batteries 8×AA/LR6 (4×AA/LR6 if necessary)
External mains adaptor 6 V DC (not supplied)
Standby energy consumption <0.3 mA (<70 mAh/day)
Energy consumption
in active mode 150 mA (+ 450 mA when IR LED is on)
Battery warning Battery symbol is shown on thedisplay
Bracket Strap or tripod/bracket with tripod thread
Size Approx. 140×100×70 mm
Ingress protection IP44
Recommended operating
humidity 5 to 90 %
Certificate FCC, CE, RoHS
English
15
Page 16

Övervaknings- och viltkamera
Art.nr 36-5761 Modell SG560K-8mHD
Läs igenom hela bruksanvisningen före användning och spara den sedan för framtida bruk.
Vi reserverar oss för ev. text- och bildfel samt ändringar av tekniska data.
Vid tekniska problem eller andra frågor, kontakta vår kundtjänst.
Innehållsförteckning
1. Funktioner ..............................................................................................17
Svenska
1.1 Allmän information .......................................................................................................17
2. Beskrivning ............................................................................................17
3. Att komma igång ...................................................................................19
3.1 Sätt i batterier ...............................................................................................................19
3.2 Sätt i minneskort ..........................................................................................................19
3.3 Formatera minneskortet ...............................................................................................19
4. Inställningar ...........................................................................................20
4.1 Camera Mode (funktion) ...............................................................................................20
4.2 Format SD (formatera minneskort) ..............................................................................21
4.3 Photo Size (bildstorlek) ................................................................................................21
4.4 Video Size (kvalitet, videofilstorlek) .............................................................................21
4.5 Set Clock (ställ in klocka och datum) ..........................................................................21
4.6 Photo Burst (antal exponeringar vid varje aktivering).................................................22
4.7 Video Length (videoinspelningens längd) ...................................................................22
4.8 Sensitivity (rörelsedetektorns känslighet) ...................................................................22
4.9 PIR Interval (intervall till ny aktivering efter en detektering) .......................................22
4.10 Timer Interval (timelapse-funktion) ............................................................................23
4.11 Timer Switch (avstängning viss tid av dygnet) ..........................................................23
4.12 Flash Range (blixtens räckvidd) .................................................................................23
4.13 Time Stamp (infoga tidsstämpel i bilden) ..................................................................23
4.14 Default Set (återställning till fabriksinställning) .........................................................24
4.15 Användningsexempel .................................................................................................24
5. Användning ............................................................................................24
5.1 Förhandsgranskning av bild (före fotografering).........................................................24
5.2 Ta foto/videosekvens manuellt ....................................................................................24
5.3 Visa bild/videosekvens.................................................................................................25
5.4 Delete (radera foto/videosekvens) ...............................................................................26
5.5 Default Set (återställning till fabriksinställningar) ........................................................26
6. Placering/fastsättning av kameran .......................................................26
7. Skötsel och underhåll ............................................................................27
8. Felsökningsschema ...............................................................................27
9. Avfallshantering .....................................................................................28
10. Specifikationer .....................................................................................28
16
Page 17
1. Funktioner
• Mörkerseende kamera med 8 MP upplösning för bevakning av t.ex. åtelplatser.
• Bilder eller film tas vid inställda tider eller när något rör sig framför kameran och
sparar detta på SD-minneskort (max 32 GB, säljs separat).
• Rörelsedetektorn känner av djur/människor på upp till 20 m avstånd, och 40 svarta
IR-dioder gör kameran mörkerseende.
• Färgskärm, minneskort och batterihållare är placerade inuti den kamouflerade kameralådan. Drivs med 8×AA/LR6-batterier (säljs separat) eller 6 V extern strömkälla.
• Levereras med fästrem och USB-kabel.
1.1 Allmän information
Obs! En övervakningskamera kräver tillstånd enligt lagen om allmän kameraövervakning, och ansökningar behandlas av länsstyrelsen. Kontakta ansvariga
i din kommun eller länsstyrelsen om du är osäker. Kameror som satts upp utan
tillstånd kan beslagtas, dessutom kan ägaren ställas till ansvar.
2. Beskrivning
1. IR-dioder
2. Indikatorlampa
3. Rörelsedetektor
4. Kameralins
5. Excenterlås
6. Låsögla för hänglås
1
2
3
4
Svenska
5
6
5
17
Page 18
Svenska
7. Display
8. [ ▲ ][ ▼ ] Stega mellan undermenyerna, [ ► ][ ◄ ] ändra inställning
9. [ OK ] Bekräfta
10. [ MENU ] Öppna/gå ut ur meny
11. [ I► ] Växla mellan playback (uppspelning) och att visa aktuell vy
12. Funktionsomkopplare med 3 lägen:
ON (kameran aktiverad enligt inställning, displayen lyser inte)
SETUP (förhandsvisning, inställning eller manuell exponering)
a) Förhandsvisar aktuell vy framför kamera.
b) Tryck [ MENU ] för att visa menyer/undermenyer och inställningar.
c) Tryck på [ ▲ ] eller [ ▼ ] för snabb ändring mellan foto- och video-läge för
att ta bild/videosekvens manuellt utan att behöva gå in i menyn.
OFF Kameran avstängd
13. [ ] Ta en bild eller starta videoinspelning manuellt
14. [ DEL ] Radera bild eller videosekvens
15. Batterifack
10
11
12
7
8
9
MENU
ON
SETUP
OFF
DEL
OK
13 1514
TV
16
DC 6V
OUT
USB
SD
20 21
16. Anslutning för batterieliminator
(6 V DC, + i centrum på anslutning)
17. TV out: videoutgång (3,5 mm)
18. USB-anslutning
17 18 19
19. Kortplats för SD-minneskort
20. Stativgänga
21. Gummitätning över DC-anslutning
18
Page 19

3. Att komma igång
3.1 Sätt i batterier
Öppna excenterlåsen och vik ut framsidan.
Sätt i 8×AA/LR6-batterier i batterifacket enligt bilden.
Byt genast ut batterierna när de börjar bli dåliga, kameran kan
skadas om gamla batterier börjar läcka. Blanda inte nya och
gamla batterier eller olika typer av batterier.
Batterierna kan räcka upp till 6 månader, men det beror på
användningstemperatur och antal exponeringar.
Obs! Displayen lyser endast i SETUP-läge och lyser INTE i ON-läge.
Displayen släcks ca 3 minuter efter senaste knapptryckning i SETUP-läge.
Kameran kan i nödfall drivas av 4×AA/LR6-batterier i höger eller i vänster sida
av batterifacket. Om så sker måste samtliga batterier bytas ut mot nya vid nästa byte.
Kameran kan drivas av extern nätadapter via uttaget (16), 6 V DC (+ i centrum på
anslutning).
3.2 Sätt i minneskort
Kameran är avsedd för SD/SDHC-minneskort från 8 MB till 32 GB.
Kontrollera först i en kortläsare att minneskortet fungerar och är tomt.
Se till att minneskortets skrivskydd ”Lock” INTE är aktiverat.
Öppna kameran och tryck i ett SD/SDHC-minneskort i kortplatsen (19) som bilden vid
kortplatsen visar. Minneskortet ska tryckas ner tills ett klickljud hörs.
3.3 Formatera minneskortet
Formatera minneskortet före användning. Formatering innebär att allt som är sparat på
minneskortet raderas för att ge plats för nya filer.
1. Ställ funktionsomkopplaren i läge SETUP.
2. Tryck på [ MENU ], Meny 1 visas med den första undermenyn
(Camera Mode) markerad.
3. Stega till Format SD med [ ▼ ].
4. Tryck på [ OK ].
5. Välj Yes (ja) eller No (avbryt) med [ ► ] eller [ ◄ ].
6. Tryck på [ OK ] för att bekräfta (eller [ MENU ] för att avbryta).
Svenska
19
Page 20

4. Inställningar
Obs! Meny visas endast i läge SETUP.
1. Ställ funktionsomkopplaren i läge SETUP.
2. Tryck på [ MENU ], Meny 1 visas med den första undermenyn (Mode) markerad.
3. Stega till önskad undermeny med [ ▼ ] eller [ ▲ ].
Meny 1
• Camera Mode (funktion)
• Format (formatera minneskort)
• Photo Size (bildstorlek)
Svenska
• Video Size (videoupplösning)
Meny 2
• Set Clock (klocka)
• Photo Burst (antal bilder i bildserie)
• Video Length (videoinspelningens längd)
• Sensitivity (rörelsedetektorns känslighet)
Meny 3
• PIR Interval (intervall till ny aktivering efter en detektering)
• Timer Interval (intervallstyrd exponering)
• Timer Switch (avstängning viss tid av dygnet)
• Flash Range (blixtens räckvidd)
Meny 4
• Time Stamp (tidsstämpel i bilden)
• Default Set (återställning till fabriksinställning)
4. Aktuell inställning för den valda undermenyn visas markerad på displayen.
5. Om du vill ändra inställningen för den valda undermenyn, gör så här: tryck på
[ ◄ ] eller [ ► ] för att ändra, varje tryckning ändrar inställningen ett steg.
4.1 Camera Mode (funktion)
1. Tryck på [ ► ] för att välja funktion Camera
(stillbilder) eller Video (videoupptagning).
2. Bekräfta genom att trycka på [ OK ]
(eller [ MENU ] för att avbryta).
(Förinställt värde (default) är Camera.)
20
Page 21
4.2 Format SD (formatera minneskort)
Formatering innebär radering av allt som är sparat på minneskortet för att ge plats
för nya filer.
1. Tryck på [ OK ].
2. Välj Yes (ja) eller No (avbryt) med [ ► ] eller [ ◄ ].
3. Tryck på [ OK ] för att bekräfta (eller [ MENU ] för att avbryta).
4.3 Photo Size (bildstorlek)
1. Välj bildstorlek 8 MP, 1,3 MP eller 5 MP med [ ► ] eller [ ◄ ].
2. Tryck på [ OK ] för att bekräfta (eller [ MENU ] för att avbryta).
(Förinställt värde (default) är 5 MP.)
4.4 Video Size (kvalitet, videofilstorlek)
1. Välj videostorlek 1280×720p eller 640×480p med [ ► ] eller [ ◄ ].
2. Tryck på [ OK ] för att bekräfta (eller [ MENU ] för att avbryta).
(Förinställt värde (default) är 1280×720p.)
4.5 Set Clock (ställ in klocka och datum)
1. Ställ funktionsomkopplaren i läge SETUP.
2. Tryck på [ MENU ], stega till inställning för
Set Clock (tidsinställning) med [ ▼ ].
3. Tryck på [ OK ] för att öppna tidsinställningen
(eller [ MENU ] för att avbryta).
- Ställ först in månad med [ ▼ ] och [ ▲ ].
- Stega till datum med [ ► ], ställ in
datum och år på samma sätt.
- Fortsätt på samma sätt med tid
(timmar : minuter : sekunder).
- Bekräfta inställningen genom att
trycka på [ OK ].
- Displayen stängs av automatiskt
ca 3 minuter efter senaste knapptryckning, då måste inställningen
göras om från början.
Svenska
21
Page 22

4.6 Photo Burst (antal exponeringar vid varje aktivering)
1. Välj antal exponeringar som görs vid varje aktivering av kameran: 3 Photos,
2. Tryck på [ OK ] för att bekräfta (eller [ MENU ] för att avbryta).
4.7 Video Length (videoinspelningens längd)
1. Välj hur lång videoinspelning som görs vid varje aktivering av kameran.
2. Tryck på [ OK ] för att bekräfta (eller [ MENU ] för att avbryta).
Svenska
4.8 Sensitivity (rörelsedetektorns känslighet)
Ju högre känslighet som väljs, desto lättare aktiveras kameran t.ex. när vinden rör
på grenar. Ju högre inställning, desto fler bilder kommer att tas. Känsligheten avtar
normalt med stigande temperatur, om kameran ska användas i hög temperatur bör
känsligheten High väljas.
1. Välj känslighet för aktivering av kameran. Välj inställning: PIR off (rörelsedetektorn
2. Tryck på [ OK ] för att bekräfta (eller [ MENU ] för att avbryta).
4.9 PIR Interval (intervall till ny aktivering efter en detektering)
Vid en aktivering tar kameran inställt antal bilder
(eller videosekvens), men om rörelsedetektorn
känner av rörelse hela tiden kommer kameran
att fortsätta att göra exponeringar av samma
motiv oavbrutet. Därför finns möjlighet att ställa
in en tidsfördröjning till nästa aktivering av
kameran oavsett om rörelsedetektorn aktiveras
eller ej.
2 Photos eller 1 Photo (3, 2 eller 1 exponering) med [ ► ] eller [ ◄ ].
(Förinställt värde (default) är 1 Photo.)
Inställning från 1 till 60 s med [ ► ] eller [ ◄ ].
(Förinställt värde (default) är 10 s.)
avstängd), Normal (normal känslighet), High (hög känslighet) och Low (låg känslighet)
med [ ► ] eller [ ◄ ].
(Förinställt värde (default) är Normal.)
1. Välj hur lång tid som förflyter innan en ny aktivering kan göras efter den senaste
aktiveringen av kameran. Inställning från 0 s till 60 min med [ ► ] eller [ ◄ ].
2. Tryck på [ OK ] för att bekräfta (eller [ MENU ] för att avbryta).
(Förinställt värde (default) är 0 s.)
22
Page 23

4.10 Timer Interval (timelapse-funktion)
Intervallstyrd exponering (oberoende av rörelsedetektorn). Den här funktionen gör det
möjligt att ta bilder med viss intervall, t.ex. ta en bildserie var 5:e minut.
1. Välj hur lång tid som förflyter mellan exponeringarna. Inställningsmöjlighet:
avstängd eller intervall från 5 min till 8 tim med [ ► ] eller [ ◄ ].
2. Tryck på [ OK ] för att bekräfta (eller [ MENU ] för att avbryta).
(Förinställt värde (default) är Off (avstängd).)
Obs! Tänk på att denna inställning måste vara i läge Off, annars kan inte kamerans
rörelsesensor aktivera kameran förutom vid de inställda tidsintervallerna.
4.11 Timer Switch (avstängning viss tid av dygnet)
Ställ in den tid under dygnet som kameran ska vara aktiv, 00:00 till 23:59.
1. Aktivera (On) eller stäng av (Off) funktionen med [ ► ] eller [ ◄ ].
2. Tryck på [ OK ] för att bekräfta (eller [ MENU ] för att avbryta).
3. Ställ in starttiden (om du har aktiverat funktionen med On).
- Ställ in starttid (Time Lapse Set).
- Start: H:M Ställ in timme och minuter
för önskad tillslagstid. Använd knapparna
[ ▲ ][ ▼ ] för att ställa in värde. Växla
mellan timmar och minuter med [ ► ][ ◄ ].
- Växla mellan start och stopp med [ ► ][ ◄ ].
- Tryck på [ OK ] för att bekräfta och spara
inställning (eller [ MENU ] för att avbryta).
4.12 Flash Range (blixtens räckvidd)
Ställ in blixtens räckvidd så att den når motivet. Inställningsmöjlighet: 15 eller 8 meter.
Välj 8 inomhus och 15 utomhus. Prova att ta några bilder med olika inställning under
sämsta möjliga ljusförhållande om du är osäker!
1. Välj 15 eller 8 meter med [ ► ] eller [ ◄ ].
2. Tryck på [ OK ] för att bekräfta (eller [ MENU ] för att avbryta).
4.13 Time Stamp (infoga tidsstämpel i bilden)
Välj om tidsstämpel ska infogas i bilden, den
infogas längst ner i högra hörnet och visar tid
och datum.
1. Välj On (infoga) eller Off (ej infogad) med
[ ► ] eller [ ◄ ].
Svenska
2. Tryck på [ OK ] för att bekräfta
(eller [ MENU ] för att avbryta).
23
Page 24

4.14 Default Set (återställning till fabriksinställning)
Tryck på [ OK ] för att bekräfta att du vill återställa till fabriksinställning (eller [ MENU ] för
att avbryta). Obs! Alla dina egna inställningar försvinner.
4.15 Användningsexempel
Förutsättning: du vill kontrollera att Time Stamp (tidsstämpel) infogas i bilden
och att tid och datum är rätt inställda.
1. Ställ funktionsomkopplaren i läge SETUP.
2. Tryck på [ MENU ].
3. Stega till Time Stamp med [ ▲ ] (tryck 2 gånger). Kontrollera att ”On” visas markerat
Svenska
4. Stega till Set Clock med [ ▼ ].
5. Tryck på [ OK ] för att visa inställd tid och datum.
6. Kontrollera inställningen för tid och datum.
a) Om inställningen är rätt, tryck på [ MENU ] för att avbryta.
b) Om inställningen är fel, ändra inställningen så här:
5. Användning
5.1 Förhandsgranskning av bild (före fotografering)
1. Ställ funktionsomkopplaren i läge SETUP.
2. Aktuell vy framför kameran visas på displayen. Detta är en god hjälp vid val av
3. Displayen släcks ca 3 minuter efter senaste knapptryckning.
efter Time Stamp. Om inte: tryck [ ► ] en gång för att ändra från Off till On.
- Ställ först in månad med [ ▼ ] och [ ▲ ].
- Stega till datum med [ ► ], ställ in datum och år på samma sätt.
- Fortsätt på samma sätt med tid (timmar : minuter : sekunder).
- Bekräfta inställningen genom att trycka på [ OK ].
kameraplacering.
5.2 Ta foto/videosekvens manuellt
1. Ställ funktionsomkopplaren i läge SETUP.
2. Aktuell vy framför kameran visas på displayen.
3. Välj att ta foto med [ ▼ ] eller videosekvens med [ ▲ ].
24
Page 25

- Tryck på [ ] (13) för att ta en bild.
Bilden visas efter en kort stund på
displayen.
- Tryck på [ ] (13) för att starta
videoupptagning. Under tiden som
videoupptagning pågår visas en röd
punkt och tiden löpande på displayen.
Tryck en gång till på [ ] för att
avbryta och spara videoupptagning.
5.3 Visa bild/videosekvens
Visa filerna på displayen
1. Ställ funktionsomkopplaren i läge SETUP.
2. Aktuell vy framför kameran visas på
displayen. Detta är en god hjälp vid val
av kameraplacering.
3. Tryck en gång på [ I► ] (10) för att öppna
Playback (uppspelning).
4. Stega mellan de sparade filerna med
[ ▲ ][ ▼ ]. Bildfiler har en pilmarkering
i övre vänstra hörnet och videofilerna har
en blå filmruta. Filnumrering visas längst
ner. Först visas löpande numrering för
visad fil och sist visas det totala antalet
filer på minneskortet.
Svenska
Visa filerna på en dator
1. Anslut kameran till en USB-port på datorn via USB-kabeln. På displayen visas
”Mass Storage” när kameran är rätt ansluten till datorn.
2. Kameran visas som t.ex. ”Flyttbar enhet” i utforskaren. Klicka på Flyttbar enhet
och öppna mappen på minneskortet för att visa de sparade filerna.
3. Du kan spara över filerna till datorn eller bara visa bilderna från kameran på datorn.
25
Page 26

5.4 Delete (radera foto/videosekvens)
1. Ställ funktionsomkopplaren i läge SETUP.
2. Tryck en gång på [ I► ] (10) för att öppna playback (uppspelning).
3. Stega mellan de sparade filerna med [ ▲ ][ ▼ ]. Bildfiler har en pilmarkering i övre
4. Tryck på [ DEL ] för att radera bilden/videosekvensen som visas.
5. ”Del One” (radera en bild) visas på displayen.
6. Tryck på [ OK ] för att bekräfta radering.
7. Välj Yes (ja) för att fortsätta eller No (nej) för att avbryta med [ ► ] eller [ ◄ ].
Svenska
8. Om du väljer Yes (ja) och trycker [ OK ] raderas filen.
5.5 Default Set (återställning till fabriksinställningar)
Återställning till fabriksinställningar innebär radering av alla egna inställningar, och
återgång till fabriksinställningarna.
Tryck på [ OK ] för att bekräfta återställning (eller [ MENU ] för att avbryta).
6. Placering/fastsättning av kameran
• Kameran kan fästas på t.ex. ett träd med remmen. Fäst kameran stabilt så att den
• Kameran kan fästas på ett kamerastativ/fäste med 1/4″ stativgänga.
vänstra hörnet och videofilerna har en blå filmruta.
Varning! Om du trycker en gång till på [ ► ] eller [ ◄ ] och väljer Del All och fortsätter
kommer alla filer på minneskortet att raderas.
Tryck på [ OK ].
inte rör sig av vind eller vibrationer.
Tänk på att placera kameran så väderskyddat som möjligt.
Lämpligt avstånd till motivet är ca 5 m, fäst kameran ca 1,5 till 2 m över marken.
Tänk på detta!
• Kameran är temperaturberoende. PIR-sensorns kapacitet och räckvidd påverkas
av temperaturförhållandet mellan omgivningens temperatur och djurets kroppsvärme, ju större skillnad desto lättare och på desto längre håll ser kameran målet.
• Kameran ger färgbilder i dagsljus och svartvita bilder i mörker.
• Tänk på var solen går upp och ned, placera kameran med solen i ryggen så slipper
du motljus i bilderna.
• Placera om möjligt kameran i riktning norrut för att förhindra motljus i bilderna och
felindikering från PIR-sensorn.
• Ta bort kvistar framför kameran, kvistar med löv kan vara en anledning till felindikering.
• Ta alltid testbilder för att prova ut rätt inställning och placering av kameran.
Obs! Kom ihåg att ställa omkopplaren i läge ON innan du stänger kameran och går hem.
26
Page 27

PIR-sensorns räckvidd:
24 m
22 m
20 m
18 m
16 m
14 m
12 m
10 m
8 m
6 m
4 m
2 m
7. Skötsel och underhåll
Torka av kameran med en lätt fuktad, mjuk trasa. Använd ett milt rengöringsmedel,
aldrig lösningsmedel eller starka, slipande rengöringsmedel, det kan skada produkten.
8. Felsökningsschema
Svenska
Något skymmer
kameralinsen.
• Kameralinsen har ett IR-filter som när kameran slås av
kan hamna i ett läge där det skymmer linsen.
När kameran slås på återtar filtret sin rätta position.
Inga bilder tagna. • Omkopplaren står i läge SETUP eller OFF.
• Minneskortet är skrivskyddat.
• Dåliga batterier.
Många tomma bilder. • Felindikering.
• Känsligheten är felinställd.
• Kameran är felriktad.
Svartvita bilder. • I mörker blir bilderna svartvita.
Oskarpa bilder. • Fel avstånd till motivet, smutsig lins.
Datorn hittar inte
• Felaktig formatering av minneskortet.
kameran (minneskortet).
Kameran hittar inte
minneskortet.
• Felaktig formatering – formatera minneskortet i kameran.
• För stort minneskort – kameran klarar max 32 GB.
• Kontrollera att minneskortet inte är låst.
• Minneskortet är felaktigt – prova ett annat minneskort.
Kameran (minnes kortet)
hittas inte när kameran
ansluts till en dator.
• Kontrollera att USB-kabeln är hel och ordentligt ansluten
till kameran och till datorn.
• Felaktig formatering av minneskortet.
27
Page 28

9. Avfallshantering
När du ska göra dig av med produkten ska detta ske enligt lokala föreskrifter.
Är du osäker på hur du ska gå tillväga, kontakta din kommun.
10. Specifikationer
Bildsensor 5 MP färg CMOS
Lins F/NO 2,2 mm, synfält = 60°
PIR-detektionsavstånd Upp till 25 m
Display 2,0″ TFT
Svenska
Minneskort SD/SDHC från 8 MB till 32 GB
Bildupplösning 8 MP = 3328×2496p interpolerat
5 MP = 2560×1920p
1,3 MP = 1280×960p
Videoupplösning 720p HD (1280×720p)
VGA (640×480p)
PIR-sensor Multizon
PIR-känslighet Inställbar hög/normal/låg
Belysning 40 svarta IR-dioder (mörkerseende)
Reaktionstid 1,2 s
Vikt Ca 250 g (utan batterier)
Användnings-/förvaringstemperatur −20 till +60 °C / −30 till +70 °C
Intervallinställning 1 s till 60 min
Bildserie 1 till 3
Videosekvens 1 till 60 s
Strömförsörjning Batterier 8×AA/LR6 (4×AA/LR6 i nödfall)
Extern nätadapter 6 V DC (säljs separat)
Strömförbrukning i standbyläge < 0,3 mA (< 70 mAh/dag)
Strömförbrukning i aktivt läge 150 mA (+ 450 mA när IR-LED är tända)
Batterivarning Batterisymbol visas på displayen
Fäste Rem eller stativ/fäste med stativgänga
Mått Ca 140×100×70 mm
Kapsling IP44
Rekommenderad luftfuktighet
vid användning 5 till 90 %
Certifikat FCC, CE, RoHS
28
Page 29

Overvåknings- og viltkamera
Art. nr. 36-5761 Modell SG560K-8mHD
Les brukerveiledningen grundig før produktet tas i bruk og ta vare på den for framtidig bruk.
Vi reserverer oss mot ev. feil i tekst og bilde, samt forandringer av tekniske data.
Ved tekniske problemer eller spørsmål, ta kontakt med vårt kundesenter.
Innholdsfortegnelse
1. Funksjonsbeskrivelse ............................................................................30
1.1 Generelle opplysninger ................................................................................................30
2. Beskrivelse ............................................................................................30
3. Kom i gang .............................................................................................32
3.1 Sette i batterier .............................................................................................................32
3.2 Sette i minnekortet .......................................................................................................32
3.3 Formatere minnekortet .................................................................................................32
4. Innstillinger ............................................................................................33
4.1 Camera Mode (funksjon) ..............................................................................................33
4.2 Format SD (formatere minnekort) ................................................................................34
4.3 Photo Size (bildestørrelse) ...........................................................................................34
4.4 Video Size (kvalitet, filstørrelse video) .........................................................................34
4.5 Set Clock (Still inn klokkeslett og dato) .......................................................................34
4.6 Photo Burst (antall eksponeringer ved hver aktivering) .............................................35
4.7 Video Length (lengde på videoinnspilling) ..................................................................35
4.8 Sensitivity (bevegelsesdetektorens følsomhet) ..........................................................35
4.9 PIR Intervall (intervall til ny aktivering etter en detektering) .......................................35
4.10 Timer Intervall (timelapse-funksjon) ..........................................................................36
4.11 Timer Switch (stenging til bestemte tider av døgnet) ...............................................36
4.12 Flash Range (blitzens rekkevidde) .............................................................................36
4.13 Time Stamp (tidsstempel på bildet) ...........................................................................36
4.14 Default Set (reset til fabrikkinnstillingene) .................................................................37
4.15 Eksempel ....................................................................................................................37
5. Bruk ........................................................................................................37
5.1 Forhåndsvisning av bilde (før fotografering) ...............................................................37
5.2 Ta foto/videosekvens manuelt .....................................................................................37
5.3 Vis bilde/videosekvens.................................................................................................38
5.4 Delete (slette foto/videosekvens) ................................................................................39
5.5 Default Set (reset til fabrikkinnstillingene) ...................................................................39
6. Plassering/fastsetting av kameraet ......................................................39
7. Stell og vedlikehold ...............................................................................40
8. Feilsøking ...............................................................................................40
9. Avfallshåndtering ...................................................................................41
10. Spesifikasjoner ....................................................................................41
Norsk
29
Page 30
1. Funksjonsbeskrivelse
• Kamera, som kan brukes i mørket, med 8 MP oppløsning for overvåkning av
f.eks. åtselsplasser.
• Fotografering eller filming foretas til bestemte tider (som du selv bestemmer)
eller når det er bevegelse foran kameraet. Dette blir lagret på SD-minnekort
(maks 32 GB, minnekort selges separat).
• Bevegelsesdetektoren registrerer dyr/mennesker på inntil 20 m og 40 IR-dioder
gjør at kameraet kan filme og fotografere i mørket.
• Fargeskjermen, minnekort og batteriholder er plassert inni den kamuflerte
kamera boksen. Drives med 8×AA/LR6-batterier (selges separat) eller en
6 V ekstern strømkilde.
• Leveres med USB-kabel og festereim.
1.1 Generelle opplysninger
Obs! Bruk av overvåkningskamera krever godkjenning. Ta kontakt med myndighetene
dersom du er usikker på hvordan du skal forholde deg.
Norsk
2. Beskrivelse
1. IR-dioder
2. Indikatorlampe
3. Bevegelsesdetektor
4. Kameralinse
5. Lås
6. Låsøgle for hengelås
1
5
2
3
6
4
5
30
Page 31

10
11
12
7
8
9
MENU
ON
SETUP
OFF
DEL
OK
7. Display
13 1514
8. [ ▲ ][ ▼ ] Gå i undermenyene, [ ► ][ ◄ ] – endre innstilling
9. [ OK ] – Bekrefte
10. [ MENU ] Åpne/gå ut av menyen
11. [ I► ] Skifte mellom playback (avspilling) og å vise aktuelt motiv
12. Funksjonsbryter med 3 innstillinger:
ON (kameraet er aktivert slik det er innstilt, displayet lyser ikke)
SETUP (forhåndsvisning, innstilling eller manuell eksponering)
a) Forhåndsviser aktuelt motiv foran kameraet.
b) Trykk [ MENU ] for å vise menyer/undermenyer og innstillinger.
c) Trykk på [ ▲ ] eller [ ▼ ] for å skifte raskt mellom Photo– og Video-modus
for å ta bild/videosekvenser manuelt uten å måtte gå innom menyen.
OFF – Avstengt
13. [ ] Ta et bilde eller starte videoinnspillingen manuelt
14. [ DEL ] Slette bilde eller videosekvens
15. Batteriholder
TV
16
DC 6V
OUT
USB
SD
20 21
17 18 19
16. Uttak for batterieliminator
(6 V DC, + i sentrum)
17. TV out Videoutgang (3,5 mm)
18. USB-tilkobling
19. Plass for minnekort (SD)
20. Stativgjenger
21. Gummitetning over DC-uttak
Norsk
31
Page 32

Norsk
3. Kom i gang
3.1 Sette i batterier
Åpne opp låsen og brett ut framsiden.
Plasser 8 stk. AA/R6-batterier i batteriholderen. Følg merkingen.
Skift batteriene straks de begynner å bli dårlige. Kameraet kan
ta skade av gamle batterier som begynner å lekke. Bland aldri
nye og gamle batterier eller batterier av forskjellige typer.
Batteriene kan vare i inntil 6 måneder, men det avhenger av
omgivelsestemperaturen og antall eksponeringer.
Obs! Displayet lyser kun i SETUP-modus. Det lyser IKKE i ON-modus.
Displayet slukkes ca. 3 minutter etter siste tastetrykk i SETUP-modus.
I nødstilfeller kan kameraet drives med 4×AA/LR6-batterier i den høyre eller venstre
delen i batteriholderen. Hvis dette er tilfelle må samtlige batterier skiftes med nye ved
neste batteribytte.
Kameraet kan drives av ekstern strømadapter via uttaket (16), 6 V DC (+ i sentrum).
3.2 Sette i minnekortet
Kameraet er beregnet for SD-/SDHC-minnekort fra 8 MB til 32 GB.
Kontroller at minnekortet er i orden og at det er tomt før det plasseres i holderen.
Pass på at skrivebeskyttelsen på minnekortet ikke er aktivert.
Åpne opp kameraet og trykk inn minnekortet i holderen (19). Minnekortet trykkes inn til
et «klikk» høres.
3.3 Formatere minnekortet
Minnekortet må formateres før bruk. Formateringen innebærer at alt som er lagret på
minnekortet slettes for å gi plass til nye filer.
1. Still funksjonsomkobleren på SETUP.
2. Trykk på [ MENU ], Meny 1 vises med den første undermenyen
(Camera Mode) markert.
3. Gå til Format SD med [ ▼ ].
4. Trykk på [ OK ].
5. Velg Yes (ja) eller No (avbryt) med [ ► ] eller [ ◄ ].
6. Trykk på [ OK ] for å bekrefte (eller [ MENU ] for å avbryte).
32
Page 33

4. Innstillinger
Obs! Meny vises kun i SETUP-modus.
1. Still funksjonsbryteren på SETUP.
2. Trykk på [ MENU ], Meny 1 vises med den første undermenyen (Mode) markert.
3. Gå til ønsket undermeny med [ ▼ ] eller [ ▲ ].
Meny 1
• Camera Mode (funksjon)
• Format (formatere minnekort)
• Photo Size (bildestørrelse)
• Video Size (videooppløsning)
Meny 2
• Set Clock (klokke)
• Photo Burst (antall bilder i bildeserien)
• Video Length (lengde på videoinnspillingen)
• Sensitivity (bevegelsesdetektorens følsomhet)
Meny 3
• PIR Interval (intervall til ny aktivering etter en detektering)
• Timer Interval (intervallstyrt eksponering)
• Timer Switch (stenging til bestemte tider av døgnet)
• Flash Range (blitsens rekkevidde)
Meny 4
• Time Stamp (tidsstempel på bildet)
• Default Set (reset til fabrikkinnstillingene)
Norsk
4. Den aktuelle innstillingen for valgt undermeny vises i displayet.
5. Hvis innstillingen i undermenyen skal endres, gjør slik: trykk på [ ◄ ] eller [ ► ]
for å endre. Hvert trykk endrer innstillingen ett trinn.
4.1 Camera Mode (funksjon)
1. Trykk på [ ► ] for å velge funksjon
Camera (stillbilder) eller
Video (videoinnspilling).
2. Trykk på [ OK ] for å bekrefte (eller [ MENU ]
for å avbryte).
(Forhåndsinnstilt verdi (default) er Camera.)
33
Page 34

4.2 Format SD (formatere minnekort)
Formateringen innebærer at alt som er lagret på minnekortet slettes for å gi plass til nye filer.
1. Trykk på [ OK ].
2. Velg Yes (ja) eller No (avbryt) med [ ► ] eller [ ◄ ].
3. Trykk på [ OK ] for å bekrefte (eller [ MENU ] for å avbryte).
4.3 Photo Size (bildestørrelse)
1. Velg bildestørrelse 8 MP, 1,3 MP eller 5 MP med [ ► ] eller [ ◄ ].
2. Trykk på [ OK ] for å bekrefte (eller [ MENU ] for å avbryte).
(Forhåndsinnstilt verdi (default) er 5 MP.)
4.4 Video Size (kvalitet, filstørrelse video)
1. Velg videostørrelse 1280×720p eller 640×480p med [ ► ] eller [ ◄ ].
2. Trykk på [ OK ] for å bekrefte (eller [ MENU ] for å avbryte).
(Forhåndsinnstilt verdi (default) er 1280×720p.)
Norsk
4.5 Set Clock (Still inn klokkeslett og dato)
1. Still funksjonsbryteren på SETUP.
2. Trykk på [ MENU ], gå til innstilling for
Set Clock (tidsinnstilling) med [ ▼ ].
3. Trykk på [ OK ] for å åpne tidsinnstillingen
(eller [ MENU ] for å avbryte).
- Still inn måned med [ ▲ ] og [ ▼ ].
- Gå til dato med [ ► ], still inn dato og
år på samme måte.
- Fortsett på samme måte med tid
(timer: minutter: sekunder).
- Bekreft ved å trykke på [ OK ].
- Displayet skrus av automatisk
ca. 3 minutter etter siste tastetrykk.
Da må innstillingen startes forfra.
34
Page 35

4.6 Photo Burst (antall eksponeringer ved hver aktivering)
1. Velg antall eksponeringer som foretas ved hver gang kameraet aktiveres:
3 Photos, 2 Photos eller 1 Photo (3, 2 eller 1 eksponering) med [ ► ] eller [ ◄ ].
2. Trykk på [ OK ] for å bekrefte (eller [ MENU ] for å avbryte).
(Forhåndsinnstilt verdi (default) er 1 Photo.)
4.7 Video Length (lengde på videoinnspilling)
1. Velg hvor lang videoinnspillingen skal være hver gang kameraet aktiveres.
Innstillning fra 1 til 60 s med [ ► ] eller [ ◄ ].
2. Trykk på [ OK ] for å bekrefte (eller [ MENU ] for å avbryte).
(Forhåndsinnstilt verdi (default) er 10 s.)
4.8 Sensitivity (bevegelsesdetektorens følsomhet)
Jo høyere følsomhet, desto lettere aktiveres kameraet, f.eks. når vinden beveger
grener. Jo høyere innstilling, desto flere bilder vil bli tatt. Følsomheten avtar vanligvis
med stigende temperatur. Hvis kameraet skal brukes i høy temperatur bør man velge
følsomheten High.
1. Velg følsomhet for aktivering av kameraet. Velg innstilling: PIR off (bevegelsesdetektor stengt), Normal (normal følsomhet), High (høy følsomhet) og Low (lav
følsomhet) med [ ► ] eller [ ◄ ].
2. Trykk på [ OK ] for å bekrefte (eller [ MENU ] for å avbryte).
(Forhåndsinnstilt verdi (default) er Normal.)
4.9 PIR Intervall (intervall til ny aktivering etter en detektering)
Ved en aktivering vil kameraet eksponere antall
bilder (eller videosekvens), men hvis bevegelsesdetektoren detekterer bevegelse hele tiden
vil kameraet fortsette å ta bilder av samme
motiv, uavbrutt. Det er derfor mulig å stille inn
en tidsforsinkelse til neste aktivering, selv om
bevegelsesdetektoren er aktivert eller ikke.
Norsk
1. Velg hvor lang tid kameraet skal forsinkes før ny aktivering kan foretas etter forrige
aktivering. Innstilling fra 0 s til 60 min med [ ► ] eller [ ◄ ].
2. Trykk på [ OK ] for å bekrefte (eller [ MENU ] for å avbryte).
(Forhåndsinnstilt verdi (default) er 0 s.)
35
Page 36

Norsk
4.10 Timer Intervall (timelapse-funksjon)
Intervallstyrt eksponering (uavhengig av bevegelsesdetektoren). Denne funksjonen gjør det
mulig å ta bilder med et visst intervall, f.eks. ta en bildeserie med eksponering hvert 5. minutt.
1. Velg tidsrom for forsinkelse mellom eksponeringene. Innstillingsmulighet:
stengt eller intervall fra 5 min til 8 timer med [ ► ] eller [ ◄ ].
2. Trykk på [ OK ] for å bekrefte (eller [ MENU ] for å avbryte).
(Forhåndsinnstilt verdi (default) er Off (stengt).)
Obs! Husk at denne innstillingen må være i Off-modus. Hvis ikke kan bevegelsessensoren
på kameraet aktiveres utenfor de innstilte tidsintervallene.
4.11 Timer Switch (stenging til bestemte tider av døgnet)
Still inn den tiden på døgnet som kameraet skal være aktivert, mellom 00:00 og 23:59.
1. Aktiver (On) eller lukk funksjonen (Off) med [ ► ] eller [ ◄ ].
2. Trykk på [ OK ] for å bekrefte (eller [ MENU ] for å avbryte).
3. Still inn starttiden (hvis du har aktivert funksjonen med On).
- Still inn starttid (Time Lapse Set )
- Start: H:M Still inn time og minutter for
ønsket tilslagstid. Bruk knappene [ ▲ ]
og [ ▼ ] for å stille inn verdiene. Skift
mellom timer og minutter med [ ► ][ ◄ ].
- Skift mellom start og stopp med [ ► ][ ◄ ].
- Trykk på [ OK ] for å bekrefte og lagre
innstillingen (eller [ MENU ] for å avbryte).
4.12 Flash Range (blitzens rekkevidde)
Still inn rekkevidden så den når fram til motivet. Innstillingsmulighet: 15 eller 8 meter.
Velg 8 innendørs og 15 utendørs. Hvis du er usikker kan du ta noen prøvebilder under
de dårligste lysforholdene som kan oppstå.
1. Velg 15 eller 8 meter med [ ► ] eller [ ◄ ].
2. Trykk på [ OK ] for å bekrefte (eller [ MENU ] for å avbryte).
4.13 Time Stamp (tidsstempel på bildet)
Tidsstempelet vil eventuelt komme nederst i
høyre hjørne på bildet sammen med datoen.
1. Velg On (infoga) eller Off (ikke tilføyd) med
[ ► ] eller [ ◄ ].
2. Trykk på [ OK ] for å bekrefte (eller [ MENU ]
for å avbryte).
36
Page 37
4.14 Default Set (reset til fabrikkinnstillingene)
Trykk på [ OK ] for å bekrefte at du vil stille tilbake til fabrikkinnstillingene (eller [ MENU ]
for å avbryte). Obs! Alle innstillingene du har foretatt vil forsvinne.
4.15 Eksempel
Forutsetning: Du vil kontrollere at Time Stamp (tidsstempel) kommer med på
bildet og at tid og dato er riktig innstilt.
1. Still funksjonsbryteren på SETUP.
2. Trykk på [ MENU ].
3. Gå til Time Stamp med [ ▲ ] (trykk 2 ganger). Kontroller at «On» er markert etter
Time Stamp. Hvis ikke: trykk [ ► ] en gang for å endre fra Off til On.
4. Gå til Set Clock med [ ▼ ].
5. Trykk på [ OK ] for å vise innstilt klokkeslett og dato.
6. Kontroller innstillingen for klokkeslett og dato.
a) Hvis innstillingen er riktig trykker du på [ MENU ] for å avbryte.
b) Hvis innstillingen er feil må innstillingen endres slik:
- Still inn måned med [ ▲ ] og [ ▼ ].
- Gå til dato med [ ► ], still inn dato og år på samme måte.
- Fortsett på samme måte med tid (timer: minutter: sekunder).
- Bekreft ved å trykke på [ OK ].
5. Bruk
5.1 Forhåndsvisning av bilde (før fotografering)
1. Still funksjonsbryteren på SETUP.
2. Aktuelt motiv foran kameraet kommer opp på skjermen. Dette er en god hjelp ved
valg av kameraplassering.
3. Displayet slukkes ca. 3 minutter etter siste tastetrykk.
Norsk
5.2 Ta foto/videosekvens manuelt
1. Still funksjonsbryteren på SETUP.
2. Aktuelt motiv foran kameraet kommer opp på skjermen.
3. Velg å ta foto med [ ▼ ] eller videosekvens med [ ▲ ].
37
Page 38

Norsk
- Trykk på [ ] (13) for å ta et bilde.
Bildet vises på skjermen etter en
kort stund.
- Trykk på [ ] (13) for å starte
videoinn spillingen. Mens videoinnspillingen pågår vil et rødt punkt og
den løpende tiden vises på skjermen.
Trykk en gang til på [ ] for å avbryte
og lagre videoopptaket.
5.3 Vis bilde/videosekvens
Vis filene på displayet
1. Still funksjonsbryteren på SETUP.
2. Aktuelt motiv foran kameraet kommer
opp på skjermen. Dette er en god hjelp
ved valg av kameraplassering.
3. Trykk en gang på [ I► ] (10) for å åpne
Playback (avspilling).
4. Forflytting mellom filene med [ ▲ ][ ▼ ].
Bildefiler har en pilmarkering i øvre
venstre hjørne og videofilene har en blå
filmrute. Filnummereringen vises lengst
nede. Først vises løpende nummerering
for vist fil og deretter det totale antall filer
på minnekortet.
Vis filene på en PC
1. Kameraet kobles til en USB-port på datamaskinen via en USB-kabel. På displayet
vises «Mass Storage» når kameraet er riktig tilkoblet.
2. Kameraet vises som f.eks. «Flyttbar enhet» i utforskeren. Klikk på Flyttbar enhet
og åpne mappen i minnekortet for å vise de lagrede filene.
3. Du kan laste filene over til datamaskinen eller bare se på dem via kameraet.
38
Page 39

5.4 Delete (slette foto/videosekvens)
1. Still funksjonsbryteren på SETUP.
2. Trykk en gang på [ I► ] (10) for å åpne playback (avspilling).
3. Forflytting mellom filene med [ ▲ ][ ▼ ]. Bildefiler har en pilmarkering i øvre venstre
hjørne og videofilene har en blå filmrute.
4. Trykk på [ DEL ] for å slette bildet/videosekvensen som vises.
5. «Del One» vises (slette et bilde) vises på displayet.
Advarsel! Hvis du trykker en gang til på [ ► ] eller [ ◄ ], velger Del All og fortsetter,
vil alle filene på minnekortet slettes.
6. Trykk på [ OK ] for å bekrefte.
7. Velg Yes (ja) for å fortsette eller No (avbryt) med [ ► ] eller [ ◄ ]. Trykk på [ OK ].
8. Hvis du velger Yes og trykker [ OK ] slettes filen.
5.5 Default Set (reset til fabrikkinnstillingene)
Reset tilbake til fabrikkinnstillingene innebærer at alle egne innstillinger slettes.
Trykk på [ OK ] for å bekrefte (eller [ MENU ] for å avbryte).
6. Plassering/fastsetting av kameraet
• Kameraet kan f.eks. spennes fast på et tre med remmen. Fest kameraet slik at det
blir hengende stabilt, selv ved vind og vibrasjoner. Det bør henge så værbeskyttet
som mulig. Passende avstand til motivet er ca. 5 meter. Kameraet bør henge
ca. 1,5 til 2 meter over bakken.
• Kameraet kan festes på et kamerastativ/feste med 1/4″ stativgjenger.
Husk følgende:
• Kameraet er temperaturavhengig. PIR- sensorens kapasitet og rekkevidde påvirkes
av temperaturforholdet mellom omgivelsestemperaturen og dyrets kroppstemperatur.
Jo større forskjell, desto lettere er det å få klare bilder.
• Kameraet gir fargebilder i dagslys og svart-hvitt i mørket.
• Husk hvor solen går opp og ned og plasser kameraet slik at ikke solen stråler rett
inn i linsen.
• Plasser, dersom det er mulig, kameraet i retning nordover for å forhindre motlys
og feilindikering fra PIR-sensoren.
• Fjern kvist og kvast foran kameraet.
• Ta alltid testebilder for å sjekke ut innstillinger og plassering.
Obs! Husk å stille bryteren på ON før du stenger kameraet og går hjem.
Norsk
39
Page 40

PIR-sensorens rekkevidde:
24 m
22 m
20 m
18 m
16 m
14 m
12 m
10 m
8 m
6 m
4 m
2 m
7. Stell og vedlikehold
Tørk kameraet med en myk lett fuktet klut. Bruk et mildt rengjøringsmiddel ved behov.
Unngå å bruke løsemidler og slipende rengjøringsmidler. Det kan skade produktet.
Norsk
8. Feilsøking
Noe skjermer for
kameralinsen.
Det er ikke tatt noen bilder. • Bryteren er innstilt på SETUP eller OFF.
Mange tomme bilder • Indikasjon på at noe er feil.
Svart-hvitt bilder. • I mørket blir bildene svart-hvite.
Uskarpe bilder. • Feil avstand til motiv, skitten linse.
Datamaskinen finner ikke
kameraet (minnekortet).
Kameraet finner ikke
minnekortet.
Linkingen mellom kameraet
(minne kortet) og datamaskin forsvinner når
data maskinen kobles til.
• Kameralinsen har et IR-filter som
kommer opp når kameraet skrus av.
Når kameraet slås på vil filteret finne
sin rette posisjon igjen.
• Minnekortet er skrivebeskyttet.
• Dårlige batterier.
• Følsomheten feilinnstilt.
• Kameraet er vendt feil vei.
• Feilformatert minnekort.
• Feil formatering – formater minnekortet i kameraet.
• For stort minnekort – kameraet har makskapasitet
på 32 GB.
• Sjekk at minnekortet ikke er låst.
• Minnekortet er feil/ødelagt – prøv med et annet minnekort.
• Kontroller at USB-kabelen er hel og ordentlig koblet til
både kamera og datamaskin.
• Feilformatert minnekort.
40
Page 41

9. Avfallshåndtering
Når produktet skal kasseres, må det skje i henhold til lokale forskrifter.
Hvis du er usikker, ta kontakt med lokale myndigheter.
10. Spesifikasjoner
Bildesensor 5 MP farge CMOS
Linse F/NO 2,2 mm, synsfelt = 60°
PIR–deteksjonsavstand Inntil 25 m
Display 2,0″ TFT
Minnekort SD/SDHC fra 8 MB til 32 GB
Bildeoppløsning 8 MP = 3328×2496p interpolert
5 MP = 2560×1920p
1,3 MP = 1280×960p
Videooppløsning 720p HD (1280×720p)
VGA (640×480p)
PIR–sensor Multizon
PIR følsomhet Stilles inn Høy/Normal/lav
Belysning 40 svarte IR-dioder
Reaksjonstid 1,2 sekunder
Vekt Ca. 250 g (uten batterier)
Bruks-/lagringstemperatur −20 til + 60 °C / −30 til + 70 °C
Innstilling av intervaller 1 sekund til 60 minutter
Bildeserie 1 til 3
Videosekvens 1 til 60 s
Strømforsyning Batterier 8×AA/LR6 (4×AA/LR6 i nødstilfeller)
Eksternt strømadapter 6 V DC (selges separat)
Strømforbruk i standbymodus < 0,3 mA (< 70 mAh/dag)
Strømforbruk ved aktiv bruk 150 mA (+ 450 mA når IR-LED er tent)
Batterivarsling Batterisymbol vises på displayet
Feste Rem eller stativ/feste med stativgjenger
Mål Ca. 140×100×70 mm
Kapsling IP44
Anbefalt luftfuktighet ved bruk 5 til 90 %
Sertifikat FCC, CE, RoHS
Norsk
41
Page 42

Suomi
Valvonta- ja riistakamera
Tuotenro 36-5761 Malli SG560K-8mHD
Lue käyttöohje ennen tuotteen käyttöönottoa ja säilytä se tulevaa tarvetta varten.
Pidätämme oikeuden teknisten tietojen muutoksiin. Emme vastaa mahdollisista tekstitai kuvavirheistä. Jos laitteeseen tulee teknisiä ongelmia, ota yhteys myymälään tai
asiakaspalveluun (yhteystiedot käyttöohjeen lopussa).
Sisällysluettelo
1. Toimintokuvaus ......................................................................................43
1.1 Yleiset ohjeet ................................................................................................................43
2. Kuvaus ...................................................................................................43
3. Käytön aloittaminen ..............................................................................45
3.1 Paristojen asetus ..........................................................................................................45
3.2 Muistikortin liittäminen .................................................................................................45
3.3 Muistikortin alustaminen ..............................................................................................45
4. Asetukset ...............................................................................................46
4.1 Camera Mode (toiminto) ..............................................................................................46
4.2 Format SD (muistikortin alustaminen) .........................................................................47
4.3 Photo Size (kuvakoko) ..................................................................................................47
4.4 Video Size (laatu, videotiedoston koko) ......................................................................47
4.5 Set Clock (Kellonajan ja päivämäärän asettaminen)...................................................47
4.6 Photo Burst (valotusten määrä jokaisen aktivoitumisen yhteydessä) .......................48
4.7 Video Length (videotallennuksen pituus) ....................................................................48
4.8 Sensitivity (liiketunnistimen herkkyys) .........................................................................48
4.9 PIR Interval (uuden aktivoinnin aikaväli liikkeentunnistuksen jälkeen) ......................48
4.10 Timer Interval (timelapse-toiminto) ............................................................................49
4.11 Timer Switch (sammutus tiettynä aikana vuorokaudesta) ........................................49
4.12 Flash Range (salaman kantama) ................................................................................49
4.13 Time Stamp (ajan ja päivämäärän liittäminen valokuvaan) ......................................49
4.14 Default Set (tehdasasetusten palauttaminen) ...........................................................50
4.15 Käyttöesimerkkejä ......................................................................................................50
5. Käyttö .....................................................................................................50
5.1 Kuvan esikatseleminen (ennen kuvaamista) ...............................................................50
5.2 Valokuvan/videon ottaminen manuaalisesti ................................................................50
5.3 Valokuvan/videokuvan katsominen .............................................................................51
5.4 Delete (valokuvien/videoiden poistaminen) ................................................................52
5.5 Default Set (tehdasasetusten palauttaminen) .............................................................52
6. Kameran sijoittaminen/kiinnittäminen ..................................................52
7. Huolto ja puhdistaminen .......................................................................53
8. Vianhakutaulukko ..................................................................................53
9. Kierrättäminen .......................................................................................54
10. Tekniset tiedot .....................................................................................54
42
Page 43

1. Toimintokuvaus
• 8 Mp:n pimeänäkökamera esim. riistan ruokintapaikkojen valvontaan.
• Kamera ottaa valokuvia tai videota valittuina aikoina, tai kun kamera havaitsee liikettä.
Kuvat ja videot tallentuvat SD-muistikortille (enintään 32 Gt, myydään erikseen).
• Liiketunnistin tunnistaa eläimet ja ihmiset enintään 20 metrin etäisyydeltä. Kamera
näkee myös pimeässä 40 mustan IR-ledin ansiosta.
• Värinäyttö, muistikortti ja paristokotelo ovat maastokuvioisen kameralaukun sisällä.
Virtalähteenä 8 kpl AA/LR6-paristoa (myydään erikseen) tai 6 V:n virtalähde.
• Mukana kiinnityshihna ja USB-kaapeli.
1.1 Yleiset ohjeet
Huom.! Valvontakameran käyttö saattaa edellyttää kameravalvontalupaa.
Kysy lisää kunnalta tai sisäasiainministeriöstä, jos olet epävarma.
2. Kuvaus
1. IR-ledi
2. Merkkivalo
3. Liiketunnistin
4. Kameran linssi
5. Epäkeskolukko
6. Riippulukon lukitussilmukka
1
2
3
5
6
Suomi
43
4
5
Page 44
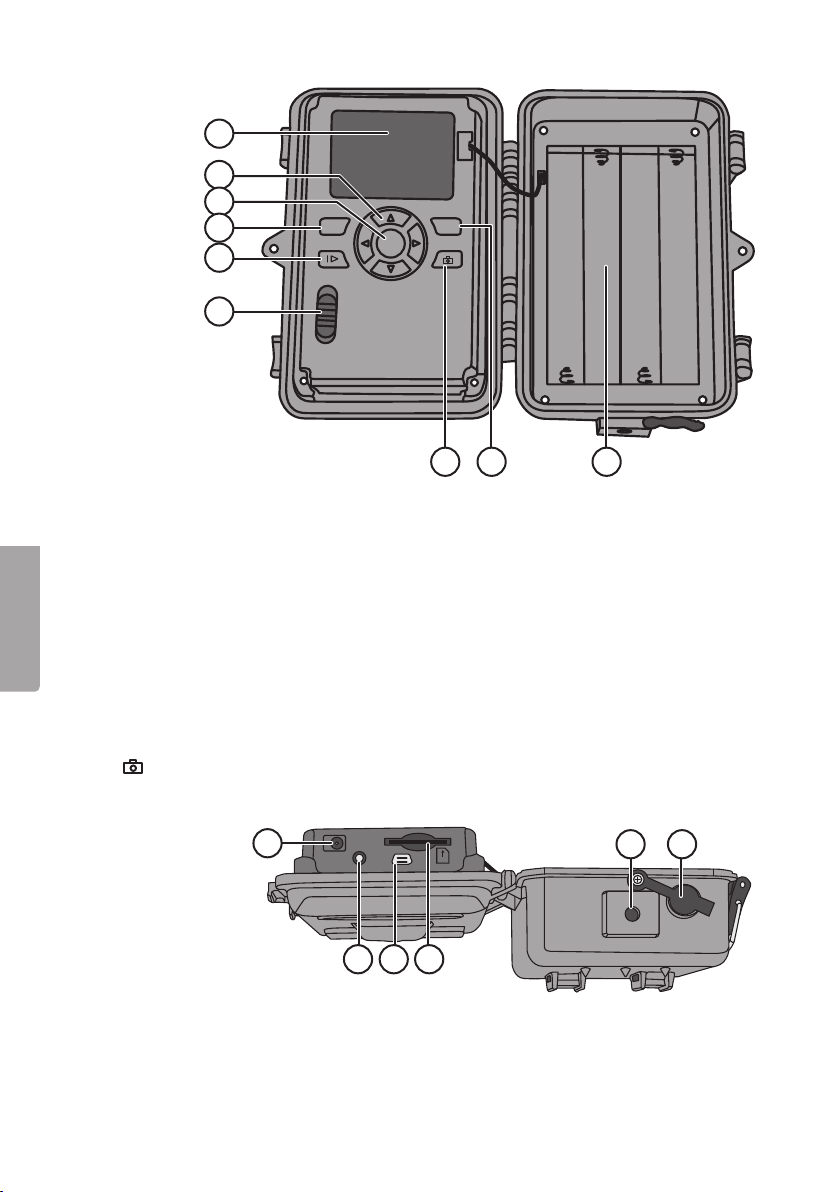
Suomi
7
8
9
10
MENU
DEL
OK
11
ON
12
SETUP
OFF
13 1514
7. Näyttö
8. [ ▲ ][ ▼ ] Siirry alavalikoihin, [ ► ][ ◄ ] – muuta asetusta
9. [ OK ] Vahvista
10. [ MENU ] Avaa/poistu valikosta
11. [ I► ] Vaihda toiston ja ajankohtaisen näkymän välillä
12. Toiminnonvalitsin, jossa 3 tilaa:
ON (kamera aktivoitu asetusten mukaisesti, näytön valo ei pala)
SETUP (esikatselu, asetus tai manuaalinen valotus)
a) Näyttää kameran näkymän
b) Katso valikot/alavalikot ja asetukset painamalla [ MENU ]
c) Voit siirtyä nopeasti valokuvaus- ja videokuvaustilojen välillä painamalla [ ▲ ] tai
[ ▼ ], ja ottaa valokuvia tai videokuvaa manuaalisesti siirtymättä valikkoon
OFF Kameran sammuttaminen
13. [ ] Ota kuva tai käynnistä videokuvaus manuaalisesti
14. [ DEL ] Poista kuva tai video
15. Paristolokero
TV
16
DC 6V
OUT
17 18 19
16. Muuntajan liitäntä (6 V DC, + keskellä)
17. TV out Videolähtö (3,5 mm)
18. USB-liitäntä
USB
SD
19. SD-korttipaikka
20. Jalustakierre
21. DC-liitännän kumitiiviste
44
20 21
Page 45

3. Käytön aloittaminen
3.1 Paristojen asetus
Avaa epäkeskolukko ja taita etupuoli ulos.
Laita paristolokeroon 8 kpl AA/LR6-paristoa kuvan
osoittamalla tavalla.
Vaihda pois heikot paristot. Vuotavat paristot saattavat
vahingoittaa kameraa. Älä sekoita vanhoja ja uusia, äläkä
erityyppisiä paristoja keskenään.
Paristot kestävät noin kuusi kuukautta riippuen
käyttölämpötilasta ja valotusten määrästä.
Huom.! Näytön valo palaa vain SETUP-tilassa. Näytön valo ei pala ON-tilassa. Näytön
valo sammuu SETUP-tilassa, jos mitään painiketta ei paineta kolmen minuutin aikana.
Kamera toimii hätätapauksessa neljällä AA/LR6-paristolla paristolokeron vasemmalla
tai oikealla puolella. Tässä tapauksessa kaikki paristot pitää vaihtaa seuraavan paristonvaihdon yhteydessä.
Kamera toimii myös ulkoisella muuntajalla (6 V DC, plus keskellä) liitännän 16 kautta.
3.2 Muistikortin liittäminen
Kameraan sopii 8–32 Gt:n SD/SDHC-muistikortti.
Varmista ensin muistikortinlukijassa, että muistikortti toimii ja että se on tyhjä.
Varmista, että muistikortti ei ole kirjoitussuojattu.
Avaa kamera ja paina korttipaikkaan (19) SD/SDHC-muistikortti korttipaikan vieressä
olevan kuvan mukaisesti. Paina muistikorttia, kunnes se napsahtaa kiinni.
Suomi
3.3 Muistikortin alustaminen
Alusta (formatoi) muistikortti ennen käyttöä. Kun muistikortti alustetaan, kaikki
muistikortin tiedot poistuvat.
1. Aseta toiminnonvalitsin asentoon SETUP.
2. Paina [ MENU ], näytöllä näkyy Valikko 1, josta on valittuna ensimmäinen alavalikko
(Camera Mode).
3. Siirry kohtaan Format SD painamalla [ ▼ ].
4. Paina [ OK ].
5. Valitse Yes (kyllä) tai No (keskeytä) painamalla [ ► ] tai [ ◄ ].
6. Vahvista painamalla [ OK ] (tai keskeytä painamalla [ MENU ]).
45
Page 46

Suomi
4. Asetukset
Huom.! Valikko näkyy vain kohdassa SETUP.
1. Aseta toiminnonvalitsin asentoon SETUP.
2. Paina [ MENU ], näytöllä näkyy Valikko 1, josta on valittuna ensimmäinen
alavalikko (Mode).
3. Siirry haluamaasi alavalikkoon painamalla [ ▼ ] tai [ ▲ ].
Valikko 1
• Camera Mode (toiminto)
• Format (muistikortin alustaminen)
• Photo Size (kuvakoko)
• Video Size (videokuvauksen tarkkuus)
Valikko 2
• Set Clock (kello)
• Photo Burst (kuvasarjan kuvien määrä)
• Video Length (videotallennuksen pituus)
• Sensitivity (liiketunnistimen herkkyys)
Valikko 3
• PIR Interval (uuden aktivoinnin aikaväli liikkeentunnistuksen jälkeen)
• Timer Interval (aikaväliohjattu valotus)
• Timer Switch (sammutus tiettynä aikana vuorokaudesta)
• Flash Range (salaman kantama)
Valikko 4
• Time Stamp (kuvan aikamerkintä)
• Default Set (tehdasasetusten palauttaminen)
4. Valitun alavalikon ajankohtainen asetus näkyy valittuna näytöllä.
5. Voit muuttaa valitun alavalikon asetusta seuraavalla tavalla: paina [ ◄ ] tai [ ► ].
Jokainen painallus muuttaa asetusta yhden askeleen.
4.1 Camera Mode (toiminto)
1. Valitse Camera (still-kuvaus) tai
Video (videokuvaus) painamalla [ ► ].
2. Vahvista painamalla [ OK ] (tai keskeytä
painamalla [ MENU ]).
(Esiasetuksena (default) on Camera.)
46
Page 47

4.2 Format SD (muistikortin alustaminen)
Kun muistikortti alustetaan, kaikki muistikortin tiedot poistuvat.
1. Paina [ OK ].
2. Valitse Yes (kyllä) tai No (keskeytä) painamalla [ ► ] tai [ ◄ ].
3. Vahvista painamalla [ OK ] (tai keskeytä painamalla [ MENU ]).
4.3 Photo Size (kuvakoko)
1. Valitse kuvakoko 8 MP, 1,3 MP tai 5 MP painamalla [ ► ] tai [ ◄ ].
2. Vahvista painamalla [ OK ] (tai keskeytä painamalla [ MENU ]).
(Esiasetuksena (default) on 5 MP.)
4.4 Video Size (laatu, videotiedoston koko)
1. Valitse videotiedoston koko 1280×720p tai 640×480p painamalla [ ► ] tai [ ◄ ].
2. Vahvista painamalla [ OK ] (tai keskeytä painamalla [ MENU ]).
(Esiasetuksena (default) on 1280×720p.)
4.5 Set Clock (Kellonajan ja päivämäärän asettaminen)
1. Aseta toiminnonvalitsin asentoon SETUP.
2. Paina [ MENU ], siirry kohtaan Set Clock
(ajan asettaminen) painamalla [ ▼ ].
3. Vahvista painamalla [ OK ] (tai keskeytä
painamalla [ MENU ]).
- Aseta ensin kuukausi painamalla
[ ▼ ] ja [ ▲ ].
- Siirry päivän asetustilaan painamalla [ ► ].
Aseta ensin päivä ja sen jälkeen vuosi.
- Jatka samalla tavalla asettaaksesi
(tunnit : minuutit : sekunnit).
- Vahvista asetus painamalla [ OK ].
- Näyttö sammuu automaattisesti,
jos mitään painiketta ei paineta
kolmen minuutin aikana. Tässä
tapauksessa asetusten tekeminen
pitää aloittaa alusta.
Suomi
47
Page 48

4.6 Photo Burst (valotusten määrä jokaisen aktivoitumisen yhteydessä)
1. Valitse kameran aktivoitumisen aikana tapahtuvien valotusten määrä: 3 Photos,
2 Photos tai 1 Photo (3, 2 tai 1 valotusta) painamalla [ ► ] tai [ ◄ ].
2. Vahvista painamalla [ OK ] (tai keskeytä painamalla [ MENU ]).
(Esiasetuksena (default) on 1 Photo.)
4.7 Video Length (videotallennuksen pituus)
1. Valitse kuvattavan videotallennuksen pituus kameran aktivoituessa. Valitse videotallennuksen pituus 1 sekunti – 60 sekuntia painamalla [ ► ] tai [ ◄ ].
2. Vahvista painamalla [ OK ] (tai keskeytä painamalla [ MENU ]).
(Esiasetuksena (default) on 10 s.)
4.8 Sensitivity (liiketunnistimen herkkyys)
Mitä suurempi herkkyys on valittuna, sitä helpommin kamera aktivoituu, kun esim. tuuli
liikuttaa oksia. Mitä suurempi herkkyys, sitä enemmän kuvia kamera ottaa. Herkkyys
heikkenee yleensä korkeassa lämpötilassa. Jos käytät kameraa korkeassa lämpötilassa,
valitse herkkyys High.
1. Valitse kameran aktivoitumisen herkkyys. Valitse asetus: PIR off (liiketunnistin pois
päältä), Normal (normaali herkkyys), High (suuri herkkyys) ja Low (pieni herkkyys)
painamalla [ ► ] tai [ ◄ ].
2. Vahvista painamalla [ OK ] (tai keskeytä painamalla [ MENU ]).
(Esiasetuksena (default) on Normal.)
Suomi
4.9 PIR Interval (uuden aktivoinnin aikaväli liikkeentunnistuksen jälkeen)
Kun kamera aktivoituu, se ottaa valitun määrän
kuvia (tai videokuvaa). Jos liiketunnistin
havaitsee jatkuvasti liikettä, kamera jatkaa
kuvien ottamista jatkuvasti. Jatkuva kuvien
ottaminen voidaan estää asettamalla kameraan
aktivoitumisen aikaviive joka on riippumaton
siitä, aktivoituuko liiketunnistin.
1. Valitse kuinka pitkän ajan kuluttua seuraava aktivoituminen tapahtuu kameran
viimeisestä aktivoitumisesta. Valitse asetuksen pituus 0 sekuntia – 60 minuuttia
painamalla [ ► ] tai [ ◄ ].
2. Vahvista painamalla [ OK ] (tai keskeytä painamalla [ MENU ]).
(Esiasetuksena (default) on 0 s.)
48
Page 49

4.10 Timer Interval (timelapse-toiminto)
Intervalliohjattu valotus (liiketunnistuksesta riippumaton). Tämän toiminnon avulla
kamera ottaa kuvia tietyin aikavälein, esim. kuvasarja viiden minuutin välein.
1. Valitse valotusten välinen aika. Valitse sammutettu tai väli 5 minuuttia – 8 tuntia
painamalla [ ► ] tai [ ◄ ].
2. Vahvista painamalla [ OK ] (tai keskeytä painamalla [ MENU ]).
(Esiasetuksena (default) on Off (sammutettu).)
Huom.! Ota huomioon, että tämän asetuksen tulee olla tilassa Off, muuten kamera
liiketunnistin voi aktivoida kameran vain asetettuina aikaväleinä.
4.11 Timer Switch (sammutus tiettynä aikana vuorokaudesta)
Aseta kellonaika, jolloin kamera on aktiivinen: 00:00 – 23:59.
1. Aktivoi (On) tai sammuta (Off) toiminto painamalla [ ► ] tai [ ◄ ].
2. Vahvista painamalla [ OK ] (tai keskeytä painamalla [ MENU ]).
3. Aseta käynnistymisaika (jos olet aktivoinut toiminnon (On)).
- Aseta käynnistysaika (Time Lapse Set )
- Käynnistäminen: H:M Aseta käynnistymisajan tunnit ja minuutit. Aseta arvo
painikkeilla [ ▲ ][ ▼ ]. Vaihda tuntien ja
minuuttien välillä painikkeilla [ ► ][ ◄ ].
- Vaihda käynnistyksen ja pysäytyksen
välillä painikkeilla [ ► ][ ◄ ].
- Vahvista ja tallenna asetukset painamalla
[ OK ] (tai keskeytä painamalla [ MENU ]).
Suomi
4.12 Flash Range (salaman kantama)
Säädä salaman kantama sopivaksi. Salaman kantaman vaihtoehdot: 15 tai 8 metriä.
Valitse 8 metriä sisälle ja 15 ulos. Ota muutamia koekuvia eri asetuksilla huonossa
valaistuksessa, jos olet epävarma.
1. Valitse 15 tai 8 metriä painamalla [ ► ] tai [ ◄ ].
2. Vahvista painamalla [ OK ] (tai keskeytä painamalla [ MENU ]).
4.13 Time Stamp (ajan ja päivämäärän liittäminen valokuvaan)
Voit liittää valokuvan oikeaan alakulmaan
kellonajan ja päivämäärän.
1. Valitse On (aika ja päivämäärä) tai Off
(ei aikaa ja päivämäärää) painamalla
[ ► ] tai [ ◄ ].
2. Vahvista painamalla [ OK ] (tai keskeytä
painamalla [ MENU ]).
49
Page 50
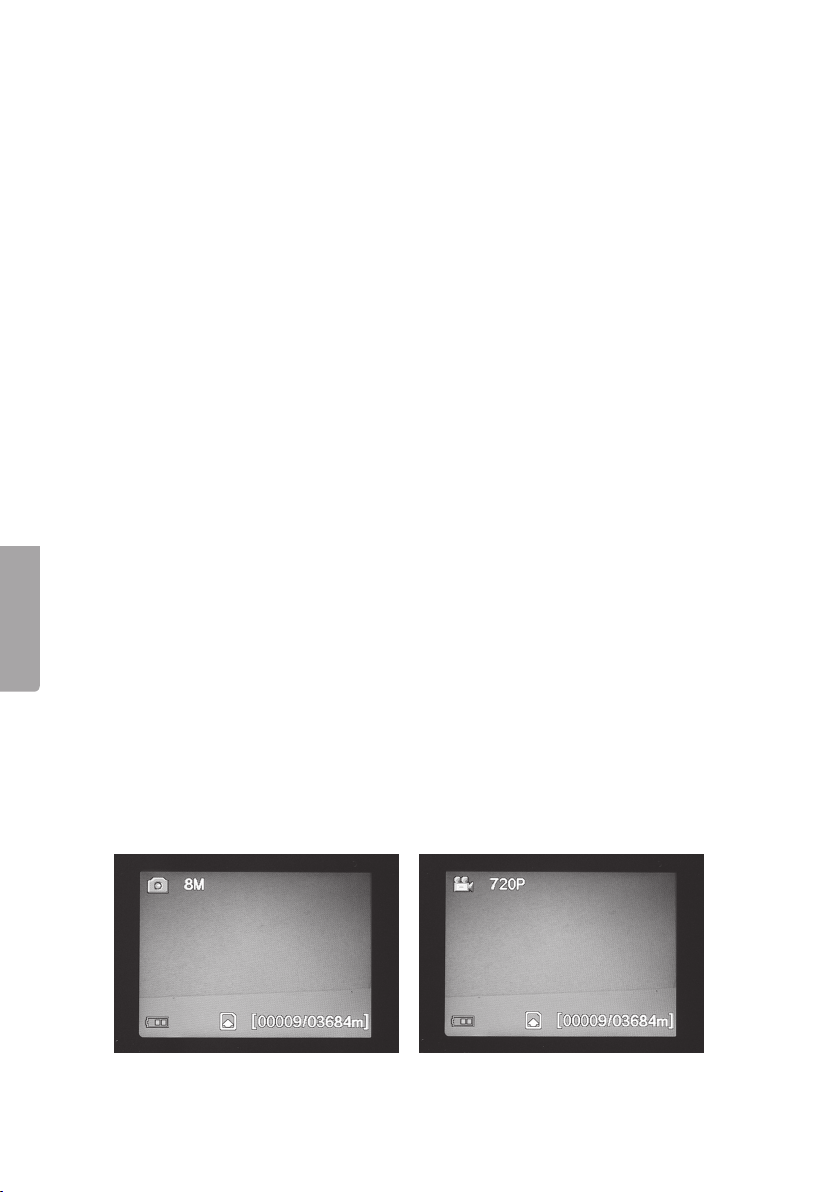
Suomi
4.14 Default Set (tehdasasetusten palauttaminen)
Palauta laitteen tehdasasetukset painamalla [ OK ] (tai keskeytä painamalla [ MENU ]).
Huom.! Kaikki tekemäsi asetukset poistuvat.
4.15 Käyttöesimerkkejä
Esimerkki: haluat varmistaa, että Time Stamp (aika ja päivämäärä) liitetään
kuvaan, ja että aika ja päivämäärä ovat oikein.
1. Aseta toiminnonvalitsin asentoon SETUP.
2. Paina [ MENU ].
3. Siirry kohtaan Time Stamp painamalla [ ▲ ] (paina 2 kertaa). Varmista, että Time
Stamp –tekstin perässä lukee ”On”. Jos On-teksti ei näy, muuta tila Off tilaksi On
painamalla [ ► ].
4. Siirry kohtaan Set Clock painamalla [ ▼ ].
5. Katso asetettu kellonaika ja päivämäärä painamalla [ OK ].
6. Tarkasta kellonaika ja päivämäärä.
a) Jos asetukset ovat oikein, keskeytä painamalla [ MENU ].
b) Jos asetukset ovat väärin, muuta asetuksia seuraavalla tavalla:
- Aseta ensin kuukausi painamalla [ ▼ ] ja [ ▲ ].
- Siirry päivän asetustilaan painamalla [ ► ]. Aseta ensin päivä ja sen jälkeen vuosi.
- Jatka samalla tavalla asettaaksesi tunnit, minuutit ja sekunnit.
- Vahvista asetus painamalla [ OK ].
5. Käyttö
5.1 Kuvan esikatseleminen (ennen kuvaamista)
1. Aseta toiminnonvalitsin asentoon SETUP.
2. Kameran senhetkinen näkymä näkyy näytöllä. Tämä toiminto helpottaa kameran
sijoittamista.
3. Näytön valo sammuu, jos mitään painiketta ei paineta kolmen minuutin aikana.
5.2 Valokuvan/videon ottaminen manuaalisesti
1. Aseta toiminnonvalitsin asentoon SETUP.
2. Kameran senhetkinen näkymä näkyy näytöllä.
3. Ota valokuva painamalla [ ▼ ] tai tallenna videokuvaa painamalla [ ▲ ].
50
Page 51

- Ota kuva painamalla [ ] (13).
Kuva näkyy hetken kuluttua näytöllä.
- Aloita videon tallentaminen painamalla [ ] (13). Videokuvan tallentamisen aikana näytöllä näkyy punainen
piste ja tallennusaika. Keskeytä ja
tallenna videokuvaus painamalla
uudelleen [ ].
5.3 Valokuvan/videokuvan katsominen
Katso näytöllä näkyviä tiedostoja
1. Aseta toiminnonvalitsin asentoon SETUP.
2. Kameran näkymä näkyy näytöllä. Tämä
toiminto helpottaa kameran sijoittamista.
3. Siirry Playback-tilaan (kuvien katselu)
painamalla kerran [ I► ] (10).
4. Katsele kuvia painikkeilla [ ▲ ][ ▼ ].
Valokuvien vasemmassa yläkulmassa
on nuolimerkintä ja videotiedostoissa
on sininen filmiruutu. Tiedoston numero
näkyy alalaidassa. Ensin näkyy tiedoston
numero ja sen jälkeen näkyy muistikortilla
olevien tiedostojen kokonaismäärä.
Suomi
Tiedostojen katseleminen tietokoneella
1. Liitä kamera tietokoneen USB-porttiin USB-kaapelilla. Kun kamera on liitetty oikein
tietokoneeseen, näytöllä lukee ”Mass Storage”.
2. Kamera näkyy esim. ”Siirrettävänä levynä” resurssienhallinnassa. Katso tallennettuja
tiedostoja napsauttamalla Siirrettävää levyä ja avaamalla muistikortin kansio.
3. Voit tallentaa tiedostot tietokoneeseen tai katsella muistikortilla olevia tiedostoja
tietokoneella.
51
Page 52

Suomi
5.4 Delete (valokuvien/videoiden poistaminen)
1. Aseta toiminnonvalitsin asentoon SETUP.
2. Siirry Playback-tilaan (kuvien katselu) painamalla kerran [ I► ] (10).
3. Katsele kuvia painikkeilla [ ▲ ][ ▼ ]. Valokuvien vasemmassa yläkulmassa on
nuolimerkintä ja videotiedostoissa on sininen filmiruutu.
4. Poista senhetkinen kuva/video painamalla [ DEL ].
5. Näytöllä näkyy ”Del One” (poista yksi kuva). Varoitus! Jos painat uudelleen
[ ► ] tai [ ◄ ] ja valitset Del All, kaikki muistikortin tiedostot poistuvat.
6. Vahvista tiedostojen poistaminen painamalla [ OK ].
7. Jatka valitsemalla Yes (kyllä) tai keskeytä valitsemalla No (ei) painikkeilla
[ ► ] tai [ ◄ ]. Paina [ OK ].
8. Poista tiedosto valitsemalla Yes (kyllä) ja painamalla [ OK ].
5.5 Default Set (tehdasasetusten palauttaminen)
Tehdasasetusten palauttaminen poistaa kaikki omat asetuksesi.
Vahvista tehdasasetusten palauttaminen painamalla [ OK ] (tai keskeytä
painamalla [ MENU ]).
6. Kameran sijoittaminen/kiinnittäminen
• Kameran voi kiinnittää esim. puuhun hihnan avulla. Kiinnitä kamera tukevasti jotta
se ei pääse liikkumaan esim. tuulessa.
Sijoita kamera mahdollisimman hyvin säältä suojattuun paikkaan.
Sopiva etäisyys kohteeseen on noin 5 metriä. Sijoita kamera noin 1,5–2 metrin
korkeudelle maasta.
• Kameran voi kiinnittää kameratelineeseen/kiinnikkeeseen, jossa on 1/4″:n jalustakierre.
Ota huomioon seuraavat asiat:
• Ympäristön lämpötila vaikuttaa kameran toimintaan. Ympäristön lämpötila ja
eläinten ruumiinlämpö vaikuttavat PIR-anturin kapasiteettiin ja kantamaan. Kamera
näkee kohteen helpommin ja pidemmälle, kun kuvattavan kohteen ja ympäristön
lämpötilaero on suurempi.
• Kamera ottaa värikuvia päivänvalossa ja mustavalkokuvia pimeässä.
• Ota huomioon auringon nousu- ja laskusuunta, ja sijoita kameran takaosa kohti
aurinkoa, niin vältät vastavalon valokuvissa.
• Kamera kannattaa mahdollisuuksien mukaan suunnata kohti pohjoista vastavalon
ja PIR-anturin virheellisen toiminnan ehkäisemiseksi.
• Poista kameran edessä olevat oksat. Kameran edessä olevat oksat, joissa on
paljon lehtiä, saattavat johtaa kameraan virheelliseen toimintaan.
• Ota aina testikuvia ja testaa kameran oikeat asetukset ja sijoittaminen.
Huom.! Muista laittaa kytkin asentoon ON, ennen kuin sammutat kameran ja jätät
sen paikoilleen.
52
Page 53

PIR-anturin kantama:
24 m
22 m
20 m
18 m
16 m
14 m
12 m
10 m
8 m
6 m
4 m
2 m
7. Huolto ja puhdistaminen
Pyyhi kamera kevyesti kostutetulla pehmeällä liinalla. Käytä mietoa puhdistusainetta.
Älä käytä vahvoja, hankaavia puhdistusaineita tai liuotinaineita, sillä ne voivat
vahingoittaa laitetta.
8. Vianhakutaulukko
Kameran linssin edessä on
jotain.
• Kameran linssissä on IR-suodatin,
joka saattaa jäädä linssin eteen,
kun kamera sammutetaan.
Suodatin palautuu oikeaan asentoon,
kun kamera laitetaan päälle.
Kamera ei ole ottanut kuvia. • Kytkin on asennossa SETUP tai OFF.
• Muistikortti on kirjoitussuojattu.
• Heikot paristot.
Paljon tyhjiä kuvia. • Virheilmoitus.
• Väärät herkkyysasetukset.
• Kamera on suunnattu väärin.
Kuvat ovat mustavalkoisia. • Kamera ottaa pimeässä vain mustavalkokuvia.
Kuvat ovat epätarkkoja. • Väärä etäisyys kohteeseen, linssi on likainen.
Tietokone ei löydä kameraa
• Muistikortti on alustettu (formatoitu) väärin.
(muistikorttia).
Tietokone ei löydä kameraa
muistikorttia.
• Virheellinen alustus – alusta muistikortti.
• Liian iso muistikortti – muistikortin suurin koko on 32 Gt.
• Varmista, että muistikorttia ei ole lukittu.
• Vääränlainen muistikortti – kokeile toista muistikorttia.
Kameraa (muisti korttia) ei löydy
tietokoneelta, kun kamera on
liitetty tietokoneeseen.
• Varmista, että USB-kaapeli on ehjä ja kunnolla
liitetty kameraan ja tietokoneeseen.
• Muistikortti on alustettu (formatoitu) väärin.
53
Suomi
Page 54

Suomi
9. Kierrättäminen
Kierrätä tuote asianmukaisesti, kun poistat sen käytöstä.
Tarkempia kierrätysohjeita saat kuntasi jäteneuvonnasta.
10. Tekniset tiedot
Kuvakenno 5 MP väri CMOS
Linssi F/NO 2,2 mm, näkökenttä = 60°
PIR-tunnistusetäisyys Enintään 25 m
Näyttö 2,0″ TFT
Muistikortti SD/SDHC 8 Mt – 32 Gt
Kuvan tarkkuus 8 MP = 3328×2496p interpoloitu
5 MP = 2560×1920p
1,3 MP = 1280×960p
Videokuvauksen tarkkuus 720p HD (1280×720p)
VGA (640×480p)
PIR-anturi Multi zone
PIR-herkkyys Säädettävä Suuri/normaali/pieni
Valo 40 mustaa IR-diodia (pimeänäköä varten)
Reaktioaika 1,2 s
Paino Noin 250 g (ilman paristoja)
Käyttö-/säilytyslämpötila −20 … + 60 °C / −30 … + 70 °C
Intervalliasetus 1 sekunti … 60 minuuttia
Kuvasarja 1–3
Videokuvauksen pituus 1–60 sekuntia
Virrankulutus Paristot 8 kpl AA/LR6 (4 kpl AA/LR6 hätätapauksessa)
Ulkoinen virtalähde 6 V DC (ei sisälly)
Virrankulutus valmiustilassa < 0,3 mA (< 70 mAh/vuorokausi)
Virrankulutus aktiivitilassa 150 mA (+ 450 mA IR-ledien ollessa päällä)
Paristojen varaustason
varoitus Paristosymboli näkyy näytöllä
Kiinnitys Hihna tai jalusta, jossa jalustakierteet
Mitat Noin 140×100×70 mm
Kotelointiluokka IP44
Käyttöympäristön
suositeltu ilmankosteus 5–90 %
Sertifioinnit FCC, CE, RoHS
54
Page 55

Überwachungs- und Wildkamera
Art.Nr. 36-5761 Modell SG560K-8mHD
Vor Inbetriebnahme diekomplette Bedienungsanleitung durchlesen und aufbewahren.
Irrtümer, Abweichungen und Änderungen behalten wir uns vor.
Bei technischen Problemen oder anderen Fragen freut sich unser Kundenservice über
eine Kontaktaufnahme.
Inhaltsverzeichnis
1. Funktionsbeschreibung .........................................................................56
1.1 Allgemeine Informationen ............................................................................................56
2. Beschreibung .........................................................................................56
3. Erste Schritte .........................................................................................58
3.1 Einsetzen von Batterien ...............................................................................................58
3.2 Einsetzen der Speicherkarte ........................................................................................58
3.3 Formatierung der Speicherkarte ..................................................................................58
4. Einstellungen .........................................................................................59
4.1 Camera Mode (Funktion) ..............................................................................................59
4.2 Format SD (Formatierung der Speicherkarte) .............................................................60
4.3 Photo Size (Bildgröße) ..................................................................................................60
4.4 Video Size (Qualität, Dateigröße Video) .......................................................................60
4.5 Set Clock (Einstellung von Uhrzeit und Datum) ..........................................................60
4.6 Photo Burst (Anzahl Belichtungen bei jeder Aktivierung) ...........................................61
4.7 Video Length (Länge der Videoaufnahme) .................................................................. 61
4.8 Sensitivity (Empfindlichkeit des Bewegungsmelders) ................................................61
4.9 PIR Interval (Intervall bis zur erneuten Aktivierung nach einer Detektion) ................61
4.10 Timer Interval (Timelapse-Funktion) ..........................................................................62
4.11 Timer Switch (Ausschaltung zu einer bestimmten Tageszeit) ..................................62
4.12 Flash Range (Blitzreichweite) .....................................................................................62
4.13 Time Stamp (Uhrzeitstempel auf dem Bild)...............................................................62
4.14 Default Set (Zurücksetzen auf dieWerkseinstellung) ...............................................63
4.15 Anwendungsbeispiel ..................................................................................................63
5. Gebrauch ...............................................................................................63
5.1 Vorschaufunktion für Fotos (vor dem Fotografieren) ..................................................63
5.2 Foto/Videosequenz manuell aufnehmen .....................................................................63
5.3 Anzeige von Foto/Videosequenz .................................................................................64
5.4 Delete (Foto/Videosequenz löschen) ...........................................................................65
5.5 Default Set (Zurücksetzen auf dieWerkseinstellung) .................................................65
6. Standortauswahl/Befestigung der Kamera ..........................................65
7. Pflege und Wartung ...............................................................................66
8. Fehlersuche ...........................................................................................66
9. Hinweise zur Entsorgung ......................................................................67
10. Technische Daten ................................................................................67
Deutsch
55
Page 56

1. Funktionsbeschreibung
• Nachtsichtkamera mit 8 MP Auflösung zur Überwachung von Futterstellen usw.
• Aufnahme von Bildern/Filmen zu eingestellten Zeiten oder wenn sich etwas vor
• Der Bewegungsmelder erkennt Tiere/Menschen auf bis zu 20 m Abstand. 40 schwarze
• Farbdisplay, Speicherkarte und Batteriehalterung sind in der getarnten Kamera
• Inkl. Haltegurt und USB-Kabel.
1.1 Allgemeine Informationen
Hinweis: Bei der Installation einer Überwachungskamera anöffentlich zugänglichen
Orten ist in Deutschland § 6b des Bundesdatenschutzgesetzes (BDSG) zu beachten.
DieDurchführung einer Videoüberwachung ist anzahlreiche Pflichten gebunden, z. B.
besteht eine Hinweispflicht, eine Pflicht zur ordnungsgemäßen Dokumentation, zur
unverzüglichen Löschung und zur Sicherstellung der technisch-organisatorischen
Maßnahmen. Bei Fragen können diePolizei oder der Landesbeauftragte für
Datenschutz kontaktiert werden.
2. Beschreibung
1. Infrarotdioden
2. Indikator-LED
3. Bewegungsmelder
4. Kameralinse
5. Spannverschluss
6. Schließöse für Vorhängeschloss
Deutsch
der Kamera bewegt. Speicherung erfolgt auf einer SD-Speicherkarte (max. 32 GB,
separat erhältlich).
Infrarot-Dioden sorgen für gute Nachtsicht.
platziert. Stromversorgung über 8×AA/LR6-Batterien (separat erhältlich) oder
externe Stromquelle (6 V).
1
5
2
3
6
4
5
56
Page 57

7
8
9
10
MENU
DEL
OK
11
ON
12
SETUP
OFF
13 1514
7. Display
8. [ ▲ ][ ▼ ] Zwischen den Untermenüs navigieren, [ ► ][ ◄ ] – Einstellungen ändern
9. [ OK ] Bestätigen
10. [ MENU ] Öffnen/dasMenü verlassen
11. [ I► ] Zwischen Playback (Wiedergabe) und aktueller Ansicht wechseln
12. Funktionswahlschalter mit 3 Positionen:
ON (DieKamera ist entsprechend der Einstellung aktiviert, dasDisplay leuchtet nicht)
SETUP (Vorschau, Einstellungen oder manuelle Belichtung)
a) Vorschau der aktuellen Ansicht vor der Kamera.
b) Auf [ MENU ] drücken um dieMenüs/Untermenüs und Einstellungen anzuzeigen.
c) Auf [ ▲ ] oder [ ▼ ] drücken um schnell zwischen Foto- und Videomodus zu
wechseln und ein Bild/eine Videosequenz manuell aufzunehmen ohne dasMenü
zu betreten.
OFF (Kamera ausgeschalte)
13. [ ] Ein Bild aufnehmen oder dieVideoaufnahme manuell starten
14. [ DEL ] Bild oder Videosequenz löschen
15. Batteriefach
16
DC 6V
TV
OUT
USB
SD
20 21
Deutsch
16. Anschluss für dasNetzteil
(6 V DC, + im Zentrum des Anschlusses)
17. TV out Videoausgang (3,5 mm)
18. USB-Anschluss
17 18 19
19. Steckplatz für eine SD-Speicherkarte
20. Stativaufnahme.
21. Gummidichtung über dem
DC-Anschluss.
57
Page 58

3. Erste Schritte
3.1 Einsetzen von Batterien
Den Spannverschluss öffnen und dieVorderseite herausklappen.
8×AA/LR6-Batterien gemäß der Abbildung in dasBatteriefach
einsetzen.
Schwache Batterien sofort austauschen, damit dieKamera
nicht durch alte, auslaufende Batterien beschädigt wird.
Alte/neue oder verschiedene Arten von Batterien nicht
zusammen verwenden.
Je nach Betriebstemperatur und Anzahl von Belichtungen reichen dieBatterien bis
zu 6 Monate.
Hinweis: DasDisplay schaltet sich nur im SETUP-Modus ein und NICHT im ON-Modus.
Im SETUP-Modus erlischt dasDisplay ca. 3 Minuten nach dem letzten Tastendruck.
Im Notfall kann dieKamera mit 4×AA/LR06-Batterien in der rechten oder linken Seite
des Batteriefachs betrieben werden. In diesem Fall müssen beim nächsten Wechsel
alle Batterien ausgetauscht werden.
DieKamera kann auch mit einem externen Netzteil über dieBuchse (16) betrieben
werden (6 V DC, + im Zentrum des Anschlusses).
3.2 Einsetzen der Speicherkarte
DieKamera ist für SD/SDHC-Speicherkarten von 8 MB bis 32 GB vorgesehen.
Zuerst sicherstellen, dass dieSpeicherkarte funktioniert und leer ist.
Sicherstellen, dass der Schreibschutz der Speicherkarte „Lock“ NICHT aktiviert ist.
DieKamera öffnen und eine SD/SDHC-Speicherkarte in den Steckplatz (19) drücken
wie auf der Abb. am Steckplatz angegeben. DieSpeicherkarte herunterdrücken bis
ein Klicken zu hören ist.
Deutsch
3.3 Formatierung der Speicherkarte
Vor Gebrauch dieSpeicherkarte formatieren. Bei einer Formatierung werden alle auf
der Speicherkarte gespeicherten Daten gelöscht, um Platz für neue zu machen.
1. Den Funktionswahlschalter auf Position SETUP stellen.
2. Auf [ MENU ] drücken, dann wird dasMenü 1 angezeigt, wobei daserste
3. Mit [ ▼ ] bis zu Format SD gehen.
4. Auf [ OK ] drücken.
5. Mit [ ► ] oder [ ◄ ] Yes oder No auswählen.
6. Mit [ OK ] bestätigen oder mit [ MENU ] abbrechen.
Untermenü (Camera Mode) markiert ist.
58
Page 59

4. Einstellungen
Hinweis: DasMenü wird nur im SETUP-Modus angezeigt.
1. Den Funktionswahlschalter auf Position SETUP stellen.
2. Auf [ MENU ] drücken, dann wird dasMenü 1 angezeigt, wobei daserste
Untermenü (Mode) markiert ist.
3. Mit [ ▼ ] oder [ ▲ ] zum gewünschten Untermenü gehen.
Menü 1
• Camera Mode (Funktion)
• Format (Formatierung der Speicherkarte)
• Photo Size (Bildgröße)
• Video Size (Videoauflösung)
Menü 2
• Set Clock (Uhr)
• Photo Burst (Anzahl von Bildern in einer Bildserie)
• Video Length (Länge der Videoaufnahme)
• Sensitivity (Empfindlichkeit des Bewegungsmelders)
Menü 3
• PIR Interval (Intervall bis zur erneuten Aktivierung nach einer Detektion)
• Timer Interval (intervallgesteuerte Belichtung)
• Timer Switch (Ausschaltung zu einer bestimmten Tageszeit)
• Flash Range (Blitzreichweite)
Menü 4
• Time Stamp (Uhrzeitstempel auf dem Bild)
• Default Set (Zurücksetzen auf dieWerkseinstellung)
4. Aktuelle Einstellung für dasausgewählte Untermenü wird auf dem Display
markiert angezeigt.
5. Um eine Einstellung für dasausgewählte Untermenü zu ändern, folgendermaßen
vorgehen: zum Ändern [ ◄ ] oder [ ► ] drücken, jeder Tastendruck ändert
dieEinstellung mit einem Schritt.
Deutsch
4.1 Camera Mode (Funktion)
1. Auf [ ► ] drücken um dieFunktion
Camera (Foto) oder Video (Filmaufnahme)
auszuwählen.
2. Zum Bestätigen auf [ OK ] drücken oder
zum Abbrechen auf [ MENU ]drücken.
(Der voreingestellte Wert (default)
ist Camera.)
59
Page 60
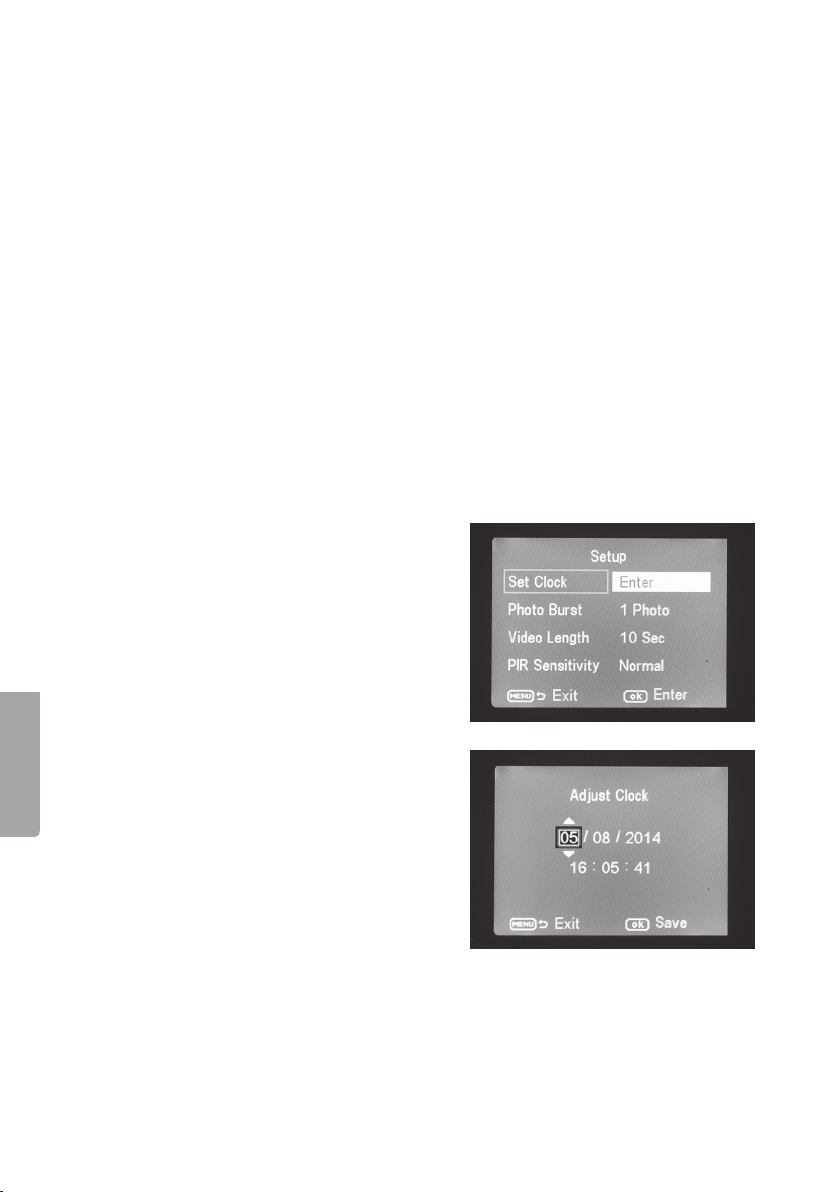
4.2 Format SD (Formatierung der Speicherkarte)
Bei einer Formatierung werden alle auf der Speicherkarte gespeicherten Daten
gelöscht, um Platz für neue zu machen.
1. Auf [ OK ] drücken.
2. Mit [ ► ] oder [ ◄ ] Yes oder No auswählen.
3. Mit [ OK ] bestätigen oder mit [ MENU ] abbrechen.
4.3 Photo Size (Bildgröße)
1. Mit [ ► ] oder [ ◄ ] dieBildgröße wählen: 8 MP, 1,3 MP oder 5MP.
2. Mit [ OK ] bestätigen oder mit [ MENU ] abbrechen.
4.4 Video Size (Qualität, Dateigröße Video)
1. Mit [ ► ] oder [ ◄ ] dieVideogröße wählen: 1280×720p oder 640×480p.
2. Mit [ OK ] bestätigen oder mit [ MENU ] abbrechen.
4.5 Set Clock (Einstellung von Uhrzeit und Datum)
1. Den Funktionswahlschalter auf Position
2. Auf [ MENU ] drücken und dann mit
3. Mit [ OK ] dieZeiteinstellung öffnen oder
Deutsch
(Der voreingestellte Wert (default) ist 5 MP.)
(Der voreingestellte Wert (default) ist 1280×720p.)
SETUP stellen.
[ ▼ ] zur Einstellung von Set Clock
(Zeiteinstellung) gehen.
mit [ MENU ] abbrechen.
- Mit [ ▼ ] und [ ▲ ] zunächst den Monat
einstellen.
- Mit [ ► ] weitergehen und auf dieselbe
Weise den Tag und dasJahr einstellen.
- Auf dieselbe Weise dieUhrzeit einstellen
(Stunden : Minuten : Sekunden).
- DieEinstellungen mit [ OK ] bestätigen.
- Ca. 3 min nach dem letzten
Tastendruck schaltet dasDisplay
automatisch aus. In diesem Fall muss
mit der Einstellung wieder von vorne
begonnen werden.
60
Page 61

4.6 Photo Burst (Anzahl Belichtungen bei jeder Aktivierung)
1. Mit [ ► ] oder [ ◄ ] dieAnzahl Belichtungen auswählen, diebei jeder Aktivierung
der Kamera durchgeführt werden: 3 Photos, 2 Photos oder 1 Photo (3, 2 oder
1 Belichtung).
2. Mit [ OK ] bestätigen oder mit [ MENU ] abbrechen.
(Der voreingestellte Wert (default) ist 1 Photo.)
4.7 Video Length (Länge der Videoaufnahme)
1. Mit [ ► ] oder [ ◄ ] dieLänge der Videoaufnahme auswählen, diebei jeder
Aktivierung der Kamera durchgeführt wird: 1 bis 60 s.
2. Mit [ OK ] bestätigen oder mit [ MENU ] abbrechen.
(Der voreingestellte Wert (default) ist 10 s.)
4.8 Sensitivity (Empfindlichkeit des Bewegungsmelders)
Je höher dieeingestellte Empfindlichkeit ist, desto leichter wird dieKamera aktiviert,
z. B. durch vom Wind bewegte Zweige. Je höher dieEinstellung ist, desto mehr
Bilder werden aufgenommen. DieEmpfindlichkeit nimmt normalerweise mit
steigender Temperatur ab. Wird dieKamera bei hohen Temperaturen verwendet,
dieEmpfindlichkeit High wählen.
1. Auswahl der Empfindlichkeit für dieAktivierung der Kamera. DieEinstellung
mit [ ► ] oder [ ◄ ] auswählen: PIR off (Bewegungsmelder ausgeschaltet),
Normal (normale Empfindlichkeit), High (hohe Empfindlichkeit) und
Low (niedrige Empfindlichkeit).
2. Mit [ OK ] bestätigen oder mit [ MENU ] abbrechen.
(Der voreingestellte Wert (default) ist Normal.)
4.9 PIR Interval (Intervall bis zur erneuten Aktivierung nach
einer Detektion)
Bei einer Aktivierung nimmt dieKamera dieeingestellte Anzahl Fotos auf (oder Videosequenz).
Wenn jedoch der Bewegungsmelder eine
kontinuierliche Bewegung entdeckt, führt
dieKamera kontinuierlich Belichtungen
durch. Darum gibt es dieMöglichkeit, eine
Verzögerung einzustellen, damit dieKamera mit
der nächsten Belichtung wartet, auch wenn der
Bewegungsmelder aktiviert ist.
1. Mit [ ► ] oder [ ◄ ] dieVerzögerung auswählen, um diebei jeder Aktivierung der
Kamera dieBildaufnahme verschoben wird: 0 s bis 60 min.
2. Mit [ OK ] bestätigen oder mit [ MENU ] abbrechen.
(Der voreingestellte Wert (default) ist 0 s.)
61
Deutsch
Page 62

4.10 Timer Interval (Timelapse-Funktion)
Intervallgesteuerte Belichtung (unabhängig vom Bewegungsmelder). Diese Funktion
ermöglicht dieFotoaufnahme in bestimmten Intervallen, z. B. eine Fotoserie mit
Aufnahme alle 5 min.
1. Mit [ ► ] oder [ ◄ ] auswählen, wie viel Zeit zwischen den Belichtungen verstreichen
soll: ausgeschaltet oder Intervalle von 5 min bis 8 Std.
2. Mit [ OK ] bestätigen oder mit [ MENU ] abbrechen.
(Der voreingestellte Wert (default) ist Off (ausgeschaltet)).
Hinweis: Bitte beachten, dass dieEinstellung im Off-Modus sein muss, damit
dieKamera außerhalb der eingestellten Zeitintervalle durch den Bewegungssensor
aktiviert werden kann.
4.11 Timer Switch (Ausschaltung zu einer bestimmten Tageszeit)
Einstellung der Tageszeit, während der dieKamera aktiviert werden kann: 00:00 bis 23:59.
1. Mit [ ► ] oder [ ◄ ] dieFunktionen einschalten (On) oder ausschalten (Off).
2. Mit [ OK ] bestätigen oder mit [ MENU ] abbrechen.
3. Einstellung der Startzeit (bei Aktivierung der Funktion mit On).
- Startzeit einstellen (Time Lapse Set)
- Start: Mit [ ▲ ][ ▼ ] dieStunden (h)
und Minuten (m) für den gewünschten
Zeitpunkt einstellen.
- Mit [ ► ][ ◄ ] vom Startzeitpunkt zum
Stoppzeitpunkt wechseln.
- Mit [ OK ] dieEinstellung bestätigen und
speichern, oder mit [ MENU ] abbrechen.
4.12 Flash Range (Blitzreichweite)
DieBlitzreichweite so einstellen, dass der Blitz dasMotiv erreicht.
Einstellungsmöglichkeiten: 15 oder 8 Meter. Im Innenbereich 8 m wählen und im
Außenbereich 15 m. Zur Sicherheit probeweise Fotos mit versch. Einstellungen unter
Deutsch
möglichst schlechten Lichtverhältnissen aufnehmen.
1. Mit [ ► ] oder [ ◄ ] 15 m oder 8 m auswählen.
2. Mit [ OK ] bestätigen oder mit [ MENU ] abbrechen.
4.13 Time Stamp (Uhrzeitstempel auf dem Bild)
Auswählen, ob ein Datumstempel im Bild
eingefügt werden soll, dieser wird in der
unteren rechten Ecke eingefügt und zeigt
Uhrzeit und Datum an.
1. Mit [ ► ] oder [ ◄ ] On (einfügen) oder Off
2. Mit [ OK ] bestätigen oder mit [ MENU ]
(nicht einfügen) auswählen.
abbrechen.
62
Page 63

4.14 Default Set (Zurücksetzen auf dieWerkseinstellung)
Mit [ OK ] dasZurücksetzen auf dieWerkseinstellung bestätigen oder mit [ MENU ]
abbrechen. Hinweis: Alle eigenen Einstellungen verschwinden beim Zurücksetzen.
4.15 Anwendungsbeispiel
Voraussetzung: Es soll sichergestellt werden, dass der Time Stamp (Zeitstempel)
im Bild eingefügt wird und Uhrzeit und Datum korrekt eingestellt sind.
1. Den Funktionswahlschalter auf Position SETUP stellen.
2. Auf [ MENU ] drücken.
3. Um zum Time Stamp zu gelangen, zweimal auf [ ▲ ] drücken. Überprüfen, ob
nach Time Stamp „On“ markiert ist. Falls nicht: einmal auf [ ► ] drücken, um
dieEinstellung von Off zu On zu ändern.
4. Mit [ ▼ ] bis zu Set Clock gehen.
5. Auf [ OK ] drücken um dieeingestellte Uhrzeit und Datum anzuzeigen.
6. DieEinstellung von Uhrzeit und Datum überprüfen.
a) Ist dieEinstellung korrekt, auf [ MENU ] klicken um abzubrechen.
b) Ist dieEinstellung falsch, diese folgendermaßen ändern:
- Mit [ ▼ ] und [ ▲ ] zunächst den Monat einstellen.
- Mit [ ► ] weitergehen und auf dieselbe Weise den Tag und dasJahr einstellen.
- Auf dieselbe Weise dieUhrzeit einstellen (Stunden : Minuten : Sekunden).
- DieEinstellungen mit [ OK ] bestätigen.
5. Gebrauch
5.1 Vorschaufunktion für Fotos (vor dem Fotografieren)
1. Den Funktionswahlschalter auf Position SETUP stellen.
2. Dieaktuelle Ansicht vor der Kamera wird angezeigt. Dies ist eine große Hilfe bei
der Auswahl des Standorts der Kamera.
3. DasDisplay erlischt ca. 3 Minuten nach dem letzten Tastendruck.
5.2 Foto/Videosequenz manuell aufnehmen
1. Den Funktionswahlschalter auf Position SETUP stellen.
2. Dieaktuelle Ansicht vor der Kamera wird angezeigt.
3. Mit [ ▼ ] dieAufnahme eines Fotos wählen oder mit [ ▲ ] dieAufnahme einer Videosequenz.
63
Deutsch
Page 64

- Auf [ ] (13) drücken um ein Foto
aufzunehmen. Nach kurzer Zeit wird
dasBild auf dem Display angezeigt.
- Auf [ ] (13) drücken um dieVideoauf nahme zu starten. Während
dieVideoaufnahme läuft, werden
auf dem Display ein roter Punkt
und dieAufnahmedauer angezeigt.
Noch einmal auf [ ] drücken um
dieAufnahme zu beenden und zu
speichern.
5.3 Anzeige von Foto/Videosequenz
Dateien auf dem Display anzeigen
1. Den Funktionswahlschalter auf Position
SETUP stellen.
2. Dieaktuelle Ansicht vor der Kamera wird
angezeigt.
3. Einmal auf [ I► ] (10) drücken um
Playback zu öffnen (Wiedergabe).
4. Mit [ ▲ ][ ▼ ] zwischen den gespeicherten
Dateien navigieren. Fotodateien
haben ein Pfeilsymbol in der oberen
linken Ecke, während Videofilme
ein blaues Filmkästchen haben.
DieFilmnummerierung wird ganz unten
angezeigt. Zuerst ist dielaufende
Nummerierung der angezeigten Datei
zu sehen und zuletzt dieGesamtanzahl
gespeicherter Dateien auf der Speicherkarte.
Deutsch
Dateien auf einem Computer anzeigen
1. DieKamera mithilfe eines USB-Kabels aneineUSB-Buchse am Computer anschließen.
2. DieKamera wird z. B. als „Wechsellaufwerk“ im Windows Explorer angezeigt.
3. DieDateien können auf den Computer übertragen werden oder direkt von der
Auf dem Display wird „Mass Storage“ angezeigt, sobald dieKamera mit dem
Computer verbunden ist.
Auf Wechsellaufwerk klicken und den Ordner auf der Speicherkarte öffnen um
dieDateien anzuzeigen.
Kamera aus am Computer angezeigt werden.
64
Page 65

5.4 Delete (Foto/Videosequenz löschen)
1. Den Funktionswahlschalter auf Position SETUP stellen.
2. Einmal auf [ I► ] (10) drücken um Playback zu öffnen (Wiedergabe).
3. Mit [ ▲ ][ ▼ ] zwischen den gespeicherten Dateien navigieren. Fotodateien
haben ein Pfeilsymbol in der oberen linken Ecke, während Videofilme ein blaues
Filmkästchen haben.
4. Auf [ DEL ] drücken um dieangezeigten Fotos/Videosequenzen zu löschen.
5. „Del One“ (eine Datei löschen) wird auf dem Display angezeigt.
Warnung: Wird ein weiteres Mal auf [ ► ] oder [ ◄ ] gedrückt und Del All ausgewählt
und bestätigt, werden alle auf der Speicherkarte befindlichen Dateien gelöscht.
6. Zum Bestätigen des Löschvorgangs auf [ OK ] drücken.
7. Mit [ ► ] oder [ ◄ ] Ye s (ja) auswählen um mit dem Löschen fortzusetzen oder
No (nein) um abzubrechen. Auf [ OK ] drücken.
8. Um dieDatei zu löschen Yes auswählen und mit [ OK ] bestätigen.
5.5 Default Set (Zurücksetzen auf dieWerkseinstellung)
DasZurücksetzen auf dieWerkseinstellung beinhaltet dasLöschen aller eigener Einstellungen.
DasZurücksetzen mit [ OK ] bestätigen oder mit [ MENU ] abbrechen.
6. Standortauswahl/Befestigung der Kamera
• DieKamera kann z. B. mit einem Riemen aneinem Baum befestigt
werden. DieKamera stabil befestigen, damit sie sich nicht durch Wind oder
Erschütterungen bewegt. Den Standort der Kamera möglichst geschützt vor
Wettereinflüssen wählen. Der geeignete Abstand zum Motiv beträgt ca. 5 m,
dieKamera ca. 1,5 bis 2 m über dem Boden befestigen.
• DieKamera kann auch auf einem Kamerastativ/-halterung mit 1/4″-Stativgewinde
befestigt werden.
Bitte beachten:
• DieKamera ist temperaturabhängig. Kapazität und Reichweite des
Bewegungssensors wird von Temperatureinflüssen beeinträchtigt: je größer der
Abstand zwischen Körperwärme des Tieres zur Umgebungstemperatur ist, desto
leichter und weiter weg sieht dieKamera dasZiel.
• DieKamera nimmt tagsüber in Farbe auf und bei Dunkelheit schwarzweiß.
• Beim Standort den Sonnenauf- und -untergang beachten und dieKamera mit dem
Rücken zur Sonne montieren um Gegenlicht auf den Bildern zu verhindern.
• Wenn möglich, dieKamera nach Norden ausrichten um Gegenlicht und fehlerhaftes
Auslösen des Bewegungssensors zu verhindern.
• Zweige vor der Kamera entfernen, belaubte Zweige können eine Aktivierung der
Kamera auslösen.
• Immer Testaufnahmen durchführen um korrekte Einstellungen und Standortauswahl
der Kamera zu überprüfen.
Hinweis: Nicht vergessen, den Schalter auf ON zu setzen bevor dieKamera geschlossen
und allein gelassen wird.
65
Deutsch
Page 66

Reichweite des Bewegungssensors:
7. Pflege und Wartung
DasGerät mit einem weichen, leicht befeuchteten Tuch reinigen. Ein mildes
Reinigungsmittel verwenden, keine scharfen Chemikalien oder Scheuermittel.
8. Fehlersuche
24 m
22 m
20 m
18 m
16 m
14 m
12 m
10 m
8 m
6 m
4 m
2 m
Deutsch
Etwas verdeckt
dieKameralinse.
• DieKameralinse hat einen Infrarotfilter,
der beim Abschalten der Kamera vor
dieLinse geraten kann. Wenn dieKamera
wieder eingeschaltet wird, nimmt der Filter
wieder seine korrekte Position ein.
Keine Bildaufnahmen. • Der Schalter befindet sich in Position SETUP oder OFF.
• Der Schreibschutz der Speicherkarte ist aktiviert.
• Schwache Batterien.
Viele leere Bilder. • Fehlerhafte Aktivierung.
• Falsch eingestellte Empfindlichkeit.
• Falsche Ausrichtung der Kamera.
Schwarzweiße Bilder. • Bei Dunkelheit werden schwarzweiße Bilder aufgenommen.
Unscharfe Bilder. • Falscher Abstand zum Motiv, schmutzige Linse.
Der Computer findet
• Falsche Formatierung der Speicherkarte.
dieKamera nicht
(Speicherkarte).
DieKamera findet
dieSpeicherkarte nicht.
• Fehlerhafte Formatierung – dieSpeicherkarte in
der Kamera formatieren.
• Zu große Speicherkarte – dieKamera ist nur bis
32 GB ausgelegt.
• Sicherstellen, dass der Schreibschutz nicht aktiviert ist.
• DieSpeicherkarte ist fehlerhaft – eine andere
Speicherkarte testen.
DieKamera (Speicherkarte) wird nicht ge funden,
wenn sie anden Computer
• Sicherstellen, dass dasUSB-Kabel intakt und korrekt
ander Kamera und dem Computer angeschlossen ist.
• DieSpeicherkarte ist falsch formatiert.
ange schlossen ist.
66
Page 67

9. Hinweise zur Entsorgung
Bitte dasProdukt entsprechend den lokalen Bestimmungen entsorgen.
Weitere Informationen sind von der Gemeinde oder den kommunalen
Entsorgungsbetrieben erhältlich.
10. Technische Daten
Bildsensor 5 MP Farbe CMOS
Linse F/NO 2,2 mm, Sichtfeld= 60°
Bewegungsmeder –
Erfassungsabstand Bis 25 m
Display 2,0″ TFT
Speicherkarte SD/SDHC von 8 MB bis 32 GB
Fotoauflösung 8 MP = 3328×2496 interpoliert
5 MP = 2560×1920
1,3 MP = 1280×960
Videoauflösung 720p HD (1280×720p)
VGA (640×480p)
Bewegungssensor Multizone
Empfindlichkeit
des Bewegungssensors Einstellbar Hoch/normal/niedrig
Beleuchtung 40 schwarze Infrarotdioden (Nachtsicht)
Reaktionszeit 1,2 s
Gewicht Ca. 250 g (ohne Batterien)
Betriebs/Aufbewahrungs -
temperatur −20 bis + 60 °C / −30 bis + 70 °C
Intervalleinstellung 1 s bis 60 min
Fotoserie 1 bis 3
Videosequenz 1 bis 60 s
Stromversorgung Batterien 8×AA/LR6 (4×AA/LR6 im Notfall)
Externes Netzteil 6 V DC (separat erhältlich)
Stromverbrauch
im Standbymodus < 0,3 mA (< 70 mAh/Tag)
Stromverbrauch
im aktiven Modus 150 mA (+ 450 mA wenn dieIR-LEDs eingeschaltet sind)
Batteriewarnung Anzeige des Batteriesymbols auf dem Display
Halterung Riemen oder Stativ/Halterung mit Stativgewinde
Maße ca. 140×100×70 mm
Schutzart IP44
Empfohlene Luftfeuchtigkeit
im Betrieb 5 bis 90 %
Zertifikat FCC, CE, RoHS
Deutsch
67
Page 68

Sverige
Kundtjänst tel: 0247/445 00
fax: 0247/445 09
e-post: kundservice@clasohlson.se
Internet www.clasohlson.se
Post Clas Ohlson AB, 793 85 INSJÖN
Norge
Kundesenter tlf.: 23 21 40 00
faks: 23 21 40 80
e-post: kundesenter@clasohlson.no
Internett www.clasohlson.no
Post Clas Ohlson AS, Postboks 485 Sentrum, 0105 OSLO
Suomi
Asiakaspalvelu puh.: 020 111 2222
sähköposti: asiakaspalvelu@clasohlson.fi
Internet www.clasohlson.fi
Osoite Clas Ohlson Oy, Maistraatinportti 4 A, 00240 HELSINKI
Great Britain
Customer Service contact number: 0845 300 9799
e-mail: customerservice@clasohlson.co.uk
Internet www.clasohlson.com/uk
Postal 10 – 13 Market Place
Kingston Upon Thames
Surrey
KT1 1JZ
Deutschland
Kundenservice Unsere Homepage www.clasohlson.de besuchen und
auf Kundenservice klicken.
 Loading...