

Clas Ohlson OCL-564-2W CLAS, OCL-564-2BC CLAS, OCL-564-1W CLAS, OCL-564-1BC CLAS Instruction Manual
Page 1
Ceiling Light
Takplafond
Kattoplafondi
Deckenleuchte
EnglishSvenskaNorskSuomiDeutsch
Art.no Model
32-1203, 32-8614 OCL-564-2BC(CLAS), OCL-564-2W(CLAS)
36-1000, 36-1005 OCL-564-1BC(CLAS), OCL-564-1W(CLAS)
Ver. 20150617
Page 2

2
Page 3
Ceiling Light
Art.no 32-1203, 32-8614 Model OCL-564-2BC(CLAS), OCL-564-2W(CLAS)
36-1000, 36-1005 OCL-564-1BC(CLAS), OCL-564-1W(CLAS)
Please read theentire instruction manual before using theproduct and then save it for future reference.
We reserve theright for any errors in text or images and any necessary changes made to technical data.
If you have any questions concerning technical problems please contact our Customer Services.
Safety
Bulb: 220–240 V AC, E27, Max 60 W
Caution!
• Intended for indoor use in ambient temperatures up to 25 ºC.
• Turn off theceiling light before changing thebulb.
• Thebulb can become very hot during use. Let it cool completely before changing.
• Contact a competent electrician if you are at all unsure about how to install the ceiling light.
• Theceiling light is rated at protection class 1 which means that it must be connected to
anelectrical earth.
• All light fittings must be installed in accordance with current safety regulations to prevent
life-threatening accidents.
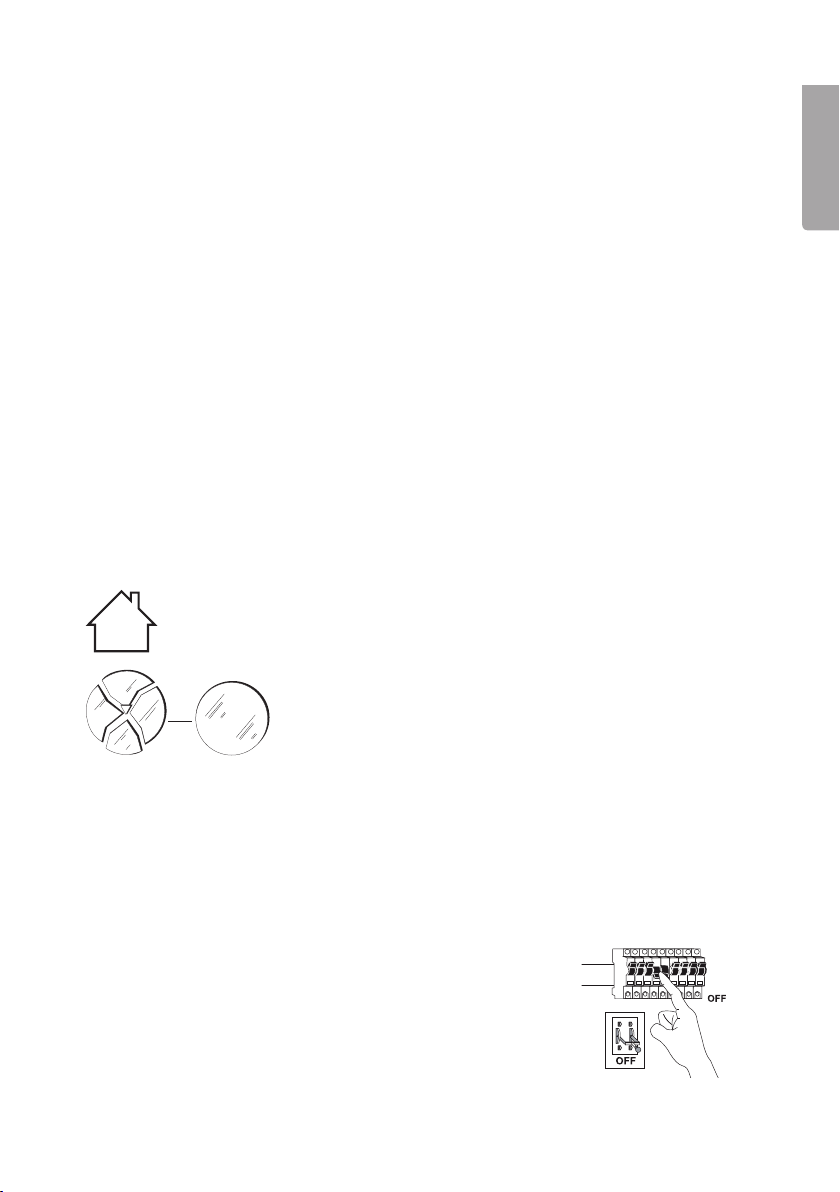
Warning symbols
Intended for indoor use only (IP20). Must not come into contact
with either water or moisture.
English
Have theceiling light repaired before using if any damage is noticed.
Installation
Note: Theceiling light comes in two model types and is mounted differently for each model type.
Art.no 32-1203, 32-8614 for SE, FI and NO (with distance ring)
Art.no 36-1000, 36-1005 for UK (without distance ring)
Installation instructions for SWE, FIN and NOR, art.no 32-1203,
32-8614 (with distance ring)
Caution! Always turn off thepower before beginning installation.
3
Page 4
• This light fitting is intended for fixed installation.
• This light fitting is intended for ceiling installation.
• Thepower supply cable must have aprotective earth wire (green-yellow) which is to be connected
to theEarth terminal on theterminal block as shown on thewiring diagram.
English
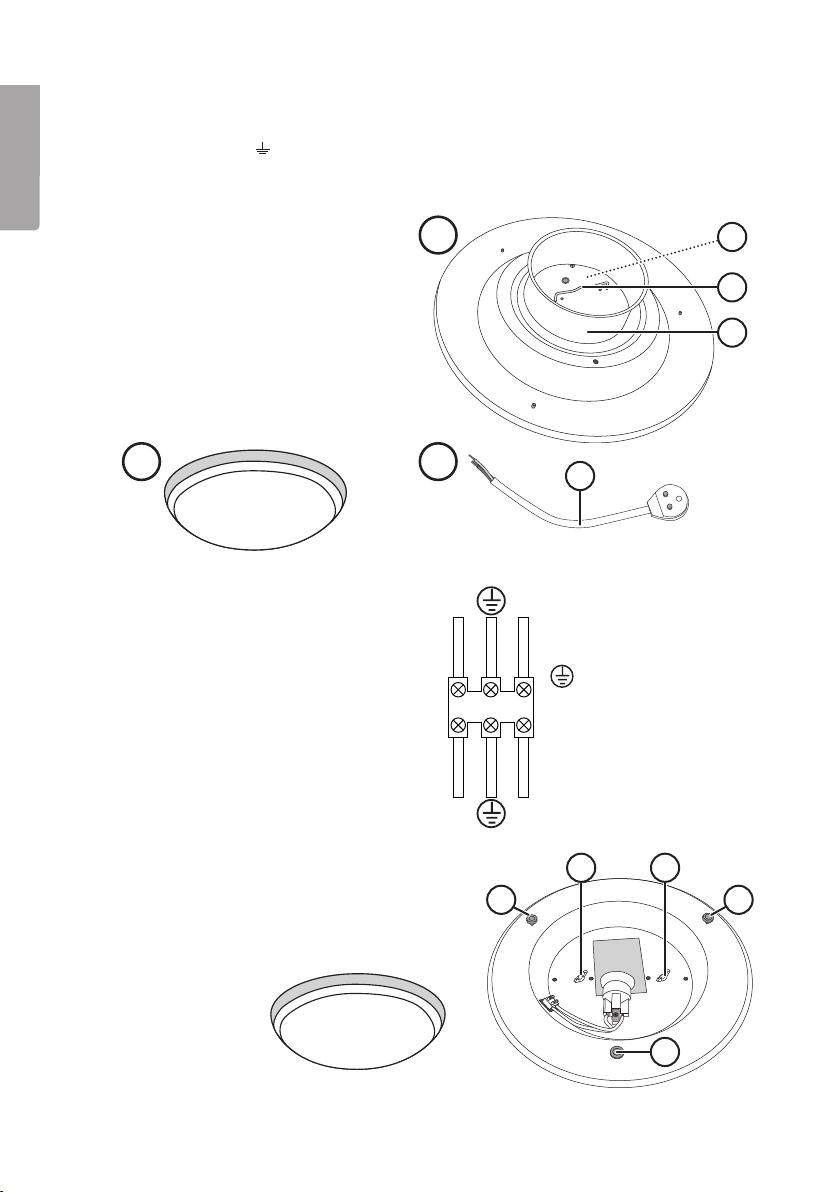
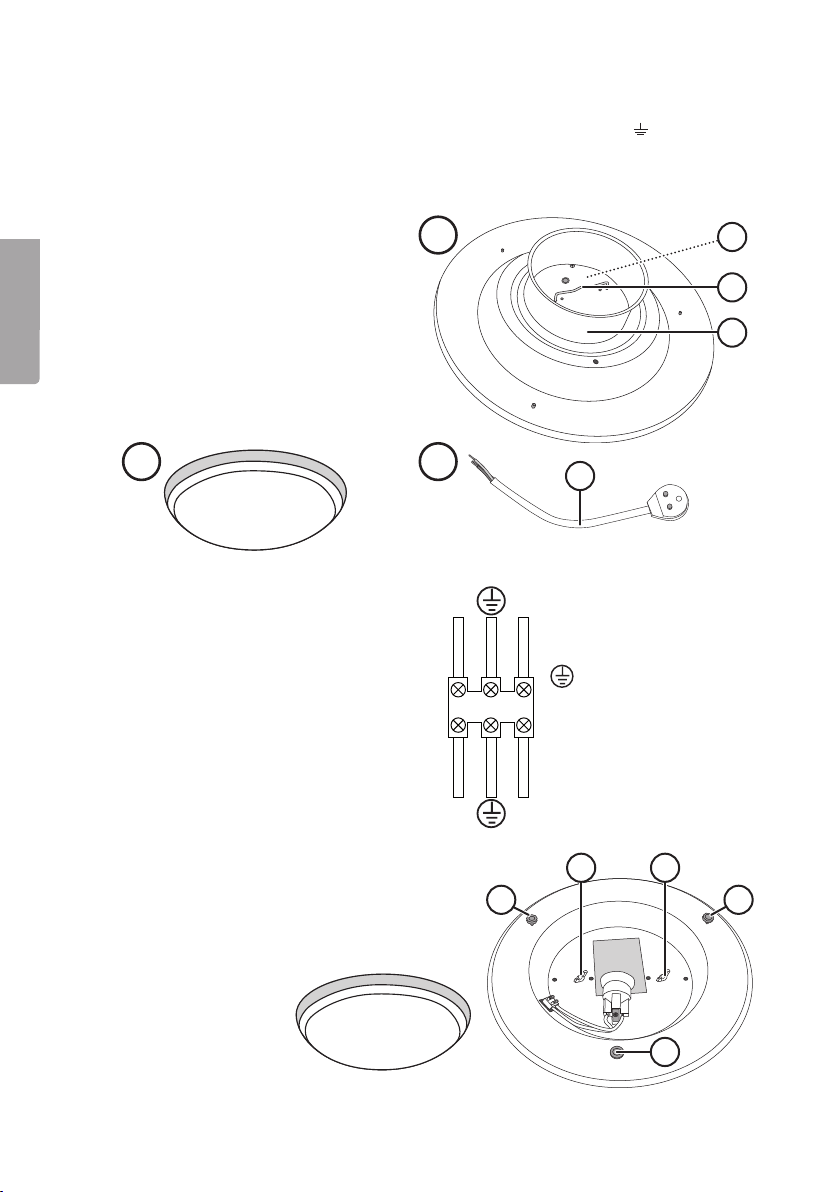
Description
1. Ceiling light fitting with attached terminal
block (a) and hanging bracket (b) plus
separate distance ring (c)
2. Glass diffuser
3. Lamp plug and cable (d)
Theinstallation should only be performed
by those with knowledge of electrical
wiring. If unsure, contact aqualified
electrician. Carefully read theinstructions
before theinstallation.
2 3
Caution! Closely check that thepower is
shut off before starting theinstallation.
1. Connect thelamp plug’s wires (d) to
theterminal block (a) according to
thewiring diagram.
2. Place the distance ring (c) on top of
the light fitting. Plug the lamp plug into
the ceiling socket.
3. Hang thelight onto theceiling hook.
4. Attach the fitting securely to the ceiling
by tightening the wing nuts (e) on the
hanging bracket.
5. Screw in alight bulb (max 60 W, E27).
6. Unscrew one of thediffuser’s retainers (f).
Mount theglass diffuser. Refit thescrew
and tighten ensuring that thediffuser sits
securely in place.
1
Ceiling cable
N
N
Wires to the light source
L
Connection block
L = Live (Brown)
N = Neutral (Blue)
L
f f
a
b
c
d
= Earth (Yellow-Green)
e e
f
4
Page 5

Installation instructions for UK model types art.no 36-1000,
36-1005 (without distance ring)
Caution! Always turn off thepower before beginning theinstallation.
• This light fitting is intended for fixed installation.
• This light fitting is intended for installation onto aceiling.
• Thepower supply cable must have aprotective earth wire (green-yellow) which is to be
connected to theEarth
Description
1. Light fixture with mounted terminal block (a)
2. Glass diffuser
3. Heat protective wire insulators (g)
4. Screws and plugs
terminal on theterminal block as shown on thewiring diagram.
1
a
English
2
3 4
g
5
Page 6

English
Theinstallation should only be performed by those with knowledge of electrical wiring. If unsure,
contact aqualified electrician. Carefully read theinstructions before theinstallation.
Caution! Closely check that thepower is shut off before starting theinstallation.
1. Fasten theceiling light onto theceiling in
anappropriately secure manner.
Use theincluded screws.
2. For ceilings made of concrete or similar
material: Use thelight fixture’s base as
atemplate and mark out where thedesired
mounting holes are to be drilled. Drill two
6 mm mounting holes, insert anchor plugs
into theholes and use theincluded screws
for mounting thelight fixture securely onto
theceiling. Watch out for hidden pipes or
electrical wiring.
3. Thread theincluded wire insulators (h) over
theincoming mains electrical wires. Then
connect these wires to theterminal block (g)
according to thewiring diagram.
4. Screw in alight bulb (max 60 W, E27).
5. Unscrew one of thediffuser’s retainers (f).
Mount theglass diffuser. Refit thescrew
and tighten, ensuring that thediffuser sits
securely in place.
Ceiling cable
N
N
Wires to the light source
L
Connection block
L = Live (Brown)
N = Neutral (Blue)
L
= Earth (Yellow-Green)
Care and maintenance
• Switch off thepower to theceiling light before cleaning.
• Clean thelight using asoft, damp cloth. Use amild detergent. Never use solvents or strong,
abrasive cleaning agents. These could possibly damage theproduct.
Disposal
This product should be disposed of in accordance with local regulations.
If you are unsure how to proceed, contact your local council.
Specifications
Max bulb wattage 60 W, E27 (sold separately)
Input voltage 220–240 VAC, 50 Hz
Diam 31 cm
Class 1, IP20 (this light fitting must be earthed)
6
Page 7
Takplafond
Art.nr 32-1203, 32-8614 Modell OCL-564-2BC(CLAS), OCL-564-2W(CLAS)
36-1000, 36-1005 OCL-564-1BC(CLAS), OCL-564-1W(CLAS)
Läs igenom hela bruksanvisningen före användning och spara den sedan för framtida bruk.
Vi reserverar oss för ev. text- och bildfel samt ändringar av tekniska data.
Vid tekniska problem eller andra frågor, kontakta vår kundtjänst.
Säkerhet
Ljuskälla: 220–240 V AC, E27, max 60 W
Varning!
• Avsedd för användning inomhus iomgivningstemperatur upp till 25 ºC.
• Stäng av takplafonden före byte av ljuskälla.
• Ljuskällan kan bli mycket varm under användning, låt den svalna före byte.
• Kontakta enkvalificerad elektriker om du är det minsta osäker på installation eller hantering
av takplafonden.
• Takplafonden har skyddsklass 1 och måste därför anslutas till jord.
• Alla armaturer måste monteras och anslutas på ettkorrekt sätt för att inte utgöra livsfara.
Varningssymboler
Endast avsedd för inomhusbruk (IP20) och får inte komma
ikontakt med vatten eller fukt.
Svenska
Om glaset är skadat måste det genast bytas ut.
Installation
Obs! Takplafonden finns itvå olika modeller som ska monteras på olika sätt.
Art.nr 32-1203, 32-8614 för SE, FI och NO (med stödring)
Art.nr 36-1000, 36-1005 för UK (utan stödring)
Installationsanvisning för modellerna för SE, FI och NO,
art.nr 32-1203 och 32-8614 (med stödring)
Varning! Bryt alltid strömmen innan installationen påbörjas.
7
Page 8
• Takplafonden är avsedd för fast installation.
• Takplafonden är avsedd för att monteras itak.
• Inkommande kabel måste ha enjordkabel (gul/grön) som ska anslutas till jord på kopplingsplinten enligt kopplingsschema.
Beskrivning
1. Armatur med monterad kopplingsplint
(a), samt upphängningsbygel (b) och
lös stödring (c).
2. Glas
3. Anslutningskabel med kontakt (d)
1
a
b
Svenska
Endast person med erforderliga kunskaper
om elinstallationer får utföra installationen.
Saknas denna kunskap, kontakta behörig
fackman. Läs noga genom bruksanvisningen
innan installation.
Varning! Kontrollera noggrant att strömmen
är frånslagen innan installationen påbörjas.
1. Anslut den bifogade anslutnings kabeln
2. Lägg stödringen (c) på ovansidan av
3. Häng upp armaturen på takkroken.
4. Spänn fast armaturen mot taket
5. Montera ljuskälla (max 60 W, E27).
6. Skruva ur enav skruvarna (f) på under-
2 3
(d) till kopplingsplinten (a) enligt
kopplingsschemat.
armaturen. Sätt i anslutningskabelns
kontakt i motsvarande kontakt i taket.
genom att dra åt vingmuttrarna (e) på
upphängningsbygeln.
sidan av armaturen. Montera glaset.
Dra fast skruven och kontrollera att
glaset sitter fast.
Ledningar från tak
N
N
L
L
Ljuskälla
f f
c
d
Kopplingsplint
= Jord (gul/grön)
L = Fas (brun)
N = Nolla (blå)
e e
f
8
Page 9

Installationsanvisning för UK-modellerna, art.nr 36-1000 och
36-1005 (utan stödring)
Varning! Bryt alltid strömmen innan installationen påbörjas.
• Takplafonden är avsedd för fast installation.
• Takplafonden är avsedd för att monteras itak.
• Inkommande kabel måste ha enjordkabel (gul/grön) som ska anslutas till jord
lingsplinten enligt kopplingsschema.
Beskrivning
1. Armatur med monterad kopplingsplint (a)
2. Glas
3. Värmeskydd till kablarna (g)
4. Skruv och plugg
1
a
2
3 4
Svenska
på kopp-
g
9
Page 10

Endast person med erforderliga kunskaper om elinstallationer får utföra installationen. Saknas
denna kunskap, kontakta behörig fackman. Läs noga genom bruksanvisningen innan installation.
Varning! Kontrollera noggrant att strömmen är frånslagen innan installationen påbörjas.
1. Fäst plafonden itaket på lämpligt sätt.
2. Om taket är av betong eller liknande.
Svenska
3. Dra på de bifogade värmeskydden (h)
4. Montera ljuskälla (max 60 W, E27).
5. Skruva ur enav skruvarna (f) på undersidan
Skötsel och underhåll
• Bryt strömmen till takplafonden innan rengöring.
• Torka av den med enlätt fuktad, mjuk trasa. Använd ettmilt rengöringsmedel,
Avfallshantering
När du ska göra dig av med produkten ska detta ske enligt lokala föreskrifter.
Är du osäker på hur du ska gå tillväga, kontakta din kommun.
Använd de bifogade skruvarna.
Använd armaturen som mall och märk ut var
fästhålen ska borras. Borra två 6 mm-hål,
tryck ipluggarna och skruva fast armaturen
itaket med de bifogade skruvarna. Se upp
för gömda ledningar eller rör.
på kablarna. Anslut anslutningskablarna
från taket till kopplingsplinten (g) enligt
kopplingsschemat.
av armaturen. Montera glaset. Dra fast
skruven och kontrollera att glaset sitter fast.
aldrig lösningsmedel eller starka, slipande rengöringsmedel. Det kan skada produkten.
Ledningar från tak
N
N
L
L
Ljuskälla
Kopplingsplint
= Jord (gul/grön)
L = Fas (brun)
N = Nolla (blå)
Specifikationer
Maxeffekt ljuskälla 60 W, E27 (säljs separat)
Drivspänning 220–240 V AC, 50 Hz
Mått Ø 31 cm
Klass l, IP 20 (belysningen måste skyddsjordas)
10
Page 11

Takplafond
Art.nr. 32-1203, 32-8614 Modell OCL-564-2BC(CLAS), OCL-564-2W(CLAS)
36-1000, 36-1005 OCL-564-1BC(CLAS), OCL-564-1W(CLAS)
Les brukerveiledningen grundig før produktet tas i bruk og ta vare på den for framtidig bruk.
Vi reserverer oss mot ev. feil i tekst og bilde, samt forandringer av tekniske data.
Ved tekniske problemer eller spørsmål, ta kontakt med vårt kundesenter.
Sikkerhet
Montering av fast installasjon skal utføres av registrert installasjonsvirksomhet.
Lyskilde: 220–240 V AC; E27; maks 60 W
Advarsel!
• Beregnet til innendørs bruk i temperatur opp til 25 ºC.
• Skru av lampen før skifte av lyskilde.
• Lyskilden blir svært varm ved bruk, så la den avkjøles før du skifter den.
• Hvis du er usikker på noe, ta kontakt med en faglært elektriker.
• Taklampen har beskyttelsesklasse 1 og må derfor kobles til jord.
• Alle armaturer må monteres og kobles korrekt. Hvis ikke utgjør det stor fare for liv og helse.
Varslingssymboler
Kun beregnet til bruk innendørs (IP20) og må ikke komme i kontakt
med vann eller fuktighet.
Norsk
Hvis lampeglasset er skadet må det erstattes.
Installasjon
Obs! Taklampen finnes i to forskjellige modeller, og disse skal monteres forskjellig.
Art. nr. 32-1203, 32-8614 for SE, FI og NO (med støttering)
Art. nr. 36-1000, 36-1005 for UK (uten støttering)
Installasjonsanvisning for modellene for SE, FI og NO,
art.nr. 32-1203 og 32-8614 (med støttering)
Advarsel! Skru alltid av sikringen eller hovedstrømbryteren
før installasjon starter.
11
Page 12

• Lampen er beregnet til fast installasjon, og all fast installasjon skal utføres av registrert
installasjonsvirksomhet.
• Lampen er beregnet for montering i tak.
• Innkommende kabel må ha en jordkabel (gul/grønn) som skal kobles til jord på koblingsplinten, som vist på koblingsskjemaet.
Beskrivelse
1. Armatur med påmontert koblingsplint
(a), i tillegg til opphengsbøyle (b) og løs
støttering (c).
2. Glass
3. Tilkoblingskabel med kontakt (d)
Kun personer med nødvendig kunnskap og
fagutdannelse innen el-installasjon kan utføre
denne monteringen. Hvis du mangler denne
kunnskapen, kontakt fagperson. Les nøye
gjennom bruksanvisningen før installasjonen.
1
a
b
c
Norsk
2 3
Advarsel! Kontroller nøye at strømmen er koblet
fra, før installasjonen påbegynnes.
1. Den medfølgende tilkoblingskabelen (d)
kobles til koblingsplinten (a) som vist
i koblingsskjemaet. (dette gjelder kun hvis
det er kontakt i taket. Hvis ikke kobles
ledningen i taket direkte til koblingsplinten).
2. Legg støtteringen (c) på oversiden av armaturen. Sett tilkoblingsledningens kontakt i
tilsvarende kontakt i taket.
3. Heng deretter opp armaturen på takkroken.
4. Spenn fast armaturen mot taket ved å dra til
vingemutrene (e) på opphengsbøylen.
5. Monter pæren (maks. 60 W, E27).
6. Skru ut en av skruene (f) som sitter
på undersiden av armaturen. Monter
glasset. Trekk til skruen og kontroller at
glasset sitter fast.
Ledninger fra tak
N
N
L
L
Lyskilde
f f
d
Koblingsplint/sukkerbit
= Jord (gul/grønn)
L = Brun
N = Blå
e e
f
12
Page 13

Installasjonsanvisning for UK-modellene, art. nr. 36-1000 og
36-1005 (uten støttering)
Advarsel! Skru alltid av strømmen før installasjon starter.
• Lampen er beregnet til fast installasjon, og all fast installasjon skal utføres av registrert
installasjonsvirksomhet.
• Lampen er beregnet for montering i tak.
• Innkommende kabel må ha en jordkabel (gul/grønn) som skal kobles til jord
plinten, som vist på koblingsskjemaet.
på koblings-
Beskrivelse
1. Armatur med påmontert koblingsplint (a)
2. Glass
3. Varmebeskyttelse til kablene (g)
4. Skrue og plugg
1
a
2
3 4
g
Norsk
13
Page 14

Norsk
Kun personer med nødvendig kunnskap og fagutdannelse innen el-installasjon kan utføre denne
monteringen. Hvis du mangler denne kunnskapen, kontakt fagperson. Les nøye gjennom bruksanvisningen før installasjonen.
Advarsel! Kontroller nøye at strømmen er koblet fra før installasjonen påbegynnes.
1. Fest taklampen i taket på en gunstig måte.
Bruk de medfølgende skruene.
2. Hvis taket er av betong eller liknende
materiale: Bruk armaturen som mal og merk
hvor hullene skal bores. Bore to stk. 6 mm
hull. Press pluggene inn og fest armaturen
i taket med de vedlagte skruene. Se opp for
skjulte ledninger og rø.
3. Dra på de medfølgende varmebeskyttelsene (h)
på kablene. Tilkoblingskablene kobles
fra taket til koblingsplinten (g) som vist
i koblingsskjemaet.
4. Monter pæren (maks. 60 W, E27).
5. Skru ut en av skruene (f) som sitter på undersiden av armaturen. Monter glasset. Trekk til
skruen og kontroller at glasset sitter fast.
Ledninger fra tak
N
N
L
L
Lyskilde
Koblingsplint/sukkerbit
= Jord (gul/grønn)
L = Brun
N = Blå
Stell og vedlikehold
• Kutt strømmen til lampen før rengjøring.
• Tørk den med en myk, lett fuktet klut. Bruk et mildt rengjøringsmiddel ved behov.
Unngå å bruke løsemidler og slipende rengjøringsmidler. Det kan skade produktet.
Avfallshåndtering
Når produktet skal kasseres, må det skje i henhold til lokale forskrifter.
Hvis du er usikker, ta kontakt med lokale myndigheter.
Spesifikasjoner
Maks effekt lyskilde 60 W E27(selges separat)
Spenning 220–240 V AC, 50 Hz
Mål Ø 31 cm
Klasse 1, IP 20 (belysningen skal jordes)
14
Page 15

Kattoplafondi
Tuotenro 32-1203, 32-8614 Malli OCL-564-2BC(CLAS), OCL-564-2W(CLAS)
36-1000, 36-1005 OCL-564-1BC(CLAS), OCL-564-1W(CLAS)
Lue käyttöohje ennen tuotteen käyttöönottoa ja säilytä se tulevaa tarvetta varten. Pidätämme
oikeuden teknisten tietojen muutoksiin. Emme vastaa mahdollisista teksti- tai kuvavirheistä.
Jos laitteeseen tulee teknisiä ongelmia, ota yhteys myymälään tai asiakaspalveluun.
Turvallisuus
Lamppu: 220–240 V AC, E27, maks. 60 W
Varoitus!
• Sopii sisäkäyttöön alle 25 ºC:n lämpötilassa.
• Sammuta valaisin ennen lampun vaihtamista.
• Lamppu kuumenee käytössä. Anna sen jäähtyä ennen vaihtamista.
• Ota yhteys valtuutettuun huoltoliikkeeseen, jos et ole varma kuinka asennus tehdään tai
kuinka valaisinta käsitellään.
• Kattovalaisin on suojaluokan 1 valaisin ja se tulee aina maadoittaa.
• Valaisimet tulee asentaa asianmukaisesti. Väärin asennetut valaisimet voivat aiheuttaa hengenvaaran.
Varoitussymbolit
Vain sisäkäyttöön (IP20). Ei saa joutua kosketuksiin veden
tai kosteuden kanssa.
Suomi
Viallinen lasi tulee vaihtaa.
Asennus
Huom.! Kattoplafondista on olemassa kaksi erilaista mallia, ja ne asennetaan eri tavoilla.
Tuotenumerot 32-1203, 32-8614 SE, FI ja NO (malleissa tukirengas)
Tuotenumerot 36-1000, 36-1005 UK (ilman tukirengasta)
Asennusohjeet malleille SE, FI ja NO, tuotenumerot 32-1203,
32-8614 (malleissa tukirengas)
Varoitus! Katkaise sähkövirta aina ennen asennuksen aloittamista.
15
Page 16

• Valaisin on tarkoitettu kiinteään asennukseen.
• Valaisin asennetaan kattoon.
• Sisääntulevassa johdossa tulee olla maadoitusjohto (keltavihreä), joka liitetään liitinriman
maaliitäntään kytkentäkaavion mukaisesti.
Kuvaus
1. Valaisin, jossa asennettuna liitinrima (a),
ripustussanka (b) ja irrallinen tukirengas (c).
2. Lasi
3. Liitäntäjohto jossa liitin (d)
Asennuksen saa suorittaa ainoastaan henkilö,
joilla on riittävät taidot sähköasennuksien
tekemiseen. Jos sinulla ei ole riittäviä taitoja,
ota yhteys ammattilaiseen. Lue käyttöohje
huolella ennen asennusta.
1
a
b
c
Suomi
2 3
Varoitus! Varmista ennen asennuksen
aloittamista, että virta on pois päältä.
1. Liitä mukana tullut liitäntäjohto (d)
liitinrimaan (a) kytkentäkaavion
osoittamalla tavalla.
2. Laita tukirengas (c) valaisimen päälle.
Liitä liitäntäjohdon liitin vastaavaan
liitäntään kattoon.
3. Ripusta valaisin kattokoukkuun.
4. Kiristä valaisin kattoon kiristämällä
ripustussangan siipimutterit (e).
5. Asenna lamppu (maks. 60 W, E27).
6. Ruuvaa auki yksi valaisimen alla olevista
ruuveista (f). Asenna lasi paikalleen.
Kiristä ruuvi ja varmista, että lasi on
kunnolla kiinni.
Katossa olevat johdot
N
N
Valaisimen johtimet
L
L
f f
d
Kytkentärima
= Maa (Keltainen/Vihreä)
L = Vaihe (Ruskea)
N = Nolla (Sininen)
e e
16
f
Page 17

Asennnusohjeet UK-malleille, tuotenumerot 36-1000,
36-1005 (ilman tukirengasta)
Varoitus! Katkaise sähkövirta aina ennen asennuksen aloittamista.
• Valaisin on tarkoitettu kiinteään asennukseen.
• Valaisin asennetaan kattoon.
• Sisääntulevassa johdossa tulee olla maadoitusjohto (keltavihreä), joka liitetään liitinriman
maaliitäntään
Kuvaus
1. Valaisin, jossa asennettu liitinrima (a)
2. Lasi
3. Johtojen lämpösuoja (g)
4. Ruuvi ja tulppa
kytkentäkaavion mukaisesti.
1
a
Suomi
17
2
3 4
g
Page 18

Asennuksen saa suorittaa ainoastaan henkilö, joilla on riittävät taidot sähköasennuksien tekemiseen.
Jos sinulla ei ole riittäviä taitoja, ota yhteys ammattilaiseen. Lue käyttöohje huolella ennen asennusta.
Varoitus! Varmista ennen asennuksen aloittamista, että virta on pois päältä.
1. Kiinnitä plafondi kattoon sopivalla tavalla.
Käytä mukana tulevia ruuveja.
2. Jos asennat valaisimen betonikattoon
tai vastaavaan, käytä valaisinta mallina
ja merkitse reikien paikat. Poraa kaksi 6
mm:n reikää, paina tulpat reikiin ja ruuvaa
valaisin kattoon mukana tulevilla ruuveilla.
Varmista, että katossa ei ole sähköjohtoja tai
vesiputkia.
3. Vedä mukana tulevat lämpösuojat (h) kaapeleiden päälle. Liitä liitäntäkaapelit liitinrimaan
(g) kytkentäkaavion osoittamalla tavalla.
4. Asenna lamppu (maks. 60 W, E27).
5. Ruuvaa auki yksi valaisimen alla olevista
ruuveista (f). Asenna lasi paikalleen. Kiristä
ruuvi ja varmista, että lasi on kunnolla kiinni.
Katossa olevat johdot
N
N
Valaisimen johtimet
L
L
Kytkentärima
= Maa (Keltainen/Vihreä)
L = Vaihe (Ruskea)
N = Nolla (Sininen)
Huolto ja puhdistaminen
• Katkaise valaisimen virta ennen valaisimen puhdistamista.
• Pyyhi valaisin kevyesti kostutetulla pehmeällä liinalla. Käytä mietoa puhdistusainetta.
Älä käytä vahvoja, hankaavia puhdistusaineita tai liuotinaineita. Ne voivat vahingoittaa laitetta.
Suomi
Kierrättäminen
Kierrätä tuote asianmukaisesti, kun poistat sen käytöstä.
Tarkempia kierrätysohjeita saat kuntasi jäteneuvonnasta.
Tekniset tiedot
Lampun suurin teho 60 W, E27 (myydään erikseen)
Käyttöjännite 220–240 V AC, 50 Hz
Mitat Ø 31 cm
Luokka l, IP 20 (valaisin tulee suojamaadoittaa)
18
Page 19

Deckenleuchte
Art.Nr 32-1203, 32-8614 Modell OCL-564-2BC(CLAS), OCL-564-2W(CLAS)
36-1000, 36-1005 OCL-564-1BC(CLAS), OCL-564-1W(CLAS)
Vor Inbetriebnahme dieBedienungsanleitung vollständig durchlesen und für künftigen Gebrauch
aufbewahren. Irrtümer, Abweichungen und Änderungen behalten wir uns vor. Bei technischen
Problemen oder anderen Fragen freut sich unser Kundenservice über eine Kontaktaufnahme.
Sicherheitshinweise
Leuchtmittel: 220–240 V AC, E27, max. 60 W
Warnung:
• Vorgesehen für dieBenutzung im Innenbereich bei einer Umgebungstemperatur bis 25 °C.
• Vor dem Wechsel des Leuchtmittels dieDeckenleuchte ausschalten.
• DasLeuchtmittel kann im Betrieb heiß werden, vor dem Austauschen daher erst abkühlen lassen.
• Bei der geringsten Unsicherheit bei der Installation oder Handhabung einen qualifizierten
Elektriker kontaktieren.
• DieDeckenleuchte hat Schutzklasse Iund muss daher direkt andieErdung angeschlossen werden.
• Zur Vermeidung lebensbedrohlicher Gefahren ist es wichtig, dass alle Leuchten korrekt
montiert und angeschlossen werden.
Warnsymbole
Nur für den Innenbereich geeignet (IP20), darf nicht in Kontakt mit
Wasser oder Feuchtigkeit gelangen.
Bei Beschädigungen am Glas dieses sofort austauschen.
Installation
Hinweis: DieDeckenleuchte ist in zwei versch. Modellen erhältlich, dienicht auf dieselbe Weise
montiert werden.
Art.Nr. 32-1203, 32-8614 für SE, FI und NO (mit Stützring)
Art.Nr. 36-1000, 36-1005 für UK (ohne Stützring)
Installationsanleitung für dieModelle für SE, FI und NO,
Art.Nr. 32-1203, 32-8614 (mit Stützring)
Warnung: Vor Aufnahme der Installation immer erst den Strom abschalten.
19
Deutsch
Page 20

• DieLeuchte ist zur Festinstallation vorgesehen.
• DieLeuchte ist für dieDeckenmontage vorgesehen.
• Zuführende Leiter müssen einen Schutzleiter (gelbgrün) haben, der andieErdungsklemme
ander Lüsterklemme angeschlossen wird, siehe Schaltplan.
Beschreibung
1. Leuchte mit montierter Lüsterklemme
(a) sowie Aufhängebügel (b) und losem
Stützring (c).
2. Glasschirm
3. Anschlusskabel mit Stecker (d)
1
a
b
Solche Installationen nur von Personen mit ausreichenden Kenntnissen über Elektroinstallationen
durchführen lassen. Sind dieKenntnisse nicht
ausreichend unbedingt einen qualifizierten
Fachmann kontaktieren. Vor der Installation
dieBedienungsanleitung gründlich lesen.
Warnung! Vor der Installation unbedingt sicherstellen, dass der Strom abgeschaltet ist.
1. Dasmitgelieferte Anschlusskabel (d)
2. Den Stützring (c) auf die Oberseite
3. DieLeuchte am Deckenhaken einhängen.
4. Die Flügelmuttern (e) des Aufhänge-
Deutsch
5. Ein geeignetes Leuchtmittel einschrauben
6. Eine der Schrauben (f) ander Unterseite
2 3
andieLüsterklemme (a) wie auf dem
Schaltplan beschrieben anschließen.
der Leuchte legen. Den Stecker des
Anschlusskabels in den entsprechenden
Anschluss an der Decke stecken.
bügels festziehen um die Leuchte an
der Decke festzuspannen.
(max. 60 W, E27).
der Leuchte herausschrauben. DasLeuchtenglas montieren. DieSchraube festdrehen
und sicherstellen,
dass dasLeuchtenglas
fest sitzt.
d
Leitungen an der Decke
N
N
L
Lüsterklemme
= Schutzleiter (gelb/grün)
L = Außenleiter (braun)
N = Neutralleiter (blau)
L
Lichtquelle
e e
f f
c
20
f
Page 21

Installationsanleitung für dieUK-Modelle, Art.Nr. 36-1000,
36-1005 (ohne Stützring)
Warnung: Vor Aufnahme der Installation immer erst den Strom abschalten.
• DieLeuchte ist zur Festinstallation vorgesehen.
• DieLeuchte ist für dieDeckenmontage vorgesehen.
• Zuführende Leiter müssen einen Schutzleiter (gelbgrün) haben, der andieErdungsklemme
ander Lüsterklemme angeschlossen wird, siehe Schaltplan.
Beschreibung
1. Leuchte mit montierter Lüsterklemme (a)
2. Glasschirm
3. Hitzeschutz für dieKabel (g)
4. Schrauben und Dübel
1
a
21
2
Deutsch
3 4
g
Page 22

Solche Installationen nur von Personen mit ausreichenden Kenntnissen über Elektroinstallationen
durchführen lassen. Sind dieKenntnisse nicht ausreichend unbedingt einen qualifizierten
Fachmann kontaktieren. Vor der Installation dieBedienungsanleitung gründlich lesen.
Warnung! Vor der Installation unbedingt sicherstellen, dass der Strom abgeschaltet ist.
1. DieDeckenleuchte auf eine geeignete Weise
ander Decke befestigen. Diemitgelieferten
Schrauben verwenden.
2. Falls dieDecke aus Beton oder einem ähnlichen Material ist: DieLeuchte als Schablone
benutzen und dieBohrlöcher markieren.
Zwei 6 mm große Löcher bohren, dieDübel
hineindrücken und dieLeuchte mit den
mitgelieferten Schrauben ander Decke
festschrauben. Auf versteckte Leitungen
oder Rohre achten.
3. Diemitgelieferten Hitzeschutzvorrichtungen
(h) über dieKabel ziehen.
DieAnschlusskabel von der Decke gemäß
dem Schaltplan ander Lüsterklemme (g)
anschließen.
4. Ein geeignetes Leuchtmittel einschrauben (max. 60 W, E27).
5. Eine der Schrauben (f) ander Unterseite der Leuchte herausschrauben. DasLeuchtenglas
montieren. DieSchraube festdrehen und sicherstellen, dass dasLeuchtenglas fest sitzt.
Leitungen an der Decke
N
N
L
Lüsterklemme
= Schutzleiter (gelb/grün)
L = Außenleiter (braun)
N = Neutralleiter (blau)
L
Lichtquelle
Pflege und Wartung
• Vor der Reinigung dieStromzufuhr unterbrechen.
• DasProdukt mit einem weichen, leicht befeuchteten Tuch reinigen. Keine scharfen Chemikalien,
Reinigungslösungen oder starke Reinigungsmittel verwenden. Dies kann dasProdukt beschädigen.
Hinweise zur Entsorgung
Bitte dasProdukt entsprechend den lokalen Bestimmungen entsorgen. Weitere Informationen
sind von der Gemeinde oder den kommunalen Entsorgungsbetrieben erhältlich.
Deutsch
Technische Daten
Max. Leistung Leuchtmittel 60 W, E27 (separat erhältlich)
Betriebsspannung 220–240 V AC, 50 Hz
Maße Ø 31 cm
Schutzklasse I, IP20 (muss geerdet werden)
22
Page 23

23
Page 24

Sverige
Kundtjänst tel: 0247/445 00
fax: 0247/445 09
e-post: kundservice@clasohlson.se
Internet www.clasohlson.se
Post Clas Ohlson AB, 793 85 INSJÖN
Norge
Kundesenter tlf.: 23 21 40 00
faks: 23 21 40 80
e-post: kundesenter@clasohlson.no
Internett www.clasohlson.no
Post Clas Ohlson AS, Postboks 485 Sentrum, 0105 OSLO
Suomi
Asiakaspalvelu puh.: 020 111 2222
sähköposti: asiakaspalvelu@clasohlson.fi
Internet www.clasohlson.fi
Osoite Clas Ohlson Oy, Maistraatinportti 4 A, 00240 HELSINKI
Great Britain
Customer Service contact number: 020 8247 9300
e-mail: customerservice@clasohlson.co.uk
Internet www.clasohlson.co.uk
Postal 10 – 13 Market Place
Kingston Upon Thames
Surrey
KT1 1JZ
Deutschland
Kundenservice Unsere Homepage www.clasohlson.de besuchen und
auf Kundenservice klicken.
 Loading...