

Page 1
USB/SD Car Stereo
Bilstereo m. USB/SD
Bilstereo m. USB/SD
Autostereo usb/sd
EnglishSvenskaNorskSuomi
Art.no Model
38-4218
NCD-7602
Ver. 201012
Page 2

2
Page 3

USB/SD Car Stereo
Art.no 38-4218 Model NCD-7602
Please read the entire instruction manual before using the product and save it
for future reference. We reserve the right for any errors in text or images and any
necessary changes made to technical data. If you have any questions regarding
technical problems please contact Customer Services.
Contents
1. Product description
2. Buttons och features
3. Connection
4. Installation
5. Operation
Radio
USB Memory/Memory Card MP3 Playback
6. Care and maintenance
7. Waste management
8. Specifications
1. Product description
Car stereo for USB memories/SD cards with MP3 players. RDS AM/FM radio. Remote
control. Detachable front panel. Displays ID3 tags. Power: 4x40 W. RCA line-out jack.
ISO connector.
English
3
Page 4
2 Buttons och features
1 2 3 4 5 6 7 8
English
9 10 11 12 13 14 15 16 17 18 19 20 21
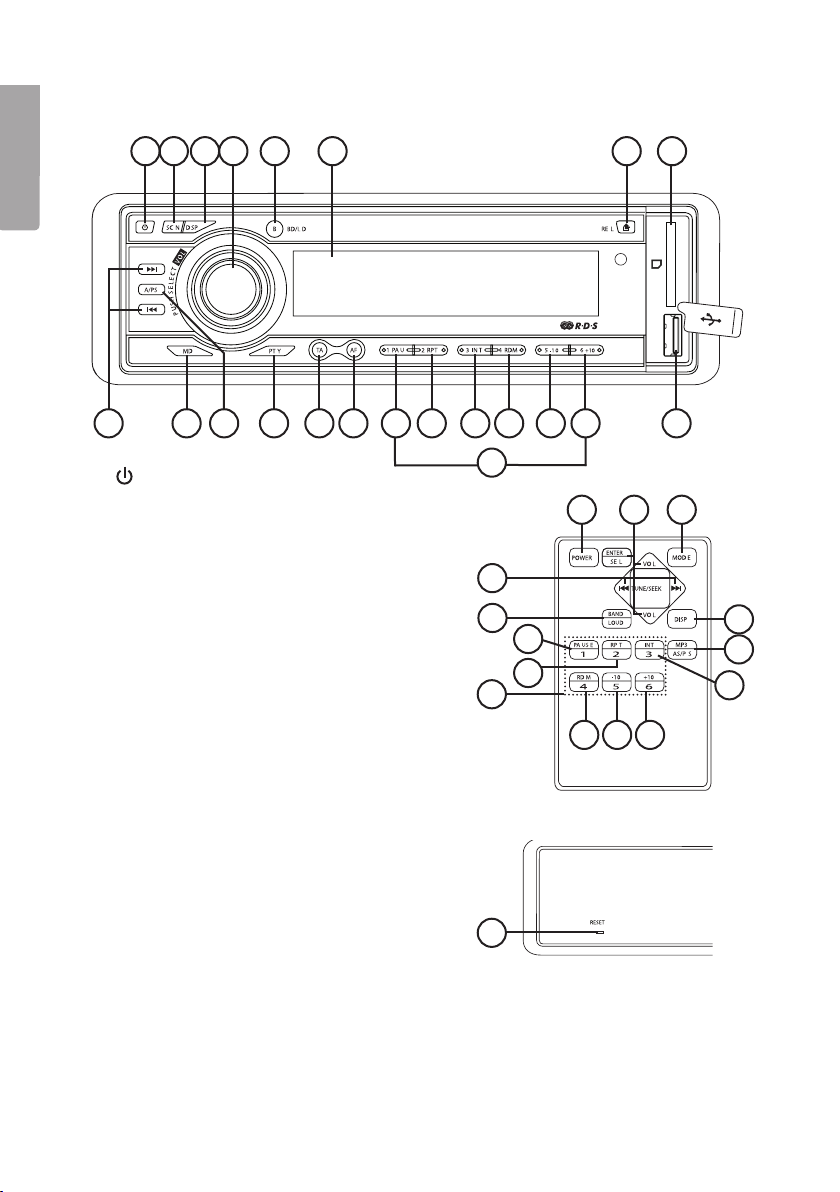
1. ON/OFF
2. SCN (Scan): Automatic radio station search
3. DSP: Display button
4. Select and control functions VOLUME, BASS,
TREBLE, BALANCE, FADER. Also controls
functions TA, PI, RETUNE, MASK, EON,
BEEP, TA VOL, ADJ and DSP
5. BD/LD: Band/loudness selector
6. LCD display
7. Front panel release button
8. Memory card slot
9. Automatic or manual station
search/track change
10. Playback selector
11. A/PS: Automatic station search/track search
12. PTY: Programme type selector
13. TA: Traffic announcement
14. AF: Alternative frequency
15. PAU: PAUSE
16. RPT: REPEAT
17. INT: INTRO
18. RDM: Random playback
19. 19, 20 Track search 10 tracks up/down
21. USB port
22. Preset stations (1, 2, 3, 4, 5, 6) in radio mode.
23. RESET (button is behind the front panel)
22
22
23
1 4 10
9
5
15
16
3
11
17
18 19 20
4
Page 5
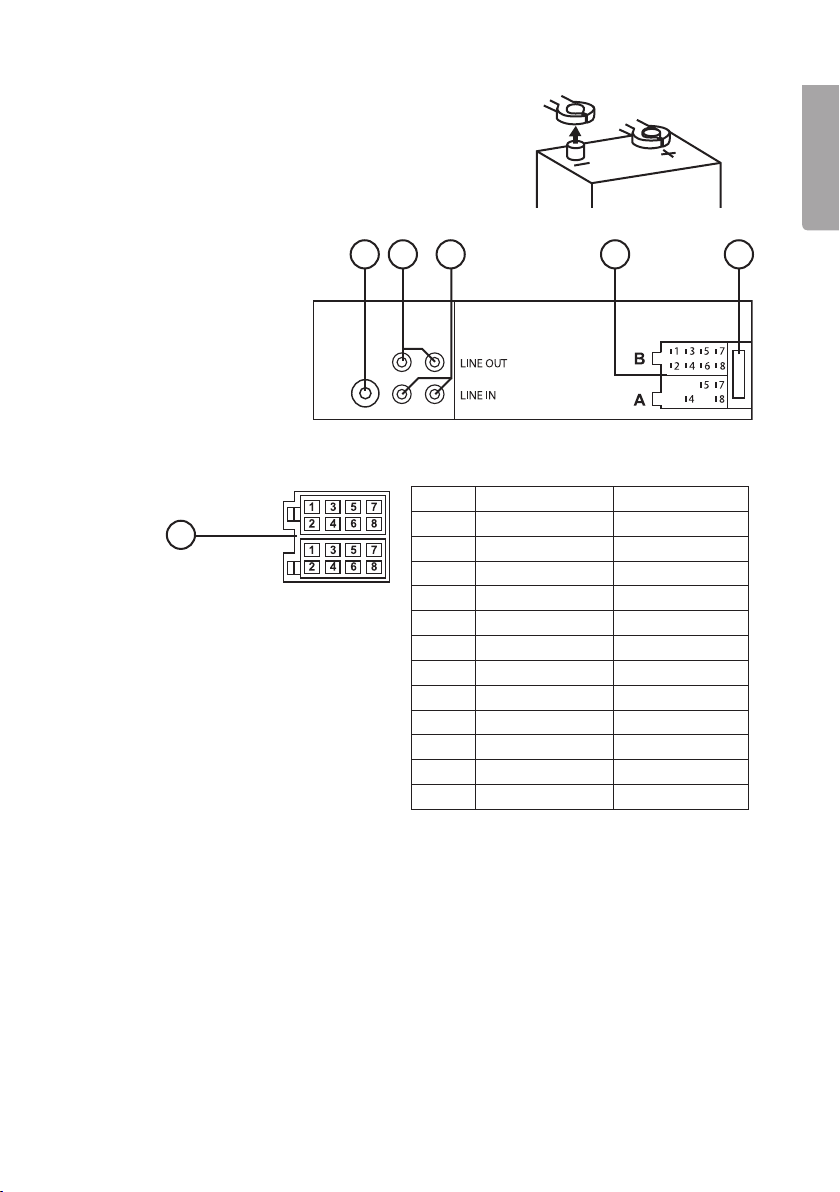
3. Connection
NB. Before beginning to install the stereo, make sure
that you first disconnect the negative lead from
the battery terminal post.
24 25 26 27 28
24. Aerial input
25. RCA LINE OUT
(red right, white left)
26. RCA LINE IN
(red right, white left)
27. ISO connector
28. Fuse 10 A
ISO connector
English
B
27
A
Push Pin Cable colour Connect to
A4 Yellow + 12 V permanent
A5 Blue Motorised aerial
A7 Red + 12 V via ignition
A8 Black (-) Earth
B1 Purple Rear right speaker (+)
B2 Purple with black stripe Rear right speaker (-)
B3 Grey Front right speaker (+)
B4 Grey with black stripe Front right speaker (-)
B5 White Front left speaker (+)
B6 White with black stripe Front left speaker (-)
B7 Green Rear left speaker (+)
B8 Green with black stripe Rear left speaker (-)
4 Installation
• Do not install the stereo in such a way that it could negatively affect traffic safety.
• Do not install the stereo where it might be exposed to high temperatures from
direct sunlight or heating systems.
• Do not install the stereo where it is exposed to excessive dust, dirt or
heavy vibrations.
• Only use the provided installation components.
5
Page 6
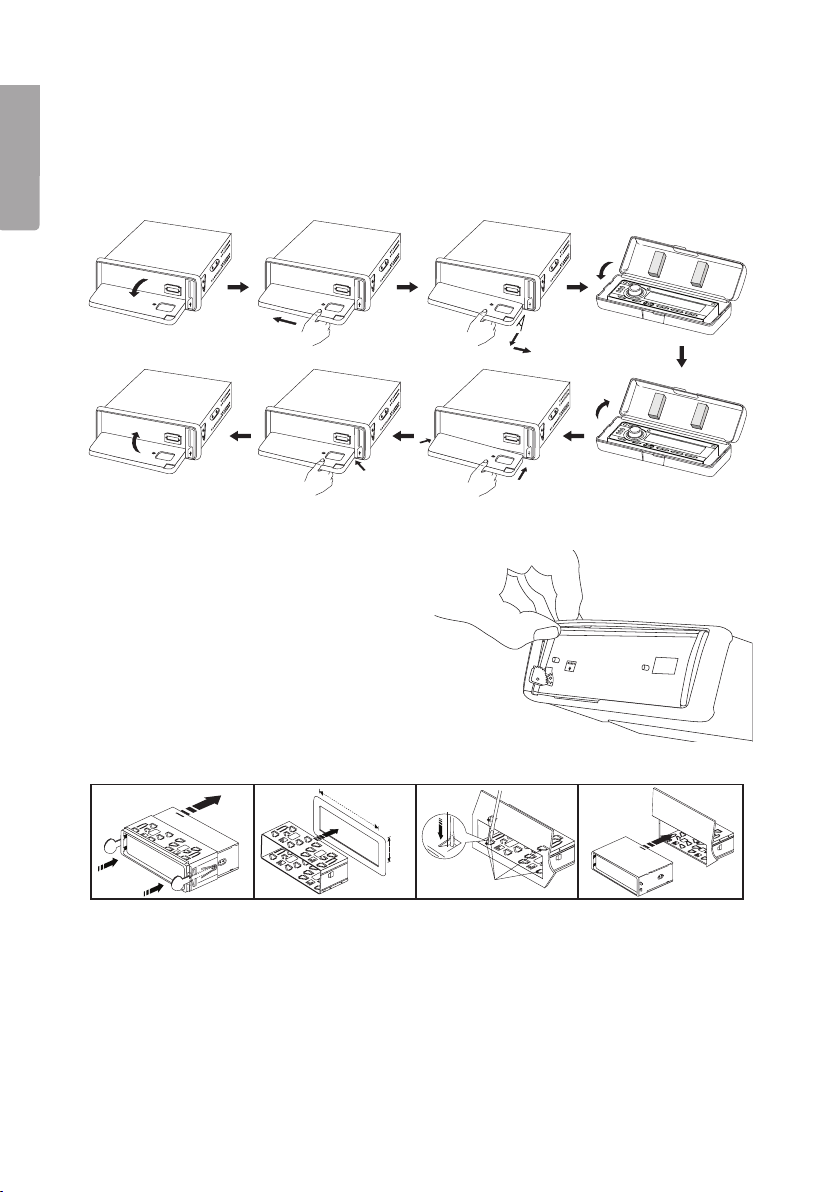
1. Remove the front panel by first pushing the release button (7). Allow the panel
to come entirely free of the console and then push it gently to the left.
2. The panel can now be pulled out, right side first. To return the front panel, reverse
the order of removal. Insert the left side first, then the right side and then push
English
the front panel in carefully until it clicks into place.
< 10°
1
2
3. Carefully remove the frame from
around the front panel by pressing
the upper corners upwards
and outwards.
4. Insert the two special keys to release
the catches and pull the frame off
the stereo.
5. Mount the frame into your console
and bend the metal tabs down to
lock it in place if necessary.
53mm
3
TAP
4
1
2
2
182mm
1
6. Carefully pull all the necessary cables out through the mounting opening
and connect them as instructed in the section Connecting.
7. Connect the cables using connecting blocks or crimped spade connectors.
Insulate all the connections using heat shrink sleeving or electrical tape.
8. Slide the stereo back into the frame until it click into place.
NB. Be careful not to crush any of the cables or damage the connections
when sliding the stereo in.
6
Page 7
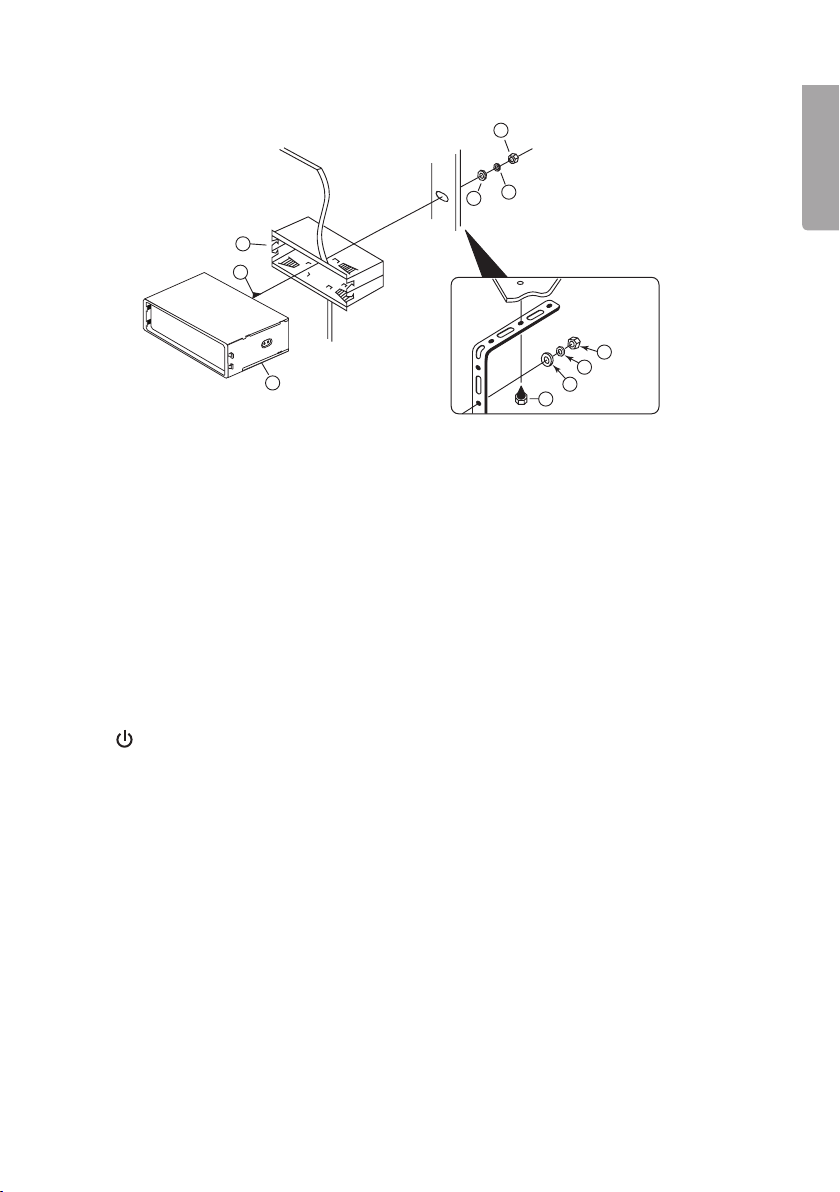
9. If necessary the stereo can even be supported with an extra, rear bracket.
4
5
6
3
2
4
5
6
7
1. Car stereo
2. Hex bolt M5 x 15 mm
3. Mounting frame
4. Hex nut M5
1
6. Plain washer
7. Self-tapping screw (make sure
that the screw does not damage
the car wiring during installation).
5. Lock washer
5 Operation
a) Radio
1. ON/OFF
Pressing this button turns the stereo on or off.
NB. The stereo can be turned on by pressing any button but can only be turned
off using the ON/OFF button.
English
2. SCN
Automatic tuning control. Each station is played for a few seconds. Pressing
the SCN button again during a scan will stop the scan so that you can listen to
the station.
3. DSP
Press this button to select what type of information is to be shown on the display:
radio frequency, clock, track, etc.
7
Page 8

4. Volume control/function selector
When the stereo is first switched on, this knob works as a volume control.
a. To select other functions, press the VOL knob briefly until the desired function
is shown on the display:
English
• VOL (volume)
• BASS
• TRB (treble)
• BAL (balance)
• FAD (fader, adjusts balance of sound between front and rear speakers).
Turning the VOL knob right or left will adjust the settings of these functions.
b. Press the VOL knob for at least 2 seconds to come to:
TA SEEK/ALARM – Turn the VOL knob to select:
• TA SEEK: The stereo searches for stations broadcasting traffic announcements.
• TA ALARM: The stereo emits a beep signal to alert the user that the current
station does not broadcast traffic announcements.
Press the VOL knob briefly to come to other functions in the following order:
PI SOUND/MUTE – Turn the VOL knob to select:
• PI SOUND: When two stations with different programme identifications (PI) are
on the frequency which is currently playing, the stereo switches to the new
station for a few seconds before switching back again.
• PI MUTE: The radio is muted for a few seconds instead of playing the new station.
RETUNE L/S – Turn the VOL knob to select:
• RETUNE L: TA search starts after 90 seconds.
• RETUNE S: TA search starts after 30 seconds.
MASK DPI/ALL – Turn the VOL knob to select:
• MASK DPI: Searches for all AF stations (alternative frequency) but masks (skips)
those with a different PI.
• MASK ALL: Masks all AF stations with different PI and RDS (RADIO DATA
SYSTEM) stations with weak signals, and automatically switches to
the transmitter broadcasting the desired station.
EON ON/OFF – Turn the VOL knob to select:
• EON function: This provides information about other stations and alternative
frequencies (Enhanced Other Networks).
BEEP ALL/2nd/OFF – Turn the VOL knob to select:
• BEEP ALL: Button sound is on permanently.
• BEEP 2nd: Button sound is on when button held down for at least 2 seconds.
• BEEP OFF: Button sound is off.
TA VOL – Turn the VOL knob to select the desired volume for the traffic
announcements.
ADJ – Clock set, turn the VOL knob to the right to set the hours and to the left to
set the minutes.
DSP – Turn the VOL knob to select one of the following equalizer settings: OFF,
FLAT, POP, ROCK, CLASSIC.
8
Page 9

5. BD/LD – Turn the VOL knob to select
Frequency band: Press the button briefly to select in order, FM1, FM2, FM3, M1,
and M2.
Loudness: Press and hold in this button for 2 seconds to select loudness ON/OFF.
6. LCD display
Shows the current state of the stereo.
7. Button to remove the front panel
Press the panel release button to remove the front panel.
8. Memory card slot
9. l◄◄ or ►►l Automatic or manual tuning
• A short press on one of these buttons will start a search for a radio station
at a higher or lower frequency.
• Press the button for more than a second to enter manual tuning mode,
increase or decrease frequency using the respective button.
10. MD
Press this button to select the mode: radio, memory card, USB or RCA LINE IN.
11. A/PS
A short press will start a search for the preset stations. The search is interrupted
for 5 seconds on each station so you can hear what is being played. Pressing in
the button for longer than 1 second will save the 6 stations which at that time have
the strongest reception as preset stations.
English
12. PTY
• Press to select programme type: music, speech, or OFF.
• When music is selected, the following choices are available on buttons 15-20:
15. Pop, Rock
16 Easy, Easy listening
17 Classics, Other
18. Jazz, Country
19 National, Oldies
20 Folk
When speech is selected, the following choices are available on buttons 15-20:
15 News, Affairs, Info
16 Sport, Education, Drama
17 Culture, Science, Varied
18 Weather, Finance, Children
19 Social, Religion, Phone in
20 Travel, Leisure, Documentary
9
Page 10

13. TA
Press to turn the traffic announcement mode ON or OFF.
14. AF
English
Press to turn the alternative frequency mode ON or OFF. If ON is selected,
the stereo searches continuously for the strongest possible signal for
the selected station.
Button 15-20
Buttons for preset stations or other functions connected with listening
via a memory card or USB stick.
21. USB port
22. Preset stations (1, 2, 3, 4, 5, and 6)
b) Playback of MP3 Files from USB Memory/Memory Card
Connect a memory card (SD or MMC) to the input (8) or a USB memory to its input
(21). The stereo will begin playing audio files from the card/stick as soon as it is
connected.
Selecting tracks
Press briefly on one of the buttons [ l◄◄ or ►►l ] to select a track and hold in
the button to fast rewind or fast forward.
PAUSE
Press button [PAU](15) to pause the track. Press again to resume playback.
REPEAT
Press button [RPT](16) to select a repeat mode ONE/ALL/DIR (all track, all tracks,
whole folder/ directory).
INTRO
Press button [INT](17) and the stereo will play the first few seconds of every track.
Press the button once more to interrupt INTRO and listen to the entire track.
RANDOM
• Press button [RDM](18) and the stereo will play all tracks in random order.
• Press the button again to cancel.
• Press button 19 to skip 10 tracks backwards in the directory.
• Press button 20 to skip 10 tracks forwards in the directory.
NB. The stereo can handle and play up to 1000 tracks. However, more than
1000 tracks can be shown on the display.
10
Page 11

Selecting tracks using the volume knob
Press briefly on the A/PS button, turn the volume knob to the right or left to select a track.
When the desired track has been found, press the volume knob to play the track.
Selecting MP3 folder/WMA file using the volume knob
Press twice briefly on the A/PS button, turn the volume knob to the right or left to select
a folder. When the desired folder/WMA file has been found, press the volume knob once
more. Turn the volume knob to the right or left to change track. When the desired track
has been found, press the volume knob to play the track.
6. Care and maintenance
Reset
This button is located behind the front panel (23).
The reset button is to be used for one of the following cases:
• When all the wiring has been completed and the stereo is started for the first time.
• If any of the functions does not work properly.
• If an Error symbol appears on the display.
Replacing the fuse
NB If the fuse has blown, check that none of the cables is short-circuited.
Replace the fuse with one of the same rating, i.e. 10A.
Theft prevention
Always detach the front panel and keep it in a safe place when the stereo is not used.
Cleaning
Regularly detach the front panel and clean the connections between the panel and
the stereo to ensure that the stereo provides optimum sound quality. Use an appropriate
electrical contact cleaner and a cotton swab or bud. Be sure to clean the connectors
carefully and not damage them or leave any residue on them.
English
11
Page 12

7. Waste management
Follow local ordinances when disposing of this product. If you are unsure of how
to dispose of this product, please contact your local authority.
English
8. Specifications
Power supply 12 V DC (10.8 – 15.6 V negative earth)
Speaker impedance 4 or 8 ohm
Output 40 W × 4 CH
Fuse 10 A
MP3 player
Signal to noise ratio > 60 dB
Channel step > 50 dB (1 kHz)
Frequency range 20 Hz – 20 kHz
FM tuner
Frequency range 87.5 – 108 MHz
Sensitivity 2.8 µV
Stereo separation 30 dB
Signal to noise ratio 50 dB
Channel step 50 kHz
MW(AM)tuner
Frequency range 522–1620 kHz
Sensitivity 32 dB
Line-out
Output voltage 1.5 V
Impedance 10 kilo-ohm
12
Page 13

Bilstereo m. USB/SD
Art.nr 38-4218 Modell NCD-7602
Läs igenom hela bruksanvisningen före användning och spara den sedan för
framtida bruk. Vi reserverar oss för ev. text- och bildfel samt ändringar av tekniska
data. Vid tekniska problem eller andra frågor, kontakta vår kundtjänst (se adressuppgifter på baksidan).
Innehållsförteckning
1. Produktbeskrivning
2. Knappar och funktioner
3. Anslutning
4. Montering
5. Användning
Radio
Uppspelning av mp3-filer från minneskort/USB-minne
6. Skötsel och underhåll
7. Avfallshantering
8. Specifikationer
1. Produktbeskrivning
Bilstereo för USB-minne/SD-kort med MP3-spelare. AM/FM-radio med RDS.
Fjärrkontroll. Löstagbar stöldfront. Visar ID3-tag. Effekt 4x40 W. RCA-lågnivåutgång.
ISO-anslutning.
Svenska
13
Page 14

2. Knappar och funktioner
1 2 3 4 5 6 7 8
Svenska
9 10 11 12 13 14 15 16 17 18 19 20 21
1. PÅ/AV
2. SCN (Scan): Automatisk sökning
av radiostation
3. DSP: Display-knapp
4. Val och styrning av funktionerna
VOLYM, BAS, DISKANT, BALANS, FADER.
Styr även funktionerna TA, PI, RETUNE,
MASK, EON, BEEP, TA VOL, ADJ och DSP.
5. BD/LD: Val av frekvensband/loudness
6. LCD-display
7. Knapp för att ta bort fronten
8. Ingång för minneskort
9. Automatisk eller manuell kanalsökning/
byte av spår
10. Val av uppspelningsfunktion
11. A/PS: Automatisk kanalsökning/spårsökning
12. PTY: Val av programtyp
13. TA: Trafikinformation
14. AF: Alternativa frekvenser
15. PAU: PAUSE
16. RPT: REPEAT
17. INT: INTRO
18. RDM: Slumpvis uppspelning
19. Spårsökning 10 spår ner
20. Spårsökning 10 spår upp
21. USB-port
22. Förvalda radiostationer (1, 2, 3, 4, 5, 6) i radioläge
23. RESET (knappen sitter innanför fronten
på apparaten)
22
22
23
1 4 10
9
5
15
16
3
11
17
18 19 20
14
Page 15

3. Anslutning
• OBS! Innan någon anslutning sker, försäkra er
om att bilen inte har någon spänning genom att
koppla bort kabeln från bilbatteriets minuspol.
24 25 26 27 28
24. Antenningång
25. RCA LINE OUT
(röd höger, vit vänster)
26. RCA LINE IN
(röd höger, vit vänster)
27. ISO-anslutning
28. Säkring 10 A
B
27
A
ISO connector
Stift Kabelfärg Kopplas till
A4 Gul + 12 V kontinuerligt
A5 Blå Motorantenn
A7 Röd + 12 V via tändning
A8 Svart (-) Jord
B1 Lila Höger bakre högtalare (+)
B2 Lila med svart rand Höger bakre högtalare (-)
B3 Grå Höger främre högtalare (+)
B4 Grå med svart rand Höger främre högtalare (-)
B5 Vit Vänster främre högtalare (+)
B6 Vit med svart rand Vänster främre högtalare (-)
B7 Grön Vänster bakre högtalare (+)
B8 Grön med svart rand Vänster bakre högtalare (-)
Svenska
4. Montering
• Montera inte apparaten på sådant sätt att den inverkar negativt på trafiksäkerheten.
• Montera inte apparaten på sådant sätt att den utsätts för höga temperaturer från
direkt solljus eller värmesystem.
• Montera inte apparaten på sådant sätt att den utsätts för stora mängder damm,
smuts eller starka vibrationer.
• Använd bara de medföljande monteringsdetaljerna.
15
Page 16

1. Ta bort fronten genom att trycka in knappen (7). Låt fronten falla ut helt och skjut
den sedan lätt till vänster.
2. Dra sedan ut fronten med högersidan först. Sätt tillbaka fronten i omvänd ordning
efter monteringen. Håll fronten helt öppen och sätt i vänstersidan först, sedan
höger och tryck därefter igen fronten försiktigt tills den klickar fast.
< 10°
Svenska
1
2
3. Ta försiktigt bort ramen runt fronten
på apparaten genom att lyfta de övre
hörnen uppåt och utåt.
4. Stick in de två specialverktygen och
dra monteringsramen från bilstereon.
5. Montera ramen på sin plats och böj ner
plåtblecken för att låsa fast den om det
är nödvändigt.
53mm
3
TAP
4
1
2
2
182mm
1
6. Dra försiktigt ut alla nödvändiga kablar genom monteringshålet och koppla ihop
allt enligt avsnitt Anslutning.
7. Koppla ihop kablarna med kopplingslist (sockerbitar) eller flatstift.
Använd krympslang eller eltejp för att isolera ev. oskyddade kopplingar.
8. Skjut försiktigt tillbaka bilstereon i monteringsramen tills den klickar fast.
OBS! Var försiktig så att inga kablar eller anslutningar kommer i kläm eller
skadas på något sätt.
16
Page 17

9. Om det är nödvändigt kan apparaten även fästas upp med ett bakre fäste.
4
5
6
3
2
4
5
6
7
1. Bilstereo
2. Gängat fäste M5 × 15
3. Monteringsram
4. Mutter M5
1
6. Planbricka
7. Självborrande plåtskruv (var försiktig
så att inte skruven skadar bilens kablar
e.d. vid montering).
5. Låsbricka
5. Användning
a) Radio
1. PÅ/AV
Tryck för att starta eller stänga av apparaten.
OBS! Det går att starta apparaten från vilken knapp som helst men den kan
bara stängas av med PÅ/AV- knappen.
2. SCN
Automatisk genomsökning av tillgängliga stationer. Varje station spelas upp
i några sek. Tryck SCN under uppspelningen för att stoppa genomsökningen
och lyssna på stationen.
Svenska
3. DSP
Tryck in knappen för att välja vad som ska visas på displayen: radiofrekvens,
klocka, eller spårinformation.
17
Page 18

4. Volymkontroll/val och styrning av olika funktioner
När apparaten slås på fungerar ratten som volymkontroll.
a. Tryck in volymkontrollen kort för att i tur och ordning komma till inställningar för:
• VOL (volym)
• BAS
• TRB (diskant)
• BAL (balans)
• FAD (faderkontroll, reglerar ljudet mellan främre och bakre högtalare).
Ställ in nivåerna i varje funktion genom att vrida volymknappen till höger eller vänster.
b. Tryck in volymknappen i minst 2 sek. för att komma till:
Svenska
TA SEEK/ALARM – Vrid volymknappen för att välja:
• TA SEEK: Apparaten söker upp program där trafikinformation sänds.
• TA ALARM: Apparaten varnar med ett pip-ljud att trafikinformation inte är
tillgänglig i den kanal som för tillfället är vald.
Tryck sedan kort för att i tur och ordning komma till inställningar för:
PI SOUND/MUTE – Vrid volymknappen för att välja:
• PI SOUND: Om man stöter på en radiosändning som ligger på samma
frekvens som den som för tillfället är inställd, men som har en annan PI-kod
(kod för att särskilja sändningar på samma frekvens) spelar apparaten upp
den nya sändningen i några sekunder för att sedan byta tillbaka.
• PI MUTE: Apparaten gör ett kort ljudavbrott istället för att spela ny kanal.
RETUNE L/S – Vrid volymknappen för att välja:
• RETUNE L: TA-sökning (sökning efter trafikinformation) börjar efter 90 sek.
• RETUNE S: TA-sökning börjar efter 30 sek.
MASK DPI/ALL – Vrid volymknappen för att välja:
• MASK DPI: Sökning sker på alla AF-stationer(alternativ frekvens) men hoppar
över de med olika PI.
• MASK ALL: Hoppar över alla AF-stationer som har olika PI och RDS-stationer
med för svag signal (Radio Data System, växlar automatiskt till den sändare
utmed färdvägen som sänder önskad/vald kanal).
EON ON/OFF – Vrid volymknappen för att välja:
• EON funktion: Information om andra kanaler och alternativa frekvenser.
BEEP ALL/2nd/OFF – Vrid volymknappen för att välja:
• BEEP ALL: Pip-ljud vid knapptryckning på.
• BEEP 2nd: Pip-ljud när knappen hålls in minst 2 sek.
• BEEP OFF: Pip-ljud av.
TA VOL – Vrid volymknappen för att välja önskad volym för trafikinformation.
ADJ – Ställ in klockan, vrid volymknappen till höger för att ställa in timmar och
till vänster för minuter.
DSP – Vrid volymknappen för att välja olika färdiga equalizer inställningar:
OFF, FLAT, POP, ROCK, CLASSIC.
18
Page 19

5. BD/LD
Vrid volymknappen för att välja:
Frekvensband: Tryck in knappen kort för att i tur och ordning välja
FM1, FM2, FM3, M1, M2.
Loudness: Tryck in knappen i minst 2 sek. för att välja loudness ON/OFF.
6. LCD display
Visar apparatens status.
7. Knapp för att ta bort frontpanelen
Tryck in knappen för att ta bort frontpanelen
8. Ingång för minneskort
9. l◄◄ eller ►►l Automatisk eller manuell inställning av radiostationer
• Tryck kort på knapparna för att starta automatisk sökning av radiostation upp
eller ner i frekvensområdet.
• Tryck längre än en sekund för att komma till manuell inställning av radiostation,
stega upp eller ner i frekvensområdet med respektive knapp.
10. MD
Tryck för att välja uppspelningsläge: radio, minneskort, USB eller RCA LINE IN.
11. A/PS
Tryck kort på knappen för att påbörja sökning efter de förinställda stationerna.
Sökningen avbryts i 5 sek. på varje kanal så att man kan höra vad som sänds.
Genom att trycka in knappen i mer än en sek. sparas de 6 stationer som för
tillfället har bäst mottagning på knapparna för förinställda stationer.
Svenska
12. PTY
Tryck för att välja programtyp: musik, tal, eller AV.
Om musik väljs, finns på knapparna 15-20 följande val:
15 Pop, rock
16 Lugnt, lättlyssnat
17 Klassiskt, annat
18 Jazz, country
19 Nationellt, gamla godingar
20 Folkmusik
Om tal väljs, finns på knapparna 15-20 följande val:
15 Nyheter, affärer, info
16 Sport, utbildning, drama
17 Kultur , vetenskap, varierat
18 Väder, ekonomi, barn
19 Socialt, religion, ring in
20 Resor, nöje, dokumentär
19
Page 20

13. TA
Tryck för att välja trafikinformation AV eller PÅ.
14. AF
Tryck för att välja alternativa frekvenser AV eller PÅ. Om PÅ väljs söker apparaten
hela tiden efter starkast möjliga signal på den station som är vald.
Knapp 15-20
Knappar för förinställda radiostationer eller för andra funktioner i samband med
lyssning från minneskort eller USB-minne.
Svenska
21. Ingång för USB-minne.
22. Förvalda radiostationer 1, 2, 3, 4, 5 och 6.
b) Uppspelning av mp3 filer från minneskort/USB-minne
Anslut ett minneskort (SD eller MMC) till sin ingång (8) eller ett USB-minne till
sin ingång (21). Apparaten börjar spela upp ljudfilerna på kortet/USB-minnet
när det ansluts.
Välj spår
Tryck kort in någon av knapparna [ l◄◄ eller ►►l ] (9) för att välja spår och håll in
knapparna för att snabbspola framåt eller bakåt.
PAUSE
Tryck in knapp [PAU](15) för att pausa spåret. Tryck igen för att återuppta
uppspelningen.
REPEAT
Tryck in knapp [RPT](16) för att välja olika repetitionsalternativ ONE/ALL/DIR (ett spår,
alla spår, hel mapp/spellista).
INTRO
Tryck in knapp [INT](17) och apparaten spelar upp några sekunder av inledningen på
varje spår. Tryck in knappen igen för att avbryta INTRO och lyssna på spåret.
RADOM
• Tryck in knapp [RDM] (18) och apparaten spelar upp alla spår i slumpvis ordning.
Tryck in knappen igen för att avbryta.
• Tryck knapp 19 för att hoppa 10 spår bakåt i spårlistan.
• Tryck knapp 20 för att hoppa 10 spår framåt i spårlistan.
OBS! Apparaten kan hantera och spela upp 1000 spår. Fler än 1000 spår kan dock
visas på displayen.
20
Page 21

Välja spår med volymknappen
Tryck kort en gång på A/PS, vrid volymknappen till höger eller vänster för att välja spår.
När önskat spår hittats tryck in volymknappen för att spela upp spåret.
Välja mp3 mapp/spellista med volymknappen
Tryck kort två gånger på A/PS, vrid volymknappen till höger eller vänster för att välja
mapp. När rätt mapp/spellista hittats tryck in volymknappen en gång. Vrid volymknappen till höger eller vänster för att välja spår. När önskat spår hittats tryck in volymknappen för att spela spåret.
6. Skötsel och underhåll
Reset
Knappen sitter innanför fronten (23).
Tryck RESET vid något av följande tillfällen:
• När all kabeldragning är klar och apparaten startas första gången.
• Om någon knapp eller funktion inte fungerar som den ska.
• Om det syns en ”error-symbol” på displayen.
Byte av säkring
OBS! Om säkringen är trasig, kontrollera alla kablar så att ingen kortslutning
uppkommit. Byt sedan säkring till en likadan med samma värden (10 A).
Förhindra stöld
Ta alltid ur fronten ur bilstereon och förvara den i sitt fodral på säker plats när
inte stereon används.
Rengöring
Ta bort fronten och rengör kontaktytorna mellan front och bilstereo med jämna mellanrum för att förhindra funktionsstörningar. Använd lämpligt elektronikrengöringsmedel
och tops e.d. Var försiktig så att inte kontaktytorna skadas eller något material från
rengöringen fastnar och blir kvar på kontaktytorna.
Svenska
21
Page 22

7. Avfallshantering
När du ska göra dig av med apparaten ska detta ske enligt lokala föreskrifter.
Är du osäker på hur du ska gå tillväga, kontakta din kommun.
8. Specifikationer
Strömförsörjning 12 V DC (10,8 – 15,6 V negativ jord)
Högtalarimpedans 4 eller 8 ohm
Uteffekt 40 W × 4 CH
Svenska
Säkring 10 A
Mp3 spelare
Signal-/brusförhållande > 60 dB
Kanal separation > 50 dB (1 kHz)
Frekvensomfång 20 Hz – 20 kHz
FM-mottagare
Frekvensområde 87,5–108 MHz
Känslighet 2,8 µV
Stereoseparation 30 dB
Signal-/brusförhållande 50 dB
Kanalsteg 50 kHz
MW(AM)-mottagare
Frekvensområde 522–1620 kHz
Känslighet 32 dB
Linjeutgång
Utspänning 1,5 V
Impedans 10 kohm
22
Page 23

Bilstereo med USB/SD
Art.nr. 38-4218 Modell NCD-7602
Les brukerveiledningen nøye før produktet tas i bruk, og ta vare på den for framtidig
bruk. Vi reserverer oss mot ev. tekst- og bildefeil, samt forandringer av tekniske data.
Ved tekniske problemer eller spørsmål, ta kontakt med vårt kundesenter.
(Se opplysninger om kundesenteret i denne bruksanvisningen).
Innholdsfortegnelse
1. Produktbeskrivelse
2. Knapper og funksjoner
3. Tilkobling
4. Montering
5. Bruk
Radio
Avspilling av mp3-filer fra minnekort/usb-minne
6. Stell og vedlikehold
7. Avfallshåndtering
8. Spesifikasjoner
1. Produktbeskrivelse
Bilstereo for USB-minne/SD-kort med MP3-spiller. AM/FM-radio med RDS.
Fjernkontroll. Avtakbar front. Viser ID3-tag. Effekt 4x40 W. RCA-lavnivåutgang.
ISO-tilkobling.
Norsk
23
Page 24

2. Knapper og funksjoner
1 2 3 4 5 6 7 8
9 10 11 12 13 14 15 16 17 18 19 20 21
Norsk
1. PÅ/AV
2. SCN (Scan): Automatisk søking
av radiostasjon
3. DSP: Display-knapp
4. Valg og styring av funksjonene VOLUM,
BASS, DISKANT, BALANSE, FADER.
Styrer også funksjonene TA, PI, RETUNE,
MASK, EON, BEEP, TA VOL, ADJ og DSP
5. BD/LD: Valg av frekvens/loudness
6. LCD-skjerm
7. Knapp for å løsne fronten
8. Inngang for minnekort
9. Automatisk eller manuell kanalsøking/
skifte av spor
10. Valg av avspillingsfunksjon
11. A/PS: Automatisk kanalsøking/sporsøking
12. PTY: Valg av programtype
13. TA: Trafikkinformasjon
14. AF: Alternative frekvenser
15. PAU: PAUSE
16. RPT: REPEAT
17. INT: INTRO
18. RDM: Tilfeldig avspillingsrekkefølge
19/20. Sporsøking 10 spor opp/ned
21. Usb-port
22. Forhåndsvalgte radiostasjoner
(1, 2, 3, 4, 5 og 6)
23. RESET (knappen sitter bak fronten på apparatet)
22
22
23
1 4 10
9
5
15
16
3
11
17
18 19 20
24
Page 25

3. Tilkobling
• OBS! Før man starter koblingene må man forsikre
seg om at bilen ikke har spenning. Dette gjøres
ved at kabelen fra minuspolen på bilens batteri
kobles fra.
24 25 26 27 28
24. Antenneinngang
25. RCA LINE OUT
(rød høyre, hvit venstre)
26. RCA LINE IN
(rød høyre, hvit venstre)
27. ISO-tilkobling
28. Sikring 10 A
B
27
A
ISO connector
Stift Farge på kanel Kobles til
A4 Gul + 12 V kontinuerlig
A5 Blå Motorantenne
A7 Rød + 12 V via tenning
A8 Sort (-) Jord
B1 Lilla Bakerste høyre høyttaler (+)
B2 Lilla med sort rand Bakerste høyre høyttaler (-)
B3 Grå Høyre høyttaler forand (+)
B4 Grå med sort rand Høyre høyttaler forand
B5 Hvit Venstre høyttaler forand (+)
B6 Hvit med sort rand Venstre høyttaler forand (-)
B7 Grønn Bakerste venstre høyttaler (+)
B8 Grønn med sort rand Bakerste venstre høyttaler (-)
Norsk
4. Montering
• Apparatet må ikke monteres slik at det virker negativt inn på trafikksikkerheten.
• Monter ikke apparatet slik at det utsettes for høye temperaturer fra direkte sollys
eller bilens varmesystem.
• Monter ikke apparatet slik at det utsettes for store mengder med støv, smuss
eller sterke viberasjoner.
• Bruk kun medfølgende monteringsdetaljer.
25
Page 26

1. Fjern fronten ved å trykke inn knappen (7). La fronten komme helt ut
og skyv den deretter lett til venstre.
2. Trekk deretter ut fronten med høyresiden først. Sett den tilbake i omvendt
rekkefølge etter montering. Hold fronten helt åpen og sett inn venstresiden først,
deretter høyre og trykk så fronten forsiktig inn til den klikker på plass.
< 10°
1
Norsk
2
3. Ta rammen rundt fronten forsiktig av
ved å løfte de øverste hjørnene opp
og utover.
4. Stikk de to spesialverktøyene inn
og trekk monteringsrammen ut
fra bilstereoen.
5. Monter rammen på plass og bøy
metallet ned for å låse den godt fast,
hvis det er nødvendig.
53mm
3
TAP
4
1
2
2
182mm
1
6. Trekk forsiktig ut alle nødvendige kabler gjennom monteringshullet og koble
sammen. Se avsnitt Tilkobling.
7. Koble sammen kablene med en koblingslist (sukkerbiter) eller flatstift.
Bruk krympeslange eller elteip for å hindre ev. oksydering ved koblingene.
8. Skyv bilstereoen forsiktig tilbake i monteringsrammen til den klikker fast.
OBS! Vær forsiktig slik at ingen kabler eller koblinger kommer i klem eller skades.
26
Page 27

9. Dersom det er nødvendig kan apparatet også festes opp med et bakre feste.
4
5
6
3
2
4
1
5
6
7
1. Bilstereo
2. Gjenget feste M5 x 15
3. Monteringsramme
4. Mutter, M5
6. Planskive
7. Selvborende plateskrue (vær forsiktig slik
at ikke skruen skader bilens kabler etc.
ved montering).
5. Låseskive
5. Bruk
a) Radio
1. PÅ/AV
Trykk for å starte eller skru av apparatet.
OBS! Apparatet kan startes fra valgfri knapp, men den kan kun skrus av
med PÅ/AV-knappen.
2. SCN
Automatisk stasjonssøk. Hver stasjon spilles av i noen sekunder. Trykk [SCN]
under avspilling for å stoppe søkingen og å lytte til en stasjon.
3. DSP
Trykk inn knappen for å velge hva som skal vises i displayet: radiofrekvens, klokke,
eller sporinformasjon.
Norsk
27
Page 28

4. Volumkontroll/valg og styring av forskjellige funksjoner
Når apparatet skrus på fungerer rattet som volumkontroll.
a. Trykk inn volumkontrollen kort for å komme til innstillingene nedenfor
i denne rekkefølgen:
• VOL (volum)
• BAS
• TRB (diskant)
• BAL (balanse)
• FAD (faderkontroll, regulerer lydet mellom fremre og bakre høyttaler).
Still inn nivåene i hver funksjon ved å dreie volumknappen til høyre eller venstre.
b. Trykk inn volumknappen i minst 2 sekunder for å komme til:
TA SEEK/ALARM – Drei volumknappen for å velge:
• TA SEEK: Apparatet søker opp program som sender trafikkinformasjon.
• TA ALARM: Apparatet advarer med en pipetone at trafikkinformasjon ikke
er tilgjengelig i den kanalen som er valgt.
Trykk inn volumkontrollen kort for å komme til innstillingene nedenfor
Norsk
i denne rekkefølgen:
PI SOUND/MUTE – Drei volumknappen for å velge:
• PI SOUND: Hvis man støter på en radiosending som ligger på samme frekvens
som den som er innstilt, men som har en annen PI-kode (kode for spesielle sendinger som ligger på samme frekvens) apparatet opp den nye sendingen i noen
sekunder for å senere skifte tilbake.
• PI MUTE: Apparatet gjør et kort lydavbrekk i stedet for å spille fra en ny kanal.
RETUNE L/S – Drei volumknappen for å velge:
• RETUNE L: TA-søk (søk etter trafikkinformasjon) starter etter 90 sek.
• RETUNE S: TA-søk starter etter 30 sek.
MASK DPI/ALL – Drei volumknappen for å velge:
• MASK DPI: Søke på alle AF-stasjoner (alternativ frekvens), men hopper over
de med ulik PI.
• MASK ALL: Hopper over alle AF-stasjoner som har ulik PI og RDS-stasjoner
med for svake signaler (Radio Data System, skifter automatisk til den sender
som sender ønsket/valgt kanal).
EON ON/OFF – Drei volumknappen for å velge:
• EON funksjon: Informasjon om andre kanaler og alternative frekvenser.
BEEP ALL/2nd/OFF – Drei volumknappen for å velge:
• BEEP ALL: Pipelyd ved tastetrykking er aktivert.
• BEEP 2nd: Pipelyd når knappen holdes inne i minst 2 sekunder.
• BEEP OFF: Pipelyd av.
TA VOL – Drei volumknappen for å velge ønsket volum for trafikkinformasjonen.
ADJ – Still inn klokken, drei volumknappen til høyre for å stille inn timer og til
venstre for å stille inn minutter.
DSP – Drei volumknappen for å velge forskjellige ferdiginnstilte equalizers:
OFF, FLAT, POP, ROCK, CLASSIC.
28
Page 29

5. BD/LD – Drei volumknappen for å velge:
Frekvensbånd: Trykk inn knappen kort for å velge FM1, FM2, FM3, M1 eller M2 i
denne rekkefølgen.
Loudness: Trykk inn knappen og hold inne i minst 2 sekunder for å velge
loudness ON/OFF.
6. LCD display
Viser apparatets status.
7. Knapp for å ta bort frontpanelet
Trykk inn knappen for å ta bort frontpanelet
8. Inngang for minnekort
9. l◄◄ eller ►►l Automatisk eller manuell innstilling av radiostasjoner
• Trykk kort på knappene for å starte automatisk søking av radiostasjon, opp
eller ned i frekvensområdet.
• Trykk lengre enn ett sekund for å komme til manuell innstilling av radiostasjon.
Gå opp eller ned i frekvensområdet med respektive knapp.
10. MD
Trykk for å velge avspillingsposisjon: radio, minnekort, USB eller RCA LINE IN.
11. A/PS
Trykk kort på knappen for å starte søk etter de forhåndsinnstilte stasjonene.
Søket avbrytes i 5 sekunder på hver kanal slik at man kan høre hva som sendes.
Ved å trykke på knappen i mer enn ett sekund lagres de 6 stasjonene som det er
best mottak på.
Norsk
12. PTY
Trykk for å velge programtype: Musikk, snakk eller AV.
Hvis musikk velges, er det følgende valg på knappene 15 – 20:
15 Pop, rock
16 Stille, lett musikk
17 Klassisk, annet
18 Jazz, country
19 Nasjonalt, gamle og gode
20 Folkemusikk
Hvis tall velges, er det følgende valg på knappene 15 – 20:
15 Nyheter, bussines, info
16 Sport, utdanning, drama
17 Kultur , vitenskap, variert
18 Vær, økonomi, barn
19 Sosialt, religion, ring inn
20 Reiser, underholdning, dokumentar
29
Page 30

13. TA
Trykk for å velge trafikkinformasjon AV eller PÅ.
14. AF
Trykk for å velge alternative frekvenser AV eller PÅ. Dersom PÅ velges søker
apparatet hele tiden etter sterkes mulig signal på den stasjonen som er valgt.
Knapp 15-20
Knapper for forhåndsinnstilte radiostasjoner eller for andre funksjoner i forbindelse med
radiostasjoner eller for andre funksjoner i sammenheng med lytting fra minnekort eller
USB-minne.
21. Inngang for USB-minne
22. Forhåndsvalgte radiostasjoner (1, 2, 3, 4, 5 og 6)
Norsk
b. Avspilling av mp3-filer fra minnekort/usb-minne
Koble til et minnekort (SD eller MMC) til riktig inngang (8) eller usb-minne til
usb-inngenen (21). Apparatet begynner å spille av lydfilene fra kortet/usb-minnet når
det kobles til.
Velg spor
Trykk kort inn en av knappene ( l◄◄ eller ►►l )(9) for å velge spor og hold knappen
inne for å hurtigspole bak- eller framover.
PAUSE
Trykk inn knapp [PAU](15) for å ta pause. Trykk igjen for å gjenoppta avspillingen.
REPEAT
Trykk inn knapp [RPT] (16) for å velge forskjellige repetisjonsalternativ ONE/ALL/DIR
(et spor, alle spor, hele mappen/spellisten).
INTRO
• Trykk inn knapp [INT](17)og apparatet spiller av noen sekunder av innledningen
på hvert spor.
• Trykk på knappen igjen for å avbryte og å lytte til valgte spor.
RADOM
• Trykk inn knapp [RDM](18) og apparatetn spiller av alle spor i tilfeldig rekkefølge.
• Trykk inn knappen igjen for å avbryte.
• Trykk knapp 19 for å hoppe 10 spor bakover i spillelisten.
• Trykk knapp 20 for å hoppe 10 spor framover i spillelisten.
OBS! Apparatet kan håndtere og spille av 1000 spor. Displayet kan dog vise flere
enn 1000 spor.
30
Page 31

Velg spor med volumknappen
Trykk kort en gang på A/PS, drei volumknappen til høyre eller venstre for å velge spor.
Når ønsket spor er funnet, trykk inn volumknappen for å spille det av.
Velg mp3 mappe/spilleliste med volumknappen
Trykk kort en gang på A/PS, drei volumknappen til høyre eller venstre for å velge
mappe. Når riktig mappe/spilleliste blir funnet, trykk inn volumknappen en gang.
Drei volumknappen til høyre eller venstre for å velge spor. Når ønsket spor er funnet,
trykk inn volumknappen for å spille det av.
6. Stell og vedlikehold
Reset
Knappen sitter bak fronten (23).
Trykk RESET hvis følgende oppstår:
• Når kabeltrekkingen er ferdig og apparatet startes første gangen.
• Hvis noen av knappene eller funksjonen ikke fungerer som de skal.
• Hvis error-symbolet kommer opp på skjermen.
Skifte av sikring
OBS! Hvis sikringen har gått, kontroller alle kablene for å sjekke om det er kortslutning.
Skift sikring til en som er lik den gamle (10 A).
Hindre tyveri
Ta alltid ut fronten på bilstereoen og oppbevar den i futteralet på en sikke plass når
stereoen ikke brukes.
Norsk
Rengjøring
Ta ut fronten og rengjør kontaktflatene mellom front og bilstereo med jevne mellomrom for å hindre kontaktvanskeligheter. Benytt passende rengjøringsmiddel som er
beregnet for elektronikk. Vær forsiktig slik at ikke kontaktflatene skades eller noe av
rengjøringsmaterialet setter seg fast på flatene.
31
Page 32

7. Avfallshåndtering
Når produktet skal kasseres, må det skje i henhold til lokale forskrifter. Ved usikkerhet,
ta kontakt med lokale myndigheter.
8. Spesifikasjoner
Strømforsyning: 12 V DC (10,8 – 15,6 V negativ jord)
Høyttalerimpedanse: 4 eller 8 ohm
Effekt ut: 40 W × 4 CH
Sikring: 10 A
MP3-spiller
Signal-/ støyforhold: > 60 dB
Kanalseparasjon: > 50 dB (1 kHz)
Frekvensomfang: 20 Hz – 20 kHz
Norsk
FM-mottaker
Frekvensområde: 87,5–108 MHz
Følsomhet: 2,8 µV
Stereoseparasjon: 30 dB
Signal-/ støyforhold: 50 dB
Kanaltrinn: 50 kHz
MW(AM)-mottaker
Frekvensområde: 522–1620 kHz
Følsomhet: 32 dB
Linjeutgang
Spenning ut: 1,5 V
Impedans: 10 kohm
32
Page 33

Autostereo usb/sd
Tuotenumero 38-4218 Malli NCD-7602
Lue käyttöohjeet ennen tuotteen käyttöönottoa ja säilytä ne tulevaa tarvetta varten.
Pidätämme oikeuden teknisten tietojen muutoksiin. Emme vastaa mahdollisista tekstitai kuvavirheistä. Jos laitteeseen tulee teknisiä ongelmia, ota yhteys myymälään tai
asiakaspalveluun (yhteystiedot käyttöohjeen lopussa).
Sisällysluettelo
1. Tuotekuvaus
2. Painikkeet ja toiminnot
3. Liitäntä
4. Asennus
5. Käyttö
Radio
Mp3-musiikin kuunteleminen usb-muistilta/muistikortilta
6. Huolto ja ylläpito
7. Kierrätys
8. Tekniset tiedot
1. Tuotekuvaus
Autostereot. Mp3-soitin, jossa liitäntä usb/sd-muisteille. AM/FM-radio ja RDS.
Kaukosäädin. Irrotettava etupaneeli. Näyttää ID3-tagin. Teho 4x40 W. RCA-linjalähtö.
ISO-liitäntä.
33
Suomi
Page 34

2. Painikkeet ja toiminnot
1 2 3 4 5 6 7 8
9 10 11 12 13 14 15 16 17 18 19 20 21
1. ON/OFF
2. SCN (Scan): Radiokanavien
automaattinen haku:
3. DSP: Näyttö-painike
4. Toimintojen VOLUME, BASS, TREBLE,
BALANCE, FADER valinta ja ohjaaminen.
Ohjaa myös toimintoja TA, PI, RETUNE,
Suomi
MASK, EON, BEEP, TA VOL, ADJ ja DSP
5. BD/LD: Taajuuden/loudnessin valinta
6. LCD-näyttö
7. Painike etupaneelin irrottamiseksi
8. Muistikortin liitäntä
9. Automaattinen tai manuaalinen kanavan
haku/raidan vaihtaminen
10. Toistotavan valinta
11. A/PS: Automaattinen kanavahaku/
raidan valinta
12. PTY: Ohjelmatyypin valinta
13. TA: Liikennetiedotteet
14. AF: Vaihtoehtoiset taajuudet
15. PAU: PAUSE
16. RPT: REPEAT
17. INT: INTRO
18. RDM: Satunnaistoisto
19. ja 20 Kanavahaku 10 raitaa ylös-/alaspäin
21. Usb-portti
22. Esivalitut radioasemat (1, 2, 3, 4, 5, 6)
23. RESET (etupaneelin takana)
22
22
23
1 4 10
9
5
15
16
3
11
17
18 19 20
34
Page 35

3. Liitäntä
Huom.! Irrota kaapeli akun miinusnavasta ennen
liittämistä varmistaaksesi, ettei autossa ole virtaa.
24 25 26 27 28
24. Antenniliitäntä
25. RCA LINE OUT
(punainen oikea,
valkoinen vasen)
26. RCA LINE IN (punainen
oikea, valkoinen vasen)
27. ISO-liitäntä
28. Sulake, 10 A
B
27
A
Nasta Kaapelin väri Mihin kytketään
A4 Keltainen +12 V jatkuva
A5 Sininen Moottoriantenni
A7 Punainen +12 V sytytyksen kautta
A8 Musta (-) Maa
B1 Violetti Oikea takakaiutin (+)
B2 Violetti, musta raita Oikea takakaiutin (-)
B3 Harmaa Oikea etukaiutin (+)
B4 Harmaa, musta raita Oikea etukaiutin (-)
B5 Valkoinen Vasen etukaiutin (+)
B6 Valkoinen, musta raita Vasen etukaiutin (-)
B7 Vihreä Vasen takakaiutin (+)
B8 Vihreä, musta raita Vasen takakaiutin (-)
Suomi
4. Asennus
• Älä asenna laitetta niin, että se vaarantaa liikenneturvallisuutta.
• Älä asenna laitetta niin, että se altistuu korkeillelämpötiloille joko suorasta
auringonvalosta tai lämmitysjärjestelmästä.
• Älä asenna laitetta siten, että se altistuu suurelle määrälle pölyä, likaa tai
voimakasta tärinää.
• Käytä vain pakkauksen mukana tulevia asennustarvikkeita.
35
Page 36

1. Irrota etupaneeli painamalla painiketta (7). Anna paneelin tulla täysin ulos ja työnnä
sitä sen jälkeen kevyesti vasemmalle.
2. Vedä etupaneeli ulos oikea puoli edellä. Laita etupaneeli takaisin käänteisessä
järjestyksessä asennuksen jälkeen. Pidä etuosa täysin auki ja aseta ensin vasen
puoli, aseta sen jälkeen oikea puoli varoen, kunnes se naksahtaa kiinni.
< 10°
1
2
3. Irrota etuosan ympärillä oleva
kehys varoen nostamalla yläkulmia
ylös- ja ulospäin.
4. Paina erikoistyökalut sisään ja vedä
asennuskehys autosteroista.
Suomi
5. Asenna kehys paikoilleen ja lukitse
kehys tarvittaessa taivuttamalla
peltikielekkeitä.
53mm
3
TAP
4
1
2
2
182mm
1
6. Vedä kaikki tarpeelliset kaapelit varoen asennusreiästä ja kytke ne yhteen
kappaleen Liitäntä mukaisesti.
7. Kytke kaapelit liitinrimalla (sokeripalalla) tai lattaliittimellä. Eristä mahdolliset
suojaamattomat liitännät kutistesukalla tai sähköteipillä.
8. Työnnä autostereo takaisin asennuskehykseen, kunnes se napsahtaa kiinni.
Huom.! Varo, etteivät kaapelit tai liitännät joudu puristuksiin tai vahingoitu.
36
Page 37

9. Laitteen voi myös kiinnittää tarvittaessa takakiinnityksellä.
4
5
6
3
2
1
4
5
6
7
1. Autostereo
2. Kiinnitys M5 × 15
3. Asennuskehys
4. Mutteri M5
5. Lukituslevy
6. Aluslevy
7. Itseporautuva peltiruuvi (varo, ettei ruuvi vahingoita
auton kaapeleita tai vastaavia asennusvaiheessa).
5. Käyttö
a) Radio
1. ON/OFF
Käynnistää ja sammuttaa soittimen.
Huom.! Laitteen voi käynnistää millä tahansa painikkeella, mutta sen voi
sammuttaa vain ON/OFF-painikkeella.
2. SCN
Radiokanavien automaattinen haku. Radio soittaa jokaista kanavaa muutaman
sekunnin ajan. Paina SCN toiston aikana keskeyttääksesi haun ja kuunnellaksesi
asemaa.
3. DSP
Paina valitaksesi näytöllä esitettävät tiedot: radiotaajuus, kello tai raidan tiedot.
Suomi
37
Page 38

4. Äänenvoimakkuus/eri toimintojen valitseminen ja ohjaaminen
Nupilla säädetään äänenvoimakkuutta laitteen ollessa päällä.
a. Paina äänenvoimakkuudensäädintä lyhyesti siirtyäksesi järjestyksessä seuraaviin
asetuksiin:
• VOL (äänenvoimakkuus)
• BAS
• TRB (diskantti)
• BAL (tasapainosäätö)
• FAD (etu- ja takakaiuttimien äänenvoimakkuuden suhteen säätäminen).
Aseta kaikkien asetusten tasot kiertämällä äänenvoimakkuusnuppia oikealle tai
vasemmalle.
b. Paina äänenvoimakkuusnuppia vähintään kahden sekunnin ajan
siirtyäksesi asetuksiin:
TA SEEK/ALARM – Kierrä äänenvoimakkuusnuppia valitaksesi:
• TA SEEK: Soitin hakee ohjelmat, jotka lähettävät liikennetiedotteita.
• TA ALARM: Soitin varoittaa merkkiäänellä, jos valitulla kanavalla
ei ole liikennetiedotteita.
Paina lyhyesti siirtyäksesi järjestyksessä seuraaviin asetuksiin:
PI SOUND/MUTE – Kierrä äänenvoimakkuusnuppia valitaksesi:
• PI SOUND: Jos samalla taajuudella on toinen kanava jolla on eri PI-koodi
(samalla taajuudella olevien lähetysten erottamisen koodi), soitin soittaa uuden
aseman lähetystä muutaman sekunnin ajan, ja vaihtaa sen jälkeen takaisin.
• PI MUTE: Laite pitää lyhyen tauon toisen kanavan soittamisen sijaan.
Suomi
RETUNE L/S – Kierrä äänenvoimakkuusnuppia valitaksesi:
• RETUNE L: TA-haku (haku liikennetiedotteen jälkeen) alkaa 90 sekunnin kuluttua.
• RETUNE S: TA-haku alkaa 30 sekunnin kuluttua.
MASK DPI/ALL – Kierrä äänenvoimakkuusnuppia valitaksesi:
• Mask DPI: Soitin hakee kaikilta AF-asemilta (vaihtoehtoinen taajuus), mutta
hyppää niiden kanavien yli, joilla on eri PI.
• Mask All: Hyppää kaikkien AF-asemien yli, joilla on eri PI sekä niiden RDSasemien yli, joilla on liian heikko signaali (Radio Data System, vaihtaa automaattisesti siihen paikalliseen lähettimeen, joka lähettää haluttua/valittua kanavaa).
EON ON/OFF – Valitse äänenvoimakkuusnupilla:
EON-toiminto: Tietoa muista kanavista ja vaihtoehtoisista taajuuksista.
BEEP ALL/2nd/OFF – Valitse äänenvoimakkuusnupilla:
• BEEP ALL: Painikkeiden merkkiääni päällä.
• BEEP 2nd: Painikkeiden merkkiääni, kun painikkeita painetaan vähintään
kahden sekunnin ajan.
• BEEP OFF: Painikkeiden merkkiääni pois päältä.
TA VOL – Valitse liikennetiedotteiden äänenvoimakkuus äänenvoimakkuusnupilla.
ADJ – Kellonajan asettaminen. Aseta tunnit kääntämällä äänenvoimakkuusnuppia
oikealle ja minuutit kääntämällä äänenvoimakkuusnuppia vasemmalle.
DSP – Valitse äänenvoimakkuusnupilla seuraavista taajuskorjainasetuksista: OFF,
FLAT, POP, ROCK, CLASSIC.
38
Page 39

5. BD/LD – Valitse äänenvoimakkuusnupilla
Taajuuskaista: Paina lyhyesti valitaksesi seuraavista FM1, FM2, FM3, M1, M2.
Loudness: Paina vähintään kahden sekunnin ajan valitaksesi ON/OFF.
6. LCD display
Näyttää laitteen statuksen.
7. Etupaneelin irrotuspainike
Irrota etupaneeli painamalla painiketta
8. Muistikortin liitäntä
9. l◄◄ tai ►►l Automaattinen tai manuaalinen radiokanavien haku
• Paina lyhyesti painikkeita käynnistääksesi automaattisen radiokanavien haun
ylös- tai alaspäin taajuuskaistalla.
• Paina yli sekunnin siirtyäksesi manuaaliseen radiokanavien asetukseen.
Siirry ylös- ja alaspäin painikkeilla.
10. MD
Valitse haluamasi toistotila painamalla: radio, muistikortti, usb tai RCA LINE IN.
11. A/PS
Paina lyhyesti aloittaaksesi esiasetettujen asemien haun. Haku pysähtyy viideksi
sekunniksi jokaiselle kanavalle, jolloin voit kuulla, mitä kanava lähettää. Paina
painiketta yli sekunnin ajan tallentaaksesi esiasetetuiksi kanaviksi ne kuusi asemaa,
joilla on paras vastaanotto.
Suomi
12. PTY
• Paina valitaksesi ohjelmatyypin: musiikki, puhe, tai AV.
• Jos valitaan musiikki, painikkeilla 15-20 on seuraavat valinnat:
15 Pop, Rock
16 Kevyttä, helposti kuunneltavaa
17 Klassista, muuta
18 Jazz, country
19 Kansallinen, vanhoja hittejä
20 Kansanmusiikki
Jos valitaan puhe, painikkeilla 15-20 on seuraavat valinnat:
15 Uutiset, liike-elämä, info
16 Urheilu, koulutus, draama
17 Kulttuuri , tiede, vaihteleva
18 Sää, talous, lapset
19 Sosiaalinen, uskonto, puhelut
20 Matkat, viihde, dokumentit
39
Page 40

13. TA
Aktivoi liikennetiedotteet tai poista aktivointi.
14. AF
Aktivoi vaihtoehtoiset taajuudet tai poista aktivointi. Jos aktivoit vaihtoehtoiset
kanavat, soitin hakee jatkuvasti vahvinta mahdollista signaalia valitulle kanavalle.
Painikkeet 15-20
Esiasetetut radiokanavat ja muut toiminnot, jotka liittyvät muistikortilta tai usb-muistilta
kuunteluun.
21. USB-muistiliitäntä
22. Esivalitut radioasemat 1, 2, 3, 4, 5, 6
b.) Mp3-musiikin kuunteleminen usb-muistilta/muistikortilta
Liitä muistikortti (sd tai mmc) liitäntään (8) tai usb-muisti liitäntään (21). Laite alkaa
toistamaan äänitiedostoja liitetyltä kortilta/usb-muistilta.
Raidan valinta
Paina lyhyesti painikkeita l◄◄ tai ►►l (9) valitaksesi raidan. Pidä painiketta pohjassa
pikakelataksesi eteen- tai taaksepäin.
Suomi
PAUSE
Pidä tauko toistossa painamalla painiketta [PAU](15). Paina uudelleen jatkaaksesi toistoa.
REPEAT
Paina painiketta [RPT](16) valitaksesi eri uudelleentoistovaihtoehdoista ONE/ALL/DIR
(yksi raita, kaikki raidat, koko kansio/soittolista).
INTRO
Paina painiketta [INT](17), niin soitin toistaa jokaisen kappaleen alun. Keskeytä
”INTRO” ja kuuntele raitaa painamalla painiketta uudelleen.
RANDOM
• Paina painiketta [RDM](18), niin soitin toistaa kaikki raidat satunnaisessa järjestyksessä. Keskeytä painamalla painiketta uudelleen.
• Siirry 10 kappaletta taaksepäin painamalla painiketta 19.
• Siirry 10 kappaletta eteenpäin painamalla painiketta 20.
Huom.!
Laite voi käsitellä ja toistaa 1000 raitaa. Näyttö voi kuitenkin näyttää yli 1000 raitaa.
40
Page 41

Raidan valitseminen äänenvoimakkuuspainikkeella
Paina lyhyesti A/PS, käännä äänenvoimakkuuspainiketta oikealle tai
vasemmalle valitaksesi raitoja. Toista haluamasi raita painamalla sen kohdalla
äänenvoimakkuuspainiketta.
Mp3-kansion/soittolistan valitseminen äänenvoimakkuuspainikkeella
Paina kaksi kertaa lyhyesti A/PS, käännä äänenvoimakkuuspainiketta oikealle tai
vasemmalle valitaksesi kansion. Paina äänenvoimakkuuspainiketta oikean kansion/
soittolistan kohdalla. Valitse raita kääntämällä äänenvoimakkuuspainiketta oikealle
tai vasemmalle. Toista haluamasi raita painamalla sen kohdalla
äänenvoimakkuuspainiketta.
6. Huolto ja ylläpito
Reset
Painike on etupaneelin (23) takana.
Paina RESET seuraavissa tapauksissa:
• Kun kaikki johdot on vedetty paikoilleen ja soitin käynnistetään ensimmäisen kerran.
• Jos jokin painike tai toiminto ei toimi oikealla tavalla.
• Jos näytöllä näkyy ”error-symboli”.
Sulakkeen vaihto
Huom.! Jos sulake on viallinen, tarkasta että kaapelit eivät ole oikosulussa.
Vaihda sulake samanlaiseen (10 A).
Suomi
Murronesto
Irrota autostereon etupaneeli aina ja säilytä sitä turvallisessa paikassa, kun soitinta
ei käytetä.
Puhdistus
Irrota etupaneeli ja puhdista etupaneelin ja autostereon väliset kontaktipinnat säännöllisesti toimintahäiriöiden estämiseksi. Käytä sopivaa elektroniikkapuhdistusainetta ja
tops-puikkoja tms. Varo, että kontaktipinnat eivät vahingoitu ja että kontaktipintoihin
ei tartu materiaalia puhdistuksen aikana.
41
Page 42

7. Kierrätys
Kierrätä tuote asianmukaisesti, kun poistat sen käytöstä. Tarkempia kierrätysohjeita
saat kuntasi jäteneuvonnasta.
8. Tekniset tiedot
Virtalähde 12 V DC (10,8–15,6 V negatiivinen maadoitus)
Kaiutinimpedanssi 4 tai 8 ohmia
Antoteho 40 W x 4 CH
Sulake 10 A
MP3-soitin
Signaali-/kohinasuhde >60 dB
Kanavaerotus >50 dB (1 KHz)
Taajuusalue 20 Hz – 20 KHz
Fm-vastaanotin
Taajuusalue 87,5 –108 MHz
Herkkyys 2,8 µV
Stereoerotus 30 dB
Signaali-/kohinasuhde 50 dB
Kanavaväli 50 kHz
Suomi
MW(AM)-vastaanotin
Taajuusalue 522–1620 KHz
Herkkyys 32 dB
Linjalähtö
Lähtöjännite 1,5 V
Impedanssi 10 kOhm
42
Page 43

43
Page 44

Sverige
Kundtjänst Tel: 0247/445 00
Fax: 0247/445 09
E-post: kundtjanst@clasohlson.se
Internet www.clasohlson.se
Post Clas Ohlson AB, 793 85 INSJÖN
Norge
Kundesenter Tlf.: 23 21 40 00
Faks: 23 21 40 80
E-post: kundesenter@clasohlson.no
Internett www.clasohlson.no
Post Clas Ohlson AS, Postboks 485 Sentrum, 0105 OSLO
Suomi
Asiakaspalvelu Puh.: 020 111 2222
Sähköposti: info@clasohlson.fi
Internet www.clasohlson.fi
Osoite Clas Ohlson Oy, Annankatu 34–36 A, 00100 HELSINKI
Great Britain
For consumer contact, please visit
www.clasohlson.co.uk and click on
customer service.
Internet www.clasohlson.co.uk
 Loading...