

Page 1
Hunting Game Camera
with MMS/E-Mail
Vilt-/åtelkamera m. MMS/e-post
Overvåknings og viltkamera med MMS/e-post
Riistakamera, jossa MMS-viestit ja sähköpostit
Wildkamera/Fotofalle mit MMS/E-Mail
EnglishSvenskaNorskSuomiDeutsch
Art.no Model
36-5762 MG882K-8mHD
Ver. 20141029
Page 2

2
Page 3
Hunting Game Camera with MMS/E-Mail
Art.no 36-5762 Model MG882K-8mHD
Please read theentire instruction manual before using theproduct and then save
it for future reference. We reserve theright for any errors in text or images and any
necessary changes made to technical data. If you have any questions concerning
technical problems please contact our Customer Services.
Product description
• 8 MP night-vision camera for monitoring hunting spots, gardens, etc. Sends
photos wirelessly by MMS or e-mail via GSM/GPRS at set times or when motiontriggered by wildlife or other movement.
• Still images and video can also be saved to SD card (max 32 GB, sold separately)
for later transfer to acomputer. Still images are saved in JPG format; video is
saved in AVI format. File system: FAT32.
• Images are stamped with time, date and moon phase. Videos are saved with audio
captured by theintegrated microphone.
• Motion detector with sensitivity of up to 20 m.
• Powered by 8×AA/LR6 batteries (sold separately) or a6 V external power source
(sold separately).
Things to consider:
• Theuse of surveillance cameras in public areas is regulated by theData Protection
Act 1998 and requires thepermission of your local authority. Theuse of camera
surveillance on private property is also regulated by theData Protection Act.
No permission is required from thelocal authority, but thepeople monitored must
be informed that they are under surveillance. TheInformation Commissioner’s
Office has compiled aCode of Practice governing theuse of CCTV cameras.
• For further information visit www.ico.gov.uk.
English
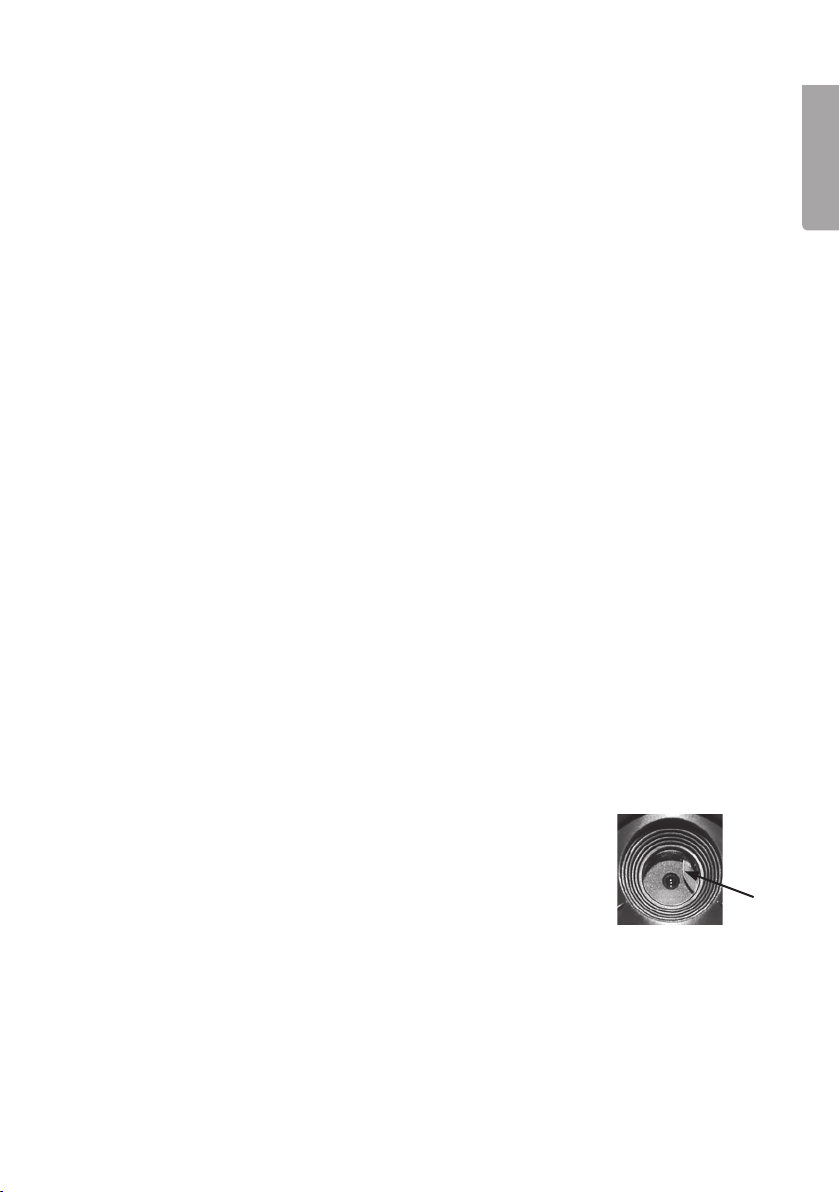
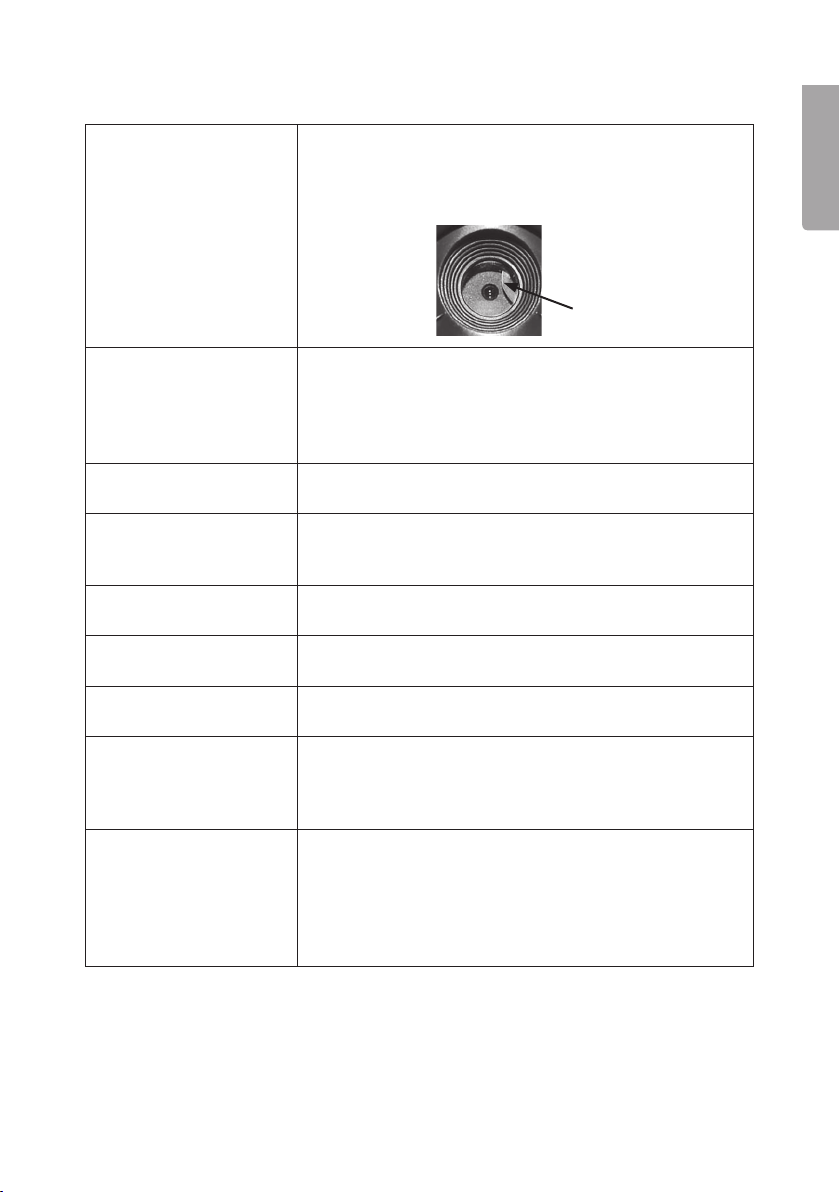
Note:
Thecamera lens has anIR filter which, when thecamera is
switched off, can end up in aposition where it is shading
thelens. When thecamera is switched back on again,
thefilter will revert to its correct position.
Getting started
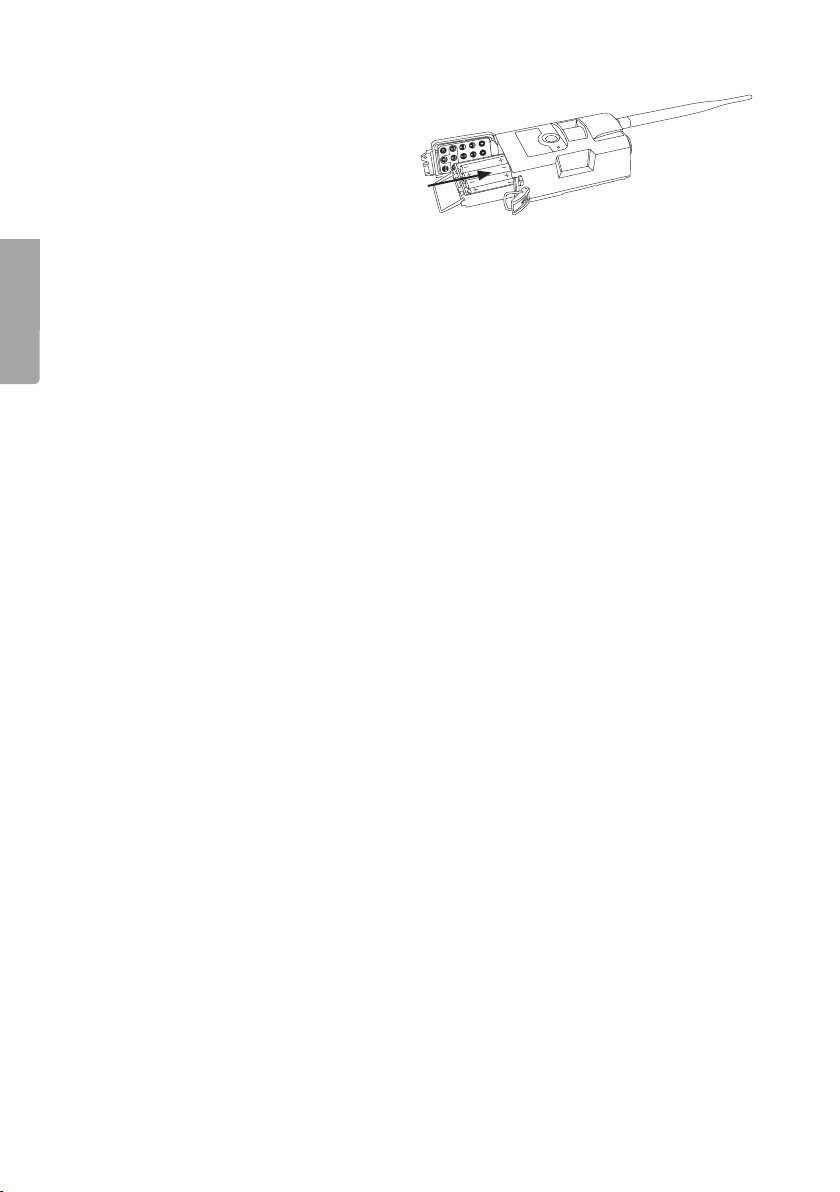
Inserting batteries
1. Lift thelid (1).
2. Grasp thehandle of thebattery holder (18) and pull theholder out of thecamera.
3. Insert 8 (or 4)×AA/LR6 batteries into thebattery compartment as shown in thefigure.
Note thepolarity markings on thebottom of thebattery holder to ensure correct insertion.
3
Page 4

English
Note:
• Thebattery holder should be
inserted as shown in thefigure
(it is possible to insert it upside
down, but then thecamera will
not work).
• Thebatteries should be replaced as soon as they start to become bad,
thecamera can be damaged by old batteries which leak. Do not mix old and
new batteries or different types of batteries (such as non-rechargeable and
rechargeable).
• Thebatteries can last for up to 6 months depending on theworking temperature
and thenumber of exposures.
• In anemergency thecamera can run on 4×AA/LR6 batteries placed in either
theright or theleft side of thebattery compartment. If only four batteries have
been used, they should be replaced with new batteries at theearliest opportunity.
• Thecamera can run on anexternal mains adaptor (sold separately) which provides
6 V DC and which has acentre-positive connector plug. Themains adaptor plugs
into the6 V input socket (19).
Important!
• In order for thecamera to be able to take photos and store them, it needs to be
fitted with anSD memory card. In order for thecamera to be able to send video or
photo (MMS) messages or e-mails, it needs to be fitted with anactive GSM SIM
card. TheSIM card must be activated for mobile data/MMS and thePIN code
must be deactivated.
• Thecamera only supports GSM (2G) and does not work with operators who
only deal with 3G. In theUK therefore, thecamera will not work with networks
operated by Three. Most other operators providing 3G coverage also support 2G (GSM)
coverage.
4
Page 5
Settings
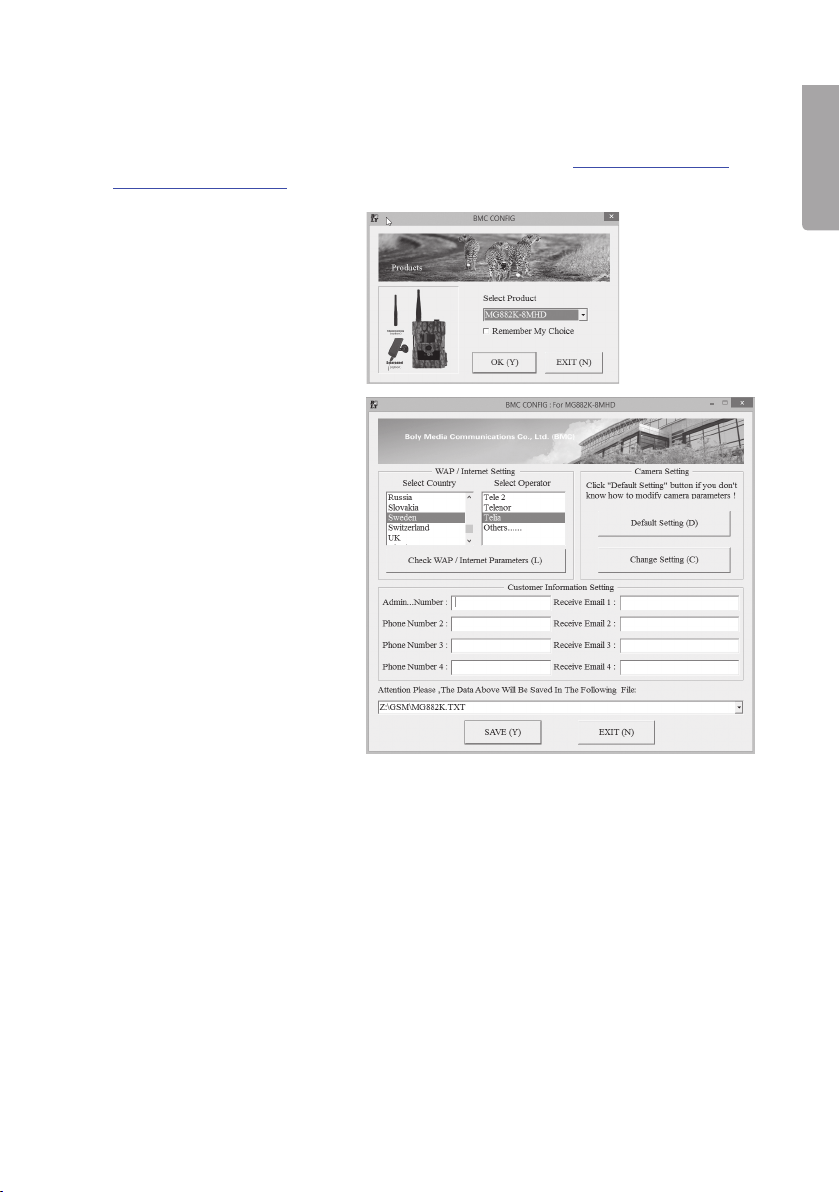
We recommend that you set up thecamera using theprogram BMC Config.
1. Download theprogram from themanufacturer’s homepage www.Bolyguard.com or
www.clasohlson.co.uk and install it on your computer.
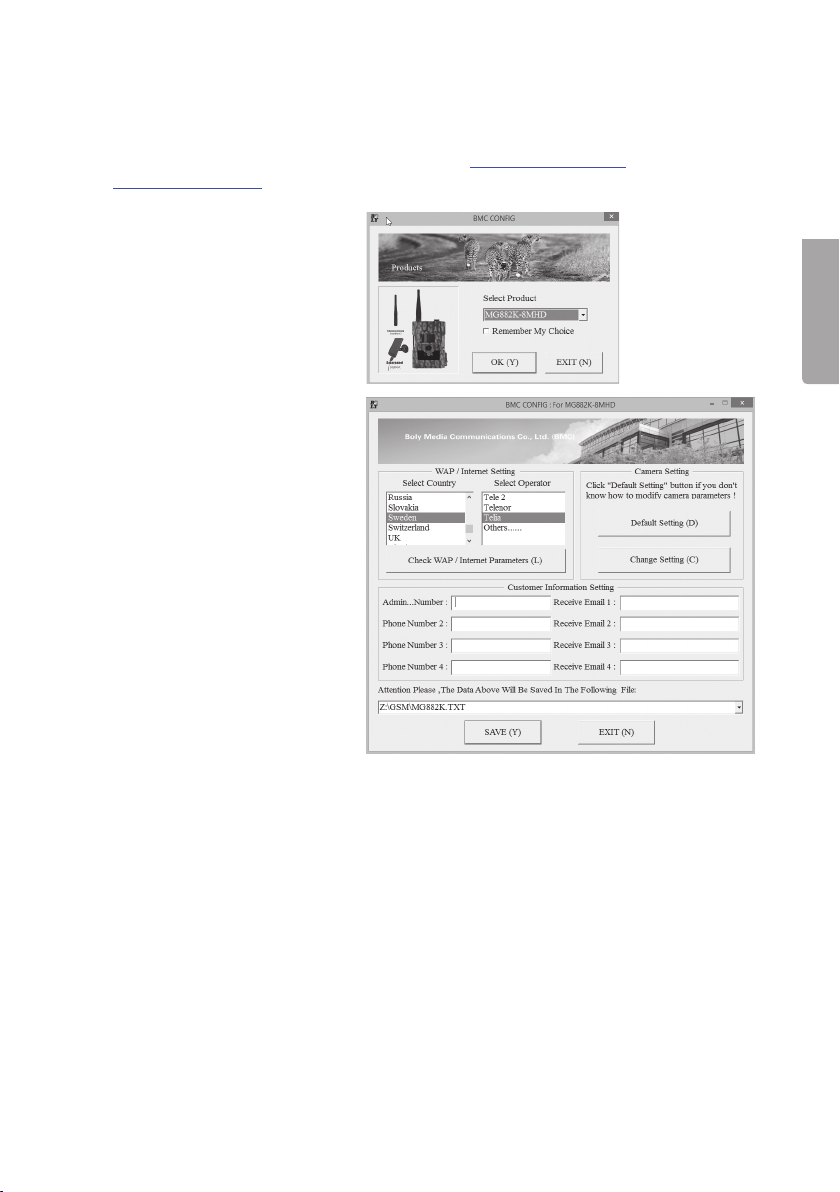
2. Run theprogram,
thestartpage will appear,
select camera model
MG882K-8MHD in the
“Select product” field and
then press [ OK ].
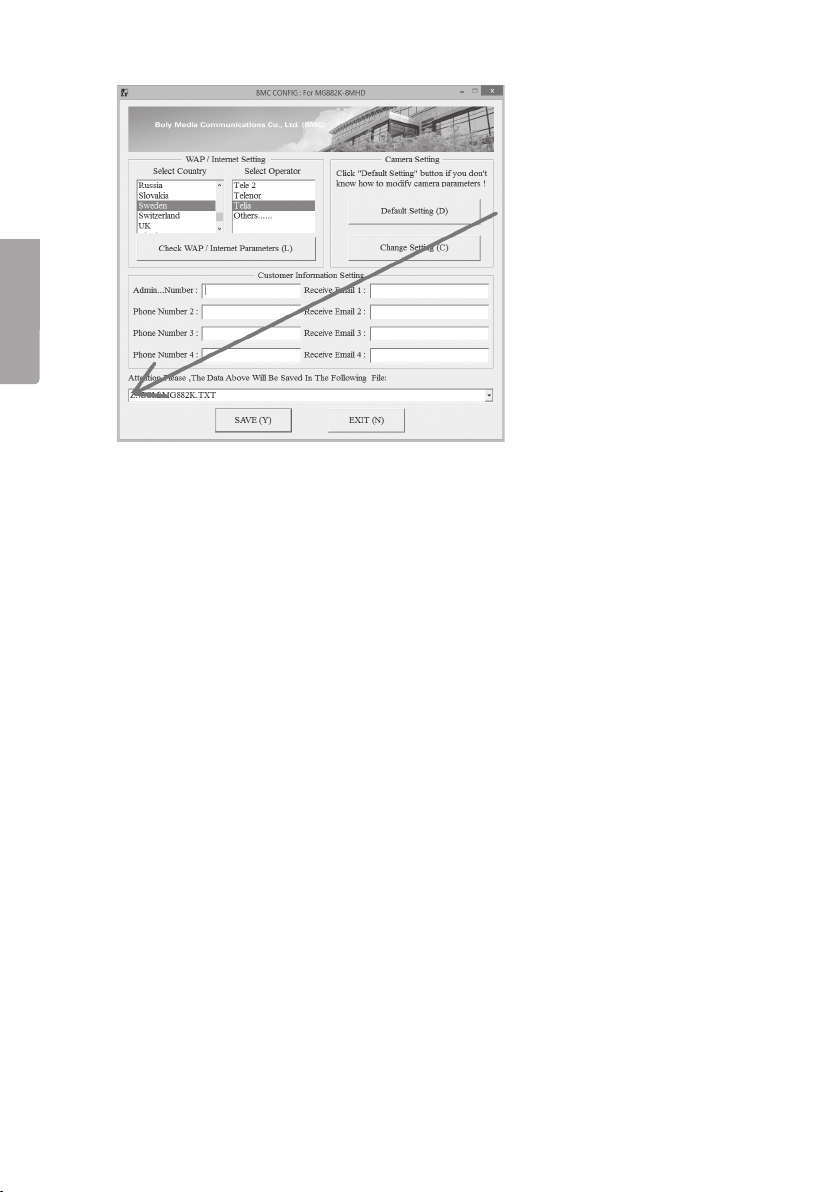
3. Anew window will appear.
Select country and
operator in the WAP/
Internet Setting box.
If your operator is not on
thelist, select Others...
and fill in thesettings (see
point 5 below). If unsure,
contact your operator for
current details.
English
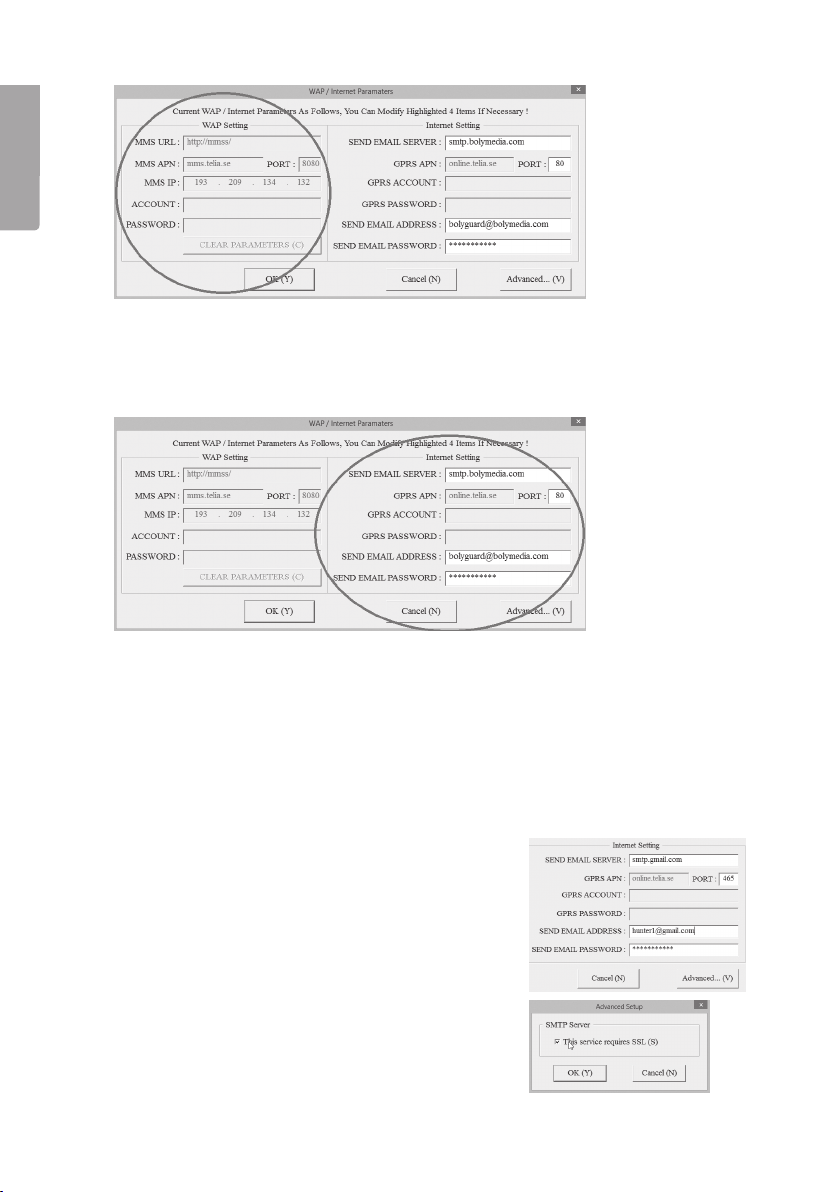
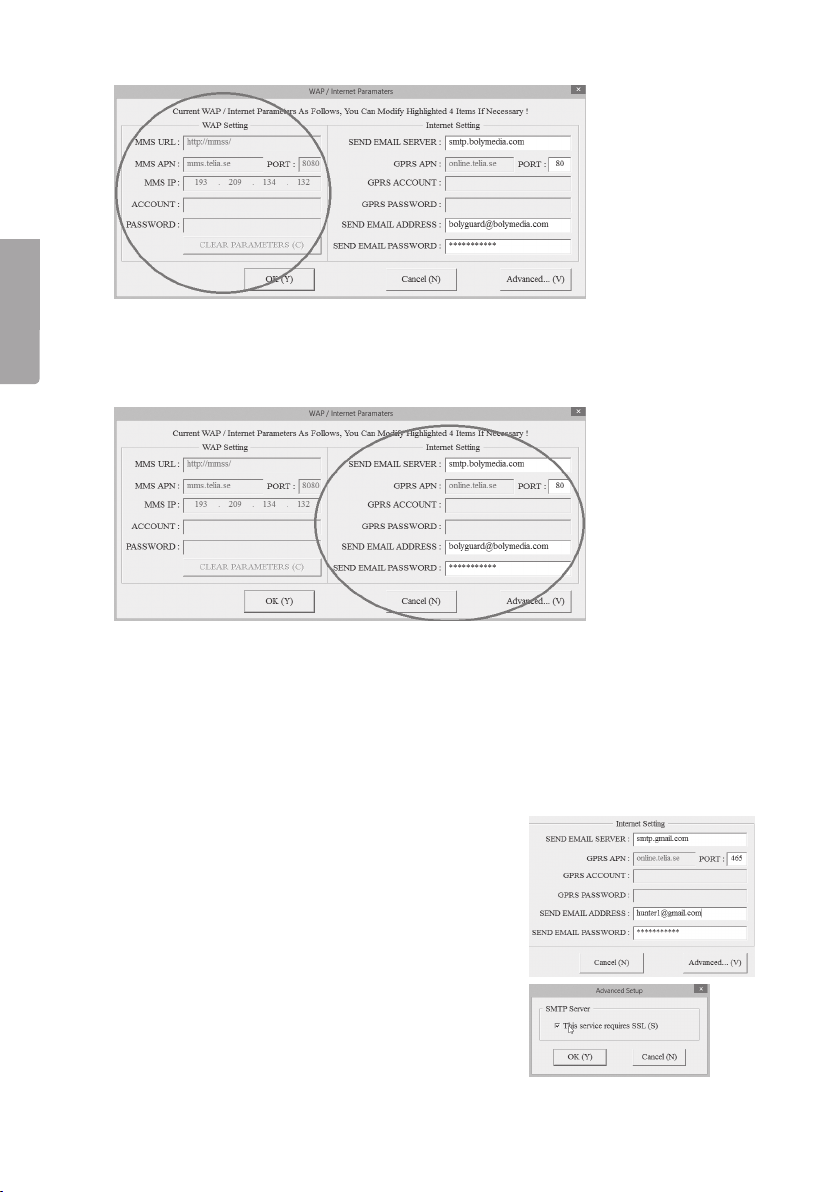
4. Press the [ Check WAP/Parameters (L) ] button. The “WAP/Internet Parameters”
window will appear. Thecamera can send photos either via MMS to atelephone
or e-mail inbox, or as ane-mail via GPRS. Thedifference is that MMS only requires
MMS settings whilst GPRS requires ane-mail account in order for thephotos to be
sent. Theadvantage of GPRS is that it has ahigher priority on themobile network,
so themessages are less likely to be delayed than MMS messages. Moreover,
GPRS can be cheaper from certain operators as they charge for theamount of
transferred data instead of thenumber of MMS messages.
5
Page 6
English
5. In thebox on theleft, WAP Setting, your MMS settings are displayed and they are
specified automatically if you have selected one of theoperators on thelist.
This is where you should fill in your own information if you have selected Others...
as anoperator. These MMS settings are required in order for thecamera to be able
to send MMS messages to mobile phones or e-mail accounts.
6. Thebox on theright, Internet Setting, is for your GPRS settings. TheGPRS
settings are required in order for thecamera to be able to send e-mails to e-mail
accounts.
We recommend that you create anew e-mail account exclusively for thecamera.
Enter thename of theSMPT server for your Internet service provider (SEND EMAIL
SERVER), port, e-mail address from which thecamera is to send from (SEND EMAIL
ADDRESS) and thepassword of thee-mail account (SEND EMAIL PASSWORD).
Contact you operator if you are unsure of thee-mail settings.
This is anexample of thesettings for using Gmail:
Do not forget to press the [ Advanced ] button
(thebox below will appear) and tick thebox for
SSL if your operator requires this.
Press [ OK (Y) ] to save.
6
Page 7
7. Press [ OK (Y) ] to save WAP/Internet Parameters.
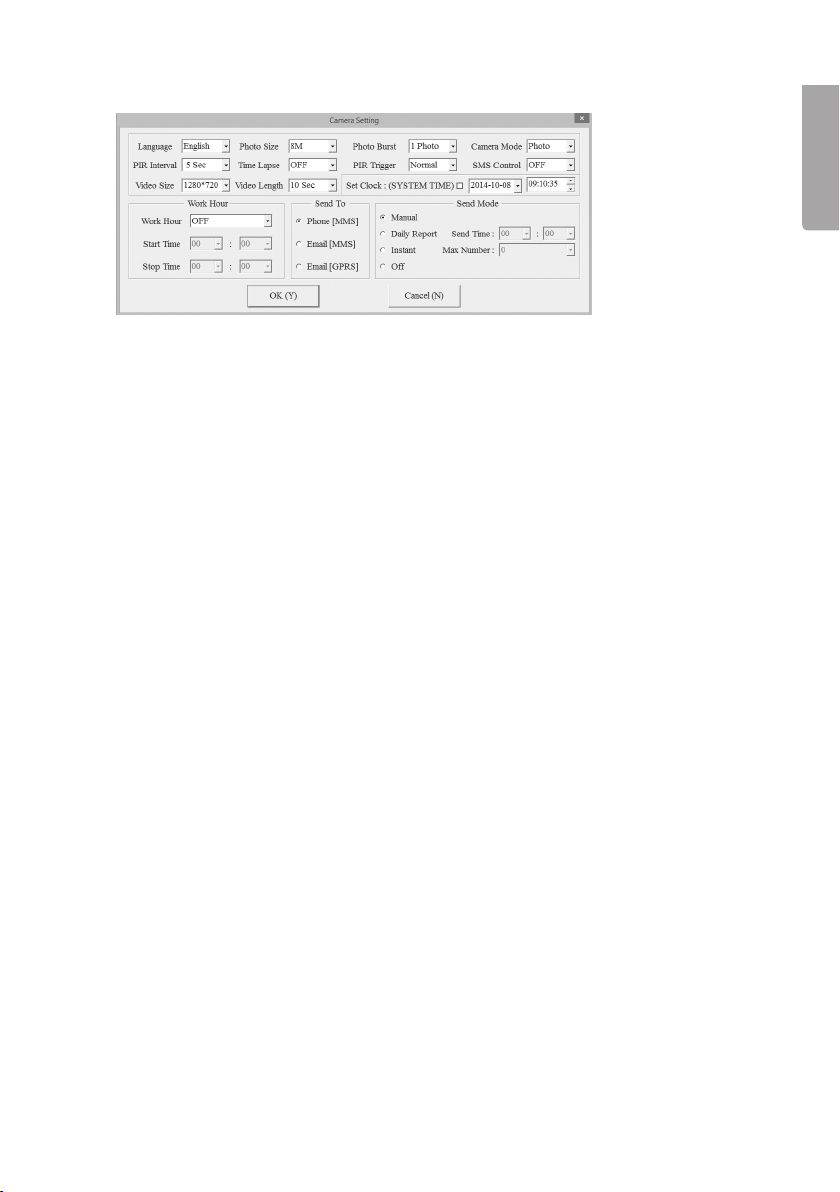
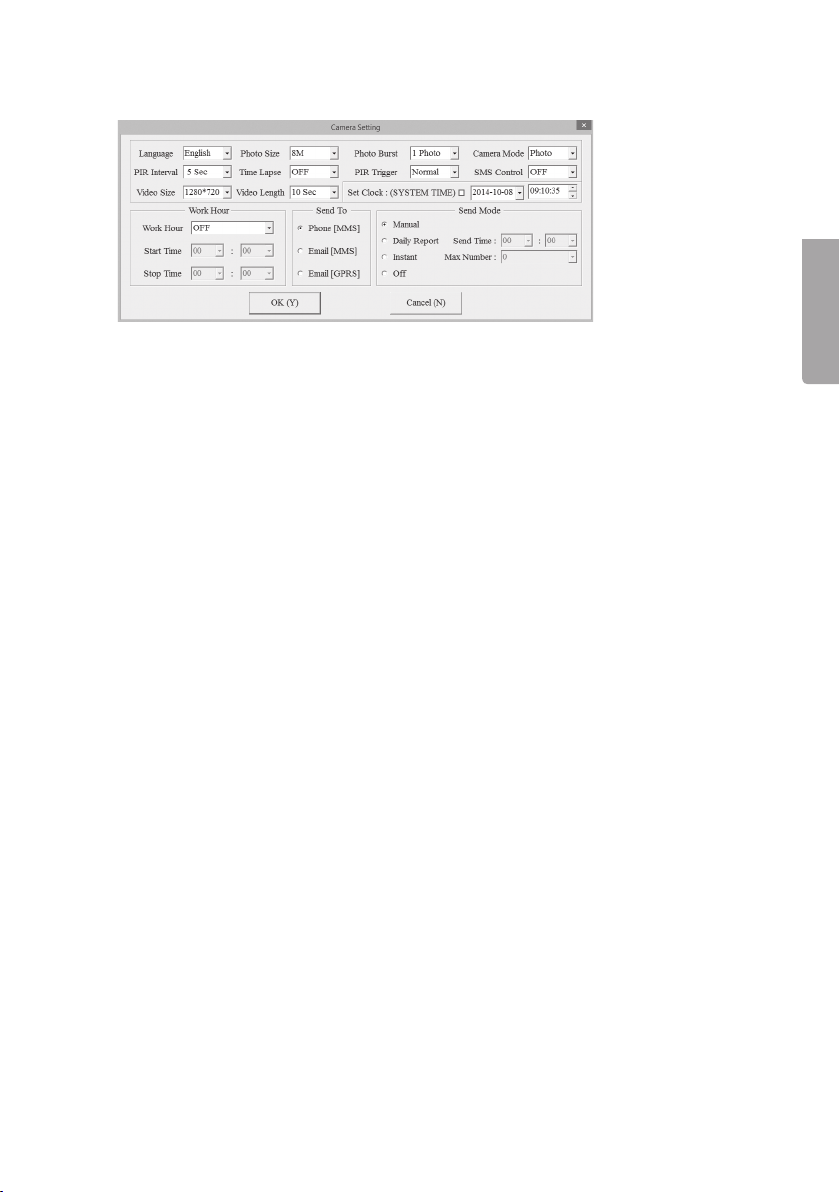
8. Press Change Setting for other camera settings. Thewindow below will appear.
Settings for attributes such as Language and PIR Interval can be made at
thetop of thewindow. Further information about these settings can be found in
thePerforming settings using theremote control section below.
Other boxes in thewindow are:
• Work hour: Used if you only want thecamera to be activated during certain hours
of theday.
• Send to: Select whether thephoto is to be sent via MMS or e-mail. If you select
Phone [ MMS ], thephoto will be sent to thetelephone number which is entered
in accordance with point 10 below. If you select Email [ MMS ] or Email [ GPRS ],
thephoto will be sent to thee-mail address which is entered in accordance with
point 10 below.
• Send mode: Select whether, or how often, thephotos are to be sent. There are 4
choices available:
- Manual: Aphoto is only sent upon request via SMS or app.
- Daily Report: Choose atime when thecamera sends areport about
thenumber of photos or videos that have been taken during 24 hours.
- Instant: Thecamera sends thephoto as soon as it has been taken.
Themaximum number of photos that can be sent during a24 hour period
can be limited.
- Off: No photos are sent.
9. When you have made all thesettings, press [ OK ] to save.
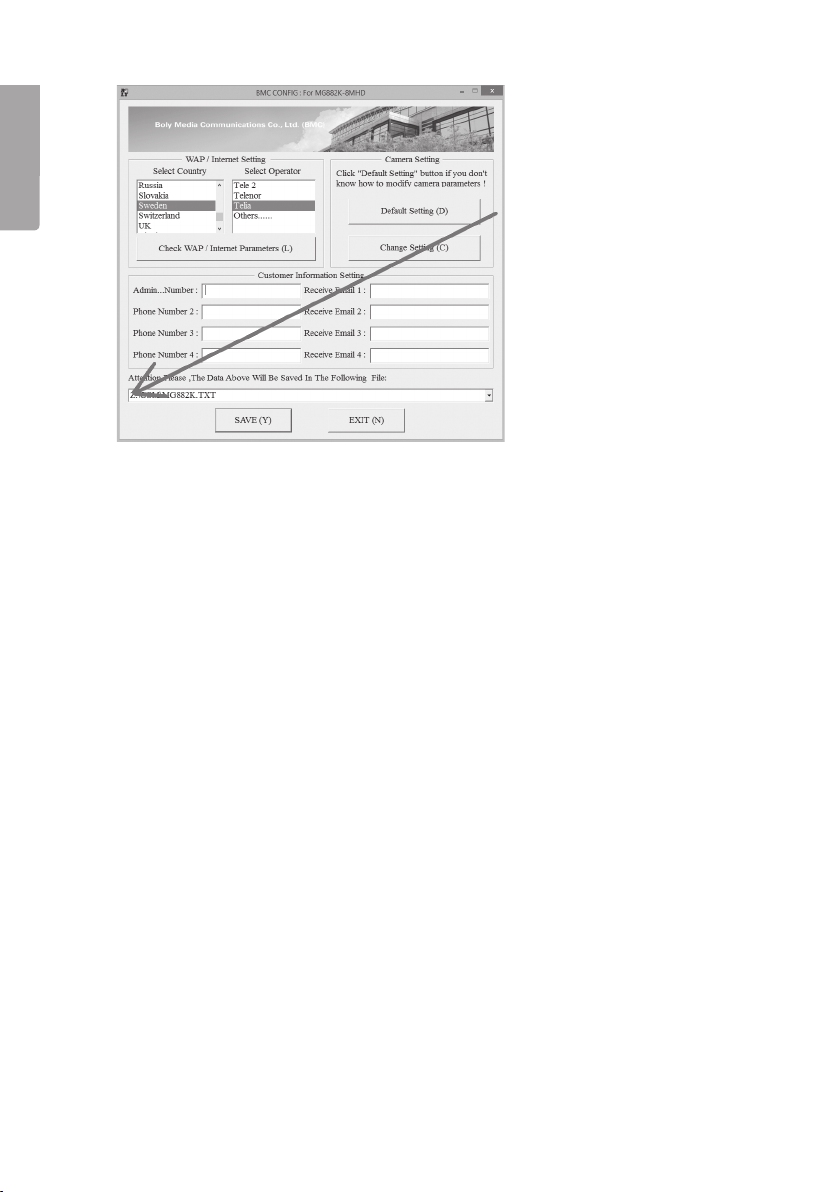
10. Enter thetelephone numbers or e-mail addresses to which you want thecamera
to send thephotos in the Customer Information Setting box in thewindow
which appears under point 3 above. If you are using theBGTools app, thenumber
of thetelephone which is to be used to control thecamera with should be entered
in the Admin... Number field.
11. If you have not already connected thecamera to your computer with theprovided
USB cable, do it now.
12. Select thecamera in thefield for where your settings are to be saved.
English
7
Page 8
English
13. Press [ SAVE (Y) ] to save thesettings.
14. Disconnect thecamera from your computer.
15. In order for thecamera to be able to adopt thenew settings the function switch
must be set to “TEST” and thecamera allowed to start up and process
thesettings, this will take approximately 30 seconds. Thefunction switch should
then be set to ON and thecamera will work in accordance with thenew settings.
16. We recommend that you test thecamera close to home to ensure that everything
works as it should before placing it out in thefield.
Things to consider:
• E-mail operators might have different security settings and levels. In some cases
you might have to change your security settings in order that another device
(thecamera) can log on to your account.
• Note: It can be difficult to see thesecurity levels of thevarious operators. If you
can’t get you e-mail to work despite following thesteps in theexample below,
we recommend that you only use theMMS function of thecamera to ensure that
thephotos are delivered.
8
Page 9
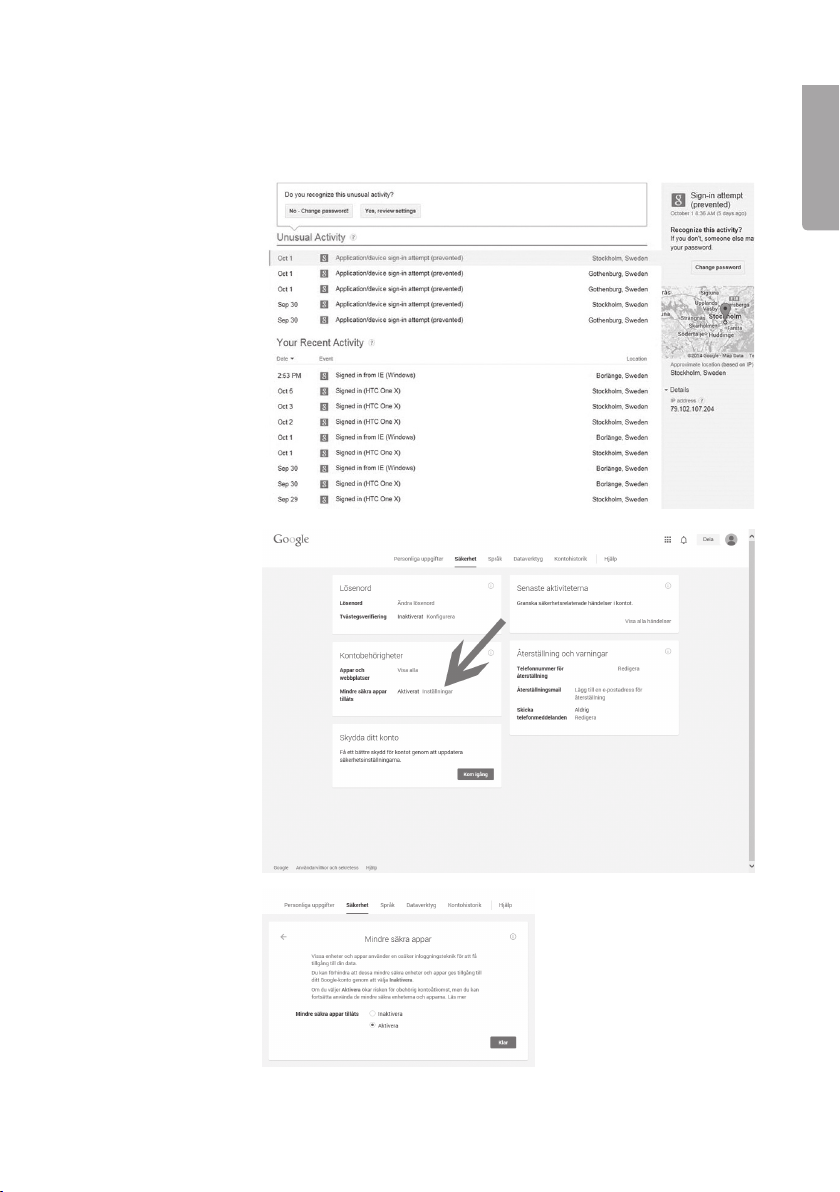
This is what it looks like when you use Gmail. Here, Gmail has prevented thecamera
from logging on to theaccount:
Example:
To access thesettings, first log on to
your Gmail account
and then click on
Account–Personal
settings–Security–
Account permissions–Access
for less secure
apps–Settings.
English
Then select Enable,
to permit less
secure apps.
9
Page 10
English
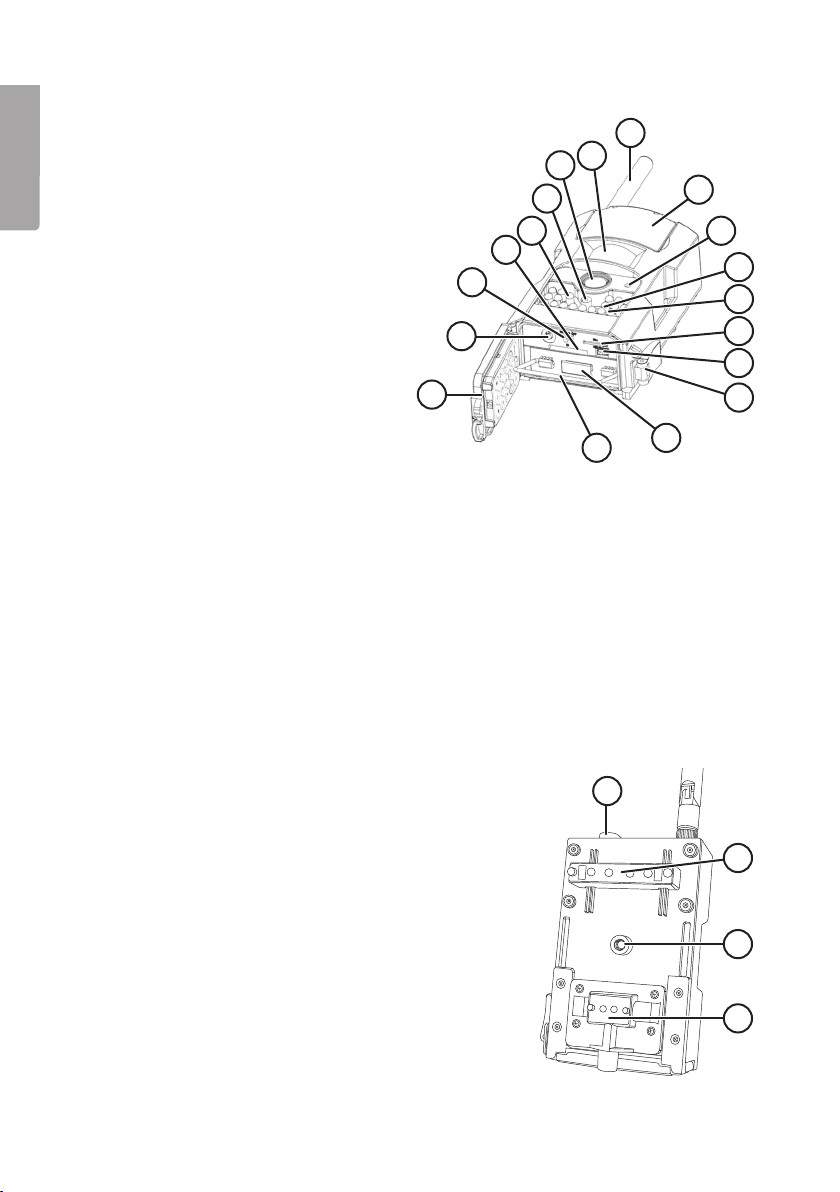
Buttons and functions
1. Lid with remote control holder
2. TV out. Video output
(power lead sold separately)
3. Function switch with 3 settings:
- OFF (Camera switched off).
- TEST (three functions: settings,
take photo/video manually, show
photos and video start window
which can help when positioning
thecamera)
- ON (thecamera activated with
factory settings or according to
your own settings)
4. SD card slot
5. LED indicator
6. Laser pointer
7. Camera lens
8. Motion detector
9. Aerial
10. LCD display door
11. Microphone
12. Twilight switch
13. IR diodes for night vision
14. SIM card slot
15. USB port. Thecamera can be connected
to acomputer using theincluded USB
lead and can manage thecontents of
your memory card in thesame way as
your operating system.
16. Drawbolt catch
17. Battery holder
18. Battery holder handle
19. 6 V DC input, + centre
(mains adaptor sold separately)
20. Tilt control
21. Tripod adapter
22. Tripod thread attachment for theftdeterrent security strap/wire
9
8
7
6
5
10
11
4
3
12
13
2
14
15
1
18
17
16
19
20
21
22
10
Page 11
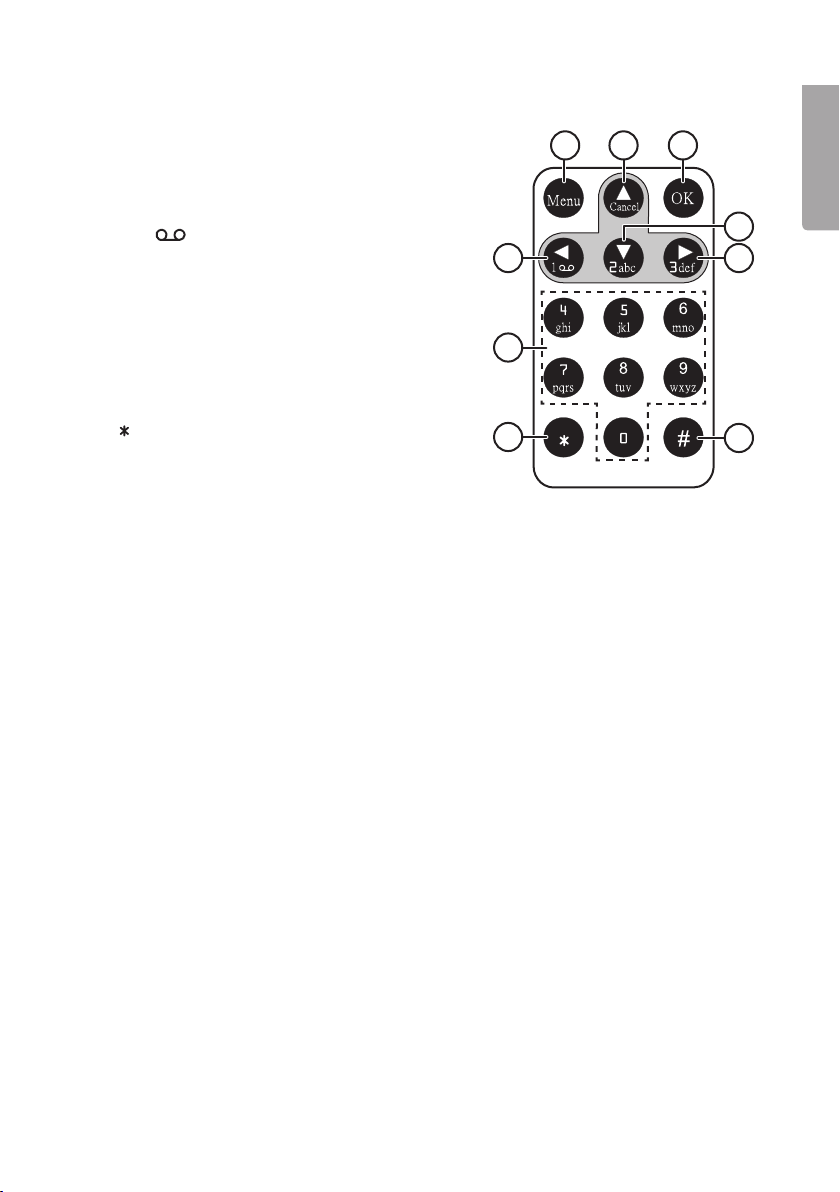
Remote control
23. [ Menu ]
24. [ ▲ Cancel ] Advance to desired submenu,
move up, undo
25. [ OK ] Open display mode, confirm selection
26. [ ◄ 1
Press therequired number of times to enter
thefollowing characters: 1. / : @ _
27. [ ▼ 2 abc ] Advance to desired submenu,
move down
28. [ ► 3 def ] Advance to desired setting in submenu
29. [ 4–0 ] Numerical and letter buttons. Press 0 several
times to enter + and -
30. [
31. [ # ]
Note:
• Theremote control is stored on theinside of thelid (1).
• Certain symbols on theremote control may not be applicable to this camera
model.
• Themaximum range of theremote control is approximately 9 m. Direct sunlight on
thecamera or remote control might shorten therange.
• When thecamera is switched on (in either ON or TEST mode) it needs 10–30 seconds
to initialise and connect to thetelephone network.
• Thestrip of plastic protruding from thebattery holder must be removed. Thestrip
of plastic prevents thebatteries from discharging during storage and transport.
] Advance to desired setting in submenu.
] Activate laser pointer when positioning camera
23 24 25
26
29
30
27
28
31
English
If theremote control does not work, thebattery may be flat.
Procedure for changing:
1. Pull out theremote control battery holder by sliding thesnap lock towards
thebattery holder at thesame time as you pull thebattery holder out.
2. Insert anew battery (1×CR 2025), thepositive terminal of thebattery (+) should
be facing you. See thesticker on theremote control.
3. Insert thebattery holder, making sure that thesnap lock locks properly.
11
Page 12
English
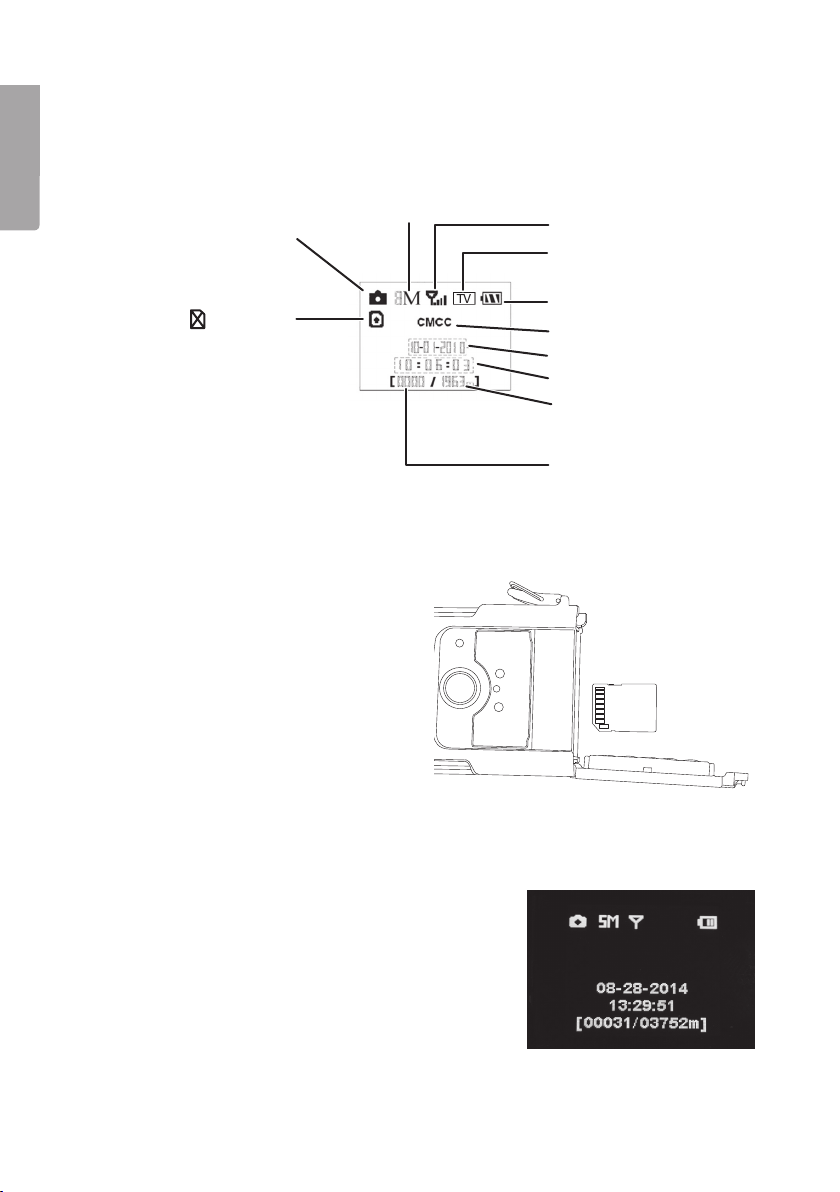
Display symbols
Note: Thedisplay only lights up when thefunction selector is in TEST mode. It does
not light up in ON mode. Thedisplay will turn blank approximately 3 minutes after
thelast time abutton is pressed in TEST mode.
Displays camera or video
camera symbol depending
on setting
Indicates that aSIM card is
loaded. If the symbol is
displayed, this means that
theMMS function does not
work (problem with telephone network, no or poor
coverage etc.).
Inserting amemory card
Note: Make sure that thecamera is off when thememory card is inserted.
Also make sure that thecamera is off when you remove thecard.
1. Thecamera is intended for SD/
SDHC memory cards 8–32 GB.
2. Make sure that thewrite protection
feature of thememory card is not
activated.
3. Open thelid (1) and carefully insert
anSD/SDHC memory card in
thecard slot (4) as shown in thefigure.
Thememory card must be pushed
in until a “click” sound is heard.
Selected image size
Signal strength
Displayed when anAV cable
is connected to TV out
Battery status
Service provider
Year and date
Time
Remaining capacity on
thememory card
Number of photos taken
Formatting thememory card
Format thememory card before use. Formatting means that anything saved on
thecard will be deleted so as to make room for new files.
1. Lift thelid that covers thedisplay.
2. Set thefunction switch (3) to theTEST mode.
3. Thestart screen is shown on thedisplay.
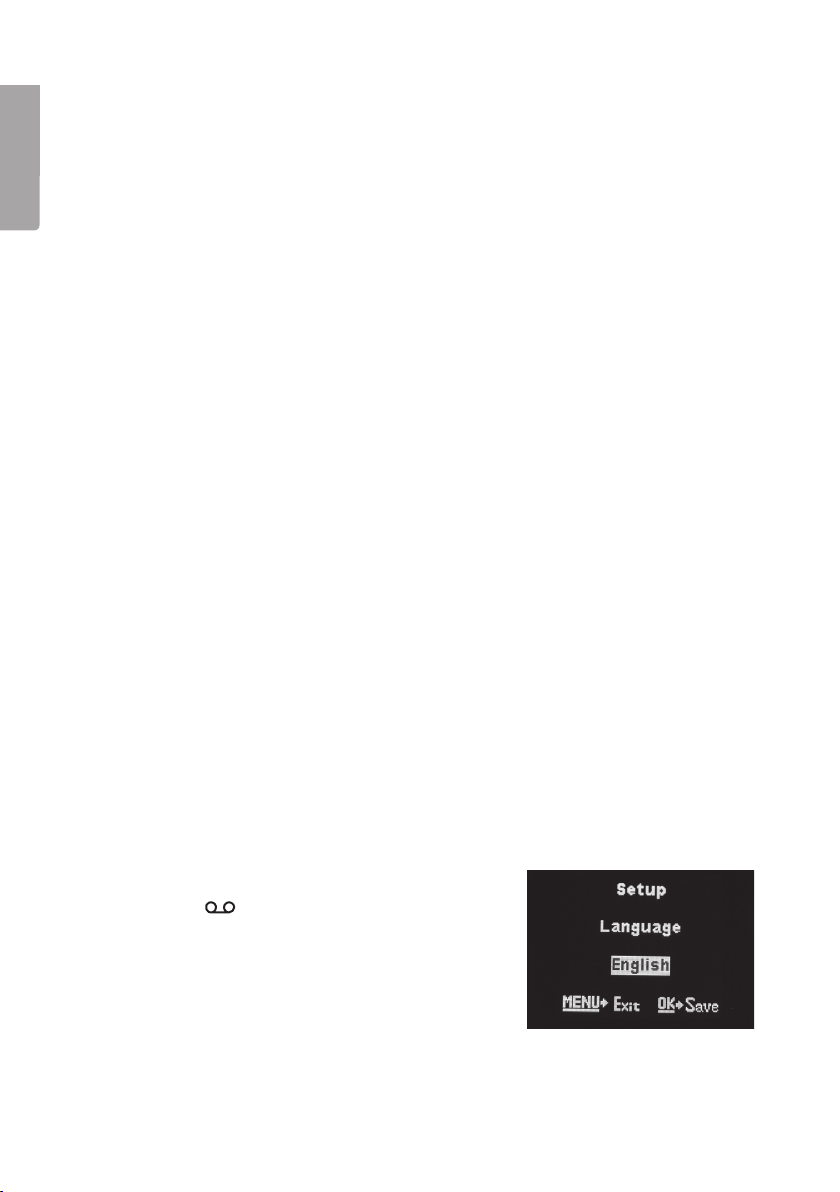
4. Press [ MENU ] on theremote control,
themenu for setting thelanguage,
“Setup Language”, is displayed.
12
Page 13
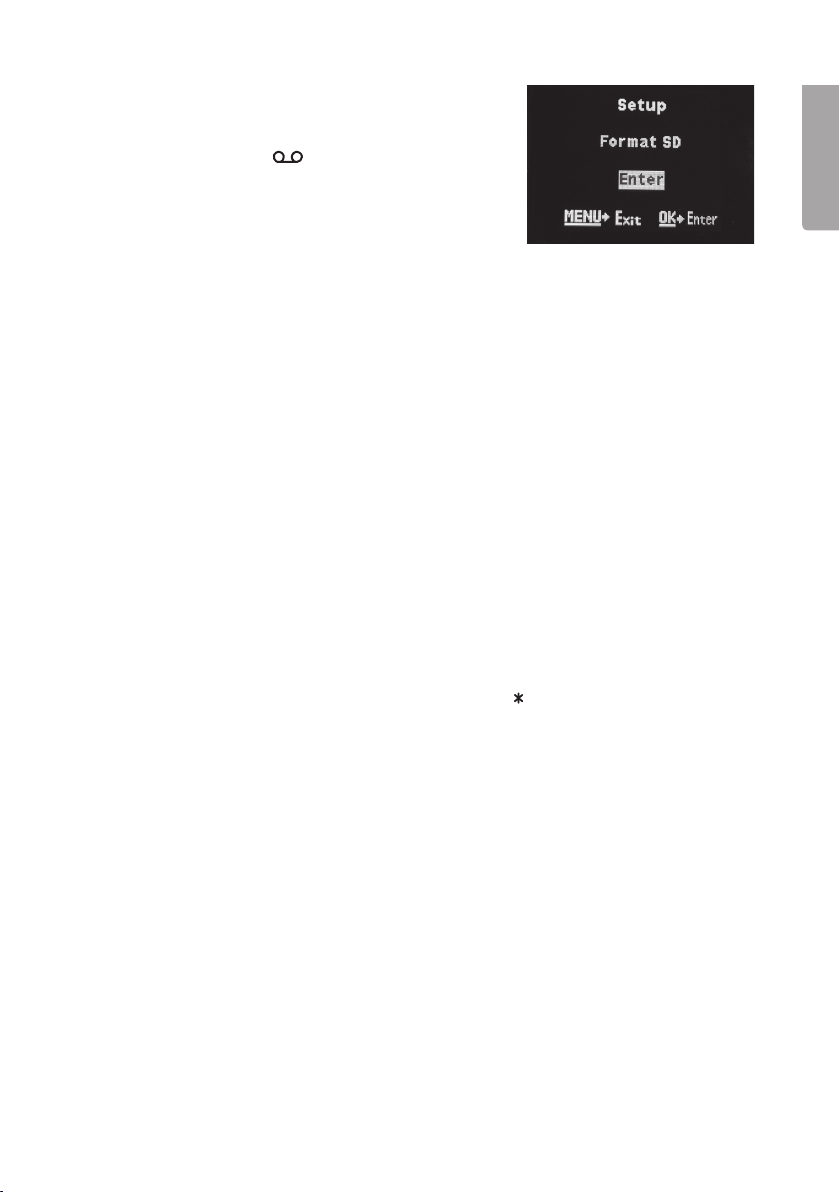
5. Advance to the “Format SD” menu with [ ▼ 2 abc ].
6. Press [ OK ]. “Format SD Yes No” is shown on
thedisplay.
7. Mark Yes with [ ◄ 1 ].
8. Press [ OK ] to confirm (or [ MENU ] to discontinue).
SIM card
If you intend to use MMS/SMS or thee-mail functions, carefully insert anappropriate
SIM card in thecompartment (14).
Refer to themarkings above thecompartment so that thecard is inserted correctly.
Operating instructions
Things to consider before turning thecamera on:
Placement
• Thecamera can be mounted with theincluded strap or by using astand or
other bracket that fits thetripod adaptor (21) or (22) on theback of thecamera.
Make sure that thecamera sits securely so that it is not affected by wind or other
external factors.
• Remember to position thecamera where it will receive thebest possible protection
from theelements.
• Asuitable distance to thesubject is approximately 5 m; secure thecamera
approximately 1.5 to 2 m above theground.
• Set thefunction selector to TEST mode and press [ ] to turn on thelaser pointer
and use it as avisual aid to aim thecamera.
English
For best results
• Thecamera is affected by temperature. Thecapacity and range of thePIR sensor is
affected by theambient temperature relative to theanimal’s body heat. Thegreater
thedifference, theeasier it is for thecamera to detect movement over alonger distance.
• Thecamera takes colour images in daylight and black and white ones in darkness.
• Bear in mind where thesun rises/sets, and position thecamera with thesun
behind it. This will prevent direct light spoiling your photos. If possible, position
thecamera in anortherly direction to prevent direct light spoiling your photos and
false indications from thePIR sensor.
• Remove any twigs in front of thecamera; twigs with leaves on them can cause
false indications.
13
Page 14
English
Taking aphoto/video sequence manually to test thecamera
Note:
• This function is anadditional aid when positioning thecamera. Take aphoto or
avideo sequence manually so that you can see thecatchment area before
thecamera is positioned permanently.
• Video cannot be shown in thecamera display, only thestart window of thevideo
is shown.
1. Set thefunction switch to theTEST mode.
2. Press [ ▼ 2 abc ] or [ ▲ Cancel ] to select photo taking or video recording. Acamera
or video camera symbol is shown in thetop left hand corner of thedisplay.
3. Press [ ► 3 def ] to take aphoto or avideo sequence.
4. Press [ OK ] to display theimage or start window of thevideo in thecamera display.
5. If you have taken several photos or video sequences, toggle between these with
[ ▼ 2 abc ] or [ ▲ Cancel ].
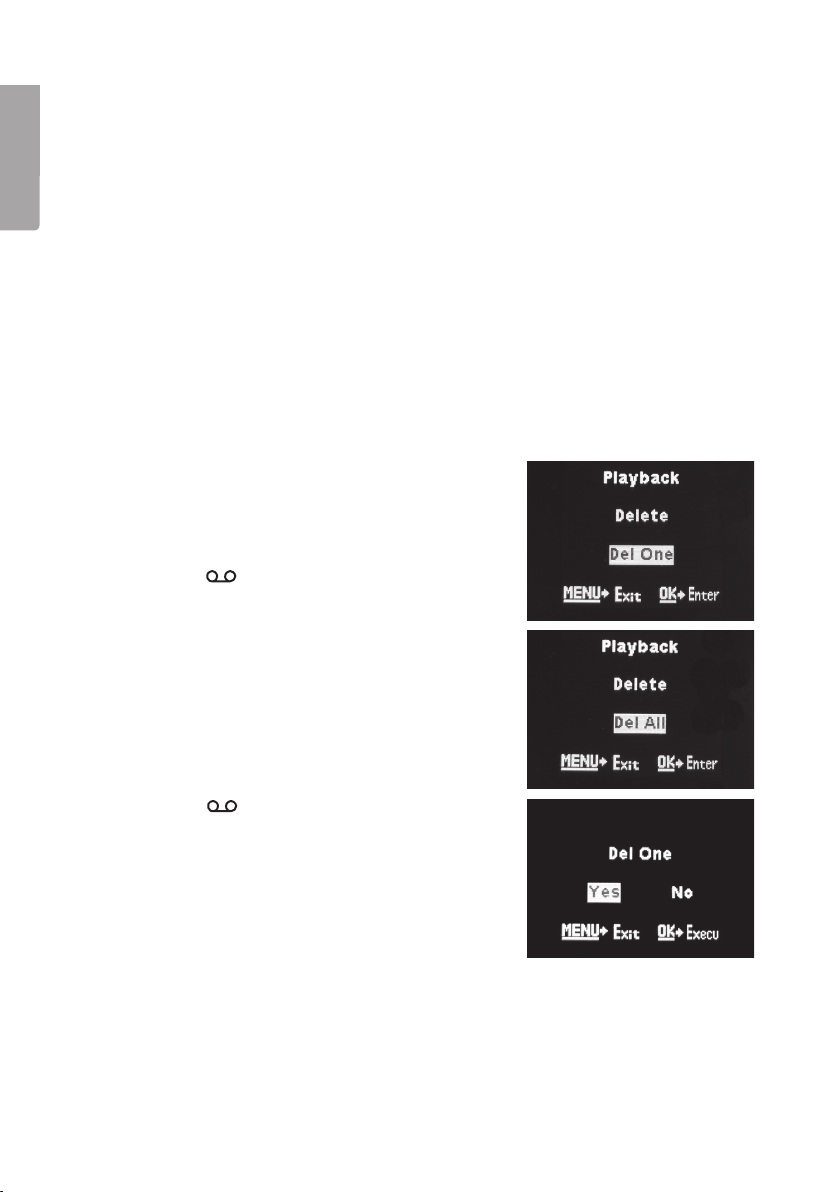
Delete aphoto or video sequence
1. Show thephoto or video sequence you want to
delete in thedisplay.
2. Press [ Menu ].
3. Press [ ▼ 2 abc ] or [ ▲ Cancel ] until “Delete” is
shown in thedisplay.
4. Press [ ◄ 1 ] or [ ► 3 def ] to select
Del One (delete thephoto you are displaying)
or Del All (delete all on thecard).
5. Press [ OK ] to confirm your selection.
6. Press [ ◄ 1 ] or [ ► 3 def ] to select
Yes (delete) or No (cancel).
14
Page 15

Thefactory settings of thecamera are as follows:
“Language” English
“Camera Mode” Still image
“Set Clock” Time and date Not set
“Photo Size” 8 megapixels
“Photo Burst” 1 photo
“Video Size” Video resolution 1280×720
“Video Length” Length of video 10 sec
“Time Lapse” Off
“PIR Trigger” Themotion sensor sensitivity Normal
“PIR Interval” Themotion sensor activation 5 sec
“Work Hour” Time when thecamera will work Off
“MMS Set” Setting theMMS function Not set
“GPRS Set” Setting GPRS Not set
“Send Mode” When messages are to be sent Manual
“Send to” Where messages are to be sent MMS to phone
“SMS Control” Off
“Version” Shows current software version —
“Format SD” Formatting thememory card —
“Default Set” Restores factory settings —
English
Performing settings using theremote control
Note: Thecamera settings can be performed using theremote control but it is much
easier to perform settings on your computer in theway described in theSettings
section above. We recommend that you only use theremote control for simple setting
adjustments when you do not have access to acomputer.
1. Set thefunction switch to the TEST mode.
2. Press [ MENU ], thefirst submenu, “Setup Language”, is shown.
3. Advance to thedesired menu with [ ▼ 2 abc ] or [ ▲ Cancel ].
4. Thecurrent setting for theselected menu is highlighted on thedisplay.
5. If you want to change thesetting for theselected menu, press [ ◄ 1
to make thechange. Each press will change thesetting one step.
6. Press [ OK ] to confirm.
7. Press [ MENU ] to exit themenu.
15
] or [ ► 3 def ]
Page 16
English
These settings menus are available:
“Language” Choose: Svenska (Swedish), English (English), Suomi (Finnish)
or Deutsch (German).
“Camera Mode” Select function: photo or video.
“Set Clock” Setting thetime and date: MM–DD–YY and time.
“Photo Size” Image size: 8 or 5 MP.
“Photo Burst” Aphoto or image series: 1 photo, 2 photos or 3 photos.
“Video Size” Video resolution: 1280×720 or 640×480.
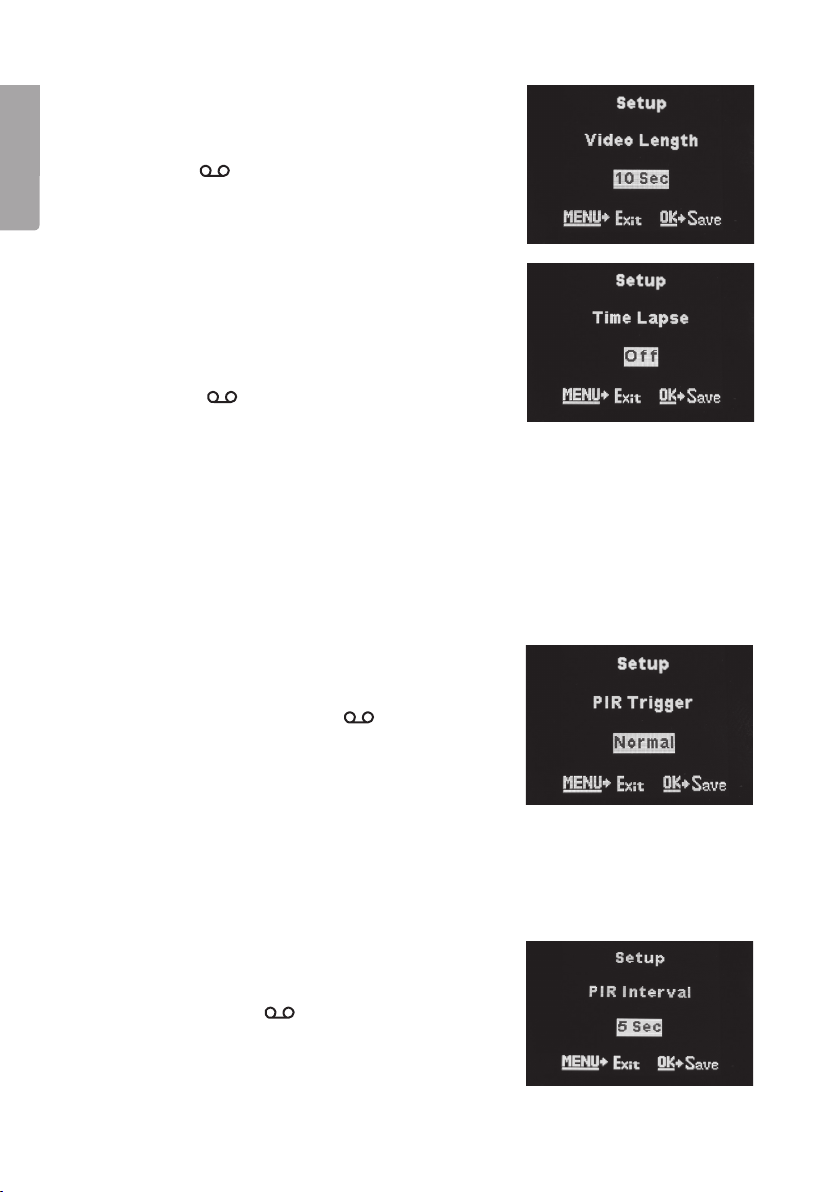
“Video Length” Select time 5–60 sec.
“Time Lapse” Take aphoto or video at apredetermined interval regardless of
whether themotion detector is activated or not. Select atime
interval between 5 mins and 8 hours or Off (function disabled).
“PIR Trigger” Set themotion sensor sensitivity: Off–Low–Normal–High.
“PIR Interval” Select when themotion detector will be activated after themost
recent activation in intervals from 0 sec to 60 mins. 0 means
that themotion detector is active all thetime.
“Work Hour” Set thetime of theday when thecamera will be active or select
to turn off thefunction, Off.
“MMS Set” MMS settings.
“GPRS Set” GPRS settings.
“Send Mode” Select when theimage will be sent: Off, Manual, Daily Report
or Instant.
“Send to” Phone MMS, Email [ GPRS ] or Email [ MMS ].
“SMS Control” Select whether or not you want to be able to control
thecamera via SMS. On or Off.
“Version” Shows which version of software and MCU is installed.
“Format SD” Formatting theSD card in thecamera’s card slot.
“Default Set” Resets thecamera to factory settings.
Note: Resetting takes place immediately when you press [ OK ].
All personal settings will be erased when resetting.
Note: All thesettings below presume that you have already:
1. Set thefunction switch to the TEST mode.
2. Pressed [ MENU ].
3. Advanced to desired menu with [ ▲ Cancel ] or [ ▼ 2 abc ].
Language (setting thelanguage)
1. Press [ ◄ 1 ] or [ ► 3 def ] to change
languages, Svenska, English, Suomi or
Deutsch.
2. Press [ OK ] to confirm (or [ MENU ]
to discontinue).
16
Page 17
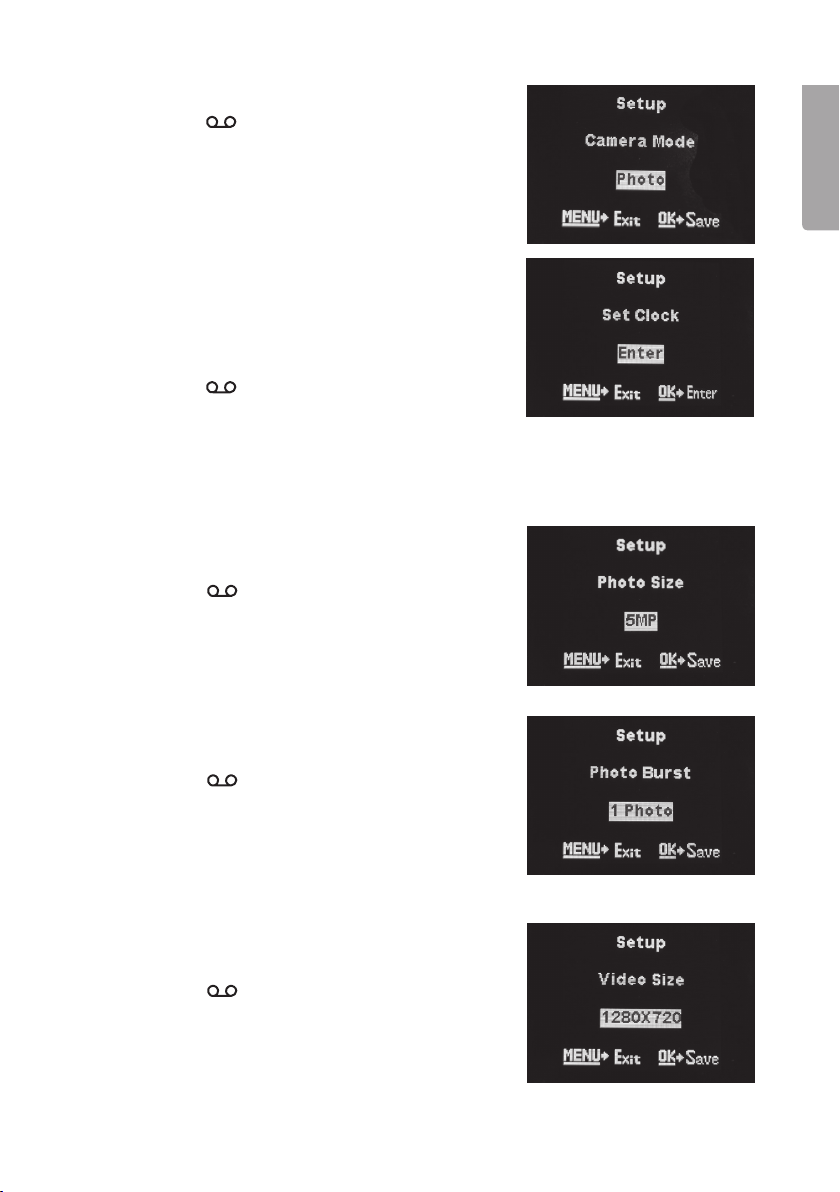
Camera Mode
1. Press [ ◄ 1 ] or [ ► 3 def ] to select
thefunction, Photo (still images) or
Video (video recording).
2. Confirm by pressing [ OK ] (or [ MENU ]
to discontinue).
Set Clock (sets time and date)
Set calendar, MM-DD-YY and time.
1. Press [ OK ] to open settings mode for time.
2. Month setting is marked, press [ ▲ Cancel ] or
[ ▼ 2 abc ] to set current month.
3. Press [ ◄ 1
date setting, set thecurrent date. Set theyear
in thesame way.
4. Follow thesame procedures for setting thetime.
5. Press [ OK ] to confirm thesetting (or [ MENU ]
to discontinue).
] or [ ► 3 def ] to advance to
Photo Size (photo resolution)
Select photo resolution, 8 or 5 MP.
1. Press [ ◄ 1
2. Press [ OK ] to confirm (or [ MENU ] to discontinue).
] or [ ► 3 def ] to change.
English
Photo Burst (series of photos)
Takes several photos when activated.
1. Press [ ◄ 1
take 1 photo, 2 photos or 3 photos each time
thecamera is activated.
2. Press [ OK ] to confirm (or [ MENU ] to discontinue).
] or [ ► 3 def ] to choose to
Video Size (video resolution)
Select video resolution, 1280×720 or 640×480.
1. Press [ ◄ 1
2. Press [ OK ] to confirm (or [ MENU ]
to discontinue).
] or [ ► 3 def ] to change.
17
Page 18
English
Video Length
Select desired time for video recording. Select
atime from 5 to 60 sec.
1. Press [ ◄ 1
time (5 to 60 sec) for video recording.
2. Press [ OK ] to confirm (or [ MENU ] to discontinue).
] or [ ► 3 def ] to select thedesired
Time Lapse (interval-controlled exposure
independently of themotion detector)
This function allows you to take photos at given
intervals, e.g. to take aseries of images every 5
minutes.
1. Press [ ◄ 1
adesired interval between automatic exposures. Select atime interval between 5 mins
and 8 hours or Off (function disabled).
2. Press [ OK ] to confirm (or [ MENU ] to discontinue).
] or [ ► 3 def ] and select
PIR Trigger (motion sensor sensitivity)
Thegreater thesensitivity selected, theeasier thecamera is activated by themotion
detector, e.g. when thewind moves branches. Thehigher thesetting, themore
photos will be taken. Thesensitivity normally decreases as thetemperature rises.
If thecamera is to be used at high temperatures, High should be selected.
1. Select sensitivity for activation of thecamera.
Choose from: Off (motion detector deactivated),
Low (low sensitivity), Normal (normal sensitivity),
High (high sensitivity) with [ ◄ 1
2. Press [ OK ] to confirm (or [ MENU ] to discontinue).
] or [ ► 3 def ].
PIR Interval (interval until re-activation after adetection)
Upon activation thecamera takes aset number of still images (or avideo sequence),
but if themotion detector detects movement all thetime, thecamera will continue
to make exposures of thesame subject in uninterrupted fashion. There is therefore
theoption of setting atime delay until thenext activation of thecamera.
1. Select how long there should be between
thelast activation of thecamera and next
re-activation. Settings range from 0 sec to
60 min using [ ◄ 1
2. Press [ OK ] to confirm (or [ MENU ] to discontinue).
] or [ ► 3 def ].
18
Page 19

Work Hour (timer)
Note: If you choose to set Work Hour to Off mode,
thecamera is always activated. Set thetime of day
thecamera is to be active, from 00:00 to 23:59.
1. Select On with [ ◄ 1
2. Press [ OK ].
3. Enter thestart time and stop time.
- Start: 00H – 00M, set desired start time.
Use the [ ▲ Cancel ] [ ▼ 2 abc ] buttons to
set thevalue. Use [ ◄ 1
to toggle between hours and minutes.
Use [ ◄ 1
between start and stop.
- Stop: 00H – 00M set desired stop time.
4. Press [ OK ] to confirm and save thesetting
(or [ MENU ] to discontinue).
] or [ ► 3 def ].
] or [ ► 3 def ]
] or [ ► 3 def ] to toggle
MMS Set (MMS settings)
Use theremote control to change settings or use
software downloaded from www.Bolyguard.com or
www.clasohlson.co.uk.
1. Press [ OK ] to access thesettings.
2. Use thekeys on theremote control to set
thedesired values.
3. Press [ ▲ Cancel ] to delete, press [ # ]
to change row.
4. Press [ OK ] to save thesettings.
English
GPRS Set (GPRS settings)
Use theremote control to change settings or use
software downloaded from www.Bolyguard.com or
www.clasohlson.co.uk.
1. Press [ OK ] to access thesettings.
2. Use thekeys on theremote control to set
thedesired values.
3. Press [ ▲ Cancel ] to delete, press [ # ]
to change row.
4. Press [ OK ] to save thesettings.
19
Page 20

Send Mode (when messages are to be sent)
Note: Video cannot be sent.
Choose from: Off, Manual, Daily report, Instant.
English
Off
No MMS messages are sent.
1. Press [ ◄ 1
2. Press [ OK ] to save.
] or [ ► 3 def ] until “Off” is displayed.
Manual
Sending anMMS manually.
1. Show thephoto you want to send on thedisplay.
2. Press [ Menu ].
3. Press [ ▲ Cancel ] or [ ▼ 2 abc ] and select Send.
4. Press [ OK ] to send. Thephoto is sent in accordance with thesettings you make in
the “Send to” menu below.
Daily Report
At apredetermined time thecamera reports how many photos/videos have been
taken during aday.
If thecamera is in still image (Photo) mode, anMMS is sent with thelatest photos
taken and thetotal number of photos taken.
If thecamera is in video mode, anSMS is sent reporting how many videos have been taken.
1. Press [ ◄ 1
2. Press [ OK ] and set thetime with [ ▲ Cancel ] or [ ▼ 2 abc ]. Use [ ◄ 1 ] or
[ ► 3 def ] to switch between hours and minutes.
3. Press [ OK ] to save.
] or [ ► 3 def ] until “Daily report” is displayed.
Instant
Thecamera sends anMMS as soon as thephoto has been taken. Set how many
photos you want thecamera to send in a24-hour period.
E.g.
You want thecamera to send 10 photos. After 8 hours thecamera has taken 10 photos
and sent them.
After thelast photo has been taken it takes 24 hours for thenext photo to be sent via MMS.
1. Press [ ◄ 1
2. Press [ OK ] and set thenumber of photos (from unlimited to 99 photos) using
[ ▲ Cancel ] or [ ▼ 2 abc ].
3. Press [ OK ] to save.
] or [ ► 3 def ] until “Instant” is displayed.
20
Page 21
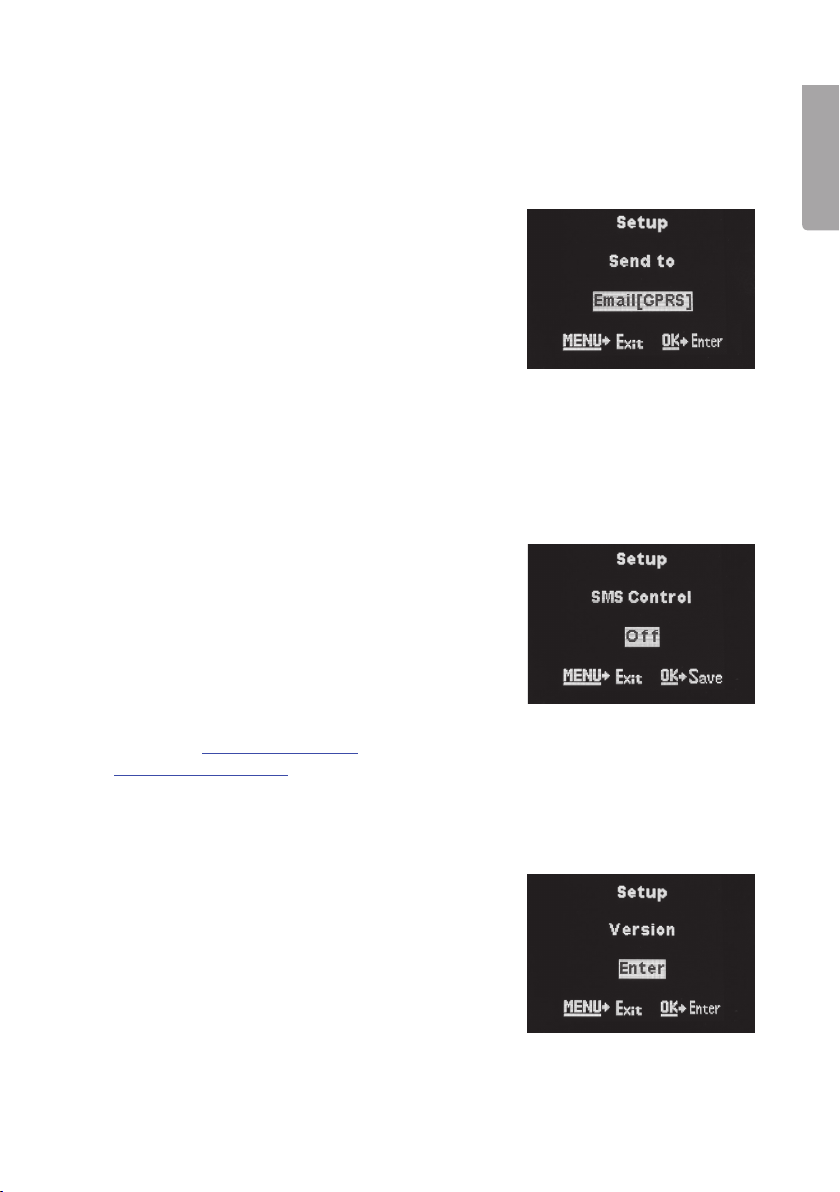
Send to (where messages are to be sent)
If you want to send to your phone
Select Phone MMS, Press [ OK ] and enter thedesired phone number
(max 4 numbers can be entered) where thephoto will be sent.
If you want to send as e-mail via GPRS
Select Email [ GPRS ], Press [ OK ] and enter
thedesired address (max 4 addresses can
be entered).
If you want to send as e-mail via MMS
Select Email [ MMS ], Press [ OK ] and enter thedesired address (max 4 addresses
can be entered).
SMS Control (If you wish to control thecamera via anapp)
• Note: In order to be able to change thecamera
settings with theaid of the “BGTools” app you
will need to download it from Google Play or
App Store. First set theSMS Control in thesettings menu of thecamera to ON and then
specify from which phone number thecamera
is to be controlled (This setting can also be performed using theBMC-config program which
can be downloaded from themanufacturer’s
homepage www.Bolyguard.com or
www.clasohlson.co.uk).
• Bear in mind that thecamera uses more power
when theSMS Control is set to ON, and
thebatteries will not last as long.
English
Version
Shows which version of software and MCU is installed.
21
Page 22

English
Default Set (restores factory settings)
Resets thecamera to factory settings.
Note: Resetting takes place immediately when you
press [ OK ]. All personal settings will be erased
when areset is performed.
When you have finished making your settings
1. Set thefunction switch to the ON position. Thered LED indicator will flash.
2. When thecamera is switched on it needs 30 seconds to initialise and connect to
thetelephone network, if applicable.
3. Theremote control is not used in ON mode. Thecamera takes photos or videos
with sound in accordance with thefactory settings or your own settings.
Care and maintenance
Clean thecamera using asoft, moist cloth. Only use amild detergent; never use
solvents or strong, abrasive cleaning agents for cleaning as these can damage
theproduct.
22
Page 23
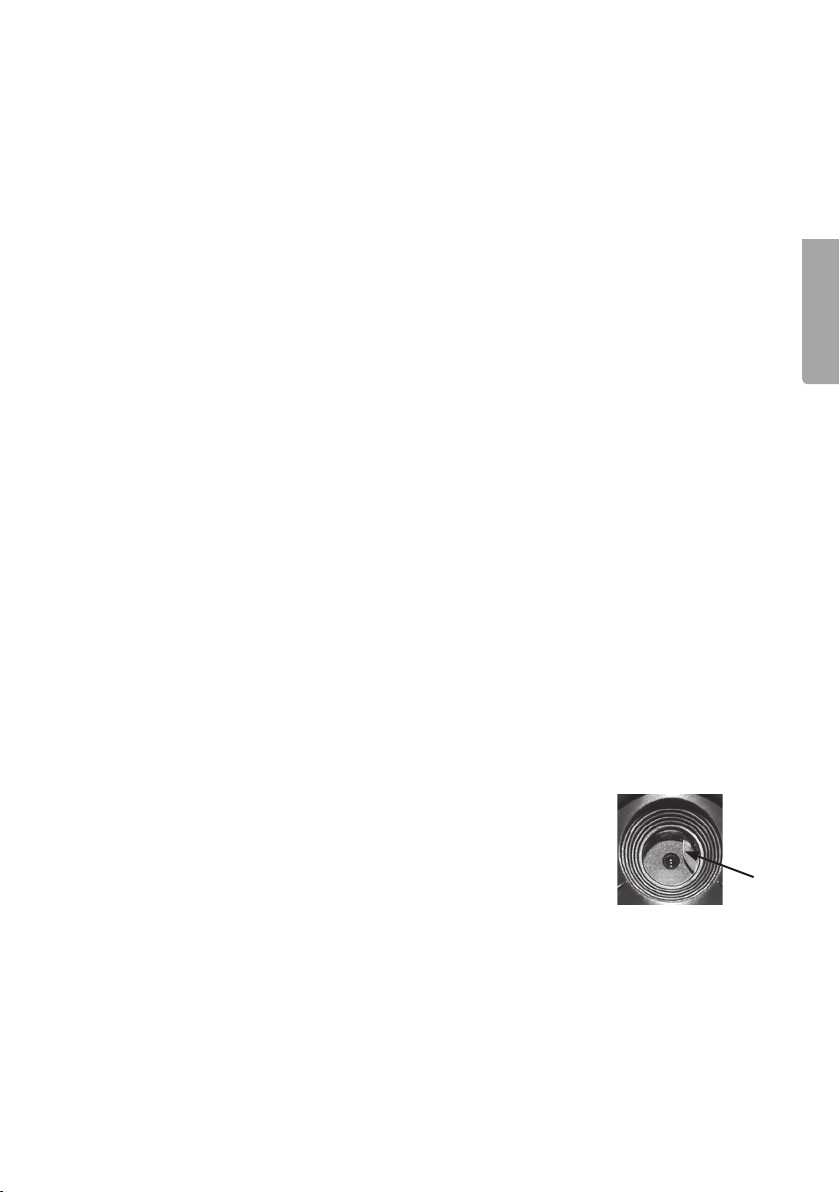
Troubleshooting guide
Something is obscuring
thecamera lens.
Theremote control is not
working.
Thedisplay is blank/does
not come on in Test mode.
No photos/videos taken. • Thefunction switch is in TEST or OFF mode.
Many blank photos/
videos.
Black and white photos/
videos.
Poorly defined photos/
videos.
Thecamera (memory
card) is not found when
thecamera is connected
to acomputer.
Thecamera cannot find
thememory card.
• Thecamera lens has anIR filter which, when
thecamera is switched off, can end up in aposition
where it obscures thelens. When thecamera is
turned on, thefilter returns to its correct position.
• Check thebattery and replace it if necessary.
• Theremote control is too far away from thecamera,
max distance approx 9 m.
• Memory card missing. Turn off thecamera and insert
amemory card.
• Thedisplay goes blank automatically after 3 minutes
if no settings are changed.
• Thememory card is write-protected.
• Discharged batteries.
• Thecamera sensitivity is set incorrectly.
• Thecamera is aimed incorrectly.
• In darkness thephotos will be black and white.
• Incorrect distance to subject.
• Check thelens, clean it if necessary.
• Check that theUSB cable is intact and properly
connected to both thecamera and computer.
• Incorrect formatting of memory card.
• Incorrect formatting, format thememory card in
thecamera.
• Memory card too big, themaximum is 32 GB.
• Check that thememory card is not locked.
• Thememory card may be defective, try another
memory card.
English
Disposal
This product should be disposed of in accordance with local regulations.
If you are unsure how to proceed, contact your local council.
23
Page 24

English
Specifications
Image sensor 5 MP colour CMOS
Lens F/NO 2.2, field of view = 60°
Motion detector range Up to 20m
Display 1.5″ TFT
Memory card SD/SDHC 8–32 GB
Still-image resolution 5 or 8 MP interpolated
Video resolution VGA (640×480) or 720p HD (1280×720)
PIR sensor (motion detector) Multizone
Motion detector sensitivity High/normal/low
Reaction time 1 sec
Operating/storage temperature −20 to +60°C/−30 to +70°C
Time setting for operation 1 sec to 60 mins
Still image series 1 to 3
Video sequence 1 to 60 sec
Power supply 4 or 8×AA/LR6 batteries
External mains adaptor 6 V DC
(sold separately)
Standby mode power consumption < 0.3 mA (< 7 mAh/day)
Active mode power consumption 150 mA (+ 450 mA when IR LED is on)
Battery status Battery symbol is shown on thedisplay
Bracket Strap or tripod/bracket with tripod thread
Recommended operating humidity 5–90%
Size 140×90×55mm
Weight 500g (incl. batteries)
24
Page 25
Vilt-/åtelkamera m. MMS/e-post
Art.nr 36-5762 Modell MG882K-8mHD
Läs igenom hela bruksanvisningen före användning och spara den sedan för framtida bruk.
Vi reserverar oss för ev. text- och bildfel samt ändringar av tekniska data. Vid tekniska
problem eller andra frågor, kontakta vår kundtjänst.
Produktbeskrivning
• Mörkerseende kamera med 8 MP upplösning för bevakning av trädgårdar, åtelplatser
etc. Bilder som kameran tar skickas med MMS eller e-post via GSM/GPRS vid
bestämda tider eller när djur/människor rör sig framför kameran.
• Bilder och film sparas även på ett SD-minneskort (max 32 GB, säljs separat) för
senare överföring till dator. Bilder sparas i JPG-format, video sparas i AVI-format.
Filsystem FAT32.
• Bilderna märks med tid, datum och månfas och filmer sparas med ljud som den
inbyggda mikrofonen fångat.
• Rörelsedetektorn känner av rörelser på upp till 20 m avstånd.
• Drivs med 8×AA/LR6-batterier (säljs separat) eller av en 6 V extern strömkälla
(säljs separat).
Tänk på att:
• Kameraövervakning som sker på allmän plats regleras av lag om allmän kameraövervakning (1998:150) och kräver anmälan eller tillstånd av länsstyrelsen.
Kameraövervakning som inte sker på allmän plats regleras istället av personuppgiftslagen (1998:204) och kräver bland annat information till dem som kameraövervakas. Tillsyn sker av länsstyrelsen respektive Datainspektionen. För mer
information se länsstyrelsens och Datainspektionens webbplatser.
• Kontakta ansvariga i din kommun eller på länsstyrelsen om du är osäker. Kameror
som satts upp utan tillstånd kan beslagtas, dessutom kan ägaren ställas till ansvar.
Svenska
Obs!
Kameralinsen har ett IR-filter som när kameran slås av kan
hamna i ett läge där det skymmer linsen. När kameran slås på
återtar filtret sin rätta position.
Att komma igång
Sätt i batterier
1. Öppna locket (1).
2. Ta tag i batterihållarens handtag (18) och dra hållaren rakt ut från kameran.
3. Sätt i 8 (eller 4)×AA/LR6-batterier i batterifacket enligt bilden. Se märkningen
i botten på batterihållaren så att polariteten blir rätt.
25
Page 26
Obs!
• Batterihållaren ska skjutas in som
• Byt ut batterierna när de börjar bli dåliga, kameran kan skadas om gamla batterier
• Batterierna kan räcka upp till 6 månader beroende på användningstemperatur och
Svenska
• Kameran kan i nödfall drivas av 4×AA/LR6-batterier i höger eller i vänster sida
• Kameran kan drivas av en extern nätadapter (säljs separat) som ger 6 V DC och
Viktigt!
• För att kameran ska kunna ta bilder och lagra dem måste du ha ett SD-minneskort
• Kameran har endast stöd för GSM (2G) och fungerar inte med operatörer som
bilden visar (den passar även att
skjuta in upp och ner, men då
fungerar inte kameran).
börjar läcka. Blanda inte nya och gamla batterier eller olika typer (t.ex. laddbara
med ej laddbara).
antal exponeringar.
i batterifacket. Om så sker måste samtliga batterier bytas ut mot nya vid nästa
batteribyte.
har + i centrumanslutningen. Nätadaptern ansluts till ingången för 6 V (19).
i kameran. För att kameran ska kunna skicka MMS och e-post måste du ha ett
aktivt GSM-SIM-kort i kameran. SIM-kortet måste vara aktiverat för mobildata/
MMS och pinkodsförfrågan måste vara avstängd.
endast tillhandahåller 3G. I Sverige fungerar därför inte kameran med operatörerna
3 och Hallon. Operatörer som t.ex. Telia och Comviq tillhandahåller roaming från
3G till 2G (GSM).
26
Page 27
Inställningar
Vi rekommenderar att du ställer in kameran med programmet BMC Config.
1. Hämta programmet från tillverkarens hemsida www.Bolyguard.com eller
www.clasohlson.se och installera det på din dator.
2. Öppna programmet, startfönstret visas, välj kameramodell MG882K-8MHD i
fältet för ”Select product”
och tryck [ OK ].
3. Ett nytt fönster visas. Välj
land och operatör i rutan
för WAP/Internet Setting.
Om din operatör saknas,
välj Others... och fyll i
inställningarna (se punkt 5
nedan). Om du är osäker,
kontakta din operatör för
aktuella uppgifter.
Svenska
4. Tryck på knappen [ Check WAP/Parameters (L) ]. Fönstret ”WAP/Internet
Parameters” visas. Kameran har möjlighet att skicka bilder antingen via MMS till
telefon eller e-postmottagare, eller som e-post via GPRS. Skillnaden är att MMS
kräver endast MMS-inställningar medan GPRS kräver ett e-postkonto för att du
ska kunna skicka bilderna. Fördelen med GPRS är att det är högre prioriterat i
mobilnätet, så meddelandena löper mindre risk att bli försenade än MMS.
GPRS kan dessutom vara billigare hos vissa operatörer då man betalar för överförd
datamängd istället för enskilda MMS.
27
Page 28
5. I den vänstra rutan, WAP Setting, visas dina MMS-inställningar som anges
Svenska
6. I den högra rutan, Internet Setting, gör du inställningar för GPRS. GPRS-
Vi rekommenderar att du skapar ett nytt e-postkonto som bara används för kameran.
Ställ in servernamn/SMPT för din e-postleverantör (SEND EMAIL SERVER), port,
e-postadressen kameran ska skicka ifrån (SEND EMAIL ADRESS) och lösenordet för
e-postkontot (SEND EMAIL PASSWORD). Kontakta din operatör om du är osäker på
inställningarna för e-post.
Här visas ett exempel på inställningar om du
använder Gmail:
automatiskt om du har valt en av operatörerna i listan. Här fyller du i egna uppgifter
om du valt Others… som operatör. MMS-inställningarna krävs för att kameran ska
kunna skicka MMS till mobiltelefon eller e-postmottagare.
inställningarna krävs för att kameran ska kunna skicka e-post till e-postmottagare.
Glöm inte att trycka på knappen [ Advanced ] (rutan
bredvid visas) och bocka i rutan för SSL om din
operatör kräver detta.
Tryck [ OK (Y) ] för att spara.
28
Page 29
7. Tryck [ OK (Y) ] för att spara WAP/Internet Parameters.
8. Tryck Change Setting för övriga kamerainställningar. Ovanstående fönster visas.
I översta delen av fönstret kan önskade inställningar för språk (Language), PIRintervall (PIR Interval) etc. göras. Närmare beskrivning av dessa inställningar finns
i avsnittet Inställningar med fjärrkontrollen nedan.
Övriga rutor i fönstret är:
• Work hour: Används om du vill att kameran endast ska vara aktiv mellan vissa
klockslag på dygnet.
• Send to: Välj om bilderna ska skickas som MMS eller e-post. Om du väljer Phone
[ MMS ] kommer bilderna att skickas till de telefonnummer som du skriver in enligt
punkt 10 nedan. Om du väljer Email [ MMS ] eller Email [ GPRS ] kommer bilderna
att skickas till de e-postadresser som du skriver in enligt punkt 10 nedan.
• Send mode: Välj om, eller hur ofta, bilderna ska skickas. 4 olika val finns:
- Manual: Skickar endast bild när detta begärs via SMS eller app.
- Daily Report: Välj en tid på dygnet då kameran skickar en rapport om hur
många bilder eller videor som tagits under 24 timmar.
- Instant: Kameran skickar bilden så snart den tagits. Max antal bilder som kan
skickas under en 24-timmarsperiod kan begränsas.
- Off: Inga bilder skickas.
9. När du är klar med alla inställningar, tryck [ OK ] för att spara.
10. Ange de telefonnummer eller e-postadresser dit du vill att kamerans bilder ska
skickas i rutan för Customer Information Setting i fönstret som visas under
punkt 3 ovan. Om du använder appen BGTools anger du telefonnumret för den
telefon som ska styra kameran i fältet Admin…Number.
11. Om du inte redan anslutit kameran till din dator med medföljande USB-kabel, gör det nu.
Svenska
29
Page 30
Svenska
12. Välj kameran i fältet för var dina inställningar ska sparas.
13. Tryck på [ SAVE (Y) ] för att spara inställningarna.
14. Koppla bort kameran från datorn.
15. För att kameran ska kunna läsa in de nya inställningarna krävs att du sätter
16. Vi rekommenderar att du testar kameran nära hemmet för att försäkra dig om att
Tänk på att:
• Mejloperatörerna kan ha olika säkerhetsinställningar och -nivåer. I vissa fall kan du
• Obs! Det kan vara svårt att överblicka olika operatorers säkerhetsnivåer. Om du
funktionsomkopplaren i läge ”TEST” och låter kameran starta upp och läsa in
inställningarna, detta tar ca 30 sekunder. Sätt sedan funktionsomkopplaren
i läge ON, och kameran kommer att arbeta efter de nya inställningarna.
allt fungerar som avsett innan du placerar ut den.
behöva ändra säkerhetsinställningarna för att en annan enhet (kameran) ska kunna
logga in på ditt konto.
inte får e-postfunktionen att fungera trots nedanstående exempel rekommenderar
vi att du endast använder kamerans MMS-funktion för att säkerställa att bilderna
kommer fram.
30
Page 31

Här ser du hur det ser ut om du använder Gmail. Gmail har här hindrat kameran att
logga in på kontot.
Exempel:
För att komma
åt inställningarna
loggar du först
in på Gmail och
sedan klickar du på
Konto–Personliga
uppgifter–
Säkerhet–Kontobehörigheter–
Mindre säkra appar
tillåts–Inställningar.
Svenska
Klicka i Aktivera,
för att tillåta
mindre säkra
appar.
31
Page 32

Knappar och funktioner
1. Lock med hållare för fjärrkontroll
2. TV-out: Videoutgång
3. Funktionsomkopplare med 3 lägen:
Svenska
4. Kortplats för SD-minneskort
5. LED-indikator
6. Laserpekare
7. Kameralins
8. Rörelsedetektor
9. Antenn
10. Lucka över LCD-display
11. Mikrofon
12. Skymningssensor
13. IR-dioder för mörkerseende
14. Kortplats för SIM-kort
15. USB-anslutning. Anslut kameran till
16. Excenterlås
17. Batterihållare
18. Handtag för batterihållare
19. 6 V DC-ingång, + i centrum
20. Lutningsjustering
21. Stativfäste
22. Fäste för extra rem eller vajer med
(anslutningskabel säljs separat)
- OFF (kameran avstängd)
- TEST (tre funktioner: inställningar,
ta bilder/video manuellt, visa bilder
och videons startruta som hjälp vid
kameraplacering)
- ON (kameran aktiverad med
fabriksinställningar eller enligt dina
egna inställningar)
en dator med den medföljande USBkabeln och hantera minneskortets
innehåll på det sätt som är normalt för
ditt operativsystem.
(nätadapter säljs separat)
stativfäste
9
8
7
6
5
10
11
4
3
12
13
2
14
15
1
18
17
16
19
20
21
22
32
Page 33

Fjärrkontroll
23. [ Menu ]
24. [ ▲ Cancel ] Stega till önskad undermeny,
stega uppåt, ångra
25. [ OK ] Öppna bildvisningsläge, bekräfta val
26. [ ◄ 1
undermeny, tryck flera gånger för att skriva
följande tecken: 1 . / : @ _
27. [ ▼ 2 abc ] Stega till önskad undermeny,
stega nedåt
28. [ ► 3 def ] Stega till önskad inställning i
undermeny
29. [ 4–0 ] Siffer- och bokstavs knappar, tryck 0
flera gånger för att skriva + och −
30. [
31. [ # ]
Obs!
• Fjärrkontrollen förvaras på insidan av locket (1).
• Vissa symboler på fjärrkontrollen kan sakna funktion på denna kameramodell.
• Fjärrkontrollens maximala räckvidd är ca 9 m. Solljus rakt mot kameran eller fjärrkontrollen kan förkorta räckvidden.
• När kameran slås på (både i läge ON och i läge TEST) behöver den 10–30 s för att
initiera och koppla upp sig mot ev. telenät.
• Dra bort plastremsan som sticker ut vid batterihållaren. Plastremsan finns för att
skydda fjärrkontrollens batteri från urladdning vid lagring och transport.
] Stega till önskad inställning i
] Aktivera laserpekare vid kameraplacering
23 24 25
26
29
30
27
28
31
Svenska
Om fjärrkontrollen inte fungerar kan batteriet vara förbrukat.
Gör så här för att byta:
1. Dra ut fjärrkontrollens batterihållare genom att skjuta snäpplåset mot batterihållaren
samtidigt som du drar den rakt ut.
2. Sätt i ett nytt batteri (1×CR 2025), batteriets plussida (+) ska vara vänd mot dig.
Se dekalen på fjärrkontrollen.
3. Skjut in batterihållaren, se till att snäpplåset låser fast ordentligt.
33
Page 34

Displayens symboler
Obs! Displayen lyser endast när funktionsomkopplaren står i läge TEST. Den lyser
inte i läge ON. Displayen släcks ca 3 minuter efter senaste knapptryckning i läge TEST.
Visar kamera- eller videokamerasymbol beroende
på inställning.
Visar att ett SIM-kort sitter
i kameran. Om symbolen
Svenska
att MMS-funktionen inte
fungerar (problem med
telenätet, ingen eller dålig
täckning etc.).
Sätt i minneskort
Obs! Försäkra dig om att kameran är avslagen när minneskortet sätts på plats.
Se också till att slå av kameran när du tar ut kortet.
1. Kameran är avsedd för SD/SDHC-
2. Se till att minneskortets skrivskydd
3. Öppna locket (1) och tryck försiktigt
visas betyder detta
minneskort 8–32 GB.
inte är aktiverat.
in ett SD/SDHC-minneskort i kortplatsen (4) som bilden visar.
Minneskortet ska tryckas in tills ett
klickljud hörs.
Vald bildstorlek
Signalstyrka
Visas när en AV-kabel
ansluts till TV-out
Batteristatus
Teleoperatör
År och datum
Tid
Ledigt utrymme på
minneskortet
Antal tagna bilder
Formatera minneskortet
Formatera minneskortet före användning.
Formatering innebär att allt som är sparat på
minneskortet raderas för att ge plats för nya filer.
1. Vik upp locket som täcker displayen.
2. Ställ funktionsomkopplaren (3) i läge TEST.
3. Startbilden visas på displayen.
4. Tryck [ MENU ] på fjärrkontrollen, menyn för
inställning av språk, ”Setup Language”, visas.
34
Page 35

5. Stega till menyn Format SD med [ ▼ 2 abc ].
6. Tryck på [ OK ]. ”Format SD Yes No” visas på
displayen.
7. Markera Yes med [ ◄ 1 ].
8. Tryck på [ OK ] för att bekräfta (eller [ MENU ]
för att avbryta).
SIM-kort
Om du avser att använda MMS-/SMS- eller e-postfunktionerna, sätt försiktigt ett
lämpligt SIM-kort i hållaren (14).
Se märkningen ovanför hållaren så att kortet sätts i på rätt sätt.
Användning
Innan du slår på kameran tänk på följande:
Placering
• Kameran kan fästas med den medföljande remmen eller genom att du använder
ett stativ eller annat fäste som passar stativfästena (21) eller (22) på kamerans
baksida. Se till att kameran sitter stadigt så att den inte påverkas av vind eller
andra yttre faktorer.
• Tänk på att placera kameran så väderskyddat som möjligt.
• Lämpligt avstånd till motivet är ca 5 m, fäst kameran ca 1,5 till 2 m över marken.
• Sätt funktionsomkopplaren i läge TEST och tryck [ ] för att slå på laserpekaren
och använda den som hjälpmedel för att rikta in kameran.
Svenska
För bästa resultat
• Kameran är temperaturberoende. PIR-sensorns kapacitet och räckvidd påverkas
av förhållandet mellan omgivningens temperatur och djurets kroppsvärme, ju större
skillnad desto lättare och på desto längre håll kan kameran detektera rörelse.
• Kameran tar färgbilder i dagsljus och svartvita bilder i mörker.
• Tänk på var solen går upp/ned, placera kameran med solen i ryggen så slipper
du motljus i bilderna. Placera om möjligt kameran i riktning norrut för att förhindra
motljus i bilderna och felindikering från PIR-sensorn.
• Ta bort kvistar framför kameran, kvistar med löv kan vara en anledning till felindikering.
35
Page 36

Ta foto/videosekvens manuellt för att testa vad som avbildas
Obs!
• Förutom att rikta in kameran med hjälp av laserpekaren kan du ta en bild eller en
• Video kan inte visas i kameradisplayen, endast videons startruta visas.
1. Ställ funktionsomkopplaren i läge TEST.
2. Tryck [ ▼ 2 abc ] eller [ ▲ Cancel ] för att välja fotografering eller videoinspelning.
3. Tryck [ ► 3 def ] för att ta en bild eller en videosekvens.
Svenska
4. Tryck [ OK ] för att visa bilden eller startrutan till videon i kameradisplayen.
5. Om du tagit flera bilder eller videosekvenser, stega mellan dessa med [ ▼ 2 abc ]
Radera ett foto eller en videosekvens
1. Visa den bild eller videosekvens som du vill
2. Tryck [ Menu ].
3. Tryck [ ▼ 2 abc ] eller [ ▲ Cancel ] tills ”Delete”
4. Tryck [ ◄ 1 ] eller [ ► 3 def ] för att välja
5. Tryck [ OK ] för att bekräfta ditt val.
videosekvens manuellt för att se upptagningsområdet innan kameran sätts på
plats permanent.
En kamera- eller videokamerasymbol visas i displayens övre vänstra hörn.
eller [ ▲ Cancel ].
radera i displayen.
visas i displayen.
Del One (radera den bild som du visar) eller
Del All (radera allt på kortet).
6. Tryck [ ◄ 1 ] eller [ ► 3 def ] för att välja
Yes (radera) eller No (ångra).
36
Page 37

Från fabrik är kameran inställd enligt följande:
”Language” Språk Engelska
”Camera Mode” Kamera Stillbild
”Set Clock” Tid och datum Inte inställt
”Photo Size” Bildupplösning 8 megapixel
”Photo Burst” Bildserie 1 bild
”Video Size” Videoupplösning 1280×720
”Video Length” Videolängd 10 s
”Time Lapse” Ta bild/video med förbestämt intervall Av
”PIR Trigger” Rörelsesensorns känslighet Normal
”PIR Interval” Rörelsesensorns aktivering 5 s
”Work Hour” Tid när kameran ska arbeta Av
”MMS Set” Inställning av MMS-funktion Inte inställt
”GPRS Set” Inställning av GPRS Inte inställt
”Send Mode” När ska meddelanden skickas? Manuell
”Send to” Vart ska meddelanden skickas? MMS till telefon
”SMS Control” Gör inställningar i kameran via appen ”BGTools”
(hämtas på Google Play eller App Store)
”Version” Visar aktuell mjukvaruversion ”Format SD” Formatera minneskortet ”Default Set” Återställning till fabriksinställningarna -
Av
Inställningar med fjärrkontroll
Obs! Det går att göra kamerainställningarna med fjärrkontrollen men det är betydligt
enklare att göra inställningarna i datorn på det sätt som beskrivs i avsnittet Inställningar
ovan. Vi rekommenderar att du endast använder fjärrkontrollen för att göra enklare
justeringar av inställningarna när du inte har tillgång till dator.
1. Ställ funktionsomkopplaren i läge TEST.
2. Tryck [ MENU ], den första undermenyn, ”Setup Language”, visas.
3. Stega till önskad meny med [ ▼ 2 abc ] eller [ ▲ Cancel ].
4. Aktuell inställning för den valda menyn visas markerad på displayen.
5. Om du vill ändra inställningen för den valda menyn, tryck [ ◄ 1
för att ändra, varje tryckning ändrar inställningen ett steg.
6. Tryck [ OK ] för att bekräfta.
7. Tryck [ MENU ] för att gå ur menyn.
] eller [ ► 3 def ]
Svenska
37
Page 38

Dessa inställningsmenyer finns:
”Language” Språk: välj Svenska (svenska), English (engelska), Suomi (finska)
eller Deutsch (tyska).
”Camera Mode” Välj funktion: foto eller video.
”Set Clock” Ställ in datum och tid: MM–DD–ÅR och tid.
”Photo Size” Bildstorlek: 8 eller 5 MP.
”Photo Burst” En bild eller bildserie: 1 bild, 2 bilder eller 3 bilder.
”Video Size” Videoupplösning: 1280×720 eller 640×480.
”Video Length” Videolängd: välj tid 5–60 s.
”Time Lapse” Ta bild eller video med förbestämt intervall oavsett om rörelse detektorn aktiveras eller inte. Välj ett tidsintervall mellan 5 min och
Svenska
8 tim eller Off (avstängd funktion).
”PIR Trigger” Ställ in rörelsesensorns känslighet: Off–Low–Normal–High.
”PIR Interval” Välj när rörelsedetektorn ska aktiveras efter senaste aktivering
i intervall från 0 s till 60 min. 0 betyder att rörelsesensorn är aktiv
hela tiden.
”Work Hour” Ställ in den tid på dygnet då kameran ska vara aktiv eller välj att ha
funktionen avstängd, Off.
”MMS Set” MMS-inställningar.
”GPRS Set” GPRS-inställningar.
”Send Mode” Välj när bild ska sändas: Off, Manual, Daily Report eller Instant.
”Send to” Phone MMS, Email [ GPRS ] eller Email [ MMS].
”SMS Control” Välj om du vill kunna styra kameran via SMS eller inte. On eller Off.
”Version” Visa installerad mjukvaru- och MCU-version.
”Format SD” Formatera SD-kortet i kamerans kortplats.
”Default Set” Återställ kameran till fabriksinställningar.
Obs! Återställning sker direkt när du trycker på [ OK ].
Alla egna inställningar försvinner vid återställning.
Obs! Alla nedanstående inställningar förutsätter att du redan:
1. Ställt funktionsomkopplaren i läge TEST.
2. Tryckt [ MENU ].
3. Stegat fram till önskad meny med [ ▲ Cancel ] eller [ ▼ 2 abc ].
Language (inställning av språk)
1. Tryck på [ ◄ 1 ] eller [ ► 3 def ] för att ändra
språk:, Svenska, English, Suomi eller Deutsch.
2. Tryck på [ OK ] för att bekräfta (eller [ MENU ] för
att avbryta).
38
Page 39

Camera Mode (kameraläge)
1. Tryck [ ◄ 1 ] eller [ ► 3 def ] för att välja
funktion, Photo (stillbilder) eller
Video (videoupptagning).
2. Bekräfta genom att trycka på [ OK ]
(eller [ MENU ] för att avbryta).
Set Clock (ställ in tid och datum)
Ställ in kalender, MM–DD–ÅR, och tid.
1. Tryck [ OK ] för att öppna inställnings läge för tid.
2. Månadsinställning är markerad, tryck [ ▲Cancel ]
eller [ ▼ 2 abc ] för att ställa in aktuell månad.
3. Tryck [ ◄ 1
inställning av datum, ställ in aktuellt datum.
Ställ in år på samma sätt.
4. Fortsätt på samma sätt med inställning av tiden.
5. Tryck på [ OK ] för att bekräfta inställningen
(eller [ MENU ] för att avbryta).
] eller [ ► 3 def ] för att gå till
Photo Size (bildupplösning)
Välj bildupplösning, 8 eller 5 MP.
1. Tryck på [ ◄ 1
2. Tryck på [ OK ] för att bekräfta (eller [ MENU ]
för att avbryta).
] eller [ ► 3 def ] för att ändra.
Svenska
Photo Burst (bildserie)
Ta flera bilder vid aktivering.
1. Tryck på [ ◄ 1
att ta 1 bild, 2 bilder eller 3 bilder varje gång
som kameran aktiveras.
2. Tryck på [ OK ] för att bekräfta (eller [ MENU ]
för att avbryta).
] eller [ ► 3 def ] för att välja
Video Size (videoupplösning)
Välj videoupplösning, 1280×720 eller 640×480.
1. Tryck [ ◄ 1
2. Tryck [ OK ] för att bekräfta (eller [ MENU ]
för att avbryta).
] eller [ ► 3 def ] för att ändra.
39
Page 40

Video Length (videolängd)
Välj önskad tid för videoupptagning. Välj tid från
5 till 60 s.
1. Tryck [ ◄ 1
2. Tryck [ OK ] för att bekräfta (eller [ MENU ]
Time Lapse (intervallstyrd exponering
oberoende av rörelsedetektorn)
Svenska
Den här funktionen gör det möjligt att ta bilder med
viss intervall, t.ex. ta en bildserie var 5:e minut.
1. Tryck [ ◄ 1
2. Tryck [ OK ] för att bekräfta (eller [ MENU ]
PIR Trigger (rörelsedetektorns känslighet)
Ju högre känslighet som väljs, desto lättare aktiveras kameran av rörelse sensorn,
t.ex. när vinden rör på grenar. Ju högre inställning, desto fler bilder kommer att tas.
Känsligheten avtar normalt med stigande temperatur. Om kameran ska användas
i hög temperatur bör känsligheten High väljas.
1. Välj känslighet för aktivering av kameran.
2. Tryck på [ OK ] för att bekräfta (eller [ MENU ]
] eller [ ► 3 def ] för att välja
önskad tid (5 till 60 s) för videoupptagning.
för att avbryta).
] eller [ ► 3 def ] och välj
önskad intervall mellan automatiska exponeringar. Inställning från 5 min till 8 tim eller Off
(avstängd funktion).
för att avbryta).
Välj inställning: Off (rörelsedetektor avstängd),
Low (låg känslighet), Normal (normal känslighet),
High (hög känslighet) med [ ◄1
[ ►3 def ].
för att avbryta).
] eller
PIR-intervall (intervall till ny aktivering efter en detektering)
Vid aktivering tar kameran inställt antal bilder (eller en videosekvens), men om rörelsedetektorn känner av rörelse hela tiden kommer kameran att fortsätta att göra exponeringar
av samma motiv oavbrutet. Därför finns möjlighet att ställa in en tidsfördröjning till
nästa aktivering.
1. Välj hur lång tid som ska förflyta innan en ny
aktivering kan göras efter den senaste aktiveringen
av kameran. Inställning från 0 s till 60 min med
[ ◄ 1
2. Tryck på [ OK ] för att bekräfta (eller [ MENU ]
för att avbryta).
] eller [ ► 3 def ].
40
Page 41

Work Hour (timer)
Obs! Om du väljer att ställa Work Hour i läge Off
är kameran alltid aktiv. Ställ in den tid under dygnet
som kameran ska vara aktiv, 00:00 till 23:59.
1. Välj On med [ ◄ 1
2. Tryck [ OK ].
3. Ställ in start- och stopptid.
- Start: 00H – 00M, ställ in önskad starttid.
Använd knapparna [ ▲ Cancel ] [ ▼ 2 abc ]
för att ställa in värde. Växla mellan timmar
och minuter med [ ◄ 1 ] eller [ ► 3 def ].
Växla mellan start och stopp med [ ◄ 1 ]
eller [ ► 3 def ].
- Stopp: 00H – 00M, ställ in önskad stopptid.
4. Tryck på [ OK ] för att bekräfta och spara inställning
(eller [ MENU ] för att avbryta).
] eller [ ► 3 def ].
MMS Set
Använd fjärrkontrollen för att utföra inställningarna
eller använd program vara som du hämtar från
www.Bolyguard.com eller www.clasohlson.se.
1. Tryck [ OK ] för att öppna inställningarna.
2. Använd fjärrkontrollens tangenter för att ställa in
önskade värden.
3. Tryck [ ▲ Cancel ] för att radera, tryck [ # ] för att
byta rad.
4. Tryck [ OK ] för att spara inställningarna.
Svenska
GPRS Set
Använd fjärrkontrollen för att utföra inställningarna
eller använd program vara som du hämtar från
www.Bolyguard.com eller www.clasohlson.se.
1. Tryck [ OK ] för att öppna inställningarna.
2. Använd fjärrkontrollens tangenter för att ställa in
önskade värden.
3. Tryck [ ▲ Cancel ] för att radera, tryck [ # ] för att
byta rad.
4. Tryck [ OK ] för att spara inställningarna.
41
Page 42

Send Mode (när ska bilden skickas)
Obs! Video kan inte skickas.
Välj mellan: Off, Manual, Daily report, Instant.
Off
Inga MMS skickas.
1. Tryck [ ◄ 1
2. Tryck [ OK ] för att spara.
Manual
Svenska
Skicka ett MMS manuellt.
1. Visa den bild du vill skicka på displayen.
2. Tryck [ Menu ].
3. Tryck [ ▲ Cancel ] eller [ ▼ 2 abc ] och välj Send.
4. Tryck [ OK ] för att skicka. Bilden skickas enligt inställningarna du gjort i menyn
Daily Report
Kameran rapporterar vid en förinställd tid hur många bilder/videor som tagits under ett dygn.
Om kameran står i stillbildsläge (Photo) skickas ett MMS med den senast tagna bilden
och totalt antal tagna bilder.
Om kameran står i videoläge skickas ett SMS som talar om hur många videor som tagits.
1. Tryck [ ◄ 1
2. Tryck [ OK ] och ställ in tiden med [ ▲ Cancel ] eller [ ▼ 2 abc ]. Flytta mellan timmar
3. Tryck [ OK ] för att spara.
] eller [ ► 3 def ] tills ”Off” visas i displayen.
”Send to” nedan.
] eller [ ► 3 def ] tills ”Daily Report” visas i displayen.
och minuter med [ ◄ 1 ] eller [ ► 3 def ].
Instant
Kameran skickar ett MMS genast efter att bilden tagits, ställ in hur många bilder du vill
att kameran ska skicka under en 24-timmarsperiod.
Ex.
Du väljer att kameran ska skicka 10 bilder. Efter 8 timmar har kameran tagit 10 bilder
och skickat dessa.
Efter att den sista bilden tagits dröjer det 24 timmar innan nästa bild skickas via MMS.
1. Tryck [ ◄ 1
2. Tryck [ OK ] och ställ in antal bilder (från obegränsat, unlimited, till 99 bilder) med
[ ▲ Cancel ] eller [ ▼ 2 abc ].
3. Tryck [ OK ] för att spara.
] eller [ ► 3 def ] tills ”Instant” visas i displayen.
42
Page 43

Send to (vart och hur bilden ska skickas)
Om du vill skicka till din telefon
Välj Phone MMS, tryck [ OK ] och skriv in önskade telefonnummer (max 4 nummer kan
skrivas in) dit bilden ska skickas.
Om du vill skicka som e-post via GPRS
Välj Email [ GPRS ], tryck [ OK ] och skriv in önskad
adress (max 4 adresser kan skrivas in).
Om du vill skicka som e-post via MMS
Välj Email [ MMS ], tryck [ OK ] och skriv in önskad adress (max 4 adresser kan skrivas in).
SMS Control (Om du vill styra kameran via app)
• Obs! Ändra kamerans inställningar med hjälp
av appen ”BGTools” (hämta den på Google
Play eller App Store). Du måste du först ställa
SMS Control i kamerans inställningsmeny till
läge ON och ange från vilket telefonnummer
kameran ska styras (du kan också göra inställningen med programmet BMC-config, som
hämtas från tillverkarens hemsida
www.Bolyguard.com eller www.clasohlson.se).
• Tänk på att kameran drar mer ström när SMS
Control står i läge ON, batterierna räcker inte
lika länge.
Svenska
Version
Installerad mjukvaru- och MCU-version visas.
43
Page 44

Default Set (återställning till fabriksinställningarna)
Återställ kameran till fabriksinställningar.
Obs! Återställning sker direkt när du trycker på [ OK ].
Alla egna inställningar försvinner vid återställning.
När du är klar med inställningarna
Svenska
1. Sätt funktionsväljaren i läge ON. Den röda LED-indikatorn blinkar.
2. När kameran slås på behöver den 30 s för att initiera och koppla upp sig mot ev. telenät.
3. I läge ON används inte fjärrkontrollen. Kameran tar bilder eller videofilmer med ljud
Skötsel och underhåll
Torka av kameran med en lätt fuktad, mjuk trasa. Använd ett milt rengörings medel,
aldrig lösningsmedel eller starka, slipande rengöringsmedel, det kan skada produkten.
enligt fabriksinställningarna eller dina egna inställningar.
44
Page 45

Felsökningsschema
Något skymmer
kameralinsen.
Fjärrkontrollen
fungerar inte.
Displayen släcks,
lyser inte i testläge.
Inga bilder/videofilmer tagna.
Många tomma bilder/
videofilmer.
Svartvita bilder/
videofilmer.
Oskarpa bilder/
videofilmer.
Kameran (minnes kortet)
hittas inte när kameran
ansluts till en dator.
Kameran hittar inte
minneskortet.
• Kameralinsen har ett IR-filter som när kameran slås av
kan hamna i ett läge där det skymmer linsen.
När kameran slås på återtar filtret sin rätta position.
• Kontrollera batteriet, byt vid behov.
• Fjärrkontrollen är för långt från kameran, max avstånd ca 9 m.
• Minneskort saknas. Slå av kameran och sätt i ett minneskort.
• Displayen släcks automatiskt efter 3 minuter om inga
inställningar utförs.
• Funktionsomkopplaren står i läge TEST eller OFF.
• Minneskortet är skrivskyddat.
• Dåliga batterier.
• Kamerans känslighet är felinställd.
• Kameran är felriktad.
• I mörker blir bilderna svartvita.
• Fel avstånd till motivet.
• Kontrollera linsen, rengör vid behov.
• Kontrollera att USB-kabeln är hel och ordentligt ansluten till
kameran och till datorn.
• Felaktig formatering av minneskortet.
• Felaktig formatering, formatera minneskortet i kameran.
• För stort minneskort, max 32 GB.
• Kontrollera att minneskortet inte är låst.
• Minneskortet kan vara defekt, prova ett annat minneskort.
Svenska
Avfallshantering
När du ska göra dig av med produkten ska detta ske enligt lokala föreskrifter.
Är du osäker på hur du ska gå tillväga, kontakta din kommun.
45
Page 46

Specifikationer
Bildsensor 5 MP färg CMOS
Lins F/NO 2,2, synfält = 60°
Rörelsesensorns räckvidd Upp till 20 m
Display 1,5″ TFT
Minneskort SD/SDHC 8–32 GB
Bildupplösning 5 eller 8 MP interpolerat
Videoupplösning VGA (640×480) eller 720p HD (1280×720)
PIR-sensor (rörelsedetektor) Multizon
Svenska
Rörelsedetektorns känslighet Hög/normal/låg
Reaktionstid 1 s
Användnings-/förvaringstemperatur −20 till +60 °C/–30 till +70 °C
Intervallinställning 1 s till 60 min
Bildserie 1 till 3
Videosekvens 1 till 60 s
Strömförsörjning 4 eller 8×AA/LR6-batterier
Extern nätadapter 6 V DC (säljs separat)
Strömförbrukning i standbyläge < 0,3 mA (< 7 mAh/dag)
Strömförbrukning i aktivt läge 150 mA (+ 450 mA när IR-LED är tända)
Batteristatus Batterisymbol visas på displayen
Fäste Rem eller stativ/fäste med stativgänga
Rekommenderad luftfuktighet
vid användning 5–90 %
Mått 140×90×55 mm
Vikt Ca 500 g (med batterier)
46
Page 47

Overvåknings og viltkamera
med MMS/e-post
Art. nr. 36-5762 Modell MG882K-8mHD
Les brukerveiledningen grundig før produktet tas i bruk og ta vare på den for framtidig
bruk. Vi reserverer oss mot ev. feil i tekst og bilde, samt forandringer av tekniske data.
Ved tekniske problemer eller ved andre spørsmål, ta kontakt med vårt kundesenter.
Produktbeskrivelse
• Kamera, som også kan brukes i mørket, med 8 MP oppløsning, til overvåkning av
f.eks. fôringsplasser. Bildene kameraet tar sendes med MMS eller e-post via GSM/
GPRS til bestemte tider eller når dyr/mennesker beveger seg foran kameraet.
• Bilder og film lagres også på et SD-minnekort (maks 32 GB, selges separat) og kan
seinere overføres til en datamaskin. Bilder lagres i JPG-format, video i AVI-format.
Filsystem FAT32.
• Bildene markeres med tid, dato og måned, og filmene lagres med lyden som den
innebygde mikrofonen fanger opp.
• Bevegelsesdetektoren fanger opp bevegelser på inntil 20 meters avstand.
• Drives med 8×AA/LR6-batterier (selges separat) eller en 6 V ekstern strømkilde
(selges separat).
Husk:
• Ved kameraovervåkning på offentlige steder/plasser gjelder spesielle lover og forskrifter.
Sjekk hva som gjelder hos deg, før kameraet monteres. Det kan også være spesielle lover/forskrifter for kameraovervåkning på ikke offentlige steder. Disse kan
for eksempel gå under Lov om Personvern etc., og må også sjekkes ut. For mer
informasjon om kameraovervåking i Norge henviser vi til Datatilsynets nettsider.
• Ta kontakt med myndighetene dersom du er usikker på hvordan du skal forholde deg.
Kameraer som er satt opp uten tillatelse kan beslaglegges og eieren kan stilles til
ansvar for dette.
Obs!
Kameralinsen har et IR-filter som kommer fram når kameraet
skrus av. Når kameraet skrus på igjen vil filteret stilles i den
rette posisjonen.
Norsk
Kom i gang
Sette i batterier
1. Åpne lokket (1).
2. Ta tak i håndtak (18) til batteriholderen og trekk holderen rett ut fra kameraet.
3. Plasser 8 stk. (eller 4)×AA/R6-batterier i batteriholderen. Følg merkingen for
polaritet i bunnen av batteriholderen.
47
Page 48

Obs!
• Batteriholderen skal skyves inn som
bildet viser (den kan også skyves
opp og ned, men va fungerer ikke
kameraet).
• Skift batteriene straks de begynner å bli dårlige. Kameraet kan ta skade av gamle
batterier som begynner å lekke. Ikke bland nye og gamle batterier eller batterier av
forskjellige typer (f.eks. ladbare og ikkeladbare).
• Batteriene kan vare i inntil 6 måneder, men det avhenger av omgivelsestemperaturen og antall eksponeringer.
• I nødstilfeller kan kameraet drives med 4 stk. AA/LR6-batterier i den høyre eller
venstre delen i batteriholderen. Hvis dette er tilfelle må samtlige batterier skiftes
med nye ved neste batteribytte.
• Kameraet kan drives av en ekstern nettadapter (selges separat) som gir 6 V DC
og har + i sentrum. Nettadapteren kobles til inngangen for 6 V (19).
Norsk
Viktig!
• For at kameraet skal kunne ta bilder og lagre dem må du ha et SD-minnekort
i kameraet. For at kameraet skal kunne sende MMS og e-post må du ha et aktivt
GSM-SIM-kort i kameraet. SIM-kortet må være aktivert for mobildata/MMS og
feltet for spørsmål om pinkode må være stengt.
• Kameraet har kun støtte for GSM (2G) og fungerer ikke med operatører som kun
tilbyr 3G. Derfor fungerer ikke kameraet i Sverige med operatørene 3 og Hallon.
Operatører som f.eks. Telia og Comviq tilbyr roaming fra 3G til 2G (GSM).
48
Page 49

Innstillinger
Vi anbefaler at du stiller inn kameraet med programmet BMC Config.
1. Det kan lastes ned fra produsentens hjemmeside: www.Bolyguard.com
eller www.clasohlson.no og installeres på datamaskinen.
2. Programmet åpnes
og startsiden kommer
opp. Velg kameramodell
MG882K-8MHD i feltet for
«Select Product» og trykk
på [ OK ].
3. Et nytt vindu kommer opp.
Velg land og operatør i
ruten for WAP/Internett
Setting. Hvis operatøren
din mangler, velg Others...
og fyll inn innstillingene
(se punkt 5 nedenfor).
Hvis du er usikker eller har
spørsmål, ta kontakt med
operatøren din.
Norsk
4. Trykk på knappen [ Check WAP/Parameters (L) ]. Vinduet «WAP/Internet
Parameters» vises. Kameraet kan enten sende bilder via MMS til telefon eller
e-post til mottakere eller som e-post via GPRS. Forskjellen er at MMS krever kun
MMS-innstillinger mens GPRS krever en e-post-konto for at du skal kunne sende
bildene. Fordelen med GPRS er at den er høyere prioritert på mobilnettet, så det er
mindre fare for at den skal bli forsinket enn MMS. GPRS kan dessuten bli billigere
hos enkelte operatører fordi man betaler for overført datamengde i stedet for hver
enkelt MMS.
49
Page 50

Norsk
5. I den venstre ruten, WAP Setting, vises MMS-innstillingene dine som oppgis
automatisk hvis du har valgt en av operatørene fra listen. Her fyller du i dine egne
opplysninger hvis du har valgt Others... som operatør. MMS-innstillingene kreves
for at kameraet skal kunne sende MMS til mobiltelefon eller e-postmottaker.
6. I den høyre ruten, Internet Setting, foretar du innstillinger for GPRS. GPRSinnstillingene kreves for at kameraet skal kunne sende e-post til e-postmottaker.
Vi anbefaler at du oppretter en ny e-post-adresse som kun brukes til kameraet.
Still inn servernavn/SMPT for e-postleverandøren (SEND EMAIL SERVER) din, port,
e-postadressen som kameraet skal sende fra (SEND EMAIL ADRESS) og passordet
til e-postadressen (SEND EMAIL PASSWORD). Kontakt operatøren din dersom du er
usikker på innstillingene for e-post.
Her er et eksempel på innstillinger hvis du
bruker Gmail:
Ikke glem å trykk på knappen [ Advanced ]
(ruten ved siden av) og kryss av i ruten for
SSL hvis operatøren krever dette.
Trykk [ OK (Y) ] for å lagre.
50
Page 51

7. Trykk [ OK (Y) ] for å lagre WAP/Internet Parameters.
8. Trykk Change Setting for øvrige kamerainnstillinger. Vinduet ovenfor vises.
I den øvre delen av vinduet kan man stille inn for språk (Language), PIR-intervall
(PIR Interval) etc. Nærmere beskrivelse av disse innstillingene finnes i avsnittet
Innstillinger med fjernkontrollen nedenfor.
De andre rutene i vinduet er:
• Work hour: Brukes hvis du vil at kameraet kun skal være aktivt mellom bestemte
klokkeslett på døgnet.
• Send to: Velg om bildene skal sendes som MMS eller e-post. Hvis du velger
Phone [ MMS ] vil bildene bli sendt til de telefonnumrene som du har skrevet inn
under pkt. 10 nedenfor. Hvis du velger Email [ MMS ] eller Email [ GPRS ] vil bildene
bli sendt til de e-postadressene som du har skrevet inn under pkt. 10 nedenfor.
• Send mode: Velg om, eller hvor ofte bildene skal sendes.
Her er det 4 innstillinger å velge mellom:
- Manual: Sender kun bilde når du spør om dette via SMS eller app.
- Daily Report: Velg en tid på døgnet som kameraet skal sende rapport om hvor
mange bilder eller videoopptak som er tatt i løpet av de siste 24 timene.
- Instant: Kameraet sender bildet straks det er tatt. Maks antall bilder som kan
sendes i en 24-timers periode kan begrenses.
- Off: Det sendes ingen bilder.
9. Når du har foretatt alle innstillingene trykker du på [ OK ] for å lagre.
10. Oppgi de telefonnumrene eller e-postadressene du vil at kameraets bilder skal bli
sendt til i ruten for Customers Information Setting i vinduet som er vist under
punkt 3 ovenfor. Hvis du bruker appen BGTools oppgir du telefonnummeret til den
telefonen som skal styre kameraet i feltet Admin...Number.
11. Hvis du ikke allerede har koblet kameraet til datamaskinen din med medfølgende
USB-kabel, kan du gjøre det nå.
Norsk
51
Page 52

Norsk
12. Velg kameraet i feltet for hvor dine innstillinger skal lagres.
13. Trykk [ SAVE (Y) ] for å lagre innstillingene.
14. Koble kameraet bort fra datamaskinen.
15. For at kameraet skal kunne lese inn de nye innstillingene kreves det at du setter
funksjonskobleren på «TEST» og lar kameraet starte opp og lese inn innstillingene.
Dette tar ca. 30 sekunder. Still deretter funksjonsbryteren på ON og kameraet vil
følge de nye innstillingene.
16. Vi anbefaler at du tester ut kameraet nær hjemmet for å forsikre deg om at alt
fungerer som det skal før du plasserer det der på den endelige plassen.
Husk:
• Mailoperatørene kan ha forskjellige sikkerhetsinnstillinger og -nivåer. I enkelte
tilfeller må du endre sikkerhetsinnstillingene for at en annen enhet (kameraet) skal
kunne logges inn på din konto.
• Obs! Det kan være vanskelig å få oversikt over de forskjellige operatørenes sikkerhetsnivåer. Hvis du ikke får e-post-funksjonen til å fungere på tross av eksempelet
nedenfor, anbefaler vi at du kun bruker MMS-funksjonen på kameraet for å sikre at
bildene kommer fram.
52
Page 53

Her ser du hvordan det ser ut ved bruk av Gmail. Gmail har her hindret at kameraet
ikke kan logges inn på kontoen:
Eksempel:
For å komme til
innstillingene må
du først logge
inn på Gmail og
deretter klikke på
Konto-Personlige
opplysningerSikkerhet-Konto
tilganger- Mindre
sikre apper
tillates-Innstillinger.
Norsk
Klikk på Aktivere,
for å tillate mindre
sikre apper.
53
Page 54

Norsk
Knapper og funksjoner
1. Lokk med holder for fjernkontroll
2. TV-out. Videoutgang (tilkoblingskabel
selges separat)
3. Funksjonsbryter med 3 innstillinger:
- OFF (kamera avstengt)
- TEST (tre funksjoner: innstillinger,
ta bilder/video manuelt, vise bilder
og videoens startrute som hjelp
ved kameraplassering)
- ON (kameraet aktivert med fabrikkinnstillinger eller i henhold til dine
egne innstillinger)
4. Plass til minnekort (SD).
5. LED-indikator
6. Laserpeker
7. Kameralinse
8. Bevegelsesdetektor
9. Antenne
10. Lokk over LCD-skjermen
11. Mikrofon
12. Skumringssensor
13. IR-dioder for varsling om at man kan
se i mørket
14. Plass til SIM-kort
15. USB-tilkobling. Kameraet kobles til en
datamaskin med den medfølgende
USB-kabelen og minnekortet behandles slik ditt operativsystem krever det.
16. Lås
17. Batteriholder
18. Håndtak til batteriholder
19. 6 V DC-inngang, + i sentrum
(nettadapteren selges separat)
20. Justering av helningsvinkel
21. Stativfeste
22. Tyveribeskyttelse med stativgjenger
9
8
7
6
5
10
11
4
3
12
13
2
14
15
1
18
17
16
19
20
21
22
54
Page 55

Fjernkontroll
23. [ Menu ]
24. [ ▲ Cancel ] Gå til ønsket undermeny,
gå oppover, angre
25. [ OK ] Åpne bildevisningsmodus, bekrefte valg
26. [ ◄ 1
Trykk flere ganger for å skrive følgende tegn:
1 . / : @ _
27. [ ▼ 2 abc ] Gå til ønsket undermeny, gå nedover
28. [ ► 3 def ] Gå til ønsket innstilling i undermenyen
29. [ 4–0 ] Tall- og bokstavknapper. Trykk 0 flere
ganger for å skrive + og -.
30. [
31. [ # ]
Obs!
• Fjernkontrollen oppbevares på lokkets innside.
• Enkelte symboler på fjernkontrollen kan være uten noen funksjon på denne
kameramodellen.
• Fjernkontrollens maksimale rekkevidde er ca. 9 meter. Sollys rett mot kameraet
eller fjernkontrollen kan forkorte rekkevidden.
• Når kameraet skrus på (både på ON og TEST) må man gi det 10–30 sekunder til
å koble seg opp mot telenettet.
• Trekk ut plastremsen som stikker ut ved batteriholderen. Plastremsen er der for å
beskytte fjernkontrollens batteri fra utlading ved lagring og transport.
] Gå til ønsket innstilling undermenyen.
] Aktiver laserpeker ved kameraplassering.
23 24 25
26
29
30
27
28
31
Norsk
Hvis man ikke får fjernkontrollen til å virke kan årsaken være at batteriet er utbrukt.
Skifte av den foregår slik:
1. Trekk ut batteriholderen på fjernkontrollen ved å skyve snepplåsen mot batteriholderen samtidig som den trekkes rett ut.
2. Sett i et nytt batteri (1×CR 2025). Batteriets plusside (+) skal vende mot deg.
Se merkingen på fjernkontrollen.
3. Skyv batteriholderen inn og pass på at sperren låser ordentlig.
55
Page 56

Symbolene på displayet
Obs! Displayet lyser kun når funksjonsbryteren står innstilt på TEST. Den lyser ikke når
den er innstilt på ON. Displayet slukkes ca. 3 minutter etter siste tastetrykk i TEST-modus.
Norsk
Viser kamera- eller videokamerasymbol avhengig av
innstilling
Viser at det sitter et
SIM-kort i kameraet. Hvis
symbolet vises betyr det
at MMS-funksjonen ikke
fungerer (problem med
telenettet, ingen eller dårlig
dekning etc.).
Valgt bildestørrelse
Signalstyrke
Vises når en AV-kabel
kobles til TV out
Batteristatus
Teleoperatør
År og dato
Tid
Ledig plass på
minnekortet
Antall eksponerte bilder
Sette i minnekort
Obs! Pass på at kameraet er stengt når minnekortet settes på plass.
Skru av kameraet når kortet tas ut også.
1. Kameraet er beregnet for SD-/
SDHC-minnekort, 8–32 GB.
2. Pass på at skrivebeskyttelsen på
minnekortet ikke er aktivert.
3. Åpne lokket (1) og trykk minnekortet
forsiktig inn i holderen (4), se fig.
Minnekortet trykkes inn til et «klikk»
høres.
Formatere minnekortet
Minnekortet må formateres før bruk. Formateringen
innebærer at alt som er lagret på minnekortet
slettes for å gi plass til nye filer.
1. Slå opp lokket som dekker displayet.
2. Sett funksjonsbryteren (3) på TEST.
3. Startbildet kommer opp på displayet.
4. Trykk [ MENU ] på fjernkontrollen. Menyen for
innstilling av språk, «Setup Language», vises.
56
Page 57

5. Gå til menyen Format SD med [ ▼ 2 abc ].
6. Trykk på [ OK ]. «Format SD Yes No» vises på
displayet.
7. Marker Ye s med [ ◄ 1 ].
8. Trykk på [ OK ] for å bekrefte (eller [ MENU ]
for å avbryte).
SIM-kort
Hvis du planlegger å bruke MMS-/SMS- eller e-postfunksjonene, så sett forsiktig inn et
passende SIM-kort i holderen (14).
Se merkingen over holderen sånn at kortet settes inn riktig.
Bruk
Husk følgende før du skrur på kameraet:
Plassering
• Kameraet kan festes med den medfølgende reimen eller ved at du bruker et stativ
eller et annet feste som passer til stativfestene (21) eller (22) på kameraets bakside.
Pass på at kameraet står stabilt og ikke blir påvirket av vind eller andre ytre faktorer.
• Det bør henge så værbeskyttet som mulig.
• Passende avstand til motivet er ca. 5 meter. Kameraet bør henge 1,5 til 2 meter
over bakken.
• Still inn funksjonsbryteren på TEST og trykk på [ ] for å slå på laserpekeren og
bruke den som hjelpemiddel for å rette inn kameraet dit du ønsker.
For best mulig resultat
• Kameraet er temperaturavhengig. PIR- sensorens kapasitet og rekkevidde påvirkes
av temperaturforholdet mellom omgivelsestemperaturen og dyrets kroppstemperatur.
Jo større forskjell, desto lettere og på desto lengre hold kan kameraet detektere
bevegelser.
• Kameraet tar fargebilder i dagslys og svart-hvitt i mørket.
• Tenk på hvor solen går opp og ned, og plasser kameraet slik at ikke solen gir bildet
motlys. Plassér, dersom det er mulig, kameraet i retning nordover for å forhindre
motlys og feilindikering fra PIR-sensoren.
• Fjern kvist og kvast foran kameraet.
Norsk
57
Page 58

Norsk
Ta foto/videosekvens manuelt for å teste hva som avbildes
Obs!
• Ta et bilde eller en videosekvens manuelt for å se opptaksområdet, før kameraet
festes permanent.
• Video kan ikke vises i kameradisplayet, det er kun videoens startrute vises.
1. Still funksjonsbryteren på TEST.
2. Trykk [ ▼ 2 abc ] eller [ ▲ Cancel ] for å velge fotografering eller videoinnspilling.
Et kamera- eller videokamerasymbol vises i displayets øvre venstre hjørne.
3. Trykk [ ► 3 def ] for å ta et bilde eller en videosekvens.
4. Trykk [ OK ] for å vise bilde eller startruten til videoen i kameradisplayet.
5. Hvis du har tatt flere bilder eller videosekvenser, skift mellom disse med [ ▼ 2 abc ]
eller [ ▲ Cancel ].
Slette et bilde eller en videosekvens
1. Vis fram på skjermen, det bildet eller den
videosekvensen som skal slettes.
2. Trykk på [ MENU ].
3. Trykk [ ▼ 2 abc ] eller [ ▲ Cancel ] til «Delete»
vises på displayet.
4. Trykk [ ◄ 1 ] eller [ ► 3 def ] for å velge
Del One (slette det bildet du viser) eller
Del All (radera alt på kortet).
5. Trykk på [ OK ] for å bekrefte valget.
6. Trykk [ ◄ 1 ] eller [ ► 3 def ] for å velge
Yes (slette) eller No (angre).
58
Page 59

Kameraets fabrikkinnstillinger er slik:
«Language» Språk Engelsk
«Camera Mode» Kamera Stillbilde
«Set Clock» Tid og dato Ikke innstilt
«Photo Size» Bildeoppløsning 8 megapixler
«Photo Burst» Bildeserie 1 bilde
«Video Size» Videooppløsning 1280×720
«Video Length» Videolengde 10 sekunder
«Time Lapse» Ta bilde/video med forhåndsbestemte intervaller Av
«PIR Trigger» Bevegelsessensorens følsomhet Normal
«PIR Interval» Bevegelsessensorens aktivering 5 sekunder
«Work Hour» Tidsrom når kameraet skal kunne aktiveres Av
«MMS Set» Innstilling av MMS-funksjon Ikke innstilt
«GPRS Set» Innstilling av GPRS Ikke innstilt
«Send Mode» Når skal beskjeden sendes Manuell
«Send to» Hvor skal beskjeden sendes MMS til telefon
«SMS Control» Innstillingene i kameraet foretas via appen
”BGTools” (lastes ned fra Google Play eller App Store)
«Version» Viser aktuell softwareversjon «Format SD» Formatere minnekortet «Default Set» Reset til fabrikkinnstillingene -
Av
Norsk
Innstillinger med fjernkontrollen
Obs! Kamerainnstillingene kan også foretas med fjernkontrollen, men det er mye enklere
å foreta dem med datamaskinen, som beskrevet i avsnittet Innstillinger ovenfor.
Vi anbefaler at du kun bruker fjernkontrollen til å foreta enklere justeringer av
innstillingene når du ikke har tilgang til datamaskin.
1. Still funksjonsbryteren på TEST.
2. Trykk [ MENU ], og den første undermenyen, «Setup Language», vises.
3. Gå til ønsket undermeny med [ ▼ 2 abc ] eller [ ▲ Cancel ].
4. Den aktuelle innstillingen for valgt undermeny vises markert på displayet.
5. Hvis du vil endre innstillingen for den valgte menyen, trykk [ ◄ 1
for å endre, hvert trykk endrer innstillingen ett trinn.
6. Trykk [ OK ] for å bekrefte.
7. Trykk [ MENU ] for å gå ut av menyen.
59
] eller [ ► 3 def ]
Page 60

Norsk
Man kan velge mellom disse innstillingsmenyene:
«Language» Språk: velg Svensk (svensk), English (engelsk), Suomi (finsk)
eller Deutsch (tysk).
«Camera Mode» Velg funksjon: foto eller video.
«Set Clock» Still inn tid og dato: MM–DD–ÅR og tid.
«Photo Size» Størrelse på bildet: 8 eller 5 MP.
«Photo Burst» Et bilde eller en hel bildeserie: 1 bilde, 2 bilder eller 3 bilder.
«Video Size» Videooppløsning: 1280×720 eller 640×480.
«Video Length» Videolengde: Velg tid 5–60 s.
«Time Lapse» Ta bilde eller video med forhåndsbestemt intervall uansett om
bevegelsesdetektoren aktiveres eller ikke. Velg et tidsintervall
mellom 5 min og 8 timer eller Off (lukket funksjon).
«PIR Trigger» Still inn følsomheten på bevegelsesdetektoren:
Off–Low–Normal–High.
«PIR Interval» Velg når bevegelsesdetektoren skal aktiveres etter seneste
aktivering i intervaller fra 0 s til 60 min. 0 betyr at bevegelse sensoren er aktiv hele tiden.
«Work Hour» Still inn den tiden på døgnet kameraet skal være aktivt eller velg
å ha funksjonen stengt Off.
«MMS Set» SMS-innstillinger.
«GPRS Set» GPRS-innstillinger.
«Send Mode» Velg når bildet skal sendes: Off, Manual, Daily Report eller Instant.
«Send to» Phone MMS, Email [ GPRS ] eller Email [ MMS ].
«SMS Control» Velg om du vil styre kameraet via SMS eller ikke. On eller Off.
«Version» Vis installert software- og MCU-versjon.
«Format SD» Formater SD-kortet i kameraets kortplass.
«Default Set» Reset kameraet tilbake til fabrikkinnstillingene.
Obs! Tilbakestillingen skjer umiddelbart når du trykker på [ OK ].
Alle egne forhåndsinnstillinger forsvinner ved resetting.
Obs! Alle innstillingene nedenfor forutsetter at du allerede har:
1. Stilt funksjonsbryteren på TEST.
2. Trykket på [ MENU ].
3. Gått til ønsket meny med [ ▼ 2 abc ] eller [ ▲ Cancel ].
Language (innstilling av språk)
1. Trykk [ ◄ 1 ] eller [ ► 3 def ] for å velge
språk, Svensk, English, Suomi eller Deutsch.
2. Trykk på [ OK ] for å bekrefte (eller [ MENU ]
for å avbryte).
60
Page 61

Camera Mode (kamerainnstilling)
1. Trykk [ ◄ 1 ] eller [ ► 3 def ] for å velge
funksjon Photo (stillbilder) eller
Video (videoopptak).
2. Trykk på [ OK ] for å bekrefte (eller [ MENU ]
for å avbryte).
Set Clock (still inn tid og dato)
Still inn kalender, MM–DD–ÅR, og tid.
1. Trykk [ OK ] for å åpne for innstilling av tid.
2. Innstillingen for måned er markert. Trykk [ ▲Cancel ]
eller [ ▼2 abc ] for å stille inn aktuell måned.
3. Trykk [ ◄ 1
innstilling av dato og still inn aktuell dato.
Still inn år på samme måte.
4. Fortsett på samme måte med innstilling av tiden.
5. Trykk på [ OK ] for å bekrefte (eller [ MENU ]
for å avbryte).
] eller [ ► 3 def ] for å gå til
Photo Size (bildeoppløsning)
Velg bildeoppløsning, 8 eller 5 MP.
1. Trykk på [ ◄ 1
2. Trykk på [ OK ] for å bekrefte (eller [ MENU ] for
å avbryte).
] eller [ ► 3 def ] for å endre.
Norsk
Photo Burst (bildeserie)
Ta flere bilder ved aktivering.
1. Trykk på [ ◄ 1
å ta 1 bilde, 2 bilder eller 3 bilder hver gang
kameraet aktiveres.
2. Trykk på [ OK ] for å bekrefte (eller [ MENU ] for
å avbryte).
] eller [ ► 3 def ] for å velge
Video Size (videooppløsning)
Velg videooppløsning, 1280×720 eller 640×480.
1. Trykk på [ ◄ 1
2. Trykk på [ OK ] for å bekrefte (eller [ MENU ] for
å avbryte).
] eller [ ► 3 def ] for å endre.
61
Page 62

Norsk
Video Length (Lengde på videosnutt)
Velg ønsket tid for videoopptaket. Valg fra 5 til
60 sekunder.
1. Trykk [ ◄ 1
ønsket tid (5–60 s) for videoopptaket.
2. Trykk på [ OK ] for å bekrefte (eller [ MENU ] for
å avbryte).
] eller [ ► 3 def ] for å velge
Time Lapse (Intervallstyrt eksponering
uavhengig av bevegelsesdetektoren)
Denne funksjonen gjør det mulig å ta bilder med et
visst intervall, f.eks. ta en bildeserie hvert 5. minutt.
1. Trykk på [ ◄ 1
ønsket intervall mellom automatiske eksponeringer.
Innstilling fra 5 minutter til 8 timer eller Off (lukket).
2. Trykk på [ OK ] for å bekrefte (eller [ MENU ] for
å avbryte).
] eller [ ► 3 def ] og velg
PIR Trigger (Bevegelsessensorens følsomhet)
Jo høyere følsomhet, desto lettere aktiveres kameraet, f.eks. når vinden beveger grener.
Jo høyere innstilling, desto flere bilder vil bli tatt. Følsomheten avtar vanligvis med
stigende temperatur. Hvis kameraet skal brukes ved høy temperatur bør det stilles
inn på følsomhet High.
1. Velg følsomhet for aktivering av kameraet.
Velg innstilling: Off (bevegelsesdetektor
avstengt), Low (lav følsomhet), Normal (normal
følsomhet),High (høy følsomhet) med [ ◄ 1
eller [ ► 3 def ].
2. Trykk på [ OK ] for å bekrefte (eller [ MENU ] for
å avbryte).
]
PIR Intervall (intervall til ny aktivering etter en detektering)
Ved en aktivering vil kameraet eksponere antall bilder (eller videosekvens), men hvis
bevegelsesdetektoren detekterer bevegelse hele tiden vil kameraet fortsette å ta bilder
av samme motiv, uavbrutt. Derfor er det mulig å stille inn en tidsforsinkelse til neste aktivering.
1. Velg hvor lang tid kameraet skal forsinkes før ny
aktivering kan foretas etter forrige aktivering av
kameraet. Innstilling fra 0 s til 60 min med
[ ◄ 1
2. Trykk på [ OK ] for å bekrefte (eller [ MENU ] for
å avbryte).
] eller [ ► 3 def ].
62
Page 63

Work Hour (timer)
Obs! Hvis du velger å stille inn Work Hour på Off,
vil kameraet være aktivt hele tiden. Still inn den
tiden på døgnet som kameraet skal være aktivert,
mellom 00:00 og 23:59.
1. Velg On med [ ◄ 1
2. Trykk på [ OK ].
3. Still inn start- og stopptid.
- Start: 00H – 00M, still inn ønsket starttid.
Bruk knappene [ ▲ Cancel ] og [ ▼2abc ]
for å stille inn verdier. Skifte mellom timer
og minutter med [ ◄ 1
Skifte mellom start og stopp med
[ ◄ 1 ] eller [ ► 3 def ].
- Stopp: 00H – 00M, still inn ønsket sopptid.
4. Trykk på [ OK ] for å bekrefte og lagre innstillingen
(eller [ MENU ] for å avbryte).
] eller [ ► 3 def ].
] eller [ ► 3 def ].
MMS Set (MMS-innstillinger)
Bruk fjernkontrollen til å utføre innstillingene eller
benytt programvare som du kan laste ned fra
www.Bolyguard.com eller www.clasohlson.no.
1. Trykk på [ OK ] for å åpne innstillingene.
2. Benytt fjernkontrollens taster til å stille inn
ønskede verdier.
3. Trykk [ ▲Cancel ] for å slette. Trykk [ # ] for
å skifte linje/rad.
4. Trykk [ OK ] for å lagre innstillingene.
Norsk
GPRS Set (GPRS-innstillinger)
Bruk fjernkontrollen til å utføre innstillingene eller
benytt programvare som du kan laste ned fra
www.Bolyguard.com eller www.clasohlson.no.
1. Trykk på [ OK ] for å åpne innstillingene.
2. Benytt fjernkontrollens taster til å stille inn
ønskede verdier.
3. Trykk [ ▲Cancel ] for å slette. Trykk [ # ] for
å skifte linje/rad.
4. Trykk [ OK ] for å lagre innstillingene.
63
Page 64

Send Mode (når skal beskjeden sendes)
Obs! Video kan ikke sendes.
Velg mellom: Off, Manual, Daily Report eller Instant.
Off
Det kan ikke sendes MMS.
1. Trykk [ ◄ 1
2. Trykk [ OK ] for å lagre innstillingene.
Bruksanvisning
Sende MMS manuelt.
1. Vis bildet du ønsker å sende på skjermen.
2. Trykk på [ MENU ].
3. Trykk [ ▲Cancel ] eller [ ▼2 abc ] og velg Send.
4. Trykk [ OK ] for å sende. Bildet sendes slik som du tidligere har stilt inn i menyen
«Send to» nedenfor.
] eller [ ► 3 def ] til «Off» vises på skjermen.
Norsk
Daily Report
Kameraet rapporterer til en forhåndsinnstilt tid hvor mange bilder/videoer som er tatt i
løpet av et døgn.
Hvis kameraet står innstilt på stilbildemodus (Photo) sendes et MMS med det siste
bildet som ble tatt og totalt antall bilder som er tatt.
Hvis kameraet står i videomodus sendes en SMS som forteller hvor mange videosekvenser som er tatt.
1. Trykk [ ◄ 1
2. Trykk [ OK ] og still inn tiden med [ ▲ Cancel ] eller [ ▼ 2 abc ].
Forandre mellom timer og minutter med [ ◄ 1 ] eller [ ► 3 def ].
3. Trykk [ OK ] for å lagre innstillingene.
] eller [ ► 3 def ] til «Daily Report» vises på skjermen.
Instant
Kameraet sender en MMS umiddelbart etter at bildet er tatt. Still inn hvor mange bilder
du vil at kameraet skal sende i løpet av en 24-timers periode.
Eks.
Du velger at kameraet skal sende 10 bilder. Etter 8 timer har kameraet tatt disse 10 bilene
og sendt dem.
Etter at det siste bilde er tatt vil det drøye 24 timer før neste bilde sendes via MMS.
1. Trykk [ ◄ 1
2. Trykk [ OK ] og still inn antall bilder (fra ubegrenset (unlimited) til 99 bilder) med
[ ▲ Cancel ] eller [ ▼ 2 abc ].
3. Trykk [ OK ] for å lagre innstillingene.
] eller [ ► 3 def ] til «Instant» vises på skjermen.
64
Page 65

Send to (hvor og hvordan skal bildene sendes)
Hvis det skal sendes til telefonen din
Velg Phone MMS. Trykk [ OK ] og skriv inn ønsket telefonnummer (maks 4 numre kan
skrives inn) dit bildene skal sendes.
Hvis du vil sende det som e-post via GPRS
Velg Email [ GPRS ]. Trykk [ OK ] og skriv inn ønsket
adresse (maks 4 adresser kan skrives inn).
Hvis du vil sende det som e-post via MMS
Velg Email [ MMS ]. Trykk [ OK ] og skriv inn ønsket adresse (maks 4 adresser kan
skrives inn).
SMS Control (Hvis du vil styre kameraet med en app)
• Obs! For å endre kameraets innstillinger med
hjelp av appen «BGTools» (hent den på google
Play eller App Store). Du må først stille inn SMS
Control i kameraets innstillingsmeny på ON
og oppgi fra hvilket telefonnummer kameraet
skal styres (Du kan også gjøre innstillingen med
programmet BMC-config som lastes ned fra
produsentens hjemmeside www.Bolyguard.com
eller www.clasohlson.no).
• Husk at kameraet trekker mer strøm når SMS
Control står innstilt på ON
og batteriene varer ikke like lenge.
Norsk
Versjon
Installert software- og MCU-versjon vises.
65
Page 66

Norsk
Default Set (reset til fabrikkinnstillingene)
Stiller kameraet tilbake til fabrikkinnstillingene.
Obs! Tilbakestillingen skjer umiddelbart når du
trykker på [ OK ]. Alle egne innstillinger vil forsvinne
når kameraet resettes.
Når innstillingene er fullført
1. Sett funksjonsvelgeren på ON. Den røde LED-indikatoren blinker.
2. Når kameraet skrus på trenger det 30 s til å koble seg opp mot telenettet.
3. I ON-modus skal man ikke bruke fjernkontrollen. Kameraet tar bilder eller videofilmer
med lyd enten som innstilt fra fabrikk eller etter dine innstillinger.
Stell og vedlikehold
Tørk kameraet med en myk lett fuktet klut. Bruk et mildt rengjøringsmiddel ved behov.
Unngå å bruke løsemidler og slipende rengjøringsmidler. Det kan skade produktet.
66
Page 67

Feilsøking
Noe skjermer for
kameralinsen.
Fjernkontrollen
fungerer ikke.
Displayet slukkes/
lyser ikke.
Det er ikke tatt
noen bilder/
videoopptak.
Mange tomme
bilder/videofilmer.
Svart-hvitt bilder/
videofilmer.
Uklare bilder/
videofilmer.
Linkingen mellom
kameraet (minnekortet) og datamaskin forsvinner
når datamaskinen
kobles til.
Kameraet finner
ikke minnekortet.
• Kameralinsen har et IR-filter som kommer opp når kameraet
skrus av. Når kameraet slås på vil filteret finne sin rette
posisjon igjen.
• Kontroller batteriene og skift dem ut ved behov.
• Fjernkontroller er for langt fra kameraet, maks avstand er ca. 9 m.
• Minnekort mangler. Skru av kameraet og sett i et minnekort.
• Displayet skrus av automatisk etter 3 minutter hvis det ikke
utføres noen innstillinger.
• Funksjonsvelgeren står innstilt på TEST eller Off.
• Minnekort er skrivebeskyttet.
• Dårlige batterier.
• Følsomheten på kameraet er feilinnstilt.
• Kameraet er vendt feil vei.
• I mørket blir bildene svart-hvite.
• Feil avstand til motivet.
• Kontroller linsen og rengjør ved behov.
• Kontroller at USB-kabelen er hel og ordentlig koblet til både
kamera og datamaskin.
• Feilformatert minnekort.
• Feil formatering – formater minnekortet i kameraet.
• Minnekortet er for stort, maks 32 GB.
• Sjekk at minnekortet ikke er låst.
• Minnekortet kan være defekt. Prøv et annet minnekort.
Norsk
Avfallshåndtering
Når produktet skal kasseres, må det skje i henhold til lokale forskrifter.
Hvis du er usikker, ta kontakt med lokale myndigheter.
67
Page 68

Norsk
Spesifikasjoner
Bildesensor 5 MP farge CMOS
Linse F/NO 2,2, synsfelt = 60°
Bevegelsessensorens rekkevidde Inntil 20 m
Display 1,5″ TFT
Minnekort SD/SDHC 8–32 GB
Bildeoppløsning 5 eller 8 MP interpolert
Videooppløsning VGA (640×480) eller 720p HD (1280×720)
PIR-sensor (bevegelsesdetektor) Multizon
Bevegelsesdetektorens følsomhet Høy/normal/lav
Reaksjonstid 1 sekund
Bruks-/lagringstemperatur −20 til +60 °C/−30 til +70 °C
Innstilling av intervaller 1 sekund til 60 minutter
Bildeserie 1 til 3
Videosekvens 1 til 60 s
Strømforsyning 4 eller 8×AA/LR6-batterier
Eksternt strømadapter 6 V DC (selges separat)
Strømforbruk i standbymodus < 0,3 mA (< 7 mAh/dag)
Strømforbruk ved aktiv bruk 150 mA (+ 450 mA når IR-LED er tent)
Batteristatus Batterisymbol vises på displayet.
Feste Rem eller stativ/feste med stativgjenger
Anbefalt luftfuktighet ved bruk 5–90 %
Mål 140×90×55 mm
Vekt Ca. 500 g (med batterier)
68
Page 69

Riistakamera, jossa MMS-viestit
ja sähköpostit
Tuotenro 36-5762 Malli MG882K-8mHD
Lue käyttöohje ennen tuotteen käyttöönottoa ja säilytä se tulevaa tarvetta varten.
Pidätämme oikeuden teknisten tietojen muutoksiin. Emme vastaa mahdollisista tekstitai kuvavirheistä. Jos laitteeseen tulee teknisiä ongelmia, ota yhteys myymälään tai
asiakaspalveluun (yhteystiedot käyttöohjeen lopussa).
Tuotekuvaus
• 8 Mp:n pimeänäkökamera esim. puutarhan tai riistan ruokintapaikan valvontaan.
Kamera lähettää kuvia MMS- tai sähköpostiviesteillä GSM:n/GPRS:n kautta valittuina aikoina tai kameran havaitessa liikettä.
• Kuvat ja videot tallentuvat myös SD-muistikortille (enintään 32 Gt, myydään
erikseen), josta ne voidaan siirtää tietokoneelle. Kamera tallentaa kuvat JPGmuodossa ja videot AVI-muodossa. Tiedostojärjestelmä FAT32.
• Kuvissa on aika-, päivämäärä- ja kuunvaihemerkinnät ja videoissa on ääni.
• Liiketunnistimen etäisyys enintään 20 metriä.
• Virtalähteenä 8 kpl AA/LR6-paristoa (myydään erikseen) tai 6 V:n virtalähde
(myydään erikseen).
Ota huomioon seuraavat asiat:
• Valvontakameran käyttö saattaa edellyttää kameravalvontalupaa.
Kameravalvonnasta on säädetty henkilötietolaissa (523/1999). Lue lisää kameravalvonnasta henkilötietolaista tai kysy lisää kunnalta tai sisäasiainministeriöstä,
jos olet epävarma.
• Kameran omistaja saattaa joutua vastuuseen väärin asennetuista kamerasta.
Huom.!
Kameran linssissä on IR-suodatin, joka saattaa jäädä linssin
eteen, kun kamera sammutetaan. Suodatin palautuu
alkuperäiseen asentoon, kun kamera laitetaan päälle.
Käytön aloittaminen
Paristojen asennus
1. Avaa kansi (1).
2. Ota kiinni paristolokeron kahvasta (18) ja vedä lokero suoraan ulos kamerasta.
3. Laita paristolokeroon 8 (tai 4) kpl AA/LR6-paristoa kuvan osoittamalla tavalla.
Noudata paristolokeron pohjan napaisuusmerkintöjä.
69
Suomi
Page 70

Suomi
Huom.!
• Paristolokero tulee työntää kuvan
osoittamalla tavalla (sen voi työntää
myös ylösalaisin, mutta tällöin
kamera ei toimi).
• Vaihda heikot paristot uusiin. Vuotavat paristot saattavat vahingoittaa kameraa.
Älä sekoita uusia ja vanhoja paristoja tai erityyppisiä paristoja (esim. akkuja ja
paristoja) keskenään.
• Paristot kestävät noin kuusi kuukautta riippuen käyttölämpötilasta ja valokuvien
määrästä.
• Kamera toimii hätätapauksessa neljällä AA/LR6-paristolla paristolokeron vasemmalla
tai oikealla puolella. Tässä tapauksessa kaikki paristot pitää vaihtaa seuraavan
paristonvaihdon yhteydessä.
• Kamera toimii myös muuntajalla (6 V DC, + keskellä). Muuntaja myydään erikseen.
Liitä muuntajan kaapeli 6 V:n liitäntään (19).
Tärkeää!
• Kamerassa pitää olla SD-muistikortti, jotta sillä voi ottaa kuvia. Kamerassa pitää
olla aktiivinen GSM-SIM-kortti, jotta sillä voi lähettää MMS-viestejä ja sähköpostia.
SIM-kortti tulee aktivoida mobiilidatalle/MMS-viesteille, ja pin-koodikyselyn tulee
olla sammutettu.
• Kamerassa on vain GSM 2G -tuki, eikä se toimi, jos palveluntarjoajalla on vain
3G-verkko.
70
Page 71

Asetukset
Suosittelemme, että teet asetukset ohjelmalla BMC Config.
1. Hae ohjelma valmistajan kotisivulta www.Bolyguard.com tai osoitteesta
www.clasohlson.fi ja asenna se tietokoneellesi.
2. Avaa ohjelma, aloitusikkuna
tulee näkyviin, valitse kameramalli MG882K-8MHD
kohdassa ”Select product”
ja paina [ OK ].
3. Uusi ikkuna tulee näkyviin.
Valitse maa ja palve-
luntarjoaja kohdassa
WAP/Internet Setting.
Jos listalla ei ole sinun
palveluntarjoajaa, valitse
Others… ja täytä asetukset
(katso kohta 5). Jos olet
epävarma, pyydä tiedot
palveluntarjoajaltasi.
Suomi
4. Paina painiketta [ Check WAP/Parameters (L) ]. Näytölle ilmestyy ikkuna ”WAP/
Internet Parameters”. Kamera voi lähettää kuvia joko MMS- tai sähköpostiviestinä
tai sähköpostiviestinä GPRS:n kautta. Näissä erona on, että MMS-viestit vaativat
vain MMS-asetukset, kun taas GPRS vaatii sähköpostitilin kuvien lähettämiseen.
GPRS:n etuna on, että se on korkeammalla etusijalla matkapuhelinverkossa, jolloin
viestit tulevat todennäköisesti aiemmin perille kuin MMS-viestit. GPRS saattaa
myös olla palveluntarjoajasta riippuen olla edullisempi vaihtoehto, sillä laskutus
riippuu MMS-viesteistä poiketen siirretystä tietomäärästä.
71
Page 72

5. MMS-asetukset näkyvät vasemmassa ruudussa kohdassa WAP Setting, jos olet
valinnut palveluntarjoajan listalta. Täytä tiedot itse, jos olet valinnut palveluntarjoajaksi
Others…. MMS-asetukset tulee tehdä, jotta kamera voi lähettää MMS-viestejä
matkapuhelimeen tai sähköpostiin.
Suomi
6. Syötä GPRS-asetukset oikeassa ruudussa Internet Setting. GPRS-asetukset
tulee täyttää, jotta kamera voi lähettää sähköpostia.
Suosittelemme, että luot uuden sähköpostitilin, jota käytät vain kameralle. Aseta palvelin-nimi/SMTP sähköpostipalveluntarjoajalle (SEND EMAIL SERVER), portti, sähköpostiosoite, josta kamera lähettää sähköpostit (SEND EMAIL ADRESS) ja sähköpostitilin
salasana (SEND EMAIL PASSWORD). Jos et ole varma sähköpostiasetuksista, ota
yhteys palveluntarjoajaasi.
Alla on esimerkki asetuksista Gmail-sähköpostissa.
Muista painaa painiketta [ Advanced ], jolloin ruudulle
ilmestyy alla oleva ikkuna, ja merkitse ruutu SSL,
jos palveluntarjoajasi edellyttää sitä.
Tallenna painamalla [ OK (Y) ].
72
Page 73

7. Tallenna WAP/Internet-parametrit painamalla [ OK (Y) ].
8. Siirry muihin kamera-asetuksiin painamalla Change Setting. Alla oleva ikkuna
tulee esille. Ruudun yläosassa voit tehdä mm. kieli- (Language) ja PIR-väliasetuksia (PIR-Interval). Tarkempi kuvaus asetuksista löytyy kappaleesta
Asetusten tekeminen kaukosäätimellä.
Ikkunan muut ruudut ovat:
• Work hour: Valitse jos haluat, että kamera on aktiivinen vain tiettynä aikana
vuorokaudesta.
• Send to: Valitse lähetetäänkö kuvat MMS-viestinä vai sähköpostina. Jos valitset
Phone [ MMS ], kuvat lähetetään puhelinnumeroihin, jotka on ilmoitettu kappaleessa
10. Jos valitset Email [ MMS ] tai Email [ GPRS ], kuvat lähetetään sähköpostiosoitteisiin, jotka on ilmoitettu kappaleessa 10.
• Send mode: Valitse lähetetäänkö kuvia, ja kuinka usein kuvia lähetetään.
Kamerassa on neljä eri lähetysvaihtoehtoa:
- Manuaalinen: Lähettää kuvia ainoastaan, kun niitä pyydetään SMS-viestillä
tai sovelluksella.
- Daily Report: Valitse mihin aikaan vuorokaudesta kamera lähettää raportin,
jossa kerrotaan kuinka monta kuvaa tai videota se on ottanut viimeisen
24 tunnin aikana.
- Instant: Kamera lähettää kuvan välittömästi. 24 tunnin jakson aikana lähetettävien
kuvien määrä voidaan rajoittaa.
- Off: Kamera ei lähetä kuvia.
9. Kun olet valmis, tallenna painamalla [ OK ].
10. Ilmoita puhelinnumero tai sähköpostiosoite, johon kuvat lähetetään kohdassa
Customer Information Setting (katso kappale 3). Jos käytät BGTools-sovellusta,
ilmoita kameraa ohjaavan puhelimen puhelinnumero kohdassa Admin…Number.
11. Jos et ole liittänyt kameraa tietokoneeseen mukana tulevalla USB-kaapelilla, liitä se nyt.
Suomi
73
Page 74

Suomi
12. Valitse kamera kohdassa, jossa asetukset tallennetaan.
13. Tallenna asetukset painamalla [ SAVE (Y) ].
14. Irrota kamera tietokoneesta.
15. Jotta kamera tunnistaa uudet asetukset, toiminnonvalitsin tulee asettaa kohtaan
”TEST”. Anna tämän jälkeen kameran käynnistyä ja lukea asetukset, tässä
kestää noin 30 sekuntia. Aseta toiminnonvalitsin asentoon ON, niin kamera toimii
uusien asetusten mukaisesti.
16. Suosittelemme että testaat kameraa kodin lähellä, ennen kuin sijoitat varsinaiseen
kohteeseen.
Ota huomioon seuraavat asiat:
• Palvelutarjoajilla voi olla eri turvallisuusasetuksia ja -tasoja. Tietyissä tapauksissa
turvallisuusasetukset edellyttävät muutoksia, jotta tilille voidaan kirjautua.
• Huom.! Eri palveluntarjoajien turvallisuustasoista voi olla vaikeaa saada selkeää
kuvaa. Jos sähköpostitoiminto ei toimi alla olevista esimerkeistä huolimatta,
suosittelemme, että varmistat kuvien tulemisen perille käyttämällä ainoastaan
kameran MMS-toimintoa.
74
Page 75

Alla on esimerkki Gmail-sähköpostiosoitteen käytöstä. Tässä esimerkissä Gmail on
estänyt kameraa kirjautumasta tilille:
Esimerkki:
Jotta pääset
asetustilaan, sinun
tulee ensin kirjautua
Gmail-sähköpostiin
ja sen jälkeen valita
Asetukset–Tilit
ja Tuonti–Muut
Google-tilin
asetukset–
Henkilökohtaiset
tiedot–
Tietoturva–Tilin
käyttöoikeudet–
Vähemmän
turvallisten
sovellusten
toiminta–
Asetukset.
Suomi
Salli vähemmän
turvalliset sovellukset valitsemalla
Ota käyttöön.
75
Page 76

Suomi
Painikkeet ja toiminnot
1. Kansi ja kaukosäätimen pidike
2. TV out. Videolähtö (liitäntäjohto myydään erikseen)
3. Toiminnonvalitsin, jossa 3 tilaa:
- OFF (kamera sammutettu),
- TEST (3 toimintoa: asetukset,
kuvien/videon ottaminen manuaalisesti, kuvien katsominen ja videon
aloitusruudun käyttäminen kameran
sijoittamisessa),
- ON, (kamera aktivoitu tehdasasetuksilla tai omilla asetuksilla)
4. SD-korttipaikka
5. LED-merkkivalo
6. Laserosoitin
7. Kameran linssi
8. Liiketunnistin
9. Antenni
10. LCD-näytön luukku
11. Mikrofoni
12. Hämäräkytkin
13. IR-diodit pimeänäköä varten
14. SIM-korttipaikka
15. USB-liitäntä. Liitä kamera
tietokoneeseen mukana tulevalla
USB-kaapelilla ja käsittele muistikorttia
käyttöjärjestelmällesi sopivalla tavalla.
16. Epäkeskolukko
17. Paristolokero
18. Paristolokeron kahva
19. 6 V DC -liitäntä, + keskellä
(muuntaja myydään erikseen)
20. Kallistuksen säätö
21. Jalustakiinnike
22. Kiinnike lisähihnalle tai -vaijerille,
jalustakiinnike
9
8
7
6
5
10
11
4
3
12
13
2
14
15
1
18
17
16
19
20
21
22
76
Page 77

Kaukosäädin
23. [ Menu ]
24. [ ▲ Cancel ] Siirry haluamaasi alavalikkoon,
siirry ylöspäin, peru valinta
25. [ OK ] Avaa kuvannäyttötila, vahvista valinta
26. [ ◄ 1
valikossa, paina useita kertoja syöttääksesi
seuraavat merkit: 1 . / : @ _
27. [ ▼2 abc ] Siirry haluamaasi alavalikkoon,
siirry alaspäin
28. [ ►3 def ] Siirry haluamaasi asetukseen
alavalikossa
29. [ 4–0 ] Numero- ja kirjainpainikkeet, paina
useita kertoja 0 syöttääksesi merkit + ja -
30. [
yhteydessä.
31. [ # ]
Huom.!
• Kaukosäädintä säilytetään kannen (1) alla.
• Tässä kameramallissa ei ole kaikkia kaukosäätimen toimintoja.
• Kaukosäätimen kantama on noin 9 metriä. Suoraan kameraan tai kaukosäätimeen
osuva auringon valo heikentää kantamaa.
• Kun kamera käynnistetään (tilat ON ja TEST), kestää noin 10–30 sekuntia, kun
kamera muodostaa yhteyden puhelinverkkoon.
• Poista paristopidikkeessä oleva muoviliuska. Muoviliuska suojaa kaukosäätimen
paristoja tyhjenemiseltä varastoinnin ja kuljetuksen aikana.
] Siirry haluamaasi kohtaan ala-
] Aktivoi laserosoitin kameran sijoittamisen
23 24 25
26
29
30
27
28
31
Suomi
Jos kaukosäädin ei toimi, paristo saattaa olla tyhjä.
Vaihda paristo seuraavalla tavalla:
1. Irrota kaukosäätimen paristolokero työntämällä napsautuslukkoa kohti paristolokeroa
ja vetämällä samalla paristolokeroa suoraan ulospäin.
2. Aseta lokeroon uusi paristo (1 kpl CR 2025) pariston plusnapa sinua päin.
Katso kaukosäätimen tarrasta.
3. Työnnä paristolokero takaisin paikalleen. Varmista, että napsautuslukko kiinnittyy
kunnolla.
77
Page 78

Suomi
Näytön kuvakkeet
Huom.! Näytön valo palaa ainoastaan, kun toiminnonvalitsin on kohdassa TEST.
Näytön valo ei pala, kun toiminnonvalitsin on asennossa ON. Näytön valo sammuu, jos
mitään painiketta ei paineta kolmen minuutin aikana TEST-tilassa.
Näyttää kamera- tai
videokamerakuvakkeen
asetuksesta riippuen
SIM-kortti on kamerassa.
Kuvake näkyy, kun MMStoiminto ei toimi (ongelmia
verkon kanssa, huono
kenttä ym.)
Muistikortin asettaminen
Huom.! Kameran tulee olla pois päältä, kun muistikortti asetetaan.
Kameran tulee olla pois päältä myös, kun muistikortti irrotetaan.
1. Kameraan sopii 8–32 Gt:n
SD-/SDHC-muistikortit.
2. Varmista, että muistikorttia ei
ole kirjoitussuojattu.
3. Avaa kansi (1) ja paina SD-/SDHCmuistikortti korttipaikkaan (4) kuvan
osoittamalla tavalla. Paina muistikorttia, kunnes se napsahtaa.
Näyttää kuvakoon
Signaalinvoimakkuus
Näkyy, kun AV-kaapeli on
liitetty TV out -liitäntään
Pariston varaustaso
Puhelinoperaattori
Vuosi ja päivämäärä
Kellonaika
Muistikortin vapaa tila
Otettujen kuvien määrä
Muistikortin alustaminen (formatointi)
Alusta muistikortti ennen käyttöä. Kun muistikortti
alustetaan, kaikki kortilla olevat tiedot poistuvat.
1. Taita auki näytön päällä oleva kansi.
2. Aseta toiminnonvalitsin (3) asentoon TEST.
3. Aloituskuva näkyy näytöllä.
4. Paina [ MENU ] kaukosäätimellä. Kielen asetustila
”Setup Language” avautuu.
78
Page 79

5. Siirry valikossa kohtaan Format SD
painamalla [ ▼ 2 abc ].
6. Paina [ OK ]. Näytöllä lukee ”Format SD Yes No”.
7. Valitse Yes painamalla [ ◄ 1
8. Vahvista painamalla [ OK ] (tai keskeytä
painamalla [ MENU ]).
].
SIM-kortti
Jos käytät MMS-/SMS- tai sähköpostitoimintoja, aseta pidikkeeseen (14) sopiva SIM-kortti.
Varmista pidikkeen yläpuolen merkinnöistä, että asetat kortin oikein päin.
Käyttö
Ota huomioon seuraavat seikat, ennen kuin käynnistät kameran:
Sijoittaminen
• Kameran voi kiinnittää mukana tulevalla hihnalla. Kameran voi myös kiinnittää jalustaan
tai muuhun vastaavaan, joka sopii kameran takana oleviin jalustakierteisiin (21) tai (22).
Varmista, että kamera seisoo vakaasti, ja että tuuli tai muut ulkoiset seikat eivät
liikuta kameraa.
• Sijoita kamera mahdollisimman hyvin säältä suojattuun paikkaan.
• Sopiva etäisyys kohteeseen on noin 5 metriä. Aseta kamera noin 1,5–2 metrin
korkeudelle maasta.
• Aseta toiminnonvalitsin kohtaan TEST ja käynnistä laserosoitin painamalla [ ].
Käytä laserosoitinta apuna kameran suuntaamisessa.
Suomi
Näin saat parhaan tuloksen
• Ympäristön lämpötila vaikuttaa kameran toimintaan. PIR-anturin kapasiteetti ja
kantama riippuvat ympäristön ja eläimen välisestä lämpötilaerosta. Mitä suurempi
lämpötilaero on, sitä helpommin ja sitä kauempaa kamera voi havaita liikettä.
• Kamera ottaa värikuvia päivänvalossa ja mustavalkokuvia yöllä.
• Ota huomioon auringon nousu- ja laskusuunta, ja sijoita kameran takaosa kohti
aurinkoa, niin vältät vastavalon valokuvissa. Kamera kannattaa mahdollisuuksien
mukaan suunnata kohti pohjoista vastavalon ja PIR-anturin virheellisen toiminnan
ehkäisemiseksi.
• Poista kameran edessä olevat oksat. Kameran edessä olevat oksat, joissa on
paljon lehtiä, saattavat johtaa kameraan virheelliseen toimintaan.
79
Page 80

Suomi
Valokuvien/videokuvan ottaminen manuaalisesti testaustarkoituksessa
Huom.!
• Kameran voi suunnata käyttämällä laserosoitinta tai ottamalla manuaalisesti valokuvia/
videokuvaa, ennen kuin kamera asennetaan lopulliseen paikkaan.
• Kameran näytöllä ei voi katsoa videokuvaa. Näytöllä näkyy ainoastaan videon
käynnistysruutu.
1. Aseta toiminnonvalitsin asentoon TEST.
2. Valitse valokuvaus tai videokuvaus painamalla [ ▼ 2 abc ] tai [ ▲ Cancel ].
Näytön vasempaan yläkulmaan ilmestyy kamera- tai videokamerakuvake.
3. Ota valokuva tai tallenna videokuvaa painamalla [ ►3 def ].
4. Katso valokuva tai videofilmin aloitusruutu kameran näytöllä painamalla [ OK ].
5. Jos olet ottanut useita kuvia tai videoita, siirry niiden välillä painamalla [ ▼ 2 abc ]
tai [ ▲ Cancel ].
Valokuvan tai videon poistaminen
1. Valitse poistettava valokuva tai video näytölle.
2. Paina [ Menu ].
3. Paina [ ▼ 2 abc ] tai [ ▲ Cancel ], kunnes näy-
töllä lukee ”Delete”.
4. Valitse Del One (poista näytöllä näkyvä kuva) tai
Del All (poista kaikki muistikortilta) painamalla
[ ◄ 1
5. Vahvista valinta painamalla [ OK ].
] tai [ ► 3 def ].
6. Valitse Yes (poista) tai No (älä poista)
painamalla [ ◄ 1 ] tai [ ► 3 def ].
80
Page 81

Kamerassa on seuraavat tehdasasetukset:
”Language” Kieli Englanti
”Camera Mode” Kamera Still-kuva
”Set Clock” Kellonaika ja päivämäärä Ei asetettu
”Photo Size” Kuvan tarkkuus 8 megapikseliä
”Photo Burst” Kuvasarja 1 kuva
”Video Size” Videokuvauksen tarkkuus 1280×720
”Video Length” Videofilmin pituus 10 sekuntia
”Time Lapse” Kuvan/videon ottaminen tietyin aikavälein Pois päältä
”PIR Trigger” Liiketunnistimen herkkyys Normaali
”PIR Interval” Liiketunnistimen aktivointi 5 sekuntia
”Work Hour” Aika jolloin kamera on aktivoituna Pois päältä
”MMS Set” MMS-toiminnon asetukset Ei asetettu
”GPRS Set” GPRS-asetukset Ei asetettu
”Send Mode” Viestin lähettämisen ajankohta Manuaalinen
”Send to” Viestin lähetysosoite MMS puhelimeen
”SMS Control” Asetusten tekeminen kamerassa sovelluksella
”BGTools” (ladataan Google Playsta tai App Storesta)
”Version” Näyttää senhetkisen ohjelmistoversion ”Format SD” Muistikortin alustaminen ”Default Set” Tehdasasetusten palauttaminen -
Pois päältä
Suomi
Asetusten tekeminen kaukosäätimellä
Huom.! Kamera-asetukset voi tehdä kaukosäätimellä, mutta ne on huomattavasti
helpompi tehdä tietokoneella kappaleessa Asetukset olevien ohjeiden mukaisesti.
Suosittelemme, että teet kaukosäätimellä vain pienempiä säätöjä, jos sinulla ei ole
tietokonetta käytettävissä.
1. Aseta toiminnonvalitsin asentoon TEST.
2. Paina [ MENU ], ensimmäinen alavalikko ”Setup Language” ilmestyy näytölle.
3. Siirry haluamaasi valikkoon painamalla [ ▼ 2 abc ] tai [ ▲ Cancel ].
4. Valitun valikon senhetkinen asetus näkyy näytöllä.
5. Voit muuttaa valitun valikon asetuksia painamalla [ ◄ 1
Jokainen painallus muuttaa asetusta yhden askelen.
6. Vahvista painamalla [ OK ].
7. Poistu valikosta painamalla [ MENU ].
81
] tai [ ► 3 def ].
Page 82

Suomi
Kamerassa on seuraavat alavalikot:
”Language” Kieli: valitse Svenska (ruotsi), English (englanti), Suomi (suomi) ja
Deutsch (saksa).
”Camera Mode” Toiminnon valitseminen: valokuvaus tai videokuvaus.
”Set Clock” Päivämäärän ja kellonajan asettaminen: KK–PP–VV ja kellonaika.
”Photo Size” Kuvakoko: 8 tai 5 megapikseliä.
”Photo Burst” Yksi kuva tai kuvasarja: 1 kuva, 2 kuvaa tai 3 kuvaa.
”Video Size” Videokuvauksen tarkkuus 1280×720 tai 640×480.
”Video Length” Videokuvauksen pituus: 5–60 sekuntia.
”Time Lapse” Kuvien tai videoiden ottaminen valittuina aikaväleinä riippumatta
liiketunnistimen aktivoitumisesta. Aikaväli 5 minuuttia – 8 tuntia
tai Off (sammutettu).
”PIR Trigger” Liiketunnistimen herkkyys: Off–Low–Normal–High.
”PIR Interval” Valitse koska liiketunnistin aktivoituu edellisen aikaväliaktivoitumisen
jälkeen: 0 sekuntia – 60 minuuttia. Jos valitset 0, liiketunnistin on
aktivoituna jatkuvasti.
”Work Hour” Aseta vuorokauden aika, jolloin kamera on aktivoitu, tai sammuta
toiminto valitsemalla Off.
”MMS Set” SMS-asetukset.
”GPRS Set” GPRS-asetukset.
”Send Mode” Valitse koska kuva lähetetään: Off, Manual, Daily Report tai Instant.
”Send to” Phone MMS, Email [ GPRS ] tai Email [ MMS].
”SMS Control” Valitse ohjataanko kameraa SMS-viesteillä. On tai Off.
”Version” Näyttää asennetun ohjelmisto- ja MCU-version.
”Format SD” SD-muistikortin alustaminen kameran korttipaikassa.
”Default Set” Kameran tehdasasetusten palauttaminen.
Huom.! Asetukset palautuvat heti, kun painat [ OK ]. Kaikki omat
asetukset poistuvat, kun tehdasasetukset palautetaan.
Huom.! Kaikki alla olevat asetukset edellyttävät että olet jo:
1. Asettanut toiminnonvalitsimen asentoon TEST.
2. Painanut [ Menu ].
3. Siirtynyt haluamaasi valikkoon painamalla [ ▲Cancel ] tai [ ▼2 abc ].
Language (kielen asetus)
1. Muuta kieleksi Svenska, English, Suomi tai
Deutsch painamalla [ ◄ 1 ] tai [ ► 3 def ].
2. Vahvista painamalla [ OK ] (tai keskeytä painamalla [ MENU ]).
82
Page 83

Camera Mode (kameratila)
1. Valitse toiminto Photo (valokuvaus) tai Video
(videokuvaus) painamalla [ ◄ 1 ] tai [ ► 3 def ].
2. Vahvista painamalla [ OK ] (tai keskeytä painamalla [ MENU ]).
Set Clock (kellonajan ja päivämäärän
asettaminen)
Aseta kalenteri, KK–PP–VV ja kellonaika.
1. Avaa kellonajan asetustila painamalla [ OK ].
2. Kuukauden asetustila on valittuna, aseta kuukausi
painamalla [ ▲Cancel ] tai [ ▼2 abc ].
3. Siirry päivän asetustilaan painamalla [ ◄ 1
tai [ ► 3 def ], aseta päivä. Aseta vuosi samalla
tavalla.
4. Aseta kellonaika samalla tavalla.
5. Vahvista asetukset painamalla [ OK ]
(tai keskeytä painamalla [ MENU ]).
Photo Size (kuvan tarkkuus)
Valitse kuvan tarkkuus, 8 tai 5 MP.
1. Muuta painamalla [ ◄ 1
2. Vahvista painamalla [ OK ] (tai keskeytä
painamalla [ MENU ]).
] tai [ ► 3 def ].
]
Suomi
Photo Burst (kuvasarja)
Useiden kuvien ottaminen aktivoitumisen yhteydessä.
1. Valitse ottaako kamera 1, 2 tai 3 kuvaa aktivoitumisen yhteydessä painamalla [ ◄ 1
[ ► 3 def ].
2. Vahvista painamalla [ OK ] (tai keskeytä
painamalla [ MENU ]).
] tai
Video Size (videokuvan tarkkuus)
Valitse videokuvauksen tarkkuus 1280×720 tai
640×480.
1. Muuta painamalla [ ◄ 1
2. Vahvista painamalla [ OK ] (tai keskeytä
painamalla [ MENU ]).
] tai [ ► 3 def ].
83
Page 84

Suomi
Video Length (videokuvauksen pituus)
Valitse videokuvauksen pituus: 5–60 sekuntia.
1. Valitse videokuvauksen aika (5–60 sekuntia)
painamalla [ ◄ 1
2. Vahvista painamalla [ OK ] (tai keskeytä
painamalla [ MENU ]).
] tai [ ► 3 def ].
Time Lapse (liiketunnistimesta
riippumaton aikaväliohjattu valotus)
Tämän toiminnon avulla kamera voi ottaa kuvia
tietyin aikavälein, esim. kuvasarja viiden minuutin
välein.
1. Valitse automaattisten valotusten aikaväli
painamalla [ ◄ 1 ] tai [ ► 3 def ].
Asetusaika valittavissa 5 minuuttia – 8 tuntia
tai Off (sammutettu).
2. Vahvista painamalla [ OK ] (tai keskeytä
painamalla [ MENU ]).
PIR Trigger (liiketunnistimen herkkyys)
Mitä suurempi herkkyys on valittuna, sitä helpommin kamera aktivoituu, kun esim. tuuli
liikuttaa oksia. Mitä suurempi herkkyys, sitä enemmän kuvia kamera ottaa. Herkkyys
pienenee yleensä lämpötilan noustessa. Jos kameraa käytetään korkeassa lämpötilassa,
herkkyydeksi pitää valita High.
1. Valitse kameran aktivoitumisen herkkyys.
Valitse asetus: Off (liiketunnistin sammutettu),
Low (alhainen herkkyys), Normal (normaali
herkkyys), High (suuri herkkyys) painamalla
[ ◄ 1
2. Vahvista painamalla [ OK ] (tai keskeytä
painamalla [ MENU ]).
] tai [ ► 3 def ].
PIR Interval (uuden aktivoinnin aikaväli liikkeentunnistuksen jälkeen)
Kun kamera aktivoituu, se ottaa valitun määrän kuvia (tai videokuvaa). Jos liiketunnistin
havaitsee jatkuvasti liikettä, kamera jatkaa kuvien ottamista jatkuvasti. Sen vuoksi
kameraan voi asettaa aikaviiveen ennen seuraavaa aktivointia.
1. Valitse kuinka pitkän ajan kuluttua seuraava
aktivoituminen tapahtuu kameran viimeisestä
aktivoitumisesta. Aseta aikaviiveeksi 0 sekuntia
– 60 minuuttia painamalla [ ◄ 1
2. Vahvista painamalla [ OK ] (tai keskeytä
painamalla [ MENU ]).
] tai [ ► 3 def ].
84
Page 85

Work Hour (ajastin)
Huom.! Jos asetat Work Hour –asetuksen kohtaan
Off, kamera on aina aktiivinen. Aseta kellonaika,
jolloin kamera on aktiivinen: 00:00–23:59.
1. Valitse On painamalla [ ◄ 1
2. Paina [ OK ].
3. Aseta aloitus- ja lopetusaika.
- Aloitus: 00H – 00M, aseta haluamasi aloitusaika. Aseta aika painikkeilla [ ▲Cancel ]
[ ▼2 abc ]. Vaihda tuntien ja minuuttien
välillä painamalla [ ◄ 1
Vaihda aloitus- ja lopetusajan välillä painamalla [ ◄ 1 ] tai [ ► 3 def ].
- Lopetus: 00H – 00M, aseta lopetusaika.
4. Vahvista ja tallenna asetukset painamalla [ OK ]
(tai keskeytä painamalla [ MENU ]).
] tai [ ► 3 def ].
] tai [ ► 3 def ].
MMS Set
Tee asetukset kaukosäätimellä tai lataa ohjelma
osoitteesta www.Bolyguard.com tai osoitteesta
www.clasohlson.fi.
1. Avaa asetustila painamalla [ OK ].
2. Aseta haluamasi arvot kaukosäätimen
painikkeilla.
3. Poista painamalla [ ▲Cancel ], vaihda riviä
painamalla [ # ].
4. Tallenna asetukset painamalla [ OK ].
Suomi
GPRS Set
Tee asetukset kaukosäätimellä tai lataa ohjelma
osoitteesta www.Bolyguard.com tai osoitteesta
www.clasohlson.fi.
1. Avaa asetustila painamalla [ OK ].
2. Aseta haluamasi arvot kaukosäätimen painikkeilla.
3. Poista painamalla [ ▲Cancel ], vaihda riviä
painamalla [ # ].
4. Tallenna asetukset painamalla [ OK ].
85
Page 86

Suomi
Send Mode (kuvan lähettäminen)
Huom.! Videokuvaa ei voida lähettää.
Valitse seuraavista: Off, Manual, Daily report, Instant.
Off
MMS-viestejä ei lähetetä.
1. Paina [ ◄ 1
2. Tallenna painamalla [ OK ].
Manuaalinen
MMS-viestin lähettäminen manuaalisesti.
1. Valitse lähetettävä kuva näytölle.
2. Paina [ Menu ].
3. Paina [ ▲Cancel ] tai [ ▼2 abc ] ja valitse Send.
4. Lähetä painamalla [ OK ]. Kuva lähetetään ”Send to” –valikossa tehtyjen
asetusten mukaisesti.
Daily Report
Kamera raportoi ennalta valittuna ajankohtana, kuinka monta kuvaa/videota se on
ottanut vuorokauden aikana.
Jos kamera on valokuvaustilassa (Photo), se lähettää MMS-viestin, jossa on viimeisin
valokuva ja otettujen kuvien kokonaismäärä.
Jos kamera on videotilassa, se lähettää SMS-viestin, jossa lukee kuinka monta videota
se on ottanut.
1. Paina [ ◄ 1
2. Paina [ OK ] ja aseta aika painamalla [ ▲Cancel ] tai [ ▼2 abc ]. Vaihda tuntien ja
minuuttien välillä painamalla [ ◄ 1 ] tai [ ► 3 def ].
3. Tallenna painamalla [ OK ].
] tai [ ► 3 def ], kunnes näytöllä lukee ”Off”.
] tai [ ► 3 def ], kunnes näytöllä lukee ”Daily Report”.
Instant
Kamera lähettää MMS-viestin kuvan ottamisen jälkeen. Valitse kuinka monta kuvaa
kamera lähettää 24 tunnin jakson aikana.
Esimerkki:
Valitset, että kamera lähettää 10 kuvaa. 8 tunnin kuluttua kamera on ottanut 10 kuvaa
ja lähettänyt ne.
Viimeisen kuvan ottamisen jälkeen kestää 24 tuntia, ennen kuin kamera lähettää
seuraavan kuvan SMS-viestinä.
1. Paina [ ◄ 1
2. Paina [ OK ] ja valitse kuvien määrä (rajoittamaton (unlimited) – 99 kuvaa)
painamalla [ ▲Cancel ] tai [ ▼2 abc ].
3. Tallenna painamalla [ OK ].
] tai [ ► 3 def ], kunnes näytöllä lukee ”Instant”.
86
Page 87

Send to (valitse mihin kuva lähetetään)
Jos haluat lähettää kuvan puhelimeen
Valitse Phone MMS, paina [ OK ] ja syötä haluamasi puhelinnumero (voit syöttää
enintään 4 numeroa), johon kuva lähetetään.
Jos haluat lähettää kuvia sähköpostilla GPRS:n kautta
Valitse Email [ GPRS ], paina [ OK ] ja syötä osoite
(voit syöttää enintään 4 osoitetta).
Jos haluat lähettää kuvia sähköpostilla MMS:n kautta
Valitse Email [ GPRS ], paina [ OK ] ja syötä osoite (voit syöttää enintään 4 osoitetta).
SMS Control (kameran ohjaaminen sovelluksen avulla)
• Huom.! Kameran asetusten muuttaminen
BGTools-soveluksen avulla (lataa Google
Playsta tai App Storesta). Aseta ensin SMS
Control kameran asetusvalikosta asentoon
ON, ja ilmoita mistä puhelinnumerosta kameraa
ohjataan (Voit myös tehdä asetuksen BMCconfig-ohjelmalla, joka ladataan valmistajan
kotisivulta osoitteesta www.Bolyguard.com tai
osoitteesta www.clasohlson.fi).
• Ota huomioon, että kamera vie enemmän
virtaa, kun SMS Control on tilassa ON.
Suomi
Version
Näyttää asennetun ohjelmisto- ja MCU-version.
87
Page 88

Suomi
Default Set (tehdasasetusten palauttaminen)
Palauttaa tehdasasetukset.
Huom.! Asetukset palautuvat heti, kun painat [ OK ].
Kaikki omat asetukset poistuvat, kun tehdasasetukset palautetaan.
Kun asetukset ovat valmiit
1. Aseta toiminnonvalitsin asentoon ON. Punainen merkkivalo vilkkuu.
2. Yhteyden muodostamisessa puhelinverkkoon kestää noin 30 sekuntia.
3. Kaukosäädin ei toimi tilassa ON. Kamera ottaa valokuvia tai videokuvaa äänellä
tehdasasetuksien tai omien asetuksiesi mukaisesti.
Huolto ja puhdistaminen
Pyyhi kamera kevyesti kostutetulla pehmeällä liinalla. Käytä mietoa puhdistusainetta.
Älä käytä vahvoja, hankaavia puhdistusaineita tai liuotinaineita, sillä ne voivat
vahingoittaa laitetta.
88
Page 89

Vianhakutaulukko
Kameran linssin
edessä on jotain.
Kaukosäädin
ei toimi.
Näyttö sammuu,
eikä ole päällä
testitilassa.
Kamera ei ole
ottanut kuvia/
videoita.
Monia tyhjiä kuvia/
videoita.
Kuvat/videot ovat
mustavalkoisia.
Kuvat/videot ovat
epätarkkoja.
Kameraa (muistikorttia) ei löydy
tietokoneelta, kun
kamera on liitetty
tietokoneeseen.
Kamera ei löydä
muistikorttia.
• Kameran linssissä on IR-suodatin, joka saattaa jäädä linssin
eteen, kun kamera sammutetaan. Suodatin palautuu
oikeaan asentoon, kun kamera laitetaan päälle.
• Tarkasta paristo ja vaihda tarvittaessa.
• Kaukosäädin on liian kaukana kamerasta.
Kantama on enintään 9 metriä.
• Muistikortti puuttuu. Sammuta kamera ja aseta muistikortti.
• Näyttö sammuu automaattisesti, jos mitään asetuksia ei
tehdä kolmen minuutin aikana.
• Toiminnonvalitsin on asennossa TEST tai OFF.
• Muistikortti on kirjoitussuojattu.
• Heikot paristot.
• Kameran herkkyys on asetettu väärin.
• Kamera on suunnattu väärin.
• Kamera ottaa pimeässä vain mustavalkokuvia/-videota.
• Väärä etäisyys kohteeseen.
• Tarkista linssi, puhdista tarvittaessa.
• Varmista, että USB-kaapeli on ehjä ja kunnolla liitetty
kameraan ja tietokoneeseen.
• Muistikortti on alustettu (formatoitu) väärin.
• Virheellinen alustus, alusta muistikortti.
• Liian iso muistikortti. Suurin sallittu koko on 32 Gt.
• Varmista, että muistikorttia ei ole kirjoitussuojattu.
• Muistikortti voi olla viallinen. Kokeile toista muistikorttia.
Suomi
Kierrätys
Kierrätä tuote asianmukaisesti, kun poistat sen käytöstä.
Tarkempia kierrätysohjeita saat kuntasi jäteneuvonnasta.
89
Page 90

Suomi
Tekniset tiedot
Kuvakenno 5 MP väri CMOS
Linssi F/NO 2,2, näkökenttä = 60°
Liiketunnistimen kantama Enintään 20 m
Näyttö 1,5″ TFT
Muistikortti SD/SDHC 8–32 Gt
Kuvan tarkkuus 5 tai 8 megapikseliä interpoloitu
Videokuvauksen tarkkuus VGA (640×480) tai 720p HD (1280×720)
PIR-sensori (liiketunnistin) Multi zone
Liiketunnistimen herkkyys Suuri/normaali/pieni
Reaktioaika 1 sekuntia
Käyttö-/säilytyslämpötila −20…+ 60 °C/−30…+ 70 °C
Intervalliasetus 1 sekunti … 60 minuuttia
Kuvasarja 1–3
Videokuvauksen pituus 1–60 sekuntia
Virtalähde 4 tai 8 kpl AA/LR6
Ulkoinen muuntaja 6 V DC (myydään erikseen)
Virrankulututus valmiustilassa < 0,3 mA (< 7 mAh/vuorokausi)
Virrankulutus aktiivitilassa 150 mA (+ 450 mA IR-ledien ollessa päällä)
Pariston varaustaso Paristosymboli näkyy näytöllä
Kiinnitys Hihna tai jalusta, jossa jalustakierteet
Käyttöympäristön
suositeltu ilmankosteus 5–90 %
Mitat 140×90×55 mm
Paino Noin 500 grammaa (paristojen kanssa)
90
Page 91

Wildkamera/Fotofalle mit MMS/E-Mail
Art.Nr. 36-5762 Modell MG882K-8mHD
Vor Inbetriebnahme dieBedienungsanleitung vollständig durchlesen und für künftigen
Gebrauch aufbewahren. Irrtümer, Abweichungen und Änderungen behalten wir uns vor.
Bei technischen Problemen oder anderen Fragen freut sich unser Kundenservice über
eine Kontaktaufnahme.
Produktbeschreibung
• Nachtsichtkamera mit 8 MP Auflösung zur Überwachung von Gärten, Futterstellen usw.
Dieaufgenommenen Bilder werden per MMS oder E-Mail über GSM/GPRS zu
bestimmten Zeiten oder wenn sich Tiere/Menschen vor der Kamera bewegen geschickt.
• Bilder und Filmaufnahmen werden auch auf einer SD-Speicherkarte gespeichert
(max. 32 GB, separat erhältlich) zur späteren Übertragung auf den Computer.
Fotos werden im JPG-Format gespeichert, Videos im AVI-Format. Dateisystem FAT32.
• DieBilder werden mit Uhrzeit, Datum und Mondphase markiert und dieFilme mit
Ton gespeichert (integriertes Mikrofon).
• Der Bewegungsmelder erkennt Bewegungen in bis zu 20 m Abstand.
• Stromversorgung über 8×AA/LR6-Batterien (separat erhältlich) oder über eine
externe 6-V-Stromquelle (separat erhältlich).
Bitte beachten:
• Bei der Installation einer Überwachungskamera anöffentlich zugänglichen
Orten ist in Deutschland § 6b des Bundesdatenschutzgesetzes (BDSG) zu
beachten. DieDurchführung einer Videoüberwachung ist anzahlreiche Pflichten
gebunden, z. B. besteht eine Hinweispflicht, eine Pflicht zur ordnungsgemäßen
Dokumentation, zur unverzüglichen Löschung und zur Sicherstellung der
technisch-organisatorischen Maßnahmen. Generell wird zwischen privater und
staatlicher Videoüberwachung unterschieden. Mehr Information gibt es z. B. auf
der Homepage der Polizei oder auf www.datenschutzzentrum.de.
• Bei Fragen können diePolizei oder der Landesbeauftragte für Datenschutz kontaktiert werden. Kameras, dieohne Vorabkontrolle nach § 4d Abs. 5 BDSG aufgestellt
wurden können als Ordnungswidrigkeit ein Bußgeld nach sich ziehen.
Hinweis:
DieKameralinse hat einen Infrarotfilter, der beim Abschalten
der Kamera vor dieLinse geraten kann. Wenn dieKamera
wieder eingeschaltet wird, nimmt der Filter wieder seine
korrekte Position ein.
Deutsch
91
Page 92

Erste Schritte
Batterien einsetzen
1. Den Deckel öffnen (1).
2. Den Griff der Batteriehalterung (18) fassen und dieHalterung gerade aus der
3. 8 (oder 4)×AA/LR6-Batterien gemäß der Abbildung in dasBatteriefach einsetzen.
Hinweis:
• DieBatteriehalterung wird wie auf
• Schwache Batterien austauschen, damit dieKamera nicht durch alte, auslaufende
• Je nach Betriebstemperatur und Anzahl von Belichtungen reichen dieBatterien bis
• Im Notfall kann dieKamera mit 4×AA/LR06-Batterien in der rechten oder linken
• DieKamera kann mit einem externen Netzteil betrieben werden (separat erhältlich), mit
Wichtig:
• Damit dieKamera Bilder aufnehmen und speichern kann, muss eine SD-Speicher-
Deutsch
• DieKamera unterstützt lediglich GSM und funktioniert nicht mit Anbietern, dienur
Kamera ziehen.
DieAbbildung unten im Batteriefach zeigt diekorrekte Ausrichtung der Batterien an.
der Abb. anzeigt hineingeschoben
(sie kann auch verkehrt herum
hineingeschoben werden, dann
funktioniert dieKamera jedoch nicht).
Batterien beschädigt wird. Alte/neue oder verschiedene Arten von Batterien
(z. B. Batterien und Akkus) nicht zusammen verwenden.
zu 6 Monaten.
Seite des Batteriefachs betrieben werden. In diesem Fall müssen beim nächsten
Wechsel alle Batterien ausgetauscht werden.
6 V DC und + im Innenleiter. DasNetzteil wird anden 6-V-Eingang (19) angeschlossen.
karte eingesetzt werden. Damit dieKamera MMS und E-Mails schicken kann,
muss eine aktive GSM-SIM-Karte eingesetzt werden. DieSIM-Karte muss für mobile
Daten/MMS aktiviert sein und diePIN-Code-Abfrage muss ausgeschaltet sein.
UMTS anbieten. In Deutschland bieten alle üblichen Mobilfunkanbieter GSM an.
92
Page 93

Einstellungen
Wir empfehlen dieEinstellung der Kamera mit dem Programm BMC Config.
1. DasProgramm über dieHomepage des Herstellers www.Bolyguard.com oder
www.clasohlson.de herunterladen und auf dem Computer installieren.
2. DasProgramm öffnen,
dasStartfenster wird
angezeigt, Kameramodell
MG882K-8MHD im Feld
„Select product“ auswählen
und auf [ OK ] klicken.
3. Ein neues Fenster wird angezeigt. Land und Anbieter
im Feld für WAP/Internet
Setting auswählen.
Fehlt der Anbieter in der
Liste, Others... auswählen
und dieEinstellungen
(siehe Punkt 5 weiter unten)
einfüllen. Bei Unsicherheit
den Anbieter für dieaktuellen
Angaben kontaktieren.
4. Auf dieTaste [ Check WAP/Parameters (L) ] klicken. DasFenster „WAP/Internet
Parameters“ wird angezeigt. DieKamera hat dieMöglichkeit, Bilder entweder
über MMS anein Mobiltelefon oder E-Mail-Empfänger, oder als E-Mail über GPRS
zu versenden. Der Unterschied ist, dass MMS nur MMS-Einstellungen benötigt,
währen GPRS ein E-Mail-Konto benötigt um Bilder zu verschicken. Der Vorteil mit
GPRS besteht darin, dass es eine höhere Priorität im Mobilfunknetz hat und damit
dieNachrichten ein kleineres Verspätungsrisiko haben als mit MMS. GPRS kann
außerdem bei manchen Anbietern billiger sein, da üblicherweise für dieübertragene Datenmenge bezahlt wird, anstatt für einzelne MMS.
93
Deutsch
Page 94

5. Im linken Kästchen WAP Setting werden dieMMS-Einstellungen angezeigt,
6. Im rechten Kästchen, Internet Setting, können dieGPRS-Einstellungen getätigt
Wir empfehlen dieAnschaffung eines neues E-Mail-Kontos, dasnur für dieKamera
benutzt wird. Den Servernamen/SMTP des E-Mail-Anbieters (SEND EMAIL SERVER),
Port und dieE-Mail-Adresse einstellen, von der dieKamera aus schicken soll
Deutsch
(SEND EMAIL ADRESS) sowie dasKennwort für dasE-Mail-Konto (SEND EMAIL
PASSWORD). Bei Unsicherheit über dieE-Mail-Einstellungen den Anbieter kontaktieren.
Im Folgenden ein Beispiel der Einstellungen bei
Benutzung von Googlemail:
diebei Auswahl eines Anbieters aus der Liste automatisch angezeigt werden.
Hier können bei der Wahl von Others... als Anbieter eigene Einstellungen angegeben werden. DieMMS-Einstellungen sind nötig, damit dieKamera MMS anein
Mobiltelefon oder E-Mail-Empfänger senden kann.
werden. DieGPRS-Einstellungen sind nötig, damit dieKamera E-Mails aneinen
E-Mail-Empfänger senden kann.
Daran denken, auf dieTaste [ Advanced ] (siehe
Kästchen unten) zu klicken und dasKästchen für
SSL anzukreuzen, falls der Anbieter dies erfordert.
Zum Speichern auf [ OK (Y) ] drücken.
94
Page 95

7. Zum Speichern von WAP/Internet Parameters auf [ OK (Y) ] drücken.
8. Für weitere Kameraeinstellungen auf Change Setting klicken. Dasunten angezeigt Fenster wird angezeigt. Im oberen Teil des Fensters können gewünschte
Einstellungen für Sprache (Language), PIR-Intervall (PIR Interval) etc. getätigt
werden. Eine genauere Beschreibung dieser Einstellungen ist im Abschnitt
Einstellungen mit der Fernbedienung weiter unten zu finden.
Weitere Kästchen im Fenster sind:
• Work hour: Wird benutzt, wenn dieKamera nur während eines bestimmten
Zeitraums aktiv sein soll.
• Send to: Auswahl ob dieBilder per MMS oder E-Mail verschickt werden. Wird
Phone [ MMS ] gewählt, werden dieBilder andieTelefonnummer, diein Punkt 10
angegeben wurde, verschickt. Wird Email [ MMS ] oder Email [ GPRS ] gewählt,
werden dieBilder andieE-Mail-Adresse, diein Punkt 10 angegeben wurde,
verschickt.
• Send mode: Bestimmt ob oder wie oft Bilder geschickt werden. Es gibt 4 versch.
Möglichkeiten:
- Manual: Schickt nur dann ein Bild, wenn es per SMS oder App angefordert wurde.
- Daily Report: Schickt täglich zu einem vorher ausgewählten Zeitpunkt einen
Bericht darüber wie viele Bilder oder Filme in 24 Stunden aufgenommen wurden.
- Instant: DieKamera schickt dasBild sobald es aufgenommen wurde. Diemax.
Anzahl Bilder, diewährend eines 24-Stunden-Zeitraums verschickt werden,
ist begrenzbar.
- Off: Es werden keine Bilder geschickt.
9. Wenn dieEinstellungen abgeschlossen sind, zum Speichern auf [ OK ] klicken.
10. DieTelefonnummer oder E-Mail-Adresse zum Bildversand der Kamera im
Kästchen für Customer Information Setting im unter Punkt 3 angezeigten
Fenster eingeben. Bei Benutzung der App BGTools wird dieTelefonnummer des
Telefons, dasdieKamera steuert, im Feld Admin...Number eingegeben.
11. Wurde dieKamera bisher nicht über dasmitgelieferte USB-Kabel mit dem
Computer verbunden, dies jetzt tun.
Deutsch
95
Page 96

12. Im Feld für den Speicherort dieKamera auswählen.
13. Zum Speichern der Einstellungen auf [ SAVE (Y) ] drücken.
14. DieKamera vom Computer trennen.
15. Damit dieKamera dieneuen Einstellungen einlesen kann ist es nötig,
16. Wir empfehlen, dieKamera zunächst nahe dem Zuhause zu testen, damit alles wie
Bitte beachten:
• E-Mail-Anbieter können unterschiedliche Sicherheitseinstellungen und -stufen
• Hinweis: Es ist schwierig, einen Überblick über dieversch. Sicherheitsstufen
Deutsch
den Funktionsschalter auf „TEST“ zu stellen, dieKamera zu starten und
dieEinstellungen einzulesen, dies dauert ca. 30 Sekunden. Dann den Funktions-
schalter auf ON stellen, dieKamera arbeitet jetzt nach den neuen Einstellungen.
geplant funktioniert, wo auch immer sie dann angebracht wird.
haben. In manchen Fällen ist es nötig, dieSicherheitseinstellungen so zu ändern,
dass ein externes Gerät (dieKamera) Zugriff auf dasKonto erhält.
aller Anbieter zu haben. Funktioniert dieE-Mailfunktion trotz der unten folgenden
Beispiele nicht, empfehlen wir, dass nur dieMMS-Funktion der Kamera genutzt
wird, um sicherzustellen, dass dieBilder ankommen.
96
Page 97

Hier wird gezeigt wie dieBenutzung mit Googlemail (Gmail) aussieht. Googlemail hat
hier dieKamera daran gehindert, in dasE-Mail-Konto einzuloggen.
Beispiel:
Um zu den
Einstellungen zu
kommen, zunächst
auf Googlemail
einloggen und
dann auf Konto
– Persönliche
Daten – Sicherheit
– Kontozugriff –
Weniger sichere
Apps zulassen
– Einstellungen.
Deutsch
Auf Aktivieren
klicken, um weniger
sichere Apps
zuzulassen.
97
Page 98

Tasten und Funktionen
1. Deckel mit Halterung für
2. TV-Out. Videoausgang
3. Funktionswahlschalter mit 3 Positionen:
4. Steckplatz für eine SD-Speicherkarte
5. Indikator-LED
6. Laserpointer
7. Kameralinse
8. Bewegungssensor
9. Antenne
10. Klappe über dem LCD-Display
11. Mikrofon
12. Dämmerungssensor
13. IR-LEDs für Nachtaufnahmen
14. Steckplatz für eine SIM-Karte
15. USB-Anschluss. DieKamera mit dem
Deutsch
16. Spannverschluss
17. Batteriehalterung
18. Griff für dieBatteriehalterung
19. 6 V DC-Eingang, + im Innenleiter
20. Neigungseinstellung
21. Stativhalterung
22. Halterung für extra Gurt oder Drahtseil
dieFernbedienung
(Anschlusskabel separat erhältlich)
- OFF (Kamera ausgeschaltet),
- TEST (drei Funktionen:
Einstellungen, Bilder/Videos
manuell aufnehmen, Bilder und
dasVideostartbild als Hilfe bei der
Standortwahl anzeigen),
- ON (dieKamera ist mit den
Werkseinstellungen oder den
eigenen Einstellungen aktiviert)
mitgelieferten USB-Kabel aneinen
Computer anschließen und den
Inhalt der Speicherkarte auf der für
dasverwendete Betriebssystem
normalen Weise verwalten.
(Netzteil separat erhältlich)
mit Stativhalterung
9
8
7
6
5
10
11
4
3
12
13
2
14
15
1
18
17
16
19
20
21
22
98
Page 99

Fernbedienung
23. [ Menu ]
24. [ ▲ Cancel ] Navigation zum gewünschten
Untermenü, aufwärts navigieren, abbrechen
25. [ OK ] Bildanzeige öffnen, Auswahl bestätigen
26. [ ◄ 1
Einstellung im Untermenü, mehrfach drücken
um diefolgenden Symbole zu schreiben:
1 . / : @ _
27. [ ▼2 abc ] Navigation zum gewünschten
Untermenü, nach unten navigieren
28. [ ►3 def ] Navigation zur gewünschten
Einstellung im Untermenü
29. [ 4–0 ] Ziffer- und Buchstabentasten, mehr mals
auf 0 drücken, um + und - zu schreiben
30. [
der Kamera aktivieren
31. [ # ]
Hinweis:
• Aufbewahrung der Fernbedienung ander Innenseite des Deckels (1).
• Bestimmte Symbole auf der Fernbedienung können bei diesem Kameramodell
ohne Funktion sein.
• Diemaximale Reichweite der Fernbedienung beträgt ca. 9 m. Scheint dieSonne
direkt auf dieKamera oder Fernbedienung kann dies dieReichweite verkürzen.
• DieKamera benötigt nach dem Einschalten (sowohl im ON- als auch TESTModus) 10–30 s zum Starten und Verbinden mit einem evtl. Mobilfunknetz.
• Den Kunststoffstreifen, der aus dem Batteriefach hervorsteht, herausziehen.
Der Kunststoffstreifen verhindert ein Entladen der Fernbedienungsbatterie bei
Aufbewahrung und Transport.
] Navigation zur gewünschten
] Den Laserpointer bei der Standortwahl
23 24 25
26
29
30
27
28
31
Deutsch
Funktioniert dieFernbedienung nicht, kann dieBatterie leer sein.
Um diese zu wechseln, folgende Schritte befolgen:
1. Um dieBatteriehalterung der Fernbedienung herauszuziehen dieArretierung
andieHalterung drücken und diese gleichzeitig gerade herausziehen.
2. Eine neue Batterie (1 × CR2025) einsetzen, diePlusseite (+) der Batterie dabei
zum eigenen Körper richten. Den Aufkleber auf der Fernbedienung beachten.
3. DieBatteriehalterung hinein schieben und sicherstellen, dass dieArretierung
ordentlich einrastet.
99
Page 100

Displaysymbole
Hinweis: DasDisplay leuchtet nur wenn der Funktionsschalter auf TEST steht.
Es leuchtet nicht im Modus ON. Im TEST-Modus erlischt dasDisplay ca. 3 Minuten
nach dem letzten Tastendruck.
Zeigt dasKamera- bzw.
Videokamerasymbol an,
je nach Einstellung
Zeigt an, dass dieSIMKarte in der Kamera sitzt.
Wird dasSymbol angezeigt, bedeutet dies, dass
dieMMS-Funktion nicht
funktioniert (Probleme mit
dem Mobilfunknetz, kein
oder nur schlechter
Empfang usw.).
Einsetzen der Speicherkarte
Hinweis: Sicherstellen, dass dieKamera ausgeschaltet ist, bevor dieSpeicherkarte
eingesetzt wird. Vor dem Herausnehmen der Speicherkarte dieKamera ausschalten.
1. DieKamera ist für SD/SDHC-Speicherkarten mit 8–32 GB vorgesehen.
2. Sicherstellen, dass der Schreibschutz
der Speicherkarte nicht aktiviert ist.
3. Den Deckel (1) öffnen und wie auf der Abb.
angegeben vorsichtig eine SD/SDHCSpeicherkarte in den Steckplatz (4)
drücken. DieSpeicherkarte herunterdrücken bis ein Klicken zu hören ist.
Gewählte Bildgröße Signalstärke
Wird angezeigt, wenn ein
AV-Kabel anden Videoausgang
(TV-Out) angeschlossen wird.
Ladestand
Mobilfunkdienstleister
Datum
Uhrzeit
Freier Speicherplatz auf
der Speicherkarte
Anzahl aufgenommener Fotos
Deutsch
Formatierung der Speicherkarte
Vor Gebrauch dieSpeicherkarte formatieren.
Bei einer Formatierung werden alle auf der
Speicherkarte gespeicherten Daten gelöscht,
um Platz für neue zu machen.
1. DieKlappe über dem Display hochklappen.
2. Den Funktionsschalter (3) auf Modus TEST stellen.
3. DasStartbild wird auf dem Display angezeigt.
4. Auf der Fernbedienung auf [ MENU ] drücken,
dasMenü zur Spracheinstellung „Setup
Language“ wird angezeigt.
100
 Loading...