

Page 1
38-2522
STEREO CASSETTE RADIO
WITH CD/MP3 PLAYER
Stereokassettradio med CD/MP3
Radio med CD/MP3 og kassettspiller, stereo
Cd-/mp3-radionauhuri
E N G L I S H S V E N S K A N O R S K S U O M I
Modell/Malli: MC-9814USB
www.clasohlson.com
Ver. 2007-07
Page 2
STEREO CASSETTE RADIO WITH CD/MP3 PLAYER
Article number: 38-2522
E N G L I S H
Model: MC-9814USB
Please read the entire instruction manual before using and save it for future use.
We apologise for any text or photo errors and any changes of technical data.
If you have any questions concerning technical problems please contact our Customer Service Department (see address on reverse.)
Important information: Read the instruction manual carefully and make sure
that you understand everything before you use the product, save it for future
use.
Warnings
C AU T I O N
RISK OF ELECTRIC
SHOCK DO NOT OPEN
!
Warning! Do not open the casing! Certain
components within the product’s casing
contain dangerous currents. Contact with
these may give you an electric shock.
On CD player
CLASS 1 LASER PRODUCT
CLASS 1
LASER PRODUCT
• The product should only be repaired by qualied service personnel.
• The product should not be taken apart or changed.
• Do not place the product where it could fall into water or another type of liquid.
• Do not place the stereo cassette radio in a damp, dusty environment or where
there are strong vibrations.
Warning! Do not open the casing! Invisible laser beam
can cause eye damage. Avoid exposure to the laser
beam. Do not look into the laser beam even with optical
instuments.
2
Page 3
1. Description
• Stereo cassette radio with CD/MP3 player.
• Remote control included.
• Connection for SD memory card or USB memory.
• Operated on 230 V or 8x R14 batteries (not included).
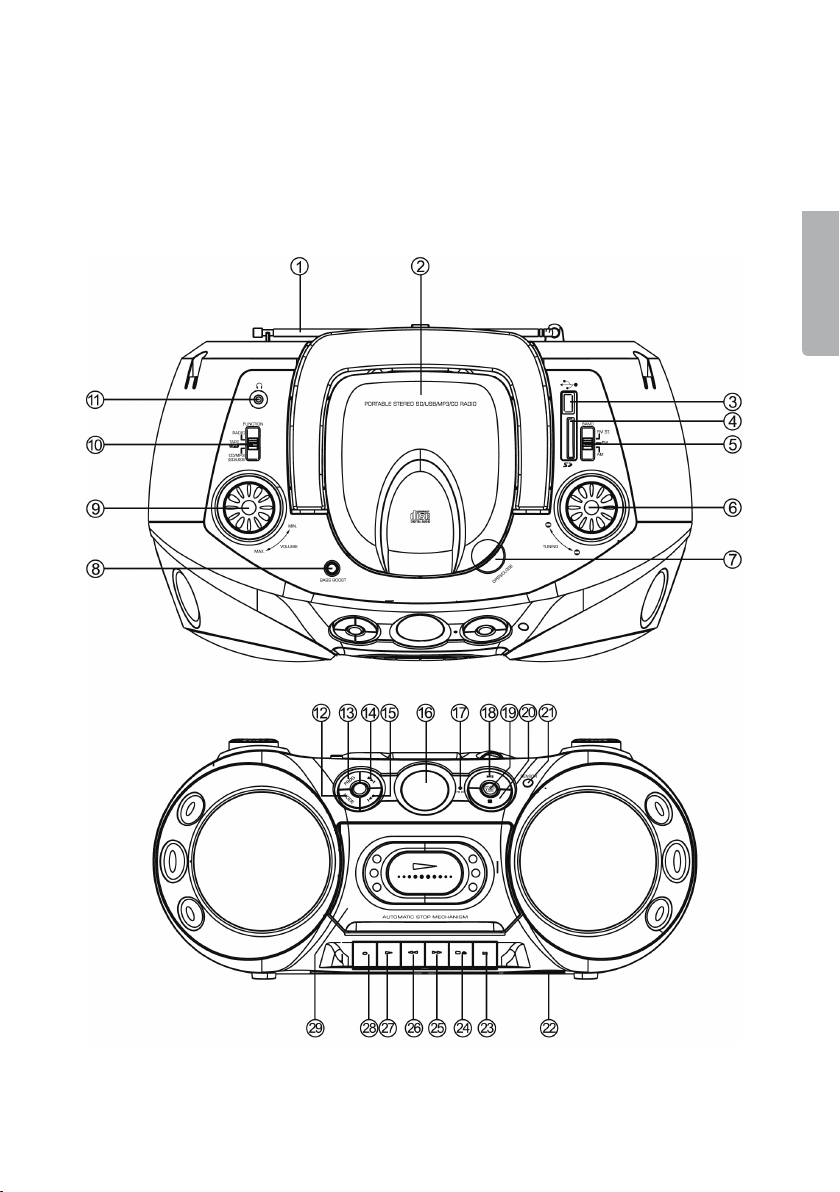
Top side
E N G L I S H
Front
3
Page 4

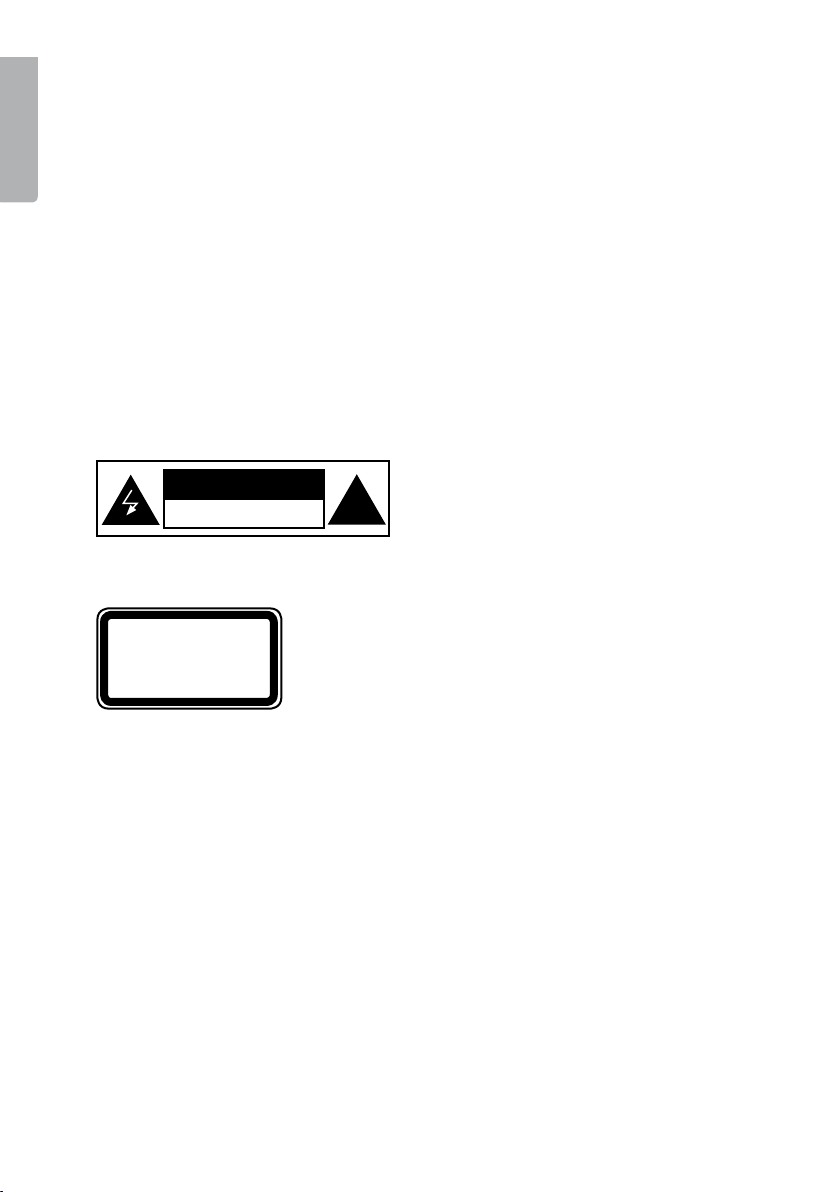
1. Telescopic antenna (for FM reception)
2. CD door
E N G L I S H
3. Connection for USB memory
4. Connection for SD/MMC memory card
5. FMST/FM/AM wavelength switch: FM Stereo, FM and AM
6. TUNING Station setting
7. OPEN/CLOSE Open/Close the CD door
8. [BASS BOOST] bass amplication
9. [VOLUME] volume control
10. RADIO/TAPE-OFF/CD/MP3/SD/USB Function switch
11. Headset outlet
12. MODE CD functions
13. PROG CD programming
] Forward to the next CD track, quick search forward.
14. [
] Back to previous CD track, quick search backwards.
15. [
16. LCD display
17. FM ST. (FM Stereo indicator)
] (Play CD or Pause)
18. [
19. CD/SD/USB Select sound source
] Stop playing the CD
20. [
21. SENSOR Sensor for the remote control
22. Battery compartment
] Pause when playing cassette
23. [
] Stop playing the cassette and open the cassette tape door
24. [
] Fast forwarding
25. [
] Fast rewinding
26. [
] Start playing a cassette
27. [
] Record button
28. [
29. Cassette tape door
4
Page 5
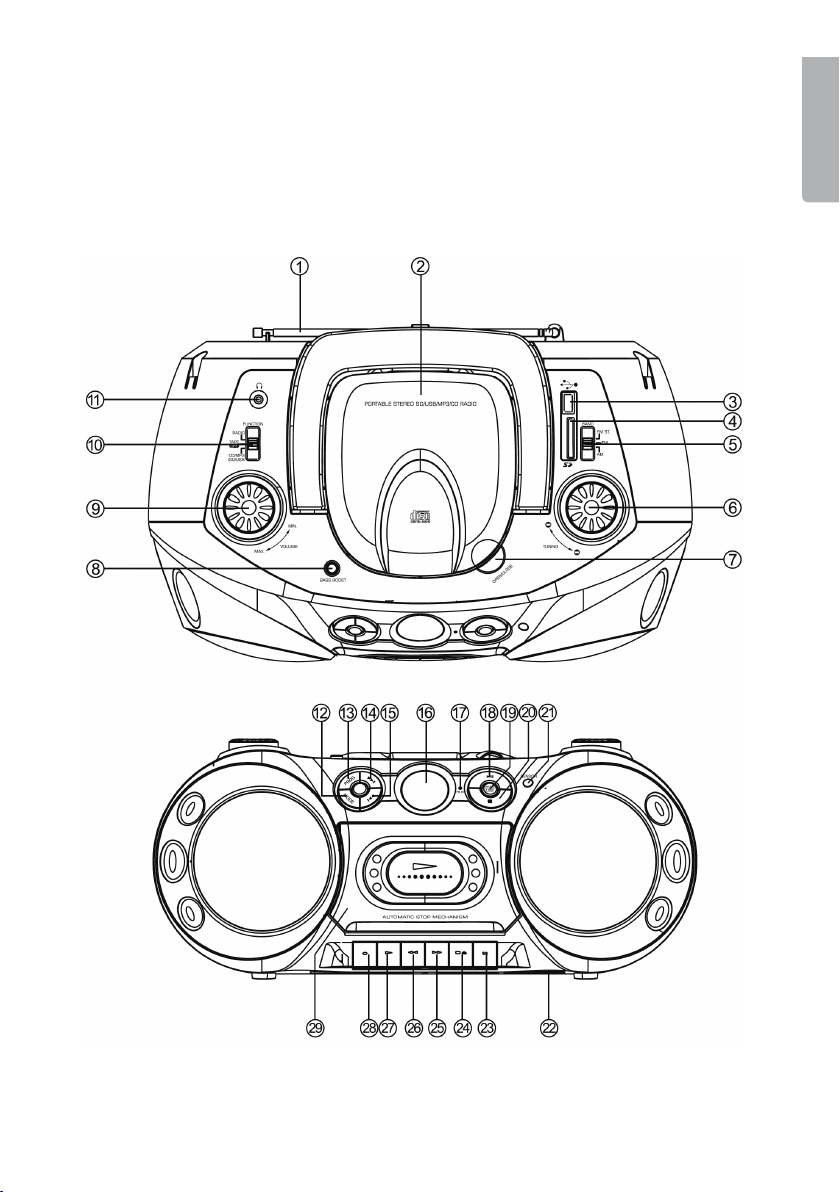
1.1 Remote control
1. [+10] Continue to 10
2. MODE Functions
] Stop
3. [
4. PROGRAM Programming
] Go back to previous track, quick
5. [
search backwards
] Forward to the next CD track,
6. [
quick search forward.
7. USB/CARD Select USB or memory
card
] Play/Pause
8. [
2. Power Supply
Mains connection
Place the network cable plug in the outlet on the backside and connect the plug to
a wall socket.
E N G L I S H
Using with batteries
Insert batteries:
1. Remove the battery cover by pressing in the direction of the arrows.
2. Insert 8x R14 batteries according to the marking on the backside.
3. Put back the battery cover.
Note:
• The network cable should be unplugged from the stereo cassette radio when
changing batteries.
• When the network cable is connected the player is not running on batteries.
• Remove bad batteries to avoid damage from leakage.
• Remove the batteries from the player if it is not to be used for a long time.
5
Page 6

3. Listen to the radio
1. Set the function control to RADIO position when you want to listen to the radio.
E N G L I S H
The display lights up.
2. Select the frequency with the control (MW, FM, FM ST).
3. Set the desired station with the control TUNING.
4. Both the built-in antenna and the telescopic antenna receive signals, stronger/
weaker depending on direction.
FM reception: Extend the telescopic antenna completely and angle it if needed.
AM (Medium wave): Turn the player until the best reception.
5. Adjust the volume with the VOLUME knob.
6. Shut the radio off when you are done listening by setting the control on TAPE/
OFF.
Helpful suggestions
- If you listen to FM stereo (FM ST) at a certain station and it is weak or have
background sound try to turn the control to FM (mono). It normally gives better
reception.
- If the control is on FM ST and you turn it to set a station the indicator lamp FM
ST lights up if a station is found and it is in stereo with good reception.
Page 7

4. Play music
Play music from CD/MP3, SD memory card or USB memory
Select what device to listen from by pressing CD/SD/USB. Selected device is
shown on the display (CD-SD-USB). When you have opened desired le the functions for all types of devices are the same. If you only have one type of device the
rst le will start automatically.
4.1 Insert a CD/MP3
1. Turn the function control to CD/MP3/SD/USB
2. Open the CD door
3. Insert a CD with the label facing up. If you insert the CD with the wrong side up
NO DISC is shown in display. CD-single (8 cm) can be played without adaptor.
4. Close the CD door carefully with one hand.
4.2 Remove the CD
1. Make sure that the CD does not play, if it does press [] (20) to end playing.
2. Open the CD door.
3. Carefully remove the CD and put it in its case.
4. Close the CD door carefully.
Helpful suggestions:
- Never touch the laser line in the CD compartment with your hands. Only clean
with a special CD meant for laser line cleaning.
4.3 Listen to the CD
Normal playing
1. Insert a CD to the player. The CD will start spinning and CD is displayed while
the CD is being read.
2. Turn the function control to CD/MP3/SD/USB.
3. The playing automatically starts with track 1 after a few seconds when the CD
is read. 001 is shown in the display.
4. Adjust volume with [VOLUME] (9).
5. Press PLAY/PAUSE to temporarily stop the playing. Press PLAY/PAUSE to
start the playing again.
6. Press [] (20) to stop the playing.
7. Set the function control to TAPE/OFF to turn the player off.
E N G L I S H
Page 8

Note!
- Never push the CD door down during playing. That may cause damage to the
CD or CD player.
E N G L I S H
- Always press STOP before removing the CD from the player.
- If you move or bump into the player during playing it might quieten for a short
while and then start up again. That is normal for CD players.
4.4 Skip tracks
1. This function gives you the possibility to nd the beginning of a track on the CD
during playing. Press [] (14) once or several times to skip to the next track.
Current track will show in the display.
2. Press [] (15) once or several times to skip to the previous track. Current
track will be shown in the display. Press once to return to the beginning of current track.
3. Press and hold [
ton when you have found the right track.
] or [] to quick search through the tracks. Let go of the but-
4.5 BASS BOOST
Press [BASS BOOST] to increase the bass.
4. Electronic anti-shake memory (ESP)
The electronic anti-shake memory prevents the sound from disappearing or
“skipping” if the player is exposed to small bumps or vibrations.
When the CD starts to play the buffer memory is automatically switched on. The
music’s digital data is stored in the forward storage buffer memory before it is decoded and starts to play.
When the player encounters an impact during playing the memory continues to
decode and play. This allows time for the pickup to stabilize and continue collecting new data later on.
Note! When the ESP function is activated or shut off the sound quiets down for
about 1-2 seconds.
8
Page 9

5. Alternative play
Functions the same way for all storage media.
5.1 Repeat a track from CD
1. Press MODE (12) once in stop or play mode. “REP” is shown on the display.
2. Press [
3. The selected track will continue to play until you press [] (20) or press
] (14) or [] (15) to select track for repetition.
[MODE] (12) several times.
5.2 Repeat all tracks from the CD
1. Press MODE (12) twice in stop or play mode. “REP ALL” is shown on the display.
2. Press [] (14) or [] (15) to select a track for repeat play.
3. The selected track will continue to play until you press [] (20) or press
[MODE] (12) several times.
5.3 INTRO (listen to the 10 rst seconds of each track)
1. Press MODE (12) three times in stop or play mode.
2. INTRO is shown on display, press [] (18) to start play with track 1.
3. The selected tracks will continue to play until you press [] (20) or press
[MODE] (12) several times.
5.4 Random (random play)
All tracks will play in random order.
1. Press MODE (12) four times in stop or play mode.
2. RAND is shown on display, press [] (18) to start play of all tracks in random order.
3. Play will continue until you press [] (20) or press [MODE] (12) several times.
E N G L I S H
9
Page 10

5.5 Programmed playback
Up to 20 tracks can be programmed for playback in selected order. Programming
E N G L I S H
can only be done when the player is in stop mode.
1. Press [] (20) to go to stop mode.
2. Press [PROG] (13), the display will show PROG and program number P01
3. Press [] (14) or [] (15) to select the rst track.
4. Press PROG to save the rst track, program number P02 will show on display
and the player awaits your next selection of track.
5. Repeat step 3 and 4 until all selected tracks (max 20) are saved in the memory.
6. Press [] (18) when the programming is done.
7. First selected track will start playing
8. All tracks will play in programmed order.
9. Press [] (20) twice to stop playing and to erase the programming.
NOTE! The memory for programmed tracks will be erased:
- If you open the CD door.
- If you switch function control from TAPE or RADIO mode.
- If the power to the player is shut off.
. The Stereo Cassette Player’s function
[] (23) Pause
Press [] to pause the cassette playing.
[] (24) Stop
Press [] to stop the play back or other on-going function. Or to open the cassette
door in stop mode.
[] (25) Fast forward
Press down to fast forward the tape, press [] to stop the fast forwarding.
[] (26) Quick rewind
Press down to quickly rewind the tape, press [] to stop rewinding.
[] (27) Play back,
Press down the button to start play back from the cassette.
[] (28) Recording
Press down both [] and [] to record from CD, radio, memory card or USB
memory.
Note! If the cassette is protected against recording the buttons will not be able to
press down. See the Erase protection of recording.
Automatic tape stop: The cassette player has a built-in tape stop and shuts off
automatically when the tape ends.
10
Page 11

. How to use the cassette tape player
1. Open the cassette door by pressing [].
2. Place the cassette inside the cassette holder.
3. Close the cassette door.
4. Set the function control on TAPE/OFF.
5. Press [] to start playing.
6. Adjusting the volume.
7. Press [] to stop play. Press once more to open the cassette door.
NOTE! When the tape ends while playing the [] button goes up and the playing
stops.
If you want to play the other side of the tape: Remove the cassette and turn it,
place it and close the cassette door and press [].
8. Take care of your cassette tapes
• The tape might tangle up or get deformed if it is not stretched between the tape
spools. If the tape is loose it needs to be tightened before use. Use a pencil or
similar to wind up the tape according to the picture.
• If the tape is heavy or makes strange noises it can be xed by fast forwarding
the tape.
• Avoid using C120 tapes in the player since they have a thinner tape strip which
may tangle.
8.1 Protect recording against erasing
The tapes are equipped with erase protection. With small tags on the backside
that you remove with a screwdriver or similar. If you want to erase earlier recording and the tag is missing you can put a piece of tape over the hole.
E N G L I S H
8.2 Erase cassette tape
1. Set the function control to TAPE.
2. Press RECORD until it locks in pressed down position (play is affected at the
same time) to start the recording. The new recording starts and the old recording will be erased at the same time. Note that the surrounding should be quiet.
Possible sounds will be recorded via the built-in microphone.
11
Page 12

9. Recording
9.1 Record from the built-in radio
E N G L I S H
1. Set the function control (10) to RADIO and set the desired channel.
2. Place a cassette tape in the cassette door.
3. Press [] (28) and [] (27) until they lock in pressed down position to start the
recording. Press PAUSE [] (23) if you do not want to start the recording at
once. Press [] again when you want to start the recording.
4. Press [] (24) to stop the recording otherwise the recording will end when the
tape ends.
5. Press [] (26) to rewind to the beginning of the recording. Press [] (24) and
then [] (27) to listen to the recording, adjust the volume.
NOTE! The beginning and end of the tape is equipped with start tape that is not
recordable. If you want to make sure that the recording starts without interruption
you should forward the tape for a few seconds before starting the recording.
9.2 Record from CD
1. Place a cassette tape in the cassette door.
2. Set the function control (10) to [CD/MP3/SD/USB] and press [CD/SD/USB]
(19), select and start playing.
3. Press [] (28) and [] (27) until they lock in pressed down position to start the
recording. Press PAUSE [] (23) if you do not want to start the recording at
once. Press [] again when you want to start the recording.
4. Press [] (24) to stop the recording otherwise the recording will end when the
tape ends.
5. Press [] (26) to rewind to the beginning of the recording. Press [] (24) and
then [] (27) to listen to the recording, adjust the volume.
9.3 Record from USB memory (USB or memory card (SD)
1. Place a cassette tape in the cassette door.
2. Set the function control (10) to [CD/MP3/SD/USB] and press [CD/SD/USB]
(19), select USB or SD and start playing.
3. Press [] (28) and [] (27) until they lock in pressed down position to start the
recording. Press PAUSE [] (23) if you do not want to start the recording at
once. Press [] again when you want to start the recording.
4. Press [] (24) to stop the recording otherwise the recording will end when the
tape ends.
5. Press [] (26) to rewind to the beginning of the recording. Press [] (24) and
then [] (27) to listen to the recording, adjust the volume.
12
Page 13

13
E N G L I S H
10. Care and maintenance of player
Clean the Open the cassette door and use a
cleaning cotton swab with rubbing alcohol or
special cleaning solution for the audio head.
NOTE! Do not use metal tools when cleaning.
Do not put in a tape before the details are completely dry.
11. Headphones
Connect headphones (not included) to the outlet (11). The speakers will mute
automatically when you connect the headphones.
12. Protect the environment
Sort your waste and recycle products instead of throwing them
away. All home electronics and packing material should be sorted
and handled according to local environmental ordinances.
13. Technical data
Size: 390 x 230 x 165 mm
Power: 230 VAC, 50 Hz
Battery type: 8x R14 batteries
Radio:
Frequency range: AM: 522 – 1,710 KHz
FM 87.5 – 108 MHz
CD player: Semiconductor laser
Decoding: 16 bites linear
Connection for SD memory card or USB memory
Headphone outlet: Ø 3.5 mm stereo plug, 8 – 32 Ohm
Capstan
Pinch roller
Playback/Record head
Q-tip
Erase head
Page 14
STEREOKASSETTRADIO MED CD/MP3
Artikelnummer: 38-2522
Modell: MC-9814USB
Läs igenom hela bruksanvisningen före användning och spara den sedan för framtida bruk.
Vi reserverar oss för ev. text- och bildfel samt ändringar av tekniska data.
Vid tekniska problem eller andra frågor, kontakta vår kundtjänst (se adressuppgifter på baksidan).
S V E N S K A
Viktig information: Läs bruksanvisningen noggrant och försäkra dig om att
du förstår den innan du använder utrustningen och spara den för framtida
bruk.
Säkerhet
Lägg märke till dessa säkerhetssymboler
C AU T I O N
RISK OF ELECTRIC
SHOCK DO NOT OPEN
!
Varning! Öppna inte höljet! Farlig spänning
nns oskyddat på komponenter inuti
produktens hölje, kontakt med dessa kan
leda till brand eller ge elektriska stötar.
Vid CD-spelare
KLASS 1 LASERAPPARAT
CLASS 1
LASER PRODUCT
• Produkten får endast repareras av kvalicerad servicepersonal.
• Produkten får inte demonteras eller ändras.
• Placera inte produkten så att den kan falla ner i vatten eller annan vätska. Ställ
inte några föremål som innehåller vätska på produkten t.ex. en blomvas eller
läskedryck.
• Placera inte stereokassettradion i fuktig, dammig miljö eller på platser där det
förekommer starka vibrationer.
Varning! Öppna inte höljet! Osynlig laserstrålning
som kan orsaka ögonskador. Rikta inte blicken in
mot strålen och titta inte direkt på den genom optiska
instrument.
14
Page 15
1. Beskrivning
• Stereokassettradio med CD/MP3-spelare.
• Fjärrkontroll ingår.
• Anslutning för SD-minneskort och USB-minne.
• Drivs med 230 V. eller 8 st. R14-batterier (medföljer ej).
Ovansida
S V E N S K A
Framsida
15
Page 16

1. Teleskopantenn (för FM mottagning)
2. CD-lucka
3. Anslutning för USB-minne
4. Anslutning för SD/MMC minneskort
5. [FMST/FM/AM] Våglängdsomkopplare: FM Stereo, FM och AM
6. [TUNING] Stationsinställning
7. [OPEN/CLOSE] Öppna/stäng CD-luckan
S V E N S K A
8. [BASS BOOST] Bashöjning
9. [VOLUME] Volymkontroll
10. [RADIO/TAPE-OFF/CD/MP3/SD/USB] Funktionsreglage
11. Hörlursjack
12. [MODE] CD-funktioner
13. [PROG] CD-programmering
] Stega till nästa CD-spår, snabbsökning framåt.
14. [
] Stega till föregående CD-spår, snabbsökning bakåt.
15. [
16. LCD Display
17. FM ST. (Indikator för FM-stereo)
] (CD-avspelning eller paus)
18. [
19. [CD/SD/USB] Välj ljudkälla
] Stoppa cd-avspelning
20. [
21. SENSOR Sensor till fjärrkontroll
22. Batterifack
] Paus vid kassettavspelning
23. [
] Stoppa kassettavspelning och öppna kassettluckan
24. [
] Snabbspolning framåt
25. [
] Snabbspolning bakåt
26. [
] börja uppspelning av kassett
27. [
] Inspelningsknapp
28. [
29. Kassettlucka
1
Page 17

1.1 Fjärrkontroll
1. [+10] Stega fram 10
2. [MODE] Funktioner
] Stopp
3. [
4. [PROGRAM] Programering
] Stega till föregående spår, snabb-
5. [
sökning bakåt
] Stega till nästa Cd-spår, snabbsök-
6. [
ning framåt.
7. [USB/CARD] Välj USB eller minneskort
] Play/Paus
8. [
2. Strömförsörjning
Nätanslutning
Sätt in nätkabelns anslutningspropp i uttaget på baksidan och anslut stickproppen
till ett eluttag.
S V E N S K A
Användning med batterier
Sätt i batterier:
1. Ta bort batteriluckan genom att trycka i pilens riktning.
2. Sätt i 8 st R14 batterier enligt märkning på baksidan.
3. Sätt tillbaka batteriluckan.
Tänk på att:
• Nätkabeln ska vara urdragen ur stereokassettradion vid batteridrift.
• När nätkabeln är ansluten går inte spelaren på batteridrift.
• Ta ur dåliga batterier för att undvika skador av läckande batterier.
• Ta ur batterierna om inte spelaren ska användas på en tid.
1
Page 18

3. Lyssna på radio
1. Ställ funktionsreglaget (10) i läge RADIO när du vill lyssna på radion, displayen
(16) lyser.
2. Välj frekvensband med reglaget (MW, FM, FM ST).
3. Ställ in önskad station med ratten TUNING.
4. Både den inbyggda mellanvågsantennen och teleskopantennen tar emot sig
naler starkare/svagare beroende på riktning.
FM-mottagning: Dra ut hela teleskopantennen och vinkla den vid behov.
S V E N S K A
AM (Mellanvåg): Vrid spelaren till bästa mottagning hörs.
5. Justera volymen med ratten VOLUME.
6. Stäng av radion när du lyssnat färdigt genom att ställa funktionsreglaget (10)
på TAPE/OFF.
Tänk på detta:
- Om du lyssnar på FM stereo (FM ST) på en speciell station och den är svag
eller har mycket bakgrundsljud, försök då att föra funktionsreglaget till ”FM”
(mono), det brukar ge bättre mottagning.
- Om du har funktionsreglaget på FM ST och vrider på ratten för att ställa in en
station, börjar indikatorlampan ”FM ST” att lysa om en station hittas som sänder i stereo och du har bra mottagning.
-
18
Page 19

4. Avspelning
Spela upp musik från CD/MP3-skiva, SD minneskort eller USB-minne.
Välj vilket lagringsmedium som du vill lyssna på genom att trycka på [CD/SD/USB]
(19), valt medium visas på displayen (Cd – Sd –Usb), när du har öppnat önskad l
är funktionen lika för alla typer av lagringsmedium. Har du bara en typ av lagringsmedium startar den första len automatiskt.
4.1 Lägg i en CD/MP3-skiva
1. För funktionsreglaget (10) till CD/MP3/SD/USB.
2. Öppna CD-luckan.
3. Sätt i en CD-skiva med etikettsidan uppåt (om du vänder skivan åt fel håll visas
”NO DISC” på displayen.) CD-singel (8 cm) går bra att använda utan adapter.
4. Stäng CD-luckan försiktigt med en hand.
4.2 Ta ur CD-skivan
1. Se till att inte CD-skivan spelas, om den gör det tryck på [] (20) för att avsluta avspelningen.
2. Öppna CD-luckan.
3. Ta försiktigt ur CD-skivan och lägg in den i fodralet.
4. Stäng CD-luckan försiktigt.
Tänk på detta:
- Vidrör aldrig laserlinsen i CD-facket med händerna, rengör den endast med en
speciell CD-skiva som är avsedd för att rengöra laserlinsen.
S V E N S K A
4.3 Lyssna på CD-skiva
Normal avspelning
1. Lägg i en CD-skiva i spelaren. Skivan börjar snurra och ”Cd” visas på displayen under tiden som skivan läses in.
2. Ställ funktionsreglaget (10) på läge CD/MP3/SD/USB.
3. Avspelningen startar automatiskt med spår 1 efter några sekunder när skivan
är inläst, 001 visas på displayen.
4. Justera volymen med [VOLUME] (9).
5. Tryck på [PLAY/PAUSE] (18) för att tillfälligt stoppa avspelningen. Tryck på
[PLAY/PAUSE] för att starta avspelningen igen.
6. Tryck på [] (20) för att avbryta avspelningen.
7. Ställ funktionsreglaget (10) på läge TAPE/OFF för att stänga av spelaren.
19
Page 20

Tänk på detta!
- Tryck aldrig ner cd-luckan under avspelning, det kan skada cd-skivan eller cdspelaren.
- Tryck alltid på ”STOP” innan CD-skivan tas ur spelaren.
- Om du yttar eller stöter till spelaren under uppspelning kan den tystna under
en kort stund och sedan starta igen. Det är normalt för CD-spelare.
4.4 Hoppa över spår
1. Den här funktionen ger dig möjlighet att hitta början på ett spår på cd-skivan
under avspelning: Tryck på [] (14) en eller era gånger för att stega till nästa
S V E N S K A
spår, aktuellt CD-spår visas på displayen.
2. Tryck på [] (15) två eller era gånger i snabb takt för att stega till föregående
spår, aktuellt cd-spår visas på displayen. Tryck på en gång för att gå till början
på aktuellt spår.
3. Tryck och håll in knappen [] eller [] för att snabbsöka genom spåren, släpp
knappen när du har hittat rätt ställe.
4.5 BASS BOOST
Tryck på [BASS BOOST] för att öka basåtergivningen.
4. Elektroniskt antiskakminne (ESP)
Det elektroniska antiskakminnet förhindrar att ljudet försvinner eller ”hoppar” om
spelaren utsätts för mindre stötar eller vibrationer.
När CD-skivan börjar spela kopplas buffertminnet in automatiskt. Musikens digitala
data lagras i en framåtlagrad minnesbuffert innan den är avkodad och börjar spelas.
När spelaren råkar ut för en skakning av något slag under spelningen så fortsätter minnesinnehållet att avkodas och spelas. På så sätt får pickupen tid på sig att
stabiliseras och fortsätta med att läsa in nya data senare.
Obs! När ESP-funktionen aktiveras eller stängs av tystnar ljudet i 1 – 2 sekunder.
20
Page 21

5. Alternativ avspelning
Fungerar på samma sätt för alla lagringsmedium.
5.1 Repetera ett spår på CD
1. Tryck en gång på [MODE] (12) i stopp- eller uppspelningsläge. ”REP 1” visas
på displayen.
2. Tryck på [] (14) eller [] (15) för att välja det spår som ska repeteras.
3. Det valda spåret fortsätter att spelas till du trycker på [] (20) eller trycker era
gånger på [MODE] (12).
5.2 Repetera alla spår på CD
1. Tryck två gånger på [MODE] (12) i stopp- eller uppspelningsläge. ”REP ALL”
visas på displayen
2. Tryck på [] (14) eller [] (15) för att välja det spår som ska repeteras.
3. Det valda spåret fortsätter att spelas till du trycker på [] (20) eller trycker era
gånger på [MODE] (12).
5.3 INTRO (lyssna till de 10 första sekunderna på varje spår)
1. Tryck tre gånger på [MODE] (12) i stopp- eller uppspelningsläge, vid avspelning av CD-skiva.
2. ”INTRO” visas på displayen, tryck på [] (18) för att starta uppspelningen
med spår 1.
3. De valda spåren fortsätter att spelas till du trycker på [] (20) eller trycker era
gånger på [MODE] (12).
S V E N S K A
5.4 Random (slumpvis avspelning)
Alla spår spelas i slumpvis ordning
1. Tryck fyra gånger på [MODE] (12) i stopp- eller uppspelningsläge, vid avspelning.
2. ”RAND” visas på displayen, tryck på [] (18) för att starta uppspelningen av
alla spår i slumpvis ordning.
3. Uppspelningen fortsätter att spelas till du trycker på [] (20) eller trycker era
gånger på [MODE] (12).
21
Page 22

5.5 Programmerad avspelning
Upp till 20 spår kan programmeras för avspelning i vald ordning. Programmering
kan endast göras när spelaren är i stoppläge.
1. Tryck på [] (20) för att gå till stoppläge.
2. Tryck på [PROG] (13), displayen kommer att visa ”PROG” och programnummer ”P01 ”.
3. Tryck på [] (14) eller [] (15) för att välja första spåret
4. Tryck på [PROG] för att spara det första spåret, programnummer ”P02” visas
och spelaren väntar ditt val av nästa spår.
5. Repetera steg 3 och 4 till alla önskade spår (max 20) är lagrade i minnet.
S V E N S K A
6. Tryck på [] (18) när programmeringen är klar.
7. Uppspelningen av det först valda spåret börjar
8. Alla spåren kommer att avspelas i den ordning som du har programmerat.
9. Tryck på [] (20) två gånger för att avsluta uppspelningen och radera programmeringen.
OBS! Minnet för de programmerade spåren kommer att raderas:
- Om du öppnar CD-luckan.
- Om du för funktionsreglaget till ”TAPE” eller ”RADIO” läge.
- Om strömmen till spelaren stängs av.
. Kassettbandspelarens funktion
[] (23) Paus
Tryck på [] för att göra paus vid kassettavspelning.
[] (24) Stopp
Tryck på [] för att avsluta avspelning eller annan pågående funktion och för att
öppna kassettluckan i stoppläge.
[] (25) Snabbspola framåt
Tryck ner för att snabbspola bandet framåt, tryck på [] för att avsluta snabbspolningen.
[] (26) Snabbspola bakåt
Tryck ner för att snabbspola bandet bakåt, tryck på [] för att avsluta snabbspolningen.
[] (27) Avspelning
Tryck ner knappen för att starta avspelning från kassett.
[] (28) Inspelning
Tryck ner både [] och [] för att spela in från cd-skiva, radio, minneskort eller
USB-minne.
Obs! Om kassetten inspelningsskyddad går det inte att trycka ner knapparna; se
”Skydda inspelning från att raderas”.
Automatiskt bandstopp: Kassettbandspelaren har inbyggt bandstopp och stängs
automatiskt av vid bandslutet.
22
Page 23

. Så här använder du kassettbandspelaren
1. Öppna kassettluckan genom att trycka på [].
2. Sätt in kassetten i kassettluckans styrningar.
3. Stäng kassettluckan.
4. Ställ funktionsreglaget på ”TAPE/OFF”.
5. Tryck på [] för att starta avspelningen.
6. Justera volymen.
7. Tryck på [] för att stoppa avspelningen, tryck en gång till för att öppna kassettluckan.
OBS! När bandet tar slut vid avspelning åker [] -knappen upp och avspelningen
stoppas.
Om du vill spela andra sidan av bandet: Ta ur kassetten och vänd den, sätt i den,
stäng kassettluckan och tryck på [].
8. Vårda dina kassettband
• Bandet kan trassla eller bli deformerat om det inte är sträckt mellan kassettens
spolar. Om bandet ligger i lös slinga bör det sträckas innan användning, ta en
penna eller liknande till hjälp och spola upp bandet enligt bilden.
• Om bandet går tungt eller låter konstigt kan det avhjälpas genom att snabbspola bandet åt båda hållen.
• Undvik att använda C120 kassetter i bandspelaren, dessa har tunnare bandremsa och det nns risk att de kan trassla.
8.1 Skydda inspelning mot radering
Kassetterna är försedda med raderingsskydd i form av små ikar på baksidan,
peta bort en ik med en mejsel eller liknande. Om bandet hålls lika som vid avspelning styr den högra iken inspelningen för den sidan som spelas.
Om du vill radera tidigare inspelning och iken är borta kan du sätta en tejpbit över
hålet.
8.2 Radera kassettband
1. För funktionsreglaget till ”TAPE”.
2. Tryck på ”RECORD” tills den låser i nedtryckt läge (play påverkas samtidigt)
för att starta inspelningen, ny inspelning börjar och därmed raderas den tidigare inspelningen (tänk på att omgivningen ska vara tyst, eventuella ljud spelas
in via den inbyggda mikrofonen).
S V E N S K A
23
Page 24

9. Inspelning
9.1 Spela in från den inbyggda radion
1. Ställ funktionsknappen (10) på RADIO och ställ in önskad kanal.
2. Sätt in en kassett i kassettluckan.
3. Tryck på [] (28) och [] (27) tills de låser i nedtryckt läge för att starta inspelningen. Tryck på Paus [] (23) om du inte vill starta inspelningen direkt, tryck
igen på [] när du vill starta inspelningen.
4. Tryck på [] (24) för att avbryta inspelningen, annars avbryts inspelningen när
bandet tar slut.
S V E N S K A
5. Tryck på [] (26) för att snabbspola bakåt till inspelningens startpunkt, tryck
där på [] (24) och sedan [] (27) för att lyssna till inspelningen, justera volymen.
OBS! Början och slut på bandet är försett med starttejp som inte är inspelningsbar, om du vill vara säker på att inspelningen börjar direkt utan uppehåll bör du
spola fram några sekunder av bandet innan du påbörjar inspelningen.
9.2 Spela in från CD-skiva
1. Sätt in en kassett i kassettluckan.
2. Ställ funktionsknappen (10) på [CD/MP3/SD/USB] tryck på [CD/SD/USB] (19),
välj CD och starta uppspelningen.
3. Tryck på [] (28) och [] (27) tills de låser i nedtryckt läge för att starta inspelningen. Tryck på Paus [] (23) om du inte vill starta inspelningen direkt, tryck
igen på [] när du vill starta inspelningen.
4. Tryck på [] (24) för att avbryta inspelningen, annars avbryts inspelningen när
bandet tar slut.
5. Tryck på [] (26) för att snabbspola bakåt till inspelningens startpunkt, tryck
där på [] (24) och sedan [] (27) för att lyssna till inspelningen, justera volymen.
9.3 Spela in från USB-minne (Usb) eller minneskort (Sd)
1. Sätt in en kassett i kassettluckan.
2. Ställ funktionsknappen (10) på [CD/MP3/SD/USB] tryck på [CD/SD/USB] (19),
välj ”USb” eller ”Sd” och starta uppspelningen.
3. Tryck på [] (28) och [] (27) tills de låser i nedtryckt läge för att starta inspelningen. Tryck på Paus [] (23) om du inte vill starta inspelningen direkt, tryck
igen på [] när du vill starta inspelningen.
4. Tryck på [] (24) för att avbryta inspelningen, annars avbryts inspelningen när
bandet tar slut.
5. Tryck på [] (26) för att snabbspola bakåt till inspelningens startpunkt, tryck
där på [] (24) och sedan [] (27) för att lyssna till inspelningen, justera volymen.
24
Page 25

25
S V E N S K A
10. Vård och skötsel av spelaren
Rengör tryckrullen, capstanaxel, raderingshuvud och in/avspelningshuvud om ljudet har
blivit dåligt eller om bandet trasslar sig när
du använder kassettband. Öppna kassettluckan och använd en rengöringspinne med
bomullstoppar doppad i alkohol eller speciell
rengöringsvätska för tonhuvud.
OBS! Använd inte metallverktyg vid rengöringen. Sätt inte in en kassett innan detaljerna är helt torra.
11. Hörlurar
Anslut hörlurar (medföljer ej) till uttaget (11). Högtalarna tystnar automatiskt när du
ansluter hörlurarna.
12. Skydda miljön
Sortera ditt avfall och låt det gå till återvinning istället för att
kasta det. All hemelektronik och förpackningsmaterial ska
sorteras och hanteras enligt lokala miljöförordningar.
13. Tekniska data
Storlek: 390 x 230 x 165 mm
Drivspänning: 230 VAC, 50 Hz
Batteridrift: 8 x R14 batterier
Radio:
Frekvensområde: AM: 522 – 1710 KHz
FM: 87,5 – 108 MHz
CD-spelare: Halvledarlaser
Avkodning: 16 bitars linjär
Anslutning för SD minneskort och USB-minne
Anslutning för hörlurar: Ø 3,5 mm stereoplugg, 8 – 32 Ohm
Capstan
Tryckrulle
In/Avspelningshuvud
Rengöringspinne
Raderingshuvud
Page 26

RADIO MED CD/MP3 OG KASSETTSPILLER, STEREO
Artikkelnummer: 38-2522
Modell: MC-9814USB
Les nøye igjennom hele bruksanvisningen og ta vare på den til senere bruk.
Vi reserverer oss mot ev. tekst- og bildefeil, samt forandringer av tekniske data.
Ved tekniske problemer eller andre spørsmål, ta kontakt med vårt kundesenter (se
opplysninger på baksiden).
Viktig informasjon: Les bruksanvisningen nøye, og forsikre deg om at du
forstår den før du bruker utstyret. Spar den til senere bruk.
Sikkerhet
Legg merke til disse sikkerhetssymbolene
N O R S K
C AU T I O N
RISK OF ELECTRIC
SHOCK DO NOT OPEN
!
Ved DVD-spiller
KLASSE 1 LASERAPPARAT
CLASS 1
LASER PRODUCT
Advarsel! Åpne ikke dekselet. Usynlig laserstråling
som kan forårsake øyeskader. Rett ikke blikket
mot strålen, og se ikke rett på den gjennom optiske
instrumenter.
Advarsel! Åpne ikke dekselet. Farlig
spenning ligger ubeskyttet på komponenter
inne i produktets deksel, kontakt med disse
kan føre til brann eller gi elektriske støt.
• Produktet må kun repareres av kvalisert servicepersonell.
• Produktet må ikke demonteres eller endres.
• Plasser ikke produktet slik at det kan falle ned i vann eller annen væske. Still
aldri produktet i nærheten av gjenstander som kan forårsake at vann eller annen væske skylles over produktet.
• Plasser ikke radioen i et fuktig, støvete miljø, eller der det forekommer sterke
vibrasjoner.
2
Page 27

1. Beskrivelse
• Musikkanlegg med CD/MP3-spiller
• Fjernkontroll følger med.
• Tilkoblingskontakt for SD-minnekort og USB-minne.
• Drives med 230 V eller 8 stk. R14-batterier (medfølger ikke).
Oversiden
N O R S K
Forsiden
2
Page 28

1. Teleskopantenne (for FM-mottaking)
2. CD-luke
3. Tilkoblingspunkt for USB-minne
4. Tilkoblingspunkt for minnekort (SD/MMC).
5. [FM ST/FM/AM] Bølgelengdeomkobler: FM Stereo, FM og AM
6. [TUNING] Radiostasjonsinnstilling
7. [OPEN/CLOSE] Åpne/stenge CD-luken
8. [BASS BOOST] Bassforsterkning
9. [VOLUME] Volumkontroll
10. [RADIO/TAPE-OFF/CD/MP3/SD/USB] Funksjonsbryter
11. Hodetelefonuttak
N O R S K
12. [MODE] CD-funksjoner
13. [PROG] CD-programmering
] Gå til neste CD-spor, hurtigsøking framover.
14. [
] Gå til foregående CD-spor, hurtigsøking bakover.
15. [
16. LCD-display
17. FM ST. (Indikator for FM-stereo)
] (CD-avspilling eller pause)
18. [
19. [CD/SD/USB] Velg lydkilde
] Stoppe spilling av CD
20. [
21. SENSOR Sensor til fjernkontroll
22. Batteriholder
] Pause i spilling av kassett
23. [
] Stopp spilling av kassett og åpne kassettlokket
24. [
] Hurtigspoling framover
25. [
] Hurtigspoling bakover
26. [
] Starte spilling av kassett
27. [
] Innspillingsknapp
28. [
29. Kassettlokk
28
Page 29

1.1 Fjernkontroll
1. [+10] Gå 10 framover
2. [MODE] Funksjoner
] Stopp
3. [
4. [PROGRAM] Programmering
] Gå til foregående spor, hurtigsø-
5. [
king bakover.
] Gå til neste CD-spor, hurtigsøking
6. [
framover.
7. [USB/CARD] Velg USB eller minnekort
] Play/Pause
8. [
2. Strømforsyning
Strømtilkobling
Plugg strømkabelen i uttaket på baksiden og plasser stikkontakten i et strømuttak.
N O R S K
Ved bruk med batterier som strømkilde
Sett i batteriene:
1. Fjern batterilokket ved å trykke i pilens retning.
2. Sett i 8 stk. R14 batterier. Plasseres som merkingen viser.
3. Sett på batterilokket igjen.
Husk:
• Strømtilkoblinger skal være koblet fra ved skifte av batterier.
• Når strømkabelen er koblet til går ikke spilleren på batteridrift.
• Ta ut dårlige batterier for å unngå skader p.g.a. lekkasje fra batteriene.
• Ta ut batteriene dersom spilleren ikke skal brukes på en stund.
29
Page 30

3. Høre på radio
1. Still inn funksjonsvelgeren på RADIO når du vil høre på radioen, displayet lyser.
2. Velg bølgelengde med velgeren (AM, FM, FM ST).
3. Still inn ønsket stasjon med rattet TUNING.
4. Både den innebygde mellombølgeantennen og den uttrekkbare teleskopanten
nen tar imot signaler sterkere/svakere avhengig av retning.
FM mottaking: Dra ut hele antennen og vinkle den etter behov.
AM (Mellombølge): Vri spilleren til du nner den beste mottakingen.
5. Juster volumet med VOLUME.
6. Skru av radioen når du ikke vil høre mer ved å stille funksjonsvelgeren på
TAPE/OFF.
Tenk på dette:
N O R S K
- Dersom du hører på FM stereo (FM ST) på en spesiell stasjon og den er svak,
eller har mye bakgrunnslyd, prøv da å føre funksjonsvelgeren til ”FM” (mono),
det gir vanligvis bedre mottaksforhold.
- Dersom du har funksjonsvelgeren på FM ST og vrir på rattet for å stille inn en
stasjon, begynner indikatorlampen FM ST å lyse dersom en stasjon nnes som
sender i stereo og du har bra mottaksforhold.
-
30
Page 31

4. Spille musikk
Spille musikk fra CD/MP3-plate, SD minnekort eller USB-minne
Velg hvilket lagringsmedium som du vil høre på ved å trykke på [CD/SD/USB].
Valgt medium vil da komme opp på displayet (CD, SD eller USB). Når du har åpnet ønsket l er funksjonene like for alle typer av lagringsmedium. Hvis du kun har
en type lagringsmedium, kan du starte den første len automatisk.
4.1 Legg i en MP3/CD-plate
1. Før funksjonsvelgeren (10) til MP3/CD/SD/USB.
2. Åpne CD-luken.
3. Legg en CD-plate med etikettsiden opp (hvis du legger platen feil vei, vises
”NO DISC” i displayet) CD-singel (8 cm) kan brukes uten adapter.
4. Lukk CD-luken forsiktig med en hånd.
4.2 Ta ut CD-platen
1. Påse at ikke CD-platen spilles. Hvis den gjør det trykk på [] for å avslutte
spillingen.
2. Åpne CD-luken.
3. Ta forsiktig ut CD-platen og legg den i futteralet.
4. Lukk CD-luken forsiktig.
Tenk på dette:
- Berør aldri laserlinsen i CD-spilleren med hendene, rengjør kun med en spesiell CD-plate som er beregnet for å rengjøre laserlinsen.
N O R S K
4.3 Høre på CD-plate
Normal avspilling
1. Sett i en CD-plate. Platen begynner å snurre og ”CD” vises på displayet mens
platen leses inn.
2. Før funksjonsvelgeren til MP3/CD/SD/USB.
3. Spillingen starter automatisk med spor 1 etter noen sekunder når platen er
innlest. 001 viser i displayet.
4. Juster volumet med [VOLUME].
5. Trykk på [PLAY/PAUSE] for å midlertidig stoppe avspillingen. Trykk på [PLAY/
PAUSE] for å starte avspillingen igjen.
6. Trykk på [] for å avbryte spillingen.
7. Før funksjonsvelgeren (10) til ”Tape/OFF” for å skru av spilleren helt.
31
Page 32

Husk at:
- Trykk aldri ned CD-luken under avspilling. Det kan skade CD-platen eller -spil
leren.
- Trykk alltid på ”STOP” før CD-platen tas ut av spilleren.
- Dersom du ytter eller støter borti spilleren under avspilling, kan den bli stille et
lite øyeblikk og deretter starte opp igjen. Det er normalt for en CD-spiller.
-
4.4 Hoppe over spor
1. Denne funksjonen gir deg mulighet til å nne begynnelsen på et spor på CDplaten under avspilling: Trykk på [] en eller ere ganger for å gå til ønsket
neste spor, aktuelt CD-spor vises i displayet.
2. Trykk på [] to eller ere ganger for hurtig å gå til ønsket foregående spor,
aktuelt CD-spor vises i displayet. Trykk en gang for å gå til begynnelsen på
aktuelt spor.
3. Trykk og hold inne knappen [] eller [] for å hurtigsøke gjennom sporene,
slipp knappen når du har funnet ønsket spor.
N O R S K
4.5 BASS BOOST
Trykk på [BASS BOOST] for å øke bassgjengivelsen.
4. Elektronisk antiristeminne (ESP)
Det elektroniske antiristeminnet forhindrer at lyden forsvinner eller ”hopper” hvis
spilleren utsettes for mindre støt eller vibrasjoner.
Når CD- platen starter å spille kobles buffertminne inn automatisk. Musikkens
digitale data lagres i en minnebuffert før den avkodes og begynner å spille.
Når spilleren blir utsatt for sterke rystelser ved avspilling, vil minneinnholdet fortsette å avkodes og musikken spilles. På denne måten får pickupen tid på seg til å
stabilisere seg og fortsette med å lese inn nye data senere.
Obs! Når ESP-funksjonen aktiveres eller skrus av blir lyden borte i 1 – 2 sekunder.
32
Page 33

5. Alternativ spilling
Fungerer på samme måte for alle lagringsmedia.
5.1 Repetere et spor på CD
1. Trykk en gang på [MODE] i stopp- eller avspillingsmodus. ”REPT 1” kommer
opp på displayet.
2. Trykk på [] (14) eller [] (15) for å velge det sporet som skal repeteres.
3. Det valgte sporet fortsetter å spilles til du trykker på [] (20) eller trykker ere
ganger på [MODE] (12).
5.2 Repetere alle spor på CD-platen
1. Trykk to ganger på [MODE] i stopp- eller avspillingsmodus. ”REPT ALL” kommer opp på displayet.
2. Trykk på [] (14) eller [] (15) for å velge det sporet som skal repeteres.
3. Det valgte sporet fortsetter å spilles til du trykker på [] (20) eller trykker ere
ganger på [MODE] (12).
5.3 INTRO (lytt til de 10 første sekundene på hvert spor)
1. Trykk tre ganger på [MODE] i stopp- eller avspillingsposisjonen, ved avspilling
av CD-plate.
2. ”INTRO” vises på displayet, trykk på [] for å starte spillingen av spor 1.
3. Det valgte sporet fortsetter å spilles til du trykker på [] (20) eller trykker ere
ganger på [MODE] (12).
N O R S K
5.4 Random (tilfeldig avspelningsrekkefølge)
Alle spor spilles i tilfeldig rekkefølge.
1. Trykk re ganger på [MODE] i stopp- eller avspillingsmodus, mens platen spilles.
2. ”RAND” vises på displayet, trykk på [] (18) for å starte spillingen av alle
spor i tilfeldig rekkefølge.
3. Det valgte sporet fortsetter å spilles til du trykker på [] (20) eller trykker ere
ganger på [MODE] (12).
33
Page 34

5.5 Programmert spilling
Opp til 20 spor kan programmeres for avspilling i ønsket rekkefølge. Programmering kan kun gjøres når spilleren er i stoppmodus.
1. Trykk på [] (20) for å gå til stopposisjonen.
2. Trykk på [PROG] (13). Displayet viser da ”PROG” og programnummer ”P01 ”
3. Trykk på [] (14) eller [] (15) for å velge det første sporet
4. Trykk på [PROG] for å lagre det første sporet, programnummer ”P02” vises og
spilleren venter på ditt neste valg av spor.
5. Repeter trinn 3 og 4 til alle ønskede spor (maks. 20)er lagret i minnet.
6. Trykk på [] [ 18 ] når programmeringen er ferdig.
7. Avspillingen av det først valgte sporet begynner.
8. Alle sporene vil spilles av i den rekkefølgen du har programmert.
9. Trykk på [] (20) to ganger for å avslutte avspillingen og slette programmeringen.
OBS! Minnet for de programmerte sporene vil slettes:
- Dersom du åpner CD-lokket.
- Dersom du ytter funksjonsvelgeren til ”Tape” eller ”Radio” - modus.
N O R S K
- Dersom strømmen til spilleren kobles fra.
. Kassettspillerens funksjon
[] (23) Pause
Trykk på [] for å ta pause ved spilling av kassett.
[] (24) Stopp
Trykk på [] for å avslutte spillingen eller annen pågående funksjon og for å åpne
kassettlokket i stopposisjon.
[] (25) Hurtigspole framover
Trykk ned for å spole båndet raskt framover. Trykk på [] for å avslutte hurtigspolingen.
[] (26) Hurtigspole bakover
Trykk ned for å spole båndet raskt framover. Trykk på [] for å avslutte hurtigspolingen.
[] (27) Avspilling
Trykk ned knappen for å starte spillingen av kassett.
[] (28) Innspilling
Trykk ned både [] og [] for å spille inn fra CD-plate, radio, minnekort eller USBminne.
Obs! Hvis kassetten er innspillingsbeskyttet, går det ikke å trykke ned knappen.
Se da ”beskytt innspilling fra å raderes”.
Automatisk båndstopp: Kassettspilleren har innebygd båndstopp og stopper automatisk når kassetten er slutt.
34
Page 35

. Slik bruker du kassettspilleren
1. Åpne kassettluken ved å trykke på [].
2. Sett inn kassetten.
3. Lukk kassettluken.
4. Still inn funksjonsvelgeren på ”TAPE/OFF”.
5. Trykk på [] for å starte spillingen.
6. Juster volumet.
7. Trykk på [] for å stoppe spillingen, og trykk en gang til for å åpne kassettluken.
OBS! Når båndet er ferdig, spretter [] -knappen opp og avspillingen stoppes.
Dersom du vil spille den andre siden av kassetten: Ta ut kassetten og snu den,
sett den inn igjen, steng kassettluken og trykk på [].
8. Ta vare på dine kassetter
• Båndet kan henge seg opp eller bli deformert dersom det ikke er strekt mellom
kassettens spoler. Dersom båndet ligger i en løs slynge, bør det strekkes før
bruk, ta en penn eller lignende til hjelp og spol opp båndet som på bildet.
• Dersom båndet går tungt eller låter merkelig kan det hjelpe å hurtigspole båndet i begge retninger.
• Unngå å bruke C120 kassetter i kassettspilleren, disse har tynnere bånd og
det er stor risiko for at de krølles.
8.1 Beskytt innspillingen mot sletting
Kassettene er utstyrt med slettebeskyttelse i form av små iker på baksiden. Pirk
bort en ik med en skrutrekker eller lignende. Dersom båndet holdes som ved
avspilling styrer den høyre iken innspillingen for den siden som spilles.
Dersom du vil slette tidligere innspilling og iken er borte, kan du sette en teipbit
over hullet.
N O R S K
8.2 Slette innspilling fra kassettbånd
1. Før funksjonsvelgeren til ”TAPE”
2. Trykk på ”RECORD” til den låser i nedtrykt posisjon (play påvirkes samtidig)
for å starte innspillingen, ny innspilling begynner og dermed slettes den tidligere innspillingen (husk at omgivelsene må være stille, eventuell lyd spilles inn
via den innebygde mikrofonen).
35
Page 36

9. Innspilling
9.1 Spill inn fra den innebygde radioen
1. Still funksjonsknappen på ”RADIO” og still inn ønsket stasjon.
2. Sett en kassett i kassettluken.
3. Trykk på [] (28) og [] (27) til de låser i nedtrykt posisjon for å starte innspillingen. Trykk på Pause [] (23) dersom du ikke vil starte innspillingen direkte.
Trykk igjen på [] når du vil starte innspillingen.
4. Trykk på [] for å avbryte innspillingen, ellers avbrytes innspillingen når båndet er slutt.
5. Trykk på [] (26) for å hurtigspole bakover til innspillingens startpunkt, trykk
deretter på [] (24) og [] (27) for å lytte til innspillingen. Juster volumet.
OBS! Begynnelsen og slutten på båndet er utstyrt med startteip som ikke er innspillbar, hvis du vill være sikker på at innspillingen begynner med en gang uten
opphold bør du spole fram noen sekunder av båndet før du begynner innspillingen.
N O R S K
9.2 Spill inn fra CD-plate
1. Plasser en kassett i kassettluken.
2. Still funksjonsvelgeren (10) på [CD/MP3/SD/USB] trykk på [CD/SD/USB] (19),
velg CD og start innspillingen.
3. Trykk på [] (28) og [] (27) til de låser i nedtrykt posisjon for å starte innspillingen. Trykk på Pause [] (23) dersom du ikke vil starte innspillingen direkte.
Trykk igjen på [] når du vil starte innspillingen.
4. Trykk på [] for å avbryte innspillingen, ellers avbrytes innspillingen når båndet er slutt.
5. Trykk på [] (26) for å hurtigspole bakover til innspillingens startpunkt, trykk
deretter på [] (24) og [] (27) for å lytte til innspillingen. Juster volumet.
9.3 Spille inn fra USB-minne (Usb) eller minnekort (Sd)
1. Plasser en kassett i kassettluken.
2. Still funksjonsvelgeren (10) på [CD/MP3/SD/USB] trykk på [CD/SD/USB] (19),
velg ”USB” eller ”SD” og start innspillingen.
3. Trykk på [] (28) og [] (27) til de låser i nedtrykt posisjon for å starte innspillingen. Trykk på Pause [] (23) dersom du ikke vil starte innspillingen direkte.
Trykk igjen på [] når du vil starte innspillingen.
4. Trykk på [] for å avbryte innspillingen, ellers avbrytes innspillingen når båndet er slutt.
5. Trykk på [] (26) for å hurtigspole bakover til innspillingens startpunkt, trykk
deretter på [] (24) og [] (27) for å lytte til innspillingen. Juster volumet.
3
Page 37

3
N O R S K
10. Vedlikehold av spilleren
Rengjør trykkrulle, capstan, slettehode og
inn/avspillingshode dersom lyden har blitt
dårlig eller båndet oker seg når du bruker
kassett. Åpne kassettluken og bruk en Q-tip
som er dyppet i alkohol eller spesiell rengjøringsvæske for tonehoder.
OBS! Bruk ikke metallverktøy ved rengjøring.
Sett ikke inn en kassett før delene er helt
tørre.
11. Hodetelefoner
Plugg hodetelefonene (følger ikke med) i uttaket (11). Det kommer ingen lyd fra
høyttalerne når hodetelefonene er koblet til.
12. Beskytt miljøet
Sorter avfallet og la det gå til gjenvinning istedenfor å kaste
det. All elektronikk og all emballasje skal sorteres og håndteres i henhold til lokale miljøforskrifter.
13. Tekniske data
Størrelse: 390 x 230 x 165 mm
Drivspenning: 230 V AC, 50 Hz
Batteridrift: 8 stk. R14 batterier
Radio:
Frekvensområde: AM: 522 – 1 710 KHz
FM: 87,5 – 108 MHz
CD-spiller: Halvlederlaser
Avkoding: 16 bites linjer
Tilkoblingskontakt for SD-minnekort og USB-minne.
Tilkobling for høretelefoner: 3,5 mm stereoplugg, 8 - 32 Ohm
Capstan
Trykkrulle
Inn/avspillingshode
Rengjøringspinne
Raderingshode
Page 38

CD-/MP3-RADIONAUHURI
Tuotenumero: 38-2522
Malli: MC-9814USB
Lue käyttöohjeet ennen tuotteen käyttöönottoa. Säilytä käyttöohjeet tulevaa tarvetta varten. Pidätämme oikeuden teknisten tietojen muutoksiin. Emme vastaa mahdollisista teksti- tai kuvavirheistä.
Jos laitteeseen tulee teknisiä ongelmia, ota yhteys myymälään tai asiakaspalveluun (yhteystiedot käyttöohjeen lopussa).
Tärkeää: Lue käyttöohje huolella ja varmista, että olet ymmärtänyt käyttöohjeen ennen tuotteen käyttöönottoa. Säilytä käyttöohje.
Turvallisuus
Huomioi seuraavat turvallisuussymbolit
C AU T I O N
RISK OF ELECTRIC
SHOCK DO NOT OPEN
S U O M I
CD-soittimessa
CLASS 1
LASER PRODUCT
• Tuotteen saa korjata vain valtuutettu huoltoliike.
• Älä pura tai muuta tuotetta.
• Älä sijoita tuotetta sellaiseen paikkaan, josta se voi tippua veteen tai muuhun
nesteeseen. Älä laita laitteen päälle nesteitä sisältäviä esineitä, kuten
maljakoita tai limsapulloja.
• Älä käytä stereoradionauhuria kosteissa tai pölyisissä tiloissa tai paikoissa,
joissa siihen kohdistuu voimakasta värähtelyä.
!
LUOKAN 1 LASERLAITE
Varoitus! Älä avaa laitteen koteloa! Näkymätön
lasersäde voi aiheuttaa silmävaurioita. Älä katso
säteeseen edes optisten instrumenttien läpi.
Varoitus! Älä avaa laitteen koteloa!
Kotelon sisällä on vaarallista jännitettä
sisältäviä suojaamattomia komponentteja,
jotka voivat aiheuttaa sähköiskun.
38
Page 39

1. Kuvaus
• Stereokasettiradio, jossa cd-/mp3-soitin.
• Pakkaus sisältää kaukosäätimen.
• Liitäntä SD-muistikortille ja USB-muistille.
• Sähkö- (230 V) ja paristokäyttöinen (8 kpl R14) eivät sisälly.
Yläpuoli
S U O M I
Etupuoli
39
Page 40

1. Teleskooppiantenni (FM-vastaanotto)
2. Cd-lokero
3. Liitäntä USB-muistille
4. Liitäntä SD/MMC-muistikortille
5. [FMST/FM/AM] Aallonpituuden valitsin: FM stereo, FM ja AM
6. [TUNING] Kanavahaku
7. [OPEN/CLOSE] Avaa/sulje cd-kansi
8. [BASS BOOST] Bassonvahvistus
9. [VOLUME] Äänenvoimakkuuden säätö
10. [RADIO/TAPE-OFF/CD/MP3/SD/USB] Toiminnonvalitsin
11. Kuulokeliitäntä
12. [MODE] Cd-toiminnot
13. [PROG] Cd-ohjelmointi
] Siirry seuraavaan cd-raitaan, pikakelaus eteenpäin
14. [
] Siirry edelliseen cd-raitaan, pikakelaus taaksepäin
15. [
16. Nestekidenäyttö
S U O M I
17. FM ST. (FM stereo -merkkivalo)
] Cd-levyn toisto tai tauko
18. [
19. [CD/SD/USB] Äänilähteen valinta
] Cd-levyn toiston pysäyttäminen
20. [
21. SENSOR Kaukosäätimen anturi
22. Paristolokero
] Tauko kasetin toistossa
23. [
] Kasetin toiston pysäytys ja kasettilokeron avaaminen
24. [
] Pikakelaus eteenpäin
25. [
] Pikakelaus taaksepäin
26. [
] Kasetin toiston aloittaminen
27. [
] Nauhoituspainike
28. [
29. Kasettilokero
40
Page 41

1.1 Kaukosäädin
1. [+10] Siirry 10 eteenpäin
2. [MODE] Toiminnot
] Pysäytys
3. [
4. [PROGRAM] Ohjelmointi
] Siirry edelliseen cd-raitaan, pikake-
5. [
laus eteenpäin
] Siirry seuraavaan cd-raitaan, pika-
6. [
kelaus taaksepäin
7. [USB/CARD] Valitse USB tai muisti
kortti
] Toisto/Tauko
8. [
-
2. Virtalähde
Verkkoliitäntä
Liitä verkkojohdon toinen pää laitteen takana olevaan liitäntään ja pistoke pistorasiaan.
S U O M I
Kun käytät nauhuria paristoilla
Paristojen asennus:
1. Irrota paristolokeron kansi painamalla sitä nuolen suuntaan.
2. Aseta lokeroon 8 kpl R14-paristoa takapuolen merkintöjen mukaisesti.
3. Pane paristolokeron kansi takaisin paikalleen.
Muista:
• Verkkojohto ei saa olla liitettynä stereoradionauhuriin paristoja käytettäessä.
• Kun verkkojohto on liitetty, laite ei toimi paristoilla.
• Poista vanhat ja vialliset paristot, jotteivät ne ala vuotaa.
• Poista paristot, mikäli laitetta ei käytetä vähään aikaan.
41
Page 42

3. Radion kuuntelu
1. Säädä toiminnonvalitsin (10) asentoon RADIO kun haluat kuunnella radiota.
Näyttö (16) loistaa.
2. Valitse aallonpituus valitsimella (MW, FM, FM ST).
3. Valitse radioasema TUNING-säätönupilla.
4. Sisäinen keskiaaltoantenni ja teleskooppiantenni vastaanottavat signaaleja,
jotka ovat vahvempia tai heikompia suuntauksesta riippuen.
FM-vastaanotto: Vedä koko teleskooppiantenni ulos ja käännä sitä
tarvittaessa.
AM (keskiaalto): Käännä laitetta, kunnes kuuluvuus on hyvä.
5. Säädä äänenvoimakkuus VOLUME-nupilla.
6. Sulje radio kääntämällä toiminnonvalitsin (10) asentoon TAPE/OFF.
Huom.:
- Jos kuuntelet kanavaa FM stereo -taajuudella ja kanava kuuluu huonosti,
käännä aallonpituuden valitsin asentoon ”FM” (mono), joka vastaanottaa
yleensä paremmin.
- Jos aallonpituuden valitsin on asennossa FM ST ja etsit kanavaa
kanavanhakunupilla, ”FM ST” -merkkivalo syttyy, kun löytyy stereona lähettävä
S U O M I
kanava ja vastaanotto on hyvänlaatuinen.
42
Page 43

4. Musiikin kuuntelu
Musiikin kuuntelu cd/mp3-levyltä, SD-muistikortilta tai USB-muistista.
Valitse, mitä tallennusmediaa haluat kuunnella, painamalla [CD/SD/USB] (19). Valittu media näkyy näytöllä (Cd – Sd – Usb). Kun olet avannut haluamasi kansion,
ovat toiminnot samat kaikille tallennusmedioille. Jos sinulla on vain yhdenlainen
tallennusmedia, alkaa ensimmäinen kansio automaattisesti.
4.1 Cd/mp3-levyn asettaminen
1. Käännä toiminnonvalitsin (10) asentoon CD/MP3/SD/USB.
2. Avaa cd-kansi.
3. Aseta lokeroon cd-levy etikettipuoli ylöspäin (jos levy on väärinpäin, näytöllä on
merkintä ”NO DISC”). Cd-singleä (8 cm) voi käyttää ilman sovitinta.
4. Sulje cd-kansi varovasti.
4.2 Cd-levyn poistaminen
1. Jos cd-levyn toisto on päällä, pysäytä toisto painamalla [] (20).
2. Avaa cd-kansi.
3. Irrota levy varovasti levylautaselta ja aseta se takaisin koteloonsa.
4. Sulje cd-kansi varovasti.
Huom.:
- Älä koske cd-lokeron laserlukupäähän käsin, vaan puhdista se ainoastaan
erityisellä laserlukupään puhdistukseen tarkoitetulla cd-levyllä.
4.3 Cd-levyn kuuntelu
Normaali toisto
1. Aseta lokeroon cd-levy. Levy alkaa pyöriä ja näytöllä lukee ”Cd” levyn
tunnistamisen ajan.
2. Käännä toiminnonvalitsin (10) asentoon CD/MP3/SD/USB.
3. Kun levy on tunnistettu, alkaa toisto automaattisesti raidasta 1. Näytöllä näkyy
001.
4. Säädä äänenvoimakkuus [VOLUME]-säätimellä (9).
5. Keskeytä toisto tilapäisesti painamalla [PLAY/PAUSE] (18). Paina [PLAY/
PAUSE], kun haluat jatkaa toistoa.
6. Lopeta toisto painamalla pysäytyspainiketta [] (20).
7. Sulje laite kääntämällä toiminnonvalitsin (10) asentoon TAPE/OFF.
S U O M I
Ota huomioon:
- Älä paina cd-kantta toiston aikana. Se voi vahingoittaa cd-levyä tai soitinta.
- Paina aina ”STOP”-painiketta ennen kuin otat cd-levyn soittimesta.
- Jos siirrät tai töytäiset soitinta toiston aikana, se voi mykistyä hetkeksi, mutta
jatkaa toistoa pian. Tämä on tavallista cd-soittimissa.
43
Page 44

4.4 Raidan yli hyppääminen
1. Tämä toiminto mahdollistaa siirtymisen eri raitojen alkuun toiston aikana: Siirry
seuraaviin raitoihin painamalla [] (14) kerran tai useita kertoja. Toistettava
raita näkyy näytöllä.
2. Siirry edellisiin raitoihin painamalla [] (15) nopeasti kahdesti tai useita
kertoja. Toistettava raita näkyy näytöllä. Siirry toistettavan raidan alkuun
painamalla kerran.
3. Pikakelaa eteen- tai taaksepäin pitämällä pohjassa painiketta [] tai [].
Päästä painike, kun olet löytänyt halutun kohdan.
4.5 BASS BOOST
Lisää bassontoistoa painamalla [BASS BOOST].
4. Elektroninen puskurimuisti (ESP)
Elektroninen puskurimuisti estää äänen häviämisen tai hyppimisen, kun soittimeen
kohdistuu iskuja tai tärinää.
Kun cd-levyn toisto alkaa, kytkeytyy puskurimuisti automaattisesti päälle. Musiikin
digitaaliset tiedot varastoidaan puskurimuistiin ennen soiton aloittamista.
Kun soitin altistuu kuuntelun aikana tärinälle, laite lukee muistia ja jatkaa levyn
toistoa. Näin lukupää ehtii tasoittua ja jatkaa uuden tiedon lukemista.
Huom.! Kun ESP-toiminto aktivoidaan tai sammutetaan, ääni hiljenee 1 – 2 sekunniksi.
S U O M I
44
Page 45

5. Vaihtoehtoinen toisto
Toimii samalla tavalla kaikkien tallennusmedioiden kanssa.
5.1 Yhden raidan uudelleentoisto
1. Paina kerran [MODE]-painiketta (12) toisto- tai valmiustilassa. Näytöllä lukee
”REP 1”.
2. Valitse toistettava raita painikkeella [] (14) tai [] (15).
3. Soitin toistaa valittua raitaa, kunnes painat [] (20) tai kunnes painat monta
kertaa [MODE] (12).
5.2 Cd:n kaikkien raitojen uudelleentoisto
1. Paina kahdesti [MODE]-painiketta (12) toisto- tai valmiustilassa. Näytöllä lukee
”REP ALL”.
2. Valitse toistettava raita painikkeella [] (14) tai [] (15).
3. Soitin toistaa valittuja raitoja, kunnes painat [] (20) tai kunnes painat monta
kertaa [MODE] (12).
5.3 INTRO (jokaisen raidan 10 ensimmäisen sekunnin kuuntelu)
1. Paina kolmesti [MODE]-painiketta (12) cd-levyn toisto- tai valmiustilassa.
2. Näytöllä on merkintä ”INTRO”. Aloita pikakuuntelu raidasta 1 painikkeella
[] (18).
3. Soitin toistaa valittuja raitoja, kunnes painat [] (20) tai kunnes painat monta
kertaa [MODE] (12).
S U O M I
5.4 Random (satunnaistoisto)
Kaikki raidat toistetaan sattumanvaraisessa järjestyksessä.
1. Paina neljästi [MODE]-painiketta (12) toisto- tai valmiustilassa.
2. Näytöllä on merkintä ”RAND”. Aloita satunnaistoisto painikkeella [] (18).
3. Toisto jatkuu, kunnes painat [] (20) tai kunnes painat monta kertaa [MODE]
(12).
45
Page 46

5.5 Ohjelmoitu toisto
Voit ohjelmoida 20 raitaa toistettavaksi halutussa järjestyksessä. Ohjelmoinnin voi
tehdä ainoastaan soittimen ollessa valmiustilassa.
1. Siirry valmiustilaan painamalla [] (20).
2. Paina [PROG] (13). Näytöllä lukee ”PROG” ja ohjelmointinumero ”P01”.
3. Valitse ensimmäinen raita painamalla [] (14) tai [] (15).
4. Tallenna ensimmäinen valitsemasi raita painamalla [PROG].
Ohjelmointinumero ”P02” näkyy näytöllä ja soitin odottaa seuraavaa valintaasi.
5. Toista kohtia 3 ja 4, kunnes kaikki haluamasi raidat (maks. 20) on tallennettu.
6. Paina [] (18), kun ohjelmointi on valmis.
7. Ensimmäisen valitsemasi raidan toisto alkaa.
8. Raidat toistetaan ohjelmoimassasi järjestyksessä.
9. Paina pysäytyspainiketta [] (20) kaksi kertaa lopettaaksesi toiston ja
poistaaksesi ohjelmoinnin.
HUOM.! Raitojen ohjelmointi katoaa:
- jos avaat cd-kannen.
- kun käännät toiminnonvalitsimen asentoon ”TAPE” tai ”RADIO”.
- kun soittimesta katkaistaan virta.
. Kasettinauhurin toiminnot
[] (23) Tauko
S U O M I
Keskeytä kasetin toisto hetkeksi painamalla []-painiketta.
[] (24) Pysäytys
Paina []-painiketta pysäyttääksesi toiston tai muun toiminnon, tai avataksesi
kasettilokeron luukun pysäytystilassa.
[] (25) Pikakelaa eteenpäin
Paina painiketta kelataksesi kasettia eteenpäin. Pysäytä kelaus painamalla [].
[] (26) Pikakelaa taaksepäin
Paina painiketta kelataksesi kasettia taaksepäin. Pysäytä kelaus painamalla [].
[] (27) Toisto
Aloita kasetin toisto painamalla toistopainiketta.
[] (28) Nauhoitus
Paina pohjaan sekä [] että [] äänittääksesi cd-levyltä, radiosta, muistikortilta tai
USB-muistista.
Huom.! Jos kasetti on tallennussuojattu, et voi painaa painikkeita pohjaan. Ks.
”Nauhoituksen suojaaminen”.
Automaattinen nauhanpysäytys: Kasettinauhuri sammuu automaattisesti, kun
kasetti on lopussa.
4
Page 47

. Näin käytät kasettinauhuria
1. Avaa kasettilokero painamalla [].
2. Aseta kasetti lokeroon.
3. Sulje kasettilokero.
4. Säädä toiminnonvalitsin asentoon ”TAPE/OFF”.
5. Aloita toisto painamalla [].
6. Säädä äänenvoimakkuus.
7. Lopeta toisto []-painikkeella. Paina painiketta uudestaan, niin kasettilokero
avautuu.
HUOM.! Kun nauha loppuu, []-painike nousee ylös ja toisto loppuu.
Jos haluat kuunnella kasetin toisen puolen, ota kasetti ulos lokerosta ja aseta se
takaisin lokeroon ja paina [].
8. Kasettien huolto
• Kasetin nauha voi sotkeutua tai rikkoutua, jos se ei ole kireällä kasettien
kelojen välissä. Jos nauha on löysällä, se tulee kiristää ennen kasetin
kuuntelua. Käytä apuna esimerkiksi kynää ja kiristä nauha kuvan mukaisesti.
• Jos nauha kulkee huonosti tai kuulostaa oudolta, pikakelaa kasettia molempiin
suuntiin. Se yleensä auttaa.
• Älä käytä C120-kasetteja nauhurissa, sillä niissä on ohuempi nauha ja ne
voivat sotkeutua helposti.
8.1 Nauhoituksen suojaaminen
Jotkin kasetit ovat nauhoitussuojattuja ja niiden alaosassa on pienet kielekkeet.
Kieleke voidaan irrottaa taltalla tai vastaavalla. Oikea kieleke ohjaa toistettavan
puolen nauhoitusta.
Jos haluat nauhoittaa kasetin päälle, eikä kasetissa ole kielekkeitä, peitä kolo teipillä.
S U O M I
8.2 Kasetin tyhjentäminen
1. Käännä toiminnonvalitsin asentoon ”TAPE”.
2. Paina ”RECORD” kunnes se lukittuu (play liikkuu samanaikaisesti)
käynnistääksesi nauhoituksen, uusi nauhoitus alkaa ja poistaa edellisen
nauhoituksen (ota huomioon, että ympäristön on oltava hiljainen, sillä
mahdolliset äänet nauhoittuvat kasetille mikrofonin kautta).
4
Page 48

9. Tallennus
9.1 Nauhoittaminen radiosta
1. Aseta toimintopainike (10) asentoon RADIO ja hae haluamasi radiokanava.
2. Aseta kasetti lokeroon.
3. Paina painikkeita [] (28) ja [] (27) kunnes ne lukittuvat. Nauhoitus alkaa.
Paina taukopainiketta [] (23), jos et halua aloittaa nauhoittamista heti. Paina
taukopainiketta uudestaan, kun haluat aloittaa nauhoittamisen.
4. Lopeta nauhoitus []-painikkeella (24). Muuten nauhoitus loppuu, kun kasetti
on lopussa.
5. Pikakelaa takaisin kohtaan, josta aloitit nauhoituksen painamalla [] (26).
Pysäytä pikakelaus []-painikkeella (24). Aloita nauhoituksen kuuntelu []painikkeella (27). Säädä äänenvoimakkuus.
HUOM.! Nauhan alussa ja lopussa on aloitusteippi, johon ei voi nauhoittaa. Jos
haluat nauhoituksen alkavan oikeasta kohdasta, kelaa kasettia muutama sekunti
eteenpäin ennen nauhoituksen aloittamista.
9.2 Cd-levyn tallennus
1. Aseta kasetti lokeroon.
2. Aseta toiminnonvalitsin (10) kohtaan [CD/MP3/SD/USB] ja paina [CD/SD/
USB]-painiketta (19). Valitse cd ja aloita toisto.
S U O M I
3. Paina painikkeita [] (28) ja [] (27) kunnes ne lukittuvat. Nauhoitus alkaa.
Paina taukopainiketta [] (23), jos et halua aloittaa nauhoittamista heti. Paina
taukopainiketta uudestaan, kun haluat aloittaa nauhoittamisen.
4. Lopeta nauhoitus []-painikkeella (24). Muuten nauhoitus loppuu, kun kasetti
on lopussa.
5. Pikakelaa takaisin kohtaan, josta aloitit nauhoituksen painamalla [] (26).
Pysäytä pikakelaus []-painikkeella (24). Aloita nauhoituksen kuuntelu []painikkeella (27). Säädä äänenvoimakkuus.
9.3 Tallentaminen USB-kortilta (Usb) tai muistikortilta (Sd)
1. Aseta kasetti lokeroon.
2. Aseta toiminnonvalitsin (10) kohtaan [CD/MP3/SD/USB] ja paina [CD/SD/
USB]-painiketta (19). Valitse joko ”Usb” tai ”Sd” ja aloita toisto.
3. Paina painikkeita [] (28) ja [] (27) kunnes ne lukittuvat. Nauhoitus alkaa.
Paina taukopainiketta [] (23), jos et halua aloittaa nauhoittamista heti. Paina
taukopainiketta uudestaan, kun haluat aloittaa nauhoittamisen.
4. Lopeta nauhoitus []-painikkeella (24). Muuten nauhoitus loppuu, kun kasetti
on lopussa.
5. Pikakelaa takaisin kohtaan, josta aloitit nauhoituksen painamalla [] (26).
Pysäytä pikakelaus []-painikkeella (24). Aloita nauhoituksen kuuntelu []painikkeella (27). Säädä äänenvoimakkuus.
48
Page 49

49
S U O M I
10. Nauhurin huolto ja puhdistus
Puhdista painotela, vetoakseli ja äänipäät, jos
äänenlaatu on heikko tai jos nauha sotkeutuu.
Käytä puhdistamiseen vanupuikkoa, joka on
kastettu alkoholiin tai äänipäille tarkoitettuun
puhdistusnesteeseen.
HUOM.! Älä käytä puhdistamiseen metalliesineitä. Älä aseta lokeroon kasettia, ennen kuin
osat ovat täysin kuivat.
11. Kuulokkeet
Kuulokkeet (eivät sisälly) voit liittää kuulokeliitäntään (11). Kaiuttimet mykistyvät,
kun kuulokkeet liitetään.
12. Pidä huolta ympäristöstä
Lajittele ja kierrätä jätteet. Älä heitä niitä sekajätteisiin. Kaikki
kodinelektroniikka ja pakkausmateriaalit on lajiteltava paikallisten ympäristösääntöjen mukaisesti.
13. Tekniset tiedot
Mitat: 390 x 230 x 165 mm
Käyttöjännite: 230 VAC, 50 Hz
Paristot: 8 x R14
Radio:
Taajuusalue: AM: 522–1710 KHz
FM: 87,5–108 MHz
Cd-soitin: Puolijohdelaser
Koodin purku: 16 bitin lineaari
Liitäntä SD-muistikortille ja USB-muistille
Kuulokeliitäntä: Ø 3,5 mm:n stereopistoke, 8–32 Ohmia
Vetoakseli
Painotela
Äänipää
Vanupuikko
Äänipää
Page 50

50
Page 51

51
Page 52

SVERIGE
KUNDTJÄNST Tel: 0247/445 00
Fax: 0247/445 09
E-post: kundtjanst@clasohlson.se
INTERNET www.clasohlson.se
BREV Clas Ohlson AB, 793 85 INSJÖN
NORGE
KUNDESENTER Tlf.: 23 21 40 00
Faks: 23 21 40 80
E-post: kundesenter@clasohlson.no
INTERNETT www.clasohlson.no
POST Clas Ohlson AS, Postboks 485 Sentrum, 0105 OSLO
SUOMI
ASIAKASPALVELU Puh: 020 111 2222
Faksi: 020 111 2221
Sähköposti: info@clasohlson.fi
INTERNET www.clasohlson.fi
OSOITE Clas Ohlson Oy, Yrjönkatu 23 A, 00100 HELSINKI
GREAT BRITAIN
For consumer contact, please visit
www.clasohlson.co.uk and click on
customer service.
INTERNET www.clasohlson.co.uk
www.clasohlson.com
Ver. -2007-07
 Loading...