

Page 1
DVD/MPEG4 Player
DVD/MPEG4-spelare
Dvd/mpeg4-spiller
Dvd-/MPEG4-soitin
SVENSKANORSKSUOMI ENGLISH
Art.no. Model
18-8108 M251-UK
38-3301 M251
www.clasohlson.com
Ver. 200906
Page 2

Page 3

DVD/MPEG4 Player
Art.no. 18-8108 Model M51-UK
8-01 M51
Please read the entire instruction manual before using the product and save it for future reference.
We reserve the right for any errors in text or images and any necessary changes made to technical data.
If you have any questions regarding technical problems please contact Customer Services.
Safety
ENGLISH
C AU T I O N
RISK OF ELECTRIC
SHOCK DO NOT OPEN
• The product should only be repaired by qualied service personnel.
• The product should not be taken apart or modied.
• The product is designed only for indoor use.
• Never expose the device to high temperatures, blows, dampness or moisture.
• Do not place the product where there is a risk of it falling into water or other types of liquid. Do not place
containers with liquid on the product e.g. ower vases, coffee cups, zzy drink bottles, etc.
• Do not place the device in damp, dusty environments or where there are heavy vibrations.
• Shut off the standby function at night or when travelling.
CLASS 1
LASER PRODUCT
CLASS 1 LASER PRODUCT
Caution: Do not open the casing! Invisible laser beams that can cause eye
damage. Do not look directly into the laser beam or look directly at it using
an optical instrument.
Caution
Do not open the casing! Certain components within the product’s
!
casing contain dangerous currents. Contact with these may give
you an electric shock.
Page 4
1. Buttons and functions
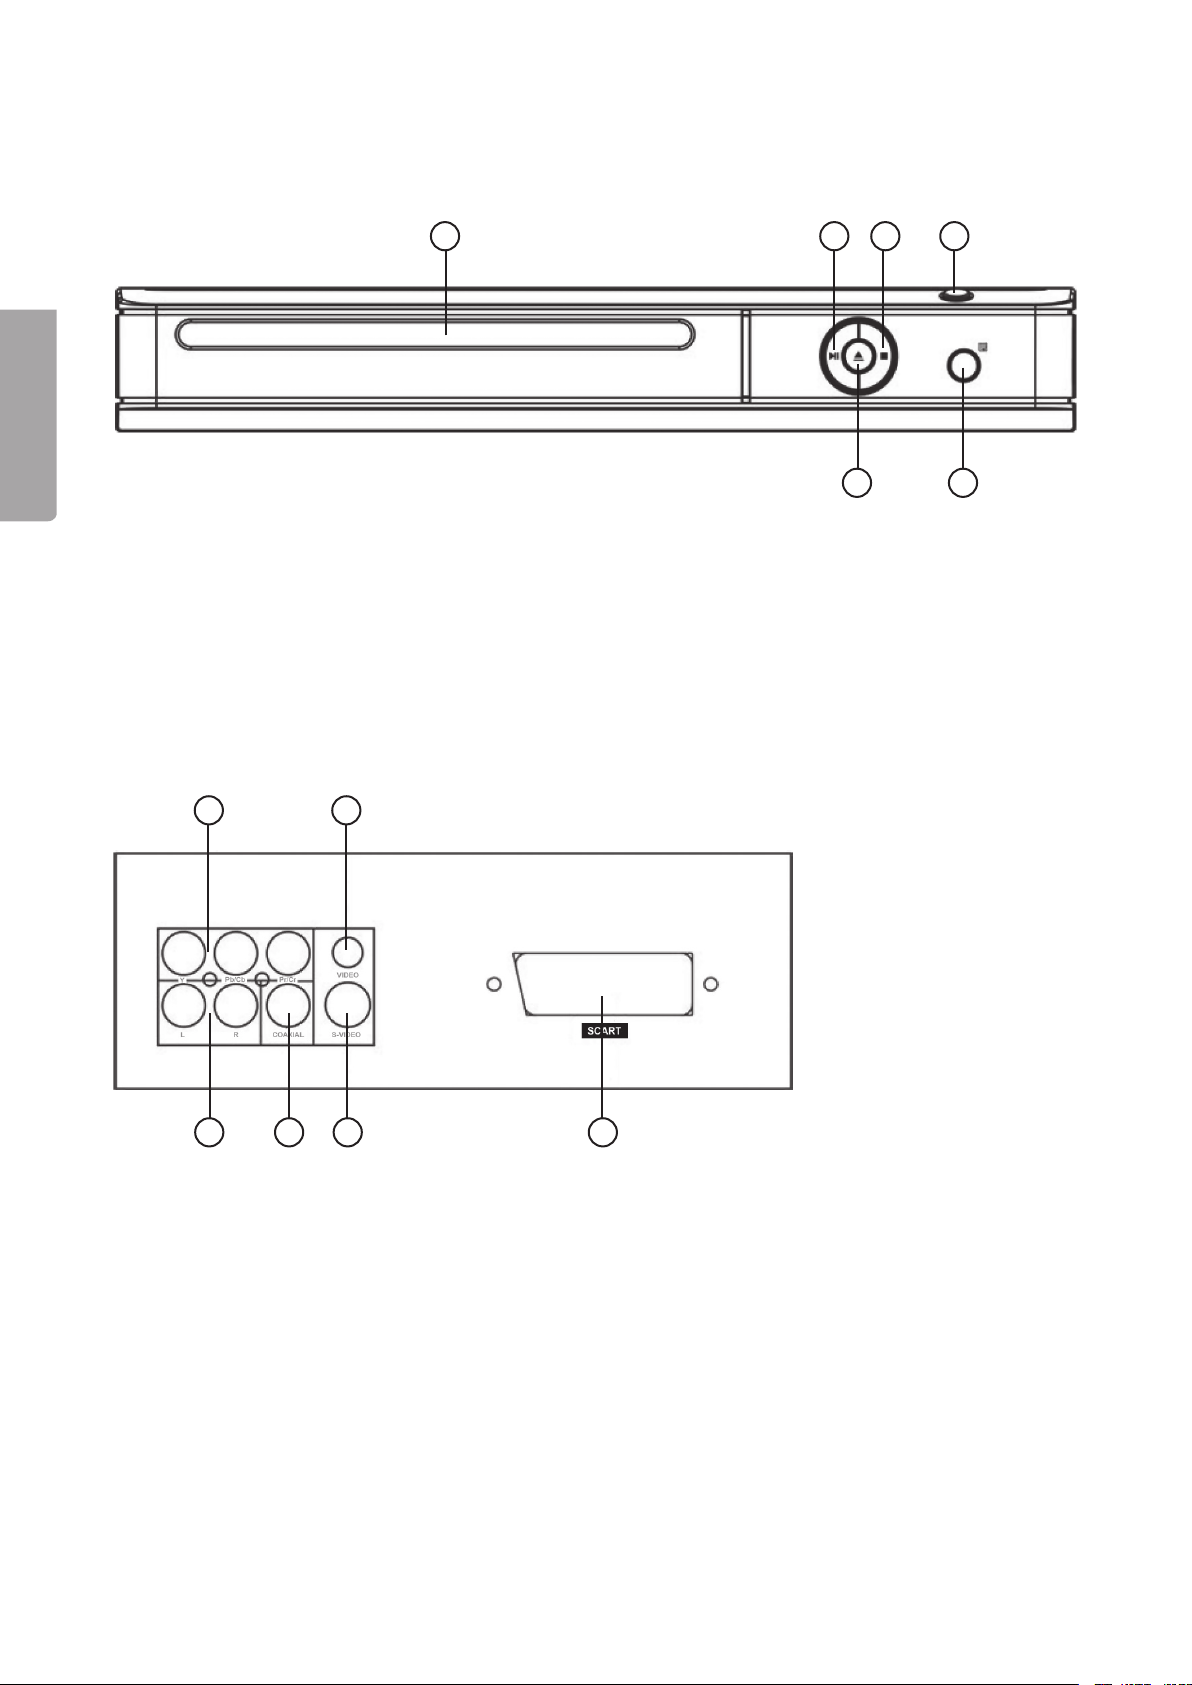
1.1 Front panel
ENGLISH
1 4
5 6
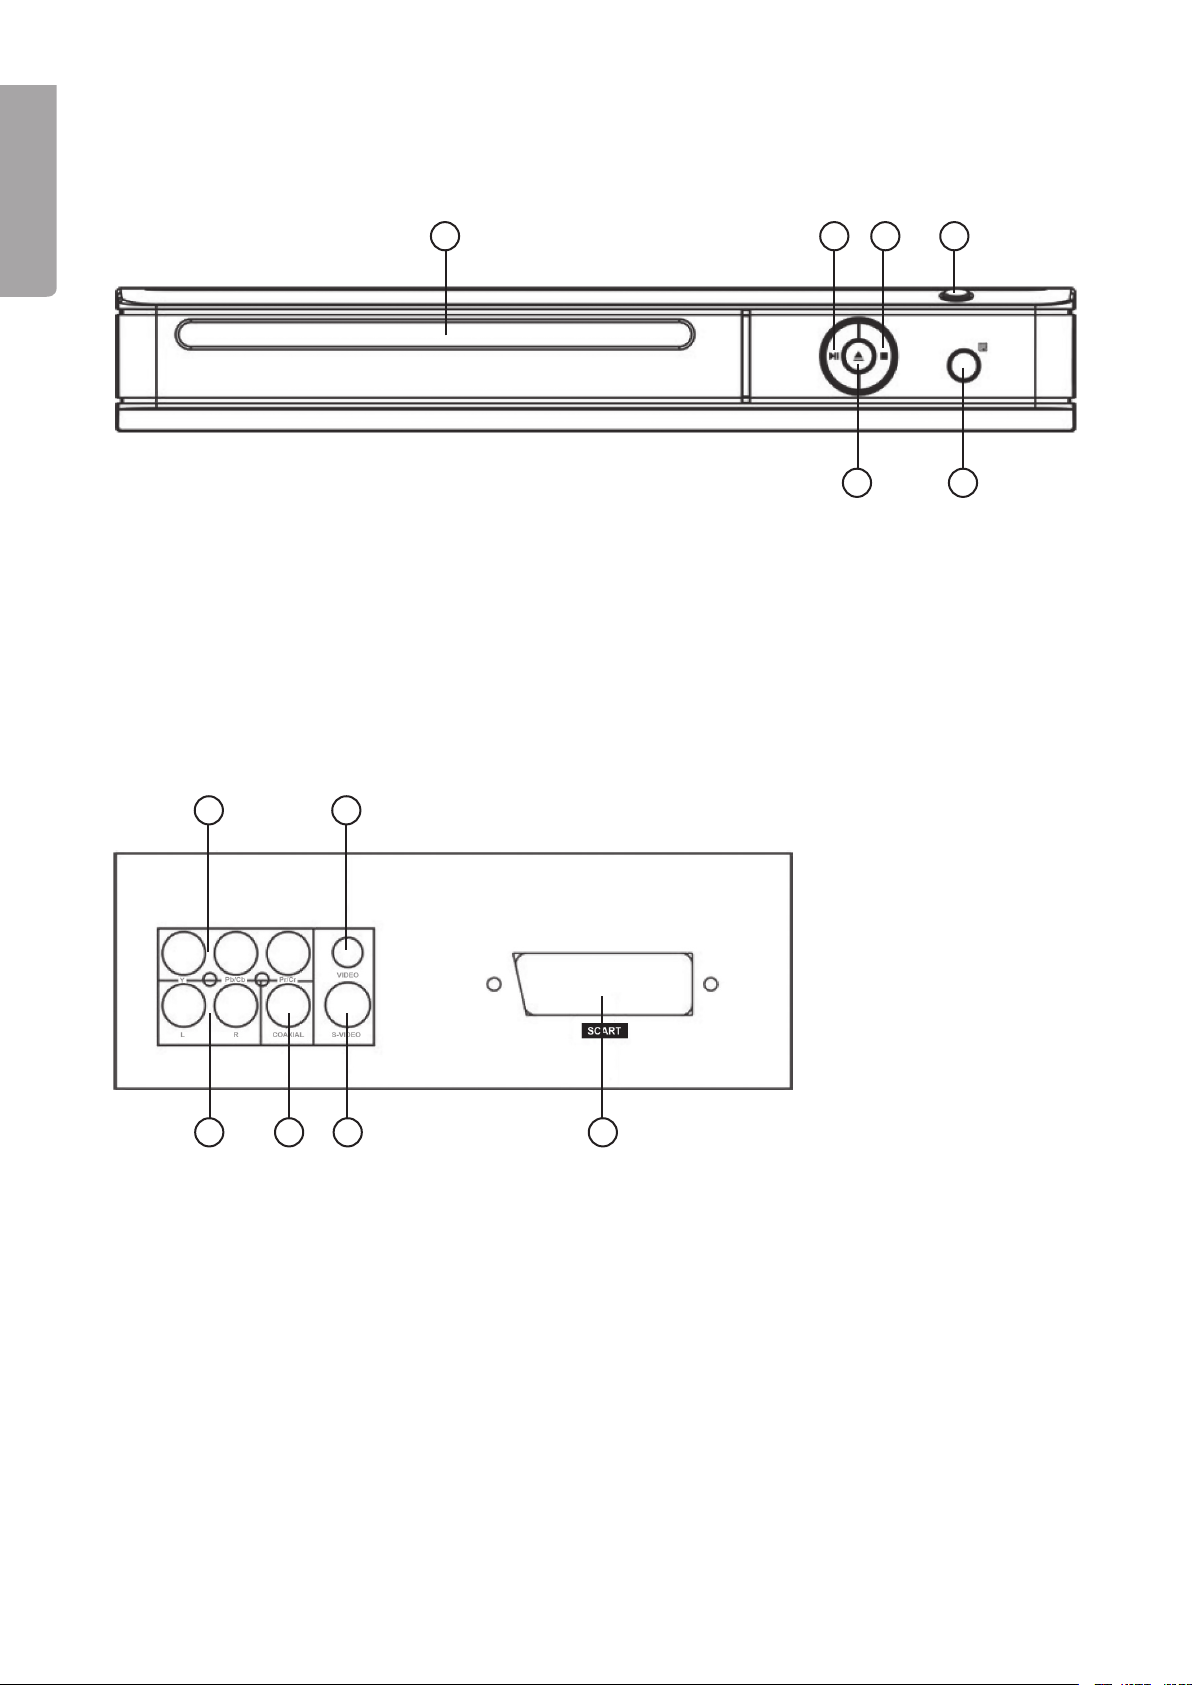
1. Disc drawer
2. PLAY/PAUSE
3. STOP
4. POWER (ON/OFF)
5. OPEN/CLOSE
6. IR sensor
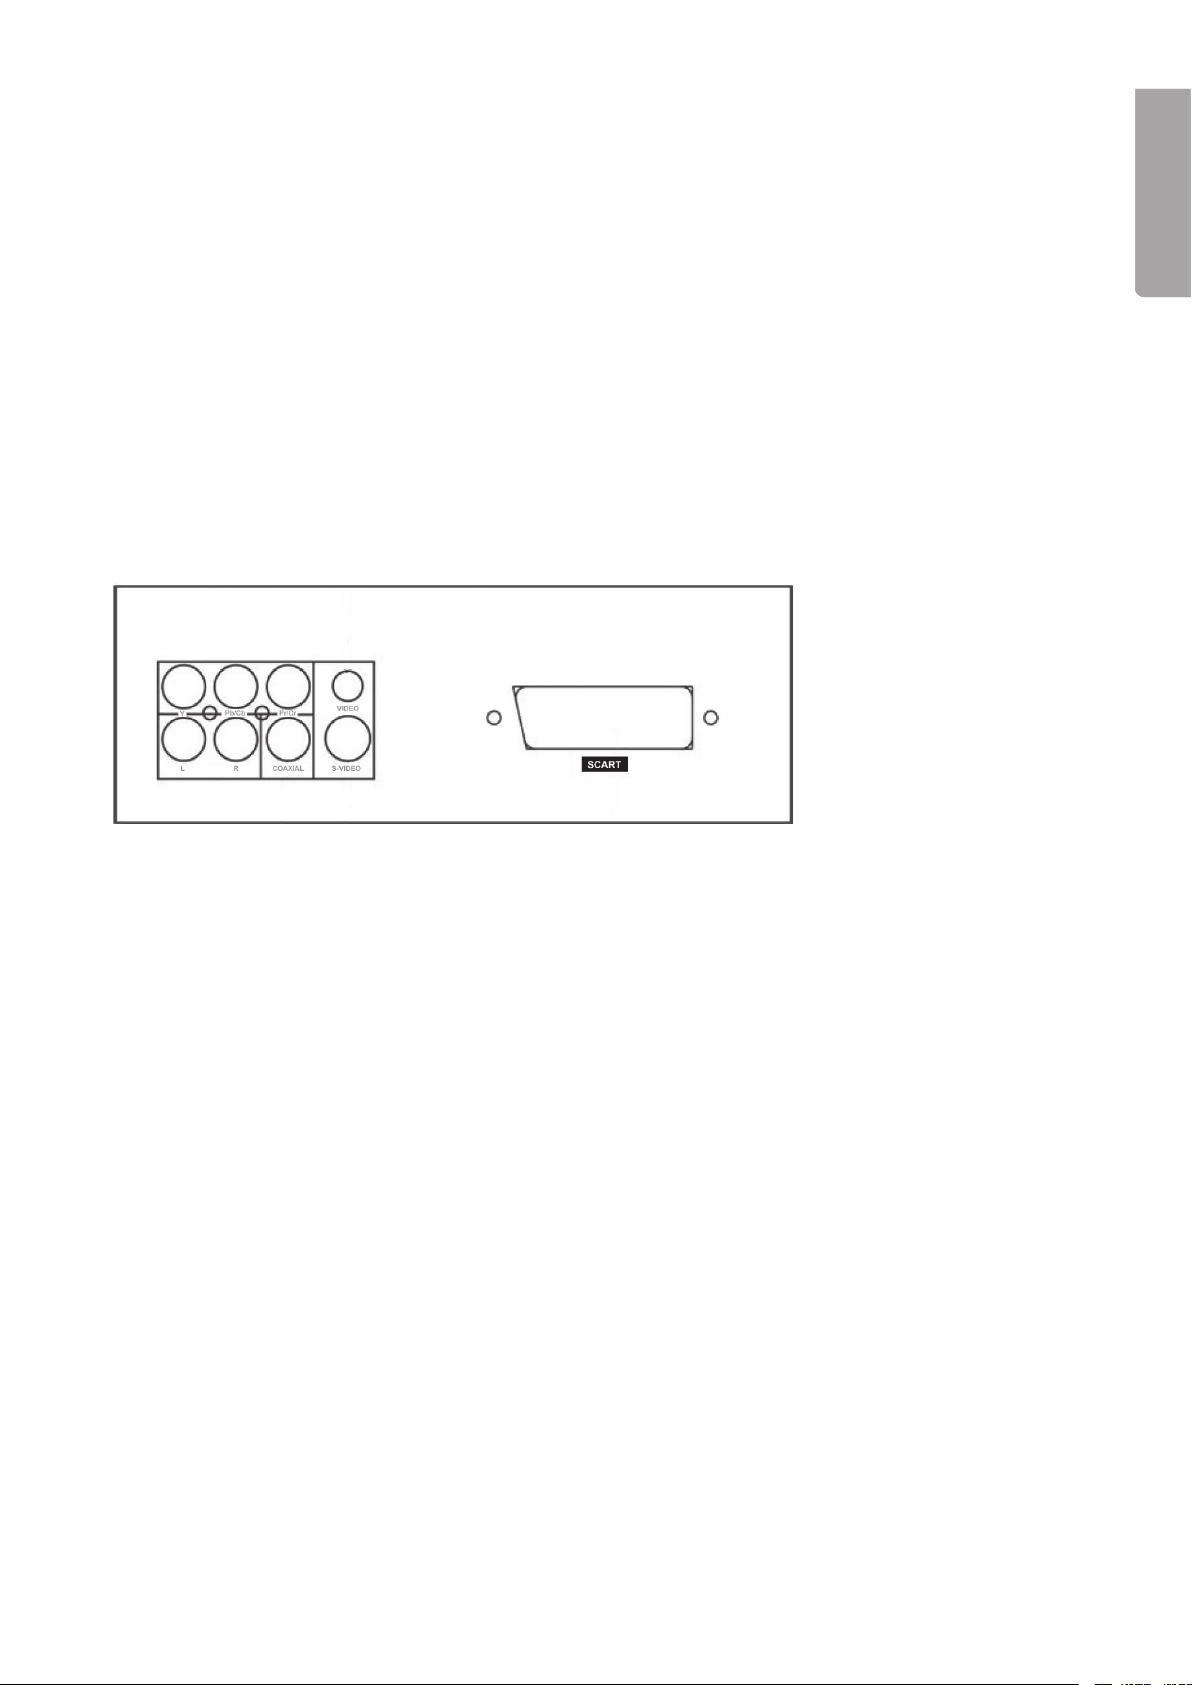
1.2 Back panel
1
4 5 6
1. Y / Pb/Cb / Pr/Cr – Component video output (3 x RCA)
2. VIDEO
3. L-R
4. COAXIAL
5. S-VIDEO
6. SCART outlet
– Composite video output. CVBS via RCA connection.
– Analogue audio output. 2-channel stereo via RCA connection.
– Digital audio output. SPDIF via RCA coaxial connection
– S-VIDEO output via 4-pin mini-DIN.
4
Page 5

1.3 Remote control
Note: Always point the remote towards the
DVD player and not the TV.
1
4
5
6
7
8
9
10
11
1
1
14
15
16
17
18
19
0
1
4
5
6
7
8
9
0
1
4
5
6
7
1. [ POWER ] – Turns the system on/off
2. [ REPEAT ] – Activates repeated playback
3. [ N/P ]
4. [ SUBTITLE ] – Selects subtitles
5. [ ANGLE ] – Selects picture angle
6. [ LANGUAGE ] – Selects audio
track/language
7. [ SETUP ] – Opens settings menu
▲ ] – Up
8. [
◄ ] – Left
9. [
10. [ ENTER ] – Conrms settings
11. [ PBC ]
12. [ VOL - ] – Reduces volume
13. [ ZOOM ] – Increases picture size
14. [ RETURN ]
15. [ L/R ]
16. [ PROGRAM ] – Programmed playback
17. [ CLEAR ] – Clears entry
◄◄ ] – Previous track/chapter
18. [ |
►►| ] – Next track/chapter
19. [
20. [ V-MODE ]
■ ] – Stops playback
21. [
▲ ] – Opens/closes disc drawer
22. [
23. [ A-B ] – Plays a section
ENGLISH
24. [ 0-9 ] – Numerical buttons
25. [ TIME ] – Jumps to section
26. [ TITLE ]
► ] – Right
27. [
28. [ MENU ] – Selects the DVD disc menus
▼ ] – Down
29. [
30. [ VOL + ] – Increases volume
31. [ SLOW ] – Slow motion playback
32. [ STEP ]
33. [ DISPLAY ]
34. [ MUTE ] – Turns off volume
►► ] – Fast forward
35. [
◄◄ ] – Rewind
36. [
►|| ] – Starts/pauses playback
37. [
5
Page 6

ENGLISH
1.4 Compatible media types
• DVD Single/double sided with one or two layers:
DVD+R/DVD+RW
DVD-R/DVD-RW
•
CD-DA (CD-Digital Audio)
•
MP3
•
MPEG4
•
CD-R / CD-RW
•
Photo CD (JPEG)
2. Care
2.1 Cleaning
• Always unplug from the wall socket before cleaning.
• Make sure that no liquids penetrate the player.
• Use only a damp cloth when cleaning the exterior.
• Never use strong solvents or detergents.
2.2 Caring for discs
• Hold the disk by the hole and edge when handling in order to avoid ngerprints and dirt from
contaminating the disk.
• Do not bend the disc or expose it to direct sunlight or heat.
• Store the discs upright in their cases.
• Clean the disks with a soft dry cloth starting from the centre and working outwards.
Never use solvents or strong detergents.
3. Preparations
3.1 Unpacking the product
Contents
• DVD player
• Remote control
• Instruction manual
Inserting batteries into the remote control
1. Remove the battery cover.
2. Insert two AAA/LR03 into the battery compartment.
3. Ensure the batteries are inserted correctly according to the markings in the battery compartment.
4. Replace the battery cover.
N.B.
• Always change both batteries simultaneously.
• Always remove batteries from the remote if it is not to be used for an extended period,
to avoid possible battery leakage.
6
Page 7
4. Connections
When transferring images using a cable there are several types of signal and connectors to choose from.
N.B.
• Turn off the DVD player and TV before making any connections.
• Read your TV or amplier manual before making any connections.
Warning:
Do not connect the coaxial output to an amplier that does not have Dolby digital AC 3 or a DTS-decoder.
This can possibly damage your speakers and the hearing of everyone in the surrounding area.
4.1 Connecting to the TV
The DVD player can be connected to the TV in several ways depending on the connection possibilities
of your TV.
ENGLISH
The most common and simplest connection is with a SCART lead
• SCART (6) – Both audio and video signals are sent to the TV.
Connect a SCART lead (not included) between the SCART output on the DVD player and the TV’s
SCART input.
o The lead carries both audio and video signals.
o Select the TV’s AV channel.
o Press the V-MODE button on the remote to select the DVD player’s outgoing signal for the best
possible picture for your particular TV.
o For most users this type of installation will sufce.
Other connections
Besides the SCART lead the DVD player can be connected in several other different ways. Below is a short
description of the different signals the DVD player is able to use.
Important! In the example below, we use a TV for connecting to the DVD player to but it works just as well
to connect the player to a projector, plasma TV or other video display equipment with similar connections.
Refer to your TV’s instruction manual about which signals and connections are possible for you to use. The
text below refers to different categories of picture quality. These references are theoretical and may function
totally differently in reality, since the combination of different products may produce unexpected results.
PAL and NTSC are two different TV systems. NTSC is used mostly in the USA. PAL is normally used in
Western Europe. Image quality can differ depending on whether the DVD is recorded in PAL or NTSC and if
the DVD player is set to PAL or NTSC.
Most TVs and DVDs in the Nordic countries are designed for PAL. This is preferable because this gives
a higher resolution than NTSC.
7
Page 8

ENGLISH
• Composite video (2) and L-R (3) (analogue audio output).
The composite video output must be activated in the menu.
o Composite video signals (CVBS) can be handled by all TVs. The easiest solution is to use a SCART
lead since SCART is capable of transferring both video (composite video) and audio. Composite
video can even be sent by a separate lead from the DVD player’s composite video output on the
back panel.
o The lead is connected to the equivalent input on the TV (normally Video In).
o Press the V-MODE button on the remote to select the DVD player’s outgoing signal for the best
possible picture for your particular TV.
S-VIDEO (5) and L-R (3) (analogue audio output).
•
S-video (Y/C) gives a higher image quality than composite video and is preferable if your TV supports
this type of signal. (Refer to your TV manual.)
o S-VIDEO is connected via a 4-pin mini-DIN (normally called an s-video contact). The DVD player’s
settings may possibly need to be changed in the menu in order to send an S-video signal.
o Press the V-MODE button on the remote in order to change the DVD player’s outgoing signal
to S-VIDEO.
N.B. If your TV does not support S-VIDEO the picture will be black and white.
o
Composite video (1) and L-R (3) (analogue audio output).
•
Component video (YPbPr) is the highest image quality that the DVD player can give and is preferred if
your TV has support for component video. The DVD player can send a component signal as interlace or
as progressive scan. Refer to your TV manual to see if interlace or progressive scan is supported.
o Component video signals uses the three RCA sockets on the DVD player’s back panel and is
connected to the equivalent input on the TV.
o Press the V-MODE button on the remote in order to change the DVD player’s outgoing signal
between interlace and progressive scan.
Caution:
Never connect an amplier to the digital audio output if it does not have Dolby Digital AC3 or a DTS decoder.
This can damage the amplier, speakers, or cause hearing damage during DVD playback.
8
Page 9

5. DVD player functions
The buttons described are valid for both the DVD player and the remote control.
POWER
Turns the player on/off.
OPEN/CLOSE
Opens/closes the disc drawer.
SUBTITLE
Changes the subtitle language (only DVDs with subtitles).
LANGUAGE
Change the track/language (only DVDs which have different tracks/languages).
TIME
• DVDs: Jumps to a given section or playback time. Use ▲ or ▼ to select and enter the playback
time/section with the numerical keypad. Conrm using ENTER.
• SVCDs, VCDs and CDs: Jumps to a specic playback time. Use ▲ or ▼ to select and enter the
playback time with the numerical keypad. Conrm using ENTER.
0-10+ (numerical keypad)
Used to enter the time, chapter/section and track number for searches.
CLEAR
Deletes the numerical keypad entry.
MENU
Jumps to the DVD disc menu when pressed during playback (only for DVDs which have this feature).
SETUP
Select the DVD player’s setup menu.
ENGLISH
DISPLAY
Displays information on the current DVD.
TITLE
Jumps to the current DVD’s title menu (only for DVDs).
▲▼◄►
Used to navigate the DVD player’s menus.
ENTER
Conrms your menu selections.
REV - ◄◄
Rewinds within a track/chapter. Pressing PLAY/PAUSE restarts normal playback. 2x, 4x, 8x, 16x and normal
playback.
FWD - ►►
Fast-forwards within a track/chapter. Pressing PLAY/PAUSE restarts normal playback. 2x, 4x, 8x, 16x and
normal playback.
PREV- |◄◄
Jumps to the previous track.
NEXT - ►►|
Jumps to the next track.
STEP
Pauses the picture. Advances the picture frame by frame (does not function for CD or MP3 playback). Pressing PLAY/PAUSE restarts normal playback.
STOP
Temporarily stops playback and resumes playback from the same point. Pressing STOP again discontinues
playback completely and returns to the beginning of the disc.
9
Page 10

ENGLISH
PLAY/PAUSE
Pauses/starts the disc during playback.
VOL- / VOL+
VOL+ increases volume. VOL- decreases volume.
REPEAT
• Repeats a chapter/section or the entire DVD (title) by pressing repeatedly.
• Repeats a track (single) or entire (all) VCDs or CDs by pressing repeatedly .
A-B
(Repeating a section)
• Pressing A-B during playback marks the beginning of a section (A). Pressing again marks the end of
the section (B) to be repeated. Playback of the marked section should now occur automatically.
Pressing A-B again cancels repetition of the section and erases the marked points.
• N.B. For CD/VCD/SVCD playback, the marking points A and B must lie within the same track.
For DVD playback, the marking points can be in different chapters/sections.
ANGLE
Changes the picture angle (if the DVD supports this).
MUTE
Turns off the volume completely. Resumes previously set volume when pressed again.
L/R
Selects audio channel during CD/VCD/SVCD playback (left/right/mix/stereo).
N/P
Selects the picture standard in stop mode, AUTO, NTSC or PAL.
PBC
Turns on/off PBC (Playback Control) during VCD/SVCD playback.
SLOW
Reduces playback speed during DVD/VCD/SVCD playback. Pressing PLAY/PAUSE restarts
normal playback.
V-MODE
Selects the outgoing video signal S-VIDEO, COMPONENT, RGB or P-SCAN in stop mode.
RETURN
Returns to the main menu during VCD/SVCD playback with PBC activated.
PROGRAM
No available functions for this model.
ZOOM
Enlarges the image for every press of the button (works only if supported on the DVD).
10
Page 11
6. Playback
6.1 DVD playback
1. Insert a DVD with the label facing up and close the drawer.
2. The disc’s main menu will automatically be loaded.
3. Use the arrow keys on the remote to make your selections on the DVD’s main menu, or press
PLAY/PAUSE to start immediate playback.
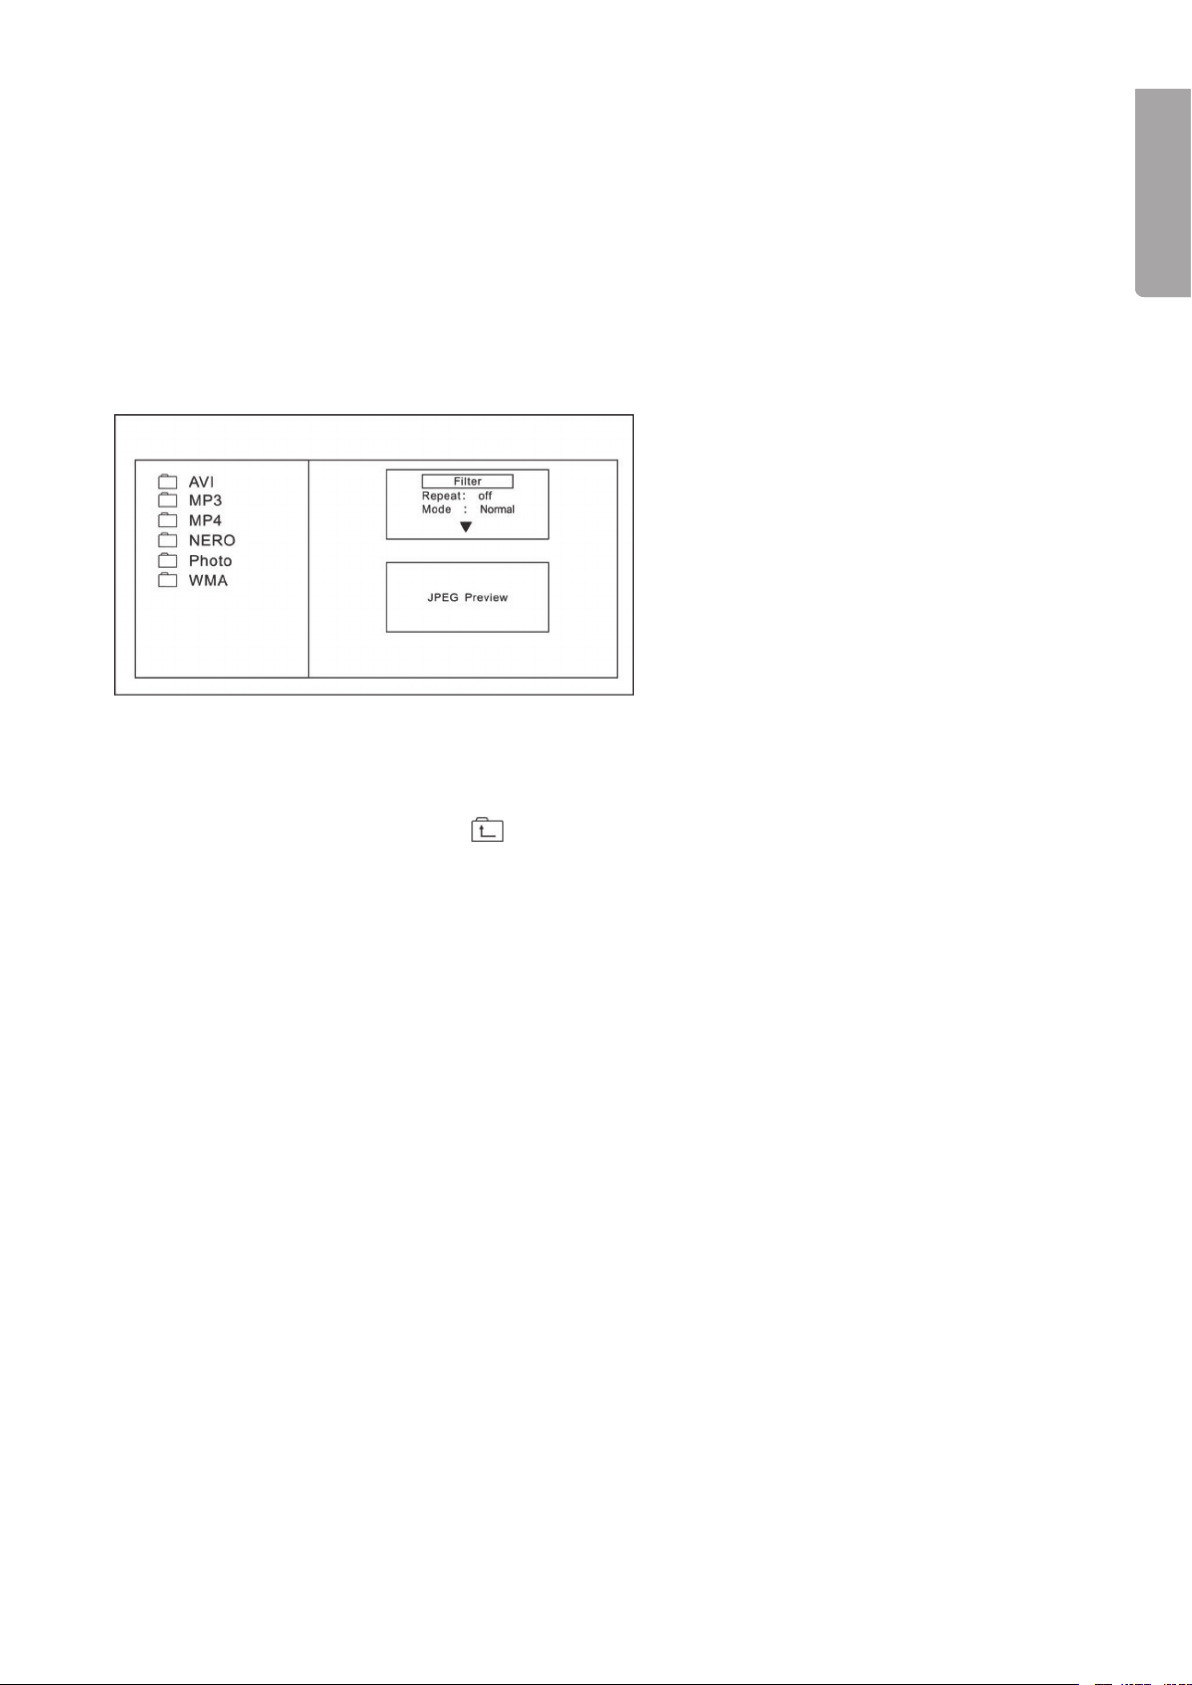
6.2 MP3/WMA/MPEG4/JPEG and Kodak Picture CD playback
Whenever a disc containing MP3/WMA/MPEG4/JPEG les or a Picture CD is inserted into the drawer, the
contents of that disc will be displayed.
• Use the arrow keys to choose a folder or track to be played. Press ENTER to conrm.
ENGLISH
• To move up a level in a folder, mark
• Right menu description (using the arrow keys to navigate):
Filter
o
Selects the le type to be shown on the left. Audio, photo and video.
Repeat
o
Selects repeated playback.
Mode
o
Selects random playback (Shufe). Previews each track playing the rst 10 seconds of each track
(Intro) or normal playback (Normal).
Edit Mode
o
Allows the selecting of tracks for the playlist using the arrow keys for track selection and ENTER to
conrm the selected track. Marking Add To Program and pressing ENTER adds the marked track to
the playlist.
Program View
o
Shows the tracks on the playlist. Marking the rst track on the playlist and pressing PLAY/PAUSE
starts playback.
Add To Program
o
Adds marked tracks to the playlist in ”Edit Mode” on the playback list.
Browser View
o
Displays the le list.
and press ENTER to conrm.
Clear Program
o
Deletes the playlist.
11
Page 12

7. System settings
To reach this menu press SETUP on the remote. Use the arrow keys to navigate through the menus.
Press ENTER to conrm your settings.
ENGLISH
To quit and exit the menu press SETUP again.
7.1 LANGUAGE
Selects the language for the menus, subtitles, and audio tracks.
OSD language (Menu language)
•
Subtitle (Subtitle language)
•
Audio (Select audio track for DVD playback)
•
DVD Menu (Selects the DVD menu language)
•
7.2 Video
Selects video settings.
Aspect Ratio (Picture format)
•
4:3 and 16:9 depending on your TV.
View Mode (Determines how the picture is displayed)
•
TV System (Selects the picture standard, AUTO, NTSC or PAL)
•
Video Out (Selects the video output signal, S-VIDEO, COMPONENT, RGB or P-SCAN)
•
S-VIDEO: Sets the video output to the interlace output.
o
COMPONENT: Sets the video output to the YUV output.
o
P-SCAN: If your TV supports the progressive setting, choose this setting for optimum picture quality.
o
RGB: Sets the video output to the SCART output. If you select the SCART connection you should
o
also set playback to RGB.
1
Page 13

7.3 Audio
Audio settings.
Digital output
•
Selecting digital output allows the S/PDIF ports on the player to be adjusted so that the player works with
other audio equipment such as receivers, speakers, etc.
Off: Disconnected setting.
o
PCM: Setting for 2-channel stereo. Use this in combination with the ”lower sampling rate” explained later.
o
All: Setting using the DVD’s original audio track. Use this setting for Dolby Digital AC3 signals pass-
o
ing through the optical or coaxial audio output.
ENGLISH
Night Mode
•
The ON setting allows for regular adjustments for better sound. The OFF setting is used when you wish
to prevent disturbing those around you i.e. in the evening when people are sleeping.
Down Sampling
•
Select the ON setting if ”PCM” is selected as described in the Digital Output step described above.
ON: “Lower sampling rate” activated.
o
OFF: “Lower sampling rate” deactivated.
o
1
Page 14
ENGLISH
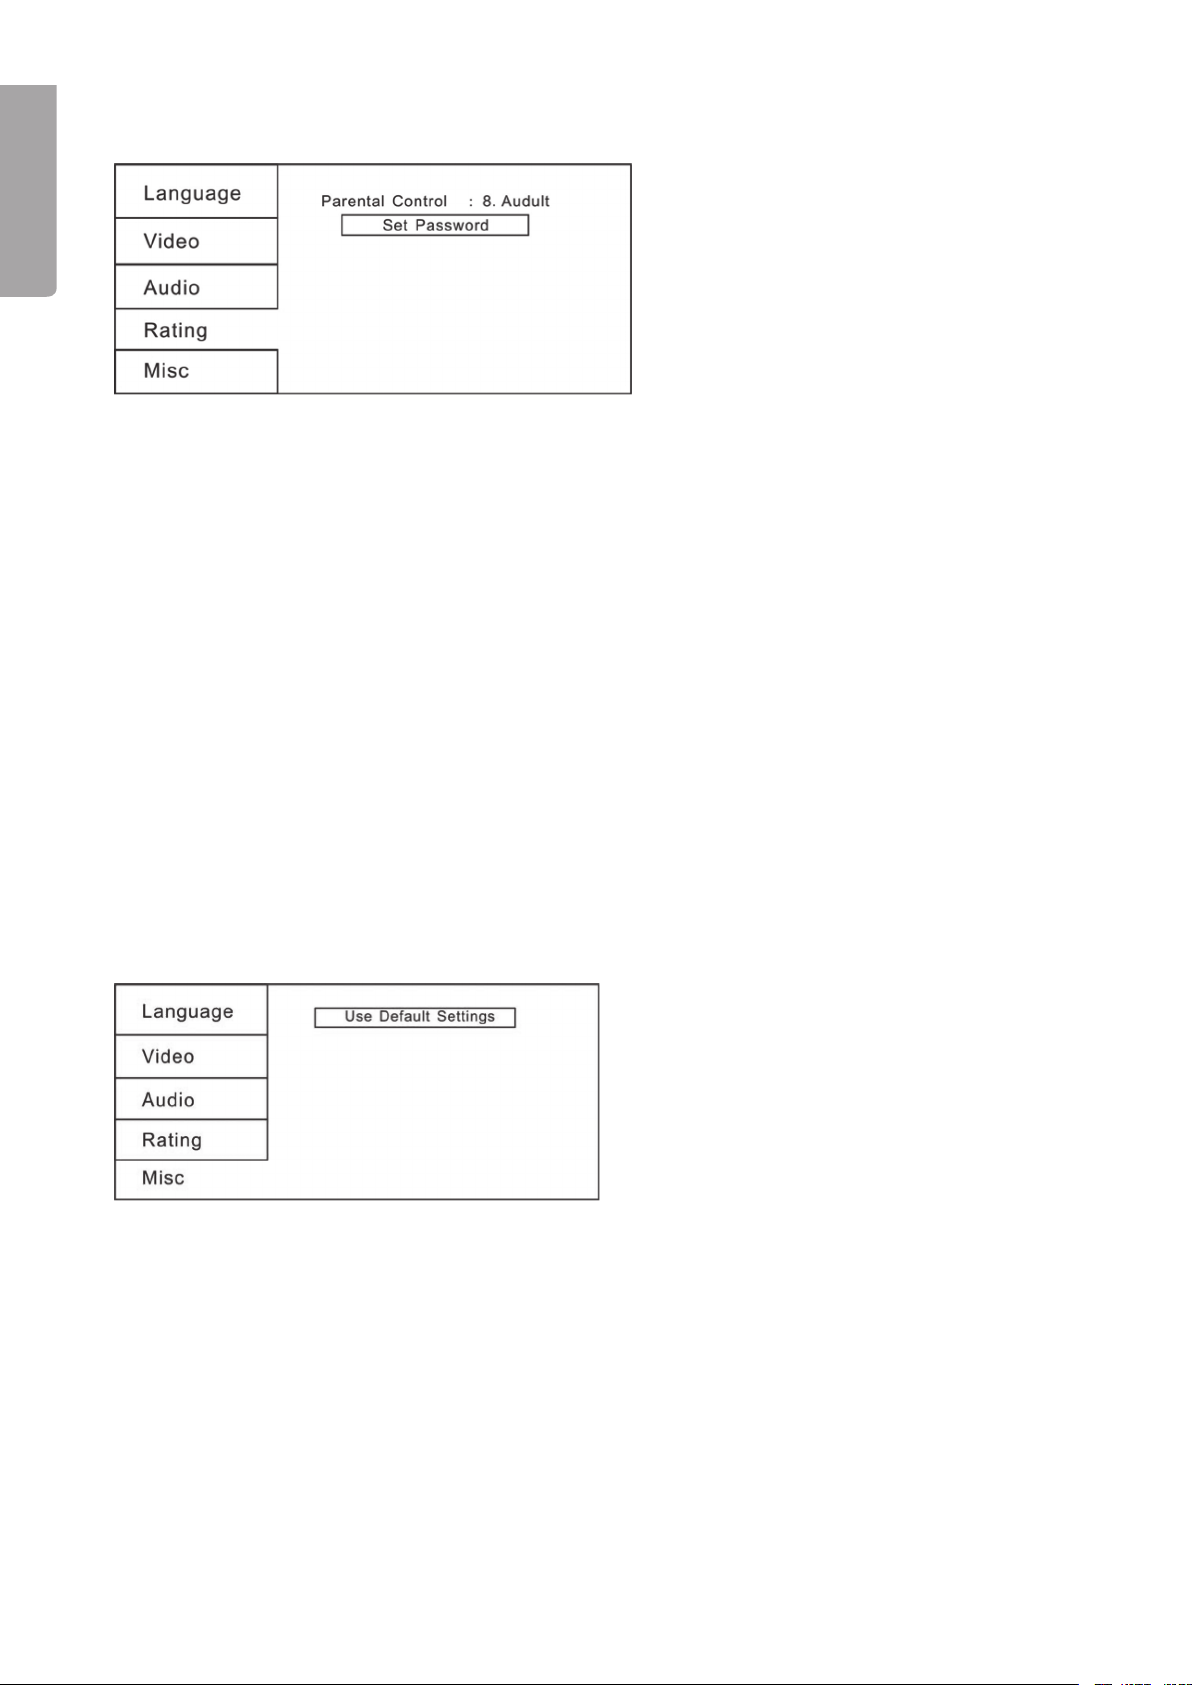
7.4 Child lock settings
Sets access restrictions for children and prevents any inappropriate material from being shown.
Changing access restrictions
• Highlight Parental Control and press ENTER to select the desired degree of access restriction. In order
to do this a password must be entered The preset password is set to “8888”. Press the right arrow key
and select with the up/down arrow keys. Press ENTER to conrm.
N.B. Only DVDs support ”Parental Control”.
•
Setting the password
1. Highlight Set Password and press ENTER.
2. Enter the preset password ”8888” and conrm with ENTER.
3. Press ENTER again.
4. Enter your desired password and press ENTER to conrm.
N.B. If you have forgotten your password you can always reset back to the preset password “8888”
to unlock the player.
7.5 MISC (Resetting default settings)
1. Go to Misc.
2. Press
► to open a submenu and select Use Default Settings.
3. Press ENTER, then highlight
4. Press ENTER.
5. The DVD player will reset to the original factory settings.
Yes in the window ”Do you want to use the default setting?”
14
Page 15

8. Troubleshooting guide
Problem Possible causes/solutions
No picture or sound. 1. Are all device’s power cables connected correctly?
2. Are all devices turned on?
3. Is video and audio turned off in the TV menu?
4. Is the TV correctly connected to the DVD player?
Playback does
not start.
No picture. 1. Is the TV turned on?
Picture ickers
or is grainy.
1. Is the disc correctly inserted?
2. Make sure that the disc is not dirty or smudged with ngerprints.
3. The disc has the wrong region code.
4. The disc’s contents have the wrong format.
5. Change the settings for parental control.
6. Turn off the player. Pull out the plug. Plug it in again and restart.
7. There is moisture on the laser. Leave the player turned off for a couple of hours
before turning it on again.
2. Check the connections.
3. Press V-MODE to change outgoing signals.
1. Connect the DVD player directly to the TV and not through other devices.
Interference can depend on the DVD player’s integrated copy protection
(a requirement on all DVD players).
ENGLISH
The picture is black
and white or ickers.
The picture is smaller
than the screen.
It is not possible to
search either forwards or backwards.
No sound or
minimal sound.
2. Purchase an RF adaptor if the TV does not have a video input.
3. Check the DVD player’s and TV’s colour settings.
4. Bad quality or scratched disc.
• Make sure the correct TV system is selected (PAL eller NTSC).
Use the N/P button on the remote to select.
1. Choose the correct aspect ratio: (SETUP MENU > VIDEO > ASPECT RATIO).
2. Select the aspect ratio from the menu on the DVD itself.
1. Certain discs are programmed to prevent searching.
2. The disc only has one track.
1. Make sure that the TV and amplier are turned on and correctly set.
2. Make sure that the TV and amplier are correctly connected and that the plugs
are pushed in securely.
3. Press LANGUAGE to select another audio track.
4. Make sure that the Mute function is not activated on the DVD player,
TV or amplier.
5. There is no sound during searching, pausing, stop and slow motion mode.
15
Page 16

Disc containing MP3’s
produce either no
sound or noise.
1. If the MP3 disc contains les MP3 les mixed with data les there will be no
sound when the data les are being read.
2. Make sure that the CD contains MP3 les.
ENGLISH
3. Try playing the next MP3 le/track.
The remote control
doesn’t work.
No Dolby Digital or
DTS Audio via the
digital audio outputs.
1. The batteries are bad or incorrectly inserted.
2. The remote is too far away from the DVD player or there are obstructions
in the way.
3. The DVD player is in standby mode.
1. Make sure the amplier supports Dolby Digital or DTS.
2. Make sure that a coaxial audio cable is used between the DVD player’s digital
audio output and the amplier’s digital audio output.
3. Make sure that the disc supports Dolby Digital or DTS and that this has been
chosen on the disc’s menu.
9. Disposal
Follow local ordinances when disposing of this product.
If you are unsure of how to dispose of this product, please contact your municipality.
10. Specifications
Complies with the following
disc formats:
Signal output TV colour-encoding system: PAL/AUTO/NTSC
Frequency response 20 Hz – 20 kHz
SNR ≥ 90 dB
Connections SCART, S-video, component video, coaxial digital and
Power supply 230 V AC, 50 Hz (Max. 25 W)
Size 255 x 38 x 190 mm
DVD
SVCD
VCD
CD
MP3
Kodak Picture CD
Photo CD
MPEG4
Audio system: Stereo R/L, coaxial/digital output
Video output: 1Vpp (vid 75 Ohm)
analogue audio output
Note: The time interval between presses of the POWER button must be more than 30 seconds.
16
Page 17
DVD/MPEG4-spelare
Art.nr 18-8108 Modell M51-UK
8-01 M51
Läs igenom hela bruksanvisningen före användning och spara den sedan för framtida bruk. Vi reserverar oss
för ev. text- och bildfel samt ändringar av tekniska data. Vid tekniska problem eller andra frågor, kontakta vår
kundtjänst (se adressuppgifter på baksidan).
Säkerhet
C AU T I O N
RISK OF ELECTRIC
SHOCK DO NOT OPEN
• Produkten får endast repareras av kvalicerad servicepersonal.
• Produkten får inte demonteras eller ändras.
• Produkten är avsedd endast för inomhusbruk.
• Utsätt aldrig apparaten för höga temperaturer, stötar, fukt eller väta.
• Placera inte produkten så att den kan falla ner i vatten eller annan vätska. Ställ inte heller några föremål
som innehåller vätska på produkten, t.ex. en blomvas eller läskedryck.
• Placera inte apparaten i en fuktig, dammig miljö eller där det förekommer starka vibrationer.
• Stäng av eventuell standby-funktion om natten eller när du reser bort.
KLASS 1 LASERAPPARAT
CLASS 1
LASER PRODUCT
Varning! Öppna inte höljet! Osynlig laserstrålning som kan orsaka
ögonskador. Rikta inte blicken in mot strålen och titta inte direkt på den
genom optiska instrument.
Varning!
Öppna inte höljet! Farlig spänning nns oskyddat på vissa komponenter
!
inuti produktens hölje, kontakt med dessa kan ge elektrisk chock.
SVENSKA
17
Page 18
1. Knappar och funktioner
1.1 Apparatens framsida
1 4
SVENSKA
5 6
1. Skivsläde
2. PLAY/PAUSE
3. STOP (stopp)
4. POWER (av/på)
5. OPEN/CLOSE (öppna/stäng)
6. IR-sensor
1.2 Apparatens baksida
1
4 5 6
1. Y / Pb/Cb / Pr/Cr – Komponentvideoutgång (3 x RCA)
2. VIDEO
3. L-R
4. KOAXIAL
5. S-VIDEO
– Kompositvideoutgång. CVBS via RCA-anslutning.
– Analog ljudutgång. 2-kanals stereo via RCA-anslutning.
– Digital ljudutgång. SPDIF via RCA-anslutning för koaxial.
– Utgång för S-VIDEO via 4-polig mini-DIN.
6. SCART-utgång
18
Page 19

1.3 Fjärrkontrollen
Observera! Rikta alltid fjärrkontrollen mot dvdspelaren och inte mot tv-apparaten.
1. [ POWER ] – Slår på och av apparaten
1
4
5
6
7
8
9
10
11
1
1
14
15
16
17
18
19
0
1
4
5
6
7
8
9
0
1
4
5
6
7
2. [ REPEAT ] – Aktiverar repeterad uppspelning
3. [ N/P ]
4. [ SUBTITLE ] – Väljer undertexter
5. [ ANGLE ] – Väljer bildvinkel
6. [ LANGUAGE ] – Väljer ljudspår/språk
7. [ SETUP ] – Väljer inställningsmenyn
▲ ] – Upp
8. [
◄ ] – Vänster
9. [
10. [ ENTER ] – Bekräftar inställningar
11. [ PBC ]
12. [ VOL - ] – Volym ned
13. [ ZOOM ] – Förstorar i bilden
14. [ RETURN ]
15. [ L/R ]
16. [ PROGRAM ] – Programmerad uppspelning
17. [ CLEAR ] – Raderar inmatning
◄◄ ] – Föregående spår/kapitel
18. [ |
►►| ] – Nästa spår/kapitel
19. [
20. [ V-MODE ]
■ ] – Stoppar uppspelning
21. [
▲ ] – Öppnar/stänger skivfacket
22. [
23. [ A-B ] – Uppspelning av ett avsnitt
SVENSKA
19
24. [ 0-9 ] – Sifferknappar
25. [ TIME ] – Gå till avsnitt
26. [ TITLE ] – Titel
► ] – Höger
27. [
28. [ MENU ] – Väljer DVD-skivans menyer
▼ ] – Ned
29. [
30. [ VOL + ] – Volym upp
31. [ SLOW ] – Uppspelning med
reducerad hastighet
32. [ STEP ]
33. [ DISPLAY ]
34. [ MUTE ] – Stänger av ljudet
►► ] – Snabbspola framåt
35. [
◄◄ ] – Snabbspolning bakåt
36. [
►|| ] – Startar/pausar uppspelningen
37. [
Page 20

1.4 Följande typer av skivor kan spelas på spelaren
• DVD Enkel-/dubbelsidiga med ett eller två lager:
DVD+R/DVD+RW
DVD-R/DVD-RW
CD-DA (CD-Digital Audio)
•
MP3
•
MPEG4
•
CD-R / CD-RW
•
Photo CD (JPEG)
•
SVENSKA
2. Skötsel
2.1 Rengöring
• Dra alltid ur nätsladdens stickpropp före rengöring.
• Se till att ingen vätska kommer in i DVD-spelaren.
• Använd endast en lätt fuktad trasa vid rengöring av höljet.
• Använd aldrig rengöringsmedel eller starka lösningsmedel.
2.2 Vårda skivorna
• Håll skivan i hålet och kanten när den hanteras för att undvika ngeravtryck och smuts på skivan.
• Böj inte skivan och utsätt den inte för direkt solljus eller annan värmekälla.
• Förvara skivorna stående i sina fodral.
• Rengör endast skivorna med en torr mjuk tvättduk från centrum och utåt, använd aldrig starka
rengöringsmedel eller lösningsmedel.
3. Förberedelser
3.1 Packa upp produkten
Förpackningen innehåller
• DVD-spelare
• Fjärrkontroll
• Bruksanvisning
Sätt i batterierna i fjärrkontrollen
1. Ta bort batteriluckan.
2. Placera 2 st. AAA/LR03-batterier i batterifacket.
3. Försäkra dig om att batterierna är rätt isatta enligt märkningen i batterifacket.
4. Sätt tillbaka batteriluckan.
Anm.
• Byt alltid båda batterierna samtidigt.
• Ta alltid ur batterierna om inte fjärrkontrollen kommer att användas under en längre period, för att inte
riskera att batterierna börjar läcka.
0
Page 21

4. Anslutningar
När man ska överföra bild via kabel så nns det några olika signaler och kontakter att välja mellan.
Obs!
• Stäng av DVD-spelaren och tv-apparaten innan du gör några anslutningar.
• Läs tv-apparatens eller förstärkarens manual innan anslutning.
Varning:
Anslut inte koaxialutgången till en förstärkare som inte har Dolby digital AC 3 eller DTS-dekoder.
Det resulterar i skada på högtalarna och eventuellt din eller andras hörsel.
4.1 Anslutning till tv
DVD-spelaren kan anslutas till din tv på era sätt beroende på vilka ingångar din tv har.
Den vanligaste och enklaste anslutningen är med en SCART-kabel
• SCART (6) – Både bild och ljud överförs till teven. Anslut en SCART-kabel (medföljer ej) mellan SCARTutgången på DVD-spelaren och tv:ns SCART-ingång.
o Kabeln överför både ljud och bild.
o Välj tv:ns AV-kanal.
o Tryck på knappen V-MODE på fjärrkontrollen för att ändra DVD-spelarens utsignal för bästa möjliga
bild för just din tv.
SVENSKA
o För de esta användare räcker denna installation.
Andra anslutningar
Utöver SCART-kabeln kan DVD-spelaren anslutas på era olika sätt. Nedan följer en kort förklaring på vilka
olika signaler DVD-spelaren kan lämna.
Viktigt. I nedanstående exempel hänvisar vi till anslutningar av DVD-spelaren till en tv men anslutningar till
projektor, plasma-tv eller annan bildvisande utrustning med motsvarande anslutningar fungerar på samma
sätt. Kontrollera bruksanvisningen för er tv vilka signaler och kontakter som är möjliga att använda. I texten
hänvisas till olika bildkvalitetsnivåer. Detta är teoretiskt och kan skilja sig mot praktiken eftersom kombinationen av olika produkter kan fungera på annat sätt.
PAL och NTSC är olika tv-system. NTSC används främst i USA. PAL används vanligtvis i hela Västeuropa.
Bildens kvalitet kan skilja beroende på om DVD-lmen är inspelad i PAL eller NTSC och om DVD-spelaren
är inställd på PAL eller NTSC.
De esta TV-apparater och DVD-lmer i Norden är anpassade för just PAL. Detta är att föredra eftersom det
ger en högre upplösning än NTSC.
1
Page 22

• Kompositvideo (2) samt L-R (3) (analog ljudutgång).
Kompositvideoutgången måste aktiveras i menyn.
o Kompositvideo (CVBS) klarar alla normala tv-apparater av att hantera. Enklast är att använda
SCART-kabeln eftersom SCART klarar att överföra både bild (kompositvideo) och ljud. Komposit-
video kan även skickas i separat kabel från DVD-spelarens kompositvideouttag på baksidan.
o Kabeln ansluts i motsvarande ingång på tv:n (vanligtvis Video In).
o Tryck på knappen V-MODE på fjärrkontrollen för att ändra DVD-spelarens utsignal för bästa möjliga
bild för just din tv.
S-VIDEO (5) samt L-R (3) (analog ljudutgång).
•
S-video (Y/C) är en högre bildkvalitet än kompositvideo och är att föredra om teven har stöd för denna
signal. (Se manualen för er tv.)
SVENSKA
o S-VIDEO kopplas in via en 4-polig mini-DIN (vanligtvis kallad s-videokontakt). DVD-spelaren kan
behöva ställas om i menyn för att kunna skicka ut s-video.
o Tryck på knappen V-MODE på fjärrkontrollen för att ändra DVD-spelarens utsignal till S-VIDEO.
OBS! Om tv:n inte klarar S-VIDEO blir bilden svart/vit.
o
Komponentvideo (1) samt L-R (3) (analog ljudutgång).
•
Komponentvideo (YPbPr) är den högsta bildkvalitén som DVD-spelaren klarar att lämna och är att föredra om teven har stöd för komponentvideo. DVD-spelaren kan antingen skicka komponentsignalen som
interlace eller progressiv scan. Se manualen för din tv om interlace eller progressiv-scan stöds.
o Komponentvideosignalen ansluts via de tre RCA-kontakterna på DVD-spelarens baksida och kopplas
in i motsvarande ingång på tv:n.
o Tryck på knappen V-MODE på fjärrkontrollen för att ändra DVD-spelarens utsignal mellan interlace
och progressiv-scan.
Varning!
Anslut aldrig en förstärkare till den digitala ljudutgången om den inte har en Dolby digital AC3- eller
DTS-dekoder. Vid uppspelning av en DVD-skiva kan detta skada förstärkare och högtalare eller
orsaka hörselskador.
Page 23

5. Förklaring över DVD-spelarens funktioner
Knapparnas beskrivning gäller för både DVD-spelaren och fjärrkontrollen.
POWER
Tryck för att slå på och av apparaten.
OPEN/CLOSE
Tryck för att öppna eller stänga skivsläden.
SUBTITLE
Tryck för att ändra undertexternas språk (endast DVD-skivor som stöder undertexter).
LANGUAGE
Tryck för att ändra ljudspår/språk (endast DVD-skivor som stöder detta).
TIME
• För DVD-skivor: Tryck för att gå till ett angivet avsnitt eller en viss tid. Välj med knapparna
▲ eller ▼ och skriv in tid/avsnitt med siffertangenterna. Bekräfta med ENTER.
• För SVCD, VCD och CD: Tryck för att gå till en angiven tid. Välj med knapparna ▲ eller ▼ och
skriv in tiden med siffertangenterna. Bekräfta med ENTER.
0-10+ (siffertangenter)
Används för att ange tid, kapitel/avsnitt samt spårnummer vid sökning.
CLEAR
Tryck för att ta bort siffror du angett med siffertangenterna.
MENU
Under uppspelning, tryck på MENU för att gå till DVD-skivans meny (endast skivor med denna funktion).
SETUP
Tryck för att välja DVD-spelarens inställningsmeny.
DISPLAY
Tryck för att visa information om DVD-skivan som spelas upp.
TITLE
Tryck för att gå till DVD-skivans titelmeny (endast DVD-skivor).
▲▼◄►
Används för att navigera i DVD-spelarens menyer.
ENTER
Tryck för att bekräfta dina val i menyer.
SVENSKA
REV - ◄◄
Tryck för att söka/snabbspola bakåt i ett spår/kapitel. Tryck på PLAY/PAUSE för att återuppta uppspelning
i normal hastighet. 2, 4, 8, 16 och normal (play).
FWD - ►►
Tryck för att söka/snabbspola framåt i ett spår/kapitel. Tryck på PLAY/PAUSE för att återuppta uppspelning
i normal hastighet. 2, 4, 8, 16 och normal (play).
PREV- |◄◄
Tryck för att välja föregående spår/kapitel.
NEXT - ►►|
Tryck för att välja nästa spår/kapitel.
STEP
Tryck för att stanna bilden. Tryck upprepade gånger för gå framåt bildruta för bildruta (ej vid uppspelning av
cd eller MP3). Tryck på PLAY/PAUSE för att återuppta uppspelningen.
STOP
Tryck en gång för att tillfälligt stoppa uppspelningen för att senare kunna återuppta uppspelningen från samma tid på skivan. Tryck igen för att stoppa uppspelningen helt och återgå till början på skivan.
Page 24

PLAY/PAUSE
Används för att starta eller pausa uppspelningen.
VOL- / VOL+
Tryck på VOL+ för att höja volymen, och VOL- för att sänka volymen.
REPEAT
• Vid DVD-uppspelning, tryck upprepade gånger för att repetera kapitel/avsnitt (chapter) eller
hela lmen (title).
• Vid uppspelning av VCD eller CD, tryck upprepade gånger för att repetera spår (single) eller
alla spår (all).
A-B
(Repetition av ett avsnitt)
• Under uppspelning, tryck på A-B för markera början på avsnittet (A), tryck igen för att markera slutet
SVENSKA
på avsnittet (B) som ska repeteras. Uppspelningen sker nu mellan de två avsnitten och repeteras
automatiskt. Tryck igen på A-B för att avbryta repetitionen mellan avsnitten och ta bort markeringarna.
• Anm. Vid uppspelning av CD/VCD/SVCD måste markeringarna A och B vara inom samma spår.
Vid DVD-uppspelning kan markeringarna vara i olika kapitel/avsnitt.
ANGLE
Tryck för att välja bildvinkel (om DVD-lmen stödjer detta).
MUTE
Tryck på MUTE för att stänga av ljudvolymen helt. Tryck igen för att återgå till senast inställda ljudvolym.
L/R
Vid uppspelning av CD/VCD/SVCD, tryck på L/R för att välja ljudkanal (vänster/höger/mix/stereo).
N/P
I stoppläget, tryck på N/P för att välja bildstandard, AUTO, NTSC eller PAL.
PBC
Vid uppspelning av VCD/SVCD, tryck för att slå på eller av PBC (Playback Control).
SLOW
Vid uppspelning av DVD/VCD/SVCD, tryck på SLOW för att spela upp med reducerad hastighet. Tryck på
PLAY/PAUSE för att återgå till normal uppspelning.
V-MODE
I stoppläget, tryck på V-MODE för att välja olika typer av utsignal för bilden, S-VIDEO, COMPONENT, RGB
eller P-SCAN.
RETURN
Vid uppspelning av VCD/SVCD med PBC aktiverat, tryck på RETURN för att återgå till huvudmenyn.
PROGRAM
Ingen funktion på denna modell.
ZOOM
Tryck upprepade gånger för att förstora bilden (fungerar endast på vissa lmer).
4
Page 25

6. Uppspelning
6.1 Spela upp en DVD-skiva
1. Lägg i en DVD-skiva med etiketten vänd uppåt i skivfacket och stäng skivsläden.
2. Skivans huvudmeny laddas automatiskt.
3. Använd piltangenterna på fjärrkontrollen för att göra dina val i skivans huvudmeny, eller tryck på PLAY/
PAUSE för att starta uppspelningen direkt.
6.2 Uppspelning av MP3/WMA/MPEG4/JPEG och Kodak Picture CD
SVENSKA
När en skiva innehållandes MP3/WMA/MPEG4/JPEG-ler eller Picture CD läggs i visas innehållet på skivan
på skärmen.
• Använd piltangenterna för att välja katalog eller det spår som ska spelas upp. Tryck på ENTER för att bekräfta.
• För att gå uppåt i katalogerna, markera
• Förklaring av den högra menyn (använd piltangenterna för att bläddra i listan):
Filter
o
Väljer vilka ltyper som ska visas i llistan till vänster. Audio, photo och video.
Repeat
o
Väljer repeterad uppspelning.
Mode
o
Väljer blandad uppspelning (Shufe), endast uppspelning av 10 sekunder på varje spår (Intro) eller
normal uppspelning (Normal).
Edit Mode
o
Välj Edit Mode och använd sedan piltangenterna och ENTER för att markera vilka spår du vill ha
med i uppspelningslistan. Markera Add To Program och tryck sedan på ENTER för att lägga till
markerade spår i uppspelningslistan.
Program View
o
Visar programmerade spår i uppspelningslistan. Markera första spåret i listan och tryck på
PLAY/PAUSE för att starta uppspelningen.
Add To Program
o
Lägger till spår som markerats i ”Edit Mode” i uppspelningslistan.
och tryck på ENTER för att bekräfta.
Browser View
o
Visar llistan.
Clear Program
o
Tömmer uppspelningslistan.
5
Page 26

7. Systeminställningar
För att gå in i menyn, tryck på SETUP på fjärrkontrollen. Använd sedan piltangenterna för att navigera
i menyerna. Tryck på ENTER för att bekräfta dina val.
För att avsluta och gå ur menyn, tryck igen på SETUP.
7.1 LANGUAGE (Språk)
SVENSKA
Väljer språk för menyer, undertexter och ljudspår.
OSD-language (Språk för menyer)
•
Subtitle (Språk för undertexter)
•
Audio (Önskat ljudspår vid uppspelning av DVD)
•
DVD Menu (Önskat språk för DVD-skivans meny)
•
7.2 Video
Väljer bildformat.
Aspect Ratio (Bildförhållande, bildens proportioner)
•
Välj mellan 4:3 och 16:9 beroende på din tv.
View Mode (Anger hur bilden visas på skärmen)
•
TV System (Välj bildstandard, AUTO, NTSC eller PAL)
•
Video Out (Välj utsignal för bilden, S-VIDEO, COMPONENT, RGB eller P-SCAN)
•
S-VIDEO: Sätt videoutgången till interlaceutgången.
o
COMPONENT: Sätt videoutgången till YUV-utgången
o
P-SCAN: Om din tv är progressiv, välj denna inställning då bilden kan bli bättre.
o
RGB: Sätt videoutgången till SCART-utgången. Om du väljer SCART-anslutning bör du
o
sätta uppspelningsläget till RGB.
6
Page 27

7.3 Audio
Ändrar ljudegenskaperna.
Digital output (digital utgång)
•
Val av digital utgång gör att man kan justera ljudutgången på S/PDIF-portar så att den fungerar i harmoni
med ljudutrustningen (t.ex. mottagare, högtalare) som är kopplad till DVD-spelaren.
Off: Digitala ljudutgången är frånkopplad.
o
PCM: Välj detta läge när du ska använda stereosignaler (2 kanaler). Du bör kombinera denna
o
möjlighet med ”lower sampling rate” som förklaras i texten som följer.
All: Detta läge använder DVD-skivans ursprungliga ljud. Använd detta läge när du vill använda Dolby
o
Digital AC3-signaler genom den optiska eller koaxiala ljudutgången.
Night Mode
•
För att justera ljudet välj ON när du spelar upp en skiva under dagen för bättre ljud, medan man på
kvällen kan välja OFF om man inte vill störa omgivningen.
SVENSKA
Down Sampling
•
Välj läge ON om du har valt ”PCM” som Digital Output i steget ovan.
o ON: “Lower sampling rate” aktiverat.
o OFF: “Lower sampling rate” avaktiverat.
7
Page 28

7.4 Inställning för barnlås
Denna inställning ger möjlighet att ställa in önskade restriktioner åt barnen för att förhindra att olämpliga
SVENSKA
lmer visas.
Ändra restriktioner
• Markera Parental Control och tryck på ENTER för att välja önskad grad av lås. För att göra detta krävs
att lösenordet anges. Det förinställda lösenordet är ”8888”. Tryck höger och välj med upp/ned, tryck
ENTER för att välja.
Obs! Endast vissa DVD-lmer stöder ”föräldrakontroll”.
•
Ställa in ett personligt lösenord
1. Markera Set Password och tryck på ENTER.
2. Ange det förinställda lösenordet ”8888” och bekräfta med
3. Tryck igen på ENTER.
4. Ange önskat lösenord och tryck på ENTER för att bekräfta.
Anm. Om du glömt ditt personliga lösenord kan du alltid använda det förinställda lösenordet ”8888”
för att låsa upp.
ENTER.
7.5 MISC (återgå till fabriksinställningarna)
1. Stega till Misc.
2. Tryck på
3. Tryck ENTER, markera sedan
► för att öppna undermenyn och välj Use Default Settings.
Yes i fönstret ”Do you want to use the default setting?”.
4. Tryck ENTER.
5. DVD-spelaren startar om med de ursprungliga inställningarna.
8
Page 29

8. Felsökningsschema
Problem Tänkbar orsak/lösning
Ingen bild/
inget ljud.
Uppspelningen
startar inte.
Ingen bild. 1. Är tv-apparaten påslagen?
Bilden imrar/
grynig bild.
1. Är alla enheters nätsladdar anslutna ordentligt?
2. Är alla enheter påslagna?
3. Är bild och ljud avstängt på tv-menyn?
4. Är tv-apparaten rätt ansluten till DVD-spelaren?
1. Är skivan rätt isatt?
2. Se till att skivan inte är smutsig eller har ngeravtryck.
3. Skivan har fel regionskod.
4. Skivans innehåll är av fel format.
5. Ändra inställningarna för föräldrakontrollen.
6. Stäng av spelaren, dra ur stickproppen, sätt i den igen och starta om.
7. Imma på linsen, låt spelaren vila ett par timmar innan du slår på den igen.
2. Kontrollera anslutningarna.
3. Tryck på V-MODE för att växla utsignalen.
1. Anslut DVD-spelaren direkt till tv-apparaten och gå inte via andra enheter,
störningarna kan bero på DVD-spelarens inbyggda kopieringskydd (ett krav
på alla DVD-spelare).
SVENSKA
Bilden är svart/
vit eller rullar.
Bilden är mindre
än skärmen.
Det går inte att
söka eller stega
framåt/bakåt.
Inget ljud eller
ofullständigt ljud.
2. Skaffa en RF-adapter om tv-apparaten inte har videoingång.
3. Kontrollera färginställningarna i DVD-spelaren och på tv-apparaten.
4. Dålig kvalitet på skivan eller repig skiva.
• Kontrollera att rätt tv-system är valt (PAL eller NTSC). Välj läge med knappen N/P
på fjärrkontrollen.
1. Välj skärmformat: (SETUP MENU > VIDEO > ASPECT RATIO).
2. Välj skärmformat från DVD-skivans meny.
1. Vissa skivor är programmerade att inte tillåta att söka eller stega framåt/bakåt.
2. Skivan har bara ett spår.
1. Kontrollera att tv och förstärkare är påslagna och rätt inställda.
2. Kontrollera att tv och förstärkare är rätt anslutna och att kontakterna är helt inskjutna.
3. Tryck på LANGUAGE för att välja annat ljudspår.
4. Kontrollera att inte ”Mute”-funktionen är aktiverad på DVD-spelaren, teven eller
förstärkaren.
5. Det är inget ljud under sökning bakåt, framåt samt paus, step och slow.
9
Page 30

MP3-skivan
ger oljud eller
inget ljud.
1. Om en MP3-skiva består av MP3-ler blandat med programler blir det tyst eller
oljud vid programlerna.
2. Kontrollera att skivan bara innehåller MP3-ler.
3. Prova nästa MP3-spår.
Fjärrkontrollen
fungerar inte.
Inget Dolby Digital-
SVENSKA
eller DTS-ljud via
de digitala ljudutgångarna.
1. Batterierna är dåliga eller felaktigt isatta.
2. Fjärrkontrollen används för långt ifrån DVD-spelaren eller så är något
i vägen mellan enheterna.
3. DVD-spelaren är i standbyläget.
1. Kontrollera att förstärkaren stöder Dolby Digital eller DTS.
2. Kontrollera att en koaxial ljudkabel används mellan DVD-spelarens digitala
ljudutgång och förstärkarens digitala ljudingång.
3. Kontrollera att skivan har stöd för Dolby Digital eller DTS och att det har valts
i skivans meny.
9. Avfallshantering
När du ska göra dig av med produkten ska detta ske enligt lokala föreskrifter.
Är du osäker på hur du ska gå tillväga, kontakta din kommun.
10. Specifikationer
Kompatibel med
följande skivformat
DVD
SVCD
VCD
CD
MP3
Kodak Picture CD
Photo CD
MPEG4
Signalutgång Färgsystem: PAL/AUTO/NTSC
Ljudsystem: Stereo R/L, koaxial/digital utgång
Videoutgång: 1Vpp (vid 75 Ohm)
Frekvensomfång 20 Hz – 20 KHz
S/N-nivå ≥ 90 dB
Anslutningar SCART, S-video, komponentvideo, koaxial digital
samt analog ljudutgång
Strömförsörjning 230 V AC, 50 Hz, 25 W
Storlek 255 x 38 x 190 mm
Observera: Tidsintervallet mellan två tryckningar på POWER-knappen måste vara mer än 30 sekunder.
0
Page 31

Dvd/mpeg4-spiller
Art.nr. 18-8108 Modell M51-UK
8-01 M51
Les bruksanvisningen nøye før bruk av produktet, og ta vare på den for ev. framtidig bruk.
Vi reserverer oss mot ev. tekst- og bildefeil, samt forandringer av tekniske data.
Ved tekniske problemer eller andre spørsmål, ta kontakt med vårt kundesenter. (Se opplysninger om kundesenteret i denne bruksanvisningen).
Sikkerhet
C AU T I O N
RISK OF ELECTRIC
SHOCK DO NOT OPEN
• Produktet må kun repareres av kyndig servicepersonell.
• Produktet må ikke demonteres eller endres.
• Produktet er kun beregnet for innendørs bruk.
• Utsett aldri produktet for høye temperaturer eller fuktighet.
• Plasser ikke produktet slik at det kan komme i kontakt med vann eller annen væske. Plasser aldri pro
duktet nær gjenstander som kan forårsake at vann eller annen væske skylles over produktet.
• Plasser ikke apparatet i et fuktig eller støvete miljø, eller der det forekommer sterke vibrasjoner.
• Skru av en eventuell standby-modus om natten, eller når du reiser bort.
KLASSE 1 LASERAPPARAT
CLASS 1
LASER PRODUCT
Advarsel! Åpne ikke dekselet. Usynlig laserstråling som kan forårsake
øyeskader. Rett ikke blikket mot strålen, og se ikke direkte på den gjennom
optiske instrumenter.
Advarsel!
Åpne ikke dekselet. Farlig spenning nnes ubeskyttet på visse
!
komponenter inne i produktet. Kontakt med disse kan gi elektrisk støt.
-
NORSK
1
Page 32

1. Knapper og funksjoner
1.1 Apparatets framside
1 4
5 6
1. Plateslisse
2. PLAY/PAUSE
3. STOP (stopp)
4. POWER (av/på)
5. OPEN/CLOSE (åpne/lukke)
NORSK
6. IR-sensor
1.2 Apparatets bakside
1
4 5 6
1. Y / Pb/Cb / Pr/Cr – Komponentvideoutgang (3 x RCA)
2. VIDEO
3. L-R
4. KOAKSIAL
5. S-VIDEO
– Komposittvideoutgang. CVBS via RCA-tilkobling.
– Analog lydutgang. 2-kanals stereo via RCA-tilkobling.
– Digital lydutgang. SPDIF via RCA-tilkobling for koaksial.
– Utgang for S-VIDEO via 4-polet mini-DIN.
6. SCART-utgang
Page 33

1.3 Fjernkontroll
Obs! Sikt alltid med fjernkontrollen direkte mot
dvd-spilleren og ikke mot tv-apparatet.
1. [ POWER ] – Slår på og av apparatet
1
4
5
6
7
8
9
10
11
1
1
14
15
16
17
18
19
0
1
4
5
6
7
8
9
0
1
4
5
6
7
2. [REPEAT] – Aktiverer repetert avspilling
3. [ N/P ]
4. [SUBTITLE] – Velger undertittel
5. [ ANGLE ] – Velger bildevinkel
6. [ LANGUAGE ] – Velger lydspor/språk
7. [SETUP] – Velger innstillingsmenyen
▲] – Opp
8. [
◄ ] – Venstre
9. [
10. [ ENTER ] – Bekrefter innstillinger
11. [ PBC ]
12. [VOL -] – Senk volumet
13. [ ZOOM ] – Forstørrer bildet
14. [ RETURN ]
15. [ L/R ]
16. [PROGRAM] – Programmert avspilling
17. [ CLEAR ] – Sletter innmatingen
◄◄ ] – Foregående spor/kapittel
18. [ |
►►| ] – Neste spor/kapittel
19. [
20. [ V-MODE ]
■ ] – Stopp avspilling
21. [
▲ ] – Åpner/Lukker plateskuffen
22. [
23. [ A-B ] – Spilling av et avsnitt
NORSK
24. [ 0-9 ] – Talltaster
25. [ TIME ] – Gå til avsnitt
26. [ TITLE ] – Tittel
► ] – Høyre
27. [
28. [ MENU ] – Velger dvd-platens menyer
▼ ] – Ned
29. [
30. [ VOL + ] – Volum opp
31. [ SLOW ] – Spilling med redusert hastighet
32. [ STEP ]
33. [ DISPLAY ]
34. [ MUTE ] – Skrur av lyden
►► ] – Hurtigspole framover
35. [
◄◄ ] – Hurtigspole bakover
36. [
►|| ] – Starte spillingen/pause i spillingen
37. [
Page 34

1.4 Følgende typer plater kan spilles på spilleren
• DVD Enkelt-/ dobbeltsidige med ett eller to lag:
DVD+R/DVD+RW
DVD-R/DVD-RW
CD-DA (CD-Digital Audio)
•
MP3
•
MPEG4
•
CD-R / CD-RW
•
Photo CD (JPEG)
•
2. Vedlikehold
2.1 Rengjøring
• Trekk alltid støpselet ut av strømuttaket før rengjøring.
• Påse at det ikke kommer væske inn i dvd-spilleren.
• Bruk kun en lett fuktet klut ved rengjøring av dekselet.
NORSK
• Bruk aldri rengjøringsmiddel eller sterke løsemidler.
2.2 Vedlikehold av platene
• Hold platen i hullet og på kanten når du håndterer den, så det ikke kommer ngeravtrykk på selve platen.
• Platen må ikke bøyes eller utsettes for direkte sollys eller sterk varme.
• Oppbevar platene stående i sine futteraler.
• Platene skal kun rengjøres med en tørr myk klut. Stryk fra sentrum av platen og utover.
Bruk aldri rengjøringsmiddel eller sterke løsemidler.
3. Forberedelser
3.1 Pakk ut produktet
Forpakningen inneholder
• Dvd-spiller
• Fjernkontroll
• Bruksanvisning
Sett batteriet i fjernkontrollen
1. Fjern batterilokket.
2. Plasser 2 stk. AAA/LR03-batterier i batteriluken.
3. Påse at de blir satt riktig i. Følg markering i batteriluken.
4. Sett på batterilokket igjen.
Anm.
• Skift alltid begge batteriene samtidig.
• Hvis ikke fjernkontrollen skal brukes på en stund bør batteriene tas ut, for å unngå at de
skal begynne å lekke.
4
Page 35

4. Tilkoblinger
Når bilder skal overføres via kabel nnes det noen forskjellige signaler og kontakter å velge mellom.
Obs!
• Før du starter oppkobling må dvd-spiller og tv-apparat skrus av.
• Les tv-apparatets eller forsterkerens manual før sammenkobling.
Advarsel:
Foreta aldri kobling mellom koaksialutgangen og en forsterker som ikke har Dolby digital AC 3 eller
DTS-dekoder. Det kan føre til skader både på høyttalerne og hørselen.
4.1 Tilkobling til tv
Dvd-spilleren kan kobles til din tv på ere måter avhengig av hvilke innganger tv-apparatet har.
NORSK
Den vanligste og enkleste måten er med en SCART-kabel
• SCART (6) – Både bilde og lyd overføres til tv-apparatet.
Koble en SCART-kabel (følger ikke med) mellom SCART-utgangen på dvd-spilleren og tv-apparatets
SCART inngang.
o Kabelen overfører både lyd og bilde.
o Velg tv-apparatets AV-kanal.
o Trykk på knappen V-MODE på fjernkontrollen for å forandre dvd-spillerens utsignal for best mulig
bilde for akkurat ditt tv-apparat.
o For de este brukere er denne installasjonen nok.
Andre koblingsmuligheter
Foruten kobling via SCART-kabel kan dvd-spilleren også kobles på ere forskjellige måter. Nedenfor følger
en kort forklaring på hvilke forskjellige signaler som dvd-spilleren kan gi.
Viktig! i eksempelet nedenfor henviser vi til tilkoblinger av dvd-spiller til tv. (Tilkobling til projektor, plasma
tv og andre ”bildevisende” media med tilsvarende tilkoblingskontakt fungerer på samme måte). Kontroller bruksanvisningen for ditt tv-apparat vedrørende hvilke signaler og kontakter som det er mulig å bruke.
I teksten henvises det til forskjellige bildekvalitetsnivåer. Dette er teoretisk og kan skille seg fra praksis, fordi
kombinasjonen av forskjellige produkter kan fungere annerledes i praksis.
PAL og NTSC er forskjellige tv-systemer. NTSC bruker først og fremst i USA. PAL brukes vanligvis i hele
Vest-Europa. Bildenes kvalitet kan skille seg ut avhengig av om dvd-lmen er innspilt i PAL eller NTSC og
om dvd-spilleren er innstilt på PAL eller NTSC.
De este tv-apparater og dvd-lmer i Norden er tilpasset for nettopp PAL. Dette er å foretrekke, fordi det gir
en høyere oppløsning enn NTSC.
5
Page 36

• Komposittvideo (2) samt L-R (3) (analog lydutgang).
Komposittvideoutgangen må aktiveres i menyen.
o Komposittvideo (CVBS) kan alle normale tv-apparater håndtere. Enklest er det å bruke SCART-
kabelen, fordi SCART kan overføre både bilde (komposittvideo) og lyd. Komposittvideo kan også
sendes i separat kabel fra dvd-spillerens komposittvideoutgang på baksiden.
o Kabelen kobles til tilsvarende inngang på tv-apparatet (vanligvis ”Video In”).
o Trykk på knappen V-MODE på fjernkontrollen for å forandre dvd-spillerens utsignal for best mulig
bilde for akkurat ditt tv-apparat.
S-VIDEO (5) samt L-R (3) (analog lydutgang).
•
S-video (Y/C) er en høyere bildekvalitet enn komposittvideo og er å foretrekke dersom tv-apparatet har
støtte for disse signalene. (Se manualen for tv-en.)
o S-VIDEO kobles inn via en 4-polet mini-DIN (vanligvis kalt s-videokontakt). Dvd-spilleren kan trenge
å bli stilt om i menyen for å kunne sende ut s-video.
o Trykk på knappen V-MODE på fjernkontrollen for å forandre dvd-spillerens utsignal til S-Video.
OBS! Hvis tv-apparatet ikke håndterer S-VIDEO, vil bildet bli svart/hvit.
o
Komponentvideo (1) samt L-R (3) (analog lydutgang).
•
NORSK
Komponentvideo (YPbPr) er den høyeste bildekvaliteten som dvd-spilleren klarer å gi og er å foretrekke
hvis tv-apparater har støtte for komponentvideo. Dvd-spilleren kan enten sende komponentsignaler som
interlace eller progressiv scan. Se manualen for din tv om hvilke av disse som kan brukes.
o Komponentvideosignaler kobles via de tre RCA-kontaktene på dvd-spillerens bakside og kobles inn
i tilsvarende inngang på tv-apparatet.
o Trykk på knappen V-MODE på fjernkontrollen for å forandre dvd-spillerens utsignal mellom interlace
og progressiv-scan.
Advarsel!
Koble aldri en forsterker til den digitale lydutgangen hvis den ikke har en Dolby digital AC3- eller DTS-dekoder.
Ved spilling av en dvd-plate kan dette skade forsterker og høyttalere eller forårsake hørselsskader.
6
Page 37

5. Forklaring av dvd-spillerens funksjoner
Knappenes beskrivelse gjelder for både dvd-spilleren og fjernkontrollen.
POWER
Trykk for å slå på og av apparatet.
OPEN/CLOSE
Trykk for å åpne eller lukke plateskuffen.
SUBTITLE
Trykk for å forandre undertekstenes språk (gjelder kun for dvd-plater som støtter undertekster).
LANGUAGE
Trykk for å forandre lydspor/språk (gjelder kun for dvd-plater som støtter dette).
TIME
• For dvd-plater: Trykk for å gå til et ønsket avsnitt eller en bestemt tid. Velg med knappene ▲ eller ▼
og skriv inn tid/avsnitt med talltastene. Bekrefte med ENTER.
• For SVCD, VCD og CD: Trykk for å gå til en ønsket tid. Velg med knappene ▲ eller ▼ og skriv inn
tiden med talltastene. Bekrefte med ENTER.
0-10+ (talltaster)
Brukes for å angi tid, kapittel/avsnitt og spornummer ved søking.
CLEAR
Trykk for å fjerne tall du har tastet inn med talltastene.
MENY
Under spilling, trykk på MENU for å gå til dvd-platens meny (kun plater som har denne funksjonen).
NORSK
SETUP
Trykk for å velge dvd-spillerens innstillingsmeny.
DISPLAY
Trykk for å vise informasjon om dvd-platen som spilles.
TITLE
Trykk for å gå til dvd-platens tittelmeny (kun dvd-plater).
▲▼◄►
Brukes til å navigere i dvd-spillerens menyer.
ENTER
Trykk for å bekrefte dine valg i menyen.
REV - ◄◄
Trykk for å søke/hurtigspole bakover i et spor/kapittel. Trykk på ”PLAY/PAUSE” for å gjenoppta avspillingen
i normal hastighet. 2, 4, 8, 16 og normal (play).
FWD - ►►
Trykk for å søke/hurtigspole framover i et spor/kapittel. Trykk på ”PLAY/PAUSE” for å gjenoppta avspillingen
i normal hastighet. 2, 4, 8, 16 og normal (play).
PREV- |◄◄
Trykk for å velge foregående spor/kapittel.
NEXT - ►►|
Trykk for å velge neste spor/kapittel.
STEP
Trykk for å stoppe bildet. Trykk gjentatte ganger for å gå framover bilderute for bilderute (ikke ved spilling av
musikk-cd eller mp3). Trykk på ”PLAY/PAUSE” for å gjenoppta avspillingen.
STOP
Trykk en gang for å stoppe spillingen midlertidig for seinere å kunne gjenoppta spillingen fra samme sted på
platen. Trykk igjen for å stoppe spillingen helt og å gå tilbake til starten på platen.
7
Page 38

PLAY/PAUSE
Brukes for å ta pause i spillingen og for å starte opp igjen etter en pause.
VOL- / VOL+
Trykk på VOL+ for å heve volumet, og VOL- for å senke volumet.
REPEAT
• Ved dvd-spilling, trykk gjentatte ganger for å repetere kapittel/avsnitt (chapter) eller hele lmen (tittel).
• Ved spilling av VCD eller cd, trykk gjentatte ganger for å repetere spor (single) eller alle spor (all).
A-B
(Repetisjon av et avsnitt)
• Under spilling, trykk på A-B for å markere starten på avsnittet (A), trykk igjen for å markere slutten
på avsnittet (B) som skal repeteres. Spillingen skjer nå mellom de to markeringene og repeteres
automatisk. Trykk igjen på A-B for å avbryte repetisjonen mellom markeringene og for å fjerne dem.
• Anm. Ved spilling av CD/VCD/SVCD må markeringene A og B være innenfor samme spor.
Ved dvd-spilling kan markeringene være i forskjellige kapittel/avsnitt.
ANGLE
Trykk for å velge bildevinkel (hvis dvd-lmen støtter dette).
MUTE
Trykk på MUTE for å stenge av lyden helt. Trykk en gang til og lyden stilles tilbake til lydvolumet du hadde
før avstenging.
L/R
NORSK
Ved spilling av CD/VCD/SVCD, trykk på L/R for å velge lydkanal (venstre/høyre/miks/stereo).
N/P
I stopposisjon, trykk på N/P for å velge bildestandard, AUTO, NTSC eller PAL.
PBC
Ved spilling av VCD/SVCD, trykk for å slå på eller av PBC (Playback Control).
SLOW
Ved spilling av DVD/VCD/SVCD, trykk på SLOW for å spille av med redusert hastighet. Trykk på ”PLAY/
PAUSE” for å gå tilbake til normal avspilling.
V-MODE
I stoppeposisjon, trykk på V-MODE for å velge forskjellige typer med utsignal for bildet: S-VIDEO, COMPONENT, RGB eller P-SCAN.
RETURN
Ved spilling av VCD/SVCD med PBC aktivert, trykk på RETURN for å gå tilbake til hovedmenyen.
PROGRAM
Ingen funksjon på denne modellen.
ZOOM
Trykk gjentatte ganger for å forstørre bildet (fungerer kun på visse lmer).
8
Page 39

6. Avspilling
6.1 Spille av en dvd-plate
1. Legg i en dvd-plate, med etiketten vendt oppover, i plateskuffen og lukk den.
2. Platens hovedmeny lades automatisk.
3. Bruk piltastene på fjernkontrollen for å foreta dine valg i platens hovedmeny, eller trykk på PLAY/PAUSE
for å starte avspillingen direkte.
6.2 Avspilling av mp3/WMA/MPEG4/JPEG og Kodak Picture cd
NORSK
Når en plate som inneholder MP3-/WMA/ MPEG4/JPEC-ler eller Picture CD legges i, vises platens innhold
på skjermen.
• Bruk piltastene for å velge katalog eller det spor som skal spilles av. Trykk på ENTER for å bekrefte.
• For å gå oppover i katalogene, marker
• Forklaring av den høyre menyen (bruk piltastene for å bla i listen):
Filter
o
Velger hvilke ltyper som skal vises i llisten til venstre. Audio, Photo eller Video
Repeat
o
Velger repetert spilling.
Mode
o
Velger blandet spilling (Shufe), kun spilling av 10 sekunder på hvert spor (Intro) eller normal spilling
(Normal).
Edit Mode
o
Velg Edit Mode og bruk deretter piltastene og ENTER for å markere hvilke spor du vil ha med i spille-
listen. Marker Add To Program og trykk deretter på ENTER for å legge til markerte spor i spillelisten.
Program View
o
Viser programmerte spor i spillelisten. Marker første sporet på listen og trykk på PLAY/PAUSE for
å starte spillingen.
Add To Program
o
Legger til markerte spor i ”Edit Mode” i spillelisten.
og trykk på ENTER for å bekrefte.
Browser View
o
Viser llisten.
Clear Program
o
Tømmer spillelisten.
9
Page 40

7. Systeminstillinger
For å gå inn i menyen, trykk på SETUP på fjernkontrollen. Bruk deretter piltastene for å navigere deg rundt
i menyene. Trykk på ENTER for å bekrefte dine valg.
For å avslutte og å gå ut av menyen, trykk igjen på SETUP.
7.1 Language (Språk)
Velger språk for menyer, undertekster og lydspor.
OSD-language (Språk for menyer)
•
Subtitle (Språk for undertekster)
NORSK
•
Audio (Ønsket lydspor ved spilling av dvd)
•
DVD Menu (Ønsket språk for dvd-platens meny)
•
7.2 Video
Velger bildeformat.
Aspect Ratio (Bildeforhold, bildenes proporsjoner)
•
Velg mellom 4:3 og 16:9 avhengig av ditt tv-apparat.
View Mode (Angir hvordan bildene vises på skjermen)
•
TV System (Velg bildestandard, AUTO, NTSC eller PAL)
•
Video Out (Velg utsignal for bildene, S-VIDEO, COMPONENT, RGB eller P-SCAN)
•
S-VIDEO: Still videoutgangen til interlaceutgangen.
o
COMPONENT: Still videoutgangen til YUV-utgangen.
o
P-SCAN: Dersom tv-apparatet ditt er progressivt oppnås best bilde her.
o
RGB: Still videoutgangen til SCART-utgangen. Hvis du velger SCART-tilkobling, bør du
o
sette spillemodus til RGB.
40
Page 41

7.3 Audio
Forandrer lydegenskapene.
Digital output (digital utgang)
•
Valg av digital utgang gjør at man kan justere lydutgangen på S/PDIF-porter, slik at den fungerer
sammen med lydutstyret (f.eks. mottaker og høyttaler) som er koblet til dvd-spilleren.
Off: Digital lydutgang er frakoblet.
o
PCM: Velg dette når du skal bruke stereosignaler (2 kanaler). Du bør kombinere denne muligheten
o
med ”lower sampling rate” som forklares i teksten nedenfor.
All: Denne modusen benytter dvd-platens opprinnelige lyd. Benytt denne modusen når du bruker
o
Dolby Digital AC3-signaler gjennom den optiske eller koaksiale lydutgangen.
Night Mode
•
For å justere lyden, velg ON når du spiller inn en plate i løpet av dagen, for bedre lyd, mens man om
natten kan velge OFF hvis man ikke vil forstyrre omgivelsen.
NORSK
Down Sampling
•
Velg posisjon ON dersom du har valgt ”PCM” som Digital Output i trinnet ovenfor.
ON: “Lower sampling rate” er aktivert.
o
OFF: “Lower sampling rate” er deaktivert.
o
41
Page 42

7.4 Innstilling av barnelås (foreldrekontroll)
Denne innstilling gir mulighet til å stille inn ønskede restriksjoner til barna for å hindre at uønskede lmer sees.
Forandre restriksjoner
• Marker Parental Control og trykk på ENTER for å velge ønsket grad av lås. For å utføre dette må
passordet oppgis. Det forhåndsinnstilte passordet er ”8888”. Trykk høyre og velg med opp/ned, trykk
ENTER for å velge.
Obs! Det er kun spesielle dvd-lmer som støtter ”foreldrekontroll”.
•
Lag et eget personlig passord
NORSK
1. Marker Set Password og trykk på ENTER.
2. Angi det forhåndsinnstilte passordet ”8888” og bekreft med ENTER.
3. Trykk igjen på ENTER.
4. Angi ønsket passord og trykk på ENTER for å bekrefte.
Anm. Hvis du har glemt ditt personlige passord kan du alltid bruke det forhåndsinnstilte passordet ”8888” for
å låse opp.
7.5 MISC (gå tilbake til fabrikkinnstillingene)
1. Gå til Misc.
2. Trykk på
3. Trykk ENTER, marker deretter
► for å åpne undermenyen og velg Use Default Settings.
Yes i vinduet: Do you want to use the default setting?
4. Trykk ENTER.
5. Dvd-spilleren restarter med de opprinnelige innstillingene.
4
Page 43

8. Feilsøkingsskjema
Problem Mulig årsak/løsning
Ikke noe bilde
eller lyd.
Avspillingen
starter ikke.
Ikke noe bilde. 1. Er tv-apparatet skrudd på?
Bildet imrer/
kornete bilde.
1. Er alle enhetenes kabler plugget ordentlig?
2. Er alle enhetene skrudd på?
3. Er bilde og lyd avstengt på TV-menyen?
4. Er tv-apparatet riktig koblet til dvd-spilleren?
1. Er platen satt riktig inn?
2. Pass på at platen ikke er skitten eller har ngertrykk.
3. Platen har feil regionskode.
4. Platens innhold er av feil format.
5. Forandre på innstillingene for foreldrekontrollen.
6. Skru av spilleren, dra ut stikkontakten, sett den inn igjen og start spilleren igjen.
7. Dugg på linsen, la spilleren hvile et par timer før du slår den på igjen.
2. Kontroller koblingspunktene.
3. Trykk på V-MODE for å skifte utsignal.
1. Koble dvd-spilleren direkte til tv-apparatet og ikke gå via andre enheter.
Forstyrrelsene kan komme av dvd-spillerens innbygde kopieringsbeskyttelse
(et krav til alle dvd-spillere).
NORSK
Bildet er sort/hvitt
eller det ruller.
Bildet er mindre
enn skjermen.
Det går ikke å søke
eller å bla fram
over/bakover.
Ingen lyd eller
forvrengt lyd.
-
2. Skaff en RF-adapter dersom tv-apparatet ikke har videoinngang.
3. Kontroller fargeinnstillingene på dvd-spilleren og på tv-apparatet.
4. Dårlig kvalitet på platen eller oppskrapt plate.
• Kontroller at du har valgt riktig tv-system (PAL eller NTSC).
Velg posisjon med knappene N/P på fjernkontrollen.
1. Velg skjermformat: (SETUP MENU > VIDEO > ASPECT RATIO).
2. Velg skjermformat fra dvd-platens meny.
1. Visse plater er programmert til å ikke tillate å søke eller å bla framover/bakover.
2. Platen har bare ett spor.
1. Kontroller at tv og forsterkeren er slått på og har riktige innstillinger.
2. Kontroller at tv og forsterker er riktig tilkoblet og at kontaktene er plugget inn.
3. Trykk på LANGUAGE for å velge et annet lydspor.
4. Kontroller at ikke ”Mute”-funksjonen er aktivert på dvd-spilleren, tv-apparatet
eller forsterkeren.
5. Det er ingen lyd ved søking bakover, framover, ved pause, step og slow.
4
Page 44

Ingen lyd overhode
fra mp3-platen.
1. Hvis en mp3-plate består av mp3-ler blandet med programler, blir det stille eller
ulyd der hvor programlene er.
2. Sjekk at platen kun inneholder mp3-ler.
3. Prøv neste mp3-spor.
Fjernkontrollen
fungerer ikke.
Ingen Dolby Digitaleller DTS- lyd via
de digitale lydutgangen.
1. Batteriene er dårlige eller galt satt inn.
2. Fjernkontrollen brukes for langt fra dvd-spilleren eller så er det noe
i veien mellom enhetene.
3. Dvd-spilleren er i standby-modus.
1. Kontroller at forsterkeren støtter Dolby Digital eller DTS.
2. Kontroller at en koaksial lydkabel brukes mellom dvd-spillerens digitale lydutgang
og forsterkerens digitale lydinngang.
3. Kontroller at platen har støtte for Dolby Digital eller DTS og at det har blitt valgt
riktig i platens meny.
9. Avfallshåndtering
NORSK
Når produktet skal kasseres, må det skje i henhold til lokale forskrifter.
Er du usikker på hvordan du går fram, ta kontakt med lokale myndigheter.
10. Spesifikasjoner
Kompatibel med
følgende plateformat
DVD
SVCD
VCD
CD
MP3
Kodak Picture CD
Photo CD
MPEG4
Signalutgang Fargesystem: PAL/AUTO/NTSC
Lydsystem: Stereo R/L, koaksial/digital utgang
Videoutgang: 1 Vpp (ved 75 Ohm)
Frekvensomfang: 20 Hz – 20 KHz
S/N-nivå: ≥ 90 dB
Tilkoblinger SCART, S-video, komponentvideo, koaksial digital
og analog lydutgang
Strømforsyning 230 V AC, 50 Hz, 25 W
Størrelse 255 x 38 x 190 mm
Obs.: Tidsintervallet mellom to trykkinger på POWER-knappen må være minst 30 sekunder.
44
Page 45

Dvd-/MPEG4-soitin
Tuotenro 18-8108 Malli M51-UK
8-01 M51
Lue käyttöohjeet ennen tuotteen käyttöönottoa. Säilytä käyttöohjeet tulevaa tarvetta varten. Pidätämme
oikeuden teknisten tietojen muutoksiin. Emme vastaa mahdollisista teksti- tai kuvavirheistä. Jos laitteeseen
tulee teknisiä ongelmia, ota yhteys myymälään tai asiakaspalveluun (yhteystiedot käyttöohjeen lopussa).
Turvallisuus
C AU T I O N
RISK OF ELECTRIC
SHOCK DO NOT OPEN
• Laitteen saa korjata vain valtuutettu huoltoliike.
• Älä pura tai muuta laitetta.
• Tuote on tarkoitettu vain sisäkäyttöön.
• Älä altista laitetta liian korkeille lämpötiloille, iskuille, kosteudelle tai vedelle.
• Älä sijoita laitetta sellaiseen paikkaan, josta se voi tippua veteen tai muuhun nesteeseen.
Älä laita laitteen päälle nesteitä sisältäviä esineitä, kuten maljakoita tai limsapulloja.
• Älä käytä laitetta kosteissa tai pölyisissä tiloissa tai paikoissa, joissa siihen kohdistuu
voimakasta värähtelyä.
• Sammuta mahdollinen valmiustila yön ajaksi ja poistuessasi kotoa.
CLASS 1
LASER PRODUCT
LUOKAN 1 LASERLAITE
Varoitus! Älä avaa laitteen koteloa! Näkymätön lasersäde voi aiheuttaa silmävaurioita. Älä katso säteeseen edes optisten instrumenttien läpi.
Varoitus
Älä avaa laitteen koteloa! Kotelon sisällä on vaarallista jännitettä sisältä-
!
viä suojaamattomia komponentteja, jotka voivat aiheuttaa sähköiskun.
SUOMI
45
Page 46

1. Painikkeet ja toiminnot
1.1 Laitteen etupuoli
1 4
1. Levykelkka
2. PLAY/PAUSE
3. STOP (pysäytys)
4. POWER (virta päällä/poissa)
5. OPEN/CLOSE (avaa/sulje levykelkka)
6. Infrapuna-anturi
5 6
1.2 Laitteen takapuoli
1
SUOMI
4 5 6
1. Y / Pb/Cb / Pr/Cr – Komponenttivideoliitäntä (3 x RCA)
2. VIDEO
3. L-R
4. KOAXIAL
5. S-VIDEO
– Komposiittivideoliitäntä CVBS RCA-liittimillä.
– Analoginen ääniliitäntä. 2-kanavainen stereo RCA-liittimillä.
– Digitaalinen ääniliitäntä. SPDIF RCA-koaksiaaliliitännällä.
– S-video-liitäntä 4-napaisella mini-DIN-liittimellä.
6. SCART-liitäntä
46
Page 47

1.3 Kaukosäädin
Huom.! Suuntaa kaukosäädin aina dvd-soitinta
kohti, ei televisiota kohti.
1
4
5
6
7
8
9
10
11
1
1
14
15
16
17
18
19
0
1
4
5
6
7
8
9
0
1
4
5
6
7
1. [ POWER ] – Kytkee laitteen päälle
ja sammuttaa sen
2. [ REPEAT ] – Aktivoi uudelleentoiston
3. [ N/P ]
4. [ SUBTITLE ] – Valitsee tekstityksen
5. [ ANGLE ] – Valitsee kuvakulman
6. [ LANGUAGE ] – Valitsee ääniraidan/kielen
7. [ SETUP ] – Valitsee asetusvalikon
▲ ] – Ylös
8. [
◄ ] – Vasemmalle
9. [
10. [ ENTER ] – Vahvistaa asetukset
11. [ PBC ]
12. [ VOL - ] – Vähentää äänenvoimakkuutta
13. [ ZOOM ] – Suurentaa kuvaa
14. [ RETURN ]
15. [ L/R ]
16. [ PROGRAM ] – Ohjelmoi toiston
17. [ CLEAR ] – Mitätöi syötetyn tekstin
◄◄ ] – Edellinen raita/luku
18. [ |
►►| ] – Seuraava raita/luku
19. [
20. [ V-MODE ]
■ ] – Pysäyttää toiston
21. [
▲ ] – Avaa/sulkee levykelkan
22. [
23. [ A-B ] – Yhden kohdan toisto
SUOMI
47
24. [ 0-9 ] – Numeropainikkeet
25. [ TIME ] – Siirry kohtaan
26. [ TITLE ] – Otsikko
► ] – Oikea
27. [
28. [ MENU ] – Valitsee dvd-levyn valikot
▼ ] – Alas
29. [
30. [ VOL + ] – Äänenvoimakkuuden lisäys
31. [ SLOW ] – Toisto hitaalla nopeudella
32. [ STEP ]
33. [ DISPLAY ]
34. [ MUTE ] – Äänen mykistys
►► ] – Pikakelaus eteenpäin
35. [
◄◄ ] – Pikakelaus taaksepäin
36. [
►|| ] – Pysäyttää/keskeyttää toiston
37. [
Page 48

1.4 Soitin toistaa seuraavat levyformaatit
• DVD Yksi- ja kaksipuoliset yksi- ja kaksikerroksiset:
DVD+R/DVD+RW
DVD-R/DVD-RW
CD-DA (CD-Digital Audio)
•
MP3
•
MPEG4
•
CD-R / CD-RW
•
Photo CD (JPEG)
•
2. Hoito
2.1 Puhdistaminen
• Irrota aina virtajohdon pistoke verkkovirrasta ennen puhdistusta.
• Varmista, että laitteeseen ei pääse kosteutta.
• Käytä kosteaa liinaa, kun puhdistat laitteen koteloa.
• Älä käytä voimakkaita puhdistusaineita tai liuottimia.
2.2 Käsittele levyjä oikein
• Pitele levyä reiästä ja reunasta. Näin vältät sormenjälkien ja lian kertymisen levyn pintaan.
• Älä taivuta levyä äläkä altista sitä suoralle auringonvalolle tai muulle lämmönlähteelle.
• Säilytä levyjä koteloissaan.
SUOMI
• Puhdista levyt kuivalla ja pehmeällä liinalla keskeltä ulospäin. Älä käytä puhdistusaineita tai vahvoja liuottimia.
3. Esivalmistelut
3.1 Ota tuote pakkauksesta
Pakkauksen sisältö
• Dvd-soitin
• Kaukosäädin
• Käyttöohje
Aseta paristot kaukosäätimeen
1. Irrota paristolokeron kansi.
2. Aseta lokeroon kaksi AAA/LR03-paristoa.
3. Varmista, että paristot tulevat lokeroon oikein päin.
4. Pane paristolokeron kansi takaisin paikalleen.
Huom.
• Vaihda aina molemmat paristot samalla kertaa.
• Poista paristot kaukosäätimestä vuotojen estämiseksi, mikäli et aio käyttää sitä vähään aikaan.
48
Page 49

4. Liitännät
Kun kuvaa siirretään johdoilla, voit valita eri signaaleja ja liittimiä.
Huom.!
• Sammuta dvd-soitin ja televisio, ennen kuin teet liitäntöjä.
• Lue television tai vahvistimen käyttöohje ennen dvd-soittimen liittämistä.
Varoitus!
Älä liitä koaksiaaliliitäntää vahvistimeen, jossa ei ole Dolby digital AC 3- tai DTS-dekooderia.
Muuten kaiuttimet voivat rikkoutua ja aiheuttaa kuulovaurioita.
4.1. Liittäminen televisioon
Dvd-soitin voidaan liittää televisioon monella eri tavalla riippuen television liitännöistä.
Yleisin ja yksinkertaisin liitäntä on SCART-johto
• SCART (6) – Sekä kuva että ääni siirtyvät televisioon.
Liitä SCART-johto (ei sisälly) dvd-soittimen SCART-ulostulon ja television SCART-sisäänmenon välille.
o Johto siirtää sekä kuvan että äänen.
o Valitse television videokanava (AV).
o Vaihda dvd-soittimen ulostulosignaalia painamalla kaukosäätimen V-MODE -painiketta
saavuttaaksesi parhaan mahdollisen kuvan televisioosi.
o Useimmille käyttäjille tämä asennus riittää.
Muut liitännät
SCART-kaapelin lisäksi voidaan dvd-soitin kytkeä usealla eri tavalla. Seuraavat kohdat selittävät
vaihtoehtoisia dvd-soittimen signaalinsiirtotapoja.
Tärkeää. Seuraavat esimerkit ovat dvd-soittimen ja television välillä olevia, mutta ne toimivat myös muiden
laitteiden (plasma-tv, videoprojektori yms.) liittämisessä, kun vain tarvittavat liittimet ovat käytettävissä. Katso
television käyttöohjeesta, mitä liittimiä ja signaaleja on käytettävissä. Tässä tekstissä viitataan erilaisiin
kuvanlaatuihin. Ne ovat teoreettisia, ja voivat käytännössä vaihdella, sillä eri laitteiden yhdistelmät voivat
toimia eri tavoin.
PAL ja NTSC ovat eri tv-järjestelmiä. NTSC:tä käytetään lähinnä USA:ssa. PAL:ää käytetään yleisesti
läntisessä Euroopassa. Kuvanlaatu voi vaihdella dvd-lmin tallennusmuodon (PAL tai NTSC) mukaan ja
dvd-soittimen asetuksen (PAL tai NTSC) mukaan.
SUOMI
Useimmat televisiot ja dvd-lmit Pohjoismaissa sopivat PAL:lle. Sitä pidetään parempana, koska sillä on
parempi erottelukyky kuin NTSC:llä.
49
Page 50

• Komposiittivideo (2) sekä L-R (3) (analoginen ääniliitäntä).
Komposiittivideoliitäntä täytyy aktivoida valikosta.
o Komposiittivideo (CVBS) toimii kaikilla normaaleilla televisioilla. Yksinkertaisinta on käyttää SCART-
johtoa, koska SCART siirtää sekä kuvan (komposiittivideon) että äänen. Komposiittivideo voidaan
siirtää myös omalla johdollaan dvd-soittimen komposiittivideoulostulosta.
o Johto liitetään television vastaavaan sisäänmenoon (yleensä Video in).
o Vaihda dvd-soittimen ulostulosignaalia painamalla kaukosäätimen V-MODE -painiketta
saavuttaaksesi parhaan mahdollisen kuvan televisioosi.
S-VIDEO (5) sekä L-R (3) (analoginen ääniliitäntä).
•
S-video (Y/C) mahdollistaa paremman kuvanlaadun kuin komposiittivideo ja on suositeltavampi, jos
television ominaisuudet mahdollistavat sen käytön. (Katso television käyttöohjeesta.)
o S-video liitetään 4-napaisella mini-DIN-liittimellä (kutsutaan s-videoliittimeksi). Dvd-soitin täytyy ehkä
asettaa valikosta, jotta se pystyy lähettämään s-video -signaalia.
o Paina kaukosäätimen V-MODE-painiketta muuttaaksesi dvd-soittimen ulostulosignaalin
s-video-signaaliksi.
HUOM.! Kuva muuttuu mustavalkoiseksi, jos televisio ei tue s-video-signaalia.
o
Komponenttivideo (1) sekä L-R (3) (analoginen ääniliitäntä).
•
Komponenttivideo (YPbPr) antaa parhaan kuvanlaadun, mitä dvd-soitin lähettää. Sitä suositellaan
käytettäväksi, jos television ominaisuudet tukevat komponenttivideota. Dvd-soitin voi lähettää
komponenttisignaalin joko interlace- tai progressive scan -tilassa. Katso television käyttöohjeesta
kumpaa tapaa televisiosi tukee.
o Komponenttivideosignaali voidaan liittää kolmella RCA-liittimellä dvd-soittimen takaa ja kytkeä
television vastaaviin liittimiin.
o Paina kaukosäätimen V-MODE -painiketta vaihtaaksesi dvd-soittimen ulostulosignaalia interlace- ja
progressive scan -tilojen välillä.
SUOMI
Varoitus!
Älä koskaan liitä vahvistinta digitaaliseen ääniliitäntään, jos sillä ei ole Dolby digital AC3- tai DTS-dekooderia.
Dvd-levyjä toistettaessa voi tämä vahingoittaa vahvistimia ja kaiuttimia tai aiheuttaa kuulovaurioita.
50
Page 51

5. Dvd-soittimen toiminnot
Painikkeiden toiminnot ovat samat sekä dvd-soittimessa että kaukosäätimessä.
POWER
Paina soitin päälle tai pois päältä.
OPEN/CLOSE
Avaa tai sulje levykelkka.
SUBTITLE
Vaihda tekstitysten kieltä (ainoastaan tekstitystä tukevissa dvd-levyissä).
LANGUAGE
Vaihda ääniraitaa/kieltä (ainoastaan tätä tukevissa dvd-levyissä).
TIME
• Dvd-levyt: Paina tätä painiketta syöttääksesi tietyn kohdan tai ajan. Valitse painikkeilla ▲ ja ▼.
Syötä aika/kohta numeropainikkeilla. Vahvista painamalla ENTER.
• SVCD, VCD ja cd: Paina syöttääksesi tietyn ajan. Valitse painikkeilla ▲ ja ▼. Syötä aika
numeropainikkeilla. Vahvista painamalla ENTER.
0–10+ (numeropainikkeet)
Käytä ajan, luvun/kohdan ja raidan numeron syöttämiseen.
CLEAR
Poista numeropainikkeilla syöttämiäsi numeroita.
MENU
Paina MENU-painiketta toiston aikana siirtyäksesi dvd-levyn valikkoon (ainoastaan niissä levyissä, joissa on
valikkotoiminto).
SETUP
Valitse dvd-soittimen asetusvalikko.
DISPLAY
Katsele dvd-levyn tietoja toiston aikana.
TITLE
Mene dvd-levyn otsikkovalikkoon (ainoastaan dvd-levyissä).
▲▼◄►
Siirry nuolinäppäimillä dvd-soittimen valikoissa.
ENTER
Vahvista valintasi valikoissa.
REV - ◄◄
Etsi/pikakelaa taaksepäin raidassa/kappaleessa. Jatka toistoa normaalilla nopeudella painamalla PLAY/
PAUSE. 2, 4, 8, 16 ja normal (play).
FWD - ►►
Etsi/pikakelaa eteenpäin raidassa/kappaleessa. Jatka toistoa normaalilla nopeudella painamalla PLAY/PAUSE. 2, 4, 8, 16 ja normal (play).
PREV- |◄◄
Valitse edellinen raita/luku.
NEXT - ►►|
Valitse seuraava raita/luku.
SUOMI
STEP
Pysäytä kuva. Paina useita kertoja, jos haluat edetä kuvaruutu kerrallaan (ei toimi toistettaessa cd:tä tai mp3:
a). Jatka toistoa painamalla PLAY/PAUSE.
STOP
Paina kerran, jos haluat pysäyttää toiston väliaikaisesti. Tällöin voit jatkaa toistoa myöhemmin samasta kohdasta. Paina toistamiseen, jos haluat pysäyttää toiston kokonaan ja palata levyn alkuun.
51
Page 52

PLAY/PAUSE
Aloita toisto tai keskeytä se hetkeksi.
VOL- / VOL+
Lisää äänenvoimakkuutta painamalla VOL+ tai laske äänenvoimakkuutta painamalla VOL-.
REPEAT
• Paina useita kertoja dvd-levyn toiston aikana, kun haluat toistaa kappaleen/kohdan (chapter) tai
koko lmin (title).
• Paina useita kertoja VCD- tai cd-levyn toiston aikana kun haluat toistaa yhden raidan (single)
tai kaikki raidat (all).
A-B
(Yhden kohdan toisto)
• Paina A–B-painiketta tavallisen toiston aikana merkitäksesi toistettavan kohdan alun (A). Paina
toistamiseen merkitäksesi toistettavan kohdan lopun (B). Soitin toistaa nyt näiden kahden kohdan
välisen kohdan ja toistaa sen uudelleen automaattisesti. Paina A–B-painiketta uudelleen, kun haluat
keskeyttää toiston ja poistaa merkinnät.
• Huom. Toistettaessa cd/VCD/SVCD-levyjä täytyy merkintöjen A ja B olla samassa raidassa.
Dvd-levyä toistettaessa voivat merkinnät olla eri kappaleissa/kohdissa.
ANGLE
Valitse kuvakulma (jos dvd-lmi tukee toimintoa).
MUTE
Mykistä ääni. Voit palata aiemmin asetettuun äänenvoimakkuuteen painamalla painiketta uudestaan.
L/R
Toistettaessa cd/VCD/SVCD-levyjä paina L/R-painiketta valitaksesi haluamasi äänikanavan
(vasen/oikea/mix/stereo).
N/P
Paina odotustilassa N/P-painiketta ja valitse kuvastandardi, AUTO, NTSC tai PAL.
PBC
VCD/SVCD-levyjä toistettaessa paina laittaaksesi PBC:n (Playback Control) päälle tai pois päältä
SUOMI
SLOW
Paina SLOW-painiketta tavallisen dvd/VCD/SVCD-levyn toiston aikana toistaaksesi levyä hitaalla nopeudella. Palaa normaaliin toistoon painamalla PLAY/PAUSE.
V-MODE
Paina odotustilassa V-MODE -painiketta ja valitse erityyppisiä kuvan ulostulosignaaleja, S-VIDEO, COMPONENT, RGB tai P-SCAN.
RETURN
Toistettaessa VCD/SVCD-levyjä ja PBC:n ollessa aktivoituna, paina RETURN-painiketta palataksesi päävalikkoon.
PROGRAM
Ei toimintoja tässä mallissa.
ZOOM
Paina useita kertoja suurentaaksesi kuvan (toimii vain joissakin lmeissä).
5
Page 53

6. Toisto
6.1 Dvd-levyn toisto
1. Aseta levykelkkaan dvd-levy etikettipuoli ylöspäin ja sulje levykelkka.
2. Levyn päävalikko latautuu automaattisesti.
3. Käytä kaukosäätimen nuolinäppäimiä valitaksesi haluamasi vaihtoehdon päävalikosta. Voit myös painaa
PLAY/PAUSE, jos haluat aloittaa toiston välittömästi.
6.2 MP3/WMA/MPEG4/JPEG-toisto ja Kodak Picture CD -toisto
Kun soittimeen asetetaan mp3-, WMA- tai MPEG4- tai JPEG-tiedostoja sisältävä levy tai Picture CD,
ilmestyy levyn sisältö näytölle.
• Valitse soitettava luettelo tai raita nuolipainikkeiden avulla. Vahvista painamalla ENTER.
• Siirry kansioissa ylöspäin, merkitsemällä
• Oikeanpuoleisen valikon selitykset (käytä nuolipainikkeita selataksesi listaa):
Filter
o
Valitse minkä tyyppisiä tiedostoja näkyy vasemmalla tiedostolistassa. Audio, photo ja video.
Repeat
o
Valitse jatkuva toisto.
Mode
o
Valitse satunnaistoisto (Shufe), esittelytoisto (jokaisesta raidasta soitetaan vain 10 sekuntia) (Intro)
tai normaalitoisto (Normal).
Edit Mode
o
Valitse Edit Mode ja käytä sitten nuolipainikkeita ja ENTER-painiketta merkitäksesi soittolistaan haluamasi raidat. Valitse Add To Program ja paina sitten ENTER lisätäksesi merkityt raidat soittolistaan.
Program View
o
Näyttää soittolistalle ohjelmoidut raidat. Valitse listan ensimmäinen raita ja paina PLAY/PAUSE aloittaaksesi toiston.
Add To Program
o
Lisää ”Edit Modessa” merkityt raidat soittolistalle.
ja vahvista painamalla ENTER.
SUOMI
Browser View
o
Näyttää tiedostolistan.
Clear Program
o
Tyhjentää soittolistan.
5
Page 54

7. Järjestelmän asetukset
Paina kaukosäätimen SETUP-painiketta avataksesi valikon. Käytä nuolipainikkeita liikkuaksesi valikoissa.
Hyväksy valinta painamalla ENTER.
Kun haluat lopettaa ja poistua valikosta, paina uudestaan SETUP.
7.1 LANGUAGE (Kieli)
Valitse kieli valikoille, tekstityksille ja ääniraidoille.
OSD-language (valikoiden kielet)
•
Subtitle (tekstitysten kielet)
•
Audio (haluttu ääniraita dvd-levyä toistettaessa)
•
DVD Menu (dvd-levyn valikon kieli)
•
7.2 Video
SUOMI
Valitse kuvasuhde.
Aspect Ratio (kuvasuhde, kuvan mittasuhteet)
•
Valitse joko 4:3 tai 16:9 televisiostasi riippuen.
View Mode (kuinka kuva näytetään televisioruudulla)
•
TV System (valitse kuvastandardi AUTO, NTSC tai PAL)
•
Video Out (valitse kuvan ulostulosignaali, S-VIDEO, COMPONENT, RGB tai P-SCAN)
•
S-VIDEO: Valitse videoulostuloksi interlace.
o
COMPONENT: Valitse videoulostuloksi YUV.
o
P-SCAN: Jos televisiosi on progressiivinen, valitse tämä asetus, sillä se saattaa parantaa kuvanlaatua.
o
RGB: Valitse videoulostuloksi SCART. Jos valitset SCART-liitännän, vaihda toistotilaksi RGB.
o
54
Page 55

7.3 Audio
Ääniominaisuuksien muuttaminen.
Digital output (digitaalinen ulostulo)
•
Jos valitset digitaalisen ulostulon, voit säätää S/PDIF-porttien äänen ulostuloa niin että ne toimivat sopusoinnussa dvd-soittimeen liitettyjen äänilaitteiden (esim. vastaanotin, kaiutin) kanssa.
Off: Digitaalinen äänen ulostulo on pois päältä.
o
PCM: Valitse tämä tila, kun käytät stereosignaalia (2 kanavaa). Yhdistä tämä vaihtoehto ”lower
o
sampling raten” kanssa.
All: Tämä tila käyttää dvd-levyn alkuperäistä ääntä. Valitse tämä tila, kun haluat käyttää Dolby Digital
o
AC3-signaaleja optisen tai koaksiaalisen ääniliitännän kautta.
Night Mode
•
Voit säätää äänenvoimakkuutta valitsemalla ON, kun katsot levyä päivällä suuremmalla
äänenvoimakkuudella tai valitsemalla OFF, jos et halua häiritä ympärillä olijoita.
Down Sampling
•
Valitse ON, jos olet valinnut digitaaliseksi ulostuloksi PCM:n.
ON: ”Lower sampling rate” päällä.
o
o OFF: ”Lower sampling rate” pois päältä.
SUOMI
55
Page 56

7.4 Lapsilukko
Aseta rajoituksia lapsille, jotta he eivät pääse katsomaan sopimattomia elokuvia.
Muuta rajoituksia
• Valitse haluamasi suojauksen taso merkitsemällä Parental Control ja painamalla ENTER. Toiminto vaatii
salasanan. Esiasetettu salasana on ”8888”. Paina oikealle ja valitse painamalla ylös/alas. Valitse painamalla ENTER.
Huom.! Vain osa dvd-lmeistä tukee sisällönsuojausta.
•
Aseta henkilökohtainen salasana
1. Valitse Set Password ja paina ENTER.
2. Syötä esiasetettu salasana ”8888” ja vahvista se painamalla ENTER.
3. Paina uudestaan ENTER.
4. Syötä haluamasi salasana ja vahvista se painamalla ENTER.
Huom. Jos unohdat henkilökohtaisen salasanasi voit aina käyttää esiasetettua salasanaa ”8888”
poistaaksesi suojauksen.
SUOMI
7.5 MISC (tehdasasetusten palautus)
1. Siirry kohtaan Misc.
2. Avaa alavalikko painamalla
3. Paina ENTER, ja valitse sitten
►. Valitse Use Default Settings.
Yes ikkunassa ”Do you want to use the default setting?”.
4. Paina ENTER.
5. Dvd-soitin käynnistyy uudestaan alkuperäisillä asetuksilla.
56
Page 57

8. Vianhakutaulukko
Ongelma Mahdollinen syy
Ei kuvaa/ääntä. 1. Onko kaikki yksiköt liitetty verkkovirtaan?
2. Ovatko kaikki yksiköt päällä?
3. Onko kuva ja ääni television valikossa kytketty pois päältä?
4. Onko televisio kytketty dvd-soittimeen oikein?
Toisto ei käynnisty. 1. Onko levy asetettu oikein?
2. Onko levy likainen tai onko siinä sormenjälkiä?
3. Levyssä on väärä aluekoodi.
4. Levyn formaatti on väärä.
5. Muuta sisällönsuojauksen asetuksia.
6. Sulje soitin, irrota pistoke hetkeksi ja aseta se takaisin. Käynnistä laite.
7. Kosteutta lukupäässä. Anna soittimen olla käyttämättä muutaman tunnin ajan.
Ei kuvaa. 1. Onko televisio päällä?
2. Tarkista liitännät.
Kuva värähtelee tai
on rakeinen.
Kuva on mustavalkoinen tai se
rullaa.
Kuva on näyttöä
pienempi.
Askeltaminen eteentai taaksepäin ei
onnistu.
Ei ääntä tai
äänenlaatu on huono.
3. Paina V-MODE ja vaihda ulostulosignaalia.
1. Älä liitä dvd-soitinta muiden laitteiden kautta, vaan liitä se suoraan televisioon.
Häiriöt saattavat johtua dvd-soittimen sisäisestä kopiointisuojauksesta
(tulee olla kaikissa dvd-soittimissa)
2. Käytä RF-adapteria, jos televisiossa ei ole videoliitäntää.
3. Tarkista dvd-soittimen ja television väriasetukset.
4. Levy on heikkolaatuinen tai naarmuinen.
• Varmista, että valittuna on oikea tv-järjestelmä (PAL tai NTSC). Valitse tila
kaukosäätimen N/P-painikkeella.
1. Muuta näytön kuvasuhdetta: (SETUP MENU > VIDEO > ASPECT RATIO).
2. Valitse kuvasuhde dvd-levyn valikosta.
1. Tietyt levyt on ohjelmoitu niin, ettei niissä voi siirtyä eteen- tai taaksepäin.
2. Levyllä on vain yksi raita.
1. Varmista, että televisio ja vahvistin ovat päällä ja oikein asennetut.
2. Varmista, että televisio ja vahvistin on liitetty oikein ja että liittimet
ovat kunnolla kiinni.
SUOMI
3. Valitse toinen ääniraita painamalla LANGUAGE-painiketta.
4. Varmista, ettei ”Mute”-toiminto ole aktivoituna dvd:ssä, televisiossa
tai vahvistimessa.
5. Takaisinkelauksen, tauon, askelluksen, hitaan toiston ja eteenpäinkelauksen
aikana ei kuulu ääntä.
57
Page 58

Mp3-levystä ei kuulu
ääntä, tai siitä kuuluu
häiriöääniä.
Kaukosäädin ei toimi. 1. Paristojen varaustaso on alhainen tai paristot on asetettu väärin.
1. Mikäli mp3-levyllä on mp3-tiedostoja ja ohjelmatiedostoja sekaisin,
ohjelmatiedostot eivät kuulu oikein.
2. Varmista, että levyllä on pelkästään mp3-tiedostoja.
3. Kokeile seuraavaa mp3-raitaa.
2. Kaukosäädin on liian kaukana dvd-soittimesta tai yksiköiden välillä on esteitä.
3. Dvd-soitin on valmiustilassa.
Ei Dolby digitaltai DTS-ääntä
digitaalisten
ääniliitäntöjen kautta.
1. Varmista, että vahvistin tukee Dolby Digital- tai DTS-ääntä.
2. Tarkista, että dvd-soittimen digitaalisen ääniulostulon ja vahvistimen digitaalisen
sisäänmenon välillä on koaksiaaliäänikaapeli.
3. Varmista, että levyssä on Dolby Digital- tai DTS-tuki, ja että se on valittuna
levyn valikosta.
9. Kierrätys
Kierrätä tuote asianmukaisesti, kun poistat sen käytöstä.
Kysy tarkempia kierrätysohjeita kuntasi jäteneuvonnasta.
10. Tekniset tiedot
Yhteensopiva seuraavien
standardien kanssa
SUOMI
Dvd
SVCD
VCD
Cd
Mp3
Kodak Picture cd
Photo cd
MPEG4
Signaaliliitäntä Värijärjestelmä: PAL/AUTO/NTSC
Äänijärjestelmä: Stereo R/L, koaksiaali/digitaaliliitäntä
Videoliitäntä: 1 Vpp (75 ohmia)
Taajuusalue 20 Hz–20 KHz
Taajuusvaste ≥ 90 dB
Liitännät SCART, S-video, komponenttivideo, koaksiaalinen
digitaalinen ja analoginen ääniliitäntä
Virtalähde 230 V AC, 50 Hz, 25 W
Mitat 255 x 38 x 190 mm
Huom.! Kahden POWER-painikkeen painamisen välillä tulee olla vähintään 30 sekunnin tauko.
58
Page 59

59
Page 60

SVERIGE
KUNDTJÄNST Tel: 0247/445 00
Fax: 0247/445 09
E-post: kundtjanst@clasohlson.se
INTERNET www.clasohlson.se
BREV Clas Ohlson AB, 793 85 INSJÖN
NORGE
KUNDESENTER Tlf.: 23 21 40 00
Faks: 23 21 40 80
E-post: kundesenter@clasohlson.no
INTERNETT www.clasohlson.no
POST Clas Ohlson AS, Postboks 485 Sentrum, 0105 OSLO
SUOMI
ASIAKASPALVELU Puh: 020 111 2222
Faksi: 020 111 2221
Sähköposti: info@clasohlson.fi
INTERNET www.clasohlson.fi
OSOITE Clas Ohlson Oy, Yrjönkatu 23 A, 00100 HELSINKI
GREAT BRITAIN
For consumer contact, please visit
www.clasohlson.co.uk and click on
customer service.
INTERNET www.clasohlson.co.uk
 Loading...