

Page 1
Circular Saw
Cirkelsåg
Sirkelsag
Pyörösaha
Important!
Read the entire instruction manual carefully
and make sure that you fully understand
it before you use the equipment. Keep the
manual for future reference.
Viktig information:
Läs hela bruksanvisningen noggrant och
försäkra dig om att du har förstått den innan
du använder utrustningen och spara den för
framtida bruk.
Viktig informasjon:
Les disse anvisningene nøye og forsikre deg
om at du forstår dem før du bruker enheten
og oppbevar dem for senere bruk.
Tärkeätä tietoa:
Lue nämä ohjeet huolellisesti ja varmista
että olet ymmärtänyt ne, ennen kuin alat
käyttää laitetta. Säilytä ohjeet myöhempää
tarvetta varten.
ENGLISHSVENSK ANOR SKSUOMI
Art.no Model
18-3034 M1Y-140-900A-UK
30-9166 M1Y-140-900A
Original instructions
Ver. 201110
Bruksanvisning i original
Original bruksanvisning
Alkuperäinen käyttöohje
Page 2

2
Page 3

Circular Saw
Art.no 18-3034 Model M1Y-140-900A-UK
30-9166 M1Y-140-900A
Please read the entire instruction manual before using and save it for future use.
We apologise for any text or photo errors and any changes of technical data.
If you have any questions concerning technical problems please contact our
Customer Service Department (see address on reverse.)
1. Safety
Warning! Read all the instructions. Failure to adhere to the following instructions may
lead to electric shocks, fires and/or serious injury. The term “electrical hand tools” in
the warning text below is referring to your mains operated or battery operated hand
tool. SAVE THE INSTRUCTIONS.
1.2 General safety instructions
1) The work space
a) Keep the work space clean and well illuminated. Cluttered and poorly lit areas
invite accidents.
b) Do not use electrical hand tools in explosive environments, i.e. nearby flammable
liquids, gas or dust. Electrical hand tools generate sparks that could easily ignite
dust or fumes.
c) Keep away from children and other spectators while using the electrical hand tool.
Distractions can make you lose your concentration and control.
ENGLISH
2) Electrical safety
a) The electrical hand tool’s plug must fit correctly in the wall socket. Never modify
the plug in any way. Never use an adaptor together with earthed electrical hand
tools. Unmodified plugs and suitable wall sockets decrease the risk of electric shock.
b) Avoid body contact with earthed objects, such as pipes, radiators, ovens or
refrigerators. There is an increased risk of electrical shock if your body is earthed.
c) Do not expose the electrical hand tool to rain or other wet conditions. If water gets
inside an electrical hand tool it increases the risk of electrical shock.
d) Do not misuse the lead. Never use the lead to carry, drag or pull the plug out of
the wall socket. Keep the lead away from heat, oil, sharp edges and movable
parts. Damaged or tangled leads increase the risk of electrical shock.
e) When you use an electrical hand tool outdoors; use an extension cord suitable
for this purpose. Use of an extension cord for outdoor use decreases the risk of
electrical shock.
3
Page 4

3) Personal safety
a) Pay attention to what you do and use common sense when using electrical hand
ENGLISH
tools. Never use an electrical hand tool if you are tired or under the influence of
drugs, alcohol or medication. One moment of not paying attention while using an
electrical hand tool may result in serious injury.
b) Use protective equipment. Always use safety glasses. Using protective equipment
such as a face mask, slip resistant protection shoes, a helmet and ear plugs when
needed decreases the risk of injury.
c) Avoid unexpected start. Make sure that the switch is set to OFF before you
connect the device to the wall socket. Never carry an electrical hand tool with one
finger on the trigger or never connect the hand tool to a wall socket when
the switch is set to ON, since it may result in injury.
d) Remove all service tools/keys before switching on the hand tool. A forgotten
service tool on a rotating part of the electrical hand tool may result in injury.
e) Do not overreach. Make sure you stand steady and well balanced at all times.
This gives better control in unexpected situations.
f) Wear suitable clothing. Do not wear loose fitting clothes or jewellery. Keep hair,
clothes and gloves away from movable parts. Loose fitting clothes, jewellery or
long hair could get caught in movable parts.
g) If the equipment for suctioning or collecting dust is available make sure it is
connected and used properly. Using technical aids may reduce dust related hazards.
4) Use and maintenance of the electrical hand tools
a) Do not overdrive the hand tool. Use a hand tool suitable for the work you are to
perform. At the correct rate of feed, the correct tool will carry out the work better
and more safely.
b) Never use the electrical hand tool if the switch does not work properly to turn
on and shut off the tool. All electrical hand tools that can not be operated by the
switch are dangerous and must be repaired.
c) Unplug the lead from the wall socket before making any adjustments, changes of
accessories or storing the electrical hand tool away. These precautions reduce the
risk of unexpected start of the electrical hand tool.
d) Store electrical hand tools that are not being used out of reach from children.
Do not let people unfamiliar with the electrical hand tool or its instructions use it.
Electrical hand tools can be dangerous if they get into the hands of inexperienced
users.
e) Maintenance of electrical hand tools. Check if something is incorrectly set, if
movable parts are getting jammed, or parts are broken or something else that
might cause the electrical hand tool to malfunction. If something is damaged it
must be repaired before use. Many accidents are caused by poorly maintained
electrical hand tools.
4
Page 5

f) Keep the tools sharp and clean. Properly maintained cutting tools with sharp
blades are less likely to jam and are easier to control.
g) Use the electrical hand tool, accessories and such according to the instructions
and in a way suitable for the type of electrical hand tool used. Using the electrical
hand tool for work other than that for which it is intended could result in
a dangerous situation.
5) Service
a) Repairs and service should only be performed by qualified persons, and only with
original spare parts. This guarantees the safety of the electrical hand tool.
Specific Safety Requirements for Circular Saws
DANGER:
a) Keep hands at a safe distance from the saw blade. Keep your other hand on
the front handle or on the housing. If you are holding the saw with both hands
you cannot cut your hand.
b) Do not reach under the workpiece. The blade guard will not protect you from
the blade underneath the workpiece.
c) Adjust the cutting depth to suit the thickness of the workpiece. Less than the
length of one of the saw blade’s teeth should be visible under the workpiece.
d) Do not hold the workpiece in your hands or across you leg. Fasten the workpiece
to a stable surface. It is important that the workpiece is correctly supported to
minimise the risk of personal injury, to prevent the saw blade from binding and to
prevent you from losing control of the saw.
e) Hold the electrical hand tool by its insulated handles whenever performing tasks
where there is a risk of the saw cutting through hidden power cables or its own
power cable. Contact with a live wire can lead to the metallic parts of the electrical
hand tool becoming live and giving the user an electric shock.
f) When rip sawing, a parallel fence or straight edge guide should be used. This
will improve the precision of the sawing and reduce the chances of the saw blade
binding.
g) Always use saw blades of the correct size and shape (diamond shaped or round).
Saw blades that do not fit the saw properly will rotate eccentrically leading to loss
of control over the saw.
h) Never use damaged or faulty washers or bolts. The washers and bolts for the saw
blade are specially designed to achieve maximum performance and safety.
ENGLISH
5
Page 6

Additional Safety Instructions for all Saws
Reasons for kickback and preventing kickback:
- Kickback is a sudden reaction to a pinched, jammed or incorrectly aligned saw
ENGLISH
blade which causes the saw to jump back violently out of the workpiece towards
the user.
- When the saw blade binds because the kerf behind the blade is closed, the blade
stops and the unit is ejected back towards the user.
- If the saw blade is twisted or distorted in the saw cut the teeth at the back of the
saw blade can fasten in the workpiece and eject it towards the user.
Kickback is caused by the saw being used incorrectly, for the wrong purpose
or under the wrong conditions and can be avoided by taking the following
precautions:
a) Hold the saw firmly in both hands and in such a way that you can parry any
kickbacks. Stand to the side of saw blade, not in line with it. A kickback can
cause the saw to jump backwards but it can be controlled if certain precautions
are taken.
b) When the saw blade jams, or if the sawing process is interrupted for some reason,
switch the power off and hold the saw still until the blade has completely stopped.
Never attempt to withdraw the saw from the workpiece when the blade is rotating,
as this could cause a kickback. Examine and take the necessary measures to
minimise the risk of blade jamming.
c) When restarting a saw in a workpiece, centre the saw blade in the saw cut and
make sure that the teeth of the blade are not touching the material. If the saw
blade has jammed it could wander upwards or be ejected from the workpiece
when the saw is restarted.
d) Support large boards to reduce the risk of the saw blade binding or of the saw
kicking back. Large boards tend to bow under their own weight. The boards need
to be supported on both sides, near the saw cut and near the edge of the board.
e) Do not use blunt or damaged saw blades. Blunt or incorrectly set saw blades can
produce saw cuts that are too narrow, producing too much friction and causing
the saw blade to bind or the saw to kickback.
f) The cutting depth and angle adjusters must be locked in place before sawing
begins. If any of the saw blade setting adjusters moves during cutting the blade
could jam or the saw could kickback.
g) Be especially careful when plunge sawing in walls or objects where it is not
possible to see what one is sawing. The saw blade could cut into objects that
could cause kickbacks.
6
Page 7

Safety Instructions for Saws Fitted with Inner Blade Guard
a) Make sure that the lower blade guard is properly closed before each use. Do not
use the saw if the lower blade guard does not move freely and close immediately.
Never clamp or bind the lower blade guard in the open position. If the saw is
accidentally dropped the lower blade guard can be bent. Lift the lower blade guard
using the handle and make sure that it can move freely without touching the saw
blade or any other part of the saw in any of the saw’s cutting angles and depths.
b) Make sure that the spring on the lower blade guard works. If the guard or spring
does not work properly it must be repaired before the saw is used. The lower
guard can stick due to damaged parts, sticky deposits or a build-up of sawdust.
c) The lower blade guard may only be moved to the side for special operations such
as plunge sawing and compound sawing. Move the lower guard to the side using
the handle and as soon as the saw blade makes contact with the material the
lower guard must be released. For all other sawing the lower guard must work
automatically.
d) Always make sure that the lower blade guard is covering the blade before laying
the saw on a bench or the floor. An uncovered rotating saw blade can cause the
saw to move backwards and saw through everything in its path. Bear in mind that
it takes time for the saw blade to come to a stop after the power switch has been
released.
Additional Safety Instructions for all Saws Fitted with
Riving Knives
a) Use a riving knife compatible with the saw blade being used. In order for
the riving knife to work it must be thicker than the saw blade but thinner
than the kerf of the saw blade.
b) Adjust the riving knife according to the directions in this instruction manual.
Incorrect distance, incorrect position and alignment can lead to the riving knife
not preventing kickbacks.
c) Always use the riving knife except when plunge sawing. The riving knife must be
reattached if it is detached for plunge sawing. The riving knife could get in
the way when plunge sawing and cause kickback.
d) In order for the riving knife to work it must pass through the workpiece.
The riving knife cannot prevent kickback on short saw cuts.
e) Do not use the saw if the riving knife is bent. Even a small defect can slow
the closing time of a safety guard.
ENGLISH
7
Page 8
- Tie the workpiece down if it is not held in place by its own weight.
- Use a dust extractor when using the circular saw.
- Always wear a dust mask when using the circular saw.
ENGLISH
- Use only those saw blades designed to be used with this circular saw.
- Always wear ear defenders when using the circular saw.
- Grinding/Cutting discs must not be used with this circular saw.
- New plugs or mains leads must only be fitted by qualified personnel.
Guide to Safety Symbols
Read the instructions thoroughly
Always use protective eyeglasses
Always use hearing protection
8
Page 9
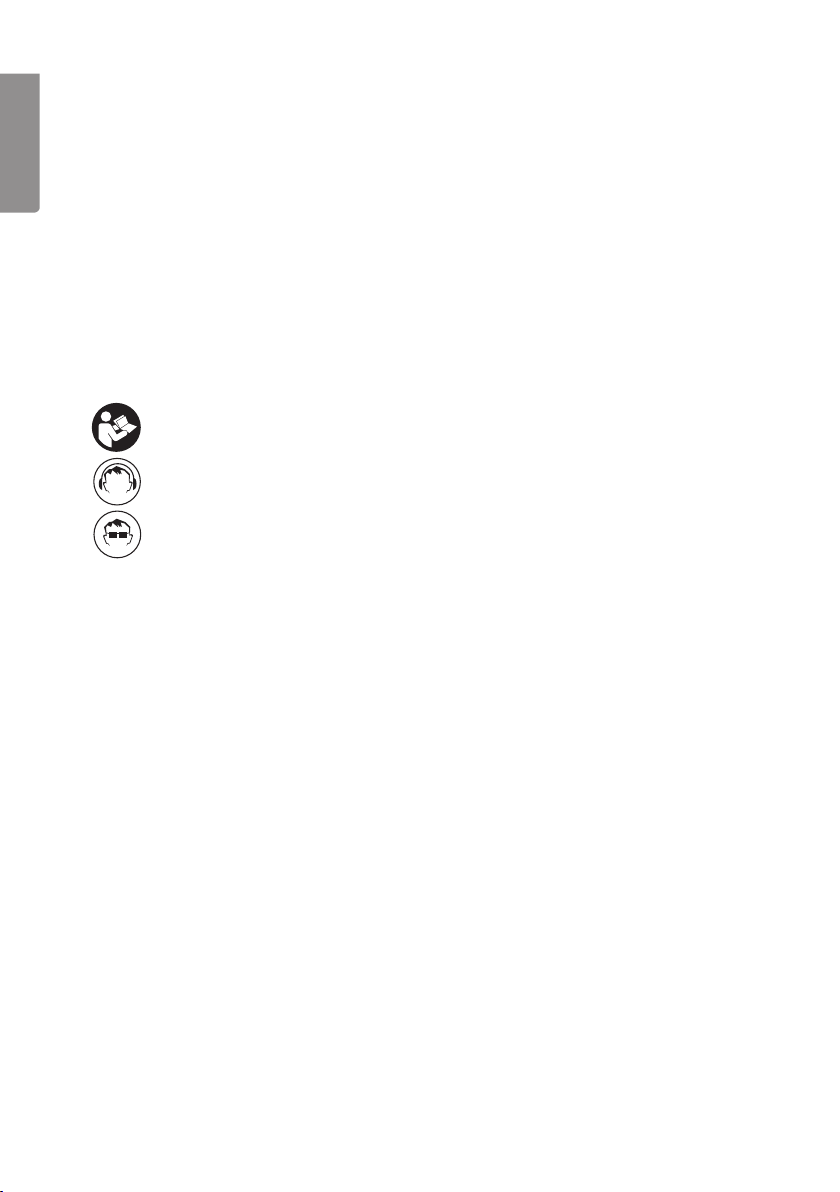
Description
1. Handle
2. Rating plate
3. Power switch
4. Lock button for power switch
5. Lock screw for depth
adjustment
6. Cord
7. Blade guard
8. Screw for saw blade
9. Foot plate
10. Blade flange
11. Saw blade
12. Parallel guide
13. Lock screw for parallel guide
14. Screw for angle adjustment
15. Connection for vacuuming
saw dust
16. Front handle
17. Manoeuvring lever for
blade guard
18. Riving knife
4 3
ENGLISH
2
5
6
15 17 7 1 16
14
Accessories
- Parallel guide
- Allen key
- Saw blade 140/16
9
18
8 10 11 12 13
9
Page 10
Adjustments and maintenance
Important! Pull plug from wall socket before making adjustments or doing
maintenance work.
ENGLISH
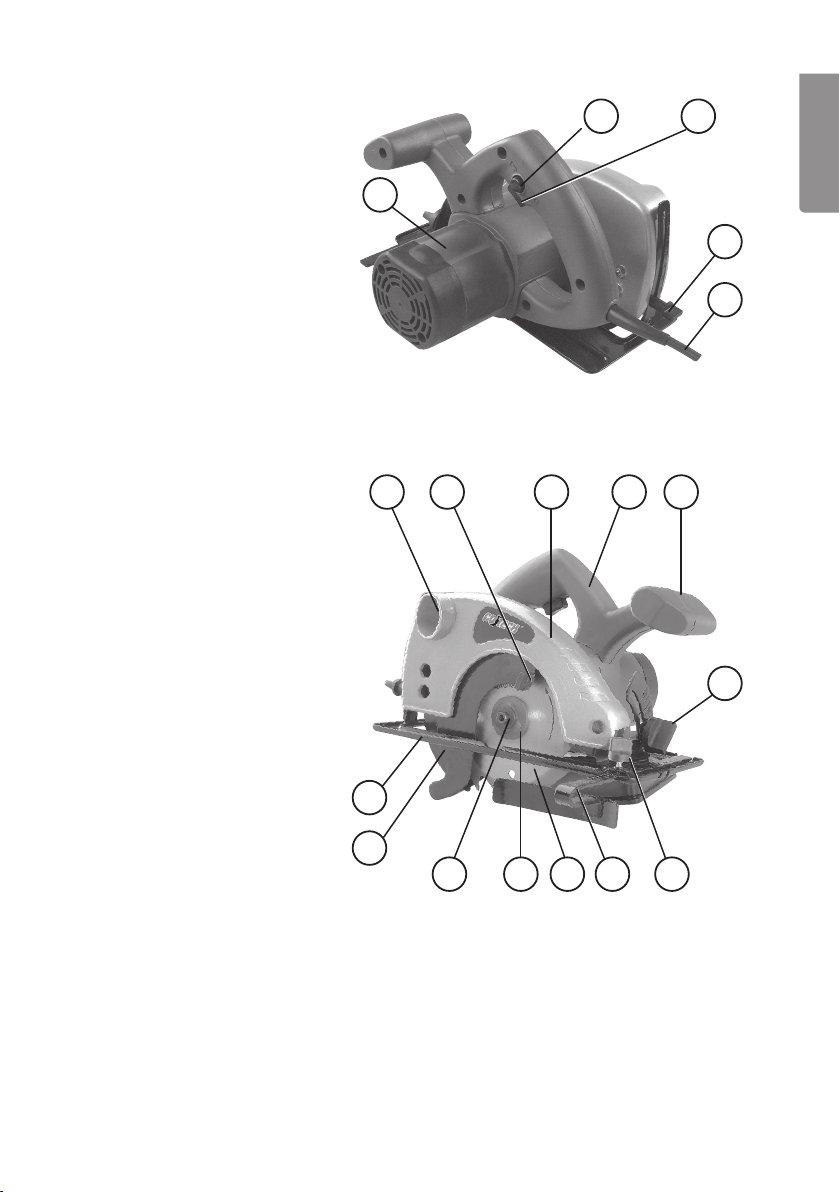
Adjustment of riving knife
1. Loosen both screws (1) holding
riving knife.
2. Push blade guard back and hold it
firmly with manoeuvring lever
3. Adjust riving knife to max. 5 mm
distance from the saw blade.
4. Saw blade must not protrude more
than 5 mm lower than the edge of
the riving knife.
5. Tighten both screws.
6. Check that the riving knife is lined
up with the saw blade.
Adjustment of saw angle
1. Loosen the lock screw.
2. Set the desired angle between
0 – 45°.
3. Tighten lock screw.
Adjustment of saw depth
1. Loosen the lock screw. (1)
2. Lower the foot to the desired depth.
3. Tighten lock screw.
1
10
Page 11

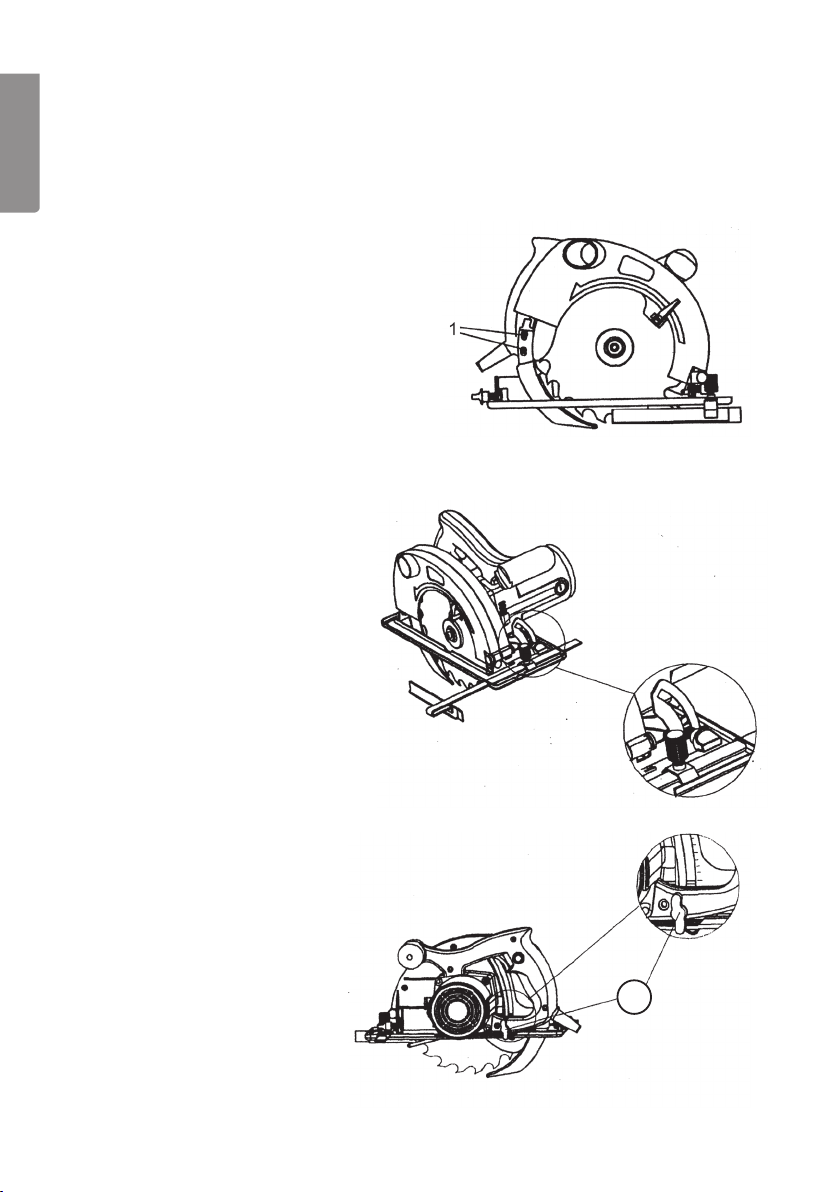
Adjustment of parallel guide
1. Loosen the lock screw (1).
2. For a 90° cut, read the scale up to the notch
A. For a 45° cut, read scale up to notch B.
Think about the width of the
saw cut. Tighten screw.
ENGLISH
1
B
Replacing the saw blade
1. Lock the saw blade.
2. Unscrew the lock screw (1) using the allen
key (2) in the direction of the blade’s rotation
3. Push the saw guard back and hold firmly
with the manoeuvring lever (3).
4. Remove flange nut (4) and loosen
saw blade.
5. Insert new saw blade by performing
the above operations in reverse order.
6. Adjust the position of the riving knife
if necessary.
NOTE! Before restarting the saw after
changing the saw blade, check carefully
that it is correctly installed and that the lock
screw is tight.
Switching on and off
Start: Press in lock button (1) to enable
the power switch (2) to be pressed.
Stop: Release buttons.
A
3
1
4
2
2
1
11
Page 12

Troubleshooting chart
Problem Possible cause Action
ENGLISH
Appliance does not
start.
No power. Check that mains outlet is live.
Worn carbon brushes. Contact customer service if motor
or power switch defective.
Short circuit.
Defective power switch.
Appliance runs slow. Dull or damaged saw
blade.
Rpm too low. Feed with less force.
Motor is overheated.
Odd noise is heard. Mechanical obstruction. Contact customer service.
Winding partly short
circuited.
Strong vibrations. Saw blade is loose. See to it that saw blade is cor-
Sparks in motor. Carbon brushes are
stuck.
Winding short-circuited.
Commutator dirty.
Sharpen or replace saw blade.
rectly installed and tighten lock
screw on saw blade
Contact customer service.
12
Page 13

Care
- Keep the ventilation openings free of shavings and debris.
- Clean appliance regularly with washing-up detergent and soft cloth.
- Do not use solvents.
Disposal
Follow local ordinances when disposing of this product. If you are unsure
about how to dispose of this product contact your municipality.
Specifications
Power supply 230 V, 50 Hz
Capacity 900 W
Speed/dry run 4500 rpm
Saw depth at 90° 45 mm
Min. saw angle 45°
Saw blade 140/16 mm
Lpa (noise pressure level) 91.4 dB (A)
Lwa (noise power level) 102.4 dB (A)
Vibration value 0.4 m/s²
ENGLISH
13
Page 14

Cirkelsåg
Art.nr 18-3034 Modell M1Y-140-900A-UK
30-9166 M1Y-140-900A
Läs igenom hela bruksanvisningen före användning och spara den sedan för
framtida bruk. Vi reserverar oss för ev. text- och bildfel samt ändringar av tekniska
data. Vid tekniska problem eller andra frågor, kontakta vår kundtjänst (se adressuppgifter på baksidan).
M1Y-140-900A
SVENSK A
Generella säkerhetsinstruktioner
Varning! Läs alla instruktioner. Om nedanstående instruktioner inte följs kan detta
leda till elektrisk stöt, brand och/eller allvarlig skada. Termen ”elektriskt handverktyg”
i varningstexten nedan refererar till ditt nätanslutna eller batteridrivna handverktyg.
Spara dessa instruktioner!
1) Arbetsutrymmet
a) Håll arbetsutrymmet rent och väl upplyst. Belamrade och mörka utrymmen
inbjuder till olyckor.
b) Använd inte elektriska handverktyg i explosiva miljöer, som i närheten av
lättantändliga vätskor, gaser eller damm. Elektriska handverktyg genererar gnistor
som kan antända damm eller ångor.
c) Håll undan barn och åskådare medan du använder det elektriska handverktyget.
Störningsmoment kan göra att du tappar kontrollen.
2) Elektrisk säkerhet
a) Det elektriska handverktygets stickpropp måste passa i vägguttaget. Modifiera
aldrig stickproppen på något vis. Använd aldrig adapter tillsammans med jordade
elektriska handverktyg. Omodifierade stickproppar och passande vägguttag
minskar risken för elektrisk stöt.
b) Undvik kroppskontakt med jordade föremål, som rör, element, köksspis eller
kylskåp. Det finns ökad risk för elektrisk stöt om din kropp är jordad.
c) Utsätt inte det elektriska handverktyget för regn eller våta förhållanden.
Om vatten tränger in i ett elektriskt handverktyg ökar det risken för elektrisk stöt.
d) Misshandla inte nätsladden. Använd aldrig nätsladden för att bära, dra eller
rycka stickproppen ur vägguttaget. Håll nätsladden undan från värme, olja,
vassa kanter och rörliga delar. Skadade eller trassliga nätsladdar ökar risken
för elektrisk stöt.
e) När du använder ett elektriskt handverktyg utomhus, använd en skarvsladd
anpassad för detta ändamål. Användning av en skarvsladd för utomhusbruk
minskar risken för elektrisk stöt.
14
Page 15

3) Personlig säkerhet
a) Var uppmärksam på vad du gör och använd sunt förnuft när du använder ett
elektriskt handverktyg. Använd inte ett elektriskt handverktyg om du är trött eller
påverkad av droger, alkohol eller medicinering. Ett ögonblicks ouppmärksamhet
när du använder ett elektriskt handverktyg kan resultera i allvarlig personskada.
b) Använd skyddsutrustning. Bär alltid skyddsglasögon. Användning av
skyddsutrustning som andningsskydd, halksäkra skyddsskor, hjälm och
hörselskydd vid behov minskar risken för personskada.
c) Undvik oavsiktlig start. Se till att strömbrytaren är i läge ”OFF” innan du ansluter
stickproppen till vägguttaget. Att bära ett elektriskt handverktyg med ett finger på
strömbrytaren/avtryckaren eller att ansluta ett elektriskt handverktyg till elnätet när
strömbrytaren är i läge ”ON” inbjuder till olyckor.
d) Tag bort alla serviceverktyg/nycklar innan du slår på det elektriska handverktyget.
Ett kvarglömt serviceverktyg på en roterande del av det elektriska handverktyget
kan reslutera i personskada.
e) Sträck dig inte för långt. Se till att du står stadigt med god balans hela tiden.
Detta möjliggör bättre kontroll i oväntade situationer.
f) Bär lämplig klädsel. Bär inte löst sittande kläder eller smycken. Håll hår, kläder
och handskar undan från rörliga delar. Lösa kläder, smycken eller långt hår kan
fastna i rörliga delar.
g) Om utrustning för utsugning och uppsamling av damm finns tillgängligt, se till att
denna är ansluten och används ordentligt. Användning av dessa hjälpmedel kan
minska dammrelaterade faror.
SVENSK A
4) Användning och underhåll av det elektriska handverktyget
a) Pressa inte det elektriska handverktyget. Använd ett elektriskt handverktyg som
är avsett för det arbetsmoment du utför. Korrekt elektriskt handverktyg gör jobbet
bättre och säkrare med avsedd matningshastighet.
b) Använd inte det elektriska handverktyget om strömbrytaren inte slår på och
stänger av verktyget. Alla elektriska handverktyg som inte kan kontrolleras med
strömbrytaren är farliga och måste repareras.
c) Tag stickproppen ur vägguttaget innan du utför några justeringar, byter tillbehör
eller lägger undan det elektriska handverktyget för förvaring. Dessa åtgärder
i förebyggande syfte minskar risken för att starta det elektriska handverktyget
oavsiktligt.
d) Förvara elektriska handverktyg som inte används utom räckhåll för barn och låt
inte personer som inte är förtrogna med det elektriska handverktyget eller dessa
instruktioner använda det. Elektriska handverktyg är farliga om de kommer
i händerna på ovana användare.
15
Page 16

e) Underhåll elektriska handverktyg. Kontrollera om något är felinställt, om rörliga
delar kärvar, om delar har gått sönder eller något annat som kan påverka
funktionen av det elektriska handverktyget. Om något är skadat måste det
repareras före användning. Många olyckor beror på dåligt underhållna elektriska
handverktyg.
f) Håll verktygen vassa och rena. Ordentligt underhållna skärverktyg med vassa
eggar är mindre benägna att kärva och lättare att kontrollera.
g) Använd det elektriska handverktyget, tillbehör och liknande enligt instruktionerna
och på det sätt som är ämnat för just den typen av elektriskt handverktyg, och
ta även hänsyn till arbetsförhållandena och den typ av arbete som ska utföras.
SVENSK A
Användning av det elektriska handverktyget för arbeten andra än vad det är
ämnat för kan resultera i en farlig situation.
5) Service
a) Låt behörig personal utföra service och reparationer, endast med originalreserv-
delar. Detta garanterar att säkerheten på det elektriska handverktyget behålls.
Särskilda säkerhetsföreskrifter för cirkelsågar
FARA:
a) Håll händerna på avstånd från sågningsområdet och sågklingan. Håll andra
handen på det främre handtaget eller på höljet. Om du håller båda händer
i sågen kan du inte skära dig i handen.
b) Sträck dig inte under arbetsstycket. Skyddet skyddar dig inte från sågbladet
under arbetsstycket.
c) Justera skärdjupet så att det passar arbetsstyckets tjocklek. Mindre än hela
längden på sågklingans tänder ska synas under arbetsstycket.
d) Håll inte stycket som skall sågas i händerna eller över benen. Sätt fast
arbetsstycket på en stabil yta. Det är viktigt att arbetsstycket stöds på rätt sätt
för att minimera risk för personskada, att sågbladet kör fast eller att du förlorar
kontrollen över sågen.
e) Håll det elektriska handverktyget i de isolerade handtagen när du utför arbete
som medför risk att sågen kommer i kontakt med dolda kablar eller den egna
kabeln. Kontakt med en strömförande kabel gör att även utsatta metalldelar på
det elektriska handverktyget blir strömförande och användaren får en stöt.
f) Vid klyvsågning, använd sidoanslag eller raksågningsstycke. Detta förbättrar
precisionen på sågningen och minskar risken för att sågklingan fastnar.
g) Använd alltid sågklingor med rätt storlek och form (diamantformade eller runda).
Sågklingor som inte passar sågens fästdon rör sig excentriskt, vilket gör att du
kan förlora kontrollen över sågen.
16
Page 17

h) Använd aldrig skadade eller felaktiga brickor eller bultar. Brickorna och bultarna
för sågklingan är speciellt utformade för din såg för bästa prestanda och högsta
säkerhet vid användning.
Ytterligare säkerhetsinstruktioner för alla sågar
Anledningar till kast och förhindrande av kast:
• Kast är en plötslig reaktion på en klämd, fastkörd eller felinställd sågklinga
som gör att sågen på ett okontrollerat sätt lyfts upp och ur arbetsstycket mot
användaren.
• När sågklingan kläms eller körs fast genom att sågspåret stänger sig stannar
klingan och motorn gör att enheten kastas snabbt bakåt mot användaren.
• Om sågklingan blir vriden eller felriktad i spåret kan tänderna i den bakre delen
av klingan tränga in i ovansidan på träet, lämna sågspåret och kastas bakåt
mot användaren.
Kast är resultatet av att sågen används på fel sätt, för fel saker eller
under felaktiga förhållanden och kan undvikas genom att nedanstående
försiktighetsåtgärder vidtas.
a) Håll stadigt i sågen med båda händerna på sågen och håll armarna så att du
kan parera kast. Placera dig på endera sida om sågklingan, inte i linje med
sågklingan. Kast kan göra så att sågen hoppar bakåt, men kast kan kontrolleras
av användaren om nödvändiga försiktighetsåtgärder vidtas.
b) När sågklingan kör fast, eller om du av någon anledning avbryter sågningen,
släpp upp strömbrytaren och håll still sågen tills sågklingan stannar helt. Försök
aldrig att ta sågen från arbetsstycket eller dra sågen bakåt när sågklingan är
i rörelse, eftersom kast då kan inträffa. Undersök och vidta nödvändiga åtgärder
för att minska riskerna för fastkörning.
c) När du återstartar en såg i ett arbetsstycke, centrera sågklingan i sågspåret och
kontrollera att sågtänderna inte ligger an mot materialet. Om sågklingan har kört
fast kan den vandra upp eller sågen kan kastas från arbetsstycket när sågen
återstartas.
d) Stöd stora skivor för att minska risken för att sågklingan kläms eller att sågen
kastar. Stora skivor tenderar att bågna av sin egen vikt. Stöd måste placeras
under skivan på båda sidor, nära sågspåret och nära kanten på skivan.
e) Använd inte slöa eller skadade sågklingor. Oskärpta eller felinställda sågklingor
gör att sågspåret blir smalt, vilket ger för mycket friktion, sågklingan kan fastna
eller sågen kan kasta.
f) Reglagen för justering av sågdjup och sågvinkel måste vara åtdragna och
säkrade före sågning. Om justeringen för sågklingan ändras under sågning kan
den köra fast eller sågen kan kasta.
g) Var extra försiktig vid instickssågning i väggar eller andra föremål där du inte ser var
du sågar. Den utskjutande sågklingan kan såga i föremål som kan orsaka kast.
SVENSK A
17
Page 18

Säkerhetsinstruktioner för sågar med inre rörligt skydd
a) Kontrollera före varje användning att det nedre skyddet stängs ordentligt.
Använd inte sågen om det nedre skyddet inte rör sig fritt och stängs omedelbart.
Kläm eller bind aldrig fast det nedre skyddet i öppet läge. Om sågen av
misstag tappas kan det nedre skyddet bli böjt. Fäll upp det nedre skyddet med
handtaget och se till att det rör sig fritt utan att vidröra sågklingan eller någon
annan del vid sågning i samtliga sågvinklar och sågdjup.
b) Kontrollera att fjädern på det nedre skyddet fungerar. Om skyddet och fjädern
inte fungerar ordentligt måste service på dessa delar utföras före användning.
SVENSK A
Nedre skyddet kan röra sig trögt p.g.a. skadade delar, klibbiga avlagringar eller
ansamlat skräp.
c) Det nedre skyddet får föras undan manuellt endast vid speciell sågning som
instickssågning och sammansatt sågning. För undan det nedre skyddet med
handtaget, och så fort sågklingan har kontakt med materialet måste det nedre
skyddet släppas. För all annan sågning ska nedre skyddet fungera automatiskt.
d) Se alltid till att det nedre skyddet täcker sågklingan innan du lägger ifrån dig
sågen på en bänk eller ett golv. En oskyddad roterande sågklinga kan få sågen
att röra sig bakåt och såga i allt den kommer i kontakt med på vägen. Var
medveten om den tid det tar för sågklingan att stanna efter det att strömbrytaren
släppts upp.
Extra säkerhetsinstruktioner för alla sågar med klyvkniv
a) Använd klyvkniv anpassad för den sågklinga du använder. För att klyvkniven
ska fungera måste den vara tjockare än sågklingans kropp men tunnare än
tändernas skärbredd.
b) Justera klyvkniven enligt instruktionerna i denna bruksanvisning. Felaktigt
avstånd, felaktig position och riktning kan göra att klyvkniven inte kan förhindra
kast.
c) Använd alltid klyvkniven utom vid instickssågning. Klyvkniven måste monteras
tillbaka efter instickssågning. Klyvkniven stör vid instickssågning och kan
orsaka kast.
d) För att klyvkniven ska fungera måste den löpa i arbetsstycket. Klyvkniven kan
inte förhindra kast vid korta sågsnitt.
e) Använd inte sågen om klyvkniven är böjd. Även en liten defekt kan sakta ner
stängningshastigheten på ett skydd.
18
Page 19

• Spänn fast arbetsstycket om det inte ligger kvar av sin egen tyngd.
• Använd spånutsug vid användning av cirkelsågen.
• Bär alltid andningsskydd vid användning av cirkelsågen.
• Använd endast sågklingor som är avsedda för denna cirkelsåg.
• Bär alltid hörselskydd vid användning av cirkelsågen.
• Slip-/kapskivor får ej användas till denna cirkelsåg.
• Byte av stickpropp eller sladd skall alltid utföres av en serviceverkstad.
Produktmärkning med säkerhetssymboler
Läs hela bruksanvisningen!
Använd alltid hörselskydd.
Använd alltid skyddsglasögon.
SVENSK A
19
Page 20

Beskrivning
1. Handtag
2. Märkskylt
3. Strömbrytare
4. Låsknapp för strömbrytare
5. Låsskruv för djupinställning
SVENSK A
6. Kabel
7. Klingskydd
8. Skruv för sågklinga
9. Basplatta
10. Klingfläns
11. Sågklinga
12. Parallellanslag
13. Låsskruv för parallellanslag
14. Skruv för vinkelinställning
15. Anslutning för spånsugning
16. Främre handtag
17. Manöverspak för klingskydd
18. Klyvkniv
2
15 17 7 1 16
4 3
5
6
14
Tillbehör
- Parallellanslag
- Insexnyckel
- Sågklinga 140/16
9
18
8 10 11 12 13
20
Page 21

Inställningar och underhåll
Viktigt!
Drag stickkontakten ur vägguttaget innan du gör inställningar och underhåll.
Inställning av klyvkniv
1. Lossa båda skruvarna (1) som håller
klyvkniven.
2. Skjut sågskyddet bakåt och håll fast
det med manöverspaken.
3. Ställ in klyvkniven med max. 5 mm
avstånd till sågklingan.
4. Sågklingan får ej sticka ut mer än
5 mm i djupled från klyvknivens kant.
5. Drag åt båda skruvarna.
6. Kontrollera att klyvkniven står
i linje med sågklingan.
Inställning av sågvinkel
1. Lossa låsskruven.
2. Ställ in önskad vinkel
mellan 0-45°.
3. Drag åt låsskruven.
SVENSK A
Inställning av sågdjup
1. Lossa låsskruven. (1)
2. Sänk basplattan till önskat
sågdjup.
3. Drag åt låsskruven.
1
21
Page 22

Inställning av parallellanslag
1. Lossa låsskruven (1).
2. För 90° sågsnitt, läs skalan mot uttag A. Vid
45° sågning, läs skalan mot uttag B. Tänk på
sågklingans skärbredd. Dra åt skruven.
1
SVENSK A
Byte av sågklinga
1. Lås fast sågklingan.
2. Skruva ur låsskruven (1) i klingans
rotationsriktning med insexnyckeln (2).
3. Skjut sågskyddet bakåt och håll fast
det med manöverspaken (3).
4. Tag bort flänsbrickan (4) och lossa
sågklingan.
5. Sätt dit en ny sågklinga genom att utföra
ovanstående moment omvänt.
6. Justera vid behov klyvknivens läge.
OBS! Innan sågen startas efter byte av sågklingan, kontrollera noggrant att den är rätt
monterad och att låsskruven är åtdragen.
3
1
2
B
A
4
Till- och frånkoppling
Start: Tryck in låsknappen (1) för att
kunna trycka in strömbrytaren (2).
Stopp: Släpp knapparna.
2
1
22
Page 23

Felsökningsschema
Problem Möjlig orsak Åtgärd
Maskinen går inte. Ingen ström. Kontrollera att uttaget är
strömförande.
Slitna kolborstar. Kontakta kundtjänst.
Kortslutning
Fel på strömbrytaren.
Maskinen går
sakta.
Ovanliga ljud hörs. Mekaniska hinder. Kontakta kundtjänst.
Starka vibrationer. Sågklingan sitter löst. Se till att sågklingan är rätt
Gnistbildning
i motorn.
Slö eller skadad sågklinga. Slipa om sågklingan eller
byt ut den.
För lågt varvtal. Mata inte så hårt.
Motorn är överhettad.
Lindning delvis kortsluten.
installerad och drag åt sågklingans låsskruv.
Fastnade kolborstar. Kontakta kundtjänst.
Lindning kortsluten.
Kollektorn smutsig.
SVENSK A
23
Page 24

Skötsel
• Håll alltid ventilationsöppningarna fria från spån och skräp.
• Rengör maskinerna regelbundet med diskmedel och mjuk trasa.
• Använd inga lösningsmedel.
Avfallshantering
SVENSK A
När du ska göra dig av med produkten ska detta ske enligt lokala
föreskrifter. Är du osäker på hur du ska gå tillväga, kontakta din kommun.
Specifikationer
Strömförsörjning 230 V, 50 Hz
Effekt 900 W
Varvtal obelastad 4500 varv/minut
Sågdjup vid 90° 45 mm
Min. sågvinkel 45°
Sågklinga 140/16 mm
Lpa (bullernivå) 91,4 dB (A)
Lwa (bullereffekt) 102,4 dB (A)
Vibrationsvärde 0,4 m/s²
24
Page 25

Sirkelsag
Artikkelnummer 18-3034 Modell M1Y-140-900A-UK
30-9166 M1Y-140-900A
Les nøye igjennom hele bruksanvisningen og ta vare på den til senere bruk.
Vi reserverer oss mot ev. tekst- og bildefeil, samt forandringer av tekniske data.
Ved tekniske problemer eller andre spørsmål, ta kontakt med vårt kundesenter
(se opplysninger på baksiden).
Generelle sikkerhetsinstruksjoner
Advarsel! Les alle instruksjonene grundig. Dersom instruksjonene ikke følges,
kan dette lede til brann, elektrisk støt og/eller alvorlig skade. Med begrepet
”elektriske håndverktøy” i teksten under, menes strømtilkoblede håndverktøy.
TA VARE PÅ DENNE INSTRUKSJONEN!
1) Arbeidsplassen
a) Hold arbeidsplassen ren, ryddig og godt opplyst. Rotete arbeidsplass eller dårlig
opplyste områder kan føre til ulykker.
b) Bruk ikke elektriske håndverktøy i omgivelser med eksplosjonsfare, som for
eksempel i nærheten av lettantennelige væsker, gasser eller støv. Elektrisk
håndverktøy kan danne gnister som igjen kan antenne støv eller trespon.
c) Hold barn og andre tilskuere unna mens du bruker elektriske håndverktøy.
Du kan lett miste kontrollen dersom du blir forstyrret mens du arbeider.
NOR SK
2) Sikkerhet ved bruk av elektrisk strøm
a) Strømkabelens støpsel, til det elektriske verktøyet, må passe i vegguttaket.
Støpselet må ikke forandres på. Bruk aldri adapter sammen med elektrisk
håndverktøy som krever jording. Ved bruk av originale kontakter og støpsler
minskes faren for elektrisk støt.
b) Unngå kroppskontakt med jordede gjenstander som rør, ovner, komfyrer og
kjøleskap. Kroppskontakt med disse øker faren for elektrisk støt.
c) Elektrisk håndverktøy bør ikke utsettes for regn eller fuktighet. Hvis det kommer
vann inn i et elektrisk håndverktøy, øker faren for elektrisk støt.
d) Håndter strømkabelen med forsiktighet. Den må ikke bli brukt til å bære
verktøyet med. Dra ikke i kabelen når du skal ha stikket ut av kontakten. Hold
kabelen unna varme, olje, skarpe kanter og bevegelige deler. Skadde eller
deformerte støpsler kan øke faren for elektrisk støt.
e) Ved bruk av elektrisk håndverktøy utendørs, skal det benyttes skjøtekabel som
er beregnet til dette formålet. Når skjøtekabel som er beregnet for utendørs bruk
benyttes, minsker faren for elektrisk støt.
25
Page 26

3) Personlig sikkerhet
a) Vær våken og bruk sunn fornuft når du bruker et elektrisk verktøy. Ikke bruk
elektriske håndverktøy når du er trett eller påvirket av rusmidler, alkohol eller
sterke medisiner. Når du bruker elektrisk håndverktøy, kan et lite øyeblikk med
uoppmerksomhet resultere i store personskader.
b) Bruk verneutstyr. Benytt alltid vernebriller. Bruk av verneutstyr som støvmaske,
sklisikre såler på skoene, hjelm og hørselsvern, ved behov, minsker faren for
personskade.
c) Unngå uønsket oppstart. Påse at strømbryteren står i posisjon ”OFF” før du
kobler til strømmen. Det å bære et elektrisk håndverktøy med en finger på
avtrekkeren/strømbryteren, eller å koble til strømmen når strømbryteren står
i posisjon ”ON”, kan forårsake ulykker.
d) Fjern alle nøkler/serviceverktøy før du starter det elektriske håndverktøyet.
Et gjenglemt serviceverktøy på en roterende del, kan forårsake personskader.
e) Strekk deg ikke for langt. Påse at du står støtt og har god balanse hele tiden.
NOR SK
Da er du bedre forberedt når uventede situasjoner oppstår.
f) Benytt fornuftige arbeidsklær. Ikke bruk løstsittende klær og smykker. Hold klær,
hansker og smykker unna bevegelige deler. Løstsittende klær, smykker eller langt
hår, kan sette seg fast i bevegelige deler.
g) Hvis det er mulig å koble til en støvsamler/støvsuger, bør dette gjøres. Ved bruk
av sådanne hjelpemidler, kan en minske faren for støvrelaterte skader og ulykker.
4) Bruk og vedlikehold av elektrisk håndverktøy
a) Ikke press et elektrisk håndverktøy. Bruk elektriske håndverktøy som er beregnet
til den arbeidsoperasjonen du skal utføre. Riktig innmatings-hastighet er viktig for
å utføre bedre og sikrere arbeide.
b) Ikke bruk det elektriske håndverktøyet dersom ikke strømbryteren virker og
verktøyet kan skrues av. Alle elektriske håndverktøy, som ikke kan kontrolleres
med en strømbryter, er farlige og må repareres.
c) Dra ut støpselet før du utfører justeringer, bytter tilbehør eller legger det elektriske
håndverktøyet fra deg. Dette for å unngå at elektrisk håndverktøy får en
ukontrollert start.
d) Oppbevar elektrisk håndverktøy utilgjengelig for barn. Påse også at elektrisk
håndverktøy er utilgjengelig for personer som ikke har fått tilstrekkelig opplæring
på eller er fortrolig med verktøyet. Elektrisk håndverktøy kan være farlige dersom
de kommer i hendene på ukyndige.
e) Vedlikehold av elektrisk håndverktøy. Påse at verktøyet ikke er feilinnstilt, at
bevegelige deler ikke beveger seg usymmetrisk, at ingen deler er skadet eller at
det elektriske håndverktøyet har andre feil, som kan påvirke verktøyets funksjon.
Dersom noe er skadet må dette repareres før verktøyet tas i bruk. Mange ulykker
skyldes dårlig eller manglende vedlikehold.
26
Page 27

f) Hold verktøyet rent. Påse også at det elektriske verktøyet holdes skarpt. Godt
vedlikeholdt skjæreverktøy, med skarpe egger, er lettere å kontrollere.
g) Følg instruksjonen, ta hensyn til arbeidsforholdene og den type arbeide som skal
utføres. Bruk av elektrisk håndverktøy til andre arbeidsoperasjoner enn det det er
beregnet til, kan skape farlige situasjoner.
5) Service
a) La profesjonelle fagfolk utføre service og reparasjoner. Benytt kun originale
reservedeler. Dette for å opprettholde sikkerheten ved bruk av det elektriske
håndverktøyet.
Spesielle sikkerhetsforskrifter for sirkelsager
FARE:
a) Hold hendene på avstand fra sagingsområdet og sagklingen. Hold andre hånden
på det fremre håndtaket eller på dekslet. Dersom du holder sagen med begge
hendene, reduseres faren for skade på hendene.
b) Strekk deg ikke under arbeidsstykket. Beskyttelsen beskytter deg ikke fra
sagbladet under arbeidsstykket.
c) Juster skjæredybden så det passer arbeidsstykkets tykkelse. Mindre enn hele
lengden på sagklingens tenner skal sees under arbeidsstykket.
d) Hold ikke stykket som skal sages i hendene eller over beina. Sett fast
arbeidsstykket på en stabil flate. Det er viktig at arbeidsstykket støttes på riktig
måte for å minimere risikoen for personskade, at sagbladet kjører seg fast eller
at du mister kontrollen over sagen.
e) Hold det elektriske håndverktøyet i de isolerte håndtakene når du utfører arbeide
som medfører risiko for at sagen kommer i kontakt med skjulte kabler eller sin
egen kabel. Kontakt med en strømførende kabel gjør at selv utsatte metalldeler
på det elektriske håndverktøyet blir strømførende og brukeren får støt.
f) Ved kløyvesaging, bruk sideanslag eller rettsagingsstykke. Dette forbedrer
presisjonen på sagingen og minsker risikoen for at sagklingen setter seg fast.
g) Bruk alltid sagklinger med rett størrelse og form (diamantformete eller runde).
Sagklinger som ikke passer sagens feste vil bevege seg merkelig, dette gjør
at du kan miste kontrollen over sagen.
h) Bruk aldri skadde eller feil skiver eller bolter. Skivene og boltene tilsagklingen
er spesielt utformet for din sag for best mulig presisjon og høyest sikkerhet
ved bruk.
NOR SK
27
Page 28

Ytterligere sikkerhetsinnstruksjoner for alle sager
Grunner til kast og hvordan man skal forhindre kast
• Kast er en plutselig reaksjon på en klemt, fastkjørt eller feil innstilt sagklinge som
gjør at sagen ukontrollert løftes opp og ut av arbeidsstykket mot brukeren.
• Når sagklingen klemmes eller kjøres fast ved at sagsporet stenger seg, stopper
klingen og motoren gjør at enheten kastes raskt bakover mot brukeren.
• Dersom sagklingen blir vridd eller feilrettet i sporet kan tennene i den bakre delen
av klingen trenge inn på oversiden av treet, forlate sagsporet og kastes bakover
mot brukeren.
Kast er resultatet av at sagen brukes på feil måte, for feil arbeide eller under feil
forhold og kan unngås ved å følge nedenforstående forsiktighetstiltak brukes.
a) Hold godt tak i sagen med begge hendene på sagen og hold armene så du
kan parere kast. Plasser deg på den ene siden av sagklingen, ikke i linje med
NOR SK
sagklingen. Kast kan gjøre så sagen hopper bakover, men kast kan kontrolleres
hvis nødvendige tiltak tas i bruk.
b) Når sagklingen kjører seg fast, eller hvis du av noen anledning avbryter sagingen,
slipp opp strømbryteren og hold sagen i ro til sagklingen stopper helt. Prøv aldri
å ta sagen fra arbeidsstykket eller dra sagen bakover når sagklingen er i bevegelse, fordi da kan kast inntreffe. Undersøk og foreta nødvendige tiltak for å minske
risikoen for å kjøre seg fast
c) Når du starter opp igjen en sag i et arbeidsstykke, sentrèr sagklingen i sagsporet
og kontroller at sagtennene ikke ligger an mot materialet. Dersom sagklingen har
kjørt seg fast kan den vandre opp eller sagen kan kastes fra arbeidsstykket når
sagen startes på nytt.
d) Støtt store plater for å minske risikoen for at sagklingen klemmes eller at sagen
kaster. Store plater har en tendens til å bue seg på grunn av sin egen vekt. Støtte
må plasseres under platen på begge sider, nær sagsporet og nær kanten på
skiven.
e) Bruk ikke sløve eller skadde sagklinger. Uskarpe eller feilinstilte sagklinger gjør at
sagsporet blir smalt, hvilket gir for mye friksjon, sagklingen kan sette seg fast eller
sagen kan kaste.
f) Spaken for justering av sagdybde og sagvinkel må være dratt til og sikret før
saging. Dersom justeringen av sagklingen endres under saging kan den kjøre seg
fast eller sagen kan kaste.
g) Vær ekstra forsiktig ved innstikksaging i vegger eller andre gjenstander der du
ikke ser hvor du sager. Den utsstikkende sagklingen kan sage i gjenstander som
kan forårsake kast.
28
Page 29

Sikkerhetsinstruksjoner for sager med indre bevegelig
beskyttelse
a) Kontroller før hver gangs bruk at den nedre beskyttelsen stenges ordentlig. Bruk
ikke sagen hvis den ikke beveger seg fritt eller stenges umiddelbart. Klem eller
bind aldri fast den nedre beskyttelsen i åpen posisjon. Hvis sagen ved en feiltakelse mistes kan den nedre beskyttelsen bli bøyd. Trekk opp den nedre beskyttelsen med håndtaket og pass på at det beveger seg fritt uten å berøre sagklingen
eller noen annen del ved saging i samtlige sagvinkler og sagdybder.
b) Kontroller at fjæren på den nedre beskyttelsen fungerer. Dersom beskyttelsen og
fjæren ikke fungerer ordentlig må service på disse delene utføres før bruk. Den
nederste beskyttelsen kan bevege seg tregt p.g.a. skadede deler, klebrige avlagringer eller oppsamlet støv.
c) Den nedre beskyttelsen skal føres bort manuelt kun ved spesiell saging som
innstikkssaging og sammensatt saging. Før bort den nedre beskyttelsen med
håndtaket, og så fort sagklingen har kontakt med materialet må den nedre beskyttelsen slippes. For all annen saging skal den nedre beskyttelsen fungere automatisk.
d) Pass alltid på at den nedre beskyttelsen dekker sagklingen før du legger fra deg
sagen på en benk eller et gulv. En ubeskyttet roterende sagklinge kan få sagen til
å røre seg bakover og sage i alt den kommer i kontakt med på veien. Vær bevisst
på den tiden det tar for sagklingen å stoppe etter at strømbryteren slippes opp.
Ekstra sikkerhetsinstruksjoner for alle sager med kløyvekniv
a) Bruk kløyvekniv tilpasset den sagklingen du bruker. For at kløyvekniven skal
fungere må den være tykkere enn sagklingens kropp men tynnere enn tennenes
skjærebredde.
b) Juster kløyvekniven i henhold til innstruksjonene i denne bruksanvisning. Feil
avstand, feil posisjon og retning kan gjøre at kløyvekniven ikke kan forhindre kast.
c) Bruk alltid kløyvekniven bortsett fra ved innstikkssaging. Kløyvekniven må
monteres tilbaka etter instikkssaging. Kløyvekniven forstyrrer ved instikkssaging
og kan forårsake kast.
d) For at kløyvekniven skal fungere må den løpe i arbeidsstykket. Kløyvekniven kan
ikke forhindre kast ved korte sagsnitt.
e) Bruk ikke sagen dersom kløyvekniven er bøyd. Selv en liten defekt kan senke
stengningshastigheten på en beskyttelse.
NOR SK
29
Page 30

• Spenn fast arbeidsstykket hvis det ikke ligger stødig av sin egen tyngde.
• Bruk sponavsug ved bruk av sirkelsagen.
• Bær alltid støvmaske ved bruk av sirkelsagen.
• Bruk kun sagklinger som er beregnet for denne sirkelsagen.
• Bær alltid hørselsvern ved bruk av sirkelsagen.
• Slipe-/kappeskiver skal ikke brukes til denne sirkelsagen.
• Bytte av støpsel eller ledning skal alltid utføres av et serviceverksted.
Produktmerking med sikkerhetssymboler
Les bruksanvisningen.
Bruk hørselsvern.
NOR SK
Bruk vernebriller/visir.
30
Page 31

Beskrivelse
1. Håndtak
2. Merkeskilt
3. Strømbryter
4. Låseknapp for strømbryter
5. Låseskrue for dybdeinnstilling
6. Kabel
7. Klingevern
8. Skrue for sagklinge
9. Grunnplate
10. Flensbrikke
11. Sagblad
12. Parallellanhold
13. Låseskrue for parallellanhold
14. Skrue for vinkelinnstilling
15. Tilkobling for sponsuging
16. Fremre håndtak
17. Manøverspak for klingevern
18. Kløyvekniv
4 3
2
5
6
NOR SK
15 17 7 1 16
14
Tilbehør
• Parallellanhold
• Insexnøkkel
• Sagklinge 140/16
9
18
8 10 11 12 13
31
Page 32

Innstillinger og vedlikehold
Viktig!
Trekk støpselet ut fra vegguttaket før du foretar innstillinger og vedlikehold.
Innstiling av kløyvekniv
1. Løsne begge skruene (1) som holder
kløyvekniven.
2. Skyv sagbeskyttelsen bakover og hold
den med manøverspaken.
3. Still inn kløyvekniven med maks. 5 mm
avstand til sagklingen.
4. Sagklinken må ikke stikke mer en 5 mm
ut i dybden, fra klyveknivens kant.
NOR SK
5. Dra begge skruene ut.
6. Kontroller at kløyvekniven
står på linje med sagklingen.
Innstilling av sagevinkel
1. Løsne låseskruen.
2. Still inn ønsket vinkel mellom
0-45˚.
3. Dra til låseskruen.
Innstilling av sagedybde
1. Løsne låseskruen (1).
2. Senk grunnplaten til ønsket
sagedybde.
3. Skru til låseskruen.
1
32
Page 33

Innstilling av parallellanhold
1. Løsne låseskruen (1).
2. For 90˚ sagesnitt, les skalaen mot uttak A.
Ved 45˚ saging, les skalaen mot uttak B.
Vær oppmerksom på sagklingens skjærebredde. Dra til skruen.
1
Bytte av sagklinge
1. Lås sagklingen.
2. Skru ut låseskruen (1) i klingens rotasjonsretning med insexnøkkelen (2).
3. Skyv sagvernet bakover og hold det fast
med manøverspaken.
4. Fjern flensbrikken (4) og løsne sagklingen.
5. Sett på en ny sagklinge ved å utføre momentene over i motsatt rekkefølge.
6. Juster kløyveknivens posisjon etter behov.
OBS! Før sagen startes etter bytte av sagklingen, må det kontrolleres at klingen er
riktig montert og at låseskruen er dratt til!
Til- og frakobling
Start: Trykk inn låseknappen (1) for å kunne
trykke inn strømbryteren (2).
Stopp: Slipp knappene.
B
A
3
NOR SK
1
4
2
2
1
33
Page 34

Feilsøkingsskjema
Problem Mulig årsak Tiltak
Maskinen går ikke. Ingen strøm. Kontroller at uttaket er
strømførende.
Slitne kullbørster.
Kortslutning.
Feil på strømbryteren.
Maskinen går sakte. Sløv eller skadet sag-
klinge.
NOR SK
Uvanlige lyd fra motor. Mekaniske hinder. Kontakt kundetjenesten.
Sterke vibrasjoner. Sagklingen sitter løst. Påse at sagklingen er riktig
Gnistdannelse i
motoren.
For lavt turtal. Mat ikke så hardt.
Motoren er overopphetet.
Spole delvis kortsluttet.
Kullbørstene sitter fast. Kontakt kundetjenesten.
Spole kortsluttet.
Kollektoren er skitten.
Kontakt kundetjenesten.
Slip opp sagklingen eller
bytt den ut.
montert og at sagklingens
låseskrue er dratt til.
34
Page 35

Vedlikehold
• Hold alltid ventilasjonsåpningene åpne og fri for rusk og spon.
• Rengjør maskinen regelmessig med lett fuktet klut/fille (bruk kun mildt
rengjøringsmiddel).
• Bruk aldri løsningsmiddel på maskinen.
Avfallshåndtering
Når du skal kvitte deg med produktet skal dette skje i henhold til
lokale forskrifter. Er du usikker på hvordan du skal gå fram ta kontakt
med din kommune.
Spesifikasjoner
Strømforsyning 230 V, 50 Hz
Effekt 900 W
Turtall ubelastet 4500 o/min
Sagedybde vid 90° 45 mm
Min. sagevinkel 45°
Sagklinge 140/16 mm
Lpa (Støynivå) 91,4 dB (A)
Lwa (Støyeffekt) 102,4 dB (A)
Vibrasjonsverdi 0,4 m/s²
NOR SK
35
Page 36

Pyörösaha
Tuotenro. 18-3034 Modell M1Y-140-900A-UK
30-9166 M1Y-140-900A
Pidätämme oikeuden teknisten tietojen muutoksiin. Emme vastaa mahdollisista
teksti- tai kuvavirheistä. Jos laitteeseen tulee teknisiä ongelmia, ota yhteys myymälään tai asiakaspalveluun (yhteystiedot käyttöohjeen lopussa).
Yleisiä turvallisuusohjeita
Varoitus! Lue kaikki ohjeet. Seuraavien ohjeiden noudattamatta jättäminen
saattaa johtaa sähköiskuun, tulipaloon ja/tai vakavaan onnettomuuteen. Varoitustekstien termi ”sähkökäyttöinen käsityökalu” tarkoittaa sinun verkkovirralla
tai paristoilla/akulla toimivaa käsityökaluasi. Säästä nämä ohjeet!
1) Työtila
a) Pidä työtilat puhtaina ja hyvin valaistuina. Täynnä tavaraa olevat ja pimeät tilat
ovat avoin kutsu onnettomuudelle.
b) Älä käytä sähkökäyttöisiä käsityökaluja räjähdysherkässä ympäristössä,
kuten helposti syttyvien nesteiden, kaasujen tai pölyn lähellä. Sähkökäyttöiset
käsityökalut muodostavat kipinöitä, jotka saattavat sytyttää pölyn tai höyryt.
SUOMI
c) Pidä lapset ja vierailijat loitolla, kun käytät sähkökäyttöisiä käsityökaluja.
Häiriötekijät saattavat johtaa laitteen hallinnan menettämiseen.
2) Sähköturvallisuus!
a) Sähkökäyttöisen käsityökalun pistokkeen tulee sopia pistorasiaan. Älä muuta
tuotetta millään tavalla. Älä käytä adapteria maadoitettujen sähkökäyttöisten
sähkötyökalujen kanssa. Pistokkeet, joita ei ole muutettu sekä sopivat pistorasiat
pienentävät sähköiskun vaaraa.
b) Vältä koskettamasta maadoitettuja esineitä, kuten putkia, lämpöpattereita, hellaa
tai jääkaappia. Sähköiskun riski kasvaa, mikäli kehosi on maadoitettu.
c) Älä altista sähkökäyttöistä käsityökalua sateelle, äläkä käytä sitä kosteissa
olosuhteissa. Veden joutuminen sähkökäyttöiseen käsityökaluun lisää
sähköiskun vaaraa.
d) Käsittele sähköjohtoa varoen. Älä käytä sähköjohtoa laitteen kantamiseen,
äläkä irrota pistoketta pistorasiasta johdosta vetämällä. Älä altista virtajohtoa
kuumuudelle, öljyille, teräville reunoille tai liikkuville osille. Vioittuneet tai
sotkeutuneet virtajohdot lisäävät sähköiskun vaaraa.
36
Page 37

e) Kun käytät sähkökäyttöistä käsityökalua ulkona, käytä ainoastaan ulko-käyttöön
sopivia jatkojohtoja. Ulkokäyttöön sopivan jatkojohdon käyttäminen pienentää
sähköiskun vaaraa.
3) Oma turvallisuutesi
a) Ole huolellinen ja käytä tervettä järkeä kun työskentelet sähkökäyttöisellä käsityö-
kalulla. Älä käytä sähkökäyttöistä käsityökalua, mikäli olet väsynyt tai huumeiden,
lääkkeiden tai alkoholin vaikutuksen alaisena. Lyhyenkin hetken kestävä tarkkaavaisuuden herpaantuminen saattaa johtaa vakavaan loukkaantumiseen.
b) Käytä suojavarusteita. Käytä aina suojalaseja. Suojavarusteiden, kuten hengitys-
suojaimen, liukuestekenkien, kypärän ja kuulosuojaimien käyttäminen vähentää
loukkaantumisvaaraa.
c) Vältä tahatonta käynnistystä. Varmista, että virtakytkin on asennossa ”OFF” en-
nen kuin liität pistokkeen seinäpistorasiaan. On äärimmäisen vaarallista kantaa
sähkökäyttöistä käsityökalua sormi liipaisimella tai liittää sähkökäyttöinen käsityökalu pistorasiaan virtakytkimen ollessa ”ON”-asennossa.
d) Poista kaikki huoltotyökalut/avaimet ennen kuin käynnistät sähkökäyttöisen käsi-
työkalun. Sähkökäyttöisen käsityökalun liikkuvan osan päälle unohdettu työkalu
saattaa johtaa onnettomuuteen.
e) Älä kurota liian kauas. Varmista, että työasentosi on tasapainoinen työn jokai-
sessa vaiheessa. Näin olet paremmin varustautunut mahdollisen onnettomuuden
sattuessa.
f) Käytä sopivia vaatteita. Älä käytä löysiä vaatteita tai koruja. Pidä hiukset, vaatteet
ja käsineet loitolla liikkuvista osista. Löysät vaatteet, korut tai pitkät hiukset saattavat juuttua liikkuviin osiin.
g) Jos käytössäsi on pölynpoistojärjestelmä, käytä sitä. Näiden apuvälineiden käyttö
saattaa vähentää pölyyn liittyviä vaaroja.
SUOMI
4) Sähkökäyttöisten käsityökalujen käyttäminen ja
huoltaminen
a) Älä pakota sähkökäyttöistä käsityökalua. Käytä sähkökäyttöistä käsityökalua, joka
soveltuu suunnittelemaasi työtehtävään. Sopiva sähkökäyttöinen käsityökalu tekee työn paremmin ja turvallisemmin oikealla nopeudella.
b) Älä käytä sähkökäyttöistä käsityökalua, mikäli virtakytkin ei käynnistä ja sammuta
laitetta. Kaikki sähkökäyttöiset käsityökalut, joita ei voida hallita virtakytkimellä,
ovat vaarallisia ja ne tulee korjata.
c) Irrota pistoke pistorasiasta ennen kuin teet sähkökäyttöiseen käsityökaluun sää-
töjä tai ennen kuin vaihdat sen varusteita tai ennen kuin asetat sen säilytykseen.
Nämä ennaltaehkäisevät toimenpiteet vähentävät sähkökäyttöisen käsityökalun
tahatonta käynnistymistä.
37
Page 38

d) Säilytä sähkökäyttöisiä käsityökaluja lasten ulottumattomissa. Älä luovuta säh-
kökäyttöistä käsityökalua henkilöille, jotka eivät tunne sitä tai sen käyttöohjetta.
Sähkökäyttöiset käsityökalut ovat vaarallisia tottumattomien käyttäjien käsissä.
e) Huolla sähkökäyttöisiä käsityökaluja. Tarkasta, että säädöt ovat kunnossa, että
liikkuvat osat liikkuvat esteettä, että osat ovat ehjiä, ja että sähkökäyttöisessä käsityökalussa ei ole muita seikkoja, jotka vaikuttavat laitteen toimintaan. Jos jokin
osa on vioittunut, se tulee korjata ennen käyttöä. Monet onnettomuudet johtuvat
väärin hoidetuista sähkökäyttöisistä käsityökaluista.
f) Pidä työkalut puhtaina ja terävinä. Terätyökalun hallinta on helpompaa, kun se on
oikein hoidettu ja sen terät ovat teräviä.
g) Käytä sähkökäyttöistä käsityökalua, sen varusteita tms. ohjeiden mukaisesti ja
sellaisella tavalla, joka sopii kyseiselle sähkökäyttöiselle käsityökalulle ja ota myös
huomioon työskentelyolosuhteet ja suoritettava työ. Sähkökäyttöisen käsityökalun
käyttäminen muihin kuin sille tarkoitettuihin työtehtäviin saattaa johtaa vaaratilanteeseen.
5) Huolto
a) Laitteen saa huoltaa ja korjata ainoastaan ammattihenkilö ja huollossa tulee
käyttää ainoastaan alkuperäisosia. Näin taataan sähkökäyttöisen käsityökalun
turvallisuus.
SUOMI
Pyörösahaa koskevia turvallisuusohjeita
VAARA:
a) Pidä kädet poissa sahausalueelta ja sahanterästä. Pidä toista kättä etukahvalla tai
rungon päällä. Kun pidät sahasta kiinni molemmin käsin, et voi sahata kättäsi.
b) Älä kurkota sahattavan kappaleen alle. Suoja ei suojaa sinua sahanterältä sahat-
tavan kappaleen alapuolelta.
c) Säädä leikkuusyvyys sahattavan kappaleen mukaan. Sahanterä ei saa pistää ulos
sahattavan kappaleen alta kokonaista hampaan pituutta.
d) Älä pidä kiinni sahattavasta kappaleesta käsin, äläkä pidä sahattavaa kappaletta
jalkojesi päällä. Kiinnitä työkappale tasaiselle ja vakaalle pinnalle. Työkappaleen
oikea kiinnittäminen on hyvin tärkeää henkilövahinkoriskien pienentämisen kannalta. Huonosti kiinnitetty työkappale lisää myös sahanterän juuttumisen tai sahan
hallinnan menettämisen riskiä.
e) Pidä kiinni sahan eristetyistä kahvoista, kun työskentelet paikoissa, joissa on
mahdollisuus osua piilossa oleviin sähköjohtoihin tai sahan omaan virtajohtoon.
Osuminen virtaa johtavaan kaapeliin johtaa siihen, että myös sahan metalliosista
tulee jännitteisiä, mikä aiheuttaa käyttäjälle sähköiskun.
38
Page 39

f) Halkaisussa tulee käyttää sivuohjainta tai sahausohjainta. Tämä parantaa
sahauksen tarkkuutta ja pienentää sahanterän juuttumisriskiä.
g) Käytä aina oikean kokoista ja muotoista sahanterää (timantinmuotoinen tai
pyöreä). Sahan käyttöakseliin sopimaton terä pyörii epäkeskeisesti, mikä saattaa
aiheuttaa sahanhallinnan menettämisen.
h) Älä käytä vioittuneita tai vääränlaisia aluslaattoja tai pultteja. Sahanterän aluslaatat
ja pultit on suunniteltu erityisesti juuri tähän sahaan, ja ne takaavat sahan
turvallisen käytön.
Yleisiä sahan turvallisuusohjeita
Mistä takapotku aiheutuu ja miten takapotkun syntyminen voidaan estää:
• Takapotku on äkillinen liike, joka tapahtuu, kun jumittunut tai väärin asennettu
sahanterä nostaa sahan sahattavasta kappaleesta hallitsemattomasti kohti
käyttäjää.
• Kun sahanterä jumittuu esim. sahausuran kiristyessä, terä pysähtyy ja saha lentää
moottorin voimasta vauhdilla kohti käyttäjää.
• Mikäli terä kiertyy tai ohjautuu väärin sahausurassa, terän takaosan hampaat
saattavat pureutua puun yläosaan ja irrota sahausurasta, jolloin saha lennähtää
taaksepäin käyttäjää kohti.
Takapotkun riski kasvaa, jos sahaa käytetään väärällä tavalla, väärään tarkoitukseen tai väärissä olosuhteissa, mutta se voidaan välttää noudattamalla alla
olevia turvallisuusohjeita.
a) Pidä sahasta kiinni kunnolla molemmin käsin, ja pidä kädet sellaisessa asennossa,
että voit suojautua mahdollisen takapotkun sattuessa. Sijoitu sahanterän linjasta
sivuun – älä sijoitu sahanterän suuntaisesti. Takapotku aiheuttaa sahan lentämisen
taaksepäin, mutta takapotkua voidaan hallita, mikäli käyttäjä noudattaa kaikkia
turvallisuusohjeita.
b) Jos sahanterä jumittuu, tai jos lopetat sahauksen, päästä virtakytkin ja pidä kiinni
sahasta, kunnes terä on täysin pysähtynyt. Älä yritä irrottaa sahaa työkappaleesta,
äläkä vedä sahaa taaksepäin terän pyöriessä, sillä se lisää takapotkun vaaraa.
Suunnittele työ huolella ja noudata riittäviä tuvallisuusohjeita pienentääksesi terän
jumittumisen riskiä.
c) Kun jatkat tauon jälkeen sahausta samasta sahausurasta, keskitä terä uraan ja
varmista, että sahanterä ei kosketa uran reunoihin. Kiinni juuttunut terä saattaa
aiheuttaa uudelleen käynnistettäessä terän liikkumisen ylös tai sahan lentämisen
työkappaleesta.
d) Tue suuret levyt, sillä muuten on olemassa vaara, että terä jumittuu tai saha
lennähtää. Suurilla levyillä on taipumus taipua omasta painostaan. Levy tulee tukea
alta päin kummaltakin puolelta ja levyn reunojen läheltä.
39
SUOMI
Page 40

e) Älä käytä tylsiä tai viallisia teriä. Tylsät tai väärin asennetut terät tekevät kapean
sahausuran, mikä aiheuttaa suurta kitkaa, mikä taas saattaa johtaa terän
jumittumiseen tai sahan lentämiseen.
f) Kiristä sahauskulman ja –syvyyden säätimet ennen sahausta. Sahanterän
säätäminen sahauksen aikana saattaa aiheuttaa terän jumittumisen tai sahan
lentämisen.
g) Ole erityisen tarkkana, kun pistosahaat seiniä tai muita kohteita, joita et näe. Ulos
pistävä sahanterä saattaa osua kohteisiin, jotka aiheuttavat takapotkun.
Turvallisuusohjeita sahoille, joissa on sisempi liikkuva suoja
a) Varmista ennen jokaista käyttöä, että alempi suoja sulkeutuu kunnolla. Älä
käytä sahaa, mikäli alempi suoja ei liiku esteettä ja sulkeudu välittömästi. Älä
kiinnitä alempaa suojaa aukiasentoon. Sahan putoaminen saattaa aiheuttaa
alemman suojan taipumisen. Taita alempi suoja auki kahvan avulla ja varmista,
että se liikkuu kaikissa sahauskulmissa ja –syvyyksissä esteettä koskettamatta
sahanterään tai muihin osiin sahauksen aikana.
b) Varmista, että alemman suojan jousi toimii. Mikäli suoja ja jousi eivät toimi, ne
tulee huoltaa ennen käyttöä. Alempi suoja saattaa liikkua hitaasti, mikäli jokin osa
on vioittunut tai mikäli suojaan on kerääntynyt likaa tai sahanpurua.
c) Alempaa suojaa saa siirtää manuaalisesti ainoastaan erityisissä toimenpiteissä,
kuten pistosahauksesssa. Kevitä alempaa teräsuojaa kahvasta ja päästä se heti,
SUOMI
kun sahanterä koskettaa materiaalia. Muussa sahauksessa alemman suojan tulee
antaa toimia automaattisesti.
d) Varmista aina, että alempi teräsuoja peittää koko terän ennen kuin lasket sahan
käsistäsi. Suojaamaton pyörivä terä saattaa aiheuttaa sen, että saha liikkuu ja
sahaa kaikkea, mikä osuu sen tielle. Ota huomioon, että terä pyörii pitkään sen
jälkeen, kun virtakytkin on päästetty.
Erityisiä turvallisuusohjeita sahoille, joissa on rakoveitsi
a) Käytä sahanterään sopivaa rakoveistä. Jotta rakoveitsi toimii, sen tulee olla
paksumpi kuin terän runko, mutta ohuempi kuin hampaiden leikkuuleveys.
b) Säädä rakoveitsi tämän käyttöohjeen ohjeiden mukaisesti. Väärä etäisyys, väärä
asento tai suunta saattavat aiheuttaa sen, että rakoveitsi ei estä takapotkua.
c) Käytä rakoveistä aina (paitsi pistosahauksessa). Rakoveitsi tulee asentaa takaisin
paikoilleen pistosahauksen jälkeen. Rakoveitsi häiritsee pistosahausta ja saattaa
aiheuttaa takapotkun.
d) Rakoveitsen tulee liikkua työkappaleessa jotta se toimii. Rakoveitsi ei estä
takapotkua sahattaessa lyhyitä sahauksia.
e) Älä käytä sahaa, mikäli rakoveitsi on taipunut. Myös hyvin pieni taipuma voi
hidastaa suojan sulkeutumisnopeutta.
40
Page 41

• Kiinnitä työkappale, mikäli se ei pysy paikoillaan oman painonsa ansiosta.
• Käytä pölynpoistoa työskennellessäsi pyörösahalla.
• Käytä aina hengityssuojainta työskennellessäsi pyörösahalla.
• Käytä ainoastaan tähän sahaan sopivia teriä.
• Käytä aina kuulosuojaimia työskennellessäsi pyörösahalla.
• Tässä pyörösahassa ei saa käyttää hioma- tai katkaisulaikkoja.
• Pistorasian tai johdon saa vaihtaa vain valtuutettu sähköasentaja.
Tuotteen merkinnät ja turvallisuussymbolit
Lue käyttöohje huolellisesti ja säilytä se tulevaa tarvetta varten.
Käytä aina kuulosuojaimia.
Käytä aina suojalaseja.
SUOMI
41
Page 42

Kuvaus
1. Kahva
2. Merkkikilpi
3. Virtakytkin
4. Virtakytkimen lukituspainike.
5. Syvyydensäädön lukitusruuvi
6. Johto
7. Teräsuoja
8. Sahanterän ruuvi
9. Pohjalevy
10. Terälaippa
11. Sahanterä
12. Halkaisuohjain
13. Rinnakkaissuojan lukitusruuvi
14. Kulman säädön ruuvi
SUOMI
15. Pölynpoistoliitäntä
16. Etukahva
17. Teräsuojan kahva
18. Rakoveitsi
2
15 17 7 1 16
4 3
5
6
14
Tarvikkeet
- Rinnakkaissuoja
- Kuusiokoloavain
- Sahanterä 140/16
9
18
8 10 11 12 13
42
Page 43

Säädöt ja huolto
Tärkeää! Irrota pistoke pistorasiasta ennen laitteen huolto- ja säätötöitä.
Rakoveitsen säätäminen
1. Avaa rakoveitsen molemmat ruuvit (1).
2. Työnnä sahasuojaa taaksepäin ja pidä
kiinni siitä ohjausvivulla.
3. Säädä rakoveitsi maks. 5 mm:n päähän
sahanterästä.
4. Sahanterä saa syvyyssuunnassa pistää
ulos korkeintaan 5 mm rakoveitsen
reunasta.
5. Kiristä molemmat ruuvit.
6. Tarkasta, että rakoveitsi on
linjassa sahanterän kanssa.
Sahauskulman säätäminen
1. Avaa lukitusruuvi.
2. Säädä haluttu kulma 0–45°.
3. Kiristä lukitusruuvit.
Sahaussyvyyden säätäminen
1. Avaa lukitusruuvi (1).
2. Laske pohjalevy halutulle
korkeudelle.
3. Kiristä lukitusruuvit.
SUOMI
43
Page 44

Halkaisuohjaimen säätö
1. Avaa lukitusruuvit (1).
2. 90°:n sahaus: lue asteikko kohdasta A.
45°:n sahaus: lue asteikko kohdasta B.
Ota huomioon sahanterän leikkuuleveys.
Kiristä ruuvit.
Sahanterän vaihto
1. Lukitse sahanterä.
2. Ruuvaa auki lukitusruuvia (1) terän pyörimissuuntaan kuusiokoloavaimella (2).
3. Työnnä sahasuojaa taaksepäin ja pidä
kiinni siitä ohjausvivulla (3).
4. Irrota laippa-aluslevy (4) ja irrota sahanterä.
5. Laita uusi sahanterä päinvastaisessa
järjestyksessä.
6. Säädä tarvittaessa rakoveistä.
SUOMI
HUOM.! Tarkasta ennen sahan käynnistämistä terän vaihdon jälkeen, että terä on
asennettu oikein ja lukitusruuvit ovat
kireällä.
1
B
A
3
1
4
2
Käynnistäminen ja sammuttaminen
Käynnistys: Paina lukituspainiketta (1)
voidaksesi painaa virtakytkintä (2).
Pysäytys: Päästä painikkeet.
44
2
1
Page 45

Vianhakutaulukko
Ongelma Mahdollinen syy Toimenpiteet
Laite ei käy. Ei virtaa. Varmista, että pistorasiassa
on virtaa.
Kuluneet hiiliharjat. Ota yhteys myymälään.
Oikosulku
Virtakytkimessä vikaa.
Laite käy hitaasti. Tylsä tai vioittunut terä. Hio tai vaihda terä.
Liian alhainen kierrosluku. Älä syötä liian kovaa
Moottori on ylikuumentunut Älä syötä liian kovaa
Epätavallisia
ääniä.
Laite tärisee voimakkaasti.
Moottori kipinöi. Juuttuneet hiiliharjat. Ota yhteys myymälään.
Mekaaninen este Ota yhteys myymälään.
Käämi osittain oikosulussa.
Sahanterä ei ole kunnolla
kiinni.
Käämi oikosulussa
Kollektori on likainen
Varmista, että sahanterä on
keskellä ja kiristä lukitusruuvi.
SUOMI
45
Page 46

Hoito
• Pidä ilmanvaihtokanavat puhtaana lastuista ja roskista.
• Puhdista koneet säännöllisesti miedolla astianpesuliuksella ja pehmeällä
puhdistusliinalla.
• Älä käytä liotinaineita.
Kierrätys
Kierrätä tuote asianmukaisesti, kun poistat sen käytöstä. Ota yhteys
kuntasi jäteneuvojaan, mikäli olet epävarma.
Tekniset tiedot
Virtalähde 230 V, 50 Hz
Teho 900 W
Kuormittamaton kierrosluku 4500 k./min
Sahaussyvyys 90°:ssa 45 mm
SUOMI
Minimisahauskulma 45°
Sahanterä 140/16 mm
LpA (melutaso) 91,4 dB (A)
LwA (meluteho) 102,4 dB (A)
Tärinäarvo 0,4 m/s²
46
Page 47

Declaration of Conformity
Försäkran om överrenstämmelse
Samsvarerklæring
Vakuutus yhdenmukaisuudesta
CLAS OHLSON AB
SE-793 85 INSJÖN, SWEDEN
Declares that this product complies with the requirements of the following directives and standards
Intygar att denna produkt överensstämmer med kraven i följande direktiv och standarder
Bekrefter at dette produktet er i samsvar med følgende direktiver og standarder
Vakuuttaa, että tämä tuote täyttää seuraavien direktiivien ja standardien vaatimukset
CIRCULAR SAW
COTECH 30-9166 / 18-3034
M1Y-140-900A / M1Y-140-900A-UK
Machinery directive
2006/42/EC
EN 60745-1:2009
EN 60745-2-5:2007
+A11
EC type certificate, no. S1 50015618
Issued by the following notified body:
Utfärdats av följande anmälda organ:
Utstedt av følgende teknisk kontrollorgan:
Myöntänyt seuraava ilmoitettu laitos:
TüV Rheinland Product Safety GmbH, Am Grauen Stein, D-51105 Köln
EMC directive
2004/108/EC
EN 55014-1:2006
EN 55014-2:1997+A1
EN 61000-3-2:2006
EN 61000-3-3:1995
+A1+A2
Klas Balkow
President
Insjön, Sweden, 2011-10-06
Page 48

SVERIGE
KUNDTJÄNST Tel: 0247/445 00
Fax: 0247/445 09
E-post: kundtjanst@clasohlson.se
INTERNET www.clasohlson.se
BREV Clas Ohlson AB, 793 85 INSJÖN
NORGE
KUNDESENTER Tlf.: 23 21 40 00
Faks: 23 21 40 80
E-post: kundesenter@clasohlson.no
INTERNETT www.clasohlson.no
POST Clas Ohlson AS, Postboks 485 Sentrum, 0105 OSLO
SUOMI
ASIAKASPALVELU Puh: 020 111 2222
Faksi: 020 111 2221
Sähköposti: info@clasohlson.fi
INTERNET www.clasohlson.fi
OSOITE Clas Ohlson Oy, Yrjönkatu 23 A, 00100 HELSINKI
UNITED KINGDOM
For consumer contact, please visit
www.clasohlson.co.uk and click on
customer service.
INTERNET www.clasohlson.co.uk
 Loading...