

Page 1
Multimedia Remote
Control Laser Pointer
Multimedia-fjärrkontroll/laser
Multimedia-fjernkontroll/laser
Multimediakaukosäädin/laser
E N G L I S HS V E N S K AN O R S KS U O M I
Art.no. Model
38-3314 LR4
www.clasohlson.com
Ver. 200906
Page 2

Page 3

Multimedia Remote Control
Laser Pointer
Art.no. 8-14 Model LR4
Please read the entire instruction manual before using the product and
save it for future reference. We reserve the right for any errors in text or images and any necessary changes made to technical data. If you have any
questions regarding technical problems please contact Customer Services.
1. Safety
Caution: Laser beams can cause eye damage. Do not point
the laser beam directly into your or anyone else’s eyes.
Caution: Use this product only according to the purpose
described in this instruction manual. Do not modify the product in any way, since this may increase the risk of someone
being exposed to harmful laser beams.
2. Product description
Wireless USB transmitter.
• LR4 is a multimedia remote control with an integrated laser pointer
designed to be used in conjunction with a computer.
• Wirelessly controls your most common keyboard/mouse functions and
your computer’s media player.
• LCD display with backlight.
• Ergonomic and easy to use. Settings memory even during battery changes.
• Range up to 10 metres.
• Timer with vibration alarm.
• Battery saving feature, automatic shut-off after 30 minutes in “Standby” mode.
• Laser pointer with 5 different icons.
• Receiver with USB connector.
• Battery: 1 x AAA/LR03.
• Requires Windows XP/Vista 32.
E N G L I S H
Page 4
3. Package contents
• LR4 remote control
•
E N G L I S H
USB receiver
•
Instruction manual
•
Battery: AAA/LR03
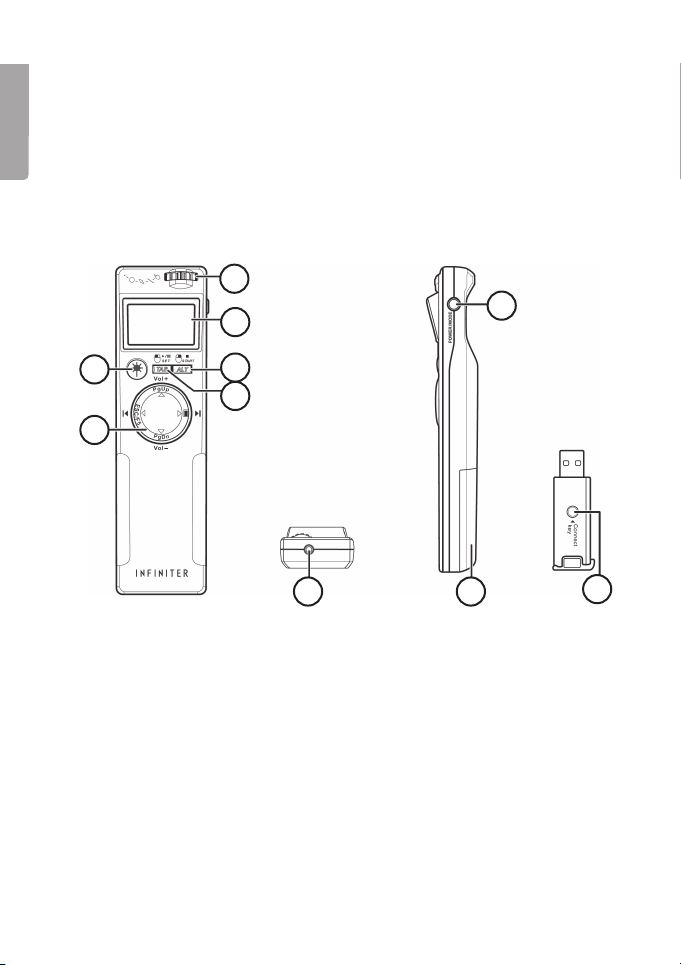
4. Buttons and functions
4
8
1
5
6
2
7
1. Laser pointer ON/OFF
2. Multi-function control
3. Laser pointer icon selector
4. LCD display
5. START/ALT/RMB
6. SET/TAB/LMB
7. Laser pointer
8. Power switch / Mode switch
9. Battery cover
10. “Connection” button/ Status-LED
9
4
10
Page 5
5. Operation
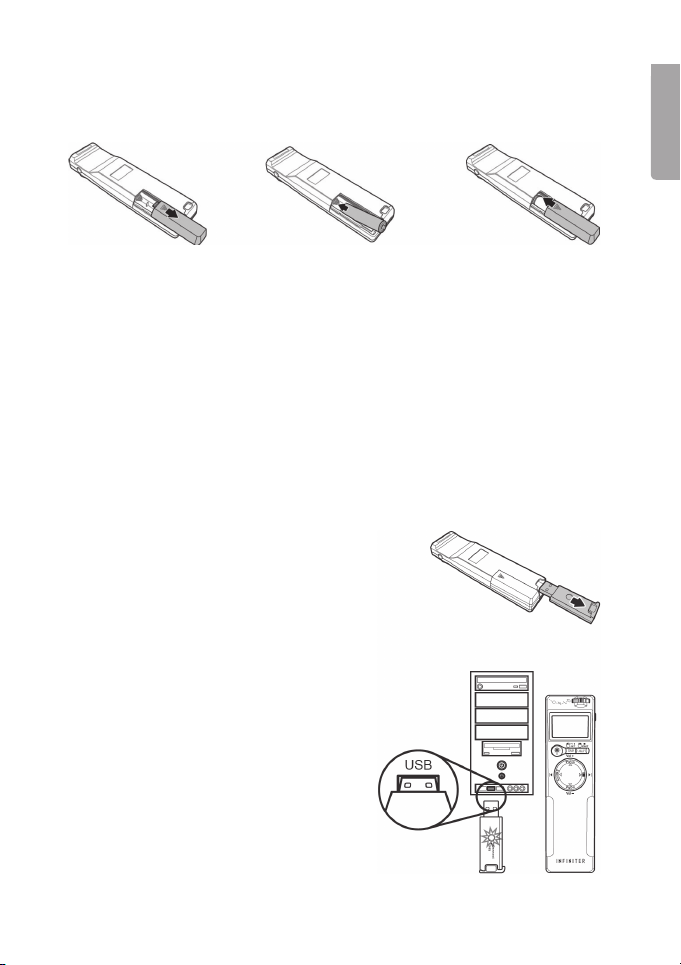
5.1 Inserting the battery
1. Press and slide the battery cover downwards in the direction of the arrow.
2. Insert the battery according to the markings.
3. Replace the battery cover.
N.B. Remove the battery from the product if it is not to be used for an
extended period.
5.2 Turning on the remote control
Depress [POWER/MODE] for 2 seconds in order to turn the remote
ON/OFF. The display will be lit for approx.3 seconds. After 30 minutes in
“Standby” mode the remote will automatically shut off to save the battery.
5.3 USB receiver
1. Slide out the USB receiver in the
direction of the arrow.
2. Connect the USB receiver to an
available USB port on your computer.
3. If you are using Windows XP (with
Service Pack 2) or Vista 32 then the
USB receiver will be detected and
the drive routines will be installed
automatically. The USB receiver will
then be ready for use.
N.B. If the USB receiver does not detect
the signals from the transmitter you
must conduct a frequency scan, see
7. Troubleshooting.
E N G L I S H
5
Page 6

5.4 Display
1. Keyboard control
2. Mouse control
E N G L I S H
3. Media-Player control
4. Countdown timer (seconds)
5. Countdown timer (hours, minutes)
6. Battery status indicator
7. Timer control
1
7
6
2
4
5
5.5 Areas of use
The remote control has four different areas of
use. Press [POWER/MODE] on the remote the
required number of times to switch between:
Keyboard (K/B) – Mouse – Media – Timer
– Keyboard, etc.
K/B (Keyboard)
1. Press [POWER/MODE] the required
number of times in order to highlight K/B.
2. Then press [ALT] and [TAB] to browse
between various les and programs.
3. ALT, TAB, PgUp, PgDn and ESC/F5
replace the exact same functions on
your keyboard.
4. Pressing the upper portion of the multifunction control will display a blank screen.
Mouse
1. Press [POWER/MODE] the required number
of times in order to highlight MOUSE.
2. Press [TAB] to set the control for your left
mouse button.
3. Press [ALT] to set the control for your right
mouse button.
4.
on the multi-function control
replaces your regular mouse movement.
6
Page 7
Media
1. Press [POWER/MODE] the required number of times in order to highlight MEDIA.
2. Press
TAB, ALT and in order
to replace the Play – Paus – Stop – Go
to previous/next track – Adjust volume
commands.
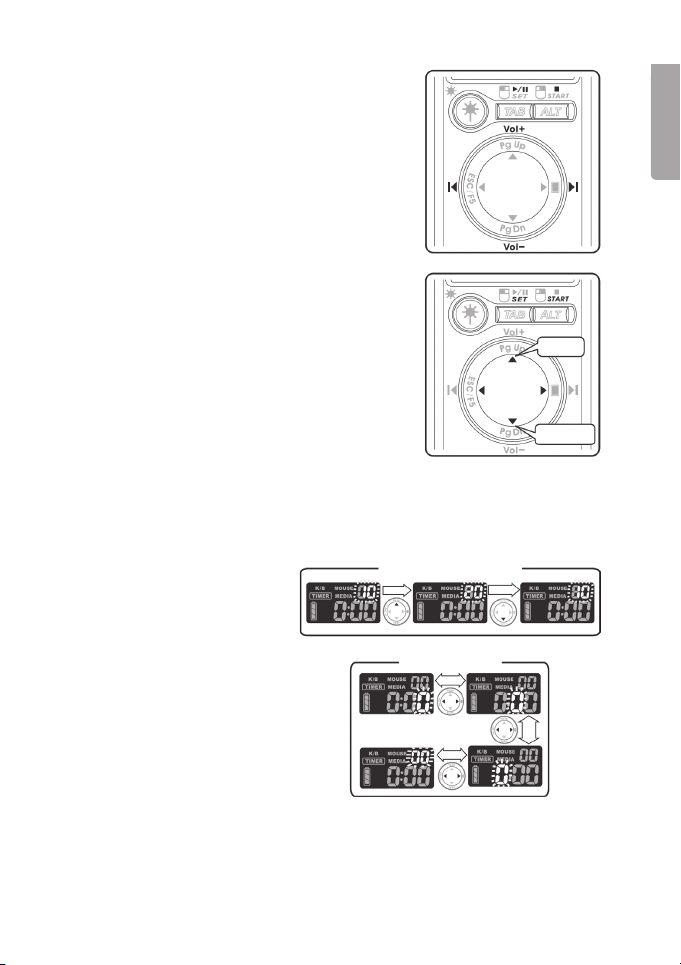
Timer
1. Press [POWER/MODE] the required number
of times in order to highlight TIMER.
2. Press [TAB] in order to open the TIMER
settings. Set the countdown timer using this
format: Hours: Min: Sec:
3. Start the countdown by pressing [ALT].
Press [TAB] to stop TIMER and change the
set countdown time.
4. Use
to come to the time value (H,M,S)
you wish to change and then use to
change that value.
5. Press [ALT] to start the newly set
countdown time.
E N G L I S H
+
-
Setting the TIMER countdown time (example):
+/- Increase/decrease value
+ Increase
- Decrease
Move right/left
Quick setting the TIMER:
Press [TAB] the required
number of times for your
needs. Each press adds
5 minutes.
+ / -
+
7
-
Page 8

5.6 Laser pointer
E N G L I S H
Press and hold [ ] to activate the laser pointer and turn the control dial
above the display to select the desired laser icon.
5.7 Backlight
To activate the backlight for 3 seconds, press [POWER/MODE] or press
PgDn on the multi-function control.
6. Care and maintenance
Do not expose the remote to extreme temperatures.
Clean the remote using a dry, soft cloth. Avoid using strong cleaning
agents since this can damage the exterior.
7. Troubleshooting
N.B. If the USB receiver does not detect the signals from the transmitter
you must conduct a frequency scan:
1. Connect the USB receiver to an available USB port on your computer.
2. Press [Connect Key] on the USB receiver. The Status LED will begin
ashing. If the frequency scan does not succeed within a minute the
Status LED will stop ashing.
3. Remove the batteries.
4. Depress [POWER/MODE] while inserting the battery simultaneously.
When the battery is in place the display will come on for about a second.
5. Release [POWER/MODE] once the LCD display and Status LED have
turned off.
6. Once the frequency scan is complete, the remote is ready to use.
8
Page 9

8. Consider the environment
Follow local ordinances when disposing of this product. If you are unsure of
how to dispose of this product, please contact your municipality.
9. Specifications
Size: 13 x 3.5 x 2.2 cm (L x W x H)
Weight: 78 g (including battery)
Range: Up to 10 metres
RF frequency: 2.4 GHz
Interface: USB 2.0
Supported operating systems: Windows XP or Vista 32
Laser wavelength: 630-680 nm
Output power: CL IIIa, <5 mW, CL II <1 mW.
Power supply: 1 x AAA/LR03 battery
Battery life: 6 hours
E N G L I S H
9
Page 10
Multimedia-fjärrkontroll/laser
Art.nr 8-14 Modell LR4
Läs igenom hela bruksanvisningen före användning och spara den sedan
för framtida bruk. Vi reserverar oss för ev. text- och bildfel samt ändringar
av tekniska data. Vid tekniska problem eller andra frågor, kontakta vår
kundtjänst (se adressuppgifter på baksidan).
S V E N S K A
1. Säkerhet
Varning! Laserstrålning kan orsaka ögonskador.
Rikta inte blicken direkt mot laserstrålen.
Varning! Använd endast produkten till de ändamål som
anges här i bruksanvisningen. Modiera inte produkten på
något sätt, därför att det kan leda till att någon utsätts för
skadlig laserstrålning.
2. Produktbeskrivning
Trådlös USB-sändare.
• LR4 är en Multimedia-fjärrkontroll med laserpekpinne. Avsedd för att
användas till en dator.
• Fjärrstyr trådlöst dina vanligaste tangent- /musfunktioner, styr media-
spelaren i datorn.
• LCD-display med bakgrundsbelysning.
• Ergonomisk och enkel att använda. Minne för inställningarna även
efter batteribyte.
• Räckvidd upp till 10 meter.
• Timer med vibrationslarm.
• Batterisparfunktion, automatisk avstängning efter 30 minuter
i stand-byläge.
• Laserpekare med 5 st. olika motiv.
• Mottagaren ansluts till datorns USB-port.
• Drivs med batteri 1 x AAA/LR03.
• Kräver Windows XP/Vista 32.
10
Page 11

3. Förpackningen innehåller
• LR4 fjärrkontroll
• USB-mottagare
• Bruksanvisning
• Batteri AAA/LR03
4. Knappar och funktioner
4
1
5
6
2
7
1. Laserpekare Av/Till
2. Multifunktionsreglage
3. Reglage för val av bild från laserpekare
4. LCD-display
5. START/ALT/RMB
6. SET/TAB/LMB
7. Laserpekare
8. Strömbrytare/Funktionsomkopplare
9. Batterilock
10. Anslutningsknapp / Status-LED
S V E N S K A
8
9
10
11
Page 12

5. Användning
5.1 Sätt i batteriet
S V E N S K A
1. Tryck batterilocket neråt i pilens riktning.
2. Sätt i batteriet enligt märkningen.
3. Sätt tillbaka batterilocket.
Obs! Ta ur batteriet om produkten inte ska användas under en längre tid.
5.2 Slå på fjärrkontrollen
Håll in [POWER/MODE] i 2 sekunder för att slå på/stänga av fjärrkontrollen.
Displayen lyser i ca 3 sekunder. Efter 30 minuter i stand-byläge sker automatisk avstängning för att spara batteri.
5.3 USB-mottagare
1. Tryck ut USB-mottagaren
i pilens riktning.
2. Anslut USB-mottagaren till en ledig
USB-port på datorn.
3. Om du använder Windows XP (med
servicepack 2) eller Vista 32 hittas
USB-mottagaren och drivrutinerna
installeras automatiskt. USB-mottagaren är klar att användas direkt.
Obs! Om inte USB-mottagaren känner
av signalerna från fjärrkontrollen måste
du göra en frekvenssökning, se
7. Felsökning.
12
Page 13

5.4 Displayens visning
1. Tangentbordsfunktion
2. Musfunktion
3. Media-Playerfunktion
4. Nedräknande timer (sekunder)
5.
Nedräknande timer (timmar:minuter)
6. Batteriindikator
7. Timer-funktion
1
7
6
5.5 Användningsområden
Fjärrkontrollen har fyra olika användningsområden. Tryck upprepade gånger på
[POWER/MODE] på fjärrkontrollen för att växla
mellan: Keyboard (K/B) – Mouse – Media
– Timer – Keyboard o.s.v.
K/B (Tangentbord)
1. Tryck upprepade gånger på [POWER/MODE]
på fjärrkontrollen för att markera K/B.
2. Tryck först på [ALT] och sedan på [TAB] för
att stega mellan alla öppna dokument och
program.
3. ALT, TAB, PgUp, PgDn och ESC/F5 på
fjärrkontrollen ersätter också motsvarande
knappar på tangentbordet.
4. Den högra delen av multifunktionsreglaget
visar svart skärmbild.
2
5
4
S V E N S K A
Mouse
1. Tryck upprepade gånger på [POWER/
MODE] på fjärrkontrollen för att markera
MOUSE.
2. Tryck på [TAB] för att ersätta vänster knapp
på musen.
3. Tryck på [ALT] för att ersätta höger knapp
på musen.
4. ersätts av multifunktionsreglaget
och yttar muspekaren.
1
Page 14

Media
1. Tryck upprepade gånger på [POWER/MODE]
på fjärrkontrollen för att markera MEDIA.
2. Tryck på TAB, ALT och
för att
ersätta Play – Paus – Stop – Gå till före-
gående/nästa spår – Justera volym.
Timer
S V E N S K A
1. Tryck upprepade gånger på [POWER/MODE]
på fjärrkontrollen för att markera TIMER.
2. Tryck på [TAB] för att öppna inställningar
för TIMER. Ställ in tiden för nedräknande
timer i formatet: Tim Tim: Min Min: Sek Sek.
3. Starta nedräkningen genom att trycka på
[ALT]. Tryck på [TAB] för att stoppa TIMER
och ändra tiden.
4. Markera vilken tid som skall ändras
medoch ändra den markerade tiden
med .
5. Tryck på [ALT] för att starta nedräkning av
den inställda tiden.
+
-
Exempel på ändring av den
inställda tiden för TIMER:
+/- Öka/Minska tiden
+ Öka
- Minska
Flytta till höger/vänster
Snabbinställning av TIMER:
Tryck på [TAB] upprepade
gånger, varje tryckning lägger
till 5 minuter.
14
+ / -
+
-
Page 15

5.6 Laserpekare
Håll in [ ] för att aktivera laserpekaren och vrid på reglaget ovanför
displayen för att välja önskad bild för laserpekaren.
5.7 Displayens bakgrundsbelysning
Aktivera displayens bakgrundsbelysning i 3 sekunder genom att trycka
på [POWER/MODE] på fjärrkontrollen eller genom att trycka på PgDn på
multifunktionsreglaget.
6. Skötsel och underhåll
Utsatt inte fjärrkontrollen för extrema temperaturer.
Rengör fjärrkontrollen med en torr, mjuk trasa. Undvik starka rengöringsmedel eftersom detta kan skada höljet.
7. Felsökning
Obs! Om inte USB-mottagaren känner av signalerna från fjärrkontrollen
måste du göra en frekvenssökning så här:
1. Anslut USB-mottagaren till en ledig USB-port på datorn.
2.
Håll in [Connect Key] på USB-mottagaren. Status-LED blinkar. Om inte
frekvenssökningen har lyckats inom en minut slutar Status-LED att blinka.
3. Ta ur fjärrkontrollens batteri.
4.
Håll in [POWER/MODE] på fjärrkontrollen under tiden som du sätter tillbaka batteriet. När du sätter i batteriet tänds LCD-displayen i ca en sekund.
5. Släpp [POWER/MODE] när LCD-displayen och Status-LED slocknar.
6. När frekvenssökningen är färdig är fjärrkontrollen klar att använda.
S V E N S K A
15
Page 16

8. Skydda miljön
När du ska göra dig av med produkten ska detta ske enligt lokala föreskrifter.
Är du osäker på hur du ska gå tillväga, kontakta din kommun.
9. Specifikationer
Storlek: 13 x 3,5 x 2,2 cm (l x b x t)
Vikt: 78 g (inklusive batteri)
S V E N S K A
Räckvidd: Upp till 10 meter
RF frekvens: 2,4 GHz
Gränssnitt: USB 2.0
Operativsystem som stöds: Windows XP/Vista 32
Laser våglängd: 630 ~ 680 nm
Utgångseffekt: CL IIIa, <5 mW, CL II <1 mW
Strömförsörjning: Batteri 1 x AAA/LR03
Batteri, driftstid: 6 timmar
16
Page 17

Multimedia-fjernkontroll/laser
Art.nr. 8-14 Modell LR4
Les bruksanvisningen nøye før bruk av produktet, og ta vare på den for ev.
framtidig bruk. Vi reserverer oss mot ev. tekst- og bildefeil, samt forandringer av tekniske data. Ved tekniske problemer eller andre spørsmål, ta
kontakt med vårt kundesenter. (Se opplysninger om kundesenteret i denne
bruksanvisningen).
1. Sikkerhet
Advarsel! Laserstråler kan forårsake øyeskader. Vend ikke
blikket direkte mot laserstrålen.
Advarsel! Produktet må kun benyttes til de formål som er
beskrevet i bruksanvisningen. Produktet må ikke modiseres
eller endres på.
2. Produktbeskrivelse
Trådløs usb-sender.
• LR4 er en Multimedia-fjernkontroll med laserpeker. Den er beregnet til
å bruke sammen med datamaskiner.
• Til trådløs fjernstyring av tastatur-/musfunksjoner. Den styrer medias
pilleren i maskinen.
• LCD-display med bakgrunnsbelysning.
• Ergonomisk og enkel i bruk. Minne for innstillingene, selv etter skifte
av batterier.
• Rekkevidde inntil 10 meter.
• Timer med vibrasjonsalarm.
• Batterisparefunksjon, automatisk avstengning etter 30 minutter
i Standby-modus.
• Laserpeker med 5 forskjellige motiver.
• Mottakeren kobles til datamaskinens usb-port.
• Drives med 1 x AAA/LR03-batteri.
• Krever Windows XP/Vista 32.
-
N O R S K
17
Page 18

3. Forpakningen inneholder
• LR4 fjernkontroll
•
Usb-mottaker
•
Bruksanvisning
•
Batteri AAA/LR03
4. Knapper og funksjoner
4
8
N O R S K
1
5
6
2
7
1. Laserpeker Av/På
2. Multifunksjonsregulering
3. Valg av bilde/mønster fra laserpeker
4. LCD-display
5. START/ALT/RMB
6. SET/TAB/LMB
7. Laserpeker
8. Strømbryter/Funksjonsomkobler
9. Batterilokk
10. Tilkoblingstast / Status - LED
18
9
10
Page 19

5. Bruk
5.1 Sette inn batteriet
1. Trykk lokket på batteriholderen nedover i pilens retning.
2. Legg batteriet i. Følg merkingen for å plassere det riktig.
3. Sett batterilokket tilbake på plass igjen.
Obs! Ta ut batteriet dersom produktet ikke skal brukes over tid.
5.2 Slå på fjernkontrollen
Hold [POWER/MODE] inne i 2 sekunder for å slå på/skru av
fjernkontrollen. Displayet lyser i ca. 3 sekunder. Etter 30 minutter
i Standby-modus skrus det automatisk av for å spare batteriet.
5.3 Usb-mottaker
1. Trekk usb-mottakeren ut
i pilens retning.
2. Koble mottakeren i en ledig usb-port
på maskinen.
3. Hvis du har Windows XP (med
servicepack 2) eller Vista 32, vil
maskinen nne usb-mottakeren
og driveren installeres automatisk.
Usb-mottakeren er klar til bruk
umiddelbart.
Obs! Dersom usb-mottakeren
ikke kjenner igjen signalene fra
fjernkontrollen må et frekvenssøk
foretas, se Feilsøking, pkt. 7.
19
N O R S K
Page 20

5.4 Displayet
1. Tastaturfunksjonen
2. Mus-funksjon
3. Media-Player-funksjon
4. Nedtellingstimer (sekunder)
5. Nedtellingstimer (timer - minutter)
6. Batteriindikator
7. Timer-funksjon
1
7
6
2
4
5
5.5 Bruksområde
Fjernkontrollen har re forskjellige bruksområder.
Trykk gjentatte ganger på [POWER/MODE] på
fjernkontrollen for å skifte mellom: Keyboard (K/B)
N O R S K
– Mouse – Media – Timer – Keyboard o.s.v.
K/B (Tastatur)
1. Trykk gjentatte ganger på [POWER/MODE]
på fjernkontrollen for å merke K/B.
2. Trykk først på [ALT] og deretter på [TAB]
for å skifte mellom alle åpne dokumenter
og programmer.
3. ALT, TAB, PgUp, PgDn og ESC/F5 på
fjernkontrollen erstatter også tilsvarende
taster på tastaturet.
4. Den høyre delen av multifunksjonstasten
viser svart skjermbilde.
Mouse
1. Trykk gjentatte ganger på [POWER/MODE]
på fjernkontrollen for å merke MOUSE.
2. Trykk på [TAB] for å erstatte den venstre
musetasten.
3. Trykk på [ALT] for å erstatte den høyre
musetasten.
4.
erstattes av multifunksjonstasten
og ytter musepekeren.
20
Page 21

Media
1. Trykk gjentatte ganger på [POWER/MODE]
på fjernkontrollen for å merke MEDIA.
2. Trykk på
TAB, ALT og for å er-
statte Play – Pause – Stopp – Gå til fore-
gående/neste spor – Justere volumet.
Timer
1. Trykk gjentatte ganger på [POWER/MODE]
på fjernkontrollen for å merke TIMER.
2. Trykk på [TAB] for å åpne innstillingene for
TIMER. Still inn tiden for nedtellingstimer
i formatet: Time Time: Minutt Minutt:
Sekund Sekund
3. Nedtellingen startes ved å trykke på [ALT].
Trykk på [TAB] for å stoppe TIMER og
å endre tiden.
4. Marker hvilken tid som skal endres med
og endre den merkede tiden med .
5. Trykk på [ALT] for å starte nedtellingen av
den innstilte tiden.
+
N O R S K
-
Eksempel på endring av den
innstilte tiden for TIMER.
+/- Øke/redusere tiden
+ Øke
- Redusere
Flytt til høyre/venstre
Hurtiginnstilling av TIMER:
Trykk på [TAB] gjentatte
ganger. Hvert trykk legger
til 5 min.
21
+ / -
+
-
Page 22

5.6 Laserpeker
Hold [ ] inne for å aktivere laserpekeren og drei på bryteren over displayet
for å velge ønsket mønster/bilde for laserpekeren.
5.7 Bakgrunnsbelysning på skjermen
Skjermens bakgrunnsbelysning aktiveres i 3 sek. ved å trykke på
[POWER/MODE] på fjernkontrollen eller ved å trykke på PgDn
på multifunksjonsbryteren.
N O R S K
6. Stell og vedlikehold
Utsett ikke produktet for ekstreme temperaturer. Rengjør produktet
med en myk, tørr klut. Unngå sterke rengjøringsmidler, da de kan skade
produktets deksel.
7. Feilsøking
Obs! Dersom usb-mottakeren ikke kjenner igjen signalene fra fjernkontrollen
må et frekvenssøk foretas på følgende måte:
1. Koble mottakeren i en ledig usb-port på maskinen.
2. Hold [Connect Key] på usb-mottakeren inne. Status-LED blinker.
Dersom ikke denne frekvenssøkingen blir vellykket i løpet av ett minutt
vil Status-LED slutte å blinke.
3. Ta ut fjernkontrollens batteri.
4. Hold [POWER/MODE] på fjernkontrollen inne mens batteriet settes inn
igjen. Når batteriet er på plass, tennes LCD-displayet i ca. ett sekund.
5. Slipp [POWER/MODE] når LCD-displayet og Status-LED slukker.
6. Når frekvenssøkingen er ferdig, er fjernkontrollen klar til bruk.
22
Page 23

8. Ta vare på miljøet
Når produktet skal kasseres, må det skje i henhold til lokale forskrifter.
Er du usikker på hvordan du går fram, ta kontakt med lokale myndigheter.
9. Spesifikasjoner
Størrelse: 13 x 3,5 x 2,2 cm (l x b x t)
Vekt: 78 g (inkl. batteri)
Rekkevidde: Inntil 10 meter
RF frekvens: 2.4 GHz
Grensesnitt: USB 2.0
Operativsystem som støttes: Windows XP/Vista 32
Bølgelengde laser: 630 ~ 680 nm
Utgangseffekt: CL IIIa, <5 mW, CL II <1 mW
Strømforsyning: 1 x AAA/LR03-batteri
Batteri, driftstid: 6 timer
N O R S K
2
Page 24

Multimediakaukosäädin/laser
Tuotenro 8-14 Malli LR4
Lue käyttöohjeet ennen tuotteen käyttöönottoa. Säilytä käyttöohjeet tulevaa
tarvetta varten. Pidätämme oikeuden teknisten tietojen muutoksiin. Emme
vastaa mahdollisista teksti- tai kuvavirheistä. Jos laitteeseen tulee teknisiä
ongelmia, ota yhteys myymälään tai asiakaspalveluun (yhteystiedot käyttöohjeen lopussa).
1. Turvallisuus
Varoitus! Lasersäde voi aiheuttaa silmävaurioita. Älä katso
suoraan lasersäteeseen.
Varoitus! Käytä tuotetta vain niihin tarkoituksiin, jotka mainitaan tässä käyttöohjeessa. Älä muuta tuotetta millään tavalla,
sillä haitallinen lasersäde voi aiheuttaa henkilövahinkoja.
2. Tuotekuvaus
Langaton USB-lähetin.
S U O M I
• LR4 on tietokoneen kanssa käytettävä multimediakaukosäädin, jossa
on laserosoitin.
• Kauko-ohjaa langattomasti tavallisimpia näppäimistö- ja hiiritoimintoja
ja ohjaa tietokoneen mediasoitinta.
• Taustavalaistu LCD-näyttö.
• Ergonominen ja helppokäyttöinen. Asetusten muisti myös pariston
vaihdon jälkeen.
• Kantama jopa 10 metriä.
• Ajastin, jossa värinähälytin.
• Paristonsäästötila, automaattinen sammutus, kun laitetta ei
käytetä 30 minuuttiin.
• Laserosoitin, jossa 5 erilaista kuviota.
• Vastaanotin liitetään USB-porttiin.
• Paristo 1 kpl AAA/LR03.
• Windows XP/Vista 32.
24
Page 25

3. Pakkauksen sisältö
• LR4-kaukosäädin
•
USB-vastaanotin
•
Käyttöohje
•
Paristo LR03/AAA
4. Painikkeet ja toiminnot
4
8
1
5
6
2
7
1. Laserosoitin päällä/pois päältä
2. Monitoiminto-ohjain
3. Laserosoittimen kuvan valintaohjain
4. LCD-näyttö
5. START/ALT/RMB
6. SET/TAB/LMB
7. Laserosoitin
8. Virtakytkin/toiminnonvalitsin
9. Paristolokeron kansi
10. Liitäntäpainike/tilan merkkivalo
25
S U O M I
9
10
Page 26

5. Käyttö
5.1 Pariston asennus
1. Paina paristolokeron kantta alaspäin nuolen suuntaan.
2. Aseta paristot lokeroon napaisuusmerkintöjen mukaisesti.
3. Laita paristolokeron kansi takaisin paikalleen.
Huom.! Poista paristo, jos laite on pitkään käyttämättä.
5.2 Kaukosäätimen käynnistäminen
Käynnistä tai sammuta kaukosäädin painamalla kahden sekunnin
ajan [POWER/MODE]-painiketta. Näyttö syttyy noin 3 sekunniksi.
Kun kaukosäädin on ollut standby-tilassa 30 minuuttia, se sammuu
automaattisesti pariston säästämiseksi.
S U O M I
5.3 USB-vastaanotin
1. Paina USB-vastaanotinta nuolen
suuntaan.
2. Liitä USB-vastaanotin tietokoneen
vapaaseen USB-porttiin.
3. Jos käytät Windows XP:tä, jossa on
servicepack 2 tai Vista 32:ta, USBvastaanotin löytyy ja ajurit asentuvat
automaattisesti. USB-vastaanotin
on valmis käytettäväksi.
Huom.! Jos USB-vastaanotin ei löydä
kaukosäätimen signaaleja, tee taajuushaku (katso kappale 7. Vianhaku).
26
Page 27

5.4 Näyttö
1. Näppäimistötoiminto
2. Hiiritoiminto
3. Mediasoitintoiminto
4. Lähtölaskenta-ajastin (sekunnit)
5.
Lähtölaskenta-ajastin (tunnit:minuutit)
6. Pariston tila
7. Ajastintoiminto
1
7
6
5.5 Käyttöalueet
Kaukosäätimessä on neljä erilaista käyttöaluetta. Vaihda seuraavien tilojen välillä painamalla
[POWER/MODE]-painiketta. Keyboard (K/B)
– Mouse – Media – Timer – Keyboard jne.
K/B (Näppäimistö)
1. Merkitse K/B painamalla kaukosäätimen
[POWER/MODE]-painiketta.
2. Siirry kaikkien avointen dokumenttien ja
ohjelmien välillä painamalla ensin [ALT] ja
sitten [TAB].
3. ALT, TAB, PgUp, PgDn ja ESC/F5painikkeet kaukosäätimessä korvaavat
näppäimistön vastaavat painikkeet.
4. Monitoiminto-ohjaimen oikea puoli näyttää
mustaa näyttökuvaa.
Mouse
1. Merkitse MOUSE painamalla kaukosäätimen [POWER/MODE]-painiketta.
2. Korvaa hiiren vasen painike painamalla [TAB].
3. Korvaa hiiren oikea painike painamalla [ALT].
4.
korvataan monitoiminto-ohjaimella
ja siirtävät hiiren osoitinta.
2
4
5
S U O M I
27
Page 28

Media
1. Merkitse MEDIA painamalla kaukosäätimen
[POWER/MODE]-painiketta.
2. Paina
TAB, ALT ja korvataksesi
seuraavat toiminnot: Toista – Tauko –
Keskeytä – Siirry edelliseen/seuraavaan
raitaan – Säädä äänenvoimakkuutta
Timer
1. Merkitse TIMER painamalla kaukosäätimen
[POWER/MODE]-painiketta.
2. Avaa ajastimen asetukset painamalla
[TAB]. Aseta lähtölaskenta-ajastimen aika
seuraavassa muodossa: TT: MM: SS.
3. Käynnistä lähtölaskenta painamalla [ALT].
Keskeytä lähtölaskenta ja muuta aikaa
painamalla [TAB].
4. Merkitse muutettava aika painikkeella
ja
muuta aikaa painikkeella .
S U O M I
painamalla [ALT].
5. Aloita asetetun ajan lähtölaskenta
+
-
Esimerkki asetetun ajan
muuttamisesta (TIMER)
+/- Lisää/vähennä aikaa
+ Lisää
- Vähennä
Siirry vasemmalle
tai oikealle
Ajastimen pika-asetus
Paina [TAB]-painiketta useita
kertoja. Jokainen painallus
lisää aikaan 5 minuuttia.
28
+ / -
+
-
Page 29

5.6 Laserosoitin
Aktivoi laserosoitin painamalla [ ]. Valitse osoittimeen haluamasi kuva
kääntämällä näytön päällä olevaa säädintä.
5.7 Näytön taustavalo
Aktivoi näytön taustavalo kolmen sekunnin ajaksi painamalla
kaukosäätimen [POWER/MODE]-painiketta tai painamalla
monitoimiohjaimen PgDn-painiketta.
6. Huolto ja ylläpito
Älä altista kaukosäädintä äärimmäisille lämpötiloille. Puhdista kaukosäädin
kuivalla ja pehmeällä liinalla. Vältä voimakkaita puhdistusaineita, sillä ne
saattavat vahingoittaa kuorta.
7. Vianetsintä
Huom.! Jos USB-vastaanotin ei löydä kaukosäätimen signaaleja, tee
taajuushaku seuraavalla tavalla.
1. Liitä USB-vastaanotin tietokoneen vapaaseen USB-porttiin.
2. Paina USB-vastaanottimen [Connect Key]-painiketta. Tilan merkkivalo
vilkkuu. Jos taajuushaku ei onnistu minuutissa, tilan merkkivalo
lopettaa vilkkumisen.
3. Poista kaukosäätimen paristo.
4. Paina kaukosäätimen [Power/Mode]-painike pohjaan siksi ajaksi kun
asetat pariston takaisin paikalleen. Kun asetat pariston paikalleen,
LCD-näyttö syttyy noin sekunnin ajaksi.
5. Päästä [POWER/MODE]-painike, kun LCD-näyttö ja tilan
merkkivalo sammuvat.
6. Kuun taajuushaku on valmis, kaukosäädin on valmis käytettäväksi.
29
S U O M I
Page 30

8. Pidä huolta ympäristöstä
Kierrätä tuote asianmukaisesti, kun poistat sen käytöstä.
Kysy tarkempia kierrätysohjeita kuntasi jäteneuvonnasta.
9. Tekniset tiedot
Mitat: 13 x 3,5 x 2,2 cm (P x L x K)
Paino: 78 g (paristo mukaan lukien)
Kantama: Jopa 10 metriä
RF-taajuus: 2,4 GHz
Käyttöliittymä: USB 2.0
Tuetut käyttöjärjestelmät: Windows XP tai Vista 32
Laserin aallonpituus: 630~680 nm
Antoteho: CL IIIa, <5 mW, CL II <1 mW
Virtalähde: 1 kpl AAA/LR03-paristo
Pariston käyttöaika: 6 tuntia
S U O M I
0
Page 31

Page 32

SVERIGE
KUNDTJÄNST Tel: 0247/445 00
Fax: 0247/445 09
E-post: kundtjanst@clasohlson.se
INTERNET www.clasohlson.se
BREV Clas Ohlson AB, 79 85 INSJÖN
NORGE
KUNDESENTER Tlf.: 2 21 40 00
Faks: 2 21 40 80
E-post: kundesenter@clasohlson.no
INTERNETT www.clasohlson.no
POST Clas Ohlson AS, Postboks 485 Sentrum, 0105 OSLO
SUOMI
ASIAKASPALVELU Puh: 020 111 2222
Faksi: 020 111 2221
Sähköposti: info@clasohlson.fi
INTERNET www.clasohlson.fi
OSOITE Clas Ohlson Oy, Yrjönkatu 2 A, 00100 HELSINKI
GREAT BRITAIN
For consumer contact, please visit
www.clasohlson.co.uk and click on
customer ser vice.
INTERNET www.clasohlson.co.uk
www.clasohlson.com
 Loading...