

Page 1

CD Player with FM Radio
CD-spelare med FM-radio
CD-spiller med FM-radio
CD-soitin ja FM-radio
CD-Spieler mit UKW-Radio
EnglishSvenskaNorskSuomiDeutsch
Art.no Model
18-8390, 18-8391, 18-8408 BBX118B-UK
38-6298, 38-6299, 38-6459 BBX118B
Ver. 20140904
Page 2

English
CD Player with FM Radio
Art.no 18-8390, 18-8391, 18-8408 Model BBX118B-UK
38-6298, 38-6299, 38-6459 BBX118B
Please read theentire instruction manual before using theproduct and then save it for
future reference. We reserve theright for any errors in text or images and any necessary
changes made to technical data. In theevent of technical problems or other queries,
please contact our Customer Services (see address details on theback).
Safety
• This product should only be repaired by aqualified service technician.
• Theproduct should not be taken apart or modified.
• Do not place theproduct where there is arisk of it falling into water or other liquid.
Do not place any objects containing liquid on top of theproduct, e.g. flower vases
or fizzy drinks.
• Shut off thestand-by function during night time or when you travel away.
• Do not cover theproduct. Adequate ventilation with adistance of at least 15 cm
between ventilation ports and thesurrounding area is necessary to prevent thedevice
from overheating.
• Do not place theproduct in damp, dusty environments or where there are
strong vibrations.
• When using headphones, do not listen to audio at high volumes for aprolonged
period. It may damage your hearing.
• When the AC/DC adapter is used as the disconnect device, the disconnect device
shall remain readily operable.
• The marking plate is located at the bottom of the apparatus.
2
Page 3
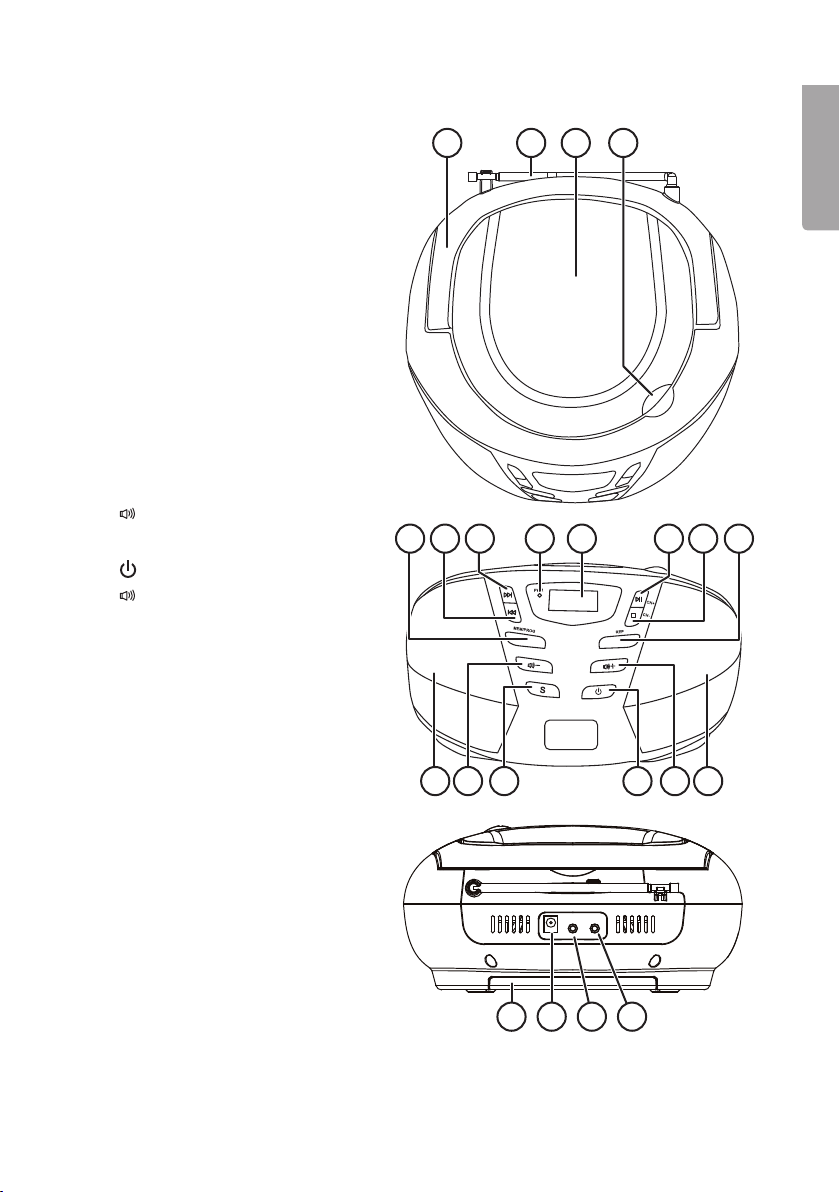
Buttons and functions
1. Handle
2. FM aerial
3. CD tray
4. CD door opening cavity
5. [ MEM/PROG ] Programmed
playback (playlist)
6. [ l◄◄ ] Previous track
7. [ ►►l ] Next track
8. Power indicator light
9. Display
10. [ ►ll/CH+ ] Play/pause
/CH- ] Stop playback
11. [
12. [ REP ] Repeat
13. Speaker
– ] Decrease volume
14. [
15. [ S ] Source/Mode
] On/off
16. [
+ ] Increase volume
17. [
18. Battery compartment
19. DC IN
20. Headphone socket
21. AUX IN
21 3 4
English
9 10 11 128765
13
15
13161417
1918 20 21
3
Page 4

English
Getting started
Battery operation
1. Remove thebattery cover on theunderside of thedevice by sliding it backwards.
2. Insert 6×C/LR14 batteries into thebattery compartment. Make sure to insert
thebatteries in accordance with thepolarity markings in thebattery compartment.
3. Refit thebattery cover.
Mains operation
Connect thecable to thesocket (19). Connect theplug to a100–240 V wall socket.
Operating instructions
Inserting aCD
1. Open theCD door by carefully lifting it at thecavity (4).
2. Insert aCD into theCD compartment.
3. Shut thedoor by carefully pushing it down.
CD playback
TheCD player can play audio discs, CD-R, CD-RW discs containing music/speech.
1. Plug themains lead into awall socket.
2. Insert aCD by following theinstructions above.
3. Press [ S ] to enter theCD playback mode.
4. Theplayback starts automatically beginning with thefirst track.
5. Press [ ►ll/CH+ ] to pause playback. Press it again to resume playback.
6. Press [
/CH- ] to stop playback.
Note:
TheCD player also stops if:
• theCD door is opened.
• you choose RADIO as thesound source.
• theentire CD has played through.
Selecting adifferent track/finding asector on atrack
1. Press [ l◄◄ ] or [ ►►l ] therequired number of times to go to thedesired track.
Thechosen track will then be shown on thedisplay.
2. Press [ l◄◄ ] once to return to thebeginning of thecurrent track.
3. Press [ l◄◄ ] repeatedly to return to previous tracks.
4. Press and hold [ l◄◄ ] or [ ►►l ] to quick search backwards or forwards.
4
Page 5

Repeating atrack
1. Whilst aCD is playing, press [ REP ] once to repeat thetrack that is playing.
“REP” will begin flashing on thedisplay.
2. Press [ REP ] asecond time to repeat all thetracks on theCD. “REP” will appear
on thedisplay.
3. Press [ REP ] athird time to play theintro. “INTRO” will appear on thedisplay.
4. Press [ REP ] afourth time to begin playing thetracks in random order. “RAN” will
appear on thedisplay.
5. Press [ REP ] afifth time to quit therepeat mode. No text is shown on thedisplay
when thefunction is shut off.
Programmed playing of CD tracks
Atotal of 20 tracks can be programmed. Always press [/CH- ] before
programming playback.
1. Press [ MEM/PROG ] once. “P-01” will flash on the display briefly and then change
to show “00” and flash.
2. Use [ l◄◄ ] or [ ►►l ] to choose thetrack that is to be programmed.
3. Press [ MEM/PROG ] to store thedesired track into theplaylist memory.
“P-02” will flash on the display briefly and then change to show “00” and flash.
4. Repeat steps 2–3 to add more tracks to theplaylist.
5. When you have finished programming, press [ ►ll/CH+ ]. Thetracks on theCD will
now be played in theorder programmed on your playlist.
6. To clear theplaylist, either press [
player off.
/CH- ] twice, select FM mode or switch theCD
English
FM radio
1. Turn theradio on by pressing [ ].
2. Extend theaerial completely.
3. Press [ S ] to select theFM mode.
4. To start theautomatic station search, press and hold in [ l◄◄ ] or [ ►►l ] for
acouple of seconds and then release.
5. Press [ l◄◄ ] or [ ►►l ] to search for stations manually.
6. Adjust thevolume using thevolume control buttons.
Saving astation
1. If you are listening to station you like, you can save it by pressing [ MEM/PROG ].
Thenumber of thememory slot that thestation is saved on will flash on thedisplay.
2. Use [
3. Confirm your selection by pressing [ MEM/PROG ].
4. Thesame procedure can be repeated to save up to 20 stations.
5. Whilst in radio mode, press [
/CH- ] and [ ►ll/CH+ ] to select which number slot you wish to save thestation on.
/CH- ] and [ ►ll/CH+ ] to recall one of theother
preset stations.
5
Page 6
English
AUX IN
1. Anexternal audio source such as anMP3 player can be connected to theAUX IN socket.
2. Start playback on theexternal audio source.
3. Press [ S ] to select AUX mode.
4. Use thecontrols on theexternal audio source to control theaudio.
Care and maintenance
Cleaning of thedevice
Wipe thesurface clean using asoft, damp cloth. Never use strong solvents or
cleaning agents.
CD care
• Do not touch thesurface of theCD. Use only theedges
for handling.
• Do not expose theCD to direct sunlight, heat or dust.
• Do not put labels on theCD.
• Only use aspecialised marker suitable for marking your CDs.
• Dry from thecentre and out when cleaning. Do not ever dry
in circles.
• Use adry soft cloth without detergents or solvents.
• Always store theCD in its case when it is not being played.
Disposal
This product should be disposed of in accordance with local regulations.
If you are unsure how to proceed, contact your local council.
Specifications
Voltage
Mains adaptor In 100–240 V AC, 50/60 Hz
Out 9 V, 1 A
Batteries 6×C/LR14 batteries (sold separately)
FM frequency range 87.5–108 MHz
Size 232×227×112.5mm
Weight 936g
6
Page 7

CD-spelare med FM-radio
Art.nr 18-8390, 18-8391, 18-8408 Modell BBX118B-UK
38-6298, 38-6299, 38-6459 BBX118B
Läs igenom hela bruksanvisningen före användning och spara den sedan för framtida bruk.
Vi reserverar oss för ev. text- och bildfel samt ändringar av tekniska data. Vid tekniska
problem eller andra frågor, kontakta vår kundtjänst (se adressuppgifter på baksidan).
Säkerhet
• Produkten får endast repareras av kvalificerad servicepersonal.
• Produkten får inte demonteras eller ändras.
• Placera inte produkten så att den kan falla ner i vatten eller annan vätska. Ställ inte
några föremål som innehåller vätska på produkten, t.ex. blomvas eller läskedryck.
• Stäng av eventuell standbyfunktion om natten eller när du reser bort.
• Täck inte över anläggningen. Tillräcklig ventilation, med ett minsta avstånd på
15 cm mellan ventilationshålen och omgivande ytor, är nödvändig för att förhindra
att anläggningen blir för varm.
• Placera inte anläggningen i en miljö som är fuktig, dammig eller där det förekommer
starka vibrationer.
• Vid användning av hörlurar, lyssna inte längre perioder med hög volym då det kan
skada din hörsel.
• Se till att vägguttaget där nätadaptern ansluts sitter lättillgängligt eftersom
nätadaptern används som frånkopplingsanordning från elnätet.
• Märkskylten är placerad på produktens undersida.
Svenska
7
Page 8
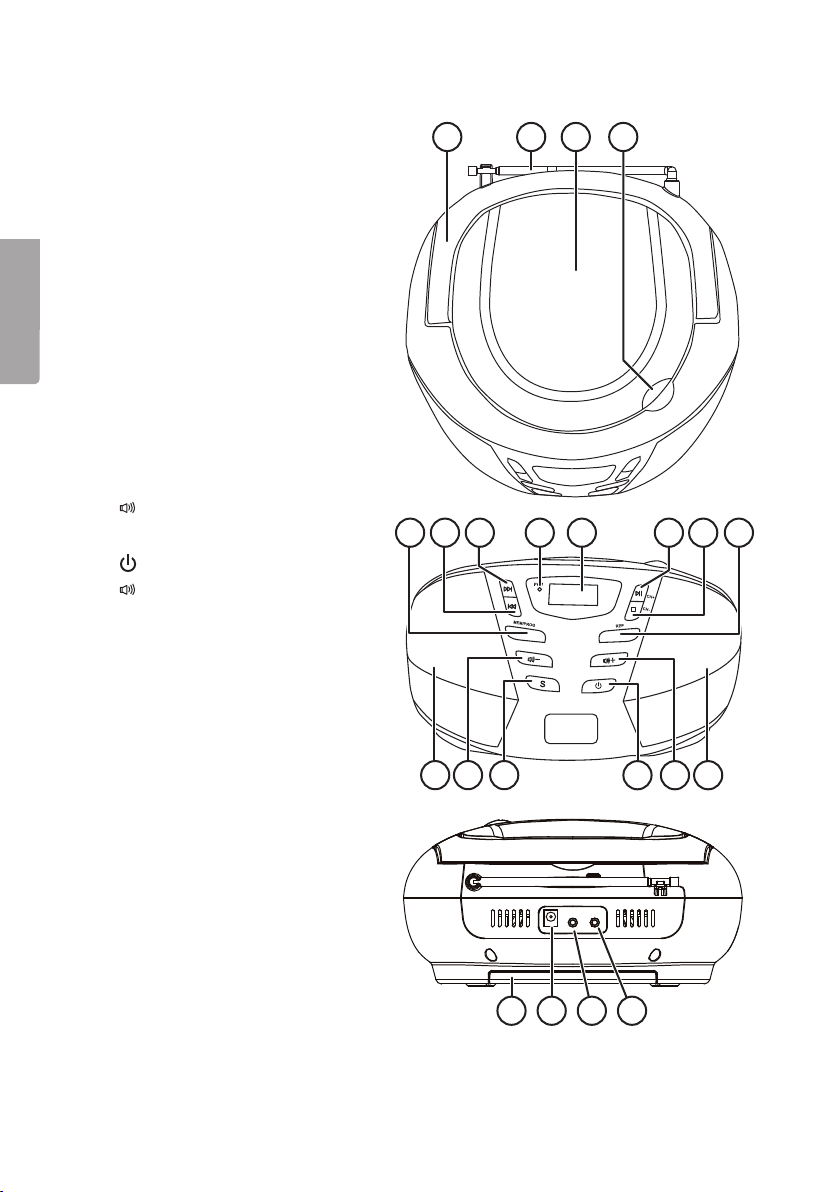
Knappar och funktioner
1. Handtag
2. FM-antenn
3. CD-lucka
4. Öppnare för CD-lucka
5. [ MEM/PROG ] Programmerad
6. [ l◄◄ ] Föregående spår
7. [ ►►l ] Nästa spår
Svenska
8. Strömindikator
9. Display
10. [ ►ll/CH+ ] Spela upp/pausa
11. [
12. [ REP ] Repetera
13. Högtalare
14. [
15. [ S ] Funktionsläge
16. [
17. [
18. Batterifack
19. DC IN
20. Hörlursuttag
21. AUX IN
21 3 4
uppspelning
/CH- ] Stoppa uppspelning
– ] Sänka volymen
9 10 11 128765
] Av/på
+ ] Höja volymen
13
15
13161417
1918 20 21
8
Page 9

Att komma igång
Batteridrift
1. Ta bort batteriluckan på apparatens undersida genom att skjuta den rakt bakåt.
2. Placera 6×C/LR14-batterier i batterifacket. Se till att vända batteripolerna korrekt
enligt märkningen i batterifacket.
3. Sätt tillbaka batteriluckan.
Nätdrift
Anslut nätsladden i uttaget (19). Sätt i stickproppen i ett 100–240 V vägguttag.
Användning
Sätta i en CD-skiva
1. Öppna luckan genom att försiktigt lyfta den uppåt (4).
2. Placera en CD-skiva i CD-facket.
3. Stäng luckan genom att försiktigt trycka den nedåt.
Spela en CD-skiva
Denna CD-spelare kan spela ljudskivor samt CD-R- och CD-RW-skivor med musik/tal.
1. Anslut nätsladden till ett vägguttag.
2. Sätt i en CD-skiva enligt instruktionen ovan.
3. Tryck på [ S ] för att gå till CD-uppspelningsläge.
4. Uppspelningen startar automatiskt från första spåret.
5. Tryck på [ ►ll/CH+ ] för att pausa uppspelningen. Tryck igen för att återuppta.
6. Tryck [
/CH- ] för att avsluta uppspelningen.
Svenska
Obs!
CD-spelaren stannar även när:
• du öppnar CD-luckan.
• du väljer RADIO som ljudkälla.
• hela CD-skivan är avspelad.
Välja ett annat spår/finna ett avsnitt i ett spår
1. Tryck på [ l◄◄ ] eller [ ►►l ] en eller flera gånger för att stega till önskat spår.
Valt spår visas på displayen.
2. Tryck en gång på [ l◄◄ ] för att komma till början på det spår som spelas.
3. Tryck upprepade gånger på [ l◄◄ ] för att stega till föregående spår.
4. Tryck och håll in [ l◄◄ ] eller [ ►►l ] för att snabbsöka bakåt eller framåt.
9
Page 10

Repetera ett spår
1. Under avspelning av en CD-skiva, tryck en gång på [ REP ] för att repetera det spår
som spelas. ”REP” blinkar i displayen.
2. Tryck en andra gång på [ REP ] för att repetera alla spår på skivan. ”REP” visas
i displayen.
3. Tryck en tredje gång på [ REP ] för att spela upp intro. ”INTRO” visas i displayen.
4. Tryck en fjärde gång på [ REP ] för att gå till slumpmässig uppspelning.
”RAN” visas i displayen.
5. Tryck en femte gång på [ REP ] för att stänga av repeterad uppspelning. Ingen text
visas i displayen när funktionen är avstängd.
Svenska
Programmerad avspelning av en CD-skiva
Sammanlagt kan upp till 20 spår programmeras. Tryck alltid på [ /CH- ] före
programmering av uppspelningen.
1. Tryck en gång på [ MEM/PROG ]. ”P-01” blinkar några gånger i displayen och
2. Använd [ l◄◄ ] eller [ ►►l ] för att välja det spår som ska lagras.
3. Tryck på [ MEM/PROG ] för att lagra det valda spåret i minnet. ”P-02” blinkar några
4. Upprepa steg 2–3 för att lagra fler spår i minnet.
5. När programmeringen är klar, tryck [ ►ll/CH+ ]. Uppspelningen av CD-skivan
6. För att rensa programmeringen, tryck antingen på [
FM-radio
1. Starta genom att trycka på [ ], av/på.
2. Dra ut antennen helt och hållet.
3. Tryck på [ S ] och gå till FM.
4. För att starta autosökning, tryck och håll ned [ l◄◄ ] eller [ ►►l ] en liten stund och
5. Tryck på [ l◄◄ ] eller [ ►►l ] för att söka manuellt.
6. Justera volymen med volymknapparna.
övergår sedan till att blinka ”00”.
gånger i displayen och övergår sedan till att blinka ”00”.
påbörjas enligt programmeringen.
/CH- ] två gånger,
sätt funktionsväljaren i läge FM eller stäng av.
släpp sedan.
Spara en station
1. När du lyssnar på din favoritstation, tryck på [ MEM/PROG ] för att spara. Siffran
stationen sparas på blinkar i displayen.
2. Använd [
3. Bekräfta genom att trycka på [ MEM/PROG ].
4. Upprepa ovanstående steg för att spara upp till 20 stationer.
5. Under uppspelning, tryck på [
sparad station.
/CH- ] och [ ►ll/CH+ ] för att välja vilken siffra du vill spara stationen på.
/CH- ] och [ ►ll/CH+ ] för att byta till en annan
10
Page 11

AUX IN
1. Det går att ansluta en extern ljudkälla (MP3-spelare etc.) till AUX IN.
2. Starta den externa ljudkällan.
3. Tryck på [ S ] för att komma till AUX-läge.
4. Styr uppspelningen från den externa ljudkällan.
Skötsel och underhåll
Rengöring av apparaten
Torka av med en mjuk, lätt fuktad trasa. Använd aldrig rengöringsmedel eller starka
lösningsmedel.
Vårda dina CD-skivor
• Ta inte på CD-skivans yta utan håll i kanten.
• Utsätt inte CD-skivan för direkt solljus, värme eller damm.
• Sätt inte etiketter på skivan.
• Skriv inte på skivan med kulspetspenna utan använd speciell
penna avsedd för märkning av CD-skivor.
• Torka från centrum och utåt vid rengöring, aldrig runt skivan
i spårens riktning.
• Använd en torr mjuk trasa utan rengöringsmedel eller
lösningsmedel.
• Förvara alltid CD-skivorna i deras fodral när de inte används.
Svenska
Avfallshantering
När du ska göra dig av med produkten ska detta ske enligt lokala föreskrifter.
Är du osäker på hur du ska gå tillväga, kontakta din kommun.
Specifikationer
Drivspänning
Nätadapter In 100–240 V AC, 50/60 Hz
Ut 9 V, 1 A
Batteri 6 st. C/LR14-batterier (säljs separat)
Frekvensområde radio FM: 87,5–108 MHz
Mått 232×227×112,5 mm
Vikt 936 g
11
Page 12

Norsk
CD-spiller med FM-radio
Art.nr. 18-8390, 18-8391, 18-8408 Modell BBX118B-UK
38-6298, 38-6299, 38-6459 BBX118B
Les brukerveiledningen grundig før produktet tas i bruk og ta vare på den for framtidig bruk.
Vi reserverer oss mot ev. feil i tekst og bilde, samt forandringer av tekniske data.
Ved tekniske problemer eller spørsmål, ta kontakt med vårt kundesenter.
(Se opplysninger om kundesenteret i denne bruksanvisningen).
Sikkerhet
• Produktet må kun repareres av kyndig servicepersonell.
• Produktet må ikke demonteres eller forandres på.
• Plasser ikke produktet slik at det kan komme i kontakt med vann eller annen
væske. Plasser aldri produktet nær gjenstander, som kan forårsake at vann eller
annen væske skylles over produktet. Dette gjelder blomstervaser, leskedrikk etc.
• Skru av en eventuell standby-funksjon om natten og når du reiser bort.
• Produktet må ikke tildekkes. Sørg for tilstrekkelig ventilasjon. Avstand fra ventilasjonsåpninger på anlegget og tilstøtende flater bør være min. 15 cm. Dette for å hindre
at anlegget blir for varmt.
• Plasser ikke anlegget i fuktig eller støvete miljø, eller der det forekommer
sterke vibrasjoner.
• Ved bruk av headset/hodetelefoner må tidsrommet man lytter begrenses.
Lytting til høyt volum over tid kan skade hørselen.
• Påse at strømuttaket, som produktet kobles til, er lett tilgjengelig, da dette er den
eneste frakoblings-anordningen for å koble produktet fra strømnettet.
• Merkeskiltet er plassert på produktets underside.
12
Page 13

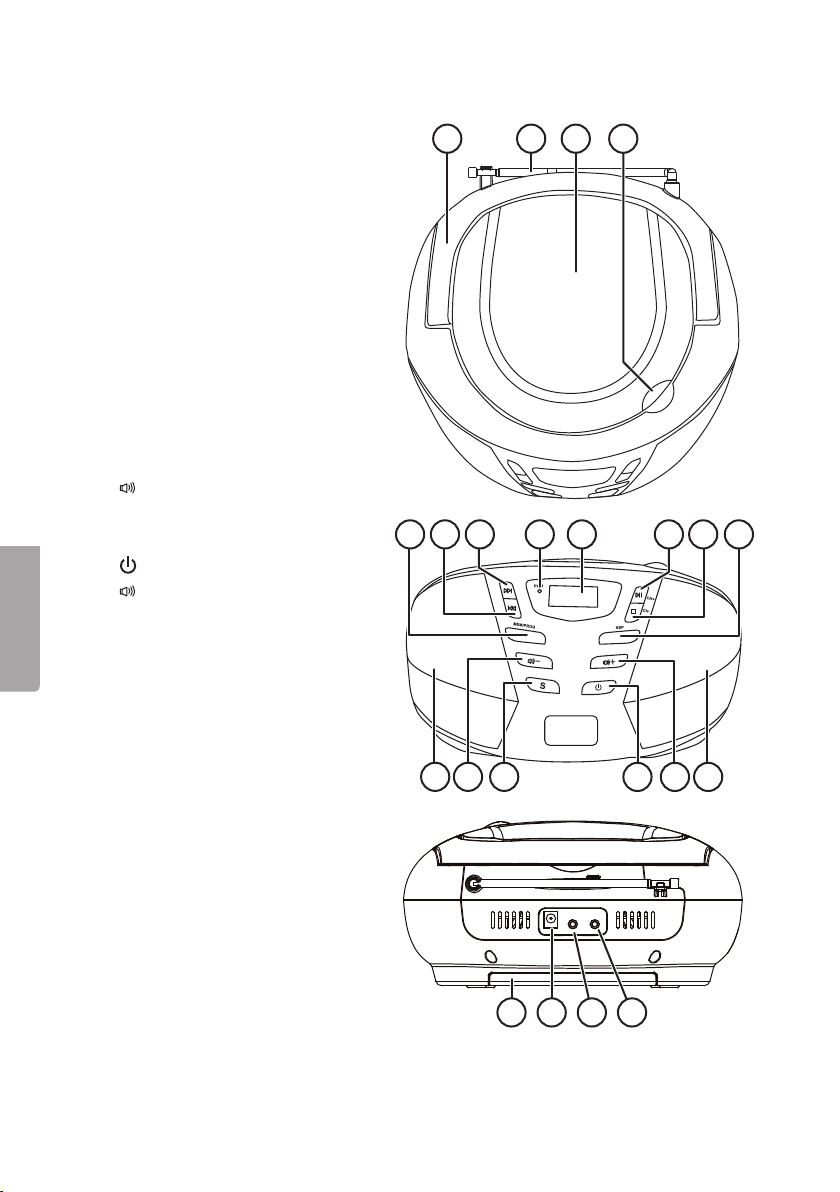
Knapper og funksjoner
1. Håndtak
2. FM-antenne
3. CD-lokk
4. Åpner til CD-lokket
5. [ MEM/PROG ] Programmert
avspilling
6. [ l◄◄ ] Foregående spor
7. [ ►►l ] Neste spor
8. Strømindikator
9. Display
10. [ ►ll/CH+ ] Spille av/ta pause
/CH- ] Stopp avspilling
11. [
12. [ REP ] Repetere
13. Høyttaler
– ] Reduser volumet
14. [
15. [ S ] Funksjonsinnstilling
] Av/på
16. [
+ ] Heve volumet
17. [
18. Batteriholder
19. DC IN
20. Hodetelefonuttak
21. AUX IN
21 3 4
Norsk
9 10 11 128765
13
13
15
13161417
1918 20 21
Page 14

Norsk
Kom i gang
Batteridrift
1. Fjern batterilokket på apparatets underside ved å skyve det rett bakover.
2. Plasser 6 stk. C/LR14-batterier i batteriholderen. Påse at batteriene ligger riktig vei.
Følg merkingen i batteriholderen.
3. Sett batterilokket på plass igjen.
Nettdrift
Koble strømledningen til strømuttaket (19). Sett støpselet i et strømuttak med 100–240 V.
Bruk
Sett i en CD-plate
1. Åpne CD-lokket ved å løfte det forsiktig ved opp (4).
2. Plasser en CD-plate i CD-rommet.
3. Steng lokket ved å trykke det forsiktig ned.
Spill en CD-plate
Denne CD-spilleren kan spille lydplater og CD-R eller CD-RW-plater som inneholder
musikk og tale.
1. Strømkabelen kobles til et strømuttak.
2. Sett i en CD-plate, som vist i instruksjonen ovenfor.
3. Trykk på [ S ] for å gå til CD-avspillingsmodus.
4. Avspillingen starter automatisk fra det første sporet.
5. Trykk på [ ►ll/CH+ ] for å ta pause i spillingen. Trykk en gang til for å starte
avspillingen igjen.
6. Trykk på [
/CH- ] for å ta pause i spillingen.
Obs!
CD-spilleren stopper også når:
• du åpner CD-lokket.
• Du velger RADIO som lydkilde.
• hele CD-platen er ferdig spilt.
Velg et annet spor/finn et avsnitt i et spor
1. Trykk på [ l◄◄ ] eller [ ►►l ] en eller flere ganger for å gå til ønsket spor. Valgt spor
vises på displayet.
2. Trykk en gang på [ |◄◄ ] for å komme til begynnelsen av det sporet du spiller.
3. Trykk gjentatte ganger på [ l◄◄ ] for å gå til foregående spor.
4. Trykk og hold inne [ l◄◄ ] eller [ ►►l ] for å hurtigsøke bakover eller framover.
14
Page 15

Repeter ett spor
1. Under avspilling av en CD-plate, trykk en gang på [ REP ], for å repetere det sporet
som spilles. «REP» blinker i displayet.
2. Trykk en gang til på [ REP ], for å repetere alle spor på platen. «REP» vises i displayet.
3. Trykk en tredje gang på [ REP ] for å spille av intro. «INTRO» vises i displayet.
4. Trykk en fjerde gang på [ REP ] for å gå til tilfeldig avspilling. «RAN» vises i displayet.
5. Trykk en femte gang på [ REP ] for å skru av repetert avspilling. Ingen tekst vises
i displayet når funksjonen er slått av.
Programmert avspilling av CD-plate
Til sammen 20 spor kan forhåndsprogrammeres. Trykk alltid på [ /CH- ] før programmering
av avspillingen.
1. Trykk en gang på [ MEM/PROG ]. «P-01» blinker i displayet noen ganger, for så å
gå over til å blinke «00».
2. Bruk [ l◄◄ ] eller [ ►►l ] for å velge det sporet som skal lagres.
3. Trykk på [ MEM/PROG ] for å lagre det valgte sporet. «P-02» blinker i displayet noen
ganger, for så å gå over til å blinke «00».
4. Gjenta trinn 2–3 for å legge flere spor i minnet.
5. Når programmeringen er ferdig, trykk [ ►ll/CH+ ]. Avspillingen av CD-platen begynner
etter programmeringen.
6. For å slette programmeringen, trykk enten på [
velgeren på FM eller skru av.
/CH- ] to ganger, sett funksjons-
FM-radio
1. Start ved å trykke på [ ], av/på.
2. Trekk antennen helt ut.
3. Trykk på [ S ] og gå til FM.
4. Autosøk startes ved å trykke inn og holde [ l◄◄ ] eller [ ►►l ] inne en liten stund.
5. Trykk på [ l◄◄ ] eller [ ►►l ] for å søke manuelt.
6. Juster volumet med volumknappene.
Norsk
Lagre en stasjon
1. Trykk på [ MEM/PROG ] når du lytter til favorittkanalen din. Den vil da bli lagret.
Tallet for denne stasjonen blinker i displayet.
2. Bruk [
3. Bekreft ved å trykke på [ MEM/PROG ].
4. Gjenta trinnene ovenfor for lagring av ytterligere 19 stasjoner, dvs. 20 totalt.
5. Trykk på [
/CH- ] og [ ►ll/CH+ ] for å velge hvilket tall (hvilken plass) du vil lagre
stasjonen på.
/CH- ] og [ ►ll/CH+ ] under spilling for å skifte til en av de andre
lagrede stasjonene.
15
Page 16

Norsk
AUX IN
1. Her, til AUX IN, kan eksterne lydkilder kobles til, f.eks. mp3-spiller.
2. Start den eksterne lydkilden.
3. Trykk på [ S ] for å komme til AUX-modus.
4. Start avspillingen fra den eksterne lydkilden.
Stell og vedlikehold
Rengjøring av apparatet
Rengjør med en myk og lett fuktet klut. Bruk aldri rengjøringsmidler eller sterke løsemidler.
Stell av CD-plater
• Ta ikke på CD-platens flate, men hold på kanten.
• Utsett ikke CD-platen for direkte sollys, varme eller støv.
• Sett ikke etiketter på platen.
• Skriv ikke på platen med kulepenn, men bruk en spesialpenn
beregnet for merking av CD-plater.
• Tørk fra midten av platen og utover ved rengjøring. Tørk aldri
rundt platen i sporets retning.
• Bruk en tørr, myk klut uten rengjøringsmiddel eller løsemiddel.
• Oppbevar alltid CD-platene i futteralet når de ikke er i bruk.
Avfallshåndtering
Når produktet skal kasseres, må det skje i henhold til lokale forskrifter.
Hvis du er usikker, ta kontakt med kommunen din.
Spesifikasjoner
Spenning
Strømadapter Inn 100–240 V AC, 50/60 Hz
Ut 9 V, 1 A
Batteri 6 stk. C/LR14-batterier (selges separat)
Frekvensområde radio FM: 87,5–108 MHz
Mål 232×227×112,5 mm
Vekt 936 g
16
Page 17

CD-soitin ja FM-radio
Tuotenro 18-8390, 18-8391, 18-8408 Malli BBX118B-UK
38-6298, 38-6299, 38-6459 BBX118B
Lue käyttöohje ennen tuotteen käyttöä ja säilytä se tulevaa tarvetta varten. Pidätämme
oikeuden teknisten tietojen muutoksiin. Emme vastaa mahdollisista teksti- tai kuvavirheistä.
Jos laitteeseen tulee teknisiä ongelmia, ota yhteys myymälään tai asiakaspalveluun
(yhteystiedot käyttöohjeen lopussa).
Turvallisuus
• Laitteen saa korjata vain valtuutettu huoltoliike.
• Älä pura tai muuta laitetta.
• Älä sijoita laitetta sellaiseen paikkaan, josta se voi pudota veteen tai muuhun
nesteeseen. Älä laita laitteen päälle nesteitä sisältäviä esineitä, kuten maljakoita
tai juomalaseja.
• Sammuta valmiustila yön ajaksi ja poistuessasi kotoa.
• Älä peitä laitetta. Riittävä ilmastointi (vähintään 15 cm ilmastointiaukon ja ympäröivän
pinnan välillä) on välttämätön, jottei laite pääse ylikuumenemaan.
• Älä käytä laitetta kosteissa tai pölyisissä tiloissa tai paikoissa, joissa siihen kohdistuu
voimakasta tärinää.
• Älä kuuntele musiikkia pitkään kovalla äänenvoimakkuudella, sillä se saattaa
vahingoittaa kuuloa.
• Varmista, että pistorasia, johon muuntaja liitetään, on helppopääsyisessä paikassa,
sillä laitteen virta katkaistaan irrottamalla muuntaja pistorasiasta.
• Merkkikilpi on laitteen alapuolella.
Suomi
17
Page 18
Suomi
Painikkeet ja toiminnot
1. Kahva
2. FM-antenni
3. CD-lokero
4. CD-lokeron avaaja
5. [ MEM/PROG ] Ohjelmoitu toisto
6. [ l◄◄ ] Edellinen raita
7. [ ►►l ] Seuraava raita
8. Virran merkkivalo
9. Näyttö
10. [ ►ll/CH+ ] Toisto/keskeytys
/CH- ] Keskeytä toisto
11. [
12. [ REP ] Uudelleentoisto
13. Kaiutin
– ] Äänenvoimakkuuden
14. [
vähentäminen
15. [ S ] Toimintotila
] Virtakytkin
16. [
+ ] Äänenvoimakkuuden
17. [
lisääminen
18. Paristolokero
19. DC IN
20. Kuulokeliitäntä
21. AUX IN
21 3 4
9 10 11 128765
18
13
15
13161417
1918 20 21
Page 19

Käytön aloittaminen
Paristokäyttö
1. Avaa laitteen pohjassa oleva paristolokero työntämällä sitä taaksepäin.
2. Aseta lokeroon 6 kpl C/LR14-paristoa. Varmista, että asetat paristot oikein päin.
3. Aseta paristolokeron kansi takaisin paikalleen.
Verkkovirtakäyttö
Liitä virtajohto liitäntään (19). Aseta pistoke 100–240 V:n pistorasiaan.
Käyttö
CD-levyn asettaminen laitteeseen
1. Avaa lokero nostamalla avaajaa (4) varovaisesti.
2. Aseta CD-levy CD-lokeroon.
3. Sulje lokero painamalla sitä varovasti alaspäin.
CD-levyn kuunteleminen
CD-soittimella voidaan kuunnella tavallisia CD-levyjä sekä CD-R- ja CD-RW-levyjä,
jotka sisältävät musiikkia tai puhetta.
1. Liitä virtajohdon pistoke pistorasiaan.
2. Aseta CD-levy soittimeen yllä olevien ohjeiden mukaisesti.
3. Siirry CD-toistotilaan painamalla [ S ].
4. Toisto käynnistyy automaattisesti.
5. Keskeytä toisto painamalla [ ►ll/CH+ ]. Palaa normaalitoistoon painamalla
painiketta uudelleen.
6. Lopeta toisto painamalla [
/CH- ].
Suomi
Huom.!
CD-levyn toisto pysähtyy myös silloin, kun:
• avaat CD-lokeron.
• valitset RADION äänilähteeksi.
• koko CD-levy on soitettu loppuun.
Raidan valitseminen/tietyn raidan kohdan etsiminen
1. Siirry haluamaasi raitaan painamalla [ l◄◄ ] tai [ ►►l ] kerran tai useasti.
Valittu raita näkyy näytöllä.
2. Siirry toistettavan raidan alkuun painamalla [ l◄◄ ] kerran.
3. Palaa edelliseen raitaan painamalla [ l◄◄ ] useasti.
4. Pikakelaa raitaa eteen- tai taaksepäin painamalla ja pitämällä pohjassa [ l◄◄ ] tai [ ►►l ].
19
Page 20

Raidan uudelleentoisto
1. Paina kerran [ REP ] CD-levyn toiston aikana, niin toistettava kappale soitetaan
uudelleen. ”REP” vilkkuu näytöllä.
2. Paina uudestaan [ REP ], niin kaikki levyn raidat toistetaan uudelleen. Näytöllä
näkyy ”REP”.
3. Soita intro painamalla kolmannen kerran [ REP ]. Näytöllä näkyy ”INTRO”.
4. Siirry satunnaiseen toistoon painamalla neljännen kerran [ REP ]. ”RAN" näkyy
näytöllä.
5. Sammuta uudelleentoisto painamalla viidennen kerran [ REP ]. Näytöllä ei näy
tekstiä, kun toiminto on pois päältä.
CD-levyn ohjelmoitu toisto
Voit ohjelmoida yhteensä 20 raitaa. Paina ennen toiston ohjelmointia painiketta [ /CH- ].
1. Paina kerran [ MEM/PROG ]. Näytöllä vilkkuu muutaman kerran ”P-01”, minkä
jälkeen näytöllä vilkkuu ”00”.
2. Valitse tallennettava raita painamalla [ l◄◄ ] tai [ ►►l ].
3. Tallenna valittu raita painamalla [ MEM/PROG ]. Näytöllä vilkkuu muutaman kerran
”P-02”, minkä jälkeen näytöllä vilkkuu ”00”.
4. Ohjelmoi lisää raitoja toistamalla kohdat 2–3.
5. Paina [ ►ll/CH+ ], kun ohjelmointi on valmis. CD-levy toistetaan ohjelmoinnin mukaisesti.
6. Poista ohjelmointi painamalla [
asentoon FM tai sammuttamalla soitin.
/CH- ] kaksi kertaa, asettamalla toiminnonvalitsin
Suomi
FM-radio
1. Käynnistä radio painamalla virtakytkintä [ ].
2. Vedä antenni kokonaan ulos.
3. Paina [ S ] ja siirry kohtaan FM.
4. Aloita automaattihaku painamalla hetken aikaa [ l◄◄ ] tai [ ►►l ].
5. Hae kanavia manuaalisesti painamalla [ l◄◄ ] tai [ ►►l ].
6. Säädä äänenvoimakkuus äänenvoimakkuuspainikkeilla.
Radioasemien tallentaminen
1. Tallenna senhetkinen asema muistiin painamalla [ MEM/PROG ].
Muistipaikka, jolle asema tallentuu, vilkkuu näytöllä.
2. Valitse asemalle numeropaikka painamalla [
3. Vahvista painamalla [ MEM/PROG ].
4. Voit tallentaa muistiin 20 asemaa toistamalla yllä olevat kohdat.
5. Vaihda muistissa olevia asemia kuuntelun aikana painamalla [
/CH- ] ja [ ►ll/CH+ ].
/CH- ] ja [ ►ll/CH+ ].
20
Page 21

AUX IN
1. Soittimeen voi liittää myös toisen soittimen (esim. MP3-soittimen) AUX IN -liitännän
kautta.
2. Käynnistä liitettävä soitin.
3. Valitse äänilähteeksi AUX painamalla [ S ].
4. Aloita toisto liitetystä soittimesta.
Huolto ja puhdistaminen
CD-soittimen puhdistaminen
Pyyhi pehmeällä ja kevyesti kostutetulla liinalla. Älä käytä puhdistusaineita tai liuottimia.
CD-levyjen huoltaminen
• Älä koske CD-levyn pintaan, vaan pidä kiinni reunoista.
• Älä altista levyä suoralle auringonvalolle, kuumuudelle tai pölylle.
• Älä liimaa levyn päälle tarroja.
• Älä kirjoita levyn pinnalle kuulakärkikynällä, vaan käytä ainoastaan
CD-levyjen merkintään tarkoitettuja kyniä.
• Puhdista levy pyyhkimällä sitä keskeltä ulospäin, ei raitojen
suuntaisesti.
• Käytä kuivaa ja pehmeää liinaa ilman puhdistus- tai liuotusaineita.
• Säilytä CD-levyt aina koteloissaan, kun niitä ei käytetä.
Suomi
Kierrättäminen
Kierrätä tuote asianmukaisesti, kun poistat sen käytöstä.
Tarkempia kierrätysohjeita saat kuntasi jäteneuvonnasta.
Tekniset tiedot
Käyttöjännite
Muuntajan sisääntulojännite 100–240 V AC, 50/60 Hz
Lähtöjännite 9 V, 1 A
Paristot 6 kpl C/LR14 (myydään erikseen)
Radion taajuusalue FM: 87,5–108 MHz
Mitat 232×227×112,5 mm
Paino 936 g
21
Page 22

CD-Spieler mit UKW-Radio
Art.Nr. 18-8390, 18-8391, 18-8408 Modell BBX118B-UK
38-6298, 38-6299, 38-6459 BBX118B
Vor Inbetriebnahme diekomplette Bedienungsanleitung durchlesen und aufbewahren.
Irrtümer, Abweichungen und Änderungen behalten wir uns vor. Bei technischen Problemen
oder anderen Fragen freut sich unser Kundenservice über eine Kontaktaufnahme
(Kontakt siehe Rückseite).
Sicherheitshinweise
• Reparaturen unbedingt qualifizierten Servicetechnikern überlassen.
• DasGerät nicht demontieren oder technisch verändern.
• DasProdukt immer so hinlegen, dass es nicht in Wasser oder andere Flüssigkeiten
fallen kann. Niemals Gegenstände mit Flüssigkeiten (z.B. Blumenvase oder
Getränk) auf dasGerät stellen.
• Eventuelle Standby-Funktion über Nacht und vor Reisen abschalten.
• DasGerät nicht abdecken. Damit dasGerät sich nicht überhitzt sicherstellen,
dass auf allen Seiten mindestens 15 cm Platz für eine ausreichende Belüftung ist.
• DasGerät nicht in feuchter, staubiger Umgebung oder anOrten mit starken
Erschütterungen aufstellen.
• Kopfhörer nicht längere Zeit mit hoher Lautstärke benutzen, dies kann zu
Gehörschäden führen.
• Sicherstellen, dass die Steckdose leicht zugänglich ist, da das Ausschalten des
Geräts durch Abziehen des Netzteils erfolgt.
• Das Typenschild ist auf der Unterseite des Gerätes angebracht.
Deutsch
22
Page 23

Tasten und Funktionen
1. Griff
2. UKW-Antenne
3. CD-Fach
4. Öffnen des CD-Fachs
5. [ MEM/PROG ] Programmierte
Wiedergabe
6. [ l◄◄ ] Vorheriger Titel
7. [ ►►l ] Nächster Titel
8. Status-LED
9. Display
10. [ ►ll/CH+ ] Wiedergabe/Pause
/CH- ] Wiedergabe stoppen
11. [
12. [ REP ] Wiederholen
13. Lautsprecher
– ] Lautstärke senken
14. [
15. [ S ] Funktionsmodus
] Ein/Aus
16. [
+ ] Lautstärke erhöhen
17. [
18. Batteriefach
19. DC IN
20. Kopfhöreranschluss
21. AUX IN
21 3 4
9 10 11 128765
23
13
15
13161417
Deutsch
1918 20 21
Page 24

Erste Schritte
Batteriebetrieb
1. Die Batterieabdeckung ander Unterseite des Geräts zum Öffnen gerade nach
hinten schieben.
2. 6×C/LR14-Batterien in dasBatteriefach einlegen. Darauf achten, dass
dieBatteriepole richtig herum liegen, siehe Kennzeichnung im Batteriefach.
3. DieBatterieabdeckung wieder anbringen.
Netzbetrieb
DasNetzkabel andieBuchse (19) anschließen. Den Stecker in eine
100–240-V-Steckdose stecken.
Gebrauch
Eine CD einlegen
1. DieCD-Klappe durch vorsichtiges Anheben (4) öffnen.
2. Eine CD ins CD-Fach einlegen.
3. DieKlappe durch vorsichtiges Herunterdrücken schließen.
Eine CD abspielen
Dieser CD-Player kann Audio-CDs sowie CD-R und CD-RW mit Musik/Sprache abspielen.
1. Den Netzstecker in eine Steckdose stecken.
2. Eine CD gemäß der Anleitung oben einlegen.
3. Auf [ MODE ] drücken, um zur CD-Wiedergabe zu wechseln.
4. DieWiedergabe startet automatisch mit dem ersten Titel.
5. Auf [ ►ll/CH+ ] drücken, um dieWiedergabe vorübergehend zu unterbrechen.
Zum Fortsetzen der Wiedergabe erneut drücken.
6. Auf [
/CH- ] drücken, um dieWiedergabe zu stoppen.
Deutsch
Hinweis:
Der CD-Player stoppt dieWiedergabe auch wenn:
• dieCD-Klappe geöffnet wird.
• auf Audioquelle RADIO gewechselt wird.
• diegesamte CD abgespielt wurde.
Einen anderen Titel wählen/Einen Abschnitt in einem Titel finden
1. Einmal oder mehrmals auf [ l◄◄ ] oder [ ►►l ] drücken, um zum gewünschten
2. Einmal auf [ l◄◄ ] drücken, um zum Anfang des aktuellen Titels zurückzukehren.
3. Mehrmals auf [ l◄◄ ] drücken, um zu den vorherigen Titeln zu gelangen.
4. Für einen Schnelldurchlauf rückwärts oder vorwärts [ l◄◄ ] oder [ ►►l ] gedrückt halten.
Titel zu gelangen. Der aktuell gewählte Titel wird im Display angezeigt.
DieTaste loslassen, wenn diegewünschte Stelle gefunden ist.
24
Page 25

Titel wiederholen
1. Während des Abspielens einer CD einmal auf [ REP ] drücken, um den aktuellen
Titel zu wiederholen. „REP“ blinkt auf dem Display.
2. Ein zweites Mal auf [ REP ] drücken, um alle Titel zu wiederholen. „REP“ wird auf
dem Display angezeigt.
3. Ein drittes Mal auf [ REP ] drücken um Intros abzuspielen. „INTRO“ wird auf dem
Display angezeigt.
4. Ein viertes Mal auf [ REP ] drücken für dieZufallswiedergabe. „RAN“ wird auf dem
Display angezeigt.
5. Ein fünftes Mal auf [ REP ] drücken um dieWiederholung der Titel auszuschalten.
Wenn dieFunktion ausgeschaltet ist, zeigt dasDisplay keinen Text mehr an.
Programmiertes Abspielen einer CD
Insgesamt können 20 Titel programmiert werden. Vor dem Programmieren der
Wiedergabe immer erst auf [
1. Einmal auf [ MEM/PROG ] drücken. „P-01” blinkt ein paar Mal auf dem Display und
dann blinkt „00”.
2. Mit [ l◄◄ ] oder [ ►►l ] den Titel wählen, der gespeichert werden soll.
3. Auf [ MEM/&PROG ] drücken, um den gewählten Titel im Speicher abzuspeichern.
„P-02” blinkt ein paar Mal auf dem Display und dann blinkt „00”.
4. Um weitere Titel im Speicher abzuspeichern, dieSchritte 2–3 wiederholen.
5. Wenn dieProgrammierung abgeschlossen ist, auf [ ►ll/CH+ ] drücken.
DieCD wird nun in der programmierten Titelreihenfolge abgespielt.
6. Um dieProgrammierung zu löschen, entweder zweimal auf [
den Funktionswahlschalter auf UKW setzen oder dasGerät ausschalten.
/CH- ] drücken.
/CH- ] drücken,
UKW-Radio
1. Zum Einschalten auf [ ] drücken.
2. DieAntenne vollständig herausziehen.
3. Auf [ S ] drücken und zum UKW-Radio gehen.
4. Für den automatischen Suchlauf [ l◄◄ ] oder [ ►►l ] drücken und kurz gedrückt
halten, dann loslassen.
5. Auf [ l◄◄ ] oder [ ►►l ] drücken um manuell nach einem Sender zu suchen.
6. DieLautstärke mit den Lautstärketasten einstellen.
Einen Sender speichern
1. Den gewünschten Speicher einstellen und dann auf [ MEM/PROG ] drücken um ihn
abzuspeichern. DieZiffer, unter der der Sender abgespeichert wird, blinkt im Display.
2. Um den gewünschten Speicherplatz auszusuchen, dieTasten [
[ ►ll/CH+ ] verwenden.
3. DieWahl mit [ MEM/PROG ] bestätigen.
4. Dies wiederholen um weitere Sender (max. 20) abzuspeichern.
5. Während der Wiedergabe auf [
anderen Senderspeicherplatz zu wechseln.
/CH- ] und [ ►ll/CH+ ] drücken um zu einem
25
/CH- ] und
Deutsch
Page 26

AUX IN
1. Es ist möglich eine externe Audioquelle (MP3-Player etc.) anden AUX IN anzuschließen.
2. Dieexterne Audioquelle einschalten.
3. Auf [ S ] drücken um zum AUX-Modus zu gelangen.
4. DieMusikwiedergabe von dem angeschlossenen Gerät aus steuern.
Pflege und Wartung
Reinigung des Geräts
Bei Bedarf dasGerät mit einem weichen, leicht befeuchteten Tuch sauber machen.
Keine Chemikalien, Reinigungslösungen oder Reinigungsmittel verwenden.
CD-Pflege
• DieCD nicht auf der Fläche berühren, sondern anden Kanten
festhalten.
• DieCD vor direkter Sonneneinstrahlung, Hitze und Staub schützen.
• DieCD nicht mit Etiketten bekleben.
• DieCD nicht mit einem Kugelschreiber sondern nur mit
einem speziellen CD-Marker beschriften.
• Beim Reinigen von der Mitte nach außen wischen, niemals
in Abspielrichtung der Tonspur.
• Zum Reinigen einen trockenen, weichen Lappen ohne
Reinigungsmittel oder Lösungsmittel verwenden.
• CDs immer in ihrer Hülle aufbewahren, wenn sie nicht
benutzt werden.
Hinweise zur Entsorgung
Deutsch
Bitte dasProdukt entsprechend den lokalen Bestimmungen entsorgen.
Weitere Informationen sind von der Gemeinde oder den kommunalen
Entsorgungsbetrieben erhältlich.
Technische Daten
Betriebsspannung
Netzteil primär 100–240 V AC, 50/60 Hz
sekundär 9 V, 1 A
Batterie 6×C/LR14 (separat erhältlich)
Frequenzbereich Radio UKW (FM) 87,5–108 MHz
Abmessungen 232×227×112,5 mm
Gewicht 936 g
26
Page 27

27
Page 28

Sverige
Kundtjänst tel: 0247/445 00
fax: 0247/445 09
e-post: kundservice@clasohlson.se
Internet www.clasohlson.se
Post Clas Ohlson AB, 793 85 INSJÖN
Norge
Kundesenter tlf.: 23 21 40 00
faks: 23 21 40 80
e-post: kundesenter@clasohlson.no
Internett www.clasohlson.no
Post Clas Ohlson AS, Postboks 485 Sentrum, 0105 OSLO
Suomi
Asiakaspalvelu puh.: 020 111 2222
sähköposti: asiakaspalvelu@clasohlson.fi
Internet www.clasohlson.fi
Osoite Clas Ohlson Oy, Maistraatinportti 4 A, 00240 HELSINKI
Great Britain
Customer Service contact number: 0845 300 9799
e-mail: customerservice@clasohlson.co.uk
Internet www.clasohlson.com/uk
Postal 10 – 13 Market Place
Kingston Upon Thames
Surrey
KT1 1JZ
Deutschland
Kundenservice Unsere Homepage www.clasohlson.de besuchen und
auf Kundenservice klicken.
 Loading...