

Page 1
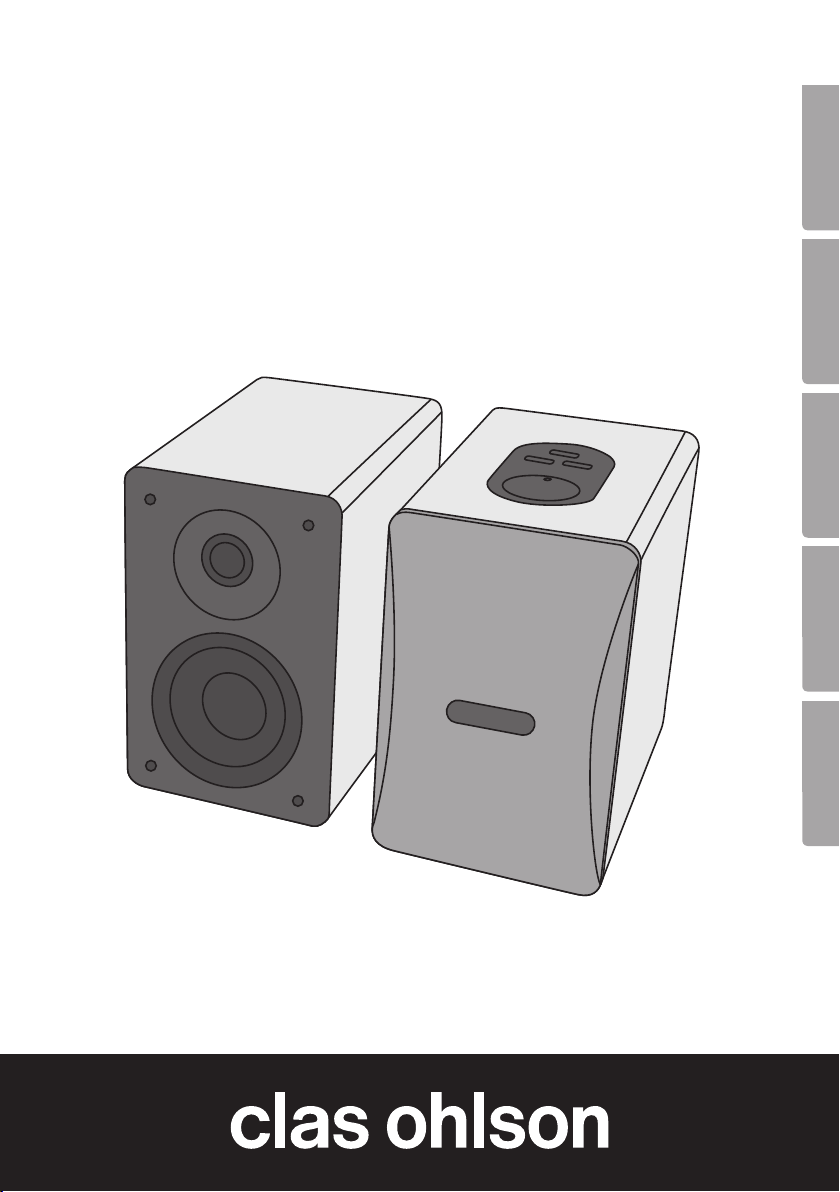
Bluetooth Speakers
Bluetooth-högtalare
Bluetooth-høyttaler
Bluetooth-kaiutin
Bluetooth-Lautsprecher
EnglishSvenskaNorskSuomiDeutsch
Art.no Model
38-5646 B100
Ver. 20130531
Page 2

2
Page 3

Bluetooth Speakers
Item no. 38-5646 Model B100
Please read the entire instruction manual before use and save it for future reference.
We reserve the right for any errors in text or images and for making any necessary
technical changes to this document. If you should have any questions concerning
technical problems please contact our Customer Services.
Things to consider:
• Other wireless equipment using thesame frequency band can reduce
thetransmission range.
• The range of all wireless equipment depends on thetype of obstacles located
between thetransmitter and thereceiver (e.g. aconcrete wall will interfere with
thesignal more than aplasterboard wall).
If you experience problems, try thefollowing:
• Turn off any other existing wireless equipment to check whether this is thecause
of theproblem.
• Move any other existing wireless equipment. Shorten thedistance between
thesending and receiving devices and reduce thenumber of obstacles (walls,
furniture, etc.) between them.
Safety
• Do not place thespeaker where it could fall into water or other liquids. Do not
place any objects which contain liquid onto thespeaker.
• Never subject thespeaker to high temperature, dust, heavy vibration, impacts,
damp or moisture.
• Do not place theproduct on soft surfaces such as beds, sofas or blankets;
as theventilation openings might become obstructed.
• The product should not be placed in aconfined space such as acupboard or on
ashelf which restricts air flow.
• The product must only be connected to astandard domestic 220–240V, 50–60 Hz
electrical supply.
• The standby switch on theremote control does not disconnect theproduct from
thepower supply. Disconnect thedevice from thepower supply by unplugging it
from thewall socket. Make sure that thewall socket and plug are easily accessible.
• Always handle themains lead with care. Do not carry theproduct by its
mains lead. Grasp and pull theplug and not themains lead when unplugging
theproduct. Make sure that themains lead does not come into contact with heat,
sharp edges or is crushed.
• The speaker is intended for indoor use only.
• Never attempt to tamper with or modify theproduct in any way.
English
3
Page 4
English
• Do not use theproduct if it is in any way damaged or does not function correctly.
• Never use accessories which are not recommended by themanufacturer.
• The product should only be repaired by qualified service technicians using
original parts.
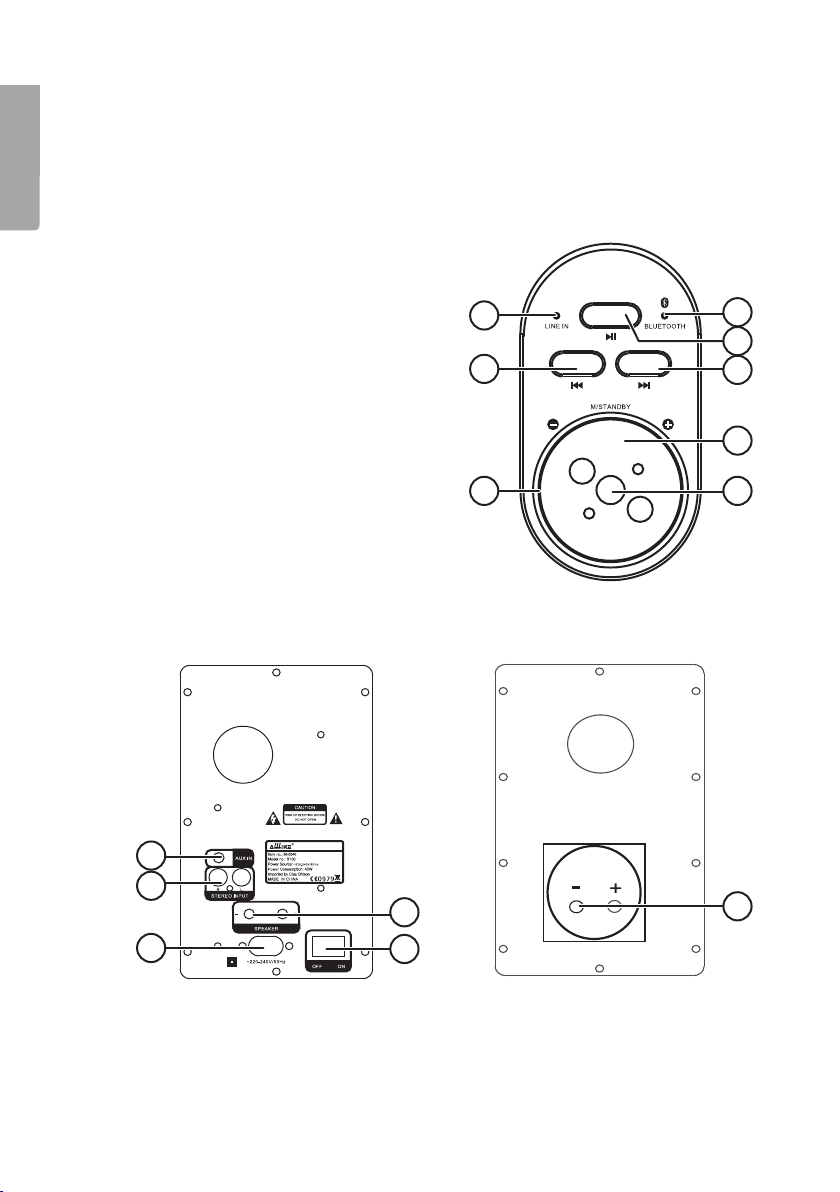
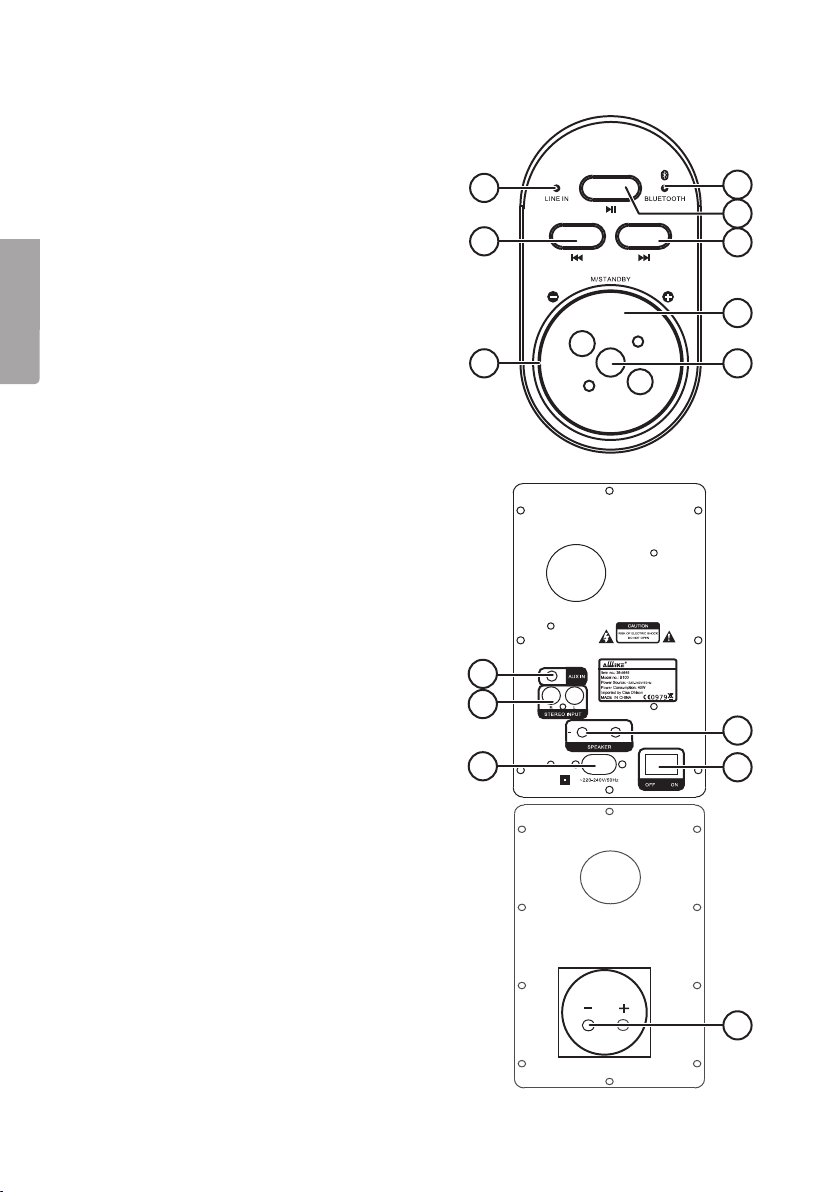
Product description
1. Indicator light for LINE IN
2. [ l◄◄ ] Previous track
3. Indicator light
4. Indicator light for Bluetooth
5. [ ►ll ] Play/pause
6. [ ►►l ] Next track
7. Volume knob
8. [ M/STANDBY ] Mode, standby
9. AUX IN: Low level input 3.5mm
10. STEREO INPUT: Low level input 2 x RCA
11. Power lead socket
12. Connection to left speaker
13. [ ON OFF ] On/Off
14. Connection from right speaker
1
2
3
4
5
6
7
8
10
11
9
12
14
13
4
Page 5
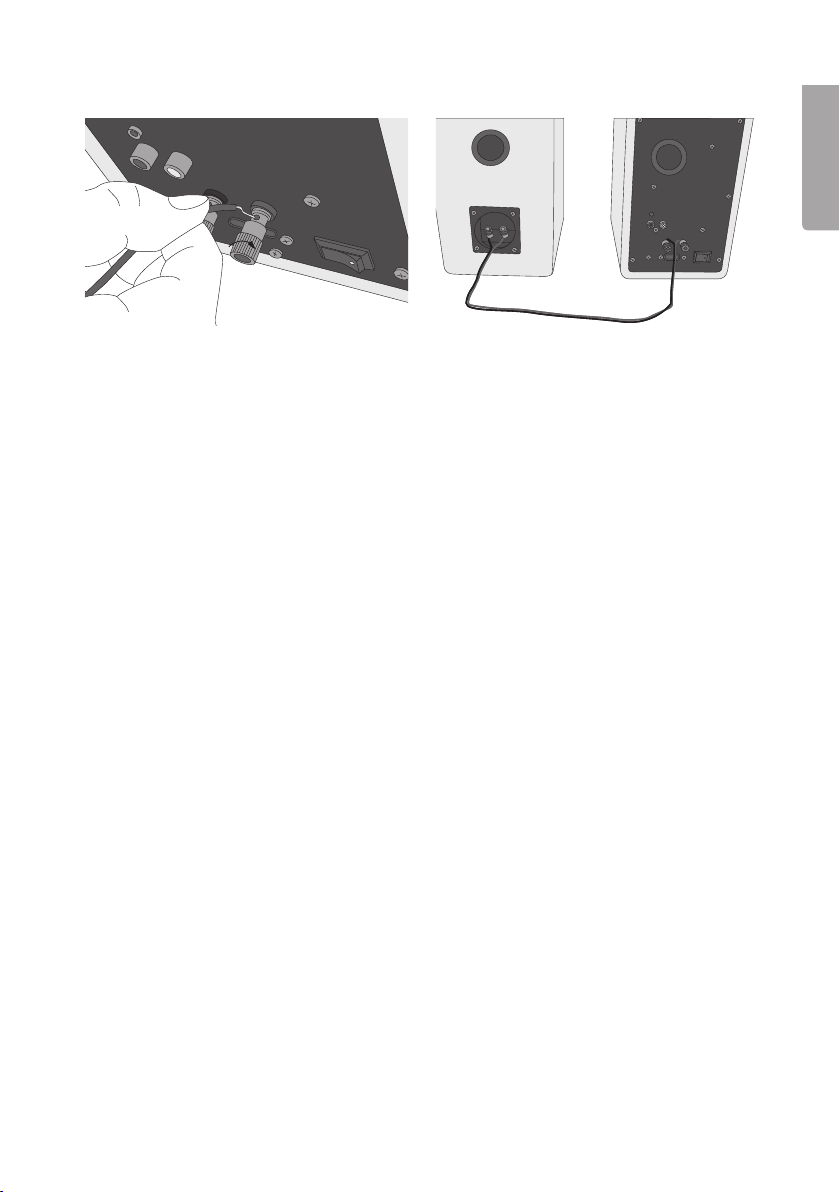
Connecting
Connect thespeaker cable provided between theconnections on thespeakers (13)
and (14).
Operation
Switching thespeaker dock on
1. Plug theiron in to awall socket.
2. Switch [ ON OFF ] on theback of thespeaker to theON position.
3. The speaker will enter Bluetooth mode automatically. The Bluetooth indicator light
(4) will flash green.
4. Press and hold down [ M/STANDBY ] for approx. 3 seconds to enter standby
mode. The indicator light for LINE IN and BLUETOOTH will go out but will flash to
indicate standby mode.
5. To turn off thespeaker completely, switch [ ON OFF ] on theback of thespeaker to
theOFF position.
English
Setup
• Press [ M/STANDBY ] to select theaudio source.
• Turn thevolume knob to set thevolume.
Bluetooth
1. Press [ M/STANDBY ] to enter Bluetooth mode. The indicator light (4) will flash green.
2. Activate Bluetooth on thedevice to be paired and place thedevice in search
mode. Select “38-5646” or “B100”.
3. If you are prompted to enter aPIN code on your device, you should enter 0000
(four zeros). Certain devices may also require you to approve theconnection.
4. When theconnection is ready, theindicator light (4) will show green. You can now
play music from your device.
5
Page 6

English
AUX IN
1. Connect anexternal audio source to AUX IN on theback of thespeaker (cable and
external audio source not supplied).
2. Press [ M/STANDBY ] to switch to LINE IN mode. The indicator light (1) will show orange.
3. Start playback from your audio source and adjust thevolume using thevolume knob.
STEREO INPUT
1. Connect anexternal audio source to STEREO INPUT on theback of thespeaker
(cable and external audio source not supplied).
2. Press [ M/STANDBY ] to switch to LINE IN mode. The indicator light (1) will show orange.
3. Start playback from your audio source and adjust thevolume using thevolume knob.
NOTE: If both AUX IN and STEREO INPUT are connected, priority is given to AUX IN.
Only thevolume knob is controlled from thespeaker in AUX IN mode.
Care and maintenance
• Clean thespeakers using alightly moistened cloth. Use only mild cleaning agents,
never solvents or corrosive chemicals.
• Unplug themains lead from thewall socket during thunderstorms.
• Store thespeakers in adry and dust-free area when you are not using
thespeakers for longer time period.
Waste disposal
This product should be disposed of in accordance with local regulations.
If you are unsure what to do, contact your local authority.
Specifications
Power supply 220–240 V, 50 Hz
Power output 40 W
Standby mode power consumption ≤ 0.5 W
Output power L/R 2 x 15W
Sensitivity LR 500 ±50 mV
Channel separation ≤ 50 db
S/N ≤ 90 dB
Speaker dimensions 134 x 220 x 218mm
6
Page 7

Bluetooth-högtalare
Art.nr 38-5646 Modell B100
Läs igenom hela bruksanvisningen före användning och spara den sedan för framtida
bruk. Vi reserverar oss för ev. text- och bildfel samt ändringar av tekniska data. Vid tekniska
problem eller andra frågor, kontakta vår kundtjänst (se adressuppgifter på baksidan).
Tänk på att:
• Annan befintlig trådlös utrustning på samma frekvensband kan påverka räckvidden
negativt.
• Räckvidden på all trådlös utrustning påverkas av vilka hinder som finns mellan
sändaren och mottagaren (t.ex. en betongvägg dämpar signalen avsevärt mer
än en gipsvägg).
Vid funktionsproblem, prova följande lösningar:
• Stäng av övriga befintliga trådlösa utrustningar för att kontrollera om de kan vara
orsaken till problemet.
• Flytta den trådlösa utrustningen och/eller förkorta avståndet, samt minska antalet
hinder (väggar, möbler etc.) mellan sändaren och mottagaren.
Säkerhet
• Placera inte högtalaren så att den kan falla ner i vatten eller annan vätska. Ställ inte
heller några föremål som innehåller vätska på högtalaren.
• Utsätt aldrig högtalaren för höga temperaturer, dammig miljö, starka vibrationer,
stötar, fukt eller väta.
• Placera inte högtalaren på sängen, i en soffa eller på en filt, detta gör att
ventilationsöppningarna blockeras.
• Högtalaren ska inte heller stå för trångt t.ex. i ett skåp eller i en bokhylla där luften
hindras från att cirkulera fritt.
• Högtalaren får endast anslutas till ett vägguttag med 220–240 V, 50–60 Hz.
• Standbyomkopplaren på fjärrkontrollen skiljer inte högtalaren från elnätet.
Bryt strömmen till högtalaren genom att dra stickproppen ur vägguttaget.
Stickproppen måste vara lättåtkomlig.
• Misshandla inte nätsladden. Bär aldrig högtalaren i nätsladden. Ryck inte i sladden
utan dra i stickproppen när du bryter strömmen. Se till att nätsladden inte kommer
i kontakt med värme, vassa kanter eller kläms på något sätt.
• Högtalaren är endast avsedd för inomhusbruk.
• Försök inte ta isär högtalaren, modifiera eller ändra den på något sätt.
• Använd inte högtalaren om den på något sätt är skadad eller inte fungerar som
den ska.
• Använd inga tillbehör som inte rekommenderas av tillverkaren.
• Högtalaren får endast repareras med originalreservdelar av kvalificerad servicepersonal.
Svenska
7
Page 8
Knappar och funktioner
1. Indikatorlampa för LINE IN
2. [ l◄◄ ] Föregående spår
3. Indikatorlampa
4. Indikatorlampa för Bluetooth
5. [ ►ll ] Play/pause
6. [ ►►l ] Nästa spår
7. Volymratt
8. [ M/STANDBY ] Läge, standby
Svenska
9. AUX IN: Lågnivåingång 3,5 mm
10. STEREO INPUT: Lågnivåingång 2 x RCA
11. Anslutning för nätkabel
12. Anslutning till vänster högtalare
13. [ ON OFF ] På/av
14. Anslutning från höger högtalare
10
1
4
5
2
6
7
3
8
9
12
11
13
14
8
Page 9

Anslutning
Anslut den medföljande högtalarkabeln mellan högtalarnas anslutningar (13) och (14).
Användning
Slå på högtalaren
1. Anslut nätsladden till ett vägguttag.
2. Ställ [ ON OFF ] på baksidan av högtalaren i läge ON.
3. Högtalaren går automatiskt till Bluetooth-läge. Indikatorlampan för Bluetooth (4)
blinkar grönt.
4. Tryck och håll ned [ M/STANDBY ] i ca 3 sekunder för att gå till standbyläge.
Indikatorlampan för LINE IN och BLUETOOTH släcks men blinkar för
standbyindikering.
5. För att slå av högtalaren helt, ställ [ ON OFF ] på baksidan av högtalaren i läge OFF.
Inställningar
• Tryck på [ M/STANDBY ] för att välja ljudkälla.
• Vrid på volymratt för att ställa in volymen.
Bluetooth
1. Tryck på [ M/STANDBY ] för att gå in i Bluetooth-läge. Indikatorlampan (4) blinkar grönt.
2. Aktivera Bluetooth på den enhet som ska paras ihop med högtalaren och sätt
enheten i sökbart läge. Välj ”38-5646” eller ”B100”.
3. Om du ombeds att ange PIN-kod på din enhet anger du 0000 (4 nollor). På vissa
enheter måste du dessutom godkänna anslutningen.
4. När anslutningen är klar lyser indikatorlampan (4) grönt. Du kan nu spela upp
musik från din enhet.
Svenska
9
Page 10

AUX IN
1. Anslut en extern ljudkälla till AUX IN på baksidan av högtalaren (kabel och extern
2. Tryck på [ M/STANDBY ] för att växla till LINE IN-läge. Indikatorlampan (1) lyser orange.
3. Starta uppspelning från din ljudkälla och justera volymen med volymratten.
STEREO INPUT
1. Anslut en extern ljudkälla till STEREO INPUT på baksidan av högtalaren
Svenska
2. Tryck på [ M/STANDBY ] för att växla till LINE IN-läge. Indikatorlampan (1) lyser orange.
3. Starta uppspelning från din ljudkälla och justera volymen med volymratten.
OBS! Om både AUX IN och STEREO INPUT är anslutna så prioriteras AUX IN.
I läget för AUX IN är volymen den enda funktion du kan styra.
Skötsel och underhåll
• Rengör högtalaren med en lätt fuktad trasa. Använd ett milt rengöringsmedel,
• Dra ur nätsladden ur vägguttaget vid åska.
• Förvara högtalaren på en torr och dammfri plats om den inte ska användas under
Avfallshantering
När du ska göra dig av med produkten ska detta ske enligt lokala föreskrifter.
Är du osäker på hur du ska gå tillväga, kontakta din kommun.
ljudkälla medföljer ej).
(kabel och extern ljudkälla medföljer ej).
aldrig lösningsmedel eller frätande kemikalier.
en längre period.
Specifikationer
Nätanslutning 220–240 V, 50 Hz
Strömförbrukning 40 W
Strömförbrukning i standbyläge ≤ 0,5 W
Uteffekt L/R 2 x 15 W
Känslighet LR 500 ±50 mV
Kanalseparation ≤ 50 db
S/N ≤ 90 dB
Mått högtalare 134 x 220 x 218 mm
10
Page 11

Bluetooth-høyttaler
Art. nr. 38-5646 Modell B100
Les brukerveiledningen grundig før produktet tas i bruk og ta vare på den for framtidig
bruk. Vi reserverer oss mot ev. feil i tekst og bilde, samt forandringer av tekniske data.
Ved tekniske problemer eller spørsmål, ta kontakt med vårt kundesenter.
(Se opplysninger om kundesenteret i denne bruksanvisningen).
Husk:
• Annet trådløst utstyr, som er innstilt på samme frekvens, kan på kan påvirke
rekkevidden negativt.
• Hindringer mellom sender og mottaker kan påvirke kontakten (rekkevidden)
mellom disse. En betongvegg kan f.eks. dempe signalene dramatisk i forhold
til en gipsvegg.
Ved problemer, prøv følgende:
• Skru av øvrig trådløst utstyr for å kontrollere hvor årsak til problemene ligger.
• Flytt det trådløse utstyret og gjør avstanden mellom sender og mottaker mindre.
Forsøk også å redusere antall hindringer mellom sender og mottaker (vegger,
møbler etc.).
Sikkerhet
• Plasser ikke produktet slik at det kan komme i kontakt med vann eller annen
væske. Plasser ikke gjenstander med væskeinnhold på høyttaleren.
• Utsett aldri produktet for høye temperaturer, fuktighet, støvete miljøer, sterke
vibrasjoner eller støt.
• Plasser ikke høyttaleren på sengen, i sofaen eller på et teppe. Det kan føre til at
ventilasjonsåpningene blir blokkert.
• Høyttaleren må ha luft rundt seg. Den må ikke plasseres i et skap, en trang bokhylle
el. l. hvor luften ikke kan sirkulere fritt rundt den.
• Høyttaleren skal kun kobles til et strømuttak med 220–240 V, 50–60 Hz.
• Standbybryteren på apparatet stenger ikke apparatet fra strømnettet. Produktet
gjøres strømløst ved at støpselet trekkes ut av strømuttaket. Apparatets støpsel
må være lett tilgjengelig.
• Påse at ikke strømledningen skades. Bær aldri produktet i strømledningen.
Trekk i selve støpselet og ikke i ledningen når strømmen skal brytes. Påse at
strømledningen ikke kommer i kontakt med varme, olje, skarpe kanter eller annet
som kan skade den.
• Produktet er kun beregnet for innendørs bruk.
• Produktets må ikke modifiseres eller endres på.
• Bruk ikke høyttaleren hvis den er skadet eller ikke fungerer som den skal.
• Bruk kun reservedeler som er anbefalt av produsenten.
• Produktet må kun repareres av kyndig servicepersonell og med originale reservedeler.
Norsk
11
Page 12

Norsk
Produktbeskrivelse
1. Indikatorlampe for LINE IN
2. [ l◄◄ ] Foregående spor
3. Indikatorlampe
4. Indikatorlampe for Bluetooth
5. [ ►ll ] Play/pause
6. [ ►►l ] Neste spor
7. Volumratt
8. [ M/STANDBY ] Modus, standby
9. AUX IN: Lavnivåinngang 3,5 mm
10. STEREO INPUT: Lavnivåinngang (2 x RCA)
11. Tilkobling for strømkabel
12. Tilkobling for venstre høyttaler
13. [ ON OFF ] På/av
14. Tilkobling for høyre høyttaler
10
1
4
5
2
6
7
3
8
9
12
12
11
13
14
Page 13

Kobling
Den vedlagte høyttalerkabelen kobles mellom høyttalernes koblingspunkter (13) og (14).
Bruk
Slå på høyttaleren
1. Strømkabelen kobles til et strømuttak.
2. Still [ ON OFF ], som sitter på høyttalerens bakside, på ON.
3. Apparatet går automatisk til Bluetooth-modus. Indikatorlampen for Bluetooth (4)
blinker grønt.
4. Trykk inn og hold [ M/STANDBY ] inne i ca. 3 sekunder for å gå til standbymodus.
Indikatorlampen for LINE IN og BLUETOOTH slukkes, men standbyindikatoren blinker.
5. Still [ ON OFF ] på OFF for å skru av høyttaleren helt.
Innstillinger
• Trykk på [ M/STANDBY ] for å velge lydkilde.
• Drei på volumratt for å justere volumet.
Norsk
Bluetooth
1. Trykk på [ M/STANDBY ] for å gå til Bluetooth-modus. Indikatorlampen (4) blinker grønt.
2. Aktiver Bluetooth på den enheten som skal brukes sammen med høyttaleren og
sett enheten i søkemodus. Velg «38-5646» eller «B100».
3. Hvis du blir bedt om å oppgi PIN-kode på enheten, oppgi 0000 (4 nuller). På
enkelte enheter må du også godkjenne tilkoblingen.
4. Når koblingen er ferdig lyser indikatorlampen (4) grønt. Du kan spille av musikk fra
enheten din.
13
Page 14

Norsk
AUX IN
1. Den eksterne lydkilden til AUX IN, på baksiden av høyttaleren, kobles (kabel og
ekstern lydkilde følger ikke med).
2. Trykk på [ M/STANDBY ] for å gå til LINE IN-modus. Indikatorlampen (1) lyser orange.
3. Start avspillingen fra lydkilden din og juster volumet med volumrattet.
STEREO INPUT
1. Den eksterne lydkilden til STEREO INPUT, på baksiden av høyttaleren, kobles til
(kabel og ekstern lydkilde følger ikke med).
2. Trykk på [ M/STANDBY ] for å gå til LINE IN-modus. Indikatorlampen (1) lyser orange.
3. Start avspillingen fra lydkilden din og juster volumet med volumrattet.
OBS! Hvis både AUX IN og STEREO INPUT er koblet til, så prioriteres AUX IN.
Det er kun volumrattet som kontrolleres fra høyttaleren i AUX IN.
Stell og vedlikehold
• Rengjør produktet med en lett fuktet klut. Bruk et mildt rengjøringsmiddel,
aldri løsningsmidler eller etsende kjemikalier.
• Trekk støpselet ut fra strømuttaket ved tordenvær.
• Høyttaleren skal oppbevares på et tørt og støvfritt sted hvis den ikke skal brukes
på en stund.
Avfallshåndtering
Når produktet skal kasseres, må det skje i henhold til lokale forskrifter.
Ved usikkerhet, ta kontakt med lokale myndigheter.
Spesifikasjoner
Spenning 220–240 V, 50 Hz
Strømforbruk 40 W
Strømforbruk i standbymodus ≤ 0,5 W
Uteffekt L/R 2 x 15 W
Følsomhet LR 500 ±50 mV
Kanalseparasjon ≤ 50 dB
S/N ≤ 90 dB
Mål på høyttaler 134 x 220 x 218 mm
14
Page 15

Bluetooth-kaiutin
Tuotenumero 38-5646 Malli B100
Lue käyttöohjeet ennen tuotteen käyttöönottoa ja säilytä ne tulevaa tarvetta varten.
Pidätämme oikeuden teknisten tietojen muutoksiin. Emme vastaa mahdollisista tekstitai kuvavirheistä. Jos laitteeseen tulee teknisiä ongelmia, ota yhteys myymälään tai
asiakaspalveluun (yhteystiedot käyttöohjeen lopussa).
Ota huomioon seuraavat asiat:
• Muut samalla taajuudella toimivat langattomat laitteet voivat heikentää kantamaa.
• Lähettimen ja vastaanottimen väliset esteet vaikuttavat kaikkien langattomien laitteiden
kantamaan (esim. betoniseinä heikentää signaalia huomattavasti kipsiseinää enemmän).
Kokeile ongelmatilanteessa seuraavia keinoja:
• Sammuta muut langattomat laitteet selvittääksesi, aiheuttavatko ne ongelmia.
• Siirrä langattomia laitteita, lyhennä laitteiden välistä etäisyyttä ja poista lähettimen
ja vastaanottimen väliset esteet, kuten huonekalut.
Turvallisuus
• Älä sijoita kaiutinta sellaiseen paikkaan, josta se voi pudota veteen tai muuhun
nesteeseen. Älä aseta kaiuttimen päälle nesteitä.
• Älä altista kaiutinta korkeille lämpötiloille, pölylle, tärinälle, iskuille, kosteudelle tai vedelle.
• Älä aseta kaiutinta sängylle, sohvalle tai huovalle, sillä ilmanottoaukot saattavat
tukkeutua.
• Älä säilytä kaiutinta ahtaassa tilassa, kuten kaapissa tai kirjahyllyssä, jotta ilma
pääsee kiertämään vapaasti kaiuttimen ympärillä.
• Kaiuttimen saa liittää ainoastaan seinäpistorasiaan (220–240 V, 50–60 Hz).
• Kaukosäätimen Standby-kytkin ei kytke kaiutinta pois sähköverkosta. Katkaise
kaiuttimen virta irrottamalla pistoke pistorasiasta. Sijoita pistoke helppopääsyiseen
pistorasiaan.
• Käsittele virtajohtoa varoen. Älä koskaan kanna kaiutinta virtajohdosta. Kun irrotat
pistokkeen, vedä pistokkeesta, älä johdosta. Varmista, ettei johto altistu kuumuudelle
tai teräville kulmille tai joudu puristuksiin.
• Tuote on tarkoitettu vain sisäkäyttöön.
• Älä pura tai muuta kaiutinta millään tavalla.
• Älä käytä kaiutinta, jos se on jollain tavalla vaurioitunut tai ei toimi normaalisti.
• Käytä ainoastaan valmistajan suosittelemia tarvikkeita.
• Ainoastaan valtuutettu huoltoliike saa korjata kaiuttimen käyttämällä pelkästään
alkuperäisosia.
Suomi
15
Page 16

Suomi
Painikkeet ja toiminnot
1. LINE IN -merkkivalo
2. [ l◄◄ ] Edellinen raita
3. Merkkivalo
4. Bluetooth-merkkivalo
5. [ ►ll ] Play/pause
6. [ ►►l ] Seuraava raita
7. Äänenvoimakkuuden säädin
8. [ M/STANDBY ] Standby-tila
9. AUX IN: Linjatulo 3,5 mm
10. STEREO INPUT: Linjatulo 2 x RCA
11. Virtajohdon liitäntä
12. Vasemman kaiuttimen liitäntä
13. [ ON OFF ] Virtakytkin
14. Oikean kaiuttimen liitäntä
10
1
4
5
2
6
7
3
8
9
12
16
11
13
14
Page 17

Liittäminen
Liitä mukana tuleva kaiutinjohto kaiuttimen liitäntöihin (13) ja (14).
Käyttö
Kaiuttimen kytkeminen päälle
1. Liitä virtajohdon pistoke verkkopistorasiaan.
2. Aseta laitteen takana oleva [ ON/OFF ]-kytkin ON-asentoon.
3. Kaiutin siirtyy automaattisesti Bluetooth-tilaan. Bluetooth-merkkivalo (4) vilkkuu vihreänä.
4. Aseta Standby-tila painamalla [ M/STANDBY ]-painiketta noin 3 sekunnin ajan.
Bluetooth- ja LINE IN –merkkivalo lakkaa palamasta yhtäjaksoisesti ja vilkkuu
Standby-tilan merkiksi.
5. Sammuta kaiutin kokonaan painamalla takaosan [ ON OFF ]-kytkin OFF-asentoon.
Asetukset
• Valitse äänilähde painamalla [ M/STANDBY ]-painiketta.
• Säädä äänenvoimakkuutta äänenvoimakkuuden säädin-säätimellä.
Bluetooth
1. Aseta Bluetooth-tila painamalla [ M/STANDBY ]-painiketta. Merkkivalo (4) vilkkuu vihreänä.
2. Aktivoi kaiuttimeen liitettävän laitteen Bluetooth ja laita laite hakutilaan. Valitse
”38-5646” tai ”B100”.
3. Jos laite pyytää PIN-koodia, syötä 0000. Tietyissä laitteissa liitäntä täytyy lisäksi
hyväksyä.
4. Kun liitäntä on valmis, vihreä merkkivalo (4) syttyy. Voit nyt soittaa musiikkia
laitteestasi.
17
Suomi
Page 18

Suomi
AUX IN
1. Liitä ulkoinen äänilähde kaiuttimen takaosan AUX IN -liitäntään (kaapeli ja ulkoinen
äänilähde myydään erikseen).
2. Siirry LINE IN -tilaan painamalla [ M/STANDBY ]-painiketta. Merkkivalo (1) palaa oranssina.
3. Käynnistä äänilähteesi toisto ja säädä äänenvoimakkuutta äänenvoimakkuussäätimellä.
STEREO INPUT
1. Liitä ulkoinen äänilähde kaiuttimen takaosan STEREO INPUT -liitäntään (kaapeli ja
ulkoinen äänilähde myydään erikseen).
2. Siirry LINE IN -tilaan painamalla [ M/STANDBY ]-painiketta. Merkkivalo (1) palaa oranssina.
3. Käynnistä äänilähteesi toisto ja säädä äänenvoimakkuutta äänenvoimakkuus säätimellä.
Huom.! Kun käytät yhtä aikaa AUX IN- ja STEREO INPUT –liitäntöjä, AUX IN -liitäntä
on ensisijainen. AUX IN -tilassa kaiuttimesta säädetään vain äänenvoimakkuutta.
Huolto ja puhdistus
• Puhdista kaiutin kevyesti kostutetulla liinalla. Käytä mietoa puhdistusainetta.
Älä käytä liuotusaineita tai syövyttäviä kemikaaleja.
• Irrota virtajohto pistorasiasta ukkosella.
• Säilytä kaiutinta kuivassa ja pölyttömässä paikassa, jos se on pitkään käyttämättä.
Kierrättäminen
Kierrätä tuote asianmukaisesti, kun poistat sen käytöstä.
Tarkempia kierrätysohjeita saat kuntasi jäteneuvonnasta.
Tekniset tiedot
Verkkoliitäntä 220–240 V, 50 Hz
Virrankulutus 40 W
Virrankulutus standby-tilassa ≤ 0,5 W
Antoteho L/R 2 x 15 W
Herkkyys LR 500 ±50 mV
Kanavaerotus ≤ 50 dB
S/N ≤ 90 dB
Mitat 134 x 220 x 218 mm
18
Page 19

Bluetooth-Lautsprecher
Art.Nr. 38-5646 Modell B100
Vor Inbetriebnahme diekomplette Bedienungsanleitung durchlesen und aufbewahren.
Irrtümer, Abweichungen und Änderungen behalten wir uns vor. Bei technischen Problemen
oder anderen Fragen freut sich unser Kundenservice über eine Kontaktaufnahme
(Kontakt siehe Rückseite).
Bitte beachten:
• Andere Funkausrüstung, dieauf dergleichen Frequenz sendet, kann
dieReichweite beeinträchtigen.
• Die Reichweite jeder Funkausrüstung wird durch Hindernisse zwischen Sender und
Empfänger beeinträchtigt (beispielsweise wird dasSignal durch eine Betonwand
deutlich stärker gedämpft als durch eine Gipswand).
Bei Funktionsproblemen bitte folgende Lösungen testen:
• Sonstige Funkausrüstung abschalten, um zu prüfen, ob sie dieProblemursache ist.
• Die Funkausrüstung versetzen und/oder den Abstand verringern. Außerdem dieZahl
derHindernisse (Wände, Möbel) zwischen Sender und Empfänger verringern.
Sicherheitshinweise
• Das Gerät immer so aufstellen, dass es nicht in Wasser oder andere Flüssigkeiten
fallen kann. Niemals Gegenstände mit Flüssigkeiten (z. B. Blumenvase oder Getränk)
auf dasGerät stellen.
• Das Gerät niemals hohen Temperaturen, staubigen Umgebungen, starken
Erschütterungen oder Feuchtigkeit aussetzen.
• Das Gerät niemals im Bett, auf einem Sofa oder einer Decke betreiben, da sonst
dieVentilationsöffnungen abgedeckt werden.
• Das Gerät nicht zu dicht anandere Gegenstände/Möbel stellen, da sonst
dieLuftzirkulation begrenzt wird.
• Das Gerät darf nur anSteckdosen mit 220–240 V, 50–60 Hz benutzt werden.
• Die Standby-Funktion schaltet dasGerät nicht komplett ab. Der Stromfluss zum
Gerät wird erst unterbrochen, wenn derNetzstecker gezogen ist. Der Stecker
muss immer leicht zugänglich sein.
• Sorgsam mit dem Netzkabel umgehen. Das Gerät niemals am Netzkabel tragen.
Nicht am Kabel, sondern am Stecker ziehen. Das Netzkabel nicht über scharfe
Kanten ziehen, klemmen oder für Wärme aussetzen.
• Das Gerät ist nur für dieVerwendung in Innenräumen geeignet.
• Niemals versuchen, dasGerät auseinanderzunehmen, umzubauen oder sonstwie
zu verändern.
• Das Gerät nicht betreiben, wenn es auf irgendeine Weise beschädigt ist oder nicht
fehlerfrei funktioniert.
• Nur Zubehör benutzen, dasvom Hersteller empfohlen wird.
• Reparaturen sind nur von qualifizierten Servicetechnikern und mit Originalzubehör
durchzuführen.
Deutsch
19
Page 20

Produktbeschreibung
1. Anzeigeleuchte für LINE IN
2. [ l◄◄ ] Vorheriges Titel
3. Anzeigeleuchte
4. Anzeigeleuchte für Bluetooth
5. [ ►ll ] Play/Pause
6. [ ►►l ] Nächster Titel
7. Lautstärkeregler
8. [ M/STANDBY ] Modus, Standby
9. AUX IN: 3,5 mm-Line-In-Eingang
10. STEREO INPUT: Cinch-Line-In-Eingang
11. Anschluss für Netzkabel
12. Anschluss anlinken Lautsprecher
13. [ ON OFF ] Ein/Aus
14. Anschluss von rechtem Lautsprecher
10
1
4
5
2
6
7
3
8
9
12
Deutsch
20
11
13
14
Page 21

Aufbau
Das mitgelieferte Lautsprecherkabel zwischen den Anschlüssen derLautsprecher (13)
und (14) anschließen.
Bedienung
Einschalten des Lautsprechers
1. Netzkabel in Steckdose einstecken.
2. Den Stromschalter [ ON/OFF ] auf derRückseite des Gerätes in Position ON versetzen.
3. Das Gerät wechselt automatisch in den Bluetooth-Modus. Die Anzeigeleuchte für
Bluetooth (4) blinkt grün.
4. Um in den Standby-Modus zu gehen [ M/STANDBY ] für ca. 3 Sekunden gedrückt
halten. Die Anzeigeleuchte für LINE IN und BLUETOOTH erlischt, blinkt aber um
den Standby-Modus anzuzeigen.
5. Um dasGerät komplett auszuschalten, [ ON OFF ] auf derRückseite des Gerätes
in Position OFF versetzen.
Einstellungen
• Zum Auswählen derAudioquelle auf [ M/STANDBY ] drücken.
• Am Lautstärkeregler diegewünschte Lautstärke einstellen.
Bluetooth
1. Um in den Bluetooth-Modus zu wechseln auf [ M/STANDBY ] drücken. Die
Anzeigeleuchte für Bluetooth (4) blinkt grün.
2. Die Bluetooth-Funktion des anzuschließenden Gerätes aktivieren und dieses in
den Suchmodus versetzen. „38-5646“ oder „B100“ auswählen.
3. Bei eventueller PIN-Nachfrage folgenden PIN angeben: 0000 (vier Nullen).
Bei manchen Geräten muss dieVerbindung akzeptiert werden.
4. Wenn dieVerbindung hergestellt ist leuchtet dieAnzeigeleuchte für Bluetooth
(4) grün. Jetzt kann Musik vom angeschlossenen Gerät über dieLautsprecher
abgespielt werden.
21
Deutsch
Page 22

AUX IN
1. Eine externe Audioquelle anAUX IN auf derRückseite des Gerätes anschließen
(Kabel und externe Audioquelle separat erhältlich).
2. [ M/STANDBY ] betätigen, um in den LINE IN-Modus zu wechseln. Die Anzeigeleuchte
(1) leuchtet orange.
3. Die Wiedergabe von derAudioquelle starten und dieLautstärke mit dem
Lautstärkeregler einstellen.
STEREO INPUT
1. Eine externe Audioquelle anSTEREO INPUT auf derRückseite des Gerätes anschließen
(Kabel und externe Audioquelle separat erhältlich).
2. [ M/STANDBY ] betätigen, um in den LINE IN-Modus zu wechseln. Die Anzeigeleuchte
(1) leuchtet orange.
3. Die Wiedergabe von derAudioquelle starten und dieLautstärke mit dem
Lautstärkeregler einstellen.
Hinweis: Wenn Audioquellen ansowohl AUX IN als auch STEREO INPUT angeschlossen sind, erfolgt dieAudiowiedergabe von AUX IN. Bei derWiedergabe von AUX IN
kann nur derLautstärkeregler anden Lautsprechern bedient werden.
Pflege und Wartung
• Das Produkt mit einem leicht befeuchteten Tuch reinigen. Ein saftes Reinigungsmittel
verwenden, keine scharfen Chemikalien oder Reinigungslösungen.
• Bei Gewitter den Netzstecker ziehen.
• Bei längerer Nichtbenutzung dasGerät aneinen trockenen, staubfreien Ort stellen.
Hinweise zur Entsorgung
Bitte dasProdukt entsprechend den lokalen Bestimmungen entsorgen.
Weitere Informationen sind von derGemeinde oder den kommunalen
Deutsch
Entsorgungsbetrieben erhältlich.
Technische Daten
Betriebsspannung Netzteil 220–240 V AC, 50Hz
Stromverbrauch 40 W
Stromverbrauch im Standby-Modus ≤ 0,5 W
Ausgangsleistung L/R 2 x 15 W
Empfindlichkeit, LR 500 ±50 mV
Kanaltrennung ≤ 50 dB
S/N ≤ 90 dB
Maße, Lautsprecher 134 x 220 x 218 mm
22
Page 23

Declaration of Conformity
Hereby, Clas Ohlson AB, declares that this FM/DAB-radio with Bluetooth
38-5646
B100
is in compliance with the essential requirements and
other relevant provisions of Directive 1999/5/EC and 2006/95/EC.
Article 3.1a (Safety): EN 60065
Article 3.1b (EMC): EN 301489-1
EN 301489-17
Article 3.2 (Radio): EN 300328
Insjön, Sweden, May 2013
0979
Klas Balkow
President
Clas Ohlson, 793 85 Insjön, Sweden
23
Page 24

Sverige
Kundtjänst tel: 0247/445 00
fax: 0247/445 09
e-post: kundservice@clasohlson.se
Internet www.clasohlson.se
Post Clas Ohlson AB, 793 85 INSJÖN
Norge
Kundesenter tlf.: 23 21 40 00
faks: 23 21 40 80
e-post: kundesenter@clasohlson.no
Internett www.clasohlson.no
Post Clas Ohlson AS, Postboks 485 Sentrum, 0105 OSLO
Suomi
Asiakaspalvelu puh.: 020 111 2222
sähköposti: asiakaspalvelu@clasohlson.fi
Internet www.clasohlson.fi
Osoite Clas Ohlson Oy, Maistraatinportti 4 A, 00240 HELSINKI
Great Britain
Customer Service contact number: 08545 300 9799
e-mail: customerservice@clasohlson.co.uk
Internet www.clasohlson.com/uk
Postal 10 – 13 Market Place
Kingston Upon Thames
Surrey
KT1 1JZ
Deutsch
Kundenservice Unsere Homepage www.clasohlson.com besuchen und
auf Kundenservice klicken.
 Loading...