

Page 1
English
Timer Switch
Art.no 32-8618 Model AX300
Please read theentire instruction manual before use and save
it for future reference. We reserve theright for any errors in text
or images and for making any necessary technical changes to
this document. If you should have any questions concerning
technical problems please contact our Customer Services.
Description
• Ideal for extra security, energy saving and convenience.
• Programmable for 20 ON/OFF settings.
• Timer with countdown.
• 3 RANDOM functions.
• 12/24 hour clock.
• Max. load 16 A, 3680 W.
• The time switch is only intended for indoor use in dry areas.
AX300 Timer Switch
Disposal
Follow local ordinances when disposing of this product.
If you are unsure about how to dispose of this product
contact your municipality.
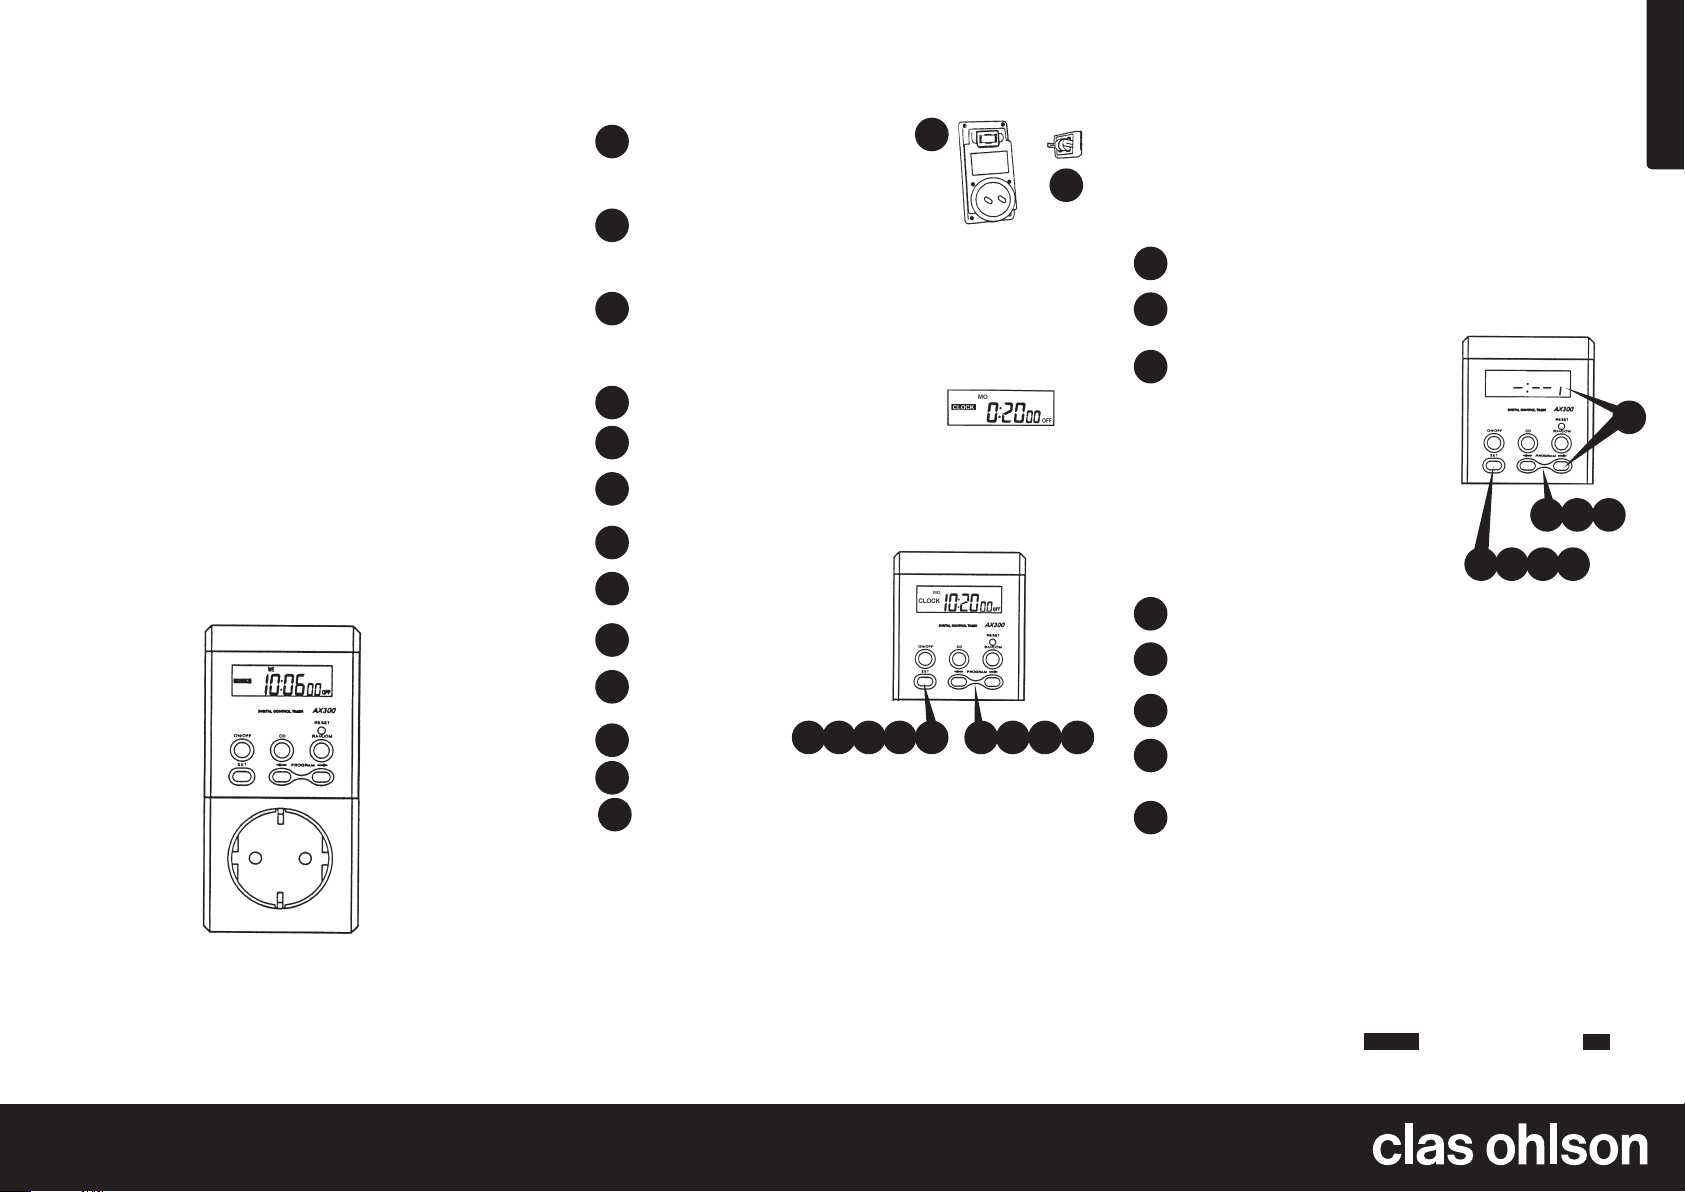
Batteries
Remove thebattery cover on
1
theback. (Pry open carefully at
thedepressions).
Insert thetwo button cell batteries
2
LR44, supplied, between thecontacts
according to themarkings.
Replace thecover (make sure that thelong battery
3
contacts are inside thebattery compartment).
1
2
Setting theclock
Go to Clock, using thearrows [ ← → ].
1
Push [ SET ].
2
Set theday using thearrows [ ← → ]
3
(Mo,Tu, We, Th, Fr, Sa, Su) (Monday – Sunday).
Push [ SET ].
4
Set thehour using
5
the arrows [ ← → ].
Push [ SET ].
6
Sets theminutes
7
using thearrows[ ← → ].
Push [ SET ].
8
Set theseconds using thearrows [ ← → ].
9
Push [ SET ].
10
• Push [ RANDOM ] whilst in thetime setup mode to change
between 12/24 hour display.
• Push both arrows at thesame time for 3 seconds in
theCLOCK mode to change to summer time. The hour
setting will advance anhour and thesun symbol lights up on
thedisplay. Push both arrows at thesame time for 3 seconds
in theCLOCK mode to return to normal time.
2
8
10
3
5 7 964
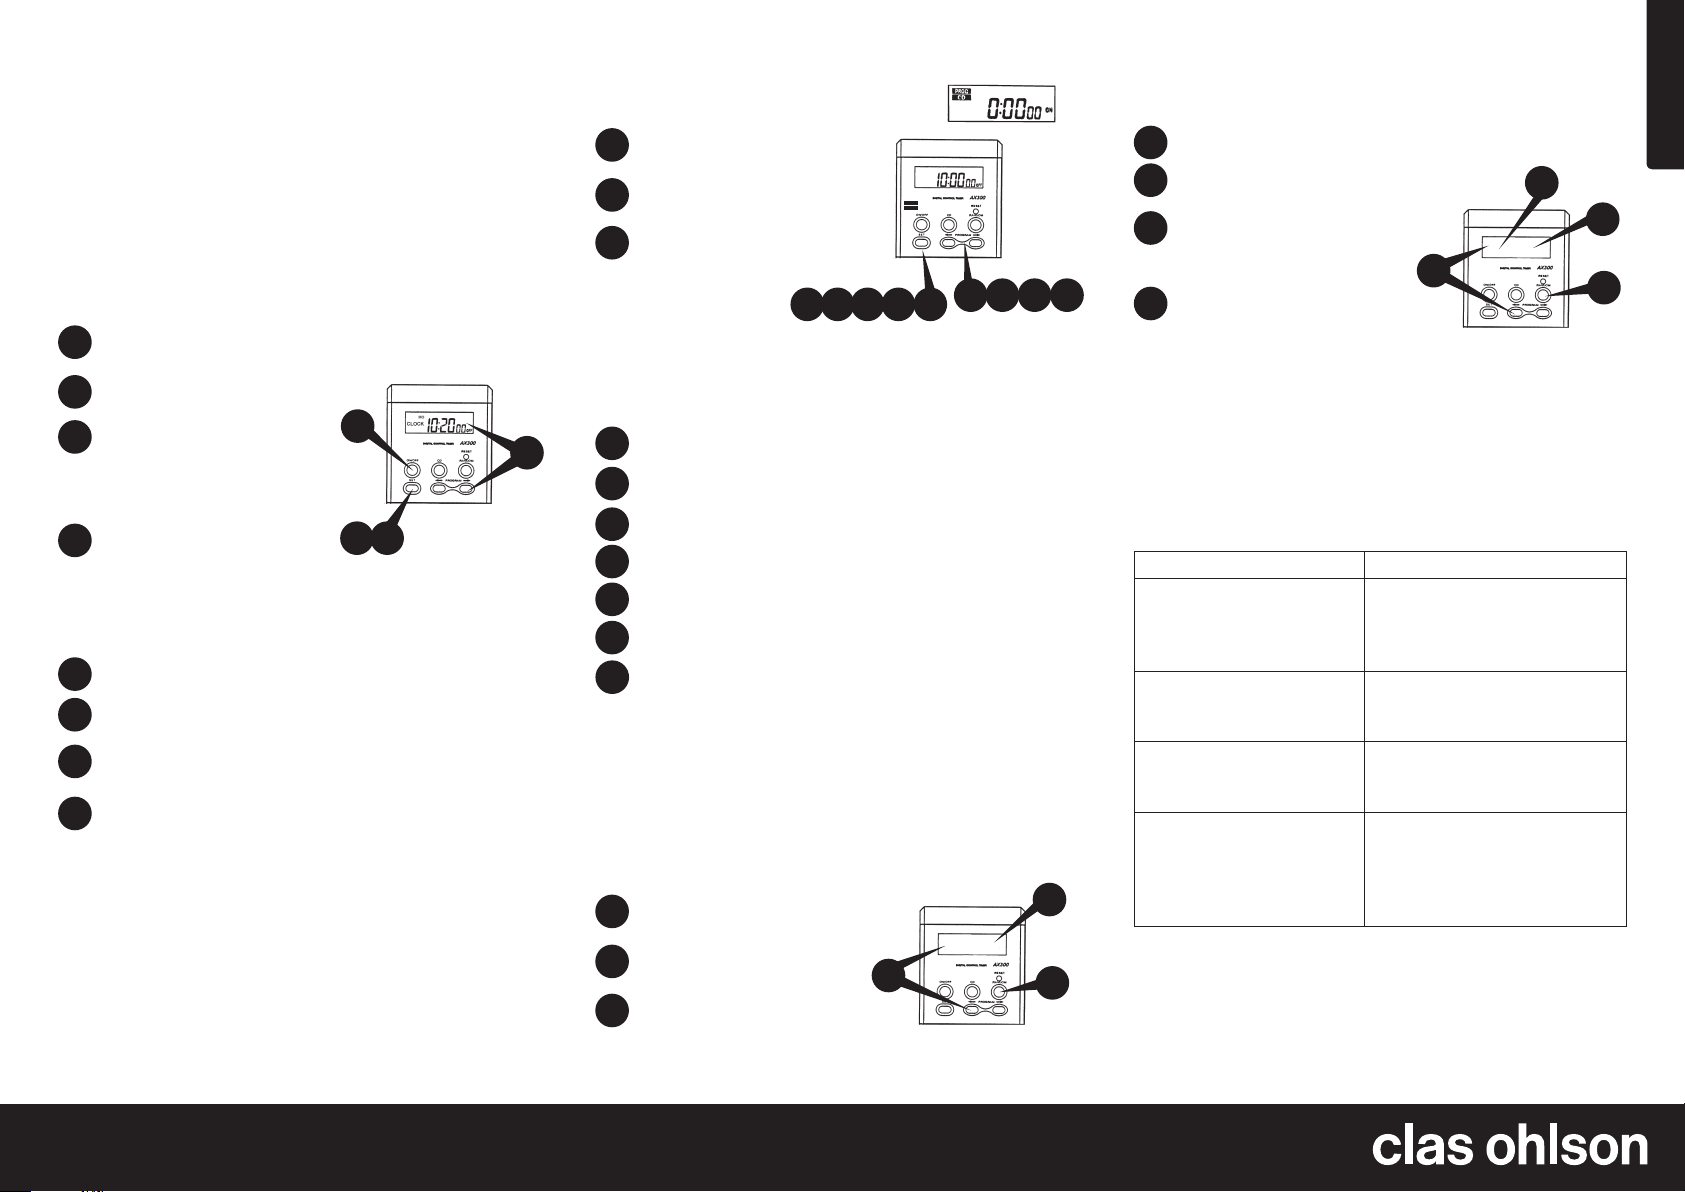
Programming thetimer
You can programme up to 20 on/off operations. The following
example shows how this is done:
Setting programme 1
It will switch on at 08:15 hrs Monday and switch off at 15:45 hrs
on Monday: MO 8:15 ON / MO 15:45 OFF.
Push thearrows [ ← → ] until thedisplay shows “PROG 1 ON”.
1
Push [ SET ]. The display will now show “SET” and theday
2
of theweek will flash.
Push thearrows [ ← → ] to choose
3
theday/s to activate PROG 1.
The days will appear one at atime,
in order MO to SU (Monday to
Sunday), then all days MO – FR
(from Monday to Friday), then all
days MO - SA (Monday – Saturday),
then theweekend (Saturday –
Sunday) and finally all week, MO –
SU (Monday to Sunday). The day in
theexample is Monday (MO).
Push SET when thedisplay shows “MO”.
4
The hours will now start to flash. Adjust thehour using
5
thearrows [ ← → ] until you get thehour 8.
Push [ SET ].
6
The minutes will now start to flash. Adjust them to 15
7
using thearrows [ ← → ].
Push SET to exit thesetup of PROGRAM 1 ON. Push
8
thearrows [ ← → ] until thedisplay shows “PROG 1 OFF”.
Set theday and thetime in thesame way.
• If you want to programme several programmes, push
thearrows [ ← → ] until thedisplay shows “PROG 2 ON”.
You can set thedesired number of programmes in
thesame way.
• If no button is pushed for one minute, thetimer switch will
return to clock display mode.
• The programmes are organised in acycle with theclock
and countdown functions
count down funktion.
CLOCK
2
→ Program 1-20 → CD
3
4 6 8
5 7
1
Ver. 20131209
GREAT BRITAIN • customer service
tel: 08545 300 9799 e-mail: customerservice@clasohlson.co.uk internet: www.clasohlson.com/uk
Page 2
English
Note: If you want thetime switch to switch on one day and switch
off another day, you need to use 2 programmes. In this example
theswitch will switch on at 20.00 hrs Monday and switch off at
06.00 hrs Tuesday. If you want to programme theswitch to switch
on at 20.00 hrs on Monday you can e.g. use PROG 1 ON and set
thetime and date. Then advance to PROG 2 OFF without setting
any times for 1 OFF and 2 ON. In programme 2 OFF setup mode
you should enter Tuesday 06.00.
To deactivate aprogramme
Choose thedesired programme using thearrows [ ← → ].
1
Push [ SET ].
2
Push [ ON/OFF ] to deactivate
3
theprogramme. A cross
shows that theprogramme
is deactivated.
Push [ SET ] 3 times to exit
4
thecancel mode.
3
2
1
4
To deactivate all programmes
Advance to CLOCK using thearrows [ ← → ].
1
Push [ SET ].
2
Push [ ON/OFF ] to deactivate all theprogrammes.
3
A cross indicates that theprogrammes are deactivated.
Push [ SET ] 4 times to exit thecancel mode (cancel all).
4
Repeat steps 1–4 if you change your mind and don’t
want to cancel theprogrammes.
Countdown Timer
This countdown timer starts in either theON or OFF mode
and counts down when activated. In theON mode thetimer
switch emits 230 V. In theOFF mode thetimer switch does not
emit any voltage.
Setting the countdown timer
Choose PROG CD using
1
the left arrow [ ← ].
Push [ SET ].
2
Choose ON or OFF using the
3
arrows [ ← → ].
2
• The ON countdown starts when you push [ CD ].
ON during the countdown and thereafter OFF.
• The OFF countdown starts when you push [ CD ].
OFF during the countdown and thereafter ON.
Push [ SET ].
4
Set the hour using the arrows [ ← → ].
5
Push [ SET ].
6
Set the minutes using the arrows [ ← → ].
7
Push [ SET ].
8
Set the seconds using the arrows [ ← → ].
9
Push [ SET ].
10
Stop the countdown by pushing [ CD ] or [ ON/OFF ].
PROG
CD
3
10
64
8
5 7 9
Random function
Short random: Operates for 1–2 hours at a time.
Long random: Operates for 2–3 hours at a time.
Programmable random: Operates for 1–2 hours at a time.
Short random: choose CLOCK.
1
Long random: choose CD.
Push [ RANDOM ].
2
“RND” flashes for short random.
3
“L-RND” flashes for long random.
1
3
2
Programmable random function
Choose programme 20 using thearrows [ ← → ].
1
Push [ RANDOM ].
2
Set thetime within which you
3
wish therandom function to
operate.
“RND” is shown on thedisplay.
4
• The programmable random function is only possible on
programme 20.
• Turn the random function off using [ RANDOM ] or [ ON/OFF ].
1
4
3
2
Manual ON/OFF
Push [ ON/OFF ].
Troubleshooting
Problem Solution
The LCD display has frozen
and the buttons don’t
respond when you
push them.
The timer switch’s settings
are lost when it is not
connected to the mains.
The timer switch does not
perform the programmed
ON/OFF operations.
The timer switch does not
perform the programmed
ON/OFF operations at
certain times.
Push [ RESET ] to reset the timer.
Change the batteries.
Make sure that the programmes
are not deactivated.
Activate the programmes.
Make sure that the random
function is not activated. Make
sure that no other programmes
or countdown functions are
activated at the same time.
Technical Specification
Programmes 20
Rated voltage 230 V AC, 16 A
Max Load 3680 W Resistive load
Shortest operating time 1 minute
Ver. 20131209
GREAT BRITAIN • customer service
tel: 08545 300 9799 e-mail: customerservice@clasohlson.co.uk internet: www.clasohlson.com/uk
Page 3

Svenska
Kopplingsur
Art.nr 32-8618 Modell AX300
Läs igenom hela bruksanvisningen före användning och spara
den sedan för framtida bruk. Vi reserverar oss för ev. text- och
bildfel samt ändringar av tekniska data. Vid tekniska problem
eller andra frågor, kontakta vår kundtjänst.
Beskrivning
• Många användningsområden för säkerhet,
energiesparning och trivsel.
• Inställning för 20 st. AV/PÅ inställningar.
• Timer med nedräkningsfunktion.
• 3 st. slumpvisa (RANDOM) funktioner.
• 12/24 timmars klocka.
• Belastning max. 16 A, 3680 W.
• Kopplingsuret är endast avsedd för inomhusbruk
i torra utrymmen.
AX300 Kopplingsur
Avfallshantering
När du ska göra dig av med produkten ska detta ske enligt
lokala föreskrifter. Är du osäker på hur du ska gå tillväga, kontakta din kommun.
Batterier
Ta bort batterilocket på baksidan.
1
(Bänd försiktigt vid fördjupningarna)
Placera de två bifogade knappcell-
2
batterierna LR44 mellan anslutningsblecken enligt märkningen.
Tryck fast locket (se till att de långa kontaktblecken går
3
ner i batterifackets öppningar).
1
Ställ in klockan
Gå till Clock med pilarna [ ← → ].
1
Tryck på [ SET ].
2
Ställ in dag med pilarna [ ← → ] (Mo,Tu, We, Th, Fr, Sa, Su)
3
(Måndag – Söndag).
Tryck på [ SET ].
4
Ställ in timme med pilarna [ ← → ].
5
Tryck på [ SET ].
6
Ställ in minuter
7
med pilarna [ ← → ].
Tryck på [ SET ].
8
Ställ in sekunder
9
med pilarna [ ← → ].
Tryck på [ SET ].
10
• Tryck på [ RANDOM ] under tidsinställningen för att växla
mellan 12/24 timmars visning.
• Tryck på båda pilarna samtidigt i 3 sekunder i CLOCK
läge för att växla till sommartid. Timmsiffran stegar fram
entimme och solsymbolen tänds i displayen. Tryck på båda
pilarna samtidigt i 3 sekunder i CLOCK läge för att återgå till
vanlig tid.
2
8
10
3
5 7 964
2
Programinställningar
Med timern kan du ställa in upp till 20 on/off-program.
Hur det går till visar följande exempel:
Inställning av program 1
Det ska slå till på måndag kl. 08:15 och från på måndag kl. 15:45:
MO 8:15 ON / MO 15:45 OFF.
Tryck på pilarna [ ← → ] tills displayen visar ”PROG 1 ON”.
1
Tryck på knappen [ SET ]. Då visar displayen ”SET” och
2
veckodagen blinkar.
Tryck på pilarna [ ← → ] för att välja
3
dag/ar/ för aktivering av PROG 1. En
dag i taget visas i ordning MO till SU
(måndag till söndag), sedan alla dagar mellan MO – FR (måndag – fredag), sedan alla dagar mellan MO SA (måndag – lördag), sedan dagarna
(lördag – söndag ) och sist alla dagar
MO – SU (måndag till söndag).
Dagen i exemplet är måndag (MO).
Tryck på [ SET ] när displayen visar ”MO”.
4
Nu blinkar timsiffran. Ställ in rätt timme med pilarna [ ← → ]
5
för att ta fram 8.
Tryck sen på [ SET ].
6
Nu blinkar minutsiffran. Ändra den till 15 med pilarna [ ← → ].
7
Tryck på [ SET ] för att avsluta inställningen av PROGRAM 1 ON.
8
Tryck på pilarna [ ← → ] till displayen visar ”PROG 1 OFF”.
Ställ in dagen och tiden på samma sätt.
• Om du vill programmera fler program trycker du på
pilarna [ ← → ] tills displayen visar ”PROG 2 ON”. Ställ sen
in önskat antal program på samma sätt.
• Om du inte trycker på någon knapp under enminut så
återgår kopplingsuret till visning av klocktid.
• Programmen är ordnade i ettrunt mönster med klockan
och nedräkningsfunktionerna
1–20 → CD Nedräkningsfunktion.
CLOCK
2
Klockan → Program
3
4 6 8
5 7
1
Ver. 20131209
SVERIGE • kundtjänst tel. 0247/445 00 fax 0247/445 09 e-post kundservice@clasohlson.se internet www.clasohlson.se
Page 4

Svenska
Obs! Om du vill att kopplingsuret ska slå till endag och slå av
enannan dag så måste du använda 2 programplatser.
I exemplet ska det slå till på måndag kl. 20.00 och från på tisdag
06.00. Om du vill programmera in ettpåslag kl. 20.00 på
måndag kan du exempelvis använda program 1 ON och ställa
in tid och datum. Stega sedan fram till 2 OFF utan att ställa in
någonting på 1 OFF och 2 ON. I läge 2 OFF ställer du in tisdag
kl. 06.00.
För att koppla ur ettprogram
Välj önskat PROGRAM med pilarna [ ← → ].
1
Tryck på [ SET ].
2
TRYCK på [ ON/OFF ] för att
3
koppla ur programmet.
Ett kryss visar att programmet
är urkopplat.
Tryck på [ SET ] 3 gånger för
4
att gå ur raderingsläget.
3
2
1
4
För att koppla ur alla program
Gå till CLOCK med pilarna [ ← → ].
1
Tryck på [ SET ].
2
TRYCK på [ ON/OFF ] för att koppla ur alla program.
3
Ett kryss visar att programmen är urkopplade.
Tryck på [ SET ] 4 gånger för att gå ur raderingsläget
4
(radera alla).
Repetera stegen 1–4 för att ångra raderingen.
Nedräknande timer
Denna nedräkningsfunktion startar i ON (påslaget) eller OFF
(avstängt) läge och räknar ner vid aktivering. I läge ON (påslaget)
ger kopplingsuret ut 230V. I läge OFF (avstängt ) ger kopplingsuret inte ut någon spänning.
Nedräknande timer, Inställning
Välj PROG CD funktionen
1
med vänsterpilen [ ← ].
Tryck på [ SET ].
2
Välj ON (PÅ) eller OFF (AV)
3
inställningar med pilarna [ ← → ].
2
• ON (på), nedräkningen startar när du trycker på [ CD ].
PÅ under nedräkningstiden och därefter AV.
• OFF (av), nedräkningen startar när du trycker på [ CD ].
AV under nedräkningstiden och därefter PÅ.
Tryck på [ SET ].
4
Ställ in timme med pilarna [ ← → ].
5
Tryck på [ SET ].
6
Ställ in minuter med pilarna [ ← → ].
7
Tryck på [ SET ].
8
Ställ in sekunder med pilarna [ ← → ].
9
Tryck på [ SET ].
10
Stoppa nedräkningsfunktionen genom att trycka på
[ CD ] eller [ ON/OFF ].
PROG
CD
3
10
64
8
5 7 9
Random function (Slumpvis funktion)
Kort slumpvis: Påslagstid 1–2 timmar per gång.
Lång slumpvis: Påslagstid 2–3 timmar per gång.
Programmerbar slumpvis: Påslagstid 1–2 timmar per gång
Kort slumpvis: välj CLOCK.
1
Lång slumpvis: välj CD.
Tryck på [ RANDOM ].
2
”RND” blinkar vid kort slumpvis.
3
”L-RND” blinkar vid lång slumpvis.
1
3
2
Programmeringsbar slumpvis funktion
Välj program 20 med pilarna [ ← → ].
1
Tryck på [ RANDOM ].
2
Ställ in den tiden du vill ha
3
önskad slumptid inom.
”RND” visas på displayen.
4
• Programeringsbar slumpvis går endast på program 20.
• Stäng av slumpfunktionen med [ RANDOM ] eller [ ON/OFF ].
1
4
3
2
Manuell AV/PÅ
Tryck på [ ON/OFF ].
Felsökning
Problem Lösning
LCD displayen har fryst
och knapparna svarar inte
vid tryckning.
Kopplingsuret tappar
inställningar när den inte
är ansluten till etteluttag.
Kopplingsuret utför inte
inställda till-/frånkopplingar.
Kopplingsuret utför inte
inställda till-/frånkopplingar
på vissa tider.
Tryck på [ RESET ] för att
återställa timern.
Byt batterier.
Se till att inte programmen är urkopplade. Koppla in programmen.
Se till att inte slumpfunktionen är
aktiverad. Se till så att inga andra
program eller nedräkningsfunktioner
är aktiverade under samma tid.
Teknisk Specifikation
Program 20 st
Märkspänning 230 V AC 16A
Max Belastning 3680 W Resistiv last
Minsta inkopplingstid 1 Minut
Ver. 20131209
SVERIGE • kundtjänst tel. 0247/445 00 fax 0247/445 09 e-post kundservice@clasohlson.se internet www.clasohlson.se
Page 5

Norsk
Koblingsur
Art.nr. 32-8618 Modell AX300
Les nøye igjennom hele bruksanvisningen og ta vare på den til
senere bruk. Vi reserverer oss mot ev. tekst- og bildefeil, samt
forandringer av tekniske data. Ved tekniske problemer eller
andre spørsmål, ta kontakt med vårt kundesenter.
Beskrivelse
• Produktet har mange bruksområder for sikkerhet,
energisparing og trivsel.
• Kan programmeres for inntil 20 stk. AV/PÅ innstillinger.
• Timer med nedtellingsfunksjon.
• 3 stk. RANDOM-funksjoner (Tilfeldige til-/fraslag).
• Valgfritt 12 eller 24 timers klokke.
• Belastning maks. 16 A, 3680 W.
• Koblingsuret er kun beregnet for innendørs bruk.
AX300 Koblingsur
Avfallshåndtering
Når du skal kassere dette produktet, skal det skje i henhold til
gjeldende forskrifter. Dersom du er usikker på reglene, ta kontakt
med lokale myndigheter for mer informasjon.
Batterier
Ta av batterilokket som sitter på
1
koblingsurets bakside.
(Press forsiktig ved fordypningene).
Plasser de to knappecellebatteriene
2
av typen LR44 (følger med) i henhold
til markering i batteriholder.
Sett lokket tilbake på plass. (Påse at de lange
3
kontaktfjærene ligger på plass i batteriholderen).
1
Stille inn klokken
Gå til CLOCK med pilene [ ← → ].
1
Trykk på [ SET ].
2
Still inn ukedag (Mo,Tu, We, Th, Fr, Sa, Su)
3
(Mandag – Tirsdag ....) med pilene.
Trykk på [ SET ].
4
Still inn time med pilene [ ← → ].
5
Trykk på [ SET ].
6
Still inn minutter med
7
pilene [ ← → ].
Trykk på [ SET ].
8
Still inn sekunder med pilene [ ← → ].
9
Trykk på [ SET ].
10
• Trykk på [ RANDOM ] under tidsinnstillingen for å veksle
mellom 12 og 24 timers visning.
• Trykk på [ SET ] i ca. 3 sekunder i CLOCK-posisjonen, for
å skifte til sommertid. Timeinnstillingen går fram en time
og sol-symbolet tennes i displayet. Trykk på begge pilene
samtidig i ca. 3 sekunder i CLOCK-posisjon for å gå tilbake
til ”vanlig” tid.
2
8
10
3
5 7 964
2
Innstilling av program
Med timeren kan du stille inn inntil 20 ON/OFF-program.
Dette kan gjøres på følgende måte:
Innstilling av program 1
Koblingsuret skal slå til på mandag klokken 08.15 og fra på
mandag klokken 15.45 (MO 8:15 ON – MO 15:45 OFF).
Trykk på pilene [ ← → ] til displayet viser at du er i ”PROG 1 ON”.
1
Trykk på [ SET ]. Displayet vil vise ”SET” og ukedagen blinker.
2
Trykk på pilene [ ← → ] for å velge
3
dag(er) for aktivering av PROG1.
Dagene vises i rekkefølge MO til SU
(mandag til søndag), deretter alle
dager mellom MO-SA (mandag –
lørdag), så kommer dagene SA og
SU (lørdag og søndag og til sist alle
dager MO-SU (mandag til søndag).
I vårt eksempel skal vi stille inn for
mandag (MO).
Trykk på [ SET ] når displayet står på ”MO”.
4
Nå blinker timesifrene. Still inn time med pilene [ ← → ]
5
for å komme til 8.
Trykk på [ SET ].
6
Nå blinker minuttsifrene. Still inn minuttene (15 i vårt eksempel)
7
med pilene [ ← → ].
Trykk på SET for å avslutte innstillingen av PROG 1 ON.
8
Trykk på pilene [ ← → ] til displayet viser at du er i ”PROG 1 OFF”.
Still inn dag og tid som beskrevet ovenfor.
• Dersom du ønsker å legge inn flere programmer, trykker du
på pilene [ ← → ] til displayet viser ”PROG 2 ON” og følger
punktene ovenfor.
• Dersom du ikke trykker på noen knapper i løpet av ett minutt,
vil koblingsuret gå tilbake til vising av klokkeslett.
• Programmene er ordnet i rekkefølge
→ CD nedtellingsfunksjon.
2
CLOCK
3
5 7
4 6 8
→ Program 1 – 20
1
Ver. 20131209
NORGE • kundesenter tel. 23 21 40 00 fax 23 21 40 80 e-post kundesenter@clasohlson.no internett www.clasohlson.no
Page 6

Norsk
Obs! Dersom du vil at koblingsuret skal kobles på en dag og av
en annen dag, må du bruke 2 programplasser. I vårt eksempel
skal det kobles til på mandag klokken 20.00 og fra på tirsdag
klokken 06.00. Nå kan du bruke PROG 1 ON og følge punktene
ovenfor for å programmere for mandagen (MA). Gå så rett til 2 OFF,
uten å avslutte med 1OFF og 2 ON. I posisjon 2 OFF, stiller du
inn tirsdag (TU) på dag og kl.06.00 på klokkeslett.
Å slette et program
Velg ønsket program men pilene [ ← → ].
1
Trykk på [ SET ].
2
Trykk på [ ON/OFF ] for å koble
3
ut programmet. Et kryss viser
at programmet er slettet.
Trykk på [ SET ] 3 ganger for
4
å gå ut av programmet for
sletting.
3
2
1
4
Å slette alle programmeringer
Gå til CLOCK med pilene [ ← → ].
1
Trykk på [ SET ].
2
Trykk på [ ON/OFF ] for å koble ut alle programmene.
3
Et kryss viser at programmene er slettet.
Trykk på [ SET ] 4 ganger for å gå ut av programmet for
4
sletting. Repeter trinnene 1–4 for å angre på at du slettet
programmene.
Timerens nedtellingsfunksjon
Denne nedtellingsfunksjonen starter i ON- (koblingsur skrudd
på) eller OFF- (koblingsur skrudd av) posisjon og teller ned ved
aktivering. I ON-posisjon gir koblingsuret 230 V ut. I OFF-posisjon
gir ikke koblingsuret noen spenning.
Innstilling
Velg PROG CD funksjonen
1
men venstrepilen [ ← ].
Trykk på [ SET ].
2
Velg ON- (på) eller OFF- (av)
3
innstillinger med pilene [ ← → ].
2
• ON (på), nedtellingen starter når du trykker på [ CD ].
PÅ ved nedtelling og deretter AV.
• OFF (av), nedtellingen starter når du trykker på [ CD ].
AV ved nedtelling og deretter PÅ.
Trykk på [ SET ].
4
Still inn time med pilene [ ← → ].
5
Trykk på [ SET ].
6
Still inn minutt med pilene [ ← → ].
7
Trykk på [ SET ].
8
Still inn sekunder med pilene [ ← → ].
9
Trykk på [ SET ].
10
Stopp nedtellingsfunksjonen ved å trykke på [ CD ]
eller [ ON/OFF ].
PROG
CD
3
10
64
8
5 7 9
Random funksjon (Tilfeldige til-/fraslag)
Tilfeldige til-/fraslag med korte intervaller:
Påslagstid 1–2 timer per gang.
Tilfeldige til-/fraslag med lange intervaller:
Påslagstid 2–3 timer per gang.
Programmerbar tilfeldig til-/fraslag: Påslagstid 1–2 timer per gang.
Innstilles som følger:
Velg CLOCK for ”Kort påslagstid”.
1
Velg CD for ”Lang påslagstid”.
Trykk på [ RANDOM ].
2
”RND” blinker når du har stilt inn på
3
kort påslagstid. ”L-RND” vil blinke når
du har stilt inn på lang påslagstid.
1
3
2
Programmeringsbar tilfeldig til-/fraslag
Velg program 20 med pilene [ ← → ].
1
Trykk på [ RANDOM ].
2
Still inn den tiden du vil at tilfeldig
3
til-/fraslag skal virke innenfor.
4
3
1
”RND” kommer opp på displayet.
4
• Tilfeldig til-/fraslag kan kun legges inn som program nr. 20.
• Funksjonen skrus av med [ RANDOM ] eller [ ON/OFF ]
2
Manuell AV/PÅ
Trykk på [ ON/OFF ].
Feilsøking
Problem Løsning
LCD displayet har frosset
fast og ingen taster
responderer når de blir
trykket på.
Koblingsuret sletter alle
innstillinger når det ikke er
koblet til strømuttak
Koblingsuret utfører
ikke de programmerte
innstillingene.
Koblingsuret utfører ikke
til- og fra-koblinger til
visse tider.
Trykk på [ RESET ] for å opprette
alle fabrikkinnstillingene.
Skift batteri.
Påse at ikke programmeringens
slettefunksjon er aktivert.
Påse at ikke RANDOM-funksjonen
er aktivert. Påse også at
ingen andre program eller
nedtellingsfunksjoner er aktivert
på samme tider.
Spesifikasjoner
Program 20 stk.
Spenning 230 V AC
Maks. belastning 3680 W Resistiv last
Minste innkoblingstid 1 minutt
Ver. 20131209
NORGE • kundesenter tel. 23 21 40 00 fax 23 21 40 80 e-post kundesenter@clasohlson.no internett www.clasohlson.no
Page 7

Suomi
Kellokytkin
Tuotenro 32-8618 Malli AX300
Lue käyttöohjeet ennen tuotteen käyttöönottoa ja säilytä ne tulevaa tarvetta varten. Pidätämme oikeuden teknisten tietojen muutoksiin. Emme
vastaa mahdollisista teksti- tai kuvavirheistä. Jos tuotteeseen tulee
teknisiä ongelmia, ota yhteys myymälään tai asiakaspalveluun.
Kuvaus
• Monia käyttömahdollisuuksia; turvallisuus-, energiansäästö- ja
mukavuustarkoituksiin.
• Mahdollisuus 20 päälle/pois -ohjelmointiin.
• Ajastin lähtölaskentatoiminnolla.
• Kolme (3) satunnaistoimintoa (RANDOM).
• 12/24 tunnnin kello.
• Suurin kuormitus 16 A, 3680 W.
• Kellokytkin on suunniteltu käytettäväksi vain kuivissa sisätiloissa.
AX300 Kellokytkin
Kierrätys
Kierrätä tuote asianmukaisesti, kun poistat sen käytöstä.
Tarkempia kierrätysohjeita saat kuntasi jäteneuvonnasta.
Paristojen asetus paikalleen
Poista paristolokeron kansi (väännä
1
varovasti syvennyksien kohdalta).
Aseta pakkauksessa mukana tulleet
2
nappiparistot (LR 44) merkintöjen mukaisesti kytkentälevyjen väliin.
Paina paristolokeron kansi paikalleen (varmista, että pitkät
3
kosketinlevyt painuvat paikoilleen paristolokeron aukkoihin)
1
Kellon asetus
Siirry kellon asetustilaan Clock
1
nuolinäppäimillä.
Paina asetuspainiketta [ SET ].
2
Säädä päivä (Mo,Tu, We, Th, Fr, Sa, Su)
3
(Maanantai – Sunnuntai) nuolinäppäimillä [ ← → ].
Paina asetuspainiketta [ SET ].
4
Säädä tunnit
5
nuolinäppäimillä [ ← → ].
Paina asetuspainiketta [ SET ].
6
Säädä minuutit
7
nuolinäppäimillä [ ← → ].
Paina asetuspainiketta [ SET ].
8
Säädä sekunnit
9
nuolinäppäimillä [ ← → ].
Paina asetuspainiketta [ SET ].
10
• Vaihtaaksesi 12 ja 24 tunnin näytön välillä, paina [ RANDOM ] ajan
asetuksen aikana.
• Vaihtaaksesi kesäjan ja talviajan välillä, paina kellon asetustilassa
molempia nuolinäppäimiä yhtä aikaa kolmen sekunnin ajan.
Kesäaikaan siirryttäessä kello siirtyy tunnilla eteenpäin ja auringon
symboli ilmestyy näytölle. Talviaikaan siirryttäessä kello siirtyy tunnin
taaksepäin ja aurinkosymboli katoaa.
2
8
10
3
5 7 964
Ohjelmointi
Kellokytkimeen voidaan ohjelmoida jopa 20 päälle/pois kytkentää.
Ohjelmointi tapahtuu seuraavan esimerkin mukaisesti:
2
Ohjelmointi, ohjelma 1
Päälle maanantaina kello 8:15, pois päältä maanantaina kello 15:45.
Painele nuolinäppäimiä [ ← → ] kunnes näytölle ilmestyy ”PROG 1 ON”
1
(Ohjelma 1 päällekytkentä).
Paina [ SET ]-näppäintä. Näytölle ilmestyy ”SET” ja viikon-päivä
2
alkaa vilkkua.
Paina nuolinäppäimiä [ ← → ] valitaksesi
3
ohjelman 1 päällekytkentäpäivän tai –
päivät. Ohjelma voidaan aktivoida monella
eri tavalla, joko päivä kerrallaan, jokainen
viikonpäivä erikseen, kaikkina arkipäivinä,
kaikkina päivinä sunnuntaita lukuunottamatta, vain viikonloppuna tai viikon
jokaisena päivänä. Päivän valinta muuttuu
jokaisella painalluksella seuraavasti:
MO =Vain maanantai, TU = Vain tiistai jne.
MO–FR = Maanantaista perjantaihin
MO–SA = Maanantaista lauantaihin SA–
SU = Lauantaista sunnuntaihin, MO–SU =
Joka päivä. Esimerkin päällekytkentäpäivä
on maanantai. Paina nuolinäppäimiä
kunnes näytöllä näkyy pelkästään MO,
maanantai.
Valinta hyväksytään painamalla asetuspainiketta [ SET ].
4
Päivän valinnan jälkeen tuntiluku alkaa vilkkua. Aseta oikea tunti
5
nuolinäppäimillä [ ← → ]. Esimerkin tuntiluku on 8. Painele
nuolinäppäimiä kunnes näytöllä vilkkuu 8.
Valinta hyväksytään painamalla asetuspainiketta [ SET ].
6
Tuntiluvun jälkeen minuuttiluku alkaa vilkkua. Muuta minuuttiluku
7
esimerkin minuuttiluvuksi 15 nuolinäppäimiä [ ← → ] käyttämällä.
Valinta hyväksytään painamalla asetuspainiketta [ SET ].
8
Ohjelman 1 päällekytkentäajankohta on nyt asetettu. Painele nyt
nuolinäppäimiä [ ← → ], kunnes näytölle ilmestyy ”PROG 1 OFF”
(Ohjelma 1 poiskytkentä). Säädä poiskytkentäpäivä ja ajankohta
samalla tavalla kuin edellä.
• Jos haluat tehdä lisää ohjelmointeja, voit valita seuraavan ohjelman
(PROG 2 ON, ohjelma 2 päällekytkentä) nuolinäppäimillä samalla tavalla
kuin valitessasi ohjelmaa 1. Säädä päälle- ja poiskytkentä kuten edellä.
• Jos ohjelmointi on kesken, ja mitään painiketta ei paineta minuutin
kuluessa, siirtyy kellokytkin takaisin normaalitilaan (kellonajan näyttö).
• Kellokytkimen toimintojen välillä voidaan siirtyä nuolinäppäimillä.
Toimintoja voidaan selata edestakaisin seuraavaan kaavan
mukaisesti:
Lähtölaskentatila →
CLOCK
Kellotila → Ohjelmat 1–20 → CD
CLOCK
Kellotila jne.
2
3
4 6 8
5 7
1
Ver. 20131209
SUOMI • asiakaspalvelu puh. 020 111 2222 sähköposti asiakaspalvelu@clasohlson.fi kotisivu www.clasohlson.fi
Page 8

Suomi
Huom.! Hyödynnä kahta ohjelmointipaikkaa, mikäli haluat ajastimen
kytkeytyvän pois päältä eri vuorokautena kuin se aktivoituu. Esimerkin
mukaan ajastin käynnistyy maanantaina klo 20.00 ja kytkeytyy pois
päältä tiistaina klo 06.00. Mikäli haluat ohjelmoida ajastimen niin, että se
aktivoituu maanantaina kello 20.00, voit ohjelmoida ajankohdan kohtaan 1 ON. Siirry seuraavaksi kohtaan 2 OFF ilman, että syötät mitään
kohtiin 1 OFF ja 2 ON. Syötä tiistai klo 06.00 kohtaan 2 OFF.
Yksittäisen ohjelman esto
(poistaa ohjelman käytöstä tilapäisesti)
Valitse haluttu ohjelma nuolinäppäimillä [ ← → ].
1
Paina asetuspainiketta [ SET ].
2
Paina virtapainiketta [ ON/OFF ].
3
Näytölle ilmestyy ”X”, joka on
merkkinä siitä, että ohjelma
on estetty.
Paina asetuspainiketta [ SET ]
4
kolme kertaa poistuaksesi
muokkaustilasta.
3
2
1
4
Kaikkien ohjelmien esto
(poistaa kaikki ohjelmat käytöstä tilapäisesti)
Siirry kellon asetustilaan CLOCK nuolinäppäimillä [ ← → ].
1
Paina asetuspainiketta [ SET ].
2
Paina virtapainiketta [ ON/OFF ]. Näytölle ilmestyy ”X”,
3
joka on merkkinä siitä, että kaikki ohjelmat on estetty.
Paina asetuspainiketta [ SET ] neljä kertaa poistuaksesi
4
muokkaus-tilasta.
Toista kohdat 1–4 kummassakin tapauksessa kun haluat poistaa
eston. Ohjelman kohdalla näytöllä oleva ”X” häviää, kun esto on
poistettu.
Lähtölaskentatoiminto
Toiminto voidaan käynnistää kun kellokytkin on joko päällekytkettynä
(ON) tai poiskytkettynä (OFF). Kun lähtölaskenta alkaa, kello laskee
alaspäin asetetusta ajasta nollaan. Kun kello saavuttaa nollan,
kytkentätila vaihtuu.
Lähtölaskentatoiminnon asetus
Siirry lähtölaskentatoimintoon
1
CD nuolinäppäimillä [ ← ].
Paina asetuspainiketta [ SET ].
2
Valitse asetus nuolinäppäimillä
3
[ ← → ].
2
• ON : Lähtölaskenta alkaa kun painat lähtölaskentapainiketta [ CD ].
Kellokytkin on päällekytketty ajanlaskun aikana, ja kytkeytyy pois
ajanlaskun lopuksi.
• OFF: Lähtölaskenta alkaa kun painat lähtölaskentapainiketta
Kellokytkin on poiskytketty ajanlaskun aikana, ja kytkeytyy päälle
ajanlaskun lopuksi.
Paina asetuspainiketta [ SET ].
4
Aseta tuntimäärä nuolinäppäimillä
5
Paina asetuspainiketta
6
Aseta minuuttimäärä nuolinäppäimillä
7
Paina asetuspainiketta
8
Aseta sekuntimäärä nuolinäppäimillä
9
10
Paina asetuspainiketta
Voit pysäyttää lähtölaskennan painamalla [ CD ] tai
[ ON/OFF ] -painikkeita.
[ SET ].
[ SET ].
[ SET ].
PROG
CD
3
10
64
8
[ ← → ].
[ ← → ].
[ ← → ].
5 7 9
[ CD ].
Satunnaistoiminto
Lyhyt satunnaisaika: 1–2 tuntia/kerta.
Pitkä satunnaisaika: 2–3 tuntia/kerta.
Ohjelmoitava satunnaisaika: 1–2 tuntia/kerta.
Lyhyt satunnaisaika: valitse CLOCK.
1
Pitkä satunnaisaika: valitse CD.
Paina satunnaispainiketta [ RANDOM ].
2
”RND” vilkkuu kun lyhyt satunnaisaika
3
on valittuna. ”L-RND” vilkkuu kun pitkä
satunnaisaika on valittuna.
1
3
2
Ohjelmoitava satunnaistoiminto
Valitse nuolinäppäimillä [ ← → ] ohjelma numero 20.
1
Paina satunnaispainiketta
2
Aseta aikaväli. Satunnaistoiminto on
3
aktiivinen asettamallasi aikavälillä.
Näytöllä näkyy ”RND”.
4
• Ohjelmoitava satunnaistoiminto voidaan tehdä ainoastaan
ohjelmaan numero 20, 1–2 tunnin satunnaisajalla.
[ RANDOM ].
1
4
Manuaalinen päälle-/poiskytkentä
Paina [ ON/OFF ]-painiketta.
Virheenetsintä
Ongelma Ratkaisu
Nestekidenäyttö ”jämähtää”
ja painikkeet eivät toimi.
Asetukset katoavat kun ajastin
ei ole kytketty verkkovirtaan.
Ajastin ei suorita asetusten
mukaisia kytkentöjä.
Ajastin ei suorita asetusten
mukaisia kytkentöjä tiettyinä
aikoina.
Alusta ajastin painamalla
[ RESET ] -painiketta.
Vaihda paristot.
Varmista ettei ohjelmien esto
ole päällä.
Varmista ettei satunnaistoiminto ole
päällä. Varmista ettei ohjelmoinneissa
ole päällekkäisyyksiä.
Tekniset tiedot
Ohjelmapaikkoja 20 kpl.
Merkkijännite 230 V AC 16 A
Maksimikuormitus 3680 W Resistiivinen kuorma
Pienin kytkentäaika 1 minuutti
3
2
Ver. 20131209
SUOMI • asiakaspalvelu puh. 020 111 2222 sähköposti asiakaspalvelu@clasohlson.fi kotisivu www.clasohlson.fi
Page 9

Deutsch
Zeitschaltuhr
Art.Nr. 32-8618 Modell AX300
Vor Inbetriebnahme die komplette Bedienungsanleitung
durchlesen und aufbewahren. Irrtümer, Abweichungen und
Änderungen behalten wir uns vor. Bei technischen Problemen
oder anderen Fragen freut sich unser Kundenservice über eine
Kontaktaufnahme.
Beschreibung
• Vielfältige Anwendungsmöglichkeiten für Sicherheit,
Energieeinsparung und Wohlbefinden.
• 20 Ein-/Ausschaltungen einstellbar.
• Zeitschaltuhr mit Countdown-Funktion.
• 3 Zufallswiedergabefunktionen (RANDOM).
• Uhrzeit im 12- oder 24-Stundenformat.
• Anschlussmöglichkeit für Geräte mit bis zu 3680 W (16 A)
• Nur für den Gebrauch in trockenen Innenräumen geeignet.
AX300 Zeitschaltuhr
Hinweise zur Entsorgung
Bitte das Produkt entsprechend den lokalen Bestimmungen
entsorgen. Weitere Informationen sind von der Gemeinde oder
den kommunalen Entsorgungsbetrieben erhältlich.
Batterien
Die Batterieabdeckung auf derRück-
1
seite abnehmen (die Vertiefungen
vorsichtig eindrücken).
Die beiden mitgelieferten Knopfzellen
2
(LR44) gemäß der Markierung
zwischen dieMetallkontakte stecken.
Den Deckel festdrücken und darauf achten, dass dieMetall-
3
kontakte in dieBatteriefachöffnung greifen.
1
Uhreinstellung
Mit den Pfeilen [ ← → ] zu Clock navigieren.
1
Taste [ SET ] drücken.
2
Mit den Pfeilen [ ← → ] den Wochentag (Mo,Tu, We, Th,
3
Fr, Sa, Su) (Montag–Sonntag) einstellen.
Taste [ SET ] drücken.
4
Mit den Pfeilen [ ← → ]
5
dieStunde einstellen.
Taste [ SET ] drücken.
6
Mit den Pfeilen [ ← → ]
7
dieMinuten einstellen.
Taste [ SET ] drücken.
2
8
Mit den Pfeilen [ ← → ] dieSekunden einstellen.
9
Taste [ SET ] drücken.
10
• Bei derZeiteinstellung Taste [ RANDOM ] drücken, um
zwischen 12- und 24-Stundenformat zu wechseln.
• Zum Umstellen auf Sommerzeit (im „CLOCK“-Modus)
gleichzeitig diePfeiltasten für 3 Sekunden gedrückt halten.
Die Stundenziffer erhöht sich um eine Stunde und im
Display erscheint ein Sonnensymbol. Zum Umstellen auf
Normalzeit (im „CLOCK“-Modus) gleichzeitig diePfeiltasten
für 3 Sekunden gedrückt halten.
8
10
3
5 7 964
2
Programmeinstellung
Mit derZeitschaltuhr lassen sich bis zu 20 Ein-/Ausschaltprogramme einstellen. Ein Beispiel zur Vorgehensweise:
Einstellung von Programm 1
Die Zeitschaltuhr soll Montag um 08.15 Uhr einschalten und
Montag um 15.45 Uhr abschalten. MO 8:15 ON / MO 15:45 OFF
Auf diePfeiltasten [ ← → ] drücken, bis dasDisplay
1
„PROG 1“ ON anzeigt.
Taste [ SET ] drücken. Das Display zeigt „SET“ und
2
derWochentag blinkt.
Die Pfeile [ ← → ] drücken, um Tag/
3
Jahr für das„PROG 1“ einzustellen.
Es wird ein Tag in derReihenfolge
MO bis SU (Montag bis Sonntag)
angezeigt, dann alle Tage von
MO – FR (Montag – Freitag), dann
alle Tage von MO – SA (Montag –
Samstag), dann dieTage SA – SU
(Samstag – Sonntag) und zuletzt
alle Tage von MO – SU (Montag bis
Sonntag). Der Tag im Beispiel ist ein
Montag (MO).
Auf SET drücken, wenn im Display „MO“ angezeigt wird.
4
Jetzt blinken dieStundenziffern. Mit den Pfeilen [ ← → ]
5
dierichtige Stunde 8 einstellen.
Taste [ SET ] drücken.
6
Jetzt blinken dieMinutenziffern. Mit den Pfeilen [ ← → ] 15
7
einstellen.
Auf SET drücken, um dieEinstellung von „PROGRAM 1
8
ON“ zu beenden. Auf diePfeile [ ← → ] drücken, bis „PROG
1 OFF“ im Display angezeigt wird. Tag und Uhrzeit auf
gleiche Weise einstellen.
• Zur Einstellung weiterer Programme diePfeile [ ← → ]
drücken, bis „PROG 2 ON“ im Display erscheint. Die gewünschte
Anzahl Programme auf gleiche Weise einstellen.
• Wird eine (1) Minute lang keine Taste gedrückt, schaltet
dieZeitschaltuhr auf Uhrzeitanzeige um.
• Das Programmmenü ist mit Uhr und CountdownFunktionen kreisförmig angeordnet:
Programm 1–20 → CD Countdown-Funktion.
2
CLOCK
3
4 6 8
Uhr →
5 7
1
Ver. 20131209
DEUTSCHLAND • Kundenservice
Unsere Homepage www.clasohlson.de besuchen und auf Kundenservice klicken.
Page 10

Deutsch
Achtung: Wenn dieZeitschaltuhr aneinem Tag ein- und aneinem
anderen Tag ausschalten soll, sind 2 Programmplätze vorzusehen.
Im Beispiel soll dieZeitschaltuhr am Montag um 20.00 einschalten und Dienstag um 06.00 Uhr ausschalten. Das Einschalten am Montag um 20.00 Uhr kann beispielsweise unter
„PROGRAM 1 ON“ mit Uhrzeit und Datum eingestellt werden.
Dann wird zu „2 OFF“ gewechselt, ohne Einstellungen unter
„1 OFF“ oder „2 ON“ vorzunehmen. Unter „2 OFF“ wird
dieUhrzeit 06.00 eingestellt.
Ausschalten eines Programms
Das gewünschte PROGRAMM mit den Pfeilen [ ← → ]
1
auswählen.
Taste [ SET ] drücken.
2
2
3
1
4
Zum Ausschalten auf
3
[ ON/OFF ] drücken. Ein Kreuz
zeigt an, dass dasProgramm
ausgeschaltet ist.
3 x [ SET ] betätigen, um den
4
Löschmodus zu verlassen.
Ausschalten aller Programme
Mit den Pfeilen [ ← → ] auf CLOCK wechseln.
1
Taste [ SET ] drücken.
2
Zum Ausschalten aller Programme auf [ ON/OFF ] drücken.
3
Ein Kreuz zeigt an, dass dieProgramme ausgeschaltet sind.
4 x [ SET ] betätigen, um den Löschmodus zu verlassen.
4
Schritt 1 bis 4 wiederholen, um den Löschvorgang
rückgängig zu machen.
Countdown-Funktion
Die Countdown-Funktion startet im ON- (eingeschaltet) oder
OFF-Modus (ausgeschaltet) und zählt nach Aktivierung abwärts.
Im Modus „ON“ (eingeschaltet) fließt Strom (230 V). Im Modus
„OFF“ (ausgeschaltet) fließt kein Strom.
Countdown-Funktion, Einstellung
PROG CD mit dem linken
1
Pfeil [ ← ] auswählen.
Taste [ SET ] drücken.
2
Mit den Pfeilen [ ← → ] entweder
3
ON (EIN) oder OFF (AUS)
einstellen.
2
• ON (EIN) – Countdown startet beim Drücken auf [ CD ].
EIN beim Countdown und danach AUS.
• OFF (AUS) – Countdown startet beim Drücken auf [ CD ].
AUS beim Countdown und danach EIN.
Taste [ SET ] drücken.
4
Mit den Pfeilen [ ← → ] dieStunde einstellen.
5
Taste [ SET ] drücken.
6
Mit den Pfeilen [ ← → ] dieMinuten einstellen.
7
Taste [ SET ] drücken.
8
Mit den Pfeilen [ ← → ] dieSekunden einstellen.
9
Taste [ SET ] drücken.
10
Die Countdown-Funktion lässt sich durch Drücken von
[ CD ] oder [ ON/OFF ] stoppen.
PROG
CD
3
10
64
8
5 7 9
Random-Funktion (Zufallsfunktion)
Kurze Dauer: Einschaltdauer jeweils 1–2 Stunden.
Längere Dauer: Einschaltdauer jeweils 2–3 Stunden.
Programmierbare Dauer: Einschaltdauer jeweils 1–2 Stunden.
Kurze Dauer: CLOCK auswählen.
1
Lange Dauer: CD auswählen.
Taste [ RANDOM ] betätigen.
2
„RND“ blinkt bei kurzer Dauer.
3
„L-RND“ blinkt bei langer Dauer.
1
3
2
Programmierbare Dauer
Programm 20 mit den Pfeilen [ ← → ] auswählen.
1
Taste [ RANDOM ] betätigen.
2
Zeit einstellen, in derdie
3
Zufallsfunktion aktiv sein soll.
„RND“ wird im Display angezeigt.
4
• Die Einstellung derprogrammierbaren Dauer ist nur im
Programm 20 möglich.
• Zufallsfunktion mit [ RANDOM ] oder [ ON/OFF ] ausschalten.
1
4
Manuelles AUS-/EIN-Schalten
Auf [ ON/OFF ] drücken.
Fehlersuche
Problem Lösung
LCD-Display ist „eingefroren”
und dieTasten reagieren
nicht auf Betätigung.
Die Einstellungen gehen
verloren, wenn dieUhr vom
Netz getrennt wird.
Die Zeitschaltuhr führt
dieeingestellten Programme
nicht aus.
Die Zeitschaltuhr
führt dieeingestellten
Programme nicht zu den
eingestellten Zeiten aus.
Auf [ RESET ] drücken, um
dieZeitschaltuhr zurückzusetzen.
Batterien auswechseln.
Sicherstellen, dass dieProgramme
nicht ausgeschaltet sind.
Programme einschalten.
Sicherstellen, dass dieZufallsfunktion nicht aktiviert ist.
Dafür sorgen, dass keine
anderen Programme oder
dieCountdown-Funktion gleichzeitig aktiviert sind.
Technische Daten
Programme 20
Nennspannung 230 V AC, 16 A
Max. Belastung 3680 W Widerstandslast
Kürzestes Schaltintervall 1 Minute
3
2
Ver. 20131209
DEUTSCHLAND • Kundenservice
Unsere Homepage www.clasohlson.de besuchen und auf Kundenservice klicken.
 Loading...