

Page 1
34-7509
Exercise Bike
Träningscykel
Trimsykkel
Kuntopyörä
SVENSKANORSKSUOMI ENGLISH
Model: AC-6472C
Ver. 200807
www.clasohlson.com
Page 2

Page 3

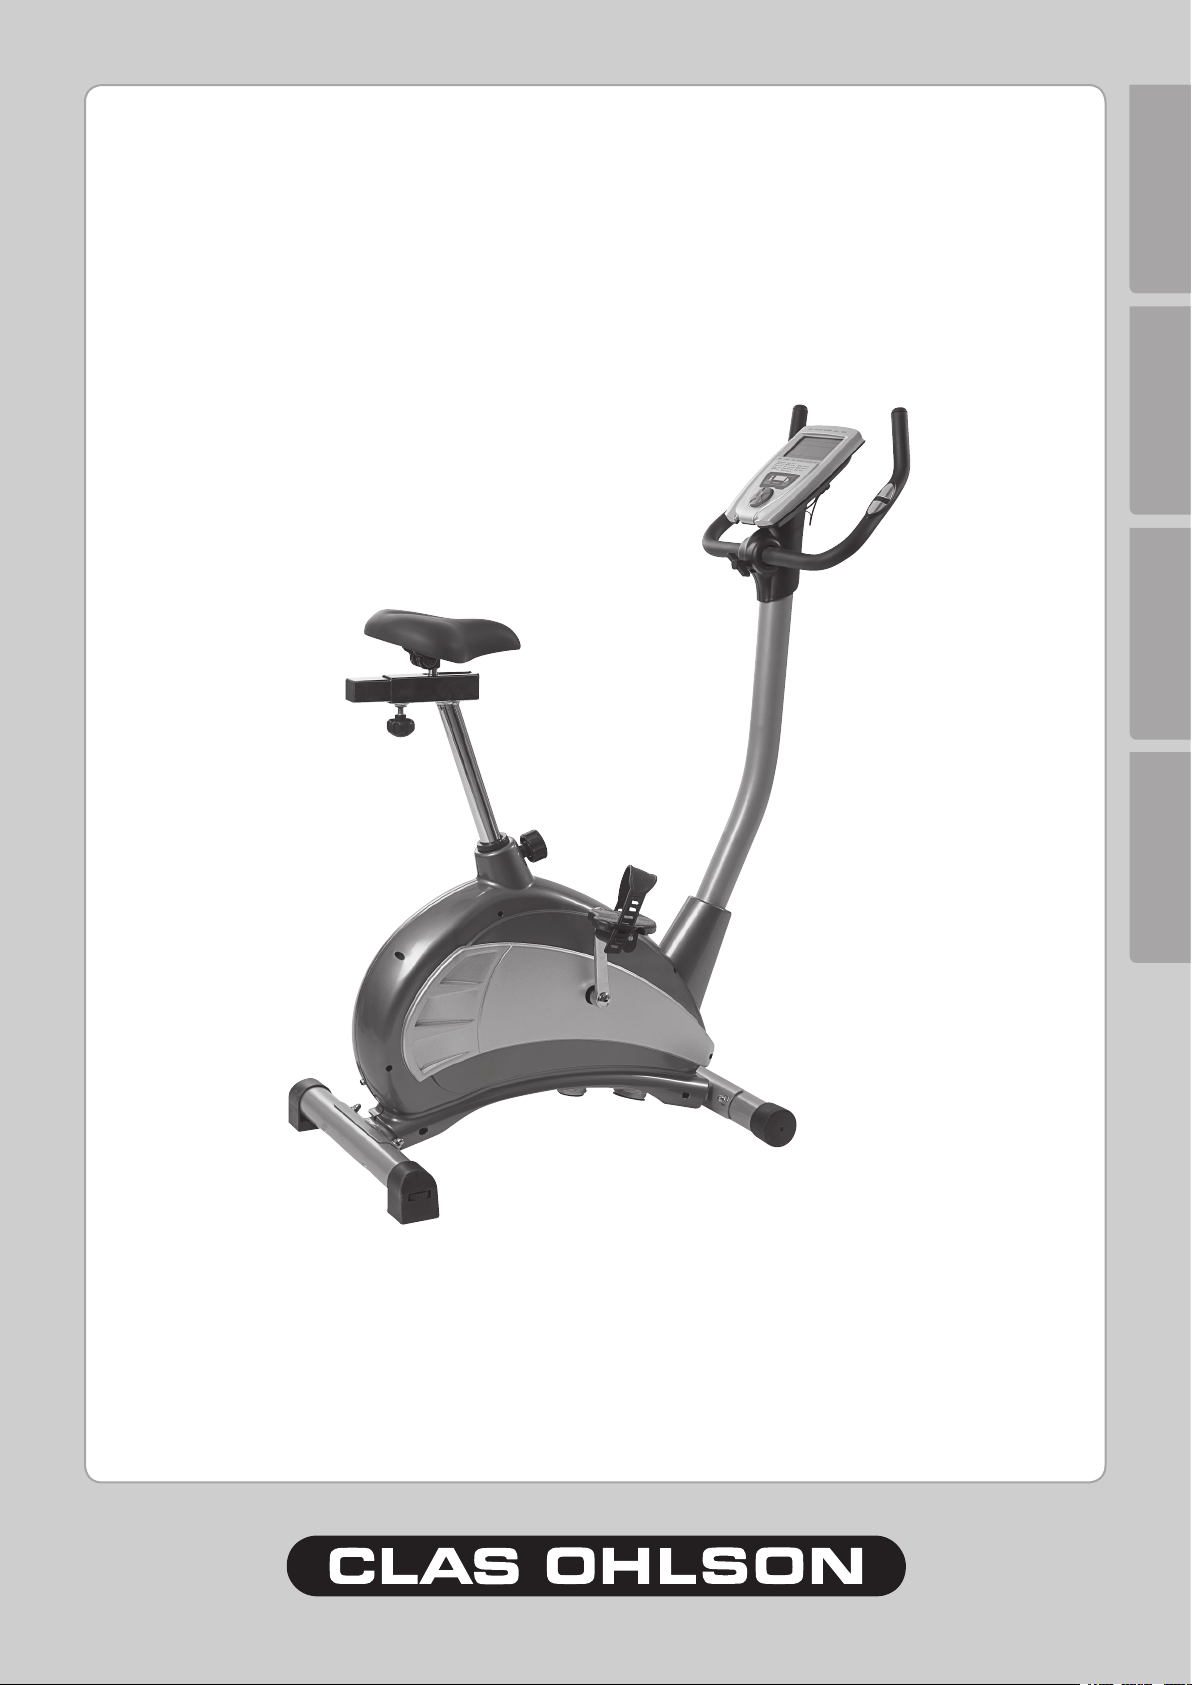
Exercise Bike
Art.no. 34-7509, model AC-6472C
Please read the entire instruction manual before using and save it for future use. We apologise for any text
or photo errors and any changes of technical data. If you have any questions concerning technical problems
please contact our Customer Service Department (see address on reverse).
Table of Contents
1. Product Description
2. Safety
3. Contents of package
4. Assembly
5. Computer Functions
6. Use
7. Exercise Instructions
8. Make all settings before starting the exercise
9. Exploded view
10. Pulse Chart
ENGLISH
3
Page 4

ENGLISH
1. Product Description
• Exercise bike with computer and various magnetically operated resistance .
• Display for speed, distance, calories burnt & pulse.
• Max load 100 kg
Note! This product is not an ergometer since some of the measuring units are steered by actual speed.
2. Safety
The product is tested according to these safety standards: EN975-1+A1 and EN975-5/HC.
Warning: Always consult with a physician before you start to exercise if you suffer from an illness or other
complaints that can worsen by physical exercise. Stop the exercise immediately if you feel dizzy.
Check that all bolts, nuts and other parts are securely tightened on the exercise bike.
Place the exercise bike in a spacious area with at least 1 metre in all directions.
Read the entire instruction manual before you start the exercise. Save it for future use.
• The exercise bike is made for home use only and tested up to a maximum body weight of 100 kg.
• Follow the steps of the assembly instructions carefully.
• Use only the original parts as delivered.
• Check that all parts are complete in the package before you start to assemble the exercise bike.
(See “Contents of package”).
• For assembly, use only suitable tools and ask for assistance if needed.
• Place the exercise bike on an even, non-slip surface. Because of possible corrosion, use of the exercise
bike in damp conditions is not recommended.
• Before rst use, and again every other month, check that all bolts and nuts are securely tightened and
undamaged on the exercise bike. Replace possible worn out parts immediately and do not use the
exercise bike before they are changed.
• For repairs, use only original spare parts.
• Never use strong solvents/detergents when cleaning the bike.
• Only use the exercise bike if it is correctly assembled, inspect it before use.
• For all adjustable parts be aware of the maximum positions to which they can be adjusted/tightened to.
Pay special attention to the minimum insertion depth of the seat post.
• The exercise bike is designed for adults. Children should not use the bike without supervision of an adult.
• Ensure that those using the exercise bike are aware of possible hazards, e.g. movable parts during
training.
• Consult your physician before starting with any exercise programme. He can advise you about suitable
kinds and levels of training. Warning! Incorrect/excessive training can cause health injuries.
• Follow the advice for correct training as detailed in the training instructions.
• The load/work can be adjusted from the computer.
4
Page 5

3. Contents of package
ENGLISH
Bolt M8x70
Dome nut M8
Washer M8
Allen key
Screwdriver
5
Page 6
ENGLISH
4. Assembly
6
Page 7

Step 1
L
L
R
R
1. Attach the front (23) and the rear (14) stabilizers.
2. Use 2 coach bolts M8x70 (13) and washers for each stabilizer.
3. If the oor is uneven, the rear height of the rear stabilizer can be adjusted on both sides.
4. The front stabilizer (23) has transportation wheels, they need to face towards the front of the cycle.
ENGLISH
Step 2
1. Screw the pedals on to the crank. The pedals are marked with L (18L) and R (18R) at the thread end.
2. Tighten the left pedal anti-clockwise, the right pedal clockwise.
7
Page 8
ENGLISH
(C)
(B)
(A)
A
B
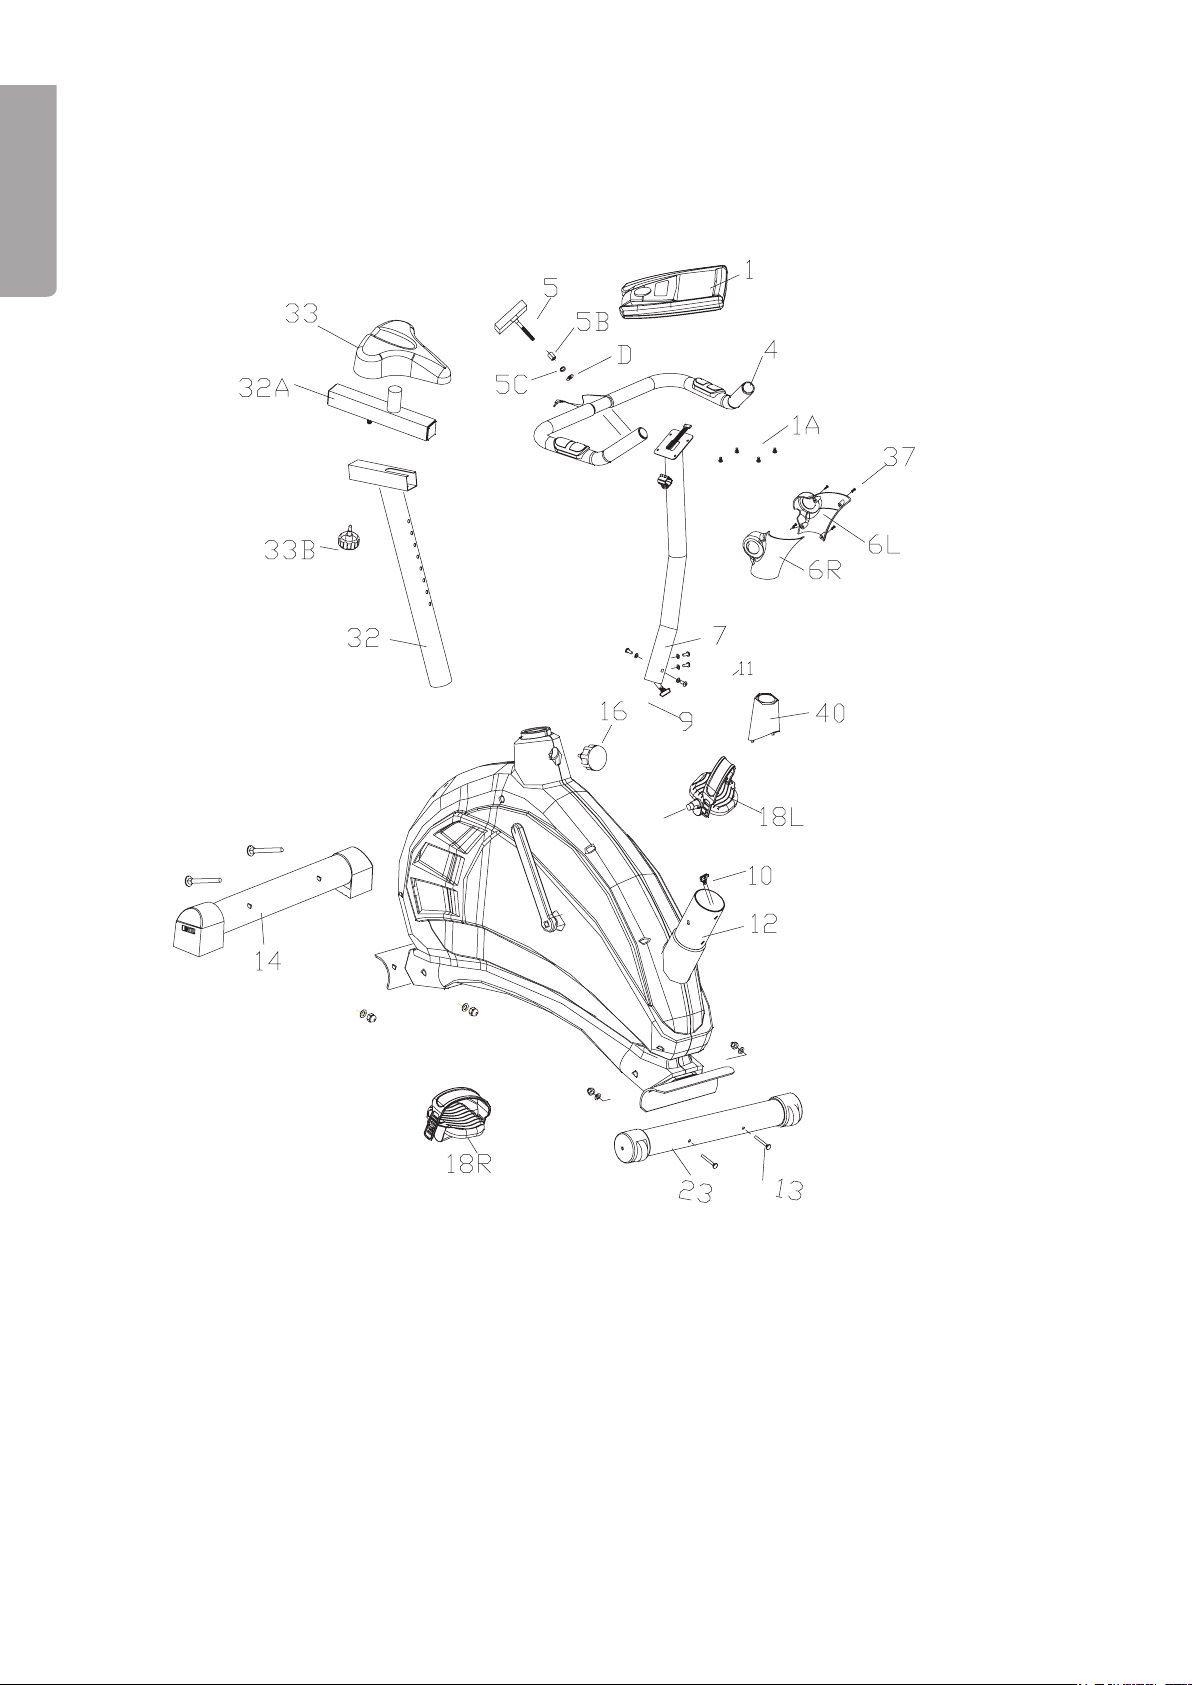
Step 3
1. Assemble the saddle (33) and the horizontal
slider (32A) on the saddle pole with the knob
(33B).
2. Insert the saddle pole (32) in the main frame
(12), choose the desired position and tighten
the knob (16). Ensure that the knob (16) is
always tightened!
Step 4
1. Pass the front cover (40)
over the handlebar post (7).
(Se g A)
2. Connect the computer cable
(9, 10). (se g. B)
3. First loosen the preassembled screws from the
handlebar post (7). Slide
the handlebar post (7) onto
the main frame (12) and x
it with 4 hexagon screws
M8x20 and washers (11).
(se g. C). Make sure not
to trap the cables while
assembling!
8
Page 9
Step 5
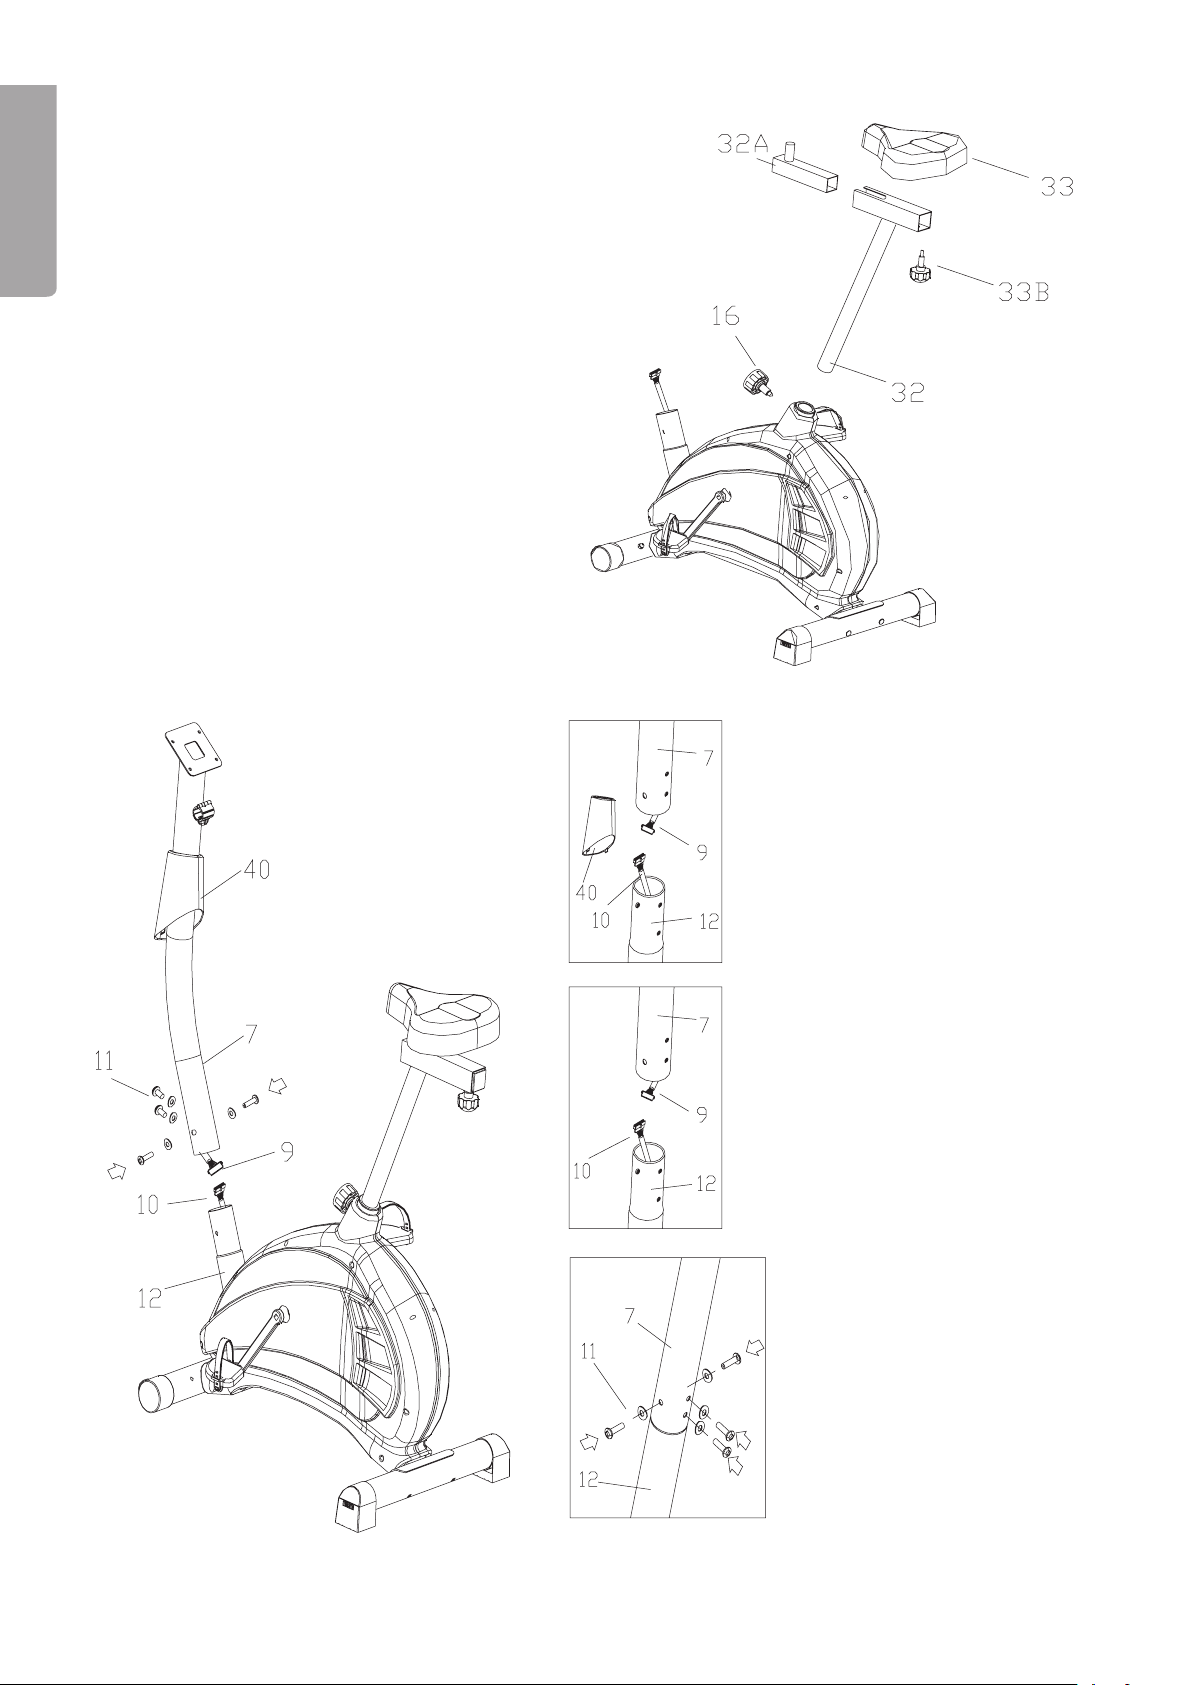
1. Attach the handlebar (4) to the handlebar post (7).
2. Place the plastic covers (6L, 6R) on the handlebar post (7) with screws (37) and insert the T-handle (5)
into the metal cover with sleeve (5A) to x the handlebar. Make sure that it is securely tightened.
3. Adjust the handlebar (4) to the right position and tighten again.
ENGLISH
Step 6
1. Mount the computer (1) onto the handlebar post (7) with the enclosed screws M5x10 (1A) and connect
the computer cables (9).
2. Connect the hand pulse cable(3) into the socket on the back of the computer (1).
5. Computer functions
PULSE RECOVERY
Pushing this button starts
the tness-test. The result is
graded from F1.0 to F6.0.
MEMORY
Stores the results from
the Body Fat test.
UP
Change setting/increase
tension
ST/SP
Start/Stop – pushing this button
starts or stops the selected
programme.
ENTER
Used for selecting programmes,
conrming settings and
selecting the display mode
(time, speed, distance, etc.).
DOWN
Change setting/reduce tension.
9
Page 10

ENGLISH
6. Operating Instructions
6.1 Basic use
Activating the display
Push one of the buttons or start pedalling to activate the display. If the display does not work, make sure that
the AC/DC adaptor is correctly connected.
Tension
The tension is represented by bars on the display, a high bar represents a high tension and a low bar represents a lower tension. The tension can be altered whilst you are exercising using [UP] and [DOWN].
Targets
Every exercise program has various targets which you can set, such as the workout time, distance travelled,
or number of calories burned.
To Pause
Push the [ST/SP] button whenever you would like to pause the training programme. The measurement will
pause and the display will show the current values. Push [ST/SP] again to resume the programme.
To change the function whilst training
Push [ST/SP] to stop the current programme. Push [UP] or [DOWN] to select another programme, conrm by
pushing [ENTER].
Resetting
To reset set programmes, push [ST/SP] and hold it in for 3 seconds. The computer will beep and the display
will briey show every sequence of the programme.
6.2 Selecting an Exercise Programme
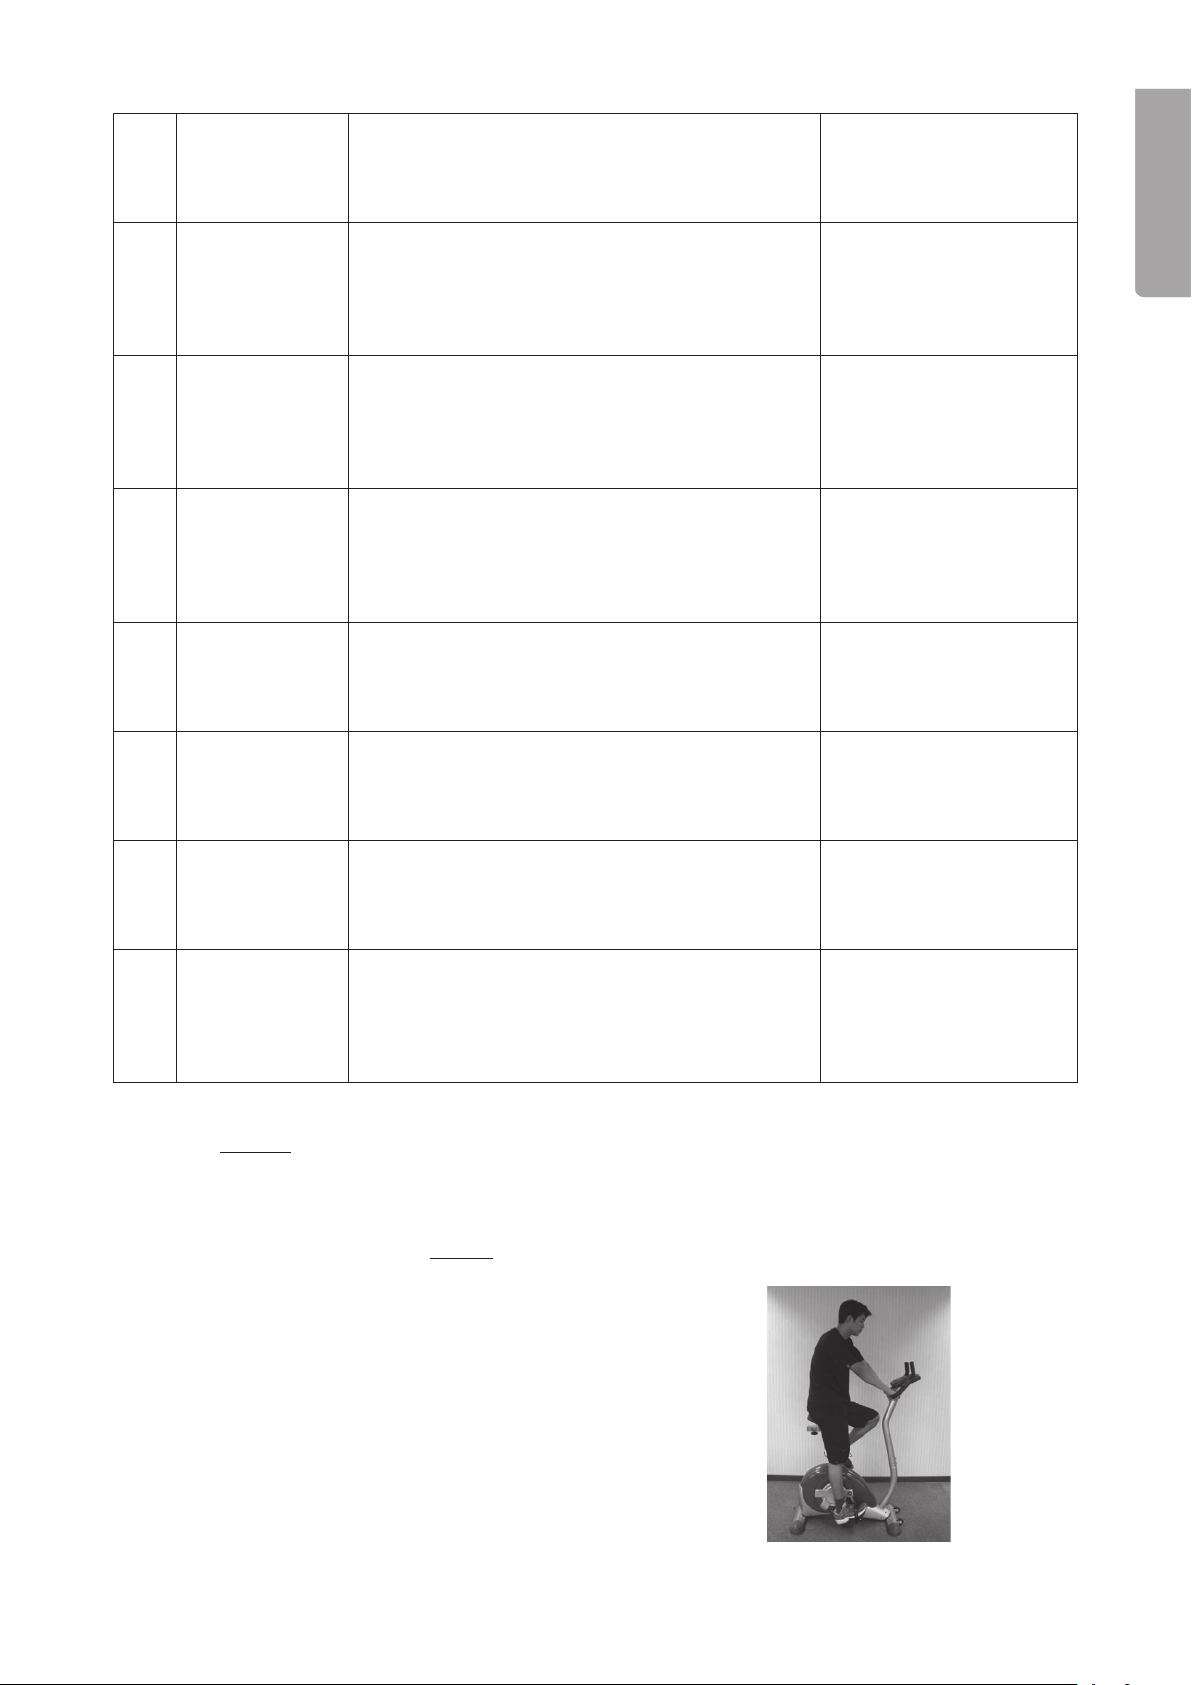
Explanation of the menus/programmes
No. Programmes Explanation Targets/Settings
1 Manual Exercise programme with or without set targets.
The tension can be manually adjusted whilst
exercising.
2 Rolling Preset programme with varied tension throughout
the workout.
3 Valley Preset programme representing the ups and
downs of a valley.
4 Fat Burn Preset programme representing an upward slope
and a downward slope.
5 Ramp Preset programme with gradually increasing
tension.
6 Mountain Preset mountain climbing programme with tension
levels rising and falling throughout.
- TIME
- DISTANCE
- CALORIES
- TIME
- DISTANCE
- CALORIES
- TIME
- DISTANCE
- CALORIES
- TIME
- DISTANCE
- CALORIES
- TIME
- DISTANCE
- CALORIES
- TIME
- DISTANCE
- CALORIES
7 Intervals Preset programme with the tension level changing
rapidly.
10
- TIME
- DISTANCE
- CALORIES
Page 11
8 Watt Control Select tension manually. Constant tension no mat-
ter how fast you pedal. Tension preset to 100 W,
but can be altered.
- TIME
- DISTANCE
- CALORIES
- WATT
ENGLISH
9 55 % H.R.C. Heart rate controlled programme. Exercise until
you have reached 55% of your maximum pulse.
10 75 % H.R.C. Heart rate controlled programme. Exercise until
you have reached 75 % of your maximum pulse.
11 90 % H.R.C. Heart rate controlled programme. Exercise until
you have reached 90 % of your maximum pulse.
12 Target H.R Heart rate controlled programme. Exercise until
you have reached your target pulse.
13 Users Prole Allows you to create a personalised programme by
setting the tension levels of each column.
- TIME
- DISTANCE
- CALORIES
- AGE
- TARGET H.R
- TIME
- DISTANCE
- CALORIES
- AGE
- TARGET H.R
- TIME
- DISTANCE
- CALORIES
- AGE
- TARGET H.R
- TIME
- DISTANCE
- CALORIES
- TARGET H.R
- TIME
- DISTANCE
- CALORIES
- COLUMN 1-10
14 Body Test Presents the results of FAT%, BMR, BMI and
BODY TYPE (see chart).
15 User Data Enter you personal details. - NAME: Max. 8 letters
Exercising without targets
Follow these steps to start exercising without setting any targets:
1. Push [UP] or [DOWN] to select the desired exercise programme (see the chart).
2. Push [ST/SP] to start exercising
3. You may now start exercising. Sit on the exercise bike as shown.
without setting any targets.
- HEIGHT
- WEIGHT
- AGE
- SEX
- HEIGHT
- WEIGHT
- AGE
- SEX
11
Page 12

Entering your personal settings
1. Select program 15 (User Data) using [UP] or [DOWN], conrm using [ENTER].
2. Change the setting using [UP] or [DOWN] and push [ENTER] to advance to the next setting.
ENGLISH
3. Repeat the process until you have made all the settings.
Starting to exercise and setting targets
1. Push [UP] or [DOWN] to select the desired exercise programme (see the chart). Press [ENTER]
to conrm.
2. Press [ENTER] once or repeatedly to select targets/settings.
3. Change the setting using [UP] or [DOWN] and push [ENTER] to advance to the next setting.
4. Repeat the process until you have made all the settings.
5. When all the settings have been made, push [ST/SP] to start exercising.
6. You may now start exercising. Sit on the exercise bike as shown.
Example:
Exercising in 15 minute intervals:
1. Select program 7 (Intervals) using [UP] or [DOWN].
2. Push [ENTER] to conrm, “TIME” is shown in the display.
3. Set the time to 15 minutes using [UP] or [DOWN].
4. Push [ST/SP] to start exercising, the countdown is displayed.
5. A buzzer sounds for a few seconds when you have reached your target, e.g. when the countdown
reaches “0”.
6.3 Pulse measurement
- Place both palms against the pulse sensor on the handlebars. Hold both pulse sensors in order to obtain
as accurate a reading as possible. After a while your current pulse rate will be displayed.
- When the words “HOLD SENSOR” appear in the display during an exercise programme you should place
both palms against the sensors.
- Heart rate control is read magnetically. There is an automatic adjustment of the read heart rate compared
to the actual heart rate.
- If your pulse rate is less then the set target value, the load tension will increase. If your pulse rate is
above the set target value, the load tension will decrease.
- If the load tension has decreased to its lowest possible value and your pulse is still above the set target
value the display starts to ash to warn you to slow down.
N.B: This programme can only be used if the computer can read your pulse without interruption.
6.4 Measuring body fat – Body test (program 14)
1. Start program 14 (Body test)
2. Place both palms against the pulse sensor on the handlebars. Hold both
pulse sensors in order to obtain a correct reading. If the computer does not
read a pulse value, ERROR will appear on the display.
3. The results will be presented as FAT%, BMR, BMI and BODY TYPE. Push
[ENTER] to select which result you wish to view.
N.B.
The results obtained from the computer are only for the interests of exercising and should not be
used for medical purposes.
FAT% Chart
1 5 % - 14 %
2 15 % - 24 %
3 25 % - 29 %
4 30 % - 39 %
5 40 % - 50 %
12
Page 13

6.5 Fitness-test (Pulse Recovery)
This test is personal and is used to measure your pulse after you have nished exercising.
1. After you workout pass, push [PULSE RECOVERY] once.
2. Hold the pulse sensors in both hands and begin pedalling.
3. The timer counts down from 60 seconds to zero.
ENGLISH
4. When the test is over the result is displayed:
F1.0 Excellent
F2.0 Good
F3.0 Average
F4.0 Below average
F5.0 Poor
F6.0 Very poor
7. Exercise instructions
Many different factors have to be considered when you plan your training program. If you have been
physically inactive for a long time or if you suffer from any kind of illness you need to consult with a physician
before you plan your exercise programme.
Intensity
• To achieve the best possible results the right intensity needs to be selected, this is based on your pulse.
This equation is often used to calculate your maximum pulse: Max pulse = 220 - Your age
• During training the workout pulse should be between 60% and 85% of your maximum pulse (see the
pulse chart in the end of the instruction manual).
• For the rst few weeks of exercise your workout pulse should be 60% of your maximum pulse.
• When you have improved your values and been training for a few weeks you can allow your workout
pulse to increase up to 85% of your maximum pulse.
Burning Fat
The body starts burning fat at 60% of your maximum pulse. The optimal fat burning will be at 60 to 70% of
your maximum pulse. You will achieve the best results if you normally do 3 workouts of 30 minutes per week.
Example:
You are 52 years old and are starting to exercise and burn fat.
Maximum pulse rate = 220 – 52 (age) = 168 pulse/min.
Lowest pulse rate = 168 x 0.6 = 101 pulse/min
Lowest pulse rate = 168 x 0.6 = 117 pulse/min
A workout pulse between 101 and 117 during training gives the best fat burning result in this example
according to the equation.
Workout tips!
Warm-up
Before every training session, you should warm-up for 5-10 minutes which can include some stretching and
cycling at low resistance.
Training session
During actual training a rate of 60 to 85% of the maximum pulse rate should be chosen.
The length of the training session can be calculated using the following as a guide.
• Daily training session = Approx.10 minutes per session.
• 2-3 times per week = Approx. 20 minutes per session.
• 1-2 times per week = Approx. 60 minutes per session.
13
Page 14

Cooling down
For an effective cooling-down of the muscles and the metabolism the intensity should be drastically
decreased during the last 5-10 minutes. Stretching is also helpful in preventing muscle stiffness.
ENGLISH
For best results:
• Exercising will show results after quite a short time and your workout pulse will soon decrease during the
training sessions.
• In order to achieve this, you will need to be motivated to exercise regularly. Choose xed hours for your
training.
• Begin exercising carefully, and then increase the amount of your training as you become tter.
Wishing you luck with a healthy lifestyle!
8. Make all settings before starting the exercise
Step 1: The pedal straps and the saddle height
First adjust the pedal straps to t your foot comfortably. Adjust the saddle height: When one pedal is at its
most downward position, your knee on the opposite side should be slightly bent. Adjust the saddle height
like this:
1. Unscrew the knob (16).
2. Pull up the saddle post (32) to the correct height.
3. Screw on the knob (16) in the holes closest to the height on the saddle post.
Warning: Male sure that the saddle post is not pulled out more than to the MAX
4.
marking.
Step 2: Adjusting the handlebar
The handlebar can be adjusted in many different positions, see the pictures. Try the different settings until
you nd the most comfortable position.
Adjust the handlebar like this:
1. Unscrew the T-bar handle (5).
2. Adjust the handlebar (4) to a comfortable position.
3. Tighten the T-bar handle (5).
N.B: The sleeve (5A) must be mounted on the T-bar handle (5) to the handlebar.
N.B: When exercising, always pedal forwards. The magnetic resistance will only work when you pedal
forwards (see picture).
14
Page 15
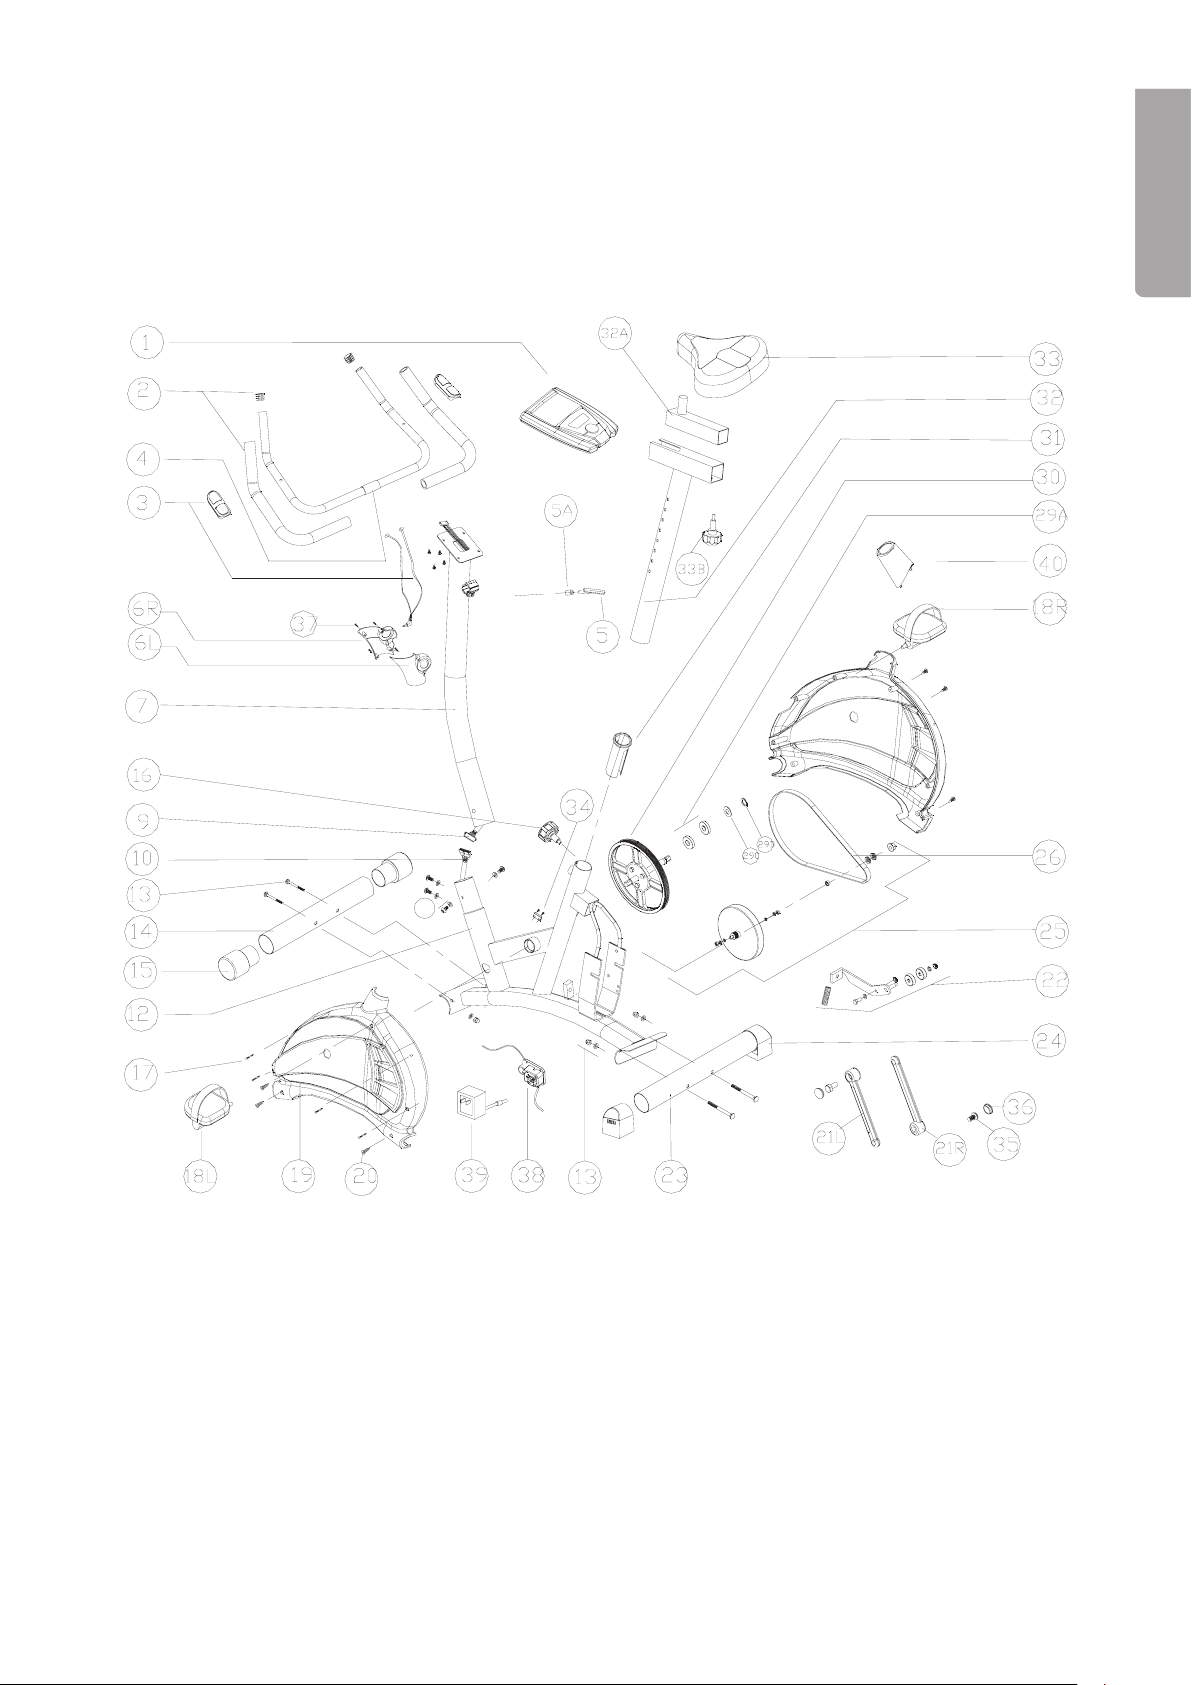
9. Exploded view
ENGLISH
11
15
Page 16

ENGLISH
Parts
Pos Description
1 Computer
2 Handlebar, plugs
3 Pulse sensor with cable
4 Handlebar
5 T-bar handle
5 A Sleeve for T-bar handle
6 L Cover left
6 R Cover right
7 Handlebar post
9 Computer cable (upper)
10 Computer cable (lower)
11 Bolt, washer for handlebar post
12 Frame
13 Screws and nuts (for the stabilizers)
14 Front stabilizer
15 Transportation wheels
16 Knob
17 Screw set (for side covers)
18 Pedals (L left, R right)
19 Side covers (left, right)
20 Screw set (for side covers)
21 L Crank, left
21 R Crank, right
22 Transportation wheels (set)
23 Rear stabilizer
24 Adjustable foot
25 Flywheel with magnetic brake
26 Driving belt
29 A Bearing (to crank)
29 C Washer (to crank)
29 D Lock ring (to crank)
30 Crank
31 Sleeve (for saddle post)
32 Saddle post
32 A Horizontal adjustment (for saddle)
33 Saddle
33 B Knob (lock knob for saddle)
34 Sensor
35 Hexagon bolt (for crank)
36 Washer (for crank)
37 Screw set (for covers)
38 Motor
39 AC/DC adaptor
40 Cover
16
Page 17
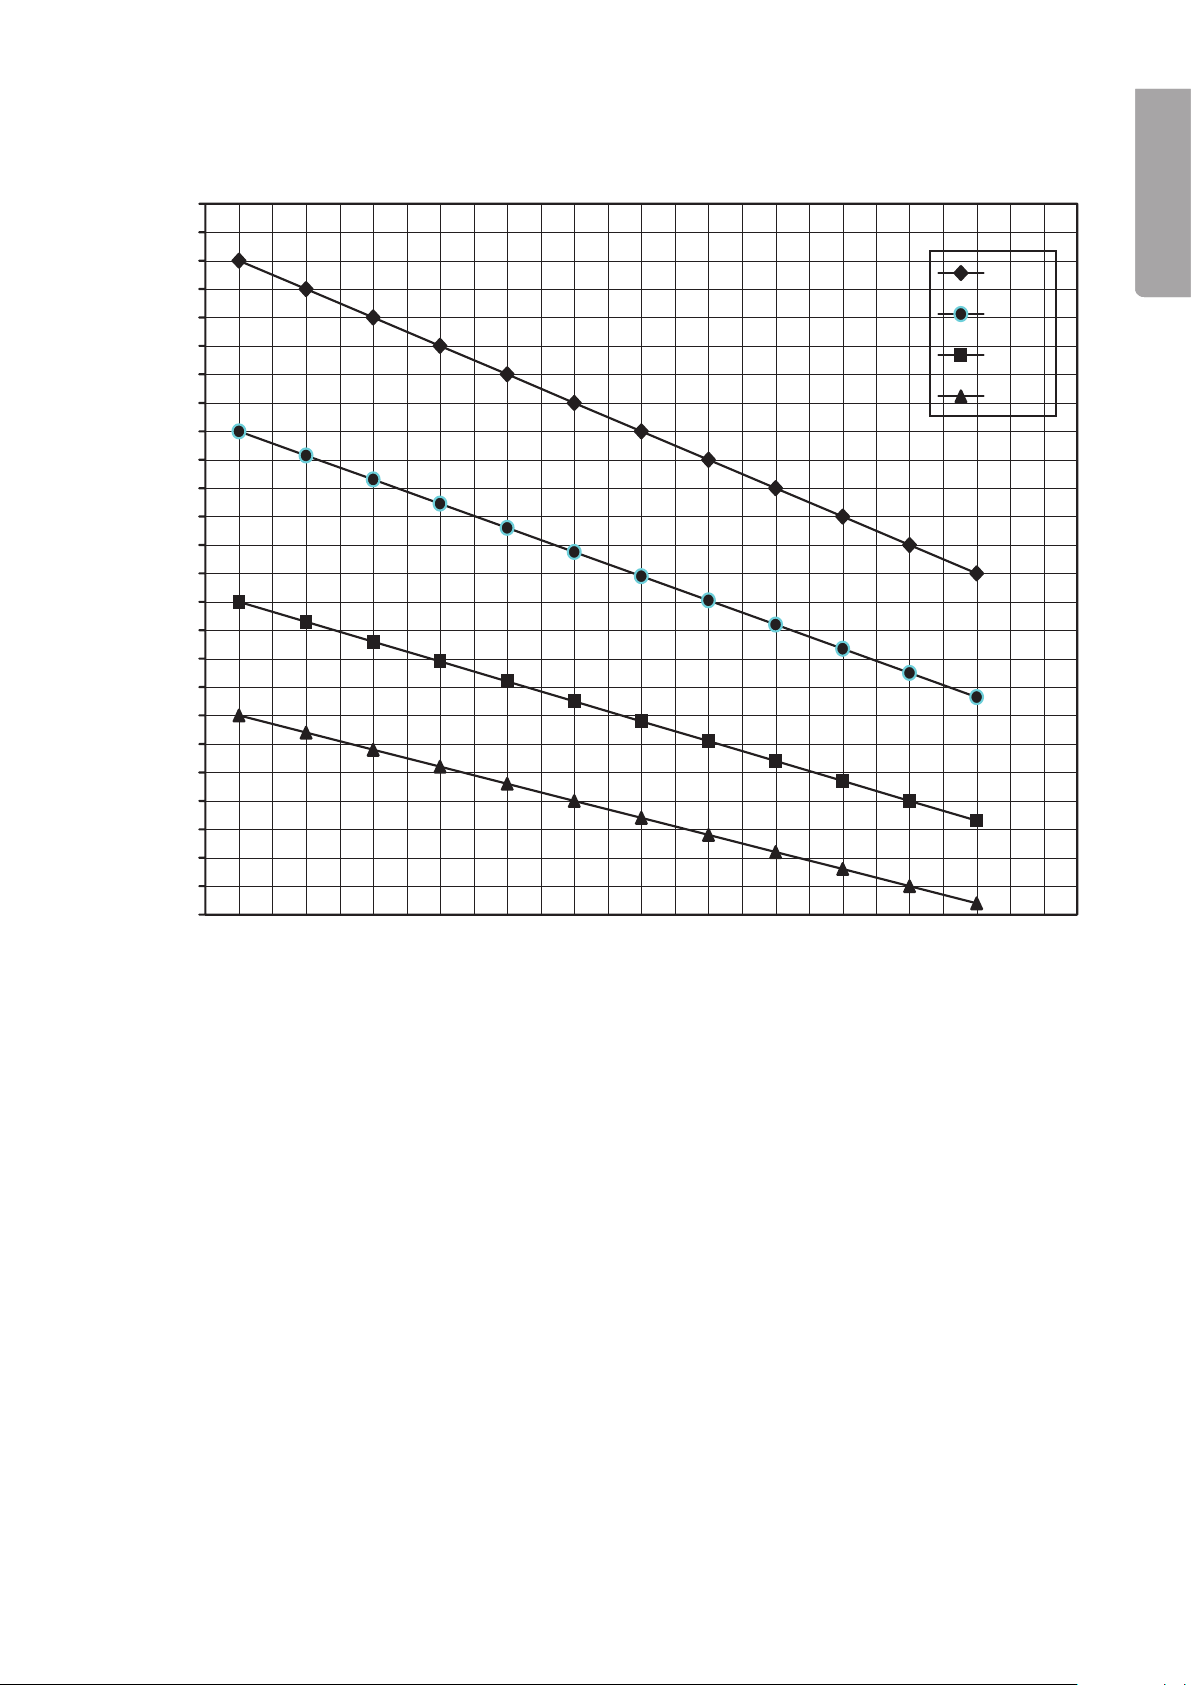
10. Pulse Chart
210
205
200
195
190
185
180
175
170
165
160
155
150
145
Pulse
Pulse
140
135
130
125
120
115
110
105
100
95
90
85
200
170
140
120
20 25 30 35 40 45 50 55 60 65 70 75 80
195
165.75
136.5
117
190
161.5
133
114
185
157.25
129.5
111
180
153
126
108
175
148.75
122.5
105
170
144.5
119
102
Age
Age
165
140.25
115.5
99
ENGLISH
Max.
85%
70%
60%
160
155
150
145
136
131.75
127.5
123.25
112
108.5
105
101.5
96
93
90
87
Protecting the Environment
Sort and recycle products instead of disposing of them. All machines, electrical components and packing
material should be sorted and handled according to local environmental regulations.
17
Page 18

Motionscykel
Art.nr. 34-7509, modell AC-6472C
Läs igenom hela bruksanvisningen före användning och spara den sedan för framtida bruk. Vi reserverar oss
för ev. text- och bildfel samt ändringar av tekniska data. Vid tekniska problem eller andra frågor, kontakta vår
kundtjänst (se adressuppgifter på baksidan).
Innehållsförteckning
1. Produktbeskrivning
2. Säkerhet
SVENSKA
3. Förpackningen innehåller:
4. Montering
5. Datorns funktioner
6. Användning
7. Träningsinstruktioner
8. Ställ in motionscykeln optimalt innan träningspasset börjar.
9. Sprängskiss
10. Pulsdiagram
18
Page 19

1. Produktbeskrivning
• Motionscykel med dator som varierar belastningen med hjälp av magnetstyrt motstånd.
• Hastighet, distans, kaloriförbrukning & puls visas.
• Avsedd för belastning upp till 100 kg.
Obs! Denna produkt är inte en ergometer då vissa mätvärden styrs av aktuell hastighet.
2. Säkerhet
Produkten är testad enligt dessa säkerhetsstandarder: EN975-1+A1 och EN975-5/HC
Varning:
Rådgör alltid med en läkare innan du börjar träna om du lider av någon sjukdom eller annan åkomma som
kan förvärras av fysisk träning. Avbryt genast träningen om du känner dig yr. Kontrollera att alla bultar/
muttrar och andra delar sitter fast på motionscykeln och är åtdragna. Placera motionscykeln så att det nns
en öppen yta runt motionscykeln på minst 1 meter i alla riktningar.
Läs hela bruksanvisningen innan du börjar träna med motionscykeln, spara bruksanvisningen för
framtida bruk.
Motionscykeln är konstruerad för personlig användning i hemmet och är testad för en kroppsvikt
•
upp till 100 kg.
• Följ monteringsanvisningens olika steg noga vid monteringen.
• Använd endast de delar eller tillbehör som medföljer förpackningen.
Kontrollera att alla delar nns med i förpackningen innan du börjar montera motionscykeln.
•
(Se ”Förpackningen innehåller”).
• Använd rätt verktyg vid monteringen, be någon om hjälp att hålla i om det behövs.
• Placera motionscykeln på ett jämnt halkfritt underlag i en torr lokal, den ska inte användas eller förvaras
i utomhus eller i lokaler som har hög luftfuktighet.
• Kontrollera innan första användningstillfället och sedan var eller varannan månad att alla bultar/muttrar
är åtdragna och oskadade samt att de sitter fast på motionscykeln. Ersätt ev. slitna delar omedelbart,
använd inte motionscykeln innan den är åtgärdad.
SVENSKA
• Använd endast originaldelar (eller motsvarande) vid reparation.
• Använd aldrig starka lösningsmedel/rengöringsmedel vid rengöring.
• Använd endast motionscykeln om den är korrekt monterad, inspektera den innan användning.
• Se till att de delar som kan justeras håller sig inom rekommenderat inställningsområde och inte dras ut
för långt. Detta gäller särskilt sadelns max höjd, höj inte sadelstolpen över ”MAX” –markeringen.
• Motionscykeln är främst avsedd för vuxna. Barn bör endast använda den under tillsyn av någon vuxen.
• Den som använder motionscykeln bör vara medveten om de faror som nns t.ex. risk att fastna med
kläder i delar som rör sig under användning.
• Rådgör gärna med en läkare eller sjukgymnast innan du börjar träna så att de kan ge råd om lämplig
träningsmetod och belastning. Varning! Felaktig/överdriven träning kan ge skador.
• Följ de träningsinstruktioner som nns i bruksanvisningen.
• Arbetsbelastningen kan justeras från datorn.
19
Page 20
3. Förpackningen innehåller
SVENSKA
20
Bult M8x70
Kupolmutter M8
Bricka M8
Insexnyckel
Stjärnmejsel
Page 21

4. Montering
SVENSKA
21
Page 22

Steg 1
L
L
R
R
1. Montera främre (23) och bakre (14) golvstöd.
2. Använd två vagnsbultar M8x70 (13) med kupolmutter och bricka till varje golvstöd.
3. Är golvet ojämnt har det bakre golvstödet (14) individuell justering av höjden på båda sidor.
4. Det främre golvstödet (23) har transporthjul, de skall vändas framåt vid montering.
SVENSKA
Steg 2
1. Skruva fast pedalerna, den vänstra är märkt ”L” (18L) och den högra är märkt ”R” (18R).
2. Skruva fast den vänstra pedalen motsols och den högra pedalen medsols.
22
Page 23

Steg 3
(C)
(B)
(A)
A
B
1. Skruva fast sadeln (33) och den horisontella
inställningen (32A) på sadelstolpen (32) med
ratten (33B).
2. Sätt i den kompletta sadelstolpen (med sadel)
i monteringshålet på huvuddelen (12), skruva
fast den med ratten (16). Se alltid till att ratten
(16) är åtskruvad i ett av hålen!
SVENSKA
Steg 4
1. Trä på kåpan (40) på
styrstolpen (7). (Se g A)
2. Koppla ihop datakabeln (9,
10). (se g. B)
3. Lossa först de förmonterade
skruvarna från styrstolpen
(7). Sätt fast styrstolpen
(7) på motsvarande fäste
på huvuddelen (12) med
4 st. insexskruvar M8x20
och tillhörande brickor (11).
(se g. C). Se till att inte
kablarna kommer i kläm vid
monteringen!
23
Page 24

Steg 5
1. Montera styret (4) på styrstolpen (7).
2. Montera plastkåporna (6L, 6R) på styrstolpen (7) med skruvarna (37), skruva fast T-handtaget (5)
tillsammans med bussningen (5A) för att xera styret. Se till att det är väl åtdraget.
3. Justera styret (4) så att det är i rätt position och dra åt igen.
SVENSKA
Steg 6
1. Montera datorn (1) på styrstolpen (7) med skruvarna M5x10 (1A) och anslut datakabel (9).
2. Anslut kabeln för pulsmätning (3) till uttaget på baksidan av datorn (1).
3. Montera plastkåporna (6L, 6R) på styrstolpen (7) med skruvarna (37), skruva fast T-handtaget (5)
tillsammans med bussningen (5A) för att xera styret. Se till att det är väl åtdraget.
4. Justera styret så att det är i rätt position och dra åt igen.
5. Datorns funktioner
PULSE RECOVERY
Tryck för att starta tness-test.
Resultatet graderas från F1.0
till F6.0.
MEMORY
Lagrar uppmätta resultat från
Body Fat-testet.
UP
Ändra inställning/Öka belastning
ST/SP
Start/Stopp – Tryck för att
starta eller stoppa
valt program.
ENTER
Tryck för att välja program,
bekräfta dina inställningar
samt välja visningsläge
(tid, hastighet, distans osv.).
DOWN
Ändra inställning/
Minska belastning
24
Page 25

6. Användning
6.1 Grundläggande användning
Aktivera displayen
Tryck på någon av knapparna eller börja trampa för att aktivera displayen. Kontrollera att batterieliminatorn
är rätt ansluten om displayen inte aktiveras.
Belastning
Belastningen följer staplarna på skärmen, en hög stapel ger hög belastning och en låg stapel ger lägre
belastning. Belastningen kan ändras under träningens gång med [UP] och [DOWN].
Träningsmål
Varje träningsprogram har olika träningsmål som låter dig ställa in träningspassets tid, distans eller hur
många kalorier som ska förbrännas.
Pausa träningen
Tryck när som helst på [ST/SP] för att pausa träningen. Mätningen stannar och displayen fryser aktuella
värden. Tryck igen på [ST/SP] för att återuppta träningen.
Ändra funktion under pågående träning
Tryck på [ST/SP] för att stoppa pågående program. Tryck på [UP] eller [DOWN] för att välja ett annat
program, bekräfta genom att trycka på [ENTER].
Återställning
För att återställa inställda program, tryck och håll in [ST/SP] i ca 3 sekunder. Datorn avger en ton och
displayen visar under en kort stund samtliga segment.
SVENSKA
6.2 Välja träningsprogram
Förklaring av menyerna/träningsprogrammen
Nr Program Förklaring Träningsmål/Inställningar
1 Manual Träningsprogram med eller utan inställda mål.
Belastningen kan manuellt ökas eller minskas
under träningens gång.
2 Rolling Förinställd belastning med varierat motstånd
under träningens gång.
3 Valley Förinställd belastning i form av en dal med
uppförs- och utförsbackar.
4 Fat Burn Förinställd belastning i form av en backe upp
och en backe ner.
5 Ramp Förinställd belastning med långsamt ökande
motstånd.
6 Mountain Förinställd belastning i form av ett berg med
ökande och minskande motstånd under träningens gång.
- TIME (tid)
- DISTANCE (distans)
- CALORIES (kaloriförbränning)
- TIME (tid)
- DISTANCE (distans)
- CALORIES (kaloriförbränning)
- TIME (tid)
- DISTANCE (distans)
- CALORIES (kaloriförbränning)
- TIME (tid)
- DISTANCE (distans)
- CALORIES (kaloriförbränning)
- TIME (tid)
- DISTANCE (distans)
- CALORIES (kaloriförbränning)
- TIME (tid)
- DISTANCE (distans)
- CALORIES (kaloriförbränning)
7 Intervals Förinställd belastning med snabbt varierande
motstånd.
25
- TIME (tid)
- DISTANCE (distans)
- CALORIES (kaloriförbränning)
Page 26

8 Watt Control Låter dig själv välja belastningen. Konstant
belastning vilket betyder samma motstånd
oberoende av hastighet. Belastningen är
inställbar men är förinställd till 100 W.
- TIME (tid)
- DISTANCE (distans)
- CALORIES (kaloriförbränning)
- WATT (effekt)
9 55 % H.R.C. Pulsstyrt program. Träning tills du uppnår
55 % procent av din maxpuls.
10 75 % H.R.C. Pulsstyrt program. Träning tills du uppnår
75 % procent av din maxpuls.
SVENSKA
11 90 % H.R.C. Pulsstyrt program. Träning tills du uppnår
90 % procent av din maxpuls.
12 Target H.R Pulsstyrt program. Träning tills du uppnår
inställd målpuls.
13 Users
Prole
Låter dig själv göra ett varierat program
genom att ställa in belastningen för varje
kolumn för sig.
- TIME (tid)
- DISTANCE (distans)
- CALORIES (kaloriförbränning)
- AGE (ålder)
- TARGET H.R (målpuls)
- TIME (tid)
- DISTANCE (distans)
- CALORIES (kaloriförbränning)
- AGE (ålder)
- TARGET H.R (målpuls)
- TIME (tid)
- DISTANCE (distans)
- CALORIES (kaloriförbränning)
- AGE (ålder)
- TARGET H.R (målpuls)
- TIME (tid)
- DISTANCE (distans)
- CALORIES (kaloriförbränning)
- TARGET H.R (målpuls)
- TIME (tid)
- DISTANCE (distans)
- CALORIES (kaloriförbränning)
- COLUMN 1-10 (kolumn 1 till 10)
14 Body Test Presenterar resultatet i FAT%, BMR, BMI
samt BODY TYPE (se tabell).
15 User Data Anger dina personliga inställningar. - NAME (namn): Max. 8 bokstäver
Starta träningen utan träningsmål
Använd denna träningsmetod om du vill träna utan att ställa in några träningsmål.
1. Tryck på [UP] eller [DOWN] för att ställa in önskat träningsprogram (se tabell).
2. Tryck [ST/SP] för att starta träningen
3. Du kan nu börja träningen. Sätt dig på motionscykeln enligt bilden.
utan att ställa in några träningsmål.
- HEIGHT (längd)
- WEIGHT (vikt)
- AGE (ålder)
- SEX (kön)
- HEIGHT (längd)
- WEIGHT (vikt)
- AGE (ålder)
- SEX (kön)
26
Page 27

Ställa in dina personliga inställningar
1. Välj program 15 (User Data) med knapparna [UP] eller [DOWN], bekräfta med [ENTER].
2. Ändra inställning med [UP] eller [DOWN] och tryck [ENTER] för att gå till nästa inställning.
3. Repetera tills du gjort alla inställningar.
Starta träningen och ställ in träningsmål
1. Tryck på [UP] eller [DOWN] för att ställa in önskat träningsprogram (se tabell).
Tryck [ENTER] för att bekräfta.
2. Tryck en eller era gånger på [ENTER] för att välja träningsmål/inställning.
3. Ändra inställning med [UP] eller [DOWN] och tryck [ENTER] för att gå till nästa inställning.
4. Repetera tills du gjort alla inställningar.
5. När du gjort dina inställningar trycker du [ST/SP] för att starta träningen.
6. Du kan nu börja träningen. Sätt dig på motionscykeln enligt bilden.
Exempel:
Intervallträning i 15 minuter:
1. Välj program 7 (Intervals) med [UP] eller [DOWN].
2. Tryck [ENTER] för att bekräfta, ”TIME” visas i displayen.
3. Ställ in tiden 15 minuter med knapparna [UP] eller [DOWN].
4. Tryck [ST/SP] för att starta träningen, nedräkningen visas i displayen.
5. En signal ljuder målet har nåtts, t.ex. när tiden har räknats ned till ”0”.
6.3 Pulsavläsning
SVENSKA
- Placera båda händerna mot pulssensorerna på styret, håll i båda pulssensorerna för att få så noggrann
avläsning som möjligt. Efter en stund visas din aktuella puls.
- När texten ”HOLD SENSOR” visas i displayen under ett träningsprogram placerar du båda händerna
mot pulssensorerna.
- Pulsen avläses magnetiskt, det nns en automatisk justering av den avlästa pulsen jämförd med den
faktiska pulsen.
- Om pulsen ligger under inställt målvärde ökas belastningen. Om pulsen ligger över inställt målvärde
minskas belastningen.
- Om belastningen har minskats till lägsta möjliga värde och pulsen fortfarande ligger över inställt målvärde
börjar displayen blinka för att varna dig att det är dags att sakta ner.
Obs! Detta program kan endast användas om datorn kan avläsa pulsen utan avbrott.
6.4 Mätning av kroppsfett – Body test (program 14)
1. Starta program 14 (Body test)
2. När texten ”HOLD SENSOR” visas placerar du båda händerna mot
pulssensorerna på styret, håll i båda pulssensorerna för att få så
noggrann avläsning som möjligt. Om datorn inte registrerar någon
pulsmätning visas efter en stund texten ”ERROR” i displayen.
3. Resultatet presenteras i FAT%, BMR, BMI samt BODY TYPE.
Tryck [ENTER] för att välja det resultat du vill visa.
Tabell FAT%
1 5 % - 14 %
2 15 % - 24 %
3 25 % - 29 %
4 30 % - 39 %
5 40 % - 50 %
Obs!
Resultaten som presenteras av datorn får endast användas i träningssyfte, ej för medicinskt bruk!
27
Page 28

6.5 Fitness-test (Pulse Recovery)
Testet är personligt och används för att mäta sin pulsnivå efter avslutat träningspass.
1. Efter träningspasset, tryck en gång på [PULSE RECOVERY].
2. Håll båda händerna på pulssensorerna och börja trampa.
3. Tiden räknas ned från 60 sekunder till noll.
4. Vid avslutat test visas resultatet på displayen:
F1.0 Utmärkt
F2.0 Bra
F3.0 Genomsnittlig
F4.0 Under genomsnitt
F5.0 Dålig
F6.0 Mycket dålig
SVENSKA
7. Träningsinstruktioner
Många olika faktorer måste tas med i beräkning när du lägger upp ditt träningsprogram. Har du varit fysiskt
inaktiv under lång tid eller lider du av någon sjukdom som kan försämras vid fysisk träning bör du rådgöra
med en läkare innan du lägger upp ditt träningsprogram.
Intensitet
• För att nå bästa möjliga resultat måste rätt intensitet väljas, detta baseras på din puls. Denna formel
används ofta för att räkna ut din max. puls: Max puls = 220 – Din ålder
• Under träning bör arbetspulsen vara mellan 60 % och 85 % av din max. puls (Se pulsdiagrammet i slutet
av bruksanvisningen).
• De första veckorna som du tränar bör din arbetspuls ligga på 60 % av din max. puls.
• När du har förbättrat dina värden och har tränat några veckor kan du långsamt låta arbetspulsen öka upp
mot 85 % av din max. puls.
Fettförbränning
Kroppen börjar förbränna fett vid 60 % av din max. puls. Optimal fettförbränning får du vid 60 till 70 % av din
max. puls. Bästa träningsresultat får du normalt om du gör 3 träningspass på 30 minuter per vecka.
Exempel:
Du är 52 år gammal och ska börja träna och förbränna fett.
Max. puls blir 220 – 52 = 168 pulsslag/minut enligt formeln.
Lägsta arbetspuls = 168 x 0,6 = 101 pulsslag/minut
Övre arbetspuls = 168 x 0,7 = 117 pulsslag/minut
Arbetspuls mellan 101 och 117 under träning ger således bästa fettförbränning i detta exempel enligt formeln!
Träningstips!
Uppvärmning
Värm upp 5 till 10 minuter innan du börjar ditt träningspass t.ex. med stretching eller cykling sakta med
låg belastning.
Träningsmängd
Arbetspuls mellan 60 till 85 % av din max. puls är lämplig under träning, träningspassets längd kan anpassas
efter denna lathund:
• Daglig träning = ca 10 minuter vid varje träningspass.
• Träning 2-3 gånger/vecka = ca 20 minuter vid varje träningspass.
• Träning 1-2 gånger/vecka = ca 60 minuter vid varje träningspass.
28
Page 29

Efter träningspasset
Låt musklerna kylas ner efter träningen, dra ner på takt och belastning de sista minuterna.
Ägna också en stund efter träningspasset till att stretcha musklerna för att förebygga stelhet i musklerna.
Vägen till framgång:
• Träningen kommer att ge resultat efter ganska kort tid, så att din arbetspuls sänks under arbetspassen.
• Försök att göra dina träningspass regelbundet, det är lättare att hålla ut om träningen sker vid samma
tidpunkt på dagen.
• Starta träningen försiktigt, öka sedan träningsdosen när du blir mera vältränad.
Lycka till med en hälsosammare livsstil!
8. Ställ in motionscykeln optimalt innan träningspasset börjar
Steg 1: Pedalernas band och sadelns höjd
Justera först pedalernas band så att de passar bra mot foten. Ställ in sadelns höjd: När ena pedalen är i sitt
nedre läge så ska knäet på den sidan vara svagt böjt. Justera sadelns höjd såhär:
1. Skruva ut ratten (16).
2. Dra upp sadelstolpen (32) till rätt höjd
SVENSKA
3. Skruva in ratten (16) i det hål som ligger närmast i höjd på sadelstolpen.
4. Varning! Se till att inte sadelstolpen dras upp längre än till ”MAX” –märkningen
Steg 2: Justera styret
Styret kan ställas i många olika positioner, se bilderna. Prova olika inställningar tills du hittar den mest
bekväma ställningen.
Justera styrets läge så här:
1. Skruva ut T-handtaget (5).
2. Vik styret (4) till ett lämpligt läge.
3. Dra åt T-handtaget (5).
Obs! Bussningen (5A) måste vara monterad på T-handtaget (5) för att xera styret.
Obs! Pedalerna ska alltid föras framåt under träningen, den magnetiska belastningen fungerar endast när
pedalerna förs framåt (se bild).
29
Page 30

9. Sprängskiss
SVENSKA
11
30
Page 31

Benämningar
Pos Benämning
1 Dator
2 Handtag, ändplugg (till styre)
3 Pulssensor med kabel
4 Styre
5 T-handtag
5 A Bussning till T-handtag
6 L Kåpa vänster
6 R Kåpa höger
7 Styrstolpe
9 Datakabel (övre)
10 Datakabel (nedre)
11 Bult, bricka till styrstolpe
12 Huvuddel
13 Skruv och mutter (till golvstöden)
14 Främre golvstöd
15 Transporthjul
16 Ratt
17 Skruvsats (till sidokåpor)
18 Pedaler (L vänster, R höger)
19 Sidokåpor
20 Skruvsats (till sidokåpor)
21 L Vevarm, vänster
21 R Vevarm, höger
22 Transporthjul (sats)
23 Bakre golvstöd
24 Justerbar fot
25 Svänghjul med magnetbroms
26 Drivrem
29 A Lagring (till vevparti)
29 C Planbricka (till vevparti)
29 D Låsring (till vevparti)
30 Vevparti
31 Bussning (till sadelstolpe)
32 Sadelstolpe
32 A Horisontaljustering (till sadel)
33 Sadel
33 B Ratt (låsratt till sadel)
34 Sensor
35 Insexbult (till vevarm)
36 Täckbricka (till vevarm)
37 Skruvsats (till kåpa)
38 Motor
39 Batterieliminator
40 Kåpa
SVENSKA
31
Page 32

10. Pulsdiagram
210
205
200
195
190
185
180
175
170
SVENSKA
165
160
155
150
145
Puls
Pulse
140
135
130
125
120
115
110
105
100
95
90
85
200
170
140
120
195
165.75
136.5
117
190
161.5
133
114
185
157.25
129.5
111
180
153
126
108
175
148.75
122.5
105
170
165
160
155
150
144.5
140.25
136
131.75
127.5
119
115.5
112
108.5
105
102
99
96
93
90
Max.
85%
70%
60%
145
123.25
101.5
87
20 25 30 35 40 45 50 55 60 65 70 75 80
Ålder
Age
Skydda miljön
Sortera ditt avfall och låt det gå till återvinning istället för att kasta det. Alla maskiner, elektroniska
komponenter och förpackningsmaterial ska sorteras och hanteras enligt lokala miljöförordningar.
32
Page 33

Trimsykkel
Art.nr. 34-7509, modell AC-6472C
Les nøye igjennom hele bruksanvisningen og ta vare på den til senere bruk. Vi reserverer oss mot ev. tekstog bildefeil, samt forandringer av tekniske data. Ved tekniske problemer eller andre spørsmål, ta kontakt
med vårt kundesenter (se opplysninger på baksiden).
Innholdsfortegnelse
1. Produktbeskrivelse
2. Sikkerhet
3. Forpakningen inneholder
4. Montering
5. Computerens funksjoner
6. Bruk
7. Treningsprogrammer
8. Still inn trimsykkelen optimalt før treningsøkten starter
9. Sprengskisse
10. Pulsdiagram
NORSK
33
Page 34

1. Produktbeskrivelse
• Trimsykkel med program som varierer belastningen ved hjelp av magnetstyrt motstand.
• Viser hastighet, distanse, kaloriforbruk og puls.
• Beregnet for belastning på inntil 100 kg.
Obs! Dette produktet er ikke en ergometersykkel da visse måleverdier styres av aktuell fart.
2. Sikkerhet
Produktet er testet i henhold til følgende sikkerhetsstandarder: EN975-1+A1 og EN975-5/HC.
Advarsel: Rådfør deg alltid med en lege før du starter å trene, dersom du lider av en sykdom eller liknende,
som kan forverres av fysisk aktivitet. Avbryt treningen umiddelbart dersom du føler deg svimmel.
Kontroller at alle bolter og mutre sitter fast og er dratt til.
Plasser trimsykkelen slik at den har fritt rom på minst 1 meter i alle retninger.
Les hele bruksanvisningen før du starter å trene på denne trimsykkelen. Ta også vare på bruksanvisningen
for senere bruk.
• Trimsykkelen er konstruert for personlig bruk i hjemmet og er testet for en kroppsvekt inntil 100 kg.
NORSK
• Følg monteringsanvisningens forskjellige trinn nøye ved montering.
• Bruk kun de deler og tilbehør som følger med i forpakningen.
• Kontroller at alle deler er med i forpakningen før du starter monteringen. (Se ”Forpakningen inneholder”).
• Bruk riktig verktøy til monteringen. Be om hjelp dersom det er behov for det.
• Plasser trimsykkelen på et jevnt og sklisikkert underlag i et tørt lokale. Den skal ikke oppbevares eller
brukes utendørs eller i lokaler som har høy luftfuktighet.
• Kontroller før første gangs bruk og deretter hver eller annenhver måned at alle bolter og mutre er dratt
godt til og at de er uskadet, samt at de sitter fast på trimsykkelen. Erstatt umiddelbart ev. slitte deler, bruk
ikke trimsykkelen før den er reparert.
• Bruk kun originale deler (eller tilsvarende) ved reparasjon.
• Bruk aldri sterke løsemidler/rengjøringsmidler ved rengjøring.
• Bruk kun trimsykkelen hvis den er riktig montert. Sjekk den før bruk.
• Påse at de delene som kan justeres holder seg innenfor anbefalt innstillingsområde og ikke dras ut for
langt. Dette gjelder særlig setets maksimumshøyde. Ikke still setestolpen på over ”MAX”-markeringen.
• Trimsykkelen er først og fremst beregnet for voksne. Hvis barn skal bruke den, bør det være under tilsyn
av voksne.
• Den som bruker trimsykkelen bør være klar over de farer som nnes som f.eks. faren for at klær kan sette
seg fast i bevegelige deler.
• Rådfør deg gjerne med en lege eller idrettslege før du starter treningen, slik at de kan gi råd om passende
treningsmetoder og belastning. Advarsel! Gal/overdrevet trening kan gi skader.
• Følg de treningsinstruksjonene som nnes i bruksanvisningen.
• Arbeidsbelastningen kan justeres fra dataen.
34
Page 35

3. Forpakningen inneholder
NORSK
35
Bolt M8 x 70
Kuppelmutter M8
Skive for M8 Bolt
4
4
4
Sekskantnøkkel
Stjernetrekker
Page 36

4. Montering
NORSK
36
Page 37

Trinn 1
L
L
R
R
1. Monter forreste (23) og bakerste (14) gulvstøtte.
2. Bruk to vognbolter M8 x 70 mm (13) med mutter og skive til hver gulvstøtte.
3. Hvis gulvet er ujevnt kan den bakerste gulvstøtten (14) justeres på høyden på begge sider.
4. Det forreste gulvstøtten (23) har transporthjul. De skal vendes framover ved montering.
NORSK
Trinn 2
1. Fest pedalene, den venstre er merket ”L” (18L) og den høyre er merket ”R” (18R).
2. Fest den venstre pedalen motsols og den høyre medsols.
37
Page 38

Trinn 3
(C)
(B)
(A)
A
B
1. Fest setet (33) og den horisontale innstillingen
(32A) på setestammen (32) med rattet (33B).
2. Plasser den komplette setestammen (med
setet) i monteringshullet på hoveddelen (12),
og skru den fast med rattet (16). Påse at rattet
(16) alltid er dratt til i ett av hullene!
NORSK
Trinn 4
1. Tre dekselet (40) på
styrestolpen (7). (Se g. A)
2. Koble sammen datakabelen
(9, 10). (se g. B)
3. Løsne først på de
formonterte skruene på
styrestolpen (7). Sett
styrestolpen (7) fast
på tilsvarende feste på
hoveddelen (12) med 4
stk. inseksskruer M8 x 20,
med tilhørende skiver (11).
(se g. C). Pass på at ikke
kablene kommer i klem ved
monteringen!
38
Page 39

Trinn 5
1. Fest styret (4) på styrestaget (7).
2. Fest plastdekslene (6L, 6R) på styrestaget (7) med skruene (37), skru fast T-håndtaket (5) med
bussingen (5A) for å feste styret. Påse at delene blir riktig dratt til.
3. Juster styret (4) slik at det er i riktig posisjon og dra til igjen.
NORSK
Trinn 6
1. Monter computeren (1) på styrestolpen (7) med skruene M5 x 10 (1A) og koble datakabel (9).
2. Koble kabelen for pulsmåling (3) til uttaket på baksiden av computeren (1).
1. Fest plastdekslene (6L, 6R) på styrestaget (7) med skruene (37), skru fast T-håndtaket (5) med
bussingen (5A) for å feste styret. Påse at delene blir riktig dratt til.
2. Juster styret (4) slik at det er i riktig posisjon, og dra til igjen.
5. Computerens funksjoner
PULSE RECOVERY
Trykk for å starte tness-test.
Resultatet graderes fra F1.0 til
F6.0.
MEMORY
Lagrer resultater fra
Body Fat-testen.
UP
Endre innstilling/Øk belastning.
ST/SP
Start/Stopp – Trykk for å
starte eller stoppe valgt
program.
ENTER
Trykk for å velge program,
bekreft dine innstillinger samt
velg visningsmodus (tid,
hastighet, distanse osv.).
DOWN
Endre innstilling/
Minske belastning.
39
Page 40

6. Bruk
6.1 Grunnleggende bruk
Aktiver displayet
Trykk på en av knappene eller begynn å tråkke for å aktivere displayet. Kontroller at batterieliminatoren er
riktig tilkoblet hvis ikke displayet aktiveres.
Belasting
Belastningen følger grafene på skjermen, et høyt utslag gir høy belastning og et lavt utslag gir lavere
belastning. Belastningen kan endres under treningens gang med [UP] og [DOWN].
Treningsmål
Hvert treningsprogram har forskjellige treningsmål som lar deg stille inn treningsøktens tid, distanse eller
hvor mange kalorier som skal forbrennes.
Ta pause i treningen
Trykk når som helst på (ST/SP) for å ta pause i treningen. Målingen stopper og displayet fryser aktuelle
verdier. Trykk en gang til på (ST/SP) for å gjenoppta treningen.
Endre funksjon under pågående trening
Trykk på (ST/SP) for å stoppe pågående program. Trykk på [UP] eller [DOWN] for å velge et annet program.
Bekreft ved å trykke på [ENTER].
NORSK
Tilbakestilling
For å tilbakestille innstilte program, trykk og hold inne (ST/SP) i ca. 3 sekunder. Computeren avgir en tone
og displayet viser samtlige segment en kort stund.
6.2 Velg treningsprogram
Forklaring på menyer/treningsprogram
Nr.: Program Forklaring Treningsmål/Innstillinger
1 Bruksanvisning Treningsprogram med eller uten
innstilte mål. Belastningen kan
manuelt økes eller minskes under
treningens gang.
2 Rolling Forhåndsinnstilt belastning med
variert motstand under treningens
gang.
3 Valley Forhåndsinnstilt belastning i
form av en dal med oppover- og
nedoverbakker.
4 Fat Burn Forhåndsinnstilt belastning i form
av en bakke med oppover- og
nedoverbakke.
- TIME (tid)
- DISTANCE (distanse)
- CALORIES (kaloriforbrenning)
- TIME (tid)
- DISTANCE (distanse)
- CALORIES (kaloriforbrenning)
- TIME (tid)
- DISTANCE (distanse)
- CALORIES (kaloriforbrenning)
- TIME (tid)
- DISTANCE (distanse)
- CALORIES (kaloriforbrenning)
5 Ramp Forhåndsinnstilt belastning med
langsomt økende motstand.
6 Mountain Forhåndsinnstilt belastning i
form av en høyde med økende
og minskende motstand under
treningens gang.
40
- TIME (tid)
- DISTANCE (distanse)
- CALORIES (kaloriforbrenning)
- TIME (tid)
- DISTANCE (distanse)
- CALORIES (kaloriforbrenning)
Page 41

7 Intervals Forhåndsinnstilt belastning med
hurtig varierende motstand.
- TIME (tid)
- DISTANCE (distanse)
- CALORIES (kaloriforbrenning)
8 Watt Control Lar deg selv velge belastningen.
Konstant belastning, noe som
betyr samme motstand uavhengig
av hastighet. Belastningen er
justerbar, men er forhåndsinnstilt til
100 W.
9 55 % H.R.C. Pulsstyrt program. Trening til du
oppnår 55 % av din makspuls.
10 75 % H.R.C. Pulsstyrt program. Trening til du
oppnår 75 % av din makspuls.
11 90 % H.R.C. Pulsstyrt program. Trening til du
oppnår 90 % av din makspuls.
12 Target H.R Pulsstyrt program. Trening til du
oppnår innstilt målpuls.
- TIME (tid)
- DISTANCE (distanse)
- CALORIES (kaloriforbrenning)
- WATT (effekt)
- TIME (tid)
- DISTANCE (distanse)
- CALORIES (kaloriforbrenning)
- AGE (alder)
- TARGET H.R (målpuls)
- TIME (tid)
- DISTANCE (distanse)
- CALORIES (kaloriforbrenning)
- AGE (alder)
- TARGET H.R (målpuls)
- TIME (tid)
- DISTANCE (distanse)
- CALORIES (kaloriforbrenning)
- AGE (alder)
- TARGET H.R (målpuls)
- TIME (tid)
- DISTANCE (distanse)
- CALORIES (kaloriforbrenning)
- TARGET H.R (målpuls)
NORSK
13 Users Prole Lar deg selv gjøre et variert
program ved å stille inn
belastningen for hver kolonne for
seg.
14 Body Test Presenterer resultatet i FAT %,
BMR, BMI samt BODY TYPE (se
tabell).
15 User Data Angir dine personlige innstillinger. - NAME (navn): Maks. 8 bokstaver
- TIME (tid)
- DISTANCE (distanse)
- CALORIES (kaloriforbrenning)
- COLUMN 1-10 (kolonne 1 til 10)
- HEIGHT (lengde)
- WEIGHT (vekt)
- AGE (alder)
- SEX (kjønn)
- HEIGHT (lengde)
- WEIGHT (vekt)
- AGE (alder)
- SEX (kjønn)
Start treningen uten treningsmål
Bruk denne treningsmetoden dersom du vil trene uten å stille inn noen treningsmål.
1. Trykk på [UP] eller [DOWN] for å stille inn ønsket treningsprogram (se tabell).
2. Trykk [ST/SP] for å starte treningen
3. Du kan nå begynne treningen. Sett deg på mosjonssykkelen som vist på bildet.
uten å stille inn noen treningsmål.
41
Page 42

Still inn dine personlige innstillinger
1. Velg program 15 (User Data) med knappene [UP] eller [DOWN], bekreft med [ENTER].
2. Endre innstilling med [UP] eller [DOWN] og trykk [ENTER] for å gå til neste innstilling.
3. Repeter til du har foretatt alle innstillinger.
Start treningen og still inn treningsmål
1. Trykk på [UP] eller [DOWN] for å stille inn ønsket treningsprogram (se tabell). Trykk på [>>|] for å bekrefte.
2. Trykk en eller ere ganger på [PROG] for å velge treningsmål/innstilling.
3. Endre innstilling med [UP] eller [DOWN] og trykk [ENTER] for å gå til neste innstilling.
4. Repeter til du har foretatt alle innstillinger.
5. Når du har foretatt dine innstillinger trykker du [ST/SP] for å starte treningen.
6. Du kan nå begynne treningen. Sett deg på mosjonssykkelen som vist på bildet.
Eksempel:
Intervalltrening i 15 minutter:
1. Velg program 7 (Intervals) med [UP] eller [DOWN].
2. Trykk [ENTER] for å bekrefte, ”TIME” vises i displayet.
NORSK
3. Still inn tiden 15 minutter med knappene [UP] eller [DOWN].
4. Trykk [ST/SP] for å starte treningen, nedtellingen vises i displayet.
5. Et signal lyder i noen sekunder når målet er nådd, f.eks. tiden har telt ned til ”0”.
6.3 Pulsavlesning
• Plasser begge hendene mot pulssensorene på styret. Hold i begge pulssensorene for å få så nøyaktig
avlesing som mulig. Etter en stund vises din aktuelle puls.
• Når teksten ”HOLD SENSOR” vises i displayet under et treningsprogram plasserer du begge hendene
mot pulssensorene.
• Pulsen avleses magnetisk. Det nnes en automatisk justering av den avleste pulsen sammenlignet med
den faktiske pulsen.
• Dersom pulsen ligger under innstilt måleverdi økes belastningen. Dersom pulsen ligger over innstilt
måleverdi reduseres belastningen.
• Dersom belastningen reduseres til laveste mulige verdi, og pulsen fortsatt ligger over innstilt måleverdi,
begynner displayet å blinke for å advare deg om at det er på tide å roe ned.
Obs! Dette programmet kan kun brukes hvis computeren kan lese av pulsen uten avbrudd.
6.4 Måling av kroppsfett – Body test (program 14)
1. Start program 14 (Body test).
2. Når teksten ”HOLD SENSOR” vises, plasserer du begge
hendene mot pulssensorene på styret. Hold i begge
pulssensorene for å få så nøyaktig avlesing som mulig. Dersom
computeren ikke registrerer noen pulsmåling, vises etter en
stund teksten ”ERROR” i displayet.
3. Resultatet presenteres i FAT %, BMR, BMI samt BODY TYPE.
Trykk [Enter] for å velge det nummeret du vil redigere.
Tabell FAT%
1 5 % - 14 %
2 15 % - 24 %
3 25 % - 29 %
4 30 % - 39 %
5 40 % - 50 %
Obs!
- Resultatene som presenteres av computeren skal kun brukes i forbindelse med trening, og ikke til
medisinsk bruk!
42
Page 43

6.5 Fitness-test (Pulse Recovery)
Testen er personlig og brukes for å måle ditt pulsnivå etter avsluttet treningsøkt.
1. Etter treningsøkten, trykk en gang på [PULSE RECOVERY].
2. Hold begge hendene på pulssensorene og start tråkkingen .
3. Tiden telles ned fra 60 sekunder til null.
4. Ved avsluttet test. Vises resultatet i displayet:
F1,0 Utmerket
F2,0 Bra
F3,0 Gjennomsnittelig
F4,0 Under gjennomsnittet
F5,0 Dårlig
F6,0 Svært dårlig
7. Treningsinstruksjoner
Mange ulike faktorer må tas med i beregningen når du legger opp ditt treningsprogram. Har du vært fysisk
inaktiv over en lang periode eller lider du av en sykdom som kan forverres ved fysisk trening, bør du rådføre
deg med en lege før du legger opp treningsprogrammet.
Intensitet
• For å nå best mulig resultat, må riktig intensitet velges. Dette baseres på din puls. Denne formelen brukes
ofte for å regne ut din maks. puls: Maks. puls = 220 – Din alder.
• Under trening bør arbeidspulsen være mellom 60 % og 85 % av din maks. puls (Se pulsdiagrammet).
• De første ukene som du trener bør din arbeidspuls ligge på 60 % av din maks. puls.
• Når du har forbedret dine verdier og har trent i noen uker, kan du sakte øke arbeidspulsen opp mot 85 %
av din maks. puls.
NORSK
Fettforbrenning
Kroppen begynner å forbrenne fett ved 60 % av din maks. puls. Optimal fettforbrenning får du ved 60 til 70 %
av din maks. puls. Best treningsresultat får du normalt om du har 3 treningsøkter på 30 minutter per uke.
Eksempel:
Du er 52 år gammel og skal begynne å trene og forbrenne fett.
Maks. puls blir 220 – 52 = 168 pulsslag/minutt i følge formelen.
Laveste arbeidspuls = 168 x 0,6 = 101 pulsslag/minutt
Høyeste arbeidspuls = 168 x 0,7 = 117 pulsslag/minutt
Arbeidspuls mellom 101 og 117 under trening gir således best fettforbrenning i dette eksemplet i følge
formelen!
Treningstips!
Oppvarming
Varm opp 5 til 10 minutter før du begynner treningsøkten med f.eks. tøying eller gange med lav belastning.
Treningsmengde
Arbeidspuls mellom 60 til 85 % av din maks. puls er passelig under trening, treningsøktens lengde kan
tilpasses etter følgende tommelngerregel:
• Daglig trening = ca. 10 minutter ved hver treningsøkt.
• Trening 2-3 ganger/uke = ca. 20 minutter ved hver treningsøkt.
• Trening 1-2 ganger/uke = ca. 60 minutter ved hver treningsøkt.
Etter treningsøkten
La musklene kjøles ned etter treningen, dra ned på takt og belastning de siste minuttene, Bruk også en
stund etter treningsøkten til å tøye musklene for å forebygge stølhet i musklene.
43
Page 44

Veien til framgang
• Treningen vil gi resultater etter ganske kort tid, slik at din arbeidspuls senkes under arbeidsøkten.
• Prøv å gjøre dine treningsøkter regelmessig. Det er lettere å holde ut hvis treningen skjer på samme
tidspunkt på dagen.
• Start treningen forsiktig, øk deretter treningsmengden når du blir mer veltrent.
• Lykke til med en sunnere livsstil!
8. Still inn trimsykkelen optimalt før treningsøkten starter
Trinn 1: Pedalenes stropper og setets høyde
Juster først pedalenes stropper slik at de passer bra mot foten/skoen. Still inn setets
høyde: Når den ene pedalen er i sitt nedre leie, skal kneet på motsatte side være
svakt bøyd. Juster setets høyde slik:
1. Skru ut rattet (16).
2. Dra opp setestolpen (32) til riktig høyde.
3. Skru inn rattet (16) i det hullet som ligger nærmest denne høyden på setestolpen.
Advarsel! Påse at ikke setestolpen dras lengre opp enn til ”MAX”-merkingen.
4.
NORSK
Trinn 2: Juster styret
Styret kan stilles inn i mange forskjellige posisjoner, se bildene. Prøv deg fram med forskjellige innstillinger til
du nner den som passer best for deg.
Juster styret slik:
1. Skru ut T-håndtaket (5).
2. Still styret (4) i en passende posisjon.
3. Skru til T-håndtaket (5).
Obs! Bussingen (5A) må være montert på T-håndtaket (5) for å feste styret.
Obs! Pedalene skal alltid føres framover under treningen. Den magnetiske belastninger fungerer kun når
pedalene føres framover (se bildet).
44
Page 45

9. Sprengskisse
NORSK
11
45
Page 46

Benevnelser
Pos. Benevning:
1 Computer
2 Håndtak, endeplugg (til styret)
3 Pulssensor med kabel
4 Styre
5 T-håndtak
5A Bussing till T-håndtak
6L Deksel, venstre
6R Deksel, høyre
7 Styrestolpe
9 Kabel for computer (øvre)
10 Kabel for computer (nedre)
11 Bolt, skive til styrestolpe
12 Hoveddel
13 Skrue og mutter (til gulvstøtten)
14 Fremre gulvstøtte
NORSK
15 Transporthjul
16 Ratt
17 Skruesett (til sidedekslene)
18 Pedaler (L venstre, R høyre)
19 Sidedeksel (venstre, høyre)
20 Skruesett (til sidedeksel)
21L Sveivarm, venstre
21R Sveivarm, høyre
22 Transporthjul (sett)
23 Bakre gulvstøtte
24 Justerbar fot
25 Svinghjul med magnetbrems
26 Drivreim
29A Lager (til sveivparti)
29C Planskive (til sveivparti)
29D Låsering (til sveivparti)
30 Sveivparti
31 Bussing (til setestolpe)
32 Setestolpe
32A Horisontaljustering (til sete)
33 Sete
33B Ratt (låseratt til sete)
34 Sensor
35 Inseksbolt (til sveivarm)
36 Dekkebrikke (til sveivarm)
37 Skruesett (for deksel)
38 Motor
39 Batterieliminator
40 Deksel
46
Page 47

10. Pulsdiagram
210
205
200
170
140
120
20 25 30 35 40 45 50 55 60 65 70 75 80
Puls
Pulse
200
195
190
185
180
175
170
165
160
155
150
145
140
135
130
125
120
115
110
105
100
95
90
85
195
165.75
136.5
117
190
161.5
133
114
185
157.25
129.5
111
180
153
126
108
175
148.75
122.5
105
170
144.5
119
102
165
140.25
115.5
99
160
136
112
96
155
131.75
108.5
93
Max.
85%
70%
60%
NORSK
150
145
127.5
123.25
105
101.5
90
87
Age
Alder
Beskytt miljøet
Sorter avfallet og la det gå til gjenvinning istedenfor å kaste det. Alle maskiner, elektriske komponenter og
emballasje skal sorteres og håndteres i henhold til lokale miljøforskrifter.
47
Page 48

Kuntopyörä
Tuotenumero 34-7509, malli AC-6472C
Lue käyttöohjeet ennen tuotteen käyttöönottoa. Säilytä käyttöohjeet tulevaa tarvetta varten. Pidätämme
oikeuden teknisten tietojen muutoksiin. Emme vastaa mahdollisista teksti- tai kuvavirheistä. Jos laitteeseen
tulee teknisiä ongelmia, ota yhteys myymälään tai asiakaspalveluun (yhteystiedot käyttöohjeen lopussa).
Sisällysluettelo
1. Tuotekuvaus
2. Turvallisuus
3. Pakkauksen sisältö
4. Asennus
5. Tietokoneen toiminnot
6. Käyttö
7. Harjoitusohjeet
8. Säädä kuntopyörä sinulle parhaiten sopivaksi ennen harjoittelun aloittamista
9. Kokoonpano
10. Syketaulukko
SUOMI
48
Page 49

1. Tuotekuvaus
• Kuntopyörä, jossa tietokone joka muuttaa kuormitusta magneettiohjatun vastuksen avulla.
• Tietokone näyttää myös nopeuden, etäisyyden, kalorien kulutuksen ja sykkeen.
• Kuormitus jopa 100 kg.
Huom.! Tuote ei mittaa lihastyötä, sillä jotkut mittausarvot ohjautuvat nopeuden mukaan.
2. Turvallisuus
Tuote on testattu seuraavien turvallisuusstandardien mukaisesti: EN975-1+A1 ja EN975-5/HC.
Varoitus: Jos sinulla on jokin sairaus tai vaiva, jota fyysinen harjoittelu voi pahentaa, keskustele lääkärin
kanssa ennen harjoittelun aloittamista. Keskeytä harjoittelu välittömästi, jos sinua rupeaa huimaamaan.
Varmista, että kaikki pultit, mutterit ja muut osat ovat paikoillaan ja kireällä.
Aseta kuntopyörä sellaiseen paikkaan, että sen ympärillä on joka puolella tilaa vähintään yhden metrin
verran.
Lue koko käyttöohje huolellisesti ennen kuntopyörän käyttöönottoa. Säilytä ohjeet tulevaa tarvetta varten.
• Kuntopyörä on suunniteltu henkilökohtaiseen kotikäyttöön ja se kestää jopa 100 kg:n painon.
• Seuraa asennusohjeita huolellisesti asentaessasi kuntopyörää.
• Käytä ainoastaan pakkauksen mukana tulleita osia ja varusteita.
• Varmista ennen asentamisen aloittamista, että pakkaus sisältää kaikki tarvittavat osat. (Ks. ”Pakkauksen
sisältö”).
• Käytä asentamiseen sopivia työkaluja ja pyydä tarvittaessa jotakuta toista pitelemään pyörää paikoillaan.
• Sijoita kuntopyörä kuivaan paikkaan tasaiselle ja liukumattomalle alustalle. Älä käytä tai säilytä pyörää
ulkona tai kosteissa tiloissa.
• Varmista ennen ensimmäistä käyttökertaa ja sen jälkeen noin runsaan kuukauden välein, että kaikki pultit,
mutterit ja muut osat ovat kunnolla paikoillaan ja vahingoittumattomia. Vaihda kuluneet osat välittömästi
uusiin äläkä käytä pyörää ennen kuin tämä on tehty.
• Käytä korjaukseen ainoastaan alkuperäisosia (tai vastaavia).
• Älä käytä pyörän puhdistukseen voimakkaita puhdistusaineita tai liuottimia.
• Käytä kuntopyörää vain, jos se on asennettu oikein. Tarkista pyörän kunto ennen käyttöä.
• Varmista, että pyörän säädettävät osat pysyvät suositellulla säätöalueella ja etteivät ne liiku liian pitkälle.
Ole erityisen tarkka satulan maksimikorkeuden kanssa. Älä nosta satulaa ”MAX”-merkinnän yli.
• Kuntopyörä soveltuu aikuisille. Lapset saavat käyttää pyörää ainoastaan aikuisen valvonnassa.
• Laitetta käyttävän tulee olla tietoinen käyttöön liittyvistä mahdollisista vaaroista. Esim. vaatteet voivat
tarttua pyörän liikkuviin osiin käytön aikana.
• Suosittelemme, että keskustelet ennen käytön aloittamista lääkärin tai lääkintävoimistelijan kanssa. He
voivat neuvoa sinua oikeaan vastukseen ja harjoittelumetodeihin liittyvissä asioissa. Varoitus! Virheellinen
ja liiallinen harjoittelu voi aiheuttaa vammoja.
SUOMI
• Noudata käyttöohjeen harjoitteluohjeita.
• Harjoittelukuormitusta voidaan säätää tietokoneella.
49
Page 50

3. Pakkauksen sisältö
SUOMI
Pultti M8x70
Kupumutteri M8
Aluslaatta M8
Kuusiokoloavain
Ristipäätaltta
4
4
4
50
Page 51

4. Asennus
SUOMI
51
Page 52

L
L
R
R
1. askel
1. Asenna etumainen (23) ja taaempi (14) lattiatuki.
2. Kiinnitä kumpikin lattiatuki kahdella M8x70 lukkopultilla, hattumutterilla ja aluslaatalla.
3. Jos lattia on epätasainen, on taaemmassa lattiatuessa (14) kummallakin puolella erillinen korkeuden
säädin.
4. Etumaisessa lattiatuessa (23) on kuljetuspyörät, jotka tulee kääntää eteenpäin asennuksen ajaksi.
SUOMI
2. askel
1. Ruuvaa polkimet kiinni. Vasen poljin on merkitty "L”-kirjaimella (18L) ja oikea ”R”-kirjaimella (18R).
2. Kiinnitä vasen poljin ruuvaamalla vastapäivään ja oikea poljin ruuvaamalla myötäpäivään.
52
Page 53

(C)
(B)
(A)
A
B
3. askel
1. Kiinnitä satula (33) ja
horisontaalinen säädin (32A)
satulatankoon (32) säätönupilla
(33B) ruuvaamalla.
2. Aseta koko satulatanko (satulan
kanssa) pääosan asennusaukkoon
(12) ja ruuvaa se kiinni säätönupin
avulla. Muista aina varmistaa,
että säätönuppi (16) on kiinnitetty
reikään!
4. askel
1. Pujota kuori (40) ohjaustankoon
(7). (Ks. kuva A)
2. Yhdistä datakaapelit (9, 10).
(Katso kuva B)
3. Irrota ensin esiasennetut ruuvit
ohjaustangosta (7). Kiinnitä
ohjaustanko (7) vastaavaan
kiinnikkeeseen pääosaan (12)
neljällä M8x20-kuusiokulmalla
ja niihin kuuluvilla aluslaatoilla
(11). (Katso kuva C). Varmista,
että johtoja ei jää puristuksiin
asennuksen aikana.
SUOMI
53
Page 54

5. askel
1. Kiinnitä ohjaimet (4) ohjaustankoon (7).
2. Asenna muovikuoret (6L, 6R) ohjaustankoon (7) ruuveilla (37), ruuvaa T-kahva (5) kiinni holkin (5A)
kanssa kiinnittääksesi ohjaimet. Varmista, että ohjaimet ovat kireällä.
3. Säädä ohjaimet (4) oikeaan asentoon ja kiristä uudestaan.
6. askel
SUOMI
1. Kiinnitä tietokone (1) ohjaustankoon (7) M5x10-ruuveilla (1A) ja liitä datakaapeli (9).
2. Liitä johto sykkeenmittausta varten (3) tietokoneen (1) takapuolella olevaan liitäntään.
1. Asenna muovikuoret (6L, 6R) ohjaustankoon (7) ruuveilla (37), ruuvaa T-kahva (5) kiinni holkin (5A)
kanssa kiinnittääksesi ohjaimet. Varmista, että ohjaimet ovat kireällä.
2. Säädä ohjaimet oikeaan asentoon ja kiristä uudestaan.
5. Tietokoneen toiminnot
PULSE RECOVERY
Paina aloittaaksesi tness-testin.
Tulosasteikko: F1.0 – F6.0.
MEMORY
Tallentaa Body Fat –testin
tuloksen.
UP
Muuta asetusta/
Lisää kuormitusta.
ST/SP
Käynnistys/Pysäytys
– Käynnistää ja pysäyttää
valitun ohjelman.
ENTER
Paina valitaksesi ohjelman,
vahvistaaksesi asetukset
sekä valitaksesi näyttötilan
(aika, nopeus, välimatka jne.).
DOWN
Muuta asetusta/
Vähennä kuormitusta.
54
Page 55

6. Käyttö
6.1 Peruskäyttö
Näytön aktivoiminen
Aktivoi näyttö painamalla jotain painikkeista tai aloittamalla polkeminen. Jos näyttö ei mene päälle, varmista,
että muuntaja on liitetty oikein.
Kuormitus
Kuormitus noudattaa näytön pylväitä, korkea pylväs tarkoittaa suurta kuormitusta ja matala pylväs tarkoittaa
alhaista kuormitusta. Kuormitusta voi muuttaa harjoituksen aikana [UP] ja [DOWN]-painikkeilla.
Harjoittelutavoitteet
Jokaisessa harjoitteluohjelmassa on eri harjoittelutavoitteita, joissa voi asettaa harjoituksen pituuden,
välimatkan ja poltettavien kaloreiden määrän.
Tauon pitäminen harjoituksessa
Voit pitää tauon koska tahansa painamalla nuppia [ST/SP]. Mittaus pysähtyy ja senhetkiset arvot pysähtyvät
näytölle. Jatka harjoittelua painamalla uudestaan nuppia [ST/SP].
Toiminnon vaihto harjoittelun aikana
Lopeta ohjelmoitu harjoitus painamalla [ST/SP]. Valitse toinen ohjelma [UP] ja [DOWN]-painikkeilla. Vahvista
painamalla [ENTER].
Asetusten palauttaminen
Jos haluat poistaa asetetun ohjelman, paina [ST/SP] noin 3 sekunnin ajan. Laitteesta kuuluu merkkiääni ja
kaikki merkinnät näkyvät näytöllä lyhyen aikaa.
6.2 Harjoitteluohjelman valitseminen
Valikkojen/harjoitusohjelmien selitykset
Nro Ohjelma Selitys Harjoittelutavoitteet/Asetukset
1 Manuaalinen Harjoitteluohjelma tavoitteella tai
ilman. Kuormitusta voi lisätä tai
vähentää manuaalisesti harjoittelun
aikana.
2 Rolling Vaihteleva vastus harjoittelun aikana. - TIME (aika)
3 Valley Ylä- ja alamäkiä. - TIME (aika)
4 Fat Burn 1 ylä- ja 1 alamäki. - TIME (aika)
5 Ramp Hitaasti kasvava vastus. - TIME (aika)
6 Mountain Vuoriharjoitteluohjelma, jossa
kasvavaa ja heikentyvää vastusta
harjoittelun aikana.
- TIME (aika)
- DISTANCE (välimatka)
- CALORIES (kalorien kulutus)
- DISTANCE (välimatka)
- CALORIES (kalorien kulutus)
- DISTANCE (välimatka)
- CALORIES (kalorien kulutus)
- DISTANCE (välimatka)
- CALORIES (kalorien kulutus)
- DISTANCE (välimatka)
- CALORIES (kalorien kulutus)
- TIME (aika)
- DISTANCE (välimatka)
- CALORIES (kalorien kulutus)
SUOMI
7 Intervals Nopeasti vaihteleva vastus. - TIME (aika)
- DISTANCE (välimatka)
- CALORIES (kalorien kulutus)
55
Page 56

8 Watt Control Valitse itse kuormitus. Jatkuva
kuormitus, mikä tarkoittaa samaa
vastusta nopeudesta riippumatta.
Kuormitus on säädettävissä
(tehdasasetuksena 100 W).
- TIME (aika)
- DISTANCE (välimatka)
- CALORIES (kalorien kulutus)
- WATT (teho)
9 55 % H.R.C. Sykeohjattu ohjelma. Harjoittelu
jatkuu, kunnes saavutat 55 %
maksimisykkeestäsi.
10 75 % H.R.C. Sykeohjattu ohjelma. Harjoittelu
jatkuu, kunnes saavutat 75 %
maksimisykkeestäsi.
11 90 % H.R.C. Sykeohjattu ohjelma. Harjoittelu
jatkuu, kunnes saavutat 90 %
maksimisykkeestäsi.
12 Target H.R Sykeohjattu ohjelma. Harjoittelu
jatkuu, kunnes tavoitesyke
saavutetaan.
13 Users Prole Voit itse tehdä vaihtelevan ohjelman
säätämällä kuormituksen vaiheittain.
- TIME (aika)
- DISTANCE (välimatka)
- CALORIES (kalorien kulutus)
- AGE (ikä)
- TARGET H.R (tavoitesyke)
- TIME (aika)
- DISTANCE (välimatka)
- CALORIES (kalorien kulutus)
- AGE (ikä)
- TARGET H.R (tavoitesyke)
- TIME (aika)
- DISTANCE (välimatka)
- CALORIES (kalorien kulutus)
- AGE (ikä)
- TARGET H.R (tavoitesyke)
- TIME (aika)
- DISTANCE (välimatka)
- CALORIES (kalorien kulutus)
- TARGET H.R (tavoitesyke)
- TIME (aika)
- DISTANCE (välimatka)
- CALORIES (kalorien kulutus)
- COLUMN 1-10 (vaiheet 1 - 10)
SUOMI
14 Body Test Näyttää tulokset: FAT%, BMR, BMI
sekä BODY TYPE (katso taulukko).
15 User Data Omat asetukset. - NAME (nimi): Maks. 8 kirjainta
- HEIGHT (pituus)
- WEIGHT (paino)
- AGE (ikä)
- SEX (sukupuoli)
- HEIGHT (pituus)
- WEIGHT (paino)
- AGE (ikä)
- SEX (sukupuoli)
Harjoittelun aloittaminen ilman tavoitteita
Käytä tätä harjoittelumuotoa, mikäli haluat harjoitella ilman harjoittelutavoitteita.
1. Valitse haluamasi harjoitteluohjelma painamalla [UP] ja [DOWN] (katso taulukko).
2. Aloita harjoittelu ilman harjoittelutavoitteita painamalla [ST/SP].
3. Nyt voit aloittaa harjoittelun. Asetu kuntopyörän päälle kuvan osoittamalla tavalla.
56
Page 57

Omien asetusten asettaminen
1. Valitse ohjelma 15 (User Data) painikkeilla [UP] tai [DOWN], vahvista painamalla [ENTER].
2. Muuta asetusta painikkeilla [UP] tai [DOWN] ja siirry seuraavaan asetukseen painamalla [ENTER].
3. Toista kunnes olet tehnyt kaikki asetukset.
Harjoittelun aloittaminen ja harjoittelutavoitteen asettaminen
1. Valitse haluamasi harjoitteluohjelma painamalla [UP] ja [DOWN] (katso taulukko). Vahvista painamalla
[ENTER].
2. Valitse haluamasi harjoittelutavoite/asetus painamalla [ENTER]
3. Muuta asetusta painikkeilla [UP] tai [DOWN] ja siirry seuraavaan asetukseen painamalla [ENTER].
4. Toista kunnes olet tehnyt kaikki asetukset.
5. Kun olet tehnyt asetukset, aloita harjoittelu painamalla [ST/SP].
6. Nyt voit aloittaa harjoittelun. Asetu kuntopyörän päälle kuvan osoittamalla tavalla.
Esimerkki:
Intervalliharjoittelu, 15 minuuttia:
1. Valitse ohjelma 7 (Intervals) [UP] ja [DOWN]-painikkeilla.
2. Vahvista painamalla [ENTER], näytöllä lukee ”TIME”.
3. Aseta aika (15 minuuttia) [UP] ja [DOWN]-painikkeilla.
4. Aloita harjoittelu painamalla [ST/SP], jäljellä oleva aika näkyy näytöllä.
5. Kun valittu aika on kulunut loppuun, laite ilmoittaa siitä äänimerkillä.
.
6.3 Sykkeen mittaaminen
- Aseta kädet ohjaintangon sykeantureihin. Pidä kiinni molemmista antureista saadaksesi mahdollisimman
tarkan tuloksen. Sykkeesi näkyy hetken kuluttua.
- Kun harjoitteluohjelman aikana näytölle tulee teksti ”HOLD SENSOR”, aseta kädet sykeantureihin.
SUOMI
Syke mitataan magneettisesti. Mikäli mitattu syke eroaa todellisesta sykkeestä, säädetään se todellisen
sykkeen mukaan.
Jos syke on matalampi kuin asetettu sykearvo, kuormitus nousee. Jos syke on korkeampi kuin asetettu
sykearvo, kuormitus laskee.
Jos kuormitusta on laskettu niin paljon kuin mahdollista ja syke on edelleen asetettua sykearvoa
korkeampi, alkaa näyttö vilkkua ilmoittaakseen, että sinun kannattaa hidastaa.
Huom.! Toimintoa voi käyttää vain, jos tietokone pystyy mittaamaan sykettä keskeytyksettä.
6.4 Kehon rasvapitoisuuden mittaaminen – Body test (ohjelma 14)
1. Aloita ohjelma 14 (Body test)
2. Kun näytöllä ilmestyy teksti ”HOLD SENSOR”, aseta kädet ohjain
tangon sykeantureihin. Pidä kiinni molemmista antureista saadaksesi mahdollisimman tarkan tuloksen. Jos tietokone ei rekisteröi
sykettä, lukee näytöllä hetken jälkeen ”ERROR”.
3. Laite näyttää tulokset: FAT%, BMR, BMI sekä BODY TYPE (katso
taulukko). Valitse tulos, jota haluat katsella painamalla [ENTER].
Huom.!
- Tietokoneen osoittama tulos on vain harjoittelukäyttöön, ei lääketieteellisen käyttöön!
Taulukko FAT%
1 5 % - 14 %
2 15 % - 24 %
3 25 % - 29 %
4 30 % - 39 %
5 40 % - 50 %
57
Page 58

6.5 Fitness-testi (Pulse Recovery)
Testi on henkilökohtainen ja sitä käytetään sykkeen mittaamiseen harjoitteluohjelman jälkeen.
1. Paina harjoitteluohjelman jälkeen kerran [PULSE RECOVERY].
2. Pidä molemmat kädet sykeantureilla ja polje.
3. Laite laskee ajan 60 sekunnista nollaan.
4. Kun testi on loppu, tulos näkyy näytöllä:
F1,0 Erinomainen
F2,0 Hyvä
F3,0 Keskitasoa
F4,0 Alle keskitason
F5,0 Huono
F6,0 Erittäin huono
7. Harjoitusohjeet
On monta asiaa, jotka sinun täytyy ottaa huomioon, kun suunnittelet harjoitusohjelmaasi. Jos olet ollut
kauan harrastamatta liikuntaa tai jos sinulla on sairaus, joka voi pahentua fyysisen harjoittelun seurauksena,
kannattaa keskustella lääkärin kanssa ennen harjoittelun aloittamista.
Intensiteetti
• Intensiteetin valitsemalla voit saavuttaa parhaan mahdollisen harjoittelutuloksen. Intensiteetti perustuu
sykkeeseen. Maksimisykkeen laskemiseen käytetään usein seuraavaa kaavaa: Maksikimisyke = 220
– ikäsi
• Harjoittelun aikana tulisi sykkeen olla 60–85 % maksimisykkeestä (ks. Syketaulukko käyttöohjeen
lopussa).
• Ensimmäisten viikkojen aikana harjoittelusykkeen tulee olla noin 60 % maksimisykkeestäsi.
• Muutaman viikon harjoittelun jälkeen voi harjoittelusyke olla jo lähempänä 85 %:a maksimisykkeestäsi.
Rasvanpoltto
Elimistö alkaa polttaa rasvaa kun syke on 60 % maksimisykkeestä. Eniten rasvaa palaa sykkeen ollessa 60–
SUOMI
70 % maksimisykkeestä. Parhaimman tuloksen saat, jos harjoittelet 30 minuutin ajan kolme kertaa viikossa.
Esimerkki:
Olet 52 vuotta ja alat harjoitella polttaaksesi rasvaa.
Maksimisykkeesi on 220 – 52 = 168 lyöntiä/min.
Alin harjoittelusyke = 168 x 0,6 = 101 lyöntiä/minuutti
Korkein harjoittelusyke = 168 x 0,7 = 117 lyöntiä/minuutti
Kun harjoittelusykkeesi on 101–117, poltat rasvaa parhaalla mahdollisella tavalla.
Harjoitteluvinkkejä
Lämmittely
Lämmittele 5–10 minuuttia ennen harjoittelun aloittamista. Voit esim. venytellä tai pyöräillä kevyellä vastuksella.
Harjoittelun määrä
Harjoittelusyke 60–85 % maksimisykkeestä on sopiva harjoitteluun. Voit laskea harjoittelun pituuden
seuraavan taulukon mukaan:
• Harjoittelet päivittäin = n. 10 minuuttia joka kerta.
• Harjoittelet 2–3 kertaa viikossa = n. 20 minuuttia joka kerta.
• Harjoittelet 1–2 kertaa viikossa = n. 60 minuuttia joka kerta.
Harjoittelun jälkeen:
Anna lihasten jäähtyä harjoittelun jälkeen. Vähennä vauhtia ja vastusta viimeisten minuuttien ajaksi.
Venyttele lihaksia hetki harjoittelun jälkeen, niin ehkäiset lihasten jäykistymistä.
58
Page 59

Tie menestykseen:
• Harjoittelu antaa tuloksia jo lyhyen ajan jälkeen. Huomaat tämän, kun harjoittelusykkeesi laskee.
• Yritä harjoitella säännöllisesti. Harjoittelusuunnitelman noudattaminen on helpompaa, jos harjoittelet aina
samaan aikaan päivästä.
• Aloita harjoittelu varovaisesti. Lisää harjoittelua sitä mukaa kun kuntosi kohenee.
• Onnea terveellisemmän elämän aloittamiseen!
8. Säädä kuntopyörä sinulle parhaiten sopivaksi ennen harjoittelun
aloittamista.
Kohta 1 Poljinten remmit ja satulan korkeus
Säädä ensin poljinten remmit siten, että ne sopivat hyvin jalalle. Säädä satulan
korkeus: Kun toinen poljin on alimmassa mahdollisessa asennossa, tulee
samanpuoleisen jalan polven olla hieman koukussa. Säädä satulan korkeus näin:
1. Ruuvaa säätönuppi (16) ulos.
2. Vedä satulatanko (32) ylös oikealle korkeudelle.
3. Ruuvaa säätönuppi (16) siihen reikään, joka on lähimpänä satulatangon
korkeutta.
4. Varoitus! Älä nosta satulatankoa ”MAX”-merkintää korkeammalle.
Kohta 2 Säädä ohjaimet
Ohjaimet on mahdollista säätää useisiin eri asentoihin. Ks. kuvat. Kokeile eri asentoja, kunnes löydät sinulle
sopivimman.
Säädä ohjaimet näin:
1. Ruuvaa T-kahva (5) ulos.
2. Taita ohjaimet (4) sopivaan asentoon.
3. Ruuvaa T-kahva (5) takaisin.
Huom.! T-kahvaa (5) ei voi kiinnittää, jos siihen ei ole asennettu holkkia (5A).
Huom.! Polje polkimilla ainoastaan eteenpäin harjoittelun aikana. Magneettinen vastus toimii vain, kun poljet
eteenpäin (ks. Kuva).
SUOMI
59
Page 60

9. Kokoonpano
SUOMI
11
60
Page 61

Osien nimitykset:
As. Nimike
1 Tietokone
2 Kahvat, päätytulpat (ohjaimiin)
3 Sykeanturit ja johto
4 Ohjaimet
5 T-kahva
5A T-kahvan holkki
6L Vasen kuori
6R Oikea kuori
7 Ohjaustanko
9 Datakaapeli (ylempi)
10 Datakaapeli (alempi)
11 Pultti ja aluslevy ohjaustankoon
12 Pääosa
13 Ruuvit ja mutterit (lattiatukiin)
14 Etumainen lattiatuki
15 Kuljetuspyörät
16 Säätönuppi
17 Ruuvisarja (sivukuoriin)
18 Polkimet (L = vasen, R = oikea)
19 Sivukuoret (vasen, oikea)
20 Ruuvisarja (sivukuoriin)
21L Polkimen varsi, vasen
21R Polkimen varsi, oikea
22 Kuljetuspyörät (sarja)
23 Taaempi lattiatuki
24 Säädettävä jalka
25 Vauhtipyörä ja magneettijarru
26 Käyttöhihna
29A Laakerit (kampeen)
29C Aluslaatta (kampeen)
29D Lukitusrengas (kampeen)
30 Kampi
31 Holkki (satulatankoon)
32 Satulatanko
32A Satulan horisontaalinen säädin
33 Satula
33B Säätönuppi (satulan lukitusnuppi)
34 Tunnistin
35 Kuusiokolopultti (polkimen varteen)
36 Peitelevy (polkimen varteen)
37 Ruuvisarja (kuoreen)
38 Moottori
39 Muuntaja
40 Kupu
SUOMI
61
Page 62

10. Syketaulukko
210
205
200
195
190
185
180
175
170
165
160
155
150
145
Syke
Pulse
140
135
130
125
120
115
SUOMI
110
105
100
95
90
85
200
170
140
120
195
165.75
136.5
117
190
161.5
133
114
185
157.25
129.5
111
180
153
126
108
175
148.75
122.5
105
170
165
160
155
150
144.5
140.25
136
131.75
127.5
119
115.5
112
108.5
105
102
99
96
93
90
Max.
85%
70%
60%
145
123.25
101.5
87
20 25 30 35 40 45 50 55 60 65 70 75 80
Age
Ikä
Pidä huolta ympäristöstä
Lajittele ja kierrätä jätteet. Älä heitä niitä sekajätteisiin. Kaikki koneet, elektroniset komponentit ja
pakkausmateriaali on lajiteltava paikallisten ympäristösääntöjen mukaisesti.
62
Page 63

Page 64

SVERIGE
KUNDTJÄNST Tel: 0247/445 00
Fax: 0247/445 09
E-post: kundtjanst@clasohlson.se
INTERNET www.clasohlson.se
BREV Clas Ohlson AB, 793 85 INSJÖN
NORGE
KUNDESENTER Tlf.: 23 21 40 00
Faks: 23 21 40 80
E-post: kundesenter@clasohlson.no
INTERNETT www.clasohlson.no
POST Clas Ohlson AS, Postboks 485 Sentrum, 0105 OSLO
SUOMI
ASIAKASPALVELU Puh: 020 111 2222
Faksi: 020 111 2221
Sähköposti: info@clasohlson.fi
INTERNET www.clasohlson.fi
OSOITE Clas Ohlson Oy, Yrjönkatu 23 A, 00100 HELSINKI
GREAT BRITAIN
For consumer contact, please visit
www.clasohlson.co.uk and click on
customer service.
INTERNET www.clasohlson.co.uk
 Loading...