

Page 1
English
Precision Mitre Saw
Art.no 40-8349
Please read the entire instruction manual before use and save it
for future reference. We reserve the right for any errors in text or
images and for making any necessary technical changes to this
document. If you should have any questions concerning technical problems please contact our Customer Services.
Description
• Diecast stove-enamelled aluminium saw table with
graduated angle scale. Can be set to 11 fixed angle settings
simply by lifting the locking lever on the front.
• Plastic feet with 4 rubber anti-slip soles.
• Saw frame capable of holding 600 mm blades,
interchangeable for different materials.
• Four guide rods for precision sawing.
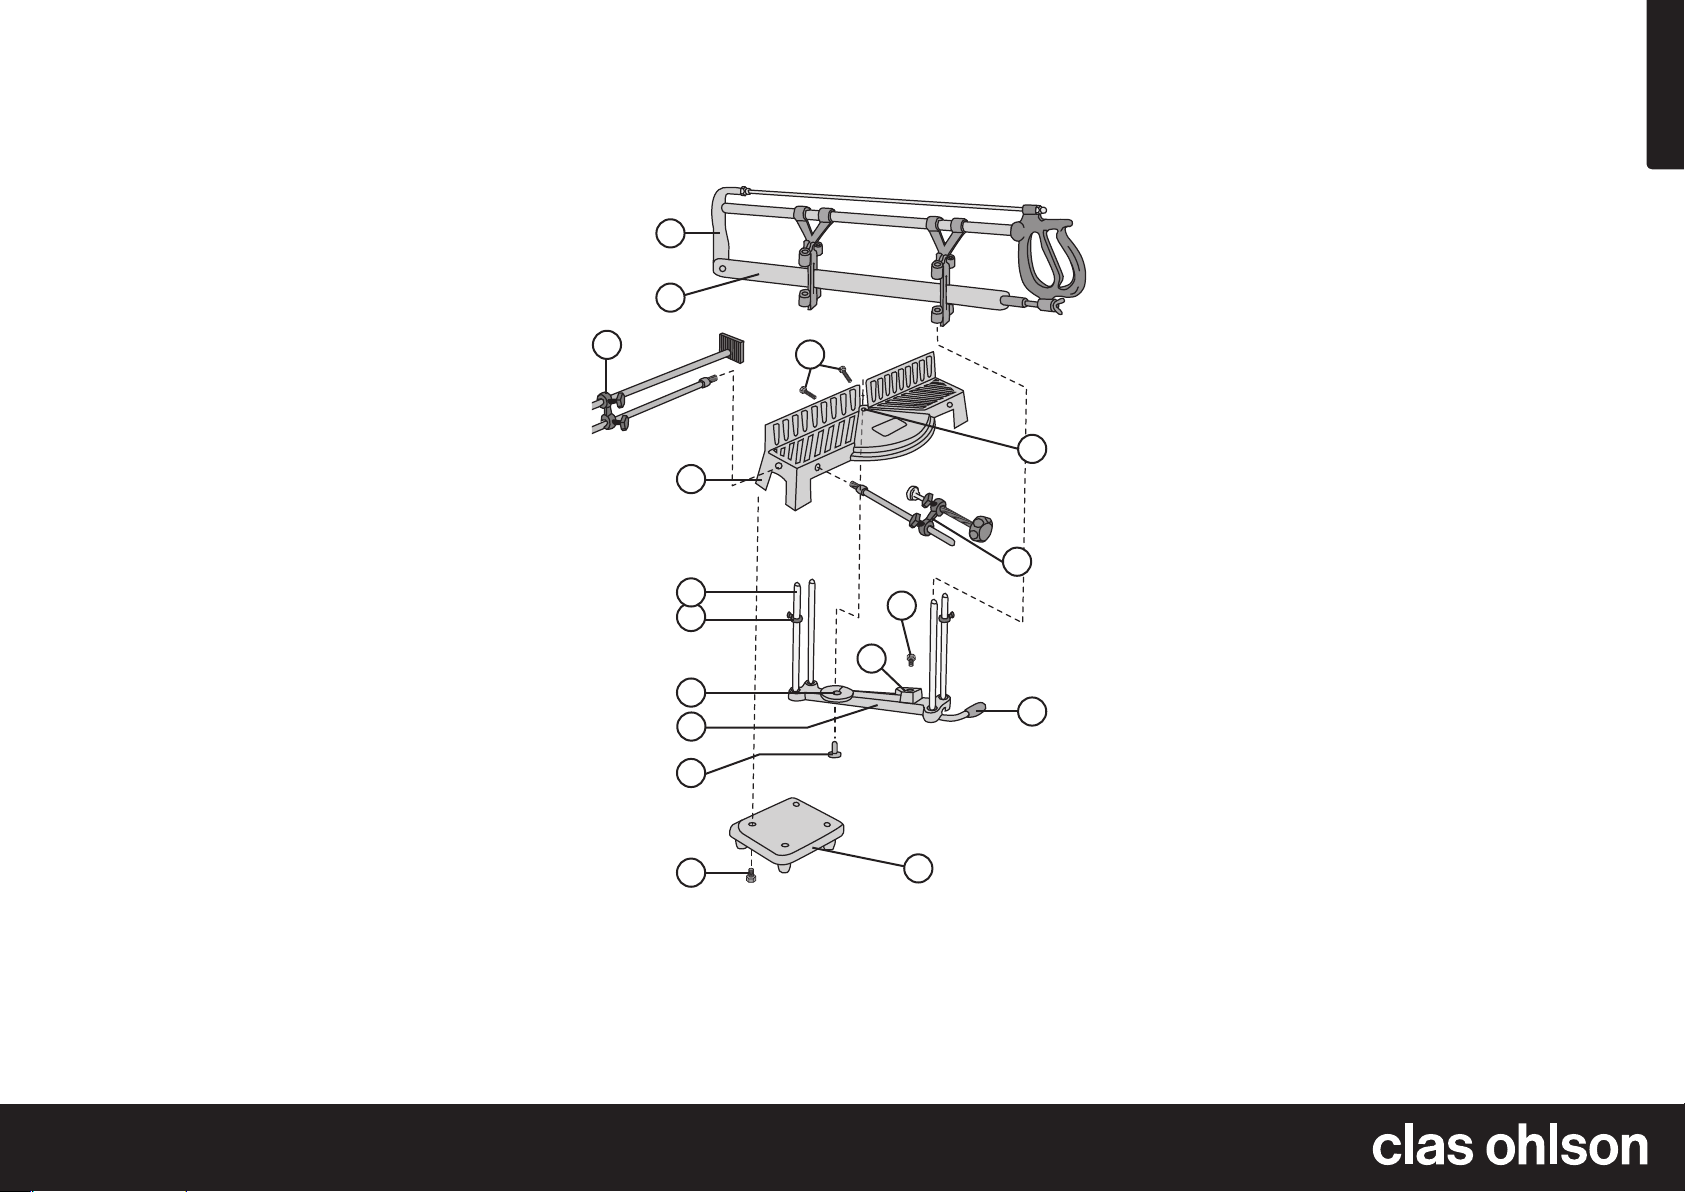
1. Saw frame
2. Saw blade
3. Length stop
4. Allen screws
5. Saw table
6. Guide rod
7. Depth stop
8. Angle adjustment arm pivot hole
9. Angle adjustment arm
10. Pin bolt
11. Screw
12. Plastic feet (4 psc)
13. Locking lever
14. Index mark
15. Material clamp
16. Hole in saw table
Assembly
1. Attach the angle adjustment arm (9) to the saw table by
passing the pin bolt (10) through the angle adjustment arm
pivot hole (8) and into the hole in the saw table (16). Secure
using the Allen screws (4). Only tighten the screws enough to
1
2
3
4
16
fasten the arm to the base while still allowing it to swing freely.
2. Attach the index mark (14) to the angle adjustment arm (9)
using a screw (4).
3. Fasten the plastic feet to the saw table (5) using 4 screws (11).
4. Attach the material clamp (15) to the saw table, locking it
with the nut.
5. Attach the length stop (3) to the saw table, locking it with the nut.
6. Remove the packaging from the guide rods (6); slide
the depth stops (7) onto the guide rods - one on the front
and one on the diagonally opposed rear guide rod.
Pass the saw frame (1) over the guide rods (6).
7. The saw is now ready for use.
5
Use
1. Place the assembled saw onto a suitable working surface.
2. Set the desired mitre angle by lifting the locking lever (13)
and aligning the index mark up with the angle on the scale.
3. Lift the saw up and lay the workpiece material along
the saw table (5) (if several workpieces of the same length
are to be cut, the length stop (3) should be used).
Hold the workpiece against the saw table fence using
the material clamp (15).
4. Saw using light, smooth strokes and let the guide rods and
saw blade do their work without exerting undue force.
10
15
6
7
4
14
8
9
13
Disposal
Follow local ordinances when disposing of this product.
If you are unsure about how to dispose of this product
11
12
contact your municipality.
GREAT BRITAIN • customer service
Specifications
Sawing height 110 mm
Sawing width at 90°: 160 mm,
at 45°: 100 mm
Saw blades 600 × 45 mm
Sawing table, length 400 mm
tel: 08545 300 9799 e-mail: customerservice@clasohlson.co.uk internet: www.clasohlson.com/uk
Ver. 20130827
Page 2

Svenska
Geringssåg
Art.nr 40-8349
Läs igenom hela bruksanvisningen före användning och spara
den sedan för framtida bruk. Vi reserverar oss för ev. text- och
bildfel samt ändringar av tekniska data. Vid tekniska problem
eller andra frågor, kontakta vår kundtjänst.
Beskrivning
• Sågbord av pressgjuten brännlackerad aluminium med
gradskala. 11 fasta vinklar som ställs in genom att man
lyfter låsspaken och vrider till önskad vinkel.
• Plastfötter med 4 glidskydd av gummi.
• Sågbåge som passar till 600 mm blad för sågning
av olika material.
• 4 styrpinnar för exakt och stadig funktion.
1. Sågbåge
2. Sågblad
3. Längdstopp
4. Insexskruvar
5. Sågbord
6. Styrpinne
7. Djupstopp
8. Vridarmens hål
9. Vridarm
10. Pinnbult
11. Skruv
12. Plastfötter (4 st)
13. Låsspak
14. Indexmärke
15. Tving
16. Hål
Montering
1. Montera vridarmen (9) genom att sätta en pinnbult (10)
i vridarmens hål (8) och passa ihop den med bordet genom
hålet (16). Fixera med insexskruvarna (4). Dra inte åt
skruvarna hårdare än att vridarmen lätt går att vrida.
1
2
3
4
16
5
15
6
7
4
14
8
9
13
10
11
12
2. Montera indexmärke (14) på vridarmen (9) med skruv (4).
3. Montera plastfötterna på sågbordet (5) med 4 skruvar (11).
4. Skruva fast tvingen (15) på sågbordet (5) och lås den
med muttern.
5. Skruva fast längdstoppet (3) på sågbordet (5) och lås det
med muttern.
6. Ta bort skydden på styrpinnarna (6), montera
djupstoppen (7) diagonalt, en på en främre styrpinne och
en på en bakre styrpinne. Sätt sågbågen (1) på styrpinnarna (6).
7. Sågen är nu klar för användning.
Användning
1. Sätt fast sågen på lämplig arbetsbänk.
2. Ställ in sågen genom att lyfta låsspaken (13) och vrida
sågen till önskad vinkel enligt skalan.
3. Sågdjupet ställs in genom att de båda djupstoppen (7) justeras.
4. Lyft sågen och lägg listen på sågbordet (5) (om flera
lika långa bitar skall sågas ställ in längdstoppet (3)).
Spänn listen mot anhållet med tvingen (15).
5. Såga med lätta rörelser. Låt bladstyrningarna och sågbladet
göra sitt arbete utan tryck.
Avfallshantering
När du ska göra dig av med produkten ska detta ske enligt
lokala föreskrifter. Är du osäker på hur du ska gå tillväga,
kontakta din kommun.
Specifikationer
Såghöjd 110 mm
Sågbredd vid 90°: 160 mm
vid 45°: 100 mm
Sågblad 600 × 45 mm
Sågbord, längd 400 mm
Ver. 20130827
SVERIGE • kundtjänst tel. 0247/445 00 fax 0247/445 09 e-post kundservice@clasohlson.se internet www.clasohlson.se
Page 3

Norsk
Gjæresag
Art.nr. 40-8349
Les brukerveiledningen grundig før produktet tas i bruk, og ta
vare på den for framtidig bruk. Vi reserverer oss mot ev. tekstog bildefeil, samt forandringer av tekniske data. Ved tekniske
problemer eller spørsmål, ta kontakt med vårt kundesenter.
Beskrivelse
• Sagbord av presstøpt brennlakkert aluminium med
gradeskala. 11 faste vinkler, som stilles inn ved at man løfter
låsespaken og dreier til ønsket vinkel.
• Plastføtter med 4 glidebeskyttelser av gummi.
• Sagbue, beregnet for sagblad på 600 mm for saging av
forskjellige materialer.
• Fire styrepinner for nøyaktig og stødig funksjon.
1. Sagbue
2. Sagblad
3. Lengdestopp
4. Inseks-skrue
5. Sagbord
6. Styrepinner
7. Dybdestopp
8. Vinkelarmens hull
9. Vinkelarmen
10. Pinnebolt
11. Skruer
12. Plastføtter (4 stk)
13. Låsespak
14. Indexmerke
15. Tvingen
16. Hull i bordet
Montering
1. Monter vinkelarmen (9) ved å sette pinnebolten (10)
i vinkelarmens hull (18) og monter armen sammen med
bordet gjennom hull (16) i bordet. Fest med inseks-skruene
(4). Ikke trekk til skruene så hardt at det blir vanskelig å dreie
1
2
3
4
på armen.
2. Monter indexmerket (14) på vinkelarmen (9) med skrue (4).
3. Monter plastføttene på sagbordet (5) med 4 skruer (11).
4. Skru tvingen (15) fast på bordet og lås den med mutteren.
5. Skru fast lengdestoppen (3) på sagbordet (5) og lås den
med mutteren.
6. Fjern beskyttelsen på styrepinnene (6), monter
dybdestoppen (7) (diagonalt, en på den fremre og en på den
bakre styrepinnen). Sett sagbuen (1) på styrepinnene (6).
7. Sagen er nå klar til bruk.
16
5
15
6
7
4
14
8
9
13
Bruk
1. Fest først sagen på en passende arbeidsbenk/bord.
2. Still den deretter i riktig posisjon ved å løfte sperren (13) og
drei vinkelarmen (9) i ønsket vinkel (se skalaen).
3. Sagdybde stilles inn ved at høyden på begge
dybdestoppen (7) justeres.
4. Løft sagbuen (1/2) og legg listen, som skal kappes, på
sagbordet (5). (Hvis du skal kappe flere like lange emner kan
du stille inn lengdestoppen (3)). Spenn listen mot anholdet
med tvingen (15).
5. Sag med lette bevegelser. La sagbladet gjøre jobben uten press.
Avfallshåndtering
10
11
12
Når du skal kvitte deg med produktet, skal dette skje i henhold
til lokale forskrifter. Er du usikker på hvordan du går fram, ta
kontakt med lokale myndigheter.
Specifikasjoner
Saghøyde 110 mm
Sagbredde ved 90°: 160 mm
ved 45°: 100 mm
Sagblad 600 × 45 mm
Sagbord, lengde 400 mm
Ver. 20130827
NORGE • kundesenter tel. 23 21 40 00 fax 23 21 40 80 e-post kundesenter@clasohlson.no internett www.clasohlson.no
Page 4

Suomi
Jiirisaha
Tuotenro 40-8349
Lue käyttöohjeet ennen tuotteen käyttöönottoa ja säilytä ne
tulevaa tarvetta varten. Pidätämme oikeuden teknisten tietojen
muutoksiin. Emme vastaa mahdollisista teksti- tai kuvavirheistä.
Jos laitteeseen tulee teknisiä ongelmia, ota yhteys myymälään
tai asiakaspalveluun.
Tuotekuvaus
• Sahauspöytä painevalettua polttolakattua alumiinia,
pöydässä asteasteikko. 11 kiinteätä kulmaa, jotka säädetään
nostamalla lukitussalpaa ja kääntämällä haluttuun kulmaan.
• Muovijalat, joissa 4 kumista liukuestoa.
• Sahan kaari, soveltuu 600 mm:n terille erilaisten
materiaalien sahaukseen.
• Neljä ohjaussauvaa varmistavat tarkan ja tasapainoisen
toiminnan.
1. Sahan kaari
2. Sahanterä
3. Pituusrajoitin
4. Kuusiokoloruuvit
5. Sahauspöytä
6. Ohjaussauvat
7. Syvyysrajoitin
8. Vipuvarren reikä
9. Vipuvarsi
10. Vaarnapultti
11. Ruuvi
12. Muovijalat (4 kpl)
13. Lukitussalpa
14. Asteikkomerkki
15. Puristin
16. Reikä
Asennus
1. Asenna vipuvarsi (9) asettamalla vaarnapultti (10) varren
reikään (8) ja sovittamalla se pöydässä olevaan reikään (16).
Kiinnitä kuusiokoloruuveilla (4). Älä kiristä ruuveja liian
tiukalle, vipuvartta on pystyttävä kääntämään kevyesti.
1
2
3
4
2. Asenna asteikkomerkki (14) vipuvarteen (9) ruuvilla (4).
3. Asenna muovijalat sahauspöytään (5) neljällä ruuvilla (11).
4. Ruuvaa puristin (15) sahauspöytään (5) ja kiinnitä mutterilla.
5. Ruuvaa pituusrajoitin (3) sahauspöytään (5) ja kiinnitä mutterilla.
6. Poista ohjaussauvojen (6) suojat ja asenna syvyysrajoittimet (7)
(kulmittain, yksi etummaiseen ja toinen takimmaiseen
ohjaussauvaan). Aseta sahan kaari (1) ohjaussauvojen (6) päälle.
7. Saha on nyt käyttövalmis.
Käyttö
10
16
5
15
6
7
4
14
8
9
13
1. Kiinnitä saha sopivaan työtasoon.
2. Säädä saha nostamalla lukitussalpaa (13) ja kääntämällä
saha haluttuun sahauskulmaan (katso asteikosta).
3. Sahaussyvyys asetetaan säätämällä molempia
syvyysrajoittimia (7).
4. Nosta sahaa ja aseta kappale sahauspöydälle (5).
Mikäli sahaat useita samanpituisia kappaleita, kannattaa
käyttää pituusrajoitinta (3). Purista kappale puristimella (15)
paikalleen.
5. Sahaa kevein liikkein antaen terän ohjaimien ja sahanterän
hoitaa tehtävänsä ilman ylimääräistä painetta.
Kierrätys
Kierrätä tuote asianmukaisesti, kun poistat sen käytöstä.
Tarkempia kierrätysohjeita saat kuntasi jäteneuvonnasta.
Tekniset tiedot
11
12
Sahauskorkeus 110 mm
Sahausleveys 90°: 160 mm
45°: 100 mm
Sahanterä 600 × 45 mm
Sahauspöytä, pituus 400 mm
Ver. 20130827
SUOMI • asiakaspalvelu puh. 020 111 2222 sähköposti asiakaspalvelu@clasohlson.fi kotisivu www.clasohlson.fi
Page 5

Deutsch
Gehrungssäge
Art.Nr. 40-8349
Vor Inbetriebnahme die komplette Bedienungsanleitung
durchlesen und aufbewahren. Irrtümer, Abweichungen und
Änderungen behalten wir uns vor. Bei technischen Problemen
oder anderen Fragen freut sich unser Kundenservice über
eine Kontaktaufnahme.
Beschreibung
• Sägetisch aus brandlackiertem Aluminium-Druckguss mit
Gradskala. 11 feste Winkel, die sich durch Anheben des
Feststellhebels und Drehen in den gewünschten Winkel
einstellen lassen.
• 4 rutschfeste Gummifüße.
• Sägebogen passend zum 600 mm Blatt zum Sägen
unterschiedlicher Materialien.
• 4 Führungsstifte für exaktes und gleichmäßiges Arbeiten.
1. Sägebogen
2. Sägeblatt
3. Längenanschlag
4. Innensechskantschrauben
5. Sägetisch
6. Führungsstift
7. Tiefenanschlag
8. Schwenkarm Bohrung
9. Schwenkarm
10. Stiftschraube
11. Schraube
12. Gummifüße 4 St.
13. Feststellhebel
14. Messmarke
15. Zwinge
16. Loch
Montage
1. Den Schwenkarm (9) montieren, indem eine Stiftschraube (10)
in die Bohrung des Schwenkarms (8) gesteckt wird und mit
der Bohrung (16) im Tisch in Übereinstimmung gebracht wird.
Mit den Innensechskantschrauben (4) fixieren. Die Schrauben
nur so fest anziehen, dass sich der Schwenkarm noch leicht
bewegen lässt.
1
2
3
5
6
7
8
9
10
11
4
16
15
4
14
13
12
2. Die Messmarke (14) am Schwenkarm (9) mit Schrauben (4)
montieren.
3. Die Gummifüße am Sägetisch (5) mit 4 Schrauben (11)
befestigen.
4. Die Zwinge (15) am Sägetisch (5) festschrauben und mit
der Mutter sichern.
5. Den Längenanschlag (3) am Sägetisch (5) festschrauben
und mit der Mutter sichern.
6. Den Schutz von den Führungsstiften (6) entfernen,
den Tiefenanschlag (7) diagonal montieren: einen an einem
vorderen Führungsstift und einen an einem hinteren Führungsstift. Den Sägebogen (1) auf die Führungsstifte (6) setzen.
7. Die Säge ist nur einsatzbereit.
Bedienung
1. Die Säge auf einer geeigneten Werkbank befestigen.
2. Zum Einstellen den Feststellhebel (13) anheben und die Säge
nach der Skala auf den gewünschten Winkel einstellen.
3. Die Sägetiefe wird durch Einstellen der beiden Tiefenanschläge (7) eingestellt.
4. Die Säge anheben und die Leiste auf den Sägetisch legen (5)
(wenn mehrere längere Werkstücke gesägt werden sollen,
den Längenanschlag (3) einstellen). Die Leiste mit
der Zwinge (15) an den Anschlag spannen.
5. Mit leichten Bewegungen sägen. Die Sägeblattführungen und
das Sägeblatt ihre Arbeit ohne Ausüben von Druck tun lassen.
Hinweise zur Entsorgung
Bitte das Produkt entsprechend den lokalen Bestimmungen
entsorgen. Weitere Informationen sind von der Gemeinde
oder den kommunalen Entsorgungsbetrieben erhältlich.
Technische Daten
Sägehöhe 110 mm
Sägetiefe bei 90°: 160 mm
bei 45°: 100 mm
Sägeblatt 600 × 45 mm
Sägetisch, Länge 400 mm
Ver. 20130827
DEUTSCHLAND • Kundenservice
Unsere Homepage www.clasohlson.de besuchen und auf Kundenservice klicken.
 Loading...