

Page 1
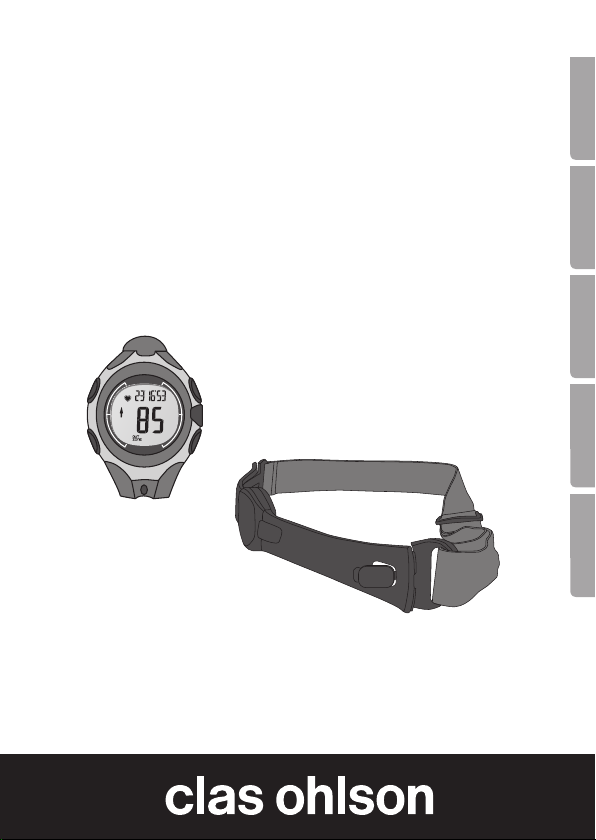
Heart Rate Monitor Watch
with Chest Strap
Pulsklocka med bröstband
Pulsklokke med pulsbelte
Sykemittari ja sykevyö
Pulsuhr mit Brustgurt
Art.no.
31-8539
Ver. 20150324
EnglishSvenskaNorsk
Suomi
Deutsch
Page 2

Page 3

Heart Rate Monitor Watch
with Chest Strap
Art.no 31-8539
Please read the entire instruction manual before use and save it for future reference.
We reserve the right for any errors in text or images and for making any necessary
technical changes to this document. If you should have any questions concerning
technical problems please contact our Customer Services.
Contents
1. Safety .......................................................................... 4
2. Product description .................................................... 4
Button functions ................................................................................... 4
Chest strap ........................................................................................... 5
3. Settings ....................................................................... 5
Setting thetime ................................................................................... 5
Setting thedesired heart rate .............................................................. 6
4. Operation .................................................................... 7
Preparations before training ................................................................ 7
Once you have begun training ............................................................. 7
Displaying your current pulse rate during training ............................. 8
Viewing data from thelatest training session (before saving) ........... 8
Showing saved data............................................................................. 9
5. Alarm setting ............................................................... 9
6. Stopwatch ................................................................. 10
7. Batteries .................................................................... 10
Changing thewatch battery .............................................................. 10
Changing thechest strap battery ...................................................... 11
8. Care and maintenance ............................................. 11
9. Troubleshooting ........................................................ 11
10. Disposal .................................................................... 12
11. Specifications ........................................................... 12
Pulse watch ........................................................................................ 12
Chest strap ......................................................................................... 12
English
3
Page 4

1. Safety
• Before using your heart rate watch, contact your physician or trainer if you
are at all unsure about theamount of physical activity you can engage in.
• Arough max pulse value can be calculated by subtracting your age from 220.
English
Example: If your age is 40, your max allowed pulse rate would be
220 – 40=180.
2. Product description
• Basic functions such as heart rate monitoring, calories burned,
stopwatch, time, date, etc.
• Wireless chest strap.
• CR2032 batteries for thechest strap and watch are included.
Button functions
[ MODE ]
• Toggles between menus:
DATA (heart rate data display),
ALARM (alarm clock), STW (stopwatch),
TIME and HRM (heart rate monitor)
• Advances to thenext setting
[ LIGHT ]
• Activates thebacklight.
• Hold in to open settings sequences in thechosen menu.
• Hold in to save thelatest data and clear previously saved data including
both heart rate data and training times. Note: When the [ LIGHT ] button is
pressed, all previously saved data is cleared and will no longer be able to
be displayed.
• Handy hint: If you want to save your training data for your records, you
will need to manually write this information down before trying to save any
new data.
[ ST/STP ] start/stop
• Increases value in settings
• Pauses thetraining session in HRM mode
[ RESET ]
• Decreases value in settings
• Toggles between sub-menus
• Toggles between lb/kg
• Clears time keeping data in STW mode (stopwatch)
4 5
Adjust/
Light
Mode
Start/
Stop
Reset
Page 5
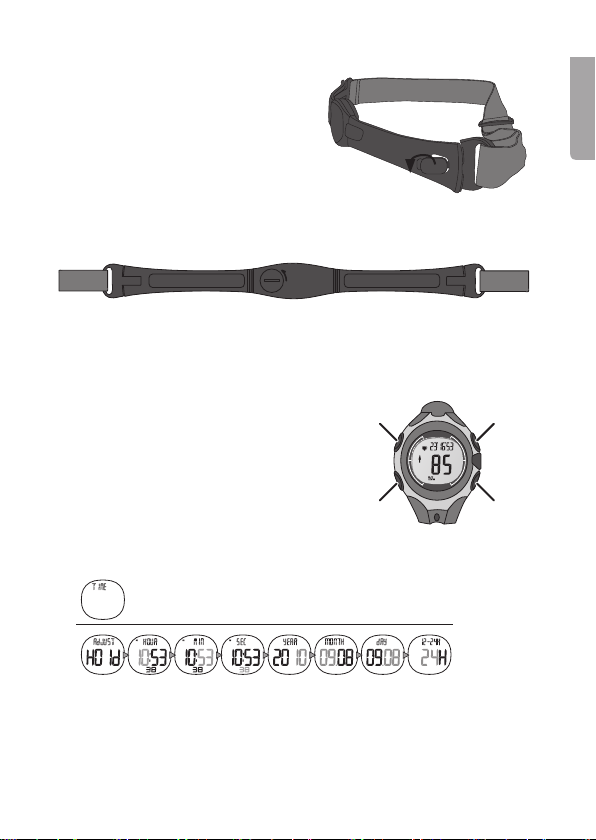
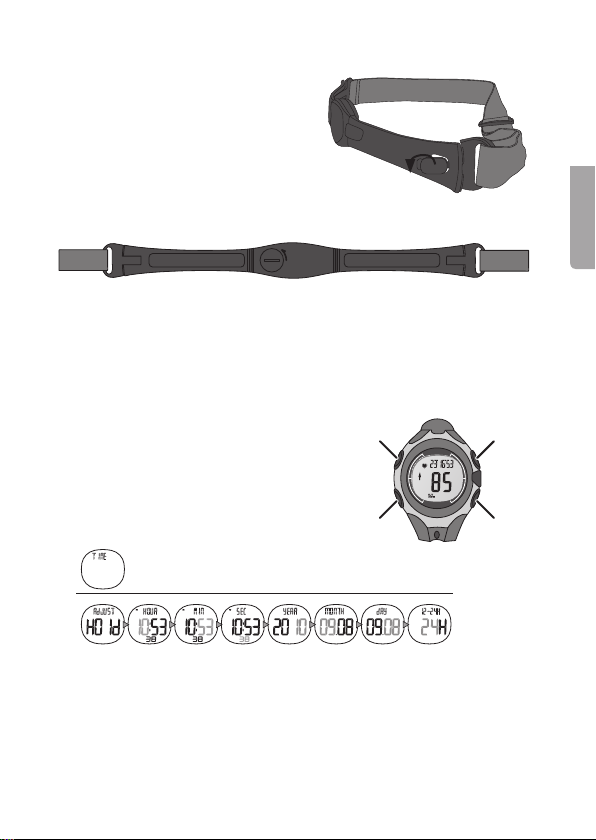
Chest strap
1. Open thechest strap by detaching
therectangular locking tabs from
thestrap.
2. Place thechest strap on your rib
cage under your chest. Re-attach
thetabs to thestrap.
3. Make sure to thestrap is positioned
in thecorrect position, refer to
themarkings on theunderside of thesensor. R (right) and L (left).
Thechest strap must be in direct contact with your skin.
L R
4. Pull thestrap abit away from your chest and moisten thesensor for
thebest possible connection.
3. Settings
Setting thetime
1. Press [ MODE ] repeatedly until “TIME”
appears on thedisplay.
2. Hold in the [ LIGHT ] button for afew seconds
until, “Hold” and “Adjust” begin to flash.
After afew seconds “HOUR” will show and
thehours display will begin flashing.
3. Enter thecorrect hour by pressing the [ ST/STP ] button to increase
thehour value or [ RESET ] to decrease thehour value.
[ LIGHT ] [ ST/STP ]
[ MODE ] [ RESET ]
English
4. Press [ MODE ] to confirm theentered value and advance to thenext setting.
Repeat theabove procedure for setting MIN (minutes), SEC (seconds),
YEAR, MONTH, DAY and 12–24H (for selecting a12 or 24 hour display).
5. Exit settings mode by pressing [ LIGHT ].
Page 6
Setting thedesired heart rate
Before using your heart rate watch, contact your physician or trainer if you are
at all unsure about theamount of physical activity you can engage in.
Arough value for your heart rate can be calculated by subtracting your age from
English
220 (men) or 226 (women). Example: If you are a40 yr old male, your max
allowed pulse rate would be 220 – 40=180.
Selecting thedesired training level
There are 3 different pre-installed training levels to choose from.
• Level 1 (55–70 % of max heart rate)
• Level 2 (70–80 % of max heart rate)
• Level 3 (80–100 % of max heart rate)
Carefully choose themost appropriate level that best fits you.
Setting your personal heart rate zone:
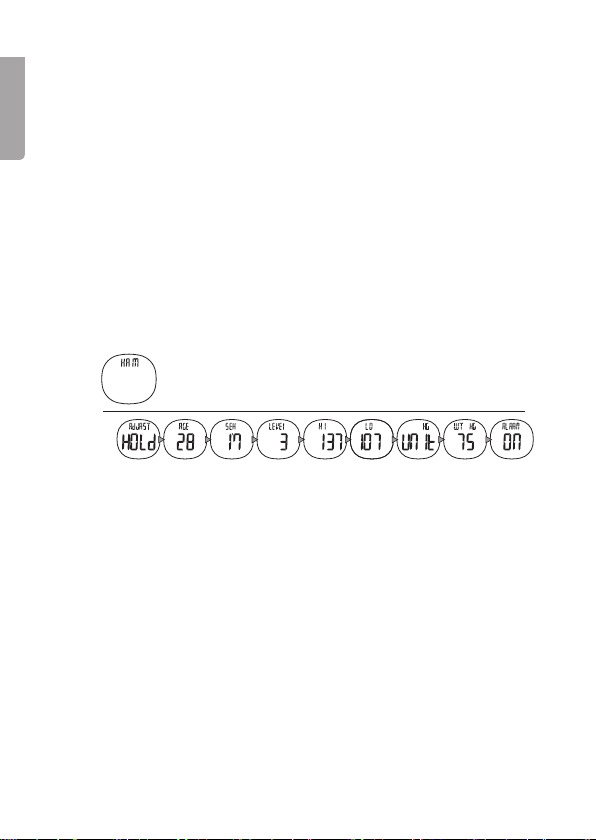
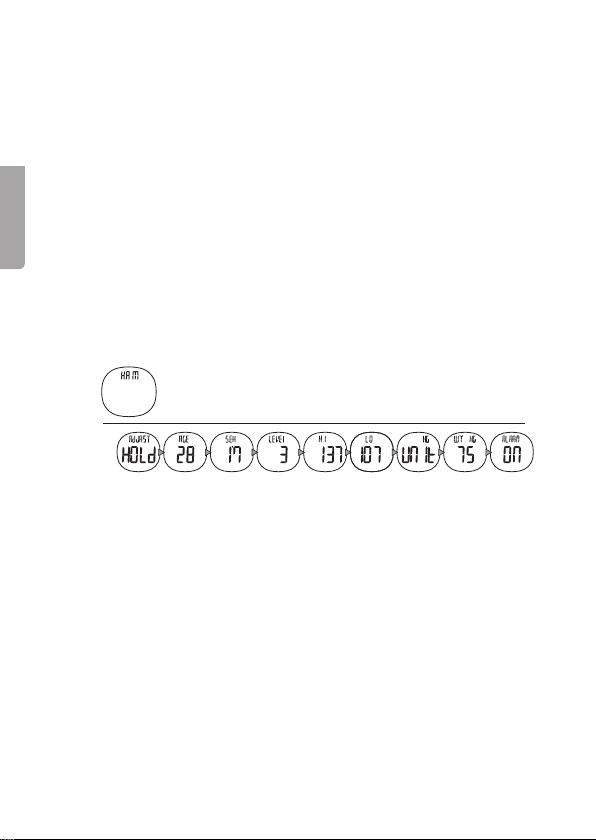
1. Press [ MODE ] repeatedly until “HRM” appears on thedisplay.
2. Hold in the [ LIGHT ] button for afew seconds until “Hold” and “Adjust”
begin to flash. After afew seconds “AGE” will appear. Enter your age
using the [ ST/STP ] (increase value) and [ RESET ] (decrease value)
buttons. Confirm with [ MODE ].
3. Continue using thesame procedure for theentering theremaining settings:
- Sex.
- Level (heart rate level) Select level 1, 2 or 3. Average levels will be suggested automatically for both thelowest (LO) and highest (HI) heart rate.
- HI (highest heart rate based on thechosen level will be shown). Accept
thepreset suggested levels or change it to better fit your personal needs.
- LO (lowest heart rate based on thechosen level will be shown). Accept
thepreset suggested levels or change it to better fit your personal needs.
- UNIT (kg or lb).
- WT (enter thevalue used for your previously entered weight setting).
- ALARM (alerts when your pulse is under or exceeds themin/max
heart rate setting parameters). ON: alarm sounds continuously
whenever themin/max settings are exceeded. OFF: alarm deactivated
regardless if themin/max settings are exceeded.
6 7
Page 7

4. To change theALARM (heart rate alarm) setting, you will have to repeat
steps 1–3 to select your desired setting: ON or OFF.
Example: You enter: 42 yrs > Man > Level 2 > HI (displays 126) > LO (displays 99)
> kg > Alarm ON. Using these settings as reference thealarm will activate
any time your pulse is below 99 or above 126. If you feel these values are
incorrect: Redo thesettings and enter your own personal HI and/or LO settings.
4. Operation
Preparations before training
1. Put on thechest strap according to theprevious instructions.
2. Input your desired level (if you have not already done so).
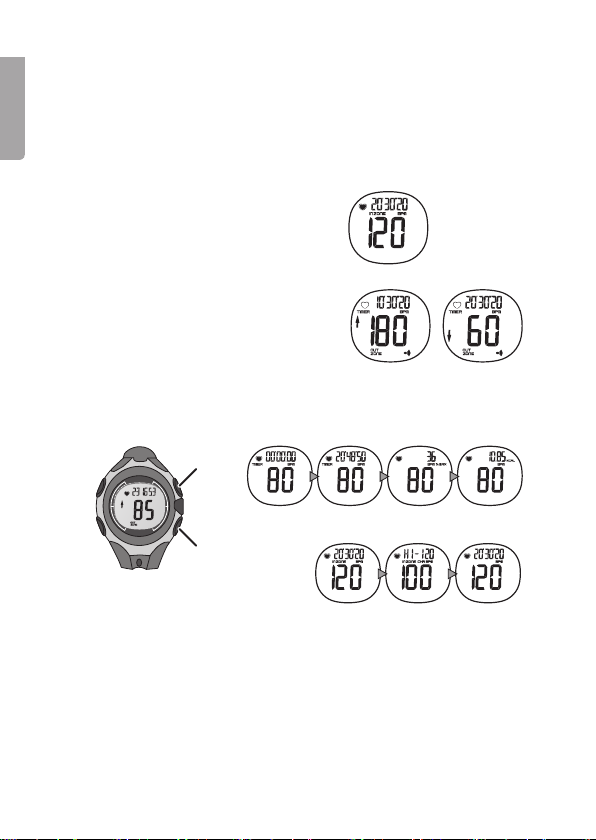
Once you have begun training
3. Press the [ MODE ] button several times until
“HRM” appears on thedisplay.
4. Press the [ ST/STP ] button to establish
aconnection with thechest strap and start
your training routine. Your running exercise
time will be displayed on theupper portion
of thewatch. Current heart rate will also be
displayed and all data will be saved once
you have begun training. Press [ ST/STP ]
again if you want to pause your training.
Your running time will also pause at this point.
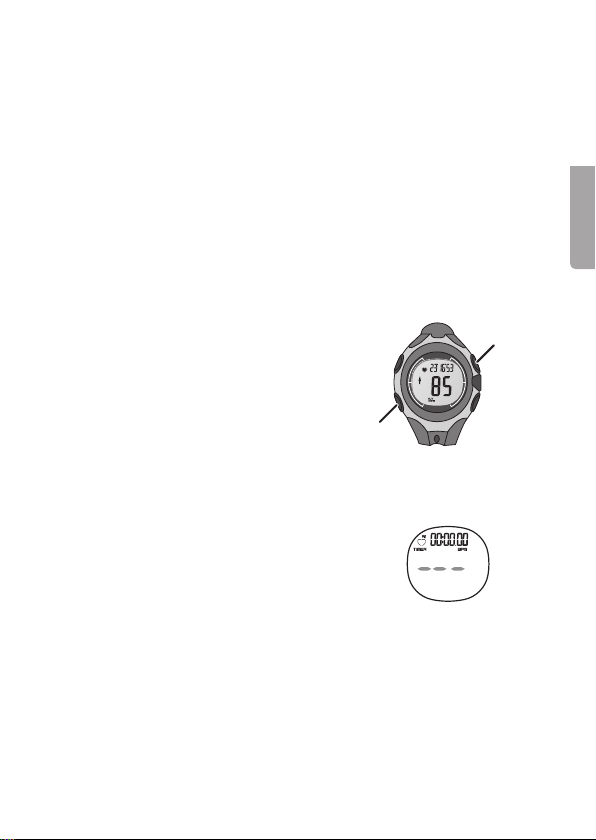
5. Thewatch receives signals from thechest
strap automatically and your current heart
rate will be shown.
- If thewatch flashes showing three dashes,
it indicates that thewatch is trying to
establish contact with your chest strap.
- If contact is not established, thethree
dashes will become static. This could be
caused by thewatch being too far away
from thechest strap. Themax rated
range is 80 cm.
Note: Once thethree dashes become static, decreasing thedistance
between watch and chest strap will not restart thewatch. You must
manually press [ ST/STP ] to start/stop theheart rate monitor again.
[ MODE ]
[ ST/STP ]
English
Page 8
6. Press [ ST/STP ] once you have finished your training session.
7. Clearing and saving data from your current training session: Hold in the
[ LIGHT ] button for afew seconds until “Hold” and “Adjust” begin to flash.
Your data will now be cleared and saved. This procedure must be done in
English
order for any new training session data can be recorded.
Displaying your current pulse rate during training
• Pulse within set pulse level limits
(no arrow shown).
• Pulse outside theset parameters, e.g.
above or below: ↑ (pulse above set
value) or ↓ (pulse below set value).
If thealarm is activated (ON mode),
thealarm will notify you every time your
pulse lies outside of theset values.
Viewing data from thelatest training session
(before saving)
[ ST/STP ]
[ RESET ]
1. Press [ MODE ] repeatedly until “HRM” appears on thedisplay.
2. Press [ RESET ] several times until thedesired information is displayed from
your latest training session. Saved information:
- XX´XX´XX recorded training session time
- BPM % MAX highest pulse, displayed as a % of your max set pulse
- KCAL burned calories
- IN ZONE BPM displays recorded time spent within theset pulse parameters
- HI maximum heart rate
- X:XX.XX current time
8 9
Page 9
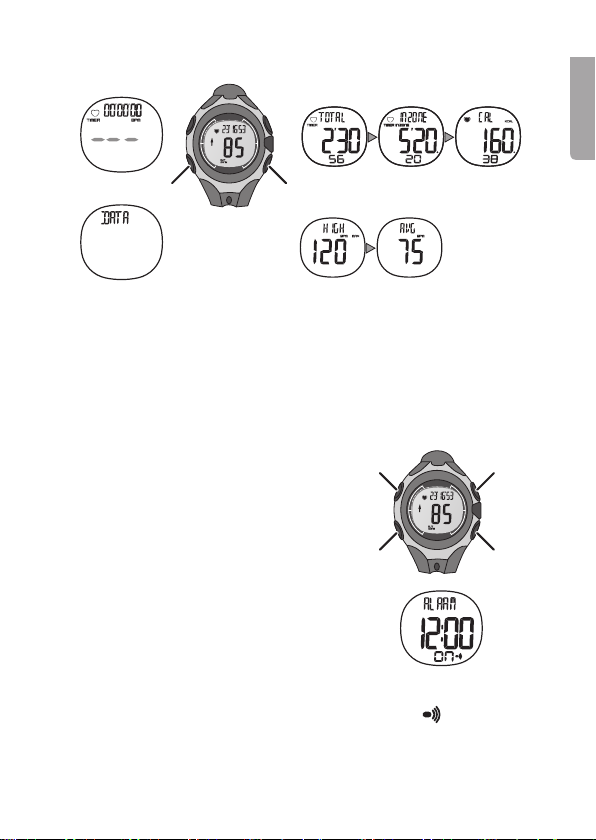
Showing saved data
[ MODE ] [ RESET ]
1. Press [ MODE ] repeatedly until “DATA” appears on thedisplay.
2. Press [ RESET ] several times until thedesired saved information is
displayed from your latest training session.
- TOTAL displays recorded training session time
- INZONE displays recorded time spent within theset pulse parameters
- CAL burned calories
- HIGH maximum heart rate
- AVG average pulse rate
English
5. Alarm setting
1. Press [ MODE ] repeatedly until “ALARM”
appears on thedisplay.
2. Hold in the [ LIGHT ] button for afew seconds
until “Hold” and “Adjust” begin to flash.
After afew seconds “HOUR” will show and
thehours display will begin flashing.
3. Enter thecorrect hour by pressing
the [ ST/STP ] button to increase thehour
value or the [ RESET ] button to decrease
thehour value.
4. Press [ MODE ] to confirm and continue
using thesame procedure for setting
theminutes.
5. Exit settings mode by pressing [ LIGHT ].
6. Turn thealarm on and off by pressing [ ST/STP ]. Alarm icon
when thealarm is activated. “– –” is displayed when thealarm is deactivated.
[ LIGHT ] [ ST/STP ]
[ MODE ] [ RESET ]
is shown
Page 10
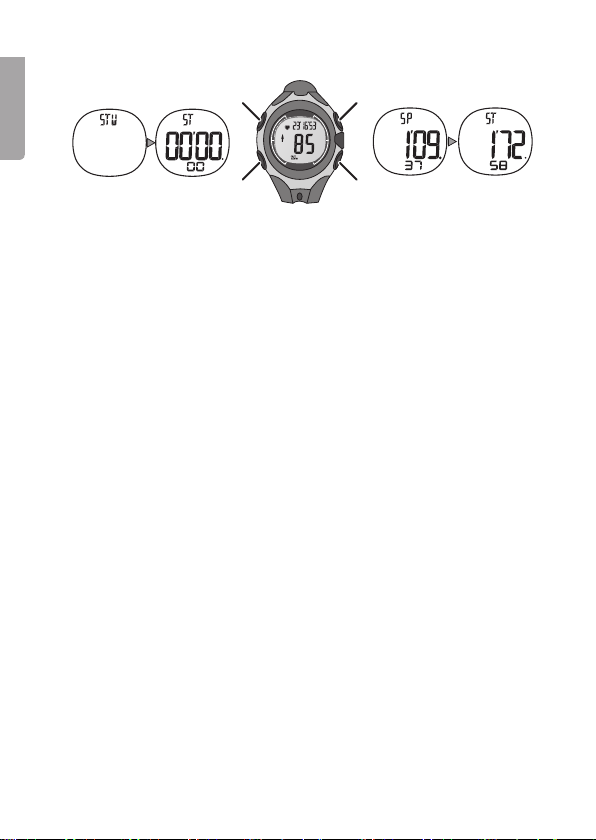
6. Stopwatch
[ LIGHT ] [ ST/STP ]
English
[ MODE ] [ RESET ]
1. Press [ MODE ] repeatedly until “STW” appears on thedisplay.
2. Press [ ST/STP ] to start thestopwatch. “ST” will appear when thestopwatch
is actived.
3. Press [ RESET ] to display split time, “SP” will appear along with your split
time, running time will continue to be taken.
4. Press [ RESET ] to return to stopwatch display mode. Your stopwatch time
is not affected and continues to show your total time since start.
5. Press [ ST/STP ] again if you want to pause from training. “ST” will
begin flashing.
6. Once thetimer has stopped, you can press [ RESET ] to reset thetimer
back to zero.
7. Batteries
Thewatch and thechest strap use thesame type of (CR2032) batteries.
Battery life is rated for about 1 year of normal use. Make sure to change
thebatteries in both thewatch and chest strap at thesame time.
Warning: Thebatteries contain dangerous substances. Make sure children
do not come in contact with thebatteries. Contact adoctor immediately if any
battery has been ingested.
Changing thewatch battery
Note: Changing thewatch battery can present difficulties. Ensure that you
have thecorrect tools and knowledge for changing thebattery. Using incorrect
tools or procedures may damage thewatch. Theguarantee does not cover
any damage incurred during improper battery changing.
It is therefore recommended that thewatch casing only be opened by qualified
personnel. Let atradesman perform thebattery change if you are at all unsure
about carrying out theprocedure yourself.
10 11
Page 11

Changing thechest strap battery
1. Turn thebattery compartment’s cover from its original CLOSE position so
that thecover’s arrow now points to theOPEN position.
2. Remove thecover. Note: Thecover has athin O-ring to prevent dust and
moisture from entering thedevice. Make sure that you do not lose this.
3. Remove theold battery and insert anew one (CR2032). Note: Note
thepolarity markings at thebottom of thebattery compartment to ensure
correct insertion. Theplus symbol should be on top facing you and fit
securely under thesmall retaining bracket. Make sure that theO-ring is
undamaged during battery change.
4. Refit thecover by placing it over thecompartment with thearrow symbol
pointing to OPEN, then turn it clockwise towards CLOSE in order to close it.
8. Care and maintenance
• Handle thewatch and chest strap carefully. Never subject them to
unnecessary knocks or blows.
• Clean thewatch and chest strap with alightly moistened soft cloth.
• Store thewatch and chest strap in adry place if you do not intend to
use them for along time.
9. Troubleshooting
Heart rate is
not displayed.
Heart rate
is displayed
irregularly or
is interrupted.
• Chest strap is improperly positioned.
• Thechest strap’s contact point is too dry. Moisten it.
• Thechest strap must be in direct contact with your skin.
• Thedistance between thewatch and chest strap is
too great.
• Thechest strap battery may be flat. Check thebattery.
Replace if necessary.
• Data transfer can be interfered with by electromagnetic
fields coming from transformers, computers, power
lines, etc.
English
11
Page 12

Thealarm
beeps
continuously.
English
Thedisplay
is frozen.
Thealarm is activated and your pulse lies outside theset
minimum or maximum value. Thealarm cannot be turned off:
• Press [ MODE ] repeatedly until HRM appears on
thedisplay.
• Hold in the [ LIGHT ] button for afew seconds until
“Hold” and “Adjust” begin to flash. After afew
seconds “AGE” will appear. Toggle to Alarm mode
by pressing the [ MODE ] button. Press [ RESET ] to
select OFF to deactivate thealarm.
Static electricity may interfere with data transfer. Thedisplay
might also freeze after abattery change. Do afactory
reset to correct: Hold in all four buttons on thewatch
simultaneously to reset thewatch to factory settings.
10. Disposal
This product should be disposed of in accordance with local regulations.
If you are unsure how to proceed, contact your local council.
11. Specifications
Pulse watch
• Water resistant down to 3 ATM
• Operating temperature: −5 to 50 ºC
• Pulse display range: 30–240 bpm (beats per minute)
• Material:
- Crystal Acrylic
- Housing ABS
- Buttons ABS
- Metal components Stainless steel
- Wrist strap Polyurethane
• Battery: 1×CR2032 (included)
Chest strap
• Splash-resistant down to 1 ATM
• Operating temperature: −5 to 50 ºC
• Materials: ABS, Polyurethane
• Battery: 1×CR2032 (included)
Page 13

Pulsklocka med bröstband
Art.nr 31-8539
Läs igenom hela bruksanvisningen före användning och spara den sedan
för framtida bruk. Vi reserverar oss för ev. text- och bildfel samt ändringar av
tekniska data. Vid tekniska problem eller andra frågor, kontakta vår kundtjänst
(se adressuppgifter på baksidan).
Innehåll
1. Säkerhet .................................................................... 14
2. Produktbeskrivning ................................................... 14
Knapparnas funktioner ...................................................................... 14
Bröstband ........................................................................................... 15
3. Inställningar ............................................................... 15
Ställ in tiden ....................................................................................... 15
Ställ in önskad pulsnivå för din träning ............................................. 16
4. Användning ............................................................... 17
Förberedelser innan träningen .......................................................... 17
När träningen börjar ........................................................................... 17
Visa pulsdata under tiden som träningen pågår ............................... 18
Visa data från senaste träningstillfället (innan data sparas) ............ 18
Visa sparade data .............................................................................. 19
5. Alarm (tid) .................................................................. 19
6. Stoppur ..................................................................... 20
7. Batterier ..................................................................... 20
Batteribyte i klocka ............................................................................ 20
Batteribyte i bröstband ...................................................................... 21
8. Skötsel och underhåll ............................................... 21
9. Felsökning ................................................................. 21
10. Avfallshantering ........................................................ 22
11. Specifikationer .......................................................... 22
Pulsklocka .......................................................................................... 22
Bröstband ........................................................................................... 22
13
Svenska
Page 14
1. Säkerhet
• Innan du börjar använda pulsklockan, kontakta din läkare eller tränare om
du är osäker på hur hårt du kan träna.
• Ett ungefärligt värde för maxpuls kan beräknas om man från värdet 220
drar sin ålder. Ex: Om du är 40 år så är din maxpuls 220–40=180.
2. Produktbeskrivning
• Grundläggande funktionersom pulsmätare,kaloriförbrukning, stoppur,
Svenska
klocka, datum m.m.
• Bröstband med trådlös överföring till klockan.
• CR2032-batterier för klocka och bröstband ingår.
Knapparnas funktioner
[ MODE ]
• Stega genom klockans menyer:
DATA (pulsdatavisning), ALARM (tidalarm),
STW (stoppur), TIME (tid) och HRM (pulsmätare)
• Stega till nästa inställning
[ LIGHT ]
• Aktivera bakgrundsbelysningen under några sekunder
• Håll in för att öppna inställningssekvenser för vald meny
• Håll in för att spara senaste data och radera de data som är sparade sedan
tidigare, både pulsdata och träningstiden nollställs. Obs! När du trycker på
[ LIGHT ] raderas all tidigare sparad data och kan då inte visas på något sätt.
• Tips! Vill du spara träningsdata från en längre period måste du skriva upp
sparade data innan du sparar ny träningsdata.
[ ST/STP ] Start/stopp
• Öka inställningsvärde
• Gör paus i träningstiden i HRM-läge
[ RESET ]
• Minska inställningsvärde
• Stega genom undermenyerna
• Välj inställning av din kroppsvikt i lb eller kg
• Nollställ tidtagning i STW-läge (stoppur)
Adjust/
Light
Mode
Start/
Stop
Reset
14 15
Page 15
Bröstband
1. Öppna bröstbandet genom att ta
isär de rektangulära spännena från
bandet.
2. Placera bröstbandet över bröstkorgen
och tryck ihop de båda spännena igen.
3. Se till att bröstbandet vänds rätt,
se märkning på insidan: R (höger)
och L (vänster). Bröstbandet måste
placeras direkt mot huden.
L R
4. Dra ut bröstbandet något och fukta de båda kontaktytorna för att få bästa
möjliga kontakt.
3. Inställningar
Ställ in tiden
1. Tryck på [ MODE ] upprepade gånger tills
”TIME” visas på displayen.
2. Håll in [ LIGHT ] några sekunder, ”Hold” och
”Adjust” blinkar. Efter ett par sekunder visas
”HOUR” och timangivelsen blinkar.
3. Ange rätt timme genom att trycka på
[ ST/STP ] (stega upp) eller [ RESET ] (stega ner).
[ LIGHT ] [ ST/STP ]
[ MODE ] [ RESET ]
Svenska
4. Tryck på [ MODE ] för att bekräfta och öppna nästa inställning. Upprepa
ovanstående för att ställa in MIN (minuter), SEC (sekunder), YEAR (år),
MONTH (månad), DAY (dag) och 12–24H (välj 12- eller 24-timmarsvisning
av tiden).
5. Gå ur inställningsläge genom att trycka på [ LIGHT ].
15
Page 16
Ställ in önskad pulsnivå för din träning
Innan du börjar använda pulsklockan, kontakta din läkare eller tränare om du
är osäker på hur hårt du kan träna.
Ett ungefärligt värde för maxpuls kan beräknas om man från värdet 220 (män),
226 (kvinnor) drar sin ålder. Ex: Om du är man och 40 år så är din maxpuls
220–40=180.
Välj önskad träningsnivå
Det finns 3 förinställda pulsnivåer att välja mellan:
• Pulsnivå 1 (55–70 % av maxpuls)
Svenska
• Pulsnivå 2 (70–80 % av maxpuls)
• Pulsnivå 3 (80–100 % av maxpuls)
Tänk efter vilken pulsnivå som passar dig och ange den i personliga inställningar.
Du kan ställa in personliga värden i pulsklockan så här:
1. Tryck på [ MODE ] upprepade gånger tills ”HRM” visas på displayen.
2. Håll in [ LIGHT ] några sekunder, ”Hold” och ”Adjust” blinkar. Efter ett par
sekunder visas ”AGE” (ålder), ställ in din ålder med knapparna [ ST/STP ]
(stega upp) eller [ RESET ] (stega ner). Bekräfta med [ MODE ].
3. Fortsätt på samma sätt med övriga inställningar:
- SEX (kön).
- LEVEL (pulsnivå), välj Pulsnivå 1, 2 eller 3. Inställningen föreslår automatiskt
en generell inställning för lägsta (LO) resp. högsta (HI) puls.
- HI (högsta puls enligt inställd pulsnivå visas). Acceptera förinställt värde
eller ändra till personlig inställning.
- LO (lägsta puls enligt inställd pulsnivå visas). Acceptera förinställt värde
eller ändra till personlig inställning.
- UNIT (vikt i kg eller lb).
- WT (ange din vikt i tidigare inställd enhet).
- ALARM (larmar när pulsen ligger utanför inställt min- eller maxvärde för
pulsen). ON: piper regelbundet när pulsen ligger utanför inställningen.
OFF: larmar inte när pulsen ligger utanför inställning.
16 17
Page 17
4. Vill du ändra inställningen för ALARM (pulsalarm) måste du göra om
stegen 1–3 och välja: ON eller OFF.
Exempel: Du ställer in: 42 år > Man > Pulsnivå 2 > HI (visar 126) > LO (visar 99)
> kg > Alarm ON. Med dessa inställningar kommer klockan att larma vid puls
under 99 och över 126, tycker du att dessa värden är fel: Gör om inställningen
och ange eget värde för HI och/eller LO.
4. Användning
Förberedelser innan träningen
1. Fäst bröstbandet runt bröstet enligt instruktion.
2. Ställ in önskad pulsnivå (om du inte redan har gjort det).
När träningen börjar
3. Tryck på [ MODE ] upprepade gånger tills
”HRM” visas på displayen för att visa puls.
4. Tryck på [ ST/STP ] när du vill få kontakt
med bröstbandet och påbörja träningen.
Tidräkningen i övre kanten på displayen
startar, pulsen visas och därmed har du
startat träningen och pulsdata sparas.
Tryck på [ ST/STP ] igen om du vill göra
paus i träningen, då stoppar tidtagningen.
5. Klockan tar automatiskt emot signalerna
från bröstbandet och aktuell puls visas på
displayen.
- När klockan försöker hitta pulssignalen
från bröstbandet blinkar 3 vågräta streck
på displayen.
- När bröstbandet och klockan inte
har kontakt visas 3 vågräta streck på
displayen. Det kan bero på att avståndet
mellan klocka och bröstband är för stort,
räckvidden är ca 80 cm.
Obs! Om bröstband och klocka inte har kontakt visas 3 vågräta streck,
men även om du minskar avståndet mellan klockan och bröstbandet
fortsätter de vågräta strecken att visas. Du måste då trycka på [ ST/STP ]
för att starta pulsmätningen.
[ MODE ]
[ ST/STP ]
Svenska
17
Page 18

6. Tryck på [ ST/STP ] när du vill avsluta träningen.
7. För att nollställa och spara data från detta träningspass: Håll in [ LIGHT ]
några sekunder, ”Hold” och ”Adjust” blinkar och data nollställs.
Detta måste utföras för att nollställa klockan inför nästa träningspass.
Visa pulsdata under tiden som träningen pågår
• Pulsen ligger inom inställd pulsnivå
(inga pilar visas).
Svenska
• När pulsen ligger över resp. under visas:
↑ (pulsen över inställt värde) eller
↓ (pulsen under inställt värde). När
pulsalarm är aktiverat (läge ON) piper
klockans larmsignal regelbundet när
pulsen ligger utanför inställningen.
Visa data från senaste träningstillfället
(innan data sparas)
[ ST/STP ]
[ RESET ]
1. Tryck på [ MODE ] upprepade gånger tills ”HRM” visas på displayen.
2. Tryck på [ RESET ] upprepade gånger för att välja önskad visning av data
från det senaste träningstillfället. Välj mellan dessa:
- XX´XX´XX visning av träningstid
- BPM % MAX högsta puls i % av inställd maxpuls
- KCAL förbrukade kalorier
- IN ZONE BPM tid som pulsen har varit inom inställd pulsnivå
- HI högsta puls
- X:XX.XX aktuell tid
18 19
Page 19

Visa sparade data
[ MODE ] [ RESET ]
1. Tryck på [ MODE ] upprepade gånger tills ”DATA” visas på displayen.
2. Tryck på [ RESET ] upprepade gånger för att välja önskad visning av data
från det senaste sparade träningstillfället:
- TOTAL visning av träningstid
- INZONE tid som pulsen har varit inom inställd pulsnivå
- CAL förbrukade kalorier
- HIGH högsta puls
- AVG medelpuls
5. Alarm (tid)
1. Tryck på [ MODE ] upprepade gånger tills
”ALARM” visas på displayen.
2. Håll in [ LIGHT ] några sekunder, ”Hold” och
”Adjust” blinkar. Efter ett par sekunder visas
”HOUR” och timangivelsen blinkar.
3. Ange rätt timme genom att trycka på
[ ST/STP ] (stega upp) eller [ RESET ] (stega ner).
4. Tryck på [ MODE ] för att bekräfta och
fortsätt lika för att ställa in minuter.
5. Gå ur inställningsläge genom att trycka på
[ LIGHT ].
6. Aktivera/stäng av alarm genom att trycka
på [ ST/STP ]. Alarmikonen
aktiverat alarm. När alarmet är avstängt
visas ”– –”.
visas vid
[ LIGHT ] [ ST/STP ]
[ MODE ] [ RESET ]
Svenska
19
Page 20

6. Stoppur
[ LIGHT ] [ ST/STP ]
[ MODE ] [ RESET ]
1. Tryck på [ MODE ] upprepade gånger tills ”STW” visas på displayen.
2. Starta tidtagning genom att trycka på [ ST/STP ], när tiden räknas visas
Svenska
”ST” på displayen.
3. Tryck på [ RESET ] för att ta en mellantid, ”SP” visas på displayen, tiden
fortsätter att löpa.
4. Tryck på [ RESET ] igen för att komma tillbaka till tidtagningen.
Totaltiden sedan start visas.
5. Tryck på [ ST/STP ] igen om du vill stoppa eller göra paus i tidtagningen.
Då blinkar ”ST”.
6. När tiden är stoppad, tryck [ RESET ] för att nollställa stoppuret.
7. Batterier
Pulsklockan och bröstbandet använder samma typ av batterier (CR2032).
Batterierna beräknas hålla i ca 1 år vid normal användning. Se till att byta
batterierna i klocka och bröstband samtidigt.
Varning! Batterierna innehåller farliga ämnen. Se till att barn inte kommer åt
batterierna. Om någon har svalt ett batteri, kontakta läkare omedelbart.
Batteribyte i klocka
Obs! Batteriet i klockan är svårt att byta och det kan medföra att klockan
skadas vid användning av fel verktyg eller fel metod. Garantin gäller inte fel
som uppstått vid batteribyte.
Klockans boett får därför endast öppnas av kvalificerad person. Låt en urmakare
utföra batteribytet om du känner dig osäker på hur arbetet ska utföras.
20 21
Page 21

Batteribyte i bröstband
1. Vrid batterihållarens lock moturs så att pilsymbolen flyttas från CLOSE till
OPEN på bröstbandet.
2. Ta bort locket. Obs! Locket har en tunn O-ring som gör att ingen fukt
kommer in i batterihållaren, se till att inte den försvinner.
3. Ta ur det förbrukade batteriet och sätt i ett nytt (CR2032).
Obs! Se märkningen i botten på batterihållaren så att batteriet monteras
rätt. Plus på batteriet ska vändas uppåt mot dig och batteriet måste skjutas
in under den lilla klacken i batterihållaren. Kontrollera att O-ringen är
oskadad i samband med batteribytet.
4. Sätt tillbaka locket med punkten på locket mot OPEN på bröstbandet,
stäng locket genom att vrida det medurs till CLOSE.
8. Skötsel och underhåll
• Behandla klockan och bröstbandet varsamt. Utsätt dem inte för slag
och stötar.
• Rengör klockan och bröstbandet med en lätt fuktad, mjuk trasa.
• Förvara klockan och bröstbandet i ett torrt utrymme om du inte tänker
använda dem under en längre period.
9. Felsökning
Pulsen visas
inte på pulsklockan.
Pulsen visas
oregelbundet
eller stoppar
ibland.
• Bröstbandet är felplacerat.
• Bröstbandets kontaktytor är för torra, fukta dem.
• Bröstbandet måste sitta direkt mot huden.
• Avståndet mellan klocka och bröstband är för stort.
• Batteriet i bröstbandet kan vara dåligt, kontrollera.
Byt ut vid behov.
• Dataöverföringen kan störas av elektromagnetiska
fält från t.ex. transformator, dator eller kraftledning.
Svenska
21
Page 22

Svenska
Klockan piper
kontinuerligt.
Displayen
hänger sig
(fryser).
Pulsalarm är aktiverat, pulsen ligger utanför inställt
min- eller maxvärde. Det går att stänga av pulsalarmet:
• Tryck på [ MODE ] upprepade gånger tills ”HRM”
visas på displayen.
• Håll in [ LIGHT ] några sekunder, ”Hold” och ”Adjust”
blinkar. Efter ett par sekunder visas ”AGE” (ålder),
stega vidare till Alarm med [ MODE ]. ]. Välj OFF
(stäng av alarm) genom att trycka [ RESET ].
Överföringen kan störas av statisk elektricitet. Displayen
kan också hänga sig efter batteribyte. Gör en återställning
(RESET): Håll in alla fyra knapparna på klockan samtidigt
för att återställa till fabriksinställningarna.
10. Avfallshantering
När du ska göra dig av med produkten ska detta ske enligt lokala föreskrifter.
Är du osäker på hur du ska gå tillväga, kontakta din kommun.
11. Specifikationer
Pulsklocka
• Vattenskyddad till 3 ATM
• Användningstemperatur: –5 till 50 ºC
• Pulsvisning: 30–240 bpm (slag per minut)
• Material:
- Glas Acryl
- Boett ABS
- Knappar ABS
- Metalldelar Rostfritt stål
- Armband Polyuretan
• 1×CR2032-batteri (ingår)
Bröstband
• Stänkskyddad till 1 ATM
• Användningstemperatur: −5 till 50 ºC
• Material: ABS, Polyuretan
• 1×CR2032-batteri (ingår)
Page 23

Pulsklokke med pulsbelte
Art.nr. 31-8539
Les nøye igjennom hele bruksanvisningen og ta vare på den til senere bruk.
Vi reserverer oss mot ev. tekst- og bildefeil, samt forandringer av tekniske data.
Ved tekniske problemer eller andre spørsmål, ta kontakt med vårt kundesenter
(se opplysninger på baksiden).
Innhold
1. Sikkerhet ................................................................... 24
2. Produktbeskrivelse ................................................... 24
Knappenes funksjoner ....................................................................... 24
Pulsbelte ............................................................................................. 25
3. Innstillinger ................................................................ 25
Stille inn tiden .................................................................................... 25
Still inn ønsket pulsnivå for treningsøkten din .................................. 26
4. Bruk ........................................................................... 27
Forberedelser før treningen ............................................................... 27
Når treningen starter .......................................................................... 27
Vising av pulsdata under trening ....................................................... 28
Vis data fra forrige treningsøkt (før du lagrer dem) .......................... 28
Vis lagrede data.................................................................................. 29
5. Alarm (tid) .................................................................. 29
6. Stoppeklokke ............................................................ 30
7. Batterier ..................................................................... 30
Skifte av batteri i klokke ..................................................................... 30
Skifte av batteri i pulsbelte ................................................................ 31
8. Stell og vedlikehold .................................................. 31
9. Feilsøking .................................................................. 31
10. Avfallshåndtering ...................................................... 32
11. Spesifikasjoner ......................................................... 32
Pulsklokke .......................................................................................... 32
Pulsbelte ............................................................................................. 32
Norsk
23
Page 24

1. Sikkerhet
• Ta kontakt med legen eller treneren din før du begynner å bruke
pulsklokken, dersom du er usikker på hvor hardt du kan trene.
• En cirka-verdi for maksimal puls kan beregnes hvis man trekker alderen sin
fra verdien 220. Eks: Hvis du er 40 år, så er din makspuls: 220–40=180.
2. Produktbeskrivelse
• Grunnleggende funksjoner som pulsmåler, kaloriforbruk, stoppeklokke,
klokke, dato, etc.
• Pulsbelte med trådløs overføring til klokken.
• Leveres med CR2032-batteri til klokke og pulsbelte.
Knappenes funksjoner
[ MODE ]
• Gå gjennom klokkens menyer:
Norsk
DATA (pulsdata-visning), ALARM (tidsalarm),
STW (stoppeklokke), TIME (tid) og
HRM (pulsmåler)
• Gå til neste innstilling
[ LIGHT ]
• Aktiverer bakgrunnsbelysningen i noen sekunder
• Hold inne for å åpne for innstillinger i valgte meny.
• Hold inne for å lagre de siste dataene og slette de dataene som er lagret fra
tidligere, både pulsdata og treningstiden nullstilles. Obs! Når du trykker på
[ LIGHT ] slettes alle tidligere lagrede data og kan da ikke vises.
• Tips! Hvis du vil lagre treningsdata fra en lengre periode må du skrive opp
lagret data før du lagrer de nye dataene.
[ ST/STP ] start/stopp
• Heve innstillingsverdi
• Ta pause i treningsøkten i HMR-modus
[ RESET ]
• Redusere innstillingsverdi
• Gå gjennom undermenyene
• Velge enhet på innstilling av kroppsvekt
• Nullstill stoppeklokken i STW-modus
24 25
Adjust/
Light
Mode
Start/
Stop
Reset
Page 25

Pulsbelte
1. Pulsbeltet åpnes ved at de
rektangulære spennene tas fra
hverandre.
2. Båndet/beltet plasseres over brystet
og spennene trykkes sammen igjen.
3. Påse at pulsbeltet ligger riktig vei, følg
merkingen på innsiden: R (høyre) og
L (venstre). Pulsbeltet må plasseres
direkte på huden.
L R
4. Begge kontaktflatene bør fuktes litt for å gi best mulig kontakt.
3. Innstillinger
Stille inn tiden
Norsk
1. Trykk på [ MODE ] gjentatte ganger til
«TIME» vises på skjermen.
2. Hold [ LIGHT ] inne i noen sekunder. «Hold»
og «Adjust» blinker. Etter ett par sekunder
vises «HOUR» og timefeltet blinker.
3. Oppgi riktig time ved å trykke på [ ST/STP ]
(gå opp) eller [ RESET ] (gå ned).
4. Trykk på [ MODE ] for å bekrefte og åpne neste innstilling. Gjør innstillingen
på samme måte når MIN (minutter), SEC (sekunder), YEAR (år),
MONTH (måned), DAY (dag) og 12–24H (velg 12 eller 24 timers visning)
skal stilles inn.
5. Gå ut av innstillingsmodus ved å trykke på [ LIGHT ].
[ LIGHT ] [ ST/STP ]
[ MODE ] [ RESET ]
Page 26

Still inn ønsket pulsnivå for treningsøkten din
Ta kontakt med legen eller treneren din før du begynner å bruke pulsklokken,
dersom du er usikker på hvor hardt du kan trene.
En cirka-verdi for maksimal puls kan beregnes ved at man trekker alderen sin
fra verdien 220 (menn) og 226 (kvinner). Eks: Hvis du er en mann på 40 år,
så er din makspuls: 220–40=180.
Velg ønsket treningsnivå
Det er tre forskjellige forhåndsinnstilte pulsnivåer å velge mellom:
• Pulsnivå 1 (55–70 % av makspuls)
• Pulsnivå 2 (70–80 % av makspuls)
• Pulsnivå 3 (80–100 % av makspuls)
Finn ut av hvilket nivå som passer deg best og oppgi det i dine personlige
innstillinger.
Personlige pulsnivåer kan stilles inn slik:
Norsk
1. Trykk på [ MODE ] gjentatte ganger til «HRM» vises på skjermen.
2. Hold [ LIGHT ] inne i noen sekunder. Hold og Adjust blinker. Etter et par
sekunder vil «AGE» (alder) vises. Still inn din egen alder med tastene
[ ST/STP ] (gå opp) eller [ RESET ] (gå ned). Bekreft med [ MODE ].
3. Fortsett på samme måte med:
- Sex (kjønn).
- Level (pulsnivå), velg Pulsnivå 1, 2 eller 3. Innstillingen foreslår
automatisk en generell innstilling for laveste (LO) og høyeste (HI) puls.
- HI (høyeste puls i henhold til innstilt pulsnivå vises). Aksepter forhåndsinnstilt verdi eller endre til dine personlige.
- LO (laveste puls i henhold til innstilt pulsnivå vises). Aksepter forhåndsinnstilt verdi eller endre til dine personlige.
- UNIT (vekt i kg eller lb).
- WT (oppgi din egen vekt i tidligere innstilt enhet).
- ALARM (varsler når pulsen ligger utenfor innstilt min- eller maksnivå).
ON: piper regelmessig når pulsen ligger utenfor det innstilte.
OFF: piper ikke når pulsen ligger utenfor det innstilte området.
26 27
Page 27

4. Hvis du vil endre innstillingen for ALARM (pulsalarm) må du gjøre om på
trinnene 1–3 og velge: ON eller OFF.
Eksempel: Du stiller inn: 42 år > Mann > Pulsnivå 2 > HI (viser 126) > LO (viser 99)
> kg > Alarm ON. Nå vil klokken varsle ved puls under 99 og over 126.
Hvis du syns disse verdiene er gale: Endre innstillingene og oppgi dine egne
verdier for HI og/eller LO.
4. Bruk
Forberedelser før treningen
1. Fest pulsbeltet rundt brystet som tidligere beskrevet.
2. Still inn ønsket pulsnivå (dersom du ikke allerede har gjort det).
Når treningen starter
3. Trykk på [ MODE ] gjentatte ganger til «HRM»
vises på skjermen, for å vise pulsen.
4. Trykk på [ ST/STP ] når du ønsker kontakt
med pulsbeltet og vil starte treningen.
Tidtakingen i øvre kant på skjermen starter,
pulsen vises og du har startet treningen.
Pulsdataene lagres. Trykk på [ ST/STP ]
igjen hvis du vil ta en pause i treningsøkten.
Da vil tidtakingen stoppe.
5. Klokken tar automatisk mot signalene fra
pulsbeltet og aktuell puls vises på displayet.
- Når klokken forsøker å finne
pulssignalene fra pulsbeltet blinker
3 vannrette streker på skjermen.
- Når pulsbeltet og klokken ikke lenger har
kontakt vil 3 vannrette streker vises på
skjermen. Det kan hende hvis det er for
stor avstand mellom pulsbelte og klokke.
Rekkevidden er ca. 80 cm.
Obs! Hvis pulsbeltet og klokken ikke har kontakt vises 3 vannrette streker,
og selv om avstanden reduseres mellom disse igjen vil de vannrette strekene
fortsatt vises. Trykk da på [ ST/STP ] for å starte pulsmålingen igjen.
[ MODE ]
[ ST/STP ]
Norsk
Page 28

6. Trykk på [ ST/STP ] når du vil avslutte treningsøkten.
7. For å lagre dataene fra denne treningsøkten og nullstille gjør du slik:
Hold [ LIGHT ] inne i noen sekunder. «Hold» og «Adjust» blinker og
data nullstilles. Dette må gjennomføres for å klargjøre klokken til neste
treningsøkt.
Vising av pulsdata under trening
• Pulsen ligger innenfor det innstilte
pulsnivået (ingen piler kommer opp).
• Når pulsen ligger over eller under
vises: ↑ (pulsen er over innstilt verdi)
eller ↓ (pulsen under innstilt verdi).
Norsk
Når pulsalarmen er aktivert med ON vil
klokkens alarmsignal pipe regelmessig
når pulsen ligger utenfor området.
Vis data fra forrige treningsøkt (før du lagrer dem)
[ ST/STP ]
[ RESET ]
1. Trykk på [ MODE ] gjentatte ganger til «HRM» vises på skjermen.
2. Trykk på [ RESET ] gjentatte ganger for å velge å vise data fra den forrige
treningsøkten. Velg mellom følgende:
- XX´XX´XX visning av klokkeslett for treningsøkten
- BPM % MAX høyeste puls i % av den innstilte makspulsen
- KCAL viser forbrukte kalorier.
- IN ZONE BPM tiden som pulsen har vært innenfor det innstilte
pulsnivået
- HI høyeste puls
- X:XX.XX aktuelt tidsrom
28 29
Page 29

Vis lagrede data
[ MODE ] [ RESET ]
1. Trykk på [ MODE ] gjentatte ganger til «DATA» vises på skjermen.
2. Trykk på [ RESET ] gjentatte ganger for å velge å vise data fra den forrige
treningsøkten som er lagret.
- TOTAL visning av klokkeslett for treningsøkten
- IN ZONE tiden som pulsen har vært innenfor det innstilte pulsnivået
- CAL forbrukte kalorier.
- HIGH høyeste puls
- AVG gjennomsnittlig puls
5. Alarm (tid)
1. Trykk på [ MODE ] gjentatte ganger til
«ALARM» vises på skjermen.
2. Hold [ LIGHT ] inne i noen sekunder. «Hold»
og «Adjust» blinker. Etter ett par sekunder
vises «HOUR» og timefeltet blinker.
3. Oppgi riktig time ved å trykke på [ ST/STP ]
(gå opp) eller [ RESET ] (gå ned).
4. Trykk på [ MODE ] for å bekrefte og fortsett
med å stille inn minutter.
5. Gå ut av innstillingsmodus ved å trykke på
[ LIGHT ].
6. Aktiver/steng alarmen ved å trykke på
[ ST/STP ]. Alarmikonet
alarmen er aktivert. Når alarmen er
deaktivert vises «– –».
vises når
[ LIGHT ] [ ST/STP ]
[ MODE ] [ RESET ]
Norsk
Page 30

6. Stoppeklokke
[ LIGHT ] [ ST/STP ]
[ MODE ] [ RESET ]
1. Trykk på [ MODE ] gjentatte ganger til «STW» vises på skjermen.
2. Start tidtakingen ved å trykke på [ ST/STP ]. Når tiden telles vises «ST»
på skjermen.
3. Trykk på [ RESET ] for å ta en mellomtid. «SP» vises på skjermen, tiden
fortsetter å gå.
4. Trykk på [ RESET ] for å gå tilbake til tidtakingen. Totaltid som har gått siden
start vises.
5. Trykk på [ ST/STP ] igjen hvis du vil stoppe eller ta en pause i treningsøkten.
Norsk
«ST» vil da blinke.
6. Når tidtakingen er stoppet, trykk på [ RESET ] for å nullstille stoppeklokken.
7. Batterier
Pulsklokken og pulsbeltet bruker samme type batteri (CR2032).
Et batteri varer i ca. ett år ved, normal bruk. Skift batterier i klokken og
pulsbeltet samtidig.
Advarsel! Batteriene inneholder farlige stoffer. Påse at ikke barn kommer
i kontakt med batteriene. Dersom noen skulle svelge et batteri, må lege
kontaktes umiddelbart.
Skifte av batteri i klokke
Obs! Det kan være litt vanskelig å skifte batteri i klokken, og feilbruk av
verktøy eller metode kan føre til at klokken skades. Garantien gjelder ikke
dersom feilen oppstår ved skifte av batteri.
Klokkehuset skal kun åpnes av kvalifisert personale. Lever den til en urmaker
hvis du ikke er sikker på hvordan det skal utføres.
30 31
Page 31

Skifte av batteri i pulsbelte
1. Drei lokket til batteriholderen moturs slik at pilsymbolet flyttes fra CLOSE
til OPEN.
2. Ta av lokket. Obs! Lokket har en tynn o-ring som gjør at fuktighet ikke
trekker inn i batteriholderen. Pass på at ikke denne forsvinner.
3. Ta ut det gamle batteriet og sett i et nytt (CR2032). Obs! Følg merking
for polaritet i bunnen av batteriholderen. Pluss på batteriet skal vende
oppover mot deg og batteriet må skyves inn under den lille sneppen
i batteriholderen. Ved batteriskifte bør man også kontrollere at o-ringen
er hel.
4. Still lokket tilbake slik at punktet på lokket kommer mot OPEN på
pulsbåndet. Lokket dreies medurs til CLOSE for å stenges.
8. Stell og vedlikehold
• Klokken og pulsbeltet må behandles varsomt. Utsett dem ikke for slag
og støt.
• Rengjør klokken og pulsbeltet med en lett fuktet, myk klut.
• Klokken og pulsbeltet skal oppbevares tørt når de ikke er i bruk.
9. Feilsøking
Pulsen vises
ikke på pulsklokken.
Pulsen vises
uregelmessig
eller stopper
av og til.
• Pulsbeltet sitter feil plassert.
• Pulsbeltets kontaktflater er for tørre, fukt dem.
• Pulsbeltet må plasseres direkte på huden.
• Avstanden mellom klokken og pulsbeltet er for stor.
• Batteriet i pulsbeltet kan være svakt, sjekk ut.
Skift batterier ved behov.
• Dataoverføringen kan bli forstyrret av
elektromagnetiske felt fra f.eks. en transformator,
datamaskin eller kraftledning.
Norsk
31
Page 32

Klokken piper
kontinuerlig.
Displayet
henger seg
(fryser).
10. Avfallshåndtering
Norsk
Når produktet skal kasseres, må det skje i henhold til lokale forskrifter.
Hvis du er usikker, ta kontakt med lokale myndigheter.
Pulsalarmen er aktivert, pulsen ligger utenfor innstilt mineller maksverdi. Det går ikke å deaktivere pulsalarmen:
• Trykk på [ MODE ] gjentatte ganger til «HRM» vises
på skjermen.
• Hold [ LIGHT ] inne i noen sekunder. «Hold» og
«Adjust» blinker. Etter noen sekunder vil «AGE» (alder)
vises. Gå videre til Alarm med [ MODE ].
Velg OFF (stenge alarmen) ved å trykke på [ RESET ].
Overføringen kan forstyrres av statisk elektrisitet.
Displayet kan også henge seg opp ved skifte av batteri.
Da bør klokken resettes med [ RESET ]. Hold alle de fire
knappene på klokken inne samtidig for å stille tilbake til
fabrikkinnstillingene.
11. Spesifikasjoner
Pulsklokke
• Vannbeskyttet til 3 ATM
• Brukertemperatur: −5 til 50 ºC
• Pulsvisning: 30–240 bpm (slag per minutt)
• Materiale:
- Glass Akryl
- Huset ABS
- Taster ABS
- Metalldeler Rustfritt stål
- Armbånd Polyuretan
• 1×CR2032-batteri (medfølger)
Pulsbelte
• Vannsprutbeskyttet til 1 ATM
• Brukertemperatur: −5 til 50 ºC
• Materiale: ABS, Polyuretan
• 1×CR2032-batteri (medfølger)
Page 33

Sykemittari ja sykevyö
Tuotenro 31-8539
Lue käyttöohjeet ennen tuotteen käyttöönottoa ja säilytä ne tulevaa tarvetta
varten. Pidätämme oikeuden teknisten tietojen muutoksiin. Emme vastaa
mahdollisista teksti- tai kuvavirheistä. Jos tuotteeseen tulee teknisiä ongelmia,
ota yhteys myymälään tai asiakaspalveluun (yhteystiedot käyttöohjeen lopussa).
Sisältö
1. Turvallisuus ............................................................... 34
2. Tuotekuvaus .............................................................. 34
Painikkeiden toiminnot ...................................................................... 34
Sykevyö .............................................................................................. 35
3. Asetukset .................................................................. 35
Kellonajan asettaminen ..................................................................... 35
Syketason asettaminen ..................................................................... 36
4. Käyttö ........................................................................ 37
Toimenpiteet ennen harjoittelua ........................................................ 37
Kun aloitat harjoittelun ....................................................................... 37
Syketietojen katsominen harjoittelun aikana .................................... 38
Viimeisen harjoittelukerran tietojen katsominen
(ennen tietojen tallentamista) ............................................................ 38
Tallennettujen tietojen katsominen .................................................... 39
5. Hälytys (aika) ............................................................. 39
6. Ajanotto ..................................................................... 40
7. Paristot ...................................................................... 40
Sykemittarin pariston vaihtaminen .................................................... 40
Sykevyön pariston vaihtaminen ....................................................... 40
8. Huolto ja puhdistaminen .......................................... 41
9. Vianhaku .................................................................... 41
10. Kierrätys .................................................................... 42
11. Tekniset tiedot ........................................................... 42
Sykemittari .......................................................................................... 42
Sykevyö .............................................................................................. 42
Suomi
33
Page 34

1. Turvallisuus
• Ota yhteys lääkäriin tai valmentajaan ennen sykemittarin käyttöä, jos et ole
varma, kuinka kovaa voit harjoitella.
• Voit laskea maksimisykkeen viitteellisen arvon laskukaavalla 220 miinus ikäsi.
Esimerkki: Jos ikäsi on 40, maksimisykkeesi on 220–40=180.
2. Tuotekuvaus
• Sykemittarissa on perustoiminnot, kuten sykkeen mittaus,
kalorien kulutus, ajanotto, kello ja päivämäärä.
• Rintanauha ja langaton tiedonsiirto sykemittariin.
• Mukana sykemittarin ja sykevyön paristot CR2032.
Painikkeiden toiminnot
[ MODE ]
• Siirry sykemittarin valikoissa:
DATA (syketietojen näyttö), ALARM (hälytysaika),
STW (ajanotto), TIME (kellonaika) ja
HRM (sykemittari).
• Siirry seuraavaan asetukseen.
[ LIGHT ]
Suomi
• Aktivoi taustavalo muutaman sekunnin ajaksi.
• Avaa valitun valikon asetusjaksot.
• Tallenna viimeiset tiedot ja poista aiemmin tallennetut tiedot. Sekä syketiedot
että harjoittelun kesto tyhjentyvät. Huom.! Kun painat [ LIGHT ], kaikki
aiemmin tallennetut tiedot tyhjentyvät, eikä niitä voi sen jälkeen enää katsoa.
• Vinkki! Jos haluat tallentaa pidemmän ajan harjoittelutiedot, kirjoita tiedot
muistiin ennen uusien harjoittelutietojen tallentamista.
[ ST/STP ] aloitus/pysäytys
• Asetusarvon lisääminen
• Tauon pitäminen harjoittelussa HRM-tilassa
[ RESET ]
• Asetusarvon vähentäminen
• Alavalikoissa liikkuminen
• Aseta painoyksiköksi lb tai kg
• Nollaa ajanotto STW-tilassa (ajanotto)
Adjust/
Light
Mode
Start/
Stop
Reset
34 35
Page 35

Sykevyö
1. Avaa sykevyö avaamalla soljet vyöstä.
2. Aseta sykevyö rintakehän päälle ja
paina soljet takaisin paikalleen.
3. Varmista, että rintanauha on oikein
päin. Katso nauhan sisäpuolen
merkinnät: R (oikea) ja L (vasen).
Rintanauha tulee asettaa suoraan
ihoa vasten.
L R
4. Vedä rintanauhaa hieman ulospäin ja kostuta molemmat kontaktipinnat
parhaan kontaktin saamiseksi.
3. Asetukset
Kellonajan asettaminen
1. Paina useita kertoja [ MODE ], kunnes
näytöllä näkyy ”TIME”.
2. Paina [ LIGHT ] muutaman sekunnin ajan,
”Hold” ja ”Adjust” vilkkuvat. Muutaman
sekunnin kuluttua näytöllä näkyy ”HOUR”
ja tunnit vilkkuvat.
3. Syötä tunnit painamalla [ ST/STP ] (siirry
ylöspäin) tai [ RESET ] (siirry alaspäin).
[ LIGHT ] [ ST/STP ]
[ MODE ] [ RESET ]
Suomi
4. Vahvista ja siirry seuraavaan asetukseen painamalla [ MODE ].
Aseta MIN (minuutit), SEC (sekunnit), YEAR (vuodet), MONTH (kuukaudet),
DAY (päivät) ja 12–24H (valitse 12 tai 24 tunnin näyttötapa) yllä olevien
ohjeiden mukaisesti.
5. Poistu asetustilasta painamalla [ LIGHT ].
Page 36

Syketason asettaminen
Ota yhteys lääkäriin tai valmentajaan ennen sykemittarin käyttöä, jos et ole
varma, kuinka kovaa voit harjoitella.
Voit laskea maksimisykkeen viitteellisen arvon laskukaavalla 220 (miehet) tai
226 (naiset) miinus ikäsi. Esimerkki: Miehen ikä on 40, ja maksimisyke on
220−40=180.
Harjoittelutason valinta
Sykemittarissa on kolme valmista syketasoa:
• Syketaso 1 (55−70 % maksimisykkeestä)
• Syketaso 2 (70−80 % maksimisykkeestä)
• Syketaso 3 (80−100 % maksimisykkeestä)
Valitse itsellesi sopiva syketaso ja ilmoita se henkilökohtaisissa asetuksissa.
Voit asettaa henkilökohtaiset arvot sykemittariin seuraavalla tavalla:
1. Paina useita kertoja [ MODE ], kunnes näytöllä näkyy ”HRM”.
Suomi
2. Paina [ LIGHT ] muutaman sekunnin ajan, Hold ja Adjust vilkkuvat. Muutaman
sekunnin kuluttua näytöllä näkyy ”AGE” (ikä), aseta ikä painikkeilla
[ ST/STP ] (siirry ylös) tai [ RESET ] (siirry alas). Vahvista valinta painamalla
[ MODE ].
3. Tee muut asetukset samalla tavalla:
- Sex (sukupuoli).
- Level (syketaso), valitse syketaso 1, 2 tai 3. Asetus ehdottaa automaattisesti yleistä asetusta alimmalle (LO) ja ylimmälle (HI) sykkeelle.
- HI (asetetun syketason mukainen ylin syke näkyy näytöllä). Hyväksy
valmis arvo tai muuta henkilökohtainen arvo.
- LO (asetetun syketason mukainen alin syketaso näkyy näytöllä).
Hyväksy valmis arvo tai muuta henkilökohtainen arvo.
- UNIT (painoyksikkö kg tai lb).
- WT (ilmoita painosi yllä valitussa yksikössä).
- ALARM (sykemittari hälyttää, kun syke on asetettujen ylimmän tai
alimman sykkeen ulkopuolella). ON: sykemittarista kuuluu säännöllinen
merkkiääni, kun syke on asetetun alueen ulkopuolella. OFF: sykemittari
ei hälytä, kun syke on asetetun alueen ulkopuolella.
36 37
Page 37

4. Jos haluat muuttaa sykealueen hälytyksen asetusta (ALARM), toista
kohdat 1−3 ja valitse: ON tai OFF.
Esimerkki: Asetat seuraavat arvot: 42 vuotta > Mies > Syketaso 2 > HI
(näyttää 126) > LO (näyttää 99) > kg > Alarm ON. Näillä asetuksilla sykemittari
hälyttää, kun syke on alle 99 ja yli 126. Jos haluat muuttaa näitä arvoja:
Tee asetus uudelleen ja syötä oma arvo kohtiin HI ja/tai LO.
4. Käyttö
Toimenpiteet ennen harjoittelua
1. Kiinnitä rintanauha rinnan ympäri ohjeiden mukaisesti.
2. Aseta syketaso (jos et ole vielä asettanut sitä).
Kun aloitat harjoittelun
3. Paina useita kertoja [ MODE ], kunnes
näytöllä näkyy ”HRM”.
4. Paina [ ST/STP ], kun haluat muodostaa
yhteyden sykevyöhön ja aloittaa harjoittelun.
Näytön ylälaidassa näkyvä ajanotto käynnistyy,
syke näkyy näytöllä. Harjoittelu on alkanut ja
syketiedot tallentuvat muistiin. Paina
[ ST/STP ], jos haluat keskeyttää harjoittelun.
Ajanotto keskeytyy.
5. Sykemittari vastaanottaa automaattisesti
signaalia sykevyöstä, ja senhetkinen syke
näkyy näytöllä.
- Kun sykemittari hakee sykesignaalia
sykevyöstä, näytöllä vilkkuu 3 vaakaraitaa.
- Jos sykemittari ei saa yhteyttä sykevyöhön,
näytöllä näkyy kolme vaakaraitaa. Tämä
saattaa johtua siitä, että sykemittari ja
sykevyö ovat liian kaukana toisistaan.
Kantama on noin 80 cm.
Huom.! Jos sykevyö ja sykemittari eivät saa yhteyttä toisiinsa, näytöllä näkyy
kolme vaakaraitaa. Jos vähennät sykemittarin ja sykevyön välistä etäisyyttä,
vaakaraidat pysyvät näytöllä. Aloita tässä tapauksessa sykkeen mittaus
painamalla [ ST/STP ].
[ MODE ]
[ ST/STP ]
Suomi
Page 38

6. Lopeta harjoittelu painamalla [ ST/STP ].
7. Nollaa tiedot ja tallenna ne muistiin: Paina [ LIGHT ] muutaman sekunnin
ajan, ”Hold” ja ”Adjust” vilkkuvat ja tiedot nollautuvat. Tämä tulee tehdä
ennen seuraavaa harjoittelukertaa, jotta sykemittarin tiedot nollautuvat.
Syketietojen katsominen harjoittelun aikana
• Syke on asetetun syketason sisällä
(näytöllä ei näy nuolia).
• Kun syke on asetetun syketason ylä- tai
alapuolella, näytöllä näkyy: ↑ (syke on
asetetun arvon yläpuolella) tai ↓ (syke
on asetetun arvon alapuolella). Kun
sykehälytys on aktivoitu (tilassa ON),
kellon hälytyssignaali soi säännöllisesti,
kun syke on asetetun alueen ulkopuolella.
Viimeisen harjoittelukerran tietojen katsominen
(ennen tietojen tallentamista)
Suomi
1. Paina useita kertoja [ MODE ], kunnes näytöllä näkyy ”HRM”.
2. Valitse ne viimeisen harjoittelukerran tiedot, joita haluat tarkastella
painamalla useita kertoja [ RESET ]. Valitse seuraavista tiedoista:
- XX´XX´XX harjoitteluajan näyttö
- BPM % MAX korkein syke prosentteina asetetusta maksimisykkeestä
- KCAL kulutetut kalorit
- IN ZONE BPM aika, jonka syke on ollut asetetun syketason sisällä
- HI korkein syke
- X:XX.XX senhetkinen kellonaika
[ ST/STP ]
[ RESET ]
38 39
Page 39

Tallennettujen tietojen katsominen
[ MODE ] [ RESET ]
1. Paina useita kertoja [ MODE ], kunnes näytöllä näkyy ”DATA”.
2. Valitse ne viimeisen tallennetun harjoittelukerran tiedot, joita haluat
tarkastella painamalla useita kertoja [ RESET ].
- TOTAL harjoitteluaika
- INZONE aika, jonka syke on ollut asetetun syketason sisällä
- CAL kulutetut kalorit
- HI korkein syke
- AVG keskisyke
5. Hälytys (aika)
1. Paina useita kertoja [ MODE ], kunnes
näytöllä näkyy ”ALARM”.
2. Paina [ LIGHT ] muutaman sekunnin ajan,
”Hold” ja ”Adjust” vilkkuvat. Näytöllä näkyy
”HOUR” parin sekunnin kuluttua, ja tunnit
vilkkuvat.
3. Syötä tunnit painamalla [ ST/STP ] (siirry
ylöspäin) tai [ RESET ] (siirry alaspäin).
4. Vahvista painamalla [ MODE ] ja aseta
minuutit samalla tavalla.
5. Poistu asetustilasta painamalla [ LIGHT ].
6. Aktivoi/sammuta hälytys painamalla
[ ST/STP ]. Hälytyksen kuvake
näytöllä, kun hälytys on aktivoitu. Näytöllä
näkyy ”– –”, kun hälytystä ei ole aktivoitu.
näkyy
[ LIGHT ] [ ST/STP ]
[ MODE ] [ RESET ]
Suomi
Page 40

6. Ajanotto
[ LIGHT ] [ ST/STP ]
[ MODE ] [ RESET ]
1. Paina useita kertoja [ MODE ], kunnes näytöllä näkyy ”STW”.
2. Aloita ajanotto painamalla [ ST/STP ]. Kun ajanotto alkaa, näytöllä näkyy ”ST”.
3. Voit ottaa väliajan painamalla [ RESET ]. Näytöllä näkyy ”SP”, ja ajanotto jatkuu.
4. Siirry takaisin ajanottotilaan painamalla [ RESET ]. Näytöllä näkyy
ajanottoaika (kokonaisaika ajanoton alusta).
5. Pysäytä ajanotto painamalla uudelleen [ ST/STP ]. Näytöllä vilkkuu ”ST”.
6. Kun ajanotto on pysäytetty, nollaa ajanotto painamalla [ RESET ].
7. Paristot
Sykemittarissa ja sykevyössä on CR2032-paristot.
Paristot kestävät noin vuoden normaalikäytössä. Vaihda sekä sykemittarin että
sykevyön paristot samanaikaisesti.
Varoitus! Paristot sisältävät vaarallisia aineita. Älä jätä paristoja lasten ulottuville.
Suomi
Jos paristo niellään, ota välittömästi yhteys lääkäriin.
Sykemittarin pariston vaihtaminen
Huom.! Sykemittarin pariston vaihtaminen on vaikeaa, ja väärin vaihdettu
paristo tai väärien työkalujen käyttäminen saattaa vahingoittaa sykemittaria.
Takuu ei kata pariston vaihdon aiheuttamia vikoja.
Vain valtuutettu henkilö saa avata sykemittarin rungon. Jätä pariston vaihto
kellosepälle, jos et ole varma, kuinka paristo vaihdetaan.
Sykevyön pariston vaihtaminen
1. Kierrä paristolokeron kantta vastapäivään niin, että sykevyön nuolikuvake
siirtyy kohdasta CLOSE kohtaan OPEN.
2. Avaa kansi. Huom.! Kannessa on ohut O-rengas, joka estää kosteuden
pääsemisen paristolokeroon. Varmista, että O-rengas ei katoa.
40 41
Page 41

3. Poista vanha paristo ja aseta tilalle uusi CR2032-paristo.
Huom.! Huomioi paristolokeron pohjan napaisuusmerkinnät.
Pariston plusnavan tulee osoittaa ylöspäin, ja paristo tulee työntää
paristolokeron pieneen syvennykseen. Varmista, että O-rengas ei
vahingoitu paristonvaihdossa.
4. Laita kansi takaisin paikalleen. Kannen pisteen tulee olla ensin kohdassa
OPEN. Sulje kansi kiertämällä sitä myötäpäivään niin, että piste on
kohdassa CLOSE.
8. Huolto ja puhdistaminen
• Käsittele sykemittaria ja sykevyötä varoen. Älä altista niitä iskuille.
• Puhdista sykemittari ja sykevyö kevyesti kostutetulla, pehmeällä liinalla.
• Säilytä sykemittaria ja sykevyötä kuivassa tilassa, jos ne ovat pitkään
käyttämättä.
9. Vianhaku
Syke ei näy sykemittarin näytöllä.
Syke näkyy
epäsäännöllisesti,
tai se pysähtyy
ajoittain.
Sykemittari piippaa jatkuvasti.
Näyttö jumittuu. Staattinen sähköisyys saattaa häiritä siirtoa. Näyttö
• Sykevyö on asetettu väärin.
• Sykevyön kontaktipinnat ovat kuivat. Kostuta ne.
• Sykevyö tulee asettaa suoraan ihoa vasten.
• Sykemittari ja sykevyö ovat liian kaukana toisistaan.
• Sykevyön paristo saattaa olla lopussa, tarkista.
Vaihda tarvittaessa.
• Muuntajien, tietokoneiden, voimalinjojen ym.
sähkömagneettiset kentät saattavat häiritä
tiedonsiirtoa.
Sykehälytys on aktivoitu. Syke ylittää tai alittaa
asetetun arvon. Sykehälytyksen voi sammuttaa.
• Paina useita kertoja [ MODE ], kunnes näytöllä
näkyy ”HRM”.
• Paina [ LIGHT ] muutaman sekunnin ajan, ”Hold”
ja ”Adjust” vilkkuvat. Näytöllä näkyy muutaman
sekunnin kuluttua ”AGE” (ikä), siirry eteenpäin kohtaan
Alarm painamalla [ MODE ]. Valit se OFF (sammuta
hälytys) painamalla [ RESET ].
saattaa jumittua pariston vaihtamisen jälkeen. Palauta
asetukset (RESET): Palauta asetukset painamalla
sykemittarin kaikkia neljää painiketta samanaikaisesti.
Suomi
41
Page 42

10. Kierrätys
Kierrätä tuote asianmukaisesti, kun poistat sen käytöstä.
Tarkempia kierrätysohjeita saat kuntasi jäteneuvonnasta.
11. Tekniset tiedot
Sykemittari
• Vesitiiviys 3 ATM
• Käyttölämpötila: −5 ºC…50 ºC
• Sykkeen näyttö: 30–240 bpm (sykettä minuutissa)
• Materiaali:
- Lasi Akryyli
- Runko ABS-muovi
- Painikkeet ABS-muovi
- Metalliosat Ruostumaton teräs
- Ranneke Polyuretaani
• 1×CR2032-paristo (sisältyy)
Sykevyö
• Roisketiiviys 1 ATM
• Käyttölämpötila: −5 ºC…50 ºC
Suomi
• Materiaali: ABS, polyuretaani
• 1×CR2032-paristo (sisältyy)
Page 43

Pulsuhr mit Brustgurt
Art.Nr. 31-8539
Vor Inbetriebnahme diekomplette Bedienungsanleitung durchlesen und
aufbewahren. Irrtümer, Abweichungen und Änderungen behalten wir uns
vor. Bei technischen Problemen oder anderen Fragen freut sich unser
Kundenservice über eine Kontaktaufnahme (Kontakt siehe Rückseite).
Inhalt
1. Sicherheitshinweise .................................................. 44
2. Produktbeschreibung ............................................... 44
Funktion der Tasten ........................................................................... 44
Brustgurt ............................................................................................. 45
3. Einstellungen ............................................................. 45
Einstellen der Zeit ............................................................................. 45
Einstellen des gewünschten Pulsniveaus für dasTraining ..............46
4. Bedienung ................................................................. 47
Vor der Inbetriebnahme ..................................................................... 47
Bei Beginn des Trainings ................................................................... 47
Anzeige der Pulswerte während des Trainings ................................. 48
Werte des letzten Trainings anzeigen
(bevor Daten gespeichert werden) ................................................... 49
Gespeicherte Werte anzeigen ........................................................... 49
5. Alarm (Zeit) ................................................................ 50
6. Stoppuhr ................................................................... 51
7. Batterien .................................................................... 51
Batteriewechsel Uhr ........................................................................... 51
Batteriewechsel Brustgurt ................................................................. 52
8. Pflege und Wartung .................................................. 52
9. Fehlersuche ............................................................... 52
10. Hinweise zur Entsorgung ......................................... 53
11. Technische Daten ..................................................... 53
Pulsuhr ................................................................................................ 53
Brustgurt ............................................................................................. 53
Deutsch
43
Page 44

1. Sicherheitshinweise
• Bei Unsicherheit vor Einsatz der Pulsuhr einen Arzt oder Trainer bezüglich
der möglichen Intensität des Trainings um Rat fragen.
• Für eine ungefähre Berechnung des Maximalpulses daseigene Alter von
dem Wert 220 abziehen. Ein Beispiel: Bei einem Alter von 40 beträgt der
maximale Puls 220–40=180.
2. Produktbeschreibung
• Basisfunktionen wie Pulsmessgerät, Kalorienverbrauch, Stoppuhr,
Uhrzeitanzeige, Datumanzeige usw.
• Brustgurt mit Funkübertragung zur Uhr.
• Inkl. CR2032-Batterien für Uhr und Brustgurt.
Funktion der Tasten
[ MODE ]
• Navigation durch dieMenüs:
DATA (Anzeige der Pulsdaten), ALARM (Zeitalarm),
STW (Stoppuhr), TIME (Zeit) und HRM (Pulsmessgerät)
• Weiter zur nächsten Einstellung
[ LIGHT ]
Deutsch
• DieHintergrundbeleuchtung für einige Sekunden einschalten
• Gedrückt halten um dieEinstellungssequenz im gewählten Menü zu öffnen.
• Gedrückt halten um dieneuesten Daten zu speichern und dieälteren
zu löschen, sowohl Pulsdaten als auch Trainingszeiten werden gelöscht.
Hinweis: Beim Drücken auf [ LIGHT ] werden alle zuvor gespeicherten
Daten gelöscht und können dann auf keine Weise mehr angezeigt werden.
• Empfehlung: Damit Trainingsdaten längerer Perioden nicht verloren
gehen, diese auf schreiben bevor neue Daten gespeichert werden.
[ ST/STP ] Start/Stopp
• Den Wert erhöhen
• Im HRM-Modus eine Pause in der Trainingsdauer einlegen
[ RESET ]
• Den Wert senken
• Durch dieUntermenüs navigieren
• Anzeige des Körpergewichts in lb oder kg einstellen
• DieZeitmessung im STW-Modus (Stoppuhr) zurücksetzen
44 45
Adjust/
Light
Mode
Start/
Stop
Reset
Page 45

Brustgurt
1. Um den Brustgurt zu öffnen,
dierechteckigen Schnallen vom Band
abnehmen.
2. Den Brustgurt über dem Brustkorb
anbringen und diebeiden Schnallen
wieder zusammendrücken.
3. Sicherstellen, dass der Brustgurt richtig herum aufliegt, siehe Markierung
ander Innenseite: R (rechts) und L (links). Der Brustgurt muss Kontakt mit
der Haut haben.
L R
4. Den Brustgurt etwas von der Haut wegziehen und beide Kontaktflächen
etwas befeuchten um dieVerbindung zu verbessern.
3. Einstellungen
Einstellen der Zeit
1. Mehrmals auf MODE] drücken, bis auf dem
Display „TIME“ angezeigt wird.
2. [ LIGHT ] einige Sekunden gedrückt halten,
bis „Hold“ und „Adjust“ blinken. Nach ein
paar Sekunden wird HOUR angezeigt und
dieZeitanzeige blinkt.
3. Um dierichtige Stunde einzustellen, auf
[ ST/STP ] (nach oben) oder [ RESET ]
(nach unten) drücken.
[ LIGHT ] [ ST/STP ]
[ MODE ] [ RESET ]
Deutsch
4. Auf [ MODE ] drücken, um zu bestätigen und zur folgenden Einstellung
überzugehen. Auf dieselbe Weise MIN (Minuten), SEC (Sekunden),
YEAR (Jahr), MONTH (Monat), DAY (Tag) und 12–24H einzustellen
(12- oder 24-Stundenanzeige der Uhrzeit).
5. Zum Verlassen des Einstellungsmodus auf [ LIGHT ] drücken.
Page 46

Einstellen des gewünschten Pulsniveaus
für dasTraining
Bei Unsicherheit vor Einsatz der Pulsuhr einen Arzt oder Trainer bezüglich der
möglichen Intensität des Trainings um Rat fragen.
Für eine ungefähre Berechnung des Maximalpulses daseigene Alter von dem
Wert 220 (Männer) bzw. 226 (Frauen) abziehen. Ein Beispiel: Bei einem Mann
im Alter von 40 beträgt der maximale Puls 220–40=180.
Dasgewünschte Trainingsniveau auswählen
Es stehen 3 voreingestellte Pulsniveaus zur Auswahl:
• Pulsniveau 1 (55–70 % des Höchstpulses)
• Pulsniveau 2 (70–80 % des Höchstpulses)
• Pulsniveau 3 (80–100 % des Höchstpulses)
Dasindividuell geeignete Pulsniveau in den persönlichen Einstellungen angeben.
Diepersönlichen Werte können folgendermaßen eingestellt werden:
1. Mehrmals auf MODE] drücken, bis auf dem Display „HRM“ angezeigt wird.
Deutsch
2. [ LIGHT ] einige Sekunden gedrückt halten, bis „Hold“ und „Adjust“ blinken.
Nach wenigen Sekunden wird „AGE“ (Alter) angezeigt, daseigene Alter mit
den Tasten [ ST/STP ] (nach oben) oder [ RESET ] (nach unten) einstellen.
Mit [ MODE ] bestätigen.
46 47
Page 47

3. Dieselben Schritte mit den anderen Einstellungen durchführen.
- Sex (Geschlecht).
- Level (Pulsniveau), Pulsniveau 1, 2 oder 3 auswählen. DieEinstellung
schlagen automatisch einen allgemeinen Wert für den niedrigsten (LO)
bzw. höchsten (HI) Puls vor.
- HI (der höchste Puls entsprechend dem eingestellten Pulsniveau
wird angezeigt). Den voreingestellten Wert bestätigen oder auf einen
individuellen Wert abändern.
- LO (der niedrigste Puls entsprechend dem eingestellten Pulsniveau
wird angezeigt). Den voreingestellten Wert bestätigen oder auf einen
individuellen Wert abändern.
- UNIT (Gewicht in kg oder lb).
- WT (dasGewicht in der zuvor eingestellten Einheit angeben).
- ALARM (signalisiert wenn der Puls außerhalb der eingestellten
Mindest- und Höchstwerten liegt). ON piepst regelmäßig wenn der
Puls außerhalb der Einstellungen liegt. OFF piepst nicht wenn der Puls
außerhalb der Einstellungen liegt.
4. Um dieALARM-Einstellungen (Pulsalarm) zu ändern, dieSchritte 1–3
wiederholen und Folgendes auswählen: ON oder OFF.
Beispiel: Einstellbeispiel: 42 Jahre > Mann > Pulsniveau 2 > HI (zeigt 126 an) >
LO (zeigt 99 an) > kg > Alarm ON. Mit diesen Einstellungen schlägt diePulsuhr
Alarm, wenn der Puls unter 99 oder über 126 liegt. Treffen diese Werte nicht zu:
DieEinstellungen erneut tätigen und eigene Werte für HI und/oder LO angeben.
4. Bedienung
Vor der Inbetriebnahme
1. Den Brustgurt nach Anleitung ander Brust befestigen.
2. Sofern nicht bereits geschehen, dasgewünschte Pulsniveau einstellen.
Bei Beginn des Trainings
3. Mehrmals auf [ MODE ] drücken, bis auf dem
Display „HRM“ und der Puls angezeigt wird.
[ ST/STP ]
Deutsch
[ MODE ]
47
Page 48

4. Auf [ ST/STP ] drücken um Kontakt zum Brustgurt herzustellen und mit
dem Training loszulegen. DieZeitmessung ander oberen Displaykante
startet, der Puls wird angezeigt. Hiermit hat dasTraining begonnen
und diePulswerte werden gespeichert. Erneut auf [ ST/STP ] drücken
um dasTraining zu unterbrechen, dann wird auch dieZeitmessung
angehalten.
5. DieUhr empfängt automatisch dieSignale
des Brustgurts und auf dem Display wird der
aktuelle Puls angezeigt.
- Wenn dieUhr versucht, dasPulssignal
vom Brustgurt zu finden, blinken auf
dem Display 3 waagrechte Striche.
- Haben der Brustgurt und dieUhr keinen
Kontakt, werden 3 waagrechte Striche auf dem Display angezeigt.
Dies kann darauf beruhen, dass der Abstand zwischen Brustgurt
und Uhr zu groß ist, dieReichweite beträgt ca. 80 cm.
Hinweis: Haben Brustgurt und Uhr keinen Kontakt, werden 3 waagrechte
Striche angezeigt, aber auch bei verkleinertem Abstand werden dieStriche
weiterhin angezeigt. Dann erneut auf [ ST/STP ] drücken um Pulsmessung
zu starten.
6. Auf [ ST/STP ] drücken um dasTraining abzuschließen.
7. Um dieDaten dieser Trainingseinheit zurückzusetzen und zu speichern:
Deutsch
[ LIGHT ] einige Sekunden gedrückt halten, bis „Hold“ und „Adjust“ blinken
und dieDaten zurückgesetzt werden. Dies muss ausgeführt werden, um
dieUhr vor der nächsten Trainingseinheit zurückzusetzen.
Anzeige der Pulswerte während des Trainings
• Der Puls liegt innerhalb des eingestellten
Pulsniveaus (es werden keine Pfeile angezeigt).
• Liegt der Puls über bzw. unter dem Niveau,
wird Folgendes angezeigt: ↑ (Puls über dem
einge stellten Wert) oder ↓ (Puls unter dem
eingestellten Wert). Wenn der Pulsalarm aktiviert
ist (Modus ON), piepst dasAlarmsignal der
Uhr regelmäßig wenn der Puls außerhalb der
Einstellung liegt.
48 49
Page 49

Werte des letzten Trainings anzeigen
(bevor Daten gespeichert werden)
[ ST/STP ]
[ RESET ]
1. Mehrmals auf [ MODE ] drücken, bis auf dem Display „HRM“ angezeigt wird.
2. Mehrmals auf [ RESET ] drücken um diegewünschte Anzeige der Werte
des letzten Trainings auszuwählen. Zwischen folgenden Möglichkeiten
auswählen:
- XX´XX´XX Anzeige der Trainingsdauer
- BPM % MAX höchster Puls in % des eingestellten Höchstpulses
- KCAL Kalorienverbrauch
- IN ZONE BPM Zeitdauer, während der der Puls innerhalb des
eingestellten Niveaus war
- HI höchster Puls
- X:XX.XX aktuelle Uhrzeit
Gespeicherte Werte anzeigen
1. Mehrmals auf [ MODE ] drücken, bis auf dem Display „DATA“ angezeigt wird.
Deutsch
[ MODE ] [ RESET ]
Page 50

2. Mehrmals auf [ RESET ] drücken um diegewünschte Anzeige der Werte
des letzten gespeicherten Trainings auszuwählen.
- TOTAL Anzeige der Trainingsdauer
- INZONE Zeitdauer, während der der Puls innerhalb des eingestellten
Niveaus war
- CAL Kalorienverbrauch
- HIGH Höchstpuls
- AVG Durchschnittspuls
5. Alarm (Zeit)
1. Mehrmals auf [ MODE ] drücken, bis auf
dem Display „ALARM“ angezeigt wird.
2. [ LIGHT ] einige Sekunden gedrückt halten,
bis „Hold“ und „Adjust“ blinken. Nach ein
paar Sekunden wird „HOUR“ angezeigt und
dieZeitanzeige blinkt.
3. Um dierichtige Stunde einzustellen, auf
[ ST/STP ] (nach oben) oder [ RESET ] (nach
unten) drücken.
4. Auf [ MODE ] drücken um zu bestätigen
und mit der Einstellung der Minuten
fortzusetzen.
5. Zum Verlassen des Einstellungsmodus auf
Deutsch
[ LIGHT ] drücken.
6. Den Alarm mit [ ST/STP ] ein-/ ausschalten.
DasAlarmsymbol
Alarm angezeigt. Ist der Alarm deaktiviert,
wird „– –“ angezeigt.
wird bei aktiviertem
[ LIGHT ] [ ST/STP ]
[ MODE ] [ RESET ]
50 51
Page 51

6. Stoppuhr
[ LIGHT ] [ ST/STP ]
[ MODE ] [ RESET ]
1. Mehrmals auf [ MODE ] drücken, bis auf dem Display „STW“ angezeigt wird.
2. DieZeitmessung mit [ ST/STP ] starten. Wenn dieZeit gemessen wird,
wird auf dem Display „ST“ angezeigt.
3. Auf [ RESET ] drücken um dieZwischenzeit abzurufen, „SP“ wird auf dem
Display angezeigt, dieZeitmessung läuft weiter.
4. Erneut auf [ RESET ] drücken um zurück zur Zeitmessung zu gelangen.
DieGesamtzeitdauer seit dem Start wird angezeigt.
5. Erneut auf [ ST/STP ] drücken um dieZeitmessung zu stoppen oder zu
unterbrechen. Dann blinkt „ST“.
6. Wurde dieZeit gestoppt, auf [ RESET ] drücken um dieStoppuhr
zurückzusetzen.
7. Batterien
DiePulsuhr und der Brustgurt benutzen dieselbe Art von Batterien (CR2032).
DieBatterien haben bei normaler Benutzung eine Lebensdauer von ca. 1 Jahr.
Sicherstellen, dass dieBatterien in Uhr und Pulsgurt gleichzeitig gewechselt werden.
Warnung: DieBatterien enthalten gefährliche Stoffe. DieBatterien außerhalb
der Reichweite von Kindern halten. Hat jemand eine Batterie verschluckt,
sofort einen Arzt kontaktieren.
Batteriewechsel Uhr
Hinweis: DieBatterie der Uhr ist schwierig zu wechseln und dieUhr kann
bei der Benutzung von falschem Werkzeug oder der falschen Methode leicht
beschädigt werden. DieGarantie gilt nicht bei Fehlern, diebeim Batteriewechsel
aufgetreten sind.
DasUhrengehäuse darf daher ausschließlich von einer qualifizierten Person
geöffnet werden. Bei Zweifeln über dieVorgehensweise den Batteriewechsel
beim Uhrmacher durchführen lassen.
Deutsch
51
Page 52

Batteriewechsel Brustgurt
1. Den Deckel des Batteriehalters gegen den Uhrzeigersinn drehen, sodass
dasPfeilsymbol am Brustgurt von CLOSE auf OPEN verstellt wird.
2. Den Deckel entfernen. Hinweis: Der Deckel hat einen dünnen O-Ring,
der dafür sorgt, dass keine Feuchtigkeit in den Batteriehalter eindringt,
daher aufpassen, dass dieser nicht verloren geht.
3. Batterie herausnehmen und eine neue Batterie (CR2032) einsetzen.
Hinweis: DieMarkierung unten im Batteriefach zeigt diekorrekte
Ausrichtung der Batterien an. Der Pluspol der Batterie muss nach oben
zum Benutzer zeigen und dieBatterie muss unter den kleinen Zapfen in
der Batteriehalterung geschoben werden. Sicherstellen, dass der O-Ring
beim Batteriewechsel nicht beschädigt wurde.
4. Den Deckel mit dem Punkt (am Deckel) zu OPEN (am Brustgurt) hin
anlegen, den Deckel durch eine Drehung mit dem Uhrzeigersinn bis auf
CLOSE schließen.
8. Pflege und Wartung
• Uhr und Brustgurt sorgsam behandeln. Keinen Schlägen und Stößen
aussetzen.
• Uhr und Brustgurt mit einem angefeuchteten, weichen Tuch reinigen.
• Uhr und Brustgurt bei längerer Nichtbenutzung aneinem trockenen Ort
Deutsch
aufbewahren.
9. Fehlersuche
Der Puls wird
auf der Uhr nicht
angezeigt.
Der Puls wird
unregelmäßig
angezeigt oder
hält manchmal
an.
• Der Brustgurt ist falsch angebracht.
• DieKontaktflächen des Brustgurtes sind zu trocken,
diese anfeuchten.
• Der Brustgurt muss Kontakt mit der Haut haben.
• DieEntfernung zwischen Uhr und Brustgurt ist zu groß.
• DieBatterie im Brustgurt ist möglicherweise
schwach, überprüfen. Bei Bedarf auswechseln.
• DieDatenübertragung wird evtl. von elektromagnetischen Feldern gestört, z. B. von einem Trafo,
einem Computer oder einer Stromleitung.
52 53
Page 53

DieUhr piepst
kontinuierlich.
DasDisplay
hängt sich auf.
Der Pulsalarm ist aktiviert, der Puls liegt außerhalb der
einge stellten Mindest- oder Höchstwerte. Der Pulsalarm
kann ausgeschaltet werden.
• Mehrmals auf [ MODE ] drücken, bis auf dem Display
„HRM“ angezeigt wird.
• [ LIGHT ] einige Sekunden gedrückt halten, bis Hold
und Adjust blinken. Nach ein paar Sekunden wird
„AGE“ (Alter) angezeigt, mit [ MODE ] weiter zu Alarm
gehen. Auf [ RESET ] drücken um OFF auszuwählen
(Alarm ausschalten).
DieÜbertragung wird evtl. durch statische Elektrizität
gestört. DasDisplay kann sich auch nach einem
Batteriewechsel aufhängen. DasGerät zurücksetzen
(RESET): Alle vier Tasten der Uhr gleichzeitig gedrückt
halten um sie auf dieWerkseinstellung zurückzusetzen.
10. Hinweise zur Entsorgung
Bitte dasProdukt entsprechend den lokalen Bestimmungen entsorgen.
Weitere Informationen sind von der Gemeinde oder den kommunalen
Entsorgungsbetrieben erhältlich.
11. Technische Daten
Pulsuhr
• Wassergeschützt bis 3 ATM
• Umgebungstemperatur: −5 bis 50°C
• Pulsanzeige. 30–240 bpm (Herzschläge pro Minute)
• Material:
- Uhrenglas Acryl
- Uhrengehäuse ABS-Kunststoff
- Tasten ABS-Kunststoff
- Metallteile Edelstahl
- Armband Polyurethan
• 1×CR2032-Batterie (inklusive)
Brustgurt
• Spritzwassergeschützt bis 1 ATM
• Umgebungstemperatur: −5 bis 50°C
• Material: ABS, Polyurethan
• 1×CR2032-Batterie (inklusive)
53
Deutsch
Page 54

54 55
Page 55

55
Page 56

Sverige
Kundtjänst tel: 0247/445 00
fax: 0247/445 09
e-post: kundtjanst@clasohlson.se
Internet www.clasohlson.se
Post Clas Ohlson AB, 793 85 INSJÖN
Norge
Kundesenter tlf.: 23 21 40 00
faks: 23 21 40 80
e-post: kundesenter@clasohlson.no
Internett www.clasohlson.no
Post Clas Ohlson AS, Postboks 485 Sentrum, 0105 OSLO
Suomi
Asiakaspalvelu puh.: 020 111 2222
sähköposti: asiakaspalvelu@clasohlson.fi
Internet www.clasohlson.fi
Osoite Clas Ohlson Oy, Maistraatinportti 4 A , 00240 HELSINKI
Great Britain
Customer Ser vice contact number: 020 8247 9300
e-mail: customerservice@clasohlson.co.uk
Internet www.clasohlson.co.uk
Postal 10 – 13 Market Place
Kingston Upon Thames
Surrey
KT 1 1JZ
Deutschland
Kundenservice Unsere Homepage www.clasohlson.de besuchen und
auf Kundenservice klicken.
 Loading...