

Page 1
Plug-in Timer
Art.no 18-2023 Model 11GW/3A-UK
36-2899 11GW/3A
Please read theentire instruction manual before using theproduct and save it for future reference. We reserve theright
for any errors in text or images and any necessary changes made to technical data. If you have any questions regarding
technical problems please contact our Customer Services.
English
Safety
• Electrical devices connected to thetimer switch
should be intended for use with a230 V AC,
50 Hz power supply.
• The timer is only intended for indoor use.
• Make sure that theplug is pressed all theway into
the timer switch.
• Do not expose thetimer to moisture or splashes.
• Ensure that theconnected appliance does not pose
afire hazard.
• If you need to clean thetimer, disconnect it from
the mains and wipe it clean with adry towel.
Do not use water or any other liquid for cleaning.
Product description
Week timer. Minimum timer activation time: 1 hr and
45 min (each tappet represents 1 hour and 45 min).
Switch for selecting timer control or continuous
wall outlet function.
2
19
1
20
24
21
23
22
4
3
1
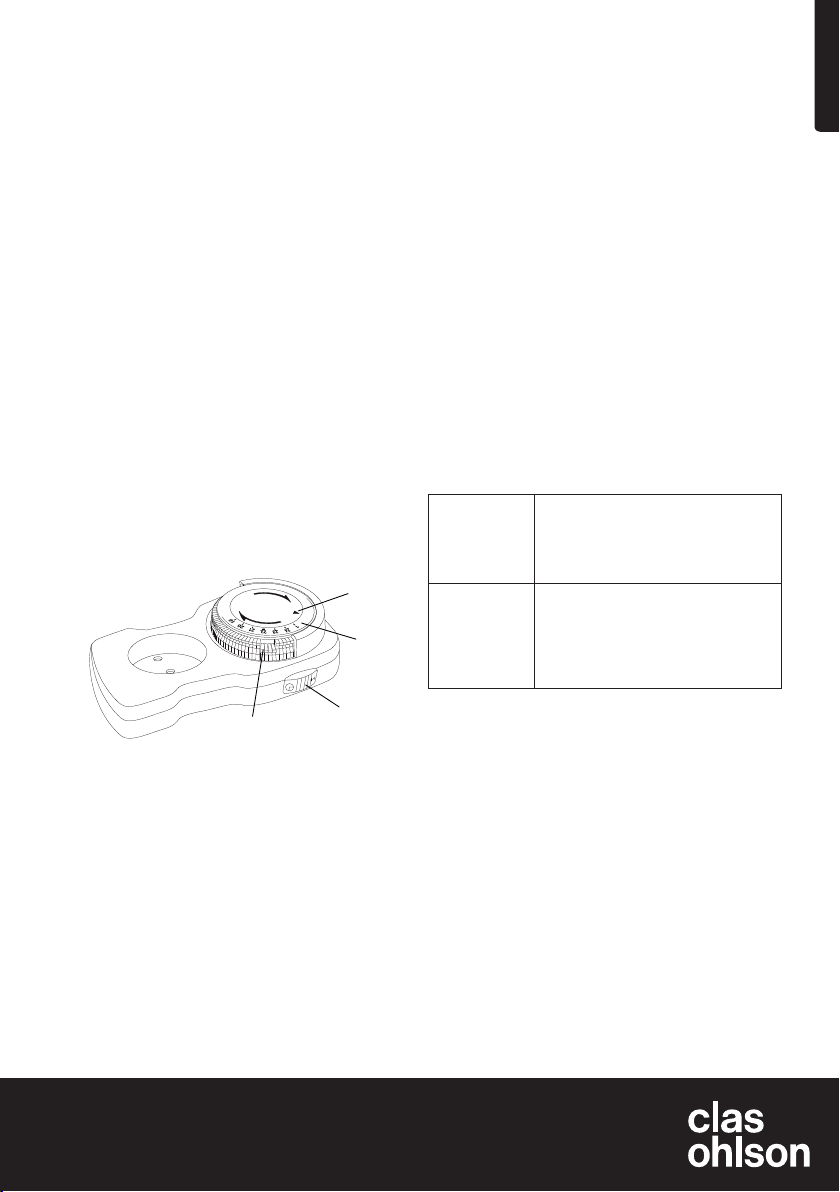
1. Time segment tappets
2. Current time indication arrow
3. Selector switch
4. Time setting dial
Operating instructions
Use as astandard wall plug
Set theselector switch (3) to the( | ) position. Connect thelight,
appliance, etc. and make sure that it is turned on.
Timer controlled
The settings dial (4) has thedays of theweek along with
thehours in aday (2, 6, 10, 14, 18 and 22).
Setting thetimer
Example: If you want thetimer to activate at 6 pm (18:00)
on Wed and turn off at 2 pm (14:00) on Thur: Press in
the 12 tappets from 18 on WEDNESDAY to 14 on THURSDAY. The timer will then be activated between 6 pm on
Wed to 2pm on Thur. With this setting, thetimer will not
reactivate until 6 pm thefollowing Wed.
Setting thecurrent time
1. Set thecurrent time by turning thedial clockwise until
the arrow is aligned with thecurrent time (2).
2. Set theselector switch (3) to the¿ position.
Troubleshooting
The connected
device does
not turn on.
The product
doesn’t seem
to work off
the timer.
The product is
on all thetime.
• Make sure that theproduct works
by connecting it to astandard wall
outlet and test if it works.
• Make sure that theconnected
product is turned on.
Make sure that theselector switch (3)
is in the¿ position.
Disposal
This product should be disposed of in accordance with
local regulations. If you are unsure how to proceed,
contact your local authority.
Specifications
Rated voltage 230 V AC, 50 Hz
Max resistive load 36-2899: 16 A, 3,680 W
18-2023: 13 A, 3,120 W
inductive load max 460 VA
Operating temperature 0–55 °C
Accuracy ± 35 minutes/day
Ver. 20140130
GREAT BRITAIN • CUSTOMER SERVICE
tel: 0845 300 9799 internet: www.clasohlson.com/uk
e-mail customerservice@clasohlson.co.uk
Page 2
Svenska
Kopplingsur
Art.nr 18-2023 Model 11GW/3A-UK
36-2899 11GW/3A
Läs igenom hela bruksanvisningen före användning och spara den sedan för framtida bruk. Vi reserverar oss för ev.
text- och bildfel samt ändringar av tekniska data. Vid tekniska problem eller andra frågor, kontakta vår kundtjänst.
Säkerhet
• Produkter som är anslutna till kopplingsuret ska vara
avsedda för 230 V AC, 50 Hz.
• Kopplingsuret är endast avsett för inomhusbruk.
• Se till att ansluten produkts stickpropp är helt intryckt
i kopplingsurets uttag.
• Utsätt inte kopplingsuret för stänk eller fukt.
• Försäkra dig om att anslutna produkter inte kan utgöra
brandfara.
• Om du behöver rengöra kopplingsuret, ta ur det ur
vägguttaget och torka av det med en torr trasa.
Använd inte vatten eller någon annan vätska.
Produktbeskrivning
Kopplingsur med veckofunktion. Minsta inkopplingstid
ca 1 tim 45 min. Manuell omkopplare mellan tidsstyrt
till-/frånslag och kontinuerlig inkoppling.
2
19
1
20
24
21
23
22
4
3
1
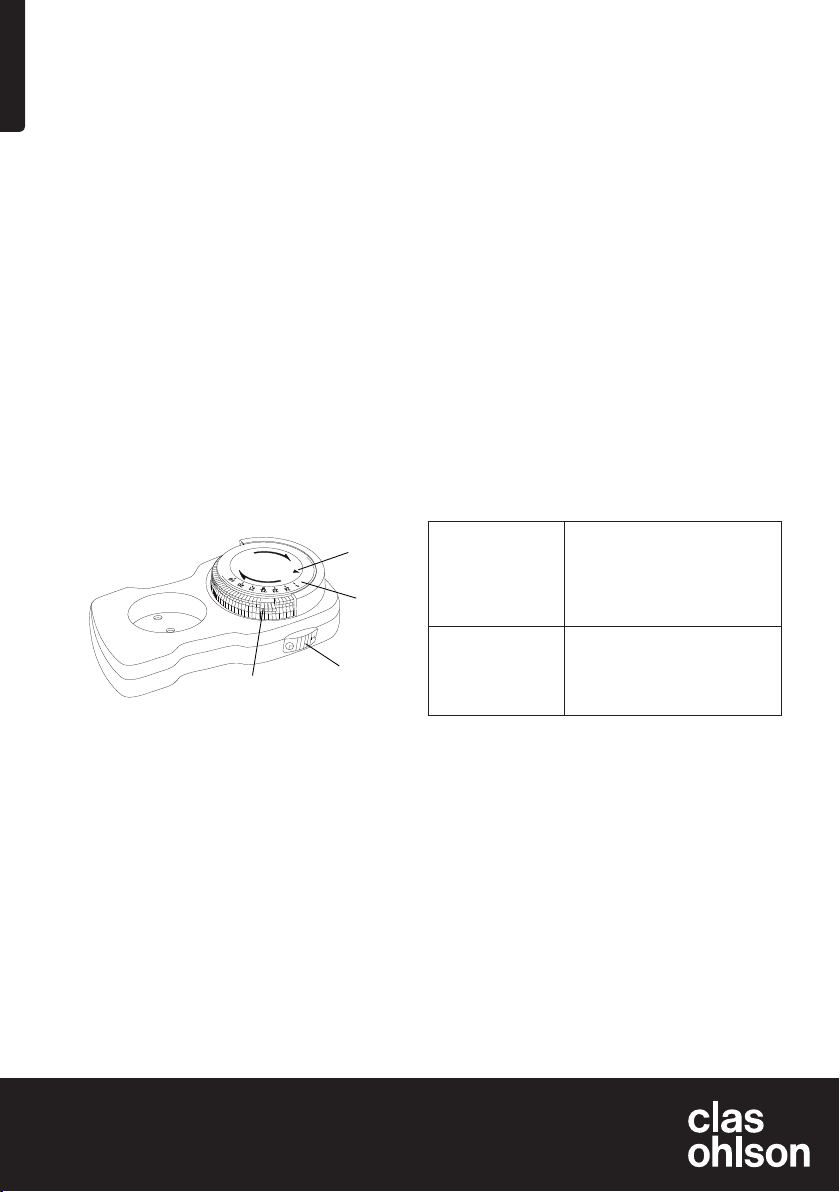
1. Tidssegment
2. Inställningspil för aktuell tid
3. Omkopplare
4. Inställningsskiva
Användning
Kontinuerlig inkoppling
Ställ omkopplaren (3) i läge ( | ). Ansluten belysning etc.
lyser kontinuerligt under förutsättning att dess strömbrytare
är tillslagen.
Tidsstyrt till- och frånslag
Inställningsskivan (4) är märkt med veckodagar samt
2, 6, 10, 14, 18 och 22 vilket symboliserar några av
dygnets timmar.
Ställ in tid för till- och frånslag
Exempel: Om du vill tända belysningen kl. 18.00 på
onsdag och släcka den kl. 14.00 på torsdag: Tryck in
de 12 tidssegmenten mellan markeringen 18 på onsdag
(WEDNESDAY) och markeringen 14 på torsdag (THURSDAY).
Belysningen kommer att vara tänd mellan kl. 18.00 på
onsdag och kl. 14.00 på torsdag. Den kommer sedan
att släckas och vara släckt fram till kl. 18.00 kommande
onsdag, då den automatiskt tänds igen.
Ställ in aktuell tid
1. Ställ in aktuell tid genom att vrida inställningsskivan
medsols tills aktuell tid är vid pilen (2).
2. Ställ omkopplaren (3) i läge ¿.
Felsökning
Den anslutna
produkten lyser eller
startar inte.
Kopplingsuret följer
inte gjorda inställningar. Ansluten
belysning etc.
lyser hela tiden.
• Kontrollera att produkten
fungerar genom att ansluta
den direkt till vägguttaget utan
att använda kopplingsuret.
• Kontrollera att ev. strömbrytare
på produkten är påslagen.
Kontrollera att omkopplaren (3)
står i läge ¿.
Avfallshantering
När du ska göra dig av med produkten ska detta ske enligt
lokala föreskrifter. Är du osäker på hur du ska gå tillväga,
kontakta din kommun.
Specifikationer
Nätanslutning 230 V AC, 50 Hz
Maxbelastning
resistiv last 36-2899: 16 A, 3680 W
18-2023: 13 A, 3120 W
induktiv last max 460 VA
Användningstemp. 0–55 °C
Noggrannhet ± 35 minuter/dygn
Ver. 20140130
SVERIGE • KUNDTJÄNST
tel. 0247/445 00 internet www.clasohlson.se
fax 0247/445 09 e-post kundservice@clasohlson.se
Page 3

Koblingsur
Art.nr. 18-2023 Modell 11GW/3A-UK
36-2899 11GW/3A
Les brukerveiledningen grundig før produktet tas i bruk og ta vare på den for framtidig bruk. Vi reserverer oss mot ev. feil
i tekst og bilde, samt forandringer av tekniske data. Ved tekniske problemer eller spørsmål, ta kontakt med vårt kundesenter.
Norsk
Sikkerhet
• Elektriske apparater som er koblet til koblingsuret skal
være beregnet for 230 V AC, 50 Hz.
• Koblingsuret er kun beregnet til bruk innendørs.
• Påse at det tilkoblede apparatets støpsel er trykket helt
inn i koblingsurets uttak.
• Utsett ikke koblingsuret for fuktighet eller søl.
• Forviss deg om at det tilkoblede produktet ikke
utgjør noen brannfare.
• Hvis koblingsuret trenger å rengjøres må støpselet
trekkes ut av strømuttaket. Tørk det med en tørr klut.
Bruk ikke vann eller annen væske til rengjøringen.
Produktbeskrivelse
Koblingsur med ukesfunksjon. Minste innkoblingstid er ca.
1 time og 45 minutter. Manuell omkobler mellom tidsstyrt
til-/fraslag og kontinuerlig innkobling.
2
19
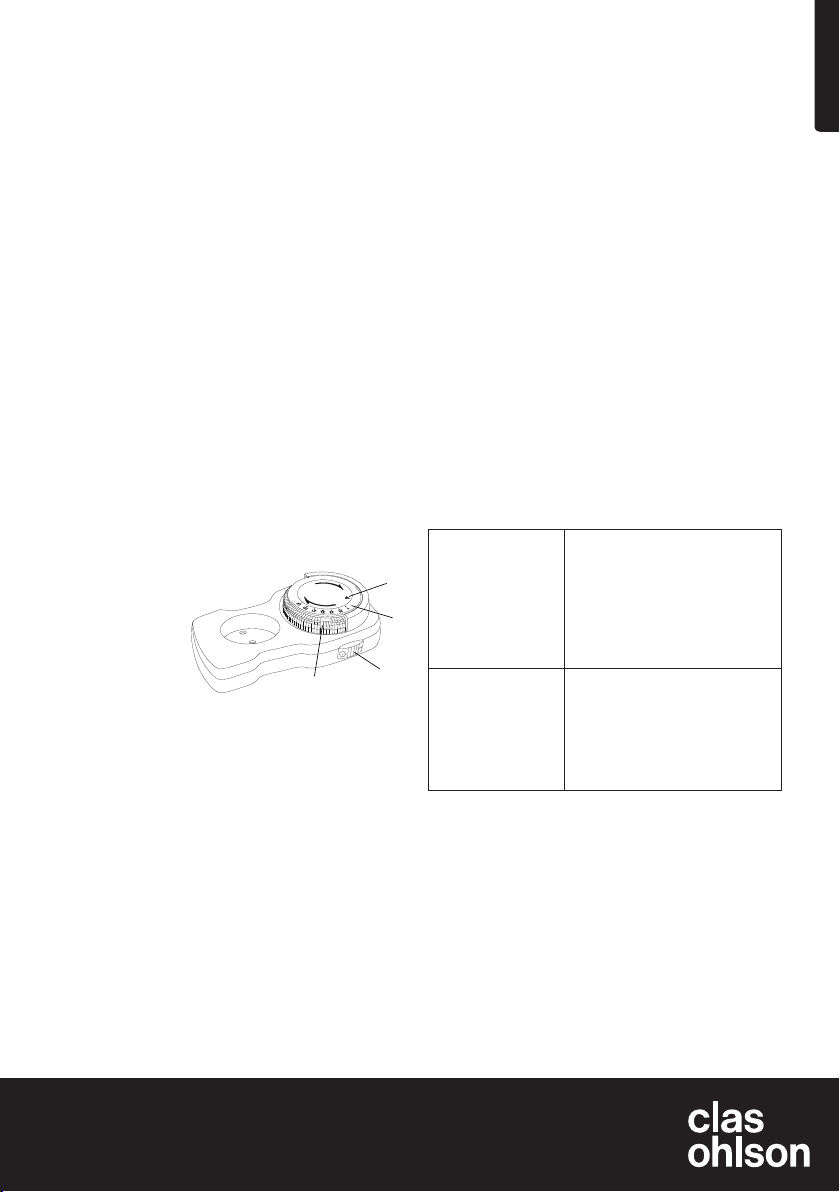
1. Tidssegment
2. Innstillingspil for aktuell tid
3. Bryter
4. Innstillingsskive
1
20
24
21
23
22
4
3
1
Still inn tid for til- og fraslag
Eksempel: Hvis belysningen skal tennes kl. 18.00 på
onsdag og slukkes kl. 14.00 på torsdag: Trykk inn de 12
tidssegmentene mellom markeringen 18 på onsdag
(wednesday) og markeringen 14 på torsdag (thursday).
Belysningen vil da være tent mellom kl. 18.00 på onsdag
og kl. 14.00 på torsdag. Den vil deretter være slukkes og
være slukket fram til kl. 18.00 neste onsdag, for så å
tennes automatisk igjen.
Still inn aktuell tid
1. Still inn aktuell tid ved å vri innstillingsskiven med
urviseren til aktuell tid er ved pilen (2).
2. Sett bryteren (3) på ¿.
Feilsøking
Det tilkoblede produktet
lyser ikke/starter ikke.
Koblingsuret følger ikke
innstillingene. Tilkoblet
produkt lyser/er på hele
tiden.
• Kontroller at produktet
fungerer ved å koble det
direkte til strømuttaket og
ikke via koblingsuret.
• Kontroller at ev. strømbryter
til produktet er skrudd på.
Kontroller at bryteren (3) står i
posisjon ¿.
Avfallshåndtering
Når produktet skal kasseres, må det skje i henhold til
lokale forskrifter. Ved usikkerhet, ta kontakt med lokale
myndigheter.
Bruk
Kontinuerlig innkobling
Still omkobleren (3) på ( | ). Den tilkoblede belysningen etc.
lyser kontinuerlig under forutsetning av at belysningens
strømbryter er koblet til.
Tidsstyrt til- og fraslag
Innstillingsskiven (4) er merket med ukedager samt 2, 6,
10, 14, 18 og 22 som symboliserer noen av døgnets timer.
Spesifikasjoner
Nettspenning 230 V AC, 50 Hz
Maks belastning
resistiv last 36-2899: 16 A, 3680 W
18-2023: 13 A, 3120 W
induktiv last maks 460 VA
Brukstemperatur 0–55 °C
Nøyaktighet ± 35 minutter/døgn
NORGE • KUNDESENTER
tel. 23 21 40 00 internett www.clasohlson.no
fax 23 21 40 80 e-post kundesenter@clasohlson.no
Ver. 20140130
Page 4

Suomi
Ajastin
Tuoteno 18-2023 Malli 11GW/3A-UK
36-2899 11GW/3A
Lue käyttöohjeet ennen tuotteen käyttöönottoa ja säilytä ne tulevaa tarvetta varten. Pidätämme oikeuden teknisten
tietojen muutoksiin. Emme vastaa mahdollisista teksti- tai kuvavirheistä. Jos laitteeseen tulee teknisiä ongelmia, ota
yhteys myymälään tai asiakaspalveluun.
Turvallisuus
• Ajastimeen liitettävien sähkölaitteiden verkkoliitännän
tulee olla 230 V AC, 50 Hz
• Ajastin on tarkoitettu vain sisäkäyttöön.
• Varmista, että ajastimeen liitettävän laitteen pistoke on
painettu ajastimen pistorasian pohjaan asti.
• Älä altista laitetta kosteudelle tai roiskeille.
• Varmista, että liitetyt laitteet eivät aiheuta palovaaraa.
• Jos ajastin pitää puhdistaa, irrota se ensin pistorasiasta
ja pyyhi se kuivalla liinalla. Älä käytä puhdistamiseen
vettä tai muita nesteitä.
Tuotekuvaus
Ajastin, jossa viikkotoiminto. Lyhin kytkentäaika noin 1 t
45 min. Manuaalinen valitsin: valitse aikaohjattu käynnistys/
sammutus tai jatkuva päällekytkentä.
2
19
1. Aikasegmentti
2. Kellonajan asetusnuoli
3. Kytkin
4. Asetuslevy
1
20
24
21
23
22
4
3
1
Aseta päälle- ja poiskytkemisen aika
Esimerkki: Jos haluat kytkeä valaistuksen esim. kello
18.00 keskiviikkona ja sammuttaa sen kello 14.00
torstaina: Paina pohjaan keskiviikon (wednesday) kello
18:n ja torstain (thursday) kello 14:n väliset 12 aikasegmenttiä. Valaisin syttyy nyt keskiviikkona kello 18.00 ja
sammuu kello 14.00 torstaina. Tämän jälkeen valaistus
on sammutettu keskiviikkoiltaan kello 18.00 asti, jolloin se
syttyy automaattisesti.
Aseta kellonaika
1. Aseta kellonaika kääntämällä asetuslevyä myötäpäivään, kunnes nuoli (2) osoittaa oikeaa aikaa.
2. Aseta kytkin (3) asentoon ¿.
Vianetsintä
Liitetty laite ei mene
päälle.
Ajastin ei toimi
tehtyjen asetusten
mukaan. Liitetty
valaisin tms. on
päällä jatkuvasti.
• Liitä laite suoraan pistorasiaan
ilman ajastinta varmistaaksesi,
että laite toimii.
• Varmista, että laitteen mahdollinen virtakytkin on päällä.
Varmista, että kytkin (3) on
asennossa ¿.
Kierrättäminen
Kierrätä tuote asianmukaisesti, kun poistat sen käytöstä.
Tarkempia kierrätysohjeita saat kuntasi jäteneuvonnasta.
Käyttö
Jatkuva päällekytkentä
Aseta kytkin (3) asentoon ( | ). Liitetty valaisin tms. palaa
jatkuvasti, jos sen virtakytkin on päällä.
Aikaohjattu päälle- ja poiskytkentä
Asetuslevyyn (4) on merkitty viikonpäivät ja tunnit 2, 6, 10,
14, 18 ja 22.
SUOMI •
puh. 020 111 2222 kotisivu www.clasohlson.fi
sähköposti asiakaspalvelu@clasohlson.fi
ASIAKASPALVELU
Tekniset tiedot
Verkkoliitäntä 230 V AC, 50 Hz
Suurin kuormitus
resistiiven kuorma 36-2899: 16 A, 3680 W
18-2023: 13 A, 3120 W
induktiiven kuorma max 460 VA
Käyttölämpötila 0–55 °C
Tarkkuus ± 35 minuuttia/vuorokausi
Ver. 20140130
Page 5
Zeitschaltuhr
Art.Nr. 18-2023 Model 11GW/3A-UK
36-2899 11GW/3A
Vor Inbetriebnahme diekomplette Bedienungsanleitung durchlesen und aufbewahren. Irrtümer, Abweichungen und
Änderungen behalten wir uns vor. Bei technischen Problemen oder anderen Fragen freut sich unser Kundenservice
über eine Kontaktaufnahme.
Sicherheitshinweise
• Nur Verbraucher anschließen, diefür eine Netzspannung
von 230 V AC/50 Hz vorgesehen sind.
• Das Gerät ist nur zur Verwendung in Innenräumen geeignet.
• Dafür sorgen, dass derNetzstecker des Verbrauchers
komplett in dieKupplung derZeitschaltuhr eingesteckt ist.
• Das Gerät niemals für Spritzer oder Feuchtigkeit aussetzen.
• Sicherstellen, dass von den Verbrauchern keine Brand-
gefahr ausgeht.
• Die Zeitschaltuhr vor derReinigung aus derNetzsteckdose ziehen und dieangeschlossenen Verbraucher
abstecken. Danach dasGerät mit einem trockenen
Tuch reinigen. Niemals Wasser oder andere Flüssigkeiten benutzen.
Produktbeschreibung
Zeitschaltuhr mit Wochenprogrammierung. Kürzestes
Schaltintervall ca. 1 Std. und 45 min. Handwechselschalter
zwischen zeitgesteuerter Ein-/Ausschaltung und Dauerbetrieb.
19
1
20
24
21
23
22
1
1. Kipphebel für dieSchaltzeiten
2. Einstellpfeil für dieaktuelle Uhrzeit
3. Handschalter
4. Einstellrad
Einstellen derSchaltzeiten
Beispiel: Zum Einschalten derBeleuchtung um 18:00 Uhr
mittwochs und Ausschalten um 14:00 Uhr donnerstags:
Die 12 Kipphebel zwischen derMarkierung 18 am Mittwoch
(WEDNESDAY) und derMarkierung 14 am Donnerstag
(THURSDAY) herunterdrücken. Die angeschlossene Beleuchtung wird jetzt zwischen 18:00 Uhr am Mittwoch bis 14:00
Uhr am Donnerstag leuchten. Dann wird dieBeleuchtung
ausgeschaltet und bleibt so bis um 18:00 Uhr am kommenden Dienstag, dann wird sie wieder angeschaltet.
Einstellen deraktuellen Uhrzeit
1. Die Uhrzeit einstellen, indem dasEinstellrad im
Uhrzeigersinn gedreht wird, bis derPfeil (2) auf
dieaktuelle Uhrzeit zeigt.
2. Den Handschalter (3) in Position ¿ bringen.
Fehlersuche
2
4
3
Der Verbraucher
leuchtet nicht/
startet nicht.
Die Zeitschaltuhr
schaltet nicht zu
den eingestellten
Zeiten ein und aus.
Angeschlossene
Beleuchtung etc.
leuchtet permanent.
• Die fehlerfreie Funktion des
Verbrauchers kontrollieren,
indem er ohne dieZeitschaltuhr direkt andie Steckdose
angeschlossen wird.
• Sicherstellen, dass ein eventueller Schalter am Verbraucher
eingeschaltet ist.
Sicherstellen, dass derHandschalter (3) in Position ¿ steht.
Deutsch
Anwendung
Dauerbetrieb
Den Handschalter (3) in Position ( | ) versetzen.
Die Angeschlossenen Verbraucher werden permanent
mit Strom versorgt.
Zeitgesteuertes Ein- und Ausschalten
Die Einstellscheibe (4) ist mit den Wochentagen markiert,
sowie 2, 6, 10, 14, 18 und 22 als Symbol einiger Tageszeiten.
DEUTSCHLAND •
KUNDENSERVICE
Hinweise zur Entsorgung
Bitte dasProdukt entsprechend den lokalen Bestimmungen
entsorgen. Weitere Informationen sind von derGemeinde
oder den kommunalen Entsorgungsbetrieben erhältlich.
Technische Daten
Betriebsspannung 230 V AC, 50 Hz
Max. Belastung
Resistive Last 36-2899: 16 A, 3680 W
18-2023: 13 A, 3120 W
Induktive Last max: 460 VA
Betriebstemperatur 0–55 °C
Genauigkeit ± 35 Minuten/Tag
Unsere Homepage www.clasohlson.de besuchen und
auf Kundenservice klicken.
Ver. 20140130
 Loading...