

Page 1
Web Camera
Webbkamera
Webkamera
Web-kamera
Webcam
EnglishSvenskaNorskSuomiDeutsch
Art.no Model
38-4754 106
Ver. 20130321
Page 2

2
Page 3
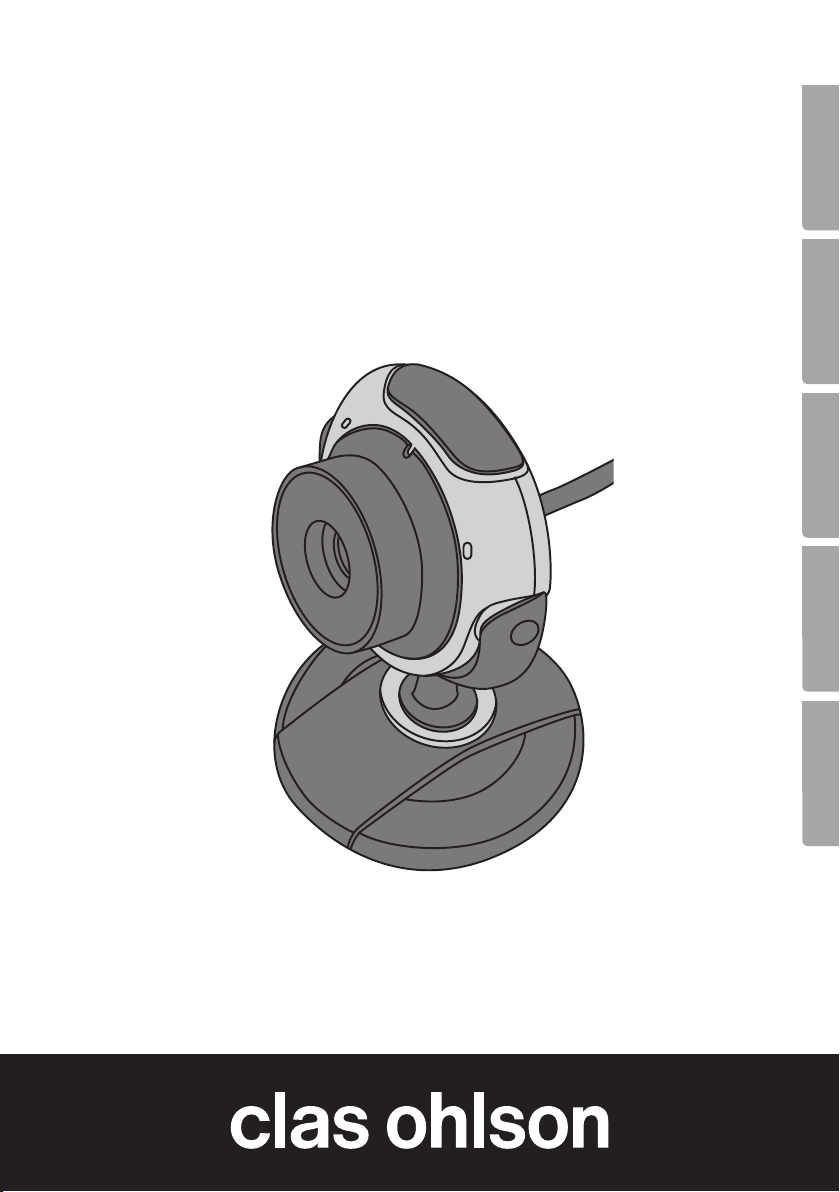
Webcam
Art.no 38-4754 Model 106
Please read the entire instruction manual before use and save it for future reference.
We reserve the right for any errors in text or images and for making any necessary
technical changes to this document. If you should have any questions concerning
technical problems please contact our Customer Services.
Safety
• To avoid damaging the image sensor, do not point the camera directly at the sun.
• Do not expose the camera to oil, steam, dust or water.
• The camera is intended for indoor use only.
• Do not use strong detergents or solvents to clean the lens. Just use a soft cloth.
• The camera can become hot during long periods of use. Always turn the camera
off when it is not in use.
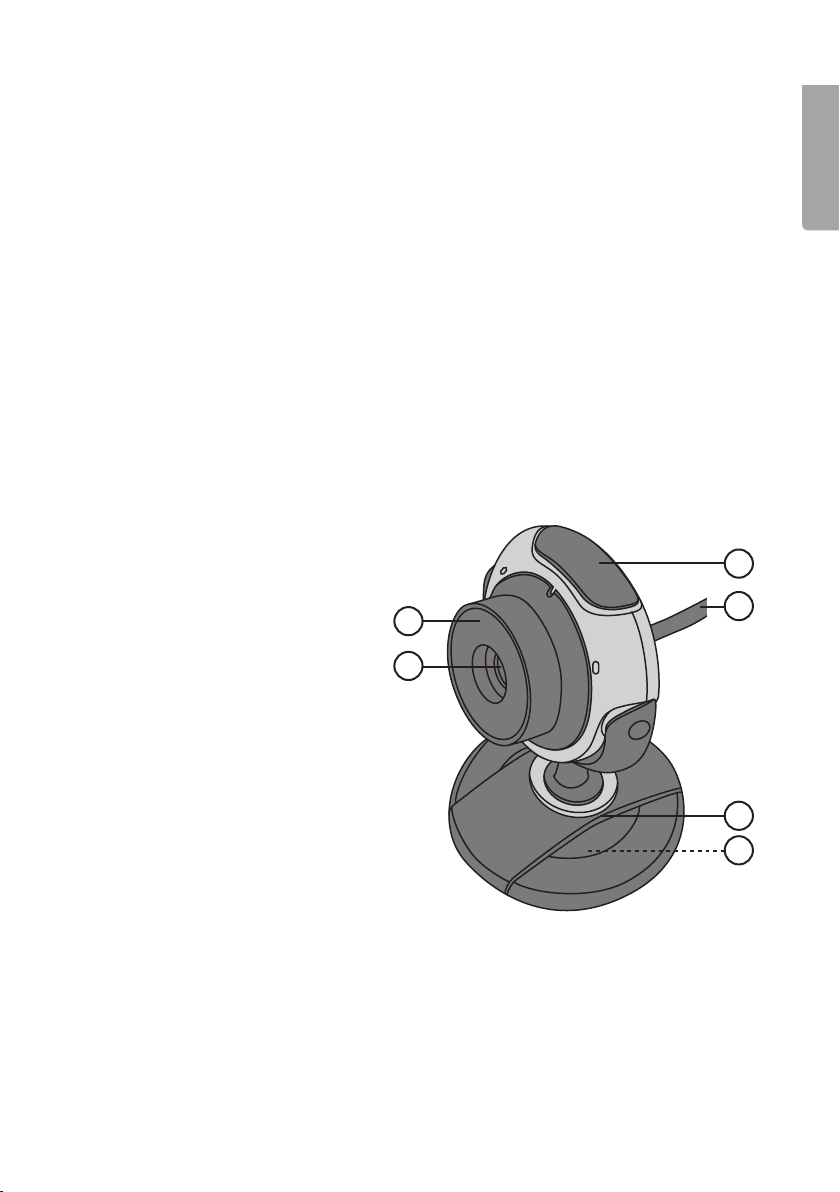
Description
1. Focus ring
2. Lens
3. Shutter button
4. USB cable
5. Base
6. Adjustable screen bracket
1
2
English
3
4
5
6
3
Page 4

English
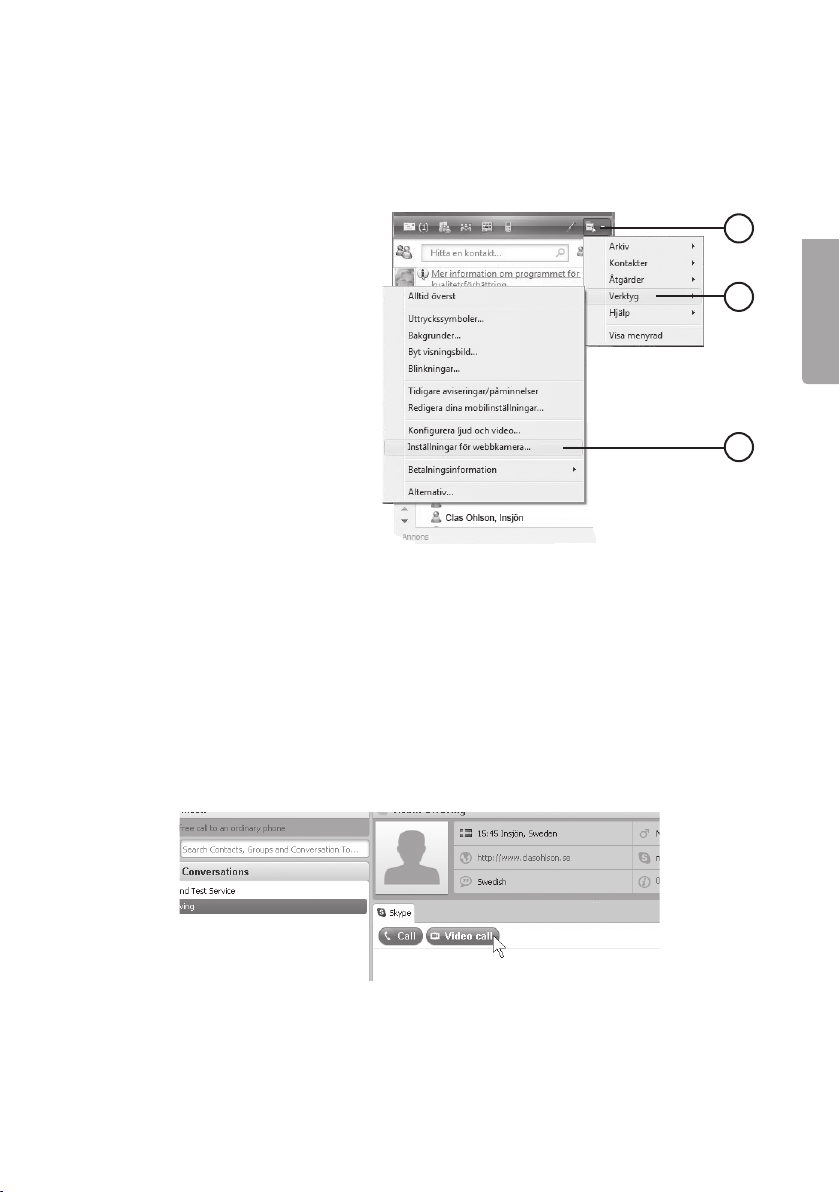
Use with MSN, Skype or other similar programmes
When using MSN or Skype no extra drivers need be installed.
MSN
• Connect the web camera to an
available USB port.
• Start MSN and log in.
• Click Display Menu (a), then
Tools (b) and Web Camera
Settings (c).
• Input your desired settings.
• The camera will start
automatically.
Skype
• Connect the web camera to an available USB port.
• Start Skype and log in.
• Go in under Tools > Alternatives> Audio Settings.
Select USB-Microphone and click Save.
• Find the person you wish to contact on your contact list and click on the contact.
• Click on Video Call in the large window.
• The camera will start automatically.
a
b
c
4
Page 5
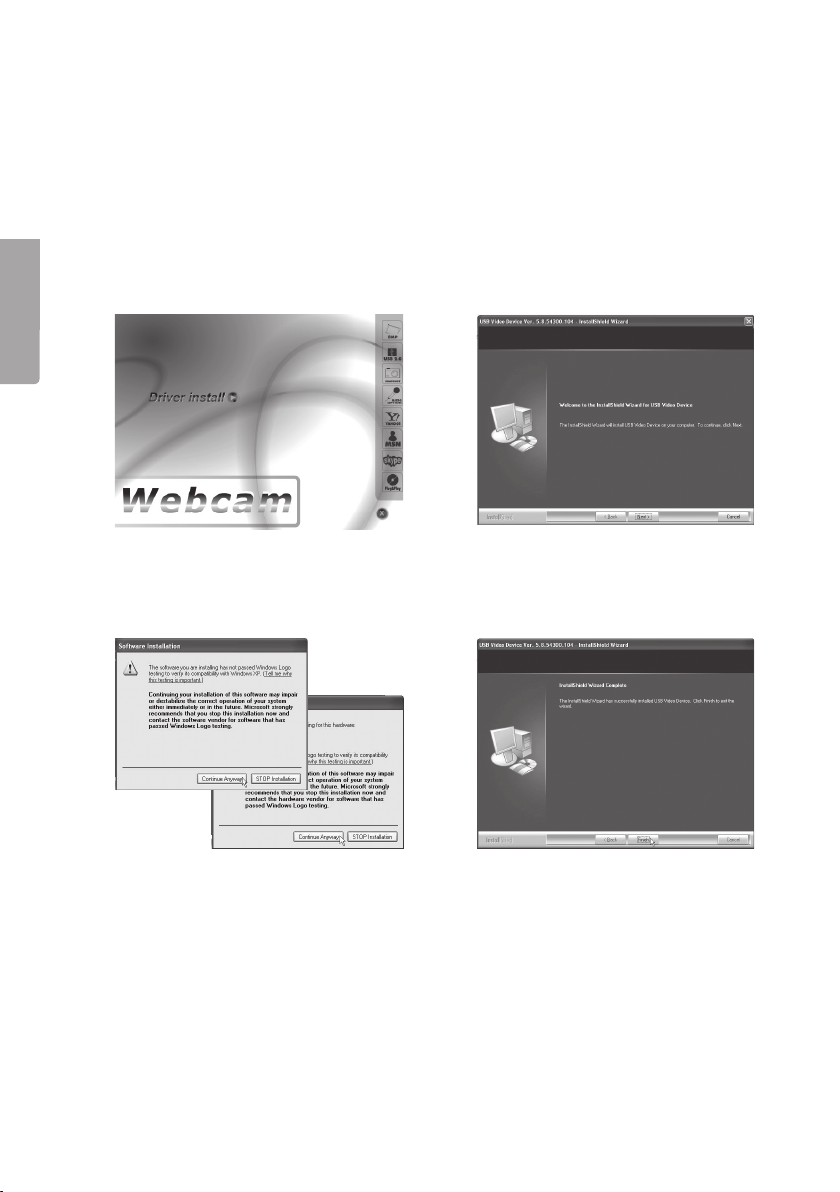
Installing drivers
(if you are not using MSN or Skype)
Important: Connect the web camera to an available USB port before installing
the software.
1. Exit all programmes before installing the drivers (especially any antivirus
programmes).
2. Insert the installation CD into the computer’s CD-ROM drive.
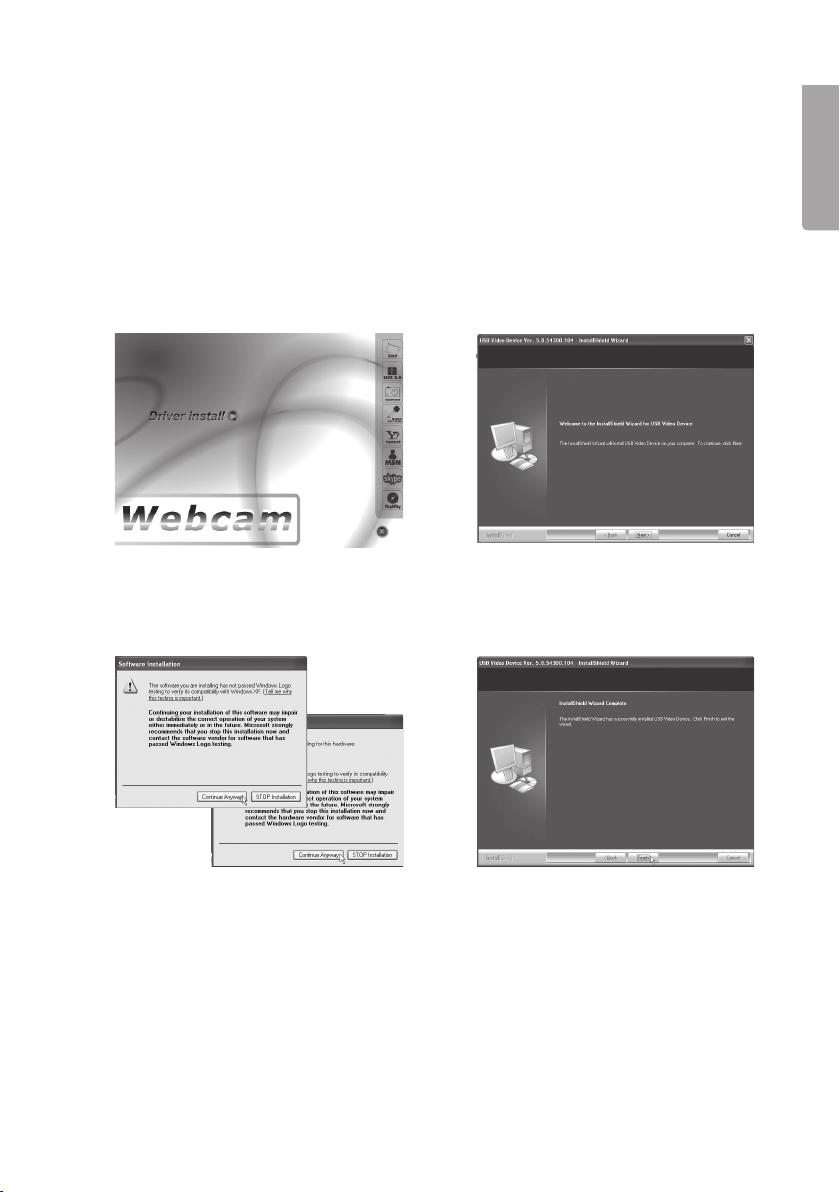
Installation example using Windows XP
English
1. Open the installation files using
Windows Explorer and double-click
Driver install.
3. Two warning messages will be
displayed, one after another.
Click on Continue Anyway for both
messages to continue installation.
2. Installation will begin. Click on Next
when prompted.
4. Click on Finish when
the installation is complete.
5
Page 6
English
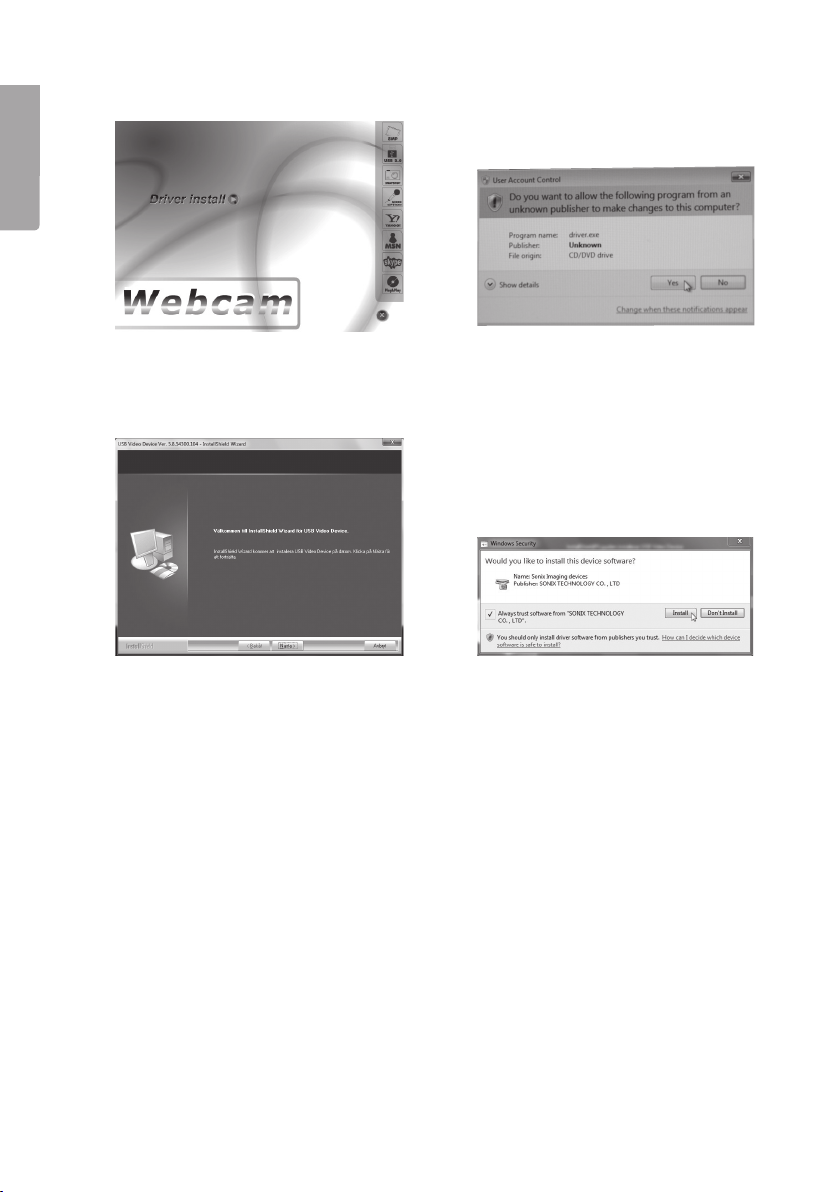
Installation example using Windows 7
1. The disc should start automatically
and the start window should display
on screen. Click on Driver install.
3. Click on Next to continue installation.
5. Click on Finish when the installation is complete.
2. A warning message will be displayed.
4. Tick the box “Always trust software
Click on Yes to continue.
from SONIX…” Click on Install to
accept installation.
6
Page 7
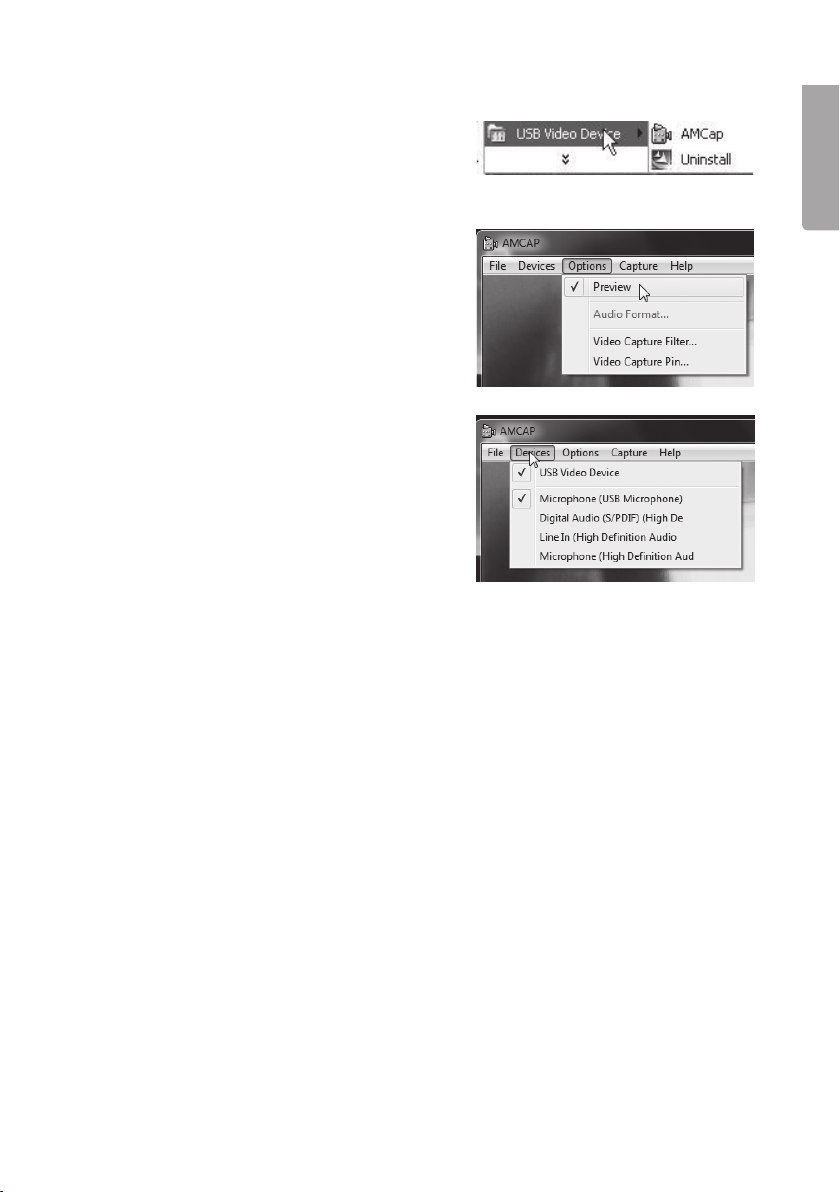
Operation
1. Double click the PMCap icon found under
Program > USB Video Device > AMCap
in order to start the programme.
2. Activate Preview under “Options” to
display images from the camera.
3. Activate the Microphone (USB
Microphone) and the USB Video Device.
4. Aim the camera.
5. Adjust the focus using the camera’s focus
ring (1).
Picture taking (snapshots/still-images)
1. Adjust the focus using the camera’s focus ring (1).
2. Press the shutter button (2) to take a picture.
3. The image will open automatically in a new window.
4. Select File/Save As to name the file and select the file format.
Press Save to save the image.
5. Select Rotate Orientation to rotate the image, if needed.
English
7
Page 8

English
Setup
The most essential settings can be found under Options:
• Audio Capture filter:
Audio input settings.
• Video Capture filter:
Video input settings.
• Video Capture Pin: Settings for
video streaming, image sizing,
frames per second, etc.
Troubleshooting guide
Description Problem Solution
The computer cannot
find the web camera,
or the programme
doesn’t start.
The picture is too
bright or too dark.
Rolling horizontal
parallel lines are
seen.
The colours displayed
are not true.
The drivers aren’t correctly
installed.
The web camera is not
properly connected.
Preview is not selected. Select Preview under “Options”.
The image settings are not
properly set.
The mains voltage fre-
quency isn’t properly set.
The image settings are too
dark.
8
Reinstall the drive routines.
Check your USB connection.
Restart your computer.
Adjust “Video Capture Filter”
settings”.
Select the proper Flicker
frequency in the “Video
Capture Filter” settings.
Adjust “Video Capture Filter”
settings.
Page 9

Disposal
This product should be disposed of in accordance with local regulations.
If you are unsure how to proceed, contact your local authority.
Specifications
Picture sensor CMOS sensor
Resolution 1.3 megapixels (up to 3,200–2,400)
Video mode RGB24/YUY2
Interface USB 2.0
Video capture 640 x 480 at 30 frames per second
1600 x 1200 at 10–15 frames per second
SNR Better than 48 dB
Dynamic range Better than 72 dB
Focus From 3 cm to infinity
White balance Automatic
Lens High-quality lens
Microphone Built-in
Bracket Folding base bracket
Still image file format .bmp and .jpg
System requirements
Operating system Windows XP/Vista (32/64-bit)
Windows 7 (32/64-bit)
Windows 8 (32/64-bit)
Processor 1 GHz or greater
Memory 256 MB RAM or more
English
9
Page 10

Webbkamera
Art.nr 38-4754 Modell 106
Läs igenom hela bruksanvisningen före användning och spara den sedan för framtida bruk.
Vi reserverar oss för ev. text- och bildfel samt ändringar av tekniska data. Vid tekniska
problem eller andra frågor, kontakta vår kundtjänst (se adressuppgifter på baksidan).
Säkerhet
• För att undvika skador på bildsensorn, rikta inte kameran mot direkt solljus.
Svenska
• Utsätt inte kameran för olja, ånga, damm eller vatten.
• Kameran är avsedd för inomhusbruk.
• Använd inte starka rengöringsmedel eller lösningsmedel för att rengöra linsen.
• Kameran kan bli mycket varm om den används under långa perioder.
Beskrivning
Använd en mjuk trasa.
Stäng av kameran när den inte används.
3
1. Fokuseringsratt
2. Lins
3. Slutarknapp
4. USB-kabel
5. Fot
6. Utvikbart fäste för skärm
1
4
2
5
6
10
Page 11
Användning med MSN, Skype eller liknande
applikationer
Vid användning tillsammans med MSN eller Skype behöver inga extra drivrutiner installeras.
MSN
1. Anslut webbkameran till en ledig
USB-port.
2. Starta MSN och logga in.
3. Klicka på Visa Meny (a), sedan
Verktyg (b) och Inställningar för
webbkamera (c).
4. Gör inställningarna.
5. Kameran startar automatiskt.
Skype
1. Anslut webbkameran till en ledig USB-port.
2. Starta Skype och logga in.
3. Gå in under Verktyg > Alternativ > Ljudinställningar.
Välj USB-Microphone som mikrofon och klicka på Spara.
4. Hitta önskad kontakt i kontaktlistan, klicka på kontakten.
5. Klicka på Video Call i stora fönstret.
6. Kameran startar automatiskt.
a
b
Svenska
c
11
Page 12
Installera drivrutinerna
(om du inte använder MSN eller Skype)
Viktigt! Anslut webbkameran till en ledig USB-port innan du installerar mjukvaran.
1. Avsluta alla program du har igång innan du installerar drivrutinerna
2. Sätt CD-skivan i datorns CD-läsare.
Installationsexempel Windows XP
Svenska
(gäller särskilt antivirusprogram).
1. Öppna skivan i utforskaren och
dubbelklicka på Driver install.
3. Två varningsrutor visas efter varandra.
Klicka på Continue Anyway i båda
för att fortsätta installationen.
2. Installationsprogrammet startar.
Klicka på Next.
4. Klicka på Finish när installationen
är klar.
12
Page 13

Installationsexempel Windows 7
1. Skivan startar automatiskt och en
startruta visas på skärmen.
Klicka på Driver install.
3. Klicka på Nästa för att fortsätta
installationen.
5. Klicka på Slutför/ Finish när installationen är klar.
2. En varningsruta visas. Klicka på
Yes för att fortsätta.
4. Markera rutan ”Always trust
software from SONIX…”
Klicka på Install för att godkänna
att installationen påbörjas.
Svenska
13
Page 14

Användning
1. Dubbelklicka på PMCap-ikonen som finns
2. Aktivera Preview under ”Options” för att
Svenska
3. Aktivera Microphone (USB Microphone)
4. Rikta in kameran.
5. Justera skärpan med fokuseringsratten (1)
Fotografering (stillbild)
1. Justera skärpan med fokuseringsratten (1) på kameran.
2. Tryck på slutarknappen (3) för att ta en bild.
3. Bilden öppnas automatiskt i ett nytt fönster.
4. Välj File/Save As för att skriva in önskat filnamn och filformat,
5. Välj Rotate Orientation för att rotera bilden om den visas felvänd.
under Program > USB Video Device >
AMCap för att starta programmet.
visa bilder från kameran.
och USB Video Device.
på kameran.
tryck på Save för att spara bilden.
14
Page 15

Inställningar
De nödvändigaste inställningarna finns under Options:
• Audio Capture filter:
Inställningar för ljudingång.
• Video Capture filter:
Inställningar för videoingång.
• Video Capture Pin: Inställningar
för video streaming, bildstorlek,
bildrutor per sekund etc.
Felsökningsschema
Svenska
Beskrivning Problem Åtgärd
Datorn kan inte hitta
webbkameran, eller
ingen startbild syns på
bildskärmen.
Bilden är för ljus eller för
mörk.
Rullande parallella ränder
syns på skärmen.
Färgerna på bilden är
förvrängda.
Drivrutinerna är inte
korrekt installerade.
Webbkameran är inte
korrekt ansluten.
Preview är inte
markerat.
Bilden är inte riktigt
inställd.
Nätfrekvensen är inte
korrekt inställd.
Bildinställningen är för
mörk.
15
Installera om drivrutinerna.
Kontrollera USB-anslutningen.
Starta om datorn.
Markera Preview under
”Options”.
Justera inställningarna
i ”Video Capture Filter”.
Välj rätt frekvens för Flicker
i ”Video Capture Filter”.
Justera inställningarna
i ”Video Capture Filter”.
Page 16

Avfallshantering
När du ska göra dig av med produkten ska detta ske enligt lokala föreskrifter.
Är du osäker på hur du ska gå tillväga, kontakta din kommun.
Specifikationer
Bildsensor CMOS-sensor
Upplösning 1,3 megapixlar (upp till 3200–2400)
Videoläge RGB24/YUY2
Interface USB 2.0
Svenska
Videofångst 640×480 vid 30 bilder per sekund
1600×1200 vid 10–15 bilder per sekund
SNR Bättre än 48 dB
Dynamik Bättre än 72 dB
Focus Från 3 cm till oändligt
Vitbalans Automatisk
Lins Lins med hög kvalitet
Mikrofon Inbyggd
Storlek 55×37×80* mm (utan fot) *totalhöjd
Fäste Utvikbart fäste under foten
Filformat stillbild .bmp och .jpg
Systemkrav
Operativsystem Windows XP/Vista (32/64-bit)
Windows 7 (32/64-bit)
Windows 8 (32/64-bit)
Processor 1 GHz eller bättre
Minne 256 MB RAM eller mer
16
Page 17

Webkamera
Art.nr. 38-4754 Modell 106
Les brukerveiledningen nøye før produktet tas i bruk, og ta vare på den for framtidig bruk.
Vi reserverer oss mot ev. tekst- og bildefeil, samt forandringer av tekniske data.
Ved tekniske problemer eller spørsmål, ta kontakt med vårt kundesenter.
(Se opplysninger om kundesenteret i denne bruksanvisningen).
Sikkerhet
• For å unngå skader på sensoren må ikke kameraet vendes direkte mot solen.
• Ikke utsett kameraet for olje, damp, støv eller vann.
• Kameraet er kun beregnet for innebruk.
• Ikke bruk sterke rengjøringsmidler eller løsemidler til rengjøring av linsen.
Bruk heller en myk klut.
• Kameraet blir svært varmt hvis det brukes over en lang periode.
Skru av kameraet når det ikke er i bruk.
Beskrivelse
Norsk
3
1. Fokuseringsratt
2. Linse
3. Utløserknapp
4. Usb-kabel
5. Fot
6. Feste for skjerm
1
4
2
5
6
17
Page 18

Brukes til MSN, Skype eller liknende applikasjoner
Ved bruk sammen med MSN eller Skype trengs ingen ekstra drivere å installeres.
Norsk
MSN
1. Webkameraet kobles til en ledig
usb-port.
2. Start MSN og logg inn.
3. Klikk på Vis Meny (a), deretter
Verktøy (b) og Innstillinger for
webkamera (c).
4. Foreta innstillingene.
5. Kameraet starter automatisk.
Skype
1. Webkameraet kobles til en ledig usb-port.
2. Start Skype og logg inn.
3. Gå inn under Verktøy > Alternativ > Lydinnstillinger.
Velg Usb-Microphone som mikrofon og klikk på Lagre.
4. Finn ønsket kontakt i kontaktlisten og klikk på denne.
5. Klikk på Video Call i det store vinduet.
6. Kameraet starter opp automatisk.
a
b
c
18
Page 19

Installasjon av drivere (dersom du ikke skal bruke
MSN eller Skype)
Viktig! Webkameraet kobles til en ledig usb-port før du installerer softwaren.
1. Lukk alle andre program som er åpnet før du installerer driverne
(gjelder særlig antivirusprogram).
2. Sett den vedlagte cd-platen i maskinens cd-rom.
Installasjonseksempel med Windows XP.
Norsk
1. Åpne platen i utforskeren og
dobbeltklikk på Driver install.
3. Det kommer opp to varslingsruter
etter hverandre. Klikk på Continue
Anyway i begge for å fortsette
installasjonen.
2. Installasjonsprogrammet starter.
Klikk på Next.
4. Klikk på Finish når installasjonen
er fullført.
19
Page 20

Installasjonseksempel med Windows 7
Norsk
1. Denne starter automatisk og startbildet kommer opp på skjermen.
Klikk på Driver install.
3. Klikk på Next for å fortsette
installasjonen.
5. Klikk på Finish når installasjonen er fullført.
2. En advarselsrute kommer opp.
Klikk på Yes for å fortsette.
4. Marker ruten «Always trust software
from SONIX…» Klikk på Install
for å godkjenne startingen av
installasjonen.
20
Page 21

Bruk
1. Dobbeltklikk på PMCap-ikonen, som
du finner under Program > USB
Video Device > AMCap, for å starte
programmet.
2. Aktiver Preview under «Options» for å vise
bilder fra kameraet.
3. Aktiver Microphone (USB Microphone) og
USB Video Device.
4. Still inn kameraet.
5. Juster skarpheten med fokuseringsrattet (1)
på kameraet.
Fotografering (stillbilde)
1. Juster skarpheten med fokuseringsrattet (1) på kameraet.
2. Trykk på utløserknapp (3) for å ta et bilde.
3. Bildet åpner seg automatisk i et nytt vindu.
4. Velg File/Save As og skriv inn ønsket filnavn og filformat.
Trykk på Save for å få bildet lagret.
5. Velg Rotate Orientation for å rotere bildet hvis det vises feil vei.
Norsk
21
Page 22

Norsk
Innstillinger
De mest nødvendige innstillingene finnes under «Options»:
• Audio Capture Filter:
Innstillinger for lydinngang.
• Video Capture Filter:
Innstillinger for videoinngang.
• Video Capture Pin: Innstillinger
for video streaming, bildestørrelse,
bilderuter per sekund etc.
Feilsøking
Beskrivelse Problem Tiltak
Datamaskinen kan ikke
finne webkameraet/
startbildet kommer ikke
opp på skjermen.
Bildet er for lyst eller for
mørkt.
Rullende parallelle
streker kommer opp på
skjermen.
Fargene på bildet er
forvrengt.
Driver er ikke riktig installert. Installer driver på nytt.
Webkameraet er ikke riktig
koblet til datamaskinen.
PreView er ikke merket. Merk PreView under
Forhåndsinnstillinger ikke
riktig utført.
Strømfrekvensen er ikke
riktig innstilt.
Bildeinnstillingen er for mørk. Juster innstillingene
22
Kontroller usb-tilkoblingen.
Start datamaskinen på nytt.
«Options».
Juster innstillingene
i «Video Capture Filter».
Velg riktig frekvens for
Flicker i «Video Capture
Filter».
i «Video Capture Filter».
Page 23

Avfallshåndtering
Når produktet skal kasseres, må det skje i henhold til lokale forskrifter.
Ved usikkerhet, ta kontakt med lokale myndigheter.
Spesifikasjoner
Bildesensor CMOS-sensor
Oppløsning 1,3 megapixler (inntil 3200–2400)
Videomodus RGB24/YUY2
Interface USB 2.0
Videohastighet 640×480 ved 30 bilder per sekund
1600×1200 ved 10–15 bilder per sekund
SNR Bedre enn 48 dB
Dynamikk Bedre enn 72 dB
Fokus Fra 3 cm til uendelig
Hvitbalanse Automatisk
Linse Linse med høy kvalitet
Mikrofon Innebygd
Feste Feste til å vike ut under foten
Filformat stillbilde -.bmp og -.jpg
Systemkrav
Operativsystem Windows XP/Vista (32/64-bit)
Windows 7 (32/64-bit)
Windows 8 (32/64-bit)
Prosessor 1 GHz eller bedre
Minne 256 MB RAM eller mer
Norsk
23
Page 24

Suomi
Web-kamera
Tuotenro 38-4754 Malli 106
Lue käyttöohjeet ennen tuotteen käyttöönottoa ja säilytä ne tulevaa tarvetta varten.
Pidätämme oikeuden teknisten tietojen muutoksiin. Emme vastaa mahdollisista tekstitai kuvavirheistä. Jos laitteeseen tulee teknisiä ongelmia, ota yhteys myymälään tai
asiakaspalveluun (yhteystiedot käyttöohjeen lopussa).
Turvallisuus
• Älä suuntaa kameraa suoraan aurinkoon välttääksesi kuvasensorin vaurioitumisen.
• Älä altista kameraa öljyille, höyrylle, pölylle tai vedelle.
• Kamera on tarkoitettu sisäkäyttöön.
• Älä käytä linssin puhdistamiseen voimakkaita puhdistusaineita tai liuottimia.
Käytä tarvittaessa pehmeää liinaa.
• Kamera voi kuumentua, jos sitä käytetään pitkiä aikoja. Sammuta kamera,
kun sitä ei käytetä.
Kuvaus
3
4
1. Tarkennussäädin
2. Linssi
3. Suljinpainike
4. USB-kaapeli
5. Jalka
6. Ulostaitettava kiinnike näyttöön
1
2
24
5
6
Page 25

Käyttö MSN:n, Skypen tai vastaavien sovelluksien
kanssa
Käyttö yhdessä MSN:n tai Skypen kanssa ei vaadi ylimääräisiä ajureita.
MSN
1. Liitä web-kamera vapaaseen
USB-porttiin.
2. Käynnistä MSN ja kirjaudu
sisään.
3. Napsauta Näytä valikko (a),
Työkalut (b) ja Web-kameran
asetukset (c).
4. Määritä asetukset.
5. Kamera käynnistyy
automaattisesti.
Skype
1. Liitä web-kamera vapaaseen USB-porttiin.
2. Käynnistä Skype ja kirjaudu sisään.
3. Siirry ääniasetuksiin napsauttamalla Työkalut > Asetukset > Ääniasetukset.
Valitse mikrofoniksi USB-Microphone ja napsauta Tallenna.
4. Etsi haluamasi henkilö kontaktilistalta ja napsauta sitä.
5. Napsauta suuressa ikkunassa Video Call.
6. Kamera käynnistyy automaattisesti.
a
b
c
Suomi
25
Page 26

Ajurien asennus (jos et käytä MSN:ää tai Skypeä)
Tärkeää! Liitä web-kamera vapaaseen USB-porttiin ennen ohjelmiston asentamista.
1. Sammuta kaikki käynnissä olevat ohjelmat ennen ajureiden asentamista
(koskee erityisesti virustentorjuntaohjelmia).
2. Aseta cd-levy tietokoneen cd-asemaan.
Asennusesimerkki, Windows XP
Suomi
1. Avaa levy resurssienhallinnassa ja
kaksoisnapsauta Driver install.
3. Näytölle ilmestyy kaksi varoitusikkunaa peräjälkeen. Jatka asennusta
napsauttamalla molemmissa ruuduissa Continue Anyway.
2. Asennusohjelma käynnistyy.
Napsauta Next.
4. Napsauta Finish, kun asennus on
valmis.
26
Page 27

Asennusesimerkki, Windows 7
1. Levy käynnistyy automaattisesti ja
näytölle ilmestyy käynnistysruutu.
Napsauta Driver install.
3. Jatka asennusta napsauttamalla
Seuraava.
5. Napsauta Lopeta/Finish, kun asennus on valmis.
2. Näytölle ilmestyy varoitusikkuna.
Jatka napsauttamalla Yes.
4. Valitse ruutu ”Always trust software
from SONIX…”
Hyväksy asennuksen aloitus
napsauttamalla Install.
Suomi
27
Page 28

Käyttö
1. Käynnistä ohjelma kaksoisnapsauttamalla
PMCap-kuvaketta kohdassa Program >
USB Video Device > AMCap.
2. Katsele kuvia kamerasta valitsemalla
Preview kohdasta ”Options”.
3. Valitse Microphone (USB Microphone) ja
USB Video Device.
4. Suuntaa kamera.
5. Säädä tarkkuus kameran tarkennussäätimellä (1).
Suomi
Valokuvaus (stillkuva)
1. Säädä tarkkuus kameran tarkennussäätimellä (1).
2. Ota kuva painamalla suljinpainiketta (3).
3. Kuva avautuu automaattisesti uuteen ikkunaan.
4. Valitse File/Save As ja kirjoita tiedostolle nimi ja tiedostotyyppi.
Tallenna kuva painamalla Save.
5. Jos kuva näkyy väärin päin, kuvaa voi kääntää valitsemalla Rotate Orientation.
28
Page 29

Asetukset
Tärkeimmät asetukset löytyvät kohdasta Options:
• Audio Capture Filter:
äänen sisääntulon asetukset.
• Video Capture Filter:
videon sisääntulon asetukset.
• Video Capture Pin:
videostreamingia, kuvakokoa,
kuvia/sekunti ym. koskevat
asetukset.
Vianhakutaulukko
Suomi
Kuvaus Ongelma Toimenpiteet
Tietokone ei löydä
web-kameraa tai
näytöllä ei näy
aloituskuvaa.
Kuva on liian vaalea
tai tumma.
Näytöllä on rullaavia
rinnakkaisia raitoja.
Kuvan värit ovat
vääristyneet.
Ajureita ei ole asennettu
oikein.
Web-kamera on väärin
kytketty.
Kohtaa Preview ei ole
valittu.
Kuvan asetuksia ei ole
säädetty oikein.
Verkkotaajuutta ei ole
säädetty oikein.
Kuva-asetus on liian
tumma.
29
Asenna ajurit uudelleen.
Tarkasta USB-liitäntä. Käynnistä
tietokone uudelleen.
Valitse Preview kohdasta
”Options!”.
Säädä asetukset kohdassa
”Video Capture Filter”.
Valitse Flickerille oikea taajuus
kohdassa ”Video Capture Filter”.
Säädä asetukset kohdassa
”Video Capture Filter”.
Page 30

Suomi
Kierrätys
Kierrätä tuote asianmukaisesti, kun poistat sen käytöstä.
Tarkempia kierrätysohjeita saat kuntasi jäteneuvonnasta.
Tekniset tiedot
Kuvasensori CMOS-kenno
Tarkkuus 1,3 megapikseliä (jopa 3200–2400)
Videomuoto RGB24/YUY2
Liitäntä USB 2.0
Videotallennus 640×480 (30 kuvaa/sekunti)
1600×1200 (10–15 kuvaa/sekunti)
SNR Parempi kuin 48 dB
Dynamiikka Parempi kuin 72 dB
Tarkennus 3 cm – ääretön
Valkotasapaino Automaattinen
Linssi Laadukas linssi
Mikrofoni Kiinteä
Kiinnike Ulostaitettava kiinnike jalan alla
Stillkuvien
tiedostomuodot .bmp ja .jpg
Järjestelmävaatimukset
Käyttöjärjestelmät Windows XP/Vista (32/64-bit)
Windows 7 (32/64-bit)
Windows 8 (32/64-bit)
Prosessori 1 GHz tai parempi
Muisti Vähintään 256 Mt RAM
30
Page 31

Webcam
Art.Nr. 38-4754 Modell 106
Vor Inbetriebnahme die komplette Bedienungsanleitung durchlesen und aufbewahren.
Irrtümer, Abweichungen und Änderungen behalten wir uns vor. Bei technischen
Problemen oder anderen Fragen freut sich unser Kundenservice über eine
Kontaktaufnahme (Kontakt siehe Rückseite).
Sicherheitshinweise
• Um Schäden am Bildsensor zu vermeiden, die Kamera nie direkt gegen
die Sonne richten.
• Die Kamera vor Öl, Dampf, Staub und Wasser schützen.
• Die Kamera ist für den Gebrauch in Innenräumen vorgesehen.
• Zur Reinigung der Linse keine starken Reinigungsmittel oder
Lösungsmittel verwenden. Mit einem weichen Tuch reinigen.
• Die Kamera kann bei längerem Einsatz heiß werden.
Bei Nichtbenutzung Kamera abschalten.
Beschreibung
3
1. Fokuseinstellrad
2. Linse
3. Auslösertaste
4. USB-Kabel
5. Fuß
6. Ausklappbare Halterung für Bildschirm
1
4
2
Deutsch
5
6
31
Page 32

Verwendung mit MSN, Skype und ähnlichen
Programmen
Bei Verwendung zusammen mit MSN oder Skype sind keine zusätzlichen Treiber
zu installieren.
MSN
1. Webcam an eine freie
2. MSN starten und einloggen.
3. Auf Menü Anzeigen (a) klicken,
4. Einstellungen vornehmen.
5. Die Kamera startet automatisch.
Skype
1. Webcam an eine freie USB-Schnittstelle anschließen.
2. Skype starten und einloggen.
3. Den Befehl Extras > Optionen > Soundeinstellungen aufrufen.
4. In der Kontaktliste auf den gewünschten Kontakt klicken.
5. Im großen Fenster auf Video Call klicken.
6. Die Kamera startet automatisch.
Deutsch
a
USB-Schnittstelle anschließen.
b
dann auf Extras (b) und
Einstellungen für Webcam (c)
klicken.
c
Als Mikrofon die Option USB-Mikrofon wählen und auf Speichern klicken.
32
Page 33

Treiberinstallation (bei Verwendung mit anderen
Programmen als MSN oder Skype)
Wichtig: Vor der Softwareinstallation die Webcam an eine freie
USB-Schnittstelle anschließen.
1. Vor Installation der Treiber alle laufenden Programme schließen
(insbesondere Virenschutzprogramme).
2. CD in das CD-Laufwerk des PC einlegen.
Installationsbeispiel Windows XP
1. CD im Explorer öffnen und auf
Driverinstall doppelklicken.
3. Es werden nacheinander zwei
Warnmeldungen angezeigt.
Bei beiden Warnmeldungen auf
Continue Anyway klicken, um
die Installation fortzusetzen.
2. Das Installationsprogramm startet.
Auf Weiter klicken.
Deutsch
4. Wenn die Installation abgeschlossen
ist, auf Finish klicken.
33
Page 34

Installationsbeispiel Windows 7
1. Die CD startet automatisch und am
3. Auf Weiter klicken und mit
Deutsch
5. Wenn die Installation abgeschlossen ist, auf Fertigstellen / Finish.
Bildschirm wird ein Startdialogfenster
angezeigt. Auf Driver install klicken.
der Installation fortfahren.
2. Es wird eine Warnmeldung angezeigt. Auf Yes klicken
und fortfahren.
4. Das Feld „Always trust software
from SONIOX...“ aktivieren.
Auf Install klicken, um zuzulassen,
dass die Installation gestartet wird.
34
Page 35

Betrieb
1. Mit Doppelklick auf das PMCap-Symbol
unter Program > USB Video Device >
AMCap das Programm starten.
2. Unter „Options“ die Option Preview
aktivieren, um Kamerabilder anzuzeigen.
3. Microphone (USB Microphone) und
USB Video Device aktivieren.
4. Kamera ausrichten.
5. Am Fokuseinstellrad (1) die Kamera
scharf einstellen.
Fotografieren (Standbild)
1. Am Fokuseinstellrad (1) die Kamera scharf einstellen.
2. Zum Aufnehmen eines Bilds die Auslösertaste (3) drücken.
3. Das Bild wird automatisch in einem neuen Fenster geöffnet.
4. File/Save As aufrufen und den gewünschten Dateinamen und das gewünschte
Dateiformat angeben. Dann das Bild mit Save speichern.
5. Rotate Orientation aufrufen, um das Bild zu drehen, falls es falsch angezeigt wird.
Deutsch
35
Page 36

Einstellungen
Die wichtigsten Einstellungen finden sich unter Options:
• Audio Capture filter:
Einstellungen für den
Audioeingang.
• Video Capture filter:
Einstellungen für den
Videoeingang.
• Video Capture Pin: Einstellungen
für Video-Streaming, Bildgröße,
Bilder pro Sekunde etc.
Fehlersuche
Deutsch
Beschreibung Problem Lösung
Der PC findet die
Webcam nicht oder der
Bildschirm zeigt kein
Startbild an.
Das Bild ist zu hell oder
zu dunkel.
Parallele Streifen laufen
über den Bildschirm.
Die Bildschirmfarben
sind schlecht.
Die Treiber sind nicht
korrekt installiert.
Die Webcam ist nicht
korrekt angeschlossen.
Preview ist nicht
aktiviert.
Das Bild ist nicht
korrekt eingestellt.
Die Netzfrequenz ist
nicht korrekt eingestellt.
Die Bildeinstellung ist
zu dunkel.
36
Treiber erneut installieren.
USB-Anschluss kontrollieren.
PC neu starten.
Preview unter „Options“
aktivieren.
Einstellungen unter „Video
Capture Filter“ korrigieren.
Unter „Video Capture Filter“
die korrekte Netzfrequenz für
Flicker wählen.
Einstellungen unter „Video
Capture Filter“ korrigieren.
Page 37

Hinweise zur Entsorgung
Bitte das Produkt entsprechend den lokalen Bestimmungen entsorgen.
Weitere Informationen sind von der Gemeinde oder den kommunalen
Entsorgungsbetrieben erhältlich.
Technische Daten
Bildsensor CMOS-Sensor
Auflösung 1,3 Megapixel (bis 3200–2400)
Farbraum RGB24/YUY2
Schnittstelle USB 2.0
Videoaufnahme 640×480 bei 30 Bildern pro Sekunde
1600×1200 bei 10–15 Bildern pro Sekunde
SNR Besser als 48 dB
Dynamik Besser als 72 dB
Fokus Von 3 cm bis unendlich
Weißabgleich Automatisch
Linse Hochwertige Linse
Mikrofon Eingebaut
Größe 55×37×80* mm (ohne Fuß) *Gesamthöhe
Halterung Ausklappbare Halterung unter dem Fuß
Dateiformat Standbild .bmp und .jpg
Systemanforderungen
Betriebssystem Windows XP/Vista (32/64-bit)
Windows 7 (32/64-bit)
Windows 8 (32/64-bit)
Prozessor 1 GHz oder höher
Speicher 256 MB RAM oder mehr
37
Deutsch
Page 38

38
Page 39

39
Page 40

Sverige
Kundtjänst tel: 0247/445 00
fax: 0247/445 09
e-post: kundservice@clasohlson.se
Internet www.clasohlson.se
Post Clas Ohlson AB, 793 85 INSJÖN
Norge
Kundesenter tlf.: 23 21 40 00
faks: 23 21 40 80
e-post: kundesenter@clasohlson.no
Internett www.clasohlson.no
Post Clas Ohlson AS, Postboks 485 Sentrum, 0105 OSLO
Suomi
Asiakaspalvelu puh.: 020 111 2222
sähköposti: asiakaspalvelu@clasohlson.fi
Internet www.clasohlson.fi
Osoite Clas Ohlson Oy, Maistraatinportti 4 A, 00240 HELSINKI
Great Britain
Customer Service contact number: 08545 300 9799
e-mail: customerservice@clasohlson.co.uk
Internet www.clasohlson.com/uk
Postal 10 – 13 Market Place
Kingston Upon Thames
Surrey
KT1 1JZ
Deutsch
Kundenservice Unsere Homepage www.clasohlson.com besuchen und
auf Kundenservice klicken.
 Loading...