

Page 1
TIGER 8/35 & 8/65
Code Nos: 000114052 & 000114057
OPERATING & MAINTENANCE
INSTRUCTIONS
O
1103
Page 2
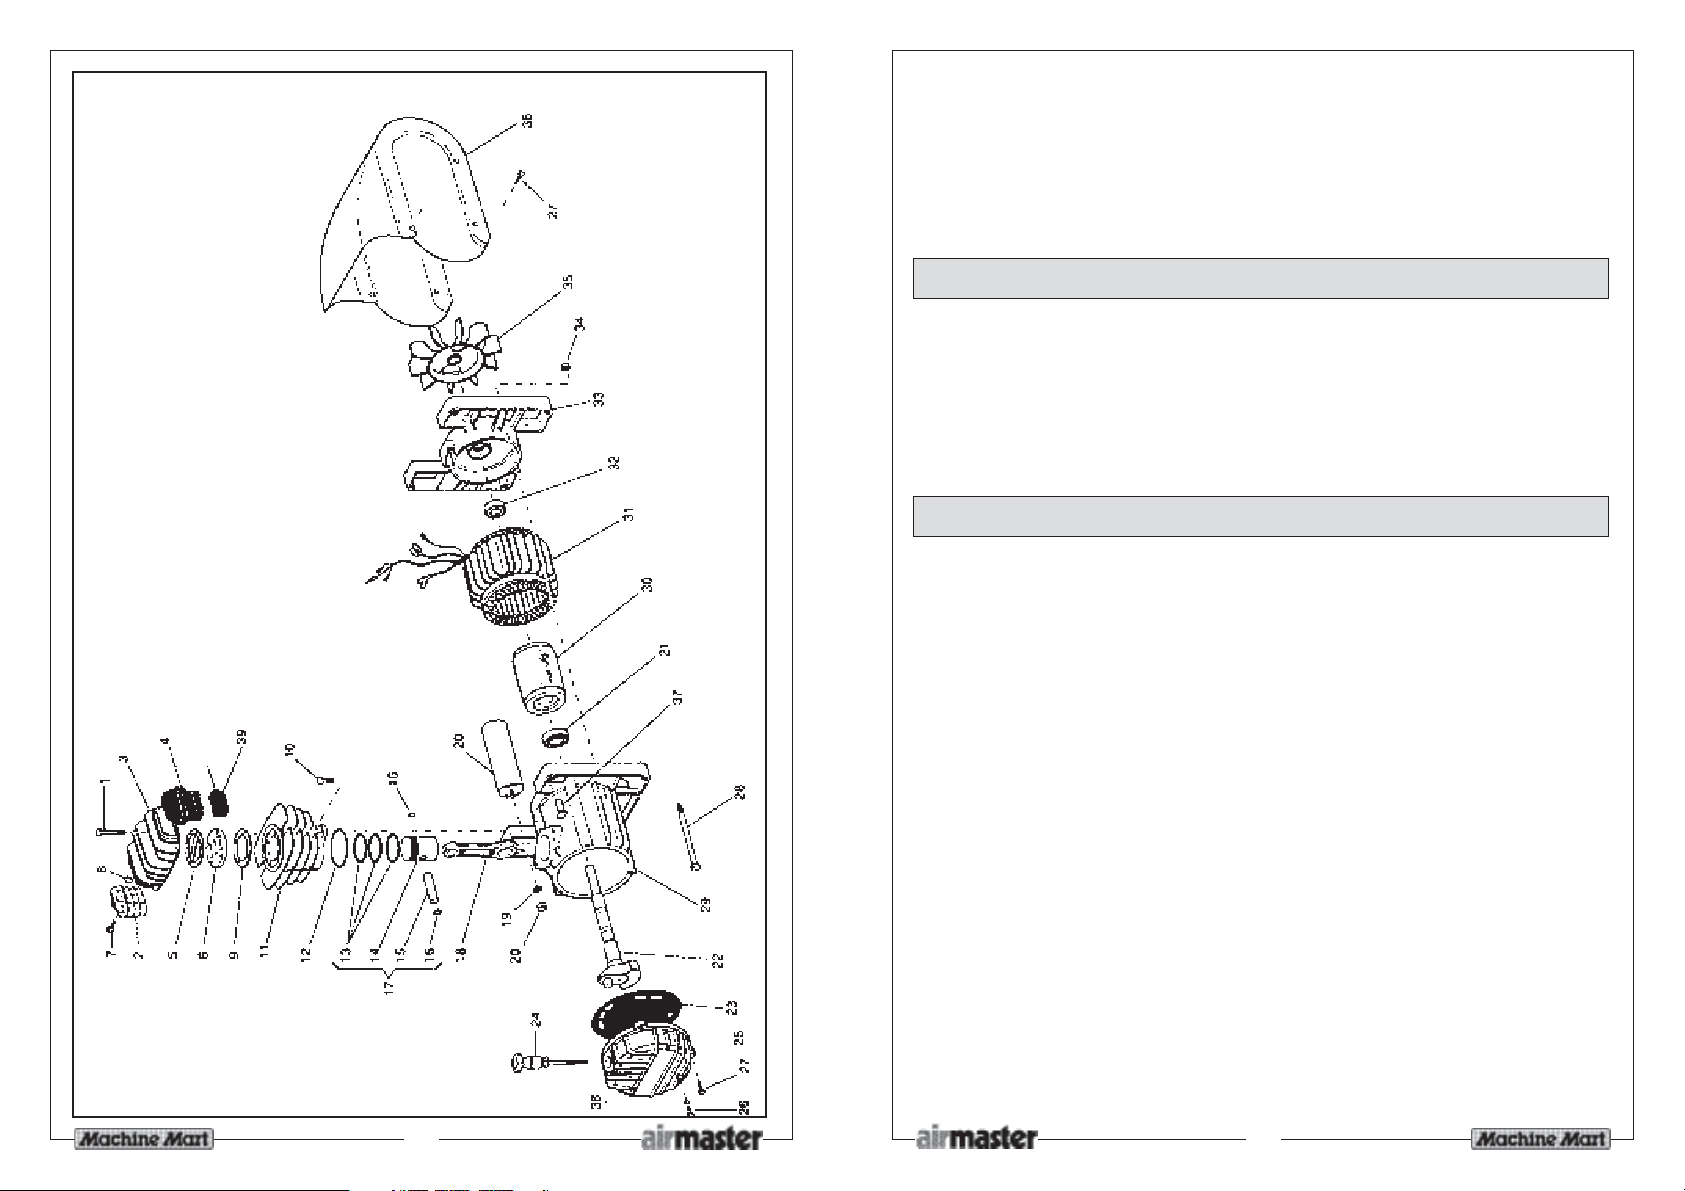
COMPRESSOR
No. Description Qty Part No.
1 Head Bolt 4 FN014002021
2 After Cooler 1 FN116117020
3 Cylinder Head 1 FN016055040
4 Filter Unit 1 FN317050000
5 Head Gasket (Upper) 1 FN116117002
6 Valve Block 1 FN116022100
7 Screw 2 FN014013021
8 O-Ring 1 FN010102000
9 Head Gasket (Lower) 1 FN116022010
10 Screw 2 FN014011064
11 Cylinder Block 1 FN116001004
12 O-Ring 1 FN010114000
13 Piston Ring set 1 FN216022002
14 Piston 1 FN116022004
15 Gudgoen Pin 1 FN116022040
16 Circlip 2 FN015001000
17 Piston Assy compl. 1 FN416022004
18 Con-Rod 1 FN116091021
19 Washer 1 FN014005006
20 Capacitor 1 FN009200015
No. Description Qty Part No.
21 Bearing 1 FN033018000
22 Shaft Assy. 1 FN116032006
23 End Housing Gasket 1 FN116001025
24 Dipstick 1 FN012035000
25 End Housing 1 FN016032014
26 Screw 1 FN014013024
27 Screw 5 FN014006121
28 Bolt 2 FN116011038
29 Motor Housing 1 FN116022051
30 Rotor 1 FN116032007
31 Stator Assy 1 FN416033604
32 Bearing 1 FN033005000
33 Housing 1 FN116011001
34 Nut 2 FN014003002
35 Fan Assy. 1 FN116001003
36 Cover 1 FN116117015
37 Overload Reset 1 FN008040000
38 Washer 1 FN010072000
39 Filter Element 1 FN116055043
- Gasket Set 1 FN216HN0001
PARTS AND SERVICE
For parts and/or servicing please contact your local dealer/service agent or
Machine Mart on one of the following numbers:
PARTS - 0115 956 1805 : SERVICE - 0115 956 1809
PARTS & SERVICE FAX - 0115 956 2910
PARTS E-MAIL - [email protected]
SERVICE E-MAIL - [email protected]
2
O
PARTS AND SERVICE
For parts and/or servicing please contact your local Machine Mart outlet, or
Machine Mart Service or Spares Departments one of the following numbers:
PARTS - 0115 956 1805 : SERVICE - 0115 956 1809
PARTS & SERVICE FAX - 0115 956 2910
PARTS E-MAIL - [email protected]
SERVICE E-MAIL - [email protected]
15
Page 3
COMPRESSOR
Thank you for purchasing this Tiger Air Compressor which is available in two
configurations - TIGER 8/35, fitted with a 24 litre air receiver and TIGER 8/65,
fitted with a 50 litre receiver.
Before attempting to operate the machine, please read this leaflet thoroughly
and carefully follow the instructions given. In doing so you will ensure the safety
of yourself and that of others around you, and you can also look forward to the
compressor giving you long and satisfactory service.
GUARANTEE
This product is guaranteed against faulty manufacture for a period of 12 months
from the date of purchase. Please keep your receipt as proof of purchase. This
guarantee is invalid if the product is found to have been abused or tampered
with in any way, or not used for the purpose for which it was intended.
Faulty goods should be returned to their place of purchase, no product can be
returned without prior permission. This guarantee does not effect your statutory
rights.
CONTENTS Page
Safety Precautions .......................................................................... 4
Electrical Connections ................................................................... 5
Preparation for Use ......................................................................... 6
Operation ........................................................................................ 6
Shutting Down ................................................................................. 8
Maintenance .................................................................................. 8
Fault Finding .................................................................................. 10
Specifications ................................................................................ 11
Accessories .................................................................................... 11
Parts Lists and Diagrams ........................................................ 12 - 15
Parts and Service ..................................................................... 2 - 15
14
O
3
Page 4
SAFETY PRECAUTIONS
WARN IN G
As with all machinery, there are certain hazards involved with their operation
and use. Exercising respect and caution will considerably lessen the risk of
personal injury. However, if normal safety precautions are overlooked, or
ignored, personal injury to the operator, or damage to property may result.
It is in your own interest to read and pay attention to the following rules:
1. COMPRESSED AIR IS DANGEROUS, NEVER direct a jet of air at people or animals,
and NEVER discharge compressed air against the skin.
2. DO NOT operate your compressor with any guards removed.
3. Electrical or mechanical repairs should only be carried out by a qualified
engineer. If problems occur, contact your Clarke dealer.
4. Before carrying out any maintenance, ensure the pressure is expelled from
the air receiver, and the machine is disconnected from the mains supply.
5. DO NOT leave pressure in the receiver overnight, or when transporting.
6. DO NOT adjust, or tamper with the safety valves. The maximum pressure is
factory set, and clearly marked on the machine.
7. DO NOT operate in wet or damp conditions. Keep the machine dry at all times.
Similarly, a clean atmosphere will ensure efficient operation. Do not use in
dusty or otherwise dirty locations.
8. Some of the metal parts can become quite hot during operation. Take care
not to touch these until the machine has cooled down.
9. Always adjust the pressure regulator to the recommended setting for the
particular spray gun or tool being used.
10. When spraying inflammable materials e.g. cellulose paint, ensure that there is
adequate ventilation and keep clear of any possible source of ignition.
11. Protect yourself. Think carefully about any potential hazards which may be
created by using the air compressor and use the appropriate protection. e.g.
Goggles will protect your eyes from flying particles. Face masks will protect
you against paint spray and/or fumes.
12. Before spraying any material always consult paint manufacturers instructions
for safety and usage.
13. Do not exert any strain on electrical cables and ensure that air hoses are not
tangled or wrapped around machinery etc.
14. When disconnecting air hoses or other equipment from your compressor ensure
that the air supply is turned off at the machine outlet and expel all pressurised
air from within the machine and other equipment attached to it.
15. Make sure that children and animals are kept well away from the compressor
and any equipment attached to it.
16. Always ensure that all individuals using the compressor have read and fully
understand the Operating Instructions supplied.
17. Ensure that any equipment or tool used in conjunction with your compressor,
has a safety working pressure exceeding that of the machine.
4
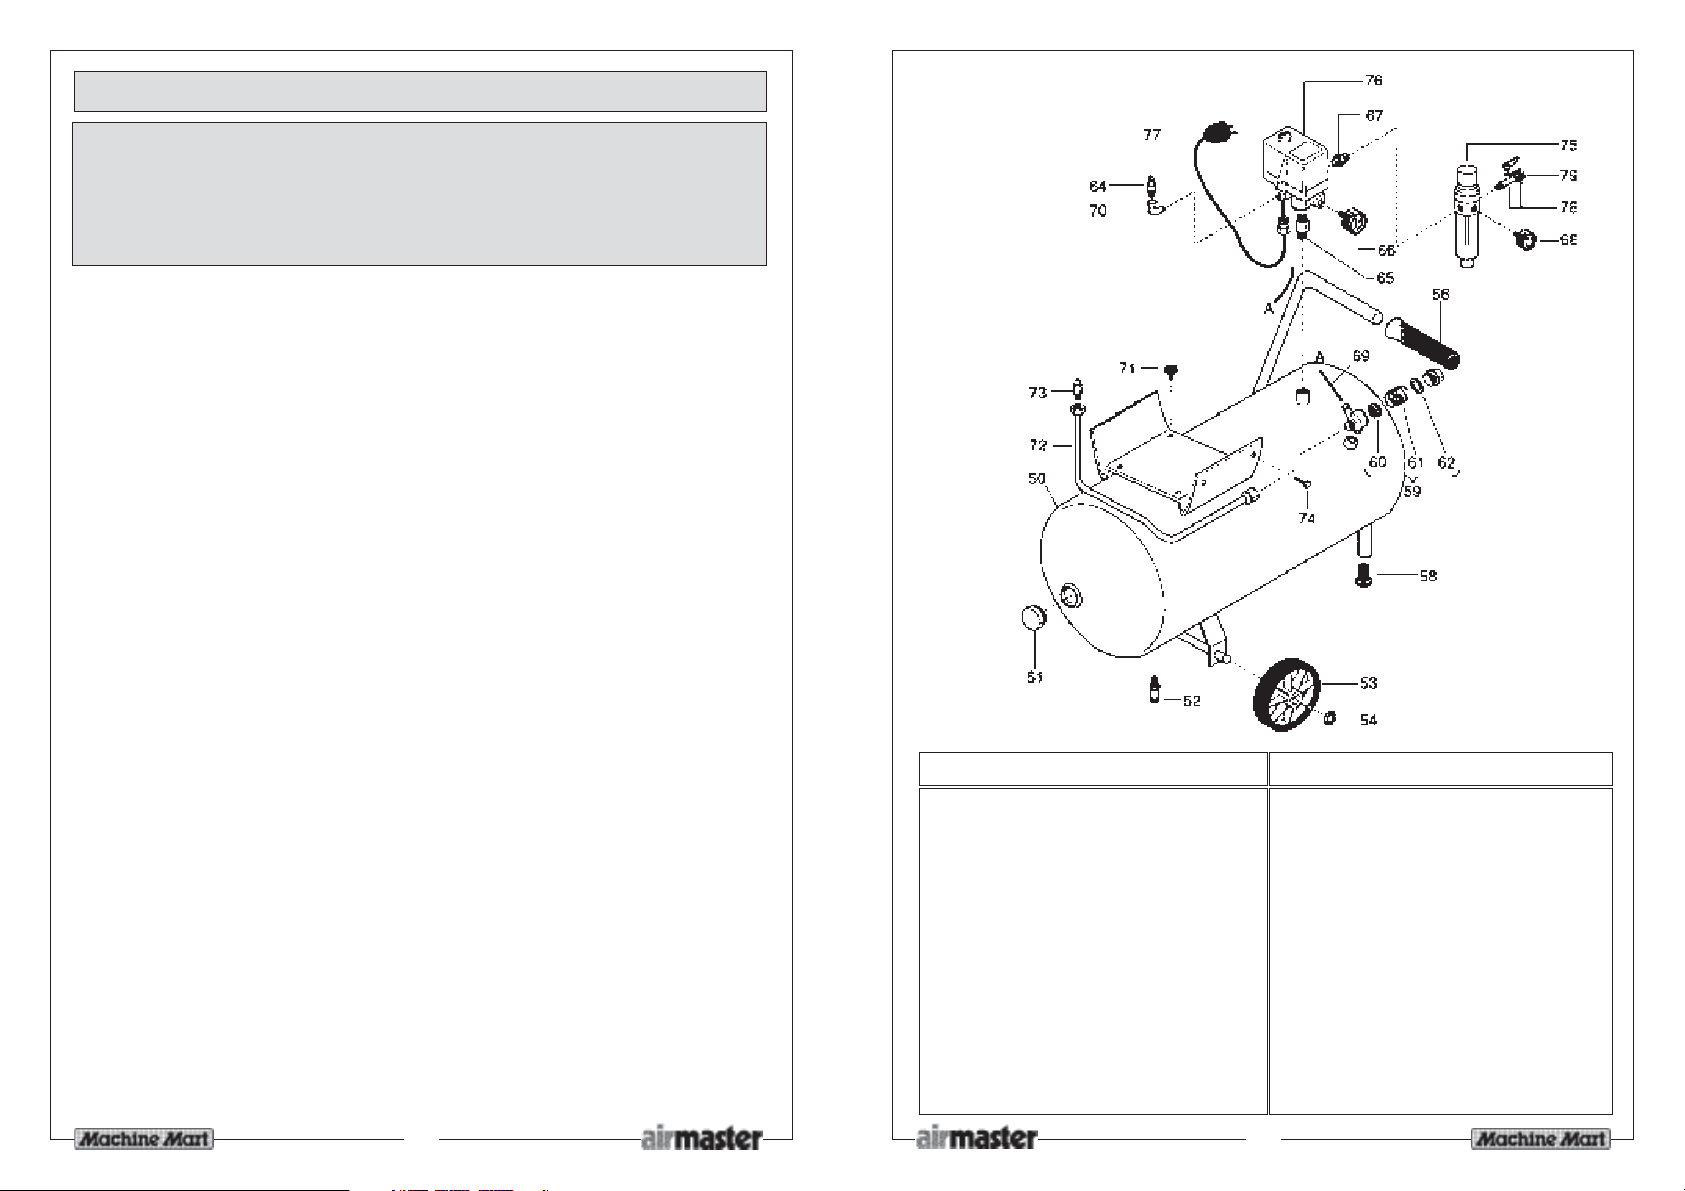
O
TIGER 8/65
No. Description Qty Part No.
50 Reservoir 1 FN17005400V
51 End Plug 2 FN011008000
52 Drain valve 1 FN022020000
53 Wheel 2 FN020001000
54 Push on Fasteners 2 FN015029000
56 Hand Grip 1 FN020121000
58 Rubber Foot 1 FN020093000
59 Valve Assembly 1 FN347043000
60 Valve 1 FN047113001
61 Spring 1 FN047113002
62 Washer 1 FN010041000
64 Valve 1 FN347027000
65 Adapter 1 FN199110140
66 Pressure Gauge-Res 1 FN330007000
No. Description Qty Part No.
67 Adapter 1 FN011017000
68 Pressure Gauge-Line 1 FN330006000
69 Tube - FN046001000
70 Elbow 1 FN011002000
71 Anti-vibration pads 1 FN199575000
72 Steel Tube 4 FN170HN0010
73 Adapter 1 FN011248000
74 Screw 4 FN014013042
75 Regulator Assy w/filter1 FN319042000
76 Pressure Reg. Assy 1 FN321028000
77 Mains Lead w/plug 1 FN101GA0200
78 Tap Assy 1 FN322008000
79 Quick Release Conn. 1 FN116011065
13
Page 5
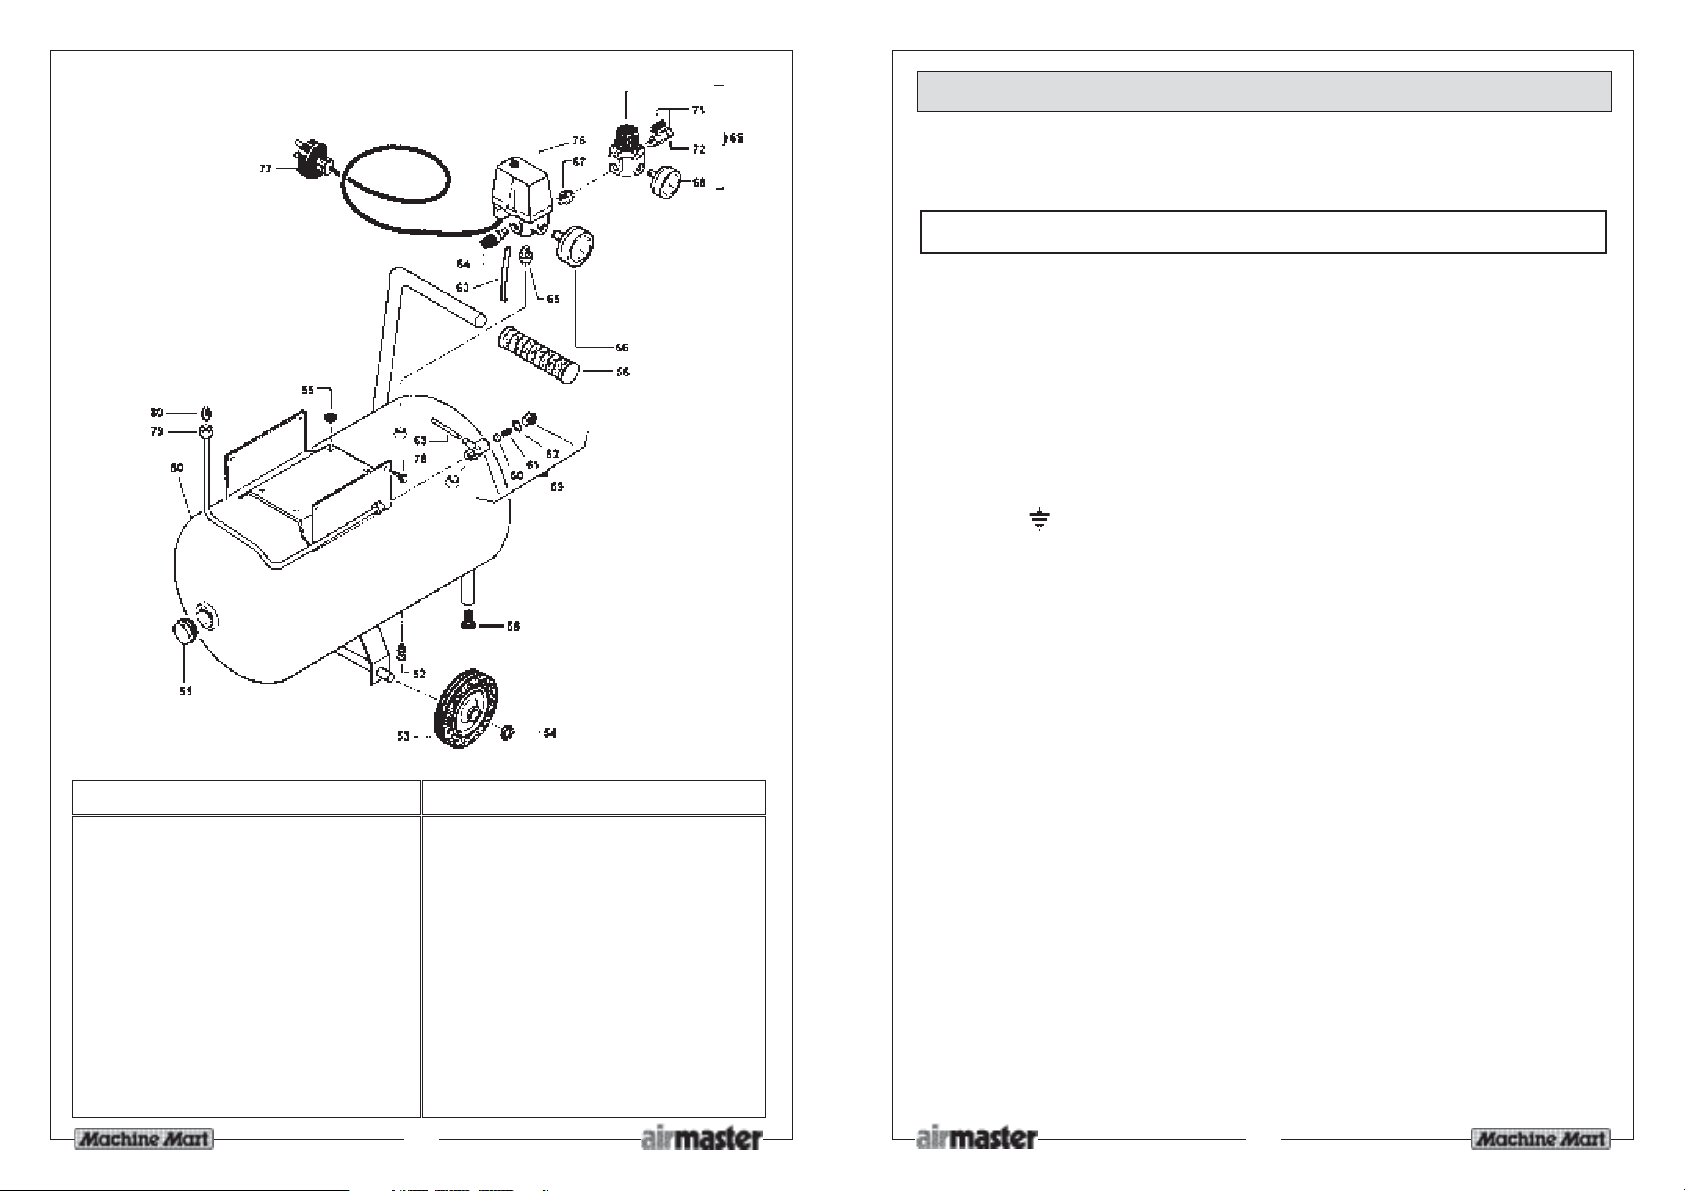
TIGER 8/35
No. Description Qty Part No.
50 Reservoir 1 FN168H96000V
51 End Plug 2 FN011008000
52 Drain valve 1 FN022020000
53 Wheel 2 FN020130000
54 Push on Fasteners 2 FN015024000
55 Anti-vibration pads 4 FN199575000
56 Hand Grip 1 FN010121000
58 Rubber Foot 1 FN020118000
59 Valve Assembly 1 FN347043000
60 Valve 1 FN047113001
61 Spring 1 FN047113002
62 Washer 1 FN010041000
63 Tube - FN046001000
No. Description Qty Part No.
64 Valve 1 FN347022000
65 Adapter 1 FN199110140
66 Pressure Gauge-Res 1 FN330004000
67 Adapter 1 FN011017000
68 Pressure Gauge-Line 1 FN330006000
69 Output Reg. Assy 1 FN319013000
71 Tap Assy 1 FN322007000
72 Quick Release Conn. 1 FN116011065
76 Pressure Reg. Assy 1 FN321053000
77 Mains Lead w/plug 1 FN101GA0200
78 Screw 1 FN014013042
79 Steel Tube 4 FN117HN0001
80 Adapter 1 FN011248000
12
O
ELECTRICAL CONNECTIONS
Connect the mains lead to a standard, 230 Volt (50Hz) electrical supply through
an approved 13 amp BS 1363 plug, or a suitably fused isolator switch.
WARNING! THIS APPLIANCE MUST BE EARTHED
IMPORTANT: The wires in the mains lead are coloured in accordance with the
following code:
Green & Yellow - Earth
Blue - Neutral
Brown - Live
As the colours of the flexible lead of this appliance may not correspond with the
coloured markings identifying terminals in your plug proceed as follows:
Connect GREEN & YELLOW cord to terminal marked with a letter “E” or Earth
symbol “ ” or coloured GREEN or GREEN & YELLOW.
Connect BROWN cord to terminal marked with a letter “L” or coloured RED.
Connect BLUE cord to terminal marked with a letter “N” or coloured BLACK.
If this appliance is fitted with a plug which is moulded onto the electric cable (i.e.
non-rewireable) please note:
1. The plug must be thrown away if it is cut from the electric cable. There is a
danger of electric shock if it is subsequently inserted into a socket outlet.
2. Never use the plug without the fuse cover fitted.
3. Should you wish to replace a detachable fuse carrier, ensure that the correct
replacement is used (as indicated by marking or colour code).
4. Replacement fuse covers can be obtained from your local dealer or most
electrical stockists.
FUSE RATING
The fuse in the plug must be replaced with one of the same rating (13 amps) and
this replacement must be approved to BS1362.
We recommend that this machine is connected to the mains supply via a Residual
Current Device (RCD)
If in any doubt, DO NOT attempt any connections or repairs yourself. Consult a
qualified electrician, or your local Machine Mart outlet.
5
Page 6
PREPARATION FOR USE
SPECIFICATIONS
NOTE: All numbered items throughout this manual refer to the parts list item number
on Pages 12 - 15
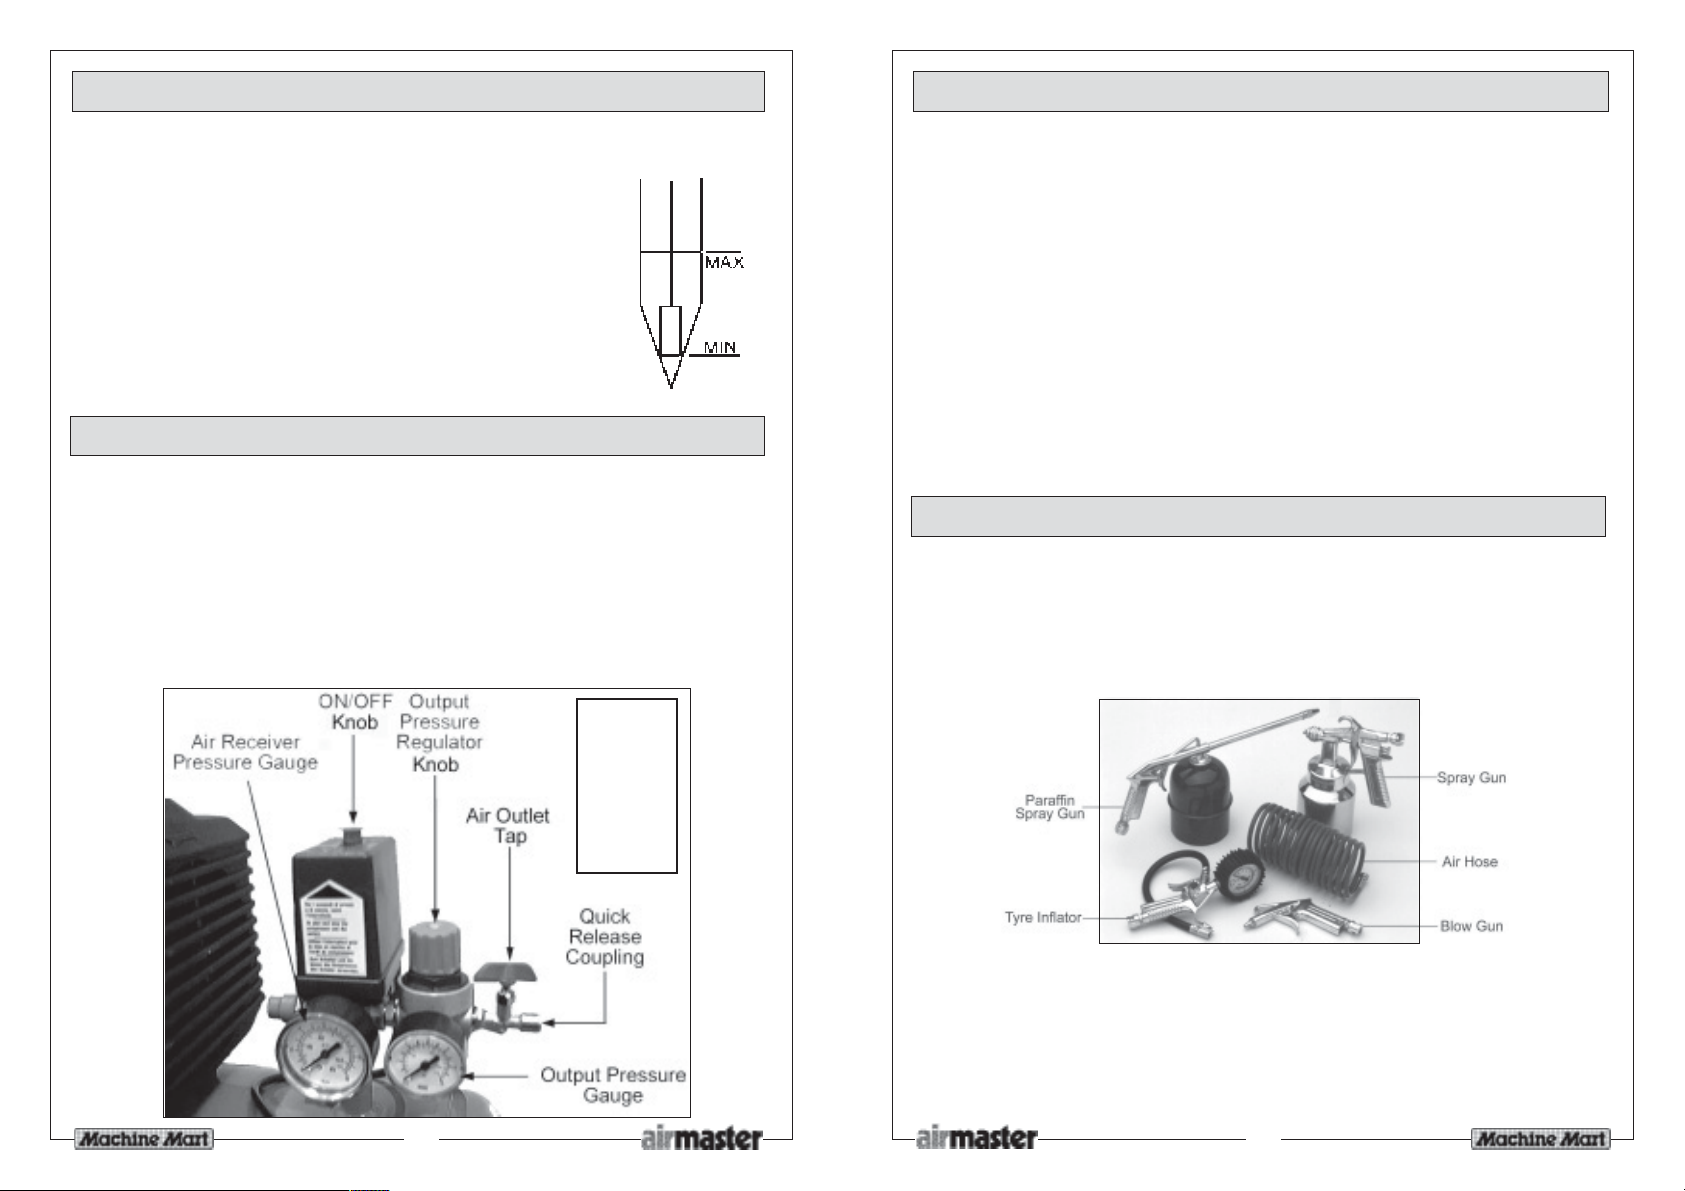
Fig.1
1. Remove the plastic travel plug from the oil filler hole,
on the top of the crank case, and insert the dipstick
(see Fig. 7 - page 9).
2. Check the oil level is at the correct level on the
dipstick, as shown in Fig.1. Where necessary, top up
with Machine Mart Compressor Oil (Available from
your local Machine Mart superstore).
OPERATION (Ref. Fig. 2)
NOTE: If you intend using your compressor for spraying, read also the ‘Helpful
Hints on Spraying” booklet - supplied with the machine.
1. Check that the mains voltage corresponds with that shown on the data sticker
on the crankcase cover of the machine.
2. Ensure that the ON/OFF switch is in the ‘OFF’ (0) position, i.e. pushed DOWN,
then plug in and switch on at the mains supply.
3. To start the compressor pull UP the ON/OFF switch to the ‘ON’ (I) position
- the motor should start immediately.
Fig. 2
Illustration is of
Tiger 8/35.
Component
layout for the
Tiger 8/65. is
the same,
although some
components
differ slightly in
appearance
Rotational Speed .................................................. 2850 rpm
Max. Pressure ........................................................ 10 bar
Air Displacement .................................................. 7 cu ft/min
Electric Motor ........................................................ 1½ hp (1.1kW)
Receiver ..................... Tiger 8/35 ........................ 24 LTR
Tiger 8/65 ........................ 50 LTR
Fuse Rating ............................................................ 13amps
Duty Cycle ............................................................ S1 at max. 7 bar
(i.e. Compressor may run continuously at 7 bar max.)
Please note that the details and specifications contained herein, are correct at the time of going to
print. However, MACHINE MART reserve the right to change specifications at any time without prior
notice. Always consult the machines Data Plate
ACCESSORIES
Your Tiger Air Compressor can be used in conjunction with a range of optional
accessories for inflating tyres, air brushing, stapling, blowing and many other uses.
For details contact your local Machine Mart.
A complete kit is available which is ideal for almost all applications (see below).
Illustrated - KIT 1000- part number 000310018
Also available without the spray Gun - KIT 600 -Part No. 000310015
- or items sold separately
Should you experience any difficulties obtaining accessories, please contact
Machine Mart telesales department by telephoning 0115 956 5555, or
0115 955 9999 for details of your nearest Machine Mart Superstore, or e-mail
6
O
11
Page 7
FAULT FINDING
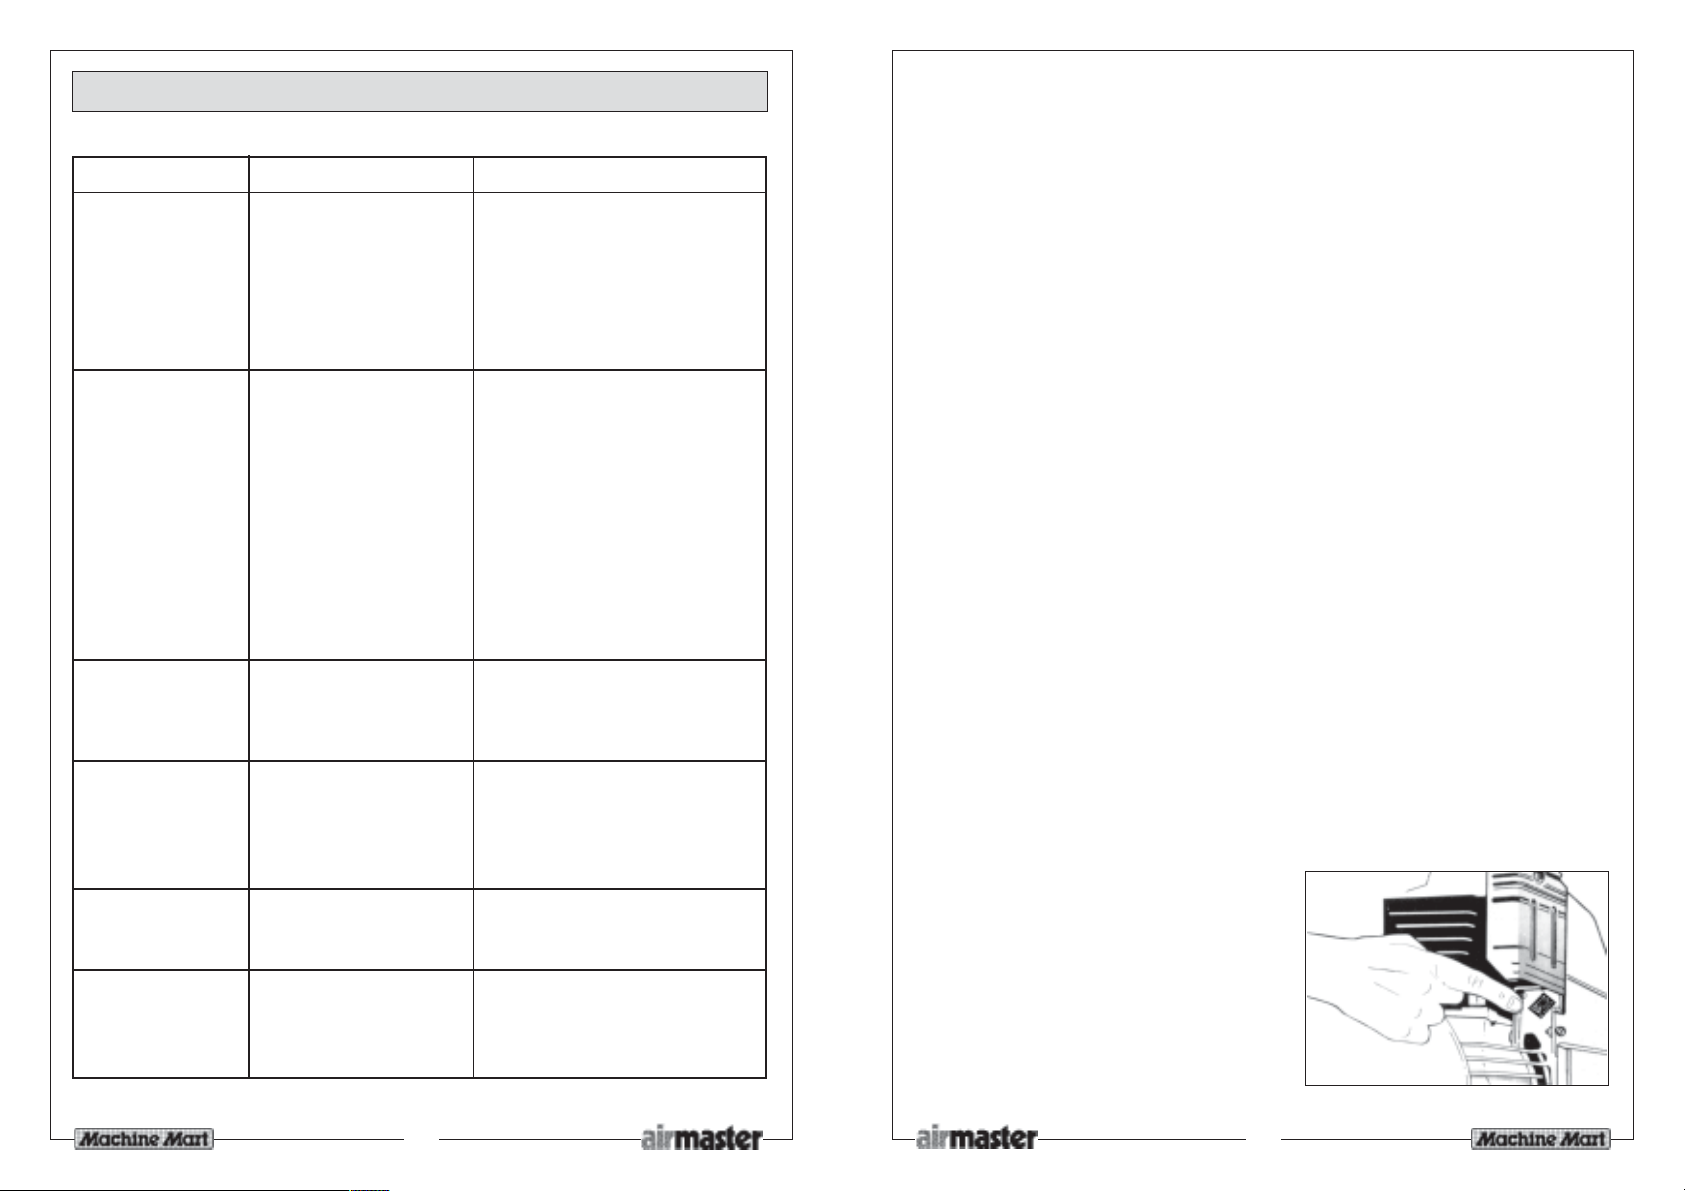
PROBLEM
The compressor
stops and will not
start again.
The compressor
does not reach
the set pressure
and overheats
easily.
Compressor does
not start.
Air leaking from
the pressure switch
valve when the
compressor is not
running.
Air pressure from
the regulator will
not adjust.
The compressor is
very noisy and
makes a metallic
knocking sound.
PROBABLE CAUSE
Bad connections.
Blown fuse
Overload cutout
switch has tripped.
Compressor head
gasket blown or valve
broken.
Air receiver charged
(see also item 1)
Faulty non-return
valve.
the regulator body is
broken.
Compressor damaged
and needs overhaul.
10
O
REMEDY
Check the electrical
connections.
Clean and tighten as
necessary.
Renew/Replace fuse
Switch off and wait 5 minutes
before pressing the reset button.
Wait for compressor to cool
down, disassemble the head
and replace any broken
components.
Carefully clean all sealing
surfaces before reassembling.
If in doubt contact Machine
Mart
NOTE: It is also possible that
you are using more air than
the compressor is capable of
delivering.
Open drain cock to expel air.
Compressor should start again
when pressure reduces to
approx 95 psi.
First drain the receiver
completely of air. Remove the
valve end plug, carefully clean
the valve seat and the gasket
and reassemble. See Fig 7.
Replace RegulatorThe diaphragm within
Return the machine to
Machine Mart.
NOTE: Should the motor fail to start immediately, it is probable that the air receiver
is already full of air. Check the tank pressure gauge (see fig. 2). If you release air,
by opening air outlet tap, the motor will start automatically once the cut-in pressure
is reached.
4. Before connecting your airline to the compressor allow it to run with the air
outlet tap completely open for 10 - 15 seconds to permit a good distribution
of the lubricating oil.
5. Close the outlet tap then connect one end of suitable air hose to the
compressor air outlet, and the other and to the equipment to be used.
Set the outlet pressure by adjusting the Output Pressure Regulator. To do this,
turn the knob clockwise to increase pressure, anti-clockwise to decrease.
The Tiger 8/65 requires that the Regulator Knob be pulled upwards before
it may be turned. Pushing the knob down again holds the pressure setting.
Read the operating pressure on the outlet pressure gauge.
NOTE: For most spraywork do not exceed 50 psi (unless following paint manufacturer’s instructions).
For other airline equipment such as air tools, tyre gauges, staple guns, paraffin
guns etc., it may be necessary to set the operating pressure at a higher (or lower)
level.
IMPORTANT: Always refer to the accessory manufacturers’ recommendations
for optimum operating pressures for their equipment.
6. With operating pressure set, reopen the air outlet tap.
7. The Pressure Switch, located within the plastic cover beneath the ON/OFF
switch, should not require adjustment. This is an automatic device and has
been preset at the factory to stop the motor when pressure in the receiver
reaches its maximum, and to start it again when the pressure falls to the
minimum preset value. This operation is completely automatic and does not
affect the spraying process in any way. However, should problems develop
with the cut-in, cut out settings, consult your local Machine Mart Service Dep’t.
NOTE:
a. If the machine pumps continuously
without cutting out then the compressor
is too small for the application/tool
being used, and damage may result.
Consult your local Machine Mart outlet.
b. The motor is protected by a Thermal
Overload so that if the motor overheats
for any reason -thethermal overload will
trip, stopping the motor. To restart, allow
a period for the motor to cool down,
before pressing the Reset Button,
illustrated in fig. 3.
c. DO NOT exceed the Duty Cycle for the
machine (see Specifications)
7
Fig. 3
Page 8
SHUTTING DOWN THE COMPRESSOR
1. The Pressure Switch is provided with an ON/OFF switch (See Fig. 2) which,
when pushed down to the ‘OFF’ (0) position, cuts off the motor.
Always use this switch to shut down the compressor. NEVER USE THE MAINS
SWITCH TO STOP MOTOR.
2. Close the air outlet tap and trigger the equipment (spraygun, air tool etc)
to release air from the air hose before disconnecting the hose from the
machine.
3. Before transporting your compressor or when leaving overnight, expel all air
from the receiver by opening drain valve (52).
Note: The Tiger 8/65 incorporates a Regulator/Filter which automatically allows
any condensate to drain off when pressure in the reservoir is completely
relieved. Water may also be drained off when the system is under pressure. The
method of operation is shown in Fig 4.
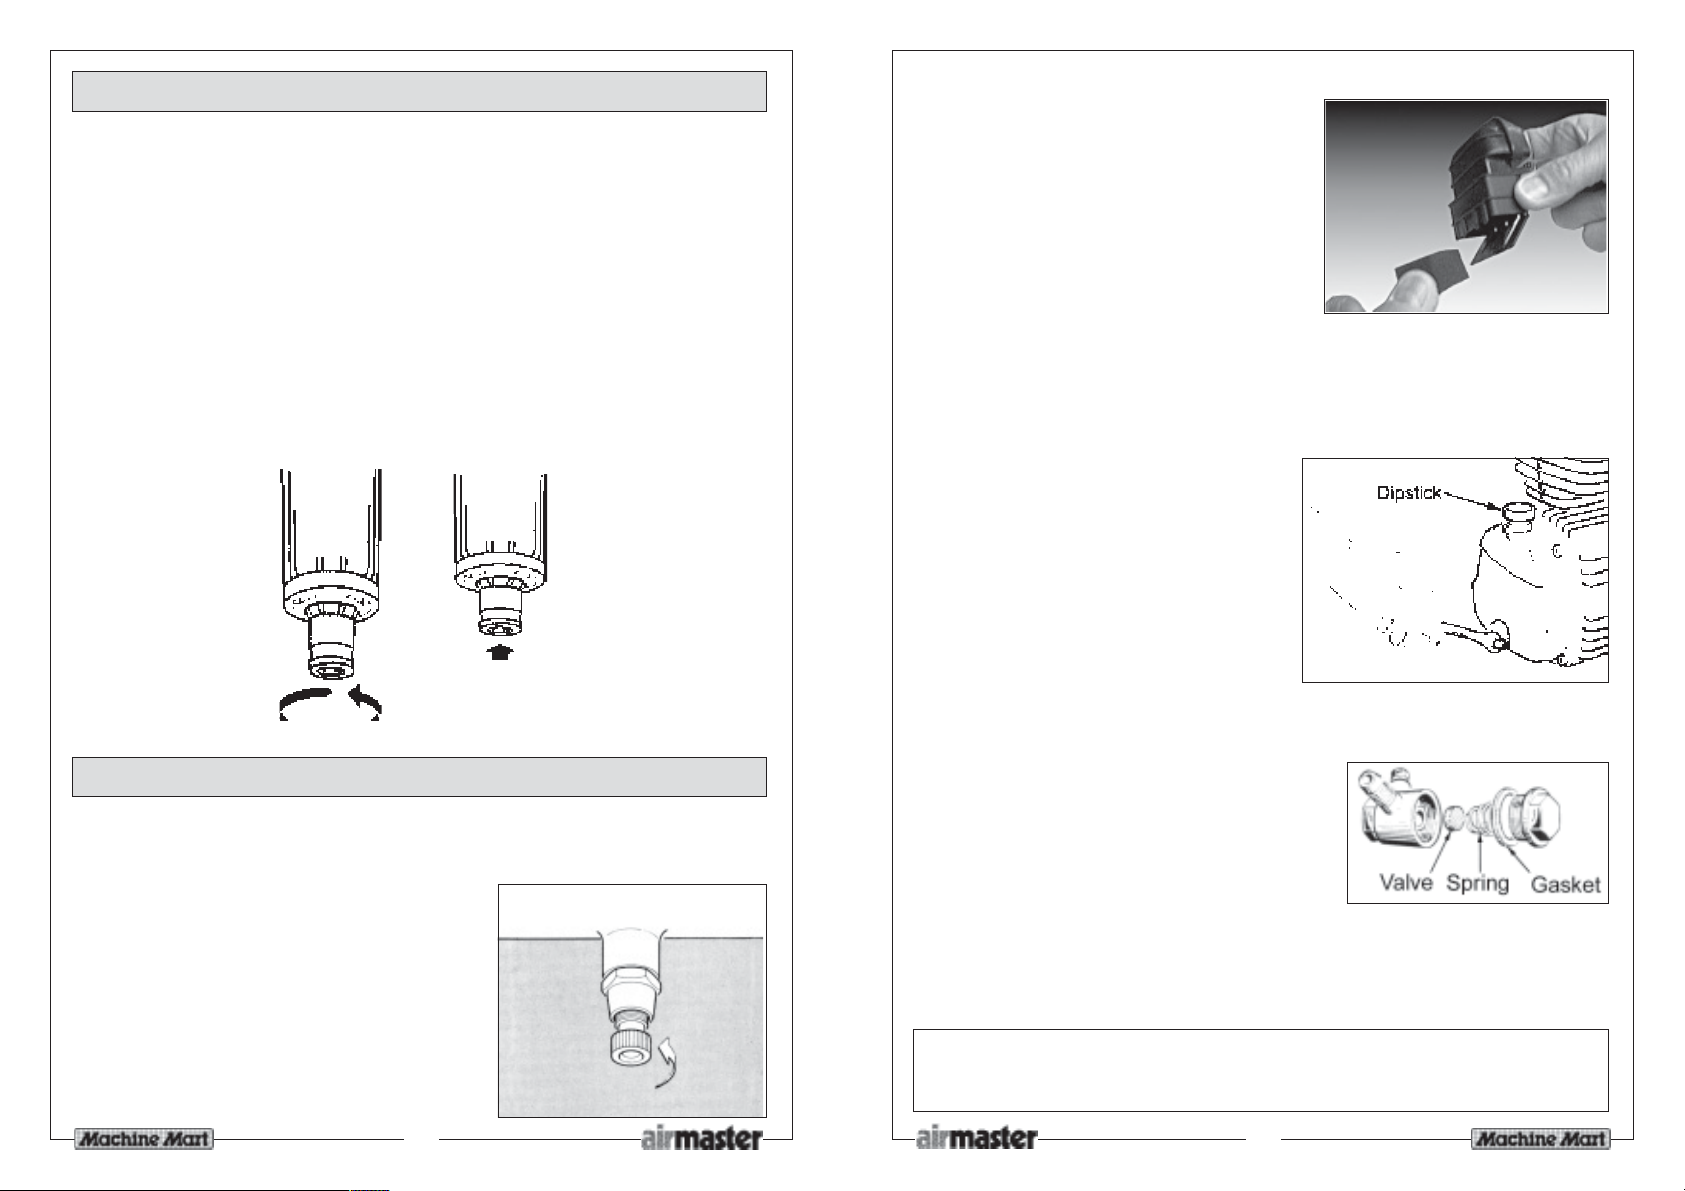
Turn the knob, at the
base of the filter
bowl, to the right to
lock it, to the left to
unlock.
In the ‘unlocked’
position, condensate
will automatically
drain when the
pressure in the system
is near zero.
Fig. 4
To blow off
condensate when
the system is
pressurised, push the
knob up when it is in
its unlocked position.
MAINTENANCE
A. DAILY
1. Check the oil level before you start and
top-up if necessary - (use Machine Mart
compressor oil).
2. Drain any condensate that may have
accumulated in the receiver by
unscrewing the drain plug underneath
the air receiver (fig. 5).
Fig. 5
bolts and motor housing screws and retighten if any have worked loose.
2. Every 50 hours (more frequently if used in
a dusty environment), clean the air
intake filter, by carefully prising the filter
from the head, opening the bottom flap
and withdrawing the sponge element
from inside (see fig 6).
Clean the sponge and the inner housing.
If necessary, the sponge filter may
be gently washed in warm soapy water,
rinsed and allowed to dry thoroughly
before refitting.
If any part of the filter is damaged then you should obtain a replacement.
3. After the first 100 hours use, replace the oil completely using Machine Mart
compressor oil. Thereafter, replace the oil completely after every 500 hours
of operation or every 6 months.
To empty the oil from the machine,
remove the drain plug from the
crankcase cover (see fig. 7).
4. Every 500 hours of operation or every 6
months
- clean all the external parts of
the compressor.
(This cleaning makes the cooling
process more efficient and prolongs
the life of the machine).
- Check and clean the inlet
and outlet valves
- Examine the non-return valve
and replace the gasket if
necessary (fig. 8)
5. In the event of an air leak follow
the procedure below:
- Load compressor to maximum pressure
- Unplug the compressor
- With a brush and soapy water wet all ‘screwed’ air connections
- Any leaks will show through the formation of air bubbles.
Fig. 6
Fig. 7
Fig. 8
Parts List item No. 59
B. PERIODICALLY
1. After the first 5 hours of running the
compressor, check the cylinder head
WARNIN G
NEVER UNSCREW A CONNECTION WHILST THE AIR RECEIVER IS UNDER PRESSURE.
ALWAYS MAKE CERTAIN THAT THE TANK HAS FIRST BEEN EMPTIED
8
O
9
 Loading...