

Page 1
SPRAY GUN
SPRAY GUN
MODEL NO: TG2
PART No: 3090070
OPERATION & MAINTENANCE
INSTRUCTIONS
0803
Page 2
- 1 -
- 14 -
Page 3
NOTES
Please read these instructions carefully before operating the tool
Thank you for purchasing this
Before using the device, please read this manual thoroughly and carefully. Follow
all instructions given. This is for your own safety and that of others around you, and
is also to help you achieve long and trouble free service from your new spray gun.
CLARKE
TG2 Touch-Up Spray Gun.
CLARKE GUARANTEE
This CLARKE product is guaranteed against faulty manufacture for a period
of 12 months from the date of purchase. Please keep your receipt as proof
of purchase.
This guarantee is invalid if the product is found to have been abused or
tampered with in any way, or not used for the purpose for which it was
intended.
Faulty goods should be returned to their place of purchase, no product can
be returned to us without prior permission.
This guarantee does not affect your statutory rights.
Please be aware that certain parts of this spray gun will wear, requiring replacement and
that these parts may not be covered by your guarantee.
The wear on certain parts depends on the abrasiveness of the materials being sprayed.
More abrasive materials such as latex paint (emulsions) will cause these parts to wear
much faster.
Replacement parts are available from your nearest Clarke International dealer.
- 13 -
PARTS & SERVICE TEL: 020 8988 7400
or e-mail as follows:
PARTS: Parts@clarkeinternational.com
SERVICE: Service@clarkeinternational.com
- 2 -
Page 4
SPECIFICATIONS
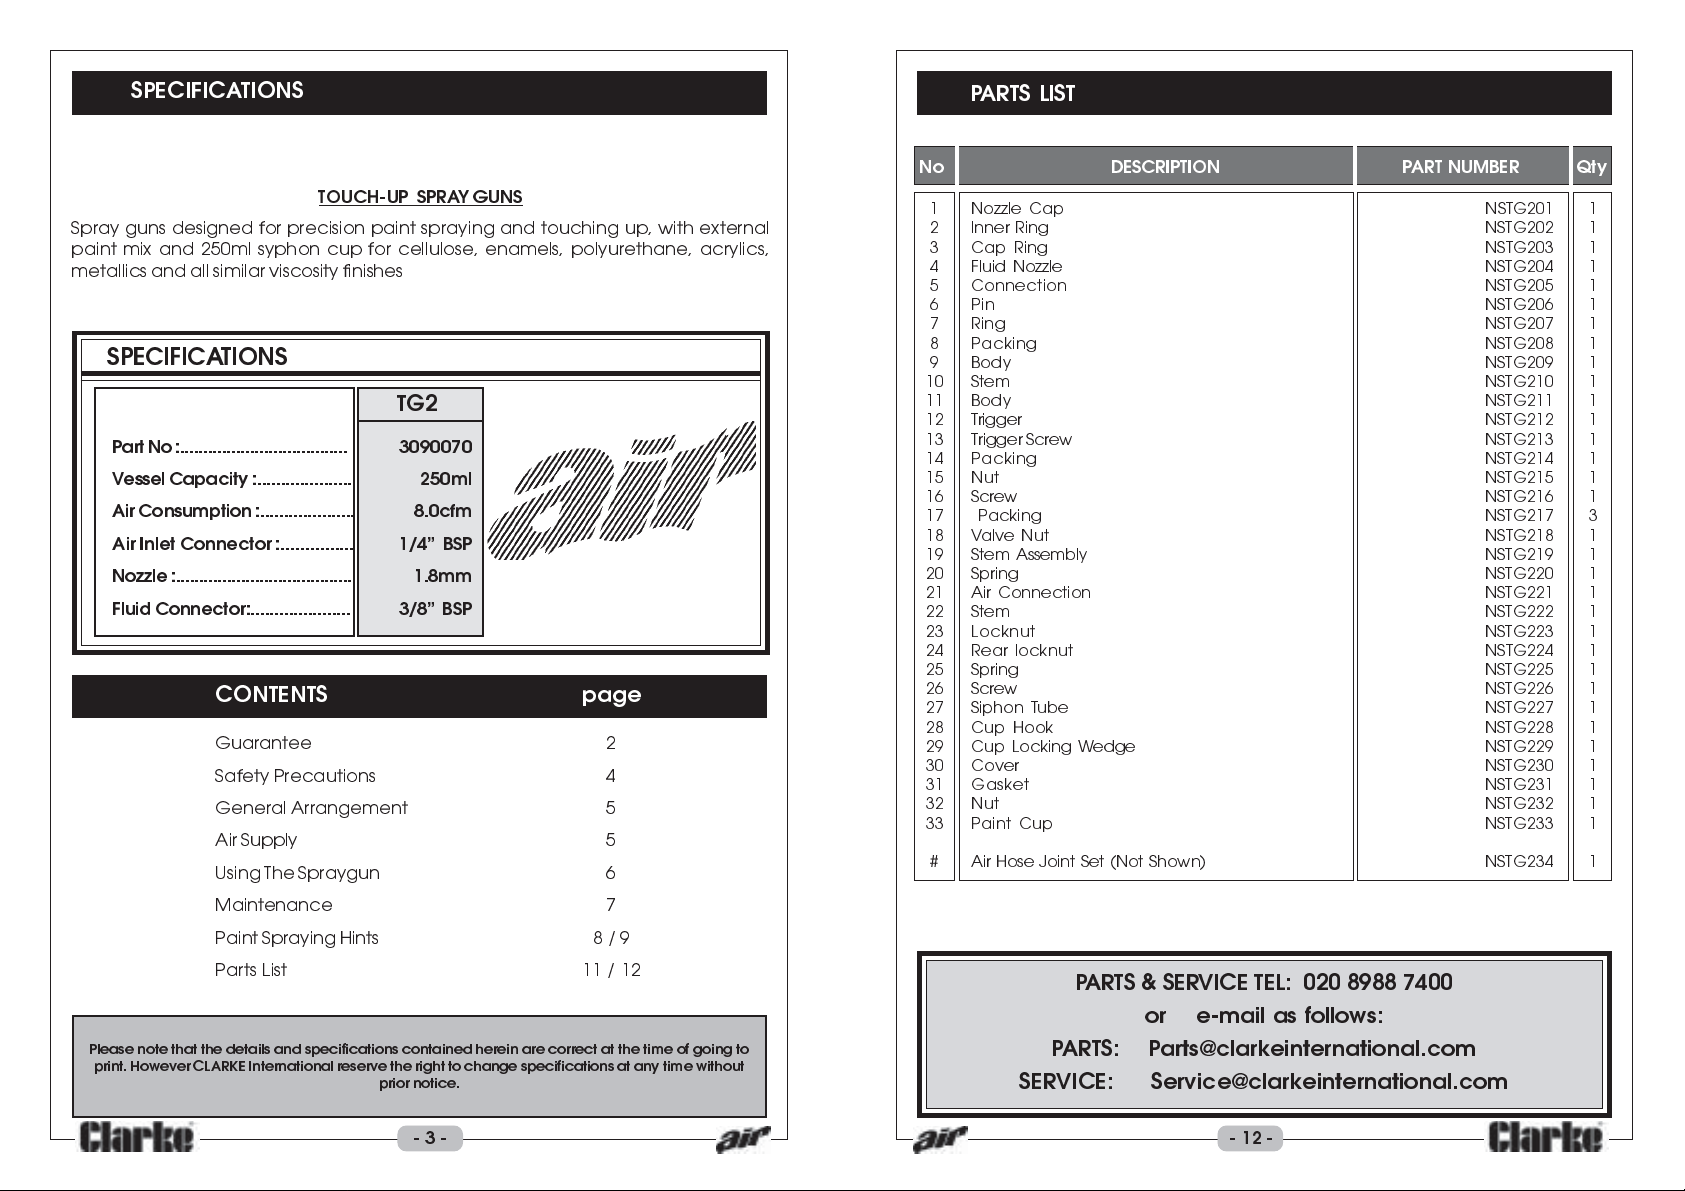
TOUCH-UP SPRAY GUNS
Spray guns designed for precision paint spraying and touching up, with external
paint mix and 250ml syphon cup for cellulose, enamels, polyurethane, acrylics,
metallics and all similar viscosity finishes
SPECIFICA TIONS
TG2
Part No :.................................... 3090070
Vessel Capacity :.................... 250 ml
Air Consumption :.................... 8.0cfm
Air Inlet Connector :............... 1/4 BSP
Nozzle :...................................... 1.8mm
Fluid Connector:..................... 3/8 BSP
CONTENTS page
Guarantee 2
Safety Precautions 4
General Arrangement 5
Air Supply 5
Using The Spraygun 6
Maintenance 7
Paint Spraying Hints 8 / 9
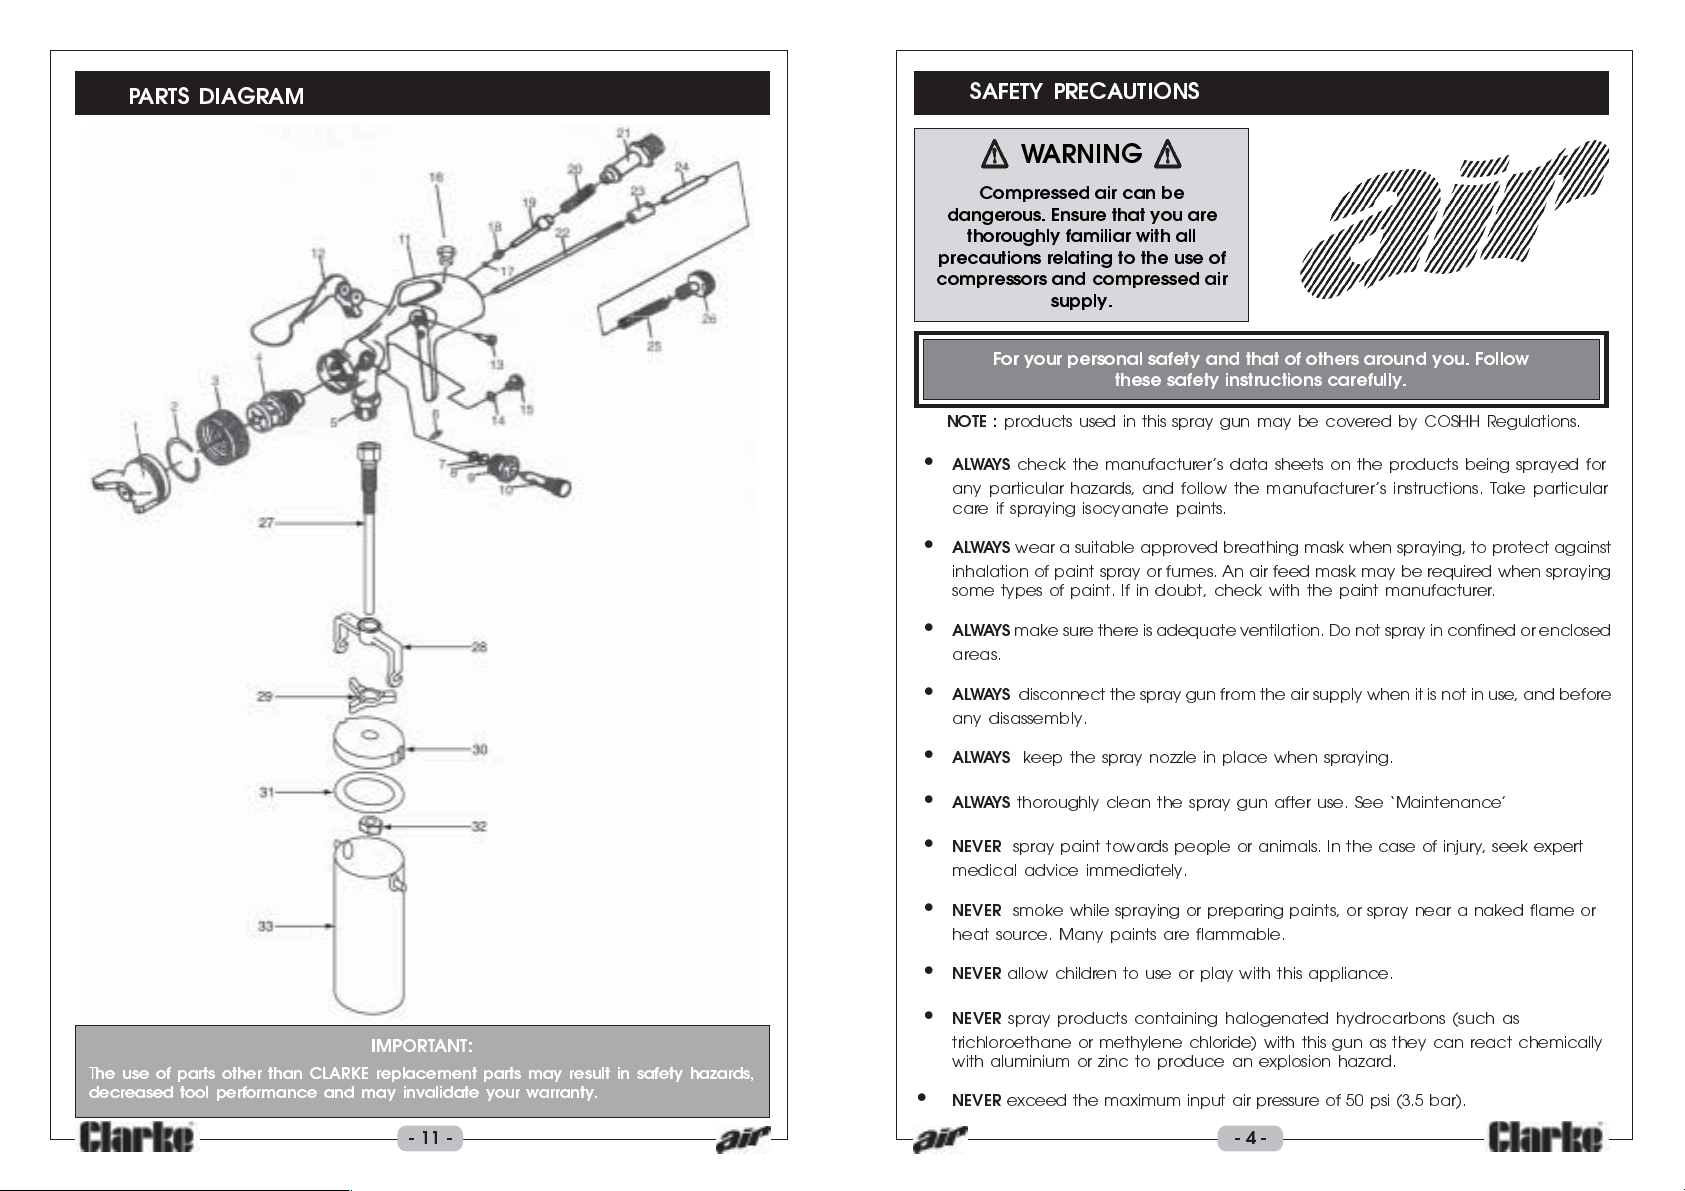
Parts List 11 / 12
Please note that the details and specifications contained herein are correct at the time of going to
print. However CLARKE International reserve the right to change specifications at any time without
prior notice.
PARTS LIST
No DESCRIPTION P ART NUMBER Qty
1 Nozzle Cap NSTG201 1
2 Inner Ring NSTG202 1
3 Cap Ring NSTG203 1
4 Fluid Nozzle NSTG204 1
5 Connection NSTG205 1
6 Pin NSTG206 1
7 Ring NSTG207 1
8 Packing NSTG208 1
9 Body NSTG209 1
10 Stem NSTG210 1
11 Body NSTG211 1
12 Trigger NSTG212 1
13 Trigger Screw NSTG213 1
14 Packing NSTG214 1
15 Nut NSTG215 1
16 Screw NSTG216 1
17 Packing NSTG217 3
18 Valve Nut NSTG218 1
19 Stem Assembly NSTG219 1
20 Spring NSTG220 1
21 Air Connection NSTG221 1
22 Stem NSTG222 1
23 Locknut NSTG223 1
24 Rear locknut NSTG224 1
25 Spring NSTG225 1
26 Screw NSTG226 1
27 Siphon Tube NSTG227 1
28 Cup Hook NSTG228 1
29 Cup Locking Wedge NSTG229 1
30 Cover NSTG230 1
31 Gasket NSTG231 1
32 Nut NSTG232 1
33 Paint Cup NSTG233 1
# Air Hose Joint Set (Not Shown) NSTG234 1
PARTS & SERVICE TEL: 020 8988 7400
or e-mail as follows:
PARTS: Parts@clarkeinternational.com
SERVICE: Service@clarkeinternational.com
- 3 - - 12 -
Page 5
PARTS DIAGRAM
SAFETY PRECAUTIONS
WARNING
Compressed air can be
dangerous. Ensure that you are
thoroughly familiar with all
precautions relating to the use of
compressors and compressed air
supply.
For your personal safety and that of others around you. Follow
these safety instructions carefully.
NOTE :
products used in this spray gun may be covered by COSHH Regulations.
AL WAYS
any particular hazards, and follow the manufacturers instructions. Take particular
care if spraying isocyanate paints.
ALWAYS
inhalation of paint spray or fumes. An air feed mask may be required when spraying
some types of paint. If in doubt, check with the paint manufacturer.
ALWAYS
areas.
check the manufacturers data sheets on the products being sprayed for
wear a suitable approved breathing mask when spraying, to protect against
make sure there is adequate ventilation. Do not spray in confined or enclosed
IMPORTANT:
T
he use of parts other than CLARKE replacement parts may result in safety hazards,
decreased tool performance and may invalidate your warranty.
- 11 -
AL WAYS
any disassembly.
AL WAYS
ALWAYS
NEVER
medical advice immediately.
NEVER
heat source. Many paints are flammable.
NEVER
NEVER
trichloroethane or methylene chloride) with this gun as they can react chemically
with aluminium or zinc to produce an explosion hazard.
NEVER
disconnect the spray gun from the air supply when it is not in use, and before
keep the spray nozzle in place when spraying.
thoroughly clean the spray gun after use. See Maintenance
spray paint towards people or animals. In the case of injury, seek expert
smoke while spraying or preparing paints, or spray near a naked flame or
allow children to use or play with this appliance.
spray products containing halogenated hydrocarbons (such as
exceed the maximum input air pressure of 50 psi (3.5 bar).
- 4 -
Page 6
Adjuster
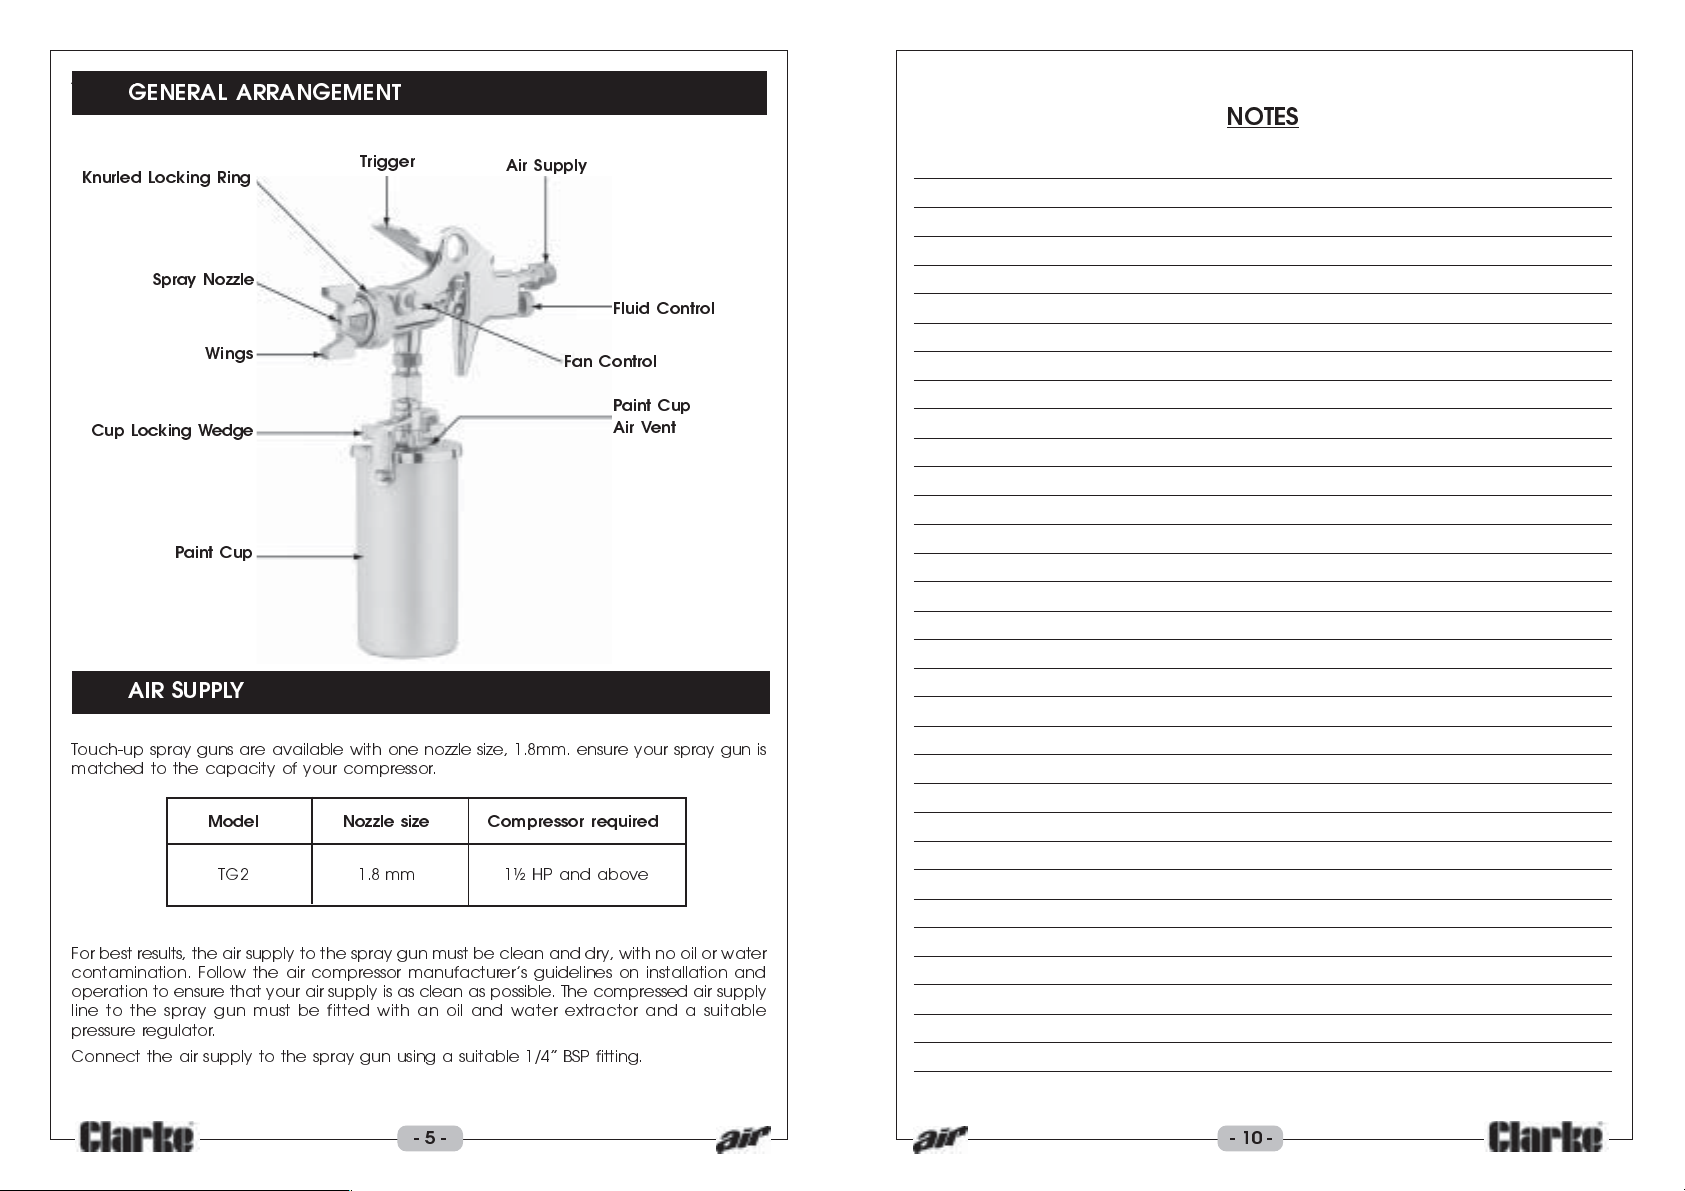
GENERAL ARRANGEMENT
NOTES
Knurled Locking Ring
Spray Nozzle
Wings
Cup Locking Wedge
Paint Cup
AIR SUPPLY
Trigger
Air Supply
Fluid Control
Fan Control
Paint Cup
Air Vent
Touch-up spray guns are available with one nozzle size, 1.8mm. ensure your spray gun is
matched to the capacity of your compressor.
Model Nozzle size Compressor required
TG2 1.8 mm 1½ HP and above
For best results, the air supply to the spray gun must be clean and dry, with no oil or water
contamination. Follow the air compressor manufacturers guidelines on installation and
operation to ensure that your air supply is as clean as possible. The compressed air supply
line to the spray gun must be fitted with an oil and water extractor and a suitable
pressure regulator.
Connect the air supply to the spray gun using a suitable 1/4 BSP fitting.
- 5 -
- 10 -
Page 7
PAINT SPRAYING HINTS Cont
To obtain best results, it is vital that the surface to be sprayed is well prepared. It must be
clean, free from dust, dirt and grease. Mask any area that is not to be sprayed.
Paint Thinning
Thinning is particularly important when paint spraying. Most paints are supplied ready for
brush application and need to be sufficiently diluted for spraying purposes. Always follow
the paint manufacturers instructions. If in doubt, always consult the paint manufacturer.
A Viscous Cup (not supplied), will assist in determining the correct thickness of the paint.
Ensure the paint is free from lumps or other
matter , if necessary strain it through a coarse
filter.
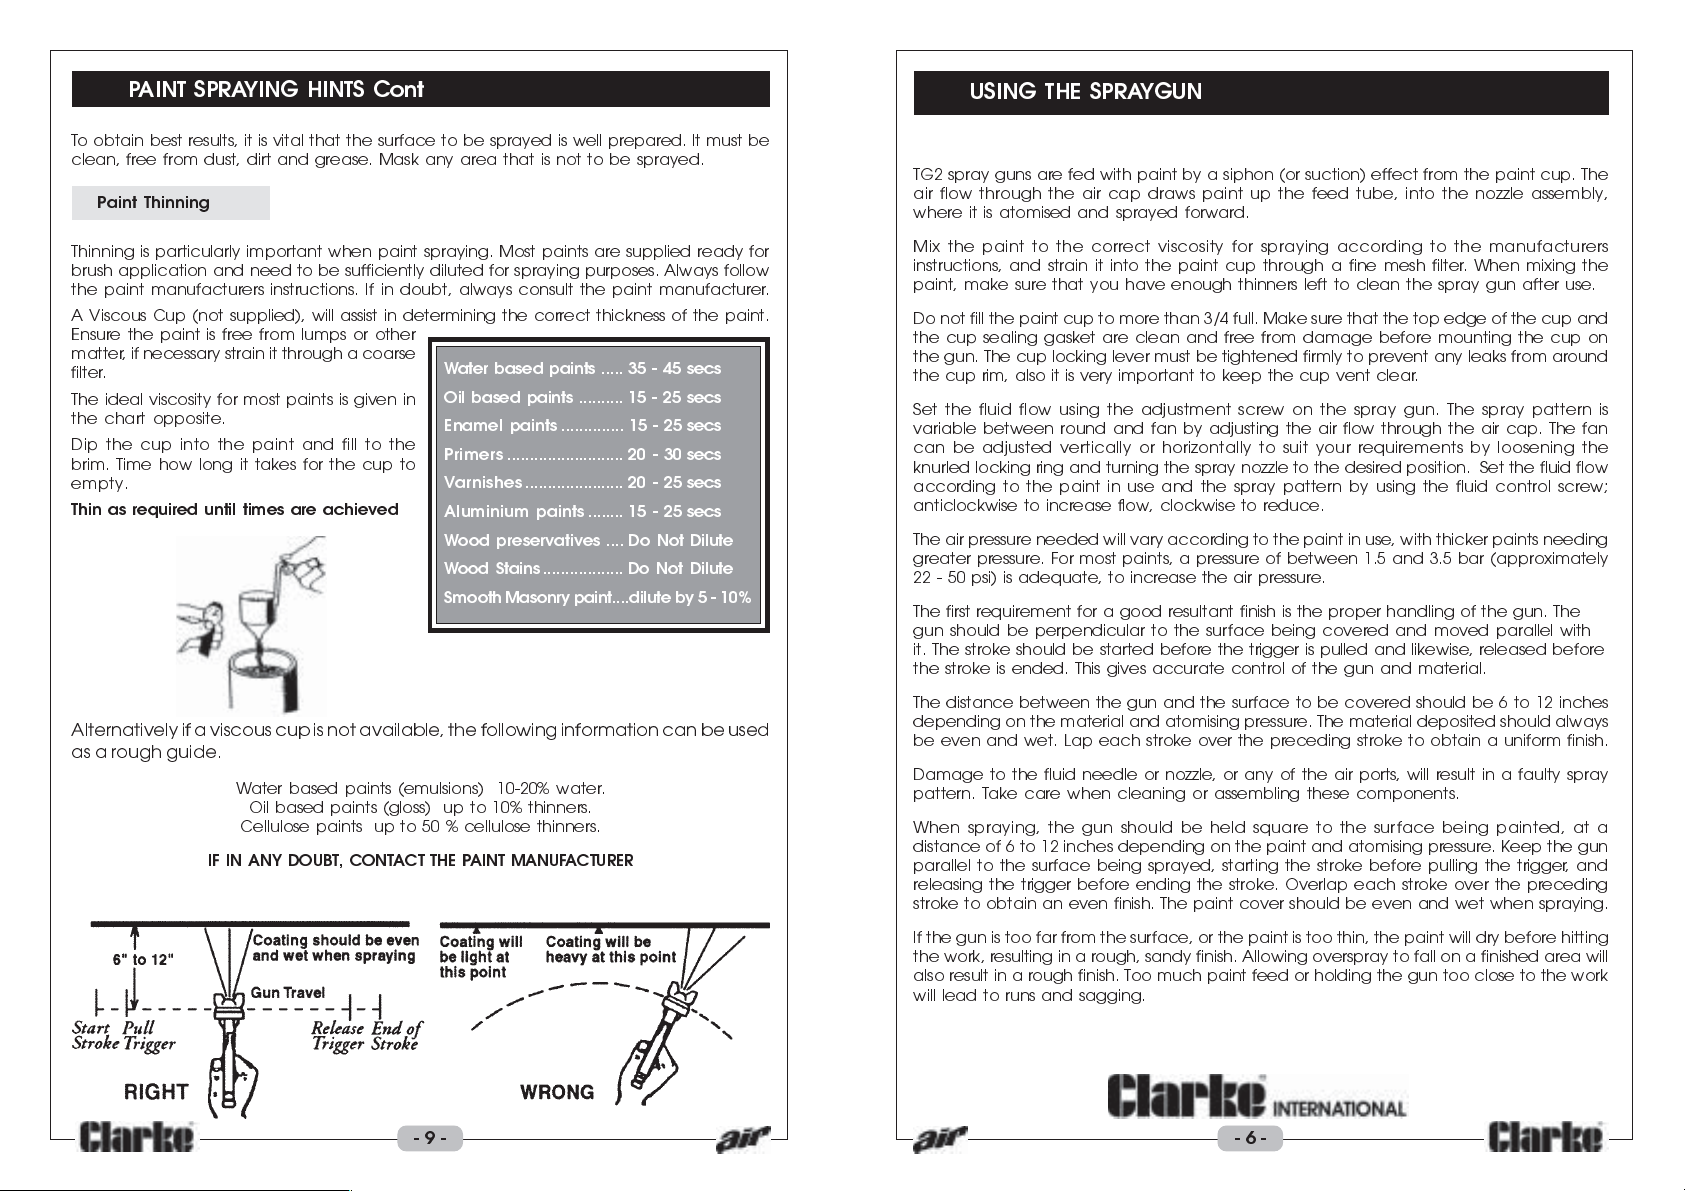
The ideal viscosity for most paints is given in
the chart opposite.
Dip the cup into the paint and fill to the
brim. Time how long it takes for the cup to
empty.
Thin as required until times are achieved
Alternatively if a viscous cup is not available, the following information can be used
as a rough guide.
Water based paints (emulsions) 10-20% water.
Oil based paints (gloss) up to 10% thinners.
Cellulose paints up to 50 % cellulose thinners.
IF IN ANY DOUBT, CONTACT THE PAINT MANUFACTURER
Water based paints ..... 35 - 45 secs
Oil based paints .......... 15 - 25 secs
Enamel paints .............. 15 - 25 secs
Primers .......................... 20 - 30 secs
Varnishes ...................... 20 - 25 secs
Aluminium paints ........ 15 - 25 secs
Wood preservatives .... Do Not Dilute
Wood Stains .................. Do Not Dilute
Smooth Masonry paint....dilute by 5 - 10%
USING THE SPRA YGUN
TG2 spray guns are fed with paint by a siphon (or suction) effect from the paint cup. The
air flow through the air cap draws paint up the feed tube, into the nozzle assembly,
where it is atomised and sprayed forward.
Mix the paint to the correct viscosity for spraying according to the manufacturers
instructions, and strain it into the paint cup through a fine mesh filter. When mixing the
paint, make sure that you have enough thinners left to clean the spray gun after use.
Do not fill the paint cup to more than 3/4 full. Make sure that the top edge of the cup and
the cup sealing gasket are clean and free from damage before mounting the cup on
the gun. The cup locking lever must be tightened firmly to prevent any leaks from around
the cup rim, also it is very important to keep the cup vent clear.
Set the fluid flow using the adjustment screw on the spray gun. The spray pattern is
variable between round and fan by adjusting the air flow through the air cap. The fan
can be adjusted vertically or horizontally to suit your requirements by loosening the
knurled locking ring and turning the spray nozzle to the desired position. Set the fluid flow
according to the paint in use and the spray pattern by using the fluid control screw;
anticlockwise to increase flow, clockwise to reduce.
The air pressure needed will vary according to the paint in use, with thicker paints needing
greater pressure. For most paints, a pressure of between 1.5 and 3.5 bar (approximately
22 - 50 psi) is adequate, to increase the air pressure.
The first requirement for a good resultant finish is the proper handling of the gun. The
gun should be perpendicular to the surface being covered and moved parallel with
it. The stroke should be started before the trigger is pulled and likewise, released before
the stroke is ended. This gives accurate control of the gun and material.
The distance between the gun and the surface to be covered should be 6 to 12 inches
depending on the material and atomising pressure. The material deposited should always
be even and wet. Lap each stroke over the preceding stroke to obtain a uniform finish.
Damage to the fluid needle or nozzle, or any of the air ports, will result in a faulty spray
pattern. Take care when cleaning or assembling these components.
When spraying, the gun should be held square to the surface being painted, at a
distance of 6 to 12 inches depending on the paint and atomising pressure. Keep the gun
parallel to the surface being sprayed, starting the stroke before pulling the trigger, and
releasing the trigger before ending the stroke. Overlap each stroke over the preceding
stroke to obtain an even finish. The paint cover should be even and wet when spraying.
If the gun is too far from the surface, or the paint is too thin, the paint will dry before hitting
the work, resulting in a rough, sandy finish. Allowing overspray to fall on a finished area will
also result in a rough finish. Too much paint feed or holding the gun too close to the work
will lead to runs and sagging.
- 9 -
- 6 -
Page 8
MAINTENANCE
WARNING
Relieve any pressure in the gun and hose, and disconnect the spray gun from
the air supply, before any disassembly.
It is essential that the spray gun is kept clean. Dried paint in the nozzle assembly or airways
will stop the gun from working. For the gun to perform at its best it must be cleaned and
lubricated after every use.
After use, empty any remaining paint from the paint cup, wipe the cup clean with a dry,
lint free rag, and fill with thinners. Spray the thinners through the spray gun until it is clean.
1. Immerse only the front end of the gun until solvent just covers the fluid connection.
NOTE : do not submerge the entire spray gun in solvent because :
a, the lubricant in the seal/packings will dissolve and the packings will dry out.
b, the lubricant at wear surfaces will dissolve resulting in harder operation and
premature wear.
c, residue from dirty solvent may clog the narrow air passages in the gun.
2. Use a small bristle brush and solvent to wash off accumulated paint.
3. Wipe down the outside of the gun with solvent dampened cloth.
4. Lubricate gun daily, using a light machine oil on :
fluid needle packing
a,
b, air valve packing
c, side port control packing
d, trigger pivot point
Coat the fluid control spring with grease.
CAUTION :
DO NOT poke any of the holes in the air cap or nozzle with metal instruments. These holes
are precision drilled, and can be damaged by probing with anything harder than a
wooden toothpick.
Make sure that the air inlet vent to the paint cup is kept clean. Blockages in this vent will
prevent an even material flow to the gun.
Do not mix components from spray guns, even those of the same type. Do not overtighten
components, and be careful not to cross thread any parts on assembly.
Check the air supply hose regularly for any signs of damage, and replace it if necessary.
Do not use damaged or leaking hoses.
never use silicon based lubricants as this may cause paint finish defects.
PAINT SPRAYING HINTS
WARNING
NEVER attempt to spray unless you are wearing suitable, approved
respiratory and eye protection.
REMEMBER that some modern paints require specialist respiratory
protection...always consult the paint manufacturers instructions.
1. General Preparation
a. Ensure that the area in which you will be spraying is clean and dust free.
b. Connect spray gun to compressor via suitable flexible hose.
c. With no paint in spray gun, test system for air leaks.
d. Cover adjacent pieces of equipment to protect from overspray. Mask areas
of the article not to be sprayed.
e. Ensure surface to be painted is clean, dry and free from oil and dust.
Check paint manufacturers instructions for any special surface
preparation required.
REMEMBER - TIME SPENT PREPARING SAVES TIME SPENT FINISHING
2. Paint Preparation
a. Achieve the correct paint viscosity. This should be done according to
paint manufacturers instructions, and will vary according to type of paint, (see
paint thinning on page 9).
b. Having mixed the paint thoroughly in a separate container, pour into the
spray gun paint container through a fine filter.
DO NOT OVERFILL SPRAY GUN PAINT CONTAINER - three quarters full is maximum
c. It is usually best to experiment with a couple of practice spray coats on a
piece of material with the same type of surface as the article you wish to
spray, e.g.. metal for a car body panel, wood for a piece of furniture etc.
d. Some common problems:
PROBLEM CAUSE CORRECTION
Paint does not atomise Paint is too thick, Add thinners.
(comes out in blobs). Air pressure is too low. Increase air pressure.
Paint dries before hitting Paint is too thin. Add more paint.
surface, leaving it dry Air pressure is too high. Reduce air pressure.
with a rough texture.
- 7 -
Finish is pitted like Air pressure too high Reduce air pressure,
Orange peel. or spray too close to increase distance between
work. gun and work.
- 8 -
 Loading...