

Page 1

SPS-28
IVIE Enterprises
www.ivie-ent.com Ph:(918)254-5161 or (888)262-5161 Fax:(918)250-4807
Space Sweeper
(INCLUDES 28G & 28B)
Section II
Parts and Service Manual
(70100B)
CLARKE TECHNOLOGY Model SPS-28 Space Sweeper Operator's Manual Page 11
Page 2
SERVICE AND MAINTENANCE
WARNING: Maintenance and repairs must be done
by authorized personnel only. Keep
Adjustments according to specifications.
WARNING: To prevent injury always stop the en-
gine or motor before doing any maintenance or repairs to this machine. Separate the connectors between the machine and batteries. Disconnect the
wire from the spark plug.
How To Check the Engine
1. Check oil level regularly. Change oil after using first two
tanks of gasoline. change oil regularly after each twentyfive (25) operating hours, or more often in extremely dirty
conditions.
2. Keep the engine clean and remove dirt and oil from coiling
fins, screen and flywheel for best engine performance and
to prevent damage from overheating.
Do not allow dirt to enter the engine when checking oil or
adding fuel.
Wire brush carbon deposits from spark plug electrodes
and regap at .030 in.
How to Clean the Engine Air Filter
Clean and re-oil every ten (10) hours - more often under
extremely dusty conditions.
1. Remove filter element. Separate pre-filter from pleated
filter.
2. Clean pre-filter only in detergent and warm water.
3. Squeeze dry.
4. Apply liberal amount of clean engine oil and distribute
evenly. Squeeze out excess oil.
5. Install element.
Lubrication
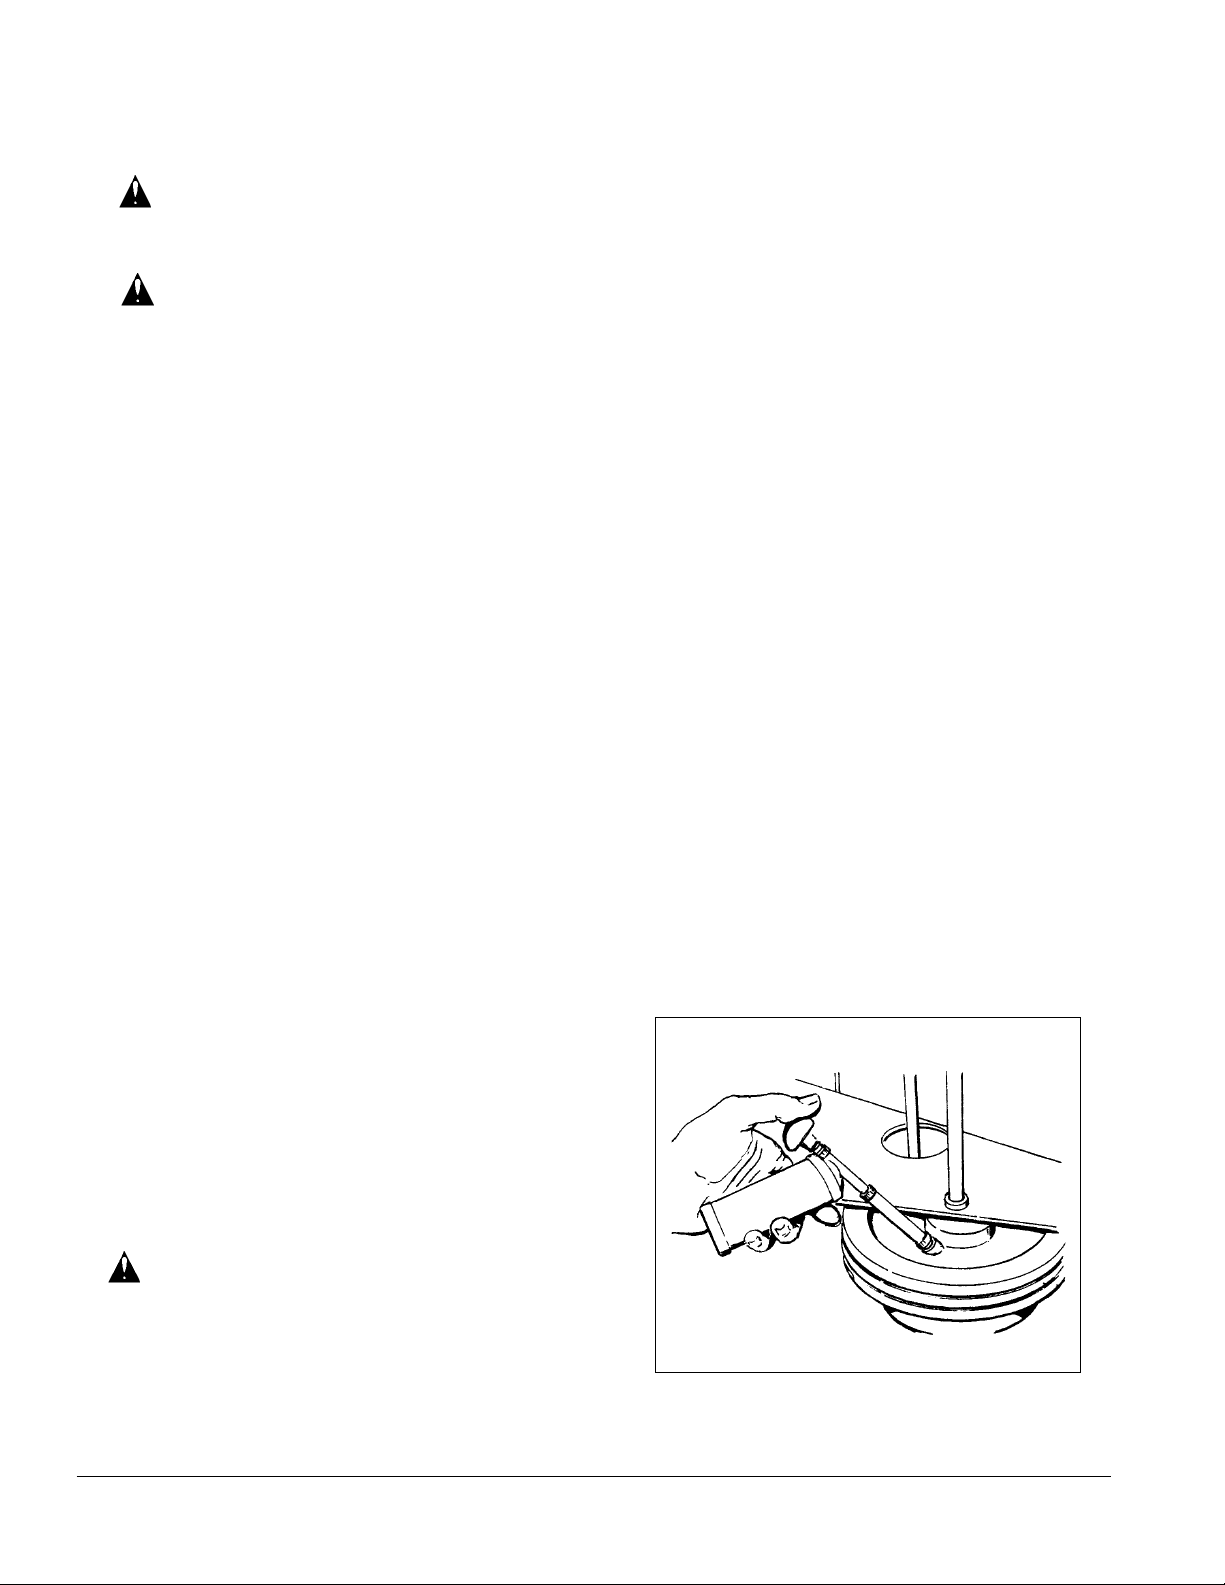
The Model SPS-28 has one grease fitting on the main drive
wheel. Apply two strokes of lubricant (PN 883853) from a
grease gun each month. (See Fig. 8)
WARNING: To prevent injury and damage, remove
the batteries or gasoline before tipping
the machine.
To get access to the grease fitting, remove the batteries and
hoppers and tip the machine on its side.
Fig. 8
Page 12 CLARKE TECHNOLOGY Model SPS-28 Space Sweeper Operator's Manual
Page 3
Drive Belts
WARNING: To prevent injury always stop the
engine or motor before doing any
maintenance or repairs to this machine.
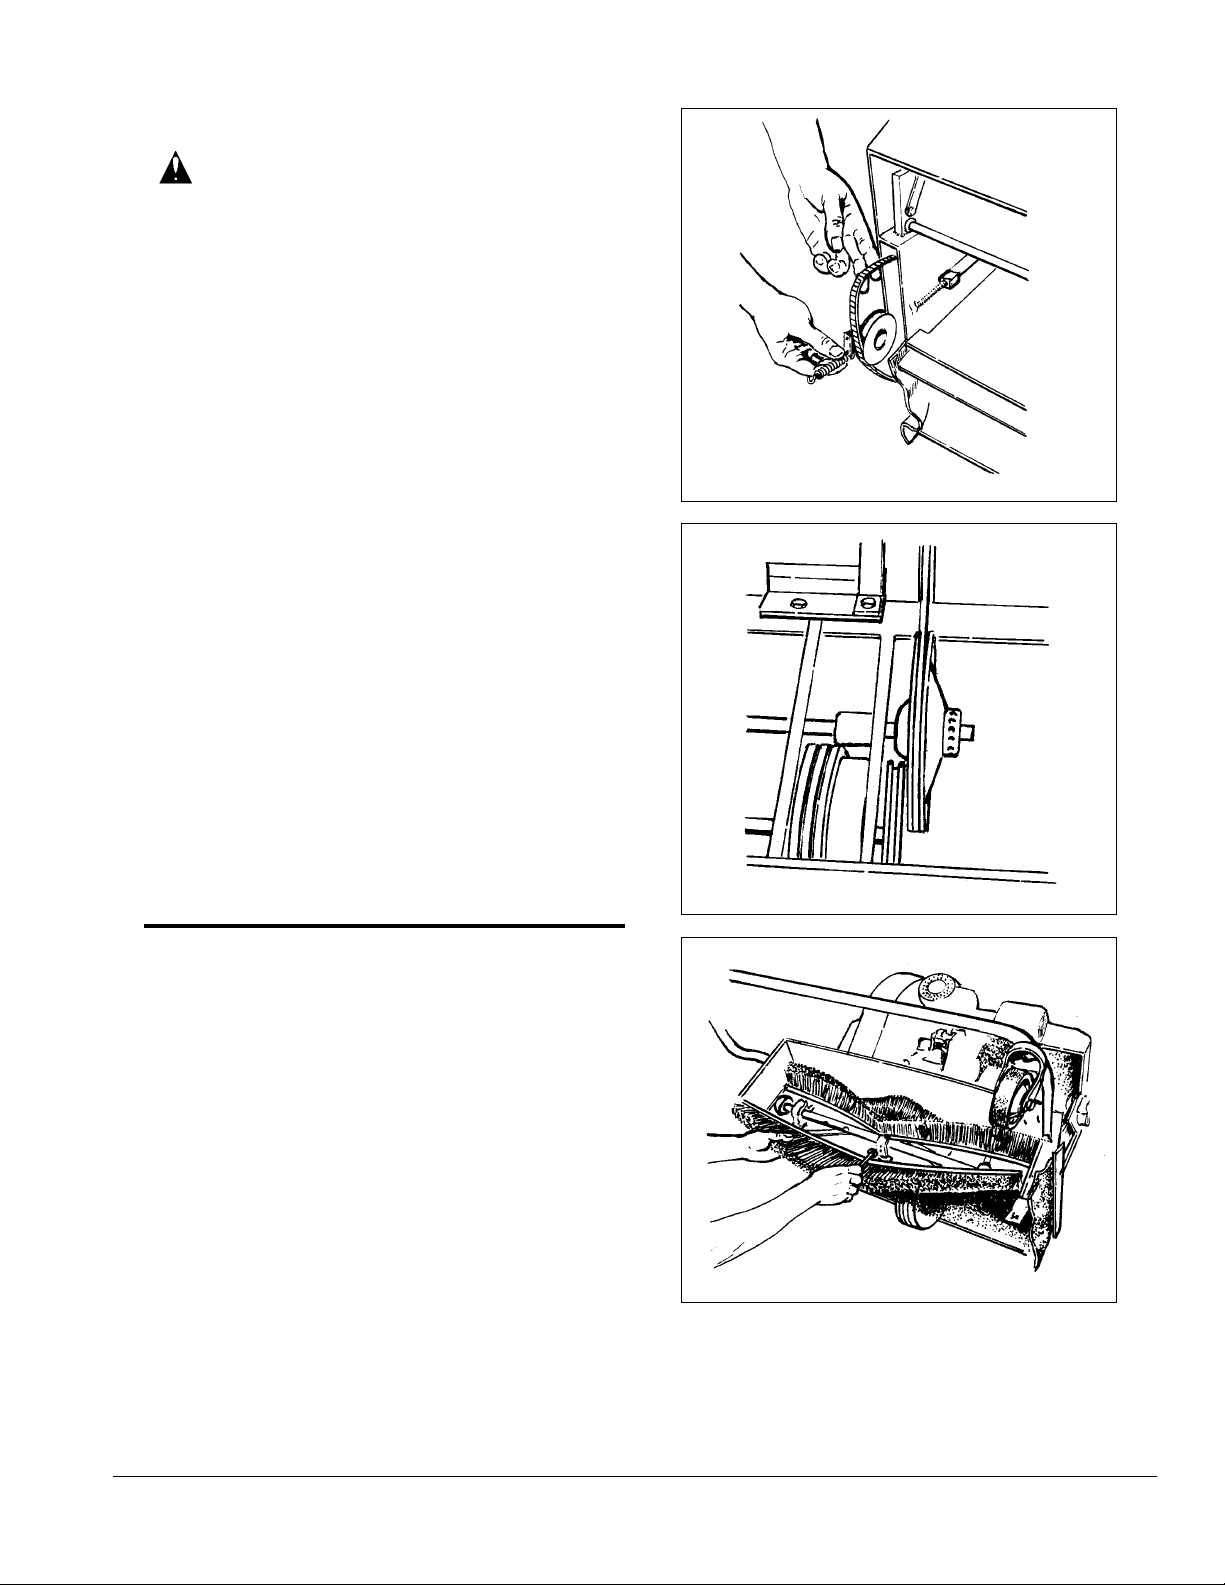
The drive belts are automatically tensioned by a springloaded idler wheel. (See Fig. 9)
1. Remove the idler pulley tension spring.
2. Slip the belt off the pulley.
3. Install a new belt.
4. Assemble idler tension spring.
5. Align pulleys and belts if necessary.
Main Broom Adjustment
The main broom should be periodically readjusted as
needed to compensate for wear. Use the broom-adjusting
lever to accomplish this. rotate counterclockwise to lower
and clockwise to raise. (See Fig. 2, page 6)
Side Broom Belt Adjustment
To increase tension on the side broom belt, loosen the two
(2) socket set screws. Push the split clamp forward on the
tubular frame until belt is sufficiently tight to drive broom
without slipping. Tighten clamp screws.
Fig. 9
Friction Drive Wheel
The friction drive wheel should be adjusted so it touches the
mating drive wheel. The machine should NOT creep or
move when the operator handle is in neutral "UP" position.
(See Fig. 10)
ENGINE SPEED ADJUSTMENT (Model 28G)
The engine speed (rpm) is governor-controlled and preset
at the factory at 2150 rpm (no load). Should it be necessary
to check or readjust this setting, use a good strobe
tachometer and adjust the governor rod threaded end to
maintain 2150 rpm (no load). Be certain all brooms are
raised for this adjustment.
Installation of new Main Brush
The main brush is made up of five (5) bristle strips, installed
and retained on the core by three (3) screws and washers
for each strip. Do not change (1) new bristle strip with (4)
worn strips.
Remove the three screws and washers and the bristle strip
retained by them. Install the new strip and assemble the
retaining screws and washers. Be sure to install the "V" of
each strip in the same relation to the core as its companion
strips. (See Fig. 11)
Fig. 10
Fig. 1 1
CLARKE TECHNOLOGY Model SPS-28 Space Sweeper Operator's Manual Page 13
Page 4
Installation of New Main Brush (cont)
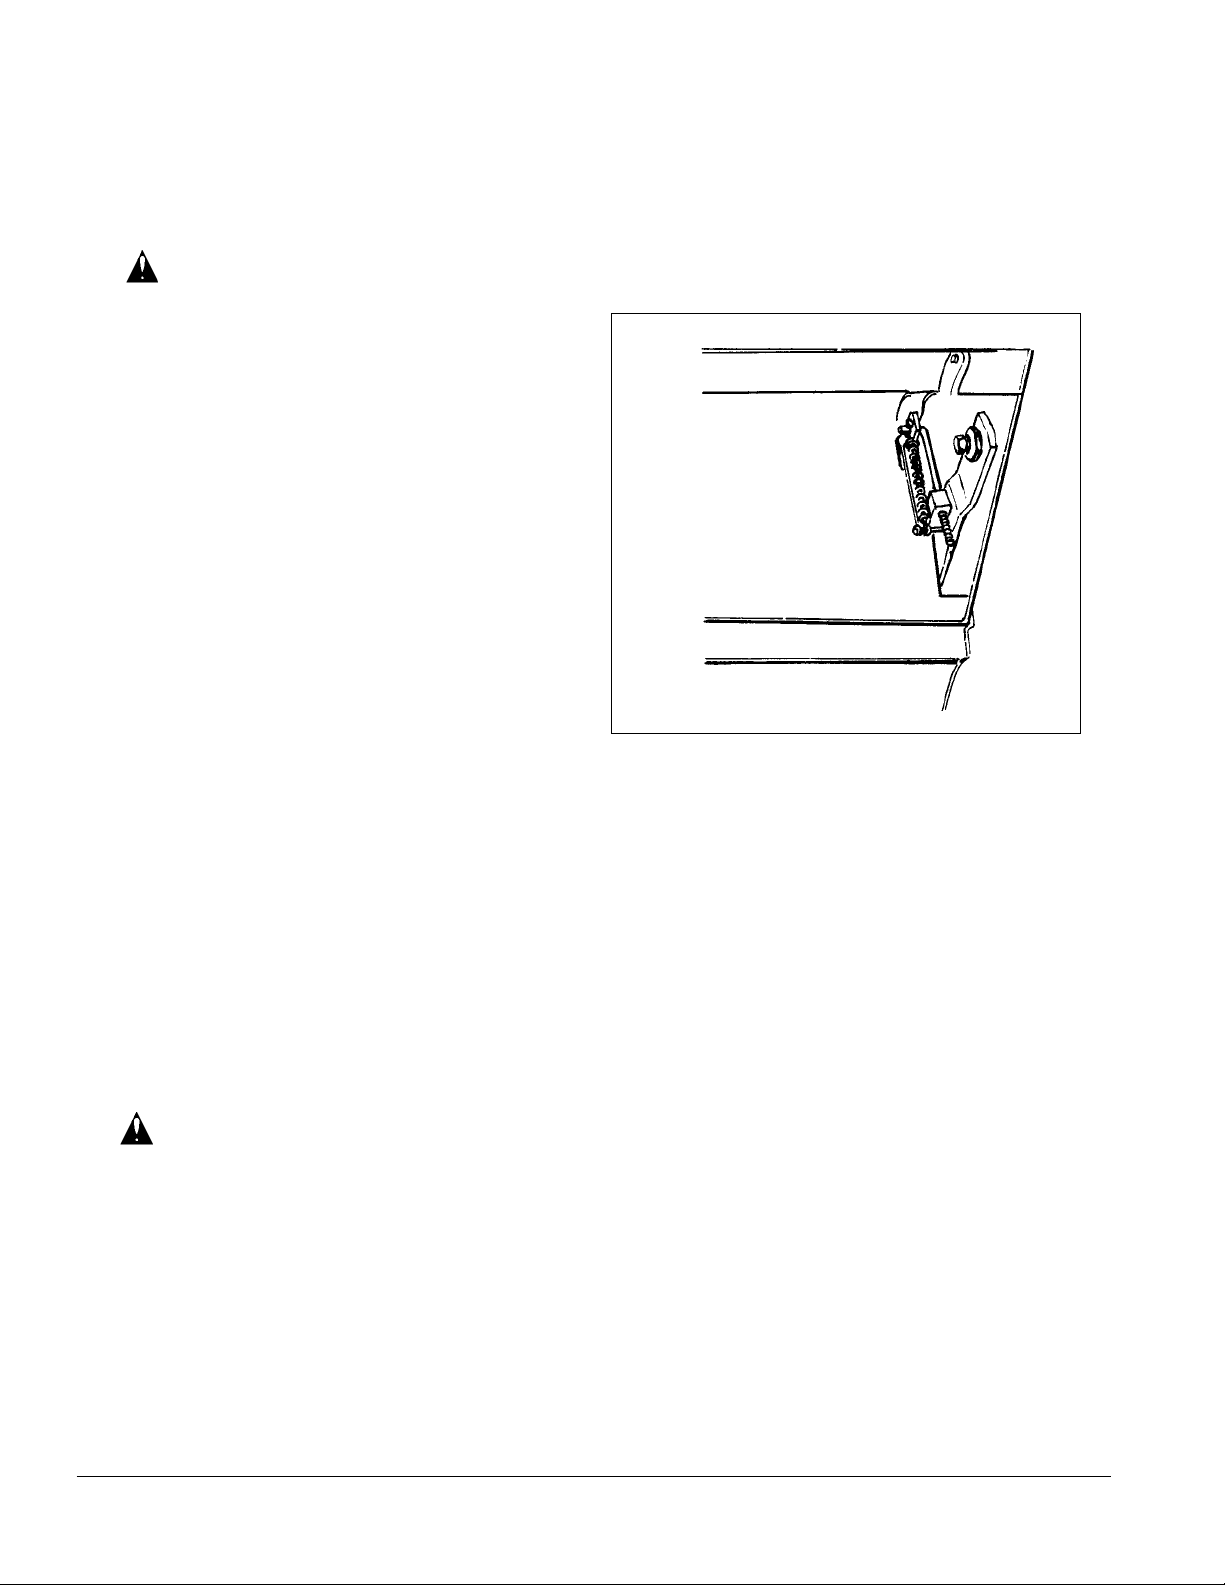
Remove the three screws and washers and the bristle
strip retained by them. Install the new strip and assemble
the retaining screws and washers. Be sure to install the
"V" of each strip in the same relation to the core as its
companion strips. (See Fig. 11, page 11)
CAUTION: The strips must be carefully centered
on the core before they are firmly
locked into position. Rotate the broom
by hand through a full revolution to
check for possible interference with
the shaft carriers at each end. Failure
to check this area could result in
damage to the drive mechanism.
Continue to replace one strip at a time, checking end
clearance on each end, until all strips have been replaced with new fillers.
Readjust the broom to allow for the new bristle strips.
The main brush is preadjusted at the factory to insure
even engagement with the floor across its full width.
However, should the brush show signs of uneven wear,
end to end, compensating adjustments may be made.
Raise or lower either end as required by changing the
length of the adjusting rod. (See fig. 12)
Fig. 12
SHOP EVALUATION OF CHARGERS
(Qualified Service Personnel Only)
Service Hints
1. Check the AC power supply (plug, cords, building
fuses and switched, etc.)
2. Check for physical damage.
3. If there is no DC output, check for blown internal
fuse(s); blown fuses may be caused by reversed DC
connections or by a defective diode.
4. Check parts - ammeter, timer-switch, diodes, transformer and fuses for tight connections and for
discoloration due to electrical failure.
WARNING: Always wear eye and face shield,
and protective clothing when
working with batteries to avoid
injury.
5. Check the condition of the batteries.
a. Specific gravity (1.280 is ideal for fully charged
batteries.
b. The battery bank voltage should come up to
about 30.7 volts at the end of the cycle.
c. The DC charging current should start in the
"normal" range and end in the "finish" range.
If the charger is still inoperative after the above checks
have been made, call your nearest authorized service
center.
Page 14 CLARKE TECHNOLOGY Model SPS-28 Space Sweeper Operator's Manual
Page 5

Capacitor T est
IVIE Enterprises
www.ivie-ent.com Ph:(918)254-5161 or (888)262-5161 Fax:(918)250-4807
If a commercial capacitor checker is not available, the
following test may be made:
1. Briefly short the capacitor terminals together with a
screwdriver.
2. Disconnect a wire from either capacitor terminal.
3. Adjust an ohmmeter to a high value such as RX10K or
RX1 Meg.
4. Connect the ohmmeter leads to the capacitor terminals.
5. A good capacitor will cause the indicator to move quickly
to zero ohms, then slowly return to infinite ohms. An
open capacitor will not cause any indicator movement; a
shorted capacitor will give a continuous zero ohms
reading.
6. If the test is to be repeated, the capacitor terminals must
again be shorted together briefly .
Diode T est
1. Y ou must have a #308 ct. Everready continuity tester or
equivalent/
2. Desolder both wires from the diode lead connections.
(Clamp heatsink pliers on the diode leads to avoid
damaging the diodes.)
3. Attach one of the test unit leads to either diode lead.
4. Attach the other test unit lead to the diode heatsink.
5. Turn the test unit on and note if the test unit bulb lights.
DANGER: Reversing charge or polarity of wiring
could cause batteries to EXPLODE causing serious bodily harm to yourself or
others.
6.. Reverse the test unit leads in Steps 3 and 4.
7. Turn the test unit on and note if the test unit bulb lights.
8. Good diode - test light bulb should light up in one of
Step s 5 and 7 and not in the other .
Defective diode - test bulb will light up in both
Steps 5 and 7.
Defective Diode - Test bulb will not light up in either
Steps 5 or 7.
CLARKE TECHNOLOGY Model SPS-28 Space Sweeper Operator's Manual Page 15
Page 6
92
IVIE Enterprises
www.ivie-ent.com Ph:(918)254-5161 or (888)262-5161 Fax:(918)250-4807
93
CLARKE TECHNOLOGY Model SPS-28
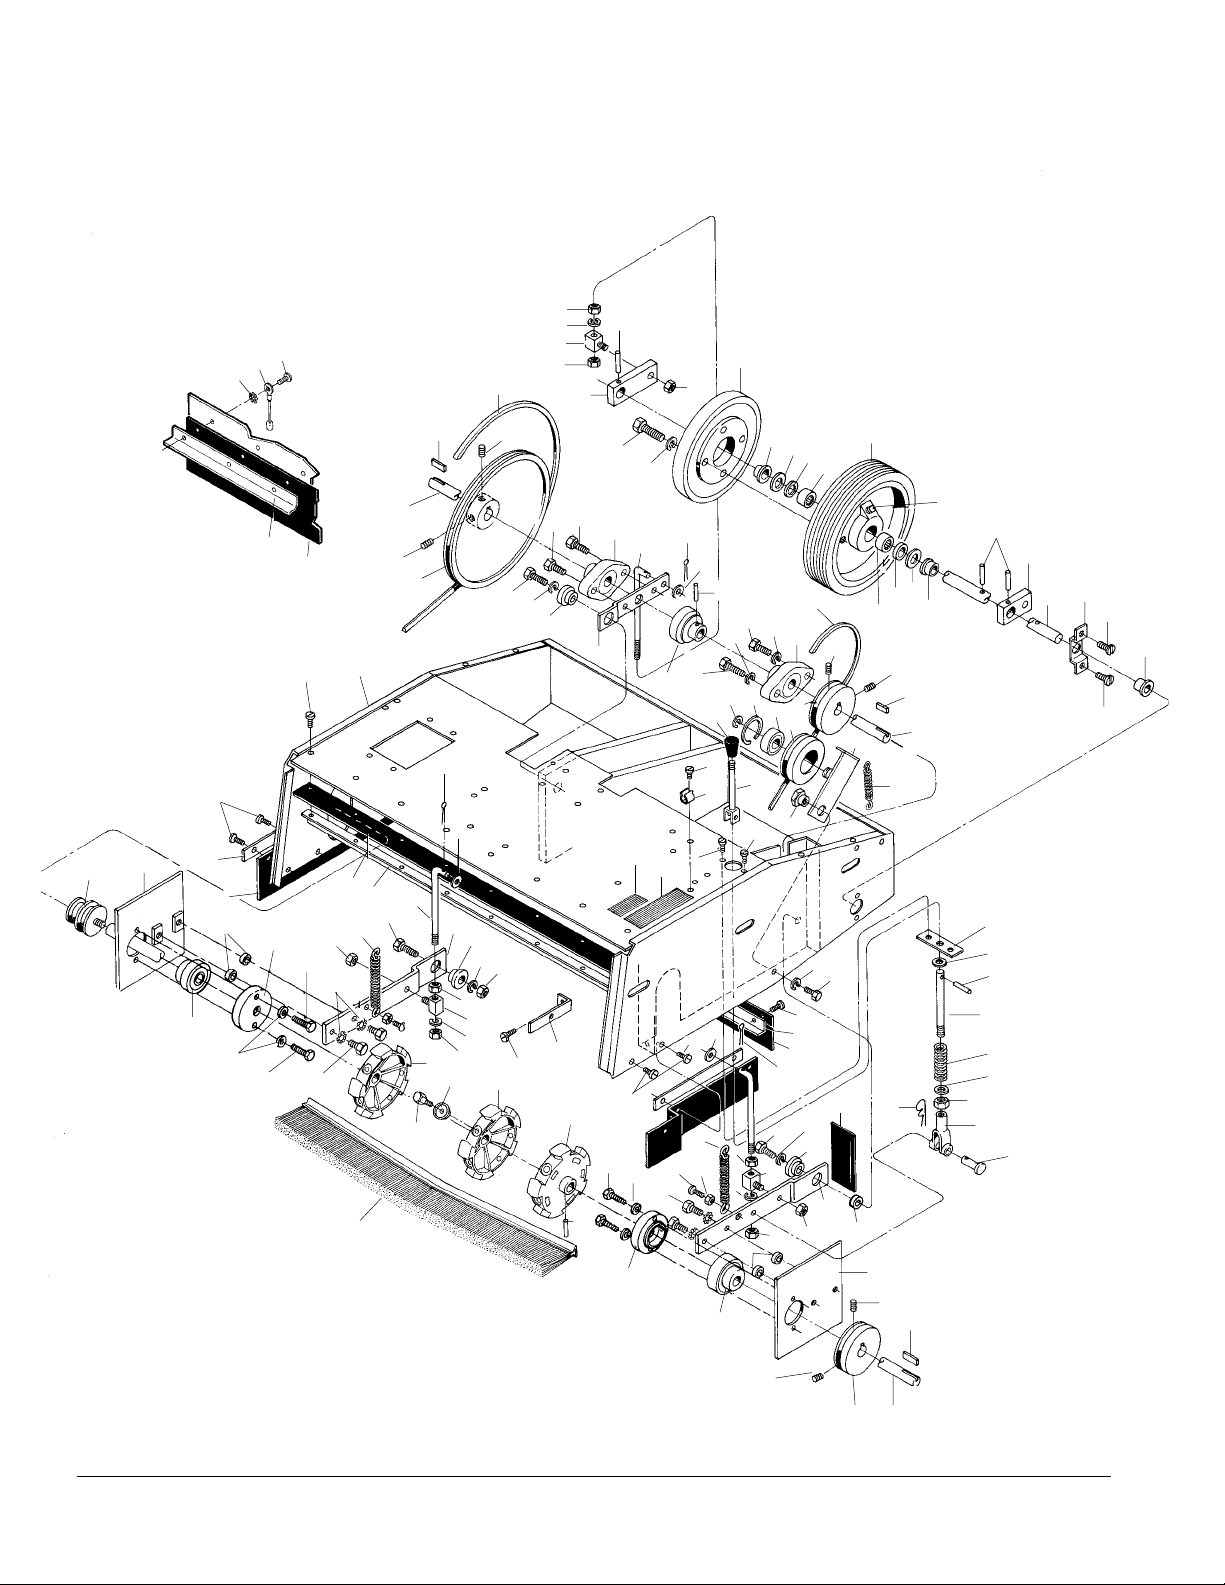
Main Frame, Brush Assembly and Drive System Drawing 1/99
4
2
5
49
21
6
4
1
14
3
81
80
78
89
49
66
94
28
42
69
95
49
62
42
3
42
68
87
74
59
69
24
22
20
31
23
83
82
19
33
70
84
32
46
26
3
25
70
13
22
60
71
43
96
14
13
88
90
22
12
22
45
11
37
37
20
10
72
55
56
53
51
2
52
34
54
52
57
15
16
17
18
10
18
22
27
24
25
26
26
25
73
4
6
5
4
82
49
65
82
42
86
30
42
29
7
8
33
31
32
27
35
85
49
58
49
74
75
28
95
76
77
47
49
50
32
78
34
38
28
4
10
11
12
27
28
29
39
36
40
41
48
44
49
49
69
62
33
25
24
6
5
4
96
Page 16 CLARKE TECHNOLOGY Model SPS-28 Space Sweeper Operator's Manual
22
36
67
Page 7

CLARKE TECHNOLOGY Model SPS-28
IVIE Enterprises
www.ivie-ent.com Ph:(918)254-5161 or (888)262-5161 Fax:(918)250-4807
Main Frame, Brush Assembly and Drive System Parts Lists 1/99
Ref # Part No. Description Qty
1 790322 Arm, Lower Clutch, R.H. 1
1
2 925543 Pin,
/8 x 1¼ Roll 3
3 920349 Nut, ¼-20 3
4 920160 Nut
5
/16 - 18 Hx Jam 6
5 980652 Washer 5/16 Lock 3
6 791323 Block, Pedal Pivot 3
5
7 85813A Screw
8 980652 Washer
/16 -18 x 1" Hx 4
5
/16 Lock 8
9 799728 Wheel 1
10 902710 Bearing, Wheel Shaft 3
11 980023 Washer, Thrust 2
12 877661 Seal, Oil 2
13 902682 Bearing, Wheel 2
14 799729 Wheel 1
15 790326 Arm, Lower clutch, L.H. 1
16 797721 Shaft, Wheel 1
17 798530 Support, Wheel Bearing 1
18 962385 Screw, 10-24 x ½ 2
19 915044 Key, 3/16 x 3/16 x 1 1
20 797727 Shaft, Brush Drive 1
21 903540 Belt, Drive 1
22 962103 Screw, 5/16 -18 x 3/8 6
23 796920 Pulley, Dri ven 1
24 962686 Screw, 5/16 -18 x 1½ Hx 2
25 980638 Washer, 3/8 "Lock 4
26 808256 Spacer, Parallel Arm Rear 3
27 962219 Screw, ¼-20 x 7/8 Hex 2
28 980657 Washer, ¼ Lock 2
29 902713 Bearing 2
30 790324 Arm, Clutch 1
31 797422 Rod, Brush Lift 3
32 980651 Washer, 5/16 Plain 3
33 925036 Pin, 3/32 x ¾ Cotter 3
34 925550 Pin, 1/8 x x 1" Roll 1
35 799727 Wheel, Friction Drive 1
36 796921 Pulley, Br ush Drive 2
37 915076 Key, 3/16 x 3/16 x 9/16 Ling Sq. 2
38 167308 Retaining Ring 1
39 857301 Retaining Ring 1
40 902659 Bearing 1
41 796926 Pulley, Brush Drive Idler 1
42 962455 Screw, ¼-20 x 1" Hex 6
43 790320 Arm Assembly, Idler Pulley 1
44 798220 Spacer, clutch Arm 1
45 858345 Spring, Bracket Adjusting Screw 1
46 903539 Belt, Brush Drive 1
47 815051 Knob, Handle 1
48 793923 Handle Assembly, Brush Lift 1
49 962546 Screw, 10 x ½ Rd. Hd. Type 23 26
Ref # Part No. Description Qty
50 302101 Clamp 1
51 796623 Plate, Brush Lift 1
52 791121 Bushing, Spring 2
53 797423 Rod, Brush Lift 1
54 858302 Spring 1
55 920329 Nut,
5
/16 -24 Hex 1
56 809904 Yoke 1
57 806705 Pin 1
58 795121 Label, Instruction 1
59 60072A Frame Assembly, Main 1
60 962302 Screw, 3/8 x 16 x 5/8 Hex 1
61
62 798526 Skirt, Brush Rear 1
63 798528 Skirt, Brush L.H. 1
64 797225 Retainer, L.H. Skirt 1
65 797224 Retainer, L.H. Skirt 1
66 798527 Skirt, Brush R.H. 1
67 797722 Shaft, Brush 1
68 798525 Skir t, Hopper Top 1
69 797221 Retainer 2
70 790337 Arm, Brush 2
71 797620 Seal, Brush Arm 2
72 883351 Grease Fitting 1
73 920260 Nut, 3/8 -16 x 5/16 Hex 2
74 53038A Spring 2
75 962139 Screw, ¼-20 x 5/8 Hex 2
76 920208 Nut, ¼-20 2
77 962709 Screw, ¼-20 x ½ Hex 4
78 902746 Bearing, Brush Shaft 2
79
80 797829 Shield Assembly, Broom Dust 1
81 796922 Pulley, Side Broom Dr ive 1
82 792703 Driver, Brush 3
83 962893 Screw ¼-20 x 7/8 Hex 15
84 797205 Retainer 15
85 920364 Nut, ¼-20 speed 15
86 925070 Pin, ¼ x 1½ Roll 3
87 790923 Brush Segment Carpet 10
790920 Brush Segment 28" 5
88 797828 Shield Assembly, Broom Dust L.H. 1
89 797223 Retainer, R.H. Skirt 1
90 856702 Pin, Hair, cotter 1
91 797235 Retainer, Brush Strp. (Std Mach. Only) 15
92 980675 Washer, #10 Shakeproof 1
93 798541 Strap, Static Discharge 1
94 798232 Spacer 2
95 797236 Retainer 2
96 858207 Spacer 2
CLARKE TECHNOLOGY Model SPS-28 Space Sweeper Operator's Manual Page 17
Page 8
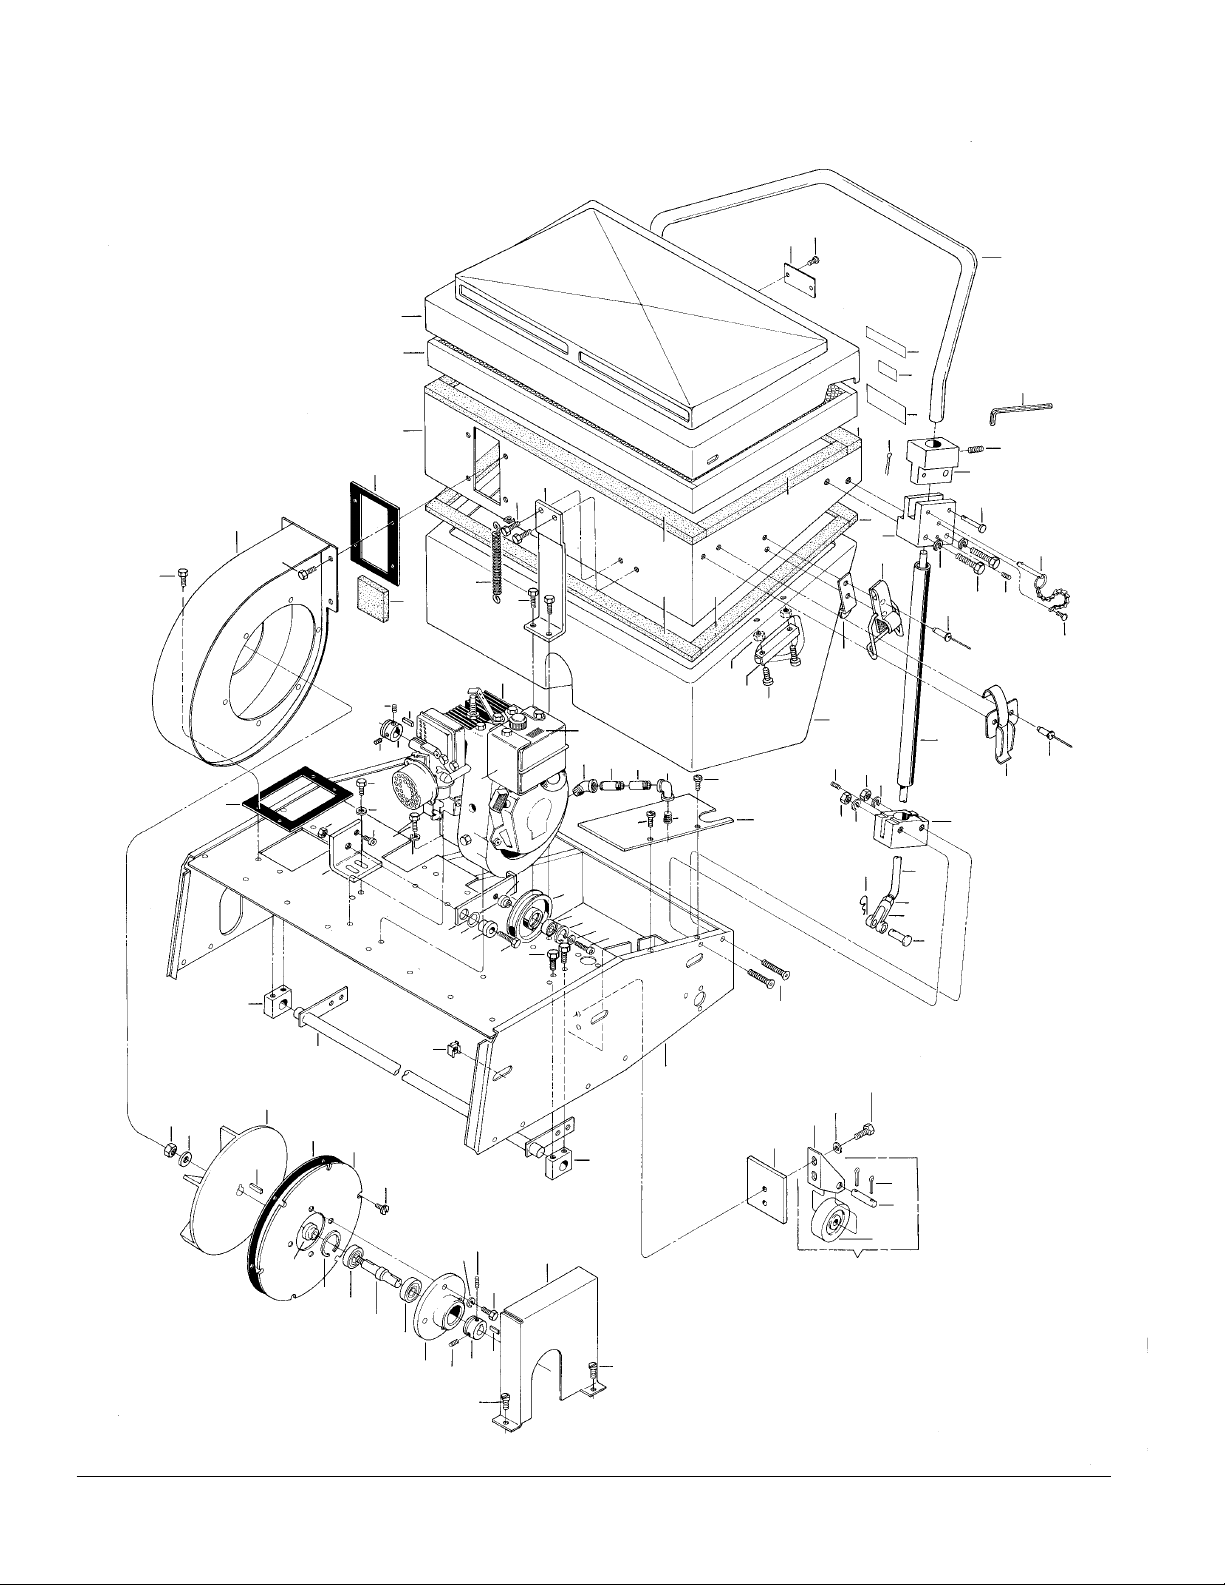
CLARKE TECHNOLOGY Model SPS-28
Engine, Dust Control & Handle Assembly Drawing 4/99
34
62
46
66
26
25
22
26
94
93
23
11
11
92
47
48
83
63
71
64
65
15
11
67
70
26
59
50
49
69
52
8
53
72
24
60
26
49
49
61
51
58
12
3
10
4
5
96
6
1791
34
9
8
13
95
14
16
26
90
18
19
20
83
21
56
57
55
75
11
78
8
78
40
8
76
79
34
7
82
80
81
68
73
11
74
53
54
28
29
43
31
30
32
44
33
45
1
43
34
84
77
85
26
83
88
87
86
89
35
36
37
38
27
11
42
26
37
39
11
41
31
34
34
Page 18 CLARKE TECHNOLOGY Model SPS-28 Space Sweeper Operator's Manual
Page 9

CLARKE TECHNOLOGY Model SPS-28
IVIE Enterprises
www.ivie-ent.com Ph:(918)254-5161 or (888)262-5161 Fax:(918)250-4807
Engine, Dust Control & Handle Assembly 4/99
Ref # Part No. Description Qty
1 60072A Frame, Main 1
2u 792920 Engine, 5 H.P. Briggs and Stratton 1
3 285161 Label, Gasoline 1
4 722824 Elbow, ¼ x 45° Street Brass 1
5 755721 Nipple, ¼ x 2½" Brass 1
6 822806 Elbow, ¼ x 90° Brass 1
7 Drain Plug - Part of Engine
5
8 822806 Washer
/16 Lock 8
9 196157 Screw, 5/16 -18 x 1¼ Hex 4
10 796924 Pulley, Engine 1
11 962103 Screw,
5
/16 -18 x 3/8 Set 8
12 915044 Key 3/16 x 3/16 x 1" Square 1
Ref # Part No. Description Qty
51 793820 Guide, Dust Hopper 2
52 682006 Clamp Assembly, Lid 2
53 930086 Rivet, 3/16 x .450 Long 1 0
54 285102 Latch, Inspection Door 3
55 60070A Hopper, Dust 1
56 797226 Retainer, Dust Hopper 2
57 962385 Screw 10- 24 x ½ Bdg. Hd. 4
58 920200 Nut, 10 - 24 Hex 4
59 790832 Bracket, Dust Housing Support 1
60 53038A Spring 1
61 793425 Gasket, Dust chamber Bottom 2
62 Serial No. Plate - Gasoline (Blank) 1
13 790335 Arm, Assembly 1
14 798231 Spacer, Parallel Arm Rear 1
15 987013 Wrench, Allen 5/32"1
16 962216 Screw, 3/8 x 16 x 1" Hex 1
17 793624 Guard, Gas Tank 1
18 796925 Pulley, Idler 1
19 902659 Bearing 1
20 857301 Retaining Ring 1
21 962454 Screw, ¼-20 x 1" 1
22 60073A Housing Assembly, Blower 1
23 793424 Gasket, Duct to Filter 1
24 791221 Bumper, Dust Hopper 1
25 793423 Gasket, Duct to Frame 1
26 962709 Screw ½ Sems 20
27 980657 Washer ¼ Lock 4
28 920110 Nut, 5/16 -18 Elastic Stop 1
29 980210 Washer, Impeller 1
30 614820 Impeller 1
31 915044 Key, 3/16 x 3/16 x 1" Square 1
32 793420 Gasket, Blower Mounting Adapter 1
33 790221 Adapter Assembly, Blower Mounting 1
34 962835 Screw, 10 x 24 x ½ Hx St. Typ F 6
35 618220 Spacer, Impeller 1
36 067304 Snap Ring 1
37 902550 Bearing 2
38 617704 Shaft, Impeller 1
39 794224 Housing, Bearing 1
40 856702 Pin, Hair Cotter 2
41 796923 Pulley, Blower 1
42 793620 Guard, Belt 1
43 790830 Bracket, Lift Shaft 2
44 797726 Shaft Assembly 1
45 920993 Nut, 3/16 -18 Panel 6
46 60074A Cover, Filter 1
47 793320 Filter, Dust 1
48 15724A Housing Asm., Dust Chamber 1
63 215104 Label, Warning 1
64 755129 Label, Patent Pending 1
65 795120 Label, Instruction 1
66 793920 Handle, Upper 1
67 790825 Bracket, Handle Pivot 2
68 806705 Pin 1
69 790824 Bracket, Handle 2
70 796721 Pin, Handle Pivot 2
71 925004 Pin, 1/16 x ½ Cotter 2
72 85818A Screw, 5/16 - 18 x 2½ Hex 4
73 796720 Pin Assembly, Handle Release 2
74 85392A Screw 6-32 x 3/8 Pan Hd 2
75 793922 Handle, Lower 2
76 798524 Support, Handle 2
77 962894 Screw, 5/16 - 18 x 2½ 4
78 920160 Nut, 5/16 - 18 Jam 4
79 797420 Rod, Traverse 1
80 920329 Nut, 5/16 -24 Hex 1
81 809904 Yoke 1
82 62665A Cover, Frame 2
83 980646 Washer, ¼ Plain 7
84 796631 Plate, Stabilizer Whl. Stiffner 2
85 798537 Support, Rear Wheel 2
86 419702 Wheel 2
87 796722 Pin, Wheel Support 2
88 925036 Pin, 3/32 x ¾ Cotter 4
89 799724 Wheel Assembly, Stabilizer 2
90 798230 Spacer, Idler Pulley 1
91 962086 Screw, ¼-20 x ¾ Hx Hd. 2
92 962799 Screw, ¼-20 x 3/8 Soc. Cap 1
93 920148 Nut, 3/8 -16 Hex Jam 1
94 790846 Bracket, Idler Arm 1
95 980202 Washer Wave 1
96
97 170266 Coupling 1
49 793422 Gasket, Dust Chamber 4
50 793421 Gasket, Dust Chamber Top 2
NOTE: uindicates a change has taken place since
last publication of this manual.
Serial No. Plate - Battery (Blank) 1
CLARKE TECHNOLOGY Model SPS-28 Space Sweeper Operator's Manual Page 19
Page 10
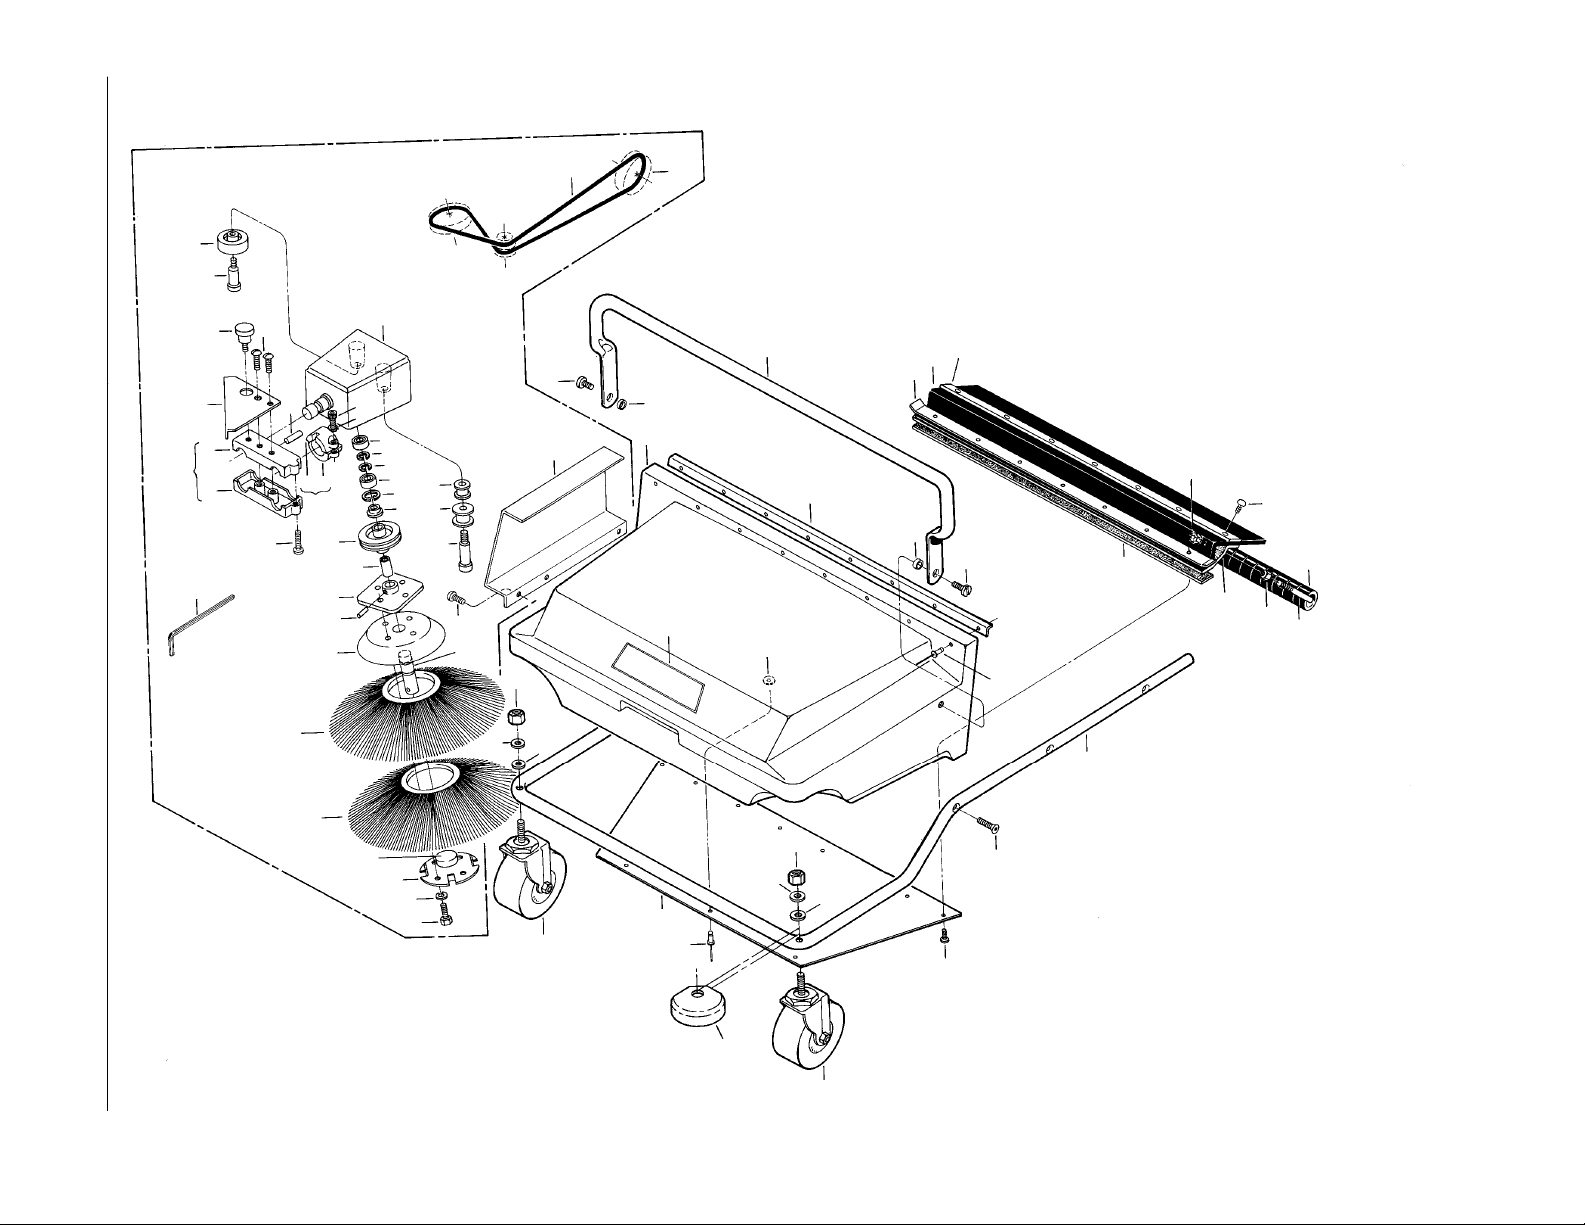
Page 20 CLARKE TECHNOLOGY Model SPS-28 Space Sweeper Operator's Manual
IVIE Enterprises
www.ivie-ent.com Ph:(918)254-5161 or (888)262-5161 Fax:(918)250-4807
27
28
51
52
50
53
55
54
52
62
OPTIONAL
SIDE BROOM
ASSEMBLY
43
57
58
61
39
40
41
37
38
26
32
33
33
32
35
36
29
30
31
BOTTOM
20
42
64 65
TOP
14
7
47
49
34
Hopper and Optional Sidebroom Assembly Drawing 1/99
17
16
19
CLARKE TECHNOLOGY Model SPS-28
5
6
24
2
20
6
7
22
15
4
25
23
21
3
11 OR 63
43
48
44
45
46
13
8
3
66
64
14
12
65
10
13
Page 11

CLARKE TECHNOLOGY Model SPS-28
IVIE Enterprises
www.ivie-ent.com Ph:(918)254-5161 or (888)262-5161 Fax:(918)250-4807
Hopper and Optional Sidebroom Assembly Parts List 1/99
Ref # Part No. Description Qty
1 60075A Hopper 1
2 798529 Support, Hopper Top 1
3 930090 Rivet,
5
/32 Dia. 8
4 725197 Label, Clarke 1
5 793921 Handle, Hopper 1
6 798203 Spacer, Carrying Handle 2
7 962568 Screw, 5/16 -18 x ½ Bdg. Hd. 2
8 797820 Shield, Hopper 1
9 962385 Screw, 10-24 x ½ Bdg. Hd. 3
10 962677 Screw, 10-24 x ¾ Pan Hd. 8
11 791220 Bumper, Front 1
12 962803 Screw 5/16 -18 x 1½ 1
13 889706 Wheel, Swivel 2
14 920196 Nut ½-13 ESNA 2
15 790823 Bracket, Skirt to Hopper 1
16 798523 Skirt, Hopper 1
17 797220 Retainer, Lower Skirt 1
18 793426 Gasket, Hopper 1
19 797222 Retainer, Hopper Skirt 1
20 962073 Screw, 10 - ½ Rd. Hd. Type Z 11
21 797421 Rod, Roller 1
22 797501 Roller 26
23 920160 Nut, 5/16 -18 Hex Jam 2
5
24 920110 Nut,
/16 -18 Elastic Stop 2
25 920200 Nut, 10-24 Hex
Optional Sidebroom Assembly
26 794201 Housing, side Brush 1
27 419702 Wheel 1
28 960953 Screw, Wheel 1
29 796902 Pulley 1
30 796903 Pulley 1
31 960970 Shoulder Bolt, Pulley 1
32 902659 Bearing 1
33 167308 Ring, Retaining 2
Ref # Part No. Description Qty
34 796922 Pulley, Side Broom Drive 1
35 857301 Ring, Retaining 1
36 798205 Spacer 1
37 796901 Pulley, Side Br ush Drive 1
38 792401 Clutch 1
39 794320 Hub, Side Brush 1
40 925062 Roll Pin 1
41 794001 Holder, Side Brush 1
42 797701 Shaft 1
43 790901 Brush, Side 2
44 796420 Plate, Brush Retaining 1
45 980657 Washer, ¼ Lock 5
46 962481 Screw, ¼-20 x 1¼ Hx Cap 4
47 793621 Guard, Side Broom Belt 1
48 798228 Spacer 1
49 903538 Belt, Side Brush Round 1
50 793622 Guard, side Brush 1
51 725020 Knob 1
52 962716 Screw, ¼-20 x 1½ 2
53 790331 Arm, Side Brush, Top 1
54 790331 Arm, Side Brush, Bottom 1
55 790331 Arm Assembly, side brush 1
56 925132 Pin, ¼ x ¾ 1
57 792023 Clamp, Top 1
58 792023 Clamp, Bottom 1
59 962454 Screw, ¼-20 x 1" 2
60 980657 Washer, ¼ Lock 2
61 792023 Clamp Asm., Side Brush 1
62 987516 Wrench, 3/16 1
63 61300A Bumper (Carpet Only) 1
64 980626 Washer, ½ Lock 2
65 980662 Washer (Carpet Only) 2
66 63900A Guard, Caster (Carpet Only) 2
CLARKE TECHNOLOGY Model SPS-28 Space Sweeper Operator's Manual Page 21
Page 12
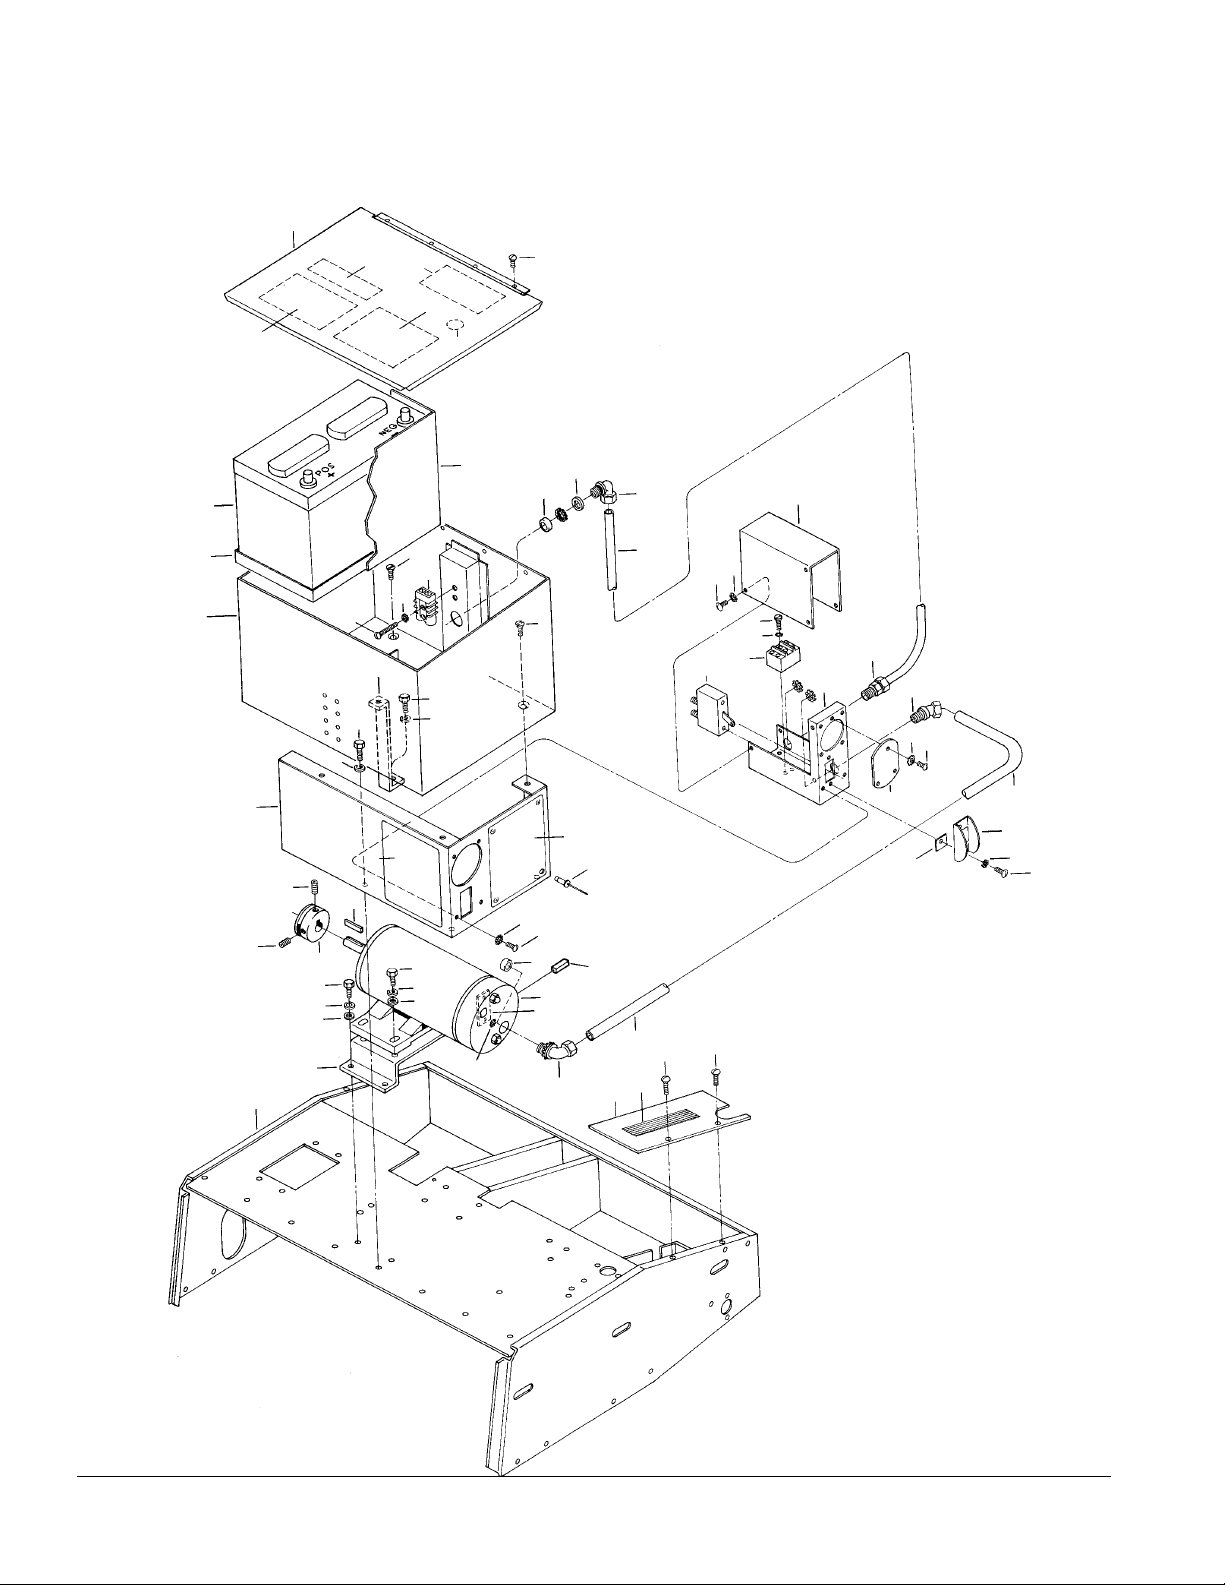
CLARKE TECHNOLOGY Model SPS-28
Battery Powered Model Drawing 1/99
1
23
53
2
25
51
4
6
19
21
54
22
24
50
27
26
30
28
29
36
5
7
20
43
11
12
19
49
31
34
32
33
35
40
38
42
36
39
41
47
3
48
36
37
14
36
37
14
13
11
12
16
17 46
18
11
12
16
24
44
45
26
55
52
41
23
30
30
Page 22 CLARKE TECHNOLOGY Model SPS-28 Space Sweeper Operator's Manual
Page 13

CLARKE TECHNOLOGY Model SPS-28
Battery Powered Model Drawing 1/99
Ref # Part No. Description Qty
1 60071A Cover Assembly, Battery Access 1
2 962003 Screw,
3 930093 Rivet,
4 871376 Battery, 95 Amp Hr . (Wet) 2
871377 Battery, 95 Amp Hr . (Dry) 2
5 15726A Housing Assembly, Battery 1
6 799224 Tray, Battery 2
7 15725A Housing Assembly, Motor 1
8 962709 Screw, ¼-20 x ½ Hx St. Sems 3
9 980657 Washer, ¼ Lock 6
10 790826 Bracket, Battery Support 1
11 85811A Screw, 5/16 -18 x ¾ Hex Hd. 8
12 980652 Washer 5/16 Lock 12
13 796927 Pulley, Motor 1
14 962103 Screw, 5/16 x 18 x 3/8 2
15 915044 Key, 3/16 x 3/16 x 1" Long Square 1
16 980651 Washer, 5/16 -Plain 4
17 790827 Bracket Asm., Motor Mounting 1
18 60072A Main Frame Assembly 1
19 962800 Screw, ¼-20 x ½ Flat Hd. 4
20 962212 Screw 6-32 x 7/8 Rd. Hd. 2
21 911470 Wire Assembly, Battery Plug 1
22 797827 Shield, Battery 2
23 795136 Label, Warning 2
24 791120 Bushing, Conduit Insulating 2
25 895196 Label, Warning 1
26 792437 Connector 90° Conduit 2
27 799024 Tubing, Battery Enclosure to Circuit Breaker 1
28 792322 Cover Assembly, Enclosure 1
29 980603 Washer, #1110 Shakeproof 6
30 962546 Screw, 10 x ½ Rd. Hd. Type 23 10
31 962399 Screw, 8-32 x 1¼ 2
32 980612 Washer #8 Lock 1
33 911438 Block, Ter minal 1
34 911440 Switch, Toggle 1
35 792921 Enclosure, Circuit Breaker 1
36 980607 Washer, #1106 Shakeproof 5
37 962045 Screw, 6-32 x ¼ Rd. Hd. 2
38 792325 Cover, enclosure 1
39 962330 Screw, 6-32 x 3/8 Rd. Hd. 3
40 792438 Connector, Straight Conduit 1
41 799021 Tubing, Circuit Breaker to Motor 1
42 792436 Connector, 45° Conduit 1
43 795145 Label, Wiring Diagram 1
44 795220 Motor, Drive 24 Volt DC 1
45 794720 Insulation, Paper (Motor) 1
46 980614 Washer, #1114 Shakeproof 2
47 793623 Guard, Switch 1
48 792337 Cover, Switch Guard 1
49 796327 Plate, Safety Label (Eng. Sp.) 1
50 980303 Washer 1
51 895178 Label, Battery Care Instruction 1
52 62665A Cover, Frame 2
53 795151 Label, Battery Size 1
54 795143 Label, UL Decal 1
55 790926 Brush, Motor 1
6
/32 x 3/8 Rd. Hd. 4
1
/8 x 1/4 - 5/16 Pop 4
CLARKE TECHNOLOGY Model SPS-28 Space Sweeper Operator's Manual Page 23
Page 14
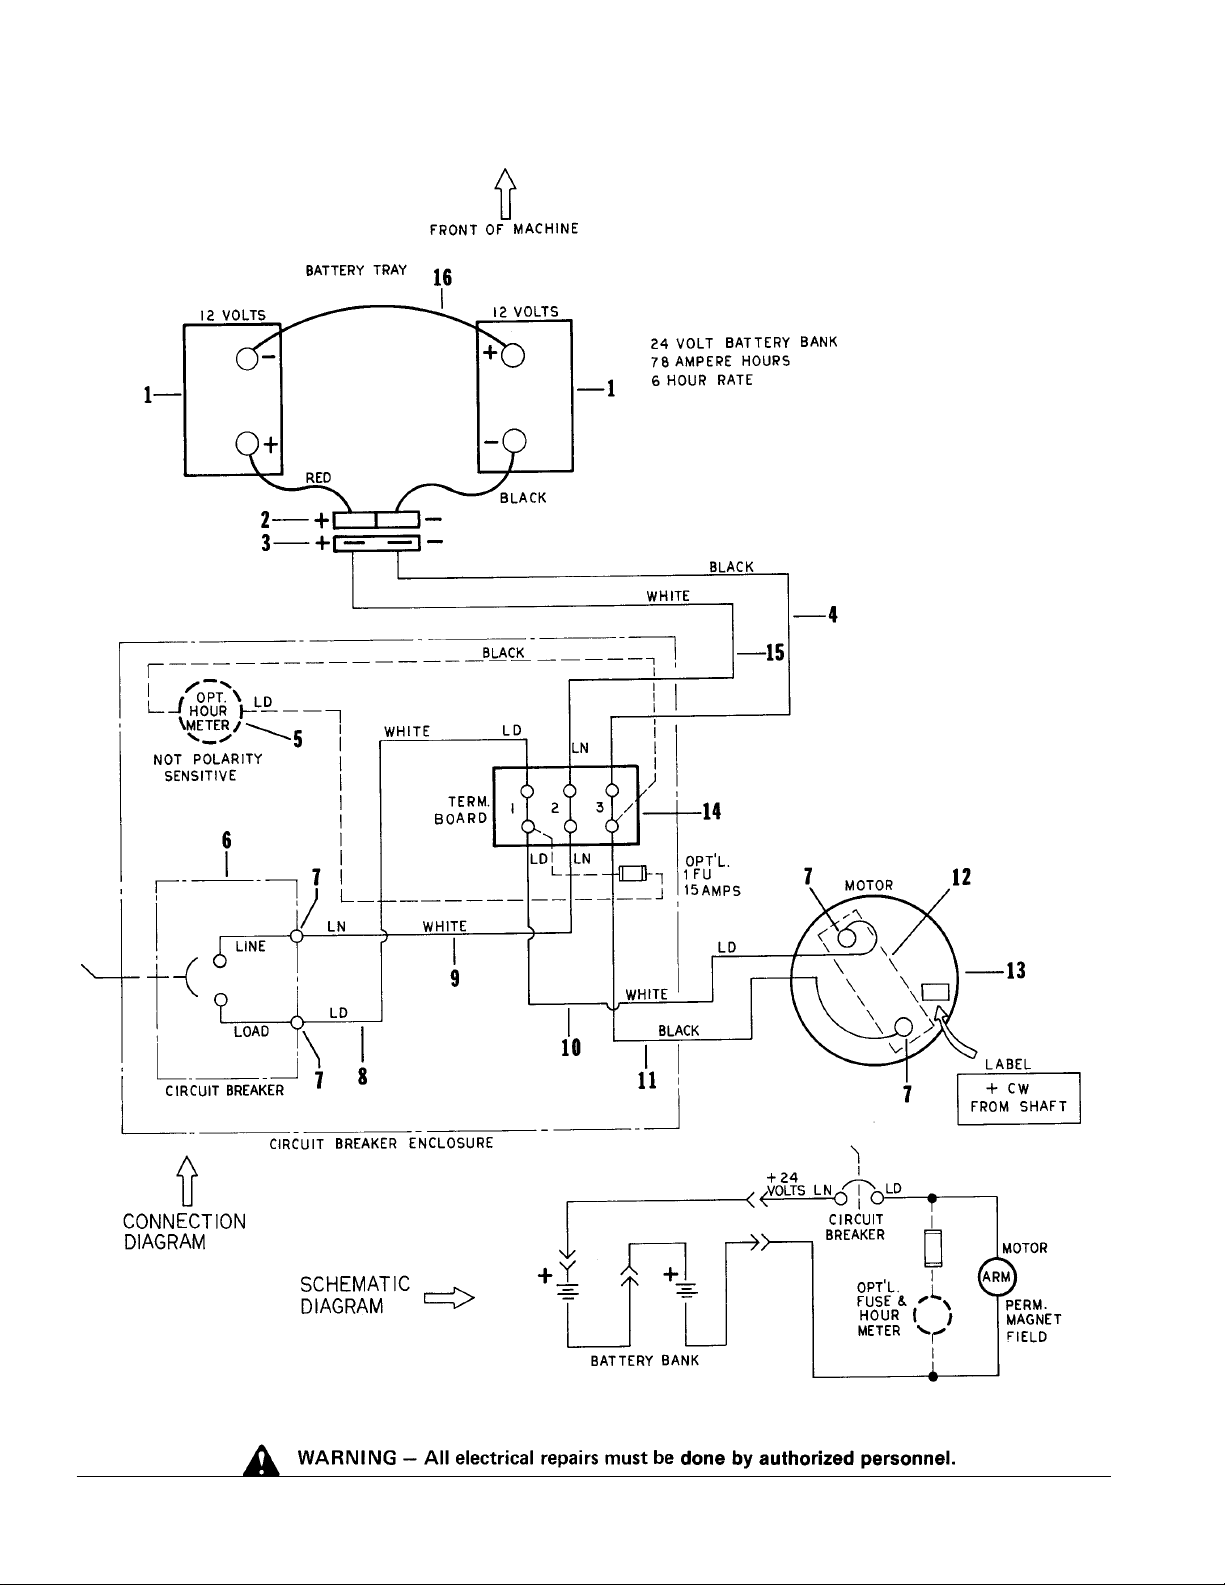
CLARKE TECHNOLOGY Model SPS-28
Wiring Diagram & Electrical Schematic 1/99
Page 24 CLARKE TECHNOLOGY Model SPS-28 Space Sweeper Operator's Manual
Page 15

CLARKE TECHNOLOGY Model SPS-28
IVIE Enterprises
www.ivie-ent.com Ph:(918)254-5161 or (888)262-5161 Fax:(918)250-4807
Wiring Diagram 1/99
Ref # Part No. Description Qty
1 871376 Battery, 95 amp Hr. (Wet) 2
871377 Battery , 95 amp Hr. (Dry) 2
2 41207A Cable, Battery 1
3 911470 Connector 1
4 951006 Wire Assembly 1
5 855607 Hour Meter (Optional) 1
6 911440 Circuit Breaker 1
7 980614 Washer, ¼ External Tooth 4
8 950807 Wire Assembly, #10 White 1
9 950806 Wire Assembly, #10 White 1
10 950805 Wire Assembly, Teminal Board - Mtr. 1
11 951004 Wire Assembly, #10 Black 1
12 794720 Insulator Motor 1
13 795220 Motor, Drive 1
14 911438 Block, Terminal 1
15 950813 Wire Assembly 1
16 842406 Cable 1
CLARKE TECHNOLOGY Model SPS-28 Space Sweeper Operator's Manual Page 25
 Loading...