

Page 1
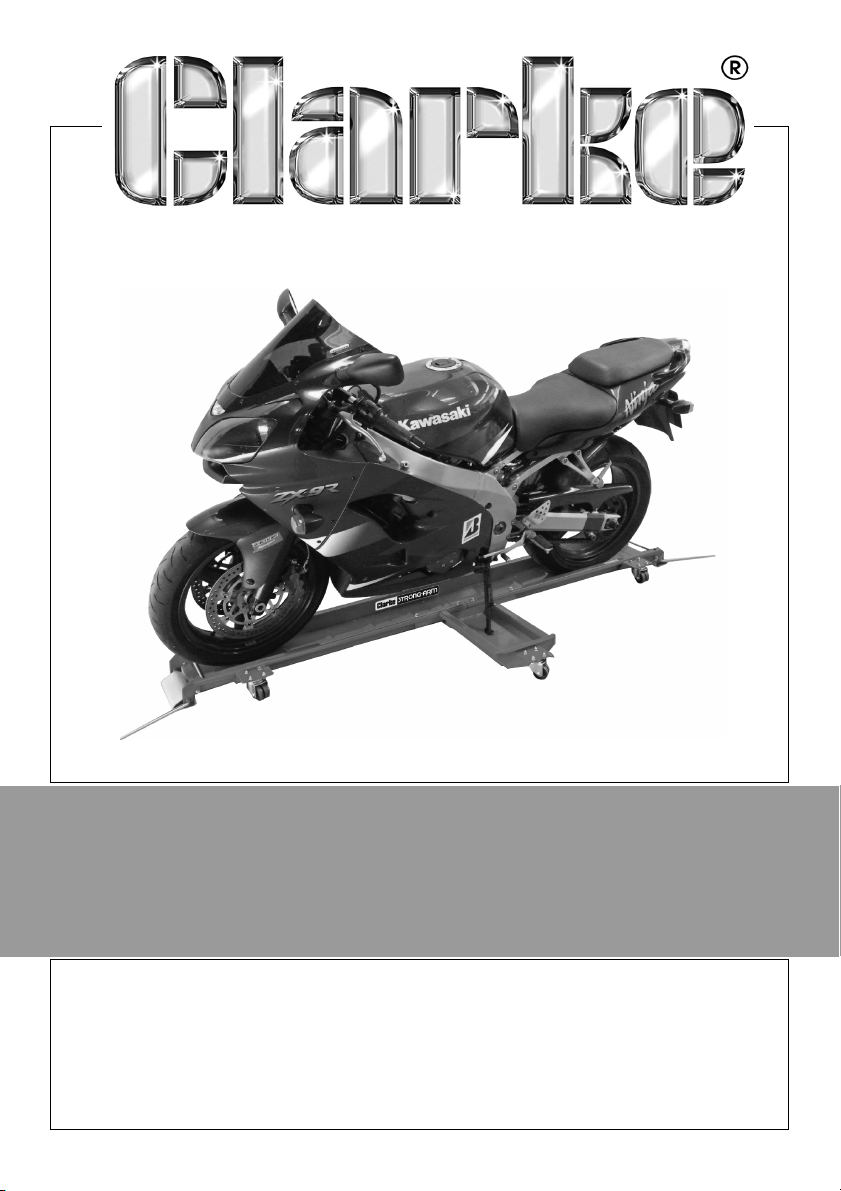
MOTORCYCLE DOLLY
MODEL NO: MCD1
PART NO: 7610139
OPERATION & MAINTENANCE
INSTRUCTIONS
LS0515
Page 2
INTRODUCTION
Thank you for purchasing this CLARKE Motorcycle Dolly.
Before attempting to operate this product, it is essential that you read this
manual thoroughly and carefully follow all instructions given. In doing so you
can look forward to the product giving you long and satisfactory service.
GUARANTEE
This CLARKE product is guaranteed against faulty manufacture for a period of
12 months from the date of purchase. Please keep your receipt as proof of
purchase.
This guarantee is invalid if the product is found to have been abused or
tampered with in any way, or not used for the purpose for which it was
intended.
Faulty goods should be returned to their place of purchase, no product can
be returned to us without prior permission.
This guarantee does not affect your statutory rights.
UNPACKING
Unpack and check the contents with the list below. Should there be any
damaged or missing parts, contact your supplier immediately.
20 x Hex Bolts M6 10 x Nut M8
8 x Cheese Head Bolts 1 x Side Tray
8 x Hex Bolts M8 2 x Main Frames
2 x Countersunk Bolts M8 5 x Castors
28 x Flat Washers M6 4 x Connecting Plates
28 x Spring Washers M6 2 x Carriages (Carriage A and Carriage B)
28 x Nuts M6 2 x Stopper Rods
10 x Flat Washers M8 2 x Connecting Bars
10 x Spring Washers M8 1 x Instruction Manual
2
Parts & Service: 020 8988 7400 / E-mail: [email protected] or [email protected]
Page 3

SAFETY INSTRUCTIONS AND WARNINGS
PLEASE READ THESE INSTRUCTIONS CAREFULLY AND KEEP THIS INSTRUCTION
MANUAL SAFE FOR FUTURE USE.
SAFETY INSTRUCTIONS AND WARNINGS
1. Maintain the dolly in good condition. Keep it clean for best and safest
performance.
2. The maximum load is 567Kg (1250 Lbs). DO NOT exceed this rated
capacity.
3. Use this dolly for supporting motorcycles only. DO NOT use it for any other
purpose.
4. Do not stand, sit or ride on the dolly.
5. Keep children and unauthorised persons away from the work area.
6. When using this dolly to support a motorcycle DO NOT leave unattended if
there is a chance of children or others entering the area.
7. Keep proper balance and footing, do not overreach, wear nonslip
footwear.
8. Only use the dolly on a surface that is flat, stable, level, dry and not
slippery, and capable of supporting the load.
9. Lower the handles on Carriage A and Carriage B when not in use.
10. Store the dolly in a safe, dry place and keep away from children.
11. DO NOT operate the dolly when you are tired or under the influence of
alcohol, drugs or any intoxicating medication.
12. DO NOT make any modifications to the dolly.
13. DO NOT expose the dolly to rain or snow.
14. If the dolly needs repairing and/or there is any part which needs to be
replaced, have it repaired by a technician and only use replacement
parts supplied by the manufacturer.
WARNING: THE WARNINGS, CAUTIONS AND INSTRUCTIONS DISCUSSED IN
THIS INSTRUCTION MANUAL CANNOT COVER ALL POSSIBLE CONDITIONS
AND SITUATIONS THAT MAY OCCUR. IT MUST BE UNDERSTOOD BY THE
OPERATOR THAT COMMON SENSE AND CAUTION ARE FACTORS WHICH
CANNOT BE BUILT INTO THIS PRODUCT, BUT MUST BE SUPPLIED BY THE
OPERATOR.
3
Parts & Service: 020 8988 7400 / E-mail: [email protected] or [email protected]
Page 4
OVERVIEW
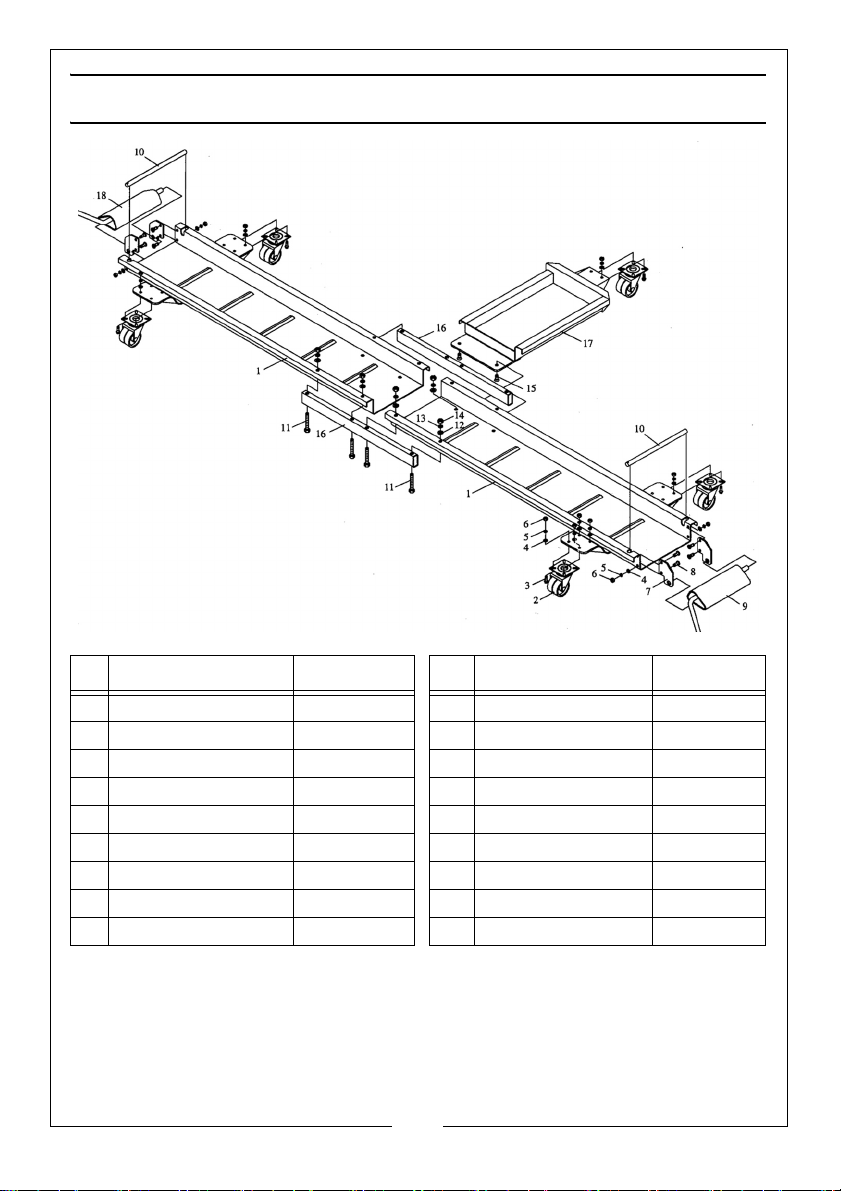
NO DESCRIPTION PART NO NO DESCRIPTION PART NO
1 Frame Assembly JMMCD101 10 Stopper Rods JMMCD110
2 Castor Assembly JMMCD102 11 Hex Bolt M8 JMMCD111
3 Hex Bolt M6 JMMCD103 12 Flat Washer M8 JMMCD112
4 Flat Washer M6 JMMCD104 13 Spring Washer M8 JMMCD113
5 Spring Washer M6 JMMCD105 14 Nut M8 JMMCD114
6 Nut M6 JMMCD106 15 Countersunk Bolts M8 JMMCD115
7 Connecting Plate JMMCD107 16 Connecting Bars JMMCD116
8 Cheese Head Bolts JMMCD108 17 Side Table JMMCD117
9 Carriage A JMMCD109 18 Carriage B JMMCD118
4
Parts & Service: 020 8988 7400 / E-mail: [email protected] or [email protected]
Page 5
ASSEMBLY
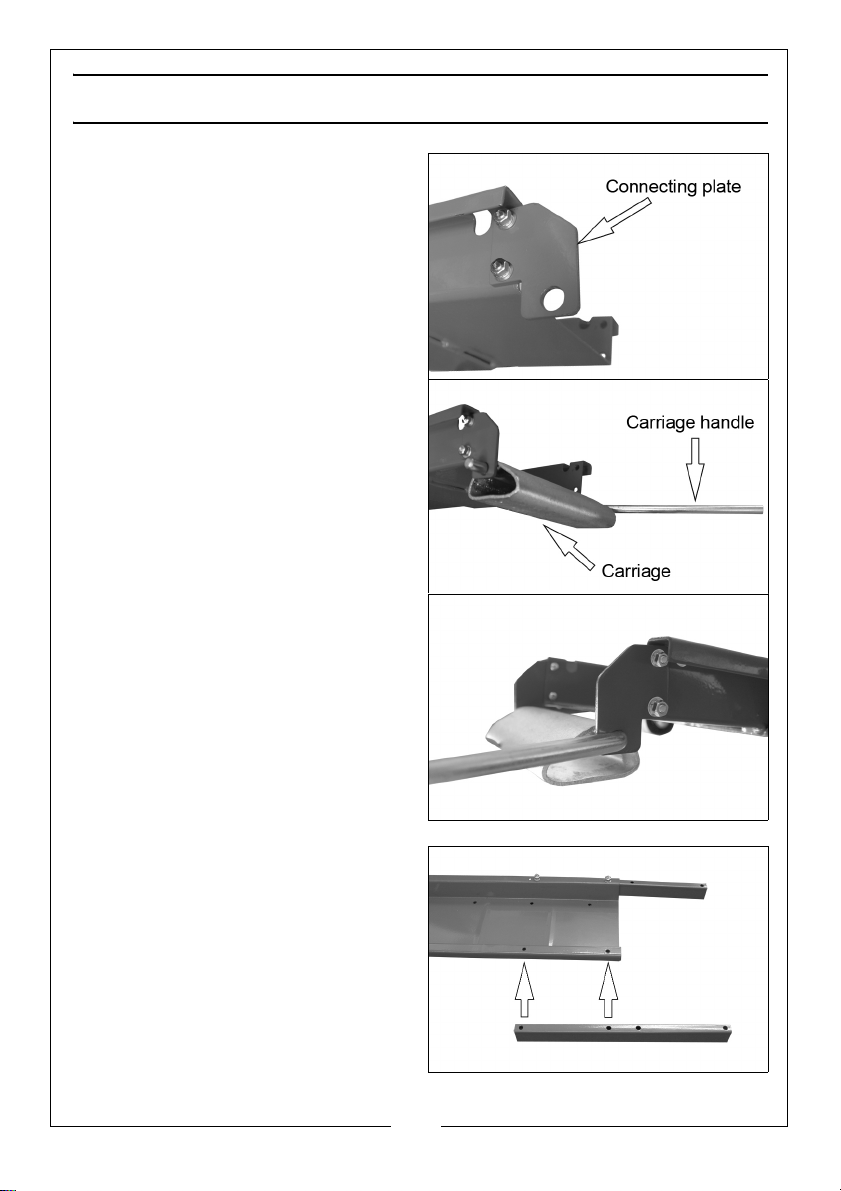
1. Fit a connecting plate (7) to one
end of the frame assembly (1) as
shown.
2. Slide one of the carriages (9 or 18)
into the hole on the connecting
plate (7) as shown.
3. Slide another connecting plate
(7) over the carriage handle and
fix it to the frame assembly as
shown.
• Secure using cheese head
bolts (8), flat washers (4), spring
washers (5) and nuts (6).
4. Repeat on the second frame
assembly.
5. Fit the connecting bars (16) to
one of the frame assemblies as
shown and fix in place using hex
bolts (11), flat washers (12), spring
washers (13) and nuts (14).
6. Fit the second frame assembly to
the other half of the connecting
bars and fix in place using hex
bolts (11), flat washers (12), spring
washers (13) and nuts (14).
5
Parts & Service: 020 8988 7400 / E-mail: [email protected] or [email protected]
Page 6
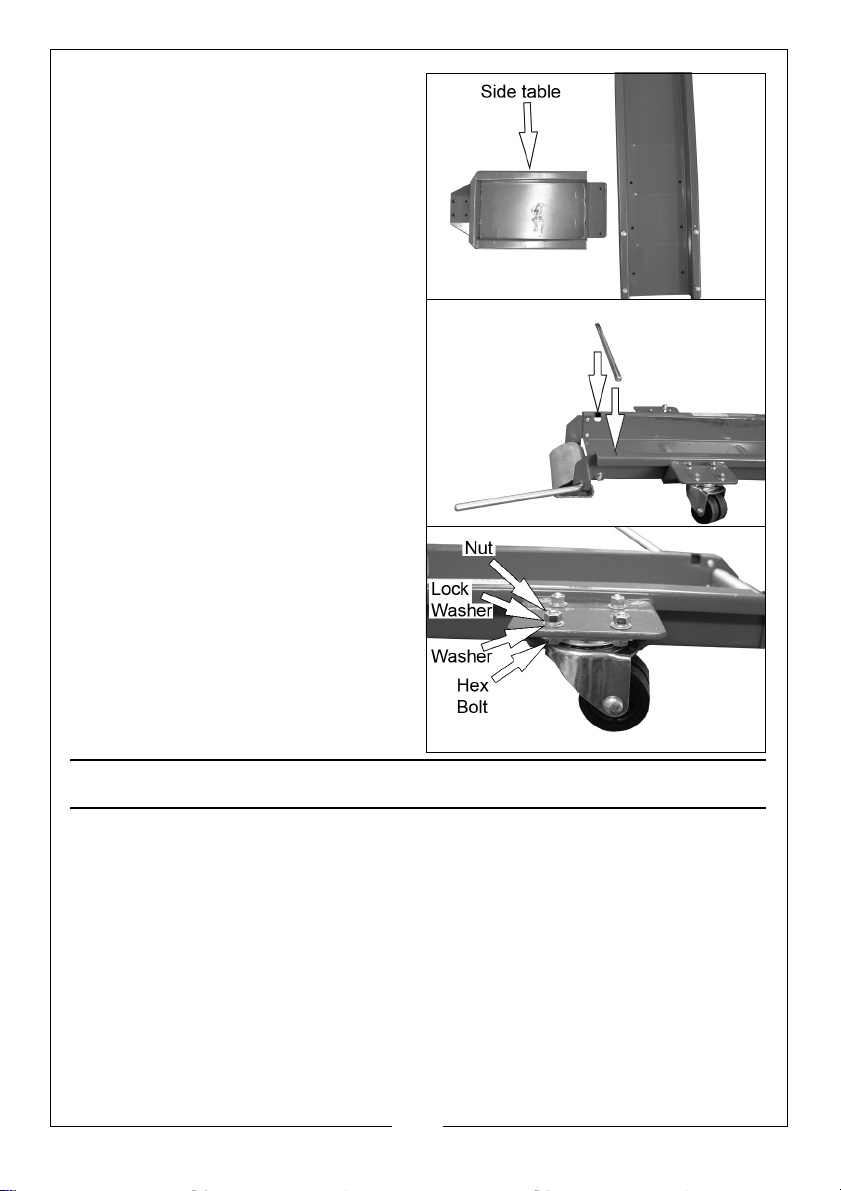
7. Fit the side table (17) to the frame
assemblies using countersunk
bolts (15), flat washers (12), spring
washers (13) and nuts (14).
• The side table can be fitted to
one of 5 spaces either side of
the frame, depending on
where the kickstand is located
on the motorbike.
8. Place the two stopper rods (10)
into the slots on each end of
frame assembly.
ATTACH THE CASTORS
1. Attach two castors (2) to each
end of the frame assembly and
one to the side tray (17) using hex
bolts (3), flat washers (4), spring
washers (5) and nuts (6).
• Secure them firmly.
MAINTENANCE
1. Periodically check all the joints. Remove from service if any cracking is
found or if the frame is bent or deformed.
2. Lubricate wheels periodically.
6
Parts & Service: 020 8988 7400 / E-mail: [email protected] or [email protected]
Page 7
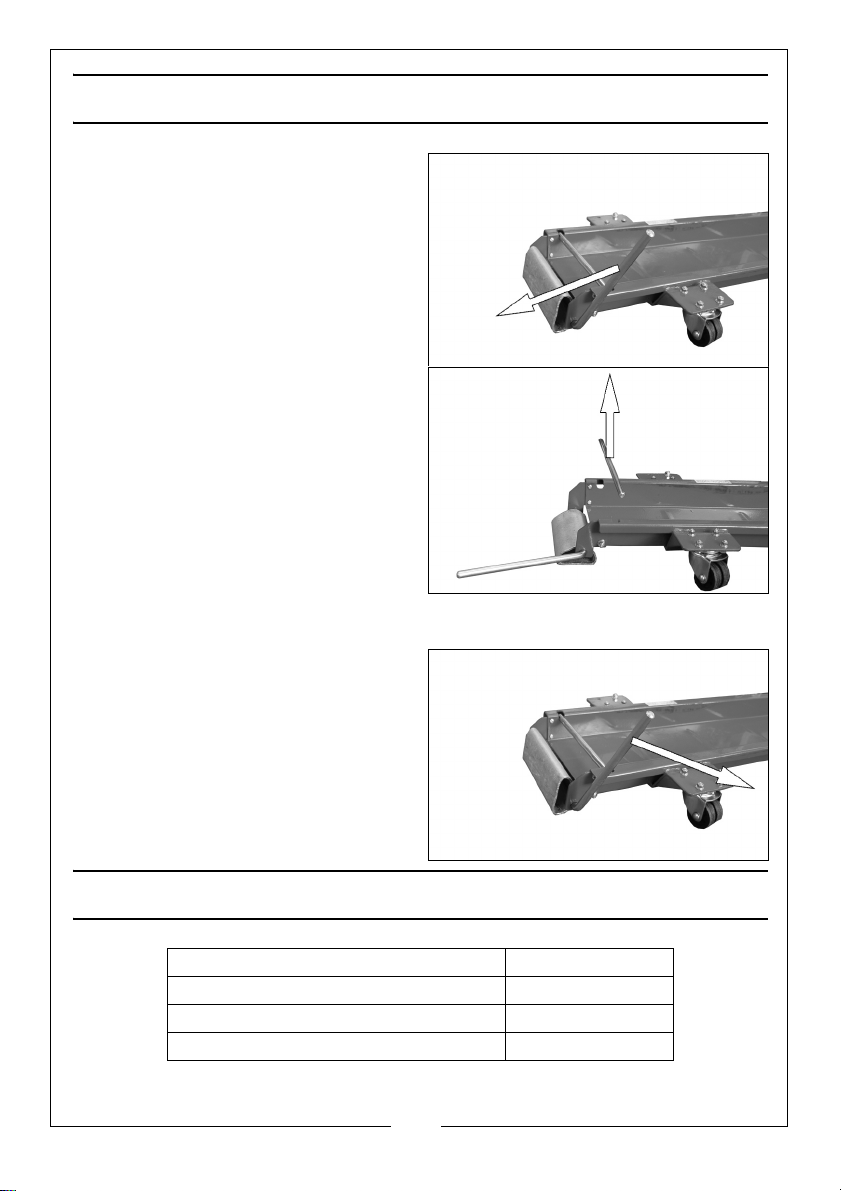
OPERATION
1. Rotate the carriage handles (9 &
18) downward to stop the dolly
from moving.
• This makes it easier to push the
motorcycle onto the dolly.
2. Remove the stopper rod (10) from
one end.
3. Push the motorcycle on to the
dolly.
• The kick stand should be on the
same side as the side table (7).
4. Replace the stopper rod (10).
• Secure the motorcycle to the
dolly using straps (not supplied)
to prevent the motorcycle
toppling over whilst being moved.
5. Rotate the carriage handles (9 &
18) upwards to allow the dolly to
be moved again.
6. ALWAYS have the carriage
handles in the down position
when working on the motor cycle,
to stop the dolly from moving.
SPECIFICATIONS
Model Number MCD1
Maximum Load 1250 lbs (567 kg)
Weight 30.3 kg
Maximum Tyre width 200 mm
7
Parts & Service: 020 8988 7400 / E-mail: [email protected] or [email protected]
Page 8

 Loading...