

Page 1
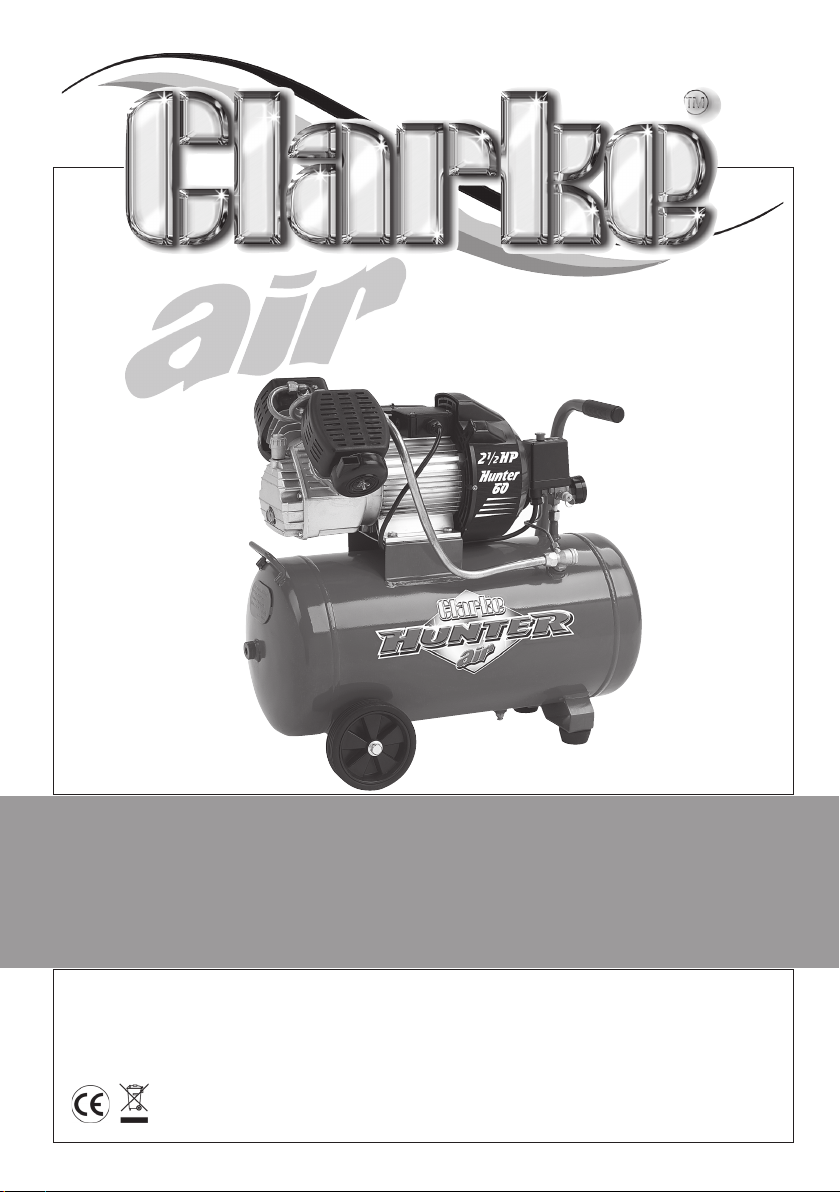
HUNTER
HUNTER
AIR COMPRESSOR
AIR COMPRESSOR
OPERATION & MAINTENANCE
INSTRUCTIONS
©
0407
Page 2
SPECIFICATIONS
Electrical Supply ........................................................... 230 V, 1 Phase 50Hz
Motor Rating ................................................................. 2.5 HP
Max. Air Pressure ........................................................... 8 bar (115 lbf/in2)
Air Displacement .......................................................... 12.5 cuft/min
Duty Cycle ..................................................................... S1 (continuous)
Operating Temperature .............................................. 0OC - 35OC
Sound Power Level ...................................................... 93 dB L
Air Receiver ................................................................... 50 litre
Nett Weight ................................................................... 44 kg
Dimensions ..................................................................... 730 x 315 x 650 mm
Compressor Oil .............................................................. CLARKE SAE 40
Part No. .......................................................................... 2130020
Please note that the details and specifications contained herein, are correct at the time of going to
print. However, CLARKE International reserve the right to change specifications at any time without
prior notice. Always consult the machine’s data plate
WA
© Copyright: Clarke International. May, 2000
2
Page 3

Thank you for purchasing this CLARKE HUNTER Air Compressor, which is designed
for hobby and DIY use only.
Please read this leaflet thoroughly and carefully follow all instructions. In doing so
you will ensure the safety of yourself and that of others around you, and you can
look forward to the compressor giving you long and satisfactory service.
GUARANTEE
This product is guaranteed against faulty manufacture for a period of 12 months
from the date of purchase. Please keep your receipt as proof of purchase.
This guarantee is invalid if the product is found to have been abused or tampered
with in any way, or not used for the purpose for which it was intended.
Faulty goods should be returned to their place of purchase, no product can be
returned without prior permission.
This guarantee does not effect your statutory rights.
CONTENTS Page
Specifications ........................................................................................ 2
Safety Precautions ................................................................................ 4
Assembly ................................................................................................ 5
Electrical Connections .......................................................................... 6
Operation ............................................................................................... 7
Routine Maintenance ........................................................................... 9
Troubleshooting .................................................................................... 10
Parts List ................................................................................................. 11
Parts Diagram ....................................................................................... 12
Accessories ........................................................................................... 13
Spare Parts and Service contacts ...................................................... 13
Paint Spraying Hints - .. General preparation .................................... 14
Preparing the paint ...................................... 14
Handling the gun .......................................... 15
Spray Gun maintenance ............................. 15
Do NOT dispose of this product with general household waste. It must be disposed of according to
all laws governing waste electrical and electronic waste at a proper disposal facility
3
Page 4

SAFETY PRECAUTIONS
WARNING
As with all machinery, there are certain hazards involved with their
operation and use. Exercising respect and caution will considerably
lessen the risk of personal injury. However, if normal safety precautions
are overlooked, or ignored, personal injury to the operator, or damage
to property may result. It is in your own interest to read and pay attention
to the following rules:
1. COMPRESSED AIR IS DANGEROUS, NEVER direct a jet of air at people or animals,
and NEVER discharge compressed air against the skin.
2. DO NOT operate your compressor with any guards removed.
3. Electrical or mechanical repairs should only be carried out by a qualified
engineer. If problems occur, contact your Clarke dealer.
4. Before carrying out any maintenance, ensure the pressure is expelled from
the air receiver, and the machine is disconnected from the mains.
5. DO NOT leave pressure in the receiver overnight, or when transporting.
6. DO NOT adjust, or tamper with the safety valves. The maximum pressure is
factory set, and clearly marked on the machine.
7. DO NOT operate in wet or damp conditions. Keep the machine dry at alll
times.
8. A clean atmosphere will ensure efficient operation. Do not use in dusty or
otherwise dirty locations.
9. Some of the metal parts can become quite hot during operation. Take care
not to touch these until the machine has cooled down.
10. Always adjust the pressure regulator to the recommended setting for the
particular spray gun or tool being used.
11. When spraying inflammable materials e.g. cellulose paint, ensure there is
adequate ventilation and keep clear of any possible source of ignition.
12. Protect yourself. Think carefully about any potential hazards which may be
created by using the air compressor and use the appropriate protection. e.g.
Goggles will protect your eyes from flying particles. Face masks will protect
you against paint spray and/or fumes.
13. Before spraying any material always consult paint manufacturers instructions
for safety and usage.
14. Personal safety products can be obtained from your local dealer.
15. Do not exert any strain on electrical cables and ensure that air hoses are not
tangled or wrapped around machinery etc.
4
Page 5
16. When disconnecting air hoses or other equipment from your compressor ensure
that the air supply is turned off at the machine outlet and expel all pressurised
air from within the machine and other equipment attached to it.
17. Make sure that children and animals are kept well away from the compressor
and any equipment attached to it.
18. Always ensure that all individuals using the compressor have read and fully
understand the Operating Instructions supplied.
ASSEMBLY
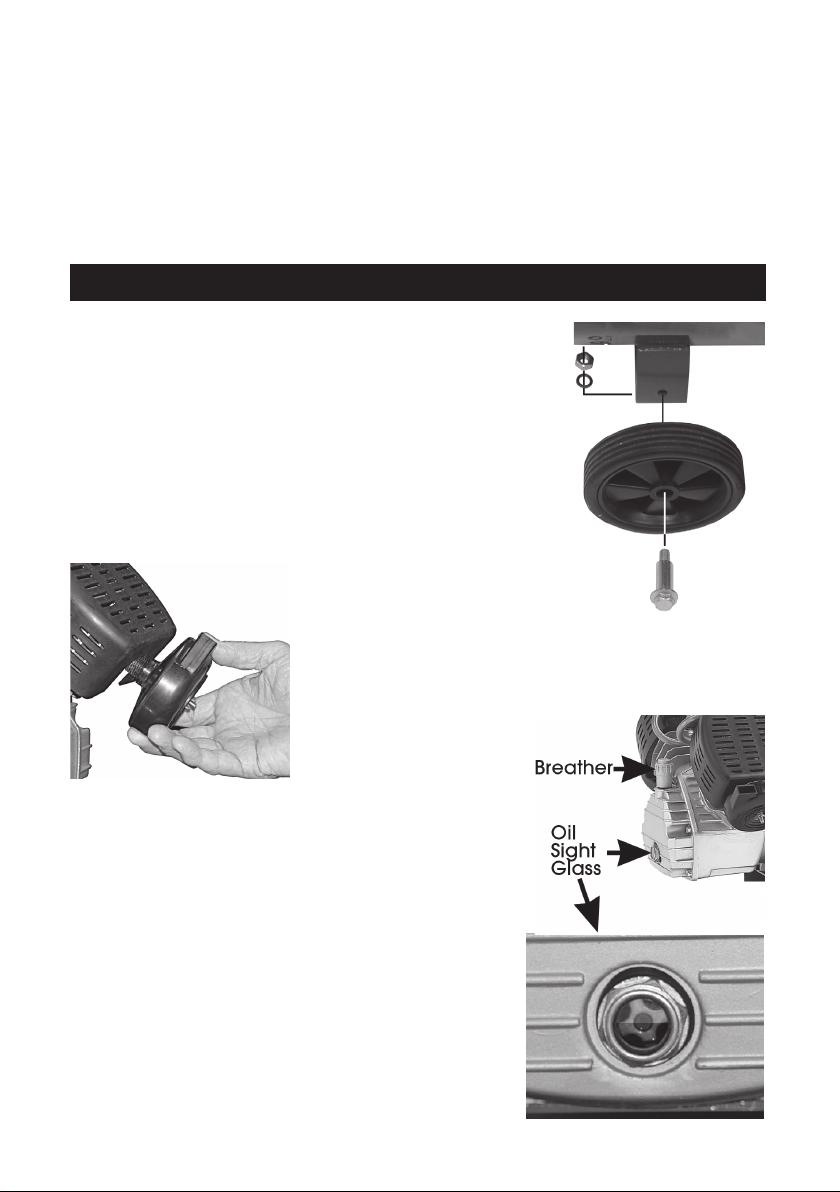
The wheel assemblies are packed separately. The
method of assembly is shown on the right.
Thread the bolt through the wheel hub, through the
hole in the support bracket.
Thread on the spring washer, screw on the nut and
tighten.
When attaching the wheels, do not tip the machine
on to its side.
Screw on the air filter
assembly fully.
IMPORTANT!
Remove the breather - see opposite, and use a
funnel to fill the machine with oil (supplied).
Check to ensure the oil level is midway across the
sight glass, as shown opposite.
Compressor oil is also available from your Clarke
dealer.
5
Page 6

ELECTRICAL CONNECTIONS
Connect the mains lead to a standard, 230 Volt (50Hz) electrical supply
through an approved 13 amp BS 1363 plug, or a suitably fused isolator
switch.
WARNING! THIS APPLIANCE MUST BE EARTHED
IMPORTANT: The wires in the mains lead are coloured in accordance
with the following code:
Green & Yellow - Earth
Blue - Neutral
Brown - Live
As the colours of the flexible lead of this appliance may not correspond
with the coloured markings identifying terminals in your plug proceed as
follows:
• Connect GREEN & YELLOW cord to terminal marked with a letter “E”
or Earth symbol “ ” or coloured GREEN or GREEN & YELLOW.
• Connect BROWN cord to terminal marked with a letter “L” or
coloured RED.
• Connect BLUE cord to terminal marked with a letter “N” or coloured
BLACK.
If this appliance is fitted with a plug which is moulded onto the electric
cable (i.e. non-rewireable) please note:
1. The plug must be thrown away if it is cut from the electric cable.
There is a danger of electric shock if it is subsequently inserted into a
socket outlet.
2. Never use the plug without the fuse cover fitted.
3. When replacing a detachable fuse carrier, ensure the correct
replacement is used (as indicated by marking or colour code).
4. Replacement fuse covers can be obtained from your local dealer
or most electrical stockists.
FUSE RATING
The fuse in the plug must be replaced with one of the same rating (13
amps) and this replacement must be ASTA approved to BS1362.
We strongly recommend that this machine is connected to the mains
supply via a Residual Current Device (RCD)
If in any doubt, consult a qualified electrician. DO NOT attempt any
repairs yourself.
6
Page 7
OPERATION
Before connecting your Hunter to the mains supply, check the following:-
• The mains voltage is 230V.
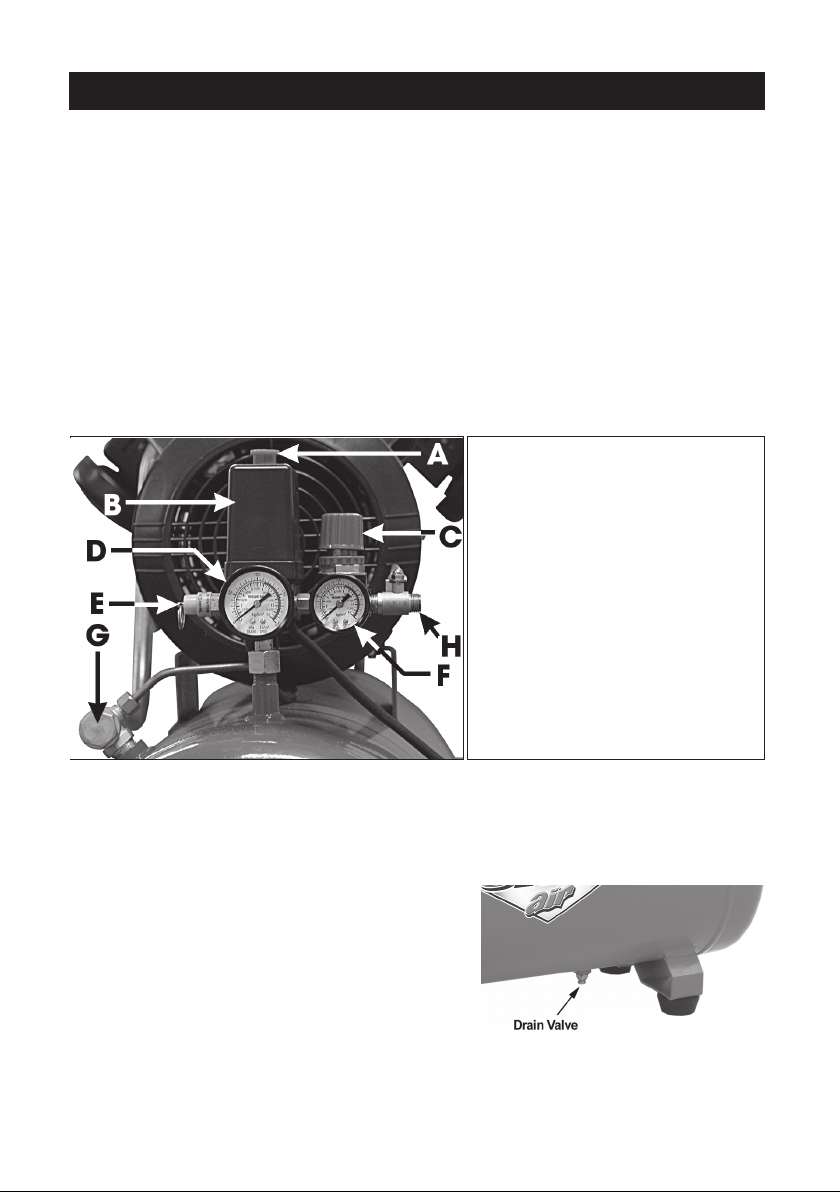
• The ON/OFF control knob (A) is in the OFF (lower) position.
• The pressure regulator (C) should be set at its lowest setting, i.e. turned fully
anticlockwise.
• If the machine has not been used for 24 hours or so, open the drain valve,
located beneath the reservoir, to drain any condensate which may have
accumulated. When clear, close the valve - finger tight.
IMPORTANT: If the receiver is under pressure, keep your hands well away from the
air being expelled.... remember, compressed air is DANGEROUS!
Fig.1
A. ON/OFF Knob
B. Pressure Regulator and Cutout
C. Air Pressure Regulator Knob
D. Air Tank Pressure gauge
E. Safety Valve
F. Air Outlet Pressure gauge
G. Non-Return Valve
H. Air Outlet
Connect a suitable air hose, with a 1/4 BSP connector, between the air outlet (H)
and the spray gun or air tool being used.
Quick Fit couplings may be used to facilitate quick and simple changing of air
tools. These are available from your Clarke dealer.
Open the drain valve to prevent initial loading.
Once the hose connections are complete,
CHECK AGAIN to ensure the pressure regulator
(C) is turned fully anticlockwise so that
compressed air cannot reach the air tool, then
switch the compressor ON, by lifting the ON/
OFF knob (A), until it clicks into the upper
position.
The air compressor will now start.
7
Page 8

Should the motor fail to start immediately, it is probable that the air receiver is
already full of air. Check the tank pressure gauge (D). If you release air, by opening
air outlet tap (H), the motor will start automatically once the cut-in pressure is
reached.
If this is not the case, it is possible that the thermal overload has intervened. This is
a safety device to prevent the motor from overheating. The device will reset when
the temperature falls to a predetermined level. In this event, switch OFF the
machine and wait for 5 - 10 minutes, depending upon ambient temperature,
press the reset button and attempt to restart. If the motor fails to start, after several
attempts, consult your Clarke dealer.
Once the machine has started and run for a few minutes, close the drain valve,
the pressure will build up in the receiver to a regulated max. pressure of 8 Bar (115
psi).
Turn ON the air supply to your air tool by opening the tap (H), and turn the pressure
regulator (C) clockwise so that your chosen setting, is shown on the air outlet
pressure gauge.
Check to ensure that there are no air leaks at any of the couplings or in other
parts of the system before operating the spray gun or air tool in the normal way. If
any leaks are apparent, switch OFF the machine by pushing the ON/OFF knob
downwards, close the outlet tap and rectify before proceeding.
When the compressor reaches its maximum working pressure, the motor will
automatically cut out, and will restart when the pressure has fallen by approximately
20 psi. This automatic STOP/START process will continue, as necessary, to maintain
pressure in the receiver.
Periodically check to make sure the cylonder head bolts are securely tightened.
When you have finished the job in hand ALWAY S switch OFF at the ON/OFF switch,
NOT the mains supply, and release any pressure remaining in the system by opening
the drain valve until all air is expelled. This also allows any condensate to drain off.
ALWAYS operate the air tool to further ensure that there is no pressure in the system
BEFORE disconnecting the tool. Finally, reset the pressure regulator to zero by turning
the knob fully anticlockwise.
8
Page 9
ROUTINE MAINTENANCE
IMPORTANT: Before carrying out any of this service work, always disconnect the
machine from the mains supply, drain the air receiver and, if necessary, allow the
machine to cool down before starting work.
Daily
Before use, always open the drain valve to ensure that any condensate, which
may have accumulated, is drained off.
Before use, make sure the cylinder head bolts are securely tightened.
Monthly
It is important to keep the Compressor clean, with the help of a small soft brush
and vacuum cleaner. In particular, the air intake
filter should be inspected at least MONTHLY, and
more often in dusty conditions, so that it is always
kept free of any dirt particles, which if not
cleaned away will affect the performance of
the machine.
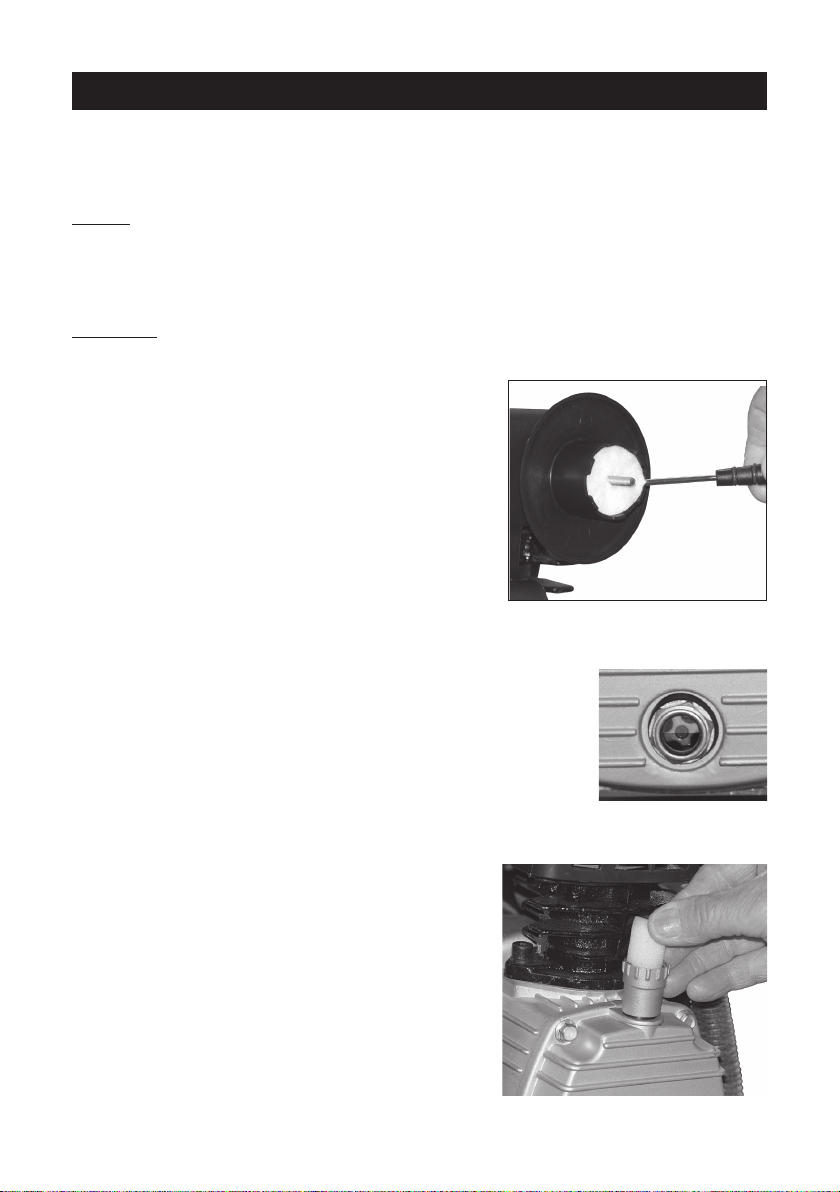
To clean the air intake filter, unscrew the cover
and carefully prise out the element shown in
Fig.2. Clean the inner housing using a cloth or
brush.
If the filter is clogged or badly blackened, it should
be replaced. It is not possible to wash the filter
Fig.2
Fig.3
Check the oil level, which should be midway across the
sight glass, as shown in Fig.3.
Remove the breather and top up, using a funnel, with Clarke
compressor oil (SAE40).
Drain and replace the oil after 6 months.
When replacing the breather, unscrew the cap
and check the filter for cleanliness as shown in
Fig.4. if it is badly contaminated, it should be
replaced, otherwise, it may be washed gently in
soapy water, rinsed thoroughly and dried before
replacing
9
Fig. 4
Page 10

TROUBLE SHOOTING
With considerate use, your CLARKE Air Compressor should provide you with long
and trouble free service. Routine checks should be made on both the electrical
supply as well as on all the compressed air lines and connections. If any fault
appears, the reason for which is not immediately obvious, we recommend that
you contact your local CLARKE Dealer.
PROBLEM
The compressor
stops and will not
start again.
The compressor
does not reach
the set pressure
and overheats
easily.
Compressor does
not start.
CAUTION Do not attempt any repair or adjustment if you are uncertain as to how
it should be done. If you have any queries, contact your local CLARKE Dealer.
PROBABLE CAUSE
Bad connections.
Overload cutout
switch has tripped.
Motor windings burnt
out.
Compressor head
gasket blown or valve
broken.
Air receiver charged
REMEDY
Check electrical connections.
Clean and tighten as
necessary.
Switch off and wait 5 minutes
before switching on.
Contact your local dealer for a
replacement motor.
Wait for compressor to cool
down, disassemble head and
replace any broken
components. Carefully clean
all sealing surfaces before
reassem-bling. If in doubt
contact your CLARKE dealer.
Open drain cock to expel air.
Compressor should start again
when pressure reduces to
approx. 95 psi.
10
Page 11

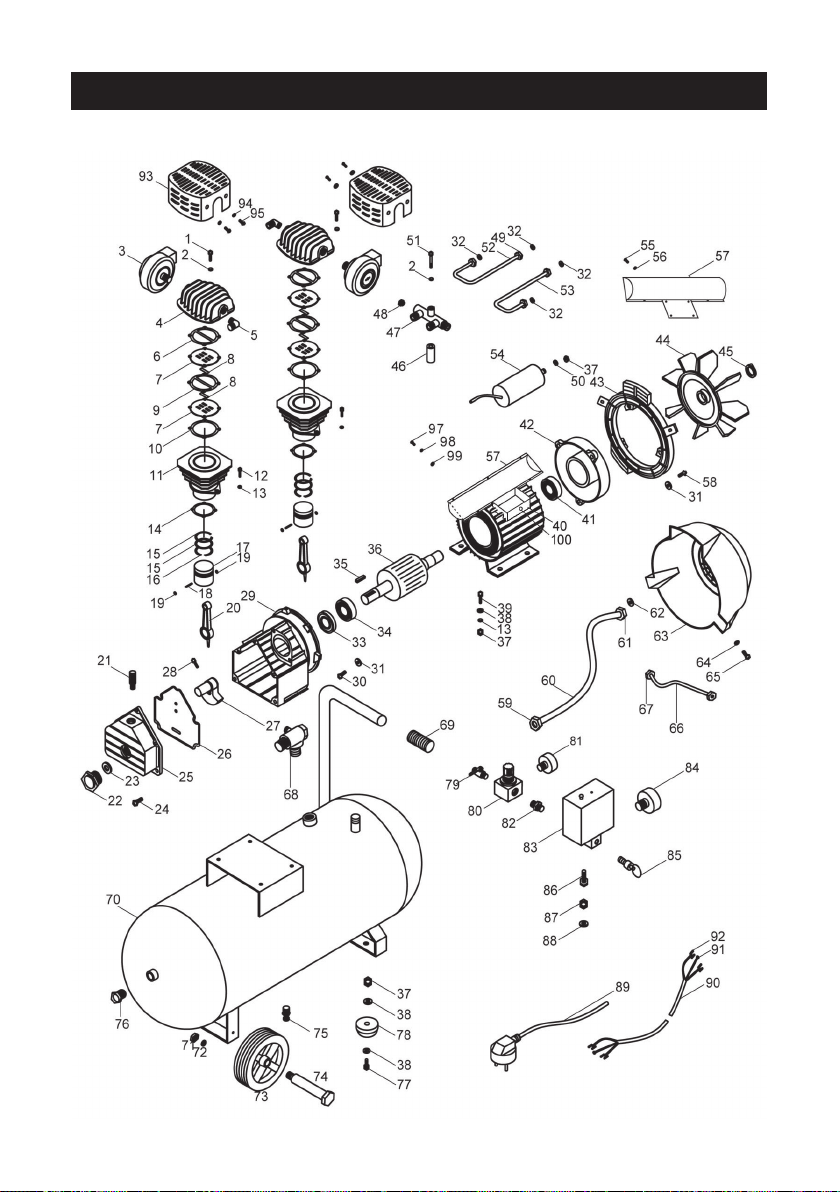
PARTS LIST
No. Description Qty Part No. No. Description Qty Part No.
1 Hex Skt Hd Bolt M6X558 HTHUN001
2 Spring Washer 6 9 HTHUN002
3 Air Filter 2 HTHUN003
4 Cylinder Head 2 HTHUN004
5 Elbow 2 HTHUN005
6 Cylinder Gasket 2 HTHUN006
7 Valve Assembly 4 HTHUN007
8 Valve 4 HTHUN008
9 Gasket 2 HTHUN009
10 Cylinder Gasket 2 HTHUN010
11 Cylinder 2 HTHUN011
12 Bolt M8X25 4 HTHUN012
13 Spring Washer 8 HTHUN013
14 Spring Gasket 2 HTHUN014
15 Piston Ring 4 HTHUN015
16 Scraper Ring 2 HTHUN016
17 Piston 2 HTHUN017
18 Gudgeon Pin 2 HTHUN018
19 Girclip 4 HTHUN019
20 Connecting Rod 2 HTHUN020
21 Oil Breather 1 HTHUN021
22 Oil Sight Glass G1/2 1 HTHUN022
23 Gasket 1 HTHUN023
24 Bolt M6x16 5 HTHUN024
25 End Casing 1 HTHUN025
26 Gasket 1 HTHUN026
27 Crank Shaft 1 HTHUN027
28 Bolt M8x35 1 HTHUN028
29 Crankcase 1 HTHUN029
30 Bolt M5x25 3 HTHUN030
31 Washer 3 HTHUN031
32 Olive 4 HTHUN032
33 Shaft Seal 1 HTHUN033
34 Bearing 1 HTHUN034
35 Flat Key 1 HTHUN035
36 Rotor 1 HTHUN036
37 Nut M8 7 HTHUN037
38 Washer 8 HTHUN038
39 Bolt M8x25 4 HTHUN039
40 Statot 1 HTHUN040
41 Bearing 1 HTHUN041
42 Back Cap 1 HTHUN042
43 Lining 1 HTHUN043
44 Fan 1 HTHUN044
45 Retainer Ring 1 HTHUN045
46 Bush 1 HTHUN046
47 Mainfold 1 HTHUN047
48 Unloader Valve 1 HTHUN048
49 Nut M16x1.5 4 HTHUN049
50 Washer 1 HTHUN050
51 Bolt M6x45 1 HTHUN051
52 Pipe(u) 1 HTHUN052
53 Pipe(u) 1 HTHUN053
54 Capacitor 1 HTHUN054
55 Screw M3X5 5 HTHUN055
56 Washer 5 HTHUN056
57 Capacitor Enclosure 1 HTHUN057
58 Bolt M5x40 3 HTHUN058
59 Nut G 1/2 1 HTHUN059
60 Exhaust Pipe 1 HTHUN060
61 Nut 1 HTHUN061
62 Olive 1 HTHUN062
63 Fan cover 1 HTHUN063
64 Washer 5 2 HTHUN064
65 Screw M2X15 2 HTHUN065
66 Unloader Pipe 1 HTHUN066
67 Nut M1 1 HTHUN067
68 Check Valve 1 HTHUN068
69 Handle 1 HTHUN069
70 Tank 1 HTHUN070
71 Nut M12 2 HTHUN071
72 Spring Washer 12 2 HTHUN072
73 Wheel 7" 2 HTHUN073
74 Wheel Axle Bolt 2 HTHUN074
75 Drain Valve 1 HTHUN075
76 Tank End Cap 2 HTHUN076
77 Bolt M8x20 2 HTHUN077
78 Foot 2 HTHUN078
79 Air Tap 1 HTHUN079
80 Pressure Regulator 1 HTHUN080
81 Outlet Press. Gauge 1 HTHUN081
82 Connector 1 HTHUN082
83 Pressure Switch 1 HTHUN083
84 Tank Pressure Gauge 1 HTHUN084
85 Safety Valve 1 HTHUN085
86 Connector 1 HTHUN086
87 Nut 1 HTHUN087
88 Gasket 1 HTHUN088
89 Plug 1 HTHUN089
90 Power cable 1 HTHUN090
91 Cable Conn.(o) 3 HTHUN091
92 Cable Conn.(u) 8 HTHUN092
93 Cover 2 HTHUN093
94 Washer 4 HTHUN094
95 Screw 4 HTHUN095
96 Air Filter Element 2 HTHUN096
97 Screw M3X8 4 HTHUN097
98 Spring Washer 4 HTHUN098
99 Washer 4 HTHUN099
100 Reset button 1 HTHUN100
11
Page 12
PARTS IDENTIFICATION
12
Page 13
ACCESSORIES
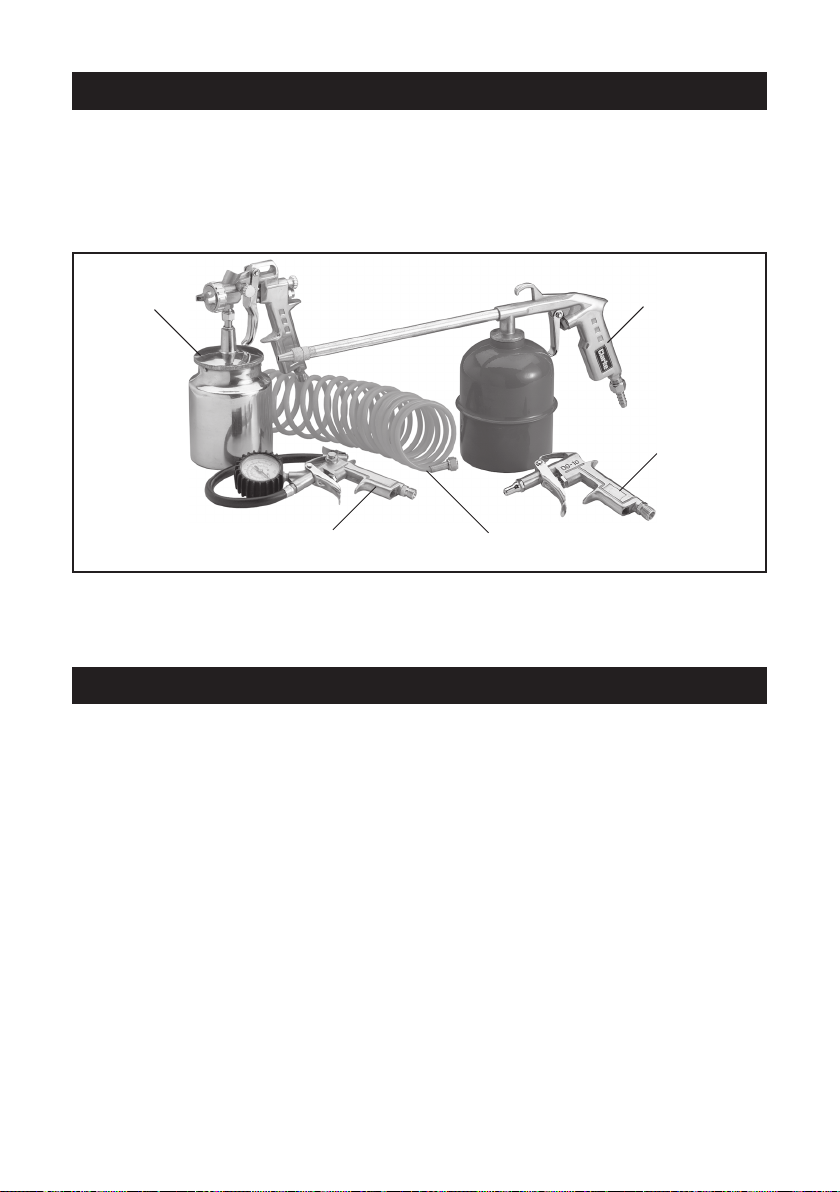
Your Clarke Hunter Oil Free Air Compressor can be used in conjunction with a range of
optional accessories for inflating tyres, air brushing, stapling, blowing and many other uses.
For details contact your local accessory stockist. A complete kit is available from your Clarke
dealer which is ideal for almost all applications.
Please quote part number 3110155
Spray Gun
Tyre Inflator
Should you experience any difficulties obtaining accessories, please contact the Clarke
Sales Department (telephone 01992 565300) for details of your nearest dealer.
Air Hose
Paraffin Spray Gun
Blow Gun
SPARE PARTS AND SERVICE
For Spare Parts and Service,please contact your nearest dealer,
or CLARKE International, on one of the following numbers.
PARTS & SERVICE TEL: 020 8988 7400
PARTS & SERVICE FAX: 020 8558 3622
or e-mail as follows:
PARTS: [email protected]
SERVICE: [email protected]
13
Page 14

PAINT SPRAYING HINTS
WARNING
NEVER attempt to spray unless you are wearing suitable, approved
respiratory and eye protection.
REMEMBER that some modern paints require specialist respiratory
protection...always consult the paint manufacturers instructions.
1. GENERAL PREPARATION
a. Ensure that the area in which you will be spraying is clean and dust free.
b. Connect spray gun to compressor via suitable flexible hose.
c. With no paint in spray gun, test system for air leaks.
d. Cover adjacent pieces of equipment to prevent overspray. Mask areas
of the article not to be sprayed.
e. Ensure surface to be painted is clean, dry and free from oil and dust.
Check paint manufacturer’s instructions for any special surface
preparation required.
REMEMBER - TIME SPENT PREPARING SAVES TIME SPENT FINISHING
2. PAINT PREPARATION
a. Achieve the correct paint viscosity. This should be done according to
paint manufacturer’s instructions, and will vary according to type of paint.
b. Having mixed the paint thoroughly in a separate container, pour into the
spray gun paint container through a fine filter.
DO NOT OVERFILL SPRAY GUN PAINT CONTAINER - three quarters full is maximum
c. It is usually best to experiment with a couple of practice spray coats on a
piece of material with the same type of surface as the article you wish to
spray, eg. metal for a car body panel, wood for a piece of furniture etc.
Some common problems:
PROBLEM CAUSE CORRECTION
Paint does not atomise Paint is too thick, air Add thinners
(comes out in blobs) pressure is too low. Increase air pressure (not
above 50 psi, unless specified by paint manuf.
Paint dries before hitting Paint is too thin. Air Add more paint.
surface, leaving it dry pressure is too high Reduce air pressure
with a rough texture
Finish is pitted like Air pressure too high Reduce air pressure,
Orange peel or spray too close to increase distance between
work gun and work.
14
Page 15
For a professional looking finish paint must be thinned. If the manufacturers
recommendations on thinning are not available, the following can be used as a
general guide: Water based paints (emulsions) - 10-20% water
Oil based paints (gloss) - up to 10% white spirit thinners
Cellulose paints - up to 50% cellulose thinners
3. HANDLING THE GUN
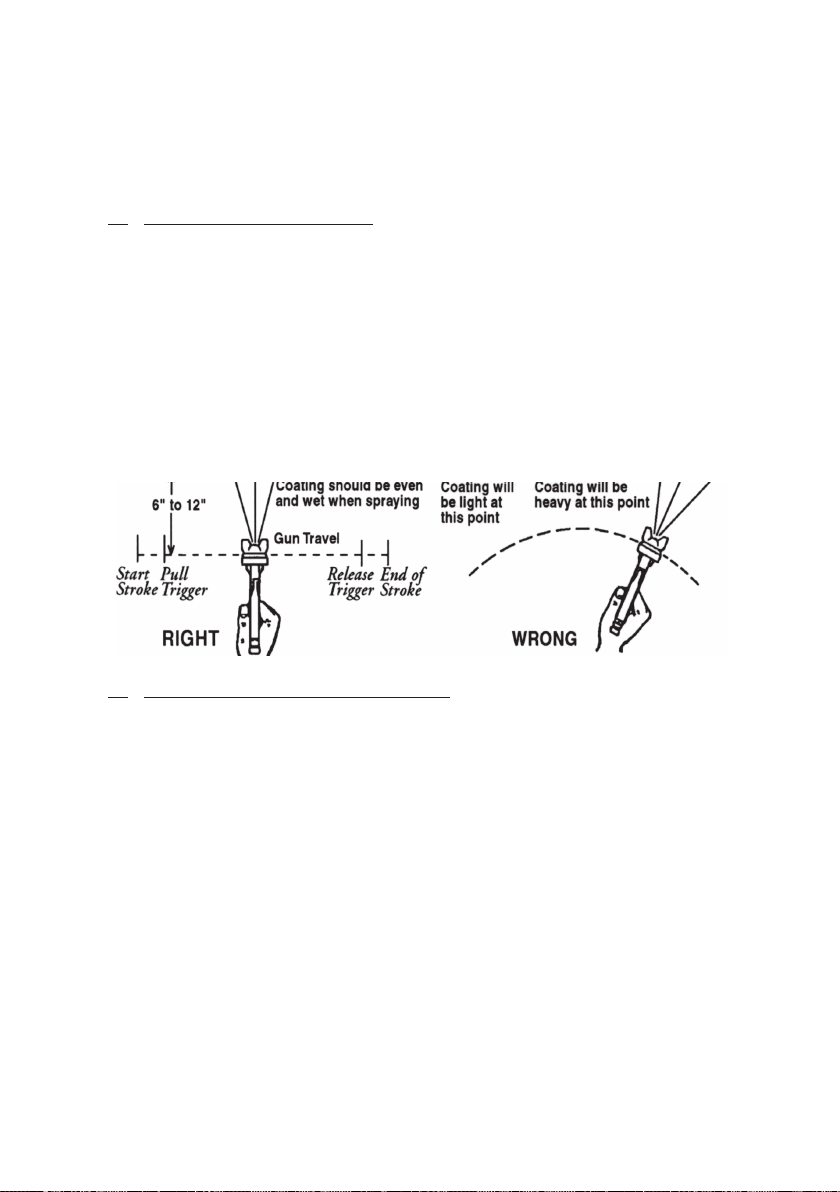
The first requirement for a good resultant finish is the proper handling of the gun.
The gun should be held perpendicular to the surface being covered and moved
parallel to it. The stroke should be started before the trigger is pulled and the
trigger should be released before the stroke is ended. This gives accurate control
of the gun and material.
The distance between gun and surface should be 6 to 12 inches depending on
material and atomizing pressure. The material deposited should always be even
and wet. Lap each stroke over the preceding stroke to obtain a uniform finish.
NOTE: To reduce overspray and obtain maximum efficiency, always spray
with the lowest possible atomizing air pressure.
4. SPRAY GUN MAINTENANCE
1. Immerse only the front end of the gun until solvent just covers the fluid
connection.
2. Use a bristle brush and solvent to wash off accumulated paint.
3. Do not submerge the entire spray gun in solvent because:
a. the lubricant in the gland packings will dissolve and the packings will dry
out.
b. the lubricant will dissolve causing harder operation and faster wear.
c. residue from dirty solvent may clog the narrow air passages in the gun.
4. Wipe down the outside of the gun with solvent dampened rag.
5. Lubricate gun daily. Use a light machine oil on:
a. fluid needle packing.
b. air valve packing.
c. fan control packing.
d. trigger pivot point.
Coat the fluid control spring with vaseline.
Caution: Never use lubricants containing silicone as this may cause finish defects.
15
 Loading...