

Page 1
HAND SPRAYERS
MODEL NOS: HSP2 & HSP8
Part Nos: 3402260 & 3402265
OPERATING & MAINTENANCE
INSTRUCTIONS
GC0712
Page 2
INTRODUCTION
Thank you for purchasing this CLARKE Sprayer, designed for use with
insecticides or other water-based products only.
Before attempting to operate the product, it is essential that you read this
manual thoroughly and carefully follow all instructions given. In doing so you
will ensure the safety of yourself and that of others around you, and you can
also look forward to the product giving you long and satisfactory service.
GUARANTEE
This CLARKE product is guaranteed against faulty manufacture for a period of
12 months from the date of purchase. Please keep your receipt as proof of
purchase.
This guarantee is invalid if the product is found to have been abused or
tampered with in any way, or not used for its intended purpose.
Faulty goods should be returned to their place of purchase, no product can
be returned to us without prior permission. This guarantee does not effect
your statutory rights.
GENERAL SAFETY PRECAUTIONS
1. Always thoroughly familiarise yourself with this product & its operation, and
always read and understand the instructions and warnings in this manual
before use.
2. Never use this sprayer to store or spray flammable solvents.
3. Empty the contents if the sparayer is not to be used for long periods.
4. If insecticide is being sprayed, always wear a protective mask and gloves
to protect the skin and face. Never spray pesticide facing into the wind.
5. Never spray pesticide in the direction of other people, animals or
foodstuffs.
6. Never use the sprayer for handling hot liquids and avoid operating in
excessively hot environments.
7. Always comply with any applicable insecticide manufacturers safety
instructions/directives before use.
8. Stop using the sprayer if the container or hose is found to be damaged.
2
Page 3
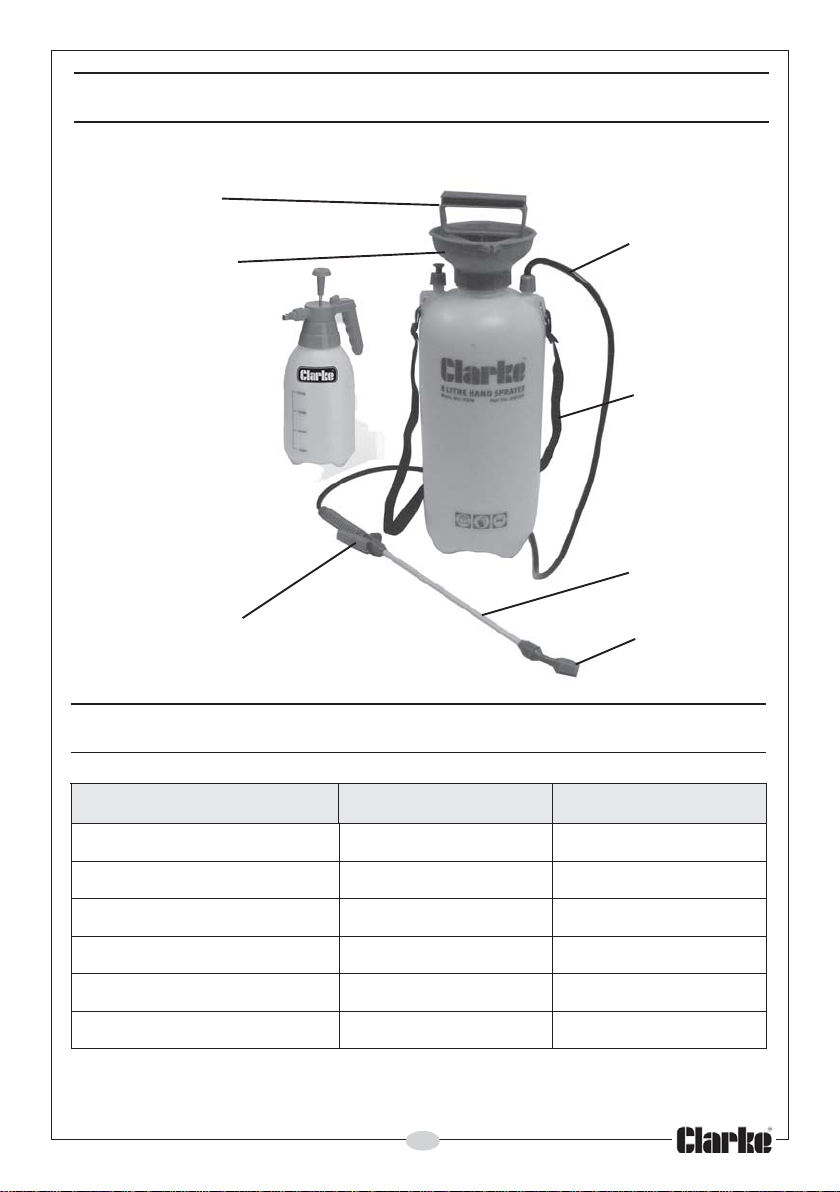
OVERVIEW
Pump Handle
Spray Hose
Pump Assembly
Shoulder Strap
Lance
Trigger Assembly Nozzle
SPECIFICATIONS
2PSH 8PSH
HxWxLsnoisnemiDmm513x531x571mm045x081x081
thgieWgk53.0gk03.1
emuloVL2L8
htgneLecnaLa/nmm073
htgneLesoHa/nmm521
p
metgnitarepO5-
Please note that the details and specifications contained herein, are correct at the
time of going to print. However, CLARKE International reserve the right to change
specifications at any time without prior notice.
O
O
04+-C
C5-
3
O
O
04+-C
C
Page 4
ASSEMBLY
HSP2
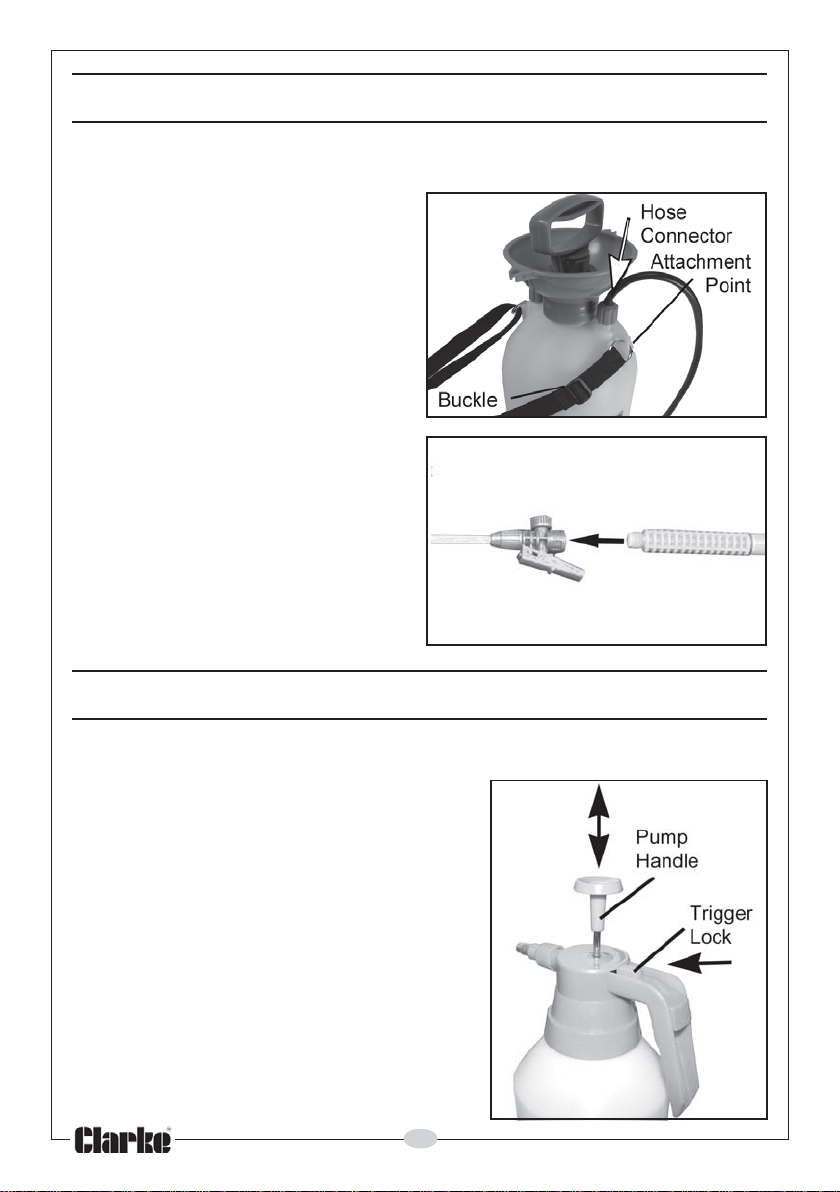
This model is fully assembled and
ready for use.
HSP8
1. If not already fitted, clip the
shoulder strap to the
attachment points. Adjust the
strap length as required using
the buckles.
2. Screw the hose/handle
assembly onto the trigger/lance
assembly.
• The other end of the hose
should already be connected to
the container.
OPERATION
HSP2
1. Unscrew and remove the container
from the pump assembly and fill with
the required liquid.
• Make sure the container is screwed
back on firmly.
2. Pressurise the container by holding the
pump handle and pumping briskly.
3. Squeeze the trigger to begin spraying.
When the spray weakens, pump the
handle to maintain container pressure.
4. With the trigger held, push the trigger
lock forward, under the lip of the pump
assembly to maintain a constant spray
without the need to hold the trigger.
4
Page 5
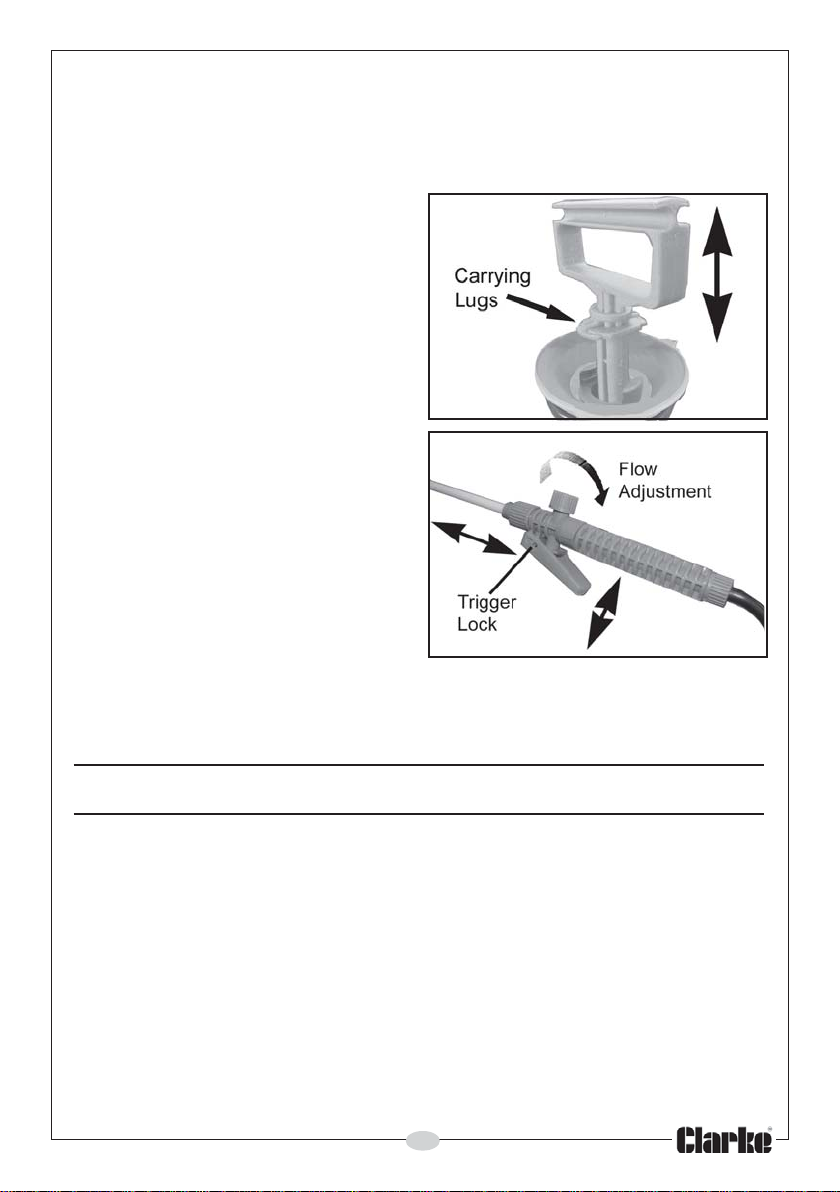
HSP8
1. Unscrew the pump assembly from the container.
2. Fill the container with the desired liquid and make sure the pump
assembly is screwed back on firmly.
3. Disengage the handle from the
carrying lugs of the pump body
by turning.
4. Pressurise the container by
pumping the handle on top of
the unit.
5. Squeeze the trigger to begin
spraying. When the spray
weakens, pump the handle to
maintain container pressure.
6. Push the trigger forward to lock
in position to maintain a
constant spray without needing
to hold the trigger. Slide the
trigger lock back to release.
7. Adjust the flow to the nozzle by
turning the knob on the trigger
body.
8. Adjust the width of the spray by
twisting the tip of the nozzle.
9. If leaks or poor delivery are experienced, always check the connections.
• The pump handle should be pushed downward and turned to
engage the carrying lugs in the cap when lifting the unit.
AFTER USE
After use, the sprayer should be flushed thoroughly with clean water to avoid
the possibility of blockages from product residue, or any crosscontamination between different products. Store in a cool place out of
reach of children.
If not used for long periods or used continuously for several days, add a light
smear of vaseline to the sealing washer and moving parts to reduce wear
and assist free movement.
5
Page 6
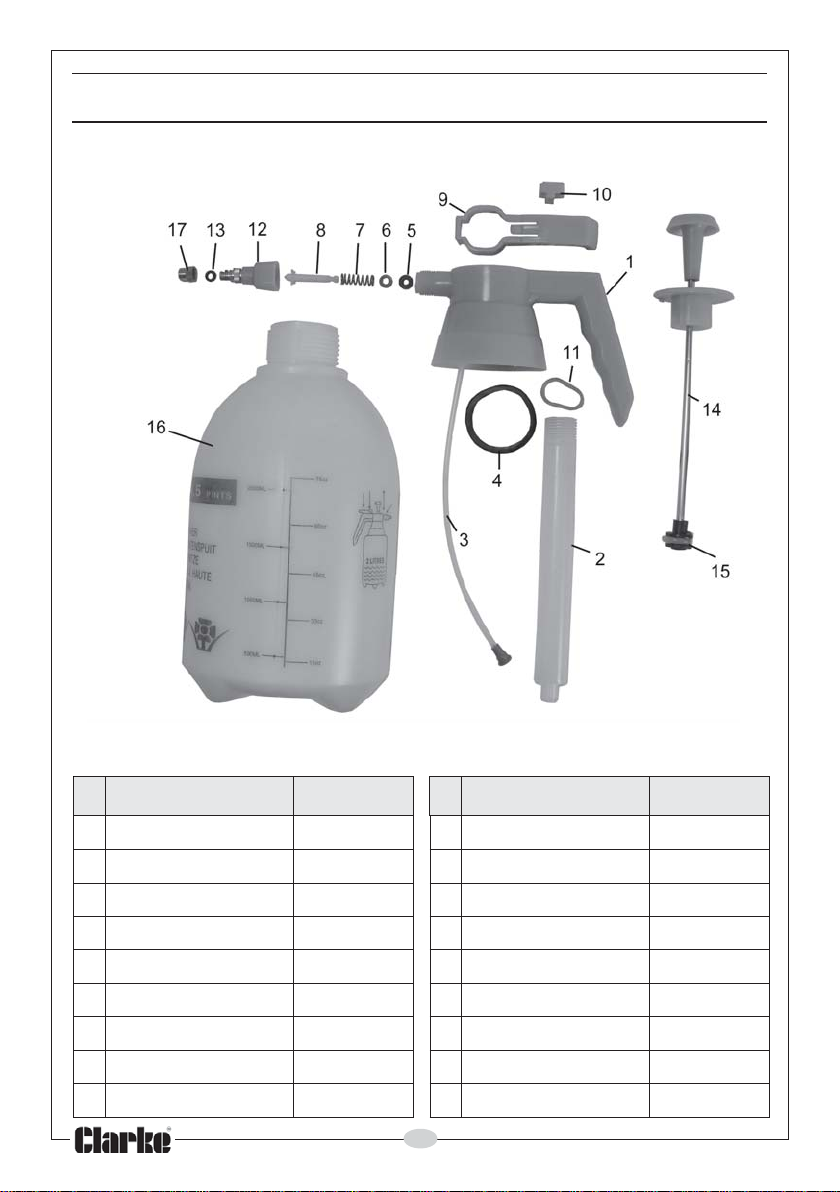
COMPONENT PARTS - HSP2
oN noitpircseD oNtraP oN noipircseD oNtraP
1eldnaH&diL102PSHHA01nottuBkcoLreggirT012PSHHA
2rednilyC202PSHHA11gniR-OrednilyC112PSHHA
3pukciPhtiwebuT302PS
4mm53gniR-O402PSHHA31gniR-OelzzoN312PSHHA
5teksaG502PSHHA41yssAregnulPpmuP412PSHHA
6taeS602
7gnirpS702PSHHA61reniatnoC612PSHHA
8regnulP802PSHHA71piTelzzoN712PSHHA
9reggirT902PSHHA
HHA21ylbmessAelzzoN212PSHHA
PSHHA51gnir-OregnulP512PSHHA
6
Page 7
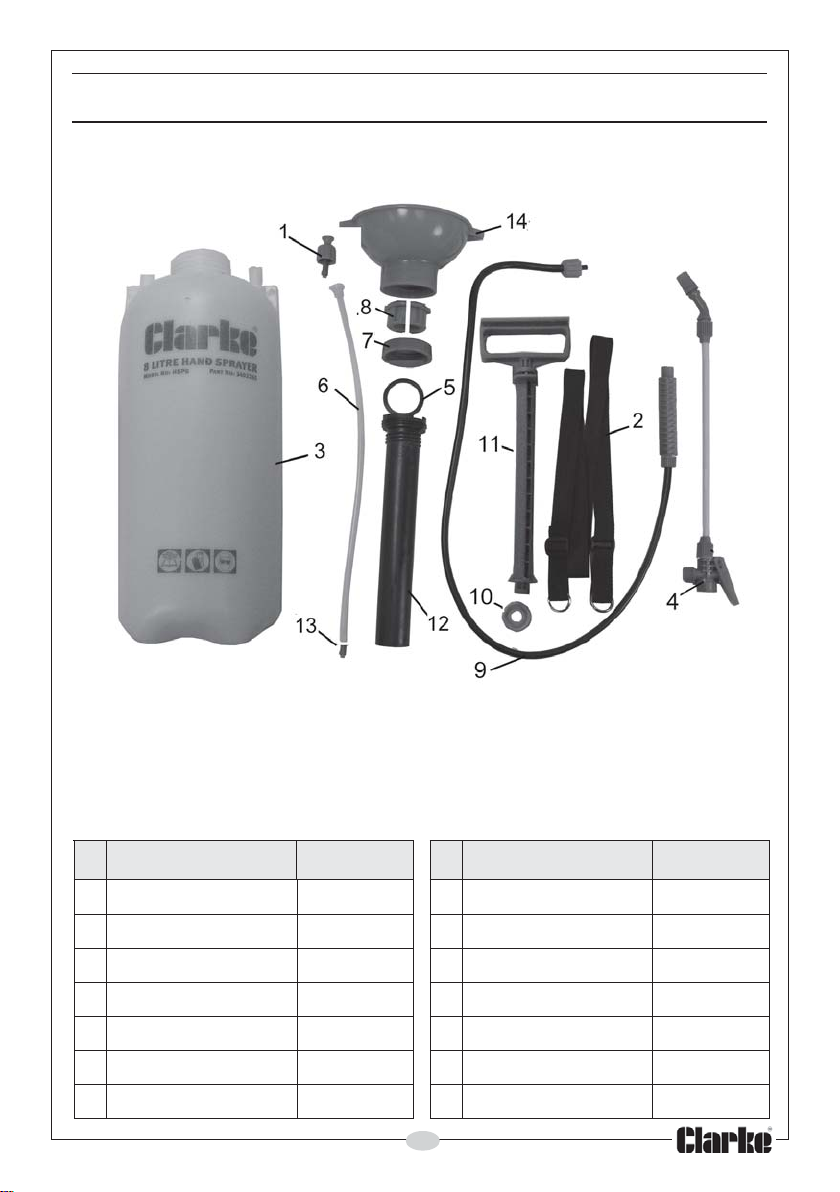
COMPONENT PARTS - HSP8
oN noitpircseD oNtraP oN noipircseD oNtraP
1evlaVfeileR108PSHHA8sgnittiFpoT908PSHHA
2partSredluohS208PSHHA9 ylbmessAesoHyarpS018PSHHA
3reniatnoC308PSHHA01l
4yssAreggirT&ecnaL408PSHHA11metS/eldnaHpmuP218PSHHA
5gniR-O508PSHHA21rednilyC318PSHHA
6ebuTpu-kciP608
7gniRgniniateR708PSHHA41paCpoT518PSHHA
PSHHA31retliFpiT418PSHHA
7
aeSpmuP118PSHHA
Page 8

 Loading...