

Page 1
HIGH-LIFT PALLET TRUCKS
Models; HLPT550 & HLPT685
Part Nos 7630180 & 7630185
OPERATING & MAINTENANCE
INSTRUCTIONS
GC12/11
Page 2

INTRODUCTION
Thank you for purchasing this CLARKE High Lift Pallet Truck. This truck is
designed to raise and lower awkward or heavy loads to an operating height
where they may be handled with relative ease, avoiding the risk of injury
which might otherwise occur if manhandling the load to the same height.
Before attempting to use the product, it is essential that you read this manual
thoroughly and carefully follow all instructions given. In doing so you will
ensure the safety of yourself and that of others around you, and you can also
look forward to the product giving you long and satisfactory service.
CONTENTS
1 x Pallet Truck Assembly
1 x Handle Assembly
1 x Fixings Kit (3 x Screws & 3 x Spring Washers)
1 x Owners Manual (this document)
GUARANTEE
This CLARKE product is guaranteed against faulty manufacture for a period of
12 months from the date of purchase. Please keep your receipt as proof of
purchase.
This guarantee is invalid if the product is found to have been abused or
tampered with in any way, or not used for its intended purpose.
Faulty goods should be returned to their place of purchase, no product can
be returned to us without prior permission.
This guarantee does not effect your statutory rights.
ENVIRONMENTAL PROTECTION
Do not dispose of this product or its packaging with general
household waste. All tools, accessories and packaging contain
valuable raw materials and should be sorted, taken to a recycling
centre and disposed of appropriately.
To avoid pollution due to leakage, the user should provide some absorbent
materials to capture any escape of oil during refilling of the hydraulic
mechanism. Such materials should then be disposed of appropriately.
2
Page 3
SAFETY PRECAUTIONS
1. Keep the work area tidy & well lit and keep children and bystanders away
from the work area.
2. Never carry out any alterations or modifications to the pallet truck.
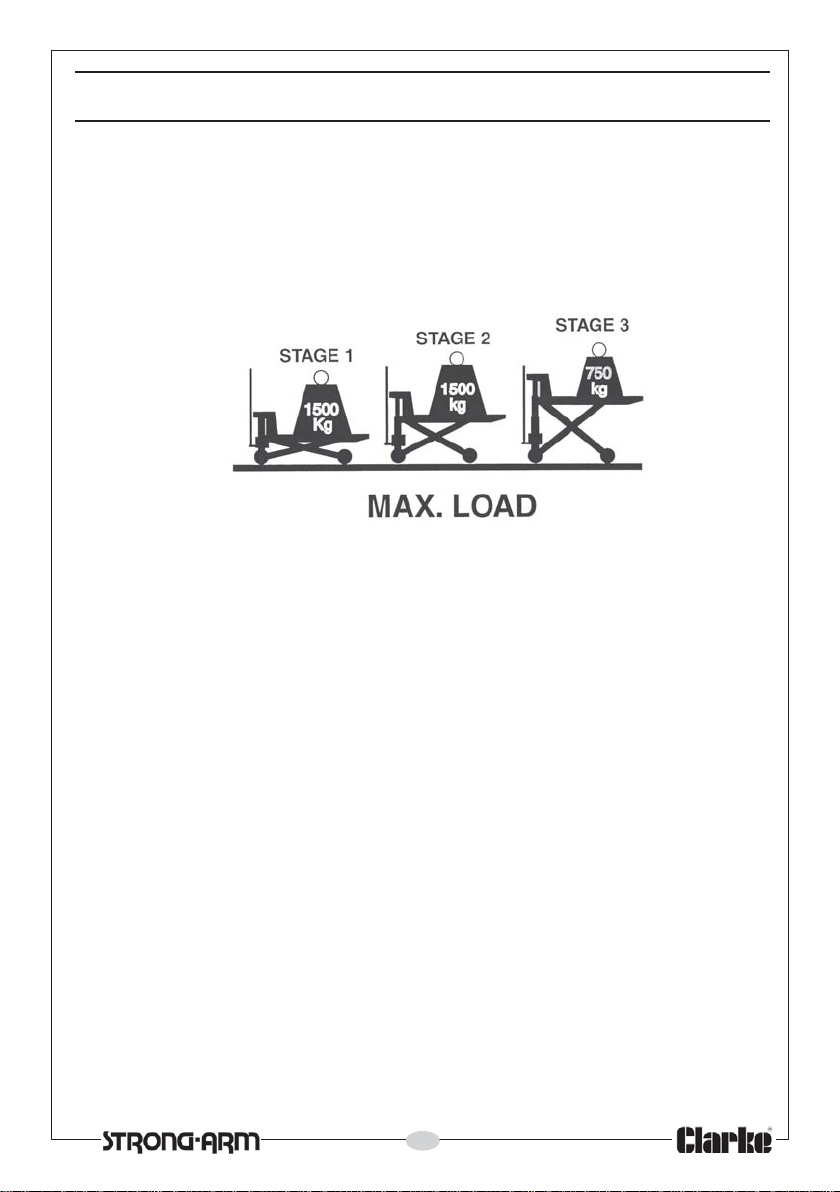
3. Do not exceed the stated capacity of the truck. Refer to the technical
specifications on page 6 and the labelling on the pallet truck.
Overloading may cause the truck to fail.
4. Load the truck evenly with the centre of gravity of the load over the
centre of the forks. Never stand on the forks.
5. Do not use on rough terrain. The pallet truck is designed for use on smooth
flooring only. Do not bounce the truck over rough ground, or down curbs
etc. Use ramps wherever possible.
6. Do not move unstable or loosely stacked loads. Use special care when
moving long, tall or wide loads or transporting a load which may impair
your view.
7. Never position any part of your body under the lifting mechanism or under
the forks. Do not transport passengers on the truck.
8. Do not operate a pallet truck until you have checked its condition, giving
special attention to the wheels, handle, forks and lift/lower controls.
9. Never use the pallet truck on a gradient if the load is too heavy to be
easily handled by the operator. The truck should not be used by operators
who are not physically capable of handling the loaded pallet truck.
10. Do not use if wheels or castors are damaged. Have them replaced
immediately.
11. When not in use, always ensure the truck is left where it is not hazard to
others. Never leave the truck on a gradient without first securely chocking
the wheels.
Please keep these instructions in a safe place for future reference.
3
Page 4
ASSEMBLY
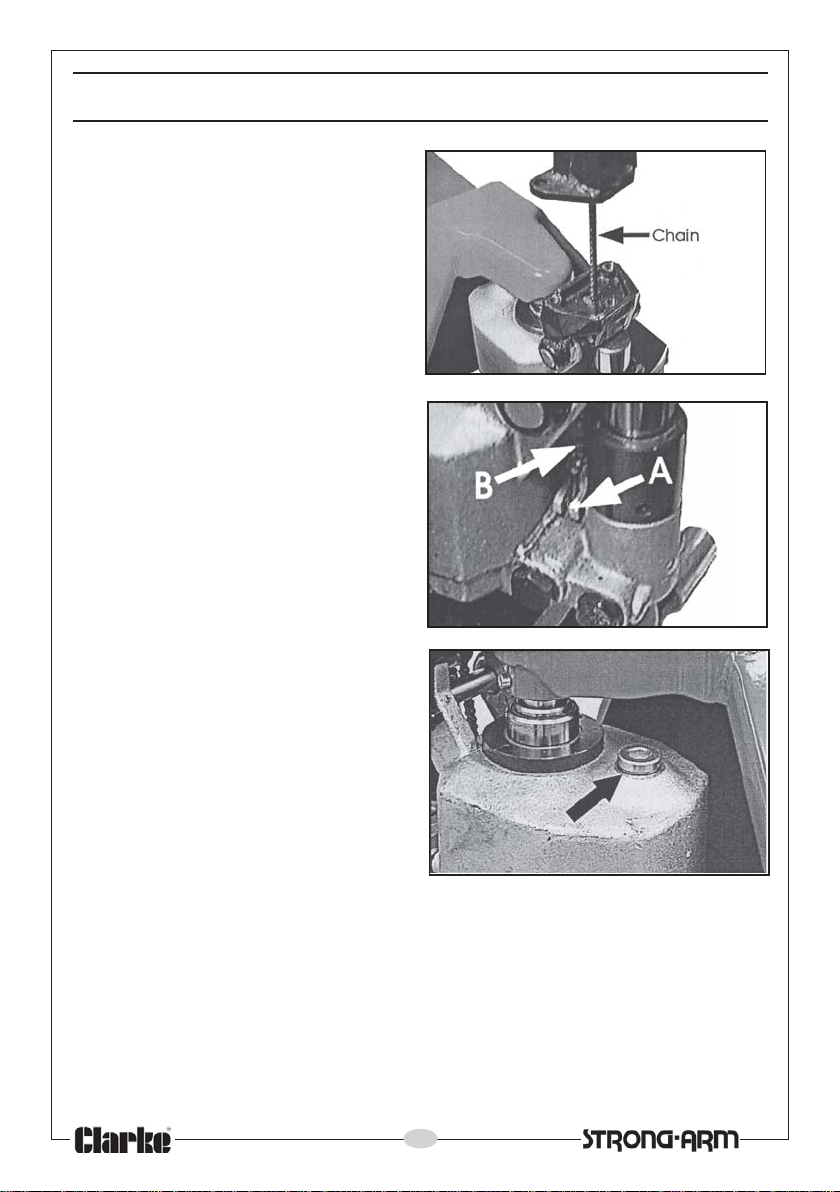
Attach the handle assembly as
follows:
1. Lower the chain through the hole
in the handle bracket, so that it
emerges at the bottom of the
housing as shown in Fig 1.
2. Secure the handle to the base
bracket with the three socketheaded screws and spring
washers provided.
3. Raise the end of the forked lever
shown at A (Fig 2), against the
spring pressure using a
screwdriver or similar, and slide
the threaded rod attached to the
end of the chain, between the
forks, so that the locknut, screwed
onto the threaded rod, locates
behind the claws on the
underside of the forks. Release
the forked lever.
4. Remove the travel plug from the
oil filler orifice and replace it with
the plug arrowed in Fig 3, which is
found in the loose polythene bag.
Your pallet truck is now fully
assembled. However, before use, it is
IMPORTANT to check the following
adjustments.
Fig. 1
Fig. 2
Fig. 3
4
Page 5
ADJUSTMENT
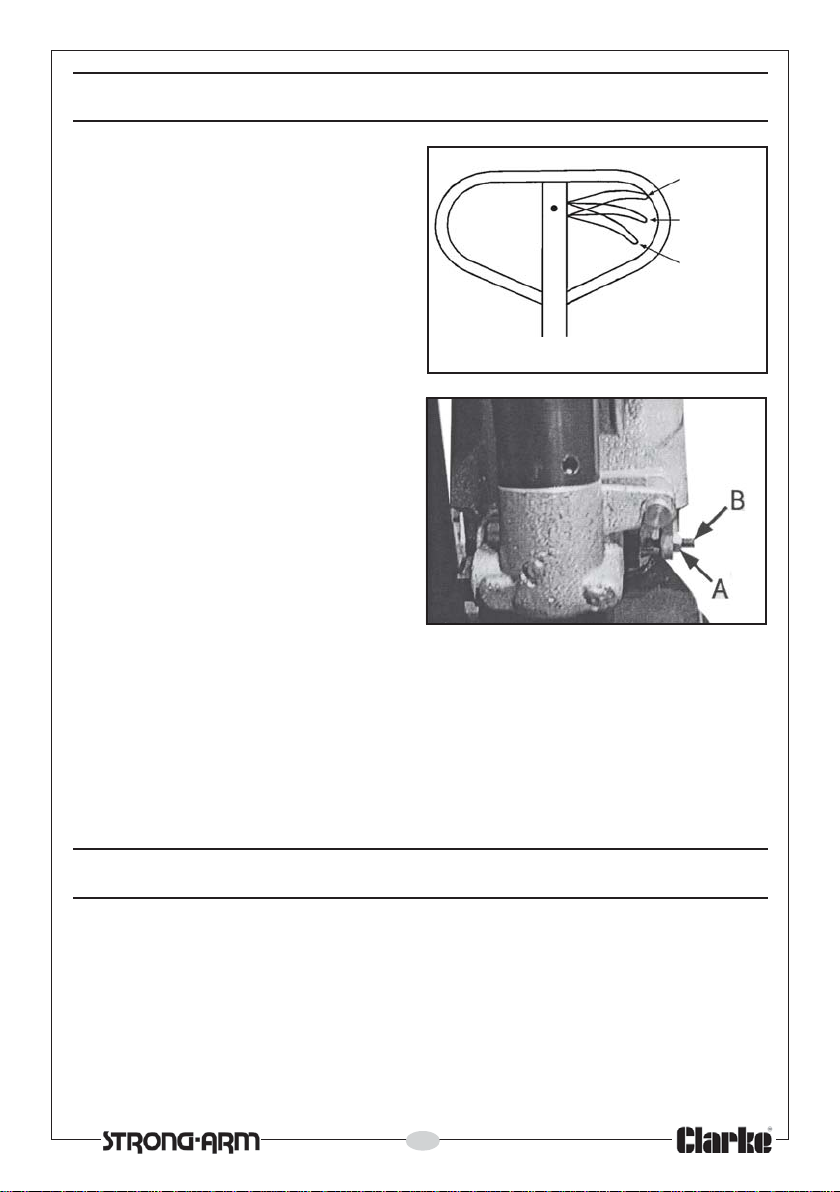
The control lever has three positions
shown in Fig 4 and indicated by the
label on the handle.
With the lever pulled to the upper
position, the forks will lower.
The middle position allows the load
to be transported.
The lower position will cause the forks
to lift when the handle is pumped.
1. Set the control lever to its lowest
position (i.e. Lever in its LIFT
position).
2. Check to ensure there is no
tension on the chain. If necessary,
adjust the locknut on the
threaded rod attached to the
end of the chain, until the free
movement on the end of the
control lever, when in its lowest
position, is approx 1/4”.
3. Pump the handle and then lower to test its operation.
4 If the forks rise but lower immediately you stop pumping or only lift slowly,
slacken the locknut ‘A’ and screw the adjuster ‘B’ anticlockwise half a turn
as shown in Fig 5 and try again.
5. If the forks do not lower when the control handle is in the LOWER
position, turn the adjusting screw (A) in clockwise until the handle lowers
the forks. Tighten locknut ‘B’. Check it’s operation in the TRANSPORT
position.
To Lower
Transport
position
To Lift
Fig. 4
Fig. 5
OPERATION
Before using the pallet truck always read the safety instructions in this manual
and the labelling on the product. The rated capacity of the truck assumes an
evenly distributed load with it’s centre being at the halfway point along the
length of the forks.
With the forks in the lowest position, manoeuvre the truck so that it is adjacent
to the pallet. Ensure the length of the forks match the length of the pallet.
Always position the pallet truck carefully, ensuring the load is centred about
5
Page 6
the forks and is completely stable. Ensure there is no obstruction before raising
the load, or that the load cannot foul the truck mechanism when raised.
Lower the forks to the lowest height when the truck is not being used.
When lowering the truck with the forks loaded, pull the control lever up
carefully and gradually so that the load descends under complete control.
MAINTENANCE
Whilst the pallet truck requires very little maintenance, the following care can
be expected.
DAILY CHECK
Before use, check that there are no foreign bodies such as threads or rag to
jam the wheels. Always leave the forks in the lowered position when work is
over for the day.
CHECKING THE OIL
Check the oil level every six months by topping up if necessary at the filler
plug. The recommended type is L-HV46 Hydraulic oil, provided the truck is not
to be used outside the temperature range of -20°C to +40°C.
BLEEDING AIR FROM THE PUMP UNIT
If the pallet truck has to be transported over any distance or been
overturned at any time, air may have permeated the hydraulic oil. This will
make it impossible to raise the forks under any load when pumping.
To bleed off the air, move the control handle to the lower position, then move
the handle up and down several times.
SPECIFICATIONS
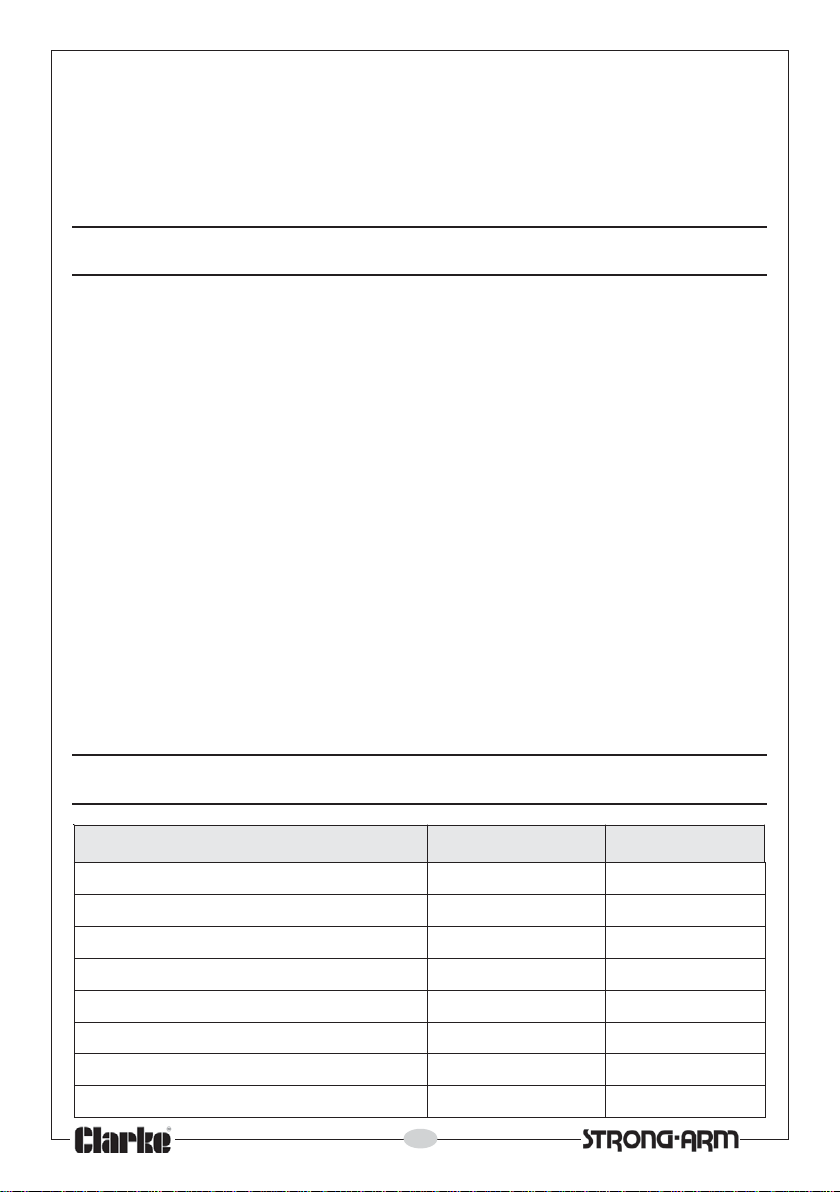
erutaeF 055TPLH 586TPLH
yticapacmumixaMgk0051gk0051
thgieWgk001gk011
skroffoedistuoothtdiWmm055mm586
htgnelkroFmm0511mm0511
roFmm061mm061
htdiwk
skrofneewtebpaGmm032mm563
snoitpoyrtnE42
)nim/xam(thgiehgnitfiLmm028-58mm028-58
6
Page 7

TROUBLESHOOTING
melborP esuaC noitcA
otesiartonnacskroF
.thgiehmumixameht
.esiartonlliwskroF.lioci
ebtonnacskroF
.d
erewol
sahkroF
.rucco
niton
.gnikaelsimsinahceM.slaesdegamadronraWwenhtiwecalper&lua
ehttubesiarskrofehT
.krow
tonlliwevlavesaeler
luardyhfokcaL
itneserpriA
esolcgnikcol
.d
.stnenopmoc
.detanimatnocsiliO
.thgitootsiwercseht
.lioehtn
.edisenootgninael
.liociluardyhtneiciffusnI.liohtiwpupoT
eudneposievlavgnipmuP
rohgihootgniebtunehtot
siydobpmuprodornotsiP
nevenuoteuddegamad
rognidaolrevo,gnidaol
noitisophgihnineeb
noisorrocrofhguonegnolrof
otnotsipdesopxeehtfo
siwercsehtrotungnitsujdA
.noitisoptcerroceht
silioehtfonoitanimatnoC
morfevlavehtgnitneverp
ehtforaewrognikcarC
.lioehtpupoT
.lioehtegnahC
.wercsehtrotunehttsujdA
.riaehtllepsidotlioehtdeelB
.ydobpmup
nitonsi
hrevO
.strap
.lioehtweneR
ehtrodornoitsipecalpeR
ehtniskrofehtpeeksyawlA
kcurtehtnehwnoitisoptsewol
ehtetacirbuL.esu
.liohtiwdornotsip
.wercsehtrotunehttsujdA
&raewrofstraptcepsnI
.yrassecensaecalper
.lioehtnitneserpriA
.degamadronrowslaesliO
tsujdA
For parts & servicing, please contact your nearest dealer, or
CLARKE International, on one of the following numbers.
siwercsehtrotungni
.noitisoptcerrocehtniton
deelB
.slaes
.wercsro
PARTS & SERVICE TEL: 020 8988 7400
PARTS & SERVICE FAX: 020 8558 3622
or e-mail as follows:
PARTS: [email protected]
SERVICE: [email protected]
7
.riaehtlepxeotmetsys
degamadronrowecalpeR
tunfonoitisopehttsujdA
Page 8
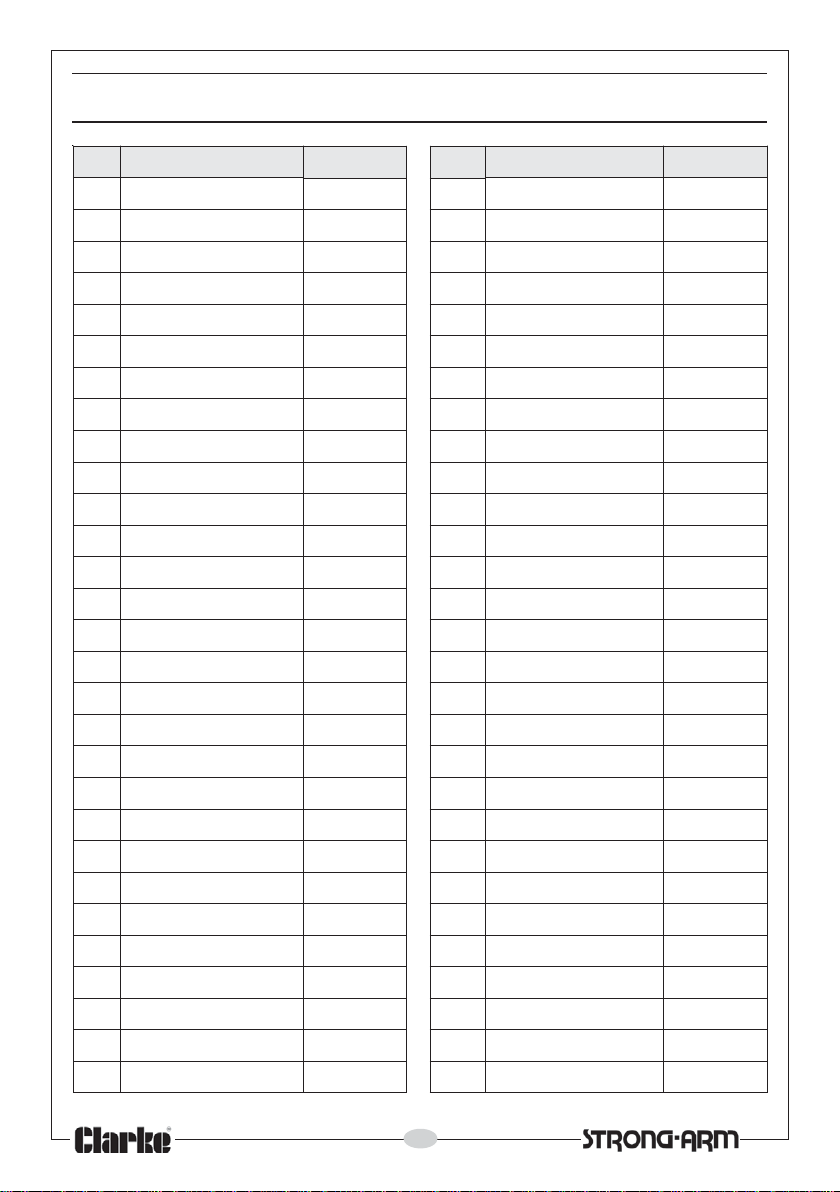
PARTS LIST & DIAGRAM - PUMP
feR noitpircseD oNtraP feR noitpircseD oNtraP
1
2gniR-O20055JZ13eldnipSevlaV13055JZ
3rednilyC55JZ30023gnirpS23055JZ
4gniR-O40055J
5wercS50055JZ43wercS43055JZ
6rehsaW60055JZ53llaBleetS53055JZ
7regnulP70055JZ63gnirpS63055JZ
8gniR-O80055JZ73gn
9llerdnaM90055JZ83niP83055JZ
01gnirpS01055JZ93gniraeBa93055JZ
11regnulP11055JZ04esaBgnitroppuS04055JZ
21gnir-O2
31tfahS31055JZ24tloB24055JZ
41emarFerusserP41055JZ34tuN34055JZ
51niP51055JZ44leehW44055JZ
61hsuB6
71relloR71055JZ64recapSflaH64055JZ
81niP81055JZ74rehsaW74055JZ
91hsuB91055JZ84pilcriC84055JZ
02tfahS02
12niP12055JZ05gniR-O05055JZ
22wercS22055JZ15eveelSevlaV15055JZ
32rehsaW32055JZ25gniR-O25055JZ
S42055JZ35niPrekirtS35055JZ
42werc
52gnirpS52055JZ45gnirpS45055JZ
62taeSgnirpS62055JZ55wercSgnitsujdA55055JZ
72llaBleetS72055JZ6
82llaBleetS82055JZ75etalPreveL75055JZ
92taeSevlaV92055JZ85esaB85055JZ
gniRtsuD10055JZ03taeSevlaV55JZ030
Z33rehsaW33055JZ
irpS73055JZ
1055JZ14gnisuoHleehW14055JZ
1055JZ54gniraeB54055JZ
055JZ94revoCtsuD94055JZ
5tuN65055JZ
8
Page 9
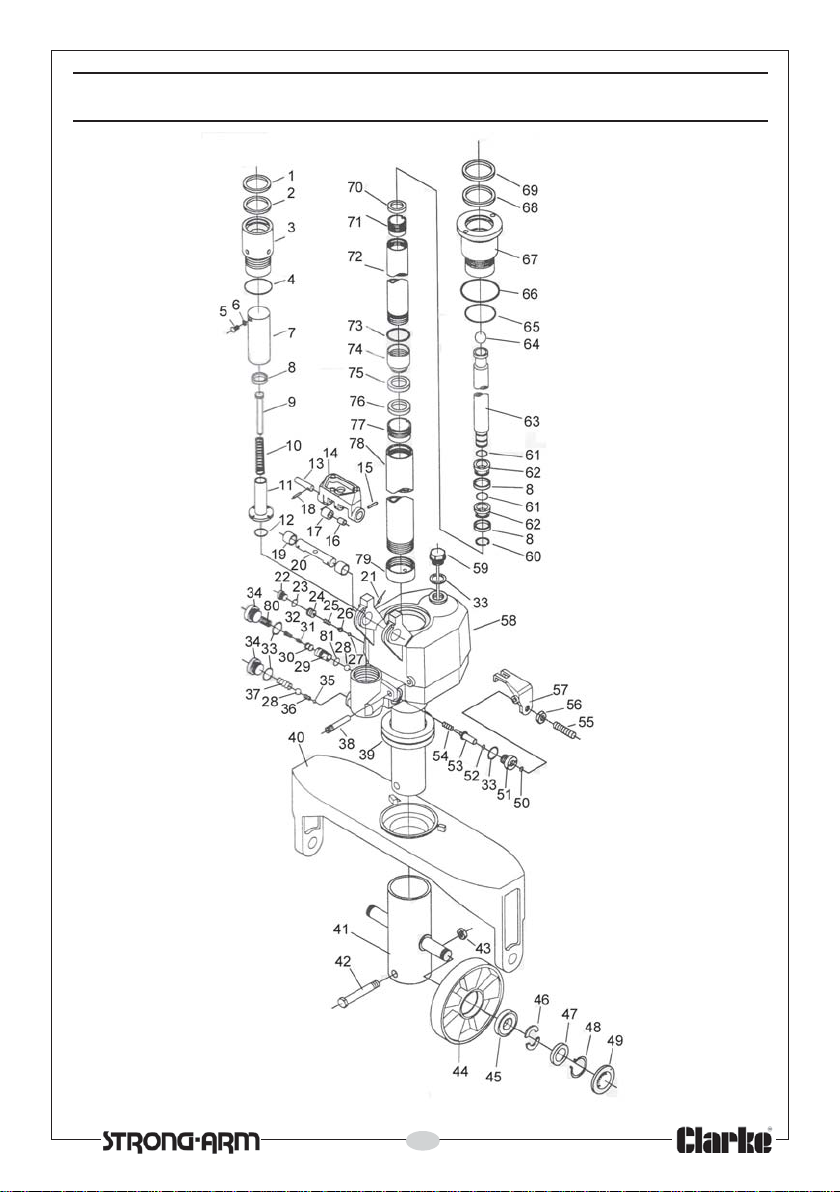
PARTS LIST & DIAGRAM - PUMP
9
Page 10
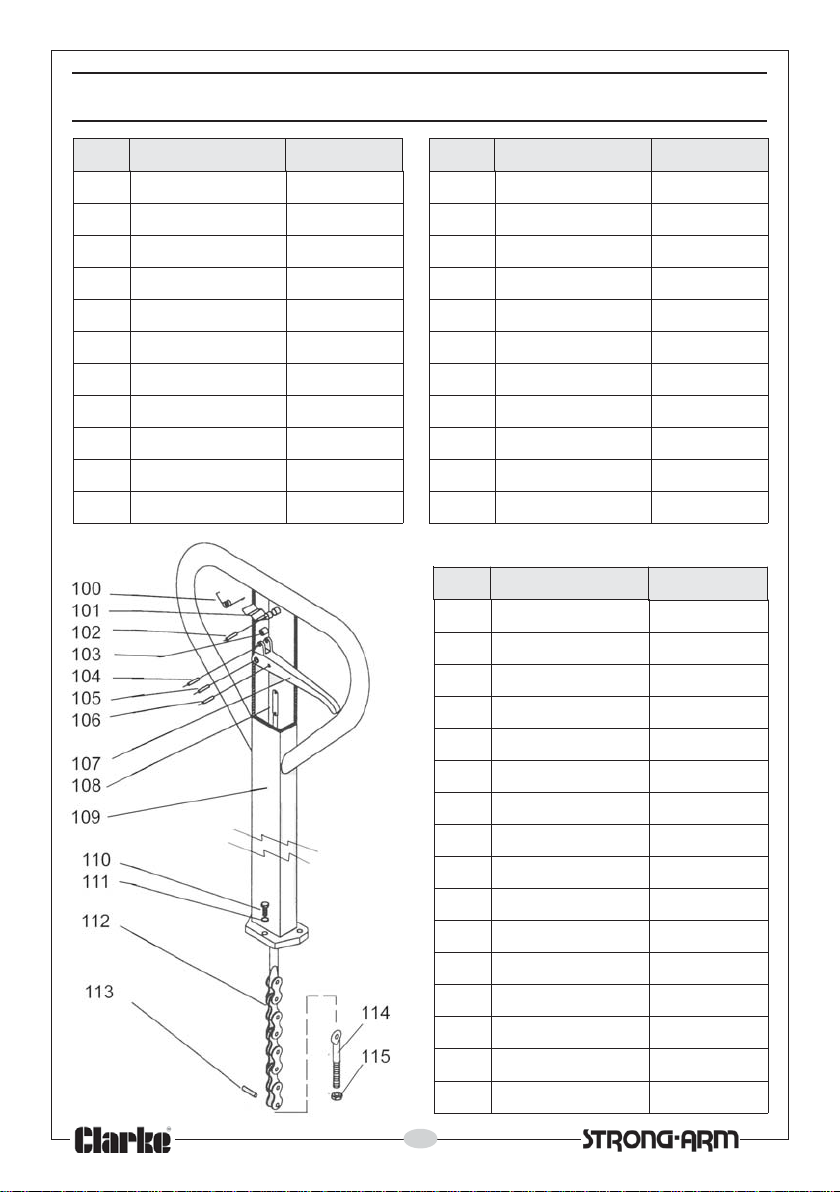
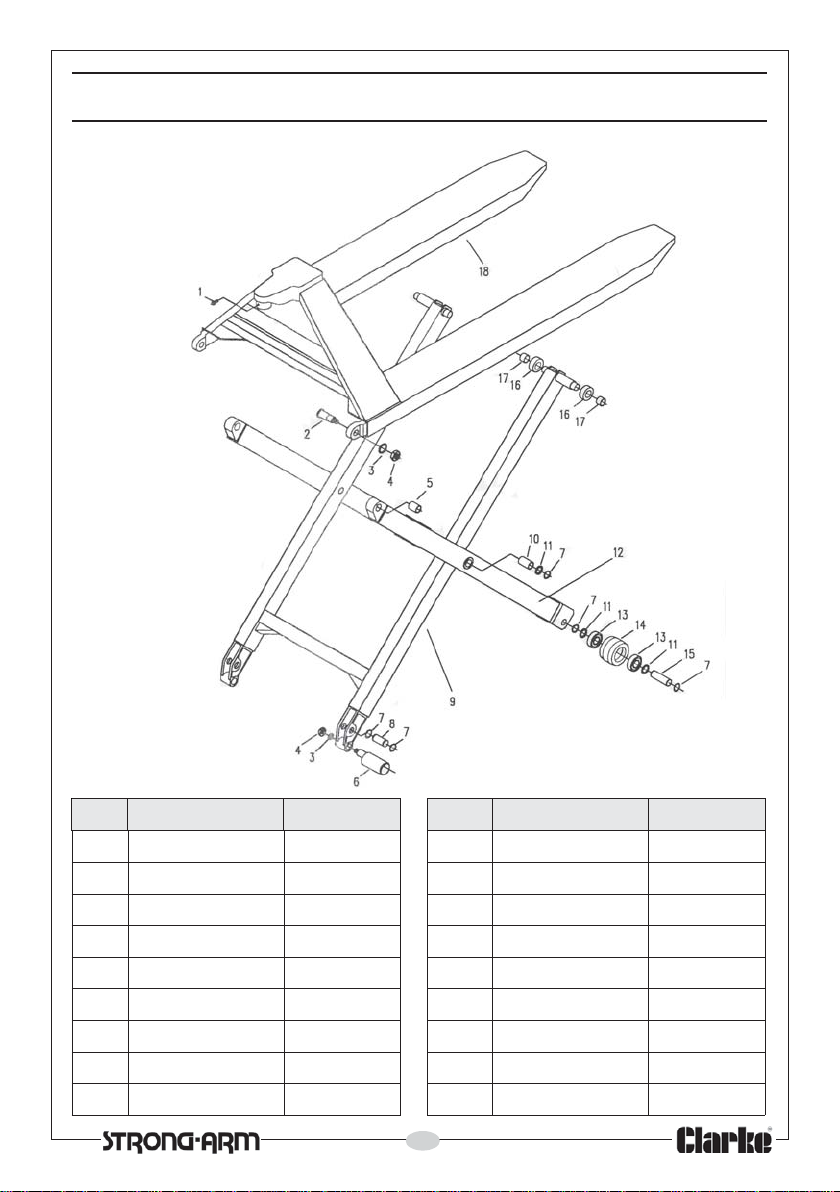
PARTS LIST & DIAGRAM - FORK FRAME
oN noitpircseD feRtraP feR noitpircseD
95
06
16
26hsuB2605
36
46llableetS46055JZ57laeS
56gniR-O56055JZ67gniRtsuD
66gn
76reniLrednilyC76055JZ87ebuTrednilyC
86gniRgnilaeS86055JZ97paCdnE
96gniRtsuD96
paCrelliFliO95055JZ07gniRtsuD07055JZ
pilcriC06055JZ17hsuB17055JZ
rehsaW16055JZ27rednilyC27055JZ
5JZ37gniR-O
doRnotsiP36055JZ47hsuB47055JZ
iR-O66055JZ77gulP
055JZ08tresnI
oN noitpircseD feRtraP
001
101edalBgnirpS101055JZ
201relloR201055JZ
301niPlloR301055JZ
401niPlloR401055JZ
501niPlloR501
601niPlloR601055JZ
701eldnaHlortnoC701055JZ
801doRlluP801055JZ
901nmuloCeldnaH901055JZ
011wercS
111rehs
211niahC
311niPgniruceS
411wercSgnitsujdA
511tuN
gnirpS001055JZ
aWkcoL
oNtraP
37055JZ
57055JZ
67055JZ
77055JZ
87055JZ
97055JZ
08055JZ
055JZ
011055JZ
111055JZ
211055JZ
311055JZ
411055JZ
511055JZ
10
Page 11
DECLARATION OF CONFORMITY
oN noitpircseD feRtraP feR noitpircseD
1
2tloB18055JZ11rehsaW
3rehsaW
4tuN
5
6
7pilcriC
8
9mrAporP
wercS08055JZ01hsuB98055JZ
28055JZ
38055JZ
hsuB
tooF
niP
48055JZ
58055JZ
68055JZ
78055JZ
88055JZ
21mrAtroppuS
31gniraeB
41leehW
51eldnipS
61relloR
71hsu
B
81emarFkroF
11
oNtraP
09055JZ
19055JZ
9055JZ
2
39055JZ
49055JZ
59055JZ
69055JZ
79055JZ
Page 12
 Loading...