

Page 1
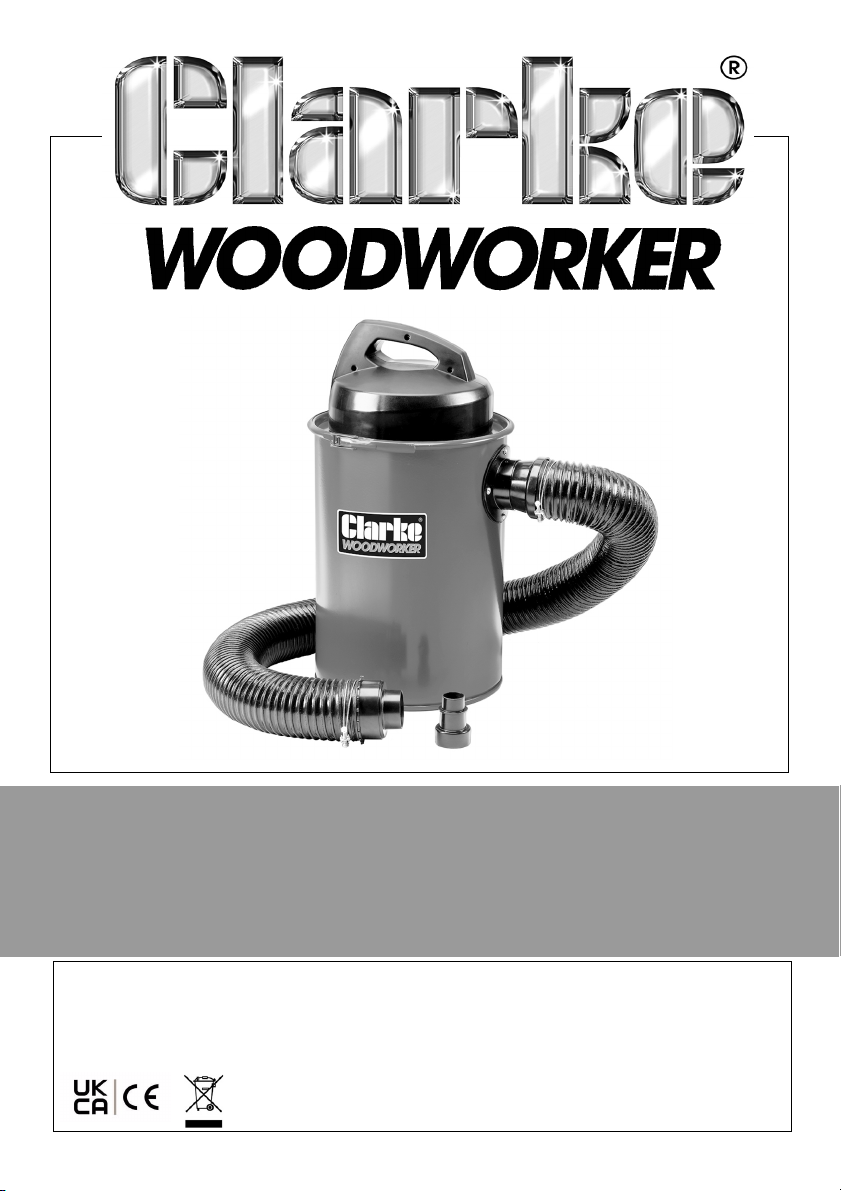
VACUUM EXTRACTOR
MODEL NO: CWVE2
PART NO: 6471169
OPERATING & MAINTENANCE
INSTRUCTIONS
ORIGINAL INSTRUCTIONS GC08/22
Page 2
INTRODUCTION
Thank you for purchasing this CLARKE Workshop Vacuum Dust Extractor.
Before attempting to use this product, please read this manual thoroughly and
follow the instructions carefully. In doing so you will ensure the safety of yourself
and that of others around you, and you can look forward to your purchase
giving you long and satisfactory service.
PRODUCT SPECIFICATIONS
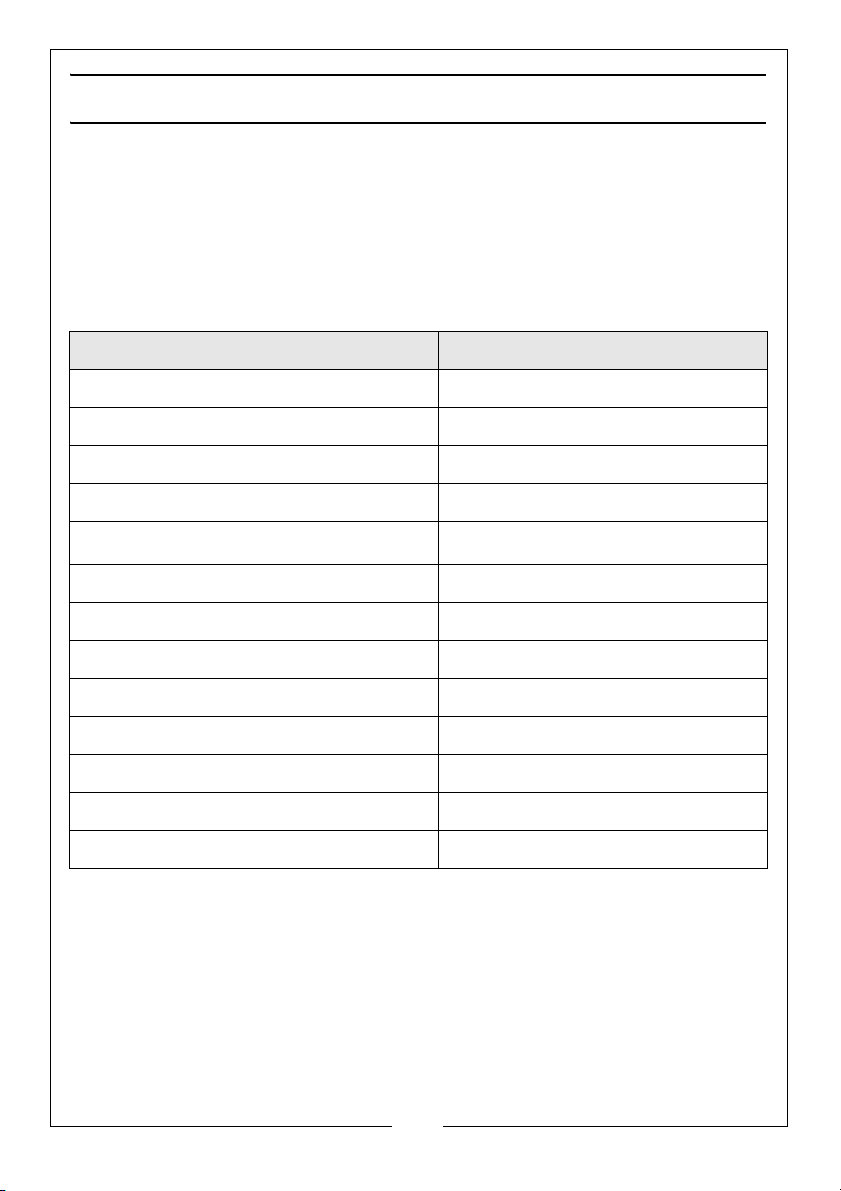
Model Number CWVE2
Dimensions (Length x Width x Height) 390 x 375 x 680 mm
Weight 9.5 kg (empty)
Container Capacity 50 Litres
Hose Length/Dia 2000 (extended) / Dia =100 mm
Airflow
Duty Cycle S1 (continuous)
Input Power 1100W
Motor Speed 2000 rpm
Power Supply 230V @ 50Hz 1ph
Ingress Protection Rating IPX0
Sound Power Level 98.2 LWA dB(A)
Sound Pressure Level 83.4 LWA dB(A)
Uncertainty Factor 3 dB(A)
183 m3/hr
2
Parts & Service: 020 8988 7400 / E-mail: [email protected] or [email protected]
Page 3

GENERAL SAFETY PRECAUTIONS
WORK AREA AND PERSONAL SAFETY
1. Avoid operating in the presence of flammable liquids or gases. The motor
may produce sparks during operation. DO NOT use in enclosed areas
where flammable, explosive or toxic vapours are given off.
2. ALWAYS stay alert, watch what you are doing and use common sense
when operating the dust extractor. DO NOT use while you are tired or
under the influence of medication, drugs or alcohol. Lack of attention can
result in personal injury.
3. NEVER over-reach. Keep your proper footing and balance at all times to
enable better control of the dust extractor in unexpected situations.
4. NEVER use a power product if any part is damaged. Have it inspected and
repaired by your CLARKE dealer. DO NOT use if the electric cable, plug, or
the machine itself, is in poor condition.
5. DO NOT insert fingers or other objects into the inlet opening.
6. ALWAYS wear eye and ear protection when using the dust extractor.
GENERAL PRODUCT USE AND CARE
1. Prior to use, all users should become familiar with the warnings in this
instruction manual.
2. ALWAYS maintain the dust extractor with care and keep it clean for best/
safest performance.
3. NEVER abuse the power cable. NEVER pull on the cable when removing
the plug from the socket or lift the extractor by the power cable. Take care
not to close doors on the cable or allow it to become snagged under
objects with sharp edges. Keep away from heat or oil.
4. Only use extension leads that are of an appropriate power rating and
suitable for the work environment. Extension leads must have an earth
connection. Inspect the extension lead regularly and replace if damaged.
5. NEVER abuse the dust extractor by standing on it.
6. ALWAYS store out of reach of children.
7. Only use parts and accessories recommended in this manual. The use of
unauthorised accessories or attachments is not permitted and may result in
personal injury or damage to the dust extractor.
8. DO NOT attempt to repair or modify this product or attempt any electrical
repair yourself. Consult a qualified electrician or the CLARKE Service
Department on 020 8988 7400.
3
Parts & Service: 020 8988 7400 / E-mail: [email protected] or [email protected]
Page 4
DUST EXTRACTOR SPECIFIC SAFETY INSTRUCTIONS
1. This product is for indoor use only.
2. This dust extractor is for collecting wood chips, shavings and dust particles
only. DO NOT use with hazardous substances i.e. MDF dust.
3. ALWAYS ensure that the dust extractor is properly positioned where
necessary to prevent it from moving during use and that the immediate
area is kept clear.
4. ALWAYS use a face or dust mask if operation is particularly dusty including
when disposing of the contents.
5. ALWAYS disconnect the dust extractor from the power supply before
servicing or removing & emptying the filter bag etc.
6. NEVER leave the dust extractor running unattended. Turn power off and
wait for the machine to stop before leaving.
7. DO NOT use in enclosed areas where flammable, explosive or toxic vapours
are given off, by oil based paints, paint thinner, petrol etc.
8. NEVER pick up flammable or readily combustible material, including
burning cigarettes or other smoking substances.
9. NEVER attempt to pick up liquids with this vacuum extractor.
10. ALWAYS use in an upright position. ALWAYS transport using the handle.
11. ALWAYS take care when a long hose is required in the work area as it
presents a trip hazard. Tidy the hose away when the job is finished.
12. DO NOT use without the inlet hose attached and ensure the cover is
securely in place when in operation.
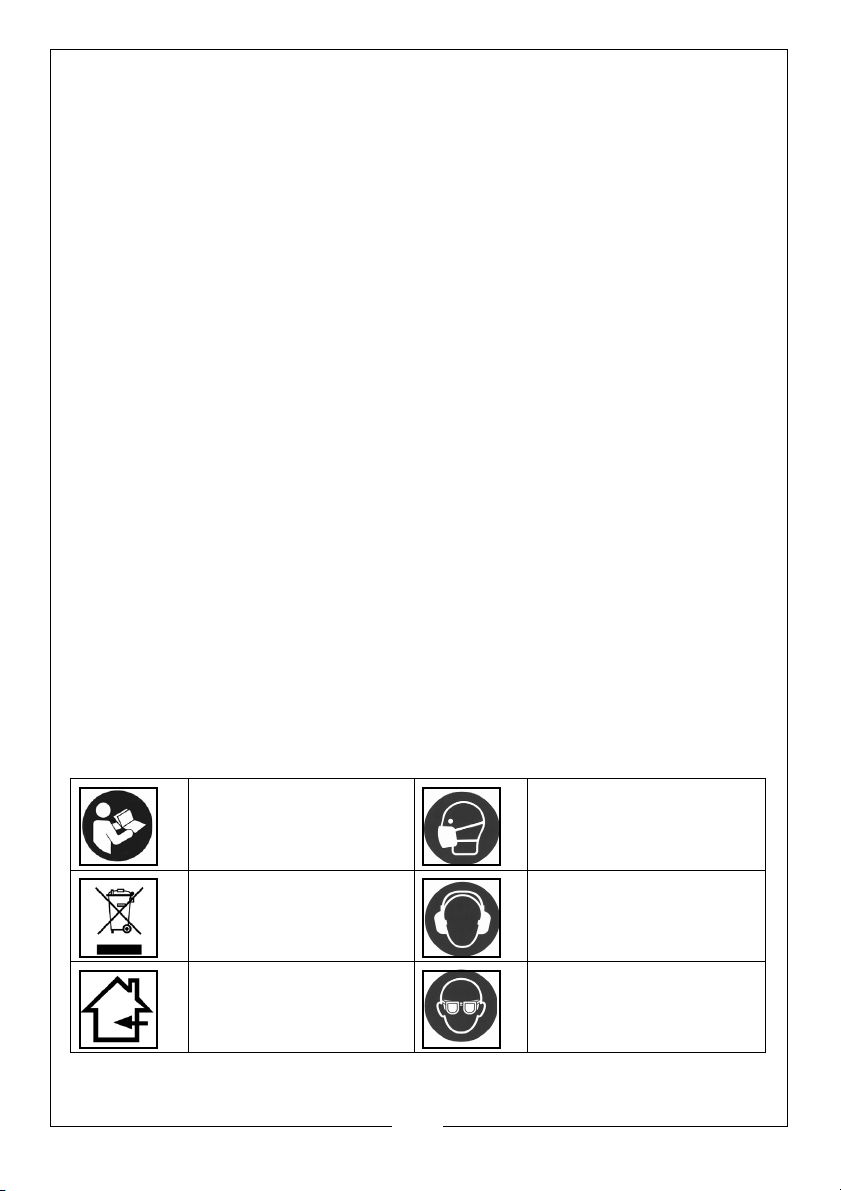
SAFETY SYMBOLS
Read instruction
manual before use
Falls under the Weee
Directive as described
on page 10.
Indoor use only Wear safety glasses
The above safety symbols appear on the product.
4
Parts & Service: 020 8988 7400 / E-mail: [email protected] or [email protected]
Wear dust mask
Wear ear defenders
Page 5
ELECTRICAL CONNECTIONS
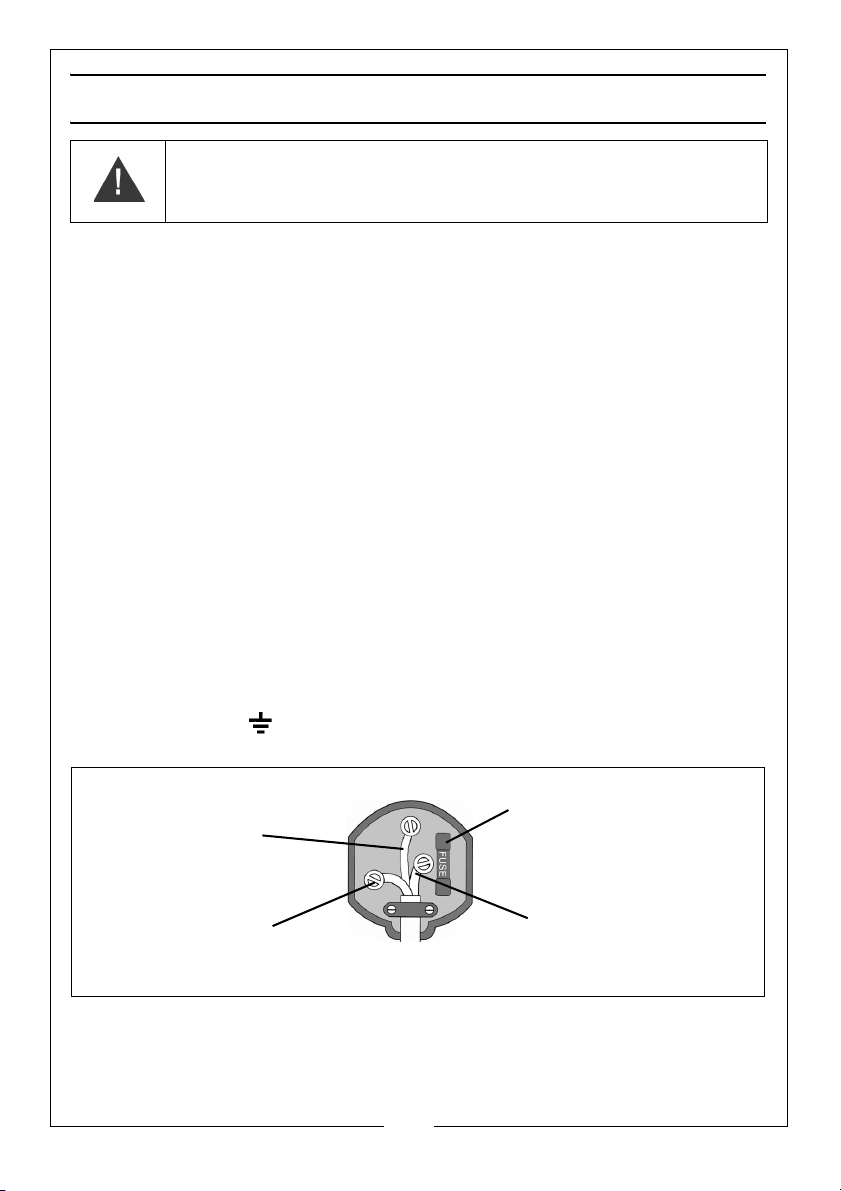
Plug must be BS1363/A approved.
Always fit a 10 Amp fuse.
Ensure that the outer sheath of the cable is firmly held by the clamp
Neutral
(Blue)
Live
(Brown)
Earth
(Green and Yellow)
WARNING! READ THESE ELECTRICAL SAFETY INSTRUCTIONS
THOROUGHLY BEFORE CONNECTING THE PRODUCT TO THE
MAINS SUPPLY.
Before switching the product on, make sure that the voltage of your electricity
supply is the same as that indicated on the rating plate. This product is
designed to operate on 230VAC 50Hz. Connecting it to any other power
source may cause damage.
This product may be fitted with a non-rewireable plug. If it is necessary to
change the fuse in the plug, the fuse cover must be refitted. If the fuse cover
becomes lost or damaged, the plug must not be used until a suitable
replacement is obtained.
If the plug has to be changed because it is not suitable for your socket, or due
to damage, it should be cut off and a replacement fitted, following the wiring
instructions shown below. The old plug must be disposed of safely, as insertion
into a mains socket could cause an electrical hazard.
If the colours of the wires in the power cable of this product do not correspond
with the markings on the terminals of your plug, proceed as follows.
•The Blue wire must be connected to the terminal marked N or
coloured black.
• The Brown wire must be connected to the terminal marked L. or
coloured red
•The Yellow and Green wire must be connected to the terminal
marked E or or coloured Green.
.
We strongly recommend that this machine is connected to the mains supply
via a Residual Current Device (RCD). If in any doubt, consult a qualified
electrician. DO NOT attempt any repairs yourself.
Parts & Service: 020 8988 7400 / E-mail: [email protected] or [email protected]
5
Page 6
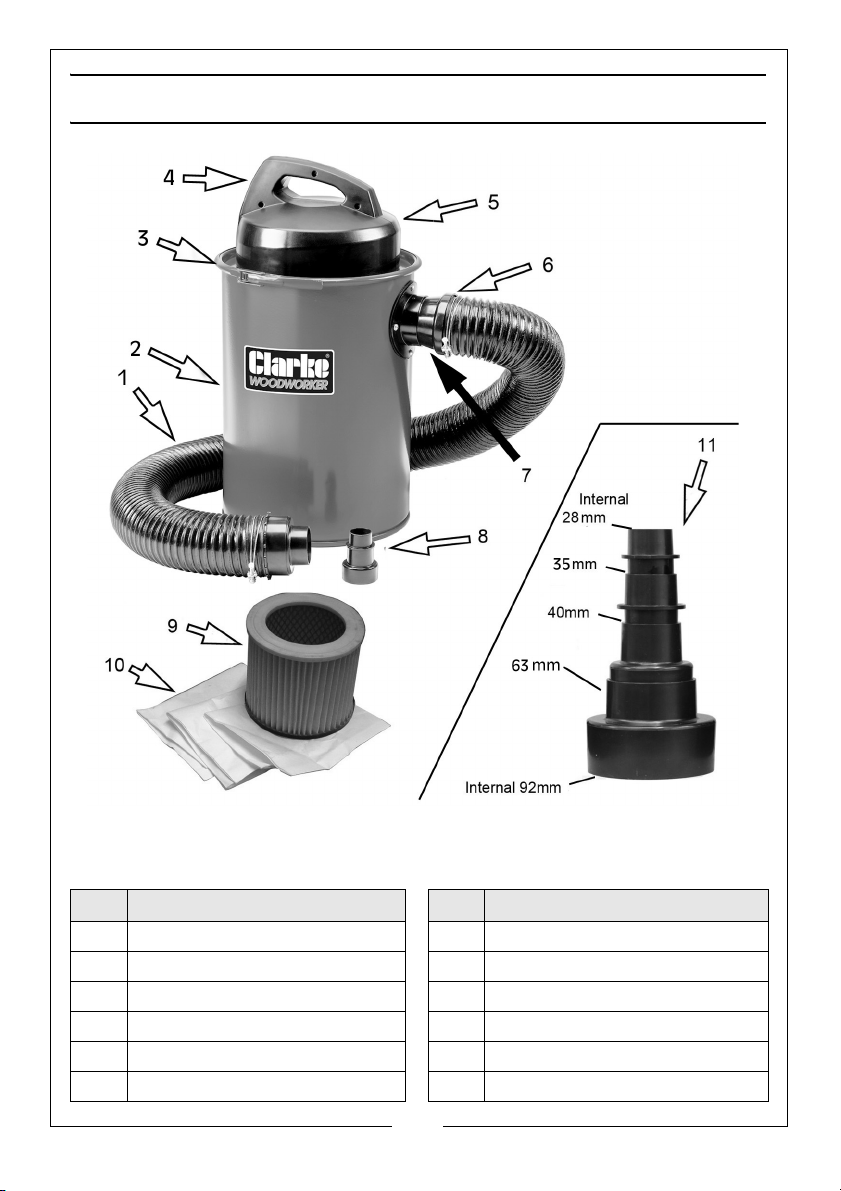
COMPONENTS
When unpacking please check contents and advise your dealer immediately
if any parts are missing. The essential components are as follows;
Pos Description Pos Description
1 Inlet Hose 7 Tapered Hose Connector
2 Dust Container 8 Straight Hose Connector
3 Retaining Band 9 Filter Cartridge
4 On/OFF Switch 10 Filter Bags
5 Motor Housing 11 Hose Adaptor Set (dims shown)
6Hose Clamps (x2)
6
Parts & Service: 020 8988 7400 / E-mail: [email protected] or [email protected]
Page 7
ASSEMBLY
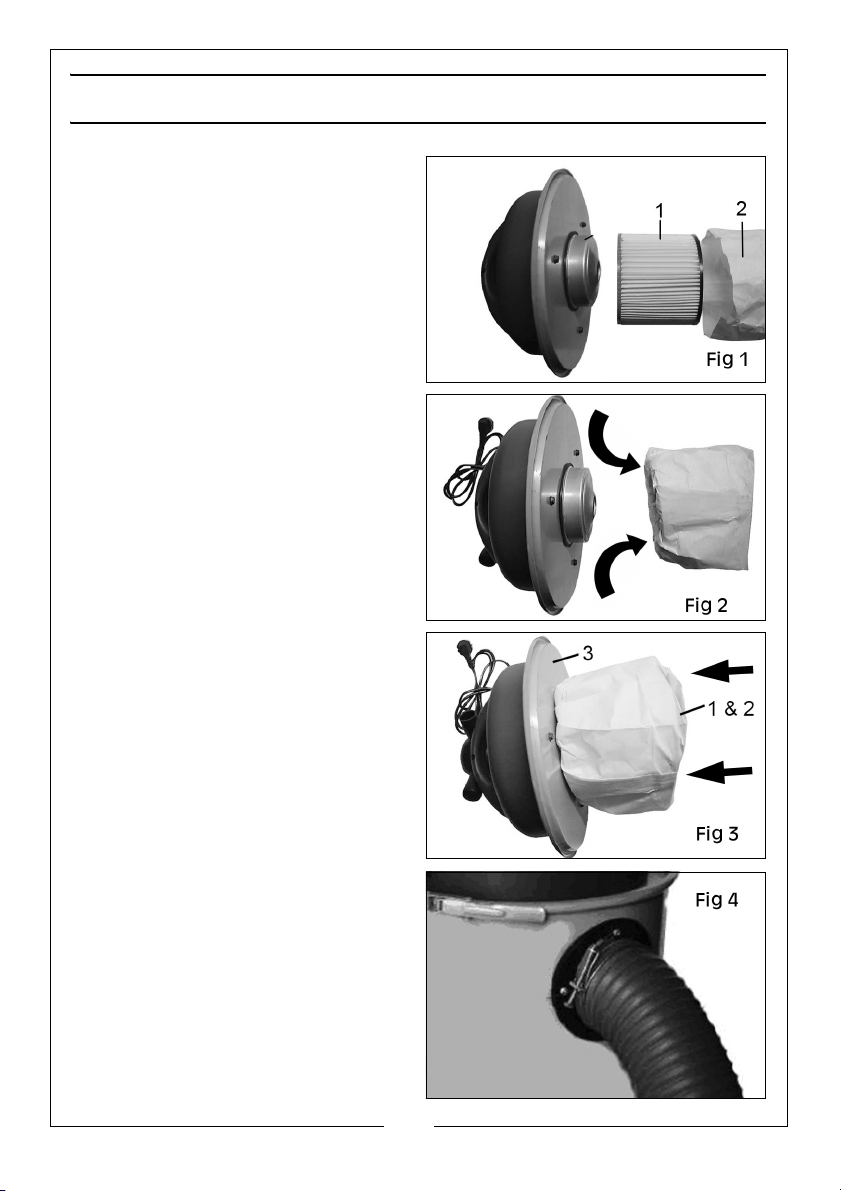
1. Place filter cartridge (1) into a filter
bag (2) as in Fig 1.
2. Fold any overhang into the filter
cartridge.
3. Push the filter cartridge (1)
complete with bag (2), onto the
fan housing part of the motor
casing (3).
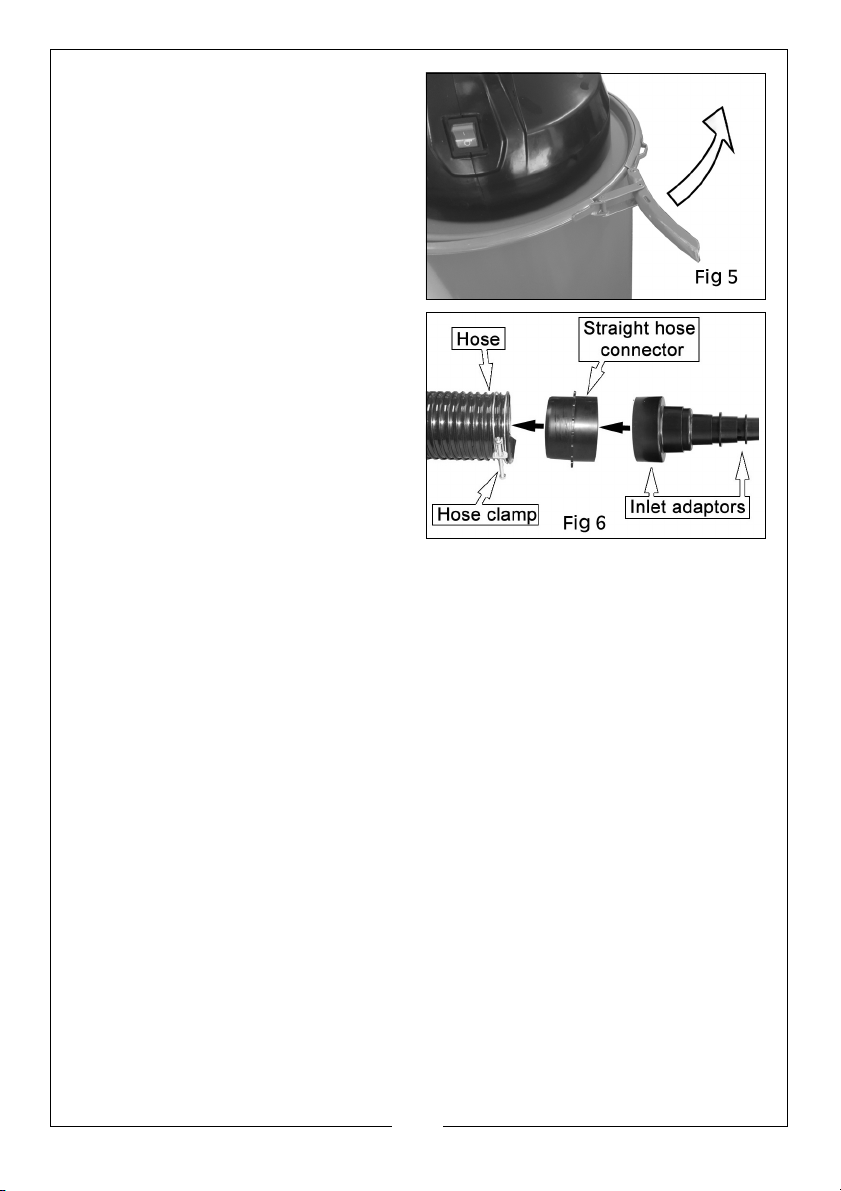
4. Attach the inlet hose to the
tapered hose connector using one
hose clamp as shown in Fig 5.
5. Push-fit the hose connector to the
dust collector body.
7
Parts & Service: 020 8988 7400 / E-mail: [email protected] or [email protected]
Page 8
6. Seat the motor housing with filter
cartridge/bag onto the canister
and secure in place with the
locking strap. The over-centre
clasp will lock into place.
7. Secure the other end of the inlet
hose to the straight hose
connector using the remaining
hose clamp as shown in Fig 6.
• The inlet adaptors can then be
connected to the straight hose
connector as required to suit
the size of the extract duct on
the woodworking appliance to
be used.
8
Parts & Service: 020 8988 7400 / E-mail: [email protected] or [email protected]
Page 9

OPERATION
PREPARING FOR USE
Before plugging into the power supply, the dust extractor should be positioned
on a firm, level surface. DO NOT cover it and always position it with good allround air ventilation. The dust extractor must remain upright.
1. Select one of the four hose adaptors that best fits the dust producing
machine outlet and attach it to the hose connector.
2. Connect the adaptor to the dust producing machine outlet. Make sure the
connection is secure.
3. Plug in the dust collector to a convenient power supply and switch on.
• Take care not to suck in foreign objects such as screws, nails, large
pieces of plastic or wood etc.
EMPTYING THE CONTENTS
1. Empty the dust extractor after use and clean it when required. Dislodge as
much imbedded debris as possible from the filter. Check the filter is not
clogged before fitting the filter over the motor inlet.
2. Check and empty the collection canister regularly.
• The machine operates at a much higher level of efficiency when the
collection canister is empty.
3. Pull out the handle of the locking strap to release and remove the locking
strap.
4. Remove the motor housing with the filter cartridge/ bag by lifting the top
handle.
5. Empty chips and dust into a suitable receptacle. Dispose of appropriately.
6. Replace the motor housing with the filter cartridge/bag on to the
collection canister and lock in place with the locking strap.
9
Parts & Service: 020 8988 7400 / E-mail: [email protected] or [email protected]
Page 10
MAINTENANCE
ROUTINE CHECKS
Regularly inspect the filter for damage before use and replace if necessary.
Regularly check the tightness of the filter and filter bag.
Regularly check the power cable is free from cracks, bare wires etc.
Ensure the hose is kept in good condition. A damaged hose will seriously effect
the efficiency of the dust extractor and should be replaced. Contact your
CLARKE dealer for replacements.
CARE & STORAGE
1. When not in use, switch off and unplug from the power supply and ensure
the power cable is not left as a hazard for persons to trip over.
2. With the dust extractor unplugged from the power supply, use a dry cloth
to wipe over the casing. DO NOT use solvents, thinners or alcohol as these
chemicals will damage the finish.
3. Store the dust extractor in a secure, dry place, out of the reach of children.
DO NOT leave it exposed to the elements and avoid direct sunlight, direct
heat, rain/moisture etc.
ENVIRONMENTAL RECYCLING POLICY
By purchasing this product, the customer is taking on the obligation to
deal with its safe disposal in accordance with the Waste Electrical and
Electronic Equipment (WEEE).
In effect, this means that this product must not be disposed of with general
household waste. It must be disposed of according to the laws governing
Waste Electrical and Electronic Equipment (WEEE) at a recognised disposal
facility.
If disposing of this product or any damaged components, do not dispose of
with general waste. This product contains valuable raw materials. Metal
products should be taken to your local civic amenity site for recycling of metal
products.
10
Parts & Service: 020 8988 7400 / E-mail: [email protected] or [email protected]
Page 11
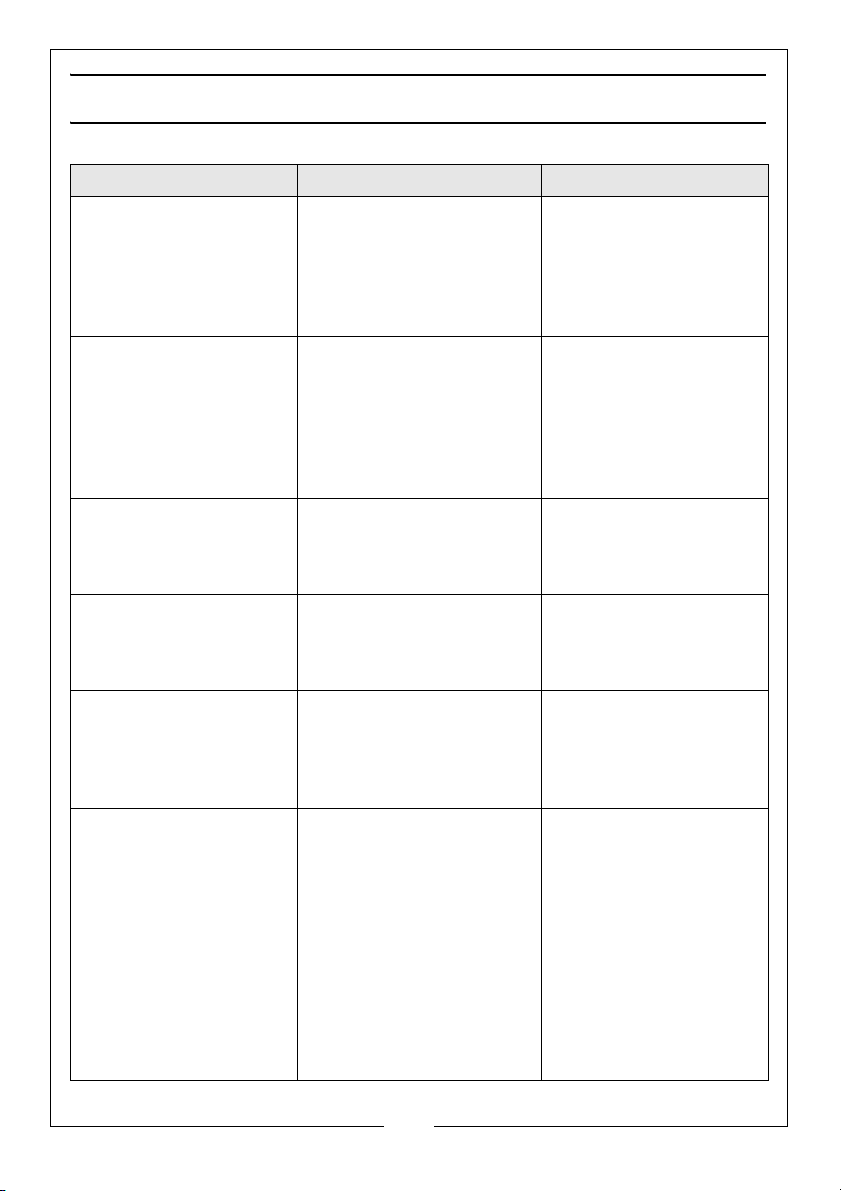
TROUBLESHOOTING
Problem Possible cause Suggested Remedy
Machine will not start 1. No power supply.
Circuit breaker is tripped
2. On/off switch is broken
3. Motor faulty
Motor will not run 1. Defective switch
2. Defective or damaged
power cable
3. Open circuit, loose
connections, or burned
out motor
Motor slow to start or
fails to reach full speed
Motor overheats 1. Motor overloaded
Unit has vibration
or noisy operation
Loud, repetitious noise or
excessive vibration coming from dust collector
1. Burned or defective
motor
2. Worn brushes
2. Improper motor cooling
1. Motor or components
are loose
2. Motor bearings faulty
1. Dust container full
2. Filter cartridge/bag is
dirty or damaged
3. Dust collector hose
restricted
4. The dust may be damp
and not flowing through
the hose smoothly
5. There is a leak in the
hose
1.Check the socket,
cable & plug. Reset
circuit breaker
2. If necessary, have
them repaired by your
CLARKE dealer.
1. Consult your CLARKE
dealer.
2. Have an electrician
check the cable.
3. Contact your CLARKE
dealer
1. Check motor, replace
if necessary
2. Inspect brushes,
replace if necessary
1. Reduce load by
reducing dust
collection
2. Clean dust from motor
1. Inspect/replace any
stripped or damaged
bolts/nuts & retighten
2. Take to your CLARKE
dealer.
1. Empty canister
2. Clean filter cartridge/
bag or replace
3. Remove hose from
dust collector inlet
and unblock the
restriction in the hose.
4. Process dust with less
than 20% moisture
content
5. Inspect and replace
hose
11
Parts & Service: 020 8988 7400 / E-mail: [email protected] or [email protected]
Page 12
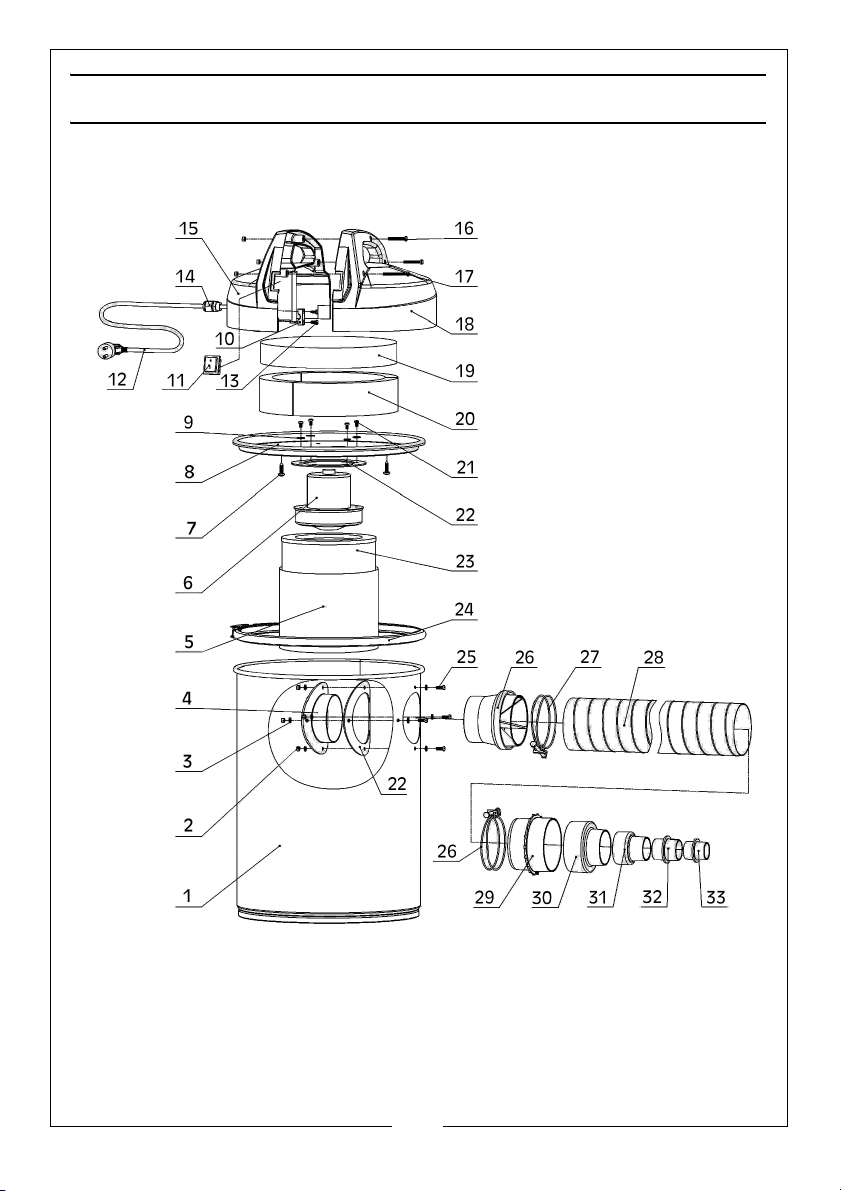
Page 13
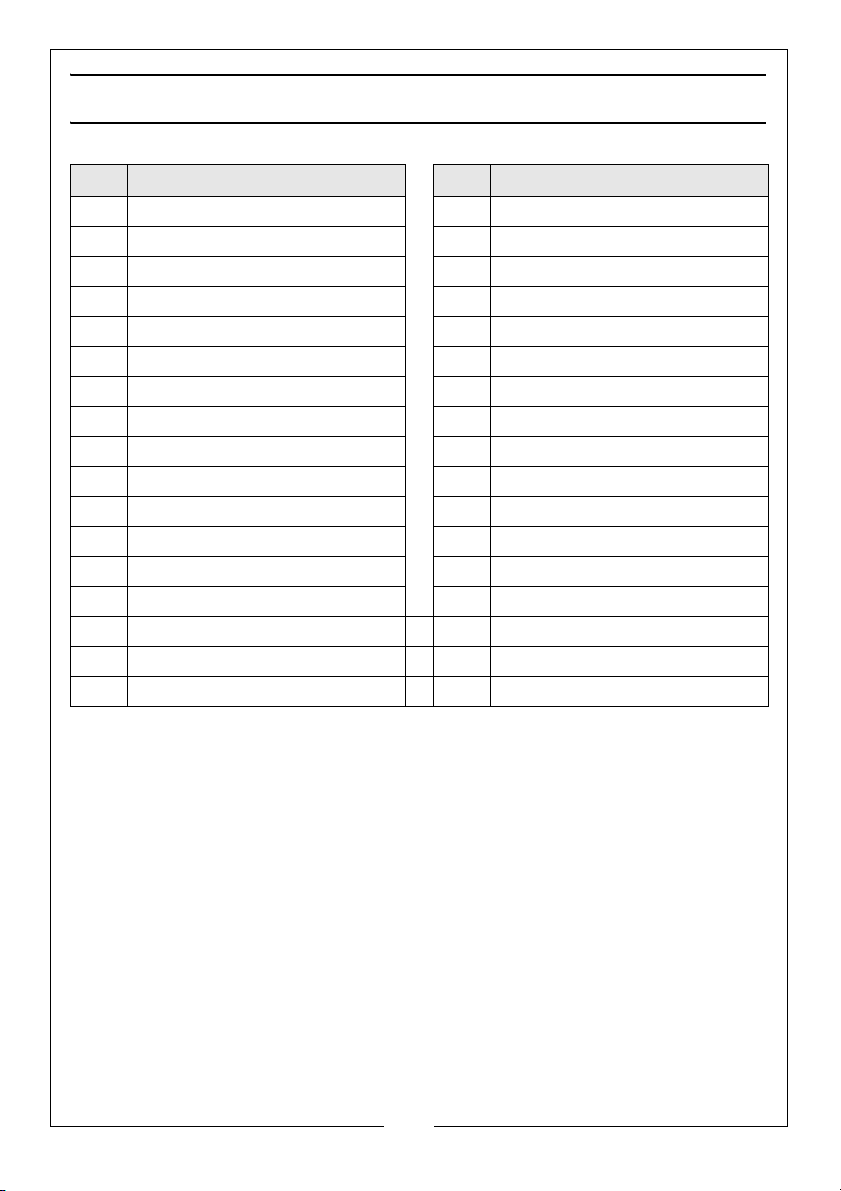
COMPONENT PARTS
No Description No Description
1 Container 18 Right guard
2 Nut M5 19 Round Sponge
3 Flat Washer 5dia 20 Long Sponge
4 Suction Inlet 21 Philips screw M5 x 8
5 Filter Bag 22 Sealing gasket
6 Motor 23 Filter cartridge
7 Philips screw ST6.3x22 24 Locking Strap
8 Top Cover 25 Philips screw M5 x 14
9 Large flat washer 5 dia 26 Hose coupling 2
10 Cable clamp 27 Hose clamp
11 Switch 28 Suction hose
12 Power Cable with Plug 29 Hose coupling 1
13 Philips screw ST4.2x13 30 Hose Adaptor 1
14 Cable gland 31 Hose Adaptor 2
15 Left Guard 32 Hose Adaptor 3
16 Philips screw M5 x 35 33 Hose Adaptor 4
17 Philips screw M5 x 35
GUARANTEE
This product is guaranteed against faulty manufacture for a period of 12
months from the date of purchase. Please keep your receipt which will be
required as proof of purchase.
This guarantee is invalid if the product is found to have been abused or
tampered with in any way, or not used for the purpose for which it was
intended.
Faulty goods should be returned to their place of purchase, no product can
be returned to us without prior permission.
This guarantee does not affect your statutory rights.
13
Parts & Service: 020 8988 7400 / E-mail: [email protected] or [email protected]
Page 14
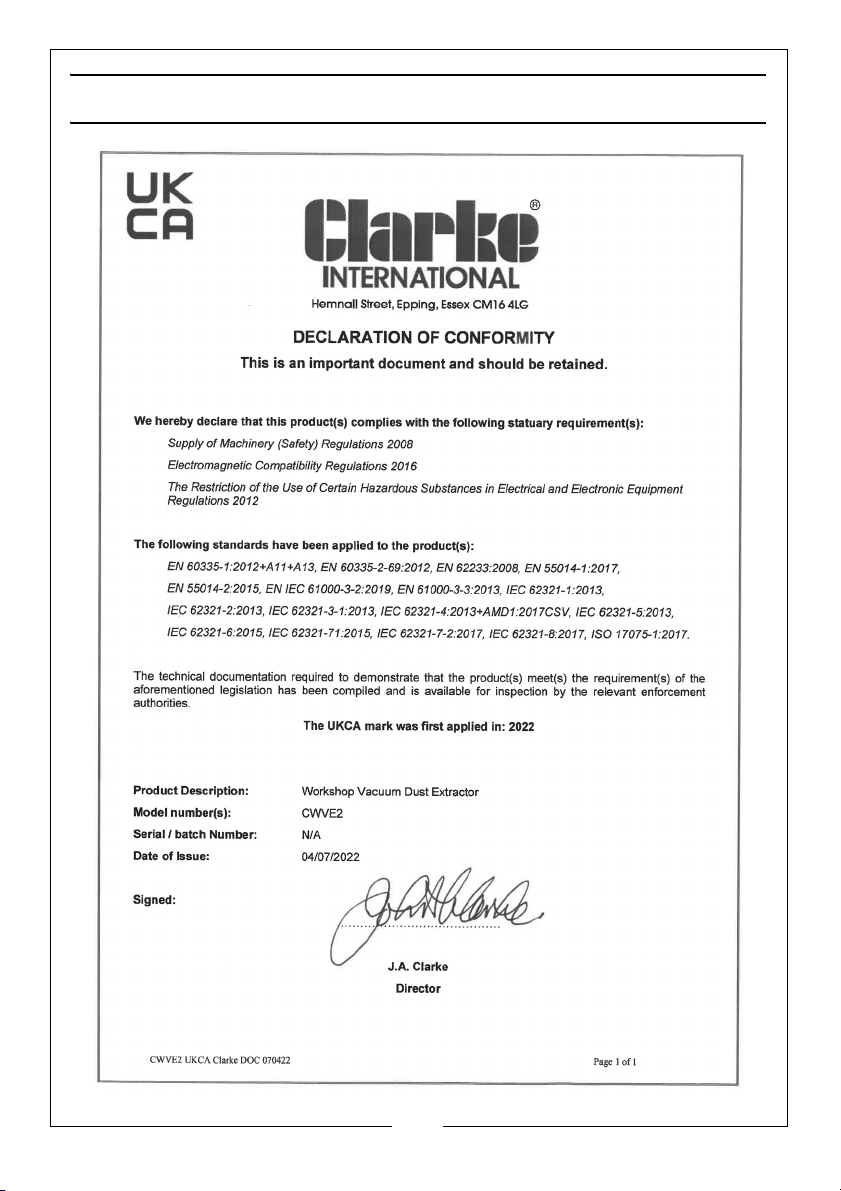
DECLARATION OF CONFORMITY-UK
14
Parts & Service: 020 8988 7400 / E-mail: [email protected] or [email protected]
Page 15
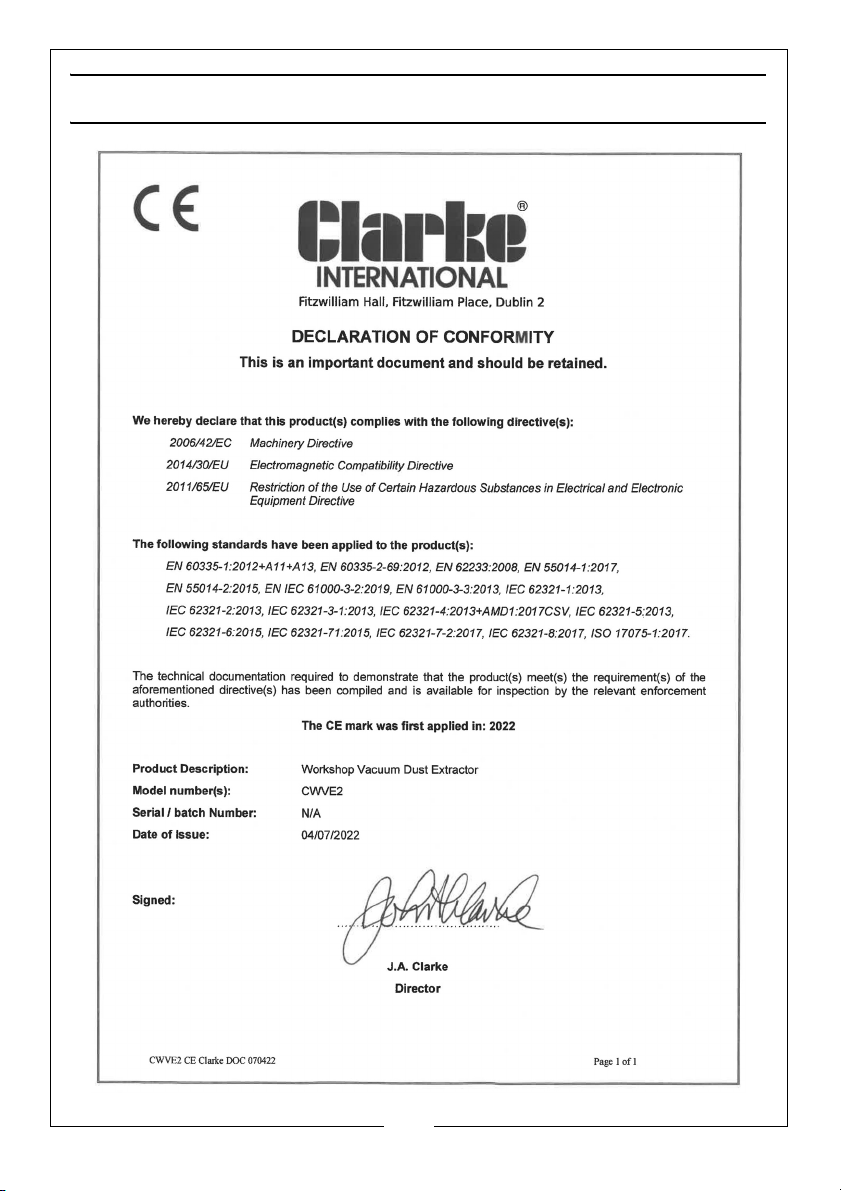
DECLARATION OF CONFORMITY-EU
15
Parts & Service: 020 8988 7400 / E-mail: [email protected] or [email protected]
Page 16
 Loading...