

Page 1
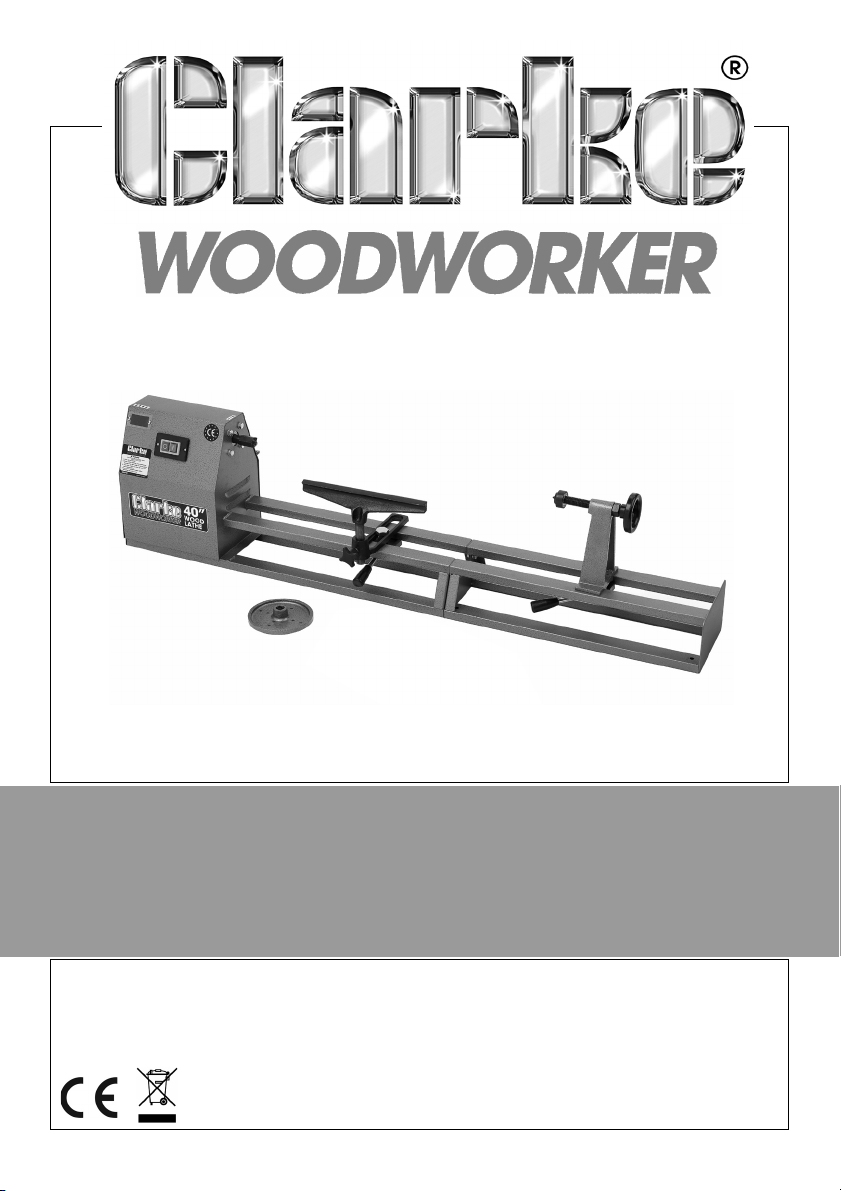
40” WOODLATHE
MODEL NO: CWL1000B
PART NO: 6500687
OPERATION & MAINTENANCE
INSTRUCTIONS
ORIGINAL INSTRUCTIONS
GC0817 - ISS 1
Page 2

INTRODUCTION
Thank you for purchasing this CLARKE Woodlathe.
Before attempting to operate the lathe, it is essential that you read this
manual thoroughly and carefully follow all instructions given. In doing so you
will ensure the safety of yourself and that of others around you, and you can
also look forward to the product giving you long and satisfactory service.
GUARANTEE
This CLARKE product is guaranteed against faulty manufacture for a period of
12 months from the date of purchase. Please keep your receipt as proof of
purchase.
This guarantee is invalid if the product is found to have been abused or
tampered with in any way, or not used for the purpose for which it was
intended.
Faulty goods should be returned to their place of purchase, no product can
be returned to us without prior permission.
This guarantee does not effect your statutory rights.
SPECIFICATIONS
Weight 23.3 kg
Dimensions (L x W x H) 1420 x 200 x 345 mm
Speed 720 / 1240 / 1750 / 2150 rpm
Distance between centres 1000 mm
Turning Capacity 350 mm
Headstock Thread 3/4” x 16TPI (UNF)
IP (Ingress protection) rating IP 20
Motor voltage/frequency 230V / 50Hz
Rated input wattage 370 W
Sound Pressure Level (Lp) No load 70.8 dB(A) / loaded 76.6 dB(A)
Sound Power Level Measured (Lw) No load 81.1 dB(A) / loaded 87.2 dB(A)
2
Parts & Service: 020 8988 7400 / E-mail: [email protected] or [email protected]
Page 3

SAFETY WARNINGS
CAUTION: FAILURE TO FOLLOW THESE PRECAUTIONS COULD RESULT IN
PERSONAL INJURY, AND/OR DAMAGE TO PROPERTY.
WORK ENVIRONMENT
1. Keep the work area clean and well lit. Cluttered and dark areas invite
accidents.
2. Do not operate power tools in explosive atmospheres, such as in the
presence of flammable liquids, gases or dust. Power tools create sparks
which may ignite the dust or fumes.
3. Keep children and bystanders away while operating a power tool. Anyone
entering the work area must wear personal protective equipment.
Distractions can cause you to lose control and fragments of work may fly
away and cause injury.
4. Store power tools properly when not in use. Abrasive products should be
stored in a dry, secure place out of the reach of children.
5. Please read these instructions carefully and retain for future reference.
ELECTRICAL SAFETY
1. Power tool plugs must match the outlet. Never modify the plug in any way.
Do not use adaptor plugs with earthed (grounded) power tools. Unmodified
plugs and matching outlets will reduce the risk of electric shock.
2. Do not expose power tools to rain or wet conditions. Water entering a
power tool will increase the risk of electric shock.
3. Do not abuse the power cable. Never use the cable for carrying, pulling or
unplugging the power tool. Keep the cable away from heat, oil, sharp
edges or moving parts. Damaged or entangled cables increase the risk of
electric shock.
PERSONAL SAFETY
1. Stay alert, watch what you are doing and use common sense when
operating a power tool. Do not use a power tool while you are tired or
under the influence of drugs, alcohol or medication. A moment of
inattention while operating power tools may result in personal injury.
3
Parts & Service: 020 8988 7400 / E-mail: [email protected] or [email protected]
Page 4

2. Use personal protective equipment. Always wear eye protection. Safety
equipment such as dust mask, non-skid safety shoes, hearing protection
and a workshop apron capable of stopping small abrasive or workpiece
fragments.
3. Avoid accidental starting. Ensure the switch is in the off position before
plugging in. Plugging in power tools that have the switch on, invites
accidents.
4. Remove any adjusting key or wrench before turning the power tool on. A
wrench or a key left attached to a rotating part of the power tool may
result in personal injury.
5. Do not overreach. Keep proper footing and balance at all times. This
enables better control of the power tool in unexpected situations. Dress
properly. Do not wear loose clothing or jewellery.
6. Keep your hair, clothing and gloves away from moving parts. Loose
clothes, jewellery or long hair can be caught in moving parts. Keep the
work area clean and tidy.
7. Regularly clean the air vents. The motor fan will draw dust inside the
housing and accumulation of material could cause electrical hazards.
8. Avoid operator fatigue. Stop the lathe at regular intervals for a short break
to rest hands and arms.
9. Maintain your tools. Keep all handles dry and clean. Keep chisels sharp.
ELECTRICAL SAFETY
1. Position the power cable so that it cannot be inadvertently pulled or
pinched and where it does not cause a trip hazard.
2. This lathe is designed for indoor environments and must not be used for
other purposes.
3. If the lathe requires repair, always contact your Clarke dealer. Always insist
on original spare parts. Repairs carried out by unauthorized persons may
be dangerous and invalidate the guarantee.
4. This lathe must only be used by adults. Children should not be allowed to
play with the lathe.
5. Do not use extension power cables.
6. Before cleaning or maintenance operations, always unplug the lathe from
the power supply.
POWER TOOL USE AND CARE
1. Do not force the machine. Use the correct tool for your task. It will do a
better and safer job at the rate for which it was designed.
4
Parts & Service: 020 8988 7400 / E-mail: [email protected] or [email protected]
Page 5

2. Do not use the power tool if the switch does not turn it on and off. Any
power tool that cannot be controlled with the switch is dangerous and
must be repaired.
3. Disconnect the power tool from the power supply before making any
adjustments, changing accessories, or storing the tool. These measures will
reduce the risk of the power tool starting accidently.
4. Store power tools out of the reach of children and do not allow persons
unfamiliar with these instructions to operate the power tool. Power tools are
potentially dangerous in the hands of untrained users.
5. Maintain tools in top condition. Keep tools/ machines clean for the best
and safest performance. Check for misalignment or binding of moving
parts, broken parts, or any condition that may affect the power tool’s
operation. If damaged, have the power tool repaired before use. Many
accidents are caused by poorly maintained power tools.
6. Use recommended accessories. The use of improper accessories could be
hazardous.
7. Machine cleanliness. Do not allow the ventilation slots in the machine to
become blocked with dust.
8. Check the power tool for damage before using the machine. Any
damaged part should be inspected to ensure that it will operate properly
and perform its intended function. Check for alignment of moving parts,
breakage of parts, mountings, and any other condition that may affect the
machine’s operation. Any damage should be properly repaired or the part
replaced. If in doubt, DO NOT use the machine. Consult your local dealer.
SERVICING
1. When necessary, have your power tools serviced or repaired by a qualified
person using identical replacement parts. This will ensure that the safety of
the power tool is maintained.
ADDITIONAL PRECAUTIONS FOR WOODLATHES
WARNING: DUST GENERATED FROM CERTAIN MATERIALS CAN BE
HAZARDOUS TO YOUR HEALTH. ALWAYS OPERATE THE LATHE IN A WELL
VENTILATED AREA. USE A DUST COLLECTION SYSTEM WHENEVER
POSSIBLE.
1. Familiarise yourself with woodlathes and turning techniques before using
the lathe. If in doubt you should consult an expert.
2. ALWAYS store chisels safety when you have finished work.
3. CAUTION: This lathe is designed for use with woodturning chisels only.
4. NEVER attempt to turn a workpiece unless a suitable support is used.
5
Parts & Service: 020 8988 7400 / E-mail: [email protected] or [email protected]
Page 6
5. ALWAYS stop the lathe before removing workpieces, work supports or swarf
from the table.
6. ALWAYS be sure that the workpiece is securely locked in position
7. ALWAYS keep hands and fingers away from the moving workpiece.
SAFETY SYMBOLS
The following safety symbols may be found on the machine.
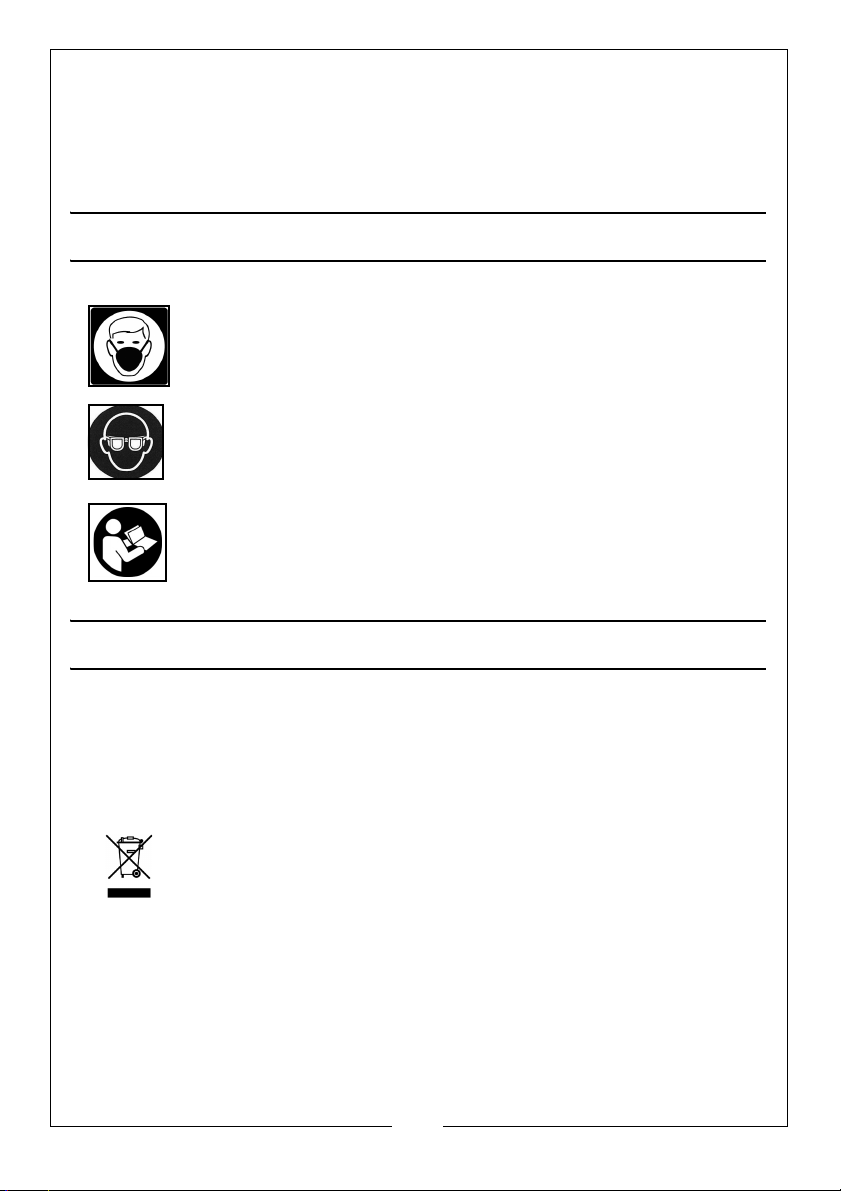
Wear a dust mask
Wear eye protection
Read instruction manual before use
ENVIRONMENTAL PROTECTION
Recycle unwanted materials instead of disposing of them as waste. All
unwanted accessories and packaging should be sorted and taken to a
recycling centre for disposal in a manner which is compatible with the
environment.
ENVIRONMENTAL RECYCLING POLICY
Through purchase of this product, the customer is taking on the
obligation to deal with the WEEE in accordance with the WEEE
regulations in relation to the treatment, recycling & recovery and
environmentally sound disposal of the WEEE.
In effect, this means that this product must not be disposed of with general
household waste but according to the laws governing Waste Electrical and
Electronic Equipment (WEEE) at a recognised disposal facility.
6
Parts & Service: 020 8988 7400 / E-mail: [email protected] or [email protected]
Page 7
ELECTRICAL CONNECTIONS
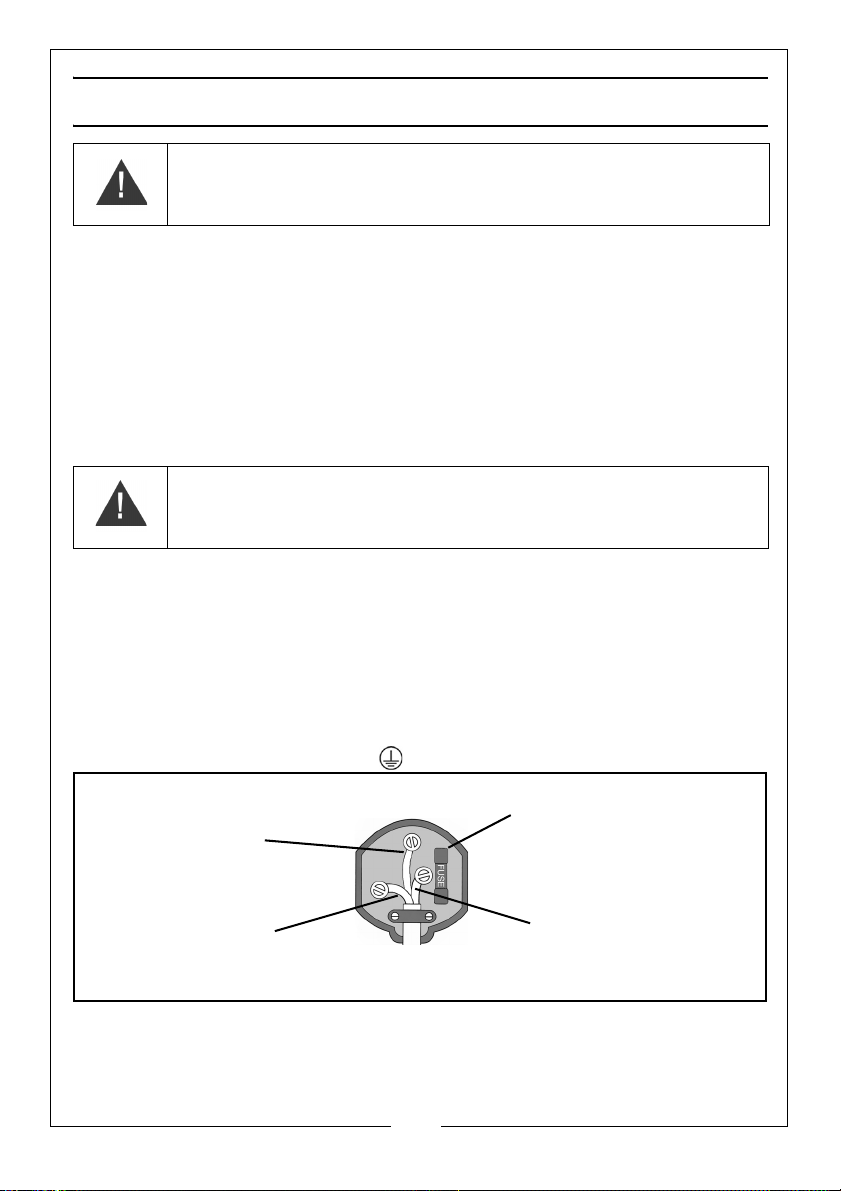
Plug must be BS1363/A approved.
Always fit a 13 Amp fuse.
Ensure that the outer sheath of the cable is firmly held by the clamp
Neutral
(Blue)
Live
(Brown)
Earth
(Green and Yellow)
WARNING: READ THESE ELECTRICAL SAFETY INSTRUCTIONS
THOROUGHLY BEFORE CONNECTING THE PRODUCT TO THE MAINS
SUPPLY.
Before switching the product on, make sure that the voltage of your electricity supply is
the same as that indicated on the rating plate. This product is designed to operate on
230VAC 50Hz. Connecting it to any other power source may cause damage.
This product may be fitted with a non-rewireable plug. If it is necessary to change the
fuse in the plug, the fuse cover must be refitted. If the fuse cover becomes lost or
damaged, the plug must not be used until a suitable replacement is obtained.
If the plug has to be changed because it is not suitable for your socket, or due to
damage, it should be cut off and a replacement fitted, following the wiring instructions
shown below. The old plug must be disposed of safely, as insertion into a mains socket
could cause an electrical hazard
WARNING: THE WIRES IN THE POWER CABLE OF THIS PRODUCT ARE
COLOURED IN ACCORDANCE WITH THE FOLLOWING CODE:
BLUE = NEUTRAL BROWN = LIVE YELLOW AND GREEN = EARTH
If the colours of the wires in the power cable of this product do not correspond with the
markings on the terminals of your plug, proceed as follows.
• The wire which is coloured Blue must be connected to the terminal which is
marked N or coloured Black.
• The wire which is coloured Brown must be connected to the terminal which
is marked L or coloured Red.
• The wire which is coloured Yellow and Green must be connected to the
terminal which is marked E or or coloured Green.
.
We strongly recommend that this machine is connected to the mains supply
via a Residual Current Device (RCD)
If in any doubt, consult a qualified electrician.
Parts & Service: 020 8988 7400 / E-mail: [email protected] or [email protected]
7
Page 8
CONTENTS
Check that all components are present and undamaged. Should any loss or
damage be apparent, please contact your CLARKE dealer immediately.
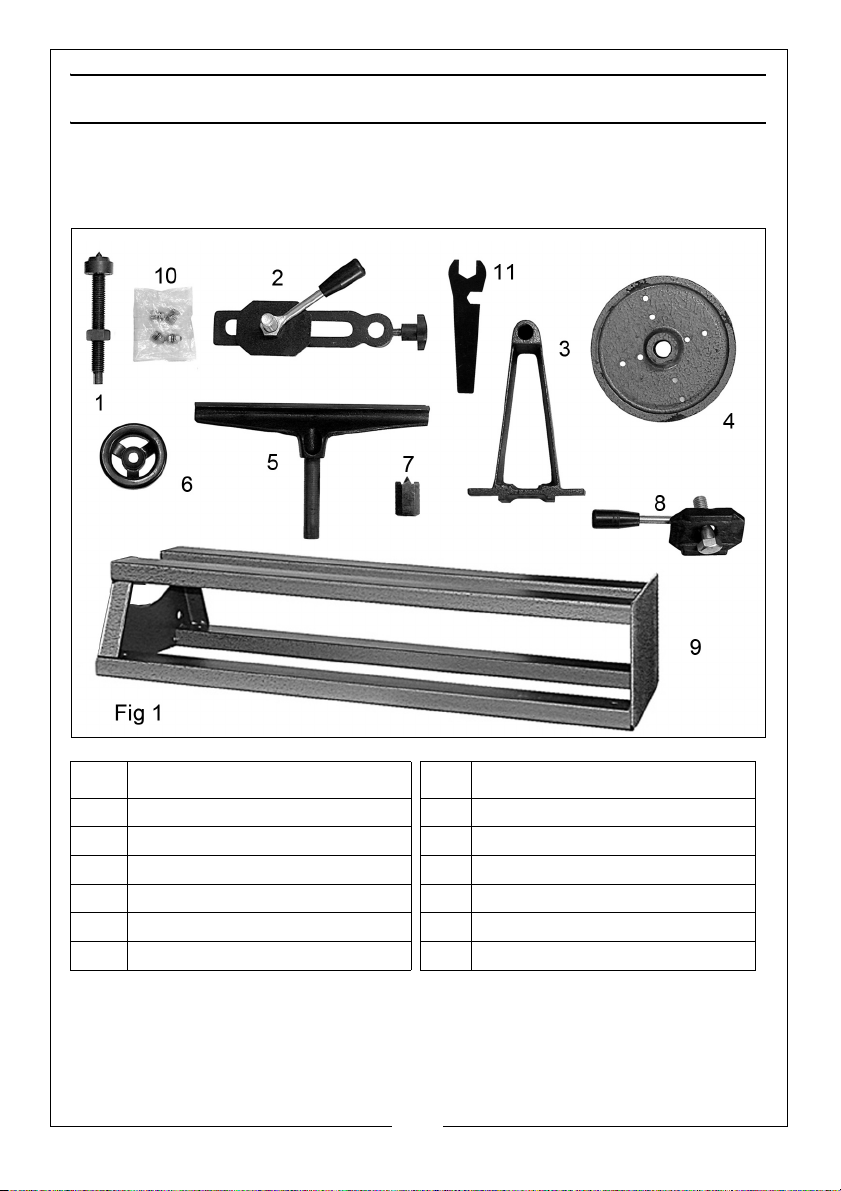
The following components are supplied loose with the lathe assembly.
Item Description Item Description
1 Tailstock spindle 7 Drive centre
2 Toolrest clamp assembly 8 Tailstock clamp assembly
3 Tailstock 9 Bed extension
4 Faceplate 10 Fixing kit (bolts/nuts/washers)
5 Tool rest 11 Spanner
6 Tailstock advance handle -/- Set of 3 chisels
8
Parts & Service: 020 8988 7400 / E-mail: [email protected] or [email protected]
Page 9
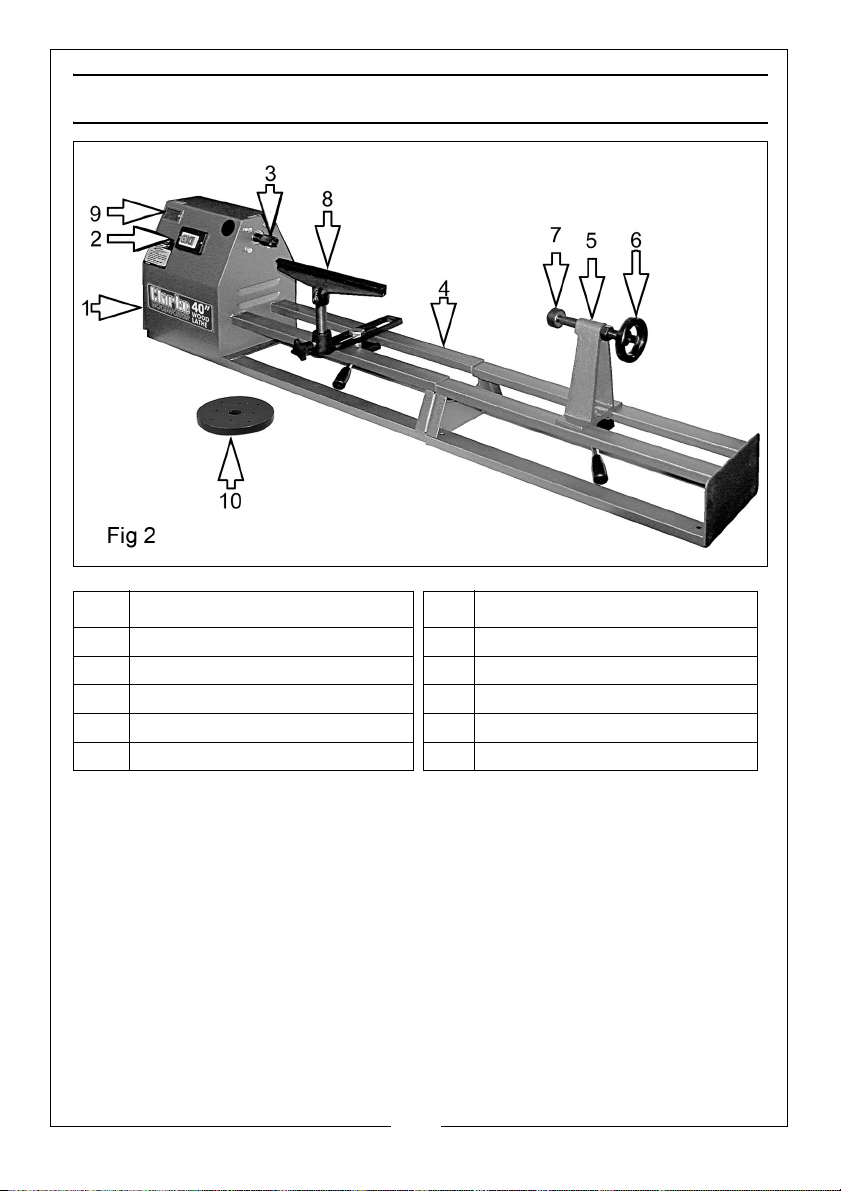
MAIN COMPONENTS
Item Description Item Description
1 Headstock 6 Tailstock advance handle
2 On/Off switches 7 Tailstock revolving centre
3 Drive centre 8 Toolrest
4 Bed 9 Pulley viewing window
5 Tailstock 10 Faceplate
9
Parts & Service: 020 8988 7400 / E-mail: [email protected] or [email protected]
Page 10
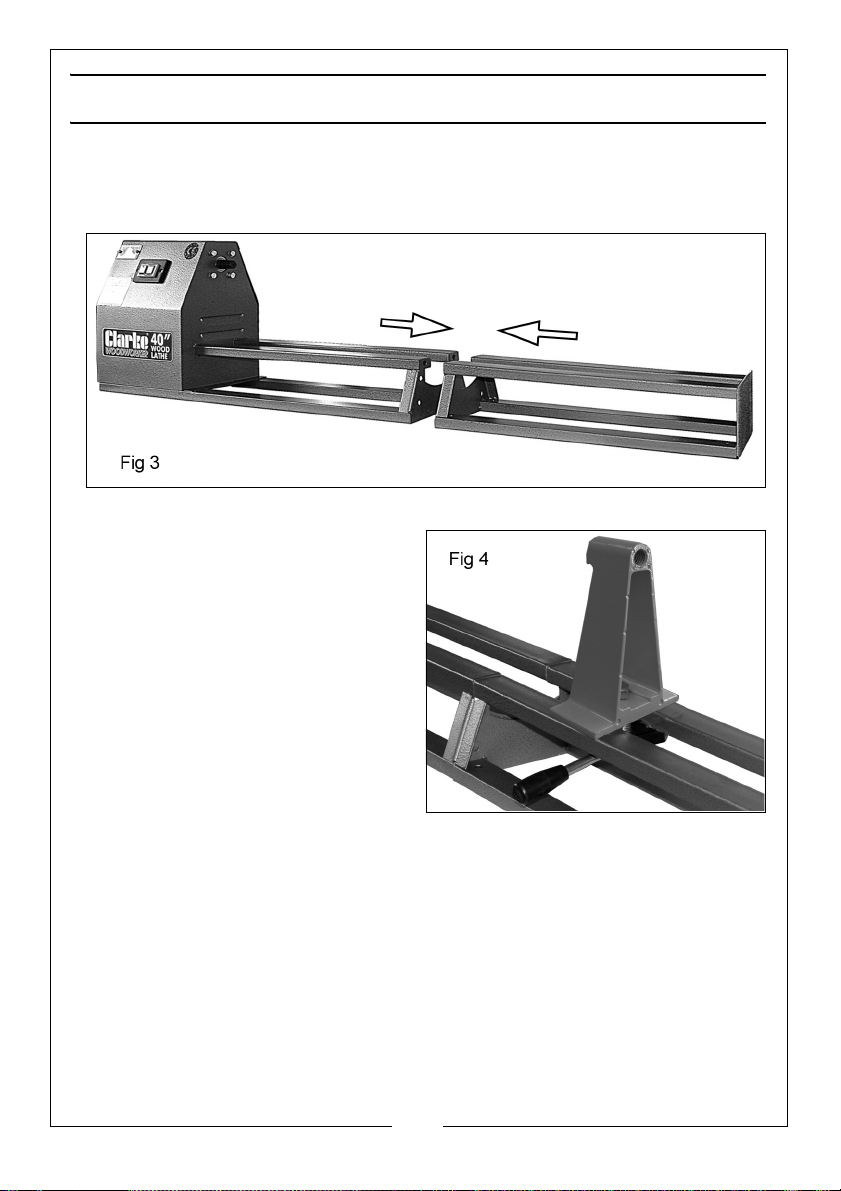
ASSEMBLY
1. Bolt the two halves of the bed together, using the four nuts, bolts and
washers supplied. Make sure that the two halves are aligned so that the
assembly lies flat on the work surface.
2. Place the tailstock on the bed
and assemble the tail stock clamp
assembly (8 in Fig 1) to the tail
stock with the bolt through the
hole in the tail stock, passing
through the clamping plate and
into the lever.
3. Note the orientation of the
components-;
• The tailstock should be orientated
as shown.
• The clamping plate has raised
edges which sit between the bed rails.
• The lever should be angled downwards.
4. Screw in the bolt and nip up tight using the lever.
NOTE: The position of the lever, when fully tightened, should be towards
the operator as shown. This is achieved by slackening off the lever
and turning the bolt head until the appropriate position is
achieved when the lever is tightened again.
10
Parts & Service: 020 8988 7400 / E-mail: [email protected] or [email protected]
Page 11
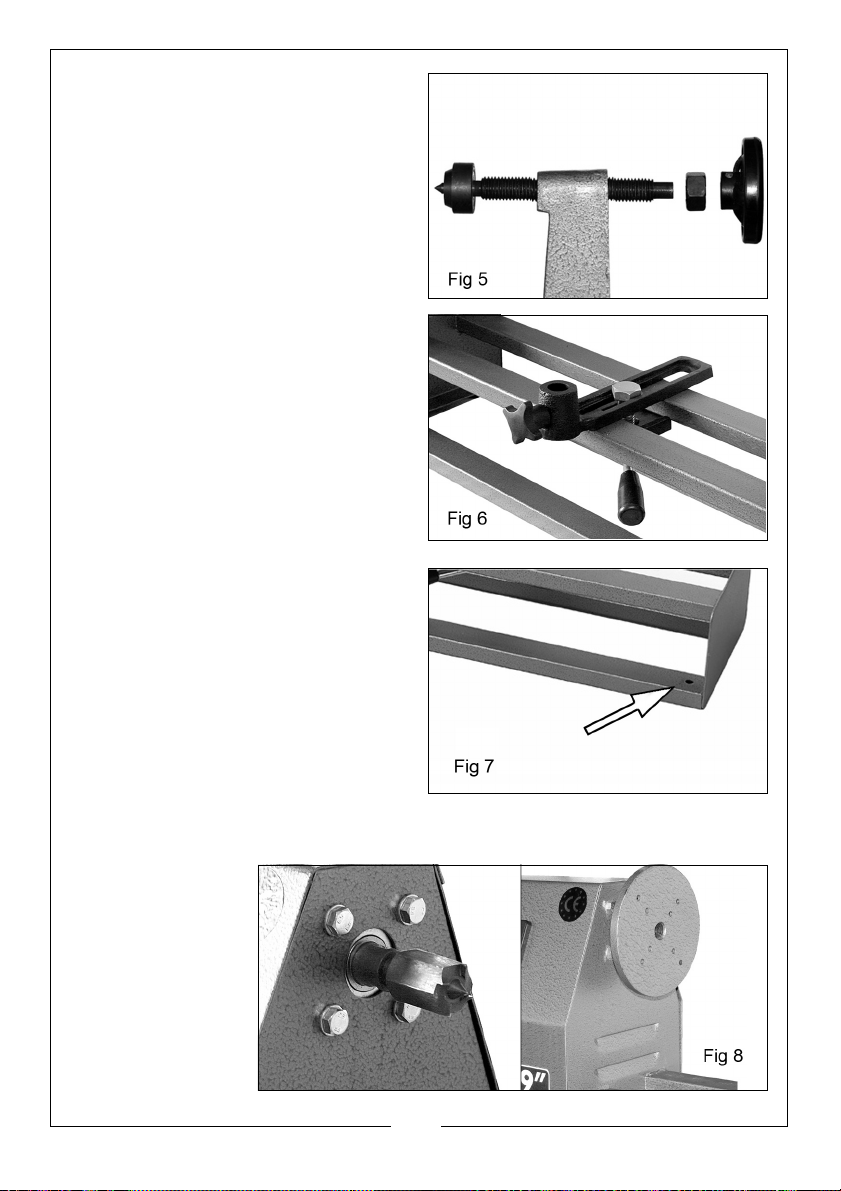
5. Screw the tail shaft into the
tailstock and screw on the locking
nut.
6. Fit the handle to the flats on the
end of the shaft and secure the
handle by tightening the grub
screw.
7. Assemble the tool support bracket
to the machine as shown in Fig 6.
The clamping bracket and lever
should be fitted and oriented in
the same manner as the tailstock.
8. The tool rest (5 in Fig 1) is simply
dropped into the hole in the
bracket and secured using the
knob provided.
9. Screw the lathe to a workbench
using the eight holes provided in
the bed. (see fig 7)
10. Alternatively, bolt the lathe to a
piece of board of at least 18 mm
in thickness and having a plan
dimension of at least 1500 x 500
mm.
11. Use countersunk bolts from
beneath the board so that the
complete assembly lies flat. The board, with the lathe attached, may then
be firmly clamped to a workbench when required for use.
12. Before use,
either the
centre spur or
the face plate
must be
attached to
the
headstock.
13. These are
simply
11
Parts & Service: 020 8988 7400 / E-mail: [email protected] or [email protected]
Page 12
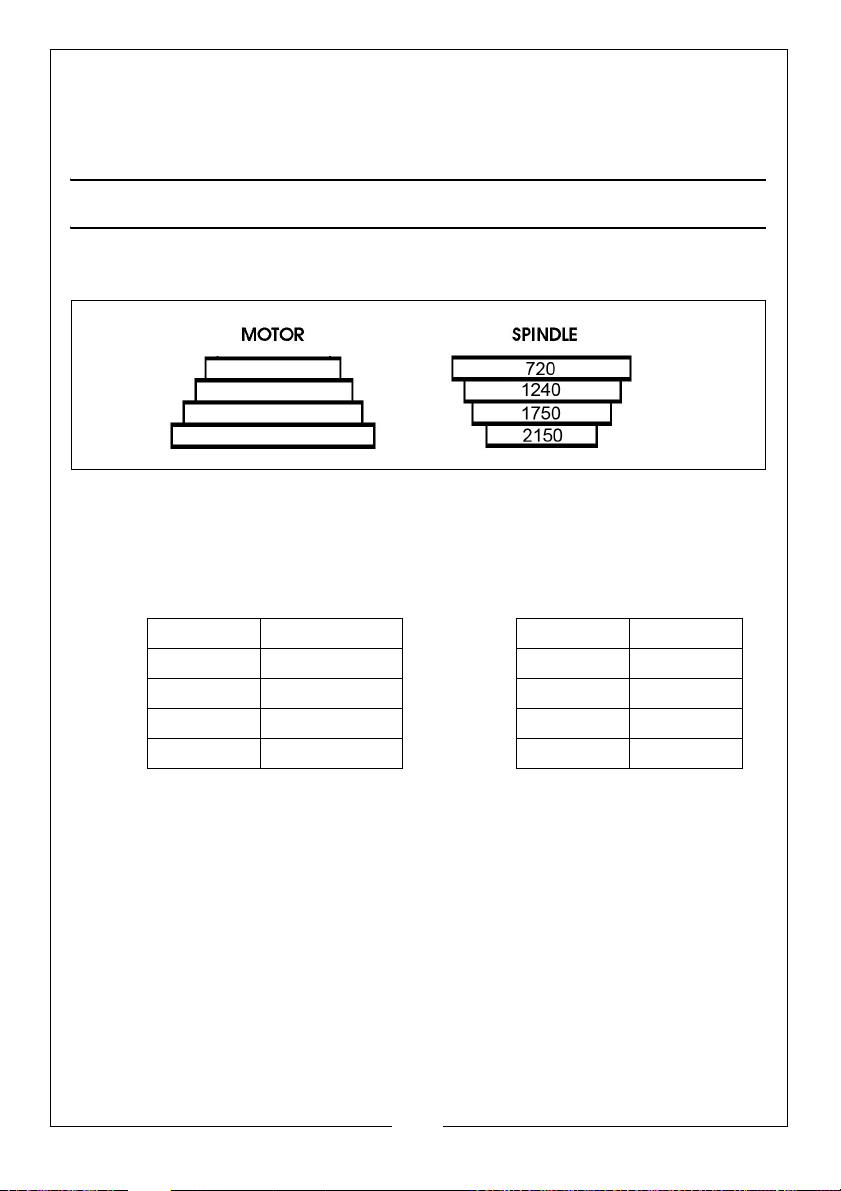
screwed to the headstock, the drive spindle being held using the spanner
provided, to grip the flats on the spindle.
14. Your lathe is now fully assembled and ready for use.
SPINDLE SPEEDS
The position of the drive belt on the pulleys is visible through the viewing
window and marked on the top of the lathe as shown below.
RECOMMENDED RUNNING SPEEDS
SPINDLE TURNING
SQUARE LENGTH ROUGHING FINISHING
1” (25 mm) 12” (305 mm) 1750 2550
2” (50 mm) 16” (406 mm) 1240 2550
3” (75 mm) 20” (508 mm) 720 2550
4” (100 mm) 20” (508 mm) 720 2550
12
Parts & Service: 020 8988 7400 / E-mail: [email protected] or [email protected]
Page 13
FACEPLATE TURNING
SQUARE LENGTH ROUGHING FINISHING
1” (25mm) 12” (305mm) 1750 2550
2” (50mm) 16” (406mm 1240 2550
3” (75mm) 20” (508mm) 720 2550
4” (100mm) 20” (508mm) 720 2550
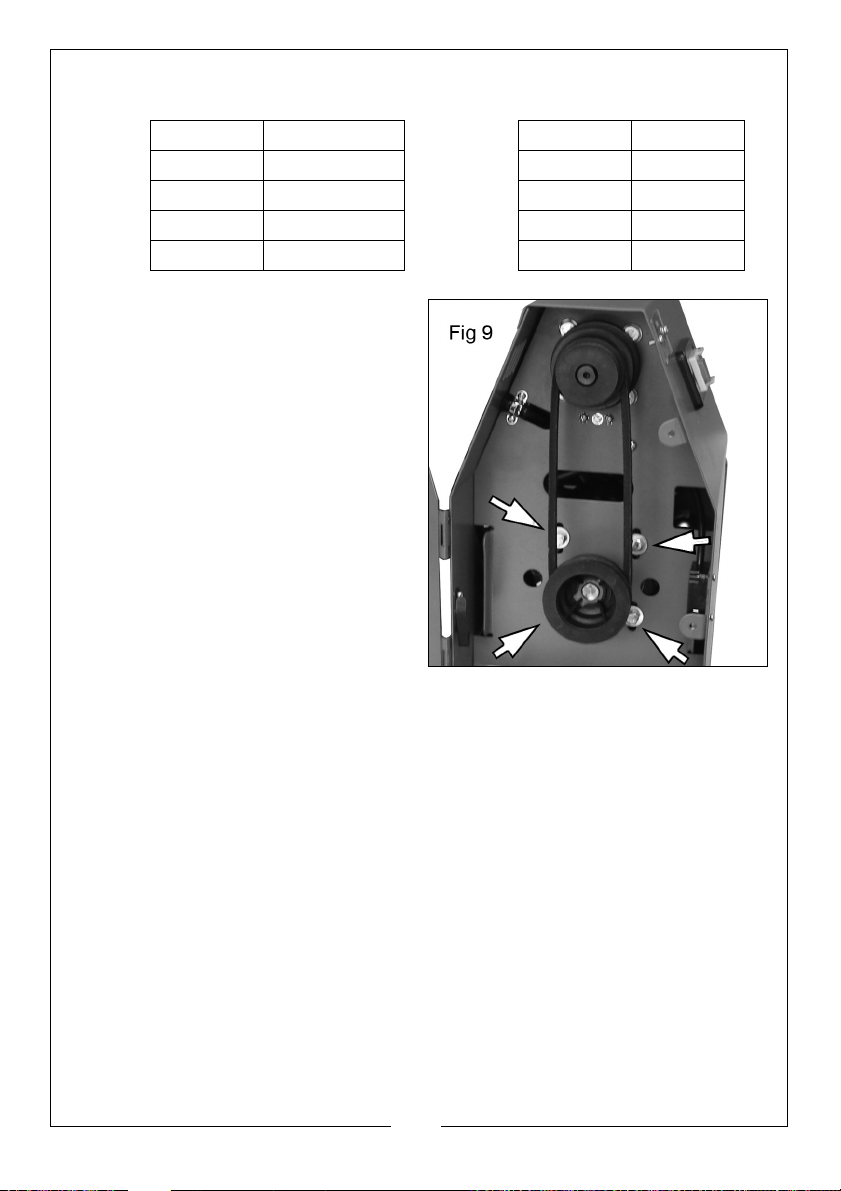
Fig 9 shows the belt positioned on the
second step from the outside face of
the pulley. This produces a spindle
speed of 1750 rpm. (Refer to the
chart above).
If you wish to run at a higher speed,
say 2150 rpm, you must shift the belt
outwards, one step.
CHANGING SPEEDS
1. Undo the two screws securing the pulley access cover.
2. Slacken the four motor securing bolts shown in Fig 9.
3. Pull up the lower motor pulley to relieve belt tension.
4. Move the belt to the appropriate pulleys.
5. Push down on the lower pulley to tension the belt. It should be firm - 1/2”
total movement at the centre of the span.
6. Retighten the motor securing bolts.
7. Re-secure the end cover.
• The motor will not run if the cover is not secured.
13
Parts & Service: 020 8988 7400 / E-mail: [email protected] or [email protected]
Page 14

OPERATION
1. Make sure that the tool rest and tailstock are securely locked in position
before starting work.
2. Always rotate the workpiece by hand before turning on the motor and
check it does not strike the tool/tool rest.
3. Always use the lowest speed when starting a new workpiece and roughly
turn the work to a round shape at low speed.
4. Always position the tool-rest just above the centre-line of the workpiece.
5. Avoid turning timber which has splits or substantial knots or voids and take
special care if these are discovered.
6. Take care that the chisels do not bite suddenly into the workpiece.
7. Press the green push-button to start the lathe.
MAINTENANCE
Always inspect before use. Any damage should be repaired and faults
rectified. The lathe requires very little maintenance other than the following
guidelines.
IMPORTANT: Disconnect from mains power before cleaning.
1. Vacuum clean any dust or shavings that accumulate.
2. Check periodically that the power cable is in good condition and not
cracked.
3. Check the tightness of the mounting bolts.
4. Check the drive belt for wear and replace if it is frayed or otherwise
damaged.
5. Very occasionally lubricate the tailstock screw thread and tool-post locking
handles with engine oil such as SAE20 or SAE30 grade if it becomes stiff to
use.
• The bearings in the headstock and tailstock spindles are greased and
permanently sealed at the factory requiring no further lubrication.
14
Parts & Service: 020 8988 7400 / E-mail: [email protected] or [email protected]
Page 15
REPLACING THE BELT
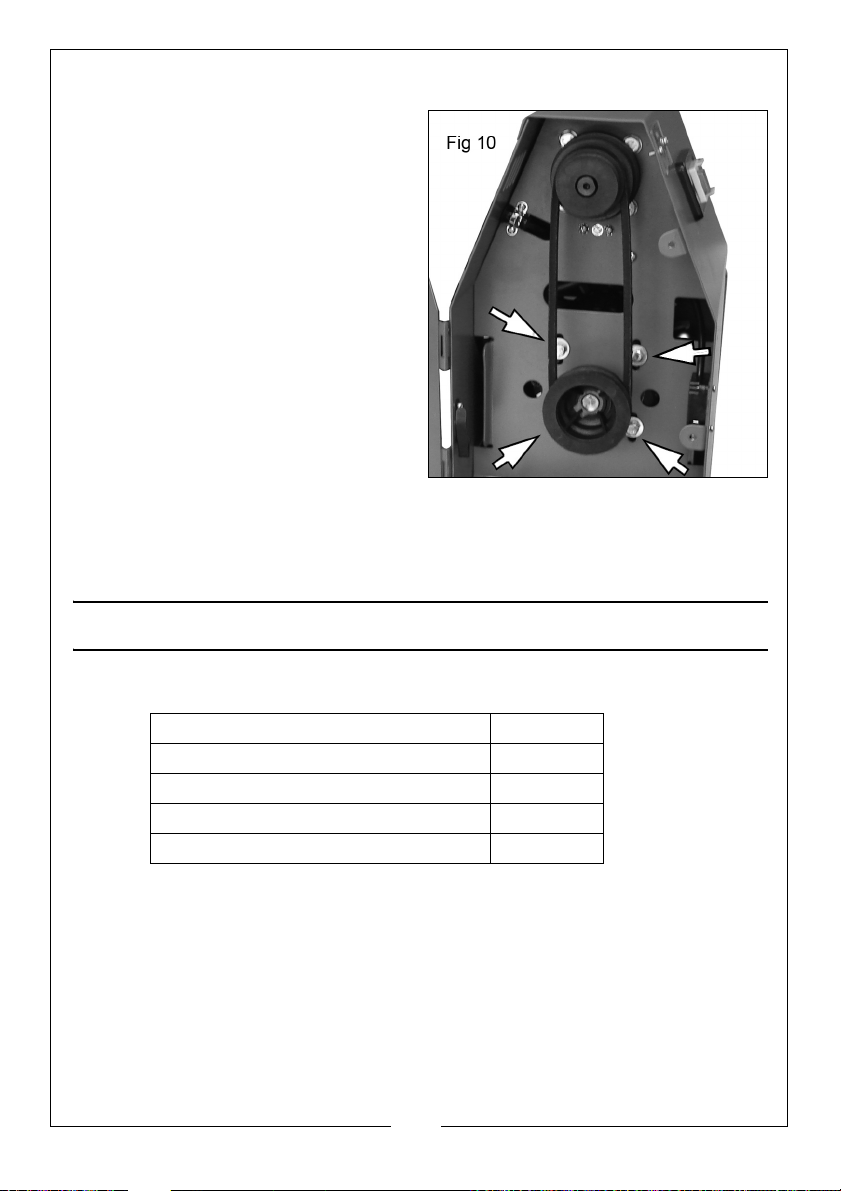
1. Open the end cover and loosen
the four bolts shown in Fig 10.
• This will enable the drive motor to
move and the drive belt to
become slack.
2. Remove the drive belt from the
drive pulleys.
3. Replacement is a reversal of the
removal procedure. Tension the
belt by pushing the motor
downwards before tightening the
bolts.
4. Re-secure the end cover.
• The motor will not run if the cover
is not secured.
Please refer to TROUBLESHOOTING on page 16. If you are unable to rectify any
faults, please contact your local dealer or Clarke International Service
Department on 0208 988 7400 for assistance.
OPTIONAL ACCESSORIES
The following are available from your local Clarke supplier.
Cup Turning Chuck 6500676
Screw Chuck 6500677
4-Jaw Independent Lathe Chuck 6500678
6” Faceplate 6500679
8 Piece Chisel Set 6500649
15
Parts & Service: 020 8988 7400 / E-mail: [email protected] or [email protected]
Page 16

TROUBLESHOOTING
Problem Check Solution
Motor stops and
will not run.
Motor will not start
and fuses or circuit
breaker trip out.
Motor fails to
reach full power.
Noisy operation 1. Incorrect belt tension.
1. Overload switch has tripped
due to excessive load on the
chuck.
2. Defective/broken switch.
Damaged power cable.
1. Short circuit in motor or
power cable.
1. Overloaded circuit.
2. Unsuitable extension cable
2. Worn spindle bearings
3. Loose drive pulley.
1. Switch off and wait for the
components to cool down
and the overload to re-set.
Then turn the lathe back on
Send to your Clarke dealer
for repair.
2. Send to your Clarke dealer
for replacement.
1. Send to your Clarke dealer
for repair.
1. Turn off other machines &
retry.
2. Consult electricain and
replace with correct type.
1. Adjust belt tension. See
Replacing the Belt on p15.
2. Send to your Clarke dealer
for replacement
3. Tighten the retaining set
screw on the pulley.
16
Parts & Service: 020 8988 7400 / E-mail: [email protected] or [email protected]
Page 17

DECLARATION OF CONFORMITY
17
Parts & Service: 020 8988 7400 / E-mail: [email protected] or [email protected]
Page 18
Page 19

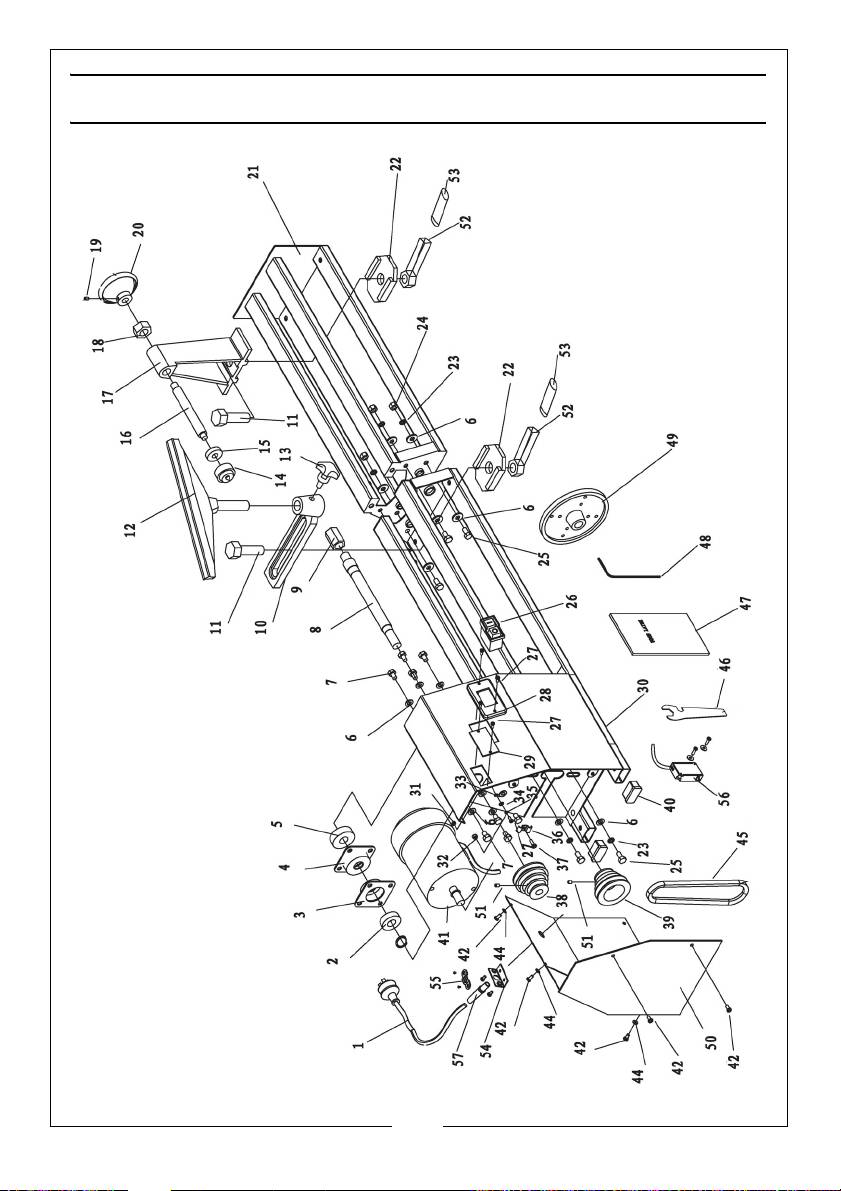
PARTS LIST
PART NO DESCRIPTION PART NO DESCRIPTION
1 Power Cable 30 Headstock Frame
2 Ball Bearing 31 Nut
3Bearing Block 32Nut
4 Bearing Block 33 Lock Washer
5 Ball Bearing 34 Washers
6 Washer 35 Spring Washer
7 Bolt 36 Wire clip
8 Headstock Spindle 37 Screw
9 Centre Spur 38 Upper Belt Pulley
10 Tool Post Support 39 Lower Belt Pulley
11 Locking Bolt 40 End Cap
12 Tool Rest 41 Motor
13 Locking Knob 42 Screw
14 Tailstock Centre 43 Cable Clamp
15 Ball Bearing 44 Washer
16 Tail Shaft 45 Drive Belt
17 Tailstock 46 Spanner
18 Nut 47 User manual
19 Grub Screw 48 Allen Key
20 Hand Wheel 49 Face Plate
21 Bed Extension 50 End Cover Plate
22 Clamping Plate 51 Grub Screw
23 Spring Washer 52 Locking Handle
24 Nut 53 Handgrip
25 Bolt 54 Cable Bracket
26 Switch 55 Cable Retainer
27 Screw 56 Micro Switch
28 Switch Bracket 57 Cable Gland
29 Viewing Window
19
Parts & Service: 020 8988 7400 / E-mail: [email protected] or [email protected]
Page 20

 Loading...