

Page 1
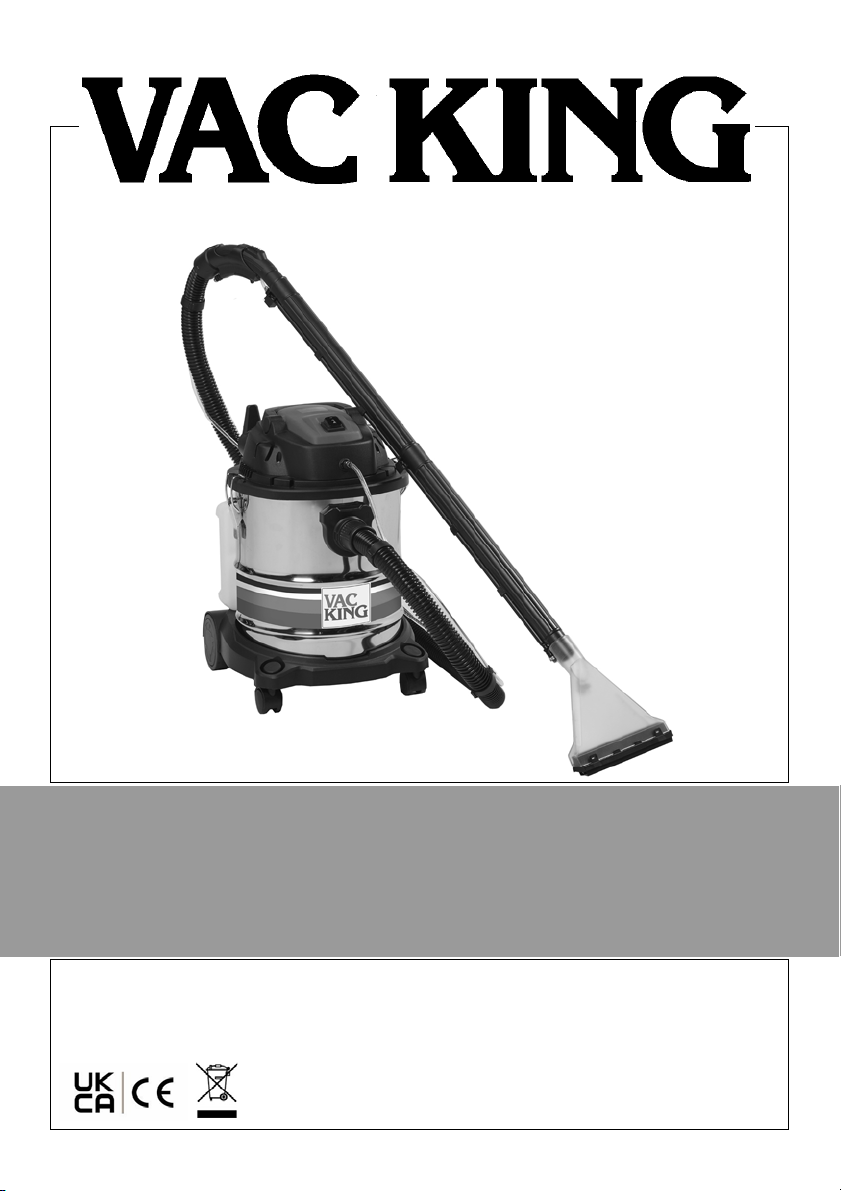
WET/DRY CARPET & UPHOLSTERY CLEANER
MODEL NO: CVAC20CCSS
PART NO: 6471098
OPERATING & MAINTENANCE
INSTRUCTIONS
ORIGINAL INSTRUCTIONS GC09/23
Page 2
INTRODUCTION
Thank you for selecting this CLARKE carpet and upholstery cleaner, which will
provide you with a cleaner and safer working environment.
Before attempting to operate the machine, it is essential that you read this
manual thoroughly and carefully follow all instructions given. In doing so you
will ensure the safety of yourself and that of others around you, and you can
also look forward to the machine giving you long and satisfactory service.
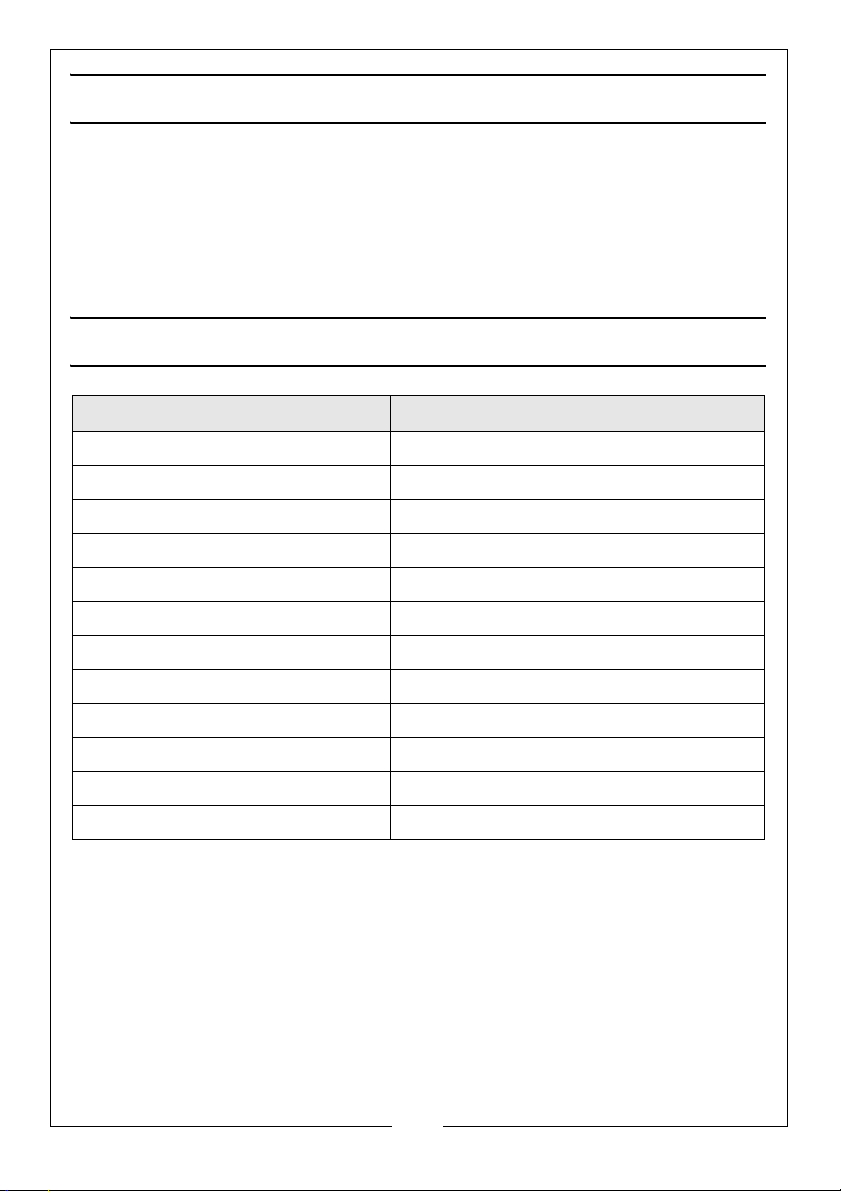
SPECIFICATION
MODEL
Part No 6471098
Weight 7.5 kg
Dimensions (D x W x H) mm 390 x 315 x 480
Water Capacity 15 Litres
Hose length 2100mm
Dust Capacity 18 Litres
Max Airflow 1.73 m3/min
Duty Cycle S1 (continuous)
Power Supply 230 V/50Hz/1ph
Motor Power rating 1.4 kW
IP Rating IP24
Power cable length 4.43 m
Please note that the details and specifications contained herein, are correct
at the time of going to print. However, CLARKE International reserve the right
to change specifications at any time without prior notice.
CVAC20CCSS
2
Parts & Service: 020 8988 7400 / E-mail: [email protected] or [email protected]
Page 3

SAFETY PRECAUTIONS
WORK AREA
1. Avoid operating in the presence of flammable liquids or gases. The motor
may produce sparks during operation. DO NOT use in enclosed areas
where flammable, explosive or toxic vapours are given off.
PERSONAL SAFETY
1. ALWAYS stay alert, watch what you are doing and use common sense
when operating. DO NOT use the machine while you are tired or under the
influence of medication, drugs or alcohol. A moment of inattention can
result in personal injury.
2. NEVER over-reach. Keep your proper footing and balance at all times to
enable better control of the machine in unexpected situations.
3. ALWAYS store the machine out of reach of children.
GENERAL MACHINE USE AND CARE
1. Prior to use, all users should become familiar with this instruction booklet.
2. ALWAYS maintain the machine with care and keep it clean for best / safest
performance.
3. NEVER use this machine if any part is damaged. Have it inspected and
repaired by your CLARKE dealer. Do not use if the electric cable, plug, or
the machine itself, is in poor condition.
4. NEVER abuse the power cable. Never pull on the cable when removing
the plug from the socket or lift the machine by the power cable. Take care
not to close doors on the cable, or allow it to become snagged under
furniture/objects with sharp edges. Keep away from heat or oil.
5. Only use extension leads that are of an appropriate power rating and
suitable for the work environment. Extension leads must have an earth
connection. Inspect the extension lead regularly and replace if damaged.
6. ALWAYS take care when a long hose is required in the work area as it
presents a trip hazard. Tidy the hose away when the job is finished.
7. NEVER pick up burning cigarettes or other hot or smoking substances.
8. NEVER abuse the machine by standing on it.
9. ALWAYS transport the machine by lifting it by the handle.
3
Parts & Service: 020 8988 7400 / E-mail: [email protected] or [email protected]
Page 4

CARE & STORAGE
1. When not in use, turn off by the On/Off switch on top of the machine and
remove the plug from the mains power supply.
2. When you have finished with the machine, ensure the electric cable is
stowed away and not left as a trip hazard.
3. DO NOT change filters or carry out any cleaning or servicing, without first
disconnecting the machine from the power supply.
4. Keep the external surfaces clean. Avoid impact damage and do not allow
the machine to come into contact with abrasive or corrosive materials.
5. DO NOT use solvents, thinners or alcohol to clean the machine, as these
chemicals will damage the finish. With the machine unplugged from the
power supply, use a dry cloth to wipe over the plastic casing.
6. When not in use the machine should be stored in a secure, dry place, out
of the reach of children. DO NOT leave it exposed to the elements and
avoid direct sunlight, direct heat, rain/moisture etc.
7. Only use parts and accessories recommended in this manual. The use of
unauthorised accessories or attachments is not permitted and may result in
personal injury or damage to the machine.
8. DO NOT attempt to repair or modify the machine. Do not attempt any
electrical repair yourself. Consult a qualified electrician or the CLARKE
Service Department on 020 8988 7400.
ENVIRONMENTAL PROTECTION
By purchasing this product, the customer is taking on the obligation
to deal with its safe disposal in accordance with the Waste Electrical
and Electronic Equipment regulations (WEEE).
In effect, this means that this product must not be disposed of with general
household waste. It must be disposed of according to the laws governing
Waste Electrical and Electronic Equipment (WEEE) at a recognised disposal
facility.
GUARANTEE
This CLARKE product is guaranteed against faulty manufacture for a period of
12 months from the date of purchase. Please keep your receipt as proof of
purchase.
This guarantee is invalid if the product is found to have been abused or
tampered with in any way, or not used for its intended purpose.
Faulty goods should be returned to their place of purchase, no product can
be returned to us without prior permission.
This guarantee does not effect your statutory rights.
4
Parts & Service: 020 8988 7400 / E-mail: [email protected] or [email protected]
Page 5
ELECTRICAL CONNECTIONS
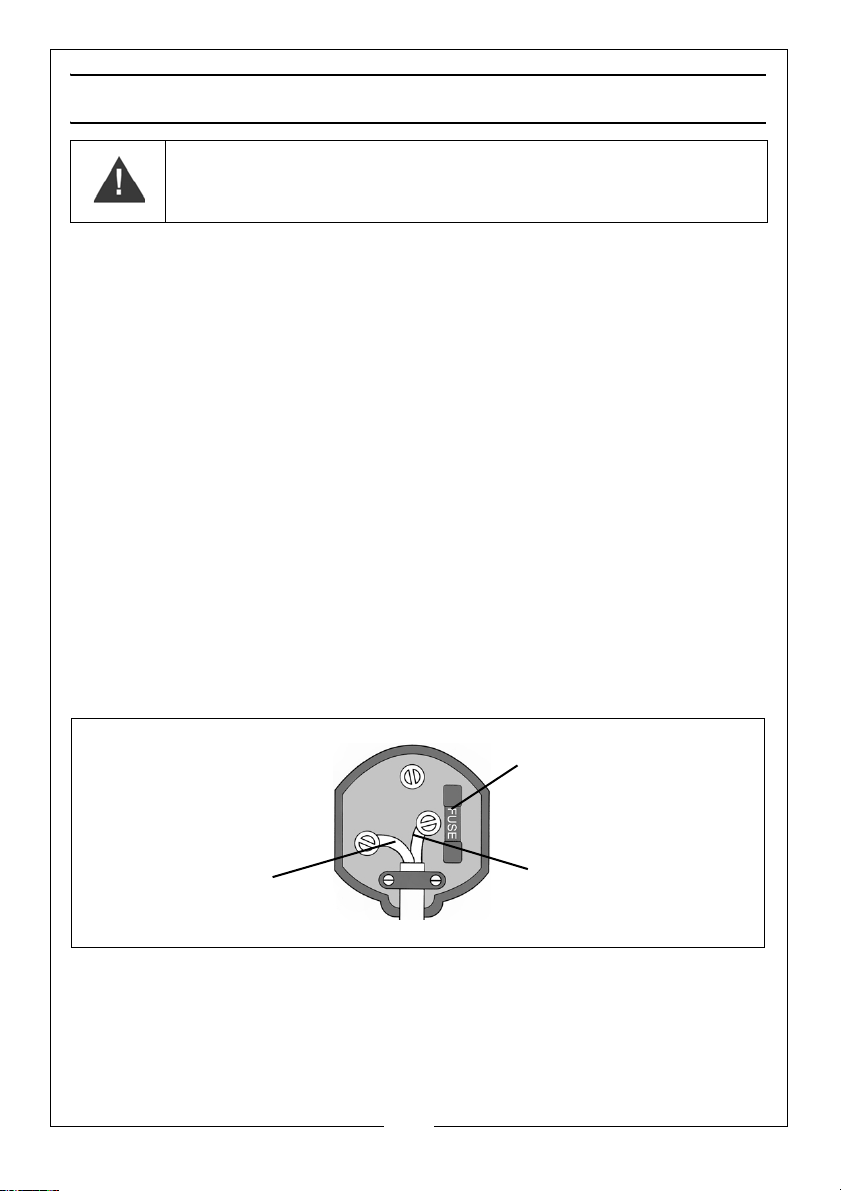
Plug must be BS1363/A approved.
Ensure that the outer sheath of the cable is firmly held by the clamp
Neutral
(Blue)
Live
(Brown)
Always fit a 13 Amp fuse
WARNING! READ THESE ELECTRICAL SAFETY INSTRUCTIONS
THOROUGHLY BEFORE CONNECTING THE PRODUCT TO THE
MAINS SUPPLY.
Before switching the product on, make sure that the voltage of your electricity
supply is the same as that indicated on the rating plate. This product is
designed to operate on 230VAC 50Hz. Connecting it to any other power
source may cause damage.
This product may be fitted with a non-rewireable plug. If it is necessary to
change the fuse in the plug, the fuse cover must be refitted. If the fuse cover
becomes lost or damaged, the plug must not be used until a suitable
replacement is obtained.
If the plug has to be changed because it is not suitable for your socket, or due
to damage, it should be cut off and a replacement fitted, following the wiring
instructions shown below. The old plug must be disposed of safely, as insertion
into a mains socket could cause an electrical hazard.
DOUBLE INSULATED APPLIANCE
If the colours of the wires in the power cable of this product do not correspond
with the markings on the terminals of your plug, proceed as follows.
•The Blue wire must be connected to the terminal marked N or
coloured Black.
•The Brown must be connected to the terminal marked L or coloured
Red
We strongly recommend that this machine is connected to the mains supply
via a Residual Current Device (RCD).
If in any doubt, consult a qualified electrician. DO NOT attempt any repairs
yourself.
Parts & Service: 020 8988 7400 / E-mail: [email protected] or [email protected]
5
Page 6
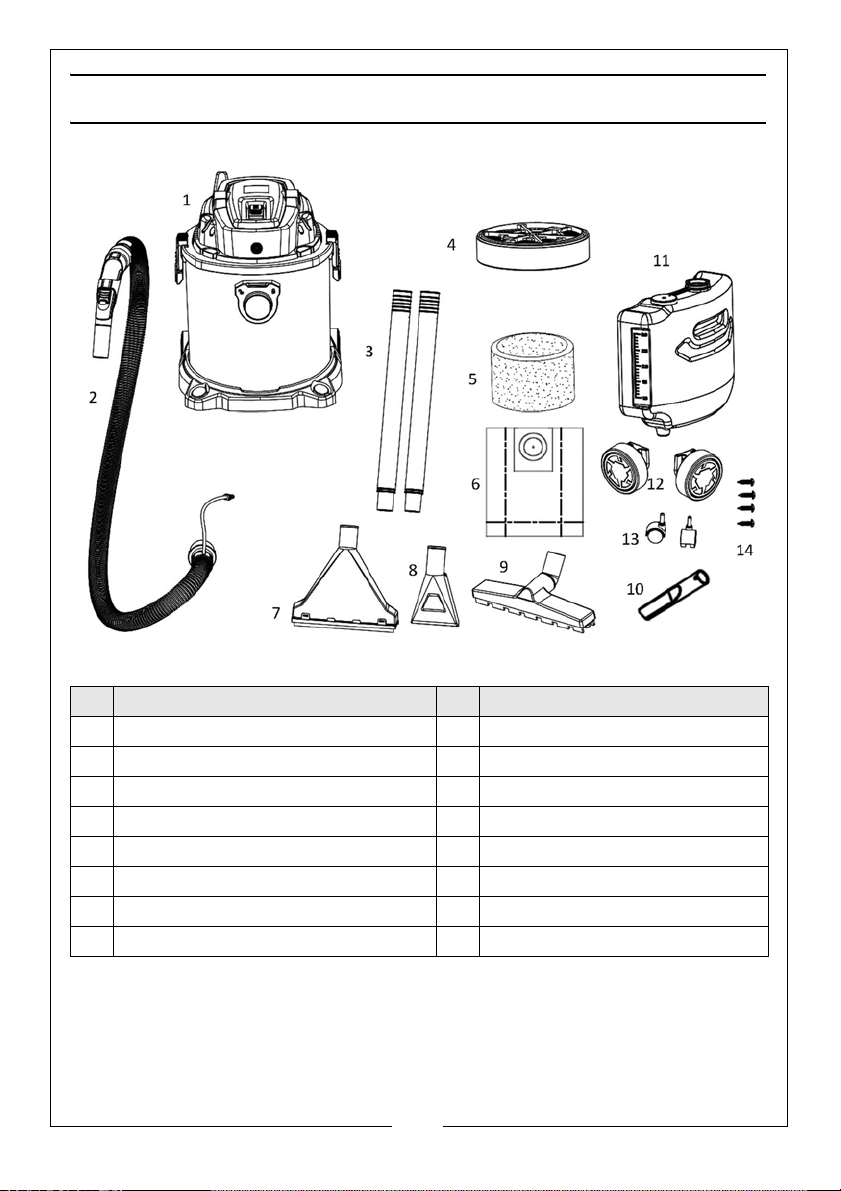
INVENTORY OF COMPONENTS
No Description No Description
1 Tank unit 9 Washing Brush (for carpet)
2 Flexible hose & detergent spraygun 10 Wet & Dry Floor Brush
3 2 x Connecting Tubes 11 Crevice Nozzle
4. HEPA Filter 12 Detergent tank
5 Sponge Filter (optional) 13 Rear wheels
6 Paper Filter 14 Front wheels
7 Cloth Bag (for dry use) 15 Screws for rear wheels
8 Washing Brush (for upholstery)
6
Parts & Service: 020 8988 7400 / E-mail: [email protected] or [email protected]
Page 7
PREPARATION FOR USE
WARNING: BEFORE USING THE CVAC, MAKE SURE THAT YOU HAVE READ
AND UNDERSTOOD THE SAFETY INSTRUCTIONS
UNPACKING & ASSEMBLY
With the CVAC removed from the packaging, undo the two clamps securing
the head and remove the components from within the tank. Lay them out
and check for shortages and that no damage was suffered in transit.
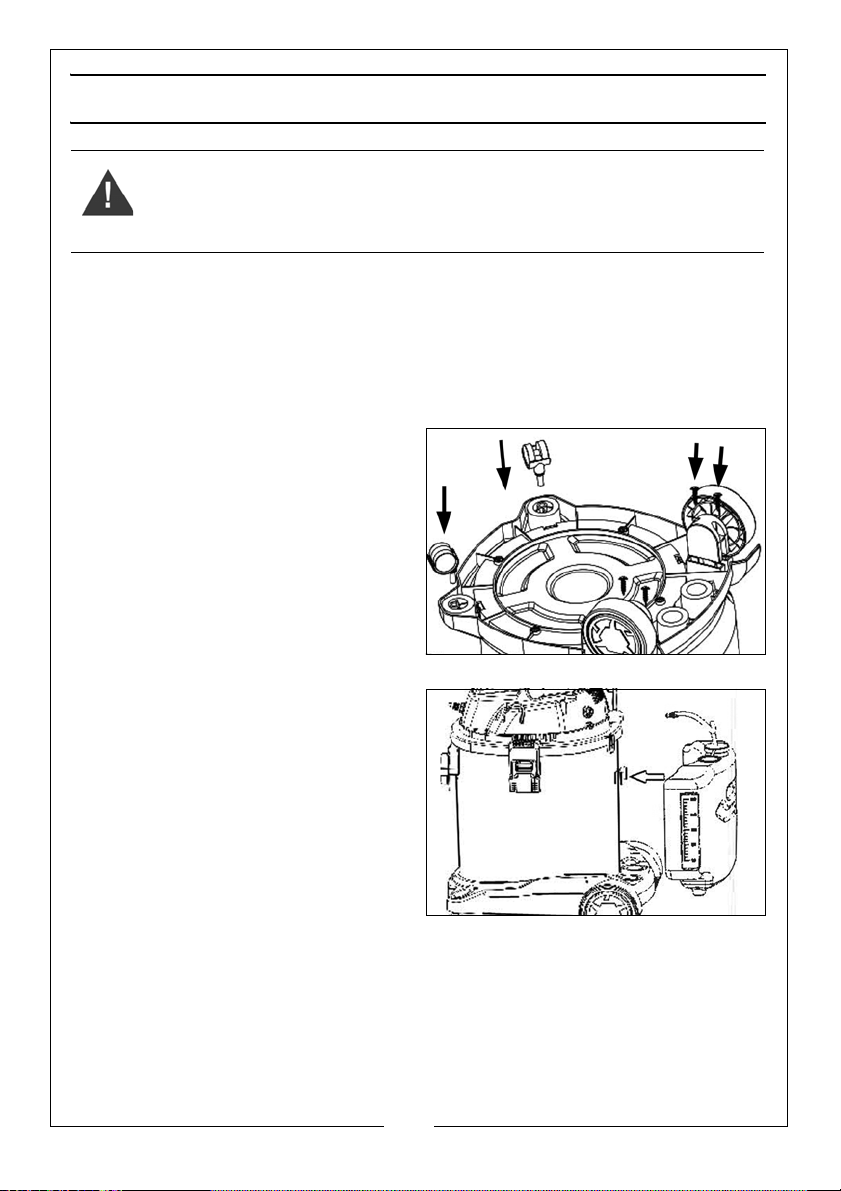
FITTING THE WHEELS
Press the 2x front wheels into the base
position and screw on the rear wheels.
FITTING THE DETERGENT TANK
Fit the detergent tank to the machine
by sitting the feet into the recesses
and pressing the body onto the
retaining clip on the tank.
7
Parts & Service: 020 8988 7400 / E-mail: [email protected] or [email protected]
Page 8
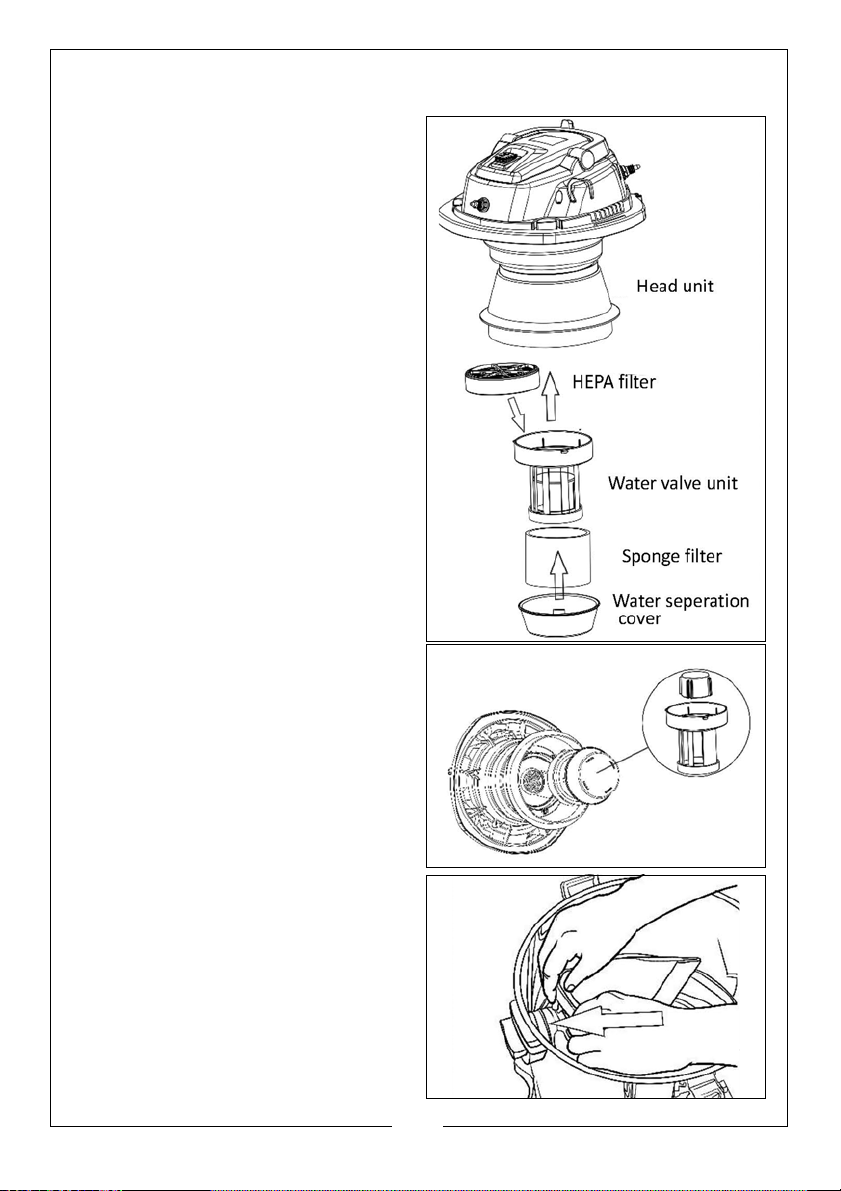
FITTING THE FILTERS
Filters are essential to ensure that dust
or foreign matter does not enter the
motor compartment which would
reduce motor efficiency and
eventually cause serious damage.
1. Fit the HEPA filter or the alternative
sponge filter into the top of the
water valve housing.
2. Fit the water valve unit complete
with sponge filter into the head
unit. Turn it clockwise to lock into
place.
3. Before cleaning dry dust, lock the
dust bag onto the suction port on
the side of the tank.
4. Clamp the head unit onto the
main tank.
8
Parts & Service: 020 8988 7400 / E-mail: [email protected] or [email protected]
Page 9
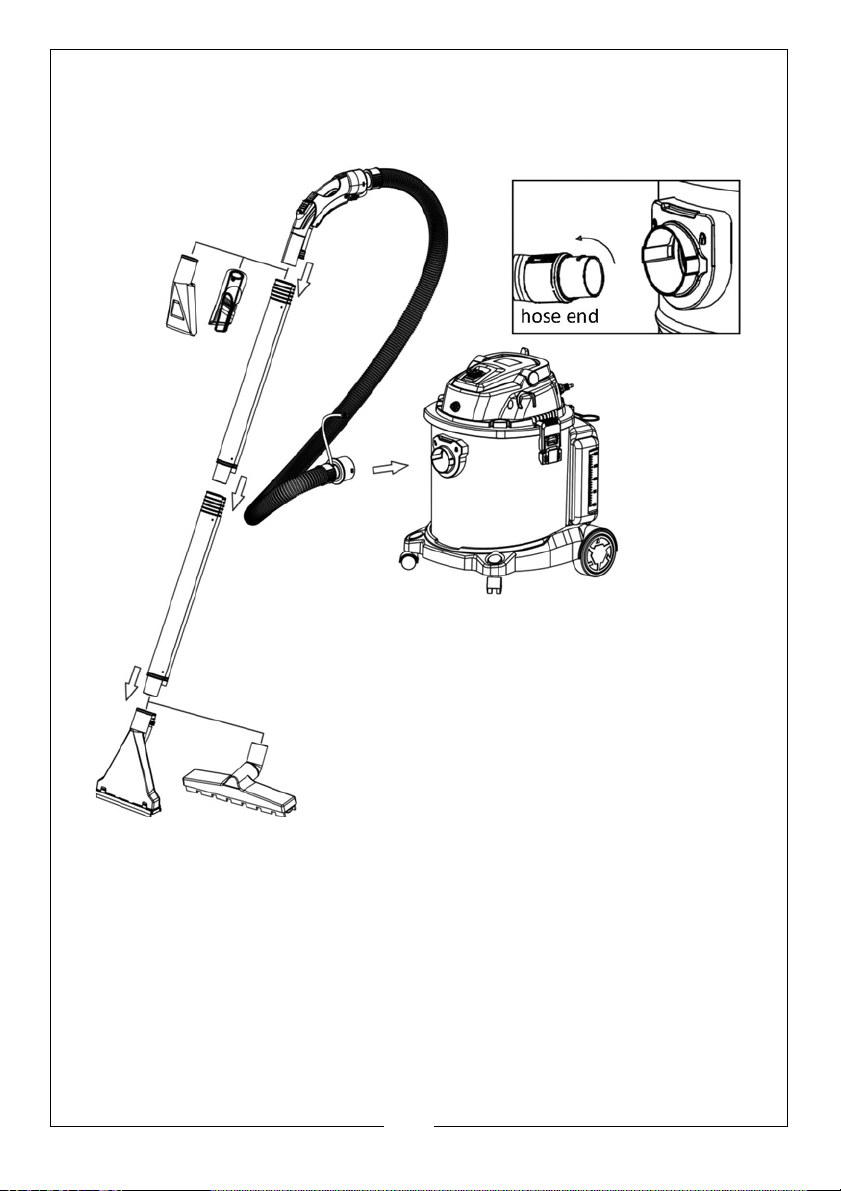
HOSE, TUBE, BRUSH & DETERGENT PIPE
1. Check the security and tightness of the following connections in case of
suction or residue leakage.
2. Connect the hose, tubes and brushes together as shown. Different brushes
should be connected with the detergent spray gun to tubes. To connect,
twist the hose end clockwise.
3. Fit all the sealing locks for the detergent hose and connectors in the
correct position and twist clockwise to secure.
9
Parts & Service: 020 8988 7400 / E-mail: [email protected] or [email protected]
Page 10
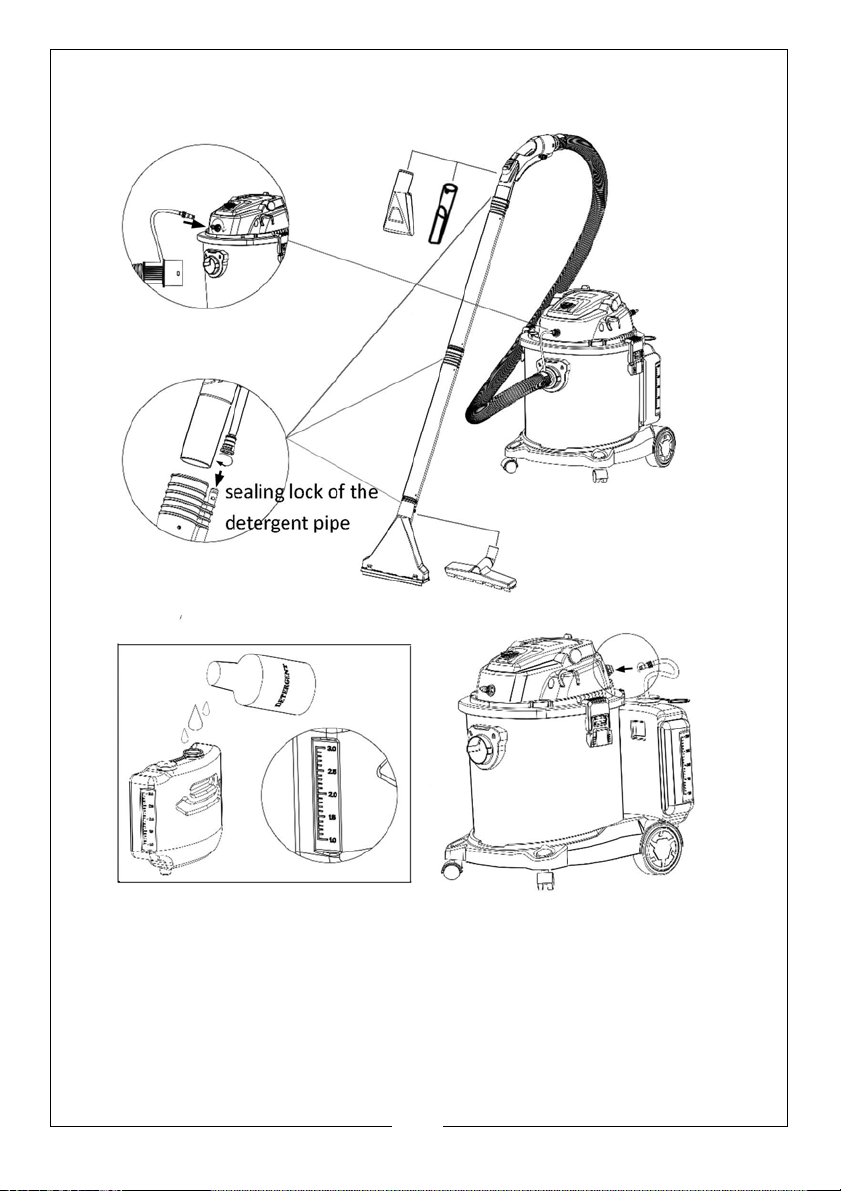
DETERGENT PIPES
4. Fill the detergent tank with detergent (max volume 3L) using the visual
scale on the side of the tank.
• Thick detergent should be diluted if there is a possibility of clogging
the pipe.
• The detergent level indicator should always be under the opening of
the detergent tank or it will be hard to pump the detergent out.
10
Parts & Service: 020 8988 7400 / E-mail: [email protected] or [email protected]
Page 11
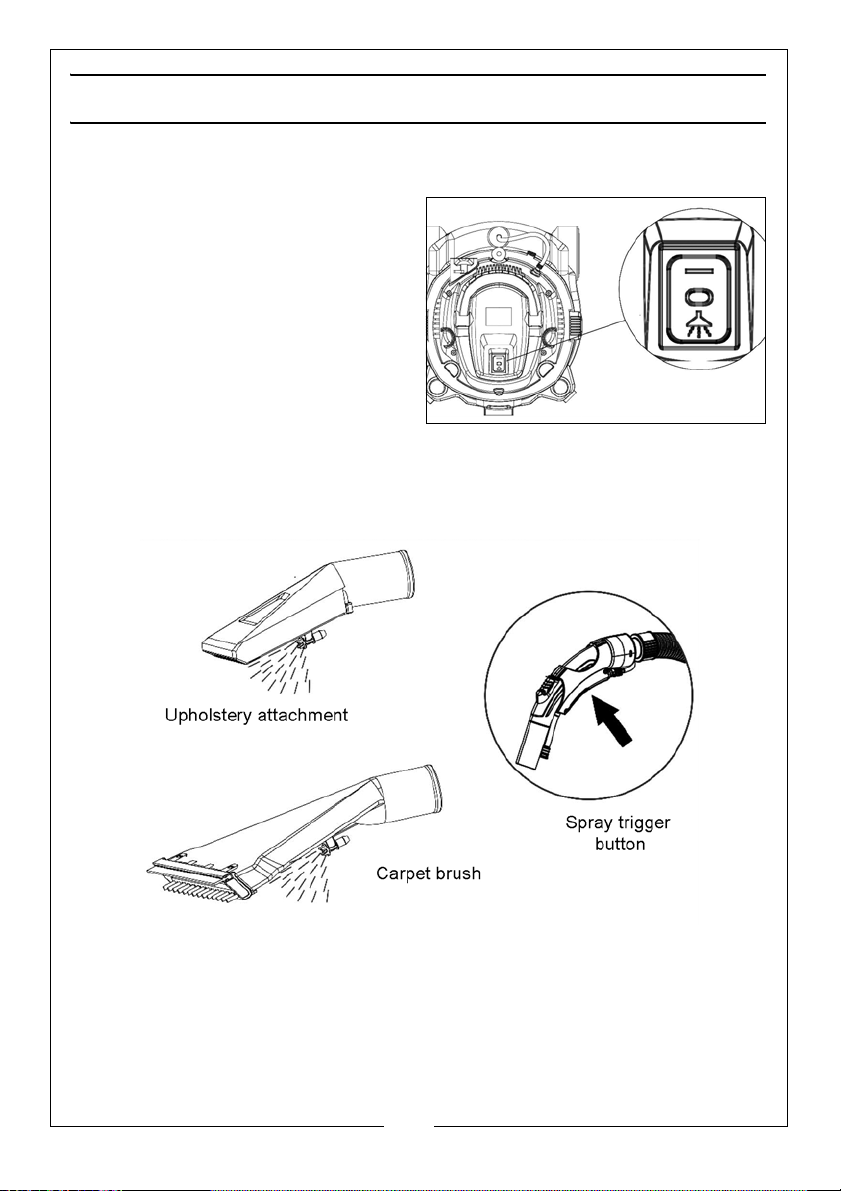
OPERATION
SWITCH
Using the (-) symbol the unit works as a
common wet/dry vacuum cleaner
Using the SPRAY symbol, the
detergent pump and spray gun
works.
CARPET AND SOFA WASHING
Choose the corresponding brush for your cleaning tasks. Ensure there is
enough detergent in the tank for best performance. The dust bag must be
removed as effluent will ruin it. Before washing it is better to have a pre-
cleaning for coarse dirt as the washing brushes are not able to clean it.
Press the button of the detergent spray gun. Detergent will spray out from the
spray nozzle of the carpet brush and sofa brush. (allow 10 seconds for the first
usage while the detergent is pumped out.
Move the brush on the carpet of sofa surface evenly and slowly, ensuring the
detergent is sprayed uniformly.
Brush the carpet or upholstery and vacuum the effluent for effective cleaning.
11
Parts & Service: 020 8988 7400 / E-mail: [email protected] or [email protected]
Page 12
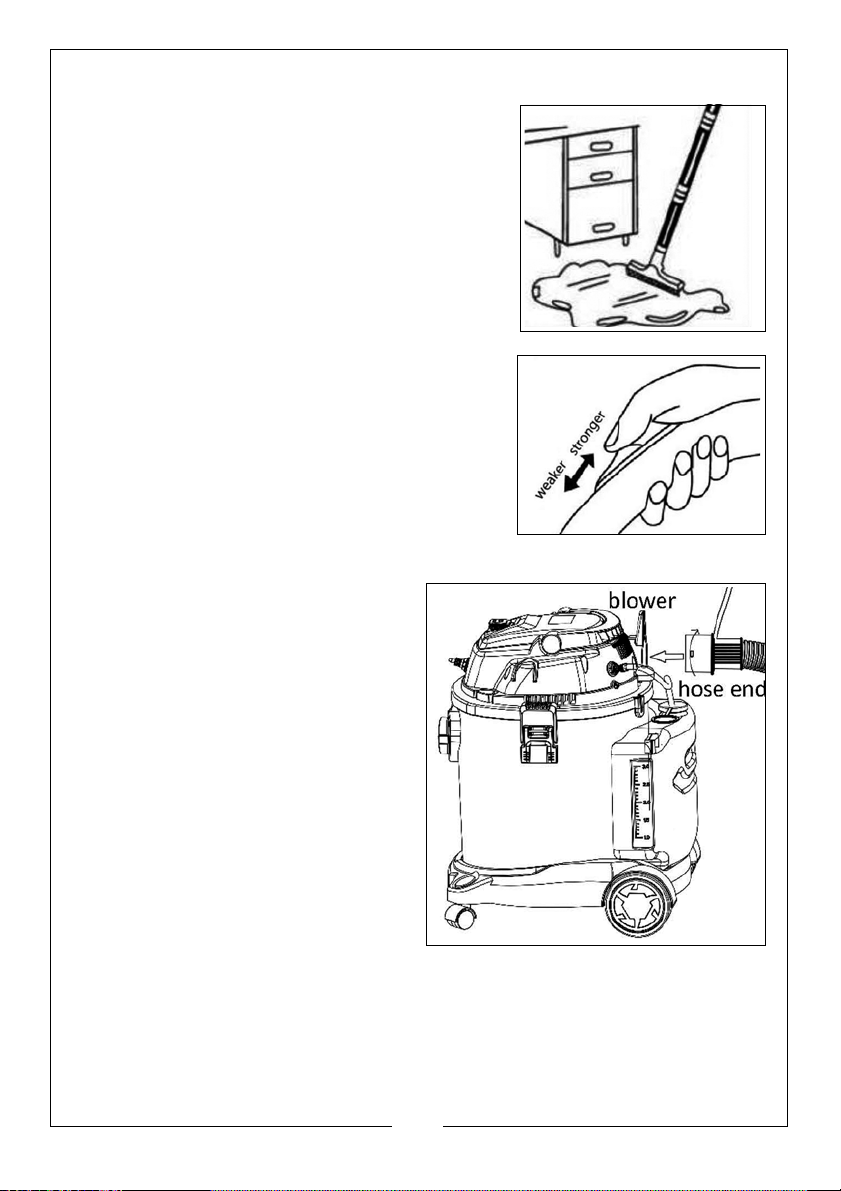
FLOOR CLEANING
Use the wet & dry floor brush for cleaning the
floor of dust, debris or spillage.
• Use the dust bag for dry use only
• Use either the fine sponge or HEPA filter for
dry dust only
• Use the sponge filter for spillage
AIRFLOW ADJUSTMENT
Slide the switch on the detergent spraygun to
adjust the suction.
BLOWING FUNCTION
Insert the end of the plastic hose into
the blower and twist clockwise to
lock.
Switch on the vacuum cleaner to start
the blower.
12
Parts & Service: 020 8988 7400 / E-mail: [email protected] or [email protected]
Page 13
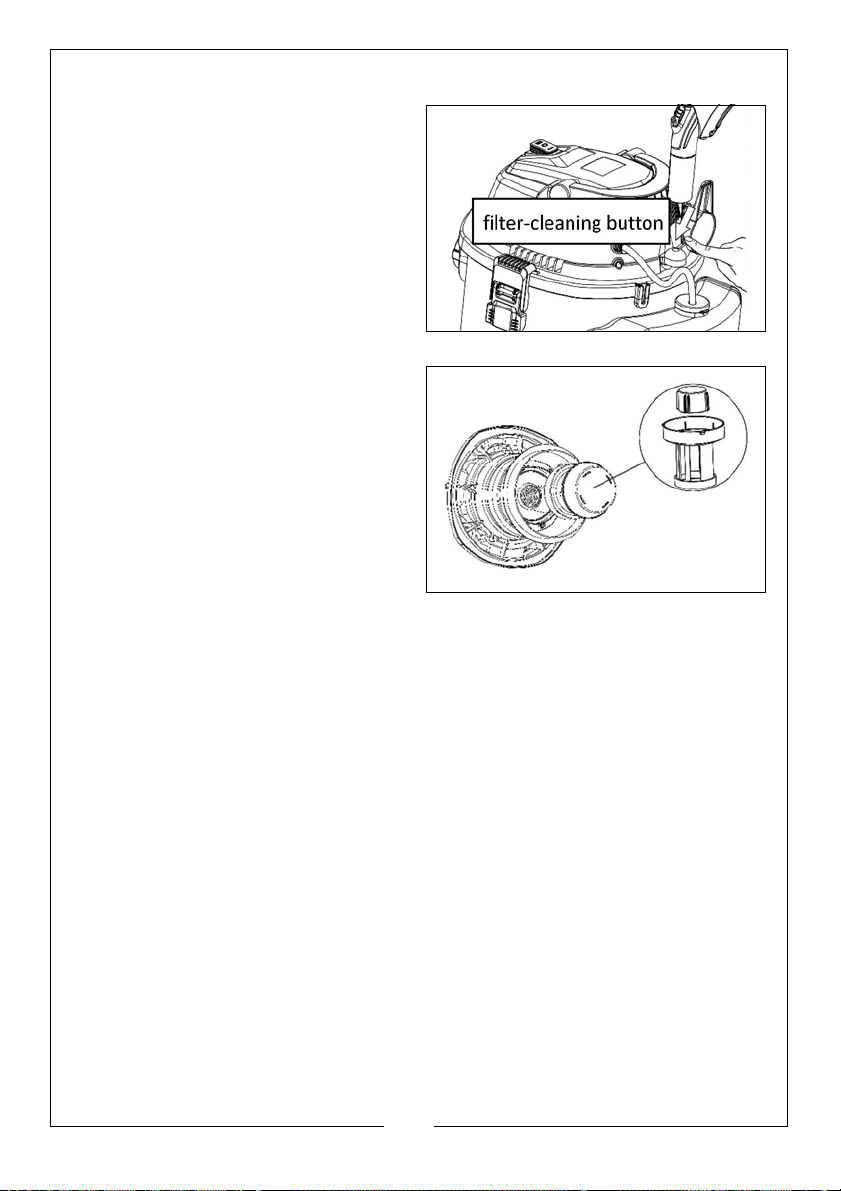
FILTER CLEANING FUNCTION
The presence of thick dust in the
garden, workshop or newly
decorated room will cause the filters
to clog easily. IN this case, press the
filter cleaning button on the back of
the unit head several times and the
suction power will recover.
Meanwhile when blocking the suction
port it will be more effective.
PROTECTIVE WATER VALVE
When the water container is full, the
protective float valve will work and
the suction power will vanish. The
motor will be heard running at high
speed and the water valve will block
the air inlet.
When picking up water, the tank will
gradually fill up. Check and empty at
frequent intervals, otherwise the float
valve will rise and shut off the suction.
This is a safety feature to prevent
water from coming into contact with electrical components. Should suction
stop, you will hear a more urgent sound from the motor. Immediately switch
OFF and empty the tank to prevent the motor overheating.
Switch off the power and empty the effluent.
WORKING PRACTICE
Before use, open the machine and check that the appropriate filters are
securely in place and in good condition. If the paper bag is full, replace it.
Spare bags are available from your CLARKE stockist.
Switch on and start work. The machine should be positioned on a firm, level
surface. DO NOT cover the machine and always position it with good allround ventilation. The machine must remain upright, especially when picking
up water/effluent.
When moving the machine:
• Always use the handle.
• DO NOT lift by (or place a strain on) the hoses or cable.
• After use always switch it off and disconnect from the power supply.
13
Parts & Service: 020 8988 7400 / E-mail: [email protected] or [email protected]
Page 14
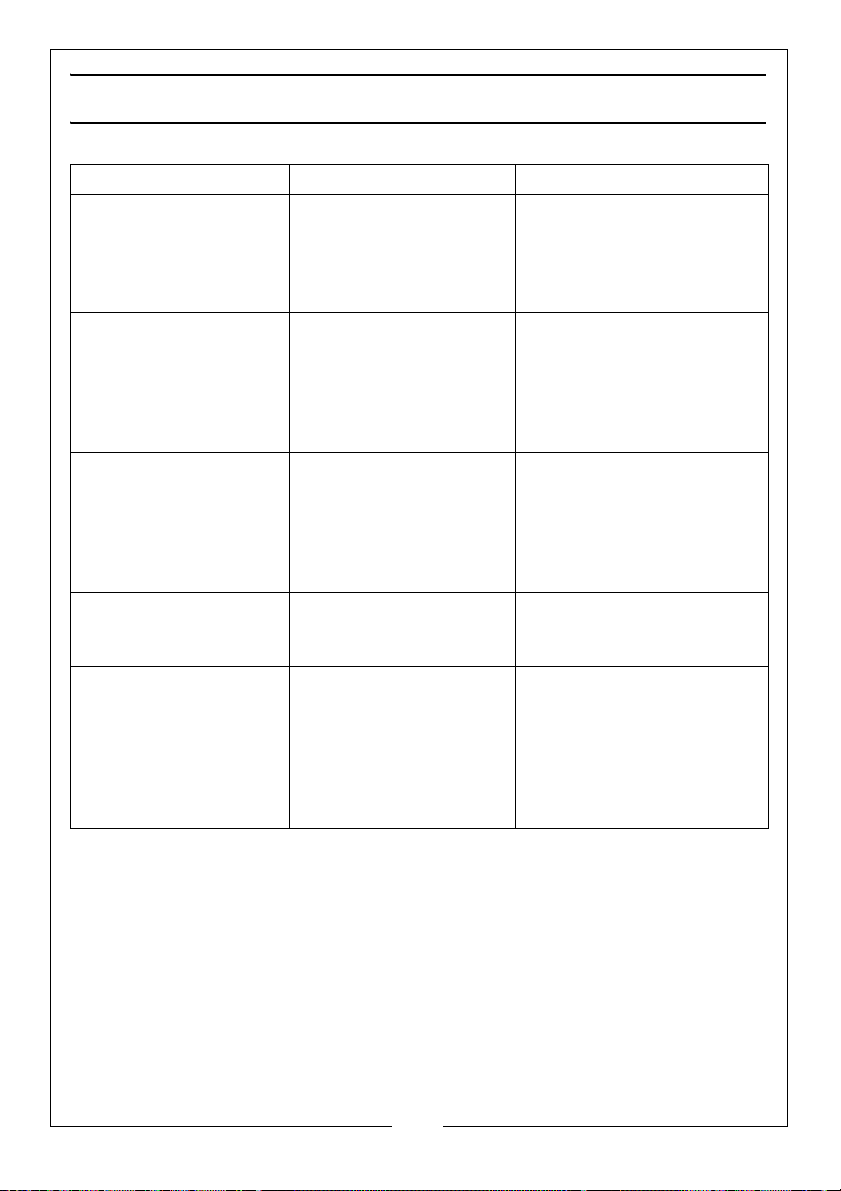
TROUBLESHOOTING
Symptom Possible Cause Corrective action
Leaks from hose/tubes/
pipes
Weak suction Filter/tubes/hose or
Abnormal noise during
operation.
Smoke appears from
machine
Effluent or foam is
blown out of the blower
or the head.
Accessories are not
installed correctly
Rubber seal ring on the
detergent pipe is broken
or loose.
suction port is blocked.
Lid not fitted correctly to
the tank.
Effluent in the tank is
excessive and the water
valve is operating
Unit is not upright and
the water valve is
operating
Overheated, overloaded or damaged
motor
Filters not installed
correctly
Filters need replacing
Too much foam in tank.
Follow assembly instructions
and check the tightness of
all joints.
For repairs, contact your
dealer.
Clean all filters/accessories
or use the filter cleaning
function.
Re-fit the head unit and
clamp it correctly to the
tank.
Clean out effluent from
tank
Ensure machine is upright.
Switch off and send for
repair.
Follow assembly instructions
and check the tightness of
all joints.
Replace filters with new.
Use low foaming detergent and clean effluent
and foam from the tank.
14
Parts & Service: 020 8988 7400 / E-mail: [email protected] or [email protected]
Page 15

MAINTENANCE
Maintenance is limited to inspecting the filters and replacing if necessary. If
the filters become holed or damaged they must be replaced.
The cartridge filter is of paper construction and therefore may not be washed.
It may be brushed clean and compressed air set at a low pressure may also
be used. The cloth bag may be washed as required and dried before use.
Ensure the hose is kept in good condition. A damaged hose will seriously effect
the efficiency of the machine and should be replaced immediately.
Inspect all other components periodically and replace damaged castors or
accessories when necessary. Contact your CLARKE dealer for replacements.
Regular inspection and the correct maintenance of the filters will ensure
efficient running and prolong the life of your machine.
CLEANING
After extensive work or when the tank is full of dust or effluent which causes the
suction to decrease, follow the following cleaning procedure.
1. Unfasten the clips and remove the head unit.
2. Remove the filter bag, empty and clean out the contents of the tank
before wiping it dry.
3. Wash and clean the filters including the HEPA (high-efficiency particulate
absorbing) and sponge filters which should be dried before the next use.
These are consumable spares and should be renewed for the best
machine performance.
4. Re-fit all items as described in Assembly.
CONSUMABLES
Replacement Filter Pack - Part No 6500565 is available for this machine.
15
Parts & Service: 020 8988 7400 / E-mail: [email protected] or [email protected]
Page 16
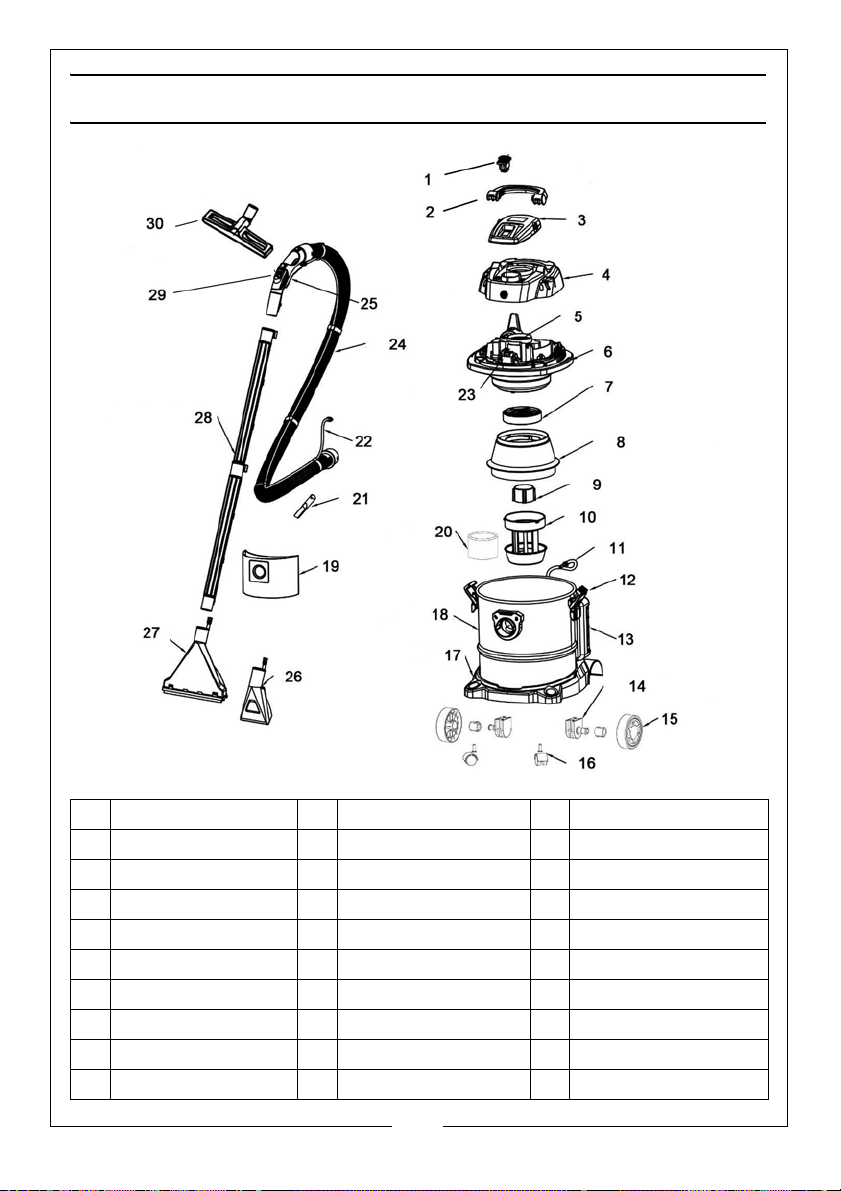
COMPONENT PARTS
1 Switch 11 Detergent inlet tube 21 Crevice nozzle
2 Handle 12 Clip 22 Detergent tube
3 Top cover 13 Detergent tank 23 Water pump
4 Middle cover 14 Wheel support 24 Hose
5 Motor 15 Rear wheel 25 Spray control
6 Base cover 16 Castor 26 Sofa spray brush
7 HEPA filter 17 Base 27 Carpet brush
8 Cover 18 SS tank 28 Plastic tube
9 Safety valve 19 Paper bag 29 Airflow control
10 Water valve unit 20 Sponge filter 30 Wet/dry floor brush
16
Parts & Service: 020 8988 7400 / E-mail: [email protected] or [email protected]
Page 17
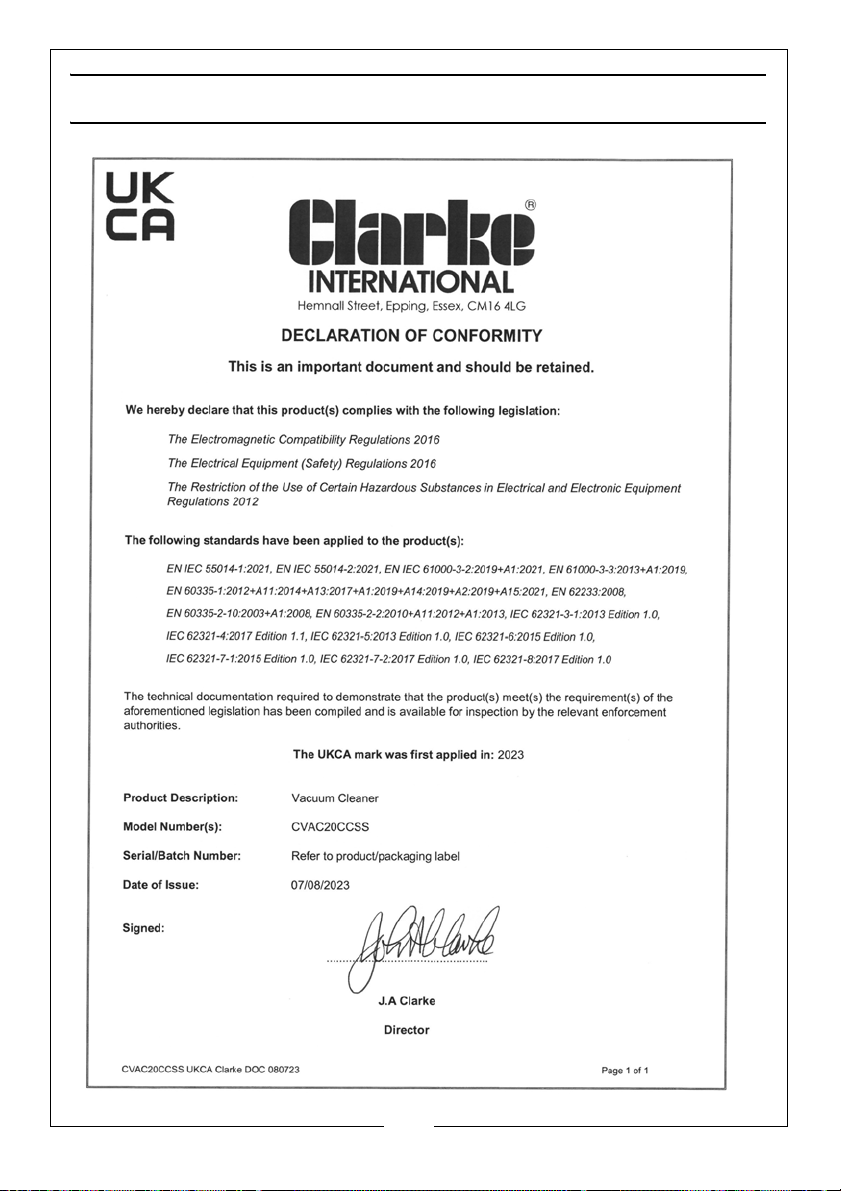
DECLARATION OF CONFORMITY-UK
17
Parts & Service: 020 8988 7400 / E-mail: [email protected] or [email protected]
Page 18
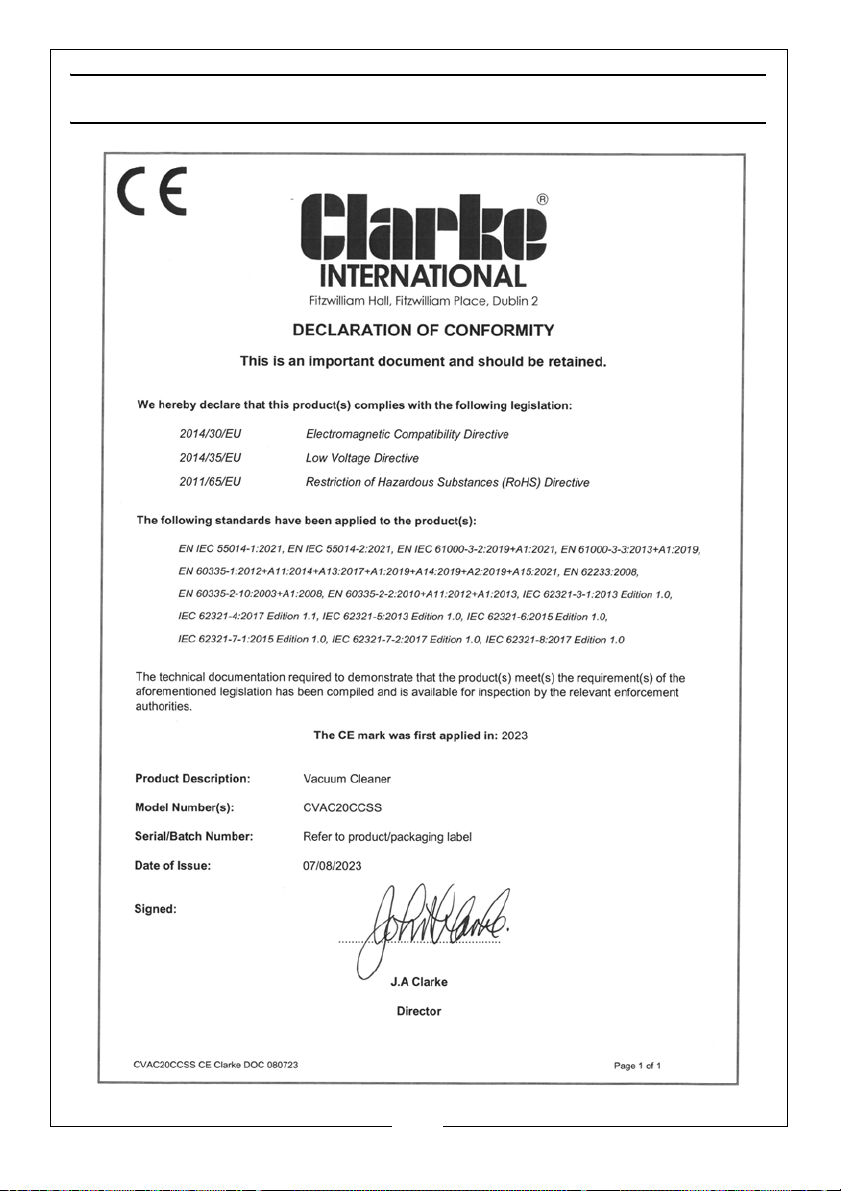
DECLARATION OF CONFORMITY-CE
18
Parts & Service: 020 8988 7400 / E-mail: [email protected] or [email protected]
Page 19

NOTES
____________________________________________________________________________
____________________________________________________________________________
____________________________________________________________________________
____________________________________________________________________________
____________________________________________________________________________
____________________________________________________________________________
____________________________________________________________________________
____________________________________________________________________________
____________________________________________________________________________
____________________________________________________________________________
____________________________________________________________________________
____________________________________________________________________________
____________________________________________________________________________
____________________________________________________________________________
____________________________________________________________________________
____________________________________________________________________________
____________________________________________________________________________
____________________________________________________________________________
____________________________________________________________________________
____________________________________________________________________________
____________________________________________________________________________
19
Parts & Service: 020 8988 7400 / E-mail: [email protected] or [email protected]
Page 20

 Loading...