

Page 1
METAL SHRINKER/STRETCHER SET
MODEL NO: CMSSCS
PART NO: 7610950
USER INSTRUCTIONS
ORIGINAL INSTRUCTIONS GC09/23-Rev 2
Page 2
INTRODUCTION
Thank you for purchasing this CLARKE product.
The CMSSCS Metal Stretcher/Shrinker Set is a handy pair of tools for sheet
metal fabricators who need custom, curve shaped metal straps, trim and
flanges for auto body repair and general sheet metalwork.
Before attempting to use this product, please read this manual thoroughly and
follow the instructions carefully. In doing so you will ensure the safety of yourself
and that of others around you and you can look forward to your purchase
giving you long and satisfactory service.
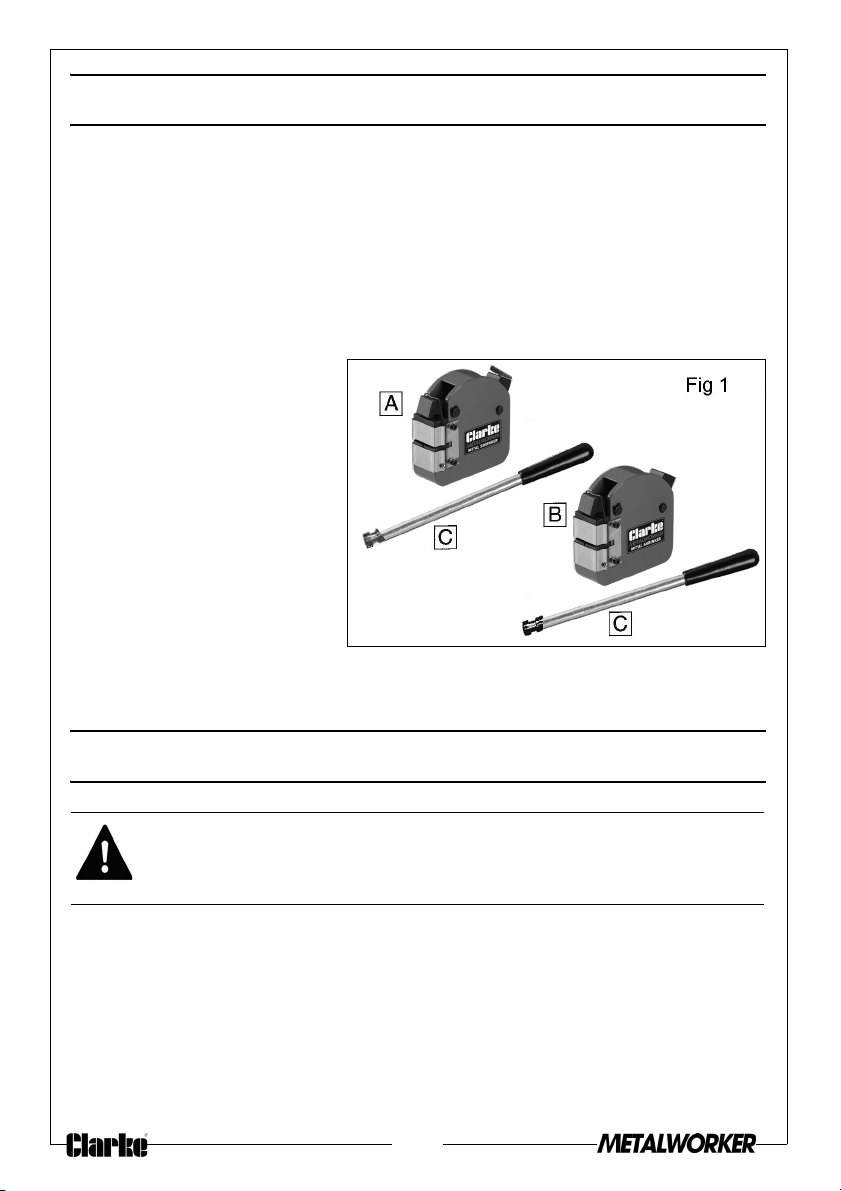
INVENTORY
A) Shrinker Body c/w Dies
B) Stretcher Body c/w Dies
C) Levers
SPECIFICATIONS
Max thickness-aluminium
.......................16Ga/1.5mm
Max thickness-mild steel
........................18Ga/1.2mm
Max thickness-Stainless Steel
.......................20Ga/1.0mm
Mounting bolt hole size- 3/8”(x2)
SAFETY PRECAUTIONS
WARNING: THE USER MUST FOLLOW ALL INSTRUCTIONS WITHIN THIS
INSTRUCTION BOOKLET
To protect against injury observe the following precautions when using this
product. Clarke International is not responsible for misuse of the equipment.
• ALWAYS secure the tool in a bench vice before use.
• ALWAYS keep the work area free of obstructions.
• NEVER try to bend material other than hot-rolled mild steel.
• NEVER modify the tool or use a handle extension arm other than the
one provided.
2
Page 3
ASSEMBLY
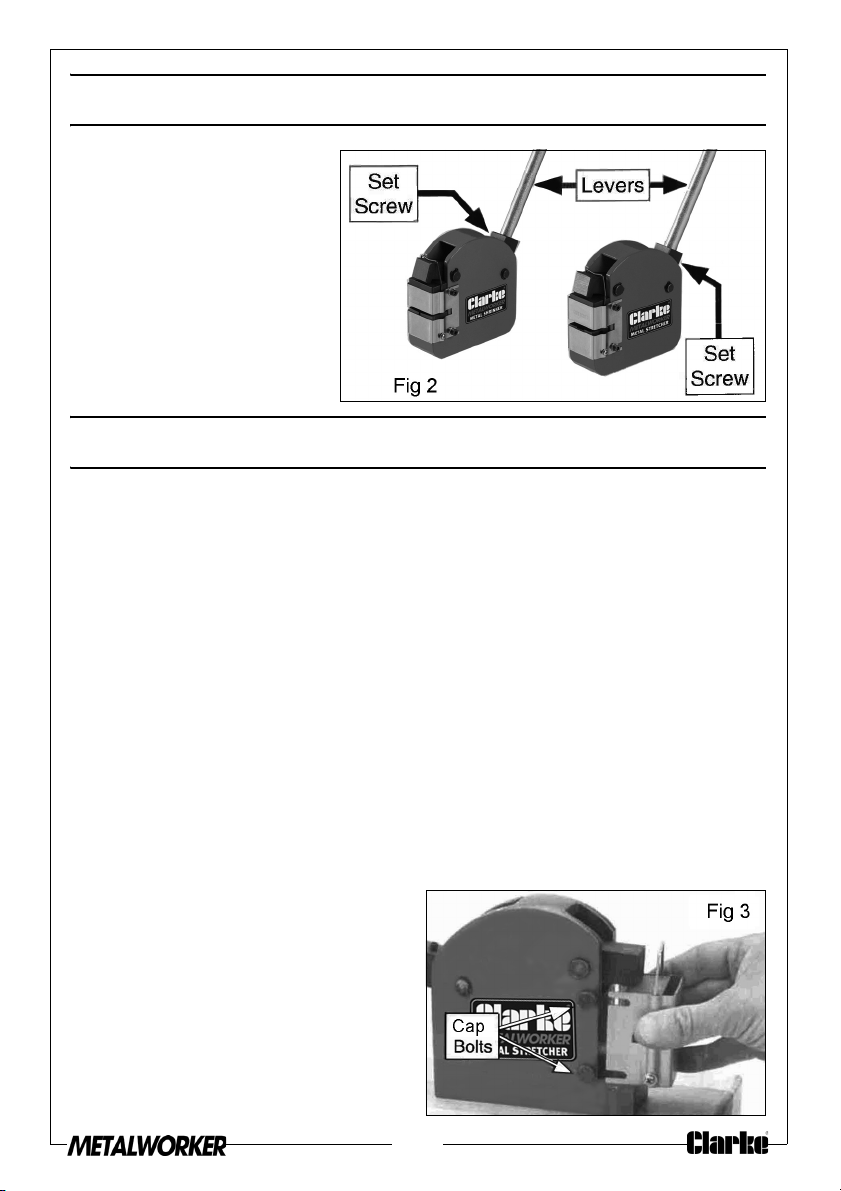
The shrinker/stretcher set
just requires final assembly
by installing one lever into
each tool body and
securing with the preinstalled M5 setscrews.
Tools required;
Hex wrench 3mm
MOUNTING
The shrinker and stretcher are portable and can be clamped in a vice for use.
However, to take full advantage of the set and to get 360
workpiece, you can mount these tools to a stand intended for a bench
grinder. To prevent tipping, be sure to fasten the stand to the floor.
o
access to your
MOUNTING THE SHRINKER AND STRETCHER
1. Clean and lubricate shrinker and stretcher as outlined in SETUP.
2. Determine where you want to mount the tool.
3. At the mounting location, center punch two points 2½" apart, and drill two
⅜" diameter holes at these locations.
4. Secure the shrinker/stretcher to your workbench or grinder stand with two
lts or cap screws of appropriate length to ensure that the fasteners
bo
thread into the casting at least ½".
SETUP
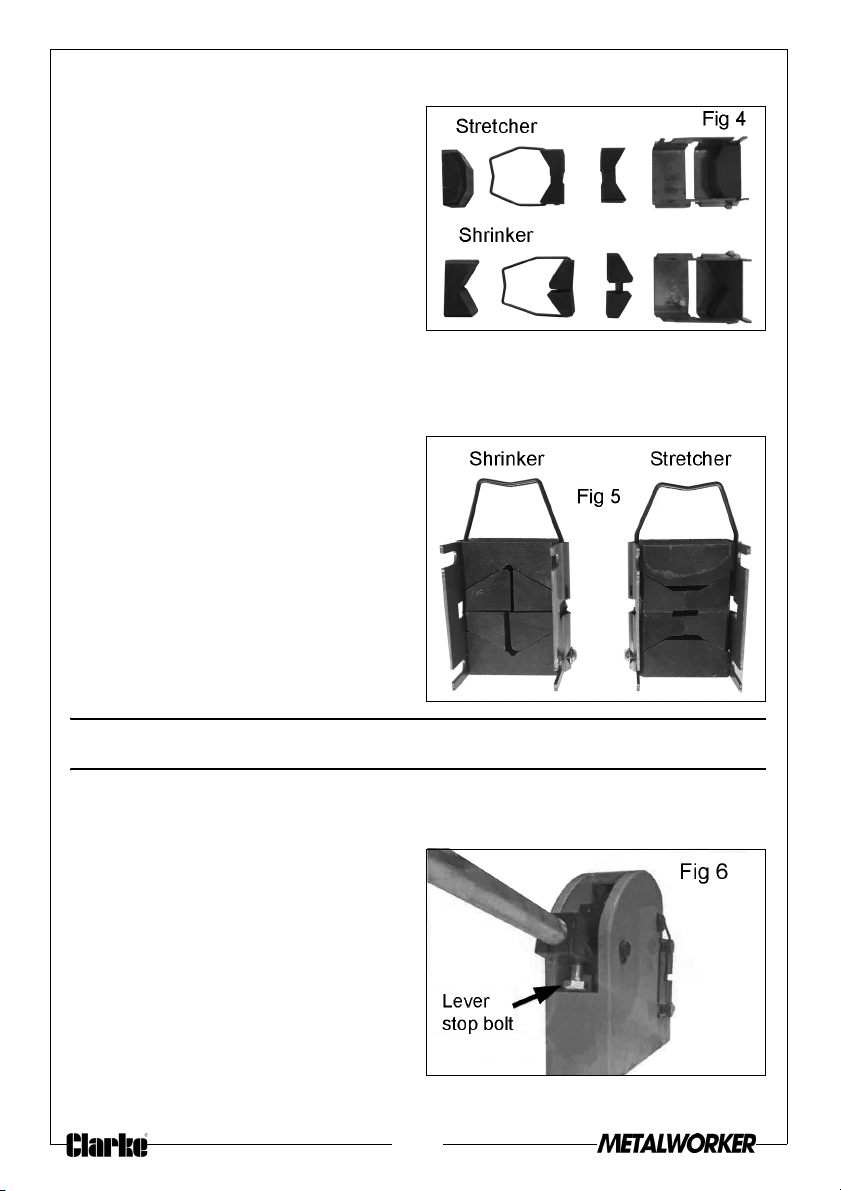
1. Raise the handle, loosen the cap
bolts using the hex wrench and
unclip die retainer from the
pressure arm. Slide the die
assembly away from the casting
(see Figure 3).
2. Grasp the die retainer clip and
ll the upper jaw from the die
pu
housing.
3
Page 4
NOTE: Be careful not to lose any springs.
3. Lay out the die components as
shown in Fig 4.
4. Clean grease, metal shavings,
and debris off the tool and dies,
then lightly oil.
NOTE: N
Figure 4 shows die and jaw assembly order.
5. Use Figures 4-5 as a guide to
arrange the die parts in the
correct o
6. The shrinker/stretchers are ready
for
ever use a wire wheel,
buffer, sand blaster, or
sandpaper on jaw teeth.
otherwise, tooth damage
may occur. It is better to let
the jaws soak in mineral spirits overnight, and then use a wire
brush or a fine dental pick to remove debris.
rder and reassemble.
operation.
OPERATION
The Shrinker/Stretcher set is designed to create long, compound-curved metal
pieces out of a single strip of metal without multiple splice points.
Operation consists of inserting a
piece of metal in the tool and pulling
down on the lever to compress or
expand the metal at various points
along the length of the metal strip,
creating the bend or shape needed.
During the bending process, as you
work along the strip of metal, the
clamping pressure exerted by the
lever can be adjusted to create
curves with a nice smooth arch.
4
Page 5
The lever stop bolt (see Figure 6) can be adjusted with a 3mm wrench to allow
the clamping lever to stop at the same location each time the lever is pulled
down.
NOTE: If the metal splits during the shrinking/stretching procedure, it is
typically because too much bend is trying to be achieved with
just a few heavy pulls of the lever. To avoid splitting, make pulls
lighter and increase number of pulls on lever. If metal still splits,
the radius of the desired bend may be too small for the metal, or
the metal is of the wrong type.
USING THE SHRINKER/STRETCHER
1. Verify the jaw teeth are free of
debris
.
2. Determine your job
requirements:
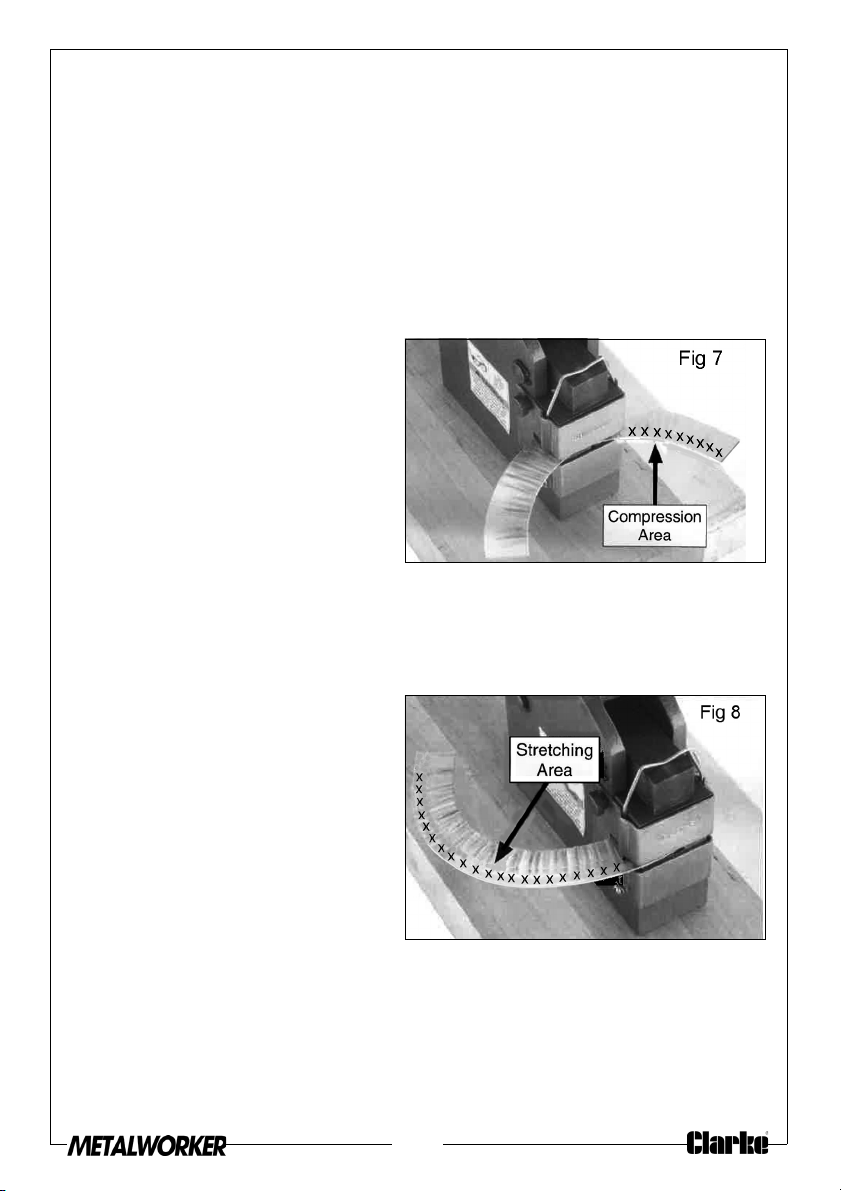
Using the shrinker, a curve in the
metal is created by compressing
the inside radius of a curve (see
Figure 7).
NOTE: Shr
CAUTION: WHEN THE TOOLS ARE NOT IN USE OR WILL BE PLACED IN STORAGE FOR
A PERIOD OF TIME, WE HIGHLY RECOMMEND REMOVING THE DIES FROM THE
TOOLS. IF THE LEVER IS ACCIDENTLY USED AND THE DIE JAWS CLAMP DOWN
AGAINST ONE ANOTHER INSTEAD OF A WORKPIECE, THE GRIPPING JAW TEETH
MAY BE DAMAGED.
inking/stretching will create small teeth marks from the jaws
and cannot be avoided. Limit the depth of any teeth marks by
making more, lighter pulls with the lever.
5
Page 6
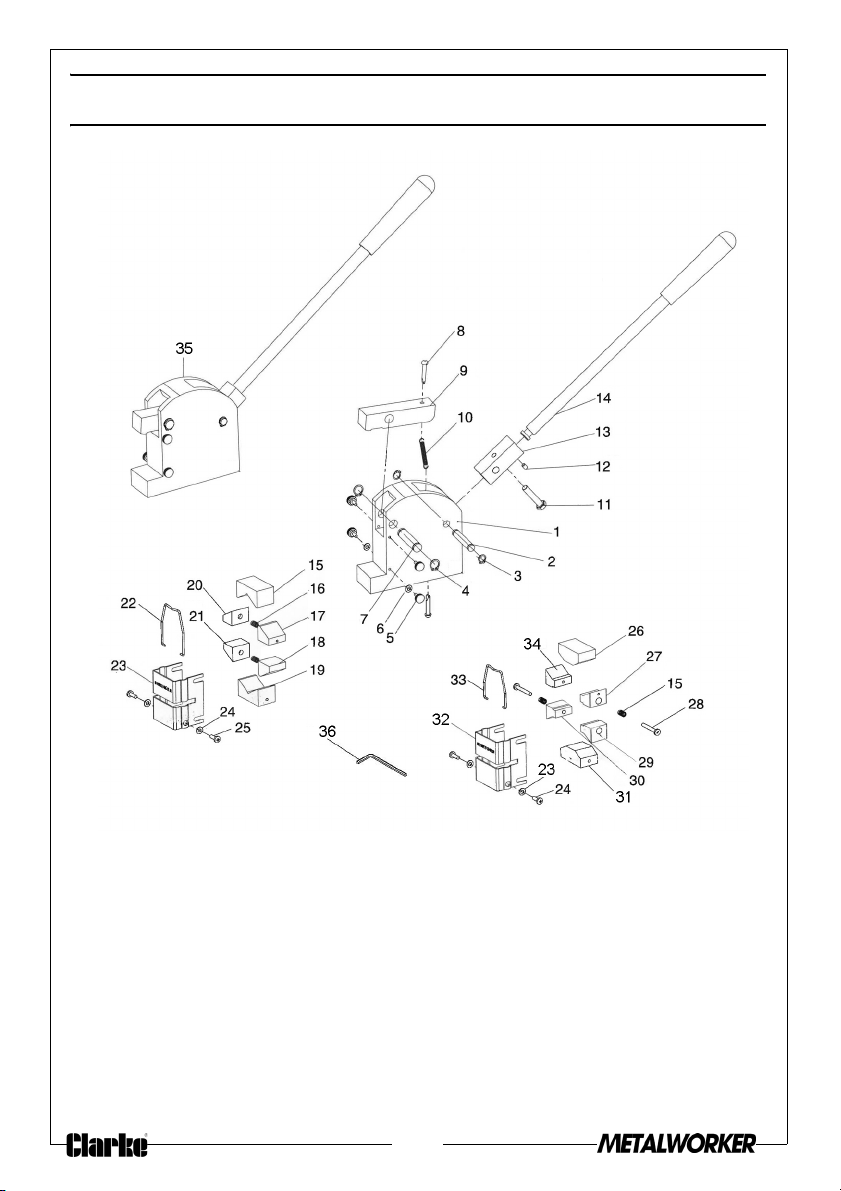
COMPONENT PARTS
6
Page 7
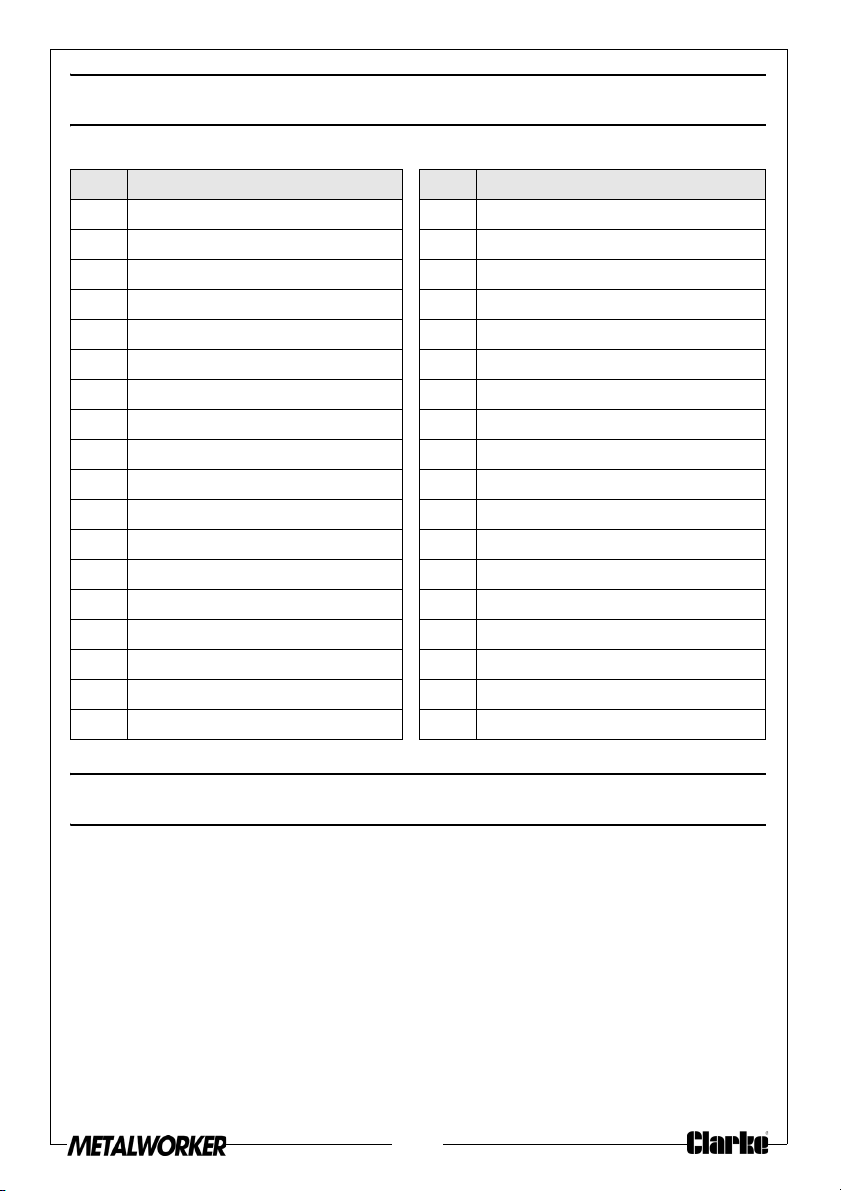
COMPONENT PARTS
ITEM DESCRIPTION ITEM DESCRIPTION
1 Stretcher body 19 Lower V-block(Shrinker)
2 Fulcrum arm pin 20 Upper jaw (Left-Shrinker)
3 External circlip 10mm 21 Lower jaw (Left-Shrinker)
4 External circlip 12mm 22 Retainer clip (shrinker)
5 Cap bolt M5 23 Die retainer (shrinker)
6 Flat washer 5mm 24 Flat washer 4mm
7 Pressure arm pin 25 Cross head screw M4 x 12
8 Rivet 26 Upper V-block (stretcher)
9 Pressure arm 27 Upper jaw (Right - stretcher)
10 Extension spring 28 Cross head screw M4 x 30
11 Bolt M8 x 35 29 Lower jaw (Right - stretcher)
12 Set-screw M5 x 8 30 Lower jaw (Left - stretcher)
13 Fulcrum arm 31 Lower V-block (stretcher)
14 Lever 32 Die retainer (stretcher)
15 Upper V-block (shrinker) 33 Retainer clip (Stretcher)
16 Compression spring 34 Upper jaw (Left - stretcher)
17 Upper jaw (right-shrinker) 35 Shrinker body
18 Lower jaw (right-shrinker) 36 Hex wrench 3mm
GUARANTEE
This product is guaranteed against faulty manufacture for a period of 12
months from the date of purchase. Please keep your receipt which will be
required as proof of purchase.
This guarantee is invalid if the product is found to have been abused or
tampered with in any way, or not used for the purpose for which it was
intended.
Faulty goods should be returned to their place of purchase, no product can
be returned to us without prior permission.
This guarantee does not effect your statutory rights.
7
Page 8

 Loading...