

Page 1
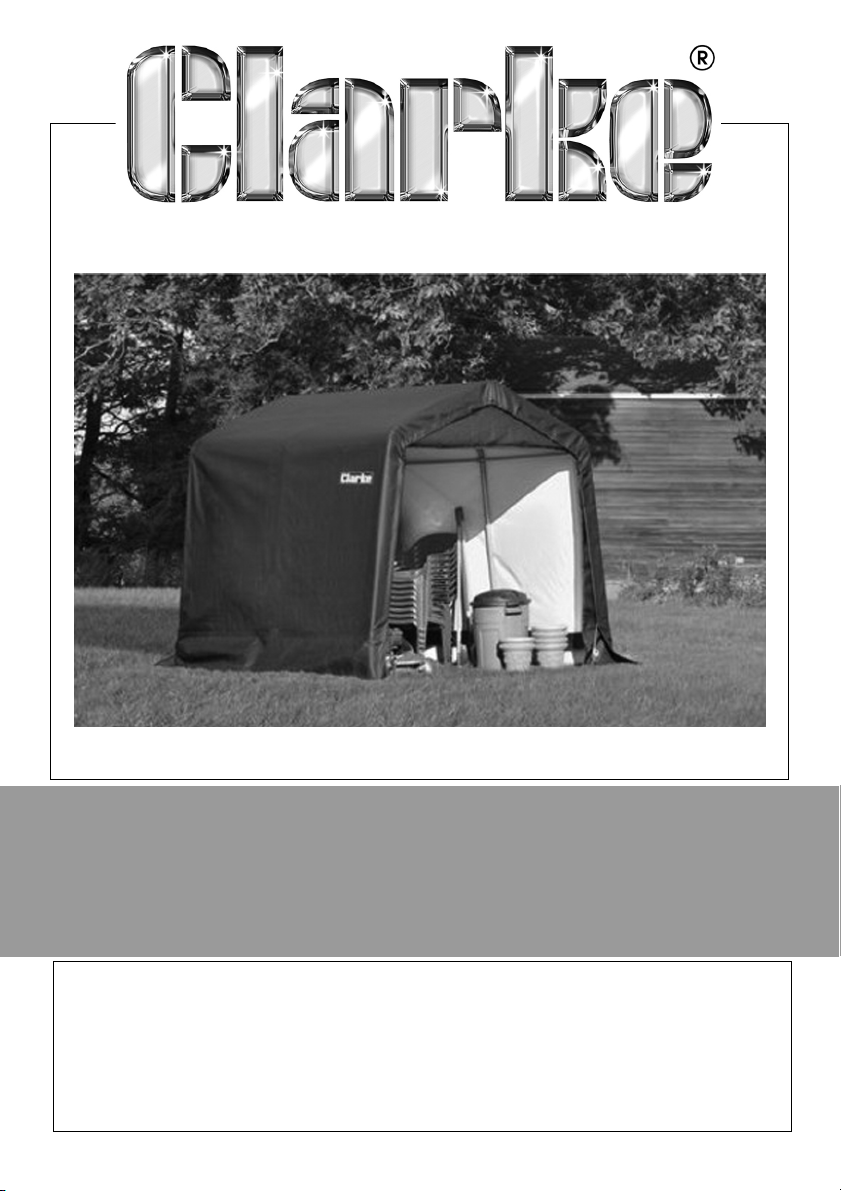
MOTORCYCLE SHED/SHELTER
MODEL NO: CIS788 (12 X16 X 8’4)
PART NO: 3503582
ASSEMBLY INSTRUCTIONS
ORIGINAL INSTRUCTIONS GC04/22 - Rev 2
Page 2
INTRODUCTION
Thank you for purchasing this CLARKE Instant Shed. Before attempting to use
this product, please read this manual thoroughly and follow the instructions
carefully. In doing so you will ensure the safety of yourself and that of others
around you, and you can look forward to your purchase giving you long and
satisfactory service.
GENERAL SAFETY WARNINGS
WARNING: READ THESE SAFETY INSTRUCTIONS TO REDUCE THE RISK OF
INJURY. RETAIN THESE INSTRUCTIONS FOR FUTURE REFERENCE.
DO NOT use this product in environments for which it is not Intended (i.e.
extreme cold, high winds, extreme heat, heavy rainfall, etc).
DO NOT use open flames or cooking or heating devices inside or in close
proximity to the shed including all types of stoves, gas heaters, gas lanterns,
electric heaters, torches, fly killers, etc. The fabric will burn if left in continuous
contact with a naked flame.
DO NOT store flammable liquids (petrol, kerosene, propane, etc.) in the shed
or operate gas powered vehicles/equipment in or around the shed.
Select a calm day to install the cover due to the high windage of the cover
both during fitting and before it is totally secured in position.
POSITIONING AND INSTALLATION OF THE SHED
This shed is a temporary structure and is not recommended as a permanent
building. It is designed to offer protection from sun, rain, light snow, tree sap
and bird droppings etc. It is not designed to shelter equipment from
excessively high winds or heavy snow.
Choose your shed location carefully. Check for overhead power lines, tree
branches, etc. DO NOT install near roofs or other structures that may shed snow,
ice or excessive run-off onto your shed.
Choose a dry location where dampness rising from ground water in the
environment will not undermine the protection offered by the shed.
Erect your shed on level ground over a firm, level area. Allow enough space
near each corner for the tie-down straps supplied to be used as intended. If
2
Parts & Service: 020 8988 7400 / E-mail: [email protected] or [email protected]
Page 3
the ground area is of tarmac or concrete, the use of ground anchor holdingdown bolts will be required to anchor the shed to the floor.
A masonry floor such as block paving or concrete is ideal, but if this is not
being supplied, a timber or shuttering plywood floor, protected by a suitable
groundsheet should be used. This will help to create a dry storage environment
by insulating the storage space from ground moisture.
Proper anchoring and keeping the cover tight and free of snow and debris is
the responsibility of the user. Damage caused by improper anchoring is not
covered under warranty.
CARE OF THE SHED STRUCTURE
This shed is NOT designed to support heavy snow. Snow or ice accumulation
may cause your shed to collapse. To avoid overload, use a ladder to brush
snow and ice off the roof top with a broom or mop to prevent collapse with
the resultant damage to property or personal injury.
NEVER clear the roof of snow or debris from inside the shed.
DO NOT use hard-edged tools or instruments, such as rakes or shovels to
remove snow. These can cause punctures to the cover.
DO NOT use bleach, alkaline or harsh detergents for cleaning. Doing so will
damage the material. Soap and warm water are recommended.
In order to reduce risk of burning and avoid damage, DO NOT- cook, smoke,
refuel or use any open flame devices in or around the garage.
USING THE STORAGE SPACE
NEVER run the engine of any vehicle or machine inside a closed shed. Ensure
that there is adequate ventilation for engines or for any work with paints,
cleaners. etc. by opening the door panel and keeping it raised.
Take steps to avoid the buildup of condensation inside the shed. Cool, damp
winter days and moisture from the breath and body heat of personnel may
cause condensation on the inside of the top cover of the shed.
For long term storage of moisture sensitive belongings in all weathers, the use
of a dehumidifier may be required, such as those in the CLARKE range. A
suitable extension lead to a locally available power supply will be required.
Condensation will be much less of an issue during the summer months.
A supply of fresh air through the doorway will at least partly remove this issue.
If storing a motorcycle in your shed over the winter months we recommend
the use of a secondary lightweight cover over your motorcycle.
3
Parts & Service: 020 8988 7400 / E-mail: [email protected] or [email protected]
Page 4
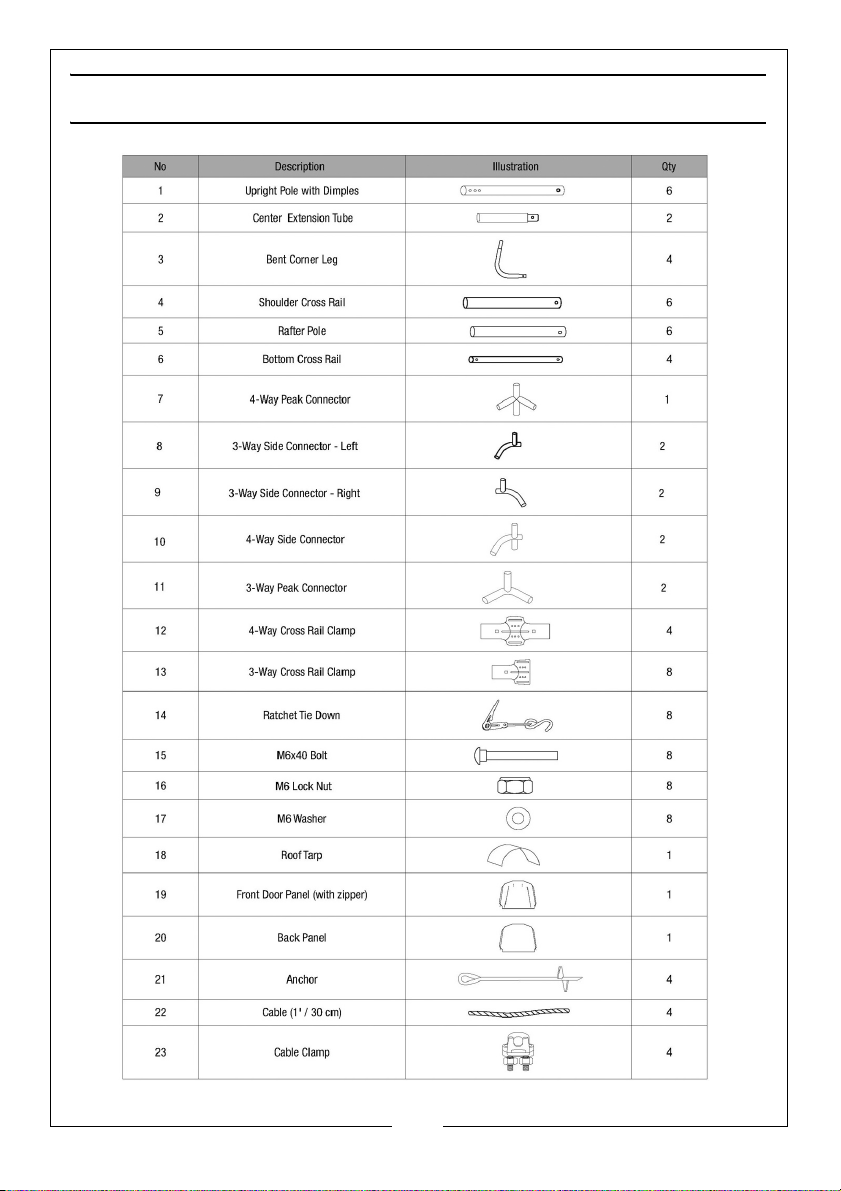
COMPONENT PARTS LIST
4
Parts & Service: 020 8988 7400 / E-mail: [email protected] or [email protected]
Page 5
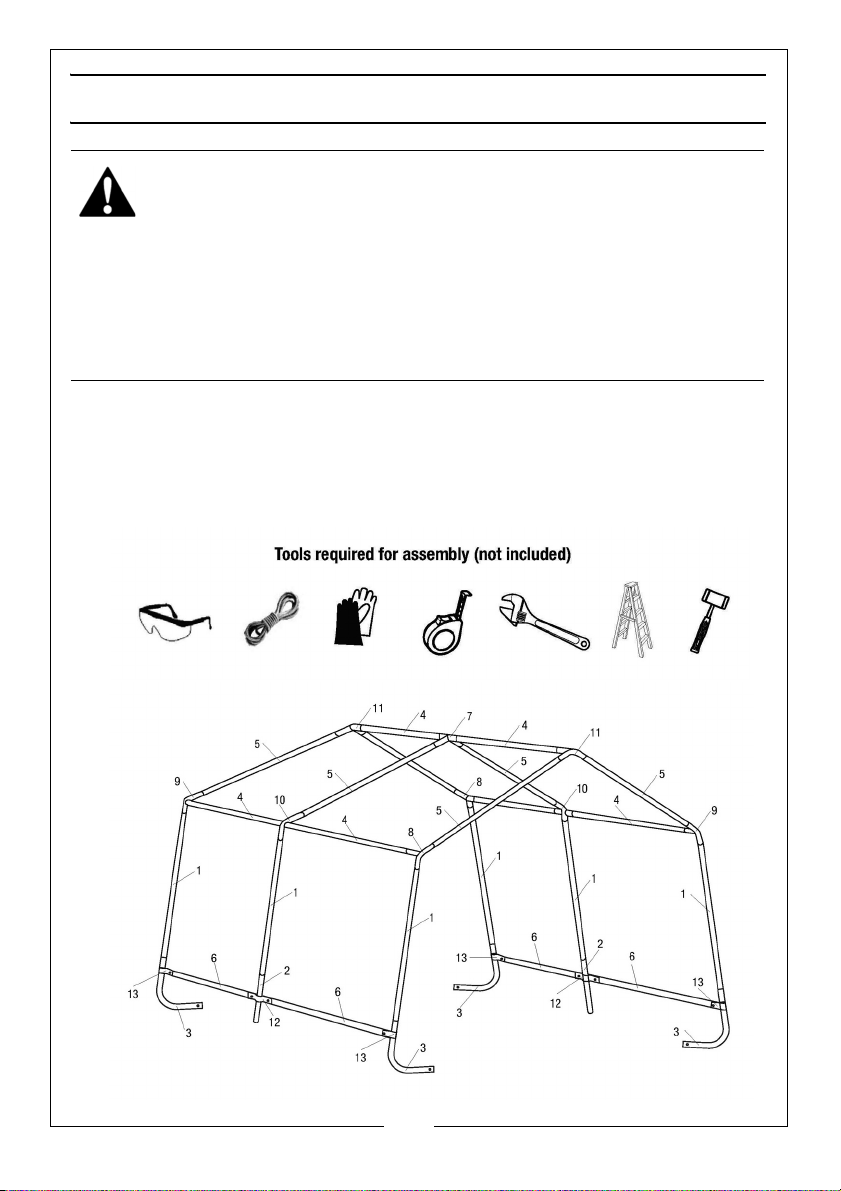
ASSEMBLY
WARNING: DO NOT PLACE THE PRODUCT UNDER TREES FROM WHICH
HARD FRUIT SUCH AS APPLES, WALNUTS OR HEAVY PINE CONES, ETC.,
MAY FALL. KEEP CHILDREN AWAY DURING ASSEMBLY. THIS PRODUCT
CONTAINS SMALL PARTS WHICH CAN BE SWALLOWED BY CHILDREN. DO
NOT ATTEMPT TO ASSEMBLE THE PRODUCT IF ANY PARTS ARE MISSING,
WARNING: AT LEAST 2 PEOPLE ARE NEEDED TO COMPLETE THE ASSEMBLY
AS SOME OF THE STEPS REQUIRE HEAVY LIFTING.
WARNING: DO NOT LEAVE THE SHED UNATTENDED DURING ASSEMBLY IN
CASE PERSONAL INJURY OR DAMAGE TO THE SHED MAY OCCUR.
1. Place all parts in a clear area and arrange them on the ground in front of
you.
2. Remove all packaging materials and place them back in the box. Do not
dispose of the packaging materials until assembly is complete.
3. Check for completeness and for any transport damage.
5
Parts & Service: 020 8988 7400 / E-mail: [email protected] or [email protected]
Page 6
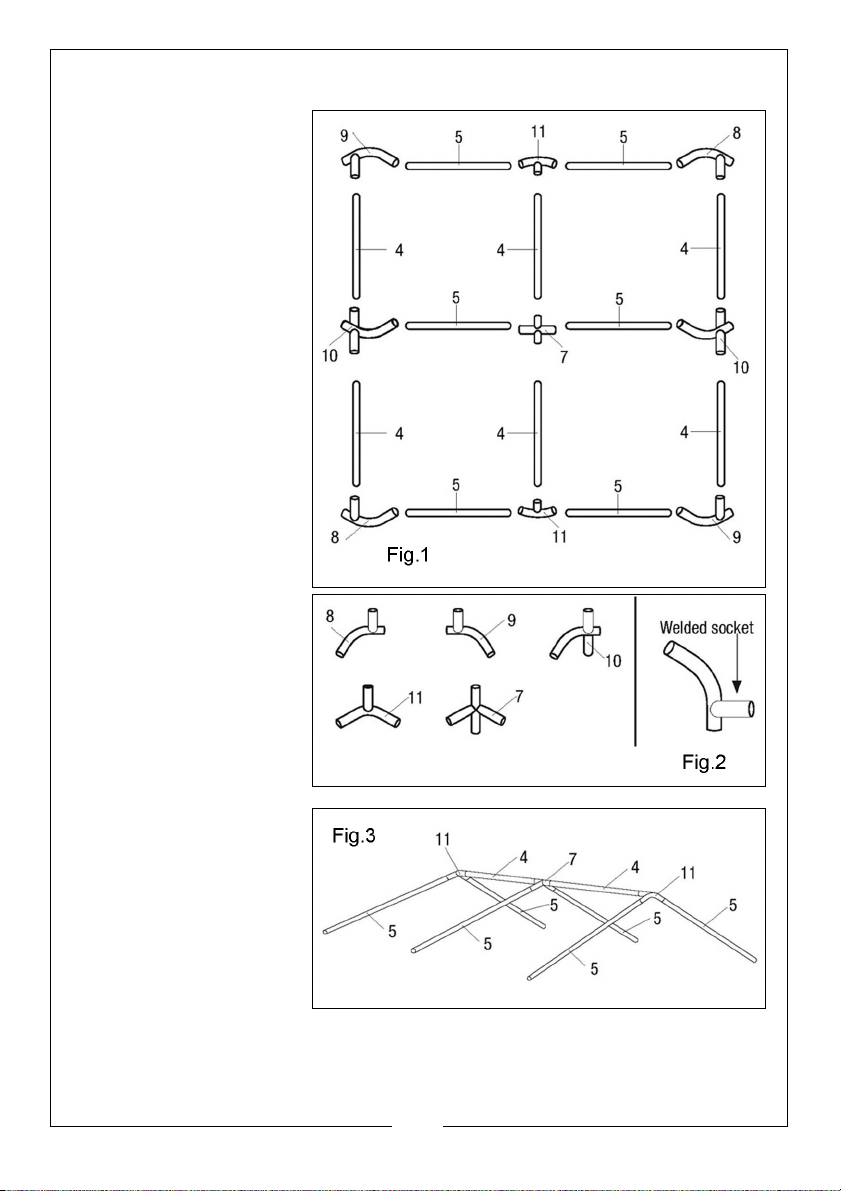
STEP 1: ASSEMBLING THE ROOF FRAME
1. Lay out the roof parts
as shown in fig 1.
The five connectors are
differently and
individually numbered.
When using them,
ensure the welded
socket for the cross rail is
below the bend as in Fig
2.
2. Assemble the centre
section of the roof
using the shoulder
cross rails (4), 3-way
peak connectors
(11) and 4-way peak
connector (7). Insert
the rafter poles (5)
into the connectors
afterwards as in Fig 3.
6
Parts & Service: 020 8988 7400 / E-mail: [email protected] or [email protected]
Page 7
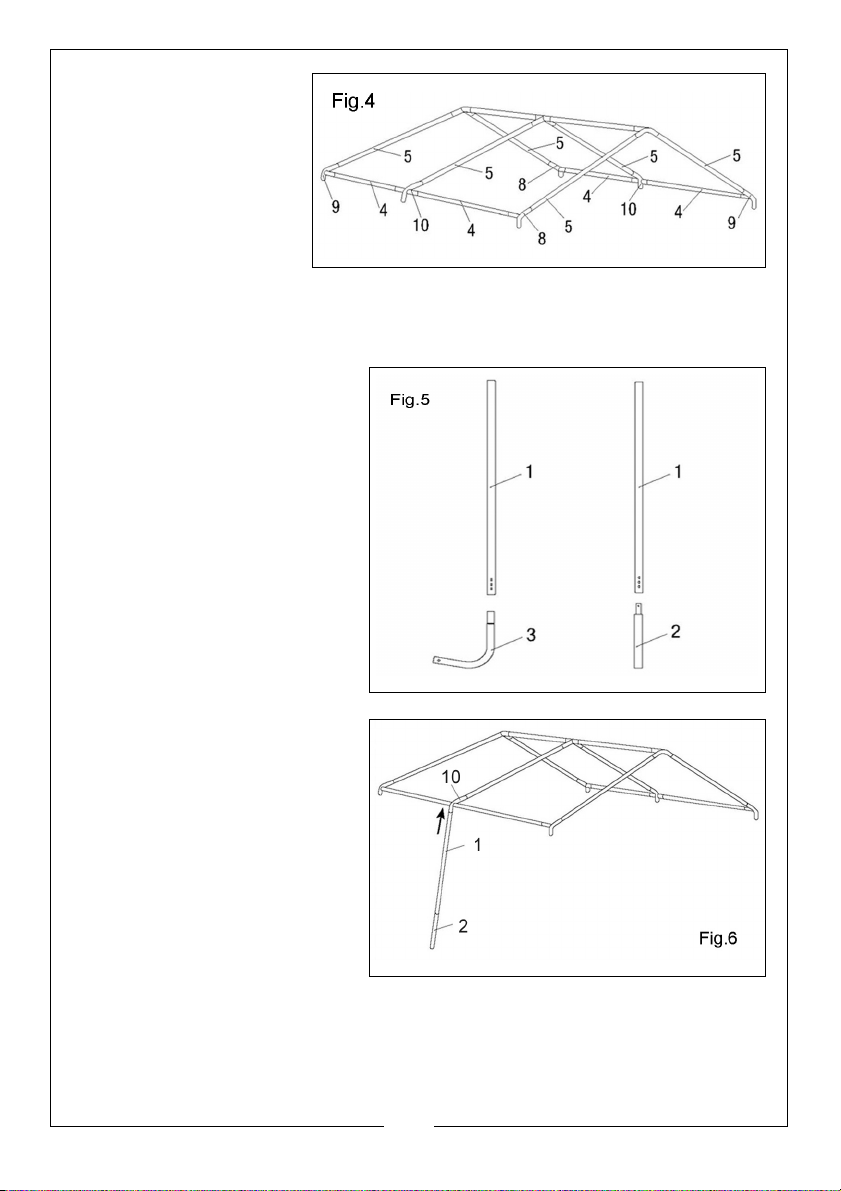
3. Attach the shoulder
cross-rails (4) to the
3-way side
connectors (8,9) and
4-way side
connectors (10).
Insert the connectors
(8,9,10) into the
rafter poles (5) to
complete the
assembly of the roof (fig 4).
STEP 2:ATTACHING THE LEGS
Assemble the legs as in Fig 5.
Corner Legs x4. Connect to
Upright pole (1) and bent corner
leg (3).
Centre Legs x 2. Connect to
upright pole (1) and Centre
extension tube (2).
Insert one assembled centre leg
into the 4-way side connector
(10) as in Fig 6.
7
Parts & Service: 020 8988 7400 / E-mail: [email protected] or [email protected]
Page 8
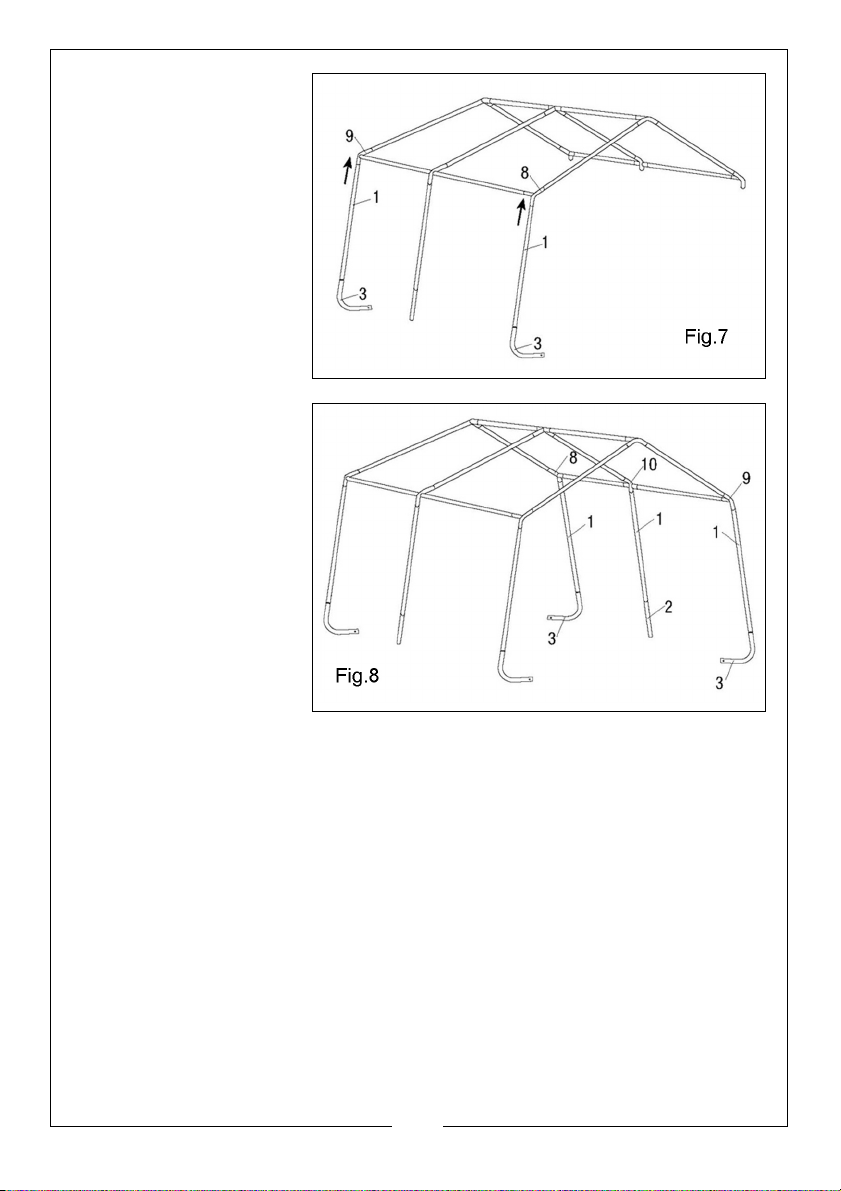
Insert the side legs into the
corresponding side connectors (8,9) as in Fig 7.
Repeat the same procedure on the opposite side
as in figure 8.
Do not let the roof rest on
the legs until all three legs
on one side are completely installed and in
place.
8
Parts & Service: 020 8988 7400 / E-mail: [email protected] or [email protected]
Page 9
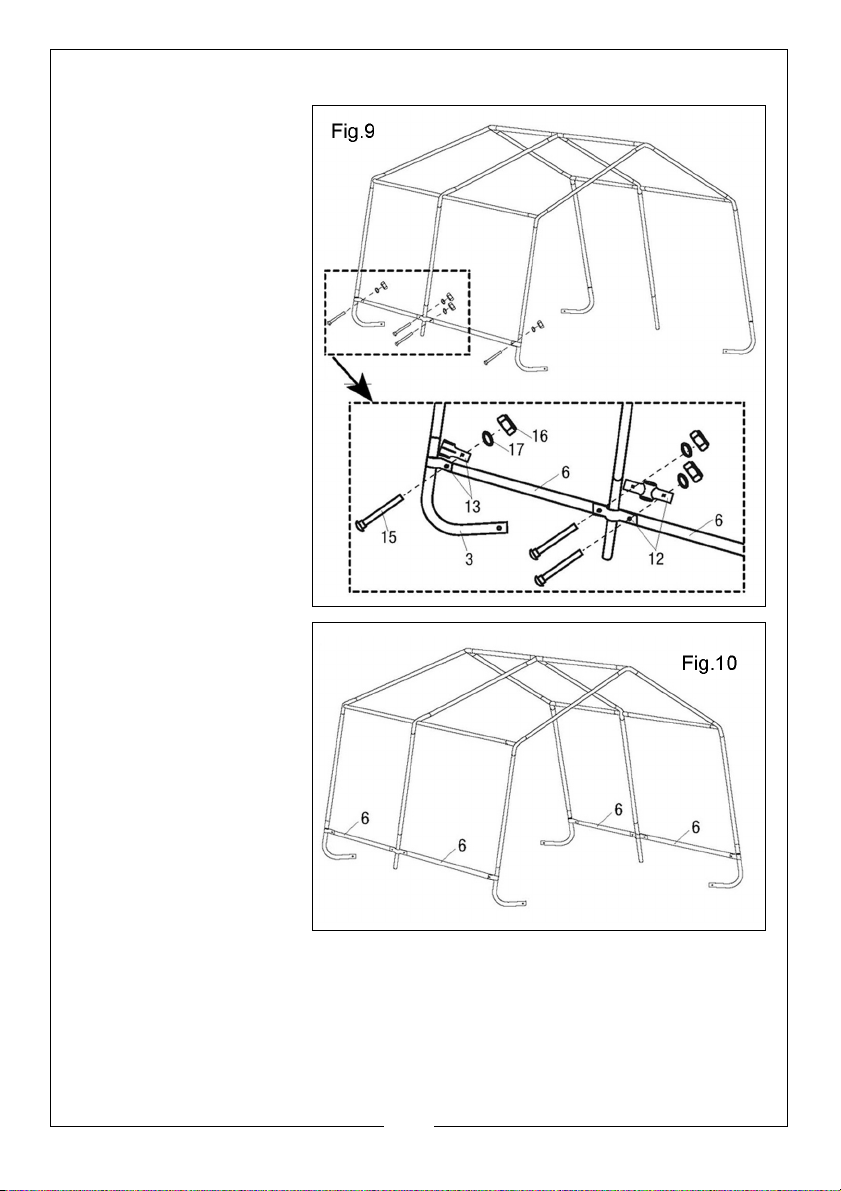
STEP 3: ATTACHING THE BOTTOM CROSS RAILS
Attach the bottom cross
rails (6) to the legs and
cover the joints with the
cross rail clamps (12,13).
Align all holes and insert
the fittings (15,16,17) as
in fig 9. Do not tighten
fully at this stage.
Repeat the same
procedure on the
opposite side.
Adjust the bottom cross
rails (6) so that they are
the same height from
the ground. Now tighten
the fittings (15,16,17) as
in fig 10.
9
Parts & Service: 020 8988 7400 / E-mail: [email protected] or [email protected]
Page 10
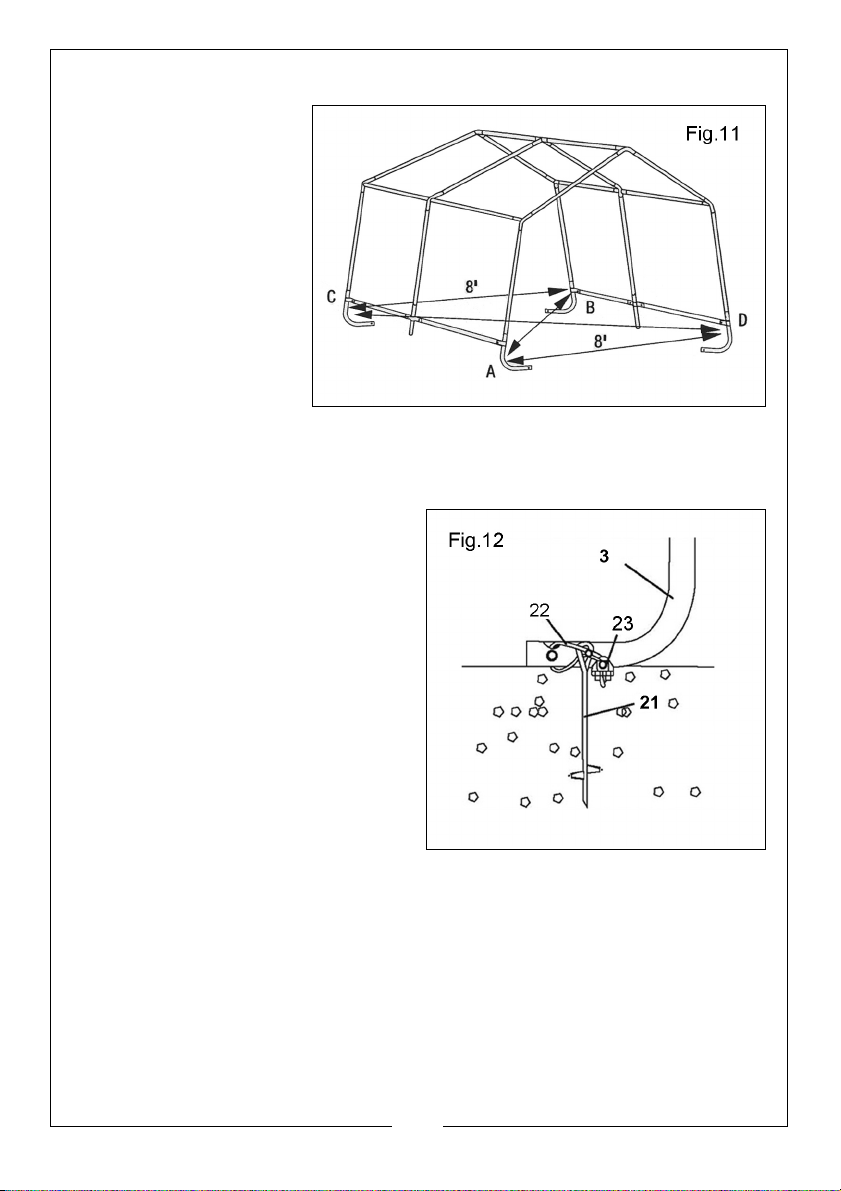
STEP 4: SQUARING UP THE FRAME
Be sure the frame is standing at the desired location
Level the frame both end
to end and side to side.
Check that the frame
measures 8’ (244cm) in
width (fig 11).
Measure the distance
between the interior of
the frame feet diagonally.
The sections A to B and C
to D should be equal
length (fig 11). If they are
not equal length, tap the
corner leg of the longer
section using a rubber mallet, inward until both diagonals are equal.
STEP 5: ANCHORING THE FRAME
The shed must be well anchored.
Do not attempt to install any of the fabric before the frame is properly
anchored.
If the ground is hard or rocky, pre-drill
holes before inserting the anchors.
Four anchors (21) are provided to
secure the shed. They are to be
installed around the bent corner legs
(3) at each corner of the shed.
Screw the anchor head to the ground.
Insert the cable (22) through the eyelets of the anchor (21) and the bent
corner leg (3). Secure the cable (22)
with the cable clamp (23) as in fig 12.
Repeat the same procedure for the
other three anchors.
10
Parts & Service: 020 8988 7400 / E-mail: [email protected] or [email protected]
Page 11
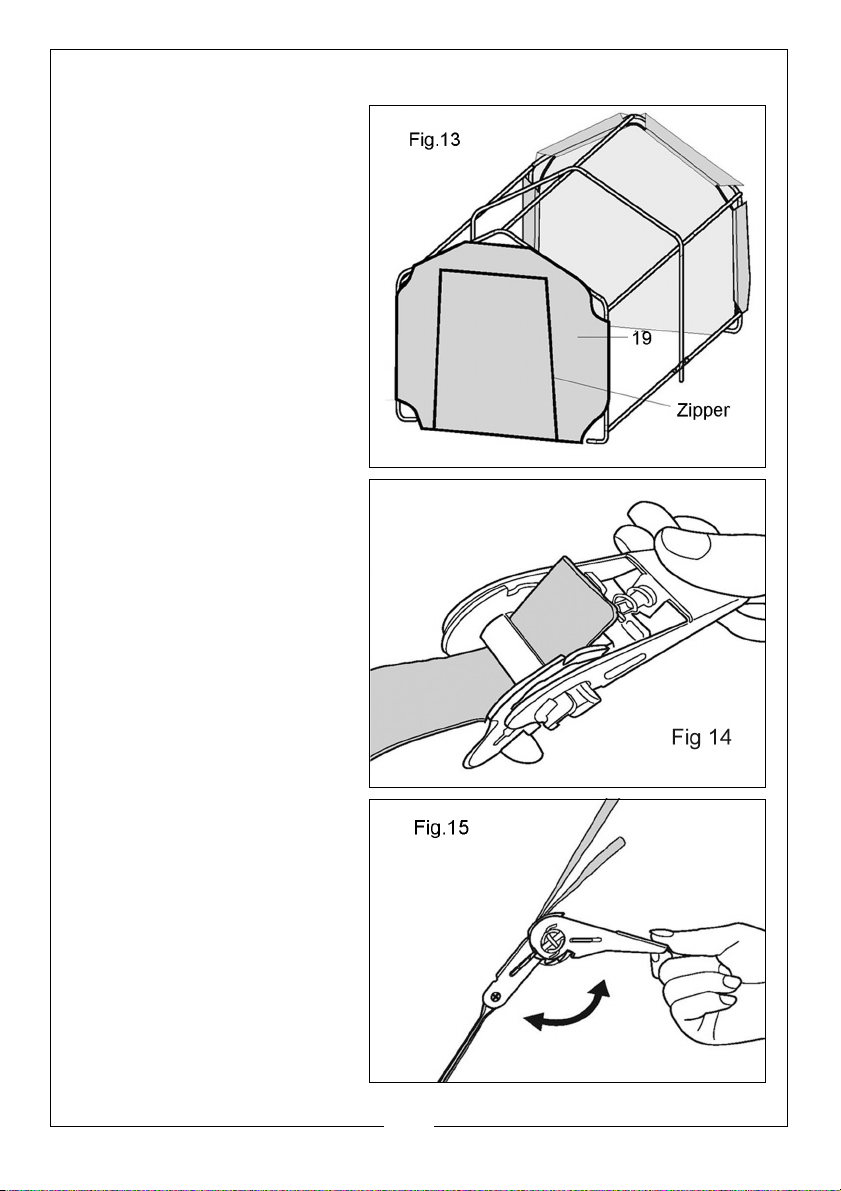
STEP 6: INSTALLING THE FRONT DOOR AND BACK PANELS
Instal the front door panel (19)
first. During installation, ensure
the zipper of the front door
panel (19) is closed for easier
installation.
To make sure the strap will stay in
the sleeve when assembling,
thread the strap through the
spindle of the ratchet as in fig 14.
Raise and lower the handle two
or three times to wind the strap
onto the spindle (fig 15).
11
Parts & Service: 020 8988 7400 / E-mail: [email protected] or [email protected]
Page 12
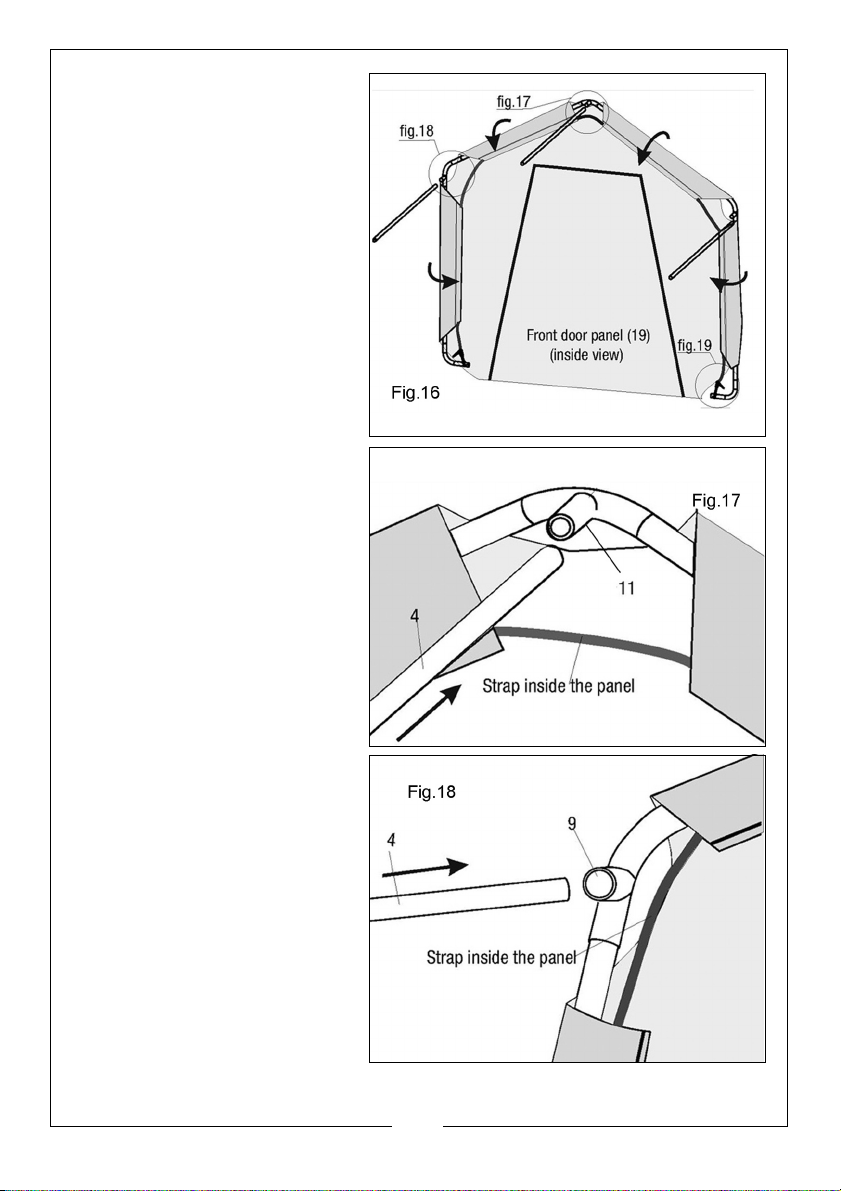
Do not thread poles through the
sleeves. To tighten, wrap the
outer sleeves around the poles
and tighten using the straps provided (Fig 16).
Locate the top part of the front
door panel (19) near the 3-way
peak connector (11), disconnect the shoulder cross rail (4)
from the 3-way peak connector
(11) and pull the strap onto the
connector (11). Finally, re-insert
the cross rail (4) to its correct
position (fig 17).
Attach the two corners of the
front door panel (19) to the 3way side connectors (8,9) in the
same way (fig 18).
12
Parts & Service: 020 8988 7400 / E-mail: [email protected] or [email protected]
Page 13
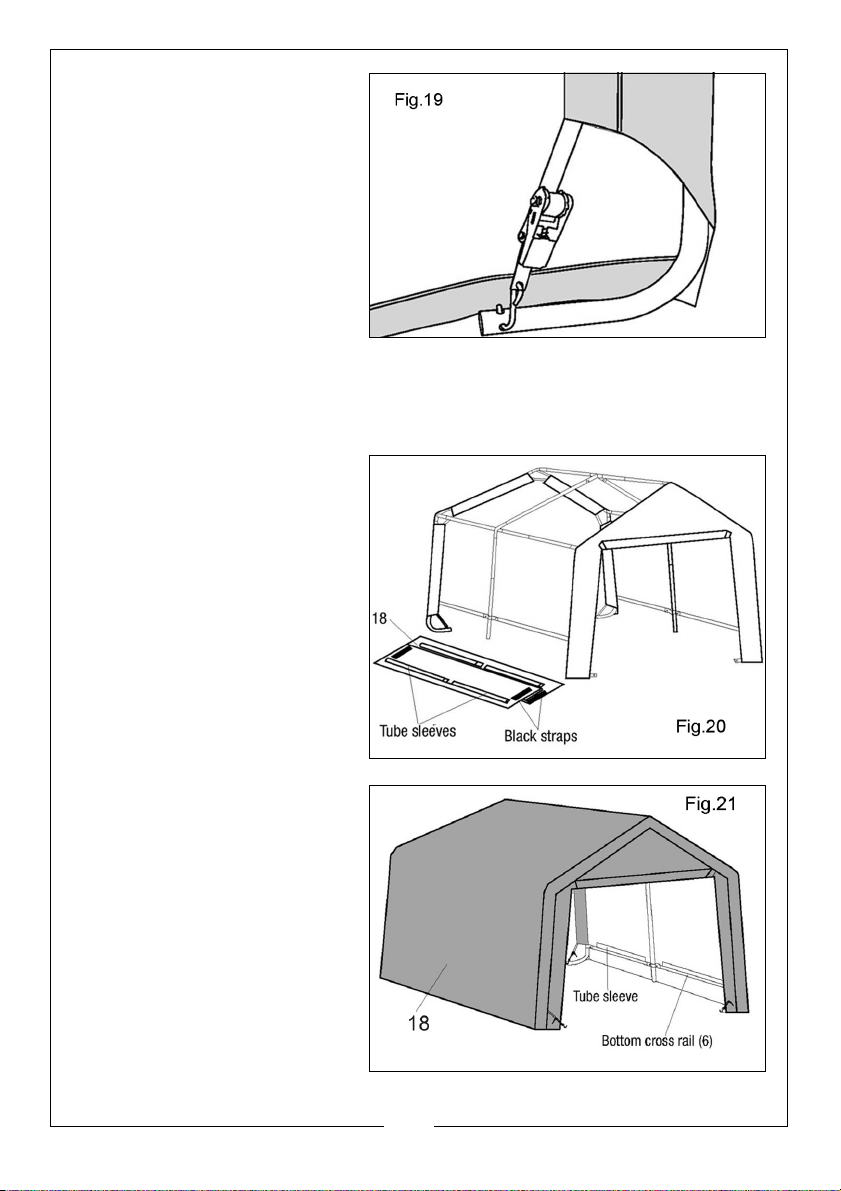
Insert the S-hook of the ratchet
into the hole of the bent corner
leg (3). Lever the ratchet handle
repeatedly to tighten the strap
(fig 19).
Repeat the same procedure to
install the back panel (20) to its
proper position.
STEP 7: INSTALLING THE ROOF TARPAULIN
The roof tarp (18) is pre-assembled with tube sleeves along its lower part on
each side.
Lay the roof tarp (18) on the
ground next to the shed frame.
Make sure the ends with the
black straps are alongside the
front door/back panels (19,20)
and the tube sleeves are facing
upward (fig 20).
Stretch the roof tarp (18) over
the shed frame and make sure it
is centred on the frame (fig 21.
Use a ladder if necessary.
13
Parts & Service: 020 8988 7400 / E-mail: [email protected] or [email protected]
Page 14
If small adjustments are needed,
two people should pull the roof
tarp (18) from the same side so
that it does not twist.
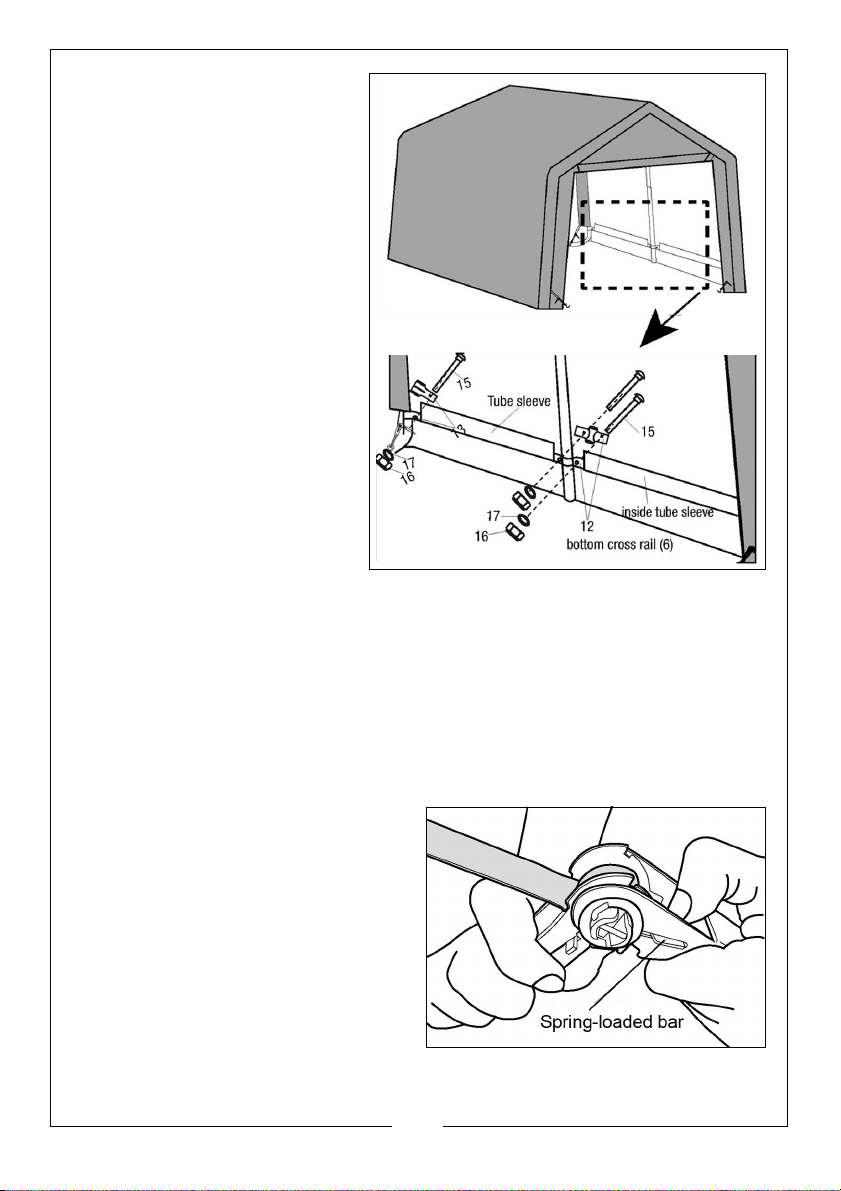
Loosen the bottom cross r (6)
from the frame. Slide the cross
bottom rails (6) through the tube
sleeves on one side of the roof
tarp. (18).
Re-assemble the clamps (12, 13)
and fittings (15,16,17) and
tighten slightly (fig 22).
Ensure the cross rails (6) are
horizontal.
Repeat the same procedure for
the opposite side of the roof tarp
(18).
Check and make sure all the
bottom cross rails (6) are level
and horizontal, and are the
same height from the ground.
Tighten all the nuts and bolts at
this stage.
Fasten the black straps at the four corners with the ratchet tie down (14).
The shed is now ready for use.
Check and tighten the bottom cross rails (6) and ratchets (14) monthly to ensure
that the roof tarp (18) is tight and secure.
DISASSEMBLY
When disassembling the shelter,
depress the spring-loaded bar to
disengage the ratchet and open the
ratchet handle completely to allow
the webbing strap to pull through.
PLEASE RE-READ ALL WARNINGS
CONTAINED ON PAGES 2/3 OF THESE
INSTRUCTIONS. SAVE THESE
INSTRUCTIONS FOR FUTURE USE.
To dismantle, execute all instructions
in reverse order.
14
Parts & Service: 020 8988 7400 / E-mail: [email protected] or [email protected]
Page 15
Store your garage in a cool, dry location between seasons to prolong the
usable life of all components. Components are not equally durable and will
require replacement over time at differing intervals.
ADDITIONAL ANCHORING
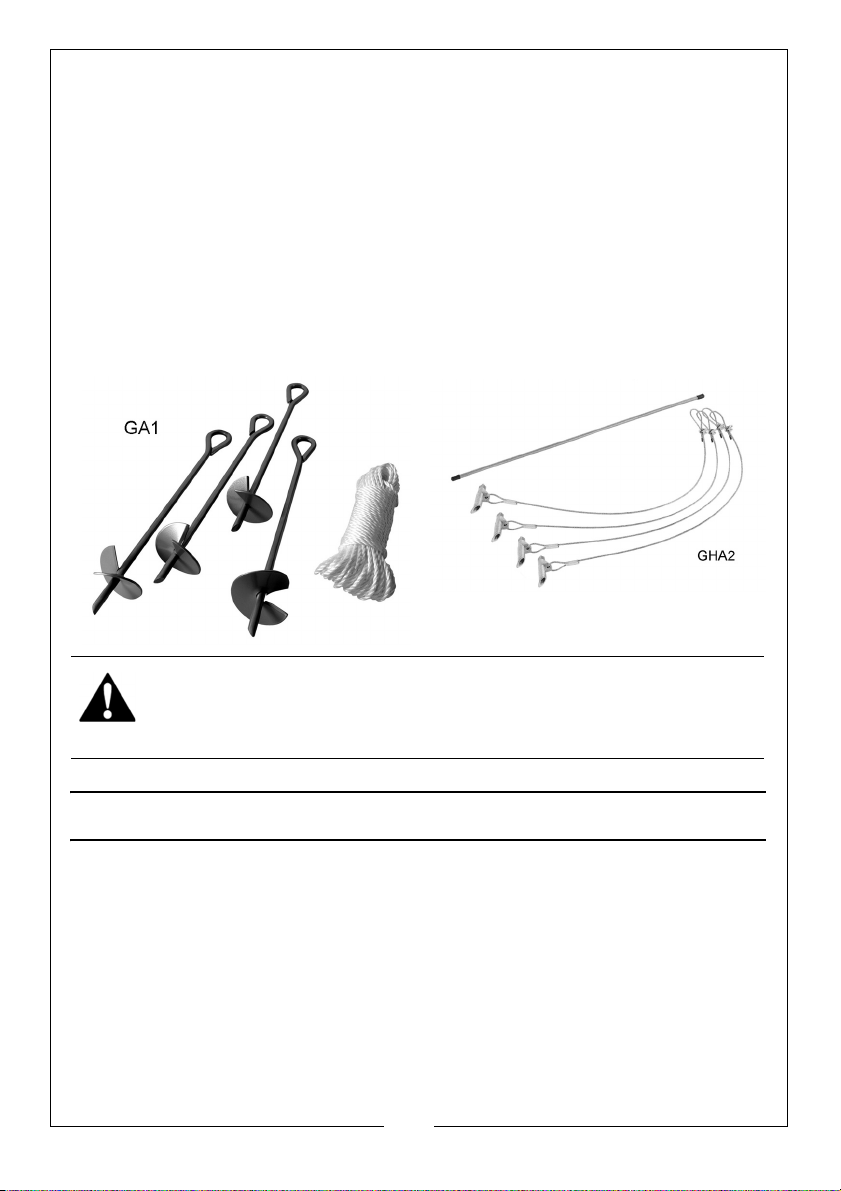
Please note that when the instant garage or shed is to be sited on soft ground
an additional, or alternative method of anchoring may be required.
This can take the form of an additional Auger Securing Set GA1 (already
supplied with Clarke instant garages), which can add greater security for
exposed, windy locations.
Alternatively, the Easy Hook Anchoring System GHA2, can be used to provide
greater security on soft ground, available from your Clarke dealer.
WARNING: SERIOUS INJURY TO PERSONS OR PROPERTY COULD RESULT IF
THE GARAGE IS NOT SECURELY ANCHORED.
GUARANTEE
This product is guaranteed against faulty manufacture for a period of 12
months from the date of purchase. Please keep your receipt which will be
required as proof of purchase.
This guarantee is invalid if the product is found to have been abused or
tampered with in any way, or not used for the purpose for which it was
intended.
Faulty goods should be returned to their place of purchase, no product can
be returned to us without prior permission.
This guarantee does not effect your statutory rights.
15
Parts & Service: 020 8988 7400 / E-mail: [email protected] or [email protected]
Page 16

 Loading...